lobotime manager navigation pc user job aid the purpose of this job aid is to provide the time...
TRANSCRIPT
LoboTime Manager Navigation PC User
Job Aid
The purpose of this job aid is to provide the Time Manager/Supervisor an overview of navigation inside of the
LoboTime system.
Manager Navigator Job AidParts of a Navigator
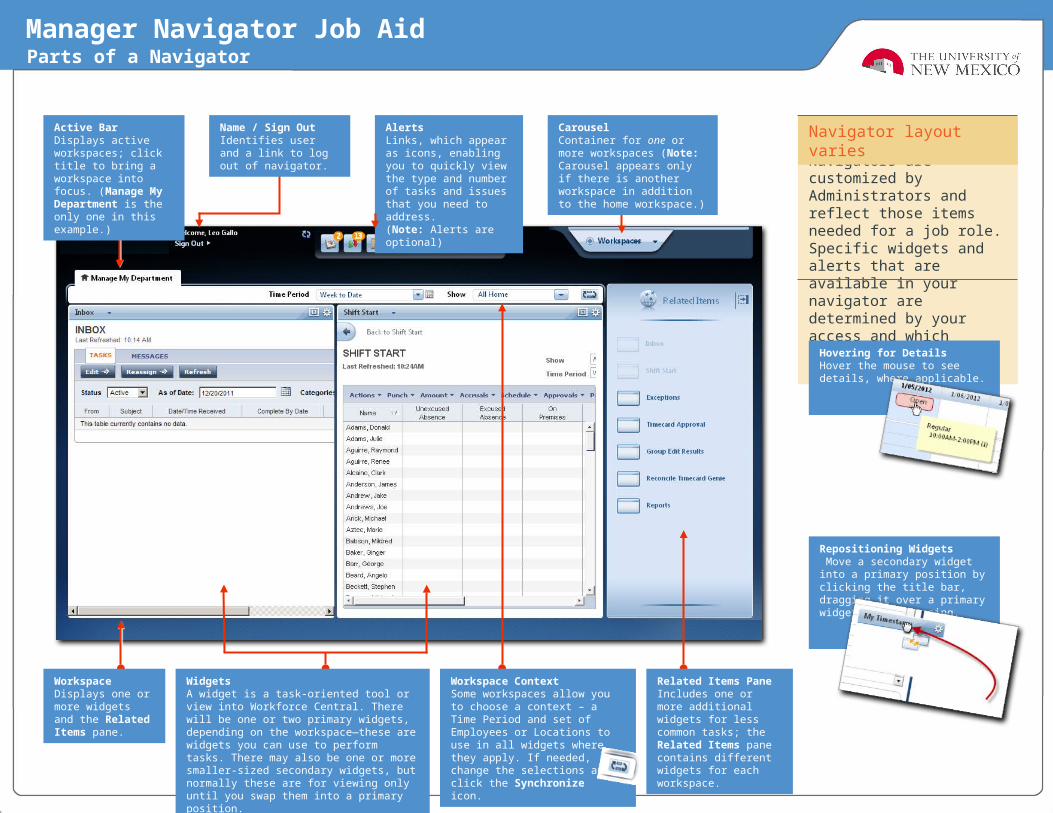
Navigators are customized by Administrators and reflect those items needed for a job role. Specific widgets and alerts that are available in your navigator are determined by your access and which applications are in use.
Navigator layout varies
Hovering for DetailsHover the mouse to see details, where applicable.
WorkspaceDisplays one or more widgets and the Related Items pane.
Related Items PaneIncludes one or more additional widgets for less common tasks; the Related Items pane contains different widgets for each workspace.
AlertsLinks, which appear as icons, enabling you to quickly view the type and number of tasks and issues that you need to address.(Note: Alerts are optional)
CarouselContainer for one or more workspaces (Note: Carousel appears only if there is another workspace in addition to the home workspace.)
Repositioning Widgets Move a secondary widget into a primary position by clicking the title bar, dragging it over a primary widget, and releasing.
WidgetsA widget is a task-oriented tool or view into Workforce Central. There will be one or two primary widgets, depending on the workspace—these are widgets you can use to perform tasks. There may also be one or more smaller-sized secondary widgets, but normally these are for viewing only until you swap them into a primary position.
Workspace ContextSome workspaces allow you to choose a context – a Time Period and set of Employees or Locations to use in all widgets where they apply. If needed, change the selections and click the Synchronizeicon.
Name / Sign OutIdentifies user and a link to log out of navigator.
Active BarDisplays active workspaces; click title to bring a workspace into focus. (Manage My Department is the only one in this example.)

Manager Navigator Job AidOpening Widgets and Workspaces
Closing the CarouselClick the Workspaces tab to close the carousel.
Alert IconsEach type of alert has its own icon. A number in the icon’s corner indicates that there are items you should review. (The significance of the number itself depends on the specific alert.) Click an icon to view details.
RefreshClick the Refresh icon to get immediate updates to your Alerts.
Alert DetailsClick an item in the details of an alert to open the relevant widget. You can then take whatever actions are needed in the open widget.
Cycling the CarouselIf there is more than one workspace in the carousel, use the arrows to cycle through the additional workspaces.
Additional WorkspacesClick an item in the carousel to open an additional workspace. To close that workspace later, hover over its tab and click the Close (X) button.
Active WidgetsWidgets already in an open workspace appear grayed out in widget list.
Activating a WidgetThere are two ways to activate a widget in the Related Items pane.
To add it to the current workspace, drag it out of the pane and release it over a widget in the workspace.
To work with the widget in a separate workspace, click the widget while it is still in the pane. To close that workspace later, hover over its tab and click the Close (X) button.
Closing the Related Items PaneClick the right arrow to close the Related Items pane. When closed, click the left arrow to open it.Alerts
Carousel
RelatedItems
Manager Navigator Job AidManaging the Active Workspace
SecondaryWidgets
PrimaryWidget
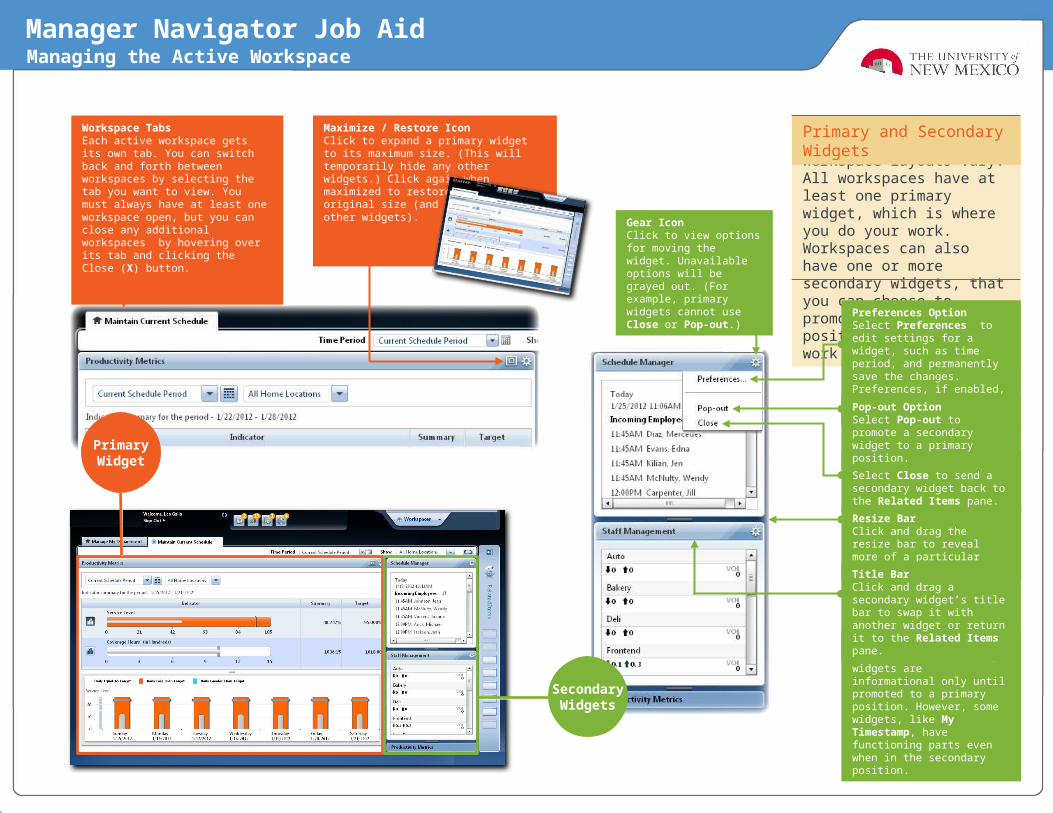
Workspace layouts vary. All workspaces have at least one primary widget, which is where you do your work. Workspaces can also have one or more secondary widgets, that you can choose to promote to the primary position if you need to work in them.
Primary and Secondary Widgets
Usable Secondary WidgetsIn most cases secondary widgets are informational only until promoted to a primary position. However, some widgets, like My Timestamp, have functioning parts even when in the secondary position.
Resize BarClick and drag the resize bar to reveal more of a particular secondary widget.
Close OptionSelect Close to send a secondary widget back to the Related Items pane.
Preferences OptionSelect Preferences to edit settings for a widget, such as time period, and permanently save the changes. Preferences, if enabled, are saved only for your use in your own widget.
Title BarClick and drag a secondary widget’s title bar to swap it with another widget or return it to the Related Items pane.
Pop-out OptionSelect Pop-out to promote a secondary widget to a primary position.
Gear IconClick to view options for moving the widget. Unavailable options will be grayed out. (For example, primary widgets cannot use Close or Pop-out.)
Maximize / Restore IconClick to expand a primary widget to its maximum size. (This will temporarily hide any other widgets.) Click again when maximized to restore to the original size (and unhide your other widgets).
Workspace TabsEach active workspace gets its own tab. You can switch back and forth between workspaces by selecting the tab you want to view. You must always have at least one workspace open, but you can close any additional workspaces by hovering over its tab and clicking the Close (X) button.
Manager Navigator Job AidUsing a Wizard
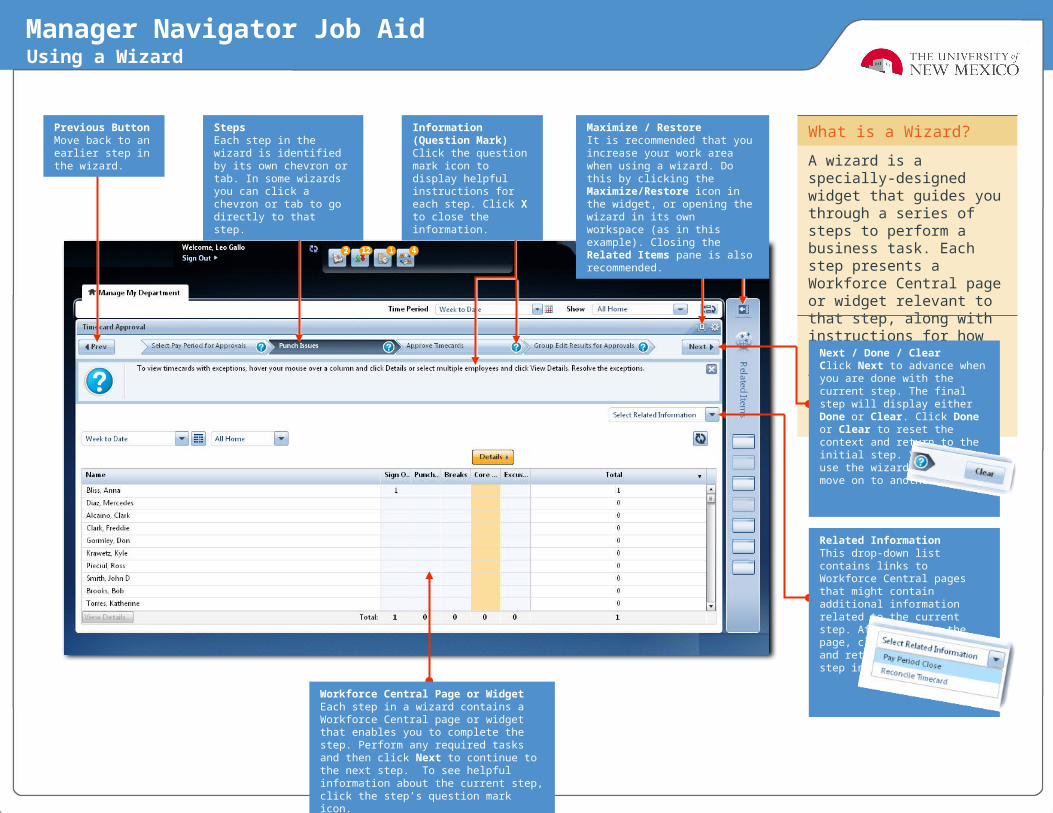
A wizard is a specially-designed widget that guides you through a series of steps to perform a business task. Each step presents a Workforce Central page or widget relevant to that step, along with instructions for how to perform that step. A wizard helps you complete a task quickly, easily, and consistently.
What is a Wizard?Information (Question Mark)Click the question mark icon to display helpful instructions for each step. Click X to close the information.
Workforce Central Page or WidgetEach step in a wizard contains a Workforce Central page or widget that enables you to complete the step. Perform any required tasks and then click Next to continue to the next step. To see helpful information about the current step, click the step’s question mark icon.
StepsEach step in the wizard is identified by its own chevron or tab. In some wizards you can click a chevron or tab to go directly to that step.
Related InformationThis drop-down list contains links to Workforce Central pages that might contain additional information related to the current step. After viewing the page, click X to close it and return to the current step in the wizard.
Next / Done / ClearClick Next to advance when you are done with the current step. The final step will display either Done or Clear. Click Done or Clear to reset the context and return to the initial step. You can then use the wizard again or move on to another task.
Maximize / RestoreIt is recommended that you increase your work area when using a wizard. Do this by clicking the Maximize/Restore icon in the widget, or opening the wizard in its own workspace (as in this example). Closing the Related Items pane is also recommended.
Previous ButtonMove back to an earlier step in the wizard.
Best Practices