lo2 6 state pattern - cse116
TRANSCRIPT

State Pattern

Lecture Task- Point of Sale: Lecture Task 5 -
Functionality: Add the following features to the store.model.checkout.SelfCheckout class:
• Implement the “addItem” method which will add an item to the machine with a barcode. When a customer enters the barcode for an item, that item will be “scanned”
• Implement the “receiptLines” method to return a List containing all items that have been entered in the order that they have been entered. You must use the provided ReceiptLine class to represent this information to ensure that we are testing in the same way
◦ The description of a receipt line should be the description of the item and the amount is the final price() of the item (Not including tax)
• Allow the customer to “scan” items. Customers must manually enter each barcode using the number pad. A customer will enter a barcode, then press the enter button to “scan” an item and add that item’s description and price to the receipt
◦ If a customer enters a barcode that has not been added via addItem, the receipt line that’s added should have a description of “error” and an amount of 0.0 (you can use the Map's getOrElse method to implement this feature)
• Implement the “displayString” method to return what the customer should see on the GUI above all the buttons. For this task, the customer should see the barcode that they are entering.
• When a customer presses the clear button, the currently entered barcode should be cleared and the empty string “” should be displayed
Testing: In the tests package, create a test suite named LectureTask5 that tests this functionality

Design Patterns• Approaches to common programming design
problems
• There are many design patterns
• We'll only focus on the state pattern in this course
• For more patterns, search "The Gang of Four"
• The primary goal of design patterns is to simplify the Design and Maintainability of our programs

State Pattern• Applies Polymorphism
• Every object contains state and behavior
• We use state variables to change the state of an object and its behavior can depend on this state
• What if we want to significantly change the behavior of an object?

State Pattern• What if we want to significantly change the
behavior of an object?
• Use if statements?
• if(condition){someBehavior()}
• else{completelyDifferentBehavior()}
• This will work, but what about maintainability?

State Pattern• What if we want to significantly change the behavior of an object?
• What if we want many different behaviors
• if(condition){someBehavior()}
• else if(otherCondition1){otherBehavior1()}
• else if(otherCondition2){otherBehavior2()}
• else if(otherCondition3){otherBehavior3()}
• else{completelyDifferentBehavior()}
• This would all be in a single method
• Hard to read
• Hard to maintain
• Need to re-test existing functionality each time a condition is added

State Pattern• Let's try using the state pattern as an alternative
• Instead of storing each behavior in the same class, we defer functionality to a state object
• Have a state variable containing the current state as an object
• Change the state as needed
• Decisions made on type (Polymorphism) not value (Conditionals)
• Modularizes code
• More, but smaller, pieces of functionality
• Easy to add new features without breaking tested features

State Pattern• State is represented by an abstract class
• Defines the methods that can be called (API)
• Extend the state class for each concrete state
• One class for each possible state
• Each state will have a reference to the object to which it is attached
• Use this reference to access other state variables
• Use this reference to change state

State Pattern - Example• OK, but what does all that actually mean?
• Let's use the cool-headed Bruce Banner as an example
• Bruce is a world-class scientist
• Bruce can successfully drive a car
• Bruce is not very helpful in a fight

State Pattern - Example• However.. Make Bruce angry and he'll become The Incredible Hulk!
• Smashes cars
• Great in a fight
• Out of control!
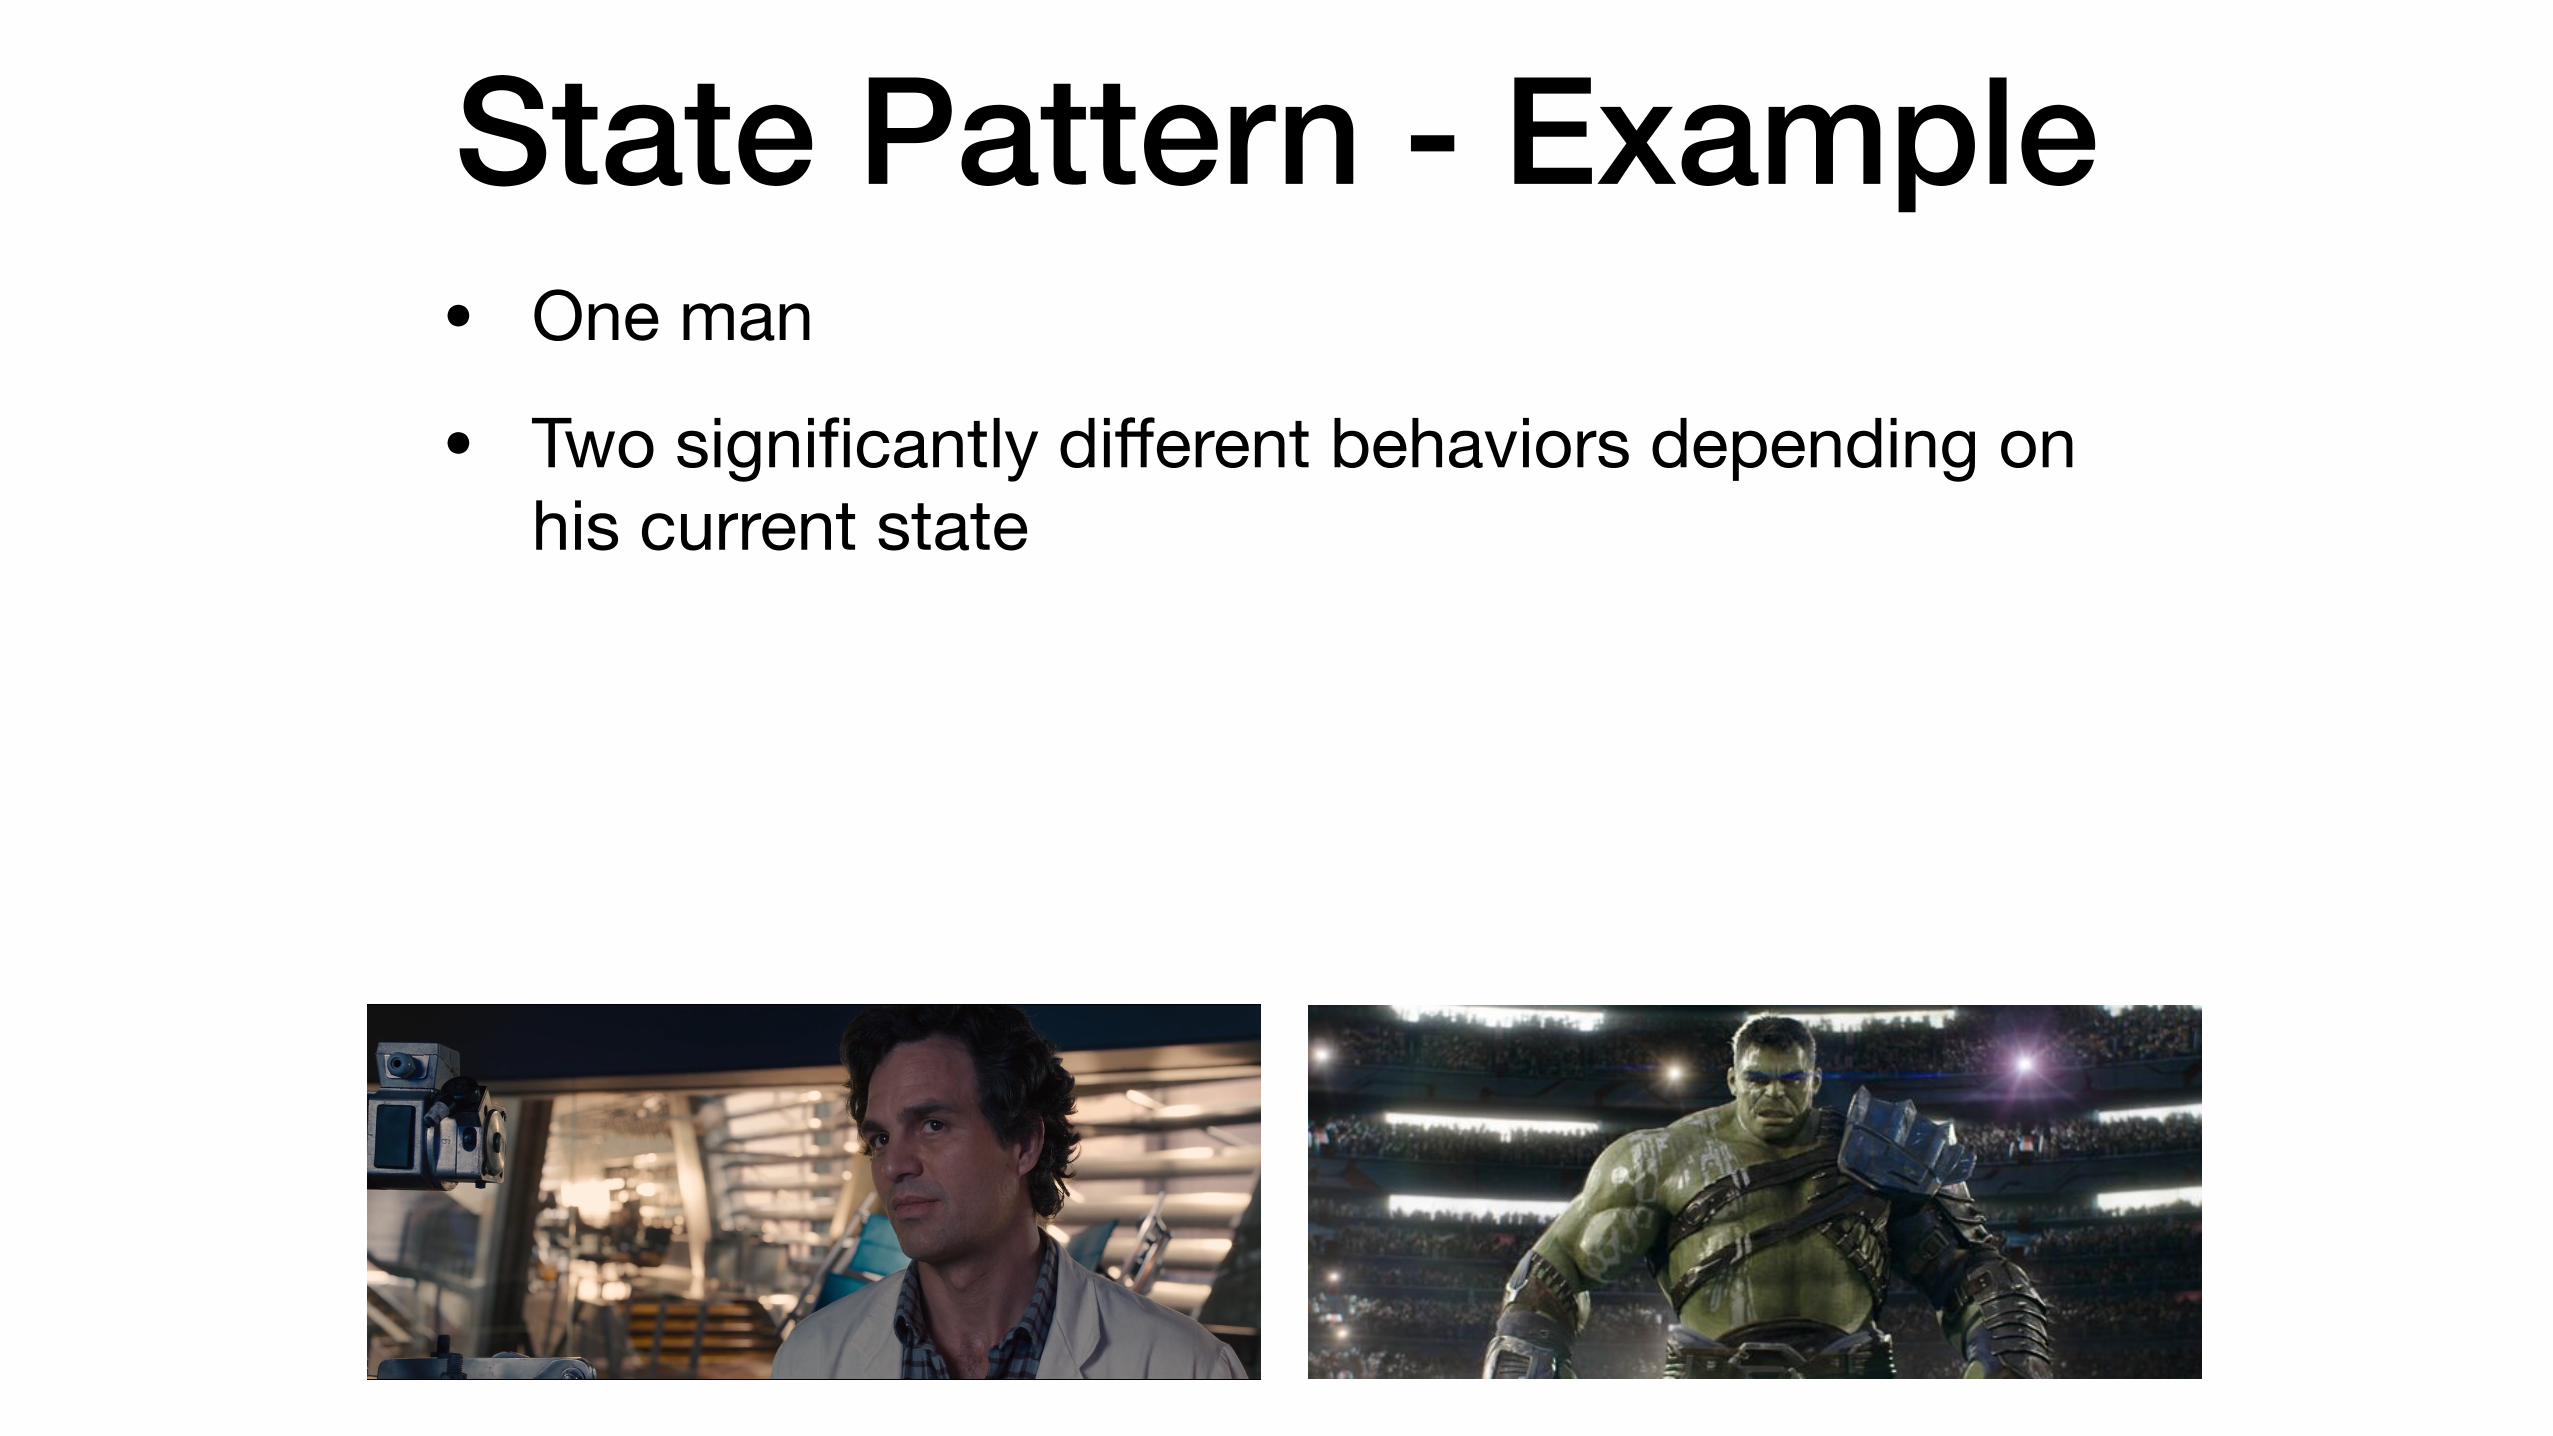
State Pattern - Example• One man
• Two significantly different behaviors depending on his current state

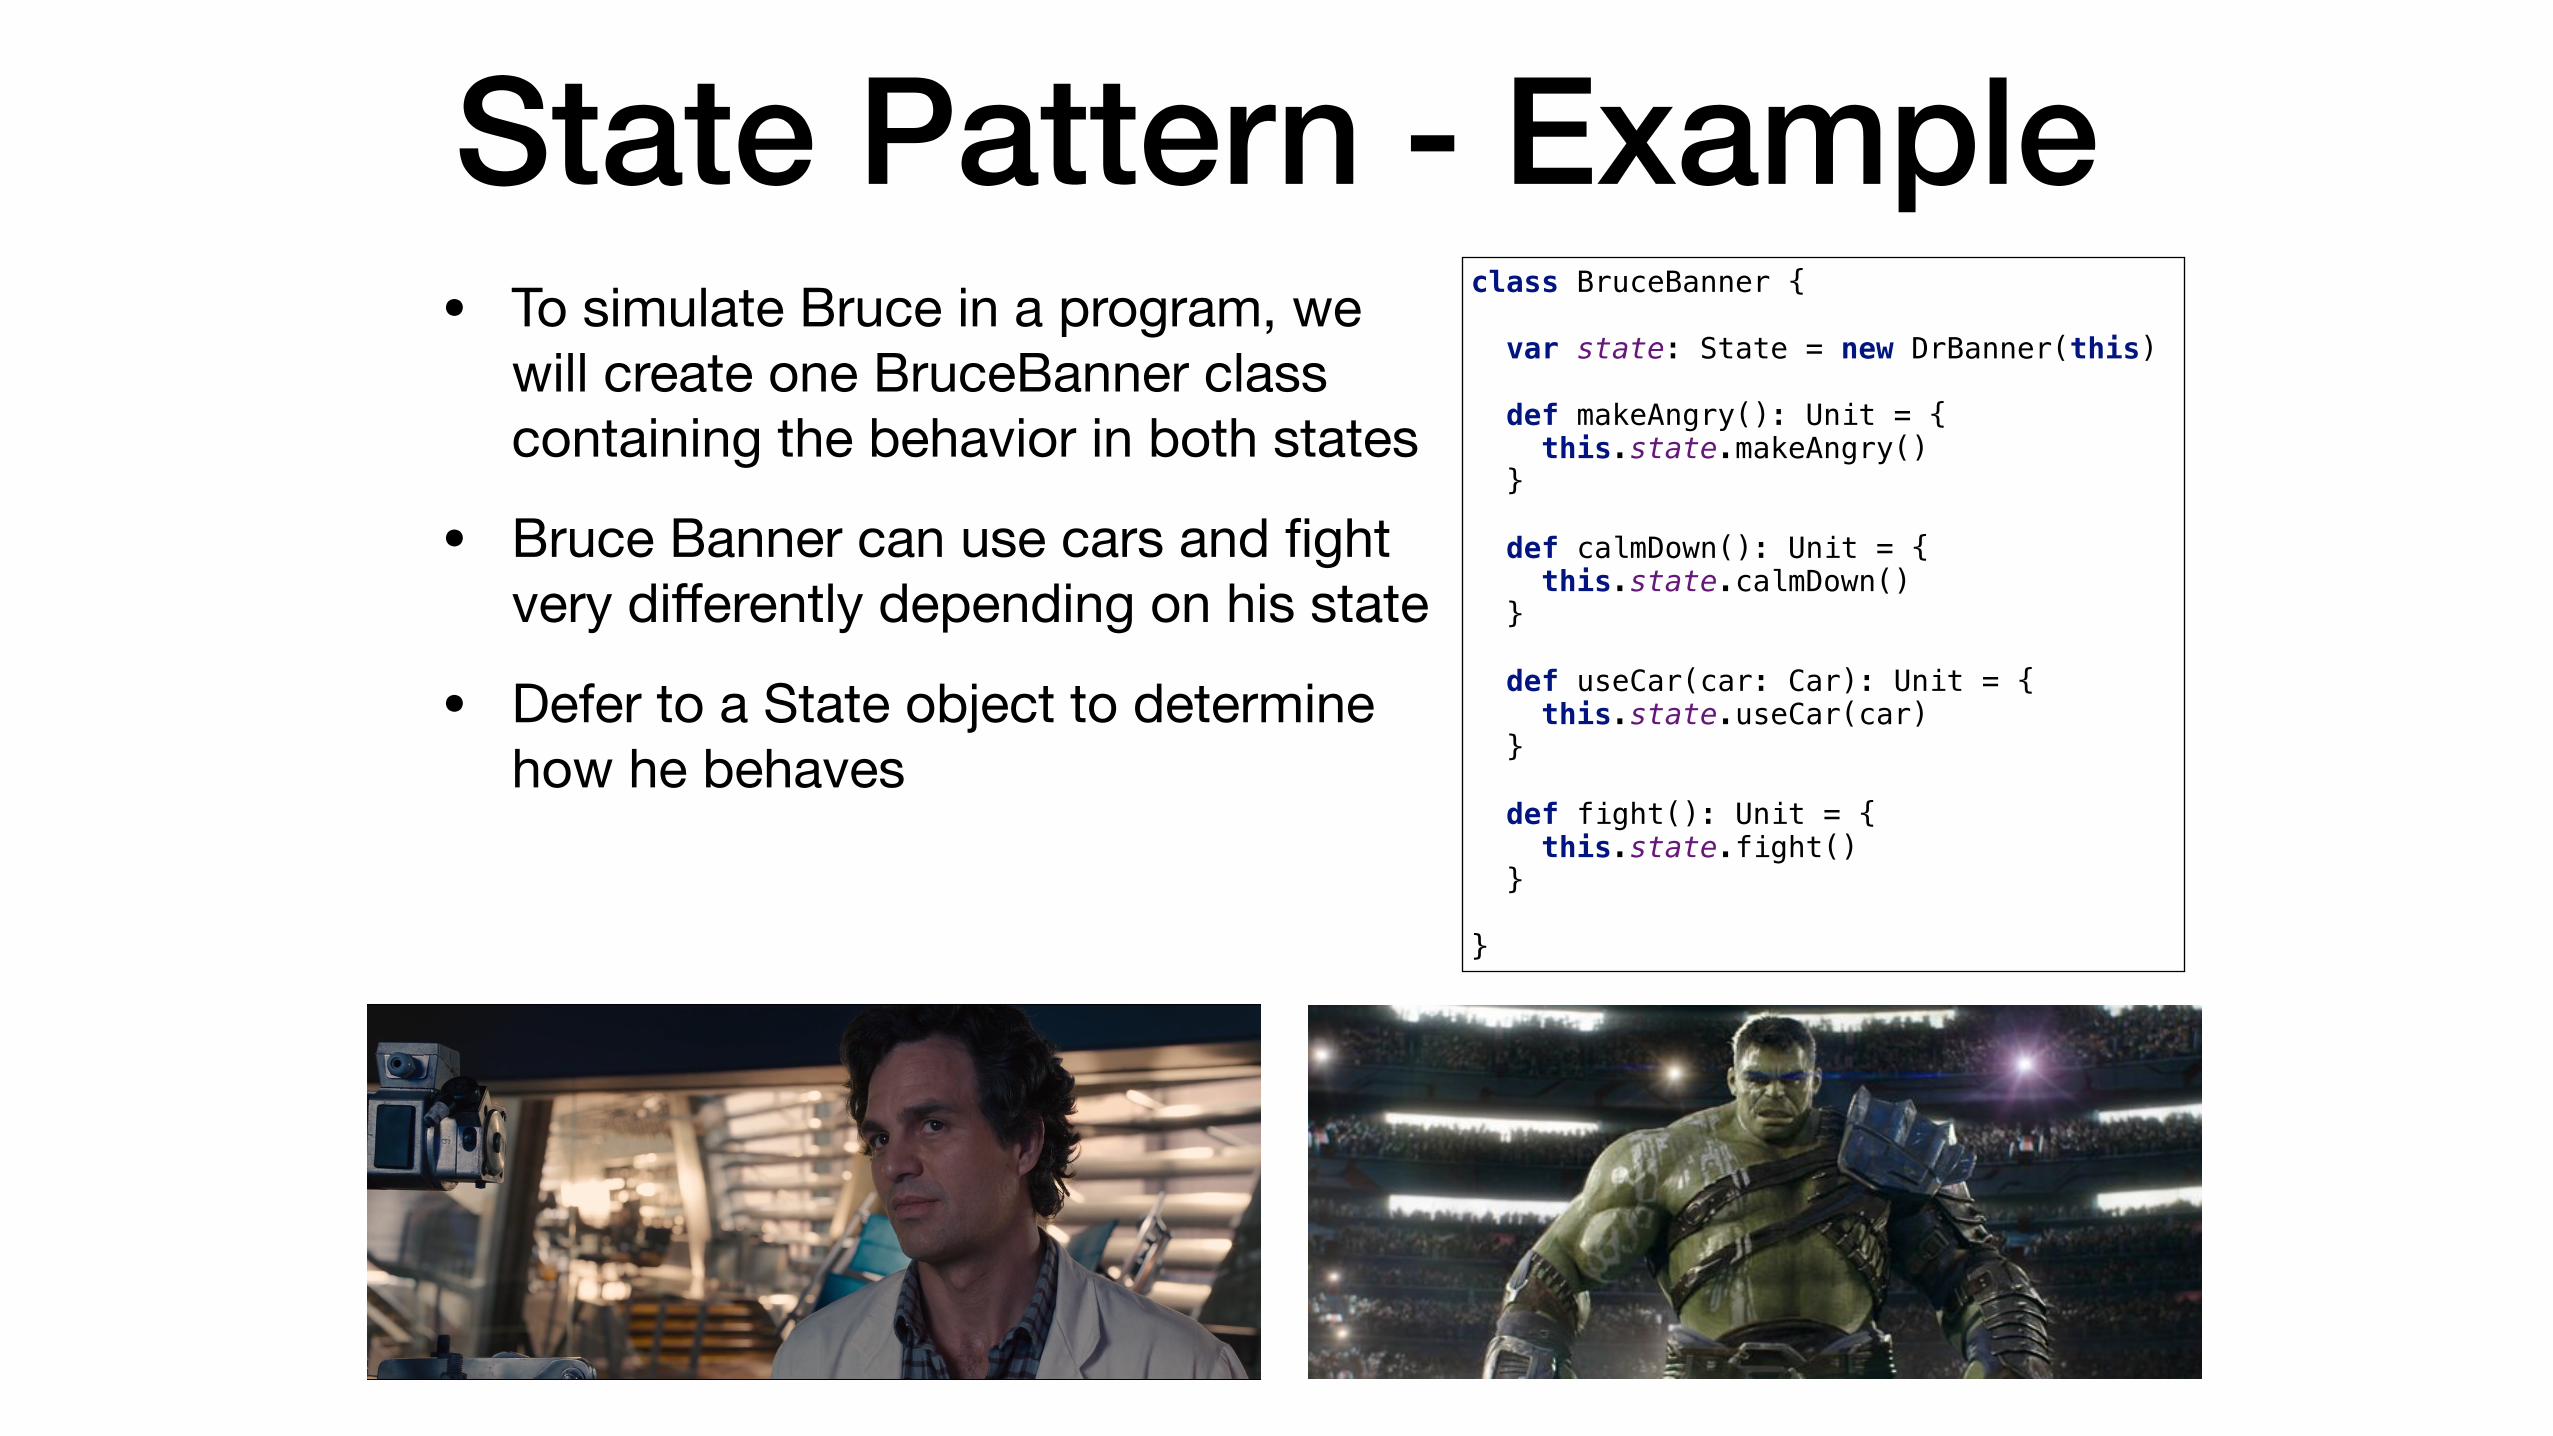
State Pattern - Example• To simulate Bruce in a program, we will create one
BruceBanner class containing the behavior in both states
• Bruce Banner can use cars and fight very differently depending on his state
• Defer to a State object to determine how he behaves
State Pattern - Example• To simulate Bruce in a program, we
will create one BruceBanner class containing the behavior in both states
• Bruce Banner can use cars and fight very differently depending on his state
• Defer to a State object to determine how he behaves
class BruceBanner {
var state: State = new DrBanner(this)
def makeAngry(): Unit = { this.state.makeAngry() }
def calmDown(): Unit = { this.state.calmDown() }
def useCar(car: Car): Unit = { this.state.useCar(car) }
def fight(): Unit = { this.state.fight() }
}

State Pattern - Example• Create State as an abstract
class to define all the methods each state must contain (API)
• Extend State for each possible concrete state
• Implement the methods for each state
abstract class State(banner: BruceBanner) {
def makeAngry()
def calmDown()
def useCar(car: Car)
def fight()
}
class DrBanner(banner: BruceBanner) extends State(banner) {
override def makeAngry(): Unit = { banner.state = new TheHulk(banner) }
override def calmDown(): Unit = { println("already calm") }
override def useCar(car: Car): Unit = { car.drive(false) }
override def fight(): Unit = { println("this won't end well") }
}
class TheHulk(banner: BruceBanner) extends State(banner){
override def makeAngry(): Unit = { println("already angry") }
override def calmDown(): Unit = { banner.state = new DrBanner(banner) }
override def useCar(car: Car): Unit = { car.smash() }
override def fight(): Unit = { println("Hulk Smash!") }
}
class BruceBanner {
var state: State = new DrBanner(this)
def makeAngry(): Unit = { this.state.makeAngry() }
def calmDown(): Unit = { this.state.calmDown() }
def useCar(car: Car): Unit = { this.state.useCar(car) }
def fight(): Unit = { this.state.fight() }
}
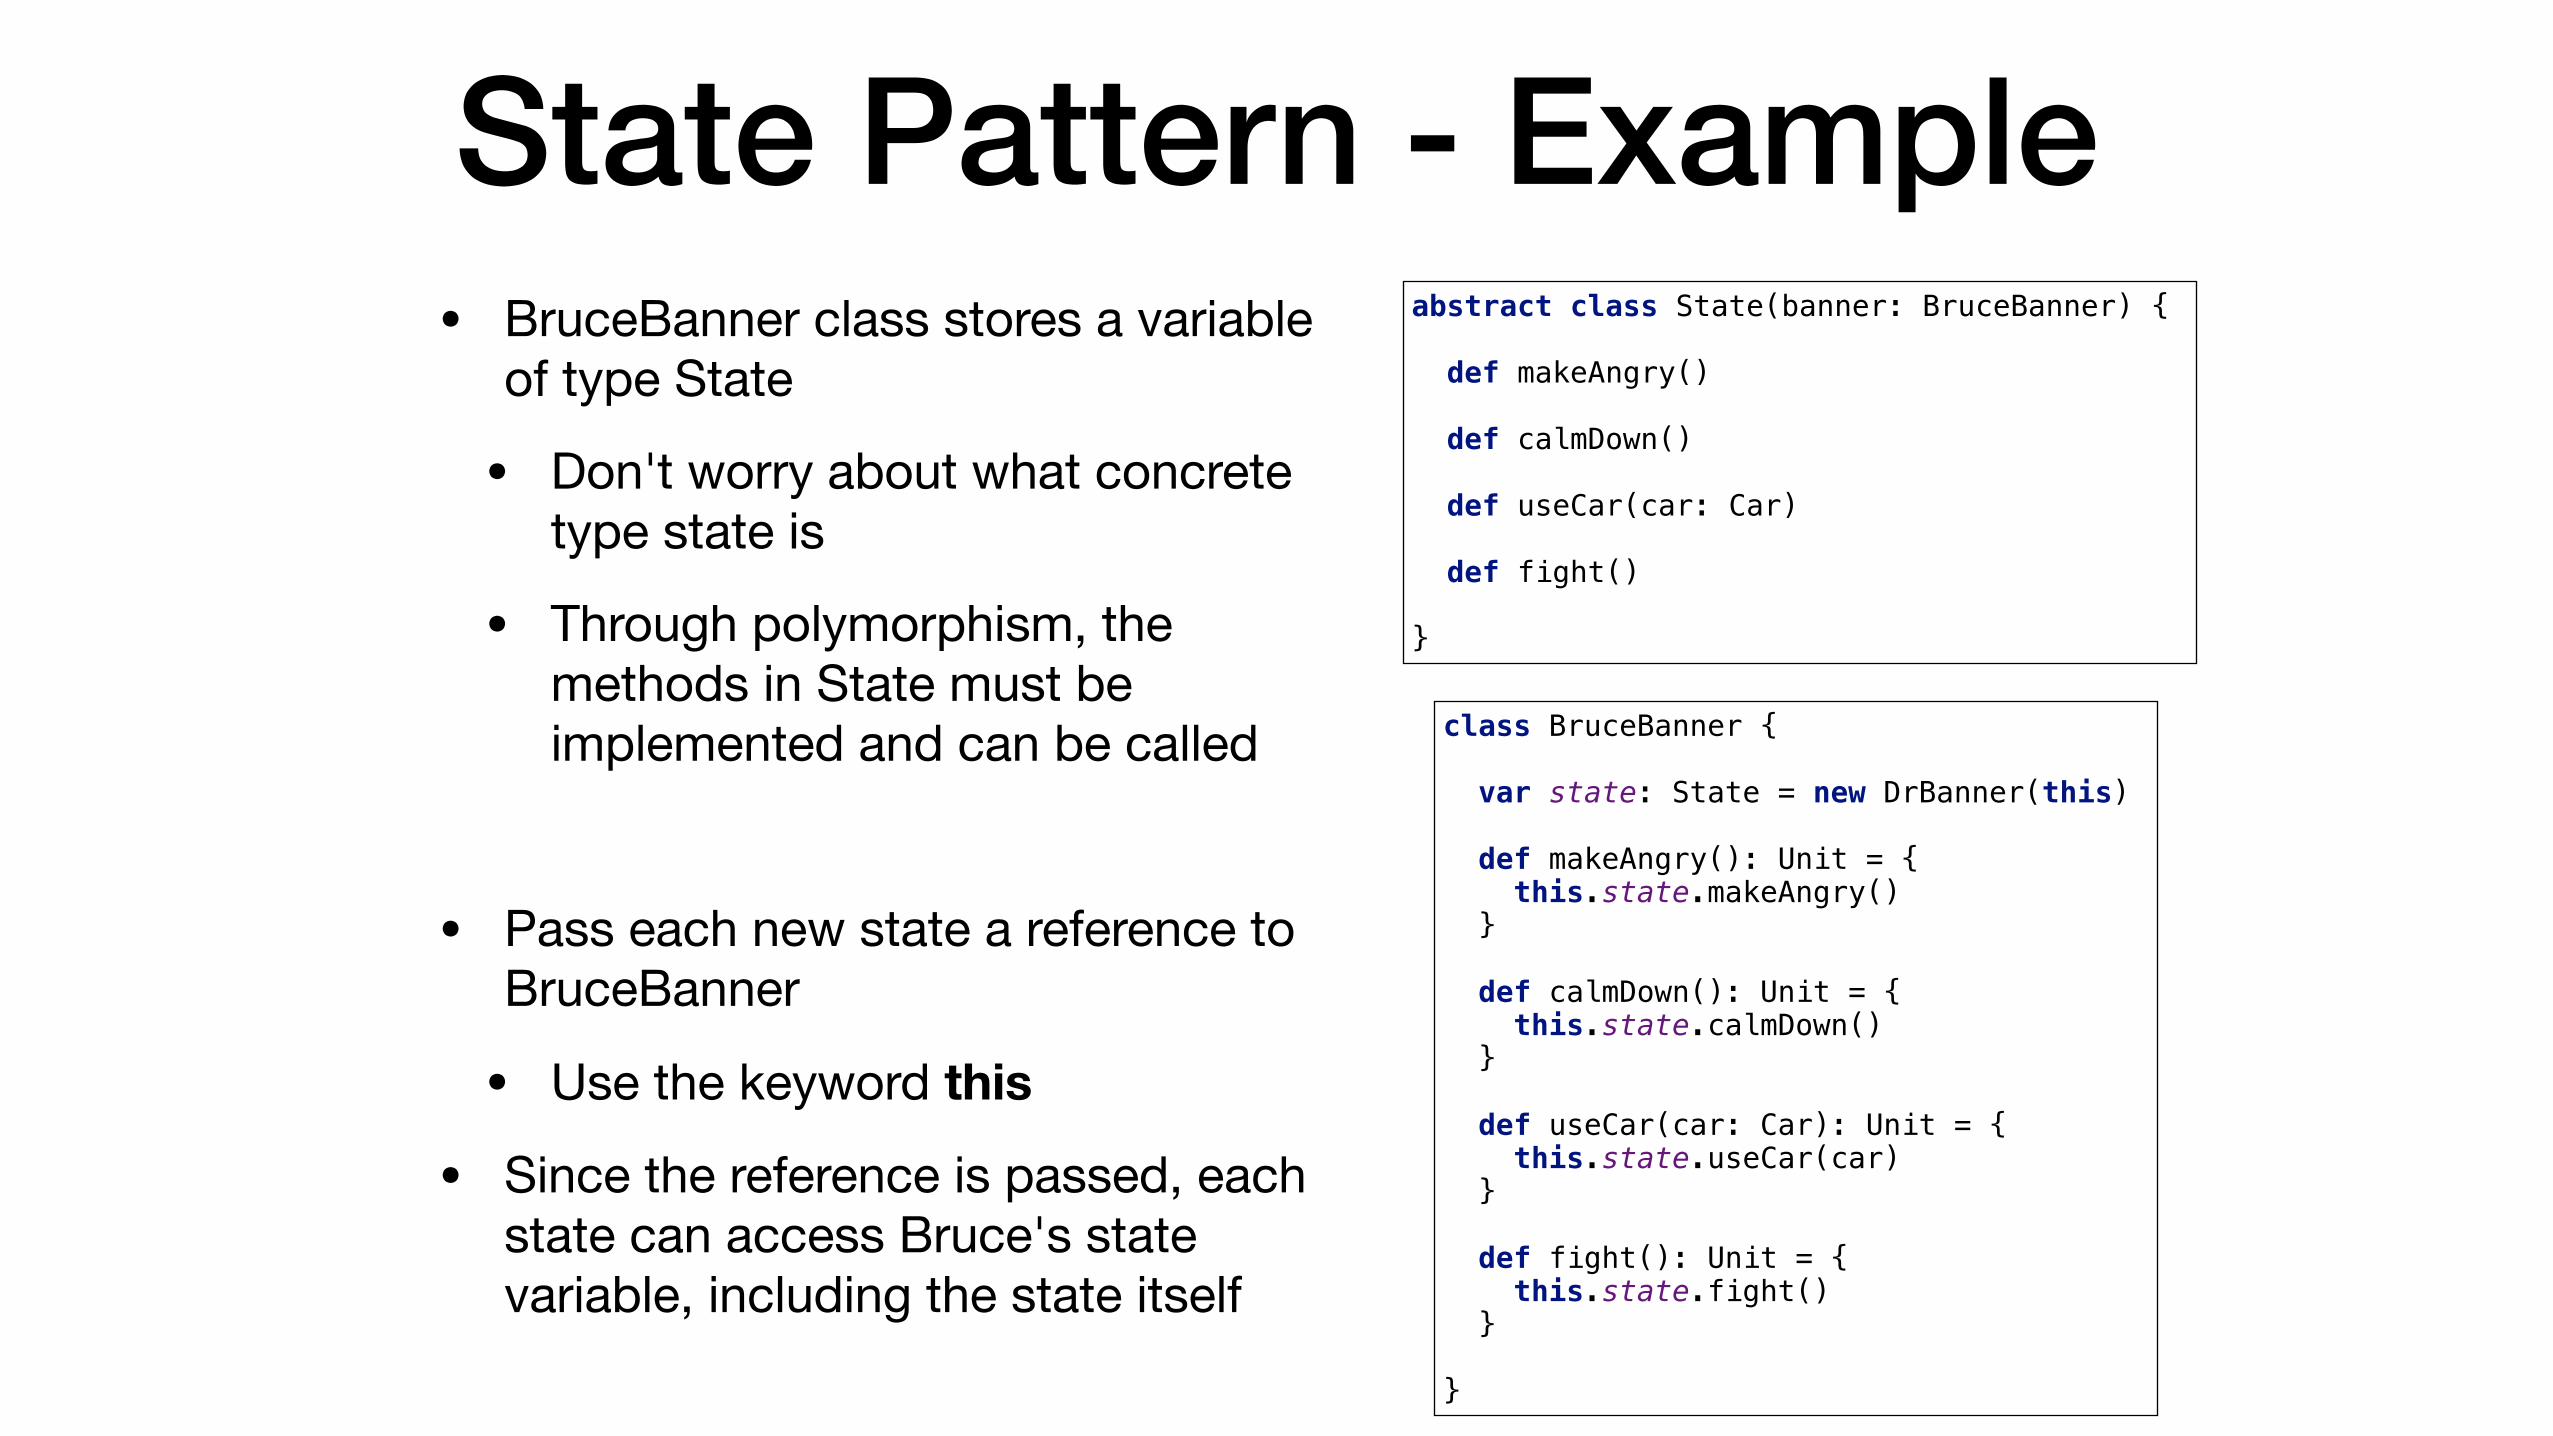
State Pattern - Example• BruceBanner class stores a variable
of type State
• Don't worry about what concrete type state is
• Through polymorphism, the methods in State must be implemented and can be called
• Pass each new state a reference to BruceBanner
• Use the keyword this
• Since the reference is passed, each state can access Bruce's state variable, including the state itself
class BruceBanner {
var state: State = new DrBanner(this)
def makeAngry(): Unit = { this.state.makeAngry() }
def calmDown(): Unit = { this.state.calmDown() }
def useCar(car: Car): Unit = { this.state.useCar(car) }
def fight(): Unit = { this.state.fight() }
}
abstract class State(banner: BruceBanner) {
def makeAngry()
def calmDown()
def useCar(car: Car)
def fight()
}

State Pattern - Example• Having access to the state allows
each state to replace itself with a new state
• We call this a state transition
abstract class State(banner: BruceBanner) {
def makeAngry()
def calmDown()
def useCar(car: Car)
def fight()
}
class DrBanner(banner: BruceBanner) extends State(banner) {
override def makeAngry(): Unit = { banner.state = new TheHulk(banner) }
override def calmDown(): Unit = { println("already calm") }
override def useCar(car: Car): Unit = { car.drive(false) }
override def fight(): Unit = { println("this won't end well") }
}
class TheHulk(banner: BruceBanner) extends State(banner){
override def makeAngry(): Unit = { println("already angry") }
override def calmDown(): Unit = { banner.state = new DrBanner(banner) }
override def useCar(car: Car): Unit = { car.smash() }
override def fight(): Unit = { println("Hulk Smash!") }
}

State Pattern - Exampleabstract class State(banner: BruceBanner) {
def makeAngry()
def calmDown()
def useCar(car: Car)
def fight()
}
class DrBanner(banner: BruceBanner) extends State(banner) {
override def makeAngry(): Unit = { banner.state = new TheHulk(banner) }
override def calmDown(): Unit = { println("already calm") }
override def useCar(car: Car): Unit = { car.drive(false) }
override def fight(): Unit = { println("this won't end well") }
}
class TheHulk(banner: BruceBanner) extends State(banner){
override def makeAngry(): Unit = { println("already angry") }
override def calmDown(): Unit = { banner.state = new DrBanner(banner) }
override def useCar(car: Car): Unit = { car.smash() }
override def fight(): Unit = { println("Hulk Smash!") }
}
class BruceBanner {
var state: State = new DrBanner(this)
def makeAngry(): Unit = { this.state.makeAngry() }
def calmDown(): Unit = { this.state.calmDown() }
def useCar(car: Car): Unit = { this.state.useCar(car) }
def fight(): Unit = { this.state.fight() }
}

State Pattern - Example• With two states we could have easily used a single
conditional and a boolean flag to store the state
• Arguably simpler than using the state pattern
• The true power of this pattern comes when we have more states

State Pattern - Example• Meet Professor Hulk
• Bruce Banner transformed as the Hulk with full control
• Can drive a car and is great in a fight

State Pattern - Example• To add the new state
• Create a new class and implement the State methods
• Add a state transition to enter the new state
• Did not modify any existing functionality!
class ProfessorHulk(banner: BruceBanner) extends State(banner){
override def makeAngry(): Unit = { println("I'm always angry") }
override def calmDown(): Unit = { println("OK") }
override def useCar(car: Car): Unit = { car.drive(true) }
override def fight(): Unit = { println("Smash carefully") }
}
class BruceBanner {
var state: State = new DrBanner(this)
def makeAngry(): Unit = { this.state.makeAngry() }
def calmDown(): Unit = { this.state.calmDown() }
def useCar(car: Car): Unit = { this.state.useCar(car) }
def fight(): Unit = { this.state.fight() }
def learnControl():Unit = { this.state = new ProfessorHulk(this) }
}
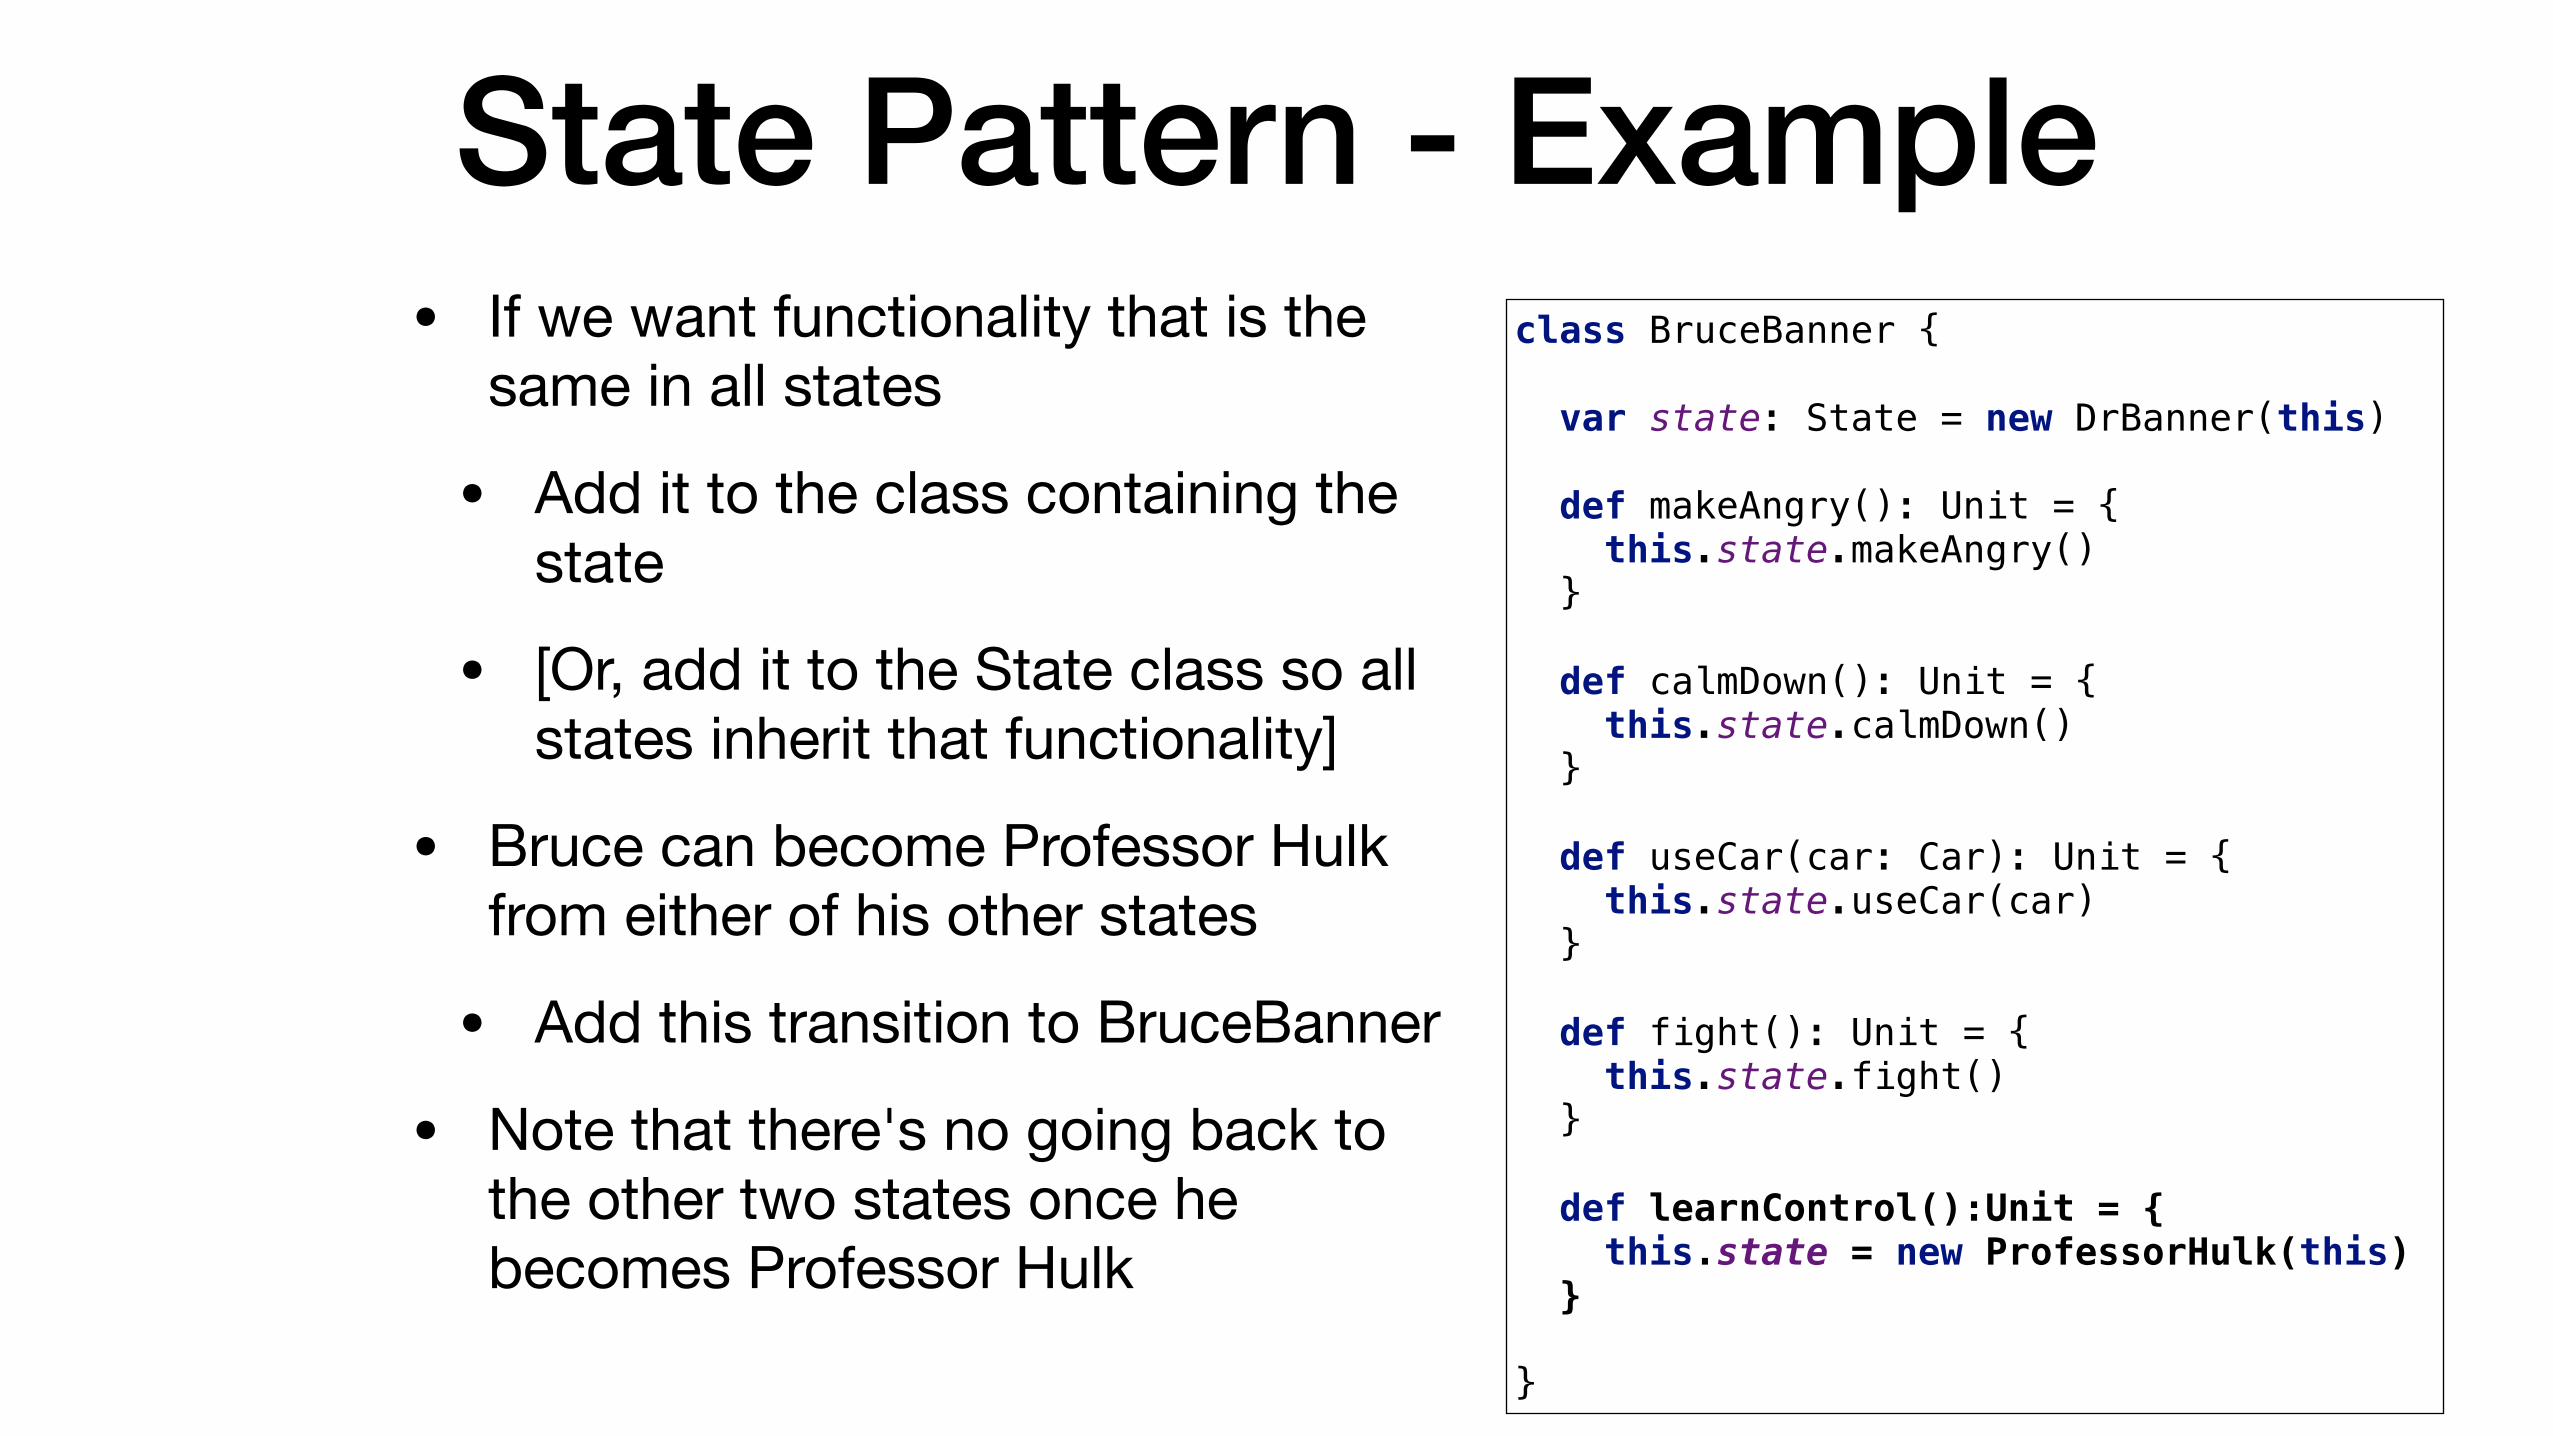
State Pattern - Example• If we want functionality that is the
same in all states
• Add it to the class containing the state
• [Or, add it to the State class so all states inherit that functionality]
• Bruce can become Professor Hulk from either of his other states
• Add this transition to BruceBanner
• Note that there's no going back to the other two states once he becomes Professor Hulk
class BruceBanner {
var state: State = new DrBanner(this)
def makeAngry(): Unit = { this.state.makeAngry() }
def calmDown(): Unit = { this.state.calmDown() }
def useCar(car: Car): Unit = { this.state.useCar(car) }
def fight(): Unit = { this.state.fight() }
def learnControl():Unit = { this.state = new ProfessorHulk(this) }
}

State Pattern - Example
Dr. Banner
Professor Hulk
The Hulk
makeAngry()
calmDown()
learnControl()
initial state
• State Diagrams
• Visualize states and state transitions
• Very helpful while designing with the state pattern
• The state diagram for Bruce Banner is as follows
learnControl()

State Pattern - Design• Write your API
• What methods will change behavior depending on the current state of the object
• These methods define your API and are declared in the State class
• Decide what states should exist
• Any situation where the behavior is different should be a new state
• Determine the transitions between states

Lecture Task- Point of Sale: Lecture Task 5 -
Functionality: Add the following features to the store.model.checkout.SelfCheckout class:
• Implement the “addItem” method which will add an item to the machine with a barcode. When a customer enters the barcode for an item, that item will be “scanned”
• Implement the “receiptLines” method to return a List containing all items that have been entered in the order that they have been entered. You must use the provided ReceiptLine class to represent this information to ensure that we are testing in the same way
◦ The description of a receipt line should be the description of the item and the amount is the final price() of the item (Not including tax)
• Allow the customer to “scan” items. Customers must manually enter each barcode using the number pad. A customer will enter a barcode, then press the enter button to “scan” an item and add that item’s description and price to the receipt
◦ If a customer enters a barcode that has not been added via addItem, the receipt line that’s added should have a description of “error” and an amount of 0.0 (you can use the Map's getOrElse method to implement this feature)
• Implement the “displayString” method to return what the customer should see on the GUI above all the buttons. For this task, the customer should see the barcode that they are entering.
• When a customer presses the clear button, the currently entered barcode should be cleared and the empty string “” should be displayed
Testing: In the tests package, create a test suite named LectureTask5 that tests this functionality