lizardskin automotive paint & coatings application instructions · 2019-01-22 · coating has a...
TRANSCRIPT


Recommended Materials for LizardSkin Application
• LizardSkin Sound Control and/orCeramic Insulation
• LizardSkin SuperProApplication Kit
• LizardSkin TopCoat
• Air compressor capable of 4–5 CFMand 50–70 PSI at the trigger
• Air nipple
• In-line air regulator (recommended,not required)
• Sandpaper or other scuffing material,at least 120 grit
• Gloves, safety glasses, & dust mask
• 1 bucket of warm (preferred, but notnecessary) water and a disposable rag
• Automotive primer (for bare steelsurfaces)
• Aluminum foil
• Floor covering (cardboard, craftpaper, tarp, etc.)
• Rubber spatula
• Automotive Tape(NOT PAINTERS TAPE)
NOTE: Ambient/substrate temperature MUST BE ABOVE 60˚F/15˚C throughout application and curing process for LizardSkin to cure properly. It is ideal for the temperatures to be over 70˚F/21˚C.
NOTE: If you are applying both LizardSkin Sound Control and Ceramic Insulation to the same substrate, Sound Control MUST BE APPLIED AT LEAST 24-36 HOURS PRIOR to Ceramic Insulation for optimal product performance.
Tip: Keep a bucket of warm (if possible) water and a rag handy to wipe up any LizardSkin if it gets somewhere unintended for use.

TIP: Higher air pressure
can produce a finer/
smoother pattern, but
pressures over 80 PSI
may prematurely dry
and damage the coating
during application.
Surface Preparation 1. Surface must be clean, dry, and free of rust, oil, and grease.
2. BARE STEEL requires an automotive primer. High gloss primers and paintedsurfaces will require a scuffing prior to application. Any primer over a weekold will need scuffing.
3. SILICONE SEAM SEALERS will need an automotive primer. If it was appliedmore than 3 days prior to LizardSkin application, then the surface should belightly scuffed.
4. FIBERGLASS, WOOD, PLASTIC, AND STAINLESS STEEL will need tobe scuffed with at least 120 grit sandpaper. Make sure any residual dust orparticulates are cleaned off the surface before applying LizardSkin.
5. WHEN APPLYING LIZARDSKIN OVER A RUST ENCAPSULATOR or similartype of coating, you need to use a primer manufactured or approved by thatcompany and applied according to their instructions before applying LizardSkin.After applying the primer, it should be scuffed.
6. Mask off all areas not intended to be sprayed with LizardSkin.
7. Use aluminum foil to cover irregular shaped components, including; steeringcolumns, brake and throttle pedal assemblies, wiring, suspension components,and any screw holes or threaded holes.
Product Preparation1. If you are applying both Ceramic Insulation and Sound Control, YOU
MUST APPLY SOUND CONTROL FIRST and allow it to cure for at least 24-36 hours (depending on temperature and humidity) prior to applying CeramicInsulation.
2. Open container using the tear tab on the lid. Pull tab off and remove lid. Keepthe lid to reseal any unused portion after application.
3. Mix LizardSkin using a variable speed drill and a stir paddle bit at a low RPM(300 or less) to a smooth consistency. Normal mix time is less than 2 minutes.
4. Clean stir paddle in water bucket immediately after mixing.
5. Lay lid on top of LizardSkin bucket until ready to fill Sprayer Cup to keep outforeign objects and to prevent product from skinning.

TIP: Put floor covering down and place LizardSkin bucket,
water bucket and mixing paddle on top. This will prevent
any wet coating getting on your shop floor while mixing and
pouring product into the Sprayer Cup.
NOTE: Coating is thick and does not require thinning with water. DO NOT ADD WATER without talking with a LizardSkin representative first.
Using the SuperPro Application Kit
1. Adjust the spray tip on the Sprayer by screwing in the nozzle until it bottomsout, and then bring it back out 2 complete turns (360 degrees).
Tightening the nozzle will reduce flow of material; loosening will increaseflow. Increased flow may require additional air pressure. Use the locking ringwhen you find your optimal volume setting.
2. Adjust your air compressor to deliver 50-70 PSI at the trigger. 55 PSI is theoptimal air pressure.
3. Pick up the LizardSkin bucket and pour into the Sprayer Cup. Hold it 8-10inches above the Sprayer Cup and let it taper into a stream. Wipe up anyproduct on the side of the bucket after you have poured. Lay lid back ontoopen bucket when not pouring. You can use a rubber spatula to get as muchproduct out of the bucket as possible when it is almost empty.
4. Spray a test pattern onto a piece of cardboard or other disposable flatsurface. You are looking for the pattern to be approximately the size ofa softball. Please see previous instructions on spray tip for adjustmentrecommendations.
5. Work with small areas (24” x 24”) to ensure consistency and slightly overlap(feather) when moving to the next area. A cross-hatching (vertical, thenhorizontal passes) pattern can aid in achieving a consistent film thickness.
TIP: The goal is to fully coat the surface uniformly, ensuring optimalthermal and sound control performance. Please remember that thiscoating has a much thicker viscosity compared to normal paint.It will not flow or atomize like conventional coatings. A slightlydimpled surface is normal. It will settle as it dries.
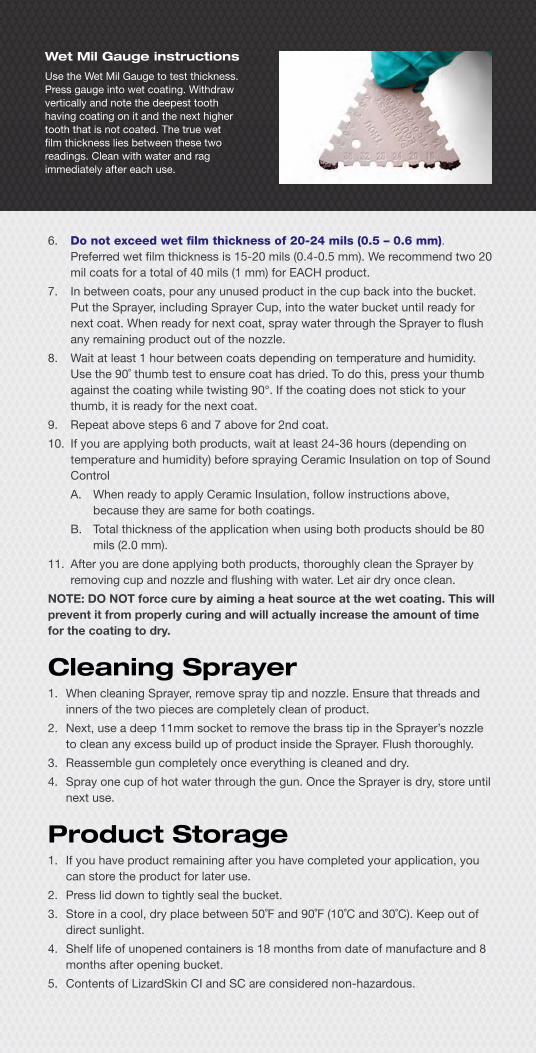
Wet Mil Gauge instructions
Use the Wet Mil Gauge to test thickness. Press gauge into wet coating. Withdraw vertically and note the deepest tooth having coating on it and the next higher tooth that is not coated. The true wet film thickness lies between these two readings. Clean with water and rag immediately after each use.
6. Do not exceed wet film thickness of 20-24 mils (0.5 – 0.6 mm).Preferred wet film thickness is 15-20 mils (0.4-0.5 mm). We recommend two 20mil coats for a total of 40 mils (1 mm) for EACH product.
7. In between coats, pour any unused product in the cup back into the bucket.Put the Sprayer, including Sprayer Cup, into the water bucket until ready fornext coat. When ready for next coat, spray water through the Sprayer to flushany remaining product out of the nozzle.
8. Wait at least 1 hour between coats depending on temperature and humidity.Use the 90˚ thumb test to ensure coat has dried. To do this, press your thumbagainst the coating while twisting 90°. If the coating does not stick to yourthumb, it is ready for the next coat.
9. Repeat above steps 6 and 7 above for 2nd coat.
10. If you are applying both products, wait at least 24-36 hours (depending ontemperature and humidity) before spraying Ceramic Insulation on top of SoundControl
A. When ready to apply Ceramic Insulation, follow instructions above,because they are same for both coatings.
B. Total thickness of the application when using both products should be 80 mils (2.0 mm).
11. After you are done applying both products, thoroughly clean the Sprayer byremoving cup and nozzle and flushing with water. Let air dry once clean.
NOTE: DO NOT force cure by aiming a heat source at the wet coating. This will prevent it from properly curing and will actually increase the amount of time for the coating to dry.
Cleaning Sprayer1. When cleaning Sprayer, remove spray tip and nozzle. Ensure that threads and
inners of the two pieces are completely clean of product.
2. Next, use a deep 11mm socket to remove the brass tip in the Sprayer’s nozzleto clean any excess build up of product inside the Sprayer. Flush thoroughly.
3. Reassemble gun completely once everything is cleaned and dry.
4. Spray one cup of hot water through the gun. Once the Sprayer is dry, store untilnext use.
Product Storage1. If you have product remaining after you have completed your application, you
can store the product for later use.
2. Press lid down to tightly seal the bucket.
3. Store in a cool, dry place between 50˚F and 90˚F (10˚C and 30˚C). Keep out ofdirect sunlight.
4. Shelf life of unopened containers is 18 months from date of manufacture and 8months after opening bucket.
5. Contents of LizardSkin CI and SC are considered non-hazardous.
TopCoat Application Use LizardSkin TopCoat to add durability, traction, and a glossy finish
to your LizardSkin application.
1. Ensure that LizardSkin CI and/or SC has fully cured prior to application andthat no dust or other foreign matter is on the coating. Protect surroundingareas from spray mist. For best results, use when both TopCoat can andsurface temperature are between 50°F and 90°F (10°C and 30°C).
2. Shake can at least one minute after rattle is heard and occasionally during use.
3. Spray surface with steady even strokes at a distance of 8 to 10 inches (20 to25cm). Several light coats give a better finish than one heavy coat.
4. If clogging develops, turn nozzle 1/4 turn or remove and clean spray headslot. Do not stick pin or other objects into can opening. With can and nozzlepointed away from you, reinsert nozzle with a gentle twisting motion.
5. To clear nozzle for future use, turn can upside down and spray for 3 seconds.Completely empty cans may be recycled or disposed of with regular trash.DO NOT incinerate or compact.