lithium-ion cordless drillcdn1.blocksassets.com/assets/ozito/ozito-product-manuals/0vcjdasmf... ·...
TRANSCRIPT

Lithium-ion Cordless Drill18VInstruction Manual3 Year Replacement Warranty CDL-1800 WARNING! Read all safety warnings and all instructions. Failure to follow the warnings and instructions may result in electric shock, fire and/or serious injury.Save all warnings and instructions for future reference.
To view the full range visit: www.ozito.com.au0812
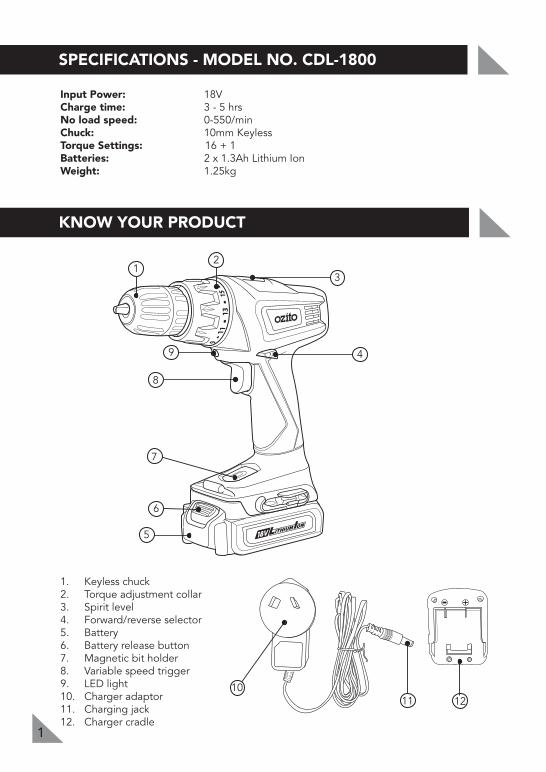
SPECIFICATIONS - MODEL NO. CDL-1800
KNOW YOUR PRODUCT
1
Input Power: 18VCharge time: 3 - 5 hrsNo load speed: 0-550/minChuck: 10mm KeylessTorque Settings: 16 + 1Batteries: 2 x 1.3Ah Lithium IonWeight: 1.25kg
1. Keyless chuck2. Torque adjustment collar3. Spirit level4. Forward/reverse selector5. Battery6. Battery release button7. Magnetic bit holder8. Variable speed trigger9. LED light10. Charger adaptor11. Charging jack12. Charger cradle
1
6
3
8
7
5
11 12
2
49
10

TABLE OF CONTENTS
2
SPECIFICATIONS ………………………………………..
INTRODUCTION…………………………………………
ELECTRICAL SAFETY…………….………………………
GENERAL POWER TOOL SAFETY WARNINGS………
BATTERY & CHARGER SAFETY WARNING……………
ADDITIONAL SAFETY WARNINGS FOR DRILLS……..
CHARGING THE BATTERY……………………………..
DRILL OPERATION………………………………………
MAINTENANCE…………….……………………………
SPARE PARTS …………….……………………………...
DESCRIPTION OF SYMBOLS ………………………….
PACK CONTENTS ………………………………………
WARRANTY………………………………………………
Page 1
Page 3
Page 3
Page 4
Page 6
Page 7
Page 8
Page 9
Page 13
Page 13
Page 13
Page 14
Page 15

INTRODUCTION
3
Congratulations on purchasing an Ozito Lithium Ion Cordless Drill. We aim to provide quality tools at an affordable price.
We hope you will enjoy using this tool for many years. YourLithium Ion Cordless Drill CDL-1800 has been designed for general purpose drilling or screwdriving around the home and is intended for DIY use only.
ELECTRICAL SAFETY
WARNING! When using mains-powered equipment, basic safety precautions, including the following, should always be followed to reduce risk of fire, electric shock, personal injury and material damage.
Read and understand the manual prior to operating this tool.
Save these instructions and other documents supplied with this tool for future reference.
This tool is double insulated in accordance with AS/NZS 60335-1; therefore no earth wire is required.
If the supply cord is damaged, it must be replaced by a qualified electrician or a power tool repairer in order to avoid a hazard.
Note: Double insulation does not take the place of normal safety precautions when operating this tool. The insulation system is for added protection against injury resulting from a possible electrical insulation failure within the tool.
Using an Extension Lead
Always use an approved extension lead suitable for the power input of this tool. Before use, inspect the extension lead for signs of damage, wear and ageing. Replace the extension lead if damaged or defective.
When using an extension lead on a reel, always unwind the lead completely. Use of an extension lead not suitable for the power input of the tool or which is damaged or defective may result in a risk of fire and electric shock.
It is recommended that the extension lead is a maximum of 25m in length. Do Not use multiple extension leads
GENERAL POWER TOOL SAFETY WARNINGS
4
WARNING! Read all safety warnings and all instructions. Failure to follow the warnings and instructions may result in electric shock, fire and/or serious injury.
Save all warnings and instructions for future reference. The term “power tool” in all of the warnings refers to your mains-operated (corded) power tool or battery-operated (cordless) power tool.
1) Work area safety
a) Keep work area clean and well lit. Cluttered or dark areas invite accidents.b) Do not operate power tools in explosive atmospheres, such as in the
presence of flammable liquids, gases or dust. Power tools create sparks which may ignite the dust or fumes.
c) Keep children and bystanders away while operating a power tool. Distractions can cause you to lose control.
2) Electrical safety
a) Power tool plugs must match the outlet. Never modify the plug in any way. Do not use any adapter plugs with earthed (grounded) power tools. Unmodified plugs and matching outlets will reduce risk of electric shock.
b) Avoid body contact with earthed or grounded surfaces, such as pipes, radiators, ranges and refrigerators. There is an increased risk of electric shock if your body is earthed or grounded.
c) Do not expose power tools to rain or wet conditions. Water entering a power tool will increase the risk of electric shock.
d) Do not abuse the cord. Never use the cord for carrying, pulling or unplugging the power tool. Keep cord away from heat, oil, sharp edges or moving parts. Damaged or entangled cords increase the risk of electric shock.
e) When operating a power tool outdoors, use an extension cord suitable for outdoor use. Use of a cord suitable for outdoor use reduces the risk of electric shock.
f) If operating a power tool in a damp location is unavoidable, use a residual current device (RCD) protected supply. Use of an RCD reduces the risk of electric shock.
3) Personal safety
a) Stay alert, watch what you are doing and use common sense when operating a power tool. Do not use a power tool while you are tired or under the influence of drugs, alcohol or medication. A moment of inattention while operating power tools may result in serious personal injury.
b) Use personal protective equipment. Always wear eye protection. Protective equipment such as dust mask, non-skid safety shoes, hard hat, or hearing protection used for appropriate conditions will reduce personal injuries.
c) Prevent unintentional starting. Ensure the switch is in the off-position before connecting to power source and/or battery pack, picking up or carrying the tool. Carrying power tools with your finger on the switch or energising power tools that have the switch on invites accidents.
d) Remove any adjusting key or wrench before turning the power tool on. A wrench or a key left attached to a rotating part of the power tool may result in personal injury.
e) Do not overreach. Keep proper footing and balance at all times. This enables better control of the power tool in unexpected situations.
5
f) Dress properly. Do not wear loose clothing or jewellery. Keep your hair, clothing and gloves away from moving parts. Loose clothes, jewellery or long hair can be caught in moving parts.
g) If devices are provided for the connection of dust extraction and collection facilities, ensure these are connected and properly used. Use of dust collection can reduce dust-related hazards.
4) Power tool use and care
a) Do not force the power tool. Use the correct power tool for your application. The correct power tool will do the job better and safer at the rate for which it was designed.
b) Do not use the power tool if the switch does not turn it on and off. Any power tool that cannot be controlled with the switch is dangerous and must be repaired.
c) Disconnect the plug from the power source and/or the battery pack from the power tool before making any adjustments, changing accessories, or storing power tools. Such preventive safety measures reduce the risk of starting the power tool accidentally.
d) Store idle power tools out of the reach of children and do not allow persons unfamiliar with the power tool or these instructions to operate the power tool. Power tools are dangerous in the hands of untrained users.
e) Maintain power tools. Check for misalignment or binding of moving parts, breakage of parts and any other condition that may affect the power tool’s operation. If damaged, have the power tool repaired before use. Many accidents are caused by poorly maintained power tools.
f) Keep cutting tools sharp and clean. Properly maintained cutting tools with sharp cutting edges are less likely to bind and are easier to control.
g) Use the power tool, accessories and tool bits etc. in accordance with these instructions, taking into account the working conditions and the work to be performed. Use of the power tool for operations different from those intended could result in a hazardous situation.
5) Battery tool use and care
a) Recharge only with the charger specified by the manufacturer. A charger that is suitable for one type of battery pack may create a risk of fire when used with another battery pack.
b) Use power tools only with specifically designated battery packs. Use of any other battery packs may create a risk of injury and fire.
c) When battery pack is not in use, keep it away from other metal objects, like paper clips, coins, keys, nails, screws or other small metal objects, that can make a connection from one terminal to another. Shorting the battery terminals together may cause burns or a fire.
d) Under abusive conditions, liquid may be ejected from the battery; avoid contact. If contact accidentally occurs, flush with water. If liquid contacts eyes, additionally seek medical help. Liquid ejected from the battery may cause irritation or burns.
6) Service
a) Have your power tool serviced by a qualified repair person using only identical replacement parts. This will ensure that the safety of the power tool is maintained.
b) If the supply cord is damaged, it must be replaced by the manufacturer, its service agent or similarly qualified persons in order to avoid a hazard.
GENERAL POWER TOOL SAFETY WARNINGS
BATTERY AND CHARGER SAFETY WARNINGS
6
THIS MANUAL CONTAINS IMPORTANT SAFETY AND OPERATING INSTRUCTIONSFOR YOUR BATTERY CHARGER.1. Before using the charger read all instructions and cautionary markings on the
charger, battery pack and the product using the battery pack.
2. This charger is not intended for any uses other than charging rechargeable batteries. Any other use may result in risk of fire, electric shock or electrocution.
3. Do not place any object on top of the charger or place the charger on a soft surface that may result in excessive internal heat. Place the charger in a position away from any heat source.
4. To reduce risk of damage to the electric plug and cord, pull by the plug rather than the cord when disconnecting the charger.
5. Make sure the cord is located so that it will not be stepped on, tripped over, or otherwise subjected to damage or stress.
6. An extension cord should not be used unless absolutely necessary. Use of an improper extension cord could result in the risk of fire, electric shock or electrocution.
7. Do not operate the charger if it has received a sharp blow, been dropped or otherwise damaged in any way. Have it checked by an electrician or power tool repairer.
8. Do not disassemble charger. Take it to an electrician or power tool repairer when service or repair is required. Incorrect reassembly may result in a risk of electric shock, electrocution or fire.
9. To reduce risk of electric shock, unplug the charger from the outlet before attempting any cleaning. Removing the battery pack will not reduce this risk.
10. Never attempt to connect 2 chargers together.11. DO NOT store or use the tool and battery pack in locations where the temperature
may reach or exceed 40ºC (such as inside sheds or metal buildings in summer).12. The charger is designed to operate on standard household electrical power
(240 volts). Do not attempt to use it on any other voltage!13. The battery pack is not fully charged out of the carton. First read the safety
instructions and then follow the charging notes and procedures.14. The longest life and best performance can be obtained if the battery pack is
charged when the air temperature is between 18 - 24ºC. Do not charge the battery pack in an air temperature below 10ºC or above 40ºC. This is important and will prevent damage to the battery pack.
15. Do not incinerate the battery pack even if it is seriously damaged or is completely worn out. The battery can explode in a fire.
16. Never attempt to open the battery pack for any reason. If the plastic housing of the battery pack breaks or cracks, immediately discontinue use and do not recharge.
17. During charging, the battery must be placed in a well ventilated area.
Danger! If the battery pack case is cracked or damaged, do not insert it into charger. There is a danger of electric shock or electrocution.
WARNING! Do not allow any liquid to get inside charger. Electric shock may result. To facilitate cooling of the battery pack after use, avoid placing the charger or battery pack in a warm environment such as in a metal shed, or an uninsulated trailer.
ADDITIONAL SAFETY WARNING FOR DRILLS
7
1. Do not use the drill in wet or damp conditions.2. Always keep the work area free of tripping hazards.3. When using the drill always ensure you are wearing protective safety equipment
including safety glasses/goggles, ear muffs, dust mask and other protective clothing including gloves and apron.
4. Always check the work piece before operation and remove any obstructions such as nails, staples, screws, string, rags, cloths and other debris.
5. Always use clamps or a vice to hold down and secure the work piece.6. Before drilling ensure there is a suitable gap below the work piece to prevent the
drill bit from touching any obstacles.7. Before drilling holes or screwing into walls ensure that you are not breaking into
any electricity, gas or water supply line, etc.8. Never change the direction of the chuck rotation while the tool is still running.
Ensure the chuck has come to a complete stop before changing the rotation of the drill.
9. Do not lay the tool down unless the tool is switched off and the chuck has come to a complete stop.
10. Keep hands and other body parts well away from the work area whilst the tool is in use.
11. Keep hand well away from the under side of the work piece during use.12. Do not use your hand to remove any dust, chips or other waste while the tool is in use.13. Do not touch the drill bit after operation. The bit can be HOT to touch and may
cause burn injuries.14. Hold power tool by insulated gripping surfaces, when performing an opera-
tion where the cutting accessory may contact hidden wiring or its own cord. Cutting accessory contacting a “live” wire may make exposed metal parts of the power tool “live” and could give the operator an electric shock.
Over Charging ProtectionThis feature ensures that the battery (5) is never overcharged. When the battery (5) has reached its full charge capacity the charger will shut off protecting the internal components of the battery (5) from being damaged.
Over Discharge ProtectionThe battery (5) includes an over discharge protector. This feature stops the battery (5) from discharging beyond the recommended lowest safety voltage.
Over Heat ProtectionThe battery (5) has an internal thermal cut-out device that stops the charging cycle if the battery (5) becomes hot during the charging process. This thermal cut-out device also stops the battery (5) from operating should the battery (5) become too hot during the operation of the tool. This can happen when the tool is overloaded or being used for extended periods of time.Up to 30 minutes cooling time may be required depending on ambient temperature and the operation being performed.
LITHIUM ION BATTERY AND CHARGER SAFETY FEATURES

LITHIUM ION BATTERY AND CHARGER SAFETY FEATURES
8
Over Current Protection
If the battery (5) is overloaded and the maximum current draw is exceeded the battery will temporarily stop working to protect the internal components. The battery (5) will resume normal operation once the current draw has returned to its normal safe level. This may take a few seconds.
Short Circuit Protection
If the battery (5) short circuits, the short circuit protector immediately stops the battery (5) from operating.
This ensures that no internal components of the battery (5) or tool are damaged.
Charging your Battery
The drills’ battery (5) has been shipped in a low charge condition, and requires charging prior to use.
1. Connect the charger jack (11) to the charging cradle (11) (Fig. 1).
2. Plug the charging adaptor (10) into a mains power outlet.
3. With the charging cradle (12) sitting flat on a bench/table, slide the battery (5) into the recess of the battery terminals ensuring a firm connection (Fig.2).
4. The battery (5) fits in one direction only. If you need to force the connection it means the battery (5) is facing the wrong way.
5. A battery takes 3 - 5 hours to charge. Charging starts automatically when the battery is connected to the charger. Remove the battery (5) from the charging cradle (12) after 5 hours.
Initial Charge
1. The battery (5) will not reach its full charge the first time it is charged.
2. Allow several charging cycles of charging and then discharging (through use of the tool) for the battery (5) to reach its maximum charge.
Caution: Disconnect the charger adaptor from the mains power when charger is not in use.
Subsequent Charges
1. After normal usage, approximately 3-5 hours of charging time is required to fully recharge the battery (5).
2. If the battery (5) is completely discharged, 5 hours or longer of charging time will be required to fully recharge it.
Fig. 1
PREPARATION AND SET-UP
Fig. 2

PREPARATION AND SET-UP (cont.)
9
Important Charging Notes
1. The charger adaptor (10) and battery (5) may become warm to touch while charging. This is a normal condition, and does not indicate a problem.
2. Use the charger at normal room temperature whenever possible. To prevent overheating, do not cover the charger and do not charge the battery pack in direct sunlight or near heat sources.
3. If the battery (5) does not charge properly: - Check current at mains power outlet by plugging in a lamp or other appliance. - If charging problems persist, have the complete tool checked by an electrician or a power tool repairer.
Installing the Battery
1. Insert the battery (5) into the battery recess on the drill until it clicks into place (Fig. 3).
2. Do not use excessive force when inserting the bat-tery (5). If the battery (5) does not slide in easily, it is not being inserted correctly and could cause dam-age to the battery (5), battery terminals or the drill.
Caution: Do not operate the variable speed trigger (8) whilst inserting the battery.
Removing the Battery
1. Depress the battery release button (6) and remove the battery (5).
Getting Started
It is important to understand the functions of the various controls. Please see below how and when to use the variable speed switch, forward/reverse control and torque control.
Familiarize yourself with these controls before first use of your new drill.
Variable Speed Trigger
The variable speed trigger (8) allows you operate the drill at different speed. The speed depends on the pressure that you apply on the variable speed trigger (8).
1. Turn the drill ON by depressing the variable speed trigger (8) (Fig. 4).
2. To turn the drill OFF, release the variable speed trigger (8).
Fig. 3
Fig. 4
DRILL OPERATION

10
Changing the Direction of Rotation
1. The direction of rotation can be changed with the forward/reverse selector (4). This is located above the switch (9) (Fig. 5).
2. To select the forward drilling position, push the forward/reverse selector (4) hard left.
3. To select the reverse drilling position push the forward/reverse selector (4) hard right.
4. The variable speed switch (9) can be locked off by pushing the forward/reverse selector (4) into the middle of both forward and reverse positions.
Torque Settings (Tightening power of your drill)
When using your drill for various driving applications, it becomes necessary to
increase and decrease the power and torque in order to prevent the possibility of damaging screw heads, threads, work pieces, etc.
In general, power and torque should correspond to the difficulty of the screw to be driven. If torque is too high, the screw heads or threads can be damaged or broken.
To Adjust Torque
1. Locate the arrow on the front of the drill housing (Fig. 6).
2. Identify the torque settings and 1 drill setting on the torque adjustment collar (2).
3. Rotate the torque adjustment collar (2) to the desired setting, aligning the required number on the torque adjustment collar (2) with the arrow on the drill housing.
4. To increase or decrease torque, rotate the torque adjustment collar (2). The lower the number, the lower the torque setting. The higher the number, the higher the torque setting.
Always check that the correct torque is selected by practicing on scrap material prior to carrying out a job.
The torque setting required to drive screws will differ with different materials. Start with the torque setting on the number you think is appropriate (e.g.: 4) and increase the torque adjustment collar to a higher number if the screw head is not sitting flush with your work piece. Remove the screw after adjusting and re-drive the screw back into the work piece until the correct torque adjustment leaves the screw head flush with your work piece.
DRILL OPERATION
WARNING! Do not change direction of rotation while the drill is in motion.
Fig. 5
Fig. 6
DRILL OPERATION (cont.)
11
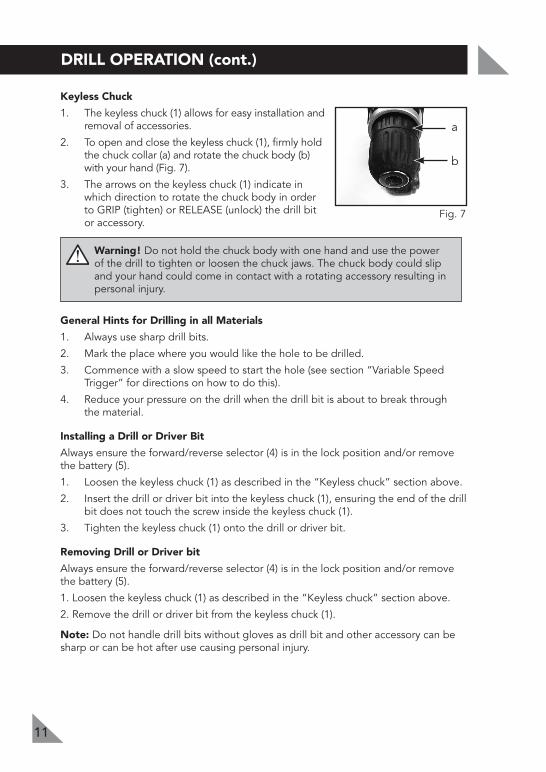
Keyless Chuck
1. The keyless chuck (1) allows for easy installation and removal of accessories.
2. To open and close the keyless chuck (1), firmly hold the chuck collar (a) and rotate the chuck body (b) with your hand (Fig. 7).
3. The arrows on the keyless chuck (1) indicate in which direction to rotate the chuck body in order to GRIP (tighten) or RELEASE (unlock) the drill bit or accessory.
Warning! Do not hold the chuck body with one hand and use the power of the drill to tighten or loosen the chuck jaws. The chuck body could slip and your hand could come in contact with a rotating accessory resulting in personal injury.
General Hints for Drilling in all Materials
1. Always use sharp drill bits.
2. Mark the place where you would like the hole to be drilled.
3. Commence with a slow speed to start the hole (see section “Variable Speed Trigger” for directions on how to do this).
4. Reduce your pressure on the drill when the drill bit is about to break through the material.
Installing a Drill or Driver Bit
Always ensure the forward/reverse selector (4) is in the lock position and/or remove the battery (5).
1. Loosen the keyless chuck (1) as described in the “Keyless chuck” section above.
2. Insert the drill or driver bit into the keyless chuck (1), ensuring the end of the drill bit does not touch the screw inside the keyless chuck (1).
3. Tighten the keyless chuck (1) onto the drill or driver bit.
Removing Drill or Driver bit
Always ensure the forward/reverse selector (4) is in the lock position and/or remove the battery (5).
1. Loosen the keyless chuck (1) as described in the “Keyless chuck” section above.
2. Remove the drill or driver bit from the keyless chuck (1).
Note: Do not handle drill bits without gloves as drill bit and other accessory can be sharp or can be hot after use causing personal injury.
Fig. 7
Metal Drilling
1. Support thin material with a piece of scrap wood.
2. Use a centre punch to mark the position of the hole.
3. If drilling a large hole, use a small size drill bit first to establish a pilot hole then use the required large size drill bit.
4. Use only HSS (high speed steel) drill bits or those recommended for metal use.
5. When drilling into iron or steel, use a cooling lubricant such as thin oil. With aluminium, use turpentine or paraffin. With brass, copper and cast iron, use no lubricant but withdraw the drill regularly to assist cooling.
Wood Drilling
1. Mark the place where you want to drill with a punch or a nail.
2. To avoid splintering on breakthrough, either clamp a piece of scrap wood to the back of your workpiece or continue the hole from the back of the wood when the drill bit first breaks through.
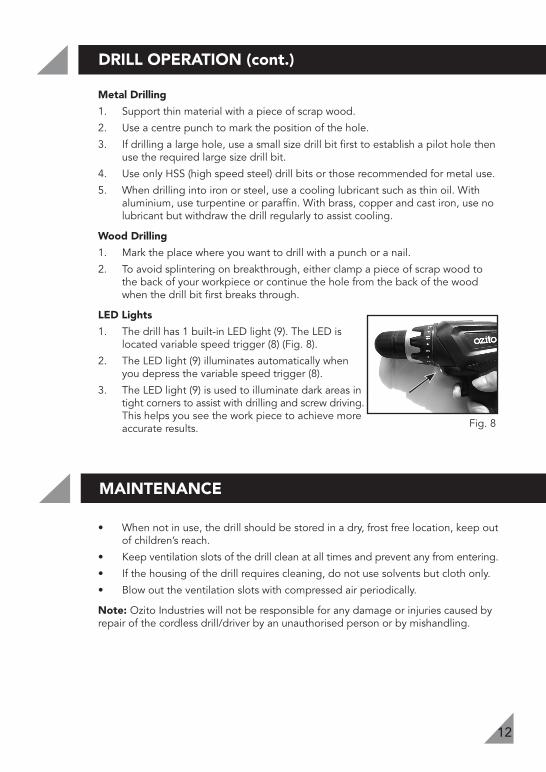
LED Lights
1. The drill has 1 built-in LED light (9). The LED is located variable speed trigger (8) (Fig. 8).
2. The LED light (9) illuminates automatically when you depress the variable speed trigger (8).
3. The LED light (9) is used to illuminate dark areas in tight corners to assist with drilling and screw driving. This helps you see the work piece to achieve more accurate results.
• When not in use, the drill should be stored in a dry, frost free location, keep out of children’s reach.
• Keep ventilation slots of the drill clean at all times and prevent any from entering.
• If the housing of the drill requires cleaning, do not use solvents but cloth only.
• Blow out the ventilation slots with compressed air periodically.
Note: Ozito Industries will not be responsible for any damage or injuries caused by repair of the cordless drill/driver by an unauthorised person or by mishandling.
DRILL OPERATION (cont.)
12
MAINTENANCE
Fig. 8
SPARE PARTS
13
Limited spare parts are available subject to availability. Please contact your local Bunnings Special Orders Desk to order the required spare parts.
Most common spare parts listed below
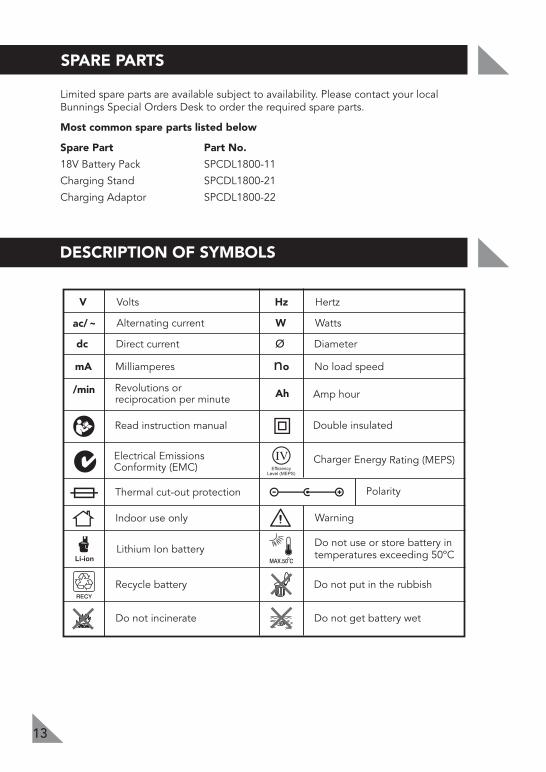
Spare Part Part No.
18V Battery Pack SPCDL1800-11
Charging Stand SPCDL1800-21
Charging Adaptor SPCDL1800-22
Lithium Ion battery
Electrical Emissions Conformity (EMC)
Read instruction manual
DESCRIPTION OF SYMBOLS

CARING FOR THE ENVIRONMENT
14
OZITO INDUSTRIES PTY LTD
PACK CONTENTS
AUSTRALIA (Head Office)1 - 23 Letcon Drive, Bangholme, Victoria, Australia 3175Telephone: 1800 069 486Facsimile: +61 3 9238 5588Website: www.ozito.com.auEmail: [email protected]
Power tools that are no longer usable should not be disposed of with household waste but in an environmentally friendly way. Please recycle where facilities exist. Check with your local council authority for recycling advice.
Recycling packaging reduces the need for landfill and raw materials. Reuse of recycled material decreases pollution in the environment. Please recycle packaging where facilities exist. Check with your local council authority for recycling advice.
1 x 18V Cordless Lithium Ion Drill/Driver
2 x Screwdriver Bit
2 x 18V Li-Ion Battery Packs
1 x Charging cradle
1 x AC Charging adaptor
3 YEAR REPLACEMENT WARRANTY
Your product is guaranteed for a period of 36 months from the original date of purchase and is intended for DIY (Do It Yourself) use only. If a product is defective it will be replaced in accordance with the terms of this warranty. Warranty excludes consumable parts, for example: screwdriver bits. Lithium Ion batteries are covered by a 12 month warranty.
WARNING
The following actions will result in the warranty being void.
• Professional, Industrial or high frequency use.• If the tool has been operated on a supply voltage other than that specified on the tool.• If the tool shows signs of damage or defects caused by or resulting from abuse, accidents
or alterations.• Failure to perform maintenance as set out within the instruction manual.• If the tool is disassembled or tampered with in any way.
OZITOAustralia/New Zealand (Head Office)1-23 Letcon Drive, Bangholme, Victoria, Australia 3175
OW7
WARRANTYYOUR WARRANTY FORM SHOULD BE RETAINED BY YOU AT ALL TIMES. IN ORDER
TO MAKE A CLAIM UNDER THIS WARRANTY YOU MUST RETURN THE PRODUCT TO YOUR NEAREST BUNNINGS WAREHOUSE WITH YOUR BUNNINGS REGISTER RECEIPT.
PRIOR TO RETURNING YOUR PRODUCT FOR WARRANTY PLEASE TELEPHONE OUR CUSTOMER SERVICE HELPLINE:
TO ENSURE A SPEEDY RESPONSE PLEASE HAVE THE MODEL NUMBER AND DATE OF PURCHASE AVAILABLE. A CUSTOMER SERVICE REPRESENTATIVE WILL TAKE YOUR CALL AND ANSWER ANY QUESTIONS YOU MAY HAVE RELATING TO THE WARRANTY POLICY
OR PROCEDURE.
The benefits provided under this warranty are in addition to other rights and remedies which are available to you at law.Our goods come with guarantees that cannot be excluded at law. You are entitled to a replacement or refund for a major failure and for compensation for any other reasonably foreseeable loss or damage. You are also entitled to have the goods repaired or replaced if the goods fail to be of acceptable quality and the failure does not amount to a major failure. Generally you will be responsible for all costs associated with a claim under this warranty, however, where you have suffered any additional direct loss as a result of a defective product you may be able to claim such expenses by contacting our customer service helpline above.
`Australia 1800 069 486New Zealand 0508 069 486