lisa owner's guide - 1000bit · system preferences so that the lisa knows what external ......
TRANSCRIPT

LisaOwner'sGuide
Converted by Tix
Guide to Lisa Manuals
Set up your Lisa following the setup procedures in theLisa accessories box or in Appendix 1, SetupProcedures, in the Lisa Owner's Guide.
Go through Section A, LisaGuide, in the Lisa Owner'sGuide, for an introduction to the Lisa.
If your dealer or service representative did not set yourSystem Preferences so that the Lisa knows what externaldevices are attached, follow the instructions in SectionD, Desktop Manager Reference Guide, under Set, in theLisa Owner's Guide.
Go to Section A, Getting Started, in the manual for eachoffice tool that you want to learn, for the essentiais ofusing that tool.
Go to Section B, Lisa Fundamentais, in the Lisa Owner'sGuide, for the background information you need beforebeginning long-term work on the Lisa.
You are now ready to start doing your own work on theLisa:• If you want self-paced instructions for using a tool, goto Section B, Tutorial, in that tool manual.
Lisa Owner
http://tiziano/tix/support/manuali/apple/lisa_og/a_0.htm (1 di 8) [20/01/2001 10.34.48]

• If you want instructions for performing specific taskswith a tool, go to Section C, Reference Guide, in thattool manual.
For specific instructions on filing and desktopmanagement, go to Section D, Desktop ManagerReference Guide, in the Lisa Owner's Guide.
For more information on the Lisa hardware, tips oncaring for the Lisa, and suggestions for troubleshootingwhen the System isn't working properly, go to the othersections of the Lisa Owner's Guide.
Contents
PrefaceA. LisaGuide
This section tells you how to start LisaGuide, whichintroduces you to the Lisa.
B. Lisa Fundamentals
This section contains the background information youneed to know before doing long-term work on the Lisa.
C. Lisa Hardware
This section covers the major Lisa components andexplains how they interact.
D. Desktop Manager Reference Guide
This section provides detailed instructions for preparingyour system for long-term use and for using the Lisafiling system.
E. Calculator
This section explains how to use the Lisa desktopcalculator.
F. Maintenance
Lisa Owner
http://tiziano/tix/support/manuali/apple/lisa_og/a_0.htm (2 di 8) [20/01/2001 10.34.48]
This section explains routine maintenance — mostly howto clean the system.
G. Troubleshooting
This section is a step-by-step guide to identifying theproblem when your Lisa doesn't do what you expect.
v
H. Service
This section guides you through replacing, adding, andremoving the Lisa internal parts.
I. Appendixes
Appendix 1. Setup ProceduresThis appendix contains the Lisa setup procedures. Itrepeats the setup instructions that are packaged in theLisa accessories box.Appendix 2. Handling DiskettesThis appendix contains suggestions on caring fordiskettes.Appendix 3. Automatic Startup TestsThis appendix describes what the Lisa is doing duringthe first few seconds of system startup. Refer to thisappendix when you are trying to interpret a startup errormessage. You may be directed to this appendix bySection G, Troubleshooting.Appendix 4. On-Off ProceduresThis appendix contains a summary of how the Lisa on-offbutton works.Appendix 5. Hardware Specifications This appendix contains information on the size, weight,compatibility, and other hardware specifics of the Lisa.Appendix 6. Office System Error MessagesThis appendix contains a series of discussions coveringthe error messages generated by the Lisa Office System.You may be referred to this appendix by screenmessages while you are using the Lisa.
J. Index
Lisa Owner
http://tiziano/tix/support/manuali/apple/lisa_og/a_0.htm (3 di 8) [20/01/2001 10.34.48]

vi
Preface
The Lisa Owner's Guide contains:
• Background information on preparing the Lisa forlong-term use.• A brief introduction to the Lisa components andspecial features.• Detailed instructions for using the Lisa filing system.• Suggestions for keeping the system clean andproblem-free.• Detailed instructions for diagnosing problems and forrepairing them.
Before beginning long-term work on your Lisa, readSection B, Lisa Fundamentals, making sure youunderstand all of the concepts in the section. Look overSection C, Lisa Hardware, for details about how thesystem works. Refer to Section D, Desktop ManagerReference Guide, for specific instructions for performingthe tasks outlined in Section B. Refer to Section E,Calculator, when you want to use the desktop calculator.
Scan the contents of Section F, Maintenance, so that youwill know which parts of the Lisa you can and shouldclean. Review the descriptions of the appendixes andnote the ones that are important to you. Then keep thismanual with your Lisa and refer to it whenever you needmore information. If something goes wrong, refer toSection G, Troubleshooting, and Section H, Service.
This owner's guide is intended to be used in conjunctionwith the Lisa tool manuals.
vii
Lisa Owner
http://tiziano/tix/support/manuali/apple/lisa_og/a_0.htm (4 di 8) [20/01/2001 10.34.48]
LisaGuide
Section ALisaGuide
Lisa Owner
http://tiziano/tix/support/manuali/apple/lisa_og/a_0.htm (5 di 8) [20/01/2001 10.34.48]
LisaGuide
Your Lisa is like an "electronic desktop" — a personaloffice system that works much the same way you'realready used to working.
The diskette named LisaGuide contains exercises,demonstrations, and examples that will teach you theLisa's basic operations. LisaGuide's exercises aregrouped into these topics:
Of Mice & MenusStarting a DocumentEditing a DocumentFiling a DocumentViewing a DocumentStopping LisaGuideMore Editing - OptionalMore Filing - OptionalShortcuts - OptionalSummaries - Optional
We recommend you complete the first six topics in theorder shown. Then you'll have learned the Lisa's basicsand be ready to work on whatever type of document youwish. You can complete the optional topics at any time.
Two pull-out cards (cards 2 and 3) under your Lisa'skeyboard summarize the skills taught by LisaGuide.
Instructions and photographs on the next two pagesexplain how to start, stop, and restart LisaGuide.
A1
Lisa Owner
http://tiziano/tix/support/manuali/apple/lisa_og/a_0.htm (6 di 8) [20/01/2001 10.34.48]

Shiny plastic
LisaGuide diskette
Insert or remove diskette
To Start LisaGuide for the First Time
1. If your Lisa is not already set up and configured, seeAppendix 1, Setup Procedures, in this manual.
2. Be sure your Lisa's power is off: If the on-off button islit, press it once.
3. Remove any diskette that your Lisa ejects from drive 1.Don't touch the shiny plastic.
4. Remove the LisaGuide diskette from its pocket insidethe front cover of this manual, and place it in drive 1.Don't touch the shiny plastic. Make sure the cutoutparts of the diskette are oriented as shown in thephotograph. Push the diskette into the drive until youhear a click.
5. Be sure the ProFile is turned on: If the ProFile's redlight is not glowing or flashing, press the on-offswitch on the back of the ProFile to On.
6. Turn on your Lisa's power: Press the on-off buttononce. The power will go on, and the button will lightup.
A2
Lisa Owner
http://tiziano/tix/support/manuali/apple/lisa_og/a_0.htm (7 di 8) [20/01/2001 10.34.48]

Profile's red light
Drive 1
On-off button
Mouse button
Mouse
7. It takes a few minutes to get LisaGuide ready. Whenthe screen says "Welcome to LisaGuide," read andfollow the instructions on the screen.
To Stop LisaGuide at Any Time
1. Hold down the key with the picture of an apple (it's tothe left of the space bar) while you press the periodkey.
2. When your Lisa ejects the LisaGuide diskette, removeit and replace it in its pocket inside the front cover ofthis manual. After a few minutes you'll see your Lisa's"usual" desktop without LisaGuide.
To Restart LisaGuide
1. Follow steps 1 through 6 under "To Start LisaGuidefor the First Time."
2. When "Welcome to LisaGuide" appears, choose thetopic you're interested in from the Topics menu.
A3
Lisa Owner
http://tiziano/tix/support/manuali/apple/lisa_og/a_0.htm (8 di 8) [20/01/2001 10.34.48]

Lisa Fundamentals
Section BLisa Fundamentals
Lisa Fundamentals
http://tiziano/tix/support/manuali/apple/lisa_og/b_0.htm (1 di 27) [20/01/2001 10.34.55]

Contents
B1 What's in Lisa Fundamentals?B2 The Lisa SystemB2 System Startup
B3 Disks and Diskettes
B3 Disk InitializationB4 Disk OrganizationB4 Disk BackupB5 LisaTest
B5 Startup and Tool DisksB5 Documents
B6 Clock/CalendarB6 System ConfigurationB7 Turning Off the LisaB8 Power Interruptions
B9 Desktop Management
B10 The Desktop B14 Disks and Diskettes B15 Folders B15 Tools B15 Documents B16 Stationery Pads B16 Wastebasket B17 Clipboard B17 Clock B18 Calculator B18 Preferences B18 Shadows
B19 Working on the Desktop B20 Selecting Icons and Activating Windows B21 Choosing Menu Items B22 Moving Objects B23 Shortcuts
B24 Cutting and Pasting between Documents
B25 Arranging the Desktop B25 Moving Windows B25 Sizing Windows B25 Layering Windows
Lisa Fundamentals
http://tiziano/tix/support/manuali/apple/lisa_og/b_0.htm (2 di 27) [20/01/2001 10.34.55]
B26 Straightening Up Icons
What's in Lisa Fundamentals?
Lisa Fundamentals is a summary of the background information youneed to use the Lisa effectively.
The first half of this section includes some basic concepts aboutcomputers in general, as well as some useful details about the Lisa inparticular. If you are already used to working with computers, you canprobably scan this section fairly quickly. But before you begin long-termwork on your Lisa, make sure you read and understand the material inthis section on these subjects:
• System Startup.
• Disk Backup.
• System Configuration.
The second half of this section is an overview of the Desktop Manager,the filing system that the Lisa uses to organize your work on the desktopand on your disks. The fundamentals of desktop management arecovered in Section A, LisaGuide. The discussion in this section underthe heading Desktop Management is a summary of that material.
Lisa Fundamentals provides only a brief discussion of the tasks neededfor long-term use of the Lisa. Refer to Section D, Desktop ManagerReference Guide, in this manual, for step-by-step instructions forperforming all of the tasks presented in this section.
The Lisa System Like all computers, the Lisa system consists of two parts,hardware and software. The Lisa hardware is the cabinet,the keyboard, the mouse, and the ProFile storage disk.When you turn the Lisa on, the computer begins lookingfor and following instructions. These instructions, knownas software, are stored on disks and diskettes and in afew places inside the computer. This section, LisaFundamentals, is concerned mostly with the Lisasoftware. For a description of the physical parts, seeSection C, Lisa Hardware, in this manual.
Lisa Fundamentals
http://tiziano/tix/support/manuali/apple/lisa_og/b_0.htm (3 di 27) [20/01/2001 10.34.55]

System Startup Each time you turn the Lisa on, the computer looks for aset of startup instructions. When you are using the LisaOffice System, the startup instructions are stored on aProFile attached to the Lisa. Your dealer or servicerepresentative should have installed the Office Systemsoftware, including the startup instructions, on yourProFile. This software is also stored on the two disketteslabeled Office System 1 and Office System 2 in the backof this manual. If your ProFile is still blank, follow theinstallation instructions in Section D, Desktop ManagerReference Guide, under Initialize a Startup ProFile and Install the Tools.
The disk drive that holds the startup instructions isknown as the startup device. Unless you specifyotherwise, the Lisa automatically assumes that thestartup device is a ProFile attached to the built-in parallelconnector. See Section C, Lisa Hardware, for adescription of the various connectors. Sometimes,however, you may want to start the system using adifferent device. Instructions for specifying your usualstartup device and for specifying a different deviceduring startup appear in Section D, Desktop ManagerReference Guide, under Set Startup Specifications andSet Startup Device during Startup.
If your startup ProFile also contains software other thanthe Lisa Office System, the Lisa may ask you duringstartup which environment you want to use. If a displaysomething like Figure 1 appears at startup, first clickOffice System and then click Start. See Appendix 4, On-Off Procedures, for details on the Environments window.
B2
Figure 1. Environments Window
Lisa Fundamentals
http://tiziano/tix/support/manuali/apple/lisa_og/b_0.htm (4 di 27) [20/01/2001 10.34.55]

Disks andDiskettes
The Lisa's two built-in floppy disk drives accept special, high-capacity,5-1/4 inch floppy diskettes. The ProFile hard disk includes both a diskdrive and a permanently installed hard disk.
Both hard and floppy disks are flat, magnetic recording surfaces usedfor storing information. Hard disks are faster and can store moreinformation than floppy disks, but they are less portable. MostApple-supplied software is sent to you on floppy diskettes, and you cantransfer it to your ProFile for day-to-day work.
In Lisa manuals, the term "diskette" is used to mean floppy disk, and theterm "disk" is used more loosely to mean either hard or floppy disk.
Refer to Appendix 2, Handling Diskettes, for recommendations oncaring for diskettes. The procedures for using diskettes in the Lisafloppy diskdrives appear in Section C, Lisa Hardware.
Disk Initialization
On a new disk, the recording surface is completely blank.like an unrecorded audio tape. Before putting anyinformation on the disk, the computer has to organizethe disk surface, a process known an initializing the disk.Every time you attach a blank ProFile or insert a blankdiskette into one of the floppy disk drives, the Lisa asks ifyou would like to initialize the disk.
B3
You can also recycle used disks by erasing andreinitializing them.
The procedures for initalizing and erasing disks appearin Section D, Desktop Manager Reference Guide, underInitialize.
Disk Organization
The Lisa system comes with six office applications,known as "tools." The tools are the instructions that tellthe computer to work as a word processor, a calculator,or an electronic spreadsheet, for example. Instructionsfor using the office tools are in the manuals that comewith the tools.
Each tool comes on a single diskette containing the toolitself, the stationery pads you need to create newdocuments, and a folder containing the examples used inthe manual. Your dealer or service representative shouldhave duplicated the contents of all six tool diskettes onyour ProFile while installing system software. If yourstartup ProFile is initialized but contains no tools, follow
Lisa Fundamentals
http://tiziano/tix/support/manuali/apple/lisa_og/b_0.htm (5 di 27) [20/01/2001 10.34.55]

the instructions in Section D, Desktop ManagerReference Guide, under Add the Contents of a Disketteto Another Disk.
Once you start doing your own work on the Lisa, yourProFile will begin to accumulate your own documentsand stationery pads. Each disk initialized by the LisaOffice System contains a pad of empty folders, which youcan use to organize your disks. See the discussion underDesktop Management later in this section for moreinformation about using folders.
You may also find it convenient to keep some of yourdocuments and stationery pads on diskettes. You can,for example, put all of the documents concerning a singleproject on one diskette, which can be carried easily toanother Lisa.
Disk Backup
Because disks can be damaged or erased accidentally— and because they eventually wear out with use — youshould keep backup copies of all disks. The discussionbelow outlines the backup strategies for different Lisadisks.
B4
LisaTest
The LisaTest diskette in the front of this manual is to helpyou diagnose the problem in case something goes wrongwith your system. Because LisaTest is not part of the LisaOffice System, you cannot use the standard copyprocedures for backing it up. Follow the backupinstructions in Section G, Troubleshooting, underLisaTest.
Startup and Tool Disks
The other diskettes that come with your Lisa — the twoOffice System diskettes and the six tool diskettes — arethe master copies of your Lisa software. Your ProFilecontains the working copies, that is, the copies you usefor day-to-day work. Keep the diskette masters in a safeplace, and use them only if you need to make new copies.
When you purchase additional Lisa office tools, put theworking copies on your ProFile, following the instructionsunder Add the Contents of a Diskette to Another Disk.
Copies of the tools will work only on the Lisa that madethe first copy of the master diskette. If you are setting up
Lisa Fundamentals
http://tiziano/tix/support/manuali/apple/lisa_og/b_0.htm (6 di 27) [20/01/2001 10.34.55]

your ProFile yourself, be sure to make the tool copies onthe Lisa system for which the tools were purchased.
Documents
The purpose of backing up documents is to save youtime and lost information on the rare occasion when oneof your disks becomes unreadable. The specific backupstrategy you use depends on how often you update yourdocuments and how you organize your disks.
There are two general approaches to backing up:
1. Copy the entire disk periodically.
2. Duplicate each document before putting it away, andthen put the duplicate on another disk.
In general:
• If you work with a number of different documents everyday, and you keep them all on one diskette, you shouldduplicate that diskette at the end of each day.
• If you do not update your documents very often, andyou keep them on a ProFile, you should back up eachdocument on a floppy disk whenever you save a copyon the ProFile.
B5
• If you use a hard disk that would take a long time toreconstruct, you should back up the entire disk onto aset of diskettes from time to time. You can also makeincremental backups periodically to back up only theinformation that has changed since the last fullbackup.
Instructions for making backup copies appear in SectionD, Desktop Manager Reference Guide, under Copy.
Lisa Fundamentals
http://tiziano/tix/support/manuali/apple/lisa_og/b_0.htm (7 di 27) [20/01/2001 10.34.55]

Clock/Calendar A clock/calendar inside the Lisa keeps track of the dateand time. Using information supplied by the clock/calendar, the Lisa tags each document with the date youcreated it and the date you last worked on it.The clock/calendar isrepresented on yourdesktop as a picture of aclock. You can open theclock to set it or to see whattime it is. Procedures forsetting the clock/calendarappear in Section D,Desktop ManagerReference Guide, under SetClock/Calendar.
As long as the Lisa is plugged into a working outlet, theclock continues to run. The built-in battery can keep theclock running for up to 10 hours when the system isunplugged.
SystemConfiguration The Lisa is compatible with a number of different
external devices, such as printers, hard disks, andtelephone-connect modems. Before you can use thesedevices, you have to tell the Lisa what you have attachedand where each device is connected. The Lisa also allowsyou to specify a set of system details, such as the rate atwhich keys repeat when held down and the loudness ofthe error tones. All of these system specificationsconstitute the system configuration. You define thesystem configuration for your Lisa through Preferences.The system Preferences arerepresented on yourdesktop as a picture of theLisa.
B6
Lisa Fundamentals
http://tiziano/tix/support/manuali/apple/lisa_og/b_0.htm (8 di 27) [20/01/2001 10.34.55]

Specifically, you use Preferences to:
• Tell the Lisa where external devices are attached andhow they are set up.
• Tell the Lisa what your startup device is and howthoroughly you want the computer's memory testedduring startup.
• Specify the screen contrast, speaker volume, and timelags for repeating keys.
These three sets of information are stored under DeviceConnections, Startup, and Convenience Settings in yoursystem Preferences. Your dealer or servicerepresentative should have set the Device Connectionsand Startup portions of your Preferences. After you haveused the Lisa for a while, you will be ready to set yourown Convenience Settings. You may want to open thePreferences icon now to make sure that the informationis correct. Instructions for using the Preferences windowappear in Section D, Desktop Manager Reference Guide,under Set.
The information in Preferences is saved in the Lisaparameter memory, a small part of memory that remainsintact as long as the Lisa is plugged into a working outletand for up to 10 hours when the Lisa is unplugged. ThePreferences settings are also stored on the startup disk.If the parameter memory runs down, it is restored fromthe information on the startup disk the next time you turnon the Lisa.
Turning Off the Lisa
Turning off the Lisa with theon-off button does notinstantly shut down themachine. Instead, it triggersa series of storageprocedures.
B7
Lisa Fundamentals
http://tiziano/tix/support/manuali/apple/lisa_og/b_0.htm (9 di 27) [20/01/2001 10.34.55]

First, the Lisa removes all documents and folders fromthe desktop, putting each one on its storage disk. Mostopen documents are stored in exactly the form you leftthem, including the last insertion point or selection.When all of its documents and folders are stored, eachdiskette is released from its disk drive. When everythingis off the desktop, the screen goes blank, and the powerlight goes out.
The next time you turn on the Lisa, the computer canreconstruct the desktop exactly as you left it. The Lisachecks all disk drives during startup and returns thedocuments and folders you were working on to thedesktop.
PowerInterruptions
Like all computers, the Lisa depends on a steady supplyof current. Occasionally, something interrupts the powerto the system — a circuit breaker in the building cuts out,for example. When power is interrupted, everything in thecomputer's memory is lost, including the state of thedesktop and all unsaved edits to any documents youwere working on. Documents saved on a disk areunaffected, unless the Lisa happened to be reading fromor writing on a disk at the time of the power loss. In thiscase, the disk itself could be damaged. That's onereason to keep backup copies of all disks.
During a sudden power loss, the normal power-downprocedures described above do not occur. The disks areleft in an in-between state. When you turn the systemback on, the Lisa tries to reconstruct the desktop asusual, but it can't find the desktop information.
Specific instructions for recovering from a powerinterruption appear in Section D, Desktop ManagerReference Guide, under Repair a Startup ProFile andRepair a Storage Disk after a System Failure. For a morecomplete discussion of how a sudden loss of poweraffects disks, see Appendix 4, On-Off Procedures.
Lisa Fundamentals
http://tiziano/tix/support/manuali/apple/lisa_og/b_0.htm (10 di 27) [20/01/2001 10.34.55]

DesktopManagement
The Lisa desktop management system is designed toreflect the same organization as the physical desktopand file drawers in your office. It also follows the sameconventions as the tools you use for creating documents:you select things using the mouse and you act on thingsusing the menus.
The fundamentals of desktop management are coveredin Section A, LisaGuide. The purpose of this discussion isto give you a summary of how the desktop works. Forspecific information and step-by-step instructions, referto Section D, Desktop Manager Reference Guide, in thismanual, and to Chapter 2 of any Lisa office tool manualReference Guide.
The work flow on the Lisa desktop goes something likethis:
• Create a new document.• Name the document.• Work on the document.• Save the document periodically on a disk.• File the document when you're finished working on it.• Retrieve the document the next time you want to workon it.• Periodically make a backup copy.
All of these activities are accomplished using three basicactions:
• Selecting things with the mouse.• Acting on the selections through the menus.• Moving things with the mouse.
B9
The Desktop
When you first start up the Lisa Office System, your screen lookssomething like Figure 2.
Lisa Fundamentals
http://tiziano/tix/support/manuali/apple/lisa_og/b_0.htm (11 di 27) [20/01/2001 10.34.55]

Figure 2. DesktopThe gray area, known as the desktop, contains a numberof icons, or pictures, which represent various parts ofyour system. Some of the icons represent physicaldevices, such as disks and diskettes, and othersrepresent information, such as documents, folders, andtools. The specific icons that are present vary dependingon the specific setup of your system.
Most of the icons can be opened into windows, like theProFile window shown in Figure 3.
The small icon in the upper left-hand corner of thewindow tells you what kind of object the window isdisplaying. In this case, the window shows the contentsof the startup ProFile.
The icons described in the following discussion, and theirproperties, are summarized in Table 1.
B10
Lisa Fundamentals
http://tiziano/tix/support/manuali/apple/lisa_og/b_0.htm (12 di 27) [20/01/2001 10.34.55]

Figure 3. Profile Window
Table 1. Desktop Objects and Their Properties
DesktopIcon
Can BeOpenedandAltered
Can BeStoredandDuplicated
Can HoldOtherObjects
Disks and diskettes Yes Yes* Yes
Folders Yes Yes Yes
*Cannot be stored in other desktop objects.
B11
Lisa Fundamentals
http://tiziano/tix/support/manuali/apple/lisa_og/b_0.htm (13 di 27) [20/01/2001 10.34.55]

Table 1. Desktop Objects and Their Properties, continued
DesktopIcon
Can BeOpenedandAltered
Can BeStoredandDuplicated
Can HoldOtherObjects
Documents Yes Yes No
Clock Yes Yes No
Calculator Yes Yes No
Tools No Yes No
Stationerypads
No Yes No
B12
Lisa Fundamentals
http://tiziano/tix/support/manuali/apple/lisa_og/b_0.htm (14 di 27) [20/01/2001 10.34.55]

Table 1. Desktop Objects and Their Properties, continued
DesktopIcon
Can BeOpenedandAltered
Can BeStoredandDuplicated
Can HoldOtherObjects
Clipboard Yes** No No
Preferences Yes No No
Wastebasket Yes No Yes
Shadows No*** No No
**Can be altered only indirectly by editing other objects with cut and copy***Name can be altered
B13
Disks and Diskettes
Each hard disk attached to theLisa and each diskette insertedinto one of the disk drives showsup on the desktop as an icon,such as the ones shown here, ora window, such as the onedisplayed in Figure 3.
Lisa Fundamentals
http://tiziano/tix/support/manuali/apple/lisa_og/b_0.htm (15 di 27) [20/01/2001 10.34.55]

An active disk window includes a status panel, which tells you howmuch space is available on the disk and when the disk was lastbacked up. The disk window can display either a collection of iconsor a list of names representing all objects stored on that disk. Thetext list includes information on the size of documents and whenthey were last updated. See Section D, Desktop Manager ReferenceGuide, under List, for the details of how disks can be displayed.
If a ProFile that is attached does not show up on your desktop,check the Device Connections portion of your Preferences window.See Section D, Desktop Manager Reference Guide, under SetDevice Connections.
B14
Folders
Each disk initialized by the LisaOffice System comes with a padof empty folders. At your option,you can use this pad to createnew folders for holding theobjects stored on your disks. Thereason for folders on storagedisks is the same as the reasonfor folders in your filing cabinets:organization makes it easier tofind things.Like disk windows, folder windows can display either a collection oficons or a list of object names.
Tools
The tool icons represent theinstructions that the Lisa needs inorder to work on your documents.The tool icons are stored on your ProFile in a folder called Tools.Ordinarily, you do not need to do anything with the tool icons.Opening the tool icons has no effect. However, a copy of the toolused to create a document must be present on one of the disks onthe desktop before you can work on that document.
Documents
The documents you create onyour Lisa are represented in theirstorage locations as documenticons. The design on the iconmatches the design on the toolthat was used to create thedocument.
Lisa Fundamentals
http://tiziano/tix/support/manuali/apple/lisa_og/b_0.htm (16 di 27) [20/01/2001 10.34.55]

Stationery Pads
Each stationery pad represents aninfinite supply of either blank orcustomized paper, which you usefor creating new documents. Thedesign on the pad matches thedesign on the tool and documentsassociated with the pad.Each tool comes with a pad of blank stationery, and you can make yourown custom stationery pads. Instructions for making a new stationerypad appear in Section D, Desktop Manager Reference Guide, underCreate a Stationery Pad.
Wastebasket
The Wastebasket is the means bywhich the Lisa discards obsoleteobjects. When you no longer needa desktop object, you can throw itaway by moving it to theWastebasket.Some objects, such as disks and diskettes, cannot be discarded. If youmove one of these objects to the Wastebasket, the icon jumps back toits previous location.
Discarded objects remain in the Wastebasket until something else fromthe same disk is thrown away or until the disk space they occupy isneeded. You can usually retrieve the last object or set of objectsdiscarded from a disk by opening the Wastebasket and moving theicons out of the Wastebasket window.
B16
Clipboard
The Clipboard holds thematerial that you cut orcopy when editingdocuments or objectnames. It always containsthe last text or graphic thatwas cut or copied. Whenyou choose Paste from theedit menu. the contents ofthe Clipboard are insertedat the selected location.
Lisa Fundamentals
http://tiziano/tix/support/manuali/apple/lisa_og/b_0.htm (17 di 27) [20/01/2001 10.34.55]

You can open the Clipboard to see its contents, but youcannot edit it. Many people leave the Clipboard windowopen at the bottom of the screen while working ondocuments, as shown in Figure 4.
Figure 4. Clopboard
Clock
The Clock icon representsthe clock/calendar insidethe Lisa.
You can open the Clock to see the time and date and toset the time and date. When you first start using the Lisa,the Clock appears at the bottom of the desktop. If youput It away through the File/Print menu, it is stored in theTools folder on the startup ProFile.
Instructions for setting the clock appear in Section D,Desktop Manager Reference Guide, under Set Clock/Calendar.
B17
Calculator
The Calculator iconrepresents the Lisa desktopcalculator. You can openthe icon to use theCalculator.When you first start using the Lisa, the Calculator appears at the bottomof the desktop. If you put it away through the File/Print menu, it is storedin the Tools folder on the startup ProFile.
Detailed instructions for using the Calculator appear in Section E,Calculator.
Lisa Fundamentals
http://tiziano/tix/support/manuali/apple/lisa_og/b_0.htm (18 di 27) [20/01/2001 10.34.55]

Preferences
The Preferences iconrepresents the part of theLisa memory that storesyour system configuration,discussed earlier in thissection.Instructions for setting Preferences appear in Section D,Desktop Manager Reference Guide, under Set.
Shadows
Shadows are place-holders for other icons. When youopen an icon into a window or move an icon from itsstorage location to the desktop, a shadow remainsbehind. Figure 5 demonstrates both forms a shadow maytake.
B18
Figure 5. White and Gray Shadows
When you open an icon from the desktop, a whiteshadow marks where it will return when set aside.
When you take an icon out of its storage location, a grayshadow marks where it will return when put away.
You can't manipulate shadows in any way. They appearonly for your information, and they disappear when nolonger needed. You can, however, edit the name of ashadow, thereby changing the name of the object as well.
Lisa Fundamentals
http://tiziano/tix/support/manuali/apple/lisa_og/b_0.htm (19 di 27) [20/01/2001 10.34.55]

Working on the Desktop
The desktop filing functions are accomplished bymanipulating the desktop icons and windows. Thediscussion below covers the three basic manipulations:selecting objects, choosing menu items, and movingobjects. Section D, Desktop Manager Reference Guide,contains detailed instructions for the specific desktoptasks: creating, naming, copying, filing, and discarding.The discussion below covers the backgroundinformation on how the desktop works.
B19
Selecting Icons and Activating Windows
You tell the Lisa which desktop object you want towork on by selecting or activating the object. In Lisamanuals, the term "select" is used to mean "specifywhich icon" and the term "activate" is used to mean"specify which window." You can have many iconsselected at once on the desktop, but you can have onlyone window active at a time.
The way to select any icon or activate any window is toplace the pointer on it and press the mouse button.A selected icon ishighlighted.
If you want to work with more than one icon at a time, youcan select a group of icons in either of two ways:
1. Hold down the <Shift> key while clicking on the icons.2. Press and hold themouse button to draw abox around a group oficons. When you releasethe button, all icons inthe box are selected.
Lisa Fundamentals
http://tiziano/tix/support/manuali/apple/lisa_og/b_0.htm (20 di 27) [20/01/2001 10.34.55]

In either case, you can deselect one or more of thehighlighted icons by holding down the <Shift> key whileclicking on or drawing a box around the icons you wantto deselect.
An active window has a dark bar around the title and acollection of view controls on the right and bottomedges. Examples of active and inactive windows areshown in Figure 6.
B20
Figure 6. Active and Inactive Windows
The use of the view controls is covered in detail inSection A, LisaGuide, and in the tool manuals.
Whenever you open an icon, its window is automaticallyactivated. If you open more than one icon at once, thewindow of the last icon to be opened will be active.Whenever you put an icon into an open disk or folderwindow, that window is automatically activated.
A word of warning about multiple icons: Opening multipledocuments at once can take even longer than openingeach individually.
Lisa Fundamentals
http://tiziano/tix/support/manuali/apple/lisa_og/b_0.htm (21 di 27) [20/01/2001 10.34.55]

Choosing Menu Items
The words along the top of the Lisa screen are menutitles. After you have selected an icon or activated awindow on the desktop, you can work with that object bychoosing a command from one of the menus. The menuitem you choose affects only the selected or activatedobjects.
To choose an item from a menu:
1. Move the pointer to the menu title.
2. Press and hold the mouse button to display the menu.
B21
3. Move the pointer downthe menu until the itemyou want is highlighted.
4. Release the mouse button.
The four menus used for desktop management are theFile/Print, Edit, Disk, and View menus. The specific tasksthese menus are used for are covered in Section D,Desktop Manager Reference Guide. The four menu itemsused most are Open, Set Aside, Save & Put Away, andSave & Continue.
Open: Opens selected icons into windows.
Set Aside: Reduces an open window to an icon, andthen puts the icon on the desktop. Setting aside adocument merely changes the display; it does not savethe document on a disk.
Save & Put Away: Reduces an open window to an icon,and then puts the icon back into its storage location. Anychanges you have made since you last saved thedocument are incorporated on the disk copy.
Save & Continue: Updates the disk copy of a documentto match the document on your desktop, but leaves the
Lisa Fundamentals
http://tiziano/tix/support/manuali/apple/lisa_og/b_0.htm (22 di 27) [20/01/2001 10.34.55]

document window open and active on your desktop.
Moving Objects
You can grasp icons bypointing to them with thepointer and pressing themouse button. As long asyou hold the button down,the icon moves along withthe pointer.
B22
You can store an object in a folder or on a disk by movingits icon onto the folder or disk icon or into the folder ordisk window. You can discard desktop objects by movingtheir icons to the Wastebasket. If you move an icon ontoan icon or window that cannot hold other objects, thefirst icon jumps back to its previous location.
Moving an icon around on the desktop or within onewindow has no effect except to reposition the icon itself.
You can move open windows, grasping them by the titlebar, but you cannot store or discard open windows.
Shortcuts
The File/Print menu contains all of the commands youneed for creating, opening, closing, and storing yourdocuments. Because you use these commands sofrequently, the Office System includes a simple shortcutfor performing these tasks: clicking the mouse buttontwice.To tear off a sheet ofstationery, click twicerapidly on the stationerypad icon.
To open an icon into awindow, click twice rapidlyon the icon.
To close an open window,click twice rapidly on thewindow's title bar icon.
B23
Lisa Fundamentals
http://tiziano/tix/support/manuali/apple/lisa_og/b_0.htm (23 di 27) [20/01/2001 10.34.55]

Clicking twice to close a window can either set aside theobject or save and put away the object, depending on where the object's shadows are. If there is a shadow onthe desktop, clicking twice causes the object to be setaside. If the only shadow is in a folder or on a disk,clicking twice summons a dialog box, which asks youwhether you want the object set aside or put away.
Cutting andPasting betweenDocuments
When you went through the LisaGuide and GettingStarted exercises, you learned to cut, copy, and pastetext and graphics. You can use these same techniques totransfer text and graphs from one document to another.You can always cut or copy something out of onedocument and paste it into another document that wascreated with the same tool. There are limitations,however, on pasting between documents created withdifferent tools.
You can always paste:
• A LisaCalc spreadsheet or LisaGraph table into eithera LisaCalc spreadsheet or a LisaGraph table.
• A LisaGraph graph into a LisaDraw document.
• A LisaCalc spreadsheet or a LisaGraph table into aLisaWrite document.
• A LisaProject chart into a LisaDraw document.
• A Calculator tape into a LisaWrite document.
• One "field" of text from any document into any otherdocument. The meaning of a "field" depends on wherethe text is pasted from and to. A field is one cell in atable, one line of text in most other documents, anyicon name, or up to a few lines of text in LisaWrite.
You cannot paste:
• Any LisaDraw graphics into any document created withanother tool.
• Any LisaList material into any document created withanother tool.
For details of cutting, copying, and pasting betweendocuments created with different tools, see any Lisaoffice tool manual, Reference Guide, Chapter 2, under
Lisa Fundamentals
http://tiziano/tix/support/manuali/apple/lisa_og/b_0.htm (24 di 27) [20/01/2001 10.34.55]

Other Tools.
B24
Arrangingthe Desktop
Like any desk, the Lisa desktop can accumulate analarming disarray of documents and folders. As youcontinue to work with the Lisa, you will develop your ownhabits for organizing both your filing system and yourworking desktop. The discussion below covers thefundamentals of arranging the desktop.
Moving Windows
You can move windows thesame way you move anyother desktop object,except that you can graspwindows only by the titlebar.You can move a window to see what's under it or to makeroom for another window to be displayed simultaneously.
Sizing Windows
You can change thedimensions of a windowwith the size control box, inthe lower right-hand cornerof the window. To resize awindow, move the pointerto the size control box, holddown the mouse button asyou move the box, andrelease the mouse buttonwhen the window is the sizeyou want.
Layering Windows
You can have up to 20 windows open at once on yourLisa desktop. When you open an icon, the Lisa usuallyreconstructs its window in whatever size and location itlast appeared. The effect can be that some windows areentirely covered by others.
The active window is always on top. You can bring adifferent window to the top of the stack by clickinganywhere on that window, thereby activating it.
B25
Lisa Fundamentals
http://tiziano/tix/support/manuali/apple/lisa_og/b_0.htm (25 di 27) [20/01/2001 10.34.55]

If the window you want towork on is entirely covered,you can uncover it quicklyby choosing Set AsideEverything. All openwindows are reduced toicons, which you canquickly scan for the one youwant.
Straightening Up Icons
You can have the Lisa arrange all icons on the desktop orin an active window by choosing Straighten Up Iconsfrom the View menu.
In a window, the Lisa arranges the icons in rows,following the shape of the window. If the window is toosmall to display them all, some icons are moved outsidethe borders of the visible window.
B26
Guide to Lisa Manuals
Set up your Lisa following the setup procedures in theLisa accessories box or in Appendix 1, SetupProcedures, in the Lisa Owner's Guide.
Go through Section A, LisaGuide, in the Lisa Owner'sGuide, for an introduction to the Lisa.
If your dealer or service representative did not set yoursystem Preferences so that the Lisa knows what externaldevices are attached, follow the instructions in SectionD, Desktop Manager Reference Guide, under Set, in theLisa Owner's Guide.
Go to Section A, Getting Started, in the manual for eachoffice tool that you want to learn, for the essentials ofusing that tool.
Go to Section B, Lisa Fundamentals, in the Lisa Owner'sGuide, for the background information you need beforebeginning long-term work on the Lisa.
Lisa Fundamentals
http://tiziano/tix/support/manuali/apple/lisa_og/b_0.htm (26 di 27) [20/01/2001 10.34.55]
• You are now ready to start doing your own work on theLisa:
• If you want self-paced instructions for using a tool, goto Section B, Tutorial, in that tool manual.
• If you want instructions for performing specific taskswith a tool, go to Section C, Reference Guide, in thattool manual.
For specific instructions on filing and desktopmanagement, go to Section D, Desktop ManagerReference Guide, in the Lisa Owner's Guide.
For more information on the Lisa hardware, tips oncaring for the Lisa, and suggestions for troubleshootingwhen the system isn't working properly, go to the othersections of the Lisa Owner's Guide.
Lisa Fundamentals
http://tiziano/tix/support/manuali/apple/lisa_og/b_0.htm (27 di 27) [20/01/2001 10.34.55]

Lisa Hardware
Section CLisa Hardware
Lisa Hardware
http://tiziano/tix/support/manuali/apple/lisa_og/c_0.htm (1 di 16) [20/01/2001 10.35.02]

Contents
C1 What's in Lisa Hardware?
C2 System Parts
C3 KeyboardC5 Numeric KeypadC5 Reference CardsC6 MouseC6 ProFileC7 CabinetC7 Video ScreenC9 Disk DrivesC10 On-Off ButtonC11 Reset ButtonC11 Power CordC12 Connectors for Extra DevicesC13 Screen Controls
C15 Radio and Television Interference
What's in Lisa Hardware?
Lisa Hardware
http://tiziano/tix/support/manuali/apple/lisa_og/c_0.htm (2 di 16) [20/01/2001 10.35.02]

This section introduces the major Lisa components andexplains how they interact. The individual discussionsinclude hardware details that will help you use the Lisaeasily and comfortably.
This section is concerned only with the physical parts ofthe Lisa. If you are using the Lisa Office System, you willfind the background information on using your system inSection B, Lisa Fundamentals. If you are a programmerusing the Development System, refer to the SystemManager section of the Workshop User's Guide for theLisa for detailed descriptions of the utility programs andthe standard interfaces.
Directions for setting up your Lisa come separatelyin the accessories box. For your convenience, theseinstructions are repeated in Appendix 1, SetupProcedures.
C1
System Parts The Lisa system consists of four separate parts:
• The keyboard.• The mouse.• The ProFile hard disk.• The cabinet containing the computer itself, the videoscreen, and the disk drives.
Figures 1 and 2 show the front and back views of theLisa.
Lisa Hardware
http://tiziano/tix/support/manuali/apple/lisa_og/c_0.htm (3 di 16) [20/01/2001 10.35.02]

Figure 1. Lisa, Front View
C2
Figure 2. Lisa, Back View
Lisa Hardware
http://tiziano/tix/support/manuali/apple/lisa_og/c_0.htm (4 di 16) [20/01/2001 10.35.02]

Keyboard
The Lisa keyboard is muchlike a typewriter keyboard,with a few additional keys.
The functions of the , , , and arrow keys( , , , ) depend on the tool you're using;they are described in the manuals that come with theLisa tools. The key is like shift lock, exceptthat it affects only the letter keys, not the number orpunctuation keys.
C3
The keys, which work like shift keys, give youaccess to a set of special symbols and internationalcharacters. These characters are displayed in Figure 3and on a pull-out card stored under the keyboard. Totype one of the special characters, hold down either
key while pressing the key for the character youwant.
Figure 3. Lisa Keyboard
Lisa Hardware
http://tiziano/tix/support/manuali/apple/lisa_og/c_0.htm (5 di 16) [20/01/2001 10.35.02]

All letter and number keys on the Lisa keyboard repeatautomatically when held down. You can specify the timelag before the keys start to repeat and the rate at whichthey repeat. Instructions for making these adjustmentsappear in Section D, Desktop Manager Reference Guide,under Set Convenience Settings, and in the SystemManager section of the Workshop User's Guide forthe Lisa.
The keyboard is attachedto the Lisa by a flexiblecable so that you can putthe keyboard on your lap,or wherever it is mostcomfortable andconvenient while you'reworking. The maximumsafe extension of the cableis 4 feet.
C4
When you are not using theLisa, you can save spaceand protect the keyboardby sliding it under the frontof the cabinet.
Numeric KeypadThe numeric keypad on theright side of the keyboard isfor your convenience whenentering numbers andequations; pressing thesekeys has the same effect aspressing the correspondingsymbols on the mainkeyboard. The , ,and arrow keys arediscussed in the toolmanuals.
Lisa Hardware
http://tiziano/tix/support/manuali/apple/lisa_og/c_0.htm (6 di 16) [20/01/2001 10.35.02]

Reference CardsThe reference cards underthe keyboard hold threekinds of information:
• The top card displays theoption keyboard layout,discussed above.
• The two middle cardscontain a quick-referencesummary of the LisaOffice System.The bottom card contains details about your Lisa andyour support agreement. If your dealer did not fill inthis card when you purchased your Lisa, you should fillit in now so that the information will be handy when youneed it.
C5
Once you no longer need the quick-reference cards, youcan turn the cards over and use the scratch pads on theback for your own reference notes.
Mouse
Like the keyboard, themouse is a device forcommunicating with theLisa. Rolling the mousealong a flat surface moves apointer on the video screen;pressing the button on topof the mouse signals theLisa that the pointer is inthe location you want. Themouse is covered in moredetail in the LisaGuidediskette, presented inSection A, LisaGuide.
Lisa Hardware
http://tiziano/tix/support/manuali/apple/lisa_og/c_0.htm (7 di 16) [20/01/2001 10.35.02]

The mouse is quite sturdy and can tolerate a lot of rollingand button-pressing. However, a sudden impact coulddamage the sensors inside. Avoid dropping the mouse orhitting it against hard objects.
After several hundred hours of use, the inside of themouse can accumulate enough dust to make pointercontrol uneven. Instructions for cleaning the mouseappear in Section F, Maintenance.
ProFile
The ProFile hard disk stores the Lisa software and thedocuments you create with the Lisa. Refer to Section B,Lisa Fundamentals, for a discussion of software anddocuments, and to the manual that came with the ProFilefor more information on the ProFile hardware.
C6
Cabinet
The cabinet contains thecomputer itself, the videoscreen, and the disk drives.It also contains the powersupply. To prevent electricalaccidents, both the frontand the back panels of thecabinet are equipped withsafety interlock switches. Ifyou remove either panelwhile the Lisa is running,the safety switchesimmediately cut off powerto the system. Withoutpower, the computer loseseverything in its memory,including any documentsyou were working on.Note: The safety interlock switches do not cut off power to thepower supply. You should always turn off and unplug the Lisabefore opening the cabinet.
Video Screen
Lisa Hardware
http://tiziano/tix/support/manuali/apple/lisa_og/c_0.htm (8 di 16) [20/01/2001 10.35.02]

The brightness and focus ofthe Lisa video screen arecontrolled mechanically;the contrast is set throughsoftware. Instructions forsetting the focus appearunder Screen Controls,later in this section.Instructions for setting thebrightness and contrastappear in Section D,Desktop ManagerReference Guide, under SetScreen Brightness andContrast, and in the SystemManager section of theWorkshop User's Guide forthe Lisa.
C7
A special glare filter comesin the Lisa accessories box.In most environments thefilter is unnecessary, butsometimes windows oroverhead lights can causeirritating reflections on thescreen. If screen glare is aproblem for you, install thefilter according to theinstructions in Section H,Service, under Install GlareFilter. After you install thefilter, you will have toreadjust the screencontrast.
Lisa Hardware
http://tiziano/tix/support/manuali/apple/lisa_og/c_0.htm (9 di 16) [20/01/2001 10.35.02]

After many hours of exactly the same display, videoscreens are subject to burn-in: the screen picks up apermanent image that is the negative of the display. Toprotect against burn-in, the Lisa dims the screen if noactivity has taken place for several minutes. Once thescreen has dimmed, any key press or mouse movementreturns it to the normal contrast level. Instructions forsetting the time lag before dimming and the contrastlevel of the dim display appear in Section D, DesktopManager Reference Guide, under Set ConvenienceSettings, and in the System Manager section of theWorkshop User's Guide for the Lisa.
You can dim the screen yourself at a moment's notice,invoking the screen's "privacy feature." To dim thescreen, hold down both the right-hand key andthe right-hand key while pressing the 0 on thenumeric keypad. To return the screen to its normalcontrast level, press the same combination of keys.
C8
Disk DrivesThe Lisa's two built-in diskdrives accept special, 5-1/4inch floppy diskettes. Whenyou buy blank diskettes, becareful to get diskettes thatare compatible with theLisa disk drives.
Insert diskettes into thedrive slots with the printedlabel facing up on the rightand the notched corner onthe right.
Lisa Hardware
http://tiziano/tix/support/manuali/apple/lisa_og/c_0.htm (10 di 16) [20/01/2001 10.35.02]

Note: Do not touch the exposed, shiny surfaces. SeeAppendix 2, Handling Diskettes, for recommendedprocedures for handling and storing diskettes.Push the diskette into thedrive gently. You can feelresistance from an internalspring for the last 1/2 inchor so. When the diskette isin place, you can hear thedisk drive clamp onto thediskette. If the Lisa is on,you can also feel thevibrations of the spinningdisk. Once a diskette is inplace and clamped, do nottry to pull it out until it Isreleased by the drive.
C9
One disk-release button islocated above each driveslot, to the right of the drivenumber. When you want toremove a diskette, pressthe disk-release button andwait for the Lisa to eject thediskette. There may be adelay while the computerupdates and releases thediskette.
On-Off ButtonPress the on-off buttonwhen you want to turn theLisa on or off. When theLisa is on, the on-off buttonis lit. To prolong the life ofthe power system, leave theLisa on continually as longas you are using it everyday. Turn it off on weekendsor any other time you willnot be using it for a day ormore.
Lisa Hardware
http://tiziano/tix/support/manuali/apple/lisa_og/c_0.htm (11 di 16) [20/01/2001 10.35.02]

Generally, pressing the on-off button when the Lisa is ondoes not instantly shut it off. The on-off button triggers aseries of disk-storage procedures, followed by a cutbackof power to standby levels. As long as the Lisa is pluggedinto a working outlet, whether or not the on-off button islit, the system draws a small amount of current. SeeAppendix 4, On-Off Procedures, for a description of thestartup and shutdown sequences.
C10
Reset ButtonThe reset button is abackup device for use whenthe normal shutdownprocedures go awry orwhen the Lisa doesn'trespond to the keyboard,mouse, or on-off button.The use of the reset buttonis discussed in Section G,Troubleshooting, and in theWorkshop User's Guide forthe Lisa.Under ordinary circumstances, do not press the resetbutton.
Power CordAs long as the Lisa isplugged into a workingoutlet, it draws a smallamount of current, which ituses to keep the clock/calendar up to date and topower a small amount ofmemory known asparameter memory.Parameter memorycontains your specificationsregarding external devices,repeating keys, and screencontrast. A battery insidethe Lisa can power theclock and parametermemory for up to 10 hoursso that you can move andservice the machine without
Lisa Hardware
http://tiziano/tix/support/manuali/apple/lisa_og/c_0.htm (12 di 16) [20/01/2001 10.35.02]

losing the time and devicesettings.When you must unplug the Lisa, make sure the light inthe on-off button is out before you pull the plug. Whenyou are done moving or servicing the machine, reattachthe plug as soon as possible, even if you do not need toturn the Lisa on again.
C11
Connectors for Extra DevicesThe Lisa is equipped withbuilt-in connectors forattaching extra devices:printers, additional diskdrives, telephone-connectmodems, and any otherequipment that interactswith the Lisa. See SectionD, Desktop ManagerReference Guide, underSet, for the procedures fortelling the Lisa that youhave attached a piece ofequipment.Serial Connectors: Thetwo serial deviceconnectors accept 25-prong, D-shaped plugs fordevices that use serialsignals. If you do not knowwhether a device you wantto attach is serial orparallel, see the manualthat came with the device.If you are using a high-speed modem (9600 baud), attachthe modem to the connector labeled Serial Device A.
Lisa Hardware
http://tiziano/tix/support/manuali/apple/lisa_og/c_0.htm (13 di 16) [20/01/2001 10.35.02]

Parallel Connector: Theparallel device connectoraccepts 25-prong, D-shaped plugs for paralleldevices. If you have morethan one parallel device,you can add additionalparallel connectors throughthe expansion slots on theleft side of the back panel.
C12
Most Lisa systems use aProFile hard disk, attachedto the built-in parallelconnector.
Expansion Slots: Thethree expansion slotsaccommodate expansioncards for a variety ofgeneral and specialfunctions. Specialinstructions for installingexpansion cards come withall Apple-supplied cards.The general procedure forinstalling and removingcards appears in Section H,Service.
Lisa Hardware
http://tiziano/tix/support/manuali/apple/lisa_og/c_0.htm (14 di 16) [20/01/2001 10.35.03]

Video Out: The video outconnector is compatiblewith standard video plugs.You can use it to send thescreen display to anexternal, high-resolutionvideo monitor. The monitormust be compatible withthe Lisa videospecifications listed inAppendix 5, HardwareSpecifications.
Screen Controls
You can make three kinds of adjustments to the screen:brightness, contrast, and focus. The exact setting ofeach depends on lighting conditions, the age of the videotube, and your personal preference.
C13
You can avoid eye strain by keeping your screen adjustedat all times, and by occasionally looking away from thescreen and focusing on something across the room.Brightness: The brightnesscontrol is the higher of thetwo white knobs extendingfrom the top right corner ofthe back panel.
Specific instructions forsetting the screenbrightness appear inSection D, DesktopManager Reference Guide,under Set ScreenBrightness and Contrast,and in the System Managersection of the WorkshopUser's Guide for the Lisa.Contrast: The screen contrast is controlled throughsoftware. Instructions for setting the contrast appear inSection D, Desktop Manager Reference Guide, underSet Screen Brightness and Contrast, and in the SystemManager section of the Workshop User's Guide for theLisa.
Lisa Hardware
http://tiziano/tix/support/manuali/apple/lisa_og/c_0.htm (15 di 16) [20/01/2001 10.35.03]

Focus: The focus control isthe lower of the two whiteknobs extending from thetop right corner of the backpanel.
C14
To set the focus, first fill thescreen with text orgraphics. Adjust the focusto make the picture assharp as possible in thedoughnut-shaped areaaround the center of thescreen.
Radio andTelevisionInterference
The Lisa generates and uses radio frequency energy. Ifthe Lisa is not used in strict accordance with theinstructions in this manual, it may interfere with radio ortelevision reception. See Appendix 5, HardwareSpecifications, for suggestions on how to eliminateinterference should it occur.
C15
Lisa Hardware
http://tiziano/tix/support/manuali/apple/lisa_og/c_0.htm (16 di 16) [20/01/2001 10.35.03]

Desktop ManagerReference Guide
Section DDesktop ManagerReference Guide
Desktop Manager Reference Guide
http://tiziano/tix/support/manuali/apple/lisa_og/d_0.htm (1 di 70) [20/01/2001 10.35.24]

Contents
D1 What's in the Desktop ManagerReference Guide?D5 CopyD17 CreateD23 DiscardD25 FileD31 InitializeD41 ListD45 NameD47 PrintD49 RepairD63 Set
What's in the Desktop ManagerReference Guide?
This section contains step-by-step instructions for usingthe Desktop Manager, the filing system that the Lisa usesto organize your work on the screen and on your disks.Use the table below to find the part of this guide thatdescribes the task you want to perform.
An overview of the Desktop Manager appears in SectionB, Lisa Fundamentals.
Desktop Manager Reference Guide
http://tiziano/tix/support/manuali/apple/lisa_og/d_0.htm (2 di 70) [20/01/2001 10.35.24]
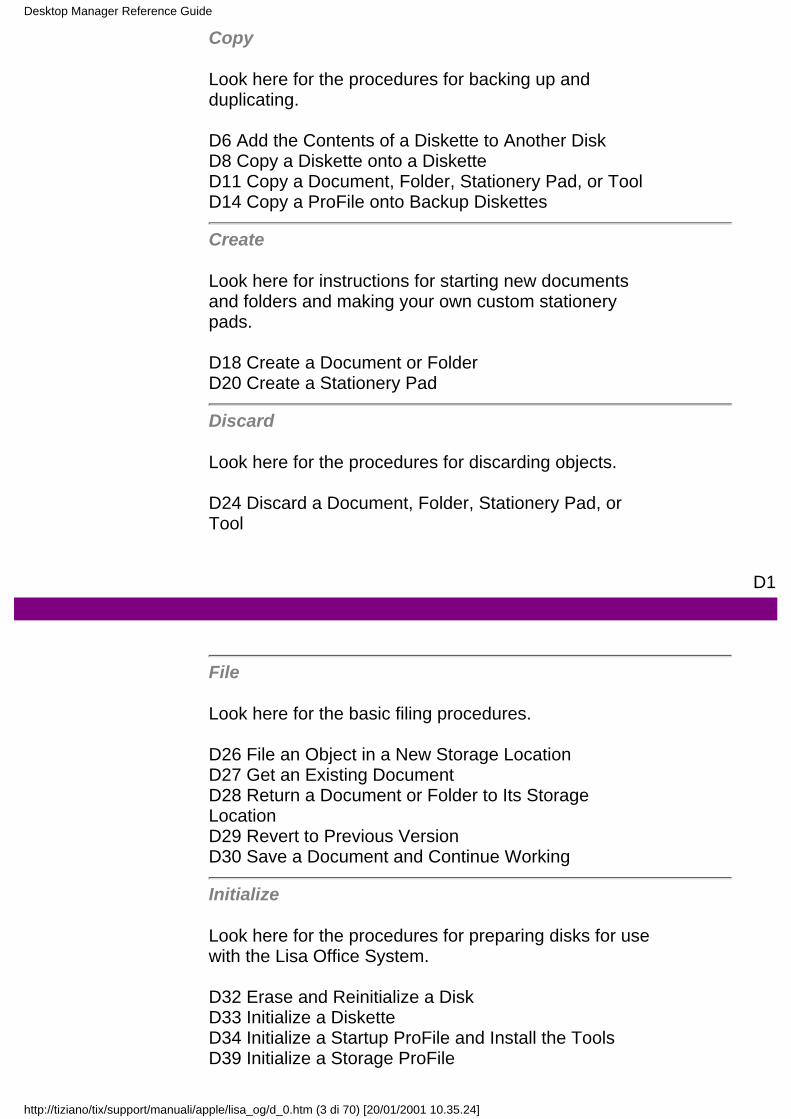
Copy
Look here for the procedures for backing up andduplicating.
D6 Add the Contents of a Diskette to Another DiskD8 Copy a Diskette onto a DisketteD11 Copy a Document, Folder, Stationery Pad, or ToolD14 Copy a ProFile onto Backup Diskettes
Create
Look here for instructions for starting new documentsand folders and making your own custom stationerypads.
D18 Create a Document or FolderD20 Create a Stationery Pad
Discard
Look here for the procedures for discarding objects.
D24 Discard a Document, Folder, Stationery Pad, orTool
D1
File
Look here for the basic filing procedures.
D26 File an Object in a New Storage LocationD27 Get an Existing DocumentD28 Return a Document or Folder to Its StorageLocationD29 Revert to Previous VersionD30 Save a Document and Continue Working
Initialize
Look here for the procedures for preparing disks for usewith the Lisa Office System.
D32 Erase and Reinitialize a DiskD33 Initialize a DisketteD34 Initialize a Startup ProFile and Install the ToolsD39 Initialize a Storage ProFile
Desktop Manager Reference Guide
http://tiziano/tix/support/manuali/apple/lisa_og/d_0.htm (3 di 70) [20/01/2001 10.35.24]

List
Look here for the procedures for displaying the contentsof a folder or disk.
D42 Alter Display of a Disk or FolderD44 Display Contents of a Disk or Folder
Name
Look here when you want to name or rename desktopobjects.
D46 Name or Rename an Object
Look here when you want to print the screen display.D48 Print Screen Display
Repair
Look here when you have mechanical problems with adisk.
D50 Reinstall System SoftwareD53 Repair a Startup ProFileD56 Repair a Storage DiskD57 Repair a Storage Disk after a System FailureD59 Restore a ProFile from Diskette Backups
Set
Look here for the details of setting up your system.
D64 Set Clock/CalendarD65 Set Convenience SettingsD69 Set Device ConnectionsD71 Set Printer Configuration, Daisy WheelD74 Set Printer Configuration, Dot MatrixD77 Set Screen Brightness and ContrastD80 Set Startup Device during StartupD82 Set Startup Specifications
Desktop Manager Reference Guide
http://tiziano/tix/support/manuali/apple/lisa_og/d_0.htm (4 di 70) [20/01/2001 10.35.24]

D3
(This page is really blank)
Copy
D6 Add the Contents of a Diskette to Another DiskD8 Copy a Diskette onto a DisketteD11 Copy a Document, Folder, Stationery Pad, or ToolD14 Copy a ProFile onto Backup Diskettes
D5
Desktop Manager Reference Guide
http://tiziano/tix/support/manuali/apple/lisa_og/d_0.htm (5 di 70) [20/01/2001 10.35.24]

Copy
Add the Contentsof a Diskette toAnother Disk
To add the contents of a diskette to another disk
Insert the diskette into either floppy disk drive. Choose Open from the
File/Print menu.
Choose Select All Iconsfrom the Edit menu.
Choose Duplicate fromthe File/Print menu.
Move the blinking duplicates onto the destinationdisk icon.
D6
Desktop Manager Reference Guide
http://tiziano/tix/support/manuali/apple/lisa_og/d_0.htm (6 di 70) [20/01/2001 10.35.24]

Copy
Add the Contentsof a Diskette toAnother Disk(continued)
If this message appears, click Copy.
This procedure enables you to add new tools - or anyother information - to any disk without destroying theinformation that is already there. If you are setting upyour startup ProFile for the first time, refer to theprocedure, Initialize a Startup ProFile and Install theTools, under Initialize, in this section for the proceduresfor adding tools while initializing the ProFile.
Copies of a tool will work only on the same Lisa thatmade the first copy of the master tool diskette. If youhave more than one Lisa in your office, you need aseparate master tool diskette for each Lisa.
You can keep only one copy of each tool on a single disk.
D7
Copy
Copy a Disketteonto a Diskette
To copy a diskette onto another diskette
Select the icon for the diskette you want to copy.
Desktop Manager Reference Guide
http://tiziano/tix/support/manuali/apple/lisa_og/d_0.htm (7 di 70) [20/01/2001 10.35.24]

Choose Duplicate fromthe File/Print menu.
Move the blinking duplicate onto the icon thatrepresents the destination diskette, that is, thediskette that will hold the copy.
In response to the alert message that appears, clickErase.
This procedure always replaces the contents of thedestination diskette with the contents of the sourcediskette. It also leaves the destination diskette with thesame name as the source diskette.
D8
Copy
Desktop Manager Reference Guide
http://tiziano/tix/support/manuali/apple/lisa_og/d_0.htm (8 di 70) [20/01/2001 10.35.24]

Copy a Disketteonto a Diskette(continued)
If you want to add the contents of one disk to thecontents of another disk without erasing the destinationdisk, follow the procedure, Add the Contents of aDiskette to Another Disk, in this section.
If you prefer to use the keyboard instead of the mouse,you can hold down the key while pressing D instead ofchoosing Duplicate from the File/Print menu.
You cannot copy LisaTest with this procedure. SeeSection G, Troubleshooting, under LisaTest, for theprocedures for backing up that diskette. Refer to theprocedure, Add the Contents of a Diskette to AnotherDisk, in this section, for special information aboutcopying tool diskettes.
Example
Suppose you have just completed all of your monthlysales reports, and you want to update your backup copyof the diskette containing the reports.1. You select the disketteSales.
2. You choose Duplicate from the File/Print menu.3. Before doing anythingelse, you move theblinking duplicate ontothe Sales Backup icon.
D9
Desktop Manager Reference Guide
http://tiziano/tix/support/manuali/apple/lisa_og/d_0.htm (9 di 70) [20/01/2001 10.35.24]

Copy
Copy a Disketteonto a Diskette(continued)
The Lisa gives you this warning message:
4. Since you want to replace the contents of SalesBackup with the contents of Sales, you click Erase.
When the Wait alert message disappears, you have twocopies of Sales. You change the name of the backup toSales Backup.
D10
Copy
Copy a Document,Folder, StationeryPad, or Tool
To make a duplicate copy of a document, folder,stationery pad, or tool
Select the icon for the object you want to copy.
Desktop Manager Reference Guide
http://tiziano/tix/support/manuali/apple/lisa_og/d_0.htm (10 di 70) [20/01/2001 10.35.24]

Choose Duplicate fromthe File/Print menu.
Move the blinking copy of the icon to its storagelocation.
If you do anything else before you move the blinkingduplicate, an alert appears, asking if you want to cancelthe duplication.
This procedure works for individual icons or groups ofselected icons. If you duplicate more than one icon atonce, moving any one of the blinking duplicates moves allof them. You cannot duplicate an object while it is open.
If you prefer to use the keyboard instead of the mouse,you can hold down the key while pressing D instead ofchoosing Duplicate from the File/Print Menu.
D11
Copy
Copy a Document,Folder, StationeryPad, or Tool(continued)
If you are copying a single document in order to back itup, you may want to modify the name of the duplicate. Ifyou habitually duplicate documents for the purpose ofbacking up, you will begin to accumulate old versions ofthe backup copies. When you are sure you don't needthem, simply discard the outdated copies.
See the procedure, Add the Contents of a Diskette toAnother Disk, in this section, for information specific tocopying tools.
Example
Desktop Manager Reference Guide
http://tiziano/tix/support/manuali/apple/lisa_og/d_0.htm (11 di 70) [20/01/2001 10.35.24]

Suppose you want to keep a backup diskette containingall your records on the Diaz project.
First you initialize the new diskette, following theprocedure, Initialize a Diskette, under Initialize, in thissection.
1. You open your ProFile and select all the folders anddocuments related to the Diaz project.
2. You choose Duplicate from the File/Print menu.
D12
Copy
Copy a Document,Folder, StationeryPad, or Tool(continued)
3. You move the duplicatesout of the ProFilewindow and onto thenew diskette icon. Whenthe duplicates are inplace, the diskette iconbecomes highlighted.Your new diskette now contains all of the documentsrelated to the Diaz project.
D13
Desktop Manager Reference Guide
http://tiziano/tix/support/manuali/apple/lisa_og/d_0.htm (12 di 70) [20/01/2001 10.35.24]
Copy
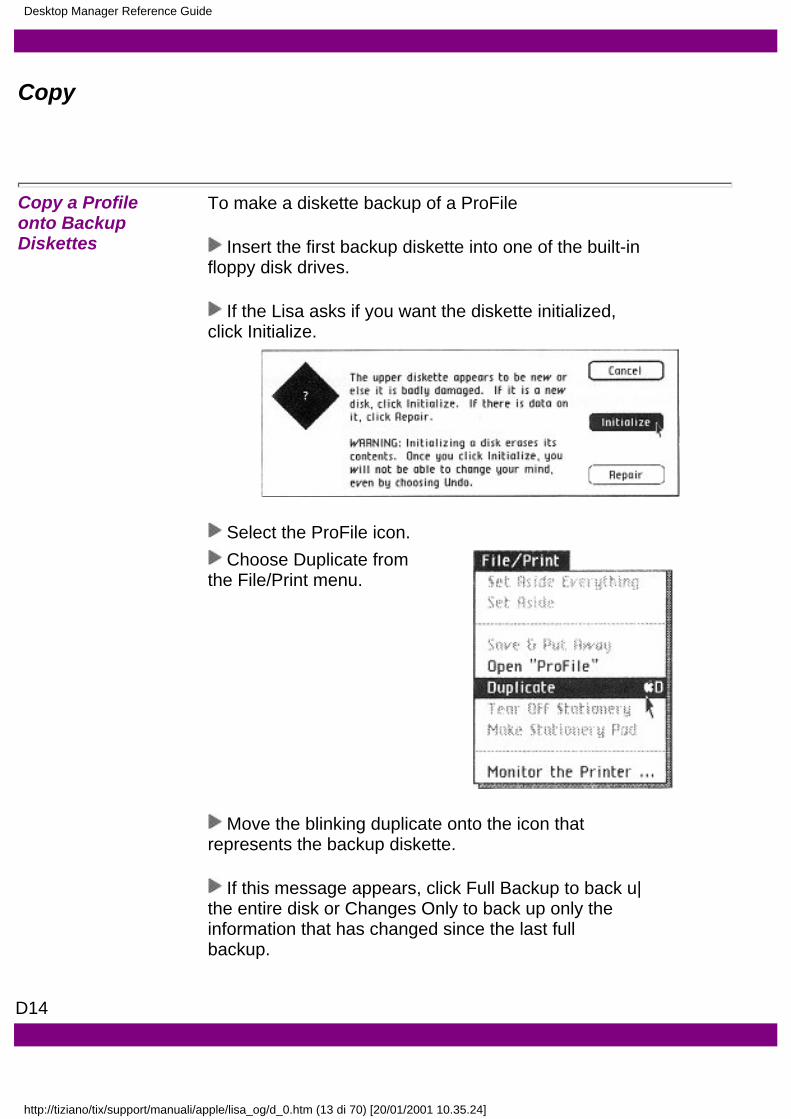
Copy a Profile onto BackupDiskettes
To make a diskette backup of a ProFile
Insert the first backup diskette into one of the built-infloppy disk drives.
If the Lisa asks if you want the diskette initialized,click Initialize.
Select the ProFile icon. Choose Duplicate from
the File/Print menu.
Move the blinking duplicate onto the icon thatrepresents the backup diskette.
If this message appears, click Full Backup to back u|the entire disk or Changes Only to back up only theinformation that has changed since the last fullbackup.
D14
Desktop Manager Reference Guide
http://tiziano/tix/support/manuali/apple/lisa_og/d_0.htm (13 di 70) [20/01/2001 10.35.24]

Copy
Copy a Profile onto BackupDiskettes(continued)
When this warning appears, click Erase.
When this message appears, remove the first disketteand insert another diskette.
If this message appears, click Initialize.
D15
Desktop Manager Reference Guide
http://tiziano/tix/support/manuali/apple/lisa_og/d_0.htm (14 di 70) [20/01/2001 10.35.24]

Copy
Copy a Profile onto BackupDiskettes(continued)
If this message appears, click Erase.
Continue removing diskettes and inserting additionaldiskettes until the Lisa ejects a diskette withoutrequesting another.
Depending on how much information is stored on yourhard disk, you may need up to eight diskettes to hold itall. You can use the same diskettes each time you make afull backup, but all information previously on thediskettes will be destroyed.
Once you have made one full backup of a ProFile, youcan make incremental backups of only the material thathas changed since the full backup.
You can make as many incremental backups as you wantbetween full backups: each incremental backup makes acopy of everything that has changed since the last fullbackup.
If you have to reconstruct the ProFile from the backupdiskettes later, you can save time by inserting first thediskettes from the last incremental backup, and then thediskettes from the last full backup.
You should probably make either a full or incrementalbackup of your ProFile at least once a week.
D16
Desktop Manager Reference Guide
http://tiziano/tix/support/manuali/apple/lisa_og/d_0.htm (15 di 70) [20/01/2001 10.35.24]

Create
D18 Create a Document or FolderD20 Create a Stationery Pad
D17
Create
Create aDocumentor Folder
To start a new document or folder
Select the stationery pad you want to use. Choose Tear Off
Stationery from theFile/Print menu.
Desktop Manager Reference Guide
http://tiziano/tix/support/manuali/apple/lisa_og/d_0.htm (16 di 70) [20/01/2001 10.35.24]

Name the new document or folder by typing the nameyou want to use.
Move the new document or folder to the disk or folderwhere you intend to store it.
If you are starting a new document, open the newdocument to begin working.
You can also tear off a new piece of stationery by clickingtwice on the stationery pad icon instead of going throughthe File/Print menu.
When you first create a new document or folder, itsstorage location is the same as the storage location ofthe pad it was created from. If you intend to file theobject in another location later, you can simplify the filingprocess by moving the icon to its intended locationbefore you open it to begin working.
D18
Create
Create aDocumentor Folder(continued)
Example
Suppose you want to write a letter to Jim, using youroffice letterhead stationery. First you locate thestationery pad Letterhead in your Stationery folder.
1. You select the stationerypad Letterhead.
Desktop Manager Reference Guide
http://tiziano/tix/support/manuali/apple/lisa_og/d_0.htm (17 di 70) [20/01/2001 10.35.24]

2. You choose Tear OffStationery from the File/Print menu.
3. You type in the name"Jim-7/21."The titleappears under the newdocument icon. Fromnow on, whenever yousee this icon, you willknow that it contains theletter you wrote to Jimon July 21.4. You want to store the document in a folder labeledCorrespondence. You move the new document iconout of the Stationery folder and into theCorrespondence folder.
5. You click twice on the document icon to open it, andyou are ready to write your letter.
D19
Create
Create aStationery Pad
To make a new pad of stationery
Prepare the document or folder that you want tomake into a stationery pad.
Reduce the object to anicon by choosing eitherSet Aside or Save & PutAway from the File/Printmenu.
Desktop Manager Reference Guide
http://tiziano/tix/support/manuali/apple/lisa_og/d_0.htm (18 di 70) [20/01/2001 10.35.24]
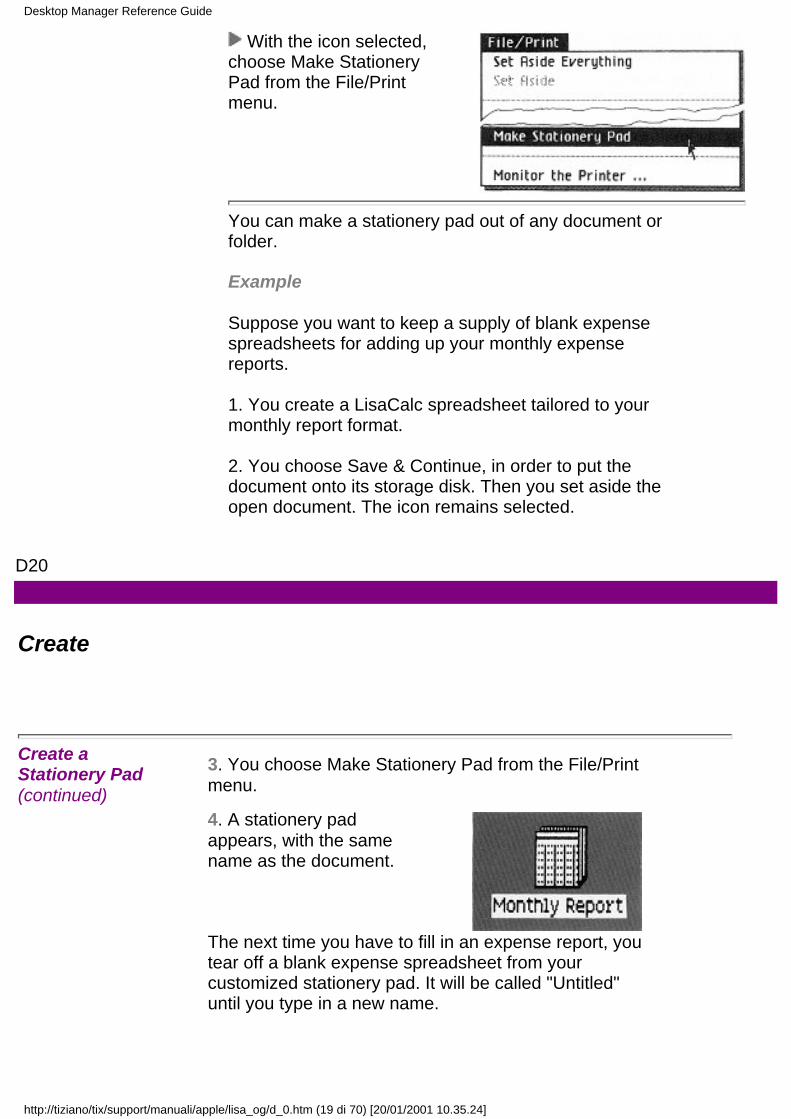
With the icon selected,choose Make StationeryPad from the File/Printmenu.
You can make a stationery pad out of any document orfolder.
Example
Suppose you want to keep a supply of blank expensespreadsheets for adding up your monthly expensereports.
1. You create a LisaCalc spreadsheet tailored to yourmonthly report format.
2. You choose Save & Continue, in order to put thedocument onto its storage disk. Then you set aside theopen document. The icon remains selected.
D20
Create
Create aStationery Pad(continued)
3. You choose Make Stationery Pad from the File/Printmenu.
4. A stationery padappears, with the samename as the document.
The next time you have to fill in an expense report, youtear off a blank expense spreadsheet from yourcustomized stationery pad. It will be called "Untitled"until you type in a new name.
Desktop Manager Reference Guide
http://tiziano/tix/support/manuali/apple/lisa_og/d_0.htm (19 di 70) [20/01/2001 10.35.24]
D21
(This page is really blank)
Discard
D24 Discard a Document, Folder, Stationery Pad, or Tool
D23
Discard
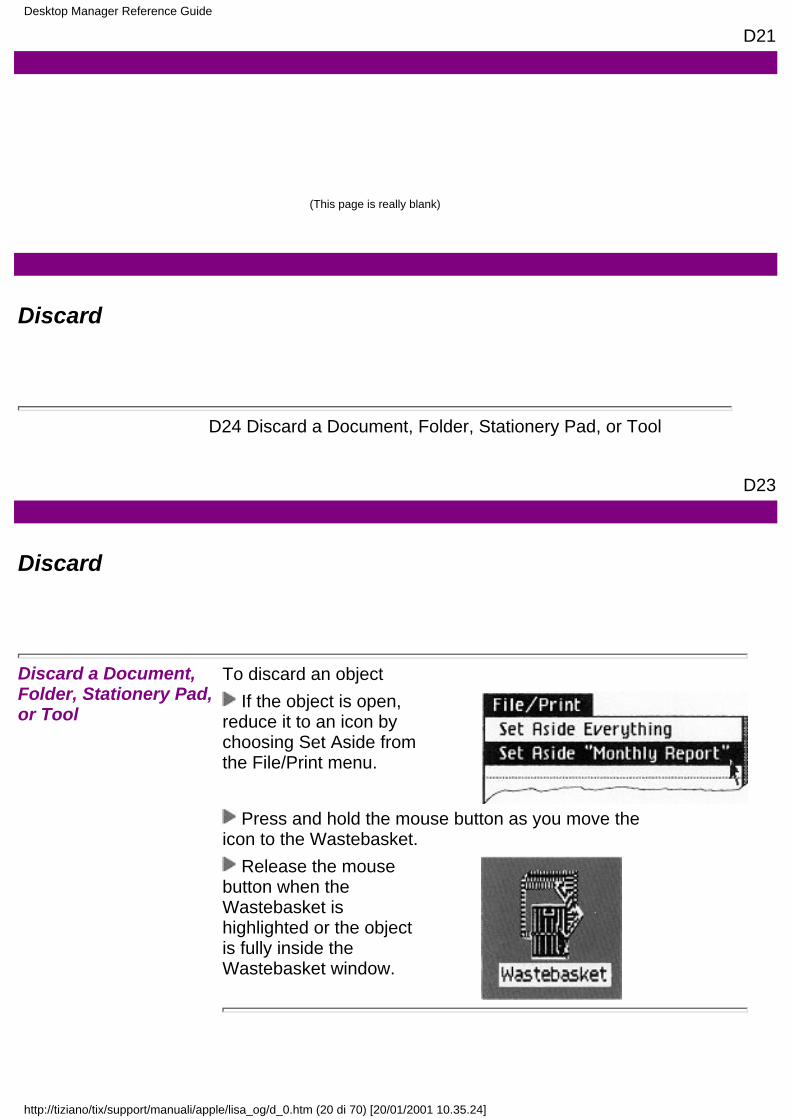
Discard a Document,Folder, Stationery Pad,or Tool
To discard an object If the object is open,
reduce it to an icon bychoosing Set Aside fromthe File/Print menu.
Press and hold the mouse button as you move theicon to the Wastebasket.
Release the mousebutton when theWastebasket ishighlighted or the objectis fully inside theWastebasket window.
Desktop Manager Reference Guide
http://tiziano/tix/support/manuali/apple/lisa_og/d_0.htm (20 di 70) [20/01/2001 10.35.24]

The Wastebasket accepts either individual icons orgroups of selected icons. If you discard a folder,everything contained in that folder is also discarded.
As you discard icons, they usually remain inside theWastebasket until something else that resides on thesame disk is also discarded. If you are trying to makemore room on a disk by discarding old documents, themost efficient procedure is to select and discard all of theold documents, and then to discard an empty folder.Sometimes the Lisa will shred everything in theWastebasket in order to reclaim disk space.
To retrieve something from the Wastebasket, open theWastebasket and move the icon out of the Wastebasketwindow.
D24
File
D26 File an Object in a New Storage LocationD27 Get an Existing DocumentD28 Return a Document or Folder to Its StorageLocationD29 Revert to Previous VersionD30 Save a Document and Continue Working
D25
File
File an Object in a NewStorage Location
To move a document, folder, stationery pad, or tool to anew storage location
Desktop Manager Reference Guide
http://tiziano/tix/support/manuali/apple/lisa_og/d_0.htm (21 di 70) [20/01/2001 10.35.24]
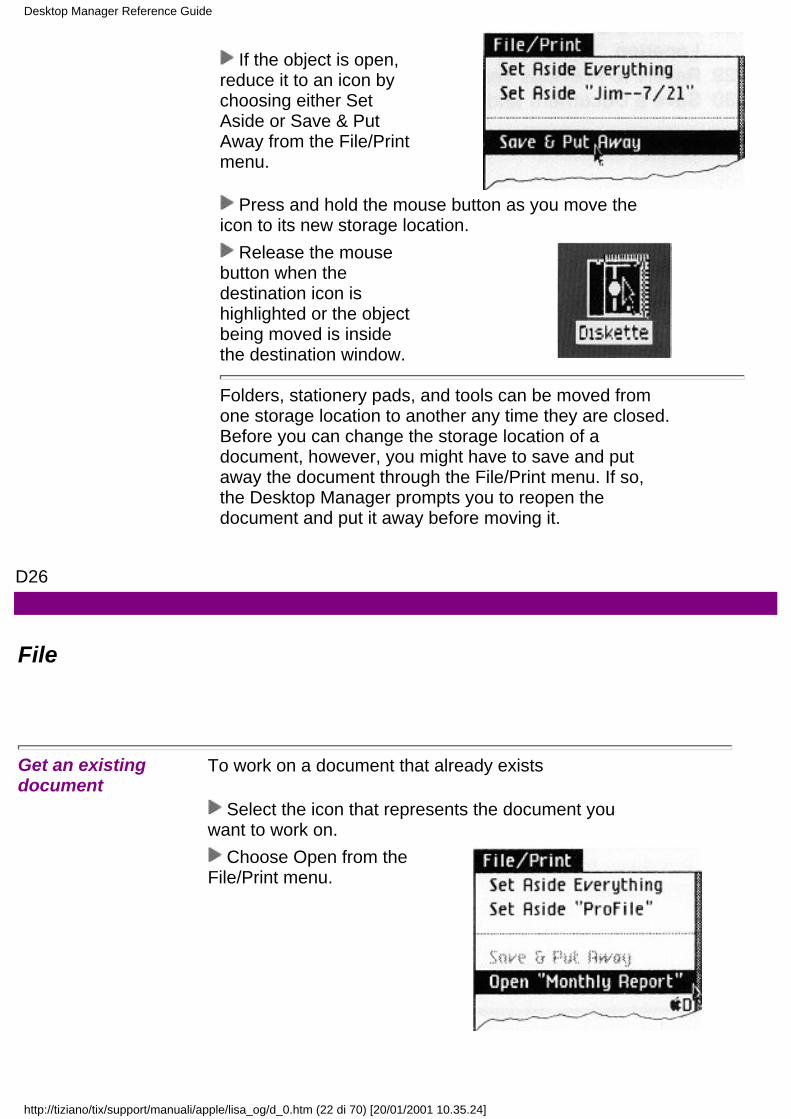
If the object is open,reduce it to an icon bychoosing either SetAside or Save & PutAway from the File/Printmenu.
Press and hold the mouse button as you move theicon to its new storage location.
Release the mousebutton when thedestination icon ishighlighted or the objectbeing moved is insidethe destination window.
Folders, stationery pads, and tools can be moved fromone storage location to another any time they are closed.Before you can change the storage location of adocument, however, you might have to save and putaway the document through the File/Print menu. If so,the Desktop Manager prompts you to reopen thedocument and put it away before moving it.
D26
File
Get an existingdocument
To work on a document that already exists
Select the icon that represents the document youwant to work on.
Choose Open from theFile/Print menu.
Desktop Manager Reference Guide
http://tiziano/tix/support/manuali/apple/lisa_og/d_0.htm (22 di 70) [20/01/2001 10.35.24]

D27
File
Return aDocument orFolder to ItsStorage Location
To file a revised document or folder in the same place itwas filed previously
With the documentselected, choose Save &Put Away from the File/Print menu.
Depending on which tool you are using, you might haveto open your documents before choosing Save & PutAway.
Save & Put Away has two simultaneous effects: on thedesktop, it reduces an open window to an icon andreturns the icon to its storage location. On the storagedisk, it saves a new version of the document,incorporating any changes you have made since you lastsaved it. If the disk contains a previous version of thedocument, the old version is removed. The next time youchoose Revert to Previous Version, the document revertsto the state it was in when it was last saved.
Some Lisa tools automatically update the stored versionof all open documents every time you eject their storagedisk or turn off the Lisa. Other tools put all opendocuments into a suspended state, not updating the diskversion. See the manual for each tool to find out whetheror not turning off the Lisa or removing a storage disketteupdates the disk version of a document.
If you have opened a document or a folder from itsstorage location, without moving the icon onto the graydesktop, then clicking the mouse button twice on the titlebar icon brings up an alert that gives you the choice ofsaving and putting away or setting aside the document.
D28
Desktop Manager Reference Guide
http://tiziano/tix/support/manuali/apple/lisa_og/d_0.htm (23 di 70) [20/01/2001 10.35.24]

File
Revert to PreviuosVersion
To cancel all changes you have made since you last saveda document
With the documentselected, choose Revertto Previous Version fromthe File/Print menu.
In response to the Caution alert, click OK.
This procedure causes the document to revert to thestate it was in the last time you saved it. All tools saveactive documents at two times:
• When you choose Save & Continue from the File/Printmenu.
• When you choose Save & Put Away from the File/Printmenu.
Some tools also save all open documents any time youeject the disk they are stored on or turn off the Lisa bypressing the on-off button. See the manual for the Lisaoffice tool you are using, Section C, Reference Guide,under Revert to Previous Version, to find out when thattool updates the document on its storage disk.
D29
Desktop Manager Reference Guide
http://tiziano/tix/support/manuali/apple/lisa_og/d_0.htm (24 di 70) [20/01/2001 10.35.24]

File
Save a Documentand ContinueWorking
To save a document while you are working With the document open
and active, choose Save& Continue from theFile/Print menu.
Save & Continue updates the document on the disk tomatch the document on your desktop, but it leaves thedocument open and active. You should save thedocument you are working on any time you feel that it'simportant to save your recent edits. Some people saveperiodically, after, for example, 15 minutes of work.
The next time you choose Revert to Previous Version, thedocument on your desktop will revert to the state it wasin when you last saved it.
D30
Initialize
Desktop Manager Reference Guide
http://tiziano/tix/support/manuali/apple/lisa_og/d_0.htm (25 di 70) [20/01/2001 10.35.24]

D32 Erase and Reinitialize a DiskD33 Initialize a DisketteD34 Initialize a Startup ProFile and Install the ToolsD39 Initialize a Storage ProFile
D31
Initialize
Erase andReinitialize aDisk
To erase and reinitialize a used disk
With the disk iconselected, choose Erasefrom the Disk menu.
When the alert message appears, double check tomake sure that this is the disk you want to erase. If so,click Erase.
Whenever the Lisa Office System erases a disk, itautomatically reinitializes it.
A recycled disk retains its old name.
Desktop Manager Reference Guide
http://tiziano/tix/support/manuali/apple/lisa_og/d_0.htm (26 di 70) [20/01/2001 10.35.24]
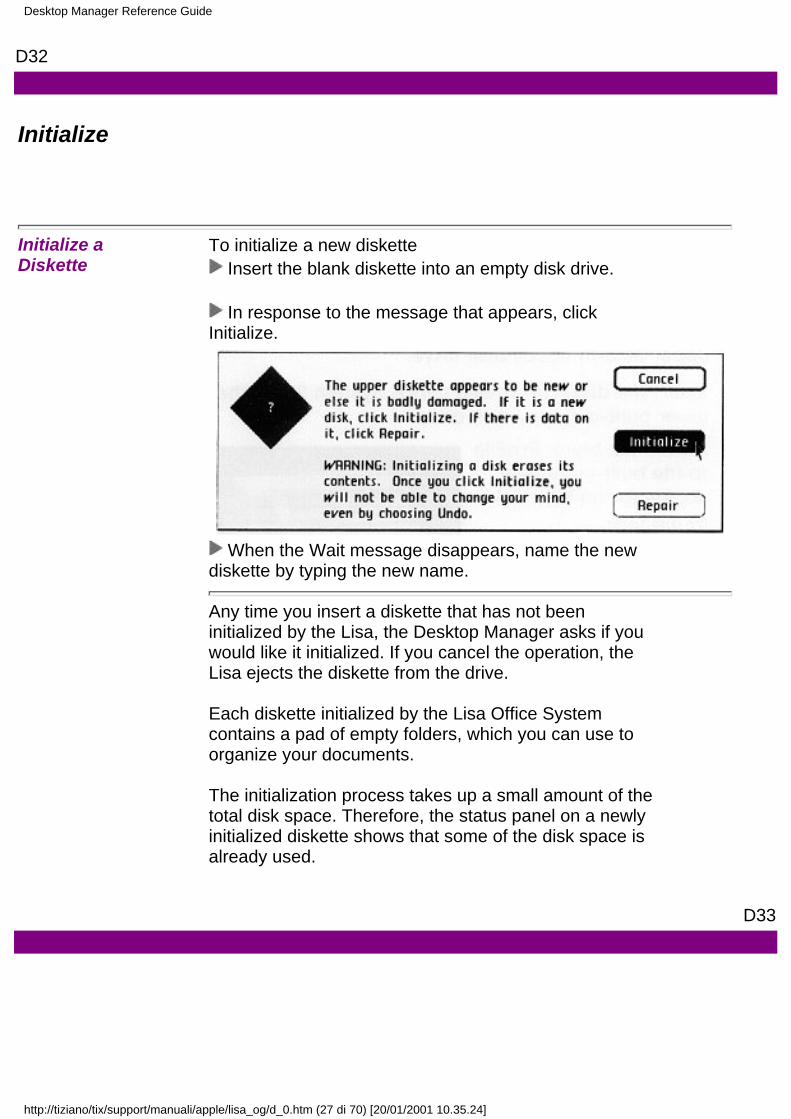
D32
Initialize
Initialize aDiskette
To initialize a new diskette Insert the blank diskette into an empty disk drive.
In response to the message that appears, click
Initialize.
When the Wait message disappears, name the newdiskette by typing the new name.
Any time you insert a diskette that has not beeninitialized by the Lisa, the Desktop Manager asks if youwould like it initialized. If you cancel the operation, theLisa ejects the diskette from the drive.
Each diskette initialized by the Lisa Office Systemcontains a pad of empty folders, which you can use toorganize your documents.
The initialization process takes up a small amount of thetotal disk space. Therefore, the status panel on a newlyinitialized diskette shows that some of the disk space isalready used.
D33
Desktop Manager Reference Guide
http://tiziano/tix/support/manuali/apple/lisa_og/d_0.htm (27 di 70) [20/01/2001 10.35.24]

Initialize
Initialize a Startup ProFile and Install the Tools
To initialize a ProFile as the startup device
If the Lisa is on, turn it off by pressing the on-offbutton once.
Insert the diskette labeled Office System 1 into theupper built-in floppy disk drive.
Insert the diskette labeled Office System 2 into thelower built-in floppy disk drive
Attach the blank ProFileto the built-in parallelconnector on the backof the Lisa.
Turn on the ProFile. Waituntil the ready lightstabilizes.
Turn on the Lisa by pressing the on-off button once.
D34
Desktop Manager Reference Guide
http://tiziano/tix/support/manuali/apple/lisa_og/d_0.htm (28 di 70) [20/01/2001 10.35.24]
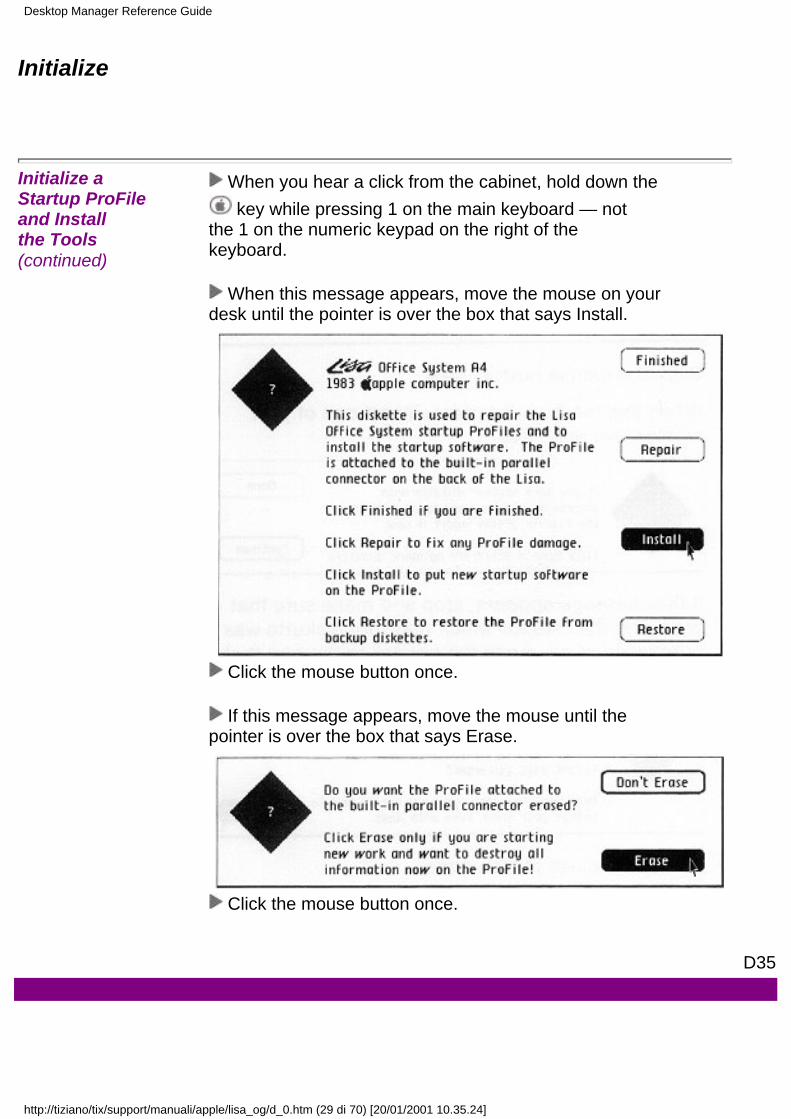
Initialize
Initialize aStartup ProFileand Installthe Tools(continued)
When you hear a click from the cabinet, hold down the key while pressing 1 on the main keyboard — not
the 1 on the numeric keypad on the right of thekeyboard.
When this message appears, move the mouse on yourdesk until the pointer is over the box that says Install.
Click the mouse button once.
If this message appears, move the mouse until thepointer is over the box that says Erase.
Click the mouse button once.
D35
Desktop Manager Reference Guide
http://tiziano/tix/support/manuali/apple/lisa_og/d_0.htm (29 di 70) [20/01/2001 10.35.24]

Initialize
Initialize aStartup ProFileand Installthe Tools(continued)
When this message appears, move the mouse to thebox that says OK.
Click the mouse button once.
When this message appears, insert one of yourmaster tool diskettes.
If this message appears, stop and make sure that youare using the Lisa for which that tool diskette waspurchased. If so, move the pointer to the box thatsays Copy.
Click the mouse button once.
When all tools are installed, move the pointer to thebox that says Done.
Desktop Manager Reference Guide
http://tiziano/tix/support/manuali/apple/lisa_og/d_0.htm (30 di 70) [20/01/2001 10.35.24]

D36
Initialize
Initialize aStartup ProFileand Installthe Tools(continued)
Click the mouse button once.
When this message appears, move the pointer to thebox that says Finished.
Click the mouse button once.
When this message appears, move the pointer to thebox that says Start Up.
Click the mouse button once.
D37
Desktop Manager Reference Guide
http://tiziano/tix/support/manuali/apple/lisa_og/d_0.htm (31 di 70) [20/01/2001 10.35.24]

Initialize
Initialize aStartup ProFileand Installthe Tools(continued)
This procedure erases any information that may havebeen stored on the ProFile. If you want to replace theLisa Office System software on a ProFile that alreadycontains some information, follow the Reinstall SystemSoftware procedure, under Repair, in this section. SeeSection B, Lisa Fundamentals, for a discussion of theLisa Office System software.
This procedure automatically sets your startup device tothe ProFile attached to the built-in parallel connector.
Your dealer or service representative should haveinitialized your startup ProFile. The instructions arepresented here in case you received a blank ProFile withyour new Lisa system.
Copies of a tool will work only on the same Lisa thatmade the first copy of the master tool diskette. If youhave more than one Lisa in your office, you need aseparate master tool diskette for each Lisa.
You can keep only one copy of each tool on a single disk.
D38
Initialize
Initialize aStorage ProFile
To initialize a ProFile as a storage device
Open the Preferences icon.
Click Device Connections.
Click the box for the connector you plan to use for theProFile.
Desktop Manager Reference Guide
http://tiziano/tix/support/manuali/apple/lisa_og/d_0.htm (32 di 70) [20/01/2001 10.35.24]

Click ProFile.
In response to the alert, click OK.
Turn off the Lisa by pressing the on-off button.
Attach the hard disk to the connector you specified inPreferences.
Turn on the ProFile and wait for the ready light tostabilize.
Turn on the Lisa.
D39
Initialize
Initialize aStorageProFile(continued)
In response to the Caution alert message thatappears, click Initalize.
Desktop Manager Reference Guide
http://tiziano/tix/support/manuali/apple/lisa_og/d_0.htm (33 di 70) [20/01/2001 10.35.24]

When the Wait message disappears, name the newdisk by typing the new name.
You can store documents, folders, stationery pads, andtools on a storage ProFile, but you cannot use it as thestartup device. If you are attaching your first ProFile tothe Lisa, follow the procedure under Initialize a StartupProFile and Install the Tools, in this section.
D40
List
D42 Alter Display of a Disk or Folder D44 Display Contents of a Disk or Folder
D41
Desktop Manager Reference Guide
http://tiziano/tix/support/manuali/apple/lisa_og/d_0.htm (34 di 70) [20/01/2001 10.35.24]

List
Alter Display of aDisk or Folder
To alter the display of a disk or folder With the open window
selected, chooseAlphabetical,Chronological, orPictorial from the Viewmenu.
Unless you specify otherwise, all disks and folders aredisplayed in the pictorial view. The examples in the Lisamanuals usually show the pictorial display. You can,however, change the display of any disk or folder to a textlist.
The next time you open the disk or folder, the contentsare displayed in whatever format you set the last time thewindow was open. The format currently in effect ischecked in the menu.
Items in a list can be selected and manipulated just likeicons in a pictorial view, except that they cannot berearranged within the list.
The alphabetical view lists the contents in alphabeticalorder by name. The list includes the relative size of eachobject, the date and time it was last modified, and thedate it was created. The icon in the left-hand columnindicates whether the item is a document, a folder, astationery pad, or a tool.
D42
Desktop Manager Reference Guide
http://tiziano/tix/support/manuali/apple/lisa_og/d_0.htm (35 di 70) [20/01/2001 10.35.24]

List
Alter Display of aDisk or Folder(continued)
The chronological view lists the contents in chronologicalorder by the date last modified. All objects that havenever been modified appear in chronological order by thedate they were created. The list includes the sameinformation as the alphabetical list.
The pictorial view displays a collection of iconsrepresenting the objects.
You can have the Lisa arrange the icons in rows within theactive window by choosing Straighten Up Icons from theView menu.
D43
Desktop Manager Reference Guide
http://tiziano/tix/support/manuali/apple/lisa_og/d_0.htm (36 di 70) [20/01/2001 10.35.24]

List
Display Contents Of a Disk Or Folder
To display the contents of a disk or folder Open the folder or disk.
A disk window includes a status panel showing howmuch space is still available on the disk and when it waslast backed up. The space is expressed in "blocks"; oneblock equals about 100 words of text.
D44
Name
D46 Name or Rename an Object
Desktop Manager Reference Guide
http://tiziano/tix/support/manuali/apple/lisa_og/d_0.htm (37 di 70) [20/01/2001 10.35.24]

D45
Name
Name or Renamean Object
To change the name of a desktop object
Select the name underthe icon or any shadowof the icon thatrepresents the object.
Type the new name.
If you want to make only a small change in the name, youcan use the same text editing procedures that you usewithin the applications. Cutting, copying, pasting, andinserting text all work for editing object names. Youcannot change the name of a tool.
You cannot directly edit the title bar of an open window.You can, however, change the name of an object while itis open by changing the name of any shadow of thatobject. Changing the name of any object also changesthe names of any shadows of that object.
Whenever you create a new document or folder, the newicon bears the name "Untitled." It's a good idea tochange the name fairly soon, before you find yourselfwith a desktop full of documents all with the same name.
Whenever you initialize a new diskette, it bears the name"Diskette." You can change the diskette names, makingit easier to distinguish between two different diskettes onyour desktop.
Whenever you duplicate any object, the duplicate bearsthe same name as the original. Depending on yourpersonal filing system, you may want to modify the nameof the duplicate.
D46
Desktop Manager Reference Guide
http://tiziano/tix/support/manuali/apple/lisa_og/d_0.htm (38 di 70) [20/01/2001 10.35.24]

D48 Print Screen Utility
D47
Print ScreenDisplay
To print the screen display
Hold down the right-hand key and the right-hand key while pressing the 4 on the numerickeypad.
This procedure works only if you have a dot matrixprinter attached to the upper connector of a parallelinterface card installed in expansion slot 2. The printermust also be listed in the Device Connections portion ofthe Preferences window.
For procedures for printing documents, see Section C,Reference Guide, under Print, in the manual for the toolyou are using.
D48
Desktop Manager Reference Guide
http://tiziano/tix/support/manuali/apple/lisa_og/d_0.htm (39 di 70) [20/01/2001 10.35.24]

Repair
D50 Reinstall System SoftwareD53 Repair a Startup ProFileD56 Repair a Storage DiskD57 Repair a Storage Disk after a System FailureD59 Restore a ProFile from Diskette Backups
D49
Repair
Reinstall SystemSoftware
To reinstall the system software withoout erasing thestartup ProFile
If the Lisa is on, turn it off by pressing the on-offbutton once.
Insert the diskette labeled Office System 1 into theupper built-in floppy disk drive.
Insert the diskette labeled Office System 2 into thelower built-in floppy disk drive.
Desktop Manager Reference Guide
http://tiziano/tix/support/manuali/apple/lisa_og/d_0.htm (40 di 70) [20/01/2001 10.35.24]

If the ProFile is off, turnit on. Wait until the readylight stabilizes.
Turn on the Lisa by pressing the on-off button once.
When you hear a click from the cabinet, hold down the key while pressing 1 on the main keyboard — not
the 1 on the numeric keypad on the right of thekeyboard.
D50
Repair
Reinstall SystemSoftware(continued)
When this message appears, click Install.
Desktop Manager Reference Guide
http://tiziano/tix/support/manuali/apple/lisa_og/d_0.htm (41 di 70) [20/01/2001 10.35.24]

When this message appears, click Don't Erase.
When this message appears, click OK.
D51
Repair
Reinstall SystemSoftware(continued)
When this message appears, click Finished.
When this message appears, click Start Up.
Desktop Manager Reference Guide
http://tiziano/tix/support/manuali/apple/lisa_og/d_0.htm (42 di 70) [20/01/2001 10.35.24]

This procedure removes the Lisa Office System softwarefrom your startup ProFile and replaces it with a copy ofthe system software on the Lisa Office System diskettes.Reinstallation is recommended when you think thesoftware on your ProFile may be damaged. SeeAppendix 6, Office System Error Messages, in thismanual, for the symptoms of damaged software.
This procedure works only for a ProFile attached to thebuilt-in parallel connector on the back of the Lisa. Afterthe system software is installed, the startup device isautomatically set to that ProFile.
D52
Repair
Repair aStartup ProFile
To repair a damaged startup Profile
If the Lisa is on, turn it off.
Insert the diskette labeled Office System 1 into theupper built-in floppy disk drive.
If the ProFile is off, turn it on. Wait until the ready lightstabilizes.
Turn the Lisa on.
When you hear a click from the cabinet, hold down the key while pressing 1 on the main keyboard — not
the 1 on the numeric keypad on the right of thekeyboard.
When this message appears, click Repair.
Desktop Manager Reference Guide
http://tiziano/tix/support/manuali/apple/lisa_og/d_0.htm (43 di 70) [20/01/2001 10.35.24]
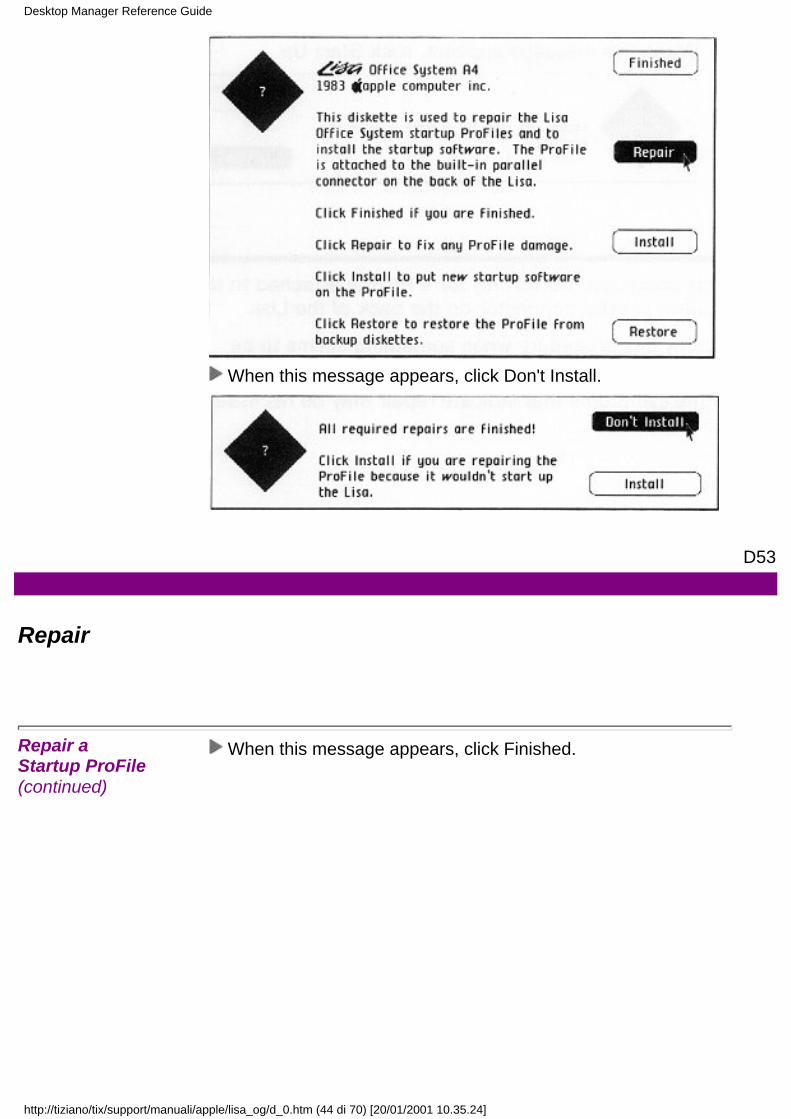
When this message appears, click Don't Install.
D53
Repair
Repair aStartup ProFile(continued)
When this message appears, click Finished.
Desktop Manager Reference Guide
http://tiziano/tix/support/manuali/apple/lisa_og/d_0.htm (44 di 70) [20/01/2001 10.35.24]

When this message appears, click Start Up.
This procedure works only for a ProFile attached to thebuilt-in parallel connector on the back of the Lisa.
Follow this procedure when something seems to bewrong with your startup ProFile. See Appendix 6, OfficeSystem Error Messages, in this manual, for a descriptionof the symptoms that indicate repair may be necessary.
D54
Repair
Desktop Manager Reference Guide
http://tiziano/tix/support/manuali/apple/lisa_og/d_0.htm (45 di 70) [20/01/2001 10.35.24]

Repair aStartup ProFile(continued)
During a repair, the Lisa compares the actual contents of a disk with the record of where things are stored on the disk surface. The computer also checks to see that all information on the disk is readable. Unreadableinformation may be altered or removed; the names ofsome documents may change.
Depending on the problem you were having, you maywant to reinstall your system software at the same timeyou repair the ProFile. If so, click Install instead of Don'tInstall after your ProFile has been repaired. See ReinstallSystem Software, in this section, and Appendix 6, OfficeSystem Error Messages, under Tool Failure.
D55
Repair
Repair aStorage Disk
To repair a disk that does not seem to be functioningnormally
Select the disk icon.
Choose Repair from theDisk menu.
During a repair, the Lisa compares the actual contents ofa disk with the record of where things are stored on thedisk surface. The computer also checks to see that allinformation on the disk is readable. Unreadableinformation may be altered or removed; the names ofsome documents may change.
You should try repairing a disk any time it is behavingunexpectedly. If, for example, the Lisa cannot find adocument that you know is there, repairing the disk maysolve the problem.
If you have already repaired a disk once and it stillbehaves oddly, there may be a physical problem with thedisk itself. In this case, replace the disk with a backupcopy or make a copy of the disk and use the copy insteadof the original.
Desktop Manager Reference Guide
http://tiziano/tix/support/manuali/apple/lisa_og/d_0.htm (46 di 70) [20/01/2001 10.35.24]

D56
Repair
Repair a StorageDisk after aSystem Failure
To repair your storage disks after the Lisa has suffered apower interruption or software failure
If the Lisa is off, turn it on. If the Lisa displays this alert, click OK.
If the Lisa suggests you check any disks, click Check.
When the Lisa displays the results of the check, clickOK.
Allow the Lisa to check all disks that were in use whenthe crash occurred.
D57
Desktop Manager Reference Guide
http://tiziano/tix/support/manuali/apple/lisa_og/d_0.htm (47 di 70) [20/01/2001 10.35.24]

Repair
Repair a StorageDisk after aSystem Failure(continued)
The interaction described above is normal after a suddenpower loss. See Appendix 4, On-Off Procedures, in thismanual, for an explanation of how a sudden power lossaffects disk organization.
In the course of checking the disks for damage, the Lisamay alter the organization of the disk. Documents maybe removed from folders, for example, or the names ofsome documents or stationery pads may change. Afterthe Lisa has checked your disks, open them and refileany documents that have been removed from theirfolders.
If any of the repair messages appear at any time otherthan after a power loss, see Appendix 6, Office SystemError Messages, in this manual.
D58
Repair
Restore a ProFilefrom DisketteBackups
To restore all of the information on a ProFile fromdiskette backups
If the Lisa is on, turn it off by pressing the on-offbutton once.
Insert the diskette labeled Office System 1 into theupper built-in floppy disk drive.
Desktop Manager Reference Guide
http://tiziano/tix/support/manuali/apple/lisa_og/d_0.htm (48 di 70) [20/01/2001 10.35.24]

If the ProFile is off, turn iton. Wait until the readylight stabilizes.
Turn on the Lisa by pressing the on-off button once.
When you hear a click from the cabinet, hold down the key while pressing 1 on the main keyboard — not
the 1 on the numeric keypad on the right of thekeyboard.
D59
Repair
Restore a ProFilefrom DisketteBackups(continued)
When this message appears, click Restore.
When this message appears, click Erase.
Desktop Manager Reference Guide
http://tiziano/tix/support/manuali/apple/lisa_og/d_0.htm (49 di 70) [20/01/2001 10.35.24]
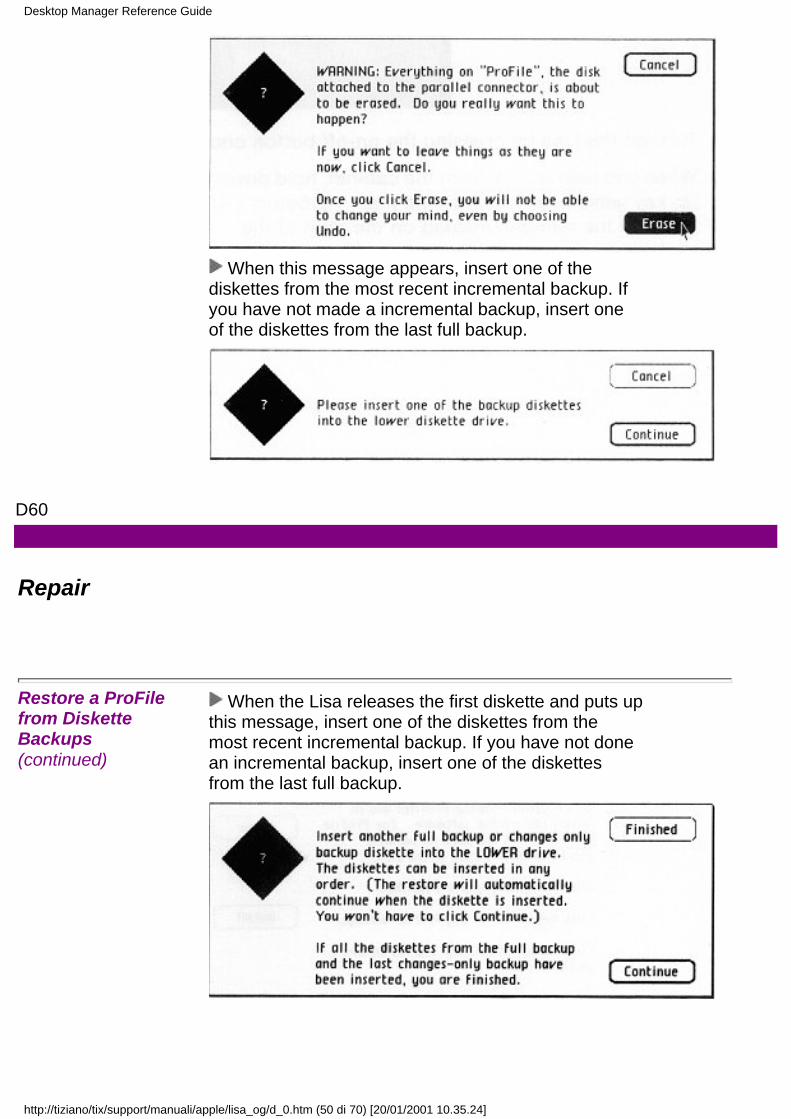
When this message appears, insert one of thediskettes from the most recent incremental backup. Ifyou have not made a incremental backup, insert one of the diskettes from the last full backup.
D60
Repair
Restore a ProFilefrom DisketteBackups(continued)
When the Lisa releases the first diskette and puts upthis message, insert one of the diskettes from themost recent incremental backup. If you have not donean incremental backup, insert one of the diskettesfrom the last full backup.
Desktop Manager Reference Guide
http://tiziano/tix/support/manuali/apple/lisa_og/d_0.htm (50 di 70) [20/01/2001 10.35.24]

Continue inserting diskettes when prompted. Whenyou have finished inserting all diskettes from the lastincremental backup, insert the diskettes from the lastfull backup.
After the Lisa has copied the last diskette back ontothe ProFile, respond to the prompt by clickingFinished.
D61
Repair
Restore a ProFilefrom DisketteBackups(continued)
When this message appears, click Finished.
When this message appears, click Start Up.
Desktop Manager Reference Guide
http://tiziano/tix/support/manuali/apple/lisa_og/d_0.htm (51 di 70) [20/01/2001 10.35.24]

Use this procedure only if you have made at least one fullbackup of your ProFile, following the instructions underCopy a ProFile onto Backup Diskettes, in this section. Ifyou back up your documents individually, then you canreconstruct a damaged ProFile by reinitializing it andcopying the contents of all your backup and tooldiskettes onto the ProFile. Refer to Initialize a StartupProfile and Install the Tools, under Initialize, in thissection.
D62
Set
D64 Set Clock/CalendarD65 Set Convenience SettingsD69 Set Device ConnectionsD71 Set Printer Configuration, Daisy WheelD74 Set Printer Configuration, Dot MatrixD77 Set Screen Brightness and ContrastD80 Set Startup Device during StartupD82 Set Startup Specifications
D63
Desktop Manager Reference Guide
http://tiziano/tix/support/manuali/apple/lisa_og/d_0.htm (52 di 70) [20/01/2001 10.35.24]

Set
Set Clock/Calendar
To set the clock/calendar Open the clock icon. Place the pointer over
the hour and click once.
Type in the correct hour.
Continue selecting and correcting each part of thetime and date until the display is correct.
Choose Set Aside fromthe File/Print menu.
The clock/calendar uses a 12-hour setting, with a.m. orp.m. specified. The Lisa will not accept settings outsideof the possible ranges for times and dates.
When you first turn on your Lisa, the clock should appearon the gray area of the desktop. If you choose Save & PutAway from the File/Print menu, the clock is stored in theTools folder on your startup ProFile. You can move itanywhere else you choose.
Once you set the clock/calendar, it should continuerunning as long as the Lisa is plugged into a workingoutlet and for up to 10 hours after the Lisa is unplugged.If the time is forgotten, the Lisa resets it to 12 a.m.1/1/83.
The Lisa uses the setting of the clock/calendar to tageach of your documents with the date you created it andthe date and time you last worked on it. The Lisa alsotags each disk with the date it was last backed up.
D64
Desktop Manager Reference Guide
http://tiziano/tix/support/manuali/apple/lisa_og/d_0.htm (53 di 70) [20/01/2001 10.35.24]
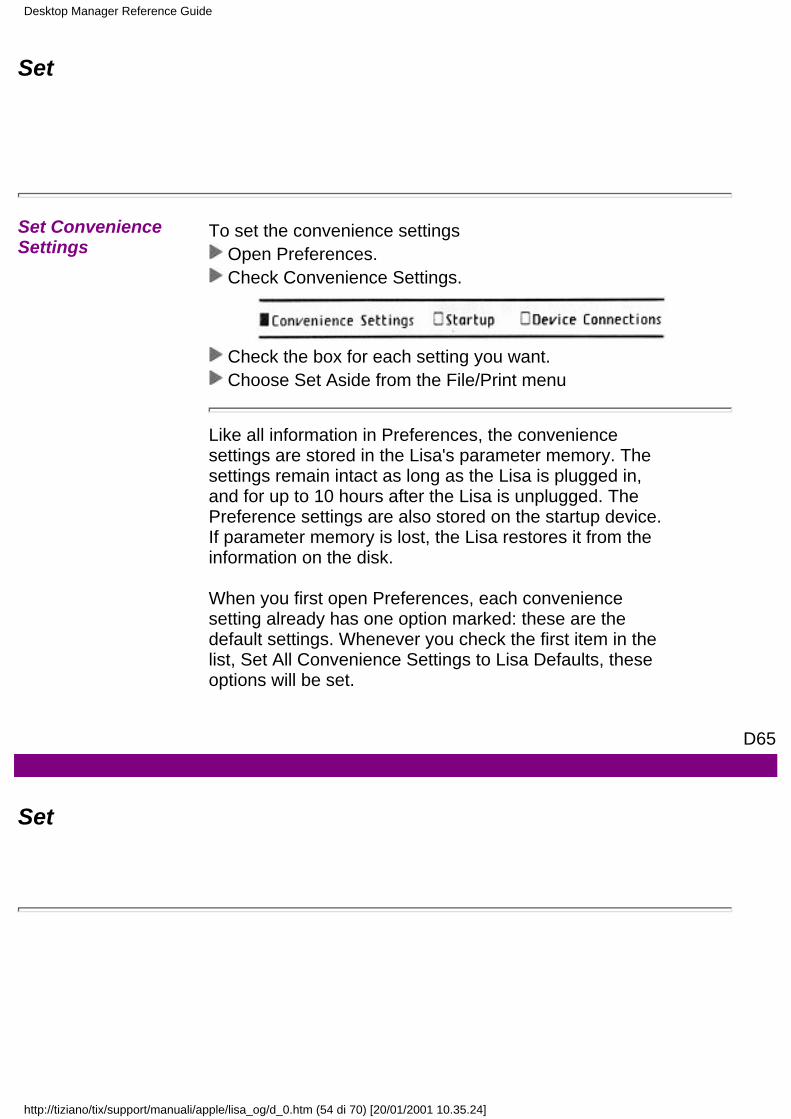
Set
Set ConvenienceSettings
To set the convenience settings Open Preferences. Check Convenience Settings.
Check the box for each setting you want. Choose Set Aside from the File/Print menu
Like all information in Preferences, the conveniencesettings are stored in the Lisa's parameter memory. Thesettings remain intact as long as the Lisa is plugged in,and for up to 10 hours after the Lisa is unplugged. ThePreference settings are also stored on the startup device.If parameter memory is lost, the Lisa restores it from theinformation on the disk.
When you first open Preferences, each conveniencesetting already has one option marked: these are thedefault settings. Whenever you check the first item in thelist, Set All Convenience Settings to Lisa Defaults, theseoptions will be set.
D65
Set
Desktop Manager Reference Guide
http://tiziano/tix/support/manuali/apple/lisa_og/d_0.htm (54 di 70) [20/01/2001 10.35.24]

Set ConvenienceSettings(continued)
For instructions for setting the screen brightness andcontrast, see the procedure, Set Screen Brightness andContrast, in this section. The other convenience settingsare described below.
Speaker Volume
From time to time, the Lisa communicates by soundingvarious beeps and tones. The meanings of these signalsare explained elsewhere in the manuals. The SpeakerVolume setting controls the loudness of these beeps andtones.
Each time you check one of the boxes, the Lisa soundstwo tones, at the low and high extremes of the level youhave chosen. Experiment with different settings until youfind one you like.
D66
Desktop Manager Reference Guide
http://tiziano/tix/support/manuali/apple/lisa_og/d_0.htm (55 di 70) [20/01/2001 10.35.24]

Set
Set ConvenienceSettings(continued)
Repeating Keys
Most of the Lisa keysrepeat automatically whenheld down. The two linesunder Repeating Keyscontrol how long you haveto hold a key down before itstarts repeating, and howfast it then generatesadditional characters.The correct settings depend on your typing speed andthe ways you use the Lisa. If you find that the Lisa oftengenerates multiple letters when you intended to type onlyone, change the repeat delay to a setting nearer the longend of the scale. If you use the repeating keys often, youprobably want to specify a short delay and a fast repeatspeed.
Whenever you check one of the delay or rate boxes, theLisa puts a few asterisks on the screen to demonstratethe interval you have chosen.
Mouse Double Click
Some of the desktop functions are accomplished byclicking the mouse button twice rapidly, or "doubleclicking."The Mouse Double ClickDelay setting determinesthe maximum time lagbetween two clicks that theLisa interprets as onedouble click.
D67
Desktop Manager Reference Guide
http://tiziano/tix/support/manuali/apple/lisa_og/d_0.htm (56 di 70) [20/01/2001 10.35.24]

Set
Set ConvenienceSettings(continued)
Like the keyboard repeat delays, this setting shouldreflect your habits and work style. If the Lisa ofteninterprets your double clicks as two single clicks, tryadjusting the delay to a longer setting. If the Lisa ofteninterprets two single clicks as one double click, tryadjusting the delay to a shorter setting.
D68
Set
Set DeviceConnections
To tell the Lisa that you are attaching or removing anexternal device
Open Preferences. Check Device Connections.
Check the box for the connector you are using.
Desktop Manager Reference Guide
http://tiziano/tix/support/manuali/apple/lisa_og/d_0.htm (57 di 70) [20/01/2001 10.35.24]

When the list of available devices appears, check thebox for the device you are attaching to that connector.If you are removing a device, check the box for NoDevice.
If another set of specifications appears, check theappropriate boxes.
Choose Set Aside from the File/Print menu.
Like all information in Preferences, the deviceconnections are stored in the Lisa's parameter memory.The settings remain intact as long as the Lisa is pluggedin, and for up to 10 hours after the Lisa is unplugged. ThePreference settings are also stored on the startup device.If parameter memory is lost, the Lisa restores it from theinformation on the disk.
D69
Set
Desktop Manager Reference Guide
http://tiziano/tix/support/manuali/apple/lisa_og/d_0.htm (58 di 70) [20/01/2001 10.35.24]

Set DeviceConnections(continued)
In general, use the following connectors for thesedevices:
• Startup ProFile: built-in parallel connector, labeledParallel Device.
• High-speed modem: serial connector labeled SerialDevice A.
• Daisy wheel printer: serial connector labeled SerialDevice B.
• Dot matrix printer: upper connector on a parallelinterface card installed in slot 2.
• Storage ProFile: either connector on a parallelinterface card installed in slot 2 or 3.
Specific instructions for setting the Preferences whenattaching printers appear in this section under SetPrinter Configuration, Daisy Wheel, and Set PrinterConfiguration, Dot Matrix. Specific instructions forsetting the Preferences when attaching a storage ProFileappear in the procedure, Initialize a Storage ProFile,under Initialize, in this section.
Detailed instructions for setting up a modem appear inthe manual that comes with the modem.
D70
Set
Set PrinterConfiguration,Daisy Wheel
To tell the Lisa that you are attaching a daisy wheelprinter
Open Preferences. Check Device Connections.
Check the box for the connector you are using.
Desktop Manager Reference Guide
http://tiziano/tix/support/manuali/apple/lisa_og/d_0.htm (59 di 70) [20/01/2001 10.35.24]

When the list of available devices appears, checkDaisy Wheel Printer. If you are removing a printer,check No Device.
In response to the screen message, click OK.
Check the boxes for the paper type, the paper size,and the print wheel you are using.
D71
Set
Set PrinterConfiguration,Daisy Wheel(continued)
Choose Set Aside from the File/Print menu. Turn off the Lisa. Attach the printer. Turn on the Lisa.
Desktop Manager Reference Guide
http://tiziano/tix/support/manuali/apple/lisa_og/d_0.htm (60 di 70) [20/01/2001 10.35.24]

The daisy wheel printer must be attached to one of theserial connectors, marked Serial Device A and SerialDevice B on the back panel. Either connector iscompatible with the daisy wheel printer. Connector A,however, is more flexible and can be used with a high-speed modem. If you want to leave connector A open forother devices, attach your daisy wheel printer toconnector B.
When you are printing a document, the specifications forthe document must match the Preferences specificationsfor at least one of your printers. See the manual for theLisa office tool you are using, Section C, ReferenceGuide, Chapter 2, under Print, for instructions onpreparing documents for printing.
Like all information in Preferences, the printer settingsare stored in the Lisa's parameter memory. The settingsremain intact as long as the Lisa is plugged in, and for upto 10 hours after the Lisa is unplugged. The Preferencesettings are also stored on the startup device. Ifparameter memory is lost, the Lisa restores it from theinformation on the disk.
D72
Set
Set PrinterConfiguration,Daisy Wheel(continued)
Paper Type
Check Single Sheet if you are printing on individualsheets of paper, such as letterhead stationery, and youare inserting the paper by hand. When Single Sheet ischecked, your Lisa pauses after printing each page andprompts you to insert the next sheet.
Check Fanfold if you are printing on fanfold paperdesigned to be fed continuously through a printer.
Check Mechanical Feed if you are printing on individualsheets of paper, such as letterhead stationery, and youhave a mechanical feeder inserting the paper.
Change the Paper Type setting any time you change the
Desktop Manager Reference Guide
http://tiziano/tix/support/manuali/apple/lisa_og/d_0.htm (61 di 70) [20/01/2001 10.35.24]

type of paper.
Paper Size
All of the paper size options available for your printerappear when you specify the type of printer. The settingin Preferences should match the size of the paperactually loaded in the printer. When you change the papersize, open the Preferences window and change thesetting.
Print Wheel
If you are using a daisy wheel printer, you must tell theLisa what kind of print wheel is attached. Thisinformation appears on the wheel itself. You can changeprint wheels whenever you like, as long as you change theinformation in Preferences.
D73
Set
Set PrinterConfiguration,Dot Matrix
To tell the Lisa that you are attaching a dot matrix printer Open Preferences. Check Device Connections.
Check the box for the connector you are using.
When the list of available devices appears, check DotMatrix Printer. If you are removing a printer, check thebox for No Device.
In response to the message that appears, click OK.
Desktop Manager Reference Guide
http://tiziano/tix/support/manuali/apple/lisa_og/d_0.htm (62 di 70) [20/01/2001 10.35.24]

Check the boxes for thepaper type and thepaper size.
Choose Set Aside from the File/Print menu. Turn off the Lisa. Attach the printer. Turn on the Lisa.
D74
Set
Sef PrinterConfiguration,Dot Matrix(continued)
The dot matrix printer must be attached to a parallelconnector. If you have a ProFile hard disk attached to thebuilt-in parallel connector, you must install a parallelinterface card into one of the expansion slots on the backpanel of the Lisa. Once you have installed an expansioncard, the Lisa will automatically include that card in thelist of available connectors.
If you want to be able to print your entire screen display,attach your dot matrix printer to the upper connector of aparallel interface card installed in expansion slot 2.
When you are printing a document, the specifications forthe document must match the Preferences specificationsfor at least one of your printers. See the manual for theLisa office tool you are using, Section C, ReferenceGuide, Chapter 2, under Print, for instructions onpreparing documents for printing.
Like all information in Preferences, the printer settingsare stored in the Lisa's parameter memory. The settingsremain intact as long as the Lisa is plugged in, and for upto 10 hours after the Lisa is unplugged. The Preferencesettings are also stored on the startup device. Ifparameter memory is lost, the Lisa restores it from theinformation on the disk.
Desktop Manager Reference Guide
http://tiziano/tix/support/manuali/apple/lisa_og/d_0.htm (63 di 70) [20/01/2001 10.35.24]

Paper Type
Check Single Sheet if you are printing on individualsheets of paper, such as letterhead stationery. WhenSingle Sheet is checked, your Lisa pauses after printingeach page and prompts you to insert the next sheet.
Check Fanfold if you are printing on fanfold paperdesigned to be fed continuously through a printer.
Change the Paper Type setting any time you change thetype of paper.
D75
Set
Set PrinterConfiguration,Dot Matrix(continued)
Paper Size
All of the paper size options available for your printerappear when you specify the type of printer. The settingin Preferences should match the size of the paperactually loaded in the printer. When you change thepaper size, open the Preferences window and change thesetting.
D76
Desktop Manager Reference Guide
http://tiziano/tix/support/manuali/apple/lisa_og/d_0.htm (64 di 70) [20/01/2001 10.35.24]

Set
Set ScreenBrightnessand Contrast
To set the screen brightness and contrast Open Preferences. Check Convenience Settings.
Locate the brightnesscontrol knob, the higherof the two white knobsextending from the backof the cabinet.
Turn the brightness control down until your screen isentirely black.
Turn the knob back up just until the black rectangleturns to gray.
Slowly turn the knobback down, just until therectangle is distinctlyblack, with no video scanlines visible, and there isa clean line on allborders.
D77
Desktop Manager Reference Guide
http://tiziano/tix/support/manuali/apple/lisa_og/d_0.htm (65 di 70) [20/01/2001 10.35.24]

Set
Set ScreenBrightnessand Contrast(continued)
Set the Normal Level by checking different boxesuntil the screen is at a comfortable contrast level foryou.
Set the Minutes Until Screen Dims by checking thebox for the delay you want.
Set the Dim Level by checking the box for the dimcontrast level you want.
Choose Set Aside from the File/Print menu.
Always set the screen brightness before adjusting thecontrast.
The normal contrast level controls the contrast of thescreen while you are using the Lisa. The importantconsideration when setting the contrast level is yourcomfort.
The automatic fade feature is designed to protect yourvideo screen from burn-in, a permanent image burnedinto the screen after many hours of the same display. Ifthe Lisa detects no activity from the mouse or keyboardfor the length of time specified under Fade Delay, thescreen automatically dims to the dim contrast level.Once the screen has dimmed, any key press or mousemovement returns it to the normal contrast setting.
D78
Desktop Manager Reference Guide
http://tiziano/tix/support/manuali/apple/lisa_og/d_0.htm (66 di 70) [20/01/2001 10.35.25]
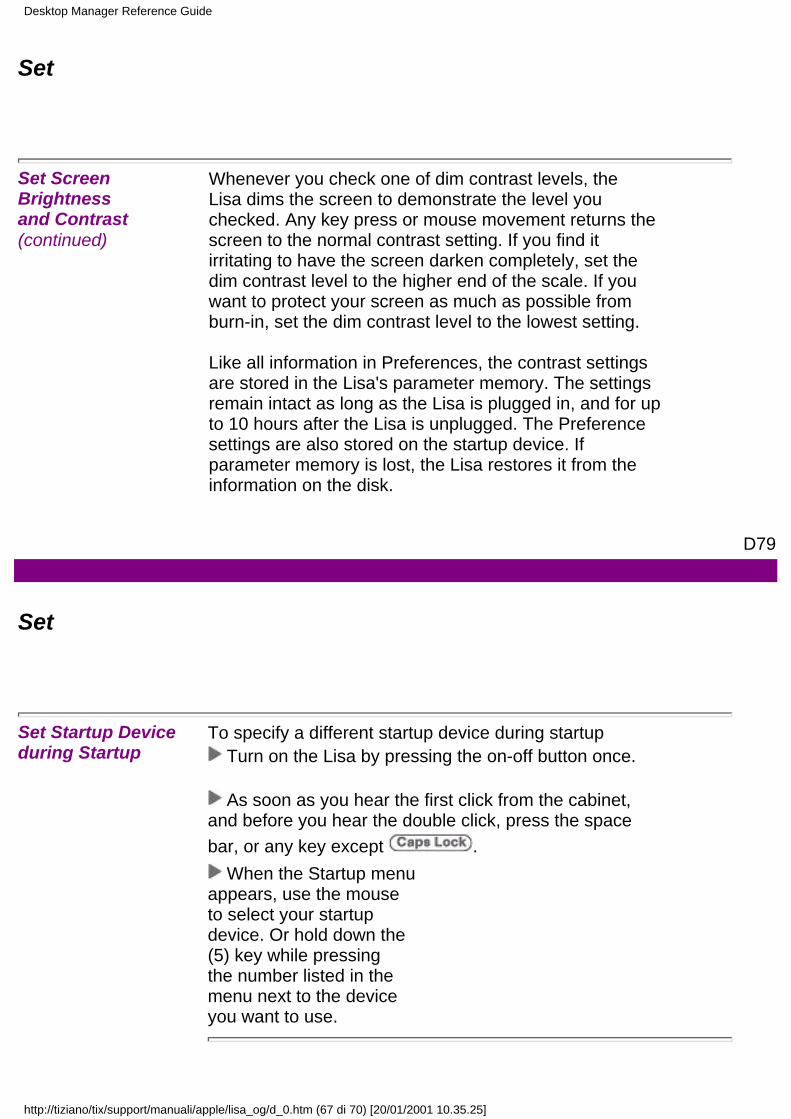
Set
Set ScreenBrightnessand Contrast(continued)
Whenever you check one of dim contrast levels, theLisa dims the screen to demonstrate the level youchecked. Any key press or mouse movement returns thescreen to the normal contrast setting. If you find itirritating to have the screen darken completely, set thedim contrast level to the higher end of the scale. If youwant to protect your screen as much as possible fromburn-in, set the dim contrast level to the lowest setting.
Like all information in Preferences, the contrast settingsare stored in the Lisa's parameter memory. The settingsremain intact as long as the Lisa is plugged in, and for upto 10 hours after the Lisa is unplugged. The Preferencesettings are also stored on the startup device. Ifparameter memory is lost, the Lisa restores it from theinformation on the disk.
D79
Set
Set Startup Deviceduring Startup
To specify a different startup device during startup Turn on the Lisa by pressing the on-off button once.
As soon as you hear the first click from the cabinet,and before you hear the double click, press the spacebar, or any key except .
When the Startup menuappears, use the mouseto select your startupdevice. Or hold down the(5) key while pressingthe number listed in themenu next to the deviceyou want to use.
Desktop Manager Reference Guide
http://tiziano/tix/support/manuali/apple/lisa_og/d_0.htm (67 di 70) [20/01/2001 10.35.25]

You can also bypass the Startup menu if you know thekeyboard code for the startup device you want to use. Touse this shortcut:
Instead of pressing any key when you hear the first click,hold down the key while pressing one of the keys inthe list below.1234578ab
Upper built-in driveLower built-in driveProFile attached to the built-in parallel connectorExpansion card in slot 1, lower connectorExpansion card in slot 1, upper connectorExpansion card in slot 2, lower connectorExpansion card in slot 2, upper connectorExpansion card in slot 3, lower connectorExpansion card in slot 3, upper connector
D80
Set
Set Startup Deviceduring Startup(continued)
If you do not specify a startup device during startup, theLisa looks in the startup device specified in Preferences.If you have not specified a startup device, the Lisa looksfor a startup ProFile attached to the built-in parallelconnector.
The alternative startup procedure can be useful if yourusual startup device is not working properly, if yoursystem Preferences have been forgotten, or if you arerunning the LisaTest diskette.
D81
Desktop Manager Reference Guide
http://tiziano/tix/support/manuali/apple/lisa_og/d_0.htm (68 di 70) [20/01/2001 10.35.25]

Set
Set StartupSpecifications
To specify your usual startup device.
Open Preferences. Check Startup.
Check the box for the startup device you intend touse.
Check either Thoroughor Brief memory test.
Choose Set Aside from the File/Print menu.
Like all information in Preferences, the startup settingsare stored in the Lisa's parameter memory. The settingsremain intact as long as the Lisa is plugged in, and for upto 10 hours after the Lisa is unplugged. If parametermemory has been lost, the Lisa automatically looks for aProFile attached to the built-in parallel connector as thestartup device.
The Preference settings are also stored on the startupdevice. If parameter memory is lost, the Lisa restores itfrom the information on the disk.
If you want to start up from a different disk than the onespecified in Preferences, follow the procedure SetStartup Device during Startup, under Set, in this section.
D82
Desktop Manager Reference Guide
http://tiziano/tix/support/manuali/apple/lisa_og/d_0.htm (69 di 70) [20/01/2001 10.35.25]

Set
Set StartupSpecifications(continued)
The Memory Test setting determines how thoroughly theLisa's memory is tested during the automatic startuptests. If you check Thorough, the tests take about aminute. If you check Brief, the tests take about 30seconds.
D83
Desktop Manager Reference Guide
http://tiziano/tix/support/manuali/apple/lisa_og/d_0.htm (70 di 70) [20/01/2001 10.35.25]

Calculator
Section ECalculator
Calculator
http://tiziano/tix/support/manuali/apple/lisa_og/e_0.htm (1 di 23) [20/01/2001 10.35.33]

Contents
E1 What's in the Calculator?E2 Organization of the CalculatorE3 Four Function CalculatorE8 Reverse Polish CalculatorE13 Adding MachineE20 Calculator Menus
Eiii
(This page is really blank)
What's in the Calculator?
Calculator
http://tiziano/tix/support/manuali/apple/lisa_og/e_0.htm (2 di 23) [20/01/2001 10.35.33]

This section introduces the Calculator and explains howit is used. A series of example problems illustrates thedifferent ways the Calculator can work.
E1
Organizationof the Calculator
The Calculator can imitate three different types ofcalculators: a standard four function calculator, a reversePolish calculator, and a financial adding machine.To use the Calculator,
Open the Calculator byclicking twice on theCalculator icon.The Calculator appears on the screen as a drawing of apocket calculator. You can push the buttons on thescreen image by clicking on them with the mouse. Youcan also select the functions displayed next to the keysby clicking on them with the mouse.
To specify which kind of calculator you want to use,
With the Calculator active, choose Four Function,Reverse Polish, or Adding Machine from theCustomize menu.
If you want to display a record of your calculations, youcan choose Show Tape from the Customize menu. Thetape is not a document and cannot be printed as it is. Itcan, however, be copied and pasted into a LisaWrite orLisaDraw document, which can be printed. The resultdisplayed on the Calculator itself can be copied andpasted into most other documents.
When you put away the Calculator, the tape and thedisplay are cleared.
Each kind of calculator uses its own set of registers tohold the numbers you are manipulating. The registers arediscussed in the descriptions of the calculators. You canchoose to display or hide the registers through the
Calculator
http://tiziano/tix/support/manuali/apple/lisa_og/e_0.htm (3 di 23) [20/01/2001 10.35.33]
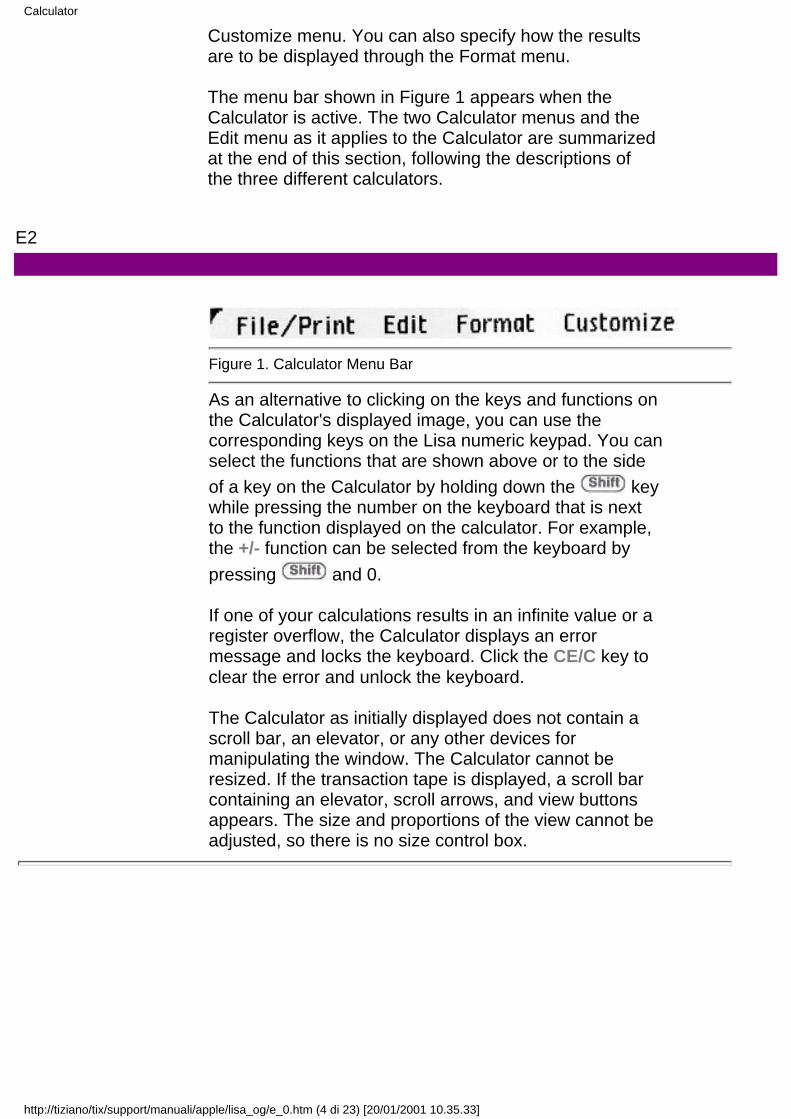
Customize menu. You can also specify how the resultsare to be displayed through the Format menu.
The menu bar shown in Figure 1 appears when theCalculator is active. The two Calculator menus and theEdit menu as it applies to the Calculator are summarizedat the end of this section, following the descriptions ofthe three different calculators.
E2
Figure 1. Calculator Menu Bar
As an alternative to clicking on the keys and functions onthe Calculator's displayed image, you can use thecorresponding keys on the Lisa numeric keypad. You canselect the functions that are shown above or to the sideof a key on the Calculator by holding down the keywhile pressing the number on the keyboard that is nextto the function displayed on the calculator. For example,the +/- function can be selected from the keyboard bypressing and 0.
If one of your calculations results in an infinite value or aregister overflow, the Calculator displays an errormessage and locks the keyboard. Click the CE/C key toclear the error and unlock the keyboard.
The Calculator as initially displayed does not contain ascroll bar, an elevator, or any other devices formanipulating the window. The Calculator cannot beresized. If the transaction tape is displayed, a scroll barcontaining an elevator, scroll arrows, and view buttonsappears. The size and proportions of the view cannot beadjusted, so there is no size control box.
Calculator
http://tiziano/tix/support/manuali/apple/lisa_og/e_0.htm (4 di 23) [20/01/2001 10.35.33]

Four FunctionCalculator
The four function calculator is the most common type ofpocket calculator. The only functions that are notobvious are the constants and the percentagecalculations, which are explained below. For most simplecalculations, you enter the numbers and symbols in theorder in which you would write them.
For example, to divide 355 by 113: Type 355. Click : Type 113. Click =.
Figure 2 shows the result. Both Show Tape and ShowRegisters have been chosen from the Customize menu.
E3
Figure 2. Four Function Calculator
Calculator
http://tiziano/tix/support/manuali/apple/lisa_og/e_0.htm (5 di 23) [20/01/2001 10.35.33]

Notice that the transaction tape contains a new symbol,the solid underscore, which indicates the final total of acalculation. In the four function calculator, this is showneach time you click the = key.
Figure 2 shows the registers used by the four functioncalculator. The K register always contains the currentvalue of the constant. Each time you do a calculation,one of the numbers is stored in the K register as aconstant, which can be used repeatedly in otheroperations of the same kind. Table 1 shows whichnumber is the constant when you enter two numbers; theconstant number is underlined in the example column.
Table 1. Use of Constants
E4
Table 1. Use of Constants, continued
Calculator
http://tiziano/tix/support/manuali/apple/lisa_og/e_0.htm (6 di 23) [20/01/2001 10.35.33]

The constant is also replaced when a new function isentered. After a calculation, the Y register contains theother number that was used. The X register, which isalways displayed, contains the result.
The percentage key performs the following fourfunctions: it finds the specified percentage of a number,it finds the percentage of one number relative to another,it calculates percent markups, and it calculates percentdiscounts. The following examples demonstrate thesecalculations.
To find 25% of 1,200: Type 1200. Click X. Type 25. Click %; 300 is displayed.
To find 108 as a percentage of 360:
Type 108. Click :. Type 360. Click %; 30 is displayed.
To find the retail price of a $50 item to be marked up60%:
Type 50. Click +. Type 60. Click %; 80 is displayed.
E5
To find the price of an $80 item that is discounted 30%:
Type 80. Click -. Type 30. Click %; 56 is displayed.
The four function calculator is shown in Figure 3.
Calculator
http://tiziano/tix/support/manuali/apple/lisa_og/e_0.htm (7 di 23) [20/01/2001 10.35.33]

Figure 3. Four Function Calculator
The following brief descriptions explain the functions ofthe keys.
Clears the displayednumber when pushed once;clears the entire Calculatorwhen pushed twice.
MC Clears the memory.Totals the pendingoperation and causes thenext number entered to besubtracted from the total.
M -Subtracts the displayednumber from the number inmemory.
E6
Calculator
http://tiziano/tix/support/manuali/apple/lisa_og/e_0.htm (8 di 23) [20/01/2001 10.35.33]

Totals the pendingoperation and causes thenext number entered to beadded to the total.
M + Adds the displayed numberto the number in memory.Totals the pendingoperation and causes thenext number entered to bemultiplied by the total.
MxMultiplies the number inmemory by the displayednumber.Totals the pendingoperation and causes thenext number entered to bedivided into the total.Divides the number inmemory by the currentlydisplayed number.Finds percentages andperforms add-on discountcalculations.Finds the square root of thedisplayed number.Totals the pendingoperation.
MRRecalls the number inmemory and displays it inthe displayed register, X.
+/- Changes the sign of thedisplayed number.Exchanges the displayednumber, X, with the numberentered last, Y.
E7
Calculator
http://tiziano/tix/support/manuali/apple/lisa_og/e_0.htm (9 di 23) [20/01/2001 10.35.33]

Finds the reciprocal of thedisplayed number, X.Exchanges the displayednumber, X, with the numberin memory, M.
Reverse PolishCalculator
The reverse Polish calculator uses a four-register stackand a mathematical convention known as Reverse PolishNotation for entering equations. This calculator is a bittricky to get used to, but it is often more convenientwhen you are working with long or complex equations.
With Reverse Polish Notation, you first enter thenumbers you are working with, and then you press thefunction key. The operation is executed immediately, andthe results are stored automatically. These results areused in subsequent calculations, if appropriate. You canwork through an equation the same way you would byhand, without working out the order of calculationsahead of time. The example below illustrates how youenter equations.
To divide 355 by 113: Type 355. Click Enter. Type 113. Click :.
Figure 4 shows the result. Both Show Tape and ShowRegisters have been chosen from the Customize menu.
E8
Calculator
http://tiziano/tix/support/manuali/apple/lisa_og/e_0.htm (10 di 23) [20/01/2001 10.35.33]

Figure 4. Reverse Polish Calculator — Example 1
The stack consists of the X, Y, Z, and T (top of stack)registers. They function as if they were stacked one ontop of the other, with the X register on the bottom. The Xregister is always displayed. It contains the result of thelast operation or the last value you typed in. ClickingEnter pushes everything one register up the stack. Thatis, the contents of the X, Y, and Z registers are copied tothe Y, Z, and T registers, respectively; the contents of theT register are lost off the top of the stack. Clicking on anyof the four basic functions (+, -, X, :) dropseverything one register down the stack. The result of theoperation is stored in the X register and the contents ofthe Z and T registers are copied to the Y and Z registers,respectively. The T register is not changed.
The four basic functions always operate on the contentsof the X and Y registers. Though the results are initiallystored only in the X register, the results are pushed ontothe stack if you enter a number immediately afterwards.The reciprocal and square root functions operate on thecontents of the X register only; the calculator will stillpush the results onto the stack if you enter a numberimmediately afterwards.
Calculator
http://tiziano/tix/support/manuali/apple/lisa_og/e_0.htm (11 di 23) [20/01/2001 10.35.33]
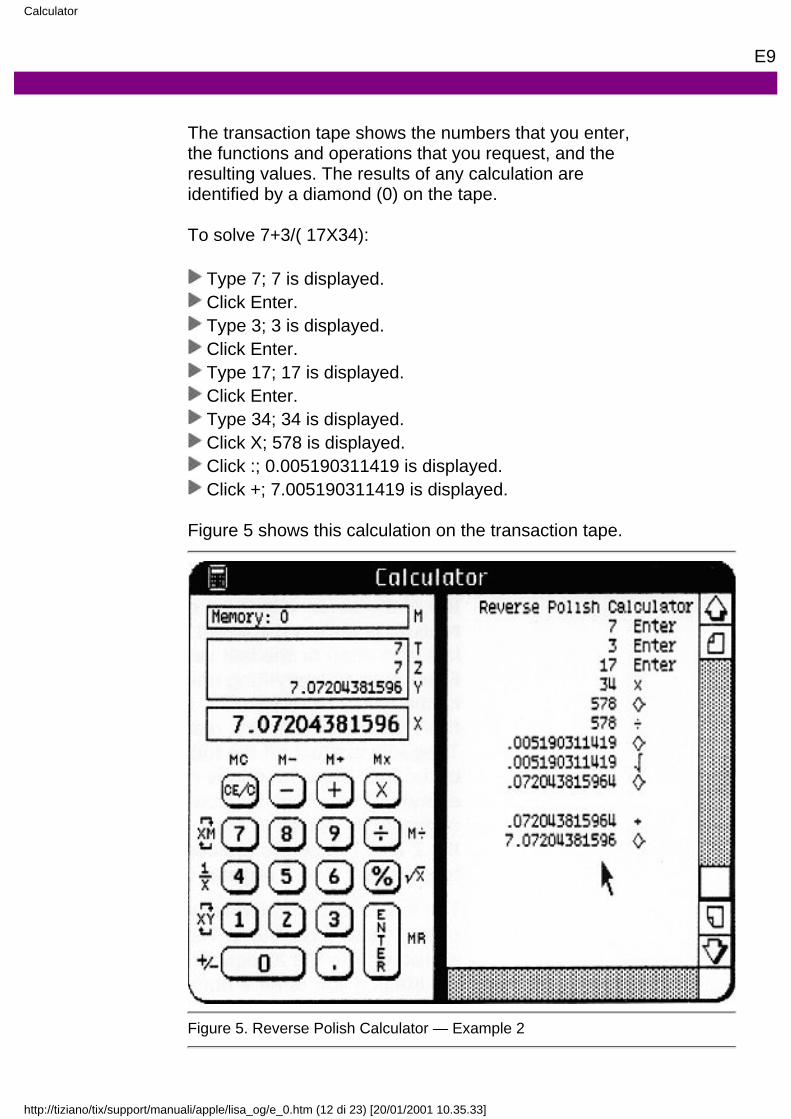
E9
The transaction tape shows the numbers that you enter,the functions and operations that you request, and theresulting values. The results of any calculation areidentified by a diamond (0) on the tape.
To solve 7+3/( 17X34):
Type 7; 7 is displayed. Click Enter. Type 3; 3 is displayed. Click Enter. Type 17; 17 is displayed. Click Enter. Type 34; 34 is displayed. Click X; 578 is displayed. Click :; 0.005190311419 is displayed. Click +; 7.005190311419 is displayed.
Figure 5 shows this calculation on the transaction tape.
Figure 5. Reverse Polish Calculator — Example 2
Calculator
http://tiziano/tix/support/manuali/apple/lisa_og/e_0.htm (12 di 23) [20/01/2001 10.35.33]

E10
To find 25% of 200: Type 200. Click Enter. Type 25. Click %; 50 is displayed.
To find the retail price of a $75 item to be marked up30%:
Type 75. Click Enter. Type 30. Click %; 22.5 is displayed. Click +; 97.5 is displayed.
To find the price of a $90 item discounted by 35%:
Type 90. Click Enter. Type 35. Click %; 31.5 is displayed. Click —; 58.5 is displayed.
The reverse Polish calculator is shown in Figure 6.
Calculator
http://tiziano/tix/support/manuali/apple/lisa_og/e_0.htm (13 di 23) [20/01/2001 10.35.33]

Figure 6. Reverse Polish Calculator
E11
The following brief descriptions explain the functions ofthe keys.
Clears the displayednumber when pushed once;clears the entire Calculatorwhen pushed twice.
MC Clears the memory.Subtracts the displayednumber from the number inthe Y register.
M -Subtracts the displayednumber from the number inmemory.Adds the displayed numberto the number in the Yregister.
M + Adds the displayed numberto the number in memory.Multiplies the displayednumber by the number inthe Y register.
MxMultiplies the number inmemory by the displayednumber.Divides the number in the Yregister by the displayednumber.Divides the number inmemory by the currentlydisplayed number.Finds the percentagerepresented by thedisplayed number dividedby the number in the Yregister with add-ondiscount calculations.Finds the square root of thedisplayed number.
E12
Calculator
http://tiziano/tix/support/manuali/apple/lisa_og/e_0.htm (14 di 23) [20/01/2001 10.35.33]

Enters or "pushes" thedisplayed number onto thefour-level stack. Allnumbers in the stack arealso pushed up one level,and the last number in thestack is lost.
MR Recalls and displays thenumber in memory.
+/- Changes the sign of thedisplayed number.Exchanges the displayednumber, X, with the lastnumber entered, Y.Finds the reciprocal of thedisplayed number, X.Exchanges the displayednumber, X, with the numberin memory, M.
Adding Machine This calculator closely resembles a financial addingmachine. It is oriented toward adding and subtractinglong strings of numbers, computing credit balances, andperforming percent markup and discount calculations. Ithas a subtotal key and a calculation register thatcontains the current value of chain operations. It also hasthe ability to print numbers, such as dates and codes, onthe transaction tape without entering them into thecalculation. These features are shown in the followingexample.
To solve 11+22+44+55+66 with a subtotal taken afterthe second addition and the number 55 printed before itis entered into the calculation:
Type 11. Click +=. Type 22. Click +=.
Click #/0; see Figure 7 now. Type 44.
E13
Calculator
http://tiziano/tix/support/manuali/apple/lisa_og/e_0.htm (15 di 23) [20/01/2001 10.35.33]

Click +=. Type 55. Click #/0. Click + =; see Figure 8 now. Type 66. Click +=. Click Total; see Figure 9 now.
In Figure 7, the subtotal 33 has been stored in thecalculation register (labeled 0), displayed in the Xregister, and shown on the transaction tape. The dottedunderscore indicates that a subtotal was taken; theactual value of the subtotal is labeled 0 Total.
Figure 7. Adding Machine — Example 1
In Figure 8, the number 55 has been shown and thenentered into the calculation. A number that is shownwithout being entered into a calculation is labeled #.
E14
Calculator
http://tiziano/tix/support/manuali/apple/lisa_og/e_0.htm (16 di 23) [20/01/2001 10.35.33]

Figure 8. Adding Machine — Example 2
In Figure 9, the final result is displayed in the X registerand shown on the tape. The solid underscore indicatesthat a total was taken; the value is labeled Total. Thecalculation register is cleared and the Calculator is readyto begin another problem.
Calculator
http://tiziano/tix/support/manuali/apple/lisa_og/e_0.htm (17 di 23) [20/01/2001 10.35.33]

Figure 9. Adding Machine — Example 3
E15
Clicking on Total affects only addition and subtraction. Itwill not give you the answers to multiplication or divisionproblems; you must use + = (or — =) for these.
To solve (10+2) X 5: Type 10. Click +=. Type 2. Click +=. Click X. Type 5. Click +=; 60 is displayed.
To solve 5 X 2 + 12:
Type 5. Click X. Type 2. Click + = to perform the multiplication. Click +=. Type 12. Click + =; 22 is displayed. Click Total to print 22 on the tape.
Percentage calculations on the adding machine aresimilar to those on the four function calculator. However,percent markup and discount calculations must beentered differently.
To find 25% of 175: Type 175. Click X. Type 25. Click %; 43.75 is displayed.
E16
Calculator
http://tiziano/tix/support/manuali/apple/lisa_og/e_0.htm (18 di 23) [20/01/2001 10.35.33]

To express 125 as a percentage of 500:
Type 125. Click -. Type 500. Click %; 25 is displayed.
To find the total cost of a $69.95 item, given 6.5% salestax:
Type 69.95. Click X. Type 6.5. Click %. Click +=; 74.49675 is displayed.
To find the price of a $79.95 item that is discounted 30%:
Type 79.95. Click X. Type 30. Click %. Click - =; 55.965 is displayed.
The adding machine is shown in Figure 10.
Figure 10. Adding Machine
Calculator
http://tiziano/tix/support/manuali/apple/lisa_og/e_0.htm (19 di 23) [20/01/2001 10.35.33]

E17
The following brief descriptions explain the functions ofthe keys.
Clears the displayednumber when pushed once;clears the entire Calculatorwhen pushed twice.
MC Clears the memory.Subtracts the displayedvalue from the contents ofthe calculation register;obtains the result innegative multiplication anddivision.
M -Subtracts the displayednumber from the number inmemory.Adds the displayed value tothe contents of thecalculation register;obtains the result inpositive multiplication anddivision.
M + Adds the displayed numberto the number in memory.Completes any pendingmultiplication or divisionand causes the nextnumber entered to bemultiplied by the total.
MxMultiplies the number inmemory by the displayednumber.Completes any pendingmultiplication or divisionand causes the nextnumber entered to bedivided into the total.Divides the number inmemory by the displayednumber.
E18
Calculator
http://tiziano/tix/support/manuali/apple/lisa_og/e_0.htm (20 di 23) [20/01/2001 10.35.33]

Finds percentages andperforms add-on discountcalculations.Finds the square root of thedisplayed number.Displays the total andclears the calculationregister.
MR Recalls and displays thenumber in memory.
+/- Changes the sign of thedisplayed number.Immediately after anoperation, displays thesubtotal. Otherwise,displays on the left side ofthe tape any keys pressedsince the last operation.Can be used to show datesor codes, which can thenbe cleared beforecalculations are continued.Finds the reciprocal of thedisplayed number, X.Exchanges the displayednumber, X, with the numberin memory, M.
E19
Calculator Menus Edit Menu
Calculator
http://tiziano/tix/support/manuali/apple/lisa_og/e_0.htm (21 di 23) [20/01/2001 10.35.33]

E20
Format Menu
E21
Calculator
http://tiziano/tix/support/manuali/apple/lisa_og/e_0.htm (22 di 23) [20/01/2001 10.35.33]

Customize Menu
E22
Calculator
http://tiziano/tix/support/manuali/apple/lisa_og/e_0.htm (23 di 23) [20/01/2001 10.35.33]

Maintenance
Section FMaintenance
Maintenance
http://tiziano/tix/support/manuali/apple/lisa_og/f_0.htm (1 di 12) [20/01/2001 10.35.37]

Contents
F1 What's in Maintenance
F2 Clean Glare Filter
F7 Clean or Replace Mouse Ball
F10 Clean Housing
Fiii
(This page is really blank)
What's in the Maintenance?
Maintenance
http://tiziano/tix/support/manuali/apple/lisa_og/f_0.htm (2 di 12) [20/01/2001 10.35.37]

The Lisa requires almost no day-to-day maintenance.Most of the procedures recommended in this section,such as cleaning the glare filter, are for your comfort andconvenience.
It's a good idea to review Table 1, SuggestedMaintenance, soon after you set up your system so thatyou will know which parts of the Lisa you can clean. Later,when you have spilled something on the housing or youthink the mouse may be dirty, look up the procedures inthis section.
Table 1. Suggested Maintenance
What When Page
Clean glare filter Screen dusty F2Clean mouse ball Mouse response
unreliable; ball stickyor dusty F7
Clean housing Housing dirty F10
F1
Clean Glare Filter Whenever the Lisa's video display is on, the screen has aslight static charge, which acts as a dust magnet. Theaccumulated dust will eventually make the display hardto read. You can keep the screen fairly dust free bywiping it gently every few weeks with the specially treatedcloth that comes with your Lisa. If dust has worked itsway under the glare filter, or if the screen has spots fromliquid spills, use the following procedure to clean theglass and filter.
Maintenance
http://tiziano/tix/support/manuali/apple/lisa_og/f_0.htm (3 di 12) [20/01/2001 10.35.37]

1. If the Lisa is on, turn itoff. Wait until alldiskettes are releasedand the light in the on-offbutton is off. Removeany diskettes that areejected from the drives.
2. Unplug the Lisa at eitherthe back panel or thewall outlet.
3. Remove the front panel, following this procedure:a. Place one finger oneach of the two fingerpads beneath thefront panel.
F2
Maintenance
http://tiziano/tix/support/manuali/apple/lisa_og/f_0.htm (4 di 12) [20/01/2001 10.35.37]

b. Push the pads up to unlatch the panel.c. Pull the panel forward and down.4. Set the panel on a flatsurface, face down.
5. Push the frame of theglare filter out fromunder the metal clip atthe bottom center of theframe.
6. Grasp the frame by thelower edge and lift thelower edge up until thetop edge pops out frombeneath the upper clip.
F3
Maintenance
http://tiziano/tix/support/manuali/apple/lisa_og/f_0.htm (5 di 12) [20/01/2001 10.35.37]

7. Wipe both the front andthe back of the glarefilter with the treatedcloth that came with yourLisa.
8. Shake out the cleaning cloth to remove the dust. Donot wash the cloth.9. If the glare filter hasspots from liquid spills,clean it in warm, soapywater. The filter can betorn, so treat it gently.Dry it with a towel beforeinstalling it over thevideo screen. (Do notuse the treated cleaningcloth to dry the filter.)
10. Clean the glass on thevideo screen with anyglass cleaner and a softcloth (not the speciallytreated cleaning cloth).Do not spray any liquiddirectly onto the glass,because stray dropscould get into otherparts of the cabinet.Instead,spray thecleaner onto the cloth,and then wipe the glass.
F4
Maintenance
http://tiziano/tix/support/manuali/apple/lisa_og/f_0.htm (6 di 12) [20/01/2001 10.35.37]

11. Replace the glare filter, following this procedure:a. Center the glare filterover the openinginside the front panel.
Hold the glare filteragainst the clip alongthe upper edge of thefront panel, at a 45degree angle.
b. While pressing downon the frame at theupper clip, rotate thelower edge until theframe slides under theupper clip.
Continue rotating thescreen until it lies flatagainst the panel.
c. Push the lower edgeof the frame in until itclears the lower clip,and then let it slideinto place behind theclip.
Make sure the filterfits neatly around theframe and under theclips.
F5
Maintenance
http://tiziano/tix/support/manuali/apple/lisa_og/f_0.htm (7 di 12) [20/01/2001 10.35.37]

12. Replace the front panel, following this procedure:a. Hold the panel withone finger on eachpad along the bottomedge.
b. Insert the upper edgeof the panel behindthe lip of the tophousing on thecabinet.
c. Pressing the pads up,push the bottom edgeof the panel againstthe cabinet until thepanel clicks intoplace.
F6
Maintenance
http://tiziano/tix/support/manuali/apple/lisa_og/f_0.htm (8 di 12) [20/01/2001 10.35.37]
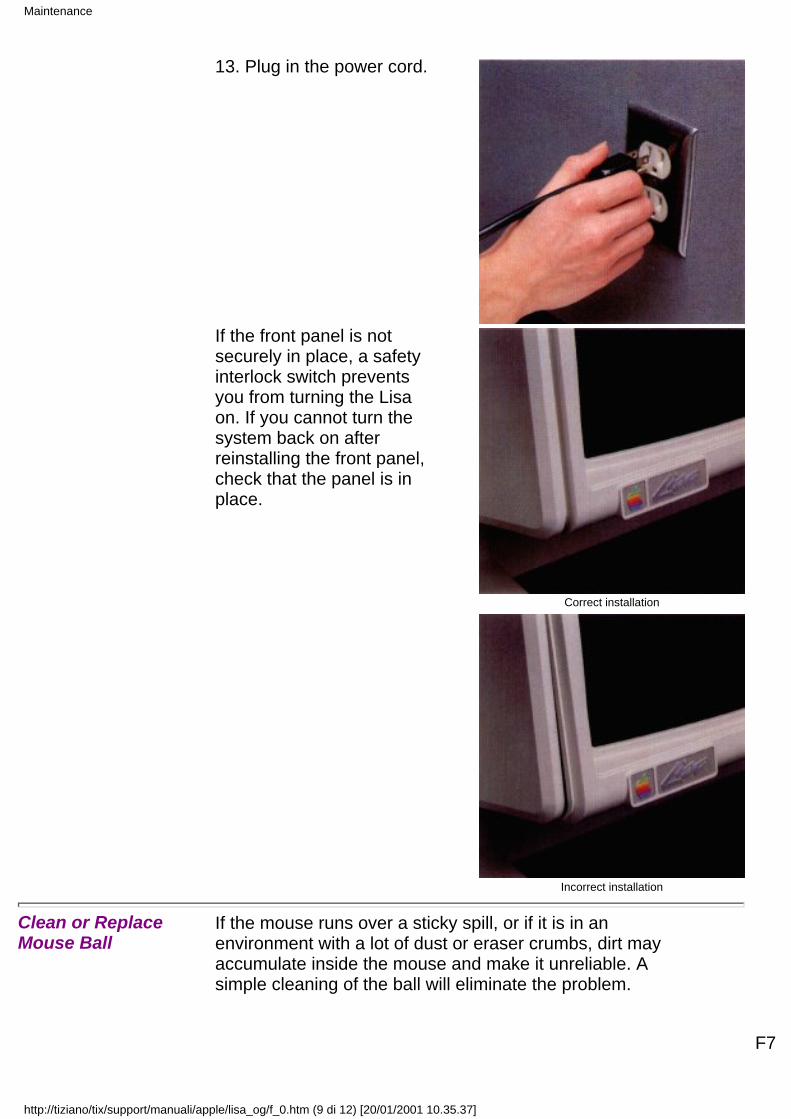
13. Plug in the power cord.
If the front panel is notsecurely in place, a safetyinterlock switch preventsyou from turning the Lisaon. If you cannot turn thesystem back on afterreinstalling the front panel,check that the panel is inplace.
Correct installation
Incorrect installation
Clean or ReplaceMouse Ball
If the mouse runs over a sticky spill, or if it is in anenvironment with a lot of dust or eraser crumbs, dirt mayaccumulate inside the mouse and make it unreliable. Asimple cleaning of the ball will eliminate the problem.
F7
Maintenance
http://tiziano/tix/support/manuali/apple/lisa_og/f_0.htm (9 di 12) [20/01/2001 10.35.37]

1. Detach the mouse cord from the Lisa, following thisprocedure:a. With one finger oneither side of the plug,push in on the softplastic shellsurrounding theconnector.
b. Pull the cord free from the Lisa.2. Open up the mouse, following this procedure:
a. Turn the mouse over, exposing the black plasticring around the ball.b. Pressing down on thering, turn itcounterclockwise 45degrees, until thenotch is lined up withthe "0" (for open) onthe mouse case.
3. Turn the mouse over andlet the ring and ball fallinto your hand.
Maintenance
http://tiziano/tix/support/manuali/apple/lisa_og/f_0.htm (10 di 12) [20/01/2001 10.35.37]

F8
4. If the ball is sticky, rinseit off gently and dry itthoroughly. Wipe theinside of the case with aclean, dry cloth.
5. Reassemble the mouse, following this procedure:a. Drop the ball gently into the hole.b. Place the ring over theball, lining up thenotch with the "0" onthe case.
c. Pressing down on thering, turn it clockwise45 degrees, until thenotch is lined up withthe "L" (for locked) onthe mouse case. Youcan feel the ring clickinto place.
F9
Maintenance
http://tiziano/tix/support/manuali/apple/lisa_og/f_0.htm (11 di 12) [20/01/2001 10.35.37]
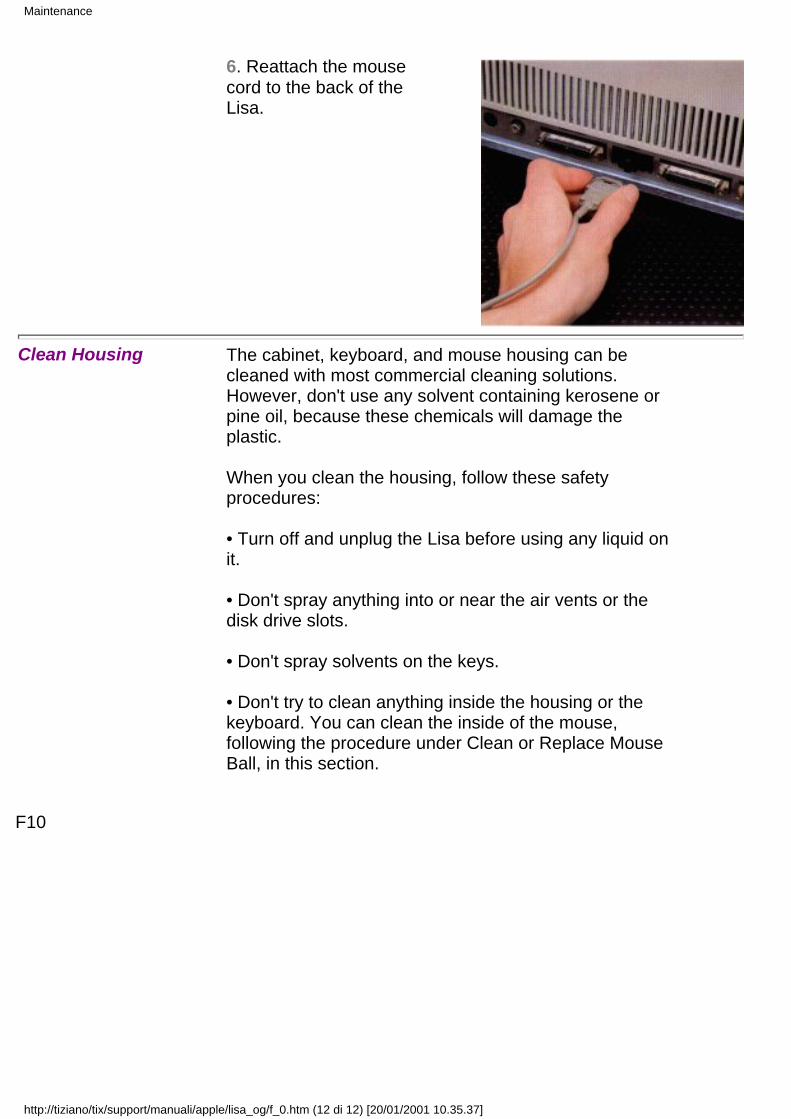
6. Reattach the mousecord to the back of theLisa.
Clean Housing The cabinet, keyboard, and mouse housing can becleaned with most commercial cleaning solutions.However, don't use any solvent containing kerosene orpine oil, because these chemicals will damage theplastic.
When you clean the housing, follow these safetyprocedures:
• Turn off and unplug the Lisa before using any liquid onit.
• Don't spray anything into or near the air vents or thedisk drive slots.
• Don't spray solvents on the keys.
• Don't try to clean anything inside the housing or thekeyboard. You can clean the inside of the mouse,following the procedure under Clean or Replace MouseBall, in this section.
F10
Maintenance
http://tiziano/tix/support/manuali/apple/lisa_og/f_0.htm (12 di 12) [20/01/2001 10.35.37]

Troubleshooting
Section GTroubleshooting
Troubleshooting
http://tiziano/tix/support/manuali/apple/lisa_og/g_0.htm (1 di 31) [20/01/2001 10.35.47]

Contents
G1 What's in Troubleshooting?G2 Start HereG2 Problems during StartupG4 Problems while WorkingG5 Problems while Powering OffG6 Procedure A. Power ProblemsG7 Procedure B. Specific Video ProblemsG8 Procedure C. Dark ScreenG9 Procedure D. System HangsG10 Procedure E. Mouse ProblemsG11 Procedure F. Keyboard ProblemsG11 Procedure G. Daisy Wheel Printer ProblemsG12 Procedure H. Dot Matrix Printer ProblemsG13 Procedure I. Startup ProFile ProblemsG14 Procedure J. Startup Diskette Problems
Giii
G16 Procedure K. Startup Expansion CardProblems
G18 Procedure L. Retrieving Diskettes
G18 Procedure M. Startup Symptoms andError Messages
G23 Procedure N. Startup MenuG24 Procedure 0. Operating System ErrorsG25 Procedure P. Environments WindowG26 Procedure Q. LisaTest
Giv
Troubleshooting
http://tiziano/tix/support/manuali/apple/lisa_og/g_0.htm (2 di 31) [20/01/2001 10.35.47]
What's in Troubleshooting?
This section contains suggested troubleshooting paths
to help you identify the problem when your Lisa seemsnot to be working properly.
This troubleshooting guide can be used in two ways:
• If you need help identifying which part of the system iscausing the problem, start by answering the firstquestion on the next page. Each possible answerdirects you either to another question or to adiagnostic procedure. If you determine that you have ahardware problem, refer to Section H, Service, in thismanual, for step-by-step instructions for replacingfaulty parts.
• If you think you already know which component is atfault, skip the troubleshooting guide and go to thediagnostic procedure for that module, or run theLisaTest diagnostic on that module. Instructions forusing LisaTest appear in Procedure Q, LisaTest.
Every time you turn on the Lisa, it automatically testsenough of the system to verify that startup is possible.For a complete description of the startup tests, seeAppendix 3, Automatic Startup Tests, in this manual.
This troubleshooting guide covers only the most likelyproblems. If the procedures suggested here do not solveyour problem, take the system to a qualified servicerepresentative for more thorough testing.
G1
Troubleshooting
http://tiziano/tix/support/manuali/apple/lisa_og/g_0.htm (3 di 31) [20/01/2001 10.35.47]
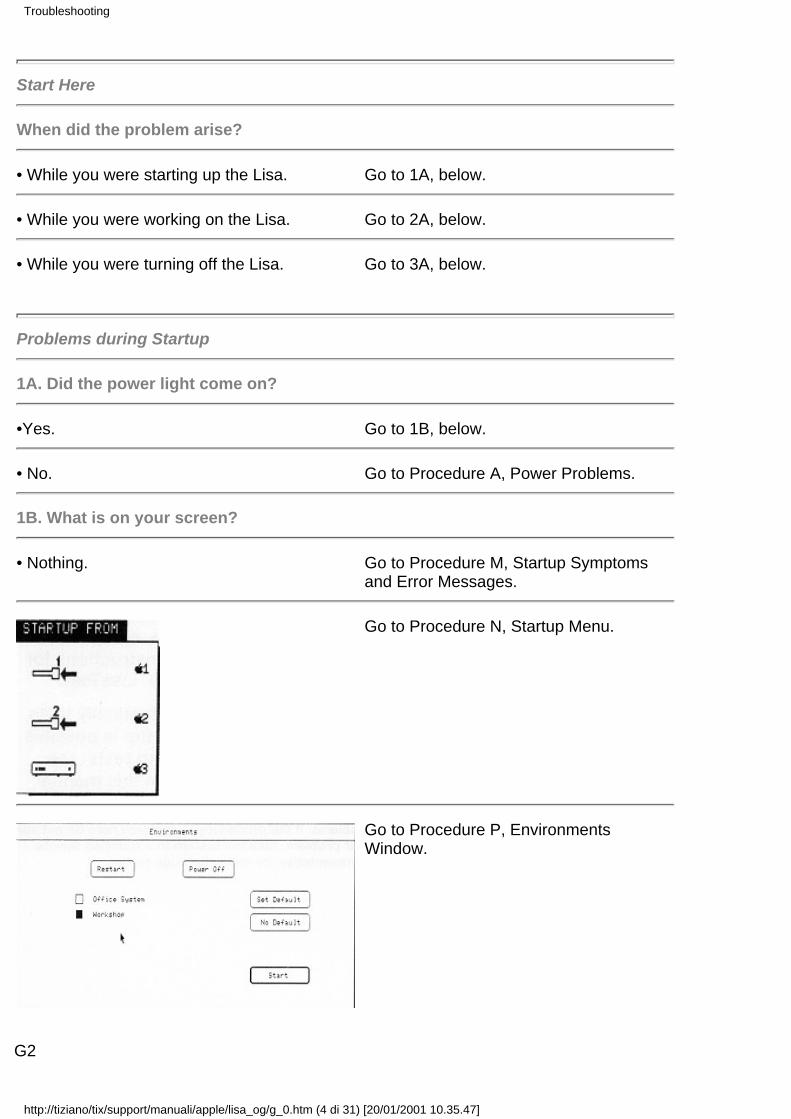
Start Here
When did the problem arise?
• While you were starting up the Lisa. Go to 1A, below.
• While you were working on the Lisa. Go to 2A, below.
• While you were turning off the Lisa. Go to 3A, below.
Problems during Startup
1A. Did the power light come on?
•Yes. Go to 1B, below.
• No. Go to Procedure A, Power Problems.
1B. What is on your screen?
• Nothing. Go to Procedure M, Startup Symptoms
and Error Messages.
Go to Procedure N, Startup Menu.
Go to Procedure P, EnvironmentsWindow.
G2
Troubleshooting
http://tiziano/tix/support/manuali/apple/lisa_og/g_0.htm (4 di 31) [20/01/2001 10.35.47]

Go to Procedure I, StartupProFile Problems.
Go to Procedure J, StartupDiskette Problems.
Go to Procedure K, StartupExpansion Card Problems.
Some other unexpected display. Go to Procedure M, Startup
Symptoms and ErrorMessages.
Normal desktop display. Go to 2B, below.
G3
Problems while Working
2A. What is on the screen?
• Nothing. Go to 3B, below.
• An error message, such as Go to Appendix 6, OfficeSystem Error Messages.
Troubleshooting
http://tiziano/tix/support/manuali/apple/lisa_og/g_0.htm (5 di 31) [20/01/2001 10.35.47]

Unstable picture, lines on screen, or display at anangle.
Go to Procedure B, SpecificVideo Problems.
Go to Procedure 0,Operating System Errors.
• Normal desktop display. Go to 2B, below.
2B. How does the system respond to input from you?
• Ignores everything: keyboard, mouse, on-off button,and disk-release buttons.
Go to Procedure D, SystemHangs.
• Responds correctly to everything except mouse. Go to Procedure E, Mouse
Problems.
• Responds correctly to everything except keyboard. Go to Procedure F,
Keyboard Problems.
• Responds correctly to everything except disk-releasebuttons.
Go to Procedure L, RetrievingDiskettes.
G4
Will not print. Go to Procedure G, Daisy
Wheel Printer Problems, orProcedure H, Dot MatrixPrinter Problems.
Problems while Powering Off 3A. What happened when you pressed the on-off button to turn the system off? The system did not respond at all. Go to Procedure D, System
Hangs.
Troubleshooting
http://tiziano/tix/support/manuali/apple/lisa_og/g_0.htm (6 di 31) [20/01/2001 10.35.47]

Power-down procedures proceeded normally, but oneor more of the diskettes was not released from thedrive.
Go to Procedure L, RetrievingDiskettes.
An error message appeared, such as Go to Appendix 6, OfficeSystem Error Messages.
3B. Is the power light on? No. Go to Procedure A, Power
Problems.
Yes Go to Procedure C, DarkScreen.
G5
Procedure APower Problems
1 Check to make sure that all cables are firmly in placeand taht the sytem is plugged in. If the power cord Isloose, insert it correctly and try again to start thesystem.
2. Verify that both the front and back panels are installedsecurely. Each panel is equipped with a safetyinterlock which automatically turns off all power if thepanel is not in place.
3. Verify that the wall outlet is actually receivingelectricity. Try plugging in a lamp and turning it on. Ifthe lamp works, you know that the outlet is working.
4. Verify that there are at least two inches of air space onall sides of the Lisa and that nothing is blocking theflow of air around the bottom edge of the cabinet.
A thermostat in the power supply shuts off the systemautomatically if the temperature surpasses about 90degrees Centigrade (195 degrees Fahrenheit). If thesystem may have overheated, unplug the Lisa,remove any obstructions to air flow, and let thesystem cool down for 10 minutes. Try again to turn iton after everything has cooled.
If this procedure reveals a temperature problem,rearrange your system setup to allow for adequateventilation. If the problem persists, replace the powersupply.
Troubleshooting
http://tiziano/tix/support/manuali/apple/lisa_og/g_0.htm (7 di 31) [20/01/2001 10.35.47]

If the system setup, the electrical supply, and the cablesall check out, the likely sources of the problem, in orderof probability, are:
• A bad power supply.
• A bad I/O board.
• A bad on-off switch.
The power supply is most likely to be the cause, but theonly way to verify the diagnosis is to try replacing the oldpower supply. If a new power supply doesn't solve theproblem, try replacing the I/O board. Instructions forreplacing both the power supply and the I/O boardappear in Section H, Service, in this manual.
If neither the power supply nor the I/O board is theproblem, take the system to a qualified service center forrepair. The on-off switch is not user serviceable.
G6
Procedure B Specific Video Problems
The symptoms listed in Table 1 indicate specificproblems, mostly with the video system. Except foradjusting the screen brightness, all of the repairs in thistable must be done by a qualified service technician. Donot try servicing the video system yourself; it can bedangerous even when the Lisa is unplugged.
Table 1. Specific Video Problems If Your Screen
Looks Like This Follow This Procedure
Take the system to aqualified service specialist.
Troubleshooting
http://tiziano/tix/support/manuali/apple/lisa_og/g_0.htm (8 di 31) [20/01/2001 10.35.47]

Take the system to aqualified service specialist.
Take the system to aqualified service specialist.
Adjust the screenbrightness.
G7
Procedure CDark Screen
If your screen goes blank while you are working, yourvideo system may have failed. Before you conclude thatthere is a hardware problem, however, you should checkfor other possible causes:
1. Try moving the mouse or pressing the spacebar. TheLisa screen automatically dims if no activity has takenplace for several minutes. If this automatic dimming isthe cause of your dark screen, moving the mouse orhitting a key should return the screen to its normalcontrast level.
2. Try holding down the right-hand key and right-hand key while pressing the 0 on the numerickeypad. This procedure toggles the screen contrastbetween the normal contrast setting and the darkestsetting. If the screen remains dark, repeat theprocedure so that the normal contrast setting will bein effect for the next step.
Troubleshooting
http://tiziano/tix/support/manuali/apple/lisa_og/g_0.htm (9 di 31) [20/01/2001 10.35.47]

3. Try adjusting the screenbrightness, using thehigher of the two whiteknobs extending fromthe back of the Lisa. Ifthis was the problem,readjust your screenbrightness and contrast,following the proceduresin Section D, DesktopManager ReferenceGuide, under Set ScreenBrightness and Contrast,in this manual.
If none of these procedures solves the problem, have theLisa serviced by a qualified service center. Working onthe video system yourself can be dangerous, even whenthe Lisa is turned off and unplugged.
G8
Procedure DSystem Hangs
Sometimes, usually because of software failures, acomputer ignores all input. The usual solution is to turnoff the system and start over. Since the Lisa on-offbutton is channeled through the computer, however,turning the system off is not always possible.
The reset button, marked ! on the back of the Lisa, is thebackup technique for bringing the system back up whenthe software hangs.
Warning: Pushing the reset button clears the computer'smemory and reinitiates the system startup procedures.This means that anything on the desktop that has notbeen saved on a disk is lost during a reset.
Before you push the reset button, make sure you havemade every effort to save any work that was on thedesktop:
• Try pressing the disk-release buttons, which shouldcause the Lisa to save all documents stored ondiskettes.
• Try turning the system off by pressing the on-offbutton, which should trigger a series of verification andstorage procedures.
If the system does not respond to either of these steps,you will not be able to recover whatever you wereworking on when the system failed. The disk should still
Troubleshooting
http://tiziano/tix/support/manuali/apple/lisa_og/g_0.htm (10 di 31) [20/01/2001 10.35.47]

contain the most recently saved version of eachdocument, however.
Press the reset button once.
1. If you see a message something like Figure 1, youprobably do not have a hardware problem.
Figure 1. Disk Repair Message
G9
Because you pressed the reset button, however, yourdisks have been left in a state that the Lisa cannotunderstand. For more information about how asudden shutdown affects disk organization, seeAppendix 4, On-Off Procedures. For the proceduresfor repairing your disks, see Section D, DesktopManager Reference Guide, under Repair a Disk aftera System Failure and Repair a Startup ProFile, in thismanual.
2. If the Lisa displays any other error message or errortones, you may have a hardware problem. Refer toProcedure M, Startup Symptoms and Error Messages.
3. If the Lisa doesn't respond even to the reset button,unplug the system from the wall outlet. Plug it back in,turn it on, and listen carefully for error tones. If thesystem starts, see items 1 and 2 in this list.
Procedure EMouse Problems
Mouse problems fall into two categories:
• General sluggish response. If the screen pointerresponds sporadically or unevenly to mousemovement, there is probably dirt inside the mouse.Clean the mouse, following the instructions in SectionF, Maintenance, in this manual. While you have themouse open, check to see if the ball is damaged. If theball has been gouged, replace it.
If the ball is neither dusty nor worn, and response isstill sluggish, you might be trying to use the mouse on a
Troubleshooting
http://tiziano/tix/support/manuali/apple/lisa_og/g_0.htm (11 di 31) [20/01/2001 10.35.47]

surface that is too uneven. If your desk or table has aparticularly uneven surface finish, you can put aclipboard or other flat object under the mouse. If noneof these efforts solves the problem, run the LisaTestdiagnostic on the mouse. Instructions for usingLisaTest appear in Procedure Q, LisaTest.
• Sluggish response in one direction only, or noresponse. If the pointer doesn't seem to move in eitheror both directions, or if the mouse button doesn't seemto work, there is probably a mechanical problem. First,make sure that the mouse cable is plugged securelyinto the back of the cabinet. Then run the LisaTestdiagnostic on the mouse. Instructions for usingLisaTest appear in Procedure Q, LisaTest.
G10
Procedure FKeyboardProblems
1. First, verify that the keyboard is plugged securely intothe cabinet. Pull out the plug entirely and replace it;don't just jiggle it in the socket.
2. If the keyboard still does not respond, run the LisaTestkeyboard diagnostic. Instructions for using LisaTestappear in Procedure Q, LisaTest.
Procedure GDaisy WheelPrinter Problems
1. Check that the power to the printer is on.
2. Check the Device Connections portion of thePreferences window to verify that the Lisa knowswhere your printer is attached. A daisy wheel printermust be attached to a serial connector.
Check that the Preferences settings match the actualconfiguration of the printer: print wheel, paper type,and paper size.
3. Check that the cable connecting the Lisa to the printeris installed securely.
4. Check that the front panel is securely in place on theprinter. The printer will not run if the front panel is notfully in place.
5. Check the ribbon on the printer. The daisy wheelprinter will not run if the ribbon has run out.
6. Run the printer self-check:a. Turn off the printer.
b. While pressing the form feed switch, turn the
Troubleshooting
http://tiziano/tix/support/manuali/apple/lisa_og/g_0.htm (12 di 31) [20/01/2001 10.35.47]
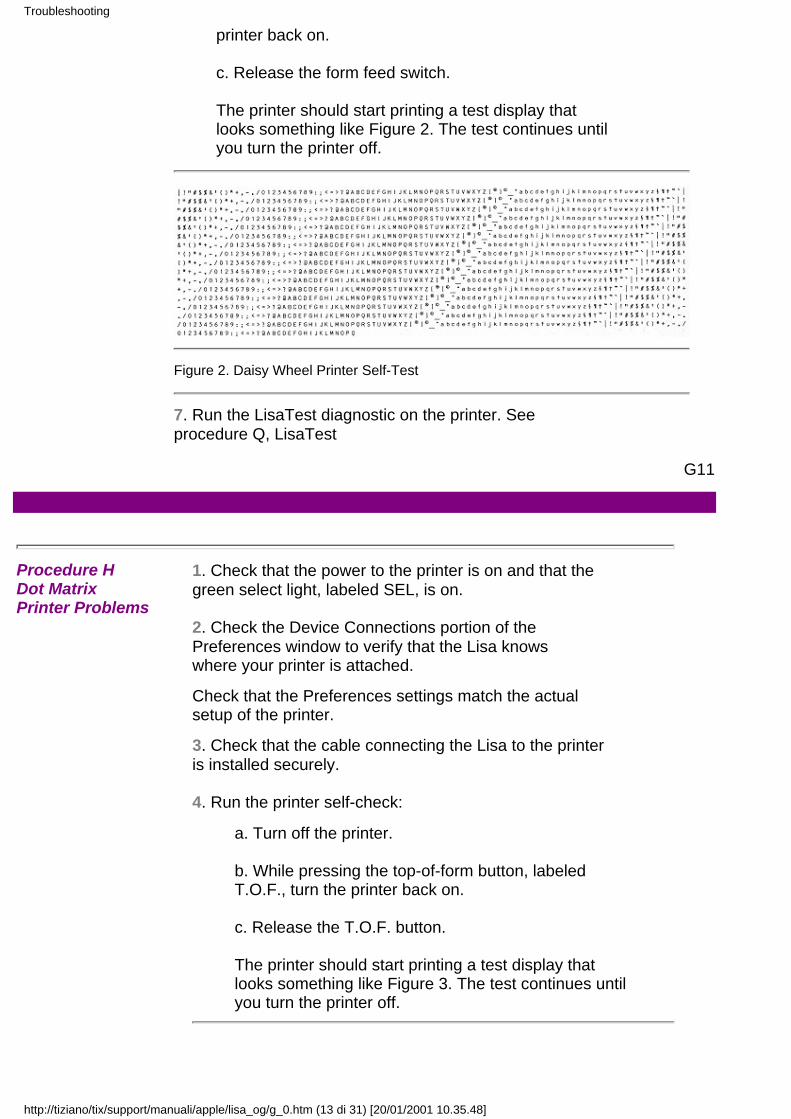
printer back on.
c. Release the form feed switch.
The printer should start printing a test display thatlooks something like Figure 2. The test continues untilyou turn the printer off.
Figure 2. Daisy Wheel Printer Self-Test 7. Run the LisaTest diagnostic on the printer. See
procedure Q, LisaTest
G11
Procedure HDot MatrixPrinter Problems
1. Check that the power to the printer is on and that thegreen select light, labeled SEL, is on.
2. Check the Device Connections portion of thePreferences window to verify that the Lisa knowswhere your printer is attached.
Check that the Preferences settings match the actualsetup of the printer.
3. Check that the cable connecting the Lisa to the printeris installed securely.
4. Run the printer self-check:
a. Turn off the printer.
b. While pressing the top-of-form button, labeledT.O.F., turn the printer back on.
c. Release the T.O.F. button.
The printer should start printing a test display thatlooks something like Figure 3. The test continues untilyou turn the printer off.
Troubleshooting
http://tiziano/tix/support/manuali/apple/lisa_og/g_0.htm (13 di 31) [20/01/2001 10.35.48]

Figure 3. Dot Matrix Printer Self-Test 5. Run the LisaTest diagnostic on the printer. See
Procedure Q, LisaTest.
G12
Procedure IStartup ProFileProblems
The presence of this icon onyour screen probablymeans that the Lisa islooking unsuccessfully forthe startup instructions ona ProFile hard diskattached to the built-inparallel connector.
If you ordinarily use a ProFile attached to the parallelconnector as your startup device, read step 1, below. Ifyou ordinarily use some other drive as your startupdevice, read step 2, below.
1. For some reason, the Lisa is having trouble readingyour startup ProFile.
First, verify that your ProFile is attached and turnedon. Do not attach or detach a ProFile while either theLisa or the ProFile is on. If the ProFile is not attached,follow this procedure for attaching it:
a. Turn off the ProFile.b. Turn off the Lisa.c. Attach the ProFile.d. Turn on the ProFile.e. Turn on the Lisa.
If the ProFile is already attached and turned on, thenfor some reason the Lisa can't read the startupinstructions. Reinstall your system software, using theLisa Office System diskettes in the back of this manualand following the instructions in Section D, Desktop
Troubleshooting
http://tiziano/tix/support/manuali/apple/lisa_og/g_0.htm (14 di 31) [20/01/2001 10.35.48]

Manager Reference Guide, under Reinstall SystemSoftware.
G13
2. If you are trying to start up from any device other thana ProFile attached to the built-in parallel connector,then the Lisa is looking for the startup instructions inthe wrong place.
a. Click Startup From.
b. When the Startupmenu appears, usethe mouse to selectthe startup device youare trying to use.
A ProFile attached to the built-in parallel connector isthe default startup device, that is, the device the Lisauses if you do not specify otherwise. If you usuallystart up from a different device, then the startupspecifications in your system Preferences may havebeen forgotten. When you have started the system,open the Preferences icon and check your startupspecifications.
Procedure JStartup DisketteProblems
The presence of any ofthese icons on your screenmeans that the Lisa islooking unsuccessfully for astartup diskette in one ofthe built-in floppy diskdrives.
Troubleshooting
http://tiziano/tix/support/manuali/apple/lisa_og/g_0.htm (15 di 31) [20/01/2001 10.35.48]

G14
If you are trying to start up from a diskette, read step 1,below. If you are trying to start up from a startup ProFile,read step 2, below.
1. Verify that the diskette is properly inserted in theproper drive. The number over the icon tells youwhether the Lisa is looking in drive 1 or drive 2. Checkthat the diskette is a startup diskette — a Lisa OfficeSystem diskette or a Development System diskette,for example.
a. After inspecting thediskette, reinsert itand click Continue.
b. If the same messageappears, try movingthe diskette into theother floppy diskdrive. Then clickStartup From.
c. When the Startupmenu appears, selectthe disk drive thatnow holds the startupdiskette.
If the Lisa starts successfully from the other diskdrive, run the LisaTest diagnostic on the first diskdrive, following the instructions in Procedure Q,LisaTest. To test a disk drive, the Lisa needs a blankor obsolete diskette. Any information that may be onthe diskette used for the test will be destroyed.
If the Lisa displays the same message for the seconddrive, your startup diskette may be damaged. Trystarting the system with the LisaTest diskette in eitherfloppy disk drive. If the Lisa starts, run a completesystem check. If the tests run satisfactorily, theproblem is probably with your startup disk.
Troubleshooting
http://tiziano/tix/support/manuali/apple/lisa_og/g_0.htm (16 di 31) [20/01/2001 10.35.48]

G15
2. If you are not trying to start up from a floppy disk, thenthe presence of the floppy disk drive icons on yourscreen means that the Lisa is trying to start up fromthe wrong device. To start up from your usual device:
a. Click Startup From.
b. When the Startupmenu appears, usethe mouse to selectyour startup drive.
If this procedure works, the specifications in yoursystem Preferences have probably been altered. Openthe Preferences icon and check the startupspecifications. If they are correct, then the Lisaprobably received an alternative startup commandduring the initial startup. You may have done thisinadvertently by pressing keys while the system wasstarting up.
Procedure KStartup ExpansionCard Problems
The presence of this icon onyour screen means that theLisa is lookingunsuccessfully for thesystem startup software ona device connected to anexpansion card. Thenumber of the expansionslot is displayed on theicon.
If your startup device is in fact attached to an expansioncard in the specified slot, read step 1, below. If yourstartup device is not attached to an expansion card, readstep 2, below.
G16
Troubleshooting
http://tiziano/tix/support/manuali/apple/lisa_og/g_0.htm (17 di 31) [20/01/2001 10.35.48]

1. Check to verify that the expansion card is securely inplace and that the cable between the expansion cardand the startup device is firmly attached. Verify thatthe startup device is turned on. Try again to start upthe Lisa.
If the same message appears, run the LisaTestdiagnostic on your expansion card. Instructions forusing LisaTest appear in Procedure Q, LisaTest.
2. If your startup device is not attached to an expansioncard, then the presence of the expansion card icon onyour screen means that the Lisa is trying to start upfrom the wrong device. To start up from your usualdevice:
a. Click Startup From.
b. When the Startupmenu appears, usethe mouse to selectyour startup drive.
If this procedure works, the specifications in yoursystem Preferences have probably been altered. Openthe Preferences icon and check the startupspecifications. If they are correct, then the Lisaprobably received an alternative startup commandduring the initial startup. You may have done thisinadvertently by pressing keys while the system wasstarting up.
G17
Troubleshooting
http://tiziano/tix/support/manuali/apple/lisa_og/g_0.htm (18 di 31) [20/01/2001 10.35.48]
Procedure LRetrievingDiskettes
The disk-release buttons on the built-in floppy diskdrives do not work when the power to the Lisa is turnedoff. The Lisa should automatically release any diskettesbefore powering off; in case something goes wrong andone of your diskettes is trapped in the drive, follow thisprocedure:
1. Turn the Lisa on.
2. When you hear the first click, and before you hear thedouble click, press the spacebar.
3. When the Startup menu appears, press the disk-release button. The diskette should be ejected.
If this procedure doesn't work, there is probably amechanical problem with the disk drive. Do not try to prythe diskette out of the drive. Because the diskette isclamped in place, forcing it out of the drive will probablydestroy the diskette.
To retrieve the diskette, take the drive to a qualifiedservice center for repair.
Procedure MStartup Symptomsand ErrorMessages
Every time you turn on the Lisa, the system automaticallyruns a series of internal tests. These tests fall into twocategories:
• The "kernel" tests, which are designed to catchproblems serious enough to interfere with the rest ofthe sequence. After the kernel tests, the Lisa emits oneclick.
• The module tests, which may result in specific errormessages. After the module tests, the Lisa emits adouble click.
Errors detected during the tests can result in screenmessages, error tones, or both. If your screen displaysan alert, read the discussion following the tables below.Table 2 lists the error tones generated by various startuptests and their meanings. If you do not rememberwhether or not the Lisa sounded any error tones duringstartup, press the reset button once to repeat the tests.
G18
Troubleshooting
http://tiziano/tix/support/manuali/apple/lisa_og/g_0.htm (19 di 31) [20/01/2001 10.35.48]

Table 2. Startup Error Tones Tones Icon Meaning Lo No icon displayed CPU or memory
error.Must be diagnosedby aqualified servicetechnician.
Lo,Lo No icon displayed Memory failure in
preliminary test.Replaceone or both memoryboards.
Lo,Hi Card cage A problem
somewhere inthe system. Ifpossible,run a completesystemcheck to identifywhichboard is causing theproblem. SeeProcedureQ, LisaTest.
Lo,Lo,Hi CPU board Replace CPU board.
Lo,Hi,Lo I/O board Replace I/O board.
Troubleshooting
http://tiziano/tix/support/manuali/apple/lisa_og/g_0.htm (20 di 31) [20/01/2001 10.35.48]

Lo,Hi,Hi Memory board Replace specifiedmemory board.
G19
Table 2. Startup Error Tones, continued Tones Icon Meaning Hi,Lo,Lo Expansion card Replace expansion
cardin specified slot.
Hi,Lo,Hi Keyboard Run keyboard
diagnostic. SeeProcedure Q,LisaTest.
Troubleshooting
http://tiziano/tix/support/manuali/apple/lisa_og/g_0.htm (21 di 31) [20/01/2001 10.35.48]
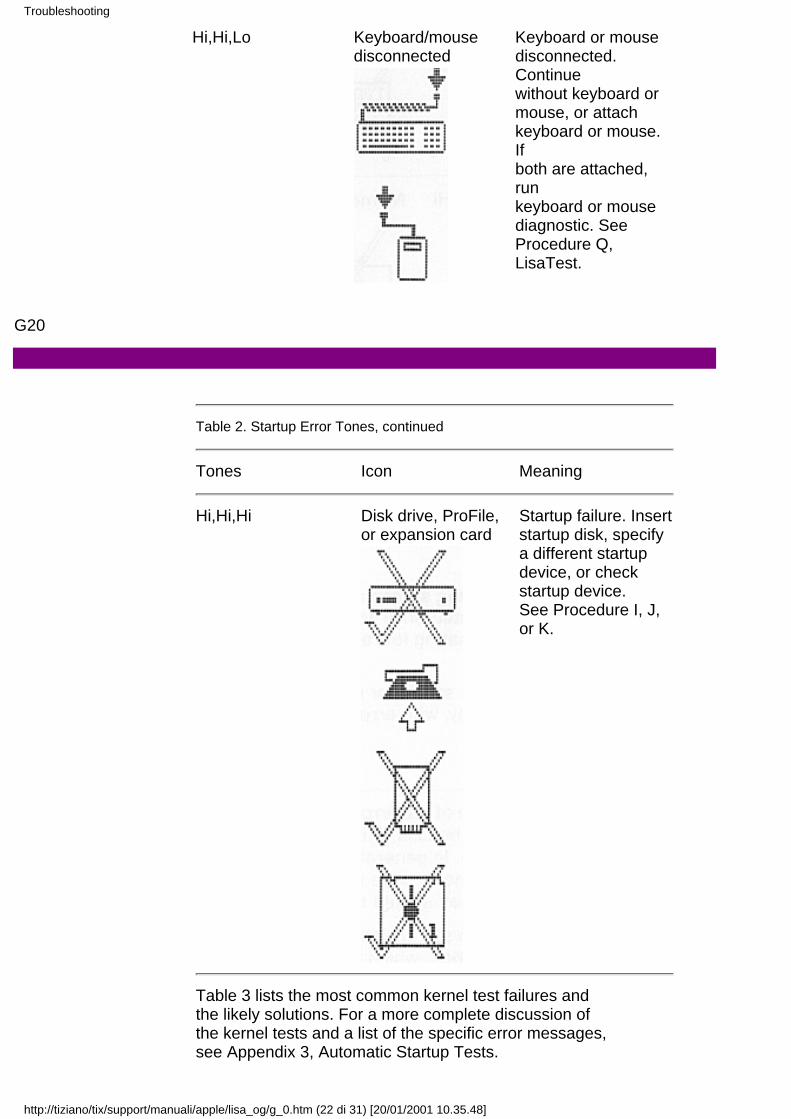
Hi,Hi,Lo Keyboard/mousedisconnected
Keyboard or mousedisconnected.Continuewithout keyboard ormouse, or attachkeyboard or mouse.Ifboth are attached,runkeyboard or mousediagnostic. SeeProcedure Q,LisaTest.
G20
Table 2. Startup Error Tones, continued Tones Icon Meaning Hi,Hi,Hi Disk drive, ProFile,
or expansion cardStartup failure. Insertstartup disk, specifya different startupdevice, or checkstartup device.See Procedure I, J,or K.
Table 3 lists the most common kernel test failures and
the likely solutions. For a more complete discussion ofthe kernel tests and a list of the specific error messages,see Appendix 3, Automatic Startup Tests.
Troubleshooting
http://tiziano/tix/support/manuali/apple/lisa_og/g_0.htm (22 di 31) [20/01/2001 10.35.48]

Table 3. Kernel Test Failures Symptom Possible Fix Blank screen, no error
tones1. Replace CPU board.2. Replace I/O board.3. Replace card cage.
White screen with whitelines, no error tones
Replace CPU board.
Random display, no errortones
Replace CPU board.
Random display, oneerror tone
Replace CPU board.
G21
Table 3. Kernel Test Failures, continued Symptom Possible Fix Random display, two low
error tones1. Replace memory boardin slot 2.2. Replace CPU board.3. Replace card cage.
Flashing screen andrepeated error tone,alternating low and highpitch
1. Replace I/O board.2. Replace CPU board.3. Replace card cage.
Blank screen or randomdisplay, with error tones
Replace board acording toerror tone sequence. SeeTable 2, Startup ErrorTones.
Some of the error messages indicate hardware problems
with the Lisa; others indicate a problem with the systemsetup. In general, the presence of an icon with or withouta numeric code means that the module represented bythe icon should be checked.
Some startup error messages are presented to you as analert box, which offers you up to three choices, as shownin Figure 4.
Troubleshooting
http://tiziano/tix/support/manuali/apple/lisa_og/g_0.htm (23 di 31) [20/01/2001 10.35.48]

Figure 4. Startup Alert Box You make your choice either by clicking on one of the
boxes or by holding down the key while pressing thenumber displayed in the box.
Restart
If you choose Restart, the Lisa repeats the startup tests.Choose Restart if you want to verify the test results.
G22
Continue
The Continue option appears only if the problem is onethat allows startup to continue. If, for example, yourstartup ProFile was not turned on during startup, you cansimply turn it on and click Continue. The Lisa continuesthe startup procedures.
Startup From
When you choose Startup From, the Lisa displays theStartup menu and waits for you to specify a startupdevice. Choose this option when you want to use adifferent startup device from the one specified in yoursystem Preferences or when your system Preferenceshave been forgotten.
If the Lisa has been unplugged for more than 10 hours,then the Preferences, usually stored in parametermemory, have been forgotten. In this case, the Lisaautomatically looks for a startup ProFile attached to thebuilt-in parallel connector. If your startup device isanything else, you will have to tell the Lisa where to find itthrough the Startup menu.
Troubleshooting
http://tiziano/tix/support/manuali/apple/lisa_og/g_0.htm (24 di 31) [20/01/2001 10.35.48]

To choose a startup device,click on the device you wantto use, or hold down the®key while pressing the keylisted in the menu next tothe device you want to use.As soon as you choose adevice, the Lisa continuesthe startup procedures.
Procedure NStartup Menu
The Startup menu appearsany time you hit any keyexcept (Caps Lock) duringthe module test sequenceof the automatic startuptests.
The Startup menu allows you to specify a differentstartup device from the one you usually use.
G23
If you unintentionally interrupted the startup sequence bypressing a key, simply select your startup device from theStartup menu. The Lisa will continue normal startupprocedures.
If you want to call up the Startup menu during startup,follow this procedure:
1. Turn on the Lisa.
2. When the cabinet emits a single click, and before itemits a double click, press any key except
Procedure OOperatingSystemErrors
This icon on your screenmeans that the Lisa OfficeSystem has failed. There isprobably nothing wrongwith your hardware; youhave encountered aproblem with the software.
Troubleshooting
http://tiziano/tix/support/manuali/apple/lisa_og/g_0.htm (25 di 31) [20/01/2001 10.35.48]

As shown in Figure 5, your only option when presentedwith the Operating System failure icon is to restart thesystem, using either your normal startup device oranother startup device. The best procedure is to restartusing the LisaTest diskette in either built-in floppy diskdrive. If the system starts, run a complete system check.See Procedure Q, LisaTest.
If the tests proceed normally, restart the system usingyour usual startup device. Your disks will probably be leftin an unusual state, and the Lisa will suggest you repairthem. See Section D, Desktop Manager ReferenceGuide, under Repair a Storage Disk after a SystemFailure and Repair a Startup ProFile, in this manual.
Figure 5. Operating System Error
G24
If you have a support agreement on your Lisa system, youshould report the failure. Write down the number underthe icon before you restart the system, and report thatnumber to your service representative or the Appleservice operator.
Procedure PEnvironmentsWindow
If your startup ProFile contains any software other thanthe Lisa Office System, you may encounter a screensimilar to the one shown in Figure 6 when you start up theLisa.
Troubleshooting
http://tiziano/tix/support/manuali/apple/lisa_og/g_0.htm (26 di 31) [20/01/2001 10.35.48]

Figure 6. Environments Window This display, known as the Environments window, allows
you to specify which software you want to use. To start upthe Lisa Office System, click Office System, and thenclick Start.
If you always want to use the Lisa Office System:1. Click Office System.
G25
Troubleshooting
http://tiziano/tix/support/manuali/apple/lisa_og/g_0.htm (27 di 31) [20/01/2001 10.35.48]

2. Click Set Default.
3. Click Start.
Once you have set the default, you will never see theEnvironments window unless you specifically request it.To call up the Environments window from the Lisa OfficeSystem, hold down the key while pressing the on-offbutton. To call up the Environments window duringsystem startup, press the and keyssimultaneously after you hear the double click from thecabinet.
For more information on the Environments window, seethe Workshop User's Guide for the Lisa or the manualthat came with the other software on your ProFile.
Procedure QLisaTest
LisaTest is designed to identify which part of the Lisa iscausing a problem. If you think you already know whichpart may be at fault, follow the instructions below forrunning a test on that part. If the suspected part checksout, or if you do not know which part to test, run acomplete system check.
The first part of this procedure explains the meanings ofthe testing options presented by LisaTest. The secondpart describes how to use the LisaTest diskette, and thethird part describes how to back up the LisaTestdiskette.
Troubleshooting
http://tiziano/tix/support/manuali/apple/lisa_og/g_0.htm (28 di 31) [20/01/2001 10.35.48]

G26
The diskette itself is stored on the inside front cover ofthis manual.
Choosing Options The LisaTest diskette follows the same conventions as
the Lisa Office System. You open menus by pointing tothe menu title and holding down the mouse button; youchoose menu items by releasing the mouse button whenthe item you want is highlighted.
Set Diagnostic Controls
This option allows you to specify whether the Lisa runseach test once or repeatedly. If you do not set thecontrols, the Lisa runs the tests only once.
Choose Set Diagnostic Controls and ask for continuoustests if the problem is intermittent. Then choose eitherRun Complete System Check or Check. The Lisacontinues running the tests until either a problem isfound or you stop the tests by pressing the on-off buttononce.
Run Complete System Check
This option tests all of the modules inside the Lisa,except the controller for the floppy disk drive that holdsthe LisaTest diskette. You will need a blank or obsoletediskette for the test of the other floppy disk drive;everything on that diskette will be erased.
If you choose Run Complete System Check, the Lisa asksyou to participate in some of the tests, such as thekeyboard and mouse test. Simply follow the instructionson the screen during these tests.
You can terminate the system check at any time bypressing the on-off button once.
Check
This option allows you to test only the part or parts thatyou think may be at fault. When you choose Check fromthe Options menu, the Lisa presents you with a display ofall available tests. Only the Lisa component that youselect from this display will be tested.
Troubleshooting
http://tiziano/tix/support/manuali/apple/lisa_og/g_0.htm (29 di 31) [20/01/2001 10.35.48]

G27
For the test of the floppy disk drive controller, you need ablank or obsolete diskette. This test destroys anyinformation that may have been stored on the diskette.You cannot test the drive that holds the LisaTestdiskette.
Using LisaTest To run LisaTest,
If the Lisa is turned on, turn it off by pressing the on-off button once.
Insert the LisaTest diskette into drive 1, if it isworking. If drive 1 is not working, insert the disketteinto drive 2.
Turn the Lisa on.
When you hear the first click, and before you hear thedouble click, press the spacebar, and then wait for theStartup menu to appear.
Use the mouse to select the drive that holds LisaTest.If the mouse isn't working, hold down the® keywhile pressing the number listed in the menu next tothe drive.
Choose either Run Full System Check, to test theentire system, or Check, to test a specific component,from the Options menu.
If you chose Check, select the icon for the part youwant tested.
Click OK.
Follow any instructions on the screen for testing thekeyboard, mouse, or disk drives.
If you want to terminate the tests, press the on-offbutton once or hold down the® key while pressingthe period.
Backing Up LisaTest
Troubleshooting
http://tiziano/tix/support/manuali/apple/lisa_og/g_0.htm (30 di 31) [20/01/2001 10.35.48]

To make a backup copy of LisaTest,
If the Lisa is turned on, turn it off by pressing the on-off buttononce.
G28
Insert the LisaTest diskette into either floppy diskdrive.
Insert a blank diskette into the other floppy disk drive.
Turn the Lisa on.
When you hear the first click, and before you hear thedouble click, press the spacebar, and then wait for theStartup menu to appear.
Use the mouse to select the drive that holds LisaTest.If the mouse isn't working, hold down the® keywhile pressing the number listed in the menu next tothe drive.
Choose Check from the Options menu.
Select the icon labeled Back Up LisaTest.
Click OK.
G29
Troubleshooting
http://tiziano/tix/support/manuali/apple/lisa_og/g_0.htm (31 di 31) [20/01/2001 10.35.48]

Service
Section HService
Service
http://tiziano/tix/support/manuali/apple/lisa_og/h_0.htm (1 di 53) [20/01/2001 10.36.23]

Contents
H1 What's in Service?
H3 Replace Disk Drives
H3 Getting InsideH4 Removing Disk DrivesH6 Installing Disk DrivesH8 Finishing Up
H10 Replace I/O, CPU, or Memory Boards
H10 Getting InsideH13 Removing BoardsH15 Installing BoardsH17 Finishing Up
H20 Replace Card Cage
H20 Getting InsideH22 Transferring CardsH25 Finishing Up
H28 Remove and Install Expansion Cards
H28 Getting InsideH30 Removing Expansion CardsH33 Installing Expansion CardsH36 Finishing Up
H38 Replace Power Supply
H38 Getting InsideH40 Replacing Power SupplyH42 Finishing Up
H43 Install Glare Filter
H43 Getting InsideH45 Installing Glare FilterH46 Finishing Up
Hiii
Service
http://tiziano/tix/support/manuali/apple/lisa_og/h_0.htm (2 di 53) [20/01/2001 10.36.23]

What's in Service?
The Lisa has been designed so that you can do most of
the servicing yourself. This section is a step-by-stepguide to replacing, removing, and installing internalparts.
Figure 1, on the fold-out page, shows all of the userservicable parts covered in this section.
If you are having trouble with the Lisa but don't knowwhich component is at fault, consult Section G,Troubleshooting.
Before you begin any servicing, make sure the Lisa hasbeen turned off and unplugged. As a safety measure, theLisa automatically turns itself off as soon as you removeeither the front or the back panel. But in order to protectyour disks from damage during a sudden loss of power,it's a good idea to turn the Lisa off with the on-off buttonbefore removing either panel. Since the power supplydraws a small amount of current even when the system isturned off, you should always unplug the Lisa beforeservicing.
When removing the backpanel, you will have todetach some or all of thecables connecting the Lisato peripheral devices. Youmay save yourself time andconfusion later by labelingall connectors with tapewhen you remove thecables so that you canmatch the plugs andsockets later.
H1
Service
http://tiziano/tix/support/manuali/apple/lisa_og/h_0.htm (3 di 53) [20/01/2001 10.36.23]

Figure 1. Lisa. Exploded view
Service
http://tiziano/tix/support/manuali/apple/lisa_og/h_0.htm (4 di 53) [20/01/2001 10.36.23]

Service
http://tiziano/tix/support/manuali/apple/lisa_og/h_0.htm (5 di 53) [20/01/2001 10.36.23]

You should also turn off allperipheral devices beforeservicing the Lisa. If youhave a ProFile hard diskattached to the Lisa, waituntil the ready light on thedisk has been steady for atleast 10 seconds beforeturning off the ProFile.
H2
Replace DiskDrives
Getting Inside1. If the Lisa is on, turn it offby pressing the on-offbutton. Wait until alldiskettes are releasedand the light in the on-offbutton is off. Removeany diskettes that areejected from the diskdrives.
2. Turn off all peripheraldevices. Unplug the Lisaat either the back panelor the wall outlet.
Service
http://tiziano/tix/support/manuali/apple/lisa_og/h_0.htm (6 di 53) [20/01/2001 10.36.23]

3. Remove the front panel, following this procedure:a. Place on finger oneach of the two fingerpads beneath thefront panel.
b. Push the pads up to unlatch the panel.c. Pull the bottom of the panel forward and down.
H3
Removing Disk Drives
1. Loosen the thumbscrewat the base of the diskdrives by turningcounterclockwise.
This screw loosens butdoes not come free fromthe module. When it'sloose, you can feel thepressure of the spring atthe base of the screw,and the screw can be pulled slightly in and out.
2. Grasp the metal tabbetween the two drivesand slowly pull out themodule.
Be careful not to put anystrain on the cablesconnected to the back ofthe drives.
Service
http://tiziano/tix/support/manuali/apple/lisa_og/h_0.htm (7 di 53) [20/01/2001 10.36.23]

3. Place the module facedown, exposing thecable connectors.Identify the connectorattached to drive 1, thedrive closer to you.
H4
4. Place one thumb oneach of the two gray tabsprojecting from thecable connector. Pull thetabs apart to release thecable.
5. Remove the cable fromthe connector.
Service
http://tiziano/tix/support/manuali/apple/lisa_og/h_0.htm (8 di 53) [20/01/2001 10.36.23]

6. Repeat with the secondcable connector,removing it from drive 2.
7. Set aside the old disk drive module and unpack thenew one.
H5
Installing Disk Drives
1. Locate the two cableconnectors on the backside of the disk drivemodule. Place themodule directly in frontof the cabinet, with thecable connectorspointing up.
2. Make sure the ridgedtabs on either side of thecable connectors are Inan open position.
If these tabs are upright,push them away fromeach other until they fallopen.
Service
http://tiziano/tix/support/manuali/apple/lisa_og/h_0.htm (9 di 53) [20/01/2001 10.36.23]

3. Locate the shorter of thetwo flat, gray cablesinside the cabinet. Youwill insert this cable intothe connector on drive 2,the drive closer to theLisa.
H6
4. Align the black plasticplug over the connectorwith the holes pointingdown and the ribboncable extending towardthe cabinet.
5. Place the plug gently intothe gray connector,making sure it iscentered and fittedneatly into the socket.Verify that all 20 prongson the connector arealigned with the 20 holesin the plug.
Service
http://tiziano/tix/support/manuali/apple/lisa_og/h_0.htm (10 di 53) [20/01/2001 10.36.23]

6. Press down firmly on theplug until the gray tabson either side click intoplace.
7. Repeat this procedurewith the longer cable,inserting it into theconnector for drive 1,the drive closer to you.
H7
8. Pick up the disk drivemodule by the metalhousing, tilt it back, andslide it into the cabinet.
Service
http://tiziano/tix/support/manuali/apple/lisa_og/h_0.htm (11 di 53) [20/01/2001 10.36.23]

9. Secure the module bypushing in on the screwat the base of the drivesand turning the screwclockwise until it is snug.
Finishing Up1. Replace the front panel, following this procedure:a. Hold the panel withone finger on eachpad along the bottomedge.
H8
b. Insert the upper edgeof the panel behindthe lip of the tophousing on thecabinet.
Service
http://tiziano/tix/support/manuali/apple/lisa_og/h_0.htm (12 di 53) [20/01/2001 10.36.23]

c. Pressing the fingerpads up, push thebottom edge of thepanel against thecabinet until the panelclicks into place.
2. Reconnect the powercord.
H9
If the front panel is notsecurely in place, a safetyinterlock switch preventsyou from turning the Lisaon. If you cannot turn thesystem back on afterreinstalling the front panel,check that the panel is inplace.
Correct installation
Service
http://tiziano/tix/support/manuali/apple/lisa_og/h_0.htm (13 di 53) [20/01/2001 10.36.23]
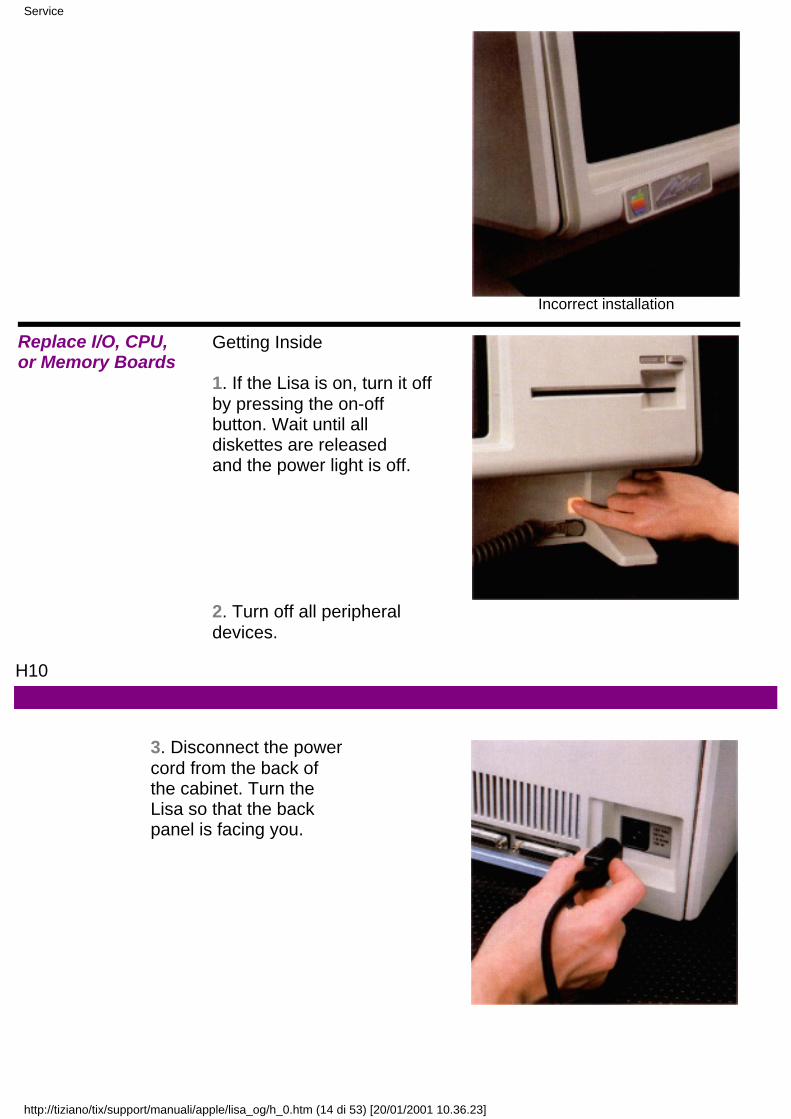
Incorrect installation
Replace I/O, CPU,or Memory Boards
Getting Inside
1. If the Lisa is on, turn it offby pressing the on-offbutton. Wait until alldiskettes are releasedand the power light is off.
2. Turn off all peripheraldevices.
H10
3. Disconnect the powercord from the back ofthe cabinet. Turn theLisa so that the backpanel is facing you.
Service
http://tiziano/tix/support/manuali/apple/lisa_og/h_0.htm (14 di 53) [20/01/2001 10.36.23]

If they are in the way,remove any cables thatare attached to theconnectors along thebottom edge of the backpanel.
4. Remove any cablesextending from theexpansion cards on theleft side of the backpanel.
5. Remove the back panel, following this procedure:a. Turn the twothumbscrews alongthe upper edgecounterclockwise untilthey won't turn anyfurther.
These screws loosenbut do not come freefrom the back panel.
H11
Service
http://tiziano/tix/support/manuali/apple/lisa_og/h_0.htm (15 di 53) [20/01/2001 10.36.23]

b. Pull the panel towardyou slightly and up.
6. Remove the card cageby pulling the bar thatruns just above the rowof connectors along thebottom of the cage.
Brace your thumbsagainst the lower edge ofthe cabinet and pull hardon the bar to free thecard cage from theinterior connectors.
Be careful not to put anypressure on the smallcomponents just behindthe bar.7. Pull the cage out and setit upright on the table.
H12
Service
http://tiziano/tix/support/manuali/apple/lisa_og/h_0.htm (16 di 53) [20/01/2001 10.36.23]

Removing Boards1. Identify the board to beremoved.
The CPU board has abrown lever on the rightand a blue lever on theleft.
The I/O board has abrown lever on the rightand a red lever on theleft.
The memory boardshave brown levers on theright and yellow leverson the left.
The components on thememory boards andCPU board all face oneway; the components onthe I/O board face theopposite way.
H13
2. Place one thumb oneither lever andsimultaneously flip upthe colored lockinglevers at the top of theboard, and then pull theboard up and out of itsslot.
Handle the board by thelevers and plastic edgesonly.
Service
http://tiziano/tix/support/manuali/apple/lisa_og/h_0.htm (17 di 53) [20/01/2001 10.36.23]

If you are servicing amemory board and thereis an expansion card inslot 3, be careful not toscrape the left-handlever against theexpansion card. If youhave trouble handlingthe levers in the tightspace, remove theexpansion card beforeservicing the memoryboards.3. Place the board carefullyon a flat surface, with thecomponents facing up.
H14
Installing Boards
1. Identify the slot intowhich the board will beinserted.
All boards are installedwith the brown lockinglever on the right. Thelabel on the card cagematches the color of theleft tab on the board thatgoes in each slot.
If you have only onememory board, you caninstall it in either the slotlabeled MEM 1 or theslot labeled MEM 2.
Service
http://tiziano/tix/support/manuali/apple/lisa_og/h_0.htm (18 di 53) [20/01/2001 10.36.23]

Your card cage probablycontains at least twoboards. This photoshows an empty cardcage to show the fourslots more clearly.2. If the colored tabs on theboard are not already inan up position, flip themup.Handle the board by thelevers and plastic edgesonly.
H15
3. With the brown lever onthe right, slide the boardinto the thin grooves inthe black plastic cage.Note that the slots in thebottom of the cage arestaggered. This preventsyou from inserting theboard into the wrongslot.
You may have to centerthe bottom edge of theboard in the slot. If so,touch only the plasticedge of the board. Donot touch the goldconnector.
Service
http://tiziano/tix/support/manuali/apple/lisa_og/h_0.htm (19 di 53) [20/01/2001 10.36.23]

The tabs on the CPU andI/O boards should beresting in the notchesalong the top of thecage.
The tabs on the memoryboards should be restingon the black plasticframe.
H16
Service
http://tiziano/tix/support/manuali/apple/lisa_og/h_0.htm (20 di 53) [20/01/2001 10.36.23]

4. Push down the leverssimultaneously to lockthe board into place.
If this requires excessiveforce, check to see thatthe gold fingers alongthe bottom of the boardare aligned over the slot.
At this point, therounded tabs below thelevers should be set inthe lower notches on theplastic card cage.
Finishing Up1. Holding the card cage bythe plastic frame, slide itback into the cabinet.
H17
Service
http://tiziano/tix/support/manuali/apple/lisa_og/h_0.htm (21 di 53) [20/01/2001 10.36.23]

2. The cage will offer someresistance for the last1/4-inch, while the cardcage connectors slideinto their slots inside thecabinet. Hold the framewith your fingers andpress with your thumbsagainst the bottom ofthe cage. The cage isinstalled when the panelalong the bottom is justinside of the bottomedge of the cabinet.
3. Replace the back panel, following this procedure:a. Make sure the metalprongs attached tothe two screws on thepanel are pointed tothe left.
b. Insert the four tabsalong the lower edgeof the back panel intothe slots at the baseof the cabinet.
H18
Service
http://tiziano/tix/support/manuali/apple/lisa_og/h_0.htm (22 di 53) [20/01/2001 10.36.23]

c. Push the panel flat against the back of the cabinet.If you encounter resistance, check to make surethat the card cage is pushed as far into the cabinetas it will go.
d. Turn the twothumbscrewsclockwise until theyare snug.
4. Reattach any cables thatyou removed from theexpansion cards or fromthe bottom edge of theback panel.
5. Connect the power cordto the back of the Lisa.
H19
Service
http://tiziano/tix/support/manuali/apple/lisa_og/h_0.htm (23 di 53) [20/01/2001 10.36.23]

Replace CardCage
Although most of the Lisa's components are on the I/O,CPU, and memory boards, there are a few circuits on thebottom of the card cage. If the LisaTest diskette couldnot identify whether a problem is with the cage or one ofthe boards, the recommended procedure is to replacethe card cage, which comes with new boards installed.
Getting Inside1. If the Lisa is on, turn it offby pressing the on-offbutton. Wait until alldiskettes are releasedand the power light is off.
2. Turn off all peripheraldevices.3. Disconnect the powercord from the back ofthe cabinet.
4. Remove the cables thatare attached to theconnectors along thebottom edge of the backpanel. Turn the Lisa sothat the back panel isfacing you.
Service
http://tiziano/tix/support/manuali/apple/lisa_og/h_0.htm (24 di 53) [20/01/2001 10.36.23]
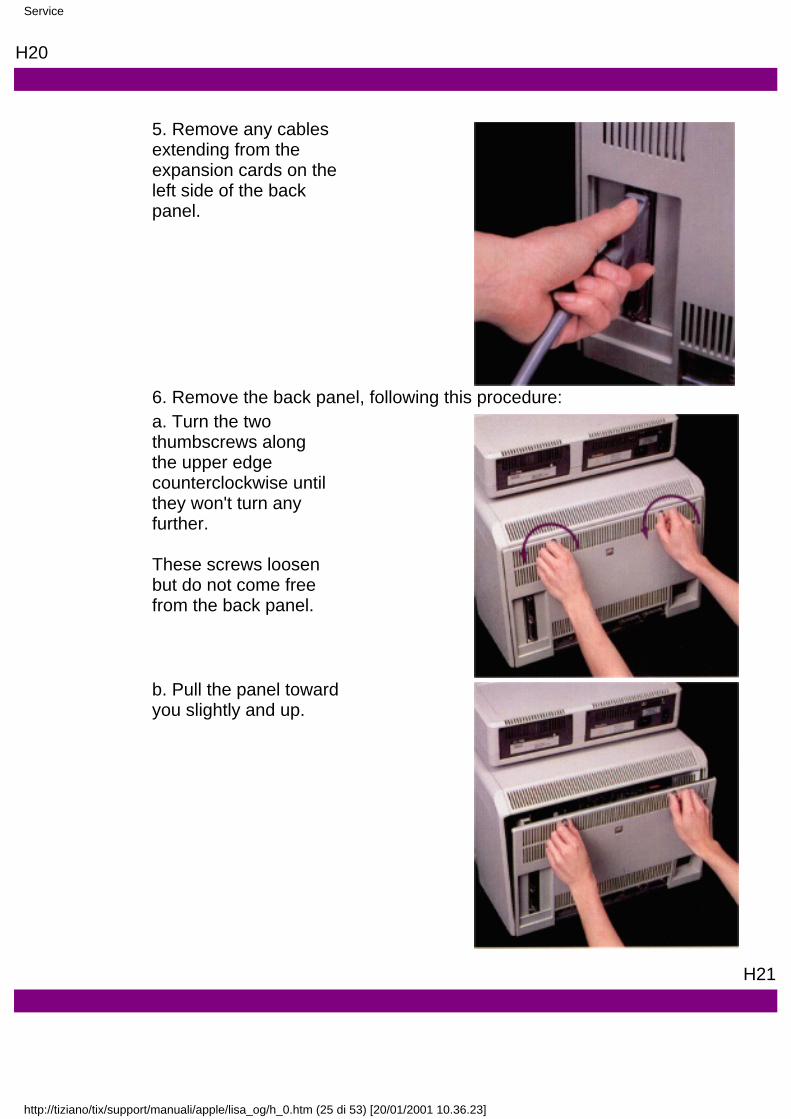
H20
5. Remove any cablesextending from theexpansion cards on theleft side of the backpanel.
6. Remove the back panel, following this procedure:a. Turn the twothumbscrews alongthe upper edgecounterclockwise untilthey won't turn anyfurther.
These screws loosenbut do not come freefrom the back panel.
b. Pull the panel towardyou slightly and up.
H21
Service
http://tiziano/tix/support/manuali/apple/lisa_og/h_0.htm (25 di 53) [20/01/2001 10.36.23]

7. Remove the card cageby pulling the bar thatruns just above the rowof connectors along thebottom of the cage.
Brace your thumbsagainst the lower edge ofthe cabinet and pull hardon the bar to free thecard cage from theinterior connectors.
Be careful not to put anypressure on the smallcomponents just behindthe bar.
8. Pull the cage out and setit on the table.
Transferring Cards
If you have any cardsinstalled in the expansionslots, transfer the cards oneat a time into the new cardcage, following thisprocedure:
H22
Service
http://tiziano/tix/support/manuali/apple/lisa_og/h_0.htm (26 di 53) [20/01/2001 10.36.23]

1. Remove each card, following this procedure: a. Pull out the metallever extending fromthe plastic cap belowthe card you want toremove.
b. Turn the leverclockwise 90 degrees,to the 3 o'clockposition.
c. Holding the card bythe metal edge, pull itstraight out of theslot.
H23
Service
http://tiziano/tix/support/manuali/apple/lisa_og/h_0.htm (27 di 53) [20/01/2001 10.36.23]

2. Install the card into the corresponding slot in the newcard cage, following this procedure:
a. Pull out the metallever extending fromthe plastic cap in frontof the card slot.
b. Turn the leverclockwise 90 degrees,to the 3 o'clockposition.
c. Hold the expansioncard by the metaledge, with the greenplastic card facingright and the whitecover facing left.Insert the bottom ofthe green card intothe connector slot andthe top of the greencard into the plasticslot above theconnector. Slide thecard evenly into thecage as far as it willgo.
H24
Service
http://tiziano/tix/support/manuali/apple/lisa_og/h_0.htm (28 di 53) [20/01/2001 10.36.23]

d. Turn the metal levercounterclockwise 90degrees, back to the12 o'clock position.
e. Push the lever backinto the plastic cap.
3. Repeat this procedure until all expansion cards havebeen transferred to the new card cage.Finishing Up
1. Holding the new cardcage by the plasticframe, slide it into thecabinet.
H25
Service
http://tiziano/tix/support/manuali/apple/lisa_og/h_0.htm (29 di 53) [20/01/2001 10.36.23]

2. The cage will offer someresistance for the last1/4-inch, while the cardcage connectors slideinto their slots inside thecabinet. Hold the framewith your fingers andpress with your thumbsagainst the bottom ofthe cage. The cage isinstalled when the panelalong the bottom is justinside of the bottomedge of the cabinet.
3. Replace the back panel, following this procedure:a. Make sure the metalprongs attached tothe two screws on thepanel are pointed tothe left.
b. Insert the four tabsalong the lower edgeof the back panel intothe slots at the baseof the cabinet.
H26
Service
http://tiziano/tix/support/manuali/apple/lisa_og/h_0.htm (30 di 53) [20/01/2001 10.36.23]

c. Push the panel flat against the back of the cabinet.If you encounter resistance, check to make surethat the card cage is pushed as far into the cabinetas it will go.
d. Turn the twothumbscrewsclockwise until theyare snug.
4. Attach the cables to theexpansion cards and thebottom edge of the backpanel.
5. Connect the power cordto the back of the Lisa.
H27
Service
http://tiziano/tix/support/manuali/apple/lisa_og/h_0.htm (31 di 53) [20/01/2001 10.36.23]

Removeand InstallExpansion Cards
Getting Inside
1. If the Lisa is on, turn it offby pressing the on-offbutton. Wait until alldiskettes are releasedand the power light is off.
2. Turn off all peripheral devices.3. Disconnect the powercord from the back ofthe Lisa. Turn the Lisa sothat the back panel isfacing you.
If they are in the way,remove any cables thatare attached to theconnectors along thebottom edge of the backpanel.
H28
Service
http://tiziano/tix/support/manuali/apple/lisa_og/h_0.htm (32 di 53) [20/01/2001 10.36.23]

4. Remove any cablesextending from theexpansion cards on theleft side of the backpanel.
5. Remove the back panel, following this procedure:a. Turn the twothumbscrews alongthe upper edgecounterclockwise untilthey won't turn anyfurther.
These screws loosenbut do not come freefrom the back panel.
b. Pull the panel towardyou slightly and up.
6. If you are simply installing a new expansion card, skipto the section on Installing Expansion Cards.
H29
Service
http://tiziano/tix/support/manuali/apple/lisa_og/h_0.htm (33 di 53) [20/01/2001 10.36.23]

Removing Expansion Cards
1. Pull out the metal leverextending from theplastic cap below thecard you want toremove.
2. Turn the lever clockwise90 degrees, to the 3o'clock position.
3. Holding the card by themetal edge, pull itstraight out of the slot.
4. If you are replacing the card you just removed with anew card, skip to the section on Installing ExpansionCards.
H30
Service
http://tiziano/tix/support/manuali/apple/lisa_og/h_0.htm (34 di 53) [20/01/2001 10.36.23]

5. Otherwise, follow steps a through e for replacing theslot cover in the back panel of the Lisa.
The slot covers are designed to block theelectromagnetic field generated by the Lisa. Eachexpansion slot opening in the back panel should becovered by either an expansion card or one of the slotcovers.
a. Locate a slot cover,stored on the insideback panel.
b. Loosen the screw justenough to let themetal plate slide overthe screw head andout of the retainingnotch. (If you don'thave a screwdriver, acoin will work nicely.)Remove the cover andretighten the screw.
c. Locate and loosen thescrew over theopening in the backpanel where yourexpansion card usedto be.
Service
http://tiziano/tix/support/manuali/apple/lisa_og/h_0.htm (35 di 53) [20/01/2001 10.36.23]

H31
d. Slide the metal plateinto the retainingnotch and over thescrew head.
e. Tighten the screw tosecure the slot cover.
6. Return to the expansionslot. Turn the metal leverin front of the slotcounterclockwise 90degrees, back to the 12o'clock position.
Service
http://tiziano/tix/support/manuali/apple/lisa_og/h_0.htm (36 di 53) [20/01/2001 10.36.23]

7. Push the lever back intothe plastic cap.
8. Skip to the section on Finishing Up.
H32
Installing Expansion Cards
1. Determine which of thethree expansion slots onthe lower left of the cardcage will hold the card.
In general, parallelinterface cards shouldbe installed in slot 2 or 3.See the documentationthat came with yourexpansion card.
2. Pull out the metal leverextending from theplastic cap in front of thecard slot.
Service
http://tiziano/tix/support/manuali/apple/lisa_og/h_0.htm (37 di 53) [20/01/2001 10.36.23]

3. Turn the lever clockwise90 degrees, to the 3o'clock position.
H33
4. Hold the expansion cardby the metal edge, withthe green plastic cardfacing right and thewhite cover facing left.Insert the bottom of thegreen card into theconnector slot and thetop of the green cardinto the plastic slotabove the connector.Slide the card evenlyinto the cage as far asit will go.5. Turn the metal levercounterclockwise 90degrees, back to the 12o'clock position.
Service
http://tiziano/tix/support/manuali/apple/lisa_og/h_0.htm (38 di 53) [20/01/2001 10.36.23]

6. Push the lever back intothe plastic cap.
7. A set of slot covers on the Lisa's back panel blocks theelectromagnetic emissions from inside the cabinet. Ifyou have just installed a card into a slot that did notpreviously contain a card, follow steps a through e forremoving the cover that protects that slot.
Otherwise, skip the lettered instructions and go toFinishing Up.
H34
a. On the back panel,locate the slot coverfor the slot in whichyou just installed acard.
Service
http://tiziano/tix/support/manuali/apple/lisa_og/h_0.htm (39 di 53) [20/01/2001 10.36.23]

b. Loosen the screw atthe top of the metalplate. (If you don'thave a screwdriver, acoin will work nicely.)
c. Pull the plate over thescrew head and outfrom behind theretaining tab.
d. Loosen one of thethree screws in themiddle of the backpanel.
H35
Service
http://tiziano/tix/support/manuali/apple/lisa_og/h_0.htm (40 di 53) [20/01/2001 10.36.23]

e. Slide the metal platebehind the retainingtab and over thescrew head.
f. Tighten both screws.
Finishing Up
1. Replace the back panel, following this procedure:a. Make sure the metalprongs attached tothe two screws on thepanel are pointed tothe left.
H36
Service
http://tiziano/tix/support/manuali/apple/lisa_og/h_0.htm (41 di 53) [20/01/2001 10.36.23]

b. Insert the four tabsalong the lower edgeof the back panel intothe slots at the baseof the cabinet.
c. Push the panel flatagainst the back ofthe cabinet. Turn thetwo thumbscrewsclockwise until theyare snug.
2. Reattach any cables thatyou removed from theexpansion cards or fromthe bottom edge of theback panel.
Service
http://tiziano/tix/support/manuali/apple/lisa_og/h_0.htm (42 di 53) [20/01/2001 10.36.23]

3. Connect the power cordto the back of the Lisa.
H37
Replace PowerSupply
Getting Inside
1. If the Lisa is on, turn it offby pressing the on-offbutton. Wait until alldiskettes are releasedand the power light is off.
2. Turn off all peripheral devices.3. Disconnect the powercord from the back ofthe Lisa. Turn the Lisa sothat the back panel isfacing you.
Service
http://tiziano/tix/support/manuali/apple/lisa_og/h_0.htm (43 di 53) [20/01/2001 10.36.23]

If they are in the way,remove any cables thatare attached to theconnectors along thebottom edge of the backpanel.
H38
4. Remove any cablesextending from theexpansion cards on theleft side of the backpanel.
5. Remove the back panel, following this procedure:a. Turn the twothumbscrews alongthe upper edgecounterclockwise untilthey won't turn anyfurther.
These screws loosenbut do not come freefrom the back panel.
Service
http://tiziano/tix/support/manuali/apple/lisa_og/h_0.htm (44 di 53) [20/01/2001 10.36.23]

b. Pull the panel towardyou slightly and up.
H39
Replacing Power Supply
1. Turn the screw at thebase of the power supplycounterclockwise. Thescrew loosens but doesnot come free from themodule.
The screw is loose whenyou can feel the pressureof the spring behind thescrew.2. Holding the powersupply by the metal tab,jiggle the module toloosen it. Pull themodule out of thecabinet.
Service
http://tiziano/tix/support/manuali/apple/lisa_og/h_0.htm (45 di 53) [20/01/2001 10.36.23]

3. Orient the new powersupply with the two whiteprongs pointed towardyou and the gold fingerspointed toward thecabinet. Do not touchthe gold fingers.
H40
4. Slide the power supplyinto the cabinet.
5. For the last 1/4-inch, themodule will resistinsertion. Put one thumbon the bottom and oneon the top of the module,and jiggle the powersupply into place. It is inplace when the top of thepower supply is evenwith the frame and thebottom of the powersupply is about 1/4-inchinside the frame.
Service
http://tiziano/tix/support/manuali/apple/lisa_og/h_0.htm (46 di 53) [20/01/2001 10.36.23]

6. Push the screw down,and then turn itclockwise until it is tight.
H41
Finishing Up
1. Replace the back panel, following this procedure:a. Make sure the metalprongs attached tothe two screws on thepanel are pointed tothe left.
b. Insert the four tabsalong the lower edgeof the back panel intothe slots at the baseof the cabinet.
Service
http://tiziano/tix/support/manuali/apple/lisa_og/h_0.htm (47 di 53) [20/01/2001 10.36.23]

c. Push the panel flat against the back of the cabinet.If you encounter resistance, check to make surethat the power supply is pushed as far into thecabinet as it will go.d. Turn the twothumbscrewsclockwise until theyare snug.
H42
2. Reattach any cables thatyou removed from theexpansion cards or fromthe bottom edge of theback panel.
3. Connect the power cordto the back of the Lisa.
Service
http://tiziano/tix/support/manuali/apple/lisa_og/h_0.htm (48 di 53) [20/01/2001 10.36.23]

Install Glare Filter Getting inside
1. If the Lisa is on, turn it offby pressing the on-offbutton. Wait until alldiskettes are releasedand the power light is off.
H43
2. Unplug the Lisa at eitherthe back panel or thewall outlet.
3. Remove the front panel, following this procedure:a. Place one finger oneach of the two fingerpads beneath thefront panel.
b. Push the pads up to unlatch the panel.c. Pull the panel forward and down.
Service
http://tiziano/tix/support/manuali/apple/lisa_og/h_0.htm (49 di 53) [20/01/2001 10.36.23]

4. Set the panel on a flatsurface, face down.
H44
Installing Glare Filter
1. Center the glare filterover the opening insidethe front panel.
Hold the glare filteragainst the clip along theupper edge of the frontpanel, at a 45 degreeangle.
2. While pressing down onthe frame at the upperclip, rotate the loweredge until the frameslides under the upperclip.
Continue rotating thescreen until it lies flatagainst the panel.
Service
http://tiziano/tix/support/manuali/apple/lisa_og/h_0.htm (50 di 53) [20/01/2001 10.36.23]

3. Push the lower edge ofthe frame in until itclears the lower clip, andthen let it slide into placebehind the clip.
Make sure the filter fitsneatly around the frameand under the clips.
H45
Finishing Up
1. Replace the front panel, following this procedure:a. Hold the panel withone finger on eachfinger pad along thebottom edge.
b. Insert the upper edgeof the panel behindthe lip of the tophousing on thecabinet.
Service
http://tiziano/tix/support/manuali/apple/lisa_og/h_0.htm (51 di 53) [20/01/2001 10.36.23]

c. Pressing the fingerpads up, push thebottom edge of thepanel against thecabinet until the pane!clicks into place.
H46
2. Reconnect the powercord.
If the front panel is notsecurely in place, asafety interlock switchprevents you fromturning the Lisa on. If youcannot turn the systemback on after reinstallingthe front panel, checkthat the panel is in place.
Correct installation
Service
http://tiziano/tix/support/manuali/apple/lisa_og/h_0.htm (52 di 53) [20/01/2001 10.36.23]
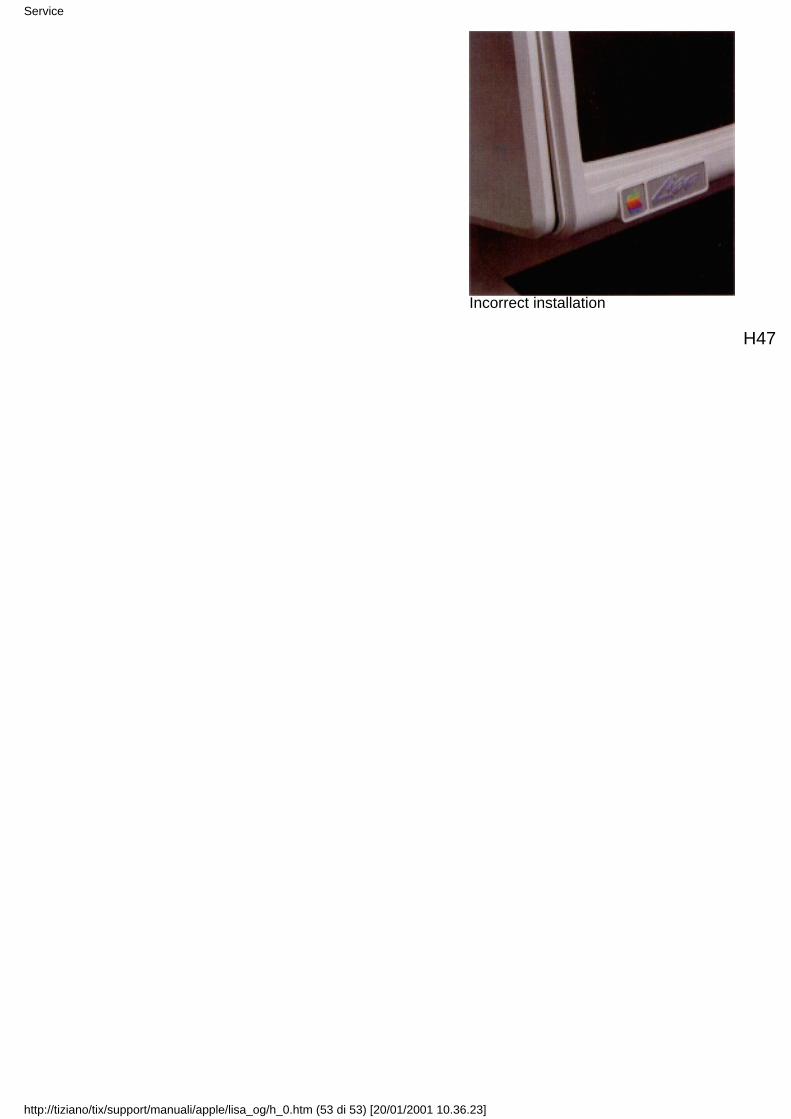
Incorrect installation
H47
Service
http://tiziano/tix/support/manuali/apple/lisa_og/h_0.htm (53 di 53) [20/01/2001 10.36.23]

Appendixes
Section IAppendixes
Appendixes
http://tiziano/tix/support/manuali/apple/lisa_og/i_0.htm (1 di 33) [20/01/2001 10.36.29]

Contents
I1 Appendix 1. Setup ProceduresI5 Appendix 2. Handling DiskettesI7 Appendix 3. Automatic Startup TestsI15 Appendix 4. On-Off ProceduresI19 Appendix 5. Hardware SpecificationsI25 Appendix 6. Office System Error Messages
Iiii
Appendix 1Setup Procedures
1. Find the packing list in the accessories box and check
to be sure that you have everything on the list. If youdon't, contact your dealer.
2. Unpack the Lisafollowing the instructionsprinted on the carton.Set the cabinet on ahard, flat surface, with 2inches of clearance onall sides.
Appendixes
http://tiziano/tix/support/manuali/apple/lisa_og/i_0.htm (2 di 33) [20/01/2001 10.36.29]

3. Install all peripheral devices:
a. If you have a dot matrix printer, you need a parallelinterface card. If your dealer has not alreadyinstalled it, install the card following the instructionsthat came with the card. Then set up the printerfollowing the instructions that came with the printer,and attach it to either connector on the parallelinterface card.
b. Set up the ProFile following the instructions thatcame with the ProFile. Attach it to the connectorlabeled Parallel Device on the back of the Lisa.
c. If you have a daisy wheel printer, set it up followingthe directions that came with the printer. Attach it tothe connector labeled Serial Device B on the backof the Lisa.
I1
4. Plug the keyboard cordinto the front of thecabinet.
5. Plug the mouse cord intothe back of the cabinet.
Appendixes
http://tiziano/tix/support/manuali/apple/lisa_og/i_0.htm (3 di 33) [20/01/2001 10.36.29]

6. Plug the power cord into the back of the Lisa, and theninto a grounded, 115-volt electrical outlet.
Warning: This equipment is intended to be electricallygrounded. The Lisa is equipped with a 3-wire grounding-type plug, which is a plug having a third (grounding) pin.This pin will fit only into a grounding-type AC outlet. Ifyou are unable to insert the plug into the outlet, contact alicensed electrician to replace the outlet and, ifnecessary, to install a grounding conductor.
I2
7. Under some lightingconditions, reflectionscan make the videoscreen hard to read. Ifglare is a problem onyour Lisa, install theglare filter following theinstructions in Section H,Service, in the LisaOwner's Guide.
Appendixes
http://tiziano/tix/support/manuali/apple/lisa_og/i_0.htm (4 di 33) [20/01/2001 10.36.29]

8. Your dealer should have initialized your ProFile andloaded it with the Office System software and tools,using the diskettes stored in the back of the LisaOwner's Guide. If your ProFile is still blank, initialize itand transfer the Office System software and tools,following the instructions in the Lisa Owner's Guide,Section D, Desktop Manager Reference Guide, underInitialize a Startup ProFile and Install the Tools.
9. Go to Section A, LisaGuide, in the Lisa Owner's Guide,to begin learning to use the Lisa.
10. Your dealer should have set your system Preferences,so that the Lisa will know what devices are connected.If not, set the device connections, following theinstructions in the Lisa Owner's Guide, Section D,Desktop Manager Reference Guide, under Set.Section D includes individual instructions forconnecting a dot matrix printer and a daisy wheelprinter. The device connections for the ProFile areautomatically set during the intialization and loadingprocedures.
11. Read Section A, Getting Started, in any Lisa toolmanual to learn the fundamentals of that tool.
12. Read Section B, Lisa Fundamentals, in the LisaOwner's Guide, for the background information youneed before beginning long-term work on the Lisa.
Safety Precautions To ensure safe and reliable operation:
1. Set up the system on a clean, flat surface, with at least2 inches of clearance on all sides. Do not try to use themachine if it is sitting on a soft surface.
Do not let'papers, books, or anything else block theflow of air to the vents under the display housing.
I3
Appendixes
http://tiziano/tix/support/manuali/apple/lisa_og/i_0.htm (5 di 33) [20/01/2001 10.36.29]

2. Turn off the Lisa by pressing the on-off button onceand unplugging the system before removing the frontor back panel. Note that the on-off button by itselfdoes NOT cut all power to the system.
3. Keep jewelry, coins, paper clips, and other small itemsaway from the air vents. Do not insert anything butdiskettes into the disk drive slots.
4. Do not try to service the video unit or the powersupply. You may replace the entire power supply unit,following the instructions in Section H, Service, in theLisa Owner's Guide, but do not open up the powersupply.
5. When unplugging the system for moving or servicing,always turn off the system first, and then wait until theon-off light is out before pulling the plug.
6. If the Lisa starts to smoke or burn, unplug the systemimmediately.
I4
Appendix 2Handling Diskettes
Caring for Diskettes
A floppy diskette is a sensitive, magnetic storagemedium, encased in a protective plastic jacket. Like anaudio tape, it is vulnerable to damage from fingerprints,dust, scratches, and magnetic charges. To protect theinformation stored on your diskettes, follow theseprecautions:
• Handle diskettes by the plastic jacket only. Nevertouch the shiny recording surface.
• Store diskettes in their paper sleeves when not in use.These sleeves are chemically treated to keep out dust.Insert the diskettes into the sleeve so that bothopenings in the plastic jacket are inside the papersleeve.
Appendixes
http://tiziano/tix/support/manuali/apple/lisa_og/i_0.htm (6 di 33) [20/01/2001 10.36.29]

• Keep diskettes away from magnetic fields. Note that anumber of articles common in office environmentsemit electromagnetic fields strong enough to erase adiskette. Avoid leaning diskettes against, for example.high-intensity desk lamps, electric staplers, electricclocks, magnetic paper clip holders, or printers.
• Store diskettes between 10 and 52 degrees Celsius (50and 125 degrees Fahrenheit). Do not leave diskettes ontop of the Lisa or in direct sunlight.
• Do not bend diskettes. Never use paper clips orstaples on diskettes.
• When writing on diskette labels, use a felt-tip pen,never a pencil or ballpoint pen. When writing over oldlabels, prepare the new label while it is still on thepaper backing sheet and then transfer the label to thediskette.
I5
Backing Up Diskettes
Because diskettes can be damaged or erasedaccidentally — and because they eventually wear outwith use — you should keep backup copies of alldiskettes. For a discussion of backing up diskettes, seeSection B, Lisa Fundamentals, in this manual. Forinstructions for backing up diskettes, see the Copyprocedures in Section D, Desktop Manager ReferenceGuide, in this manual.
I6
Appendixes
http://tiziano/tix/support/manuali/apple/lisa_og/i_0.htm (7 di 33) [20/01/2001 10.36.29]

Appendix 3Automatic Startup Tests
Every time you turn the Lisa on, the system itself runs aseries of tests to verify that startup can proceed. Thisappendix describes the tests in the order that they arerun and provides a table explaining the error messagesgenerated by the tests. A less detailed table of the mostcommon messages and a discussion of the proceduresfor responding to startup test error messages appear inSection G, Troubleshooting, of this manual.
Startup TestSequence
If everything is working correctly during startup, the testsproceed in the following sequence.
ROM Checksum: This test computes a 16-bit checksumof the entire ROM to check its validity. If the checksum issuccessful, the system passes on to the next test.
If the system fails the ROM checksum, the system hangs.The screen may be blank, or it may display a randompattern at a very bright contrast level.
MMU Register Test: This is a read/write and addresstest of the static RAMs in the memory management unit.Successful completion is followed by the next test.
An early failure causes the test to repeat indefinitely, witha blank display on the screen.If this test reaches its finalstages and then encountersa failure, the screendisplays the CPU boardicon, with error code 40.
I7
Appendixes
http://tiziano/tix/support/manuali/apple/lisa_og/i_0.htm (8 di 33) [20/01/2001 10.36.29]

Memory Sizing: This test determines the amount ofmemory in your system, to facilitate further testing. If anerror is found, the error is saved but testing continues. Ifmemory cannot be accessed at all, the speaker beepsonce with a low tone and the system hangs with a seriesof vertical lines on the screen.
Preliminary Memory Test: Next the system tests thefirst 2048 bytes of memory, to ensure that some memoryis available for use by the startup ROM. If an erroroccurs, the Lisa sounds the speaker twice and thenhangs in a test loop, with a random display on the screen.
Parallel Port VIA Test: Thistest verifies that the I/Oboard can be accessed,and it does a partial test ofthe parallel port. Failureresults in either the I/Oboard icon, with error code58, or the CPU board icon,with error code 41.
If this test proceeds without problems, the Lisa turns thescreen contrast all the way down.
Screen Memory Test: This test facilitates the reportingof errors that are found during other tests. Errors do notinterrupt the tests but are reported at the end of startupas a memory failure.
I/O Board Tests: The contrast is set to midrange, andthe keyboard and mouse connections are checked. Ifeither the keyboard or the mouse is not connected, theLisa alerts you to the situation at the end of the startupsequence. If those tests proceed normally, a click isemitted from the speaker. This click tells you that alltests up to this point have been executed and that thekeyboard is ready to accept alternative startup devicecommands. The procedure for giving an alternativestartup command is described in Section D, DesktopManager Reference Guide, under Set Startup Deviceduring Startup.
I8
Appendixes
http://tiziano/tix/support/manuali/apple/lisa_og/i_0.htm (9 di 33) [20/01/2001 10.36.29]

From this point, the screen displays a series of iconsshowing which test is in progress, as shown in Figure 1.While a board is being tested, its icon is highlighted onthe screen. As each board passes the tests, the Lisadisplays a check mark over the icon. Usually, the videoscreen has not had time to warm up at this point, so youwill rarely see this display.
Figure 1. Startup Module Test Display
Errors detected during the following tests are reportedboth by a screen message and by a two- or three-noteerror tone. A table of error tones appears in Section G,Troubleshooting, under Startup Symptoms and ErrorMessages, in this manual.
CPU Board Test Completion: The remaining two CPUboard tests partially check the video circuitry and recordwrong parity circuitry. If either test fails, testing isterminated, and the CPU board icon is displayed withone of two error codes:42 — Video logic error
43 — Parity logic error
Memory Test: The final memory check is a full read/write and address check of all RAM not yet tested. Thebrief test takes about 30 seconds for a full megabyte ofmemory. If you have specified a thorough test in yourstartup specifications, the test takes about twice as long.Errors detected in this test are displayed at the end of the startup sequence. The memory board icon with error code 70 indicates read/write errors, and thememory board with errorcode 71 indicates parityerrors.
I9
Appendixes
http://tiziano/tix/support/manuali/apple/lisa_og/i_0.htm (10 di 33) [20/01/2001 10.36.29]

I/O Board TestCompletion: This testverifies that the disk
controller is ready, checks shared memory, and thendisables the disk interruptsuntil startup is complete.Errors are displayed as anI/O board icon with errorcode 57.
The Lisa then tests theserial port controller. Errorsare displayed as an I/Oboard icon, with error code55 for port A errors andwith error code 56 for portB errors.
After these tests, the speaker emits a double click andthe Lisa scans the keyboard for any keystrokes enteredsince the first click. The Lisa then reads the clock/calendar and saves the time and date information forlater use.
Errors in reading thekeyboard or the clock aredisplayed as an I/O boardicon, with error code 52 forthe I/O board COPS, whichcontrols the keyboard andmouse interface, or witherror code 54 for the clock/calendar.
Expansion Slot Configuration Check: Finally, thesystem scans each expansion slot to see if a card ispresent. The results are stored for future use, but are notcompared with the information in parameter memory.
If this check uncovers abootable device in any slot,the Lisa scans the requiredROM on the card to ensurethat it can be read properly.An error here is displayedas an expansion card icon,with error code 92.
I10
Appendixes
http://tiziano/tix/support/manuali/apple/lisa_og/i_0.htm (11 di 33) [20/01/2001 10.36.29]

Startup Error Messages andTones
Each startup error message can consist of three parts:
„ An icon representing the module that caused theproblem.
• A numeric code indicating what kind of problem it is.
• A one-, two-, or three-note error tone indicating eitherwhich module caused the problem or what kind ofproblem it is.
Some of the error messages indicate a physical problemwith the Lisa; others indicate a problem with the systemsetup. In general, the presence of an icon with or withouta numeric code means that the module represented bythe icon should be checked or replaced. Forrecommended troubleshooting procedures, see SectionG, Troubleshooting. For module replacementprocedures, see Section H, Service.
The meanings of the numeric codes are summarizedin Table 1. The meanings of the error tones aresummarized in Section G, Troubleshooting, underStartup Symptoms and Error Messages.
I11
Table 1. Startup Error Messages
Icon Code MeaningDisk drive 7 No diskette in startup drive
Appendixes
http://tiziano/tix/support/manuali/apple/lisa_og/i_0.htm (12 di 33) [20/01/2001 10.36.29]

Diskette 22
23
25
38
Unable to clamp diskette.
Unable to read diskette.
Unable to unclamp diskette.
No startup file on diskette.
CPU Board 39
40
41
42
43
44
45
46
47
48
49
Disk controller timeout.
MMU error.
CPU selection logic error.
Video circuitry error.
Parity circuitry error.
Unexpected NMI interrupt.
Bus error.
Address error.
Other unexpected exception.
Illegal instruction error.
Line 1010 or 1111 trap.
I12
Table 1. Startup Error Messages, continued
Icon Code Meaning
I/O board 50
51
52
53
54
55
56
57
58
59
60
COPS VIA error.
Parallel port VIA error.
I/O board COPS error.
Keyboard COPS error.
Clock error.
RS232 port A error.
RS232 port B error.
Diskette controller error.
I/O board access error.
I/O board COPS code error.
I/O or keyboard error.
Appendixes
http://tiziano/tix/support/manuali/apple/lisa_og/i_0.htm (13 di 33) [20/01/2001 10.36.29]

Memoryboard
70
71
Memory read/write error.
Memory parity error.
I13
Table 1. Startup Error Messages, continued
Icon Code Meaning
Startupdevice
75 Startup failure; startup fileon disk probably bad.
Appendixes
http://tiziano/tix/support/manuali/apple/lisa_og/i_0.htm (14 di 33) [20/01/2001 10.36.29]

ProFile 80
81
82
83
84
85
ProFile not attached to parallelport.
ProFile not ready.
Bad response from ProFile.
Nonzero status bytes returnedfrom ProFile.
Invalid boot file on ProFile.
ProFile timeout.
Expansioncard
90
91
92
93
No expansion card installed.
Expansion card not bootable.
Bad ROM checksum onexpansion card.
Bad status returned fromexpansion card.
I14
Appendix 4On-Off Procedures
The single button that turns the Lisa on and off is a"soft" power button. It does not directly control power tothe computer. When you press the button to turn the Lisaon, you are bringing the system up from a standbycondition to a fully active state. When you press it to turnthe Lisa off, you are triggering a series of verification andstorage procedures that eventually return the system tostandby status. This appendix summarizes the on-offprocedures, including the Environments window, whichmay appear if you occasionally use any software otherthan the Lisa Office System.
Appendixes
http://tiziano/tix/support/manuali/apple/lisa_og/i_0.htm (15 di 33) [20/01/2001 10.36.29]

Standby Status As long as the Lisa is plugged in, it draws a small amountof current, which it uses to keep the clock/calendar up todate and to remember your Preferences. A battery insidethe Lisa can power the clock and a small amount ofsystem memory — known as parameter memory — forup to 10 hours so that you can move and service themachine without resetting all system information. Whenyou must unplug the Lisa, push the on-off button andwait for the light to go out before removing the plug fromthe wall outlet. When you have finished moving orservicing the Lisa, plug the Lisa back in as soon aspossible, even if you do not need to turn it onimmediately.
Turning Onthe Lisa
When you press the on-off button to bring the Lisa upfrom the standby condition to an active state, thecomputer runs a series of self-tests to verify that startupis possible. These tests and related error messages aredescribed in Appendix 3, Automatic Startup Tests, andin Section G, Troubleshooting, under Startup Symptomsand Error Messages, in this manual.
I15
Each time you turn the Lisa on, the system must read acollection of startup instructions. For a discussion ofthese startup instructions, see Section B, LisaFundamentals, in this manual.
Unless you specify otherwise, the Lisa looks for thestartup instructions on a ProFile attached to the built-inparallel connector on the back of the Lisa. Instructionsfor specifying another startup device appear in SectionD, Desktop Manager Reference Guide, under Set StartupSpecifications, in this manual, and in the SystemManager section of the Workshop User's Guide for theLisa.
You can also specify the startup device while turning thesystem on. This procedure is described in Section D,Desktop Manager Reference Guide, under Set StartupDevice during Startup.
Whenever you turn on a ProFile, the ProFile goes througha series of self-tests for about a minute. During this time,the ready light on the right-hand side of the ProFile isflickering. To ensure that a signal from the Lisa does notinterrupt the ProFile self-tests, always wait until theready light on the ProFile has stabilized before turning on
Appendixes
http://tiziano/tix/support/manuali/apple/lisa_og/i_0.htm (16 di 33) [20/01/2001 10.36.29]

the Lisa.
EnvironmentsWindow
If your startup ProFile contains any software other thanthe Lisa Office System, you may encounter a screensomething like the one shown in Figure 1 when you startup the Lisa.
Figure 1. Environments Window
I16
This display, known as the Environments window, allowsyou to specify which software you want to use. To start upthe Lisa Office System, click Office System, and thenclick Start.
You can specify a default environment, which causes theLisa to bring up that environment every time you turn onthe system. If, for example, you always want to use theLisa Office System:
Click Office System.
Appendixes
http://tiziano/tix/support/manuali/apple/lisa_og/i_0.htm (17 di 33) [20/01/2001 10.36.29]

Click Set Default.
Click Start.
If you normally want the Lisa to start up a differentsoftware environment, see the manual that came withthat software.
I17
Once you have set the default, you will never see theEnvironments window unless you specifically request it.To call up the Environments window from the Lisa OfficeSystem, hold down the key while pressing the on-offbutton. To call up the Environments window duringsystem startup, press any key except after youhear the double click from the cabinet.
Appendixes
http://tiziano/tix/support/manuali/apple/lisa_og/i_0.htm (18 di 33) [20/01/2001 10.36.29]

Turning Offthe Lisa
When you are using the Lisa Office System, pushing theon-off button once to turn the Lisa off does not instantlyshut down the machine. Instead, it triggers a series ofverification and storage procedures.
The point of this complex power-down procedure is thatthe next time you turn the Lisa on, the computer canreconstruct the desktop exactly as you left it. During thenext startup, the Lisa checks all on-line storage devicesand puts all documents that were on the desktop back onthe desktop again. The power-down procedure may takeseveral minutes.
First, the Lisa saves the "desktop state" of eachdocument on the desktop. The desktop state includesthe size and location of the document display, allchanges to the document since it was last saved, and thecurrent selection or insertion point. Except for LisaListand ListWrite documents, the disk copy of the documentitself is not updated. As the desktop state of eachdocument is stored, the document disappears from thescreen.
If there is not enough room on a disk to record thedesktop states for all of the documents pulled from thatdisk, the Lisa terminates the power-down procedure. Youcan then make more room on the disk in two ways:
• Put away some of the documents yourself so that theLisa does not have to keep two versions.
• Remove some old documents from the disk so thatthere is enough space for all the documents on thedesktop.
When the desktop states of all of the resident documentson a diskette are stored, the diskette is released from itsdisk drive. When the desktop is clear, the screen goesblank, and the power light goes out.
I18
Appendixes
http://tiziano/tix/support/manuali/apple/lisa_og/i_0.htm (19 di 33) [20/01/2001 10.36.29]

Appendix 5Hardware Specifications
Size and Shape Cabinet
Height: 350 mm (13.8 in.)Depth: 388 mm (15.2 in.)Width: 475 mm (18.7 in.)Weight: 22 kg (48 Ibs.)Cord length: 1.8 m (6 ft.)
Keyboard
Height: 68 mm (2.7 in.)Depth: 165 mm (6.5 in.)Width: 475 mm (18.7 in.)Weight: 18 kg (4 Ibs.)Cord length: 1.2 m (4 ft.) safe extension
Mouse
Height: 38 mm (1.5 in.)Depth: 94 mm (3.7 in.)Width: 62 mm (2.4 in.)Cord length: 1.2 m (4 ft)
Profile
Height: 106 mm (4.2 in.)Depth: 228 mm (8.6 in.)Width: 434 mm (17.2 in.)Cord length: 1.8 m (6 ft.)
I19
Appendixes
http://tiziano/tix/support/manuali/apple/lisa_og/i_0.htm (20 di 33) [20/01/2001 10.36.29]

Power Levels European/Asian Systems
Voltage: 180 to 260 V.ACCycles: 48 to 68 Hz
United States Systems
Voltage: 90 to 130 VACCycles: 48 to 68 Hz
TemperatureRanges
Storage: -22° C to 65° C (-8° F to 149° F)Operation: 5° C to 40° C (40° F to 104° F)
Humidity Ranges Storage: 5% to 95% noncondensingOperation: 10% to 80% noncondensing
Capacity Internal memory sizes: 1/2 Megabyte, 1 MegabyteBuilt-in drives: 871 Kilobytes (formatted) eachProFile: 4.98 Megabytes (formatted)
Video Screen dimensions: 30 cm diagonal (15 cm by 22 cm active)
12 in. diagonal (6 in. by 8.5 in. active)Resolution: 364 lines by 720 dots per lineScreen refresh rate: 60 HzHorizontal line rate: 22,900 HzDot rate: 20 MHz
Compatibilities Format: Standard ASCII plus additional Apple charactersRecommended printers: Apple dot matrix andApple daisy wheel
I20
Keyboard
US Keyboard Layout
Appendixes
http://tiziano/tix/support/manuali/apple/lisa_og/i_0.htm (21 di 33) [20/01/2001 10.36.29]
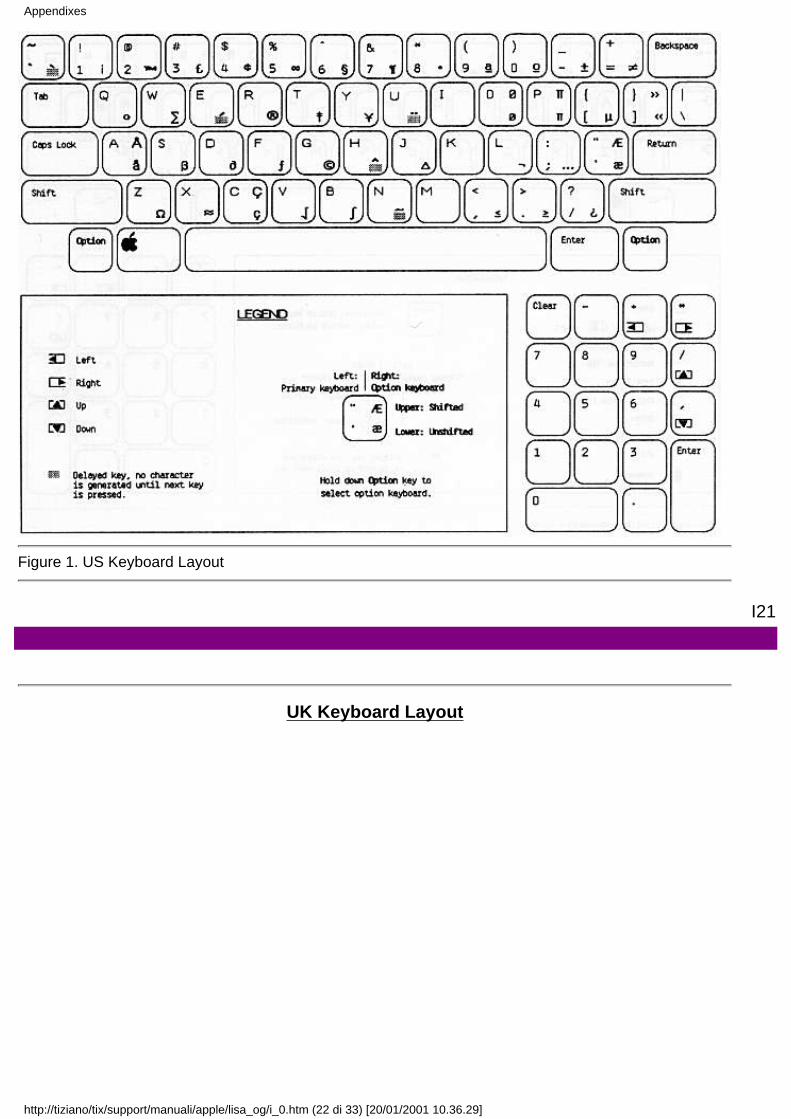
Figure 1. US Keyboard Layout
I21
UK Keyboard Layout
Appendixes
http://tiziano/tix/support/manuali/apple/lisa_og/i_0.htm (22 di 33) [20/01/2001 10.36.29]

Figure 2. UK Keyboard Layout
I22
Radio andTelevisionInterference
The Lisa generates and uses radio frequency energy. Ifthe Lisa is not installed and used properly (that is, instrict accordance with the instructions in this manual), itmay cause interference to radio and television reception.
This equipment has been tested and complies with thelimits for a Class B computing device in accordance withthe specifications in Subpart J of Part 15 of FCC rules.These rules are designed to provide reasonableprotection against such interference in a residentialinstallation. However, there is no guarantee that theinterference will not occur in a particular installation,especially if a "rabbit ear" TV antenna is used. (A rabbitear antenna is the telescoping rod antenna usuallycontained on TV receivers.)
You can determine whether your computer is causing
Appendixes
http://tiziano/tix/support/manuali/apple/lisa_og/i_0.htm (23 di 33) [20/01/2001 10.36.29]

interference by turning it off. If the interference stops, itwas probably caused by the computer or its peripherals.To further isolate the problem:
• Disconnect the peripheral devices and their I/O cablesone at a time. If the interference stops, it is caused byeither the peripheral or its I/O cable. These devicesusually require shielded I/O cables. For Appleperipherals, you can obtain the proper shielded cablefrom your dealer. For non-Apple peripherals, contactthe manufacturer or your dealer for assistance.
If your computer does cause interference to radio ortelevision reception, you can try to correct theinterference by using one or more of the followingmeasures:
• Turn the TV or radio antenna until the interferencestops.
• Move the computer to one side or the other of the TVor radio.
• Move the computer farther away from the TV or radio.
• Plug the computer into an outlet that is on a differentcircuit from the TV or radio. That is, make certain thecomputer and the TV or radio are on circuits controlledby different circuit breakers or fuses.
• Consider installing a rooftop TV antenna with coaxialcable lead-in between the antenna and the TV.
I23
If necessary, you should consult your dealer or anexperienced radio/television technician for additionalsuggestions. You may find helpful the following booklet,prepared by the Federal Communications Commission:How to Identify and Resolve Radio-TV InterferenceProblems. This booklet is available from the U.S.Government Printing Office, Washington, D.C. 20402,Stock Number 004-000-003454.
I24
Appendixes
http://tiziano/tix/support/manuali/apple/lisa_og/i_0.htm (24 di 33) [20/01/2001 10.36.29]

Appendix 6Office SystemError Messages
This appendix contains a series of discussions coveringthe error messages generated by the Lisa Office System.The discussions are grouped into four generalcategories, with specific entries under each majorheading. If you have encountered an error message, goto the specific entry mentioned in that message. If youthink you may have a physical problem with your system,refer to Section G, Troubleshooting, in this manual.
Disk Problems
126 Insufficient Room on Disk126 Damaged Disk127 Difficulty Accessing Disk127 Disk Drive Problems
Document Problems
128 Damaged Document128 Difficulty Opening Document129 Difficulty Saving Document
Tool Problems
129 Tool Failure130 Difficulty Starting Tool130 Incompatible Version
System Problems
130 Insufficient Memory131 System Restart132 Desktop State132 Difficulty Printing
I25
Appendixes
http://tiziano/tix/support/manuali/apple/lisa_og/i_0.htm (25 di 33) [20/01/2001 10.36.29]

Disk Problems Insufficient Room on Disk
Many common desktop operations — opening or savingdocuments, for example — require a certain amount offree disk space. When your disks become crowded, youcan make more room in several ways:
• Discard obsolete documents by moving their icons tothe Wastebasket. The last thing you discard from adisk stays in the Wastebasket — and on the storagedisk — until something else from the same disk is alsodiscarded. Sometimes the Lisa will destroy objects inthe Wastebasket if it needs the disk space. Usually,however, the space occupied by an object is notactually reclaimed until you have thrown away anotherobject from the same disk. Therefore, if you arediscarding a group of documents in order to makemore room on the disk, you must discard somethingelse afterward. To reclaim as much room as possible,first discard all obsolete documents, and then discardan empty folder.
• Move some objects to a different storage disk. Do notduplicate the objects and move the duplicates,because that will not remove the copy from the originaldisk.
• If you are using LisaList, select Show Entire List fromthe List menu.
• Repair the disk, following the procedures in Section D,Desktop Manager Reference Guide, in this manual,under either Repair a Storage Disk or Repair a StartupProFiie. During the repair process, the Lisa reclaimsany disk space that may have been lost duringprevious software failures or power losses.
Conversely, you can move the document itself to anotherdisk before trying to work with it.
• If, after you have made more space on the disk thatholds the document, the Lisa still says there is notenough room on the disk, verify that there is also spaceavailable on the startup disk.
Damaged Disk
The Lisa may tell you that one of your disks is
Appendixes
http://tiziano/tix/support/manuali/apple/lisa_og/i_0.htm (26 di 33) [20/01/2001 10.36.29]

"damaged." This could mean either that some of theinformation stored on the disk has been altered or thatthe disk itself is physically damaged.
I26
• First, repair the disk following the procedures inSection D, Desktop Manager Reference Guide, undereither Repair a Storage Disk or Repair a StartupProFile. The repair process verifies that all informationon the disk is usable and that the record of wherethings are stored on the disk surface matches theactual contents of the disk. Unreadable informationmay be altered or removed; the names of somedocuments may change.
• If the Lisa is unable to repair the disk, there is probablya physical problem with either the disk or the diskdrive. If the disk in question is a floppy diskette, tryinserting it in another disk drive or another Lisa. If theother drive or other machine has no trouble with thedisk, run the LisaTest diagnostic on the first disk drive.Instructions for using the LisaTest diskette appear inSection G, Troubleshooting, under LisaTest, in thismanual. If the other drive or machine cannot read thediskette either, then the diskette may have sufferedphysical damage. Erase the diskette and use a backupcopy.
Difficulty Accessing Disk
• First, try restarting the system: put away all opendocuments, and then turn the Lisa off and back onagain. When the desktop returns, try again to accessthe disk.
If this procedure works, your system was probably in atemporary error condition caused by the interaction ofdifferent tools and documents.
• If restarting the system doesn't solve the problem, themost likely cause is a damaged document, disk, ortool. If you are trying to access a document, seeDamaged Document, below. If that discussion does notaddress your problem, see Damaged Disk, above, andthen, as a last resort, Tool Failure and Disk DriveProblems, below.
Disk Drive Problems
Appendixes
http://tiziano/tix/support/manuali/apple/lisa_og/i_0.htm (27 di 33) [20/01/2001 10.36.29]
Sometimes a mechanical failure in a disk drive results inerrors that appear to come from your documents ordisks. You can verify that the drive in question is workingproperly by running the LisaTest diagnostic. Instructionsfor using the LisaTest diskette, which is stored on theinside front cover of this manual, are in Section G,
I27
Troubleshooting, under LisaTest, in this manual. If thetests indicate that the disk drive is not working properly,you should repair any disks that were used in that drive,following the procedures in Section D, Desktop ManagerReference Guide, under Repair a Storage Disk, in thismanual. If your startup device is not working properly,you should have it repaired or replaced beforeproceeding.
DocumentProblems
Damaged Document
A document can be damaged in a number of ways. Thedisk on which the document is stored could be wearingout, for example, or the document may have beendamaged during a power failure. Sometimes a softwarefailure leaves a document unreadable.
• First, restart the system if you have not already doneso. Put away all documents, and then turn the Lisa offand on again. Try again to open the document.
• If the document still won't open, try to duplicate thedocument and put the duplicate on a different disk. Ifthis works, the original disk is probably not damaged.Try to open the copy. If the Lisa reports that the copy isalso damaged, the document itself probably containssome inconsistent or unreadable information. If youare using LisaList, repair the document with theLisaList repair facility.
• If you cannot make a duplicate of the document, try tomake a copy of the entire disk. Whether or not thecopy procedure works, repair the original disk,following the instructions in Section D, DesktopManager Reference Guide, under Repair a StorageDisk or Repair a Startup ProFile, in this manual. If youare using LisaList, you will probably have to repeat theLisaList repair procedure. Be sure to make a newbackup of the list first.
Appendixes
http://tiziano/tix/support/manuali/apple/lisa_og/i_0.htm (28 di 33) [20/01/2001 10.36.29]
• If the document is still damaged after the disk isrepaired, discard the document and replace it with abackup copy.
Difficulty Opening Document
Check the status panel of the document's storage diskto see how much free space is left on the disk. If thenumber of free blocks is approaching 200 or less, seeInsufficient Room on Disk, above.
I28
• If the disk contains adequate free space, yourdocument or the tool used to create it could bedamaged. See Damaged Document, above, and ToolFailure, below.
Difficulty Saving Document
• Check the status panel of the document's storage diskto see how much free space is left on the disk. If youhave saved an earlier version of the document, changethe disk display to an alphabetical view, and see howmany blocks the document required in its earlierversion. Estimate how much space the document nowneeds, on the basis of whether you have added orremoved information. If there is inadequate spaceavailable, see Insufficient Room on Disk, above.
• If disk space is not the problem, or if you do not wantto remove anything to make room on the storage disk,you may be able to save the document by setting itaside and then moving it to another disk. You may notbe able to use this technique, since some tools will notlet you move a document that has not been put away.
Difficulty saving a document could also indicate adamaged document. See Damaged Document, above.
Appendixes
http://tiziano/tix/support/manuali/apple/lisa_og/i_0.htm (29 di 33) [20/01/2001 10.36.29]

Tool Problems Tool Failure
Before you conclude that a tool is actually damaged,restart the system and try to repeat the failure. Torestart the system, put away all documents, and thenturn the Lisa off and on again. If the procedure worksafter a restart, the system was probably in a temporaryerror condition caused by the interaction of varioustools and documents.
If the tool still fails, discard the working copy from yourProFile and replace it with a duplicate of the mastertool. If your dealer set up your startup ProFile, theworking copies of all tools are stored in the folderlabeled Tools on your startup ProFile. A diskettecontaining the master tool is stored in the manual thatcomes with each tool.
I29
The calculator, the clock, the Preferences, and some ofthe printing routines are all part of the systemsoftware. If replacing the tool doesn't work, or if theproblem was with this software in the first place,reinstall the system software on your startup ProFile.Instructions for reinstalling system software appear inSection D, Desktop Manager Reference Guide, underReinstall System Software, in this manual.
Difficulty Starting Tool
Check the status panel in the window of the disk thatholds the tool and, if it is different, in the window ofyour startup device. If the number of free blocks isapproaching 200 or less, see Insufficient Room onDisk, above.
If disk space is not the problem, see Tool Failure,above.
Incompatible Version
From time to time, Apple releases updated versions ofthe Lisa software. If you buy an additional Lisa systemmore than six months after you bought your first Lisasystem, the computers may come with different versionsof the software. (If you have a support agreement, youwill always have the most recent updates of all software.)
Appendixes
http://tiziano/tix/support/manuali/apple/lisa_og/i_0.htm (30 di 33) [20/01/2001 10.36.29]

Old documents are usually compatible with new revisionsof the tools. New documents, however, many not becompatible with old versions of the tools; and once youhave worked on an old document with a more recentversion of the tool, you may no longer be able to work onthat document with the old tool. If the Lisa cannot workon a document because the tool and the document areincompatible, take the document to a Lisa that has amore recent revision of the tool. To find out the releasedate of a tool, display an alphabetical or chronologicalview of the folder in which the tool is stored.
System Problems Insufficient Memory
Insufficient room in memory usually means either thattoo many documents are open on the desktop or that thedocument you are actually working on has gotten too big.
I30
• First, put away all documents that you are not currentlyworking on, especially if the documents were createdwith a different tool from the one you are using.
• If the Lisa still can not perform the task, restart thesystem: put away all documents, and turn the Lisa offand on again. Then open only the document you wantto work on, and try the operation again.
• If you are using LisaList, try changing to a larger font orshrinking the document window.
• If none of these techniques works, then your documentis probably too big. Split it into two smaller documents,if possible.
System Restart
Sometimes the Lisa Office System encounters an errorcondition that it cannot handle. In this case, the Lisashuts down the desktop and starts over. If possible, anyopen documents are suspended in their current states sothat you can continue where you left off after the systemrestart.
If the problem recurs, either your software or yourhardware may be damaged.
• Use the LisaTest diskette to run a complete system
Appendixes
http://tiziano/tix/support/manuali/apple/lisa_og/i_0.htm (31 di 33) [20/01/2001 10.36.29]

check. The diskette is stored on the inside front coverof this manual, and instructions for using it appear inSection G, Troubleshooting, under LisaTest, in thismanual.
• If you have no hardware problems, try reinstalling yoursystem software and replacing the working copies ofthe tools you were using when the restart occurred.Instructions for reinstalling system software appear inSection D, Desktop Manager Reference Guide, underReinstall System Software. If your dealer loaded yourstartup ProFile, the working copies of all tools arestored in the folder labeled Tools. A diskettecontaining the master copy of the tool is stored in themanual that comes with each tool.
I31
Desktop State
When you are using the Lisa Office System, pressing oneof the disk-release buttons triggers a series of storageprocedures. Before ejecting the diskette, the computerrecords the "desktop state" of the diskette. The desktopstate includes a list of all documents from that disk thatare currently on the desktop, the size and location of anyopen windows, all changes to the documents since theywere last saved, and the current selection or insertionpoint in each open document.
When you turn off the Lisa, the computer goes throughthe same set of storage procedures for all disks.
• If the Lisa is unable to save the desktop state for adisk, check the status panel of the disk to see howmuch space is available. If you have several opendocuments and not much disk space left, seeInsufficient Room on Disk, above, for suggestions formaking more room on the disk. Alternatively, you canput away some of the documents yourself, so that theLisa has less desktop state information to record.
• If disk space is not the problem, you may have a faultydisk drive. See Disk Drive Problems, above.
During a sudden power loss or an unexpected softwarefailure, the normal power-down and disk-releaseprocedures described above do not occur. The disks areleft in an in-between state, which requires repair. See
Appendixes
http://tiziano/tix/support/manuali/apple/lisa_og/i_0.htm (32 di 33) [20/01/2001 10.36.29]
Section D, Desktop Manager Reference Guide, underRepair, in this manual.
Usually, losing the desktop state is not a problem. Simplyopen the disks yourself, and then open any documentsyou want to work on. However, you may have lost anywork you have done since last saving your documents.
Difficulty Printing
The Lisa can have difficulty printing a document for anumber of reasons, from simple mechanical problems tosoftware failures.
• First, verify that the printer is turned on and that allconnections are secure. See Section G,Troubleshooting, in this manual, for a checklist ofpossible mechanical problems.
I32
If your system setup checks out, the Lisa may haveinsufficient room in memory or insufficient free spaceon the startup disk. See Insufficient Memory andInsufficient Room on Disk, above.
●
If none of these strategies solves the problem, eitherthe tool you were using or your system software mayhave failed. See Tool Failure, above.
●
I33
Appendixes
http://tiziano/tix/support/manuali/apple/lisa_og/i_0.htm (33 di 33) [20/01/2001 10.36.29]

Index
Section JIndex
Index
http://tiziano/tix/support/manuali/apple/lisa_og/j_0.htm (1 di 15) [20/01/2001 10.36.31]

Index
Index
A
Active and inactive windows, B20Adding machine, E13Alphabetical view, D43Alternative keyboard, C3Apple key, D9, D11Automatic startup tests, 17
B
Back up, B4
Diskette, D8Document, D12LisaTest, G28ProFile, D14
Backup, incremental, D16Blocks, D44Boot, see Start upBoot ROM, G18, 17Brightness, C14, D77Burn-in, C8
C
Cabinet, C7
Cleaning, F10Interlock switches, G6Opening front of, H3Opening back of, H10
Calculator, B18, E2
Adding machine, E13Four function calculator, E3Icon on desktop, B12Menus, E20Reverse Polish calculator, E8Transaction tape, E2
Index
http://tiziano/tix/support/manuali/apple/lisa_og/j_0.htm (2 di 15) [20/01/2001 10.36.31]

With other tools, B24
J1
Cancel changes, D29Caps lock key, C3
Card, installing or removing expansion, H28Change
Name, D46Storage location, D26
Changes-only backup, D16Check disk, D57Choose menu item, B21Chronological view, D43Clean
Cabinet, F10Glare filter, F2Mouse, F7Screen, F2
Click mouse button, B20, B23Clipboard, B17
Icon on desktop, B13
Clock/calendar, B6, B17
Icon on desktop, B12Setting, D64
Configuration, system, B6, D69Connectors, C12, D70, D72Contrast, C8, C14, D77Convenience settings, D65
Screen brightness and contrast, D77
Controls, screen, C13Copy
Contents of disk, D6Diskette, D8Document, folder, stationery pad, or tool, D11LisaTest diskette, G28ProFile, D14Tool, D7, D38
CPU board, replacing, H10Crash, repairing disks after, D57Create new document or folder, D18
Index
http://tiziano/tix/support/manuali/apple/lisa_og/j_0.htm (3 di 15) [20/01/2001 10.36.31]

Customize stationery, D20Cut and paste between documents, B24
D
Daisy wheel printer
Attaching, D71Paper, D73Troubleshooting, G11
Damaged disk, 126
J2
Damaged document, 128Damaged startup device, D53Dark screen, C8, D78
Troubleshooting, G8
Date, setting, D64Delete file, see DiscardDeselect icon, B20Desktop, B10, B25, D43Desktop management, B9Desktop state, B8, 118, 132Device connections, D69
Daisy wheel printer, D71Dot matrix printer, D74
Different documents, cutting and pasting between, B24Difficulty accessing disk, 127Difficulty printing, 132Difficulty starting tool, 130Dim screen, C8, D78, G8Discard
Document, folder, stationery pad, or tool, D24Object, B16
Disk, see also Diskette and ProFile
Backing up, B4, D8, D14Changing display of, D42Damaged, 126Difficulty accessing, 127Displaying contents of, D44Erasing, D32Initializing, B3Initializing diskette, D33
Index
http://tiziano/tix/support/manuali/apple/lisa_og/j_0.htm (4 di 15) [20/01/2001 10.36.31]

Initializing startup ProFile, D34Initializing storage ProFile, D39Organizing, B15Reinitializing, D32Repairing, D53, D56, D57Status panel, B14Troubleshooting, 126
Disk drive, B3
Built-in, C9ProFile, C6Retrieving trapped diskettes, G18Troubleshooting, 127
Disk initialization, B3Disk problems, 126Disk-release button, C10
J3
Diskette, B3, C9, see also Disk
Caring for, 15Copying, D6, D8Icon on desktop, B11, B14Initializing, D33Inserting and removing, C9Retrieving, G18
Display
Contents of disk or folder, D44Document, D27
Document, B15
Backing up, B5Damaged, 128Difficulty opening or saving, 128Discarding, B16, D24Filing, B23, D26Icon on desktop, B12Naming, D46Opening, D27Refiling, D28Retrieving, D27Saving, B22, D30Starting, D18
Documents, cutting and pasting between, B24Dot matrix printer
Index
http://tiziano/tix/support/manuali/apple/lisa_og/j_0.htm (5 di 15) [20/01/2001 10.36.31]

Attaching, D74Paper, D75, D76Troubleshooting, G12
Double-click delay, D67Duplicate
Diskette, D8Document, folder, stationery pad, or tool, D11LisaTest diskette, G28
E
Environments window, B3, G25, 116Erase disk, D32Error codes, table, G19, 112Error messages
Office System, 125Recovering from, G22Startup, G2, G19, 17, 112
Error tones, table, G19Expansion card, removing and installing, H28Expansion slots, C13External devices, B6, C12
Attaching, D70
J4
F
Fanfold paper, D73, D75File object, B23, D26Floppy disk, see DisketteFocus, C14Folder, B15
Changing display of, D42Displaying contents of, D44Icon on desktop, B11Refiling, D28Starting, D18
Four function calculator, E3Full backup of ProFile, D16
G
Glare filter, C8
Cleaning, F2
Index
http://tiziano/tix/support/manuali/apple/lisa_og/j_0.htm (6 di 15) [20/01/2001 10.36.31]

Installing, H43
H
Hard disk, see ProFileHardware specifications, 119
I
I/O board, replacing, H10Icon,B10
Closing icon, B23Desktop icon table, B11Error icon table, G19, 112Opening icon, B22, B23Selecting icon, B20Startup error icon table, 112Title bar icon, B23
Incompatible version of tool, 130Incremental backup of ProFile, D16Initialize, B3
Diskette, D33Startup ProFile, D34Storage ProFile, D39
Install
Expansion card, H28Glare filter, H43Software update, D50Tools during initialization, D34Tools on initialized ProFile, D6
J5
Insufficient memory, 130Insufficient room on disk, 126Interface card, installing or removing, H28Interference, C15,123
K
Keys
Apple, D9, D11Option, C4, D48Repeating, C4, D67
Keyboard, C3
Index
http://tiziano/tix/support/manuali/apple/lisa_og/j_0.htm (7 di 15) [20/01/2001 10.36.31]

Layout, 121Option, C4Troubleshooting, G11
Keypad, numeric, C5
L
Lisa tools, compatibility, B24LisaTest,G1,G26
Backing up, B5, G28
M
Maintenance schedule, F1Make stationery pad, D20Mechanical feed, D73Memory boards, replacing, H10Memory, parameter, B6, C11Memory test, D83Menu item, choosing, B21Mouse, C6
Cleaning, F7Clicking button, B20, B23Double-click delay, D67Replacing ball, F7Troubleshooting, G10
Move
Icon, B22, D26Window, B25
N
Name object, D46New document or folder, D18Numeric keypad, C5
J6
Index
http://tiziano/tix/support/manuali/apple/lisa_og/j_0.htm (8 di 15) [20/01/2001 10.36.31]

O
Office System software, B2
Office System 1, D53, D59Office System 1 and 2, B2, D34, D50
On-off button, B7, C10, 115On-off procedures, B7, 115
Troubleshooting, G2Turning off the Lisa, 118
Open
Document, D27Icon, B22,B23
Option keyboard, C4Option keys, C3, D48
P
Paper size
Daisy wheel printer, D73Dot matrix printer, D76
Paper type
Daisy wheel printer, D73Dot matrix printer, D75
Parallel connector, C12, D70Parallel interface card, installing or removing, H28Parameter memory, B6, C11Paste between documents, B24Peripherals, B6, C12
Attaching, D70Installing parallel interface card, H28Printers, D71ProFile, see ProFile
Pictorial view, D43Ports, C12Power, C10
Soft power button, 115Specifications, 120Troubleshooting, G2
Power cord, C11Power interruption, B8, C7
Index
http://tiziano/tix/support/manuali/apple/lisa_og/j_0.htm (9 di 15) [20/01/2001 10.36.31]

Repairing disks after, D57
Power supply, C7
Replacing, H38Troubleshooting, G6
J7
Preferences, B6, B18
Convenience settings, D65, D77Device connections, D69For daisy wheel printer, D71For dot matrix printer, D74Icon on desktop, B13Startup specifications, D82
Print screen display, D48, D75Print wheel, D73Printer
Connecting, D70Daisy wheel, D71Dot matrix, D74Paper, D73, D75Troubleshooting, G11, G12
ProFile, B3, C6
Backing up, B5, D14Icon on desktop, B11, B14Incremental backup, D16Initializing as startup device, B2, D34Initializing as storage device, D39Installing tools, D6, D34Repairing as startup device, D53Repairing as storage disk, D56Restoring from backup diskettes, D59Updating system software, D50
Q
Quick reference, C5
R
Radio and television interference, C15, 123Recycle disk, D32Reference cards, C5Refile document of folder, D28Reinitialize disk, D32Reinstall system software, D50, D55
Index
http://tiziano/tix/support/manuali/apple/lisa_og/j_0.htm (10 di 15) [20/01/2001 10.36.31]

Remove expansion card, H28Rename object, D46Repair
Disk after system failure, D57Startup ProFile, D53Storage disk, D56System software, D50
Repeating keys, C4, D67
J8
Replace
Card cage, H20Disk drives, H3I/O, CPU, or memory board, H10Mouse ball, F7Power supply, H38
Reset, C11, G9Restart, 131Restore ProFile from backup diskettes, D59, D62Retrieve
Discarded object, D24Filed document, D27Trapped diskette, G18
Reverse Polish calculator, E8Revert to previous version, D29RFI, 123
S
Safety precautions, 13Save and continue, B22, D30Save and put away, B22, D28Save document, B22, D30Screen, C7, C13
Brightness, C14, D77Cleaning, F2Contrast, C8, C14, D77Dimming, C8, D78, G8Focus, C14Glare, C8Installing glare filter, H43Printing screen display, D48, D75Specifications, 120Troubleshooting, G7, G8 G21
Index
http://tiziano/tix/support/manuali/apple/lisa_og/j_0.htm (11 di 15) [20/01/2001 10.36.31]

Screen controls, C13Select icon, B20Serial connectors, C12, D70, D72Service
Installing or removing expansion cards, H28Installing glare filter, H43Replacing I/O, CPU, or memory boards, H10Replacing card cage, H20Replacing disk drives, H3Replacing or cleaning mouse ball, F7Replacing power supply, H38
J9
Set
Clock/calendar, D64Convenience settings, D65Device connections, D69Screen brightness and contrast, D77Startup specifications, D82
Set aside, B22Set aside everything, B26Setup procedures, 11Shadow, B18
Icon on desktop, B13
Shortcuts, B23Show tape, E2Single sheet, D73, D75Software, definition, B2Space available on disk, D44Speaker volume, D66Specifications
Hardware, 119Startup, B7, D82Video, 120
Stack, E9
Start new document or folder, D18Start up, B2Automatic startup tests, G18, 17Environments window, 116Error message table, G19, 112Error tones, G18On-off button, 115Startup menu, D80, G23
Index
http://tiziano/tix/support/manuali/apple/lisa_og/j_0.htm (12 di 15) [20/01/2001 10.36.31]

Troubleshooting, G13, G14, G16
Startup device, B2
Default, D81Initializing, D34Repairing, D53Setting, D82Specifying during startup, D80Troubleshooting, G13, G14, G16Updating, D50
Startup error messages, G2, 17
Responding to, G22Table, G19, 112
Startup from, G23Startup instructions, B2, B5Startup menu, D80, G23Startup specifications, B7, D82Startup tests, G18, 17
J10
Stationery, tearing off, B23, D18Stationery pad, B16
Copying, D11Creating, D20Discarding, D24Icon on desktop, B12Using, D18
Status panel, B14, D44Storage location, D26Straighten up icons, B26, D43Support agreement, C5System configuration, B6, D69System failure, repairing disks after, D57System parts, C2System reset, G9System restart, 131System setup, 11System software, B2
Errors, G24Reinstalling, D50, D55Repairing or updating, D50
T
Index
http://tiziano/tix/support/manuali/apple/lisa_og/j_0.htm (13 di 15) [20/01/2001 10.36.31]

Tear off stationery, B23, D18Tests
LisaTest, G1, G26Memory test, D82
Throw away object, D24Time, setting, D64Title bar icon, B23Tones
Error tone table, G19Setting volume, D66
Tool, B4, B15
Backing up, B5Compatibility, B24Copies of, D7, D38Failure of, 129Icon on desktop, B12Incompatible version of, 130Installing, B4Installing during initialization, D34Installing on previously initialized ProFile, D6
Transaction tape, E2
J11
Troubleshooting, G1
Daisy wheel printer, G11Dark screen, G8Disk drives, 127Disks, 126Dot matrix printer, G12Environments window, G25Insufficient memory, 130Keyboard, G11Mouse, G10Power problems, G6Printing, G11, G12, 132Retrieving diskettes, G18Startup error messages, G18, 112Startup problems, G2System hangs, G9Video problems, G7With LisaTest, G26
U
Index
http://tiziano/tix/support/manuali/apple/lisa_og/j_0.htm (14 di 15) [20/01/2001 10.36.31]

Update system software, D50
V
Ventilation, G6Video out, C13Video screen, see ScreenVideo specifications, 120Volume, speaker, D66
W
Wastebasket, B16, D24
Icon on desktop, B13
Window, B10, B23, B25
Active/inactive, B20Sizing, B25
Work flow, B9
J12
Index
http://tiziano/tix/support/manuali/apple/lisa_og/j_0.htm (15 di 15) [20/01/2001 10.36.31]