lionel ready-to-play tm train set owner's manual · ready-to-play tm train set owner's...
TRANSCRIPT

7-11000 Ready-to-PlayTM Series
LionelReady-to-Play TM Train Set
Owner's Manual
Adult assembly requiredBatteries not included
Packaging contains important information and should be kept
2
Congratulations!
Congratulations on your purchase of this Lionel Ready-to-Play train set. This set featureseverything you need to get started – a wireless remote control, a huge loop of easy-to-
assemble track, a string of detailed cars, a tender and locomotive.
Read this instruction manual thoroughly for important tips on operating and maintaining your Ready-to-Play train set.
Set Inventory• 1 Steam locomotive with head lamp, bell, and sounds• 1 Tender • 2 Rolling Stock cars• 24 curved track sections• 8 straight track sections• 1 Wireless Remote Controller • 1 Owners manual

3
FCC and RSS Statements
Warning: Changes or modifications to this unit not expressly approved by the party responsible for compliance could void the user authority to operate the equipment.
Notes: This equipment has been tested and found to comply with the limits for a Class B digital device, pursuant to Part 15 of the FCC Rules. These limits are designed to provide reasonable protection against harmful interference in a residential installation. This equipment generates, uses and can radiate radio frequency energy and, if not installed and used in accordance with the instructions, may cause harmful interference to radio communications.
However, there is no guarantee that interference will not occur in a particular installation. If this equipment does cause harmful interference to radio or television reception, which can be determined by turning the equipement off and on, the user is encouraged to try to correct the interference by one or more of the following measures:
• Increase the separation between the equipment and receiver.
• Consult the dealer or an experienced radio/TV technician for help.
This device complies with part 15 of the FCC Rules. Operation is subject to the following two conditions: (1) this device may not cause interference, and (2) this device must accept any interference, including interference that may cause undesired operation.
This device complies with Industry Canada license-exempt RSS standard(s). Operation is subject to the following two conditions: (1) this device may notcause interference, and (2) this device must accept any interference, includinginterference that may cause undesired operation of the device.

4
Table of contentsTrack assembly and layoutJoining the track sections 5Layouts 6
Battery installation and optionsInstalling 'AAA' batteries into the wireless controller 7Installing 'C' batteries into the locomotive 8-9
Operating your trainConnecting the locomotive and tender 10The wireless controller 11-13Power activation button on the locomotive 13
Maintenance and operationsBattery Warning 14Cleaning the track 14Troubleshooting 15Limited Warranty/Lionel Service 16
The following Lionel marks are used throughout this Owner’s Manual and are protected under law. All rights reserved.
Lionel®, LionChief™, LionChief Plus™,TMCC®, LEGACY®, FasTrack®, TrainMaster®, Odyssey®, RailSounds®, CrewTalk™, TowerCom™, DynaChuff™, StationSounds™, Pullmor®, ElectroCoupler™, Magne-Traction®, CAB-1® Remote Controller, American Flyer®, Lionel ZW®, ZW®, MagniVision®, TMCC®, Lionelville®, Wireless Tether™, Powerhouse™, LionMaster®, Conventional Classics™, Postwar Celebration Series™, TruRail™, PH-1 Powerhouse®, Powermaster®, Powerstation-Powerhouse®, Accessory Motor Controller™, AMC™, Accessory Switch Controller™, ASC™, Action Recorder Controller™, ARC™, Track Power Controller 300™, TPC 300™, Track Power Controller 400™, TPC 400™, Block Power Controller™, BPC™, Operating Track Controller™, OTC™, FatBoy™, Lionel Lines®, Joshua Lionel Cowen Series™, Lockon®, TrainSounds™, MultiHorn™, MultiWhistle™, Choo-Choo™, SensorTrack™, Plug Expand Play™, Ready-to-Play™, Imagineering™
5
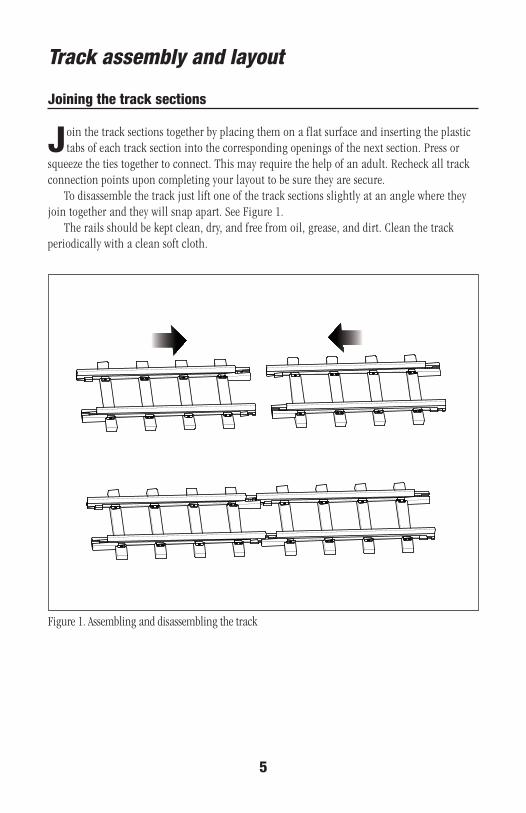
Track assembly and layout
Joining the track sections
Join the track sections together by placing them on a flat surface and inserting the plastic tabs of each track section into the corresponding openings of the next section. Press or
squeeze the ties together to connect. This may require the help of an adult. Recheck all track connection points upon completing your layout to be sure they are secure.
To disassemble the track just lift one of the track sections slightly at an angle where they join together and they will snap apart. See Figure 1.
The rails should be kept clean, dry, and free from oil, grease, and dirt. Clean the track periodically with a clean soft cloth.
Figure 1. Assembling and disassembling the track

6
Track assembly and layout
Layouts
These are three possible layouts you can make with the track provided. See Figure 2.
Circle
• Connect all curved track sections
Extended Circle
• Make four ninety-degree curves by joining three curved sections each
• Connect the three-section ninety-degree curves with one straight section in between
Oval
• Make two half-circles using six curved sections for each. Make two long straight tracks using two sections each. Join the curves using the two long straight sections.
Figure 2. Possible track layouts
7-11826 Add-On Track 12-PackStraight (available separately)
7-11827 Add-On Track 12-PackCurved (available separately)
Figure 3. Additional track is now available separately to create new layouts

7
Installing AAA batteries into the Remote Control
Using a Phillips Head screwdriver, have an adult loosen the screw on the battery compartment cover. Once the battery tray has been removed (as shown in figure 4)
install 3 'AAA' Alkaline Batteries (not included). Please be sure the +/- of each battery is positioned properly in the battery compartment. Replace the battery door and tighten the Phillips head screw. Be careful to avoid over-tightening the screw.
Use only Alkaline AAA batteries. Use only new batteries. Never mix new and used batteries or use different types together.
Figure 4. Opening and closing the battery compartment
REMOVE ALL BATTERIES WHEN THE TRAIN WILL NOT BE USED FOR AN EXTENDED PERIOD OF TIME. LIONEL'S LIMITED WARRANTY DOES NOT
COVER DAMAGE TO YOUR REMOTE CAUSED FROM LEAKING Important!
When you are not operating the train, move the On/Off switch to theOff position to conserve the battery life.Important!
Important!
Battery installation and options
Remove the cover

8
Battery installation and options
Using a Phillips Head screwdriver, have an adult loosen the screw on the battery compartment cover. Push down on the battery tray locking mechanism to allow the tray
to slide out of the cavity inside the locomotive. Once the battery tray has been removed install 6 'C' Alkaline Batteries (not included). Please be sure the +/- of each battery is positioned as shown in the battery compartment. See Figure 5(a/b).
Close the battery compartment by inserting the slot on the top end of the cab interior lid into the retaining rib. Then close the bottom end of the lid and secure by tightening the Phillips Head screw.
Use Alkaline ‘C’ batteries. Use only new batteries. Never mix new and used batteries or use different types together.
Important!
Figure 5a. Installing ‘C’ batteries in the Berkshire Locomotive
Berkshire Locomotive
Remove the cover from the cab and press down to remove the battery tray
Once the batteries are loaded, the screw should be tightened all the way to ensure that the battery contacts stay in place between the battery holder and the spring contacts.
FRONT
REAR
Installing ‘C’ batteries into the Berkshire Locomotive
Loosen screw
9
Remove all batteries when the train will not be used for an extendedperiod of time. Lionel's Limited Warranty does not cover damage to the engine caused from leaking batteries.
Important!
Battery installation and options Installing ‘C’ batteries into the General Locomotive
Slide the battery tray out of the cab to add the 'C' batteries
Remove the cover from the cab
Loosen screw
FRONT
REAR
GeneralFigure 5b. Installing ‘C’ batteries in the locomotive

10
Operating your train
Connecting the locomotive and coal tender
P lace the engine on the track first. Be sure that all the wheels are within the track rails.
The locomotive will not turn on until the power switch at the top of the locomotive is slid to the "ON" position.
Place the tender on the track behind the engine and connect the couplers. Be sure that all the tender’s wheels are on the track rails. See Figure 6.
Figure 6. Connecting the engine and the other cars
Note!
Note!
Connecting the couplers
Remove all batteries when the train will not be used for an extended period of time. Lionel's Limited Warranty does not cover damage to the engine caused from leaking batteries.

11
Operating your trainThe wireless controller
Turn the power switch on the side of the wireless remote to the up or ON position. The redLED at the top of the speed dial will illuminate to tell you the controller is on.
Turn the power switch on the Wireless Controller to the down position or OFF when not inuse. The LED at the top of the dial will go out to indicate the power is off. See Figure 7.
Leaving the Wireless Controller power ON when not in use will drain the controller’s battery.
Pairing the wireless controller to your Ready-to-PlayTM train set
W ith the remote turned off, turn the locomotive power switch to the “ON” position. The locomotive will produce a loud beeping sound, while the headlight will be off, and the cab
light is blinking on and off. Turn the remote on. The locomotive sounds will turn on, the headlight will illuminate, and the cab light will turn off as long as the train is stopped (at idle).
Note!
Note!
Figure 7. Using the wireless controller
If the remote is turned on PRIOR to the locomotive, the LED on the remote will blink on and off. Once the remote pairs with the locomotive, the LED on the remote will turn solid if the position of the dial is in the neutral/idle position and the knob is facing up. The locomotive sounds will come alive as described above.
3 BUTTON REMOTE
FORWA
RDREV ERS E
W
HISTL
EB E L L
FORWA
RDREV ERS E
WHIS
TLEB E L L
FORWA
RDREV ERS E
W
HISTL
EB E L L
FORWA
RDREV ERS E
W
HISTL
EB E L LPower on light
ON
OFF

12
Operating your trainOperating your wireless controller
Turn your Wireless Controller to the ON position by sliding the button on the right side of the controller up. An LED on top of the dial will light to indicate the power is on (See Figure 7 on
page 11). See Figure 8 on page 13 for button operations.
ForwardTurn the throttle dial to the right towards GREEN. There are three speeds in the forward
position and the more you turn the dial along the green arrow, the faster the train will run. The flashing rate of the LED will be consistent with the speed. The 3 speeds are slow (slow blink), medium (medium blink) and fast (fast blink). Once the locomotive begins to move, the cab light will turn on and stay on as long as the locomotive is moving.
StopTurning the dial to the top will stop the train. Note that it may take up to several seconds for the
train to come to a complete stop depending on how fast it was going. Make sure to bring the train toa complete stop before changing direction.
ReverseTurn the dial towards the blue REVERSE position to have the train move in reverse. Again,
there are three speeds in the reverse position. The more you turn the dial along the blue arrow, the faster the train will go. The flashing rate of the LED will be consistent with the speed.
BellPressing the BELL button activates the engine's bell sound.
Center Button (Depending on which set purchased)Pressing the UNMARKED center button activates a special announcement when stopped and
another announcement when moving
WhistlePressing the WHISTLE button activates the engine's whistle.
If the locomotive power switch is turned off while the locomotive is moving, it will stop. The LED on the remote will begin to blink slowly, signifying it has lost communicationwith the locomotive.
If the remote is turned off while the train is running the locomotive will slow down and stop. The headlight will turn off, cab light will begin flashing and a loud beeping sound will begin playing (notifying the operator to slide the power switch to the “OFF” position to conserve battery life)
Leaving the Wireless Controller power ON when not in use will drain the controller’s battery.
Note!
Note!

13
Operating your trainOperating your wireless controller continued
Power activation button on the engine
S lide the engine power switch to the “on” position. The engine cab light will blink and anaudible beeping sound will come on to indicate it is looking for remote pairing.
OFFON
Figure 9. Power Activation Button
Figure 8. Operating your 3 Button Wireless Controller
3 BUTTON REMOTE
FORWA
RDREV ERS E
W
HIST L
EB E L L
FORWA
RDREV ER S E
W
HISTL
EB E L L
FORWA
RDREV ER S E
W
HISTL
EB E L L
FORWARD STOP REVERSE
WHISTLE
ANNOUNCEMENT
BELL
Berkshire
General
ONOFF

14
Maintenance and operations
IMPORTANT : BATTERY INFORMATION
Please retain this information for future reference.Batteries should be replaced by an adult.
CAUTION:
• Do not mix alkaline, standard (carbon-zinc), or rechargeable (nickle-cadmium) batteries.• Different types of batteries or new and used batteries are not to be mixed.• Only batteries of the same or equivalent type as recommended are to be used.• Batteries are to be inserted with correct polarity.• Exhausted batteries are to be removed from the toy.• The supply terminals are not to be short-circuited.• Dispose of battery(ies) safely.• Do not dispose of this product in a fire. The batteries inside may explode or leak.• Non-rechargeable batteries are not to be recharged.• Rechargeable batteries are to be removed from the toy before being charged.• Rechargeable batteries are only to be used under adult supervision.
Cleaning the track
I t is very important to keep the track and wheels free from dirt and grease. Wipe them with asoft cloth whenever they get dirty. This will help the engine run more efficiently.

15
Maintenance and operationsTroubleshooting
The train will not run and the engine light is not on. The engine cab light is blinking.
1. Check to see if the remote is in the “off” position.
2. After checking the above and if the light is still not on replace the 6 ‘C’ batteries in the engine. Be sure the batteries are oriented as indicated in the battery compartment (see page 8 and 9). After replacing the batteries, slide the switch to the “on” position.
The train will not run but the engine headlight and sounds are on.
1. Check to make sure the Wireless Controller power switch is in the On position. This will be indicated by the red LED being illuminated.
2. Try moving the controller closer to the engine. Although designed for an optimal range of 10 feet, the signal can be weakened by a metal object or other interference.
3. Be sure the controller is not lying flat on the floor and the controller is positioned above the level of the train.
4. Replace the 3 AAA batteries in the controller (see page 7). Be sure that the batteries are oriented as indicated in the battery compartment.
The train will not run and the cab light is flickering.
1. Check to see if your wireless remote's power light is on. Give the train a new command such as the whistle button. If the lamp remains flickering and the whistle will not sound, either your engine or remote needs repair. If the cablight changes to a steady white glow and the whistle does not sound, your engine needs repair. Please contact Lionel service. See page 16.
The train runs, but the wheels slip on the track.
1. Check the top of the track rails and rubberized drive wheels for dirt or grease. Clean with a soft dry or slightly dampened cloth.
2. Check to see that all of the wheels of both the engine, tender and cars are located properly on the track.
White cab light.Under normal conditions the cab light will turn on as the train runs.

©2016 LIONEL L.L.C., CONCORD, NC 28027UNITED STATES OF AMERICAPRINTED IN CHINA
QUESTIONS?
This product is covered by a ONE year limited warranty effective from the date of purchase against defects in materials and workmanship.
Consumer Assistance:586-949-4100 option 2