linux ultimate guide - gopala...
TRANSCRIPT

Linux Ultimate Guide
Author & Credits:
Occupytheweb
https://creator.wonderhowto.com/occupythewebotw/

Getting Started
Step 1 Boot up Linux
Once you've booted up BackTrack, logged in as "root" and then type:
bt > startx
You should have a screen that looks similar to this.
Step 2 Open a Terminal
To become proficient in Linux, you MUST master the terminal. Many things can be done
now in the various Linux distributions by simply pointing and clicking, similar to Windows
or Mac OS, but the expert hacker must know how to use the terminal to run most of the
hacking tools.

So, let's open a terminal by clicking on the terminal icon on the bottom bar. That should
give us a screen that looks similar to this.
If you've ever used the command prompt in Windows, the Linux terminal is similar, but
far more powerful. Unlike the Windows command prompt, you can do EVERYTHING in
Linux from the terminal and control it more precisely than in Windows.
It's important to keep in mind that unlike Windows, Linux is case-sensitive. This means
that "Desktop" is different from "desktop" which is different from "DeskTop". Those who
are new to Linux often find this challenging, so try to keep this in mind.
Step 3 Examine the Directory Structure
Let's start with some basic Linux. Many beginners get tripped up by the structure of the
file system in Linux. Unlike Windows, Linux's file system is not linked to a physical drive
like in Windows, so we don't have a c:\ at the beginning of our Linux file system, but
rather a /.

The forward slash (/) represents the "root" of the file system or the very top of the file
system. All other directories (folders) are beneath this directory just like folders and sub-
folders are beneath the c:\ drive.
To visualize the file system, let's take a look at this diagram below.
It's important to have a basic understanding of this file structure because often we need
to navigate through it from the terminal without the use of a graphical tool like Windows
Explorer.
A couple key things to note in this graphical representation:
The /bin directory is where binaries are stored. These are the programs that make
Linux run.
/etc is generally where the configuration files are stored. In Linux, nearly everything
is configured with a text file that is stored under /etc.
/dev directory holds device files, similar to Windows device drivers.
/var is generally where log files, among other files, are stored.
Step 4 Using Pwd
When we open a terminal in BackTrack, the default directory we're in is our "home"
directory. As you can see from the graphic above, it's to the right of the "root" directory
or one level "below" root. We can confirm what directory we are in by typing:

bt > pwd
pwd stands for "present working directory" and as you can see, it returns "/root" meaning
we're in the root users directory (don't confuse this with the top of the directory tree
"root." This is the root users directory).
pwd is a handy command to remember as we can use it any time to tell us where we are
in the directory tree.
Step 5 Using Cd Command
We can change the directory we're working in by using the cd (change directory)
command. In this case, let's navigate "up" to the top of the directory structure by typing:
bt > cd ..
The cd command followed by the double dots (..) says, "move me up one level in the
directory tree." Notice that our command prompt has changed and when we type pwd
we see that Linux responds by telling us we are in the "/" or the top of the directory tree
(or the root directory).
bt > pwd

Creating Directories & Files
Let's open up BackTrack and getting started learning more Linux for the aspiring hacker.
Step 1 Change Directory (Cd)
We can change directories in multiple ways with cd..we can use cd .. to move up one level
in the directory tree. We can also move directly to the root directory by typing cd / or
move to our home directory by cd ~.
More often, we will use cd to move to a directory by using the absolute path of the
directory. This mean that we write out the entire path of the directory we want to move
to after cd. We can also move to the directory by using the relative path of the directory.
This means that we don't need to write the entire path, but simply use the path that we're
currently in and append to it. Let's look at some examples.
Let's say we're in our root user directory in BackTrack and we want to move to the
aircrack-ng directory (we'll be doing some aircrack tutorials soon). We can simply type:
bt > cd /pentest/wireless/aircrack-ng
This will take us directly to the aircrack-ng directory.
Now let's say we want to go to the scripts sub-directory within aircrack-ng. We could
type out the full path to the sub-directory, but it's much simpler to type the relative path
from where we are. We know we are /pentest/wireless/aircrack-ng, so type:

bt > cd scripts
And that takes us to the scripts sub-directory within aircrack-ng or
/pentest/wireless/aircrack-ng/scripts.
Once again, it's critical to emphasize that Linux is case sensitive, so typing the directory
without the proper case will result in the error message, "no such file or directory".
Step 2 Listing Command (Ls)
Once of most used and important commands in Linux is ls or list. This command is used
to list the contents of a directory or sub-directory so that we can see the contents. It's
very similar to the dir command in Windows. So let's use it in the aircrack-ng directory;
bt > ls

We can see that Linux listed all the files and directories within the aircrack-ng directory.
Linux allows us to modify its commands by using switches; these are usually letters
preceded by the dash (-). With ls, it's helpful to use two of theses switches, -a and -l.
The -a switch means all, so when we use it, Linux will list all files and directories, even
those that are hidden. When we use the -l switch, it gives us a long listing, meaning it
gives us info on the security permissions, the size, the owner, the group of the file or
directory, when it was created, etc.
Let's type:
bt > ls -la
We'll examine more closely the security permissions in a later tutorial, but you must know
that you need execute (x) permission on any file you want to execute. So, if you download
a new tool, you must make certain that you have execute permission on it.

Step 3 Create a File (Touch)
To create a file in Linux, it's a bit different from Windows. In Linux, we use the touch
command. So, let's create a new file called newfile:
bt > touch newfile
Now we can check to see if that file exists by doing a directory listing:
bt > ls -la
We can see that new file has been created!
Step 4 Create a Directory (Mkdir)
Similar to Windows, we can create a directory by using the make directory command
(mkdir). Let's now make a new directory.
bt > mkdir newdirectory

Now type ls and we can see that a new directory has been created.
Step 5 Getting Help (Man)
Linux has a very useful utility called man. Man is the manual for nearly every command.
If you should forget what a command does, simply type man and the name of the
command and it will display the manual with all the info you need about that command,
its switches, and arguments. For instance, type:
bt > man touch

With most commands, you can also use either the -h switch or the --help switch after the
command to obtain "help" about a particular command. In the case of "touch", we must
use the --help to obtain help on the touch command.
bt > touch --help

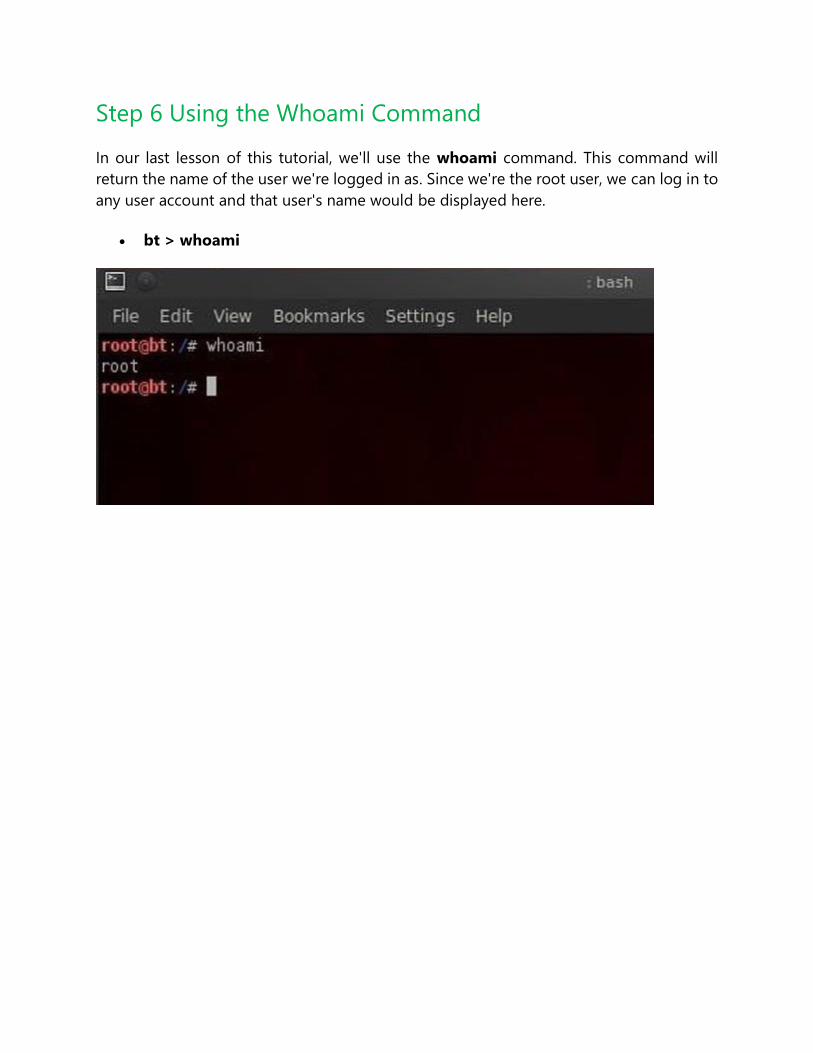
Step 6 Using the Whoami Command
In our last lesson of this tutorial, we'll use the whoami command. This command will
return the name of the user we're logged in as. Since we're the root user, we can log in to
any user account and that user's name would be displayed here.
bt > whoami

Managing Directories & Files
In this installment, we'll look at how to manage files and directories in Linux, namely
copying, renaming, moving, and viewing. Then we'll look a bit at networking and the
ifconfig command.
Step 1 Copying Files (Cp)
Let's imagine that we need a copy of the file in our home directory, user root. We can do
that by:
bt > cp newfile /root
We simply tell Linux copy (cp) the newfile (in our current directory) to the directory of
the root user (once again, don't confuse this with the / directory). We don't need to

specify the directory that newfile is in, if it's in our current working directory. The copy
command makes a copy of the file specified and places it in the specified directory leaving
the original untouched and unchanged, so we now have two copies of the original file.
You can see in the screenshot above that when we change directory (cd) to the root user
and list the files (ls) that now a newfile copy appears in that directory.
What if we wanted to copy a file from a directory that wasn't in our current working
directory? In that case, we would need to specify a path to the directory, such as:
bt > cp /etc/newfile /root
Also, note that we don't need to specify the file name we're copying it to. It simply makes
a copy and gives it the same name as the original "newfile."

Step 2 Moving Files (Mv)
Unfortunately, Linux doesn't have a rename command for renaming files, so most users
use the move (mv) command to both move files and rename them. Let's imagine now
that we placed that newfile in the wrong directory and we really wanted it in the root (/)
directory. We can use the move command to do so.
bt > mv /root/newfile /
This command says, move the newfile from the root user directory to the root (/)
directory. The move command literally moves the file and does not leave a copy where
the old one existed. Note that the newfile has moved to the root directory.
Sometimes, we want change the name of the file and not actually move it to a different
location. The move command can be used for that also. We simply tell Linux to move the
original file to a new file with a new name. Take for instance our newfile in the aircrack-
ng directory. Let's say that we want to rename that file to "crackedpasswords. We can
simply type:

bt > mv newfile crackedpasswords
Notice here that I did not use any directory paths because I was moving a file in my current
working directory and to a file in my current working directory. If we run a directory listing
now, we can see that newfile is gone and crackedpasswords now exists in the aircrack-
ng directory.
Step 3 Viewing Files (Cat, More, Less)
From the command line in the terminal, we can view the contents of files by using the cat
command. cat is short for concatenate, which is a $20 word for putting together a bunch
of pieces (we are putting together the words for display on the screen). Concatenate is a
fancy word, but is used throughout computer science and information technology, so add
it to your vocabulary.
Staying in the /pentest/wireless/aircrack-ng directory, let's cat some files. First, let's
get a listing of files in this directory.

Notice in the screenshot above, there is a file called README. Often, software developers
use this file to provide important notes to their users. This file can be critical, especially
with hacking tools because most are open source and seldom have manuals. Let's take a
look at the contents of this file.
bt > cat README

When you run this command, you'll see lots of text running across your screen. Obviously,
it goes by way too fast to read, but when its done, we could use the scroll button on the
terminal to scroll up to read all the text. There is another way, though, that might be easier.
There are two commands that work similar to cat but don't simply run the text across the
screen until it hits the end of file. These are more and less. They are very similar, each
only displaying one page of information on your screen until you prompt it to scroll down.
Let's try more first.
bt > more README

As you can see, when I use more and the filename, it displays the file until the screen fills
and waits for further instructions from me. If I hit enter, it will scroll down one line at a
time, while if I hit the spacebar, it will scroll one page at a time.
Now let's try the more powerful less (in some Linux circles, there is a saying "less is more",
meaning that less is more powerful than more).
bt > less README

You can see that less followed by the filename, once again displays the README file until
it fills up my terminal just like more. Though, note that less displays the name of the file
that I'm viewing in the lower left-hand corner. Probably more importantly, less has
powerful text searching capabilities that are missing from more. I can search for text
within this file by typing the forward slash followed by what I'm searching for and less
will find it and highlight it for me.
That's one of the primary reasons I prefer less.
Step 4 Networking (Ifconfig)
Before I finish this tutorial, I want to show you one last simple networking command,
ifconfig. Those of you comfortable with Windows networking, know that you can use the
ipconfig command in Windows to display key information on your networking
configuration. ifconfig in Linux is very similar, with only one letter different. Let's run
ifconfig see what it tells us.
bt >ifconfig
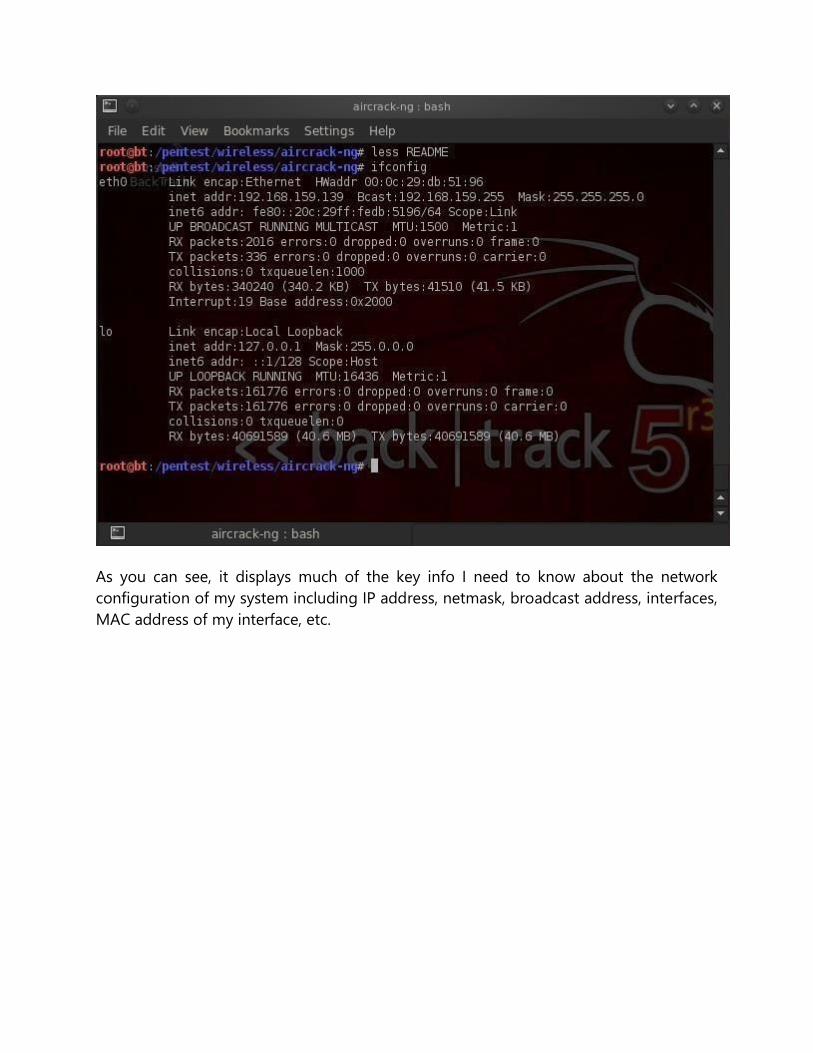
As you can see, it displays much of the key info I need to know about the network
configuration of my system including IP address, netmask, broadcast address, interfaces,
MAC address of my interface, etc.
Finding Files
Linux beginners are often faced with the issue of how to find files and programs, especially
considering the radically different directory structure as compared to Mac OS or Windows.
Beginners sometimes get frustrated trying to find the necessary files or binaries, so I'm
dedicating this tutorial to finding stuff in Linux.
Step 1 Finding Files in a Directory (Find)
The first command I want to show you is find. As you probably guessed, find is able to
find stuff by looking in a directory for the file you're hunting for. By default, its recursive,
which means it will look in all sub-directories and display a list of everywhere it finds the
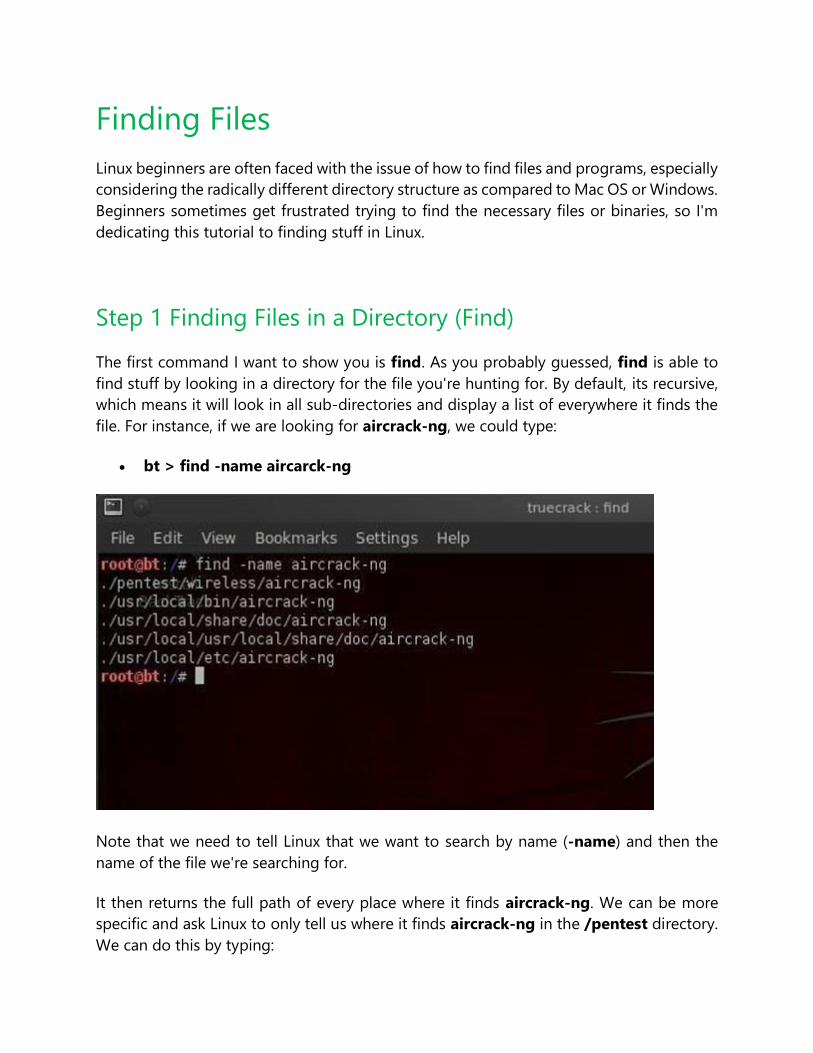
file. For instance, if we are looking for aircrack-ng, we could type:
bt > find -name aircarck-ng
Note that we need to tell Linux that we want to search by name (-name) and then the
name of the file we're searching for.
It then returns the full path of every place where it finds aircrack-ng. We can be more
specific and ask Linux to only tell us where it finds aircrack-ng in the /pentest directory.
We can do this by typing:

bt > find /pentest -name aircrack-ng
This command says, "look in the pentest directory and all its sub-directories and tell me
where you find something called aircrack-ng".
Now, Linux only returns those paths to files that are in the directory /pentest or its sub-
directories, such as /pentest/wireless/aircrack-ng and the others.
Step 2 Finding Binaries in Path Variables (Which)
The next searching command we want to look at is which. This command allows us to
search for binaries that are in our path variable. Hmm...even I think that's a lot of techo-
googlygoop. Let's try to make some sense of it.
Binaries are the files that are the equivalent of executables in Windows. These are files
that do something like echo, ls, cd, mv, etc. Our path variable is the variable that keeps
the directory path to our binaries. Usually, our binaries are in the /bin (bin is short for
binaries) or /sbin directory and that's reflected in our path variable. Our path variable
setting can be checked by asking Linux to echo the value in the variable. We do this by
typing:
bt > echo $PATH

Linux responds with the value in our path variable. These are the places that which will
search for binaries. So when we type:
bt > which ls
It returns the path to that binary. If we use which to search for aircrack-ng:
bt > which aircrack-ng

Then we can see that Linux returns /usr/local/bin/aircrack-ng. If aircrack-ng were not
in a directory that was in our path, it would not be able to help us.
Step 3 Finding Any File in Any Directory (Whereis)
Unlike which, whereis is not limited to finding binaries in our path. It can locate files in
any directory, and in addition, it also locates the files manual or man pages. So, when we
type:
bt > whereis aircrack-ng
We can see that whereis returns the path to multiple locations of aircrack-ng including
the man pages.
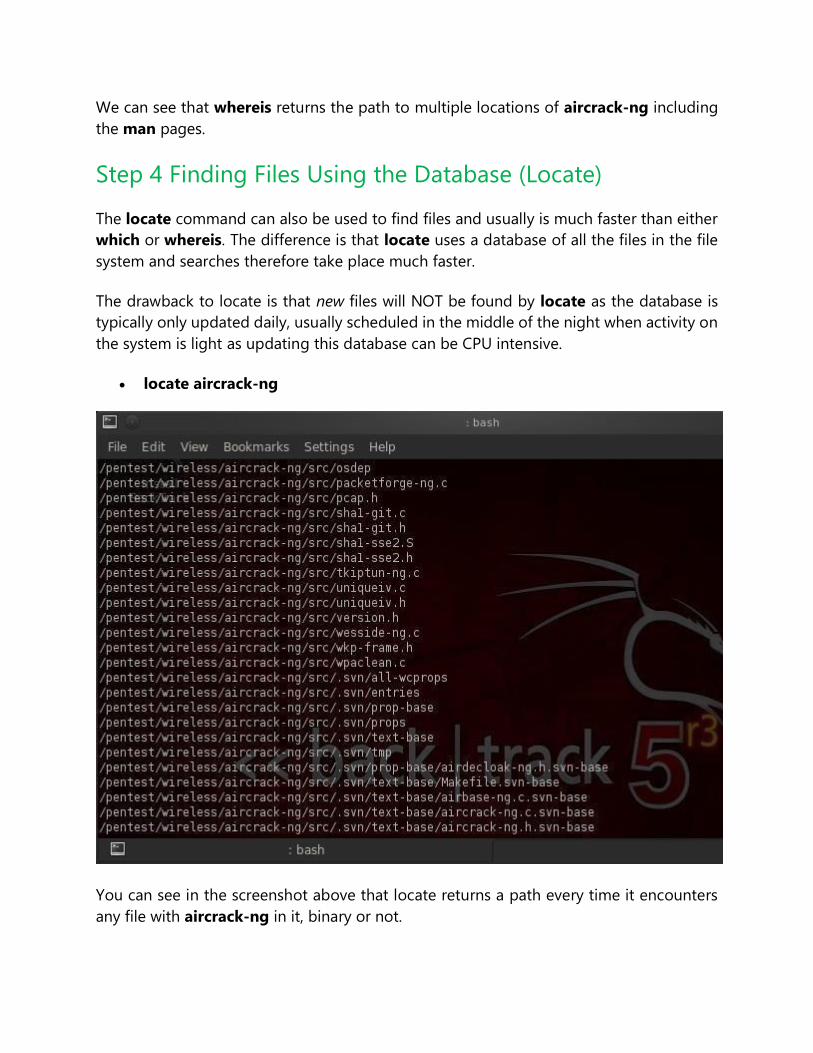
Step 4 Finding Files Using the Database (Locate)
The locate command can also be used to find files and usually is much faster than either
which or whereis. The difference is that locate uses a database of all the files in the file
system and searches therefore take place much faster.
The drawback to locate is that new files will NOT be found by locate as the database is
typically only updated daily, usually scheduled in the middle of the night when activity on
the system is light as updating this database can be CPU intensive.
locate aircrack-ng
You can see in the screenshot above that locate returns a path every time it encounters
any file with aircrack-ng in it, binary or not.

Installing New Software
We've looked at numerous basic commands in the first few tutorials, but here I want to
focus on installing new software in Linux, and especially in BackTrack.
BackTrack v5r3 was built on Ubuntu, which is a type of Debian Linux. That's important
because different Linux systems use different methods for package management
(package management means downloading and installing new software packages).
Step 1 Using the GUI Package Manager
The simplest way to install software on BackTrack is to use the GUI package manager. In
my KDE-based BackTrack 5, the GUI package manager is called KPackageKit (some of
you may have Synaptic).
These package managers enable us find packages, download them, and install them on
our system. We can open KPackageKit by navigating to System and then KPackageKit
as shown in the screenshot below.

When open, you simply put the name into search field. It will then retrieve all the options
fulfilling the criteria of your search, then just click on the icon next to the package you
want to download.
In this example, we will be looking for the wireless hacking software, aircrack-ng.
Note that if the package is already installed, there will be an X next to it. If not, there will
be a downward-pointing arrow. Click on the arrow and then click on the APPLY button
below.
Step 2 Updating Your Repositories
Package managers search in specified repositories (websites housing packages) for the
package you are seeking. If you get a message that the package was not found, it doesn't
necessarily mean that it doesn't exist, but simply that it's not in the repositories your OS
is searching.
BackTrack defaults to searching in backtrack-linux.org where many hacking tools are
available. Unfortunately, if you are looking for something that is not a hacking tool or a
new hacking tool that BackTrack hasn't yet placed in its repository, you may have to revise
where your operating system searching for packages.
This can be done by editing the /etc/apt/sources.list file. Let's open it with KWrite and
take a look.

As you can see, BackTrack has three default sources on its sources.list, all pointing to
BackTrack repositories. We can add any repository with Linux software to this list, but
since BackTrack is a Ubuntu distribution, we might want to add an Ubuntu repository to
this list to download and install Ubuntu software. We can do this by adding a single line
to this file:
deb http://archive.ubuntu.org/ubuntu lucid main restricted

Now when I use my package manager, it will search the three BackTrack repositories first,
and if it fails to find the package in any of those places, it will then search for it in the
Ubuntu repository.
Step 3 Command Line Package Management
Ubuntu also has a command line package manager called apt. The basic syntax for using
apt to download packages is:
apt-get install aircrack-ng
So, let's open a terminal and type the above command to install aircrack-ng (of course,
we just need to replace the name of the package to install other software).

If the package is in one of our repositories, it will download it and any of the necessary
dependencies (files that the package need to run properly), and install it on your system
automatically.
Step 4 Installing from Source
Finally, sometimes you will need to download software that is neither in a repository, nor
in a package. Most often these are archived as tar or tarballs. These are files that are
"tarred" together into a single file and often compressed (similar to zipping files with
WinZip and then putting them together into a .zip file).
Let's say that aircrack-ng was not in our repository (some software never finds its way
into a repository) and we had to download it from aircrack-ng.org website. We could
download the file aircrack-ng-1.2-beta1.tar.
Once we've downlaoded it, then we need to untar it using the tar command:
tar xvf aircrack-ng-1.2-beta1.tar
This will untar and uncompress it, if it's compressed. Next we need to compile it with the
GNU compiler. Compiling from source code will give us binaries (the program files) that
are optimized for our hardware and operating system, meaning they will often run faster
and more efficiently. We can compile this source code by typing:
gcc aircrack-ng
Finally, we can now run this file from within the directory where we unzipped it:
./aircrack-ng

Note that to run the file, we preceded it with the ./, which tells Linux to execute this file
from the directory we are presently in, so make certain you run this command in the same
directory that you compiled the source code in.
That should cover all the major ways of installing software and I hope it wasn't too
confusing. In most cases, we can simply use the GUI based package manager to install
software, but like all things in life, there are exceptions.

Networking Basics
I assume that you understand a small amount of networking concepts, things like IP
addresses, MAC addresses, DNS, DHCP, etc.
Step 1 Analyzing Networks
The most basic linux command for analyzing networks is ifconfig. It's very similar to the
Windows command ipconfig. Let's take a look at it.
ifconfig
As you can see in this screenshot, ifconfig conveys a significant amount of information
to the user. In the very first line, we see to the far left eth0. This is the first wired network
connection, ethernet 0 (Linux usually starts counting at 0).
Following this, we see the type of network being used (Ethernet) and the hardware
address (this is the globally unique address stamped on every piece of network hardware,
in this case the NIC).

The second line then contains information of the IP address, in this case, 192.168.1.114,
the broadcast address (the address to send out information to all IPs on the subnet), and
finally the network mask (this is the info on what part of the IP address is network and
which part is hosts). There is a lot more technical info there, but it's beyond the scope of
a Linux basics tutorial.
If we look down below to what appears to be a second paragraph, we see the start of
another paragraph with lo to the far left.
This is the loopback address or localhost. This is the address of the machine you're
working on if you simply wanted to test something like a website. It generally is
represented with the IP address 127.0.0.1.
Step 2 Changing IP Addresses
Changing IP addresses can be fairly simple in Linux. Remember that in most cases, you're
going to have a dynamically assigned address from a DHCP server. In some cases, you
may need to reassign the address, especially if you're hacking. This can be useful in
spoofing your IP address, making network forensics more challenging, but certainly not
impossible.

We can do this by using the ifconfig command with the interface we want to assign the
IP to and the IP address we want. Such as:
ifconfig eth0 192.168.1.115
Now, when we type ifconfig, we can see that our IP address has changed to the new IP
address.
We can also change the netmask and broadcast address, if necessary, such as:
ifconfig eth0 192.168.1.115 netmask 255.255.255.0 broadcast 192.168.1.255
Step 3 DHCP (Dynamic Host Configuration Server)
Linux has a DHCP server that runs a daeman called dhcpd. It's this DHCP server that
assigns IP addresses to all the systems on the subnet. It also keeps logs files of which
machines had which IP addresses at which time. It's this log that is often used to trace
hackers in a forensic analysis after an attack.

When I want to be assigned a new address from the DHCP server, I can simply call the
server with the command dhclient (different Linux distros use different DHCP clients, but
BackTrack is built on Ubuntu which uses dhclient), like this:
dhclient
As you can see, the dhclient command sends out DHCPDISCOVER request from the
default NIC. It then gets an offer (DHCPOFFER) of 192.168.1.114 from the DHCP server,
then confirms the IP assignment to the DHCP server. Now, if we type ifconfig, we can see
that the DHCP server has assigned a new IP address.

Step 4 DNS (Domain Name Service)
DNS, or Domain Name Services, is the service that enables us to type in a domain name
like www.wonderhowto.com, which it then translates to the appropriate IP address.
Without it, we would all have to remember thousands of IP addresses of our favorite
websites (no small task even for a savant).
One of the most useful commands for the aspiring hacker is dig, which is the equivalent
of nslookup in Windows, but offers us much more information on the domain. For
instance, we dig wonderhowto.com and by adding the ns option, it will display the name
server for wonderhowto.com.
dig wonderhowto.com ns

By using the dig command with the mx option, we can get info on WonderHowTo's email
servers.
dig wonderhowto.com mx

The most common Linux DNS server is the Berkeley Internet Name Domain, or BIND. In
some cases, Linux users will often refer to DNS as BIND, so don't be confused. DNS or
BIND simply maps individual domain names to IP addresses.
On our BackTrack system, we can point out DNS services to a local DNS server or a public
DNS server. This pointing takes place in the a plain text tile named /etc/resolv.conf file.
Let's open it with kwrite:
kwrite /etc/resolv.conf
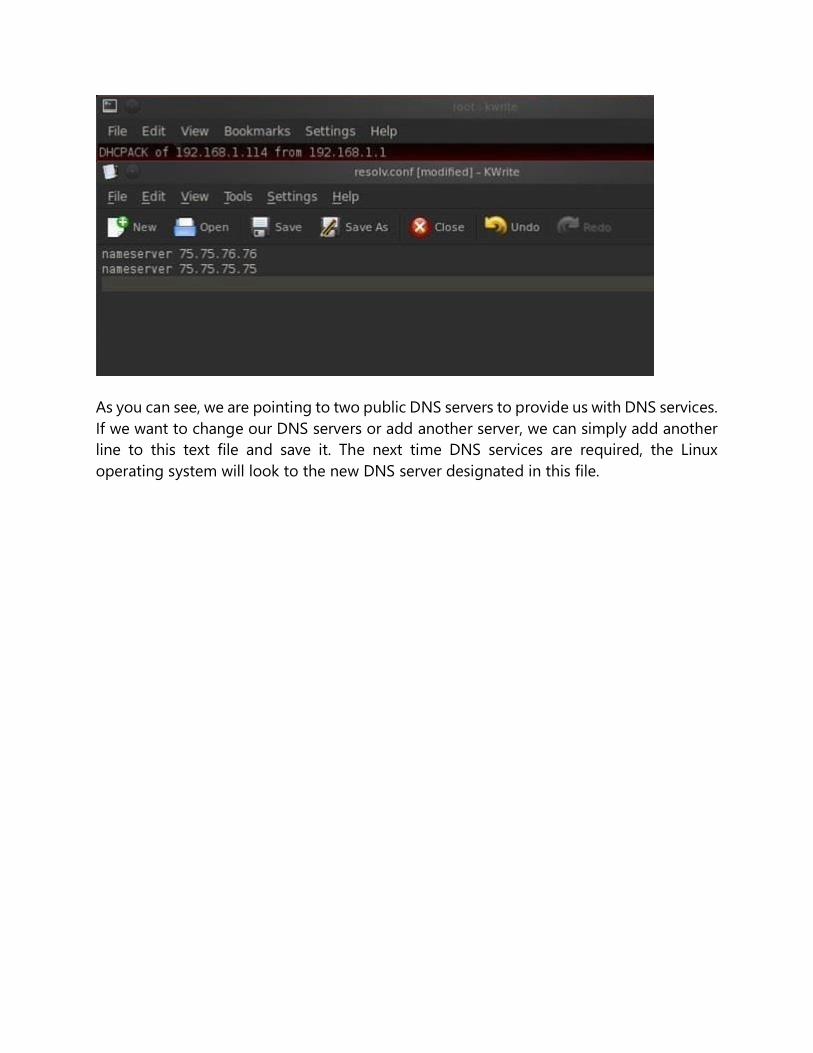
As you can see, we are pointing to two public DNS servers to provide us with DNS services.
If we want to change our DNS servers or add another server, we can simply add another
line to this text file and save it. The next time DNS services are required, the Linux
operating system will look to the new DNS server designated in this file.

Managing Permissions
Step 1 Checking Permissions
When we want to find the permissions on a file, we can simply use the ls command with
the -l or long switch. Let's use that command in the pentest/wireless/aircrack-ng
directory and see what it tells us about the files there.
If we look at each line, we can see quite a bit of info on the file including whether it's a
file or directory, the permissions on the file, the number of links, the owner of the file, the
group owner of the file, the size of the file, when it was created or modified, and finally,
the name of the file. Let's examine each of these.

Identifying a File or Directory
The very first character of the line tells us whether it's a file or directory. If the line begins
with a d, it's a directory. If it begins with a -, it's a file.
Identifying the Permissions
The next section of characters defines the permissions on the file. There are three sets of
rwx that stands for read, write and execute. This determines whether there is the
permission to read the file, write to the file, or execute the file. Each set of rwx represents
the permissions of the owner, group, and then all others.
So, if we look at the second line for the ChangeLog file...
We can see that it begins with:
-rw-r--r--
This means that it's a file (-) where the owner has read (r) and write (w) permissions, but
not execute permission (-).
The next set of permissions represents those of the group. Here we can see that the group
has read permissions (r), but not write (-) or execute permission (-).

Finally, the last set of permissions are for all others. We can see that all others have only
the read (r) permission on the ChangeLog file.
Step 2 Changing Permissions
Let's imagine a case where we wanted the group to be able to both write and execute the
ChangeLog file. Linux has a command called chmod that allows us to change the
permissions on a file as long as we're root or the owner of the file. These permissions are
represented by their binary equivalents in the operating system.
The Numbers
Remember that everything is simply zeros and ones in the underlying operating system,
and these permissions are represented by on and off switches in the system. So, if we
could imagine the permissions as three on/off switches and these switches are in the base
two-number system, the far right switch represents 1 when it's on, the middle switch
represents 2 when it's on, and finally, the far left switch represents 4 when on.
So, the three permissions look like this when they are all on:
r w x
4 2 1 = 7
If you sum these three, you get seven, right? In Linux, when all the permission switches
are on, we can represent it with the decimal numerical equivalent of 7. So, if we wanted
to represent that the owner (7) and the group (7) and all users (7) had all permissions, we
could represent it as:
777

Now, lets go back to our ChangeLog file. Remember its permissions? They were rw-r--r-
-, so we could represent that numerically like:
r w - r - - r - -
4 2 0 4 0 0 4 0 0
This can be represented by 644.
Changing the Actual Permissions of ChangeLog
Now, if we wanted to give the group write (2) and execute (1) privilege, we can use the
chmod command to do it. We need to add the write (2) privilege and the execute (1)
privilege to the ChangeLog file. We do that by:
chmod 7 7 4 ChangeLog

This statements says give the owner all permissions (4+2+1=7), the group the same
(4+2+1=7). and give everyone else simply read permission (4+0+0=4). When we now do
a ls -l, we can see that the permissions for ChangeLog are now:
r w x r w x r - -
Simple, right?
Step 3 Changing Permissions with UGO
Although the numeric method is probably the most common method for changing
permissions in Linux (every self-respecting Linux guru can use it), there's another method
that some people are more comfortable with. It's often referred to as the UGO syntax.
UGO stands for U=user or owner, G=group and O=others. UGO has three operators:
+ for add a permission
- for subtract a permission
= to set a permission
So, if I wanted to subtract the write permission to the group that ChangeLog belongs to,
I could write:
chmod g-w ChangeLog
This command says "for the group (g) subtract (-) the write (w) permission to
ChangeLog."

You can see that when I now check file permissions by typing ls -l, that the ChangeLog
file no longer has write permission for the group.
If I wanted to give both the user and group execute permission, I could type:
chmod u+x, g+x ChangeLog
This command says "for the user add the execute permission, for the group add the
execute permission to the file ChangeLog."
Step 4 Giving Ourselves Execute Permission on a New
Hacking Tool
Very often as a hacker, we'll need to download new hacking tools. After we download,
extract, unzip, make, and install them, we'll very often need to give ourselves permission
to execute it. If we don't, we will usually get a message that we don't have adequate
permission to execute.

We can see in the screenshot above that our newhackertool does not have execute
permission for anyone.
We can give ourselves permission to execute on a newhackertool by writing:
chmod 766 newhackertool

As you now know, this would give us, the owner, all permissions including execute, and
the group and everyone else just read and write permissions (4+2=6). You can see in the
screenshot above that after running the chmod command, that's exactly what we get!

Managing Processes
In Linux, a process is a program running in memory. Typically, your computer is running
hundreds of processes simultaneously. If they're system processes, Linux folks refer to
them as daemons or demons. You will often see the process name ending with a "d"
such httpd, the process or daemon responsible for the http service.
Step 1 See What Processes Are Running
We can see all the processes running on your system by typing:
ps aux
These switches will provide all processes (a), the user (u) ,and processes not associated
with a terminal (x). This is my favorite set of switches for using ps as it enables me to see
which user initiated the process and how much in resources it's using.
Note that each process listed shows us among many things.
user
PID (process identifier)
%CPU

%MEM (memory)
If we just wanted to see the all the processes with limited information, we can type:
ps -A
You can see all the processes running, but without such information as CPU percentage
and memory percentage. Note that airbase-ng is listed with PID 5143 and the last process
is the ps command.
Process numbers, or PIDs, are critical for working in Linux, as you often need the PID to
manage a process. As you might have seen in some of my Metasploit tutorials, the PID
often becomes critical in hacking the victim systems.
Step 2 The Top Command
Similar to the ps command is the top command, except that top shows us only the top
processes. In other words, it only shows us the processes using the most resources and
it's dynamic, meaning that it is gives us a real-time look at our processes. Simply type:
top

As you can see, the processes are listed in the order by how much system resources they
are using, and the list is constantly changing as the processes use more or less resources.
Step 3 Killing Processes
Sometimes we will need to stop processes in Linux. The command we use is kill. Don't
worry, it sounds more violent than it actually is. This command is particularly important if
we have a process that continues to run and use system resources, even after we have
tried to stop it. These processes are often referred to as "zombie" processes.
We can kill a process by simply typing kill and the process ID or PID. So to kill my airbase-
ng process, I can simply type:
kill 5143

We can see in the screenshot above that my airbase-ng process is no longer running.
There are many types of "kills". The default kill (when we use the kill command without
any switches) is kill 15 or the termination signal. It allows the process to cleanup and
gently terminate its process.
Sometimes, processes still refuse to terminate even when sent the default kill command.
In that case, we have to get more serious and use the absolute terminator to do the job.
This is kill -9, which takes no prisoners and ends the job without allowing it to say its
goodbyes and forces the kernel to terminate it immediately.
Step 4 Change Process Priority
Every process in Linux is given a priority number. As you probably guessed, this priority
number determines how important the process is and where it stands in line in terms of
using system resources. These priority numbers range from 0 to 127 with 0 being the
highest priority and 127 being the lowest.
As the root user or system admin, we can't directly determine the priority of a process—
that is the job of the kernel—but we can hint to the kernel that we would like a process
to run with a higher priority. We can do this through the nice command. Nice values range
from -20 to +19 with the lower values indicating a higher priority.

We can set a processes' nice value by using the nice command, the -n switch, the value
of the nice, and then the command we want to run. So, if if we wanted to start our airbase-
ng process from our Evil Twin tutorial with the highest priority, we could type:
nice -n -20 airbase-ng -a 00:09:5B:6F:64:1E --essid "Elroy" -c 11 mon0
Later on, if we felt that we wanted to reduce the priority of the airbase-ng command, we
could renice it. The renice command requires simply the renice command, the priority
level, and unlike the nice command, it only takes the process PID, such as:
renice 15 5143
We can see that by renice-ing the airbase-ng command, we have reduced its priority from
-20 (highest) to 15 (relatively low).
Step 5 Push a Process into the Background
When we run a command from the shell terminal, the process will take control of that
shell until it is complete. If it's an ongoing process, similar to airbase-ng, it will maintain
control of that terminal until we stop it. Until that time, we can't use that shell.
If we want to still use that shell, we can send that process into the background and then
get control of the shell again. To start a command in the background, we simply need to

end the command with the & or ampersand. So, to get airbase-ng to run in the
background, we simply type:
airbase-ng -a 00:09:5B:6F:64:1E --essid "Elroy" -c 11 mon0 &
If we want to bring a background job to the foreground, we simply type fg. To send a
foreground processes to the background, we can type Control Z to stop it and then and
using the bg command with the PID to send it to the background.

Managing Environmental Variables
One of the areas that often gives Linux newcomers problems are the environment
variables. Although Windows systems have environment variables, most users, and for
that matter, most administrators, never manage their environment variables.
Environment variables are the variables that are used by our particular user environment.
In most cases, this will be our BASH shell. Each user, including root, has a set of
environment variables that are set at default values unless they're changed. We can
change these values to make our system work more efficiently and tailor our work
environment to best meet our individual needs.
Step 1 View Our Environment Variables
We can view our environment variables by typing:
set
Notice that set lists for us all of the environment variables, user defined functions, and
aliases. Also, make note that our environment variables are always UPPER CASE names
such as HOME, PATH, HISTSIZE, etc.

If want to see the value inside the variable, we can type:
echo $HISTSIZE
It's important to notice that when we want to use the value inside the variable, such as
here, we need to put a $ before the variable name.
The HISTSIZE variable contains the value of the number of commands that are stored in
our history file. As you can see in this screenshot, the HISTSIZE variable is set to 1000. In
some cases, we may not want our commands stored in the history file, such as when we
are covering our tracks, then we can set our HISTSIZE variable to zero.
HISTSIZE=0
When we change an environment variable, it's only for that environment. This means that
once we close that terminal, any changes that we made to these variables is lost or set
back to the default value. If we want the value to remain for our next terminal session and
other terminal sessions, we need to export the variable. We can do this by simply typing:
export HISTSIZE
Step 2 Changing Our Terminal Prompt
Let's have a little fun and change the prompt in our terminal. The environment variable
that contains our prompt for the first terminal is PS1. We can change it by typing:
PS1= "World's Best Hacker: #"

Remember that our prompt will now be "World's Best Hacker" whenever we open the first
terminal (PS1), but the second terminal will still be the default BackTrack command
prompt. In addition, if we really like this command prompt and want to keep it, we need
to export it so that each time we open this terminal, the prompt will be "World's Best
Hacker."
export PS1
Step 3 Changing Our Path Variable
Probably the most important variable in our environment is our PATH variable. This is
what controls where our shell looks for the commands we type, such as cd, ls, echo, etc.
If it doesn't find the command in one of the directories in our path, it returns an error
"command not found," even if it DOES exist in another directory not in our PATH.
Let's take a look at our path variable:
echo =$PATH

Notice the directories included in our PATH. These are usually the various /bin and /sbin
directories where our system variables are found. When we type ls, the system knows to
look in each of these directories for the ls command.
Whenever we want to use aircrack-ng or another hacking application in this PATH
variable, we have to first navigate to that directory. In the case of aircrack-ng, that would
be /pentest/wireless/aircrack-ng.
Now, if we want to add our wireless hacking application to our PATH variable, we can
type:
PATH=$PATH:/pentest/wireless/aircrack-ng
Now when we want to run aircrack-ng, we don't need to navigate to the
pentest/wireless/aircrack-ng directory. We now can execute aircrack-ng applications
from anywhere in BackTrack!

This can be a very useful technique for directories that we use often, but be careful to not
add too many directories to your PATH variable as the system will have to search through
every directory in the PATH to find commands and could potentially slow down your
terminal.

Manipulating Text
With so many text files, manipulating text becomes crucial in managing Linux and Linux
applications. In this tutorial, we'll look at several of the commands and techniques for
manipulating text in Linux. For demonstration purposes, we'll use files from the world's
best NIDS, Snort.
Step 1 Cat That File
cat is probably the most basic text display command. Let's cat the Snort config file found
in /etc/snort.
cat /etc/snort/snort.conf
As you can see, the snort.conf is displayed on our screen until it comes to the end of the
file. Not the most convenient way to work with this file.
Step 2 Take the Head
If we just want to view the beginning of a file, we can use the head command. This
command displays the first 10 lines of a file, by default.
head /etc/snort/snort.conf

If we want to see more or less than the default 10 lines, we can tell head how many lines
we want to see by putting the number of lines we want to see (with the - switch) between
the command and the file name.
head -30 /etc/snort/snort.conf

Apache Web Servers
One area that's critical that we haven't covered yet is building and managing an Apache
web server.
Apache is found on over 60% of the globe's web servers, so any self-respecting Linux
admin should be familiar with it. As a hacker aspiring to hack websites, it's critical to
understand the inner workings of Apache, websites, and the backend databases of these
sites.
In addition, by setting up your own web server, you could serve up malware to anyone
who visits your site. If you're thinking of building a botnet, this is one of the best ways of
doing that (I'll do a tutorial on building a botnet in the near future).
Getting Apache on Your System
If you have BackTrack running on your system, Apache is already installed. Many other
Linux distros have it installed by default as well. If you don't have Apache installed, you
can download and install the LAMP stack.

LAMP is an acronym for Linux, Apache, MySQL, PERL, and PHP. These are the most widely
used tools for developing websites in the Linux world, and they're very popular in the
Microsoft world too, only it's generally referred to as WAMP, where the W simply stands
for Windows.
Simply download this LAMP stack and install it on your system, and then I will take you
through the care and feeding of your LAMP stack to serve up webpages. In addition, we'll
download and install a website that we can use for web and database hacking in future
tutorials.
Step 1 Start Your Apache Daemon
The first step, of course, is to start our Apache daemon. In BackTrack, go the BackTrack -
> Services -> HTTPD and click on apache start.
Step 2 Open the Default Website
Now that Apache is running, it should be able to serve up its default webpage. Let's type
http://localhost/ in your favorite web browser.

Step 3 Open the Index.html File
Apache's default webpage is /var/www/index.html. We can edit that file and get Apache
to serve up whatever webpage we want, so let's create our own.
Use any text editor you please, including vi, gedit, Kate, KWrite, emacs, etc. For
demonstration purposes here, I'll open the /var/www/index.html with KWrite.

Note here that the default webpage has exactly the text that was displayed when we
opened our browser to localhost, but in html format. All we need to do is edit this file to
have our web server display the information we want.
Step 4 Add Some Html
Now that we have the web server running and the index file open, we can add whatever
text we'd like the web server to serve up. We will create some simple html blocks.
Let's serve up this page:
<html>
<body>
<h1> Null Byte is the Best! </h1>
<p> If you are new to hacking, wonderhowto.com's Null Byte</p>
<p>world is the best place to learn hacking!</p>
</body>
</html>
Now, save this file and close KWrite.

Step 5 Let's See What Happens
Now that we have saved our /var/www/index.html file, we can check to see what Apache
will serve up. Navigate your browser once again to http://localhost.

Apache has served up our webpage just as we created it!
Step 6 Download & Install DVWA
Now that we have our web server up and running, we want to download and install a
website designed especially for hacking, known as the Damn Vulnerable Web
Application or DVWA. Let's download it from here, then unzip it. To unzip it, type:
unzip DVWA-1.0.8.zip -d /var/www
Next, we need to change permissions to give us (root) execute permissions.
chmod 755 DVWA-1.0.8
In my next Linux tutorial

Here we can see that only the first 30 lines of snort.conf are displayed.
Step 3 Grab That Tail
Similar to the head command, we view the last lines of a file by using the tail command.
Let's use it on the snort.conf.
tail /etc/snort/snort.conf

Notice that it displays some of the last "includes" of the rules files, but not all of them.
Let's now see if we can display all the rule "includes" by grabbing the last 40 lines of the
snort.conf.
tail -40 /etc/snort/snort.conf

Now we can view nearly all the rule includes all on one screen.
Step 4 Numbering Those Lines
Sometimes—especially with very long files—we may want the file displayed with line
numbers. This is probably the case with the snort.conf, as it has 838 lines. This makes it
easier to reference changes and come back to the same place within a file. To display a
file with line number, we simply type:
nl snort.conf
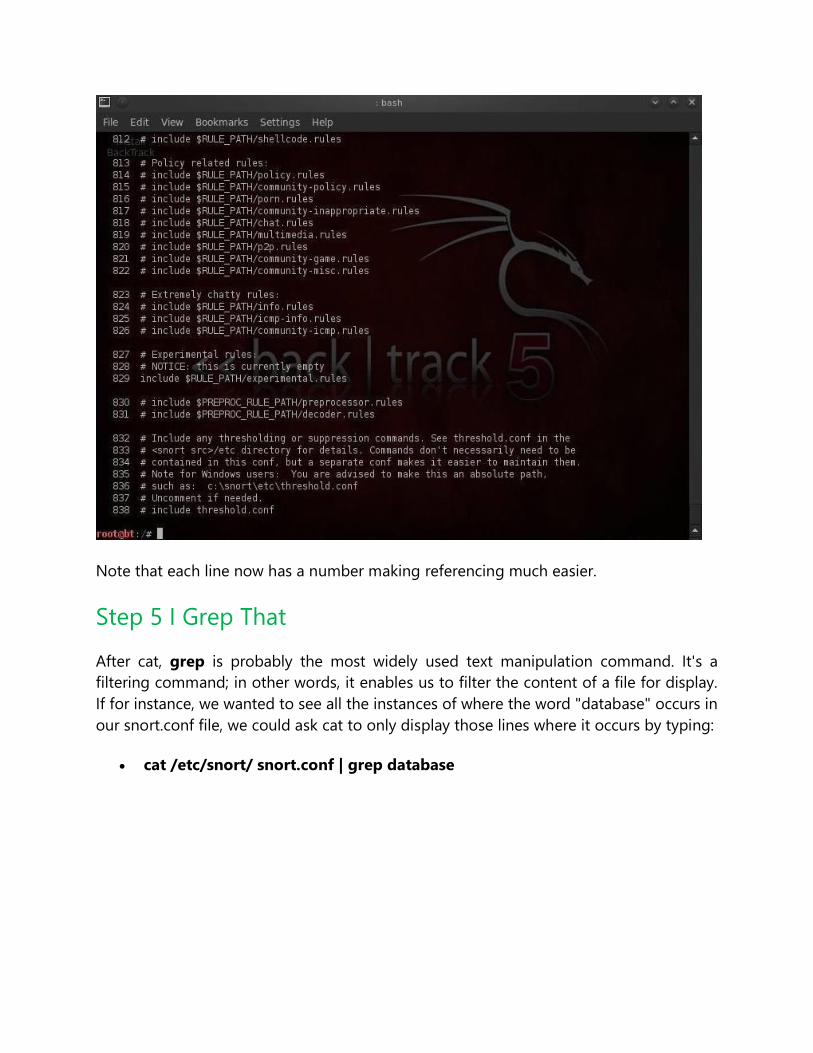
Note that each line now has a number making referencing much easier.
Step 5 I Grep That
After cat, grep is probably the most widely used text manipulation command. It's a
filtering command; in other words, it enables us to filter the content of a file for display.
If for instance, we wanted to see all the instances of where the word "database" occurs in
our snort.conf file, we could ask cat to only display those lines where it occurs by typing:
cat /etc/snort/ snort.conf | grep database

This command will first grab the snort.conf and then "pipe" it (|) to grep which will take it
as input and then look for the occurrences of the word "database" and only display those
lines. Grep is a powerful and essential command for working in Linux as it can save us
hours searching for every occurrence of a word or command.
Step 6 I Sed That Works
The sed command essentially allows us to search for occurrences of a word or text pattern
and then do some work on it. The name comes from the concept of a stream editor and
is a contraction of those two words. In its most basic form, sed operates like the find and
replace function in Windows. Let's search for the word "mysql" in the snort.conf file using
grep.
cat /etc/snort/snort.conf | grep mysql

We can see that the grep command found five occurrences of the word mysql.
Let's say we want sed to replace every occurrence of mysql and with MySQL (remember,
Linux is case sensitive) and then save the new file to snort2.conf. We could do this by
typing:
sed s/mysql/MySQL/g snort.conf > snort2.conf
This command says, "search (s) for the word mysql and replace it with the word MySQL
globally (i.e. wherever you find it in the file)."
Now, when we grep snort2.conf for mysql, we see that none were found and when we
grep for MySQL, we find five occurrences of MySQL.
cat /etc/snort/snort.conf | grep MySQL
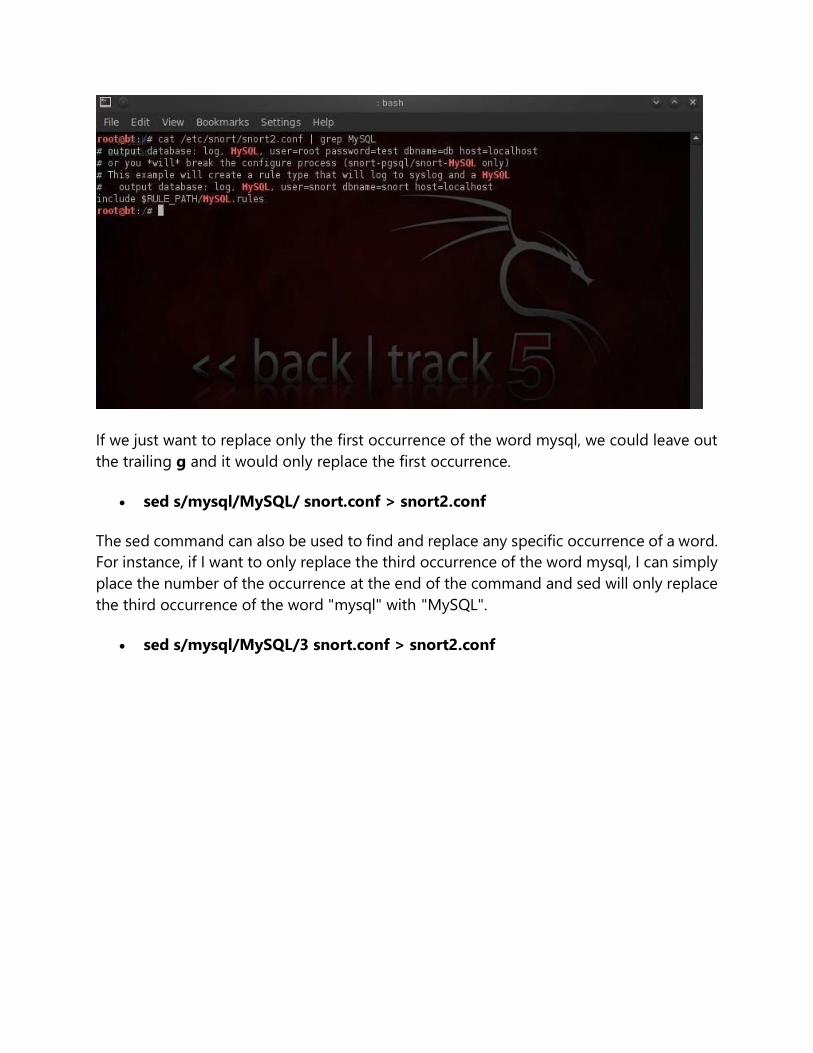
If we just want to replace only the first occurrence of the word mysql, we could leave out
the trailing g and it would only replace the first occurrence.
sed s/mysql/MySQL/ snort.conf > snort2.conf
The sed command can also be used to find and replace any specific occurrence of a word.
For instance, if I want to only replace the third occurrence of the word mysql, I can simply
place the number of the occurrence at the end of the command and sed will only replace
the third occurrence of the word "mysql" with "MySQL".
sed s/mysql/MySQL/3 snort.conf > snort2.conf

Loadable Kernel Modules
I now want to address Loadable kernel modules (LKMs), which are key to the Linux
administrator because they provide us the capability to add functionality to the kernel
without having to recompile the kernel. Things like video and other device drivers can
now be added to the kernel without shutting down the system, recompiling, and
rebooting.
Loadable kernel modules are critical to the hacker because if we can get the Linux admin
to load a new module to their kernel, we not only own their system, but because we are
at the kernel level of their operating system, we can control even what their system is
reporting to them in terms of processes, ports, services, hard drive space, etc.
So, if we can offer the Linux user/admin a "new and improved" video driver with our
rootkit embedded in it, we can take control of his system and kernel. This is the way some
of the most insidious rootkits take advantage of the Linux OS.
So, I hope it's clear that understanding LKMs is key to being an effective Linux admin and
being a VERY effective and stealthy hacker.
Step 1 What Is a Kernel Module?
The kernel is a core component of any Linux operating system, including our BackTrack
System. The kernel is the central nervous system of our operating system, controlling
everything an operating system does, including managing the interactions between the
hardware components and starting the necessary services. The kernel operates between
user applications and the hardware such as the CPU, memory, the hard drive, etc.
As the kernel manages all that is taking place with the operating system, sometimes it
needs updates. These updates might include new device drivers (such as video card or
USB devices), file system drivers, and even system extensions. This is where LKMs come
in. We can now simply load and unload kernel modules as we need them without
recompiling the kernel.
Step 2 Checking the Kernel
The first thing we want to do is check to see what kernel our system is running. There are
at least two ways to do this. We can type:

uname -a
Note that the kernel tells us its kernel build (2.6.39.4), but also the architecture it is built
for (x86_64). We can also get this info by "catting" the /proc/version file, which actually
gives up even more info.
cat /proc/version
Step 3 Kernel Tuning with Sysctl
Sometimes, a Linux admin will want to "tune" the kernel. This might include changing
memory allocations, enabling networking feature, and even hardening the kernel from
hackers.
With modern Linux kernels, we have the sysctl command to tune kernel options. All
changes you make with the sysctl remain in effect only until you reboot the system. To
make any changes permanent, the configuration file for sysctl must be edited at
/etc/sysctl.conf.

Be careful in using systctl because without the proper knowledge and experience, you can
easily make your system unbootable and unusable. Let's take a look at the contents of
sysctl now.
sysctl -a |less
To view the configuration file for sysctl, we can get it at /etc/sysctl.conf.
less /etc/sysctl.conf
One of the ways we may want to use sysctl for hacking is to enable ipforwarding
(net.ipv4.conf.default.forwarding) for man-in-the-middle attacks. From a hardening
perspective, we can disable ICMP echo requests (net.ipv4.icmp_echo_ignore_all) so as to
make more difficult, but not impossible, for hackers to find our system.

Step 4 Kernel Modules
To manage our kernels, Linux has at least two ways to do it. The older way is to use a
group of commands built around the insmod command. Here we use one of those—
lsmod—to list the installed modules in kernel.
lsmod
We can load or insert a module with insmod and remove a module with rmmod.
Step 5 Modprobe
Most newer distributions of Linux, including our BackTrack 5v3, have converted to the
modprobe command for LKM management. To see what modules are installed in our
kernel, we can type:

modprobe -l
To remove a module, we simply use the -r switch with modprobe.
modprobe -r
A major advantage of modprobe is that understands dependencies, options, and
installation and removal procedures for our kernel modules.
To see configuration files for the installed modules, we list the contents of the
/etc/modprobe.d/ directory.
ls -l /etc/modprobe.d/
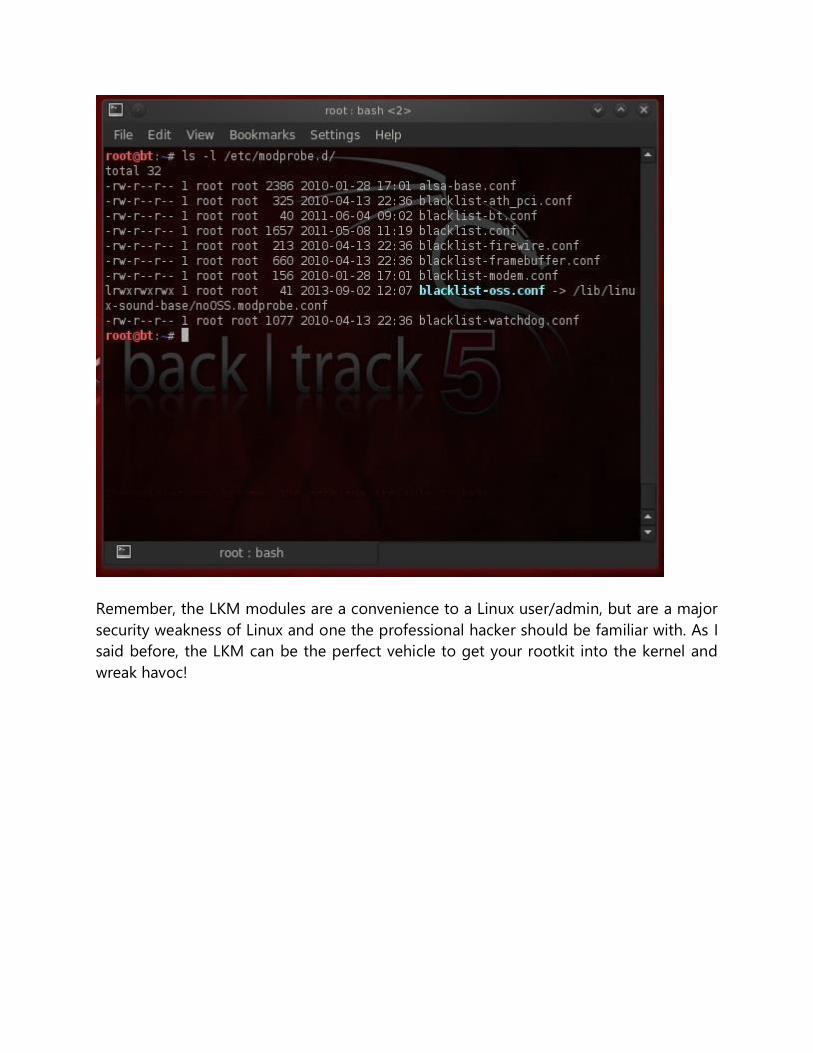
Remember, the LKM modules are a convenience to a Linux user/admin, but are a major
security weakness of Linux and one the professional hacker should be familiar with. As I
said before, the LKM can be the perfect vehicle to get your rootkit into the kernel and
wreak havoc!

Mounting Drives & Devices
One of those areas of Linux that Windows users invariably struggle with is the concept of
"mounting" devices and drives. In the Windows world, drives and devices are
automatically "mounted" without any user effort or knowledge. Well, maybe a bit of
knowledge. Most Windows users know to unmount their flash drive before removing it,
but they usually think of it as "ejecting" it.
The mount command has a history back to the prehistoric days of computing (the 1970s)
when computer operators physically mounted tape drives to the the behemoth,
gymnasium-sized computers. These tape drives were the storage medium of choice (as
hard drives had not been invented yet) and the operator had to tell the machine that they
were mounting the tape before it could be read.
Windows generally auto-mounts drives and devices with the PnP service, so users don't
need to think about mounting. Each drive or device then is assigned with a letter mount
point such as C:, D:, E:, etc.
In more recent distributions of Linux, auto-mount is often enabled as well, but the true
Linux admin needs to understand the mount command and the mounting process as they

will someday need to mount a device or drive that does not auto-mount. This is true for
the everyday ordinary sysadmin in Linux and especially true for the digital forensic
investigator and hacker as many times the devices will not be automatically mounted.
Step 1 File Structure
Remember, Linux has a single tree structure for its file system (unlike Windows) with a
root for every drive and device. This means that all drives and devices are part of a single
filesystem tree with / at the top. Any other drives must be "mounted" to this tree. We can
do this with the mount command.
When we mount a device, we mount it to a directory and it becomes part of the tree. We
can mount a device to ANY directory, but when we do so, that directory that we mount
our device to is "covered" and unavailable to us. This means we can't access any of the
files in that directory. It goes without saying—I think—that's not good. That's why we have
special, empty directories for mounting devices. These will vary by distribution of Linux,
but generally they are /mnt and /media.
Step 2 Mount Command
Let's take a look at the mount command. Type in:
mount -h
This brings up the help screen displayed below.

I have highlighted the crucial part regarding the syntax of the command. Basically, it is:
mount -t filesystemtype location
This command will "mount" a filesystem of the type (-t) at the location specified. So, for
instance, we could mount cdrom at the media directory by typing:
mount -t /dev/cdrom /media
This will mount the cdrom device at the /media directory on the filesystem tree.
We also have numerous options we can use when mounting a device including:
rw - mount read/write
ro - mount read only
user - permit any user to mount
auto/noauto - file system will or will NOT automatically mount
exec/noexec - permit or prevent the execution of binaries on the mounted device
As always, you can check the man page for mount to learn all the options:
man mount

Step 3 Setting up Automounting with Fstab
The fstab is the "File system table". It a system configuration file in Linux. The mount
command reads the fstab to determine what options to use when mounting a filesystem.
In this way, it defines the options automatically when we mount the device. It simply reads
the entry in the fstab table for that device and applies those options defined there.
As we can see in the screenshot above, we have simply displayed the contents of fstab
with the cat command.
cat fstab
The fstab table is comprised of six (6) columns. These are:
1. Device - the UUID
2. Mount point - the directory where we want to attach the device
3. Type - the filesystem type such ext2, ext3, swap, ISO9660, etc.
4. Options - these rw (read/write), auto, nouser, async, suid, etc
5. Dump - indicates how often to backup the device
6. Pass - specifies the pass when fsck should check the filesystem
Step 4 Umount
When want to unmount a drive or device, the command we use is umount (that's right. I
didn't spell it wrong. It is umount, not unmount).

To unmount our cdrom device that we mounted above, we type:
umount /dev/cdrom
You can NOT unmount a drive or device that is currently being used by the system.

MySQL
This tutorial we will focus on the MySQL database. Although this is not strictly a Linux
tutorial, MySQL is the database of choice on most Linux distributions. In addition, it is the
most widely used database behind database driven web applications. This installment is
critical to understand before we progress to hacking MySQL databases and before we
hack web applications that use MySQL (which there are literally thousands).
MySQL is an open source, GPL licensed database. That is probably the primary reason you
will find it on nearly every Linux distribution. As you know, Linux is also open source and
GPL licensed. First developed by MySQL AB of Sweden in 1995, it was purchased by Sun
Microsystems in 2008 and Sun Microsystems was then purchased by Oracle in 2009.
As Oracle is the world's largest database software publisher, the open source community
has significant trepidations about Oracle's commitment to keep MySQL open source. As
a result, there is now a fork of the MySQL database software called Maria that IS
committed to keeping this software and its subsequent versions open source.
Because it's free, MySQL has become the database of choice for many web applications.
Sites and apps that use it include:
WordPress
Kayak
Walmart.com
Wikipedia
YouTube
Other popular Content Management Systems(CMS) such as Joomla, Drupal, and Ruby on
Rails all use MySQL. You get the idea. If you want to develop or attack web applications,
you should know MySQL. So, let's get started.
Step 1 Start MySQL
Luckily, BackTrack has MySQL already installed (if you are using another distribution, you
can usually download and install MySQL from the software repository) and has a graphical
start and stop. Let's start our MySQL service.
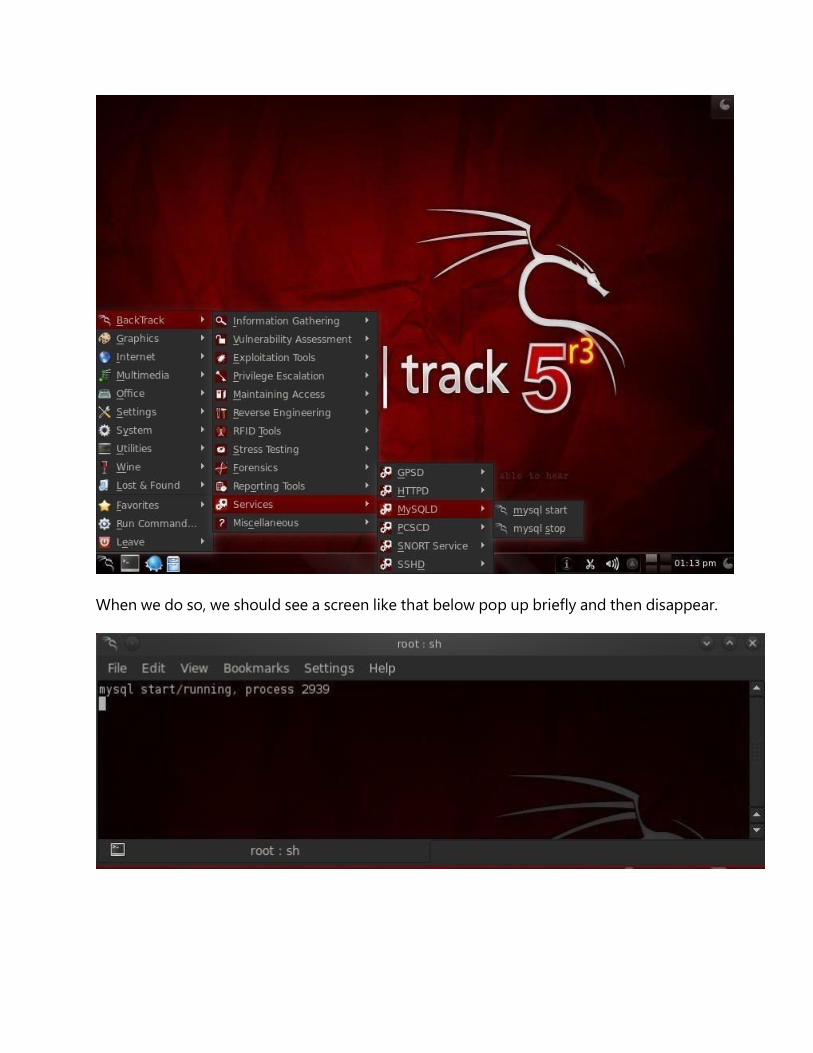
When we do so, we should see a screen like that below pop up briefly and then disappear.

Step 2 Logging in to MySQL
Now that our MySQL service is started, we can begin to use it. First, we need to
authenticate ourselves by logging in.
Open a terminal and type:
mysql -u root -p
You will be prompted for your password, which is "toor" in BackTrack. It may be different
on other systems. Please note that although the username and password for MySQL is
the same as the BackTrack username and password, that is not necessarily so on other
distributions of Linux and MySQL. Usernames and passwords for the operating system
(here is it Linux Ubuntu) and MySQL are separate and distinct.
This syntax, mysql -u <username> -p, works if we are trying to access a MySQL database
on our localhost. This command defaults to using the MySQL instance on the localhost, if
not given a hostname or IP address. For remote access (and that will likely be the case as
a hacker), we need to provide the hostname or IP address of the system that is hosting
the MySQL database, such as:
mysql -u root -p 192.168.1.101
This will connect us to the MySQL instance at 192.168.1.101 and prompt us for a password.
This opens up the MySQL command line interface that provides us with the mysql>
prompt. Like Microsoft's SQL Server, MySQL has a GUI interface both native (MySQL
Workbench) and third party (Navicat and TOAD for MySQL). Let's look athe command line
interface first and then will will advance to the GUI interface
As a hacker, the command line interface may be our best opportunity for exploiting the
MySQL database, so we should focus on it. It's unlikely that as an unauthorized entrant to
the database you will be presented with an easy to use GUI.
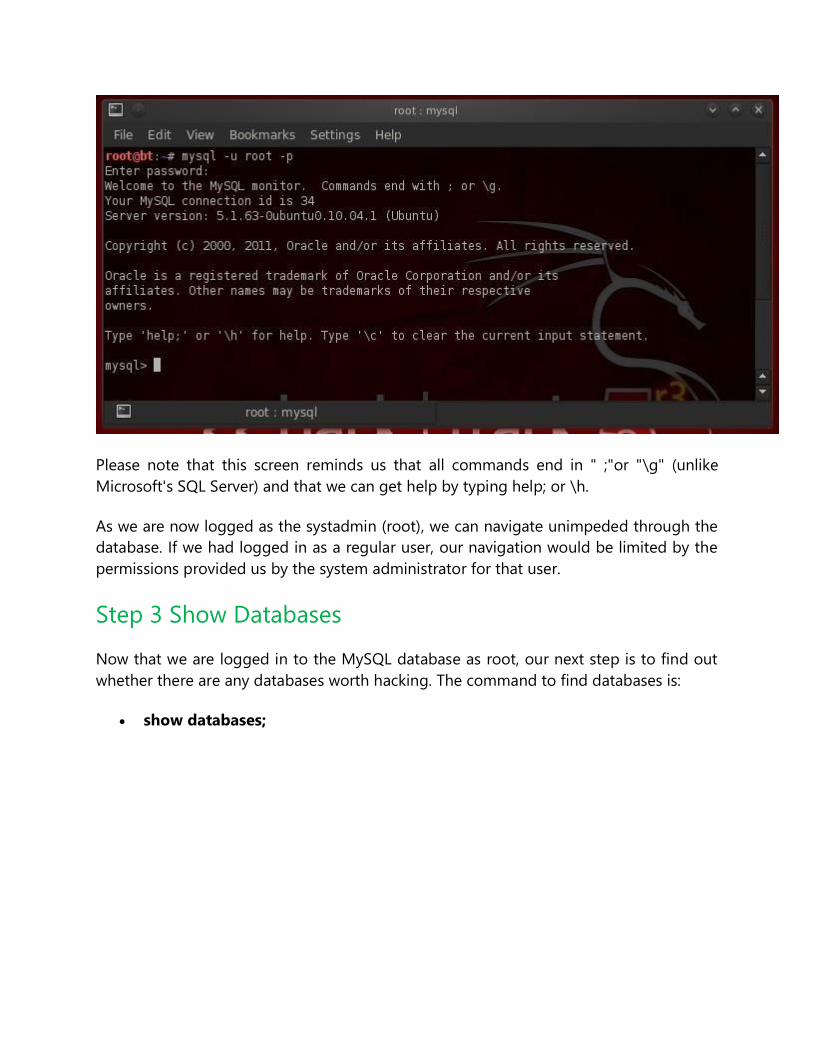
Please note that this screen reminds us that all commands end in " ;"or "\g" (unlike
Microsoft's SQL Server) and that we can get help by typing help; or \h.
As we are now logged as the systadmin (root), we can navigate unimpeded through the
database. If we had logged in as a regular user, our navigation would be limited by the
permissions provided us by the system administrator for that user.
Step 3 Show Databases
Now that we are logged in to the MySQL database as root, our next step is to find out
whether there are any databases worth hacking. The command to find databases is:
show databases;

Ah Hah! We found a database worth exploring here named "creditcardnumbers".
Step 4 Connect to a Database
Once we have logged into the MySQL instance, our next step is to connect to a particular
database. In MySQL, like other database management systems, we can connect to the
database we are interested in by typing use <databasename>. Since we now know that
the database we are interested in is named "creditcardnumbers", we simply type:
use creditcardnumbers;
As you can see, MySQL responds with "Database changed", indicating that we are now
connected to the "creditcardnumbers" database.
Of course, I hope it goes without saying, that you should use the appropriate database
name in place here of "creditcardnumbers". Its unlikely that a database admin will be so

kind and accommodating as to name a database with such an easily recognizable name,
so you may need to do a bit of exploring to find the database of interest.
Step 5 Finding the Tables
Now we are connected to the "creditcardnumbers" database and we can do a bit of
exploring to see what might be in that database. We can find out what tables are in this
database by typing:
show tables;
In the screenshot above, we can see that this database has just one table in it called
"cardnumbers". Generally, databases will have numerous tables in them, but we are
fortunate here as we can focus our attention on this single table to extract the hackers
"golden fleece"!
Step 6 Describe the Table to Discover Its Structure
Since we can focus our efforts on this single table, we will need to understand the structure
of that table. In subsequent tutorials--when we are hacking this database--we will see that
understanding the structure is critical to a successful hack.
We can see the structure of the table by typing:
describe cardnumbers;

MySQL responds with the critical infornation on the structure of our table of interest. We
can see each of the fields and their data type (varchar or int), whether it will accept NULL's,
the key, the default values and extra.
Step 7 SELECT Data
To actually see the data in the table, we can use the SELECT command. The SELECT
command requires to know:
1. The table we want to view
2. The columns within that table we want to view
Using the format:
SELECT <columns> FROM <table>
As a handy shortcut if we want to see data from all the columns, we can use the asterix
("*") as a wildcard instead of typing out every single column name. So, to see a dump of
all the data from the cardnumbers table, we type:
SELECT * FROM cardnumbers;

As we can see, MySQL displayed all the information from the cardnumbers table to our
screen.
Step 8 Export Data
Now that we know where the data is, we need to export it so that we can use it. MySQL
has a command called mysqldump. Generally, it is used to create a backup copy of the
data. You can run it from any command prompt, but you will need:
1. A username (root)
2. The password for that username (toor)
3. The name of the database you want data from (creditcardnumbers)
4. The table within the database you want (cardnumbers)
5. The directory you want to dump to (/tmp)
So, to "dump" the data from command line we simply type:
mysql --tab = /tmp --user root -p creditcardnumbers cardnumbers;
This will send the data to the directory we designated, in this case /tmp.
Success!
As we can see below (after we changed to the /tmp directory and then listed that
directory) we have created two files, cardnumbers.sql and cardnumbers.txt. The first,
cardnumbers.sql, contains a script to create the table necessary to hold the data and the
second, cardnumbers.txt, contains the data.
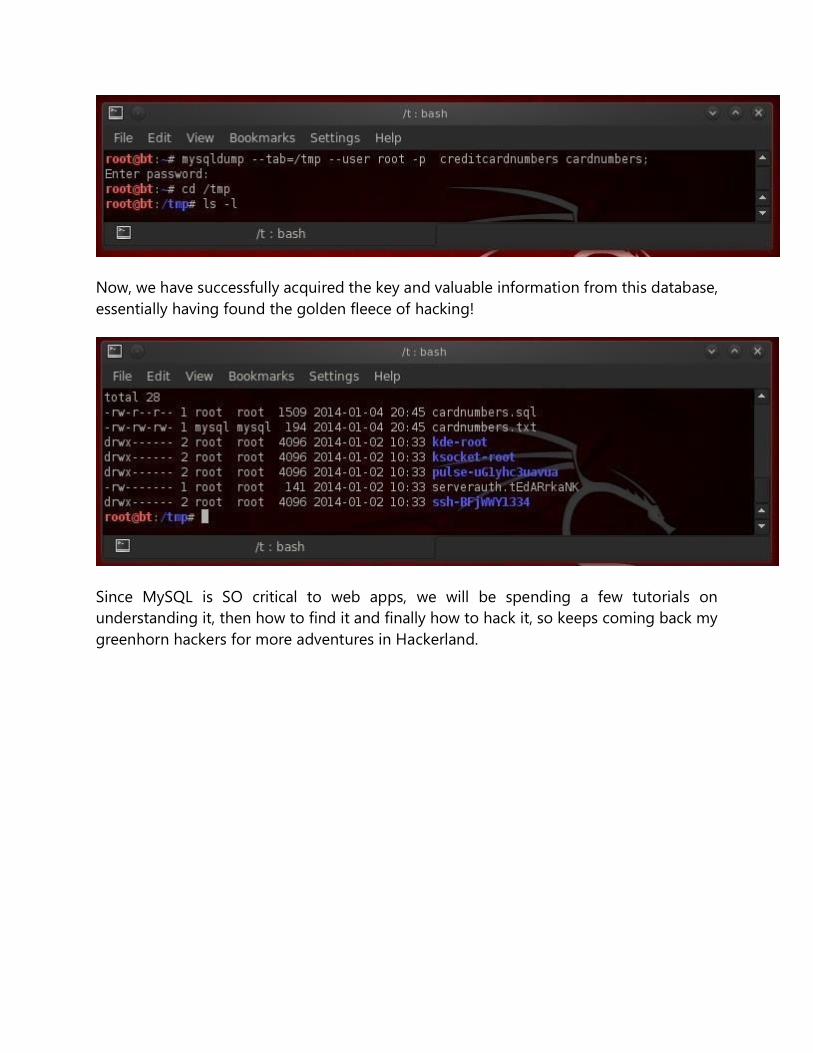
Now, we have successfully acquired the key and valuable information from this database,
essentially having found the golden fleece of hacking!
Since MySQL is SO critical to web apps, we will be spending a few tutorials on
understanding it, then how to find it and finally how to hack it, so keeps coming back my
greenhorn hackers for more adventures in Hackerland.

Creating a Secure Tunnel to MySQL
In my continuing effort to build your basic Linux skills for hacking, I want to show you how
to build a secure "tunnel" to MySQL.
Of course, the techniques I use here could be used for any application, but since MySQL
is such a critical app on most Linux installations, and since un-encrypted sessions to your
MySQL database server could easily be sniffed and confidential information exposed, we'll
use our database server as our example in this tutorial.
This is not to say that an encrypted tunnel is foolproof from being hacked. As with
anything, it can be hacked, but it makes it many times more difficult. If we leave the data
un-encrypted, any script kiddie with a sniffer can see and grab our traffic to our database.
We'll be using SSH or Secure Shell to encrypt our traffic. Every Linux distribution has a
SSH server and client built in, unlike Windows where you will need to download one of
many SSH clients such as PuTTY. Our BackTrack has BSD OpenSSH built-in, so don't need
to download and install anything to build a secure connection between our client and
server.
Like so many other applications in Linux, SSH operates on a server/client architecture. To
successfully connect, you must have both the server and the client running.
Step 1 Open BackTrack & Start MySQL
MySQL has the capability of using SSH, but you must configure and compile it to do so.
Since the default configuration of MySQL, such as ours on BackTrack, does not have SSH
built-in, we need to do a workaround using the SSH built into the operating system and
then connecting to MySQL. This will create an encrypted "tunnel" to our database, so that
hackers can't view our transmissions back and forth to the database.
In our example here, we'll be connecting between two BackTrack installations. I have
shown you how to start MySQL from the GUI in the previous Linux basics guide, but in
many distributions of Linux you won't have that luxury, so let's start MySQL from the
command line.
bt > mysql_safe start
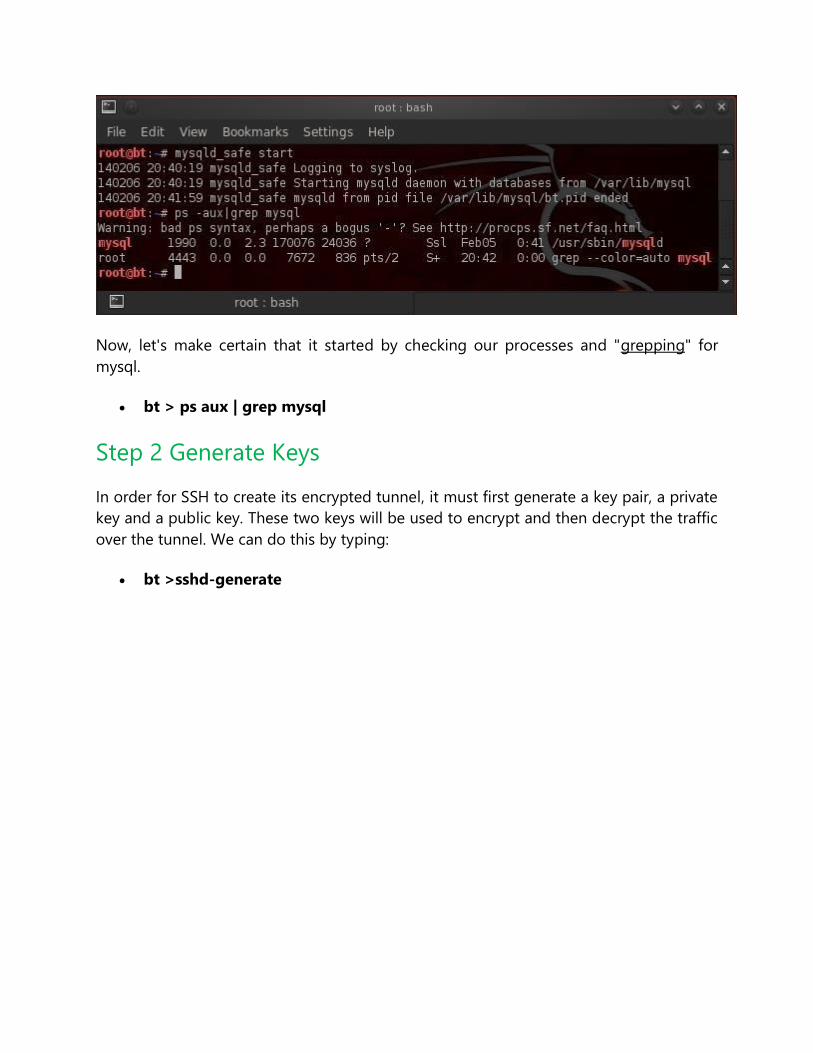
Now, let's make certain that it started by checking our processes and "grepping" for
mysql.
bt > ps aux | grep mysql
Step 2 Generate Keys
In order for SSH to create its encrypted tunnel, it must first generate a key pair, a private
key and a public key. These two keys will be used to encrypt and then decrypt the traffic
over the tunnel. We can do this by typing:
bt >sshd-generate

As we can see, SSH has generated a key pair from which it will now be able to generate
our secure tunnel. I have created a user named "nullbyte" on this server that we will use
to connect to this machine.
Step 3 Start SSH
From the client machine, we can now connect to that SSH server by typing:
ssh -L3316:127.0.0.1:3306 [email protected]

Here's a breakdown of what's in the command above.
ssh is the client command
-L3316 listens on port 3316
127.0.0.1 is the location of the SSH client daemon on the client machine
3306 is the default port of MySQL that we want the tunnel to on the server machine
nullbyte is a user on the operating system on the server
192.168.1.112 the IP address of the MySQL server
When we execute this command, we get a connection to the remote machine on
nullbyte's account as shown below.
What we have done here is to connect to the SSH client daemon on our client system that
then connects via port 3331 to the SSH server that then connects to port 3306 to connect
to MySQL.
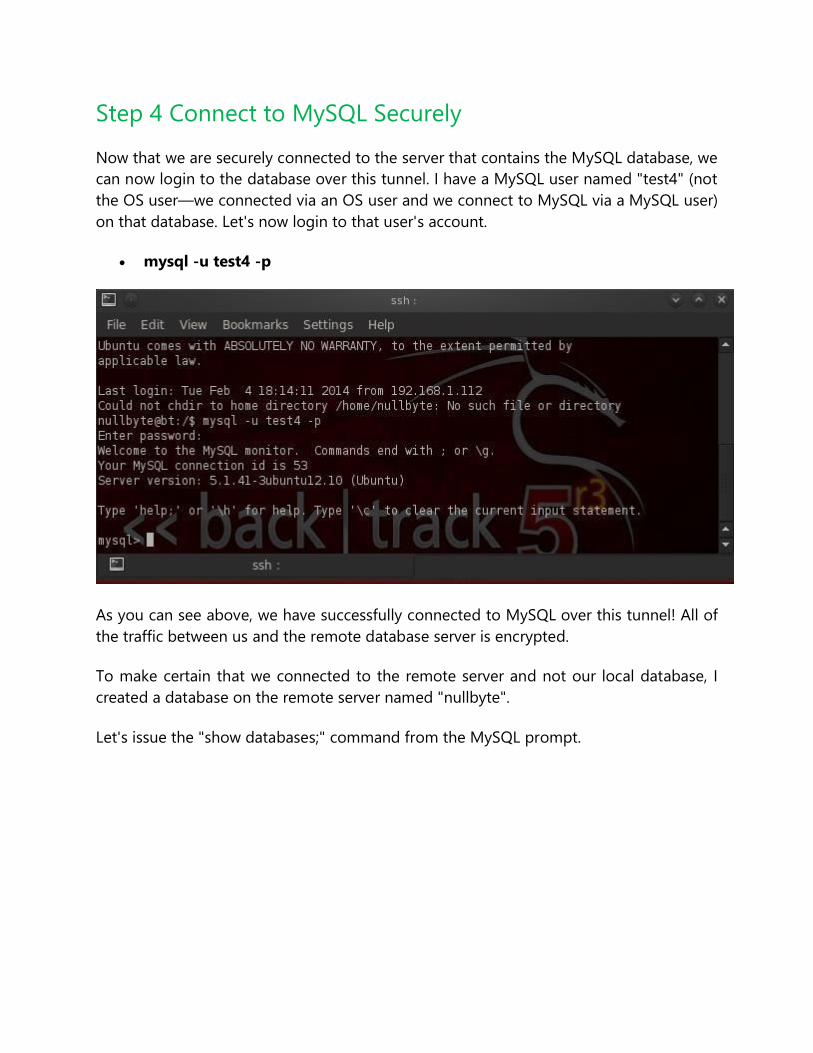
Step 4 Connect to MySQL Securely
Now that we are securely connected to the server that contains the MySQL database, we
can now login to the database over this tunnel. I have a MySQL user named "test4" (not
the OS user—we connected via an OS user and we connect to MySQL via a MySQL user)
on that database. Let's now login to that user's account.
mysql -u test4 -p
As you can see above, we have successfully connected to MySQL over this tunnel! All of
the traffic between us and the remote database server is encrypted.
To make certain that we connected to the remote server and not our local database, I
created a database on the remote server named "nullbyte".
Let's issue the "show databases;" command from the MySQL prompt.

As you can see, we have connected to the remote database server as it has the "nullbyte"
database.

Stdin, Stdout, & Stderror
Along the way, I realized that I've failed to provide you with some basic background
material on the stdin, stdout, and stderror.
In human language, these are often referred to as standard input (stdin), standard output
(stdout), and standard error (stderror). These represent how and where Linux sends the
output from your commands (stdout), where it receives its input (stdin), and where it
sendsits error messages (stderror).
Since you've now been using Linux for awhile, you realize that both standard output and
standard error are sent to your computer screen. Both as the name implies, this is the
standard place and not necessarily the only place. Linux let's us define where our output
and error messages should go.
Before we go any further, let's take a moment to define some terms.
Standard Output (1)
Whenever you complete a command, it must know where to send the output. You might
want to send it to a file, a printer, the screen, etc. The default for standard output is the
computer screen. Standard output is often referred to as stdout or simply use the numeric
representation of 1.
Standard Input (0)
Standard input is where the program or command gets the information it needs. By
default, in Linux this is the keyboard, but can be a file, etc. Standard input is often referred
to as stdin or simply represented by the numeric representation of 0.
Standard Error (2)
When we make a mistake or our program throws an error, it send the error message to
stanadard error. By default, this is our computer screen. Standard error is often referred
to as stderror or simply represented by the numeral 2.
When we want to direct any of these three from the command line or a script, we use the
numeric representation of each, 0 for stdin, 1 for stdout, and 2 for stderr.

Step 1 List Two Directories
To demonstrate how we can use and manipulation these I/O streams, let's do a listing of
two different directories, /etc/hosts and /etc/snort.
In Linux, you can do listings of more than one directory at a time. The /etc/snort directory
is where our configuration file for snort resides and /etc/hosts is a directory where we can
set static name resolution in Linux (I'll do a new Linux tutorial on DNS and name resolution
in Linux soon).
If we wanted to see the two directories, we could type:
ls /etc/hosts /etc/snort
As you can see, the listing comes back to us by the standard output to our computer
screen showing us the listing of both directories.
Now, let's try the same thing, but this time let's list a directory that doesn't exist, such as
/etc/aircrack-ng.
ls /etc/hosts /etc/aircrack-ng

As you can see, our BASH shell comes back with two outputs, the standard output from
etc/hosts and the standard error from the non-existent directory.
Step 2 Send Standard Output to a File
Next, let's suppose that we want to separate our standard output from our standard error.
Imagine we're running a script where we don't want to see our output messages until
after the script has run, but we need to see error messages on our screen immediately.
We could rewrite our command as:
ls /etc/hosts /etc/aircrack-ng 1>goodoutput
Let's now imagine just the reverse of our previous scenario where instead we want to see
our output on screen, but store our error messages to a separate file for viewing later. We
could write:
ls /etc/hosts /etc/aircrack-ng 2>erroroutput

Now, after the command has been run, we can go back and cat the erroroutput file to view
any possible error messages.
Step 3 Send Standard Output & Standard Error to Separate
File
Now, let's imagine a script where we want both our standard output and standard error
to be directed to separate files for viewing later. We can type:
ls /etc/hosts /etc/aircrack-ng 1>goodoutput 2>erroroutput
Notice that nothing comes back to our screen, neither standard output nor standard error.
Step 4 Send Both Standard Output & Standard Input to
Same File
Finally, what if we wanted both standard error and standard output to be written to same
file? We could type:
ls /etc/hosts /etc/aircrack-ng >goodoutput 2>&1

Notice that I did not use the 1 before the >goodoutput as BASH defaults to stdout if no
number is used.

Client DNS
Domain Name System (DNS) is one of those things we seldom think about unless it
doesn't work. Then, it can be very frustrating when we attempt to navigate to a website
and we get that frustrating error message.
DNS enables us to type in a domain name in our browser, such as wonderhowto.com,
rather than a numerical IP address of the site we are trying to reach. In its simplest form,
DNS simply translates domain names into IP addresses, making our lives much simpler.
Can you imagine trying to remember all of the IP addresses of the hundreds of sites you
visit daily?
For most of us working in Linux, we have two DNS concerns. First, as a client we need to
access DNS services to translate our domain names into IP addresses. Second, as a server
we need to provide DNS services. Here, I will limit myself to managing DNS from a client
perspective and leave providing DNS services to another tutorial.
It's important to remind you here that in Linux, nearly everything is a file, and
configuration is usually through the editing of a simple text file. This rule certainly applies
to DNS.
Step 1 /Etc/Hosts
In Linux, we have what is referred to as a "hosts" file. It's found where nearly all the
configuration files are in the /etc directory, so /etc/hosts. This hosts file acts similarly to
DNS, but it is static. This means that it's not updated like DNS is. The hosts file is the
simplest and fastest method for mapping hostnames to IP addresses, but also the most
time consuming.
Let's look at the /etc/hosts file in BackTrack. Type:
bt > kwrite /etc/hosts
This will open the following file. Note that the default configuration in BackTrack has just
the entries for localhost at 127.0.0.1 and then some notes on IPv6.

We could add additional lines to this file to provide simple name resolution services. If we
wanted to resolve the word "hacker" to a system on our internal network, we could simply
add a line to our hosts file, such as:
192.168.116.7 hacker
When we save our /etc/hosts and type "hacker" into our browser, we will be directed to
the IP 192.168.117.7.
Step 2 /Etc/resolv.conf
The primary file for pointing your system to a DNS server is the /etc/resolv.conf. Please
note that the file name is similar to the English word resolve, but without the "e" at the
end. It is here that we tell our system where to look for DNS services.
Let's open it with kwrite.
bt> kwrite /etc/resolv.conf
When we hit ENTER, kwrite opens the file as below.

The format of this file is:
nameserver IPaddress
As you can see, my /etc/resolv.conf is pointing to a DNS server on my local network,
192.168.116.1. I can change this to point to any public DNS server by simply editing and
deleting the internal IP address with that of a public DNS server, such as Comcast's at
75.75.75.75.
If you have an internal DNS server, you would probably prefer to use it as it will give you
faster responses, but people very often will put in both an internal DNS server first and
then a public DNS server, second. In this way, your system will check the internal DNS
server first and if it doesn't find a listing on that DNS server, it will then progress to the
public IP server and will hopefully find it there.
I've edited my /etc/resolv.conf to include the public DNS server for Comcast at 75.75.75.75.
All I do now is Save the /etc/resolv.conf file and my system will look to my internal DNS
server first and then to the Comcast public DNS server, if it doesn't find the name in my
private DNS server.
Step 3 /Etc/nsswitch.conf
Lastly, we have the /etc/nsswitch.conf file. Here is where we tell our system the order of
where to look for name resolution. We have opened it with kwrite and have displayed it
below.

Note the line that begins with "hosts". This line line tells the system the order of which to
search for name resolution. The system will try each in order until it finds the name it is
looking for. Let's examine each separately.
files - Refers to the /etc/hosts file. Generally, we want the system to look here first
as it is the fastest.
mdns4_minimal - This is a legacy multi-cast DNS protocol.
dns - This tells the system to go to the /etc/resolv.conf for find a DNS server.
[NOTFOUND=return] - This indicates that if the mdns_minimal search returns
NOTFOUND, this should be treated as authoritative and the search ceases.
mdns4 - This is multicast DNS, a relatively rare DNS-like protocol for small
networks without DNS servers.

Scheduling Jobs
Linux has a built-in functionality that allows us to schedule such jobs as these on a regular
schedule. In Linux, this is called cron, or crond, for the daemon that runs these services
(a daemon, or demon, is simply a process that runs in the background).
How Cron Works in Linux
Typically used to schedule such mundane, but necessary, tasks such as doing scheduled
regular backups at a regular time each week, we can use it to schedule our scans or other
nefarious "jobs".
The cron daemon starts when the system boots and continues to run as long as the system
is up and running. It reads a configuration file or files that consist of the jobs to be run
and the schedule they are to be run on. Almost anything we can do from the command
line can be scheduled to be done on a regular schedule using cron.
Let's take a look how it works and how we can use it as a hacker.
Step 1 Locating Crontab
Cron is one of those functions that is almost identical across Linux distributions, so what
you learn here can be used in Ubuntu, Red Hat, Suse, Mint, Slackware, CentOS, etc. It has
been part of the Linux/UNIX family since the 1970s, so it is tried and true and has proven
its value.
Like so many things in Linux, the cron functionality is controlled by a configuration file
that is a plain text file. In a multi-user environment, each user can have their own cron
configuration file, but here we will concentrate on the root user in Kali.
For cron, the configuration file is the crontab, or "cron table", file. To find the crontab file,
type:
locate crontab

As you can see, it is located in the /etc directory like nearly every other configuration file
in Linux (there are exceptions, of course).
Step 2 Opening Crontab
Let's open it and look around. We can open it with any text editor, but here let's use the
graphical text editor built into Kali, Leafpad. Type:
leafpad /etc/crontab

The Debian version that Kali is built on has a newer version of crontab that is slightly easier
to work with than earlier versions. Unlike earlier versions, they have labeled the fields and
added a new field to denote the user that will run the job.
Step 3 The Anatomy of a Crontab
Let's break down the parts. As you can see in the screenshot above, the crontab starts
with 5 lines that are commented (#) out. These lines are simply an explanation and notes,
they are not seen or executed by the system.
After the commented lines, you see a couple of lines together.
The first of these sets the shell to run the jobs from. In our case, we have designating the
BASH shell with the following command. If want to use a different shell, we could
designate it here.
SHELL=/bin/sh
The second line sets the PATH variable. The PATH variable is an environment variable
(there is one in Windows, too), that tells the system where to look for commands that are
being used in the cron job. Typically, these are bin and sbin directories (binary) that
contain the system commands that we use in Linux (ls, echo, ps, cd, etc.).
Here the default settings are:
PATH=/usr/local/sbin:/usr/local/bin:/sbin:/bin:/usr/sbin:/usr/bin
This simply means that the cron daemon will look in those directories for the commands
that you use in your scheduled jobs. If you are using a command or file not in those
directories, simply edit that line and add that directory to the end of the line after putting
in a colon (:), such as:
PATH=/usr/local/sbin:/usr/local/bin:/sbin:/bin:/usr/sbin:/usr/bin:/newdir

Step 4 Scheduling Jobs
Now comes the meat of the crontab file. In this third section, we schedule the jobs that
we want to run.
As you can see, each line represents a scheduled job that will run automatically at
whatever day, date, or time you have it scheduled for.
The fields of the crontab file are as follows:
Minute -- the exact minute when the command or will be run (0-59)
Hour -- the exact hour when the command or job will be run (0-23)
Day of the Month -- the exact day of the month when the command or job will
be run (1-31)
Month -- the exact month when the command or job will be run (1-12)
Day of the week -- the exact day when you want the command to run (0-6,
Sunday=0)
User -- the user permissions that the job will run as
Command -- the command or job you want to run
The asterisk (*), or star, represents any, so it may be any day, any hour, or any minute.
Using Cron to Find Vulnerable Servers
Now, let's imagine that we want to scan the globe for IP addresses that are vulnerable to
the Heartbleed vulnerability.
Reportedly, there are over 300,000 servers that are still unpatched. Although that's a very
large number, with over 2 billion IP addresses on the planet; that represents 1 out of every
10,000 IP addresses that are vulnerable. This means we will need to set up a scanner to
repeatedly search thousands of IP's to find just one vulnerable server.
This is a perfect task for a cron job!

Step 5 Scheduling Our Heartbleed Scanner
We can schedule the scanner to run every night while we are asleep and hopefully, awake
each morning with a new potential victim(s)!
Let's open that cron tab file again in any text editor.
Now we are going to add a line to run our nmap scanner each weeknight at 2:05 am.
Simply add this line to our crontab file:
05 2 * * 1,2,3,4,5 root nmap -sV --script=ssl-heartbleed 68.76.0.0/16
Now, save and close this file.
This would schedule our nmap Heartbleed scanner to run Monday, Tuesday, Wednesday,
Thursday, and Friday at precisely 2:05 am for the Heartbleed vulnerability across 65,536
IP addresses.
That's good start.

Linking Files
As you have probably discovered by now, the file system in Linux is structured differently
from Windows. There are no physical drives—just a logical file system tree with root at
the top (yes, I know, roots should be at the bottom, but this is an upside-down tree).

In addition, filenames are often very long and complex with lots of dashes (-), dots (.), and
numbers in their names. This can make typing them difficult for those of us with limited
keyboard skills (remember, you can always use the tab key to autocomplete if you are in
the right directory).
Sometimes we want to simplify the names of a file or we want to link a file in one directory
with another in a separate directory. Linux has at least two ways to do this—symbolic (or
soft) links and hard links. To understand how these two work and how they are different,
we need to delve into some basic background on the Linux file system's internal structure.
Linux File Structure
We know that the Linux file system hierarchical structure is different than the Windows
hierarchical structure, but from the inside, Linux's ext2 or ext3 file system is very different
from Windows NTFS. Linux stores files at a structural level in three main sections:
The Superblock
The Inode Table
Data Blocks
Let's take brief look at each of these.
Superblocks
The superblock is the section that contains the information about the file system, in
general. This includes such things as the number of inodes and data blocks as well as how
much data is in each file. It's kind of a overseer and housekeeper of the file system.
Inode Table
The inode table contains several inodes (information nodes) that describe a file or
directory in the file system. Essentally, it is simply a record that describes a file (or
directory) with all its critical information such as date created, location, date modified,
permissions, and ownership. It does not, however, contain the data in the file.
It's important to understand from a forensic perspective that when a file is deleted, only
the inode is removed.

Data Blocks
Data blocks are where the data that is in the file is stored, as well as the file name. Now
with that understanding, let's introduce two ways of linking files, the hard link and the soft
or symbolic link.
Hard Links
Hard linked files are identical. They have the same size and the same inode. When one
hard linked file is modified or changed, it's linked file changes as well. You can hard link a
file as many times as you need, but the link cannot cross file systems. They must be on
the same file system as they share an inode.
Soft or Symbolic Links
Symbolic or soft links are different from hard links in that they do not share the same
inode. A symbolic link is simply a pointer to the other file, similar to links in Windows, and
they have different file sizes too. Unlike hard links, symbolic links do NOT need to be on
the same file system.

Step 1 Viewing Links
Let's take a look at what links look like in our filesystem on Kali. Let's navigate to the /bin
directory. Remember that the /bin directory is just below the root of the file system and
contains most the commands that we use on a daily basis in Linux.
kali> cd /bin
Now, let's look at the files in the bin directory.
kali > ls -l
Notice that several files here show an arrow (->) pointing to another file. These are
symbolic links. Also, note how small they are. Each is only 6 bytes. That's because they
are only pointers, pointing to another file. The data block of the link simply contains the
path to the file it is linked to.
When you edit the symbolically linked file, you are actually editing the target file as the
symbolic file is only that path to the target file. Hope that makes sense.
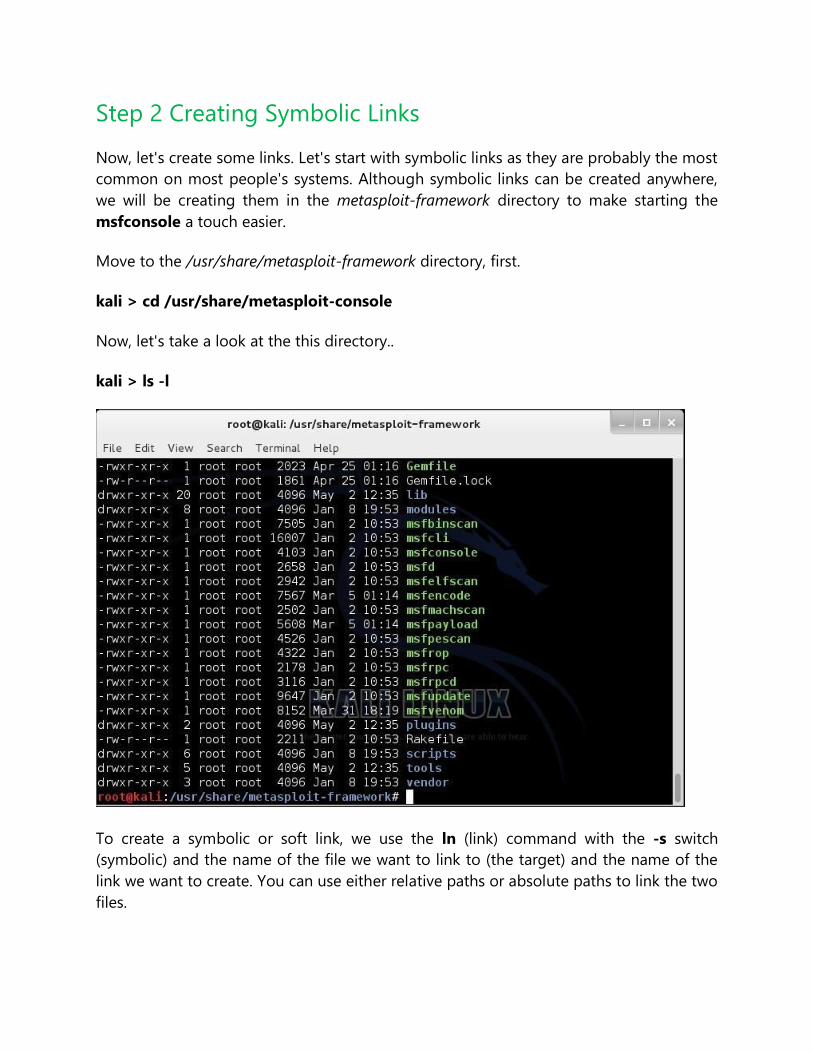
Step 2 Creating Symbolic Links
Now, let's create some links. Let's start with symbolic links as they are probably the most
common on most people's systems. Although symbolic links can be created anywhere,
we will be creating them in the metasploit-framework directory to make starting the
msfconsole a touch easier.
Move to the /usr/share/metasploit-framework directory, first.
kali > cd /usr/share/metasploit-console
Now, let's take a look at the this directory..
kali > ls -l
To create a symbolic or soft link, we use the ln (link) command with the -s switch
(symbolic) and the name of the file we want to link to (the target) and the name of the
link we want to create. You can use either relative paths or absolute paths to link the two
files.

Usually, when we want to enter the Metasploit console, we type msfconsole, remember?
Now, let's say we want to change it so that we can simply type metasploit to enter the
console rather having to remember msfconsole. We can link a new file, metasploit, to the
old file, msfconsole, so that whenever we type metasploit it links or redirects to
msfconsole.
Here is how we would do that.
kali >ln -s msfconsole metasploit
Note how small the symbolic link file, metasploit, is. It's just 12 bytes, because it is only a
pointer. A path to the file it is linked to.
Now, to get into the msfconsole, I can type either metasploit or msfconsole and both will
take me to the same place—the Metasploit Framework console.
Step 3 Creating Hard Links
To create a hard link, the syntax is very similar with the exception that we use the ln (link)
command without the -s (symbolic) switch, then the existing file to hard link to, and finally,
the target file that will be created to the existing file.
Back to our msfconsole example, let's add a hard link between msfconsole to a simpler
command, msf. We can do this by typing:
kali > ln msfconsole msf

As you can see above, now we have created a hard link called msf. Remember, hard links
share an inode with the linked file, so they are exactly the same size. Notice that our new
file, msf, is exactly the same size as msfconsole, 4103 bytes. Now, when we want to invoke
(start) the msfconsole, we have the option to type metasploit, msf, and the original
msfconsole. All will work equally well.

Devices Files
Fundamental to understanding how to use and administer hard drives and other devices
in Linux is an understanding of how Linux specifies these devices in its file system.
Very often, if we are using are hard drive in a hack or in forensics, we will need to
specifically address its device file name. These device file names allow the device (e.g. hard
drive) to interact with system software and kernel through system calls. These files are
NOT device drivers, but rather rendezvous points that are used to communicate to the
drivers. Linux maintains a device file for every device in the system in the /dev directory.
In this tutorial, we will examine how Linux names and interacts with the file system through
the /dev directory and its files.
The /Dev Directory
The /dev directory contains all the files that represent physical peripheral devices present
on the system such as disk drives, terminals, and printers. The /dev directory is directly
below the / directory. If we navigate there, we will see an entry for all of our devices.
kali > cd /dev
kali > ls -l
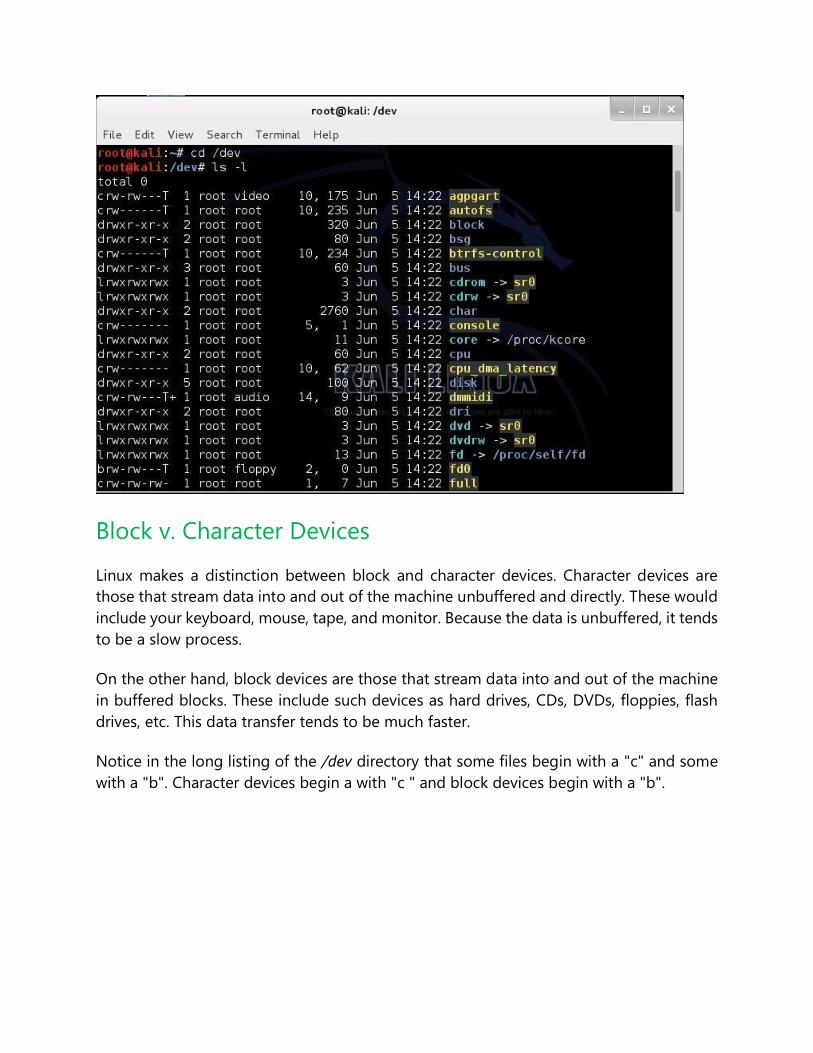
Block v. Character Devices
Linux makes a distinction between block and character devices. Character devices are
those that stream data into and out of the machine unbuffered and directly. These would
include your keyboard, mouse, tape, and monitor. Because the data is unbuffered, it tends
to be a slow process.
On the other hand, block devices are those that stream data into and out of the machine
in buffered blocks. These include such devices as hard drives, CDs, DVDs, floppies, flash
drives, etc. This data transfer tends to be much faster.
Notice in the long listing of the /dev directory that some files begin with a "c" and some
with a "b". Character devices begin a with "c " and block devices begin with a "b".

You will notice in the third line of the /dev directory listing that there is directory named
"block". Let's navigate there and do a long list.
kali > cd /block
kali > ls -l

Here we see a listing of all the block devices. In the first line we see sr0; that would be the
first CD-ROM (Linux tends to begin counting at 0, not 1). Near the bottom, we see sda,
sda1, sda2, sda5 (yours may be different), where sda1 represents the first primary
partition on the SATA drive, and sda2 represents the second primary partition on the
SAME drive.
Naming Conventions of Devices in Linux
Originally, hard drives were two types, IDE or SCSI. IDE (or later, E-IDE) was designed as a
low cost alternative for low cost PCs. They were relatively slow and only allowed four
devices per machine. In addition, they had to be configured in a master and slave
configuration. Each master and slave combination had one cable and controller.
A faster, but more expensive alternative was the SCSI (Small Computer System Interface)
drive. SCSI drives were (are) faster and pricier. Besides their speed advantage, they did not
need a master/slave configuration, but rather were configured with a controller and a
series of devices up to 15.
Linux would designate IDE hard drives with an hd and SCSI hard drives with an sd. In
recent years, with the development and proliferation of SATA drives, we see that Linux
designates these drives with sd, just like SCSI drives.
The first IDE drive was designated with an hda, the second hdb, the third hdc, and so on.
The same happens with SCSI and now SATA drives; the first is designated with sda, the
second sdb, the third sdc, and so on.
Some other devices files include:
/dev/usb - USB devices
/dev/lp - parallel port printer
/dev/tty - local terminal
/dev/fd - floppy drive (does anyone still use floppies?)
Logical vs. Physical Partitions of Hard Drives
Linux is able to recognize four (4) primary hard drive partitions per operating system. This
doesn't limit us to four hard drives or four partitions as we can also use logical or extended
partitions. We can have up to 15 logical or extended partitions per disk and each of these
partitions acts as its own hard drive and operates just as fast as a primary partition.
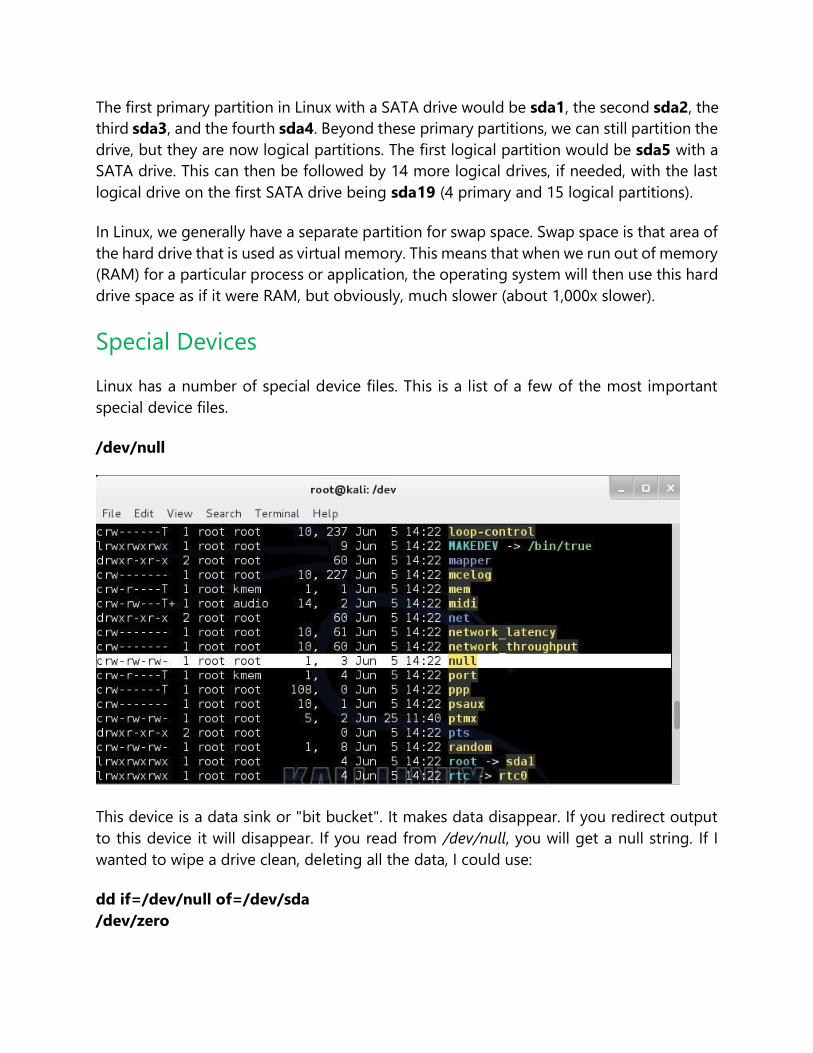
The first primary partition in Linux with a SATA drive would be sda1, the second sda2, the
third sda3, and the fourth sda4. Beyond these primary partitions, we can still partition the
drive, but they are now logical partitions. The first logical partition would be sda5 with a
SATA drive. This can then be followed by 14 more logical drives, if needed, with the last
logical drive on the first SATA drive being sda19 (4 primary and 15 logical partitions).
In Linux, we generally have a separate partition for swap space. Swap space is that area of
the hard drive that is used as virtual memory. This means that when we run out of memory
(RAM) for a particular process or application, the operating system will then use this hard
drive space as if it were RAM, but obviously, much slower (about 1,000x slower).
Special Devices
Linux has a number of special device files. This is a list of a few of the most important
special device files.
/dev/null
This device is a data sink or "bit bucket". It makes data disappear. If you redirect output
to this device it will disappear. If you read from /dev/null, you will get a null string. If I
wanted to wipe a drive clean, deleting all the data, I could use:
dd if=/dev/null of=/dev/sda
/dev/zero

This device can be used as an input file to provide as many null bytes (0x00) as necessary.
It is often used to initialize a file or hard drive.
/dev/ full
This device is a special file that always returns the "device full" error. Usually, it is used to
test how a program reacts to a "disk full" error. It is also able to provide an infinite number
of null byte characters to any process for testing.
/dev/random
This device can be used as an input to fill a file or partition with random, or more precisely,
pseudo-random data. I might use this to overwrite a file or partition to make it much
harder to recover deleted files by a forensic investigator.
It's almost impossible to remove evidence of a file from recovery by a skilled forensic
investigator with unlimited time and money. Since few forensic investigators have the skill
or the time or the money, this technique will inhibit most forensic investigations.
To do this, we can use the dd command. For instance:
dd if=/dev/random of=evidencefile bs=1 count=1024

GRUB Bootloader
Many of you have installed Kali Linux as a virtual machine (VM) using VMware or
VirtualBox, while others have installed Kali (or BackTrack) in a dual-boot system. The
drawback to installing these hacking systems as a VM is that it then requires an external
wireless adapter (your wireless adapter is piped through the VM as a wired device, eth0),
but it makes for a great place to test your hacks while honing your skills.
Using Kali in a dual-boot system doesn't require another wireless adapter and enables
you to use the full resources of your physical system without having to go through a
hypervisor. In this way, when you need your Windows, you boot into Windows, and when
you need Kali, you boot into Kali.
The Bootloader
To be able to run a dual-boot system, you must have a bootloader, and therein lies the
issue. The bootloader enables us to choose which operating system we want to boot into.
To be comfortable with this arrangement, we need to understand a bit about this thing
called a bootloader.
Historically, Linux has used two bootloaders, LILO and GRUB. You may find LILO on some
older, legacy systems, but it has largely been replaced by GRUB. GRUB has two versions,
the original GRUB and now the new improved GRUB2! Our Kali system comes with GRUB2
by default, so I will focus my attention on this newer version here.
A Little Background on GRUB
GRUB is an acronym for GRand Unified Bootloader. It largely replaces the legacy
bootloader found on many older Linux version, LILO. GRUB works by intercepting control
of the boot process when the BIOS transfers control to the Master Boot Record (MBR) in
the first sector of the primary hard drive. Rather than the MBR then finding the first active
partition, GRUB replaces the MBR with its own code that controls which partition is
booted.

Step 1 Exploring GRUB
Let's take a look at GRUB2 as it is installed on Kali. GRUB2, unlike the original GRUB, has
all its files installed into three main locations. These are:
/boot/grub/grub.cfg - this is the main configuration file (replaces menu.lst)
/etc/grub.d - this directory contains the scripts that build the grub.cfg
/etc/default/grub - this file contains the GRUB menu settings
Now, let's begin by navigating and looking inside the GRUB directory.
kali > cd /boot/grub
kali >ls -l

As you can see, there are many files in this directory, but the one we want to focus on
here is the grub.cfg. This is the configuration file in the new GRUB2 that comes with Kali.
It replaces the old menu.lst that you will find on the original GRUB. Let's open it with the
more command and examine it.

Grub.cfg is basically a script for running and configuring GRUB2. It is generated by the
scripts in /etc/grub.d and you generally should NOT try editing it directly (note the
warning on the second line of the file).
Step 2 The /Etc/grub.d Directory
Next, let's look at the /etc/grub.d directory.
kali > cd /etc/grub.d
kali > ls -l

As you can see in the screenshot above, this directory has a number of scripts that are run
to create the grub.cfg file. Let's look at the key entries here.
00_header - this script loads the settings from /etc/default/grub
05_debian_theme - this script defines the colors, background, etc.
10_linux - this script loads the menu entries
20_memtest86 - this script loads the memory tester
30_os-prober - this script scans the hard drives for other operating systems
40_custom - this is a template for manually adding other menu entries
Step 3 Exploring /Etc/Default/Grub
Now, let's go to the /etc/default directory and look to see what is in this directory.
kali > cd /etc/default
kali > ls -l

This directory contains many files and scripts that configure various daemons or services
in Linux. The only one we are interested here is the grub file that I highlighted in the
screenshot above. Let's open that file with the more command.
kali > more /etc/default/grub
When we do so, we will see the following output.
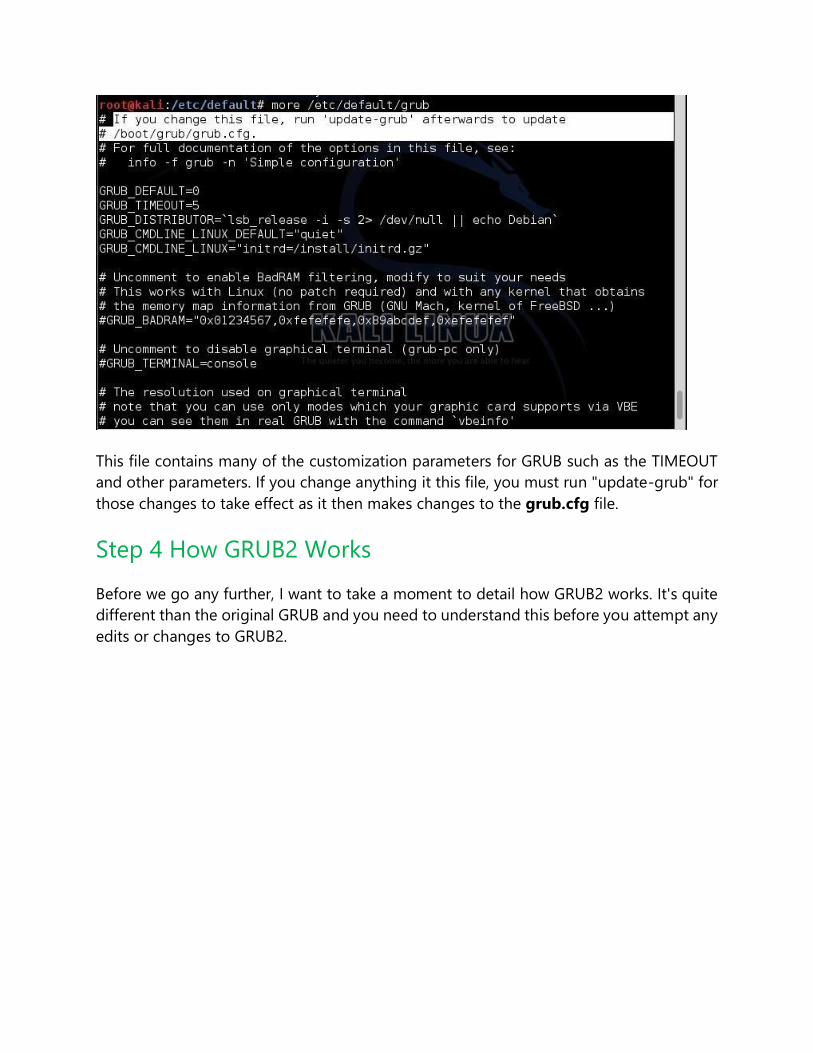
This file contains many of the customization parameters for GRUB such as the TIMEOUT
and other parameters. If you change anything it this file, you must run "update-grub" for
those changes to take effect as it then makes changes to the grub.cfg file.
Step 4 How GRUB2 Works
Before we go any further, I want to take a moment to detail how GRUB2 works. It's quite
different than the original GRUB and you need to understand this before you attempt any
edits or changes to GRUB2.

The differences in configuring GRUB and GRUB2. Image via jEriko
The /etc/default/grub file contains customization parameters.
The /etc/grub.d/ directory contains scripts for the GRUB menu information and the
scripts to boot the various operating systems. When the update-grub command is run,
it reads the contents of the grub file and the grub.d scripts and creates the grub.cfg file.
To change the grub.cfg file, you need to edit the grub file or the scripts under grub.d.

Samba
Those of you who use Windows in a LAN environment understand that Windows
machines can share directories, files, printers, etc. using "shares." This protocol dates back
to the 1980s when the then dominant computer firm, IBM, developed a way for computers
to communicate over the LAN by just using computer names rather than MAC or IP
addresses.
Eventually, Microsoft and Intel developed a similar protocol for file sharing, originally
named NetBIOS, and eventually renamed Server Message Block (SMB). By 1992, Andrew
Tridgell, reverse-engineered SMB for Linux/Unix (including Apple's Mac OS X) and named
it Samba. It is a server-side implementation of SMB and requires no software to be
installed on the client. Samba provides:
File sharing
Network printing
Authentication and authorization
Name resolution
Service announcement (browsing)
Samba functionality is implemented by two daemons, smbd and nmbd. These daemons
(services) are installed and run on nearly every distribution of Unix and Linux. Samba, like
Windows NetBios/SMB, runs on ports 135, 137, and 445.
Just like Window's SMB, Linux's Samba has been one of the weakest and most often
exploited protocols. There is a long list of vulnerabilities and exploits that take advantage
of Linux's Samba, and when I want to exploit a Linux system, one of the first things I test
is Samba. Samba 3.6.3 and earlier versions allow anonymous users to gain root access
through Samba 's remote procedure call.
The more we know and understand Samba, the better network admin's we will be and the
better Linux hackers we will be. Let's take a little time to understand this essential and,
often, very vulnerable protocol in Linux.
Step 1 Locate Samba
To find Samba files in our Kali, let's just type:
locate smb

When you do so, you will see dozens of files with SMB or Samba in their name, including
numerous Metasploit modules for exploiting Samba. Near the top of that list is the main
configuration file for Samba, /etc/samba/smb.conf. Like nearly every application or
daemon in Linux, there is a configuration file located in the /etc directory. These are simple
text files that can be edited and saved to alter the configuration of the application or
daemon. Samba is no different.
Let's open that now with the text editor of your choice. In this case, I'll use Leafpad in Kali.
kali > leafpad /etc/samba/smb.conf
As you can see, this configuration file is well commented. For more information on
configuring Samba, you can also type:
kali > man samba
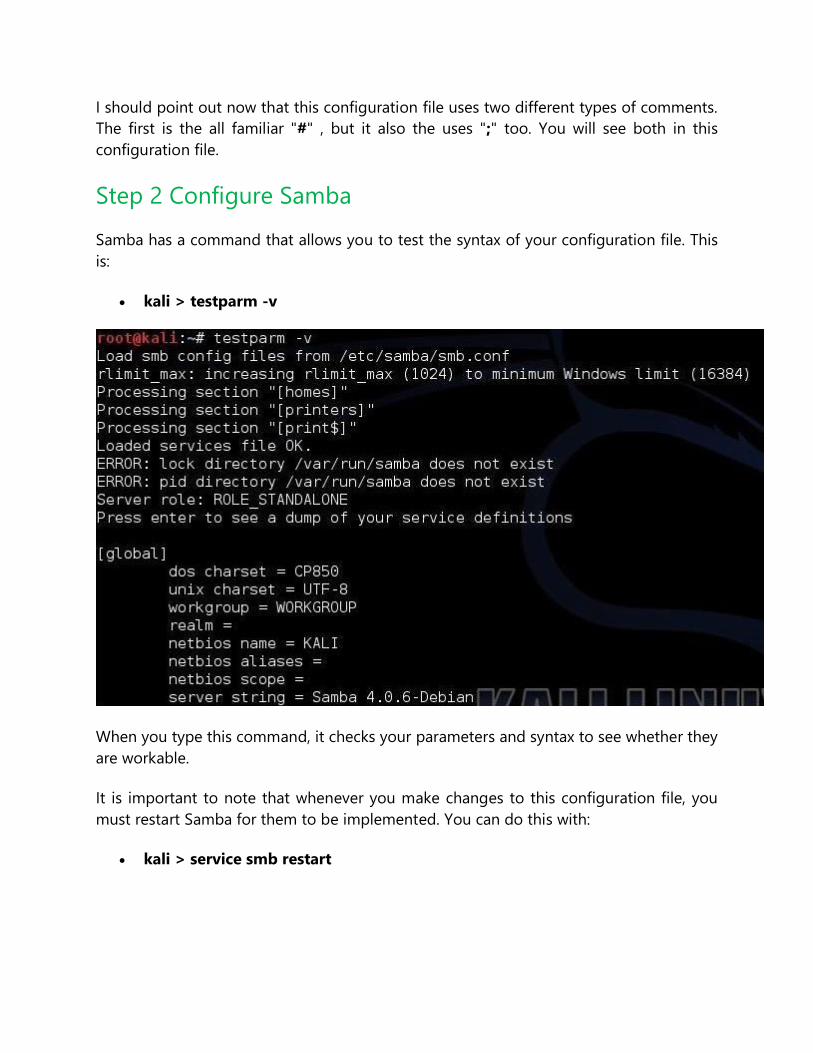
I should point out now that this configuration file uses two different types of comments.
The first is the all familiar "#" , but it also the uses ";" too. You will see both in this
configuration file.
Step 2 Configure Samba
Samba has a command that allows you to test the syntax of your configuration file. This
is:
kali > testparm -v
When you type this command, it checks your parameters and syntax to see whether they
are workable.
It is important to note that whenever you make changes to this configuration file, you
must restart Samba for them to be implemented. You can do this with:
kali > service smb restart

Step 3 Create a Samba User
Samba has its own password authentication system. You can create users with access to
Samba, if they exist, in the /etc/passwd file (in other words, they are a user on the system)
with the command:
kali > smbpasswd -a <username>
As you can see, I have added myself, OTW, to the Samba user list with my password.
Step 4 Setting the WorkGroup
If you want to connect to the workgroup from a Windows machine, you will need the
name of the Windows workgroup. In the "Global Settings," you can see the default is set
to workgroup but, of course, this should set to the name of the Windows workgroup that
Samba will be connected to.
Step 5 Accounting/Logging
Next, let's navigate down within the Global Settings to the "Debugging/Accounting"
section.

Here you can see we can set the location of the log file:
log file = /var/log/samba/log.%m
The maximum log size (KB):
max log size = 1000
And whether to only use syslog to centralize our logging to a dedicated logging system:
syslog only = no
Among many other things.
Step 6 Authentication
If we navigate a bit lower in the Global Settings, we come to the "Authentication" section.

Here we can set what type of server Samba will be:
server role = standalone server
Whether Samba should obey/use pluggable authentication modules (PAM):
obey pam restrictions = yes
Whether Samba syncs passwords with the Linux/Unix password system:
unix password sync = yes
And finally, how Samba handles password setting.
Step 7 Samba Variables
You will notice that throughout the Samba configuration file, variables are used that begin
with "%". For instance, in the logging section above, we saw this line:

log file = /var/log/samba/log.%m
The "%m" at the end represents a variable. If we use the table below, we can see that the
"%m" represents the "The client's NetBIOS name." If the NetBIOS name of the computer
were "NullByte," this would mean that the logs would be found for that system at:
log file = /var/log/samba/log.NullByte
When we replaced the variable with the value of the NetBIOS name.

Although there are far more changes we can make to this configuration file, in many cases
the default setting will suffice in most circumstances, although not optimally. I'll be doing
a second Samba tutorial in the near future where we will configure Samba for optimal file
sharing, so keep coming back, my aspiring hackers.

Logging
When you are using and administering Linux, it is important to be conversant in the use
of the log files. As you know, log files are the repository for much information about our
system, including errors and security alerts.
If we are trying to secure Linux, it is crucial to know how to manage the logging functions
to be able to know if your system has been attacked, and to then decipher what actually
happened and who did it. If you are the attacker, it is crucial to understand what
information can be gathered about you and your methods from these same log files so
you can avoid leaving any trace behind.
Generally, Linux uses a daemon (a program that runs in the background) called syslogd
that is a unified system for logging events on your computer. Several variations of syslog
exist, including rsyslog and syslog-ng. Although they operate very similarly, they do have
some minor differences. Since our Kali Linux is built on Debian, it comes with rsyslog by
default, so that is what we will be using in this tutorial.
Step 1 Open a Terminal in Kali
Let's begin by opening a terminal in terminal. To find our rsyslog, we can simply type:
kali > locate rsyslog
Step 2 Open the Rsyslog Configuration File (rsyslog.conf)
Like nearly every application in Linux, rsyslog is managed and configured by a plain text
configuration file. As you hopefully learned in earlier Linux tutorials, generally,
configuration files are located in the /etc directory. In the case of rsyslog, it is located at
/etc/rsyslog.conf. Let's open that file with any text editor (here I will use Leafpad).

kali > leafpad /etc/rsyslog.conf
As you can see above, the rsyslog.conf file comes well documented with numerous
comments explaining its use.
Step 3 Format of the Rsyslog Configuration File
Let's navigate down a bit to below Line 50. Here begins the "Rules" section. This is where
we can set the rules for what Linux logs.
The basic format for these rules is:
facility.priority action
The facility word references the program (such as mail, kernel, lpr, etc.) that generates
the message to be logged. The priority keyword references the importance of the log

message. Finally, the action keyword references the location that the log is to be sent to.
This can be a file, remote computer, etc.
Facilities
The valid codes to put in place of the facility keyword in our configuration file rules
include:
auth
authpriv
daemon
kern
lpr
mark
news

security
syslog
user
uucp
An asterisk (*) refers to all facilities. You can select more than one facility by listing them
separated by a comma.
Priorities
The valid codes for priority are:
debug
info
notice
warning
warn
error
err
crit
alert
emerg
panic
The priority codes are listed from lowest (debug) priority to highest (emerg, panic). The
warning is the same as warn, error is the same as err, and emerg is the same as panic.
Error, warn, and panic are all deprecated and should not be used.
For instance, if you specify a priority code of alert, the system will log messages that are
classified as alert or emerg, but not crit or below.
Actions
The action is usually a file name with its location. For instance, /var/log/messages.
Step 4 Examples of Facility.Priority Action
Let's look at some examples.
mail.* /var/log/mail

This example will log mail events of all (*) priorities to /var/log/mail.
kern.crit /var/log/kernel
This example will log kernel (kern) events of critical (crit) priority or higher to
var/log/kernel.
*.emerg *
This example will log all events (*) of the emergency priority (emerg) to all logged on
users.
Step 5 Logrotate
If you don't delete your log files, they will eventually fill your entire hard drive. On the
other hand, if you delete your log files too frequently, you will not have them for an
investigation at some future point in time. We can use logrotate to determine the balance
between these opposing requirements.
We can rotate our log files by creating a cron job that periodically rotates our log files
through the logrotate utility. The logroate utility is configured with the /etc/logrotate.conf.
Let's open it with a text editor and take a look at it.

In most cases, the default configuration will work for most people, but note on Line 6 that
the default setting is to rotate logs every 4 weeks. If you want to keep your logs for a
longer or shorter time, this is the setting you should change

The Linux Philosophy
I'd like to take this moment to explain the philosophy around the Linux operating system.
When I use the term "philosophy," I am not referring to such questions as "what is the
meaning of life" or "does God exist," but rather what was the underlying logic and
reasoning behind the design of this ubiquitous and love-lived operating system.
As many of you already know, I am strong advocate for the Linux operating system.
Although Linux may be ideally suited to hacking and many other applications, I think it is
important to understand the philosophy underlying the Linux/Unix structure and model
for any environment.
In this article, I will use the term Unix/Linux to designate this operating system. Unix was
the original, developed by Thompson and Ritchie, and Linux was a re-engineer of Unix by
Linux Torvalds and team. Mac OS X, iOS, Android, Solaris, AIX, HP-UX, and IRIX are all
forms of Unix/Linux.
In addition, Red Hat, Ubuntu, Mint, Fedora, Debian, Slackware, and SUSE are all
distributions of Linux. A distribution of Linux is simply an operating system that uses the
Linux kernel, but then adds in its own additional components. These components vary,
but may include applications, utilities, modules, the GUI, and others.
This variability in the distributions is often confusing and frustrating to the novice, but it
is actually part of the Linux beauty and strength. Unix/Linux are designed to be flexible
and portable, allowing the end-user to work the way they are comfortable, rather than
the way the software developer thinks you should work.
Unix was first developed in the early 1970s by Dennis Ritchie and Ken Thompson at AT&T
Labs. The fact that it is still being used over 40 years later tells you something about the
quality, durability, and efficiency of this operating system. These guys did something right!
How many things in computing are still around from the early 1970s?
If anything, rather than this "ancient" operating system fading away, it is gaining ground
nearly every day. Chrome, Android, iOS, Linux, and Mac OS X are all based on this 40-
year-old operating system. If we look at the fastest growing market—mobile devices—it
is dominated by Unix variants with iOS and Android compromising over 91% of the
market. It appears that the mobile market in the near future will be nearly 100%
Unix/Linux.

What about this modest operating system has made it this durable and long-lasting? Let's
take a look then at some of the tenants of this design philosophy that has made Linux so
successful.
Assume the User Is Computer Literate
The developers of Unix (and thereby Linux) made a radical assumption: That the users are
computer literate. We can't say the same for many other operating systems. In many cases,
the operating system developers assume we are ignorant, illiterate Neanderthals who
need to be protected ourselves. Not so with Unix/Linux.
As one sage said, "Unix(Linux) was not designed to stop its users from doing stupid things
as that would also keep them from doing clever things."
Perfect! Could not have said it better myself!
Complete Control
One of key reasons that hackers use Linux and only Linux, is that it gives us complete
control. Other operating systems try to hide some of their operations and features from
us, afraid we will screw things up. Linux is totally transparent and enables us to see and
use everything.
Choose Portability over Efficiency
Unix was the first portable operating system, meaning it could be used on many different
hardware platforms. This has served it well as Unix/Linux has now been ported and
compiled for over near 60 hardware platforms. This has been a critical element in its
longevity and ability to adopt to an ever-changing technological environment.
Store Data in Flat Text Files
Unix/Linux stores data in flat text files unlike other operating systems. This makes the data
as portable, or more portable, than the code itself. Nearly all systems can import and use
flat text files.
Use Shell Scripts to Increase Leverage & Portability
Shell scripts enhance the power of our applications. By writing a script, we can automate
an application to do something as many times as we would like, as well as leverage the
capabilities of other applications simultaneously. In addition, these scripts are then
portable to other systems without having to recompile them.
Allow the User to Tailor Their Environment
Unix/Linux was designed to allow the user to tailor their environment to their liking. The
user is in control and not the software developer. Unix/Linux implements mechanisms for
doing things, but they don't dictate how you do things. This tailoring can take many forms
including the graphical user interface (GUI). There are numerous GUIs available for Linux
including GNOME (the default on Kali and the most widely used), KDE, Unity (Ubuntu's
default), Sugar, Trinity, Xfce, Enlightenment, and many more. In most cases, despite the
default GUI that might come with your system, you can install and use any one of the
other interfaces, if you please.
Make the Kernel Small & Lightweight
Although many operating system kernels continue to add features to the main kernel to
offer users greater capability, they make it more and more bloated. The Unix/Linux model
is to keep the kernel small and lightweight, but allow the developers and users to add
components and modules as they please.
User Lowercase & Keep It Short
lowercase names and commands are a unix/linux tradition.
Silence Is Golden
Unix/Linux commands tend to be silent when you have done things correctly. This can
drive some new users a bit batty when they, for instance, copy a file from one location to
another and Unix/Linux has nothing to say. Not a confirmation or even a pat on the back.

Think Hierarchically
The Unix/Linux operating system was the first to develop a file system organized into a
hierarchical tree. This hierarchical thinking has extended into many other areas of the
operating system, such as networking and object-oriented programming.
I hope this little foray into the philosophy of Linux helps you to understand why Linux is
so different than those other operating systems. The result of this philosophy is an
operating system that is small, lightweight, and flexible, which treats all users with respect.

Inetd, the Super Daemon
In my ongoing attempts to familiarize aspiring hackers with Linux (nearly all hacking is
done with Linux, I want to address a rather obscure, but powerful process. There is one
super process that is called inetd or xinetd or rlinetd. I know, I know... that's confusing,
but bear with me.
Before I discuss the inetd process, I want to explain that in Linux and Unix, processes that
run in the background are called daemons. In some places, you we will even see them
referred to as "demons," but that is incorrect. A daemon is a spirit that influences one's
character or personality. They are not representatives of good or evil, but rather
encourage independent thought and will. This is in contrast to a "demon," which we know
is something quite different.
Image via Unknown
Now, back to inetd. In the beginning—well, at least in the beginning of Unix—all daemons
started at boot time and ran continuously. As you might imagine, this meant that
processes that were not being used were using resources and depleting performance.
This obviously was an inefficient way of doing business.
As systems gained more and more services, it became readily apparent that something
different needed to be done. As a result, a programmer at Berkeley decided that it might

be best to create a daemon that would control all other daemons, a sort of super daemon.
Thus, began inetd, or the Internet daemon.
Inetd always runs in the background and it then decides when to start and stop other
daemons. So, if a call comes in on port 21 for FTP services, inetd starts the FTP daemon.
When a call comes in on port 80 for HTTP services, inetd starts HTTP services, and so on.
In this way, inetd conserves resources and improves overall system performance.
Eventually, this super daemon was exploited by hackers (imagine that) in a number of
ways. If you think about it, if I can exploit the super daemon that controls all of the other
daemons, I can control the entire system. At the very least, if I can control the super
daemon, I can probably DoS the system. This is exactly what did happen and, as a result,
we got a new and improved super daemon called xinetd.
Xinetd was developed to address some of the security vulnerabilities in inetd and was
rather rapidly adopted by the commercial Linux distributions, Red Hat and SUSE. Debian
and Ubuntu, which are the underlying Linux distributions of Kali and BackTrack,
respectively, stayed with the older inetd, initially. But now Debian has transitioned to a
newer version of inetd, labelled rlinetd.

Find Rlinetd
We can find rlinetd in our Kali system by typing the following.
kali > locate rlinetd

We can see at the top of the list, the configuration file for rlinetd and the daemon file
itself.
Rlinetd Manual
As I mentioned in earlier articles, whenever we want to know something about a particular
command in Linux, we can, of course, Google it. Alternatively, we can also use the man,
or manual, file. We simply type "man" before the command and the system will pull up
the manual file for that command. Let's check out the manual for rlinetd.
kali > man rlinetd
Take a Look at rlinetd.conf
Finally, let's take a look at the configuration file for rlinetd. Let's open it with Leafpad or
any text editor.

kali > leadpad rlinetd
We can make our Linux system more secure by setting some default values in the
rlinetd.conf file. For instance, if the system were only used for FTP services, it not only
would be inefficient to run any other service, but also less secure. For example, if an
attacker were trying to exploit HTTP and HTTP was disabled in the rlinetd.conf, they would
not have much luck.
We could also change the rlinetd.conf to only start FTP services as needed and nothing
else. If you only want this system accessible to a list of IP addresses or just your internal
network, you could configure that access in the rlinetd.conf.
As a beginner with Linux, I recommend not making any changes to the rlinetd as you are
more likely to sabotage and disable your system than making it more secure or efficient,
but now you understand what inetd is. With more system admin experience, you can
manage this super daemon to make your system safer and more efficient.
Don't Confuse Inetd with Init.d
Linux novices often confuse init.d and inetd. Init.d is an initialization daemon that runs
when the system starts up. It determines the runlevel and the daemons that activate at
start up. When a computer is turned on, the kernel starts the systems init.d, which always
has a Process ID (PID) of 1.
The init process starts a series of scripts that get the system ready for use. These are things
such as checking the filesystem and then mounting it and starting any system daemons

that are required. These scripts are often referred as rc files because they all begin with
the rc.(run command). I'll explain more on init.d in a subsequent tutorial, but I wanted to
make certain that this distinction was clear.