like this post emax screw retained, scan post, cerec guide with a 4 7 legacy3
DESCRIPTION
Like This Post Emax Screw Retained, Scan Post, Cerec Guide With A 4 7 Legacy3TRANSCRIPT

Like This Post: Emax Screw Retained, Scan Post, CEREC Guide with a 4.7 Legacy3
Case Study by: August de Oliveira, DDS
This is a bit of a long case, but I think it really shows how well my three favorite technologies
work together: CEREC, Galielos, and the new Emax abutment blocks. This patient fractured #9,
tried in a medium Reference Body and extracted the root.

Like This Post: Emax Screw Retained, Scan Post, CEREC Guide with a 4.7 Legacy3
Fabricated a CEREC Guide and got busy. Note that the lance bur which is my first when I do any
immediate has a shank with a 2.8mm diameter not a 2.3, so start with the 2.8 key. Note the
position of the pilot and the position planned!
2 | P a g e

Like This Post: Emax Screw Retained, Scan Post, CEREC Guide with a 4.7 Legacy3
Used a 4.7mmD by 13mmL Legacy3. The keys I make for CEREC Guide go up to a 4.4 drill which
is the last for the 4.7 in D2 bone. Note the palatal position and angulation of the implant.
3 | P a g e

Like This Post: Emax Screw Retained, Scan Post, CEREC Guide with a 4.7 Legacy3
Used a stock zirconia abutment and milled out a CEREC "Temp" of an Empress CAD Multi A1
block. When doing immediates I usually either mill the temp in CEREC or get a milled or
processed acrylic temp from a lab. Cemented with Multi Link.
4 | P a g e

Like This Post: Emax Screw Retained, Scan Post, CEREC Guide with a 4.7 Legacy3
6 months later the implant is ready to restore. In this case, we just accessed the abutment screw
hole and turned this abutment/crown in to a screw retained temp.
5 | P a g e

Like This Post: Emax Screw Retained, Scan Post, CEREC Guide with a 4.7 Legacy3
Placed the scan post, I like to take a film to both verify seating and to check integration. Note the
papillae and the interproximal bone height.
6 | P a g e

Like This Post: Emax Screw Retained, Scan Post, CEREC Guide with a 4.7 Legacy3
Placed the grey scan cap on the post. Really look at it and make sure that it lines up with the
post. It’s pretty easy to have it off and then it’s sort of game over when it comes time to seat the
restoration.
7 | P a g e
Like This Post: Emax Screw Retained, Scan Post, CEREC Guide with a 4.7 Legacy3
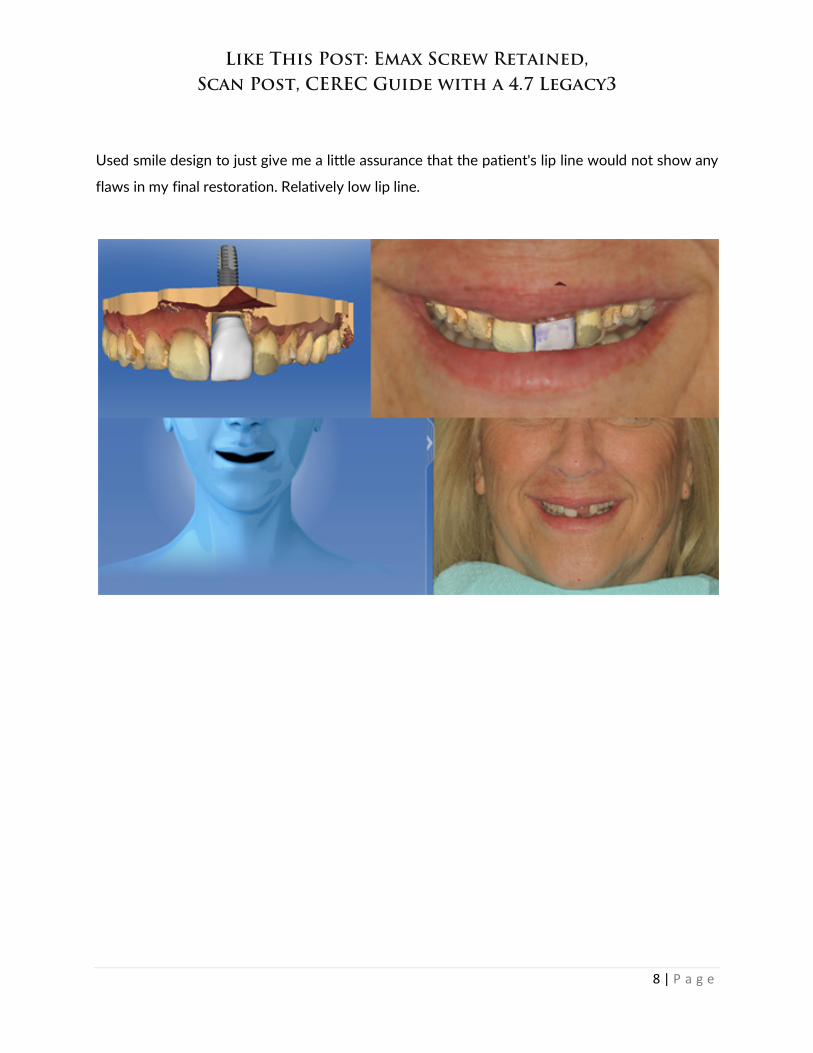
Used smile design to just give me a little assurance that the patient's lip line would not show any
flaws in my final restoration. Relatively low lip line.
8 | P a g e

Like This Post: Emax Screw Retained, Scan Post, CEREC Guide with a 4.7 Legacy3
There’s lots to love about the Emax abutment block, but if I could voice two small gripes. First is
a software issue. If you index the scan post to the buccal, like you should, the sprue is always 90
degrees to that, meaning you get a sprue in the inter proximal. To counteract that you need to
index the scan post to the inter proximal, which makes it tough to visualize. Second, and there is
no way around this, the screw hole, even though you place your implant in the cingulum, may
slightly "draw" with your incisal edge. The only way around that is to stack a little porcelain.
9 | P a g e

Like This Post: Emax Screw Retained, Scan Post, CEREC Guide with a 4.7 Legacy3
Those 16 blocks take a while to mill! Tried in the mouth, note the hole in the incisal edge. I like to
place the ti-base into the Emax framework and try it as one unit. If the gingival hold you up, you
make need to contour with a laser. Took a physical impression for the lab cut back.
10 | P a g e

Like This Post: Emax Screw Retained, Scan Post, CEREC Guide with a 4.7 Legacy3
Back from the lab with incisal added. Nice tissue. The gingival crest is a little lower than 8, but
the patient has a low lip line so no worries.
11 | P a g e

Like This Post: Emax Screw Retained, Scan Post, CEREC Guide with a 4.7 Legacy3
Torqued down progressively (15, 20, 25, 30 Ncm), waiting about 30 seconds to a minute
between "clicks". Endo sponge and opaque flowable in access.
12 | P a g e

Like This Post: Emax Screw Retained, Scan Post, CEREC Guide with a 4.7 Legacy3
Final, we should get some papilla growth on the mesial. Is it perfect? No, but certainly a better
option than crown lengthening or even orthodontic extrusion. I love having this technology at
my disposal!
Dr August de Oliveira graduated from dental school in 1997 from the University of Washington
and completed his General Practice Residency in Los Angeles in 1998. Dr de Oliveira has been lecturing
on 3D technology since 2004, when he started as a CEREC Basic trainer. Since 2008 he has been involved
with Implant Direct’s R and D department developing Guided Surgery Software and Hardware and testing
their CAD Milled Bars and Substructure Department. Dr de Oliveira has written two books on
Implantology: Implants Made Easy and Guided Implantology Made Easy. He has been involved with beta
testing Sirona’s Sidexis Program, as well as developing the Opti and CEREC Milled Surgical Guides. Dr de
Oliveira lectures nationwide for Sirona on the Galileos Cone Beam system and Sirona Guided Implant
Surgery. He also teaches for Implant Direct at their Las Vegas Educational Facility and with the Engel
Institute in Charlotte NC. Dr de Oliveira lives and practices in Los Angeles CA.
13 | P a g e