lighting management unit with high-voltageboost … · lighting management unit with...
TRANSCRIPT

LP5526
SW
MAIN
SUB
RLED
GLED
BLED
Li-Ion Batteryor Charger
= 150 mA
= 8V...20 V
FB
VDD2
10 F
L1
10 PH
P
MCUSCL
SDA
SUB BACKLIGHT0...25 mA/LED
MAIN BACKLIGHT0...25 mA/LED
NRST
VDDIO
IRGB
IRT
VDDA100 nF
VREF
D1
VDD1100 nF
GND 1-5
100 nF
1 PF
GPIO[0]/PWM
GPIO[1]
GPIO[2]
2 x 4.7 uF
FLASH0...150 mA
+ COUT
IMAX
VOUT
CVDDA
CIN CVDD
CVREF
RRGB
RRT
RSDA
VDDIO
CVDDIO
82 kÖ
LP5526
www.ti.com SNVS431D –FEBRUARY 2006–REVISED MARCH 2013
Lighting Management Unit With High-Voltage Boost Converter With up to 150-mA SerialFlash LED Driver
Check for Samples: LP5526
1FEATURES DESCRIPTIONLP5526 is a Lighting Management Unit for portable
2• High-Efficiency Boost Converter Withapplications. It is used to drive display backlights,Programmable Output Voltage up to 20Vkeypad LEDs, RGB LEDs and camera flash LEDs.
• Two Individual Drivers for Serial Display LP5526 can drive 2 separately connected strings ofBacklight LEDs LEDs with high voltage boost converter. The RGB
driver allows driving either individual color LEDs or• Automatic Dimming ControllerRGB LED from separate supply power, or it can be• Standalone RGB Controllerused to drive series connecter flash LEDs from high
• Dedicated Flash Function voltage boost converter.• Safety Function to Avoid Prolonged Flash
The backlight drivers (MAIN and SUB pins) are both• Three General-Purpose IO Pins high resolution constant current mode drivers. The
flash outputs can drive series connected flash LED• 25-Bump DSBGA Package: (2.54mm x 2.54mmwith up to 150mA of current. External PWM controlx 0.6mm)can be used for dimming any selected LED outputs orit can be used to trigger the flash. The flash has alsoAPPLICATIONS1-second safety timer.
• Cellular Phones and PDAsThe device is controlled through a 2-wire low-voltage
• MP3 Players I2C compatible interface that reduces the number of• Digital Cameras required connections.
Typical Applications
Figure 1.1
Please be aware that an important notice concerning availability, standard warranty, and use in critical applications ofTexas Instruments semiconductor products and disclaimers thereto appears at the end of this data sheet.
2All trademarks are the property of their respective owners.
PRODUCTION DATA information is current as of publication date. Copyright © 2006–2013, Texas Instruments IncorporatedProducts conform to specifications per the terms of the TexasInstruments standard warranty. Production processing does notnecessarily include testing of all parameters.

LP5526
SW
MAIN
SUB
RLED
GLED
BLED
Li-Ion Batteryor Charger
= 150 mA
= 8V...20 V
FB
VDD2
10 F
L1
10 PH
P
MCUSCL
SDA
SUB BACKLIGHT0...25 mA/LED
MAIN BACKLIGHT0...25 mA/LED
NRST
VDDIO
IRGB
IRT
VDDA100 nF
VREF
D1
VDD1100 nF
GND 1-5
100 nF
1 PF
GPIO[0]/PWM
GPIO[1]
GPIO[2]
2 x 4.7 uF
+ COUT
IMAX
VOUT
CVDDA
CIN CVDD
CVREF
RRGB
RRT
RSDA
VDDIO
CVDDIO
82 kÖ
RGBUp to 50 mA/LED
4.5 V
LP5526
SNVS431D –FEBRUARY 2006–REVISED MARCH 2013 www.ti.com
Figure 2.
2 Submit Documentation Feedback Copyright © 2006–2013, Texas Instruments Incorporated
Product Folder Links: LP5526

1
2
3
4
5
E D C B A
IRT
BLED
GND_RGB
GPIO[0]
GPIO[1]
GND
VREF
GLED
IRGB
GPIO[2]
VDD1
VDDA
RLED
SCL
SDA
FB
SUB
VDDIO
NRST
GNDT
SW
GND_SW
MAIN
GND_WLED
VDD2
1
2
3
4
5
A B C D E
SW FB
GND_SW
MAIN SUB
GND_WLED
GND
VDD1
VDD2
VDDA
VREF
IRT
RLED GLED BLED
GND_RGBIRGB
VDDIO
NRST SCL
SDAGPIO
[0]
GPIO[1]
GPIO[2]
GNDT
LP5526
www.ti.com SNVS431D –FEBRUARY 2006–REVISED MARCH 2013
Connection Diagrams
25-Bump Thin DSBGA Package, Large Bump, Package Number YZR0025CCA
Figure 3. Top View Figure 4. Bottom View
Table 1. Pin Descriptions
Pin # Name Type Description
5E SW Output Boost Converter Power Switch
5D FB Input Boost Converter Feedback
5C RLED Output Red LED Output (Current Sink / Open Drain Switch)
5B GLED Output Green LED Output (Current Sink / Open Drain Switch)
5A BLED Output Blue LED Output (Current Sink / Open Drain Switch)
4E GND_SW Ground Power Switch Ground
4D NRST Input External Reset, Active Low
4C SCL Logic Input Clock Input for I2C Compatible Interface
4B IRGB Input External RGB LED Maximum Current Set Resistor
4A GND_RGB Ground Ground for RGB LED Currents
3E VDD2 Power Supply Voltage 3.0...5.5 V
3D VDDIO Power Supply Voltage for Digital Input/Output Buffers and Drivers
3C SDA Logic Input/Output Data Input/Output for I2C Compatible Interface
3B GPIO[2] Logic Input/Output General Purpose Logic Input/Output
3A GPIO[0] / PWM Logic Input/Output General Purpose Logic Input/Output / External PWM Input
2E GND_WLED Ground Ground for White LED Currents (MAIN and SUB Outputs)
2D GNDT Ground Ground
2C VDD1 Power Supply Voltage 3.0...5.5 V
2B VREF Output Reference Voltage (1.23V)
2A GPIO[1] Logic Input/Output General Purpose Logic Input/Output
1E MAIN Output MAIN Display White LED Current Output (Current Sink)
1D SUB Output SUB Display White LED Current Output (Current Sink)
1C VDDA Output Internal LDO Output (2.80V)
1B GND Ground Ground for Core Circuitry
1A IRT Input Oscillator Frequency Set Resistor
Copyright © 2006–2013, Texas Instruments Incorporated Submit Documentation Feedback 3
Product Folder Links: LP5526

LP5526
SNVS431D –FEBRUARY 2006–REVISED MARCH 2013 www.ti.com
These devices have limited built-in ESD protection. The leads should be shorted together or the device placed in conductive foamduring storage or handling to prevent electrostatic damage to the MOS gates.
Absolute Maximum Ratings (1) (2)
V (SW, FB, MAIN, SUB, RLED, GLED, BLED) -0.3V to +23V
VDD1, VDD2, VDDIO, VDDA -0.3V to +6.0V
Voltage on IRGB, IRT, VREF -0.3V to VDD1+0.3V with 6.0V max
Voltage on Logic Pins -0.3V to VDDIO +0.3V with 6.0V max
I (VREF) 10µA
I(RLED, GLED, BLED) 100mA
Continuous Power Dissipation (3) Internally Limited
Junction Temperature (TJ-MAX) 125ºC
Storage Temperature Range -65ºC to +150ºC
Maximum Lead Temperature (Soldering) (4) 260ºC
ESD Rating Human Body Model (5) 2kV
Machine Model 200V
(1) Absolute Maximum Ratings indicate limits beyond which damage to the component may occur. Operating Ratings are conditions underwhich operation of the device is ensured. Operating Ratings do not imply ensured performance limits. For ensured performance limitsand associated test conditions, see the Electrical Characteristics tables.
(2) If Military/Aerospace specified devices are required, please contact the TI Sales Office/Distributors for availability and specifications.(3) Internal thermal shutdown circuitry protects the device from permanent damage. Thermal shutdown engages at TJ=150ºC (typ.) and
disengages at TJ=130ºC (typ.).(4) For detailed soldering specifications and information, please refer to Application Note AN1112 : Micro SMD Wafer Level Chip Scale
Package SNVA009(5) The Human body model is a 100pF capacitor discharged through a 1.5kΩ resistor into each pin. The machine model is a 200pF
capacitor discharged directly into each pin. MIL-STD-883 3015.7
Operating Ratings (1) (2)
V (SW, FB, MAIN, SUB) 0 to +21V
VDD1,2 3.0 to 5.5V
VDDIO 1.65V to VDD1
Recommended Load Current (RLED, GLED, BLED) CC Mode 0mA to 50mA/driver
Recommended Total Boost Converter Load Current 0mA to 150mA
Junction Temperature (TJ) Range -30ºC to +125ºC
Ambient Temperature (TA) Range (3) -30ºC to +85ºC
(1) Absolute Maximum Ratings indicate limits beyond which damage to the component may occur. Operating Ratings are conditions underwhich operation of the device is ensured. Operating Ratings do not imply ensured performance limits. For ensured performance limitsand associated test conditions, see the Electrical Characteristics tables.
(2) All voltages are with respect to the potential at the GND pins.(3) Junction-to-ambient thermal resistance is highly application and board-layout dependent. In applications where high maximum power
dissipation exists, special care must be paid to thermal dissipation issues in board design.
Thermal PropertiesJunction-to-Ambient Thermal Resistance (θJA) (1) 60ºC/W to 100ºC/W
(1) Junction-to-ambient thermal resistance is highly application and board-layout dependent. In applications where high maximum powerdissipation exists, special care must be paid to thermal dissipation issues in board design.
4 Submit Documentation Feedback Copyright © 2006–2013, Texas Instruments Incorporated
Product Folder Links: LP5526
LP5526
www.ti.com SNVS431D –FEBRUARY 2006–REVISED MARCH 2013
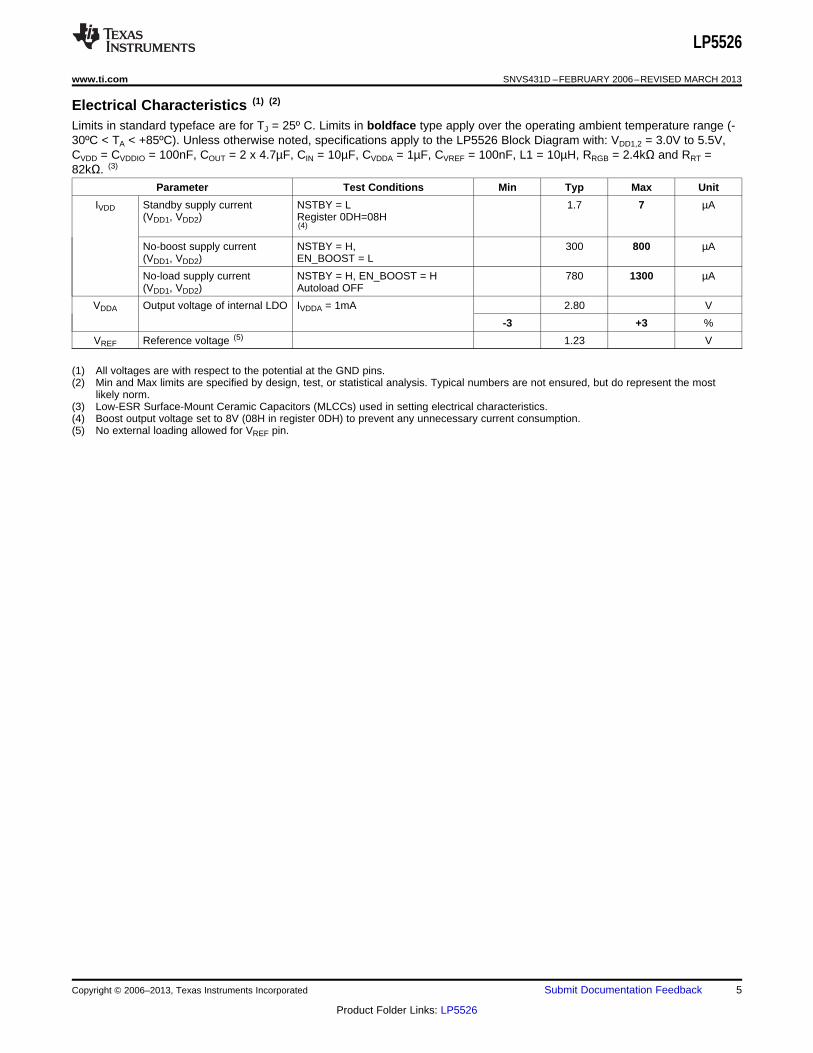
Electrical Characteristics (1) (2)
Limits in standard typeface are for TJ = 25º C. Limits in boldface type apply over the operating ambient temperature range (-30ºC < TA < +85ºC). Unless otherwise noted, specifications apply to the LP5526 Block Diagram with: VDD1,2 = 3.0V to 5.5V,CVDD = CVDDIO = 100nF, COUT = 2 x 4.7µF, CIN = 10µF, CVDDA = 1µF, CVREF = 100nF, L1 = 10µH, RRGB = 2.4kΩ and RRT =82kΩ. (3)
Parameter Test Conditions Min Typ Max Unit
IVDD Standby supply current NSTBY = L 1.7 7 µA(VDD1, VDD2) Register 0DH=08H
(4)
No-boost supply current NSTBY = H, 300 800 µA(VDD1, VDD2) EN_BOOST = L
No-load supply current NSTBY = H, EN_BOOST = H 780 1300 µA(VDD1, VDD2) Autoload OFF
VDDA Output voltage of internal LDO IVDDA = 1mA 2.80 V
-3 +3 %
VREF Reference voltage (5) 1.23 V
(1) All voltages are with respect to the potential at the GND pins.(2) Min and Max limits are specified by design, test, or statistical analysis. Typical numbers are not ensured, but do represent the most
likely norm.(3) Low-ESR Surface-Mount Ceramic Capacitors (MLCCs) used in setting electrical characteristics.(4) Boost output voltage set to 8V (08H in register 0DH) to prevent any unnecessary current consumption.(5) No external loading allowed for VREF pin.
Copyright © 2006–2013, Texas Instruments Incorporated Submit Documentation Feedback 5
Product Folder Links: LP5526

SW
GND_SW
MAIN
GND_WLED
SUB
GND_RGB
RLED
GLED
BLED
FB
VDD1
DA
8-BitIDAC
8-Bit IDAC
MCUSCL
SDA
LDO
BIAS
REF THSD
POR
OSC
I2C
BRIGHTNESS CONTROL
CONTROL
BG
BOOST
PWM
INT
ER
FA
CE
NRST
VDDIO
IRGB
IRT
VDDA
VREF
VDD2Logic supply
GND
GPIO[0]/PWM
GPIO[1]
GPIO[2]
DA
Li-Ion Battery
or Charger
= 150 mA
= 8V...20 V
10 éF
L1
10 PH
SUB BACKLIGHT
0...25 mA/LED
MAIN BACKLIGHT
0...25 mA/LED100 nF
D1
100 nF
100 nF
1 PF
2 x 4.7 éF
100 pF390:
Optional EMI FILTER, close to SW pin
+ COUT
IMAX
VOUT
RSW CSW
CVDDA
CIN CVDD
CVREF
RRGB
RRT
RSDA
VDDIO
CVDDIO
FLASH 0...150mA
82k:
LP5526
SNVS431D –FEBRUARY 2006–REVISED MARCH 2013 www.ti.com
BLOCK DIAGRAM
6 Submit Documentation Feedback Copyright © 2006–2013, Texas Instruments Incorporated
Product Folder Links: LP5526

LP5526
www.ti.com SNVS431D –FEBRUARY 2006–REVISED MARCH 2013
DETAILED DESCRIPTION
Modes of Operation
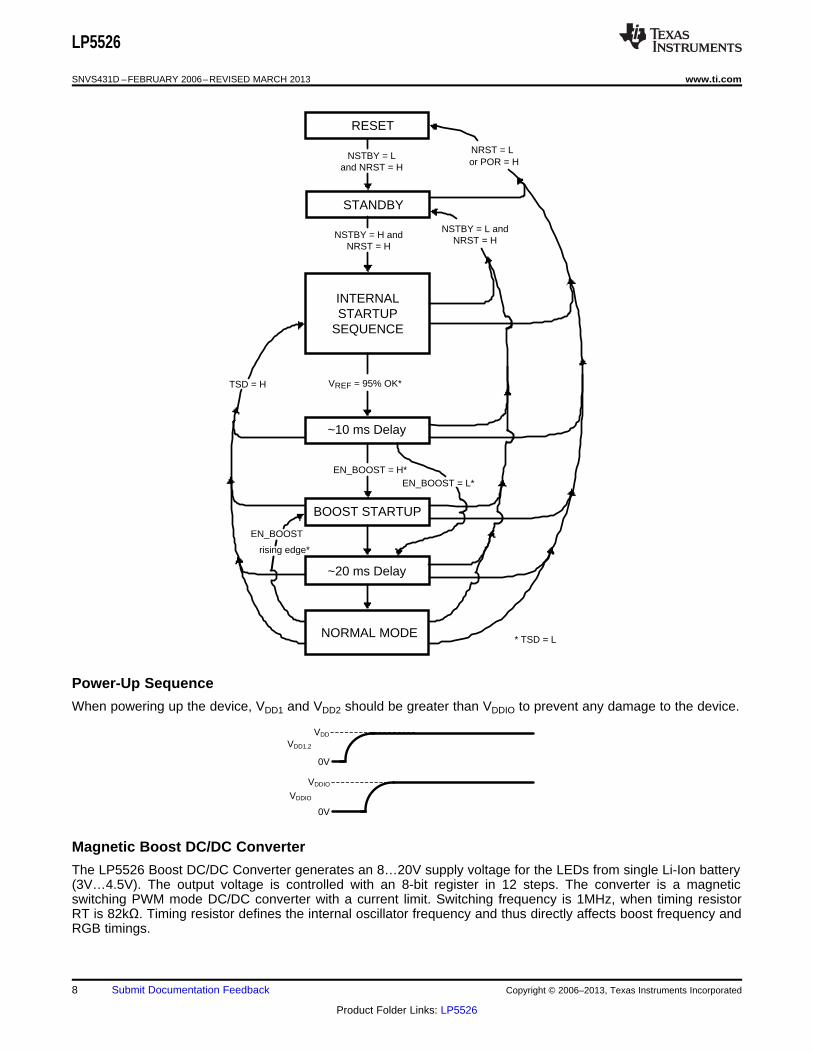
RESET: In the RESET mode all the internal registers are reset to the default values. Reset is entered always ifinput NRST is LOW or internal Power On Reset is active. Power On Reset (POR) will activate during thechip startup or when the supply voltages VDD1 and VDD2 fall below 1.5V. Once VDD1 and VDD2 rises above1.5V, POR will inactivate and the chip will continue to the STANDBY mode. NSTBY control bit is low afterPOR by default.
STANDBY: The STANDBY mode is entered if the register bit NSTBY is LOW and Reset is not active. This is thelow power consumption mode, when all circuit functions are disabled. Registers can be written in thismode and the control bits are effective immediately after start up.
STARTUP: When NSTBY bit is written high, the INTERNAL STARTUP SEQUENCE powers up all the neededinternal blocks (VREF, Bias, Oscillator etc.). To ensure the correct oscillator initialization, a 10ms delay isgenerated by the internal state-machine. If the chip temperature rises too high, the Thermal Shutdown(TSD) disables the chip operation and STARTUP mode is entered until no thermal shutdown event ispresent.
BOOST STARTUP:Soft start for boost output is generated in the BOOST STARTUP mode. The boost output israised in low current PWM mode during the 20ms delay generated by the state-machine. All LED outputsare off during the 20ms delay to ensure smooth startup. The Boost startup is entered from Internal StartupSequence if EN_BOOST is HIGH or from Normal mode when EN_BOOST is written HIGH.
NORMAL: During NORMAL mode the user controls the chip using the Control Registers. The registers can bewritten in any sequence and any number of bits can be altered in a register in one write.
Copyright © 2006–2013, Texas Instruments Incorporated Submit Documentation Feedback 7
Product Folder Links: LP5526
VDD1,2
VDDIO
0V
0V
VDD
VDDIO
STANDBY
RESET
INTERNALSTARTUP
SEQUENCE
NRST = Lor POR = H
EN_BOOST = H*
TSD = H
~10 ms Delay
BOOST STARTUP
NSTBY = H and NRST = H
NSTBY = L and NRST = H
EN_BOOST = L*
~20 ms Delay
NORMAL MODE
EN_BOOST
rising edge*
* TSD = L
VREF = 95% OK*
NSTBY = L and NRST = H
LP5526
SNVS431D –FEBRUARY 2006–REVISED MARCH 2013 www.ti.com
Power-Up Sequence
When powering up the device, VDD1 and VDD2 should be greater than VDDIO to prevent any damage to the device.
Magnetic Boost DC/DC Converter
The LP5526 Boost DC/DC Converter generates an 8…20V supply voltage for the LEDs from single Li-Ion battery(3V…4.5V). The output voltage is controlled with an 8-bit register in 12 steps. The converter is a magneticswitching PWM mode DC/DC converter with a current limit. Switching frequency is 1MHz, when timing resistorRT is 82kΩ. Timing resistor defines the internal oscillator frequency and thus directly affects boost frequency andRGB timings.
8 Submit Documentation Feedback Copyright © 2006–2013, Texas Instruments Incorporated
Product Folder Links: LP5526

+-
+-
+-
+-
VOUTVIN
FB
SW
RS
R
R
R
Duty control1 MHz clock
OVPCOMP
ERRORAMP
SLOPER OLPCOMP
RESETCOMP
LOOPC+-
ACTIVELOAD
SWITCH
+-
UVCOMP
2V
+-
R
IMAX
OCPCOMP
R
LP5526
www.ti.com SNVS431D –FEBRUARY 2006–REVISED MARCH 2013
EMI filter (RSW and CSW) on the SW pin can be used to suppress EMI caused by fast switching. Thesecomponents should be as near as possible to the SW pin to ensure reliable operation. The LP5526 BoostConverter uses pulse-skipping elimination to stabilize the noise spectrum. Even with light load or no load aminimum length current pulse is fed to the inductor. An active load is used to remove the excess charge from theoutput capacitor at very light loads. Active load can be disabled by writing the EN_AUTOLOAD bit low. Disablingactive load will increase slightly the efficiency at light loads, but the downside is that pulse skipping will occur.The Boost Converter should be stopped and set to 8V when there is no load to minimize the currentconsumption.
The topology of the magnetic boost converter is called CPM control, current programmed mode, where theinductor current is measured and controlled with the feedback. The user can program the output voltage of theboost converter. The output voltage control changes the resistor divider in the feedback loop. Figure 5 shows theboost topology with the protection circuitry. Four different protection schemes are implemented:1. Over voltage protection, limits the maximum output voltage
– Keeps the output below breakdown voltage.– Prevents boost operation if battery voltage is much higher than desired output.
2. Over current protection, limits the maximum inductor current– Voltage over switching NMOS is monitored; too high voltages turn the switch off.
3. Feedback break protection. Prevents uncontrolled operation if FB pin gets disconnected.4. Duty cycle limiting, done with digital control.
Figure 5. Boost Converter Topology
Copyright © 2006–2013, Texas Instruments Incorporated Submit Documentation Feedback 9
Product Folder Links: LP5526
LP5526
SNVS431D –FEBRUARY 2006–REVISED MARCH 2013 www.ti.com
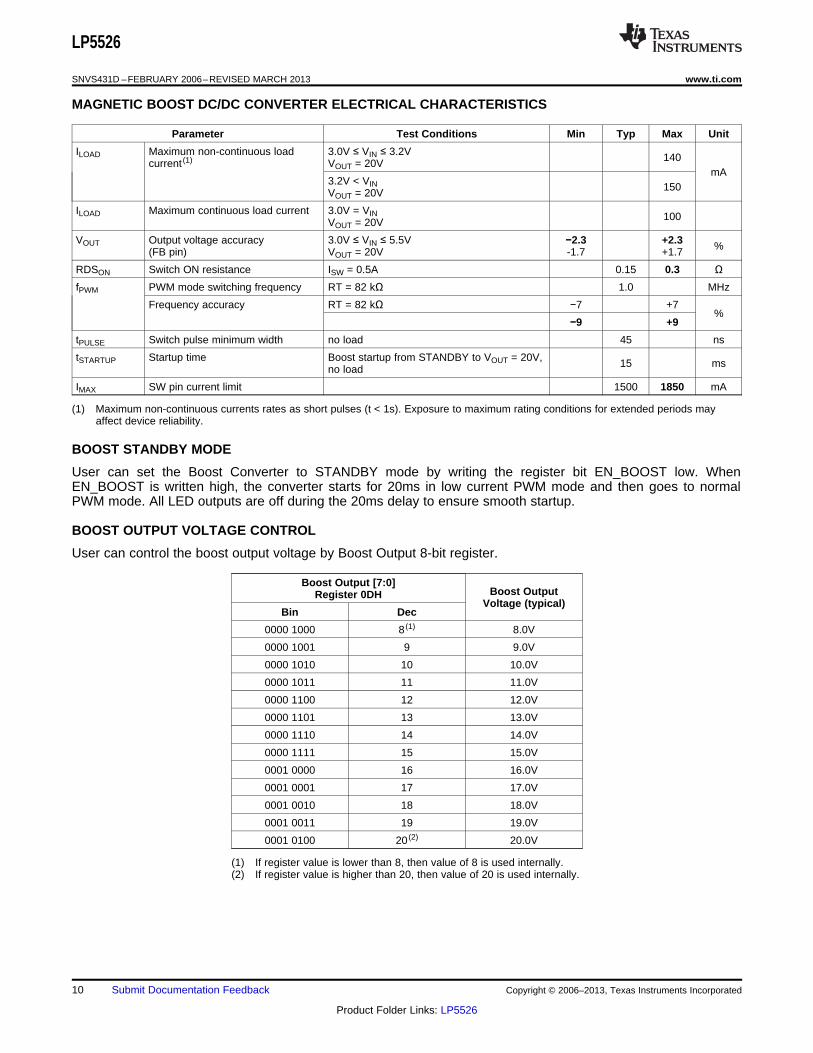
MAGNETIC BOOST DC/DC CONVERTER ELECTRICAL CHARACTERISTICS
Parameter Test Conditions Min Typ Max Unit
ILOAD Maximum non-continuous load 3.0V ≤ VIN ≤ 3.2V 140current (1) VOUT = 20VmA
3.2V < VIN 150VOUT = 20V
ILOAD Maximum continuous load current 3.0V = VIN 100VOUT = 20V
VOUT Output voltage accuracy 3.0V ≤ VIN ≤ 5.5V −2.3 +2.3 %(FB pin) VOUT = 20V -1.7 +1.7
RDSON Switch ON resistance ISW = 0.5A 0.15 0.3 ΩfPWM PWM mode switching frequency RT = 82 kΩ 1.0 MHz
Frequency accuracy RT = 82 kΩ −7 +7%
−9 +9
tPULSE Switch pulse minimum width no load 45 ns
tSTARTUP Startup time Boost startup from STANDBY to VOUT = 20V, 15 msno load
IMAX SW pin current limit 1500 1850 mA
(1) Maximum non-continuous currents rates as short pulses (t < 1s). Exposure to maximum rating conditions for extended periods mayaffect device reliability.
BOOST STANDBY MODE
User can set the Boost Converter to STANDBY mode by writing the register bit EN_BOOST low. WhenEN_BOOST is written high, the converter starts for 20ms in low current PWM mode and then goes to normalPWM mode. All LED outputs are off during the 20ms delay to ensure smooth startup.
BOOST OUTPUT VOLTAGE CONTROL
User can control the boost output voltage by Boost Output 8-bit register.
Boost Output [7:0]Boost OutputRegister 0DH
Voltage (typical)Bin Dec
0000 1000 8 (1) 8.0V
0000 1001 9 9.0V
0000 1010 10 10.0V
0000 1011 11 11.0V
0000 1100 12 12.0V
0000 1101 13 13.0V
0000 1110 14 14.0V
0000 1111 15 15.0V
0001 0000 16 16.0V
0001 0001 17 17.0V
0001 0010 18 18.0V
0001 0011 19 19.0V
0001 0100 20 (2) 20.0V
(1) If register value is lower than 8, then value of 8 is used internally.(2) If register value is higher than 20, then value of 20 is used internally.
10 Submit Documentation Feedback Copyright © 2006–2013, Texas Instruments Incorporated
Product Folder Links: LP5526

120 mA
50 mA
ILOAD = 150 mA
L = TDK SLF6028T-100M1R3
I CO
IL =
900
mA
AV
ER
AG
E20
0 m
A/D
IVV
OU
T =
20
V1
V/D
IVV
SW
ITC
H
10 V
/DIV
VIN = 3.6VControl 8V...20V
LP5526
www.ti.com SNVS431D –FEBRUARY 2006–REVISED MARCH 2013
Boost Output Voltage Control
Figure 6.
Boost Converter Typical Performance CharacteristicsVin = 3.6V, Vout = 20.0V if not otherwise stated
Boost Converter Efficiency Boost Typical Waveforms at 150mA Load
Figure 7. Figure 8.
Copyright © 2006–2013, Texas Instruments Incorporated Submit Documentation Feedback 11
Product Folder Links: LP5526

VO
UT
200
mV
/DIV
I OU
T
50 m
A/D
IV AUTOLOAD OFF
AUTOLOAD ON
VO
UT
200
mV
/DIV
I IN
1 A
/DIV
VIN
50
0 m
V/D
IV
VOUT TARGET VALUE = 20V
ILOAD = 150 mA
VOUT = 8 V
VOUT = 20 V
L = TDK SLF6028T-100M1R3VIN = 3.2 V
LP5526
SNVS431D –FEBRUARY 2006–REVISED MARCH 2013 www.ti.com
Vin = 3.6V, Vout = 20.0V if not otherwise statedBattery Current Boost Output Voltage
vs vs.Voltage Current
Figure 9. Figure 10.
Boost Line Regulation 3.0V - 3.6V, no load Boost Turn On Time with No Load
Figure 11. Figure 12.
Boost Load Transient Response 50mA – 150mA Autoload Effect on Input Current, No Load
Figure 13. Figure 14.
12 Submit Documentation Feedback Copyright © 2006–2013, Texas Instruments Incorporated
Product Folder Links: LP5526

VIN = 3.6 V
VIN = 5.5 V
VIN = 3.0 V
LP5526
www.ti.com SNVS431D –FEBRUARY 2006–REVISED MARCH 2013
Vin = 3.6V, Vout = 20.0V if not otherwise statedBoost Maximum Current
vs.Output Voltage
Figure 15.
Functionality of Color LED Outputs (RLED, GLED, BLED)
LP5526 has one RGB/color LED output, consisting of three individual LED output pins. Output pins can be usedin switch mode or constant current mode. Output mode can be selected with the control register (address 00H)bit CC_SW. If the bit is set high, then RGB outputs are in switch mode, otherwise in constant current mode.These modes are described later in separate chapters.
RGB LED output control can be done in three ways:1. Defining the expected color and brightness with internal PWM in RGB register (address 01H)2. Direct setting each LED ON/OFF via RGB Control register (address 00H)3. External PWM control
BRIGHTNESS CONTROL WITH RGB REGISTER
If the RGB LED output is used by defining the balance and brightness in the RGB register, then one needs to setEN_RGB bit high and RGB_PWM bit high in the Control register (address 00H). RSW, GSW and BSW are usedto enable each LED output, enabled when written high. CC_SW defines the LED output mode. A single registeris used for defining the color and brightness for the RGB LED output. OVL bit selects overlapping/non-overlapping mode. Overlapping mode is selected when OVL = 1.
Table 2. CONTROL REGISTER (00H)
Name Bit Description
RGB_PWM 7 0 = Internal PWM control disabled1 = Internal PWM control enabled
EN_RGB 6 0 = RGB outputs disabled1 = RGB outputs enabled
CC_SW 5 0 = Constant current sink mode1 = Switch mode
RSW 3 0 = RLED disabled1 = RLED enabled
GSW 2 0 = GLED disabled1 = GLED enabled
BSW 1 0 = BLED disabled1 = BLED enabled
RGB REGISTER (01H)
COLOR[3:0] 7:4 Color for RGB LED output
BRIGHT[2:0] 3:1 Brightness control
Copyright © 2006–2013, Texas Instruments Incorporated Submit Documentation Feedback 13
Product Folder Links: LP5526

LP5526
SNVS431D –FEBRUARY 2006–REVISED MARCH 2013 www.ti.com
Table 2. CONTROL REGISTER (00H) (continued)
Name Bit Description
OVL 0 0 = Non-overlapping mode1 = Overlapping mode
Brightness control is logarithmic and is programmed as follows:
Table 3.
Bright[2:0] Brightness [%] Ratio to max brightness
000 0 0
001 1.56 1/64
010 3.12 1/32
011 6.25 1/16
100 12.5 1/8
101 25 1/4
110 50 1/2
111 100 1/1
Table 4.
COLOR (1)[3:0] RED active [%] GREEN active [%] BLUE active [%] RGB COLOR
0000 100 0 0 red
0001 0 100 0 green
0010 0 0 100 blue
0011 50 50 0 yellow
0100 0 50 50 cyan
0101 50 0 50 magenta
0110 33 33 33 white
0111 50 25 25 pink
1000 25 50 25 light green
1001 25 50 25 light blue
1010 25 25 50 orange
1011 75 25 0 deep pink
1100 0 75 25 spring green
1101 25 75 0 lawn green
1110 0 25 75 sky blue
1111 25 0 75 indigo
(1) 16 colors can be selected as follows. Please note that exact color depends on RGB LED current and type. Color setting is valid only innon-overlapping mode.
14 Submit Documentation Feedback Copyright © 2006–2013, Texas Instruments Incorporated
Product Folder Links: LP5526

ON
ON
ON
FRAME 50 Ps/20 kHz
RED
GREEN
BLUE
RGB Ð RED25%
GREEN25%
BLUE50%
ON
ON
ON
FRAME50 és/20 kHz
RED
GREEN
BLUE
LP5526
www.ti.com SNVS431D –FEBRUARY 2006–REVISED MARCH 2013
Overlapping Mode
In overlapping mode the brightness is controlled using PWM duty cycle based control method as Figure 16shows.
Figure 16. Overlapping Mode
Since RGB outputs are on simultaneously, the maximum load peak current is:IMAX = I(RLED)MAX + I(GLED)MAX + I(BLED)MAX (1)
Non-Overlapping Mode
The timing diagram shows the split R, G and B and brightness control effect to split parts. Full brightness is usedin the diagram. If for example ½ brightness is used, the frame is still 50µs, but all LED outputs’ ON time is 50%shorter and at the last 25µs all LED outputs are OFF.
Figure 17. Non-Overlapping Mode
The non-overlapping mode has 16 programmed colors (different R, G and B ratio -> different color). Since the R,G and B are split into non-overlapping slots the output current through the RGB LED can be calculated withfollowing equation:
IAVG=(CR×IR+CG×IG+CB×IB)×B (2)
where
C = Color [%] (see Table 4)
B = Brightness [%] (see Table 3)
Copyright © 2006–2013, Texas Instruments Incorporated Submit Documentation Feedback 15
Product Folder Links: LP5526

LP5526
SNVS431D –FEBRUARY 2006–REVISED MARCH 2013 www.ti.com
LED ON/OFF CONTROL WITH RGB CONTROL REGISTER
Each LED output can be set ON by writing the corresponding bit high in the Control register (00H). RSW controlsRLED, GSW controls GLED and BSW controls BLED output. Note that EN_RGB bit must be high andRGB_PWM bit low. In this mode, the RGB register (01H) does not have any effect. CC_SW bit in Control registerdefines the LED output mode.
Switch Mode / Constant Current Mode
Each RGB LED output can be set to act as a switch or a constant current sink. Selection of mode is done withthe CC_SW bit in the Control Register. If bit is set high, then the switch mode is selected. Default is switch mode.
SWITCH MODE
In switch mode, the RGB LED outputs are low ohmic switches to ground. Resistance is typically 3.2Ω. Externalballast resistors must be used to limit the current through the LED.
CONSTANT CURRENT MODE
In constant current mode, the maximum output current is defined with a single external resistor (RRGB) and themaximum current control register (address 02H).
Table 5. RGB MAX CURRENT REGISTER (02H)
Name Bit Description
IR[1:0] 5:4 RLED maximum current
IG[1:0] 3:2 GLED maximum current
IB[1:0] 1:0 BLED maximum current
Maximum current for each LED output is adjusted with the RGB max current register in following way:
IR[1:0], IG[1:0], IB[1:0] Maximum Current / Output
00 0.25 x IMAX
01 0.50 x IMAX
10 0.75 x IMAX
11 1.00 x IMAX
External ballast resistors are not needed in this mode. The maximum current for all RGB LED drivers is set withRRGB. The equation for calculating the maximum current is:
IMAX = 100 × 1.23V / (RRGB + 50 Ω) (3)
where
IMAX = maximum RGB current in any RGB output (during constant current mode)
1.23V = reference voltage
100 = internal current mirror multiplier
RRGB = resistor value in Ohms
50Ω = Internal resistor in the IRGB input
Table with example resistance values and corresponding output currents:
Maximum Current / Output IMAXRGB Resistor RRGB (kΩ) (mA)
2.4 50.2
2.7 44.7
3.0 40.3
3.3 36.7
3.6 33.7
3.9 31.1.
16 Submit Documentation Feedback Copyright © 2006–2013, Texas Instruments Incorporated
Product Folder Links: LP5526

LP5526
www.ti.com SNVS431D –FEBRUARY 2006–REVISED MARCH 2013
Maximum Current / Output IMAXRGB Resistor RRGB (kΩ) (mA)
4.3 28.3
4.7 25.9
5.1 23.9
5.6 21.8
6.2 19.7
Note that the LED output requires a minimum saturation voltage in order to act as a true constant current sink.The saturation voltage minimum is typically 230mV defined with 10% current drop. If the LED output voltagedrops below 230mV, then the current will decrease significantly.
EXTERNAL PWM CONTROL
The GPIO[0]/PWM pin can be used to control the RGB output brightness or set RGB LEDs on/off. PWM functionfor the pin is selected by writing EN_PWM_PIN high in GPIO control register (address 06H). Note, that EN_RGBbit must be set high. Each LED output can be enabled with RSW, GSW and BSW bits. EN_EXT_R_PWM,EN_EXT_G_PWM and EN_EXT_B_PWM bits are used to select, which LED outputs are controlled with theexternal PWM input. Note that polarity of external PWM control is active high i.e. when pin is in high state, thenLED output is enabled. If RGB_PWM is set low, then each selected LED output is controlled directly with externalPWM input. If RGB_PWM is set high, then internal PWM control is modulated by the external PWM input. Inlatter case, internal PWM control is passed to LED when external PWM input is high.
FLASH LED DRIVING USING RGB DRIVERS
RGB drivers can be connected in parallel and used as a flash LED driver (see Figure 2). Flash LEDs can bepowered through the boost converter. Flash LEDs are controlled basically the same way as RGB LEDscontrolling is previously described. Additional safety mode is introduced for FLASH LED driving to avoidprolonged flash and damage to application. FLASH can be done in 3 different ways:1. Using external PWM control2. Controlling RGB max current register values3. Using Flash mode
Using External PWM control
In this case pre-flash brightness is adjusted by adjusting the pulse width of PWM signal• Enable external PWM pin by writing EN_PWM_PIN bit high• Use EN_EXT_R_PWM, EN_EXT_G_PWM and EN_EXT_B_PWM bits to select, which LED outputs are
controlled by the external PWM control. Output which external PWM control is not selected will be onconstantly regardless of the state of the external PWM pin.
• Enable RGB constant current mode, if external ballast resistors are not used (CC_SW = 0)• Disable internal RGB PWM mode (RGB_PWM = 0)• Write wanted maximum current values for each output to RGB max current register (e.g. 11b for maximum
current)• Enable RGB functions (EN_RGB = 1, RSW= 1, GSW= 1, BSW = 1)• Use external PWM control pin (GPIO[0]/PWM) to introduce pre-flash and flash.
Copyright © 2006–2013, Texas Instruments Incorporated Submit Documentation Feedback 17
Product Folder Links: LP5526

EN_RGB
RGB_PWM
RGB max current reg
XSW
RGB total current
0A
Max current
Pre-flash Flash
Pre-flash current value Max current value
EN_RGB
XSW
RGB_PWM
EN_EXT_X_PWM
EN_PWM_PIN
GPIO[0]/PWM
RGB total current
0A
Max current
Pre-flash Flash
LP5526
SNVS431D –FEBRUARY 2006–REVISED MARCH 2013 www.ti.com
Figure 18. Using External PWM Control for Flash
Controlling RGB Max Current Register Values
In this case pre-flash brightness is adjusted by adjusting the current values in the RGB max current register.Note that in this mode flash control speed and timing depends on the I2C communication speed.• Enable RGB functions and disable PWM mode (EN_RGB = 1, RGB_PWM = 0)• Enable RGB constant current mode (CC_SW = 0)• Write pre-flash values for each output to RGB max current register (e.g. 00b for 25% of maximum current)• Start pre-flash by switching on the LEDs (RSW = 1, GSW = 1, BSW = 1). Pre-flash brightness can be
adjusted also by setting on only one or two LEDs during the pre-flash• Start flash by writing each output maximum current values to RGB max current register• Stop flash by switching off the LEDs (RSW = 0, GSW = 0, BSW = 0)
Figure 19. Controlling RGB Max Current Values to Introduce Flash
18 Submit Documentation Feedback Copyright © 2006–2013, Texas Instruments Incorporated
Product Folder Links: LP5526

LP5526
www.ti.com SNVS431D –FEBRUARY 2006–REVISED MARCH 2013
When RLED, GLED and BLED are connected together as in Figure 1, flash current can be adjusted with 8.33%step in constant current mode by changing RGB max current register values as seen in Table 6. Note that 0%means that appropriate output is turned off by setting RSW, GSW or BSW bit to 0.
Table 6.
Total CurrentIR [%] IG [%] IB [%] [%]
0 0 25 8.33
0 0 50 16.67
0 0 75 25.00
0 0 100 33.33
0 25 100 41.67
0 50 100 50.00
0 75 100 58.33
0 100 100 66.67
25 100 100 75.00
50 100 100 83.33
75 100 100 91.67
100 100 100 100
Using Flash Mode
In this mode Flash is triggered with external PWM pin and pre-flash brightness is adjusted by adjusting the RGBmax current values. After flash pulse flash led will be shut down.• Write the pre-flash current values to RGB max current register• Enable RGB functions and disable PWM mode (EN_RGB = 1, RGB_PWM = 0)• Enable flash mode (EN_FLASH = 1), make sure GPIO[0]/PWM pin is in low state• Enable external PWM pin (EN_PWM_PIN = 1)• Start pre-flash by switching on the LEDs (RSW = 1, GSW = 1, BSW = 1). Pre-flash brightness can be
affected also by setting on only one or two LEDs• Use EN_EXT_R_PWM, EN_EXT_G_PWM and EN_EXT_B_PWM bits to select which LED outputs are used
for flash• Start flash pulse by setting GPIO[0]/PWM pin high and stop it by setting GPIO[0]/PWM pin low• During the flash pulse the LED outputs with EN_EXT_x_PWM bit enabled give out maximum current,
regardless of RGB max current register value or XSW values
NOTEEN_FLASH bit must be set low, and then high again before it is possible to make a newflash pulse.
Copyright © 2006–2013, Texas Instruments Incorporated Submit Documentation Feedback 19
Product Folder Links: LP5526

EN_RGB
RGB_PWM
RGB max current reg
XSW
RGB total current
0A
Max current
Pre-flash Flash
Pre-flash current value
GPIO[0]/PWM
EN_PWM_PIN
LP5526
SNVS431D –FEBRUARY 2006–REVISED MARCH 2013 www.ti.com
Figure 20. Using Flash Mode
FLASH SAFETY TIMER FUNCTION
Flash safety function can be used to prevent damages due to possible overheating when flash or RGB LEDshave been stuck on because of software or user error. Safety function has two operation modes:1. Disabling selected RGB drivers when no writing has been done to the RGB max current register (address
02H) for 1 second2. Disabling selected RGB drivers if the external flash trigger pulse is longer than 1 second
Flash safety function can be individually enabled for all RGB LED drivers (EN_SAFETY_R, EN_SAFETY_G,EN_SAFETY_B). The safety function operation mode depends on the state of EN_FLASH bit.1. EN_FLASH = 0: Safety counter starts counting when at least one of the EN_SAFETY_X bits is enabled.
Safety counter can be cleared by executing an I2C read or write sequence to address 02H. If safety counterreaches one second, the LEDs which have the safety function enabled, are switched off. Also the read-onlybit SAFETY_SET is set high.
2. EN_FLASH = 1: Safety counter starts counting when the external flash trigger pulse starts (GPIO[0]/PWMgoes high) and stops counting when flash pulse stops (GPIO[0]/PWM goes low). If flash pulse is longer thanone second, the LEDs which have the safety function enabled, are switched off. Also the read-only bitSAFETY_SET is set high.
In both cases (EN_FLASH = 0/1) after one second is reached and the LEDs which safety bit has been enabledare switched off, the LED state can be restored by disabling the safety function of the corresponding LED.Counter can be cleared only by disabling all safety bits (EN_SAFETY_R = 0, EN_SAFETY_G = 0,EN_SAFETY_B = 0), I2C read or write sequence to address 02H does not clear the counter when safety functionhas been activated.
20 Submit Documentation Feedback Copyright © 2006–2013, Texas Instruments Incorporated
Product Folder Links: LP5526

+85°C
-40°C
+25°C
RRGB = 2.4 kÖ
VDD = 3.6V
LP5526
www.ti.com SNVS431D –FEBRUARY 2006–REVISED MARCH 2013
RGB LEDs Driver Performance Characteristics
Parameter Test Conditions Min Typ Max Unit
ILEAKAGE RLED, GLED, BLED pin leakage 1 µAcurrent
IMAX(RGB) Maximum recommended sink CC mode 50 mAcurrent (1)
SW mode 60 mA
Accuracy at 50mA CC mode 5 12.5 %
Current mirror ratio CC mode 1:100
RGB current matching error IRGB set to 50mA, CC mode 2 %
RSW Switch resistance SW mode 3.2 ΩƒRGB RGB internal PWM switching Accuracy same as internal clock 20 kHz
frequency frequency accuracy
VSAT Saturation voltage (current drop +25ºC, IRGB set to 50mA 230 350 mV10%) -30ºC 300
+85ºC 430
(1) RGB current should be limited as follows:constant current mode – limited by external RRGB resistorswitch mode – limited by external ballast resistors
Output Current Output Currentvs vs
Pin Voltage (CC Mode) RRGB (CC Mode)
Figure 21. Figure 22.
Backlight Drivers
LP5526 has 2 independent backlight drivers. Both drivers are regulated constant current sinks. LED current forboth LED strings are controlled by the 8-bit current mode DACs with 0.1 mA step. MAIN and SUB LEDs can bealso controlled with one DAC (MAIN) for better matching allowing the use of larger displays having up to 8 whiteLEDs by setting DISPL bit to 1.
Copyright © 2006–2013, Texas Instruments Incorporated Submit Documentation Feedback 21
Product Folder Links: LP5526

main[7:0]
en_main
8-Bit IDAC
en_main_pwm
External PWM&
MAIN
MA
IN
VBOOST
SU
B
VBOOST
main[7:0]
en_main
8-Bit IDAC
en_main_pwm
External PWM&
MAINM
AIN
VBOOST
sub[7:0]
en_sub
8-Bit IDAC
en_sub_pwm
External PWM&
SUB
SU
B
VBOOST
LP5526
SNVS431D –FEBRUARY 2006–REVISED MARCH 2013 www.ti.com
Figure 23. MAIN output for 4 LEDs (DISPL = 0) Figure 24. SUB output for 2 LEDs (DISPL = 0)
Figure 25. MAIN and SUB outputs for 8 LEDs (DISPL = 1)
EXTERNAL PWM CONTROL
The GPIO[0]/PWM pin can be used to control the backlight drivers brightness or set LEDs on/off. External PWMcontrol is enabled by writing 1 to EN_MAIN_PWM and/or EN_SUB_PWM bits in register address 2BH.GPIO[0]/PWM pin is used as external PWM input when EN_PWM_PIN is set high. PWM input is active high, i.e.LED is activated when in high state.
FADE IN / FADE OUT
LP5526 has an automatic fade in and out for main and sub backlight. The fade function is enabled withEN_FADE bit. The slope of the fade curve is set by the SLOPE bit. Fade control for main and sub display is setby FADE_SEL bit.
Recommended fading sequence:1. Set SLOPE2. Set FADE_SEL3. Set EN_FADE = 14. Set EN_MAIN / EN_SUB = 1
22 Submit Documentation Feedback Copyright © 2006–2013, Texas Instruments Incorporated
Product Folder Links: LP5526

LP5526
www.ti.com SNVS431D –FEBRUARY 2006–REVISED MARCH 2013
5. Set target WLED value6. Fading will be done either within 0.65s or 1.3s based on SLOPE selection
Fading times apply to full scale change i.e. from 0 to 100% or vice versa. If the current change does notcorrespond to full scale change, the time will be respectively shorter. See WLED Dimming diagrams for typicalfade times.
Table 7. WLED CONTROL REGISTER (03H) (1)
Name Bit Description
SLOPE 5 FADE execution time:0 = 1.3s (full scale)1 = 0.65s (full scale)
FADE_SEL 4 FADE selection:0 = FADE controls MAIN1 = FADE controls SUB
EN_FADE 3 FADE enable0 = FADE disabled1 = FADE enabled
DISPL 2 Display mode:0 = MAIN and SUB individual control1 = MAIN and SUB controlled with MAIN DAC
EN_MAIN 1 MAIN enable:0 = disable1 = enable
EN_SUB 0 SUB enable:0 = disable1 = enable
(1) If DISPL=1 and FADE_SEL=0 then FADE affects MAIN and SUB.
Adjustment is made with 04H (main current) and with 05H (sub current) registers:
MAIN CURRENT [7:0] Driver Current,SUB CURRENT [7:0] mA (typical)
0000 0000 0
0000 0001 0.1
0000 0010 0.2
0000 0011 0.3
… …
… …
1111 1101 25.3
1111 1110 25.4
1111 1111 25.5
Backlight Driver Electrical Characteristics
Parameter Test Conditions Min Typ Max Unit
IMAX Maximum Sink Current 25.5 30 mA
ILEAKAGE Leakage Current VSUB, MAIN =20V 0.003 1 µA
IMAIN MAIN Current tolerance IMAIN and ISUB set to 12.8mA 11.1 12.8 14.1 mAISUB SUB Current tolerance (80H) %
MatchMAIN-SUB Sink current matching error (1) ISINK=12.8mA, DISPL=1 0.2 %
MatchMAIN-SUB Sink current matching error (1) ISINK=12.8mA, DISPL=0 5 %
VSAT 95% Saturation Voltage ISINK=25.5mA 400 500 mV650
(1) Matching is the maximum difference from the average.
Copyright © 2006–2013, Texas Instruments Incorporated Submit Documentation Feedback 23
Product Folder Links: LP5526

+85°C
-40°C
+25°CC
UR
RE
NT
(%
)
100
0
TIME (s)
0 1.40.2 0.4 0.6 0.8 0.1 1.2
80
60
40
20
FADE OUT
FADE IN
CU
RR
EN
T (
%)
100
0
TIME (s)
0 0.70.1 0.2 0.3 0.4 0.5 0.6
80
60
40
20
FADE OUT
FADE IN
LP5526
SNVS431D –FEBRUARY 2006–REVISED MARCH 2013 www.ti.com
WLED Dimming, SLOPE=0 WLED Dimming, SLOPE=1
Figure 26. Figure 27.
WLED Output Currentvs.
Voltage
Figure 28.
General Purpose I/O Functionality
LP5526 has three general purpose I/O pins: GPIO[0]/PWM, GPIO[1] and GPIO[2]. GPIO[0]/PWM can also beused as a PWM input for the external LED PWM controlling. GPIO bi-directional drivers are operating from theVDDIO supply domain.
Registers for GPIO are as follows:
Table 8. GPIO CONTROL (06H)
Name Bit Description
EN_PWM_PIN 4 Enable PWM pin0 = disable1 = enable
OEN[2:0] 2:0 GPIO pin direction0 = input1 = output
24 Submit Documentation Feedback Copyright © 2006–2013, Texas Instruments Incorporated
Product Folder Links: LP5526

LP5526
www.ti.com SNVS431D –FEBRUARY 2006–REVISED MARCH 2013
Table 9. GPIO DATA (07H)
Name Bit Description
DATA[2:0] 2:0 Data bits
GPIO control register is used to set the direction of each GPIO pin. For example, by setting OEN0 bit high theGPIO[0]/PWM pin acts as a logic output pin with data defined DATA0 in GPIO data register. Note, that theEN_PWM_PIN bit overrides OEN0 state by forcing GPIO[0]/PWM to act as PWM input. GPIO[1] and GPIO[2]pins can be selected to be inputs or outputs, defined by OEN1 and OEN2 bit status. PWM functionality is validonly for GPIO[0]/PWM pin. GPIO data register contains the data of GPIO pins. When output direction is selectedto GPIO pin, then GPIO data register defines the output pin state. When GPIO data register is read, it containsthe state of the pin despite of the pin direction.
Table 10. Logic Interface Characteristics(VDDIO = 1.65V...VDD1,2 unless otherwise noted)
Parameter Test Conditions Min Typ Max Unit
LOGIC INPUT SCL, SDA, GPIO[0:2]
VIL Input low level 0.2×VDDIO V
VIH Input high level 0.8 × VVDDIO
II Logic input current −1.0 1.0 µA
fSCL Clock frequency 400 kHz
LOGIC INPUT NRST
VIL Input low level 0.5 V
VIH Input high level 1.2 V
II Input current -1.0 1.0 µA
tNRST Reset pulse width 10 µs
LOGIC OUTPUT SDA
VOL Output low level ISDA = 3mA 0.3 0.5 V
VOH Output high level ISDA = -3mA VDDIO − VDDIO −0.5 0.3
IL Output leakage current VSDA = 2.8V 1.0 µA
LOGIC OUTPUT GPIO[0:2]
VOL Output low level IGPIO = 2 mA 0.3 0.5 V
IGPIO = -2 mA VDDIO − VDDIO −VOH Output high level V0.5 0.3
IL Output leakage current VGPIO = 2.8V 1.0 µA
I2C Compatible Interface
I2C SIGNALS
The SCL pin is used for the I2C clock and the SDA pin is used for bidirectional data transfer. Both these signalsneed a pull-up resistor according to I2C specification.
I2C DATA VALIDITY
The data on SDA line must be stable during the HIGH period of the clock signal (SCL). In other words, state ofthe data line can only be changed when CLK is LOW.
Copyright © 2006–2013, Texas Instruments Incorporated Submit Documentation Feedback 25
Product Folder Links: LP5526

ADR6Bit7
ADR5bit6
ADR4bit5
ADR3bit4
ADR2bit3
ADR1bit2
ADR0bit1
R/Wbit0
MSB LSB
I2C SLAVE address (chip address)
SDA
SCLS P
START condition STOP condition
SCL
SDA
datachangeallowed
datavalid
datachangeallowed
datavalid
datachangeallowed
LP5526
SNVS431D –FEBRUARY 2006–REVISED MARCH 2013 www.ti.com
Figure 29. I2C Signals: Data Validity
I2C START AND STOP CONDITIONS
START and STOP bits classify the beginning and the end of the I2C session. START condition is defined as SDAsignal transitioning from HIGH to LOW while SCL line is HIGH. STOP condition is defined as the SDAtransitioning from LOW to HIGH while SCL is HIGH. The I2C master always generates START and STOP bits.The I2C bus is considered to be busy after START condition and free after STOP condition. During datatransmission, I2C master can generate repeated START conditions. First START and repeated STARTconditions are equivalent, function-wise.
Figure 30. I2C Start and Stop Conditions
TRANSFERRING DATA
Every byte put on the SDA line must be eight bits long, with the most significant bit (MSB) being transferred first.Each byte of data has to be followed by an acknowledge bit. The acknowledge related clock pulse is generatedby the master. The transmitter releases the SDA line (HIGH) during the acknowledge clock pulse. The receivermust pull down the SDA line during the 9th clock pulse, signifying an acknowledge. A receiver which has beenaddressed must generate an acknowledge after each byte has been received.
After the START condition, the I2C master sends a chip address. This address is seven bits long followed by aneighth bit which is a data direction bit (R/W). The LP5526 address is 59H (101 1001b). For the eighth bit, a “0”indicates a WRITE and a “1” indicates a READ. This means that the first byte is B2H for WRITE and B3H forREAD. The second byte selects the register to which the data will be written. The third byte contains data to writeto the selected register.
Figure 31. I2C Chip Address
Register changes take an effect at the SCL rising edge during the last ACK from slave.
26 Submit Documentation Feedback Copyright © 2006–2013, Texas Instruments Incorporated
Product Folder Links: LP5526

SDA
SCL
1
8
2
3
7 6
5
8
10
4 9
1 7
ack from slave
start msb Chip Address lsb
SCL
ack from slave
w msb Register Add lsb rs r msb DATA lsb stop
ack from slave ack from masterrepeated start data from slave
SDA
start id = 59H = 101 1001b w ack addr = 00H ack rs r ack address 00H data ack stop
msb Chip Address lsb
id = 59H = 101 1001b
start msb Chip Address lsb w ack msb Register Add lsb ack msb DATA lsb ack stop
ack from slave ack from slave ack from slave
SCL
SDA
start id = 59H = 101 1001b w ack addr = 02H ack ackaddress 02H data stop
LP5526
www.ti.com SNVS431D –FEBRUARY 2006–REVISED MARCH 2013
w = write (SDA = “0”)r = read (SDA = “1”)ack = acknowledge (SDA pulled down by either master or slave)rs = repeated startid = 7-bit chip address, 59H (101 1001b) for LP5526.
Figure 32. I2C Write Cycle
When a READ function is to be accomplished, a WRITE function must precede the READ function, as shown inthe Read Cycle waveform.
Figure 33. I2C Read Cycle
Figure 34. I2C Timing Diagram
Copyright © 2006–2013, Texas Instruments Incorporated Submit Documentation Feedback 27
Product Folder Links: LP5526
LP5526
SNVS431D –FEBRUARY 2006–REVISED MARCH 2013 www.ti.com
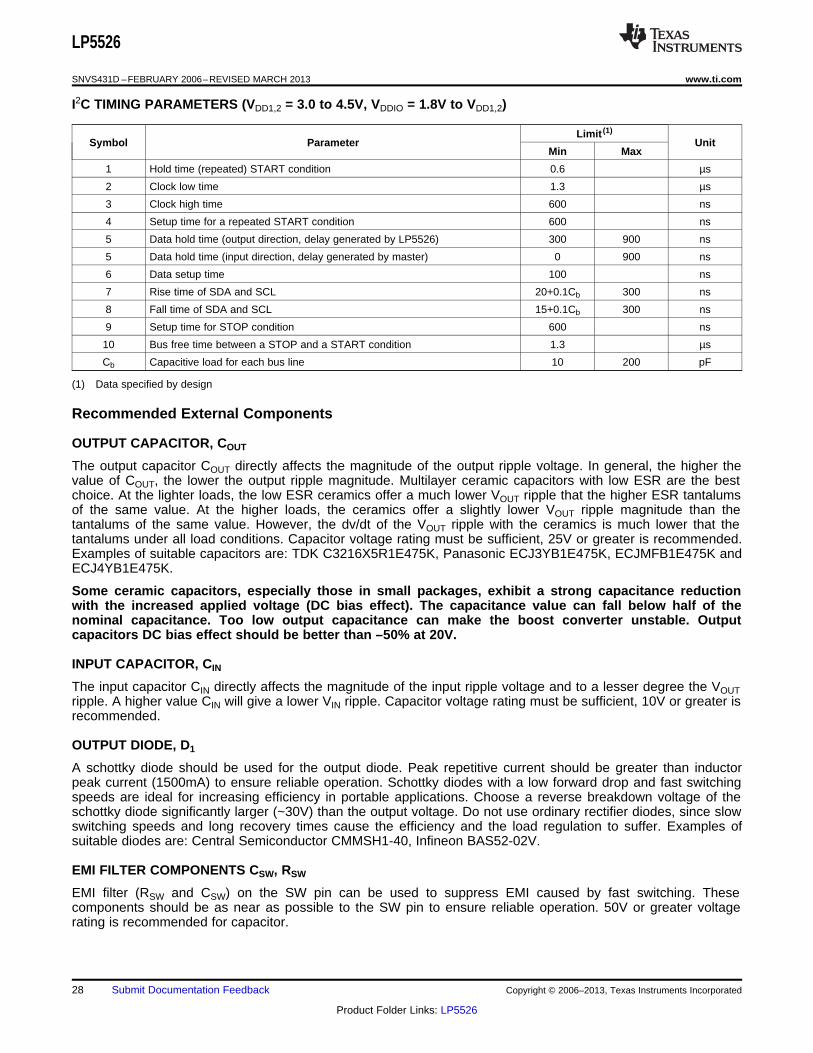
I2C TIMING PARAMETERS (VDD1,2 = 3.0 to 4.5V, VDDIO = 1.8V to VDD1,2)
Limit (1)
Symbol Parameter UnitMin Max
1 Hold time (repeated) START condition 0.6 µs
2 Clock low time 1.3 µs
3 Clock high time 600 ns
4 Setup time for a repeated START condition 600 ns
5 Data hold time (output direction, delay generated by LP5526) 300 900 ns
5 Data hold time (input direction, delay generated by master) 0 900 ns
6 Data setup time 100 ns
7 Rise time of SDA and SCL 20+0.1Cb 300 ns
8 Fall time of SDA and SCL 15+0.1Cb 300 ns
9 Setup time for STOP condition 600 ns
10 Bus free time between a STOP and a START condition 1.3 µs
Cb Capacitive load for each bus line 10 200 pF
(1) Data specified by design
Recommended External Components
OUTPUT CAPACITOR, COUT
The output capacitor COUT directly affects the magnitude of the output ripple voltage. In general, the higher thevalue of COUT, the lower the output ripple magnitude. Multilayer ceramic capacitors with low ESR are the bestchoice. At the lighter loads, the low ESR ceramics offer a much lower VOUT ripple that the higher ESR tantalumsof the same value. At the higher loads, the ceramics offer a slightly lower VOUT ripple magnitude than thetantalums of the same value. However, the dv/dt of the VOUT ripple with the ceramics is much lower that thetantalums under all load conditions. Capacitor voltage rating must be sufficient, 25V or greater is recommended.Examples of suitable capacitors are: TDK C3216X5R1E475K, Panasonic ECJ3YB1E475K, ECJMFB1E475K andECJ4YB1E475K.
Some ceramic capacitors, especially those in small packages, exhibit a strong capacitance reductionwith the increased applied voltage (DC bias effect). The capacitance value can fall below half of thenominal capacitance. Too low output capacitance can make the boost converter unstable. Outputcapacitors DC bias effect should be better than –50% at 20V.
INPUT CAPACITOR, CIN
The input capacitor CIN directly affects the magnitude of the input ripple voltage and to a lesser degree the VOUTripple. A higher value CIN will give a lower VIN ripple. Capacitor voltage rating must be sufficient, 10V or greater isrecommended.
OUTPUT DIODE, D1
A schottky diode should be used for the output diode. Peak repetitive current should be greater than inductorpeak current (1500mA) to ensure reliable operation. Schottky diodes with a low forward drop and fast switchingspeeds are ideal for increasing efficiency in portable applications. Choose a reverse breakdown voltage of theschottky diode significantly larger (~30V) than the output voltage. Do not use ordinary rectifier diodes, since slowswitching speeds and long recovery times cause the efficiency and the load regulation to suffer. Examples ofsuitable diodes are: Central Semiconductor CMMSH1-40, Infineon BAS52-02V.
EMI FILTER COMPONENTS CSW, RSW
EMI filter (RSW and CSW) on the SW pin can be used to suppress EMI caused by fast switching. Thesecomponents should be as near as possible to the SW pin to ensure reliable operation. 50V or greater voltagerating is recommended for capacitor.
28 Submit Documentation Feedback Copyright © 2006–2013, Texas Instruments Incorporated
Product Folder Links: LP5526

LP5526
www.ti.com SNVS431D –FEBRUARY 2006–REVISED MARCH 2013
INDUCTOR, L1
A 10uH shielded inductor is suggested for LP5526 boost converter. The inductor should have a saturationcurrent rating higher than the RMS current it will experience during circuit operation (1300mA). Less than 300mΩESR is suggested for high efficiency and sufficient output current. Open core inductors cause flux linkage withcircuit components and interfere with the normal operation of the circuit. This should be avoided. For highefficiency, choose an inductor with a high frequency core material such as ferrite to reduce the core losses. Tominimize radiated noise, use a toroid, pot core or shielded core inductor. The inductor should be connected tothe SW pin as close to the IC as possible. Examples of suitable inductors are: TDK SLF6028T-100M1R3,Coilcraft MSS6122-103MLB.
LIST OF RECOMMENDED EXTERNAL COMPONENTS
Symbol Symbol explanation Value Unit Type
CVDD C between VDD1,2 and GND 100 nF Ceramic, X7R / X5R
CVDDIO C between VDDIO and GND 100 nF Ceramic, X7R / X5R
CVDDA C between VDDA and GND 1 µF Ceramic, X7R / X5R
C between FB and GND 2 x 4.7 or 1 x µFCeramic, X7R / X5R, tolerance +/-10COUT 10%
Maximum DC bias effect at 20V -50 %
CIN C between battery voltage and GND 10 µF Ceramic, X7R / X5R
L between SW and VBAT 10 µHL1 Shielded inductor, low ESR
Saturation current 1300 mA
CVREF C between VREF and GND 100 nF Ceramic, X7R / X5R
RRGB R between IRGB and GND 2.4 kΩ ±1%
RRT R between IRT and GND 82 kΩ ±1%
Rectifying diode (Vf at maximum load) 0.3-0.5 V
D1 Reverse voltage 30 V Schottky diode
Repetitive peak current 1500 mA
CSW C in EMI filter 100 pF Ceramic, X7R / X5R, 50V
RSW R in EMI filter 390 Ω ±1%
LEDs User Defined
Note: See Application Note AN-1442 "Design and Programming Examples for Lighting Management UnitLP5526" SNVA145 for more information on how to design with LP5526
Copyright © 2006–2013, Texas Instruments Incorporated Submit Documentation Feedback 29
Product Folder Links: LP5526

LP5526
SNVS431D –FEBRUARY 2006–REVISED MARCH 2013 www.ti.com
Table 11. LP5526 Control Register Names and Default Values
ADDR REGISTER D7 D6 D5 D4 D3 D2 D1 D0(HEX)
RGB_PWM EN_RGB CC_SW RSW GSW BSW00 Control Register
0 0 1 0 0 0
COLOR[3:0] BRIGHT[2:0] OVL01 RGB
0 0 0 0 0 0 0 0
SAFETY_SE IR[1:0] IG[1:0] IB[1:0]T02 RGB max current0 0 0 0 0 0 0
SLOPE FADE_SEL EN_FADE DISPL EN_MAIN EN_SUB03 WLED Control
0 0 0 0 0 0
MAIN[7:0]04 MAIN Current
0 0 0 0 0 0 0 0
SUB[7:0]05 SUB Current
0 0 0 0 0 0 0 0
EN_PWM_P OEN[2:0]IN06 GPIO Control0 0 0 0
DATA[2:0]07 GPIO Data
0 0 0
NSTBY EN_BOOST EN_FLASH EN_AUTOLOAD0B Enables
0 0 0 1
BOOST[7:0]0D Boost Output
0 0 0 0 1 0 0 0
EN_SAFET EN_SAFET EN_SAFET EN_EXT_R_ EN_EXT_G_ EN_EXT_B_ EN_MAIN_P EN_SUB_PY_R Y_G Y_B PWM PWM PWM WM WM2B PWM Enable
0 0 0 0 0 0 0 0
LP5526 Register Bit Explanations
Each register is shown with a key indicating the accessibility of the each individual bit, and the initial condition:
Table 12. Register Bit Accessibility and Initial Condition
Key Bit Accessibility
RW Read/write
R Read only
–0,–1 Condition after POR
30 Submit Documentation Feedback Copyright © 2006–2013, Texas Instruments Incorporated
Product Folder Links: LP5526

LP5526
www.ti.com SNVS431D –FEBRUARY 2006–REVISED MARCH 2013
CONTROL REGISTER (00H) – RGB LEDS CONTROL REGISTER
D7 D6 D5 D4 D3 D2 D1 D0
RGB_PWM EN_RGB CC_SW RSW GSW BSW
RW - 0 RW - 0 RW - 1 R - 0 RW - 0 RW - 0 RW - 0 R - 0
0 - Internal RGB PWM control disabledRGB_PWM Bit 7 1 - Internal RGB PWM control enabled
0 – RGB outputs disabledEN_RGB Bit 6 1 – RGB outputs enabled
0 – Constant current sink modeCC_SW Bit 5 1 – Switch mode
0 – RLED disabledRSW Bit 3 1 – RLED enabled
0 – GLED disabledGSW Bit 2 1 – GLED enabled
0 – BLED disabledBSW Bit 1 1 – BLED enabled
RGB (01H) – RGB COLOR AND BRIGHTNESS CONTROL REGISTER
D7 D6 D5 D4 D3 D2 D1 D0
COLOR[3:0] BRIGHT[2:0] OVL
RW - 0 RW - 0 RW - 0 RW - 0 RW - 0 RW - 0 RW - 0 RW - 0
COLOR[3:0] Bits 7-4 PWM color for RGB outputs
BRIGHT[2:0] Bits 3-1 PWM brightness control for RGB outputs
0 – Overlapping mode disabledOVL Bit 0 1 – Overlapping mode enabled
RGB MAX CURRENT (02H) – MAXIMUM RGB CURRENT CONTROL REGISTER
D7 D6 D5 D4 D3 D2 D1 D0
SAFETY_SET IR[1:0] IG[1:0] IB[1:0]
R - 0 R - 0 RW - 0 RW - 0 RW - 0 RW - 0 RW - 0 RW - 0
0 – safety function not activatedSAFETY_SET Bit 7 1 – safety function activated
IR[1:0] Bits 5-4 RLED maximum current
IG[1:0] Bits 3-2 GLED maximum current
IB[1:0] Bits 1-0 BLED maximum current
Table 13. Maximum Current for RGB driver
IR,IG,IB[1:0] Maximum Output Current
00 0.25 × IMAX
01 0.50 × IMAX
10 0.75 × IMAX
11 1.00 × IMAX
Copyright © 2006–2013, Texas Instruments Incorporated Submit Documentation Feedback 31
Product Folder Links: LP5526

LP5526
SNVS431D –FEBRUARY 2006–REVISED MARCH 2013 www.ti.com
WLED CONTROL (03H) – WLED CONTROL REGISTER
D7 D6 D5 D4 D3 D2 D1 D0
SLOPE FADE_SEL EN_FADE DISPL EN_MAIN EN_SUB
R - 0 R - 0 RW - 0 RW - 0 RW - 0 RW - 0 RW - 0 RW - 0
0 – fade execution time 0.65 sec (full scale)SLOPE Bit 5 1 – fade execution time 1.3 sec (full scale)
0 – fade control for MAINFADE_SEL Bit 4 1 – fade control for SUB
0 – automatic fade disabledEN_FADE Bit 3 1 – automatic fade enabled
0 - MAIN and SUB individual controlDISPL Bit 2 1 - MAIN and SUB controlled with MAIN DAC
0 – MAIN output disabledEN_MAIN Bit 1 1 – MAIN output enabled
0 – SUB output disabledEN_SUB Bit 0 1 – SUB output enabled
MAIN CURRENT (04H) – MAIN CURRENT CONTROL REGISTER
D7 D6 D5 D4 D3 D2 D1 D0
MAIN[7:0]
RW - 0 RW - 0 RW - 0 RW - 0 RW - 0 RW - 0 RW - 0 RW - 0
SUB CURRENT (05H) – SUB CURRENT CONTROL REGISTER
D7 D6 D5 D4 D3 D2 D1 D0
SUB[7:0]
RW - 0 RW - 0 RW - 0 RW - 0 RW - 0 RW - 0 RW - 0 RW - 0
Table 14. MAIN, SUB Current Adjustment
MAIN[7:0], SUB[7:0] Typical Driver Current (mA)
0000 0000 0
0000 0001 0.1
0000 0010 0.2
0000 0011 0.3
0000 0100 0.4
… …
1111 1101 25.3
1111 1110 25.4
1111 1111 25.5
GPIO CONTROL (06H) – GPIO CONTROL REGISTER
D7 D6 D5 D4 D3 D2 D1 D0
EN_PWM_PI OEN[2:0]N
R - 0 R - 0 R - 0 RW - 0 R - 0 RW - 0 RW - 0 RW - 0
0 – External PWM pin disabledEN_PWM_PIN Bit 4 1 – External PWM pin enabled
0 – GPIO pin set as a inputOEN[2:0] Bits 2-0 1 – GPIO pin set as a output
32 Submit Documentation Feedback Copyright © 2006–2013, Texas Instruments Incorporated
Product Folder Links: LP5526

LP5526
www.ti.com SNVS431D –FEBRUARY 2006–REVISED MARCH 2013
GPIO DATA (07H) – GPIO DATA REGISTER
D7 D6 D5 D4 D3 D2 D1 D0
DATA[2:0]
R - 0 R - 0 R - 0 R - 0 R - 0 RW - 0 RW - 0 RW - 0
DATA[2:0] Bits 2-0 GPIO data register bits
ENABLES (0BH) – ENABLES REGISTER
D7 D6 D5 D4 D3 D2 D1 D0
NSTBY EN_BOOST EN_FLASH EN_AUTOLOAD
R - 0 RW - 0 RW - 0 R - 0 RW - 0 RW - 1 R - 0 R - 0
0 – LP5526 standby modeNSTBY Bit 6 1 – LP5526 active mode
0 – Boost converter disabledEN_BOOST Bit 5 1 – Boost converter enabled
0 – Flash function disabledEN_FLASH Bit 3 1 – Flash function enabled
0 – Boost active load disabledEN_AUTOLOAD Bit 2 1 – Boost active load enabled
BOOST OUTPUT (0DH) – BOOST OUTPUT VOLTAGE CONTROL REGISTER
D7 D6 D5 D4 D3 D2 D1 D0
BOOST[7:0]
RW - 0 RW - 0 RW - 0 RW - 0 RW - 1 RW - 0 RW - 0 RW - 0
Table 15. BOOST Output Voltage Adjustment
BOOST[7:0] Typical Boost Output Voltage (V)
0000 1000 8.00
0000 1001 9.00
0000 1010 10.00
0000 1011 11.00
0000 1100 12.00
0000 1101 13.00
0000 1110 14.00
0000 1111 15.00
0001 0000 16.00
0001 0001 17.00
0001 0010 18.00
0001 0011 19.00
0001 0100 20.00
Copyright © 2006–2013, Texas Instruments Incorporated Submit Documentation Feedback 33
Product Folder Links: LP5526

LP5526
SNVS431D –FEBRUARY 2006–REVISED MARCH 2013 www.ti.com
PWM ENABLE (2BH) – EXTERNAL PWM CONTROL REGISTER
D7 D6 D5 D4 D3 D2 D1 D0
EN_EXT EN_EXT EN_EXT EN_MAIN EN_SUBEN_SAFETY_R EN_SAFETY_G EN_SAFETY_B R_PWM G_PWM B_PWM PWM PWM
RW - 0 RW - 0 RW - 0 RW - 0 RW - 0 RW - 0 RW - 0 RW - 0
0 – Safety function for RLED disabledEN_SAFETY_R Bit 7 1 – Safety function for RLED enabled
0 – Safety function for GLED disabledEN_SAFETY_G Bit 6 1 – Safety function for GLED enabled
0 – Safety function for BLED disabledEN_SAFETY_B Bit 5 1 – Safety function for BLED enabled
0 – External PWM control for RLED disabledEN_EXT_R_PWM Bit 4 1 – External PWM control for RLED enabled
0 – External PWM control for GLED disabledEN_EXT_G_PWM Bit 3 1 – External PWM control for GLED enabled
0 – External PWM control for BLED disabledEN_EXT_B_PWM Bit 2 1 – External PWM control for BLED enabled
0 – External PWM control for MAIN disabledEN_EXT_MAIN_PWM Bit 1 1 – External PWM control for MAIN enabled
0 – External PWM control for SUB disabledEN_EXT_SUB_PWM Bit 0 1 – External PWM control for SUB enabled
34 Submit Documentation Feedback Copyright © 2006–2013, Texas Instruments Incorporated
Product Folder Links: LP5526

LP5526
www.ti.com SNVS431D –FEBRUARY 2006–REVISED MARCH 2013
REVISION HISTORY
Changes from Revision C (March 2013) to Revision D Page
• Changed layout of National Data Sheet to TI format .......................................................................................................... 34
Copyright © 2006–2013, Texas Instruments Incorporated Submit Documentation Feedback 35
Product Folder Links: LP5526

PACKAGE OPTION ADDENDUM
www.ti.com 8-Oct-2015
Addendum-Page 1
PACKAGING INFORMATION
Orderable Device Status(1)
Package Type PackageDrawing
Pins PackageQty
Eco Plan(2)
Lead/Ball Finish(6)
MSL Peak Temp(3)
Op Temp (°C) Device Marking(4/5)
Samples
LP5526TL/NOPB ACTIVE DSBGA YZR 25 250 Green (RoHS& no Sb/Br)
SNAGCU Level-1-260C-UNLIM -30 to 85 5526
(1) The marketing status values are defined as follows:ACTIVE: Product device recommended for new designs.LIFEBUY: TI has announced that the device will be discontinued, and a lifetime-buy period is in effect.NRND: Not recommended for new designs. Device is in production to support existing customers, but TI does not recommend using this part in a new design.PREVIEW: Device has been announced but is not in production. Samples may or may not be available.OBSOLETE: TI has discontinued the production of the device.
(2) Eco Plan - The planned eco-friendly classification: Pb-Free (RoHS), Pb-Free (RoHS Exempt), or Green (RoHS & no Sb/Br) - please check http://www.ti.com/productcontent for the latest availabilityinformation and additional product content details.TBD: The Pb-Free/Green conversion plan has not been defined.Pb-Free (RoHS): TI's terms "Lead-Free" or "Pb-Free" mean semiconductor products that are compatible with the current RoHS requirements for all 6 substances, including the requirement thatlead not exceed 0.1% by weight in homogeneous materials. Where designed to be soldered at high temperatures, TI Pb-Free products are suitable for use in specified lead-free processes.Pb-Free (RoHS Exempt): This component has a RoHS exemption for either 1) lead-based flip-chip solder bumps used between the die and package, or 2) lead-based die adhesive used betweenthe die and leadframe. The component is otherwise considered Pb-Free (RoHS compatible) as defined above.Green (RoHS & no Sb/Br): TI defines "Green" to mean Pb-Free (RoHS compatible), and free of Bromine (Br) and Antimony (Sb) based flame retardants (Br or Sb do not exceed 0.1% by weightin homogeneous material)
(3) MSL, Peak Temp. - The Moisture Sensitivity Level rating according to the JEDEC industry standard classifications, and peak solder temperature.
(4) There may be additional marking, which relates to the logo, the lot trace code information, or the environmental category on the device.
(5) Multiple Device Markings will be inside parentheses. Only one Device Marking contained in parentheses and separated by a "~" will appear on a device. If a line is indented then it is a continuationof the previous line and the two combined represent the entire Device Marking for that device.
(6) Lead/Ball Finish - Orderable Devices may have multiple material finish options. Finish options are separated by a vertical ruled line. Lead/Ball Finish values may wrap to two lines if the finishvalue exceeds the maximum column width.
Important Information and Disclaimer:The information provided on this page represents TI's knowledge and belief as of the date that it is provided. TI bases its knowledge and belief on informationprovided by third parties, and makes no representation or warranty as to the accuracy of such information. Efforts are underway to better integrate information from third parties. TI has taken andcontinues to take reasonable steps to provide representative and accurate information but may not have conducted destructive testing or chemical analysis on incoming materials and chemicals.TI and TI suppliers consider certain information to be proprietary, and thus CAS numbers and other limited information may not be available for release.
In no event shall TI's liability arising out of such information exceed the total purchase price of the TI part(s) at issue in this document sold by TI to Customer on an annual basis.

PACKAGE OPTION ADDENDUM
www.ti.com 8-Oct-2015
Addendum-Page 2

TAPE AND REEL INFORMATION
*All dimensions are nominal
Device PackageType
PackageDrawing
Pins SPQ ReelDiameter
(mm)
ReelWidth
W1 (mm)
A0(mm)
B0(mm)
K0(mm)
P1(mm)
W(mm)
Pin1Quadrant
LP5526TL/NOPB DSBGA YZR 25 250 178.0 8.4 2.69 2.69 0.76 4.0 8.0 Q1
PACKAGE MATERIALS INFORMATION
www.ti.com 2-Sep-2015
Pack Materials-Page 1

*All dimensions are nominal
Device Package Type Package Drawing Pins SPQ Length (mm) Width (mm) Height (mm)
LP5526TL/NOPB DSBGA YZR 25 250 210.0 185.0 35.0
PACKAGE MATERIALS INFORMATION
www.ti.com 2-Sep-2015
Pack Materials-Page 2

MECHANICAL DATA
YZR0025xxx
www.ti.com
TLA25XXX (Rev D)
0.600±0.075D
E
A. All linear dimensions are in millimeters. Dimensioning and tolerancing per ASME Y14.5M-1994.B. This drawing is subject to change without notice.
NOTES:
4215055/A 12/12
D: Max =
E: Max =
2.562 mm, Min =
2.562 mm, Min =
2.502 mm
2.502 mm

IMPORTANT NOTICE
Texas Instruments Incorporated (TI) reserves the right to make corrections, enhancements, improvements and other changes to itssemiconductor products and services per JESD46, latest issue, and to discontinue any product or service per JESD48, latest issue. Buyersshould obtain the latest relevant information before placing orders and should verify that such information is current and complete.TI’s published terms of sale for semiconductor products (http://www.ti.com/sc/docs/stdterms.htm) apply to the sale of packaged integratedcircuit products that TI has qualified and released to market. Additional terms may apply to the use or sale of other types of TI products andservices.Reproduction of significant portions of TI information in TI data sheets is permissible only if reproduction is without alteration and isaccompanied by all associated warranties, conditions, limitations, and notices. TI is not responsible or liable for such reproduceddocumentation. Information of third parties may be subject to additional restrictions. Resale of TI products or services with statementsdifferent from or beyond the parameters stated by TI for that product or service voids all express and any implied warranties for theassociated TI product or service and is an unfair and deceptive business practice. TI is not responsible or liable for any such statements.Buyers and others who are developing systems that incorporate TI products (collectively, “Designers”) understand and agree that Designersremain responsible for using their independent analysis, evaluation and judgment in designing their applications and that Designers havefull and exclusive responsibility to assure the safety of Designers' applications and compliance of their applications (and of all TI productsused in or for Designers’ applications) with all applicable regulations, laws and other applicable requirements. Designer represents that, withrespect to their applications, Designer has all the necessary expertise to create and implement safeguards that (1) anticipate dangerousconsequences of failures, (2) monitor failures and their consequences, and (3) lessen the likelihood of failures that might cause harm andtake appropriate actions. Designer agrees that prior to using or distributing any applications that include TI products, Designer willthoroughly test such applications and the functionality of such TI products as used in such applications.TI’s provision of technical, application or other design advice, quality characterization, reliability data or other services or information,including, but not limited to, reference designs and materials relating to evaluation modules, (collectively, “TI Resources”) are intended toassist designers who are developing applications that incorporate TI products; by downloading, accessing or using TI Resources in anyway, Designer (individually or, if Designer is acting on behalf of a company, Designer’s company) agrees to use any particular TI Resourcesolely for this purpose and subject to the terms of this Notice.TI’s provision of TI Resources does not expand or otherwise alter TI’s applicable published warranties or warranty disclaimers for TIproducts, and no additional obligations or liabilities arise from TI providing such TI Resources. TI reserves the right to make corrections,enhancements, improvements and other changes to its TI Resources. TI has not conducted any testing other than that specificallydescribed in the published documentation for a particular TI Resource.Designer is authorized to use, copy and modify any individual TI Resource only in connection with the development of applications thatinclude the TI product(s) identified in such TI Resource. NO OTHER LICENSE, EXPRESS OR IMPLIED, BY ESTOPPEL OR OTHERWISETO ANY OTHER TI INTELLECTUAL PROPERTY RIGHT, AND NO LICENSE TO ANY TECHNOLOGY OR INTELLECTUAL PROPERTYRIGHT OF TI OR ANY THIRD PARTY IS GRANTED HEREIN, including but not limited to any patent right, copyright, mask work right, orother intellectual property right relating to any combination, machine, or process in which TI products or services are used. Informationregarding or referencing third-party products or services does not constitute a license to use such products or services, or a warranty orendorsement thereof. Use of TI Resources may require a license from a third party under the patents or other intellectual property of thethird party, or a license from TI under the patents or other intellectual property of TI.TI RESOURCES ARE PROVIDED “AS IS” AND WITH ALL FAULTS. TI DISCLAIMS ALL OTHER WARRANTIES ORREPRESENTATIONS, EXPRESS OR IMPLIED, REGARDING RESOURCES OR USE THEREOF, INCLUDING BUT NOT LIMITED TOACCURACY OR COMPLETENESS, TITLE, ANY EPIDEMIC FAILURE WARRANTY AND ANY IMPLIED WARRANTIES OFMERCHANTABILITY, FITNESS FOR A PARTICULAR PURPOSE, AND NON-INFRINGEMENT OF ANY THIRD PARTY INTELLECTUALPROPERTY RIGHTS. TI SHALL NOT BE LIABLE FOR AND SHALL NOT DEFEND OR INDEMNIFY DESIGNER AGAINST ANY CLAIM,INCLUDING BUT NOT LIMITED TO ANY INFRINGEMENT CLAIM THAT RELATES TO OR IS BASED ON ANY COMBINATION OFPRODUCTS EVEN IF DESCRIBED IN TI RESOURCES OR OTHERWISE. IN NO EVENT SHALL TI BE LIABLE FOR ANY ACTUAL,DIRECT, SPECIAL, COLLATERAL, INDIRECT, PUNITIVE, INCIDENTAL, CONSEQUENTIAL OR EXEMPLARY DAMAGES INCONNECTION WITH OR ARISING OUT OF TI RESOURCES OR USE THEREOF, AND REGARDLESS OF WHETHER TI HAS BEENADVISED OF THE POSSIBILITY OF SUCH DAMAGES.Unless TI has explicitly designated an individual product as meeting the requirements of a particular industry standard (e.g., ISO/TS 16949and ISO 26262), TI is not responsible for any failure to meet such industry standard requirements.Where TI specifically promotes products as facilitating functional safety or as compliant with industry functional safety standards, suchproducts are intended to help enable customers to design and create their own applications that meet applicable functional safety standardsand requirements. Using products in an application does not by itself establish any safety features in the application. Designers mustensure compliance with safety-related requirements and standards applicable to their applications. Designer may not use any TI products inlife-critical medical equipment unless authorized officers of the parties have executed a special contract specifically governing such use.Life-critical medical equipment is medical equipment where failure of such equipment would cause serious bodily injury or death (e.g., lifesupport, pacemakers, defibrillators, heart pumps, neurostimulators, and implantables). Such equipment includes, without limitation, allmedical devices identified by the U.S. Food and Drug Administration as Class III devices and equivalent classifications outside the U.S.TI may expressly designate certain products as completing a particular qualification (e.g., Q100, Military Grade, or Enhanced Product).Designers agree that it has the necessary expertise to select the product with the appropriate qualification designation for their applicationsand that proper product selection is at Designers’ own risk. Designers are solely responsible for compliance with all legal and regulatoryrequirements in connection with such selection.Designer will fully indemnify TI and its representatives against any damages, costs, losses, and/or liabilities arising out of Designer’s non-compliance with the terms and provisions of this Notice.
Mailing Address: Texas Instruments, Post Office Box 655303, Dallas, Texas 75265Copyright © 2017, Texas Instruments Incorporated