lexmark ms/mx series · 2014. 3. 26. · lexmark ms/mx series toner & drum cartridge...
TRANSCRIPT

LEXMARK® MS/MX SERIESTONER & DRUM CARTRIDGE REMANUFACTURING INSTRUCTIONS
LEXMARK MS/MX TONER & DRUM UNIT
© 2014 UniNet Imaging Inc. All trademark names and artwork are property of their respective owners. Product brand names mentioned are intended to show compatibility only.UniNet Imaging does not warrant downloaded information. Unauthorized sale, reproduction or distribution of this article is prohibited. For additional support, please contact [email protected]
www.uninetimaging.com

LEXMARK MS/MX SERIES TONER & DRUM CARTRIDGE REMANUFACTURING INSTRUCTIONS
First introduced in October 2012, the Lexmark MS/MX series is based on a new 35-70 ppm (depending on the model)Lexmark 1200 dpi engine. These engines for the first time in their larger printers use a two-cartridge system. The toner hopper isbasically a tube with a chip. The drum unit contains the drum, waste chamber, developer roller, PCR, wiper blade, and doctor blade.The basic design is similar to the T650 all-in-one cartridge, but is broken into two cartridges.
Due to the speed, fuser characteristics and transfer efficiency, the toner is completely different and unique to this series.When choosing a toner for these machines make sure the transfer efficiency is high so the waste does not overflow. If yourreplacement toner runs at more than 2.5g of waste per 1,000 pages, you run the risk of overflowing the drum unit waste hopper.The smaller drum unit can hold up to 160g of waste toner and the larger drum unit can hold up to 220g. OEM and UniNetX Generation® toners run at less than 1.5g per 1,000 pages.
Lexmark calls their new toner system “Unison." This toner has a lower melting point (thus saving energy on fusing temperatures),a high-transfer efficiency, and a “shake-free” design for the toner cartridge.
REMANUFACTURING THE LEXMARKMS/MX SERIES TONER & DRUM CARTRIDGES
By Mike Josiah and the Technical Staff at UniNet
© 2014 UniNet Imaging Inc. All trademark names and artwork are property of their respective owners. Product brand names mentioned are intended to show compatibility only.UniNet Imaging does not warrant downloaded information. Unauthorized sale, reproduction or distribution of this article is prohibited. For additional support, please contact [email protected]
www.uninetimaging.com

There are quite a few machines based on these engines and also quite a few cartridges. Lexmark made this cartridge as complicatedas they could. Basically there are physically two different toner cartridges and two different drum units. The MS/MX 310, 410,510 and 610 series all use the smaller toner cartridge and drum unit. The MS/MX 710, 711, 810, 812 series all use the largertoner cartridge and drum units.
LEXMARK MS/MX SERIES TONER & DRUM CARTRIDGE REMANUFACTURING INSTRUCTIONS
© 2014 UniNet Imaging Inc. All trademark names and artwork are property of their respective owners. Product brand names mentioned are intended to show compatibility only.UniNet Imaging does not warrant downloaded information. Unauthorized sale, reproduction or distribution of this article is prohibited. For additional support, please contact [email protected]
www.uninetimaging.com

LEXMARK MS/MX SERIES TONER & DRUM CARTRIDGE REMANUFACTURING INSTRUCTIONS
The drum units are either rated for 60,000 pages (small version) or 100,000 pages (large version).
With drum units selling new for as low as $45.00USD, there is not much demand for remanufacturing them. That being said,if you’re selling MICR toner cartridges, you must also supply MICR drum units. Both types of drum units come pre-charged withtoner so you need to know how to take a new drum unit and clean it out. When rebuilding them it’s important to put in 50-60g oftoner so they are pre-charged properly. Because of that we have included the instructions for both cartridges here. The tonercartridges as stated above are basically a tube with a chip. They are very easy to remanufacture, and have very highprofit margins.
MACHINES CURRENTLY AVAILABLE BASED ON THE LEXMARK MS/MX ENGINEMS310 Series: MS310d, 310dn (35 ppm)MS410 Series: MS410d, 410dn (40 ppm)MS510 Series: MS510d, 510dn (45 ppm)MS610 Series: MS610dn, 610de, 610dte, 610dtn (50 ppm)MS710 Series: MS710d, 710dn (50 ppm)MS711 Series: MS711d, 711dn (55 ppm)MS810 Series: MS810d, 810de, 810dtn, 810dtv (55 ppm)MS811 Series: MS811n, 811dn, 811dtn (63 ppm)MS812 Series: MS812de, 812dn, 812dtn (70 ppm)
MX310 Series: MX310d, 310dn (35 ppm)MX410 Series: MX410de (40 ppm)MX510 Series: MX510dhe, 510dthe (45 ppm)MX610 Series: MX610de (50 ppm)MX611 Series: MX611de, 611dhe, 611dte (50 ppm)MX710 Series: MX710de (63 ppm)MX711 Series: MX711de, 711dhe, 711dthe (70 ppm)MX810 Series: MX810de, 810dfe, 810dme, 810dte, 810dtfe, 810dtme, 810dxe, 810dxfe, 810dxme (55 ppm)MX811 Series: MX811de, 811dfe, 811dme, 811dte, 811dtfe, 811dtme, 811dxe, 811dxfe, 811dxme (63 ppm)MX812 Series: MX812de, 812dfe, 812dme, 812dte, 812dtfe, 812dtme, 812dxe, 812dxfe, 812dxme (70 ppm)
© 2014 UniNet Imaging Inc. All trademark names and artwork are property of their respective owners. Product brand names mentioned are intended to show compatibility only.UniNet Imaging does not warrant downloaded information. Unauthorized sale, reproduction or distribution of this article is prohibited. For additional support, please contact [email protected]
www.uninetimaging.com
The toner cartridges feed the toner to the drum units through a small toner port.

LEXMARK MS/MX SERIES TONER & DRUM CARTRIDGE REMANUFACTURING INSTRUCTIONS
The following Lexmark machines (1145 & 3150) were released in 10/2012 but there is little to no information on the Lexmarkwebsite for them. They use the MS/MX style cartridges, but the chips will be different...
LEXMARK 1145 & 3150M1145/XM1145 (45 ppm)M3150/XM3150 (50 ppm)
DELL VERSIONSB2360 Series: B2360d, 2360dnB3460 Series: B3460dn B3465 Series: B3465dnfB5460 Series: B5460dnB5465 series: B5465dnf
SOURCE TECHNOLOGIES VERSIONS (MICR)ST9712ST9720ST9722ST9730
As with all Lexmark cartridges, the "Return Program" cartridges have killer-type chips installed that will not allow the cartridge tobe used again until the chipboard is replaced. The standard cartridges will work without replacing the chips. Replacement chipsare available for the toner cartridges. If drum unit chips are ever developed, it remains to be seen.
Lexmark has also released cartridges for different areas of the world. The Americas are one region; Europe, the Middle East andAfrica are another (EMEA); Latin America, and the Asia Pacific region is the last. As in the past, the only difference in the cartridgesbesides the part numbers is the chips.
In the smaller series, a "starter" or low yield cartridge can be made into a high yield (20K) if the machine accepts that yield.The same goes for the larger toner cartridges. They can be made into a 45K cartridge but the machine must accept that yield.
© 2014 UniNet Imaging Inc. All trademark names and artwork are property of their respective owners. Product brand names mentioned are intended to show compatibility only.UniNet Imaging does not warrant downloaded information. Unauthorized sale, reproduction or distribution of this article is prohibited. For additional support, please contact [email protected]
www.uninetimaging.com

LEXMARK MS/MX SERIES TONER & DRUM CARTRIDGE REMANUFACTURING INSTRUCTIONS
There are quite a few different cartridges, all with different chips. They are all included below in the least confusing way.The Americas Lexmark part numbers for these cartridges are as follows...
SMALL MS SERIES CARTRIDGES“Return Program” 1.5K* toner cartridge: (501) 50F1000 List $64.99** MS 310/410/510/610“Return Program” 5K* toner cartridge: (501H) 50F1H00 List $149.99** MS 310/410/510/610“Return Program” 10K* toner cartridge: 501X) 50F1X00 List $225.99** MS 410/510/610“Return Program” 20K* toner cartridge: 501U) 50F1U00 List $330.99** MS 510/610“Return Program” 60K* drum cartridge: (500Z) 50F0Z00A List $44.99** All 300/400/500/600 MS/MX machines
Standard 5K* cartridge: (500HA) 50F0HA0 List $195.99** MS 310/410/510/610Standard 10K* cartridge: (500XA) 50F0XA0 List $271.99** MS 410/510/610Standard 20K* cartridge: (500UA) 50F0UA0 List $377.99** MS 510/610Standard 60K* drum cartridge: (500ZA) 50F0ZA0 List $70.99** All 300/400/500/600 MS/MX machines
LARGE MS SERIES CARTRIDGES“Return Program” 6K* toner cartridge: (521) 52D1000 List $141.99** MS 710/711/810/811/812“Return Program” 25K* toner cartridge: (521H) 52D1H00 List $419.99** MS 810/811/812“Return Program” 45K* toner cartridge: (521X) 52D1X00 List $519.99** MS 410/510/610“Return Program” 100K* drum cartridge: (520Z) 50F0Z00A List $47.99** All 710/711/810/811/812 MS/MX machines
Standard 25K* cartridge: (520HA) 52D0HA0 List $496.99** MS 810/811/812Standard 45K* cartridge: (520UA) 52D0XA0 List $596.99** MS 811/812Standard 100K* drum cartridge: (520ZA) 52D0ZA0 List $73.99** All 710/711/810/811/812 MS/MX machines
SMALL MX SERIES CARTRIDGES“Return Program” 2.5K* toner cartridge: (601) 60F1000 List $89.99** MX310/410/510/511/610/611“Return Program” 10K* toner cartridge: (601H) 60F1H00 List $149.99** MX310/410/510/511/610/611“Return Program” 20K* toner cartridge: (601X) 60F1X00 List $330.99** MX510/511/610/611“Return Program” 60K* drum cartridge: (500Z) 50F0Z00A List $44.99** All 300/400/500/600 MS/MX machines
Standard 10K* cartridge: (600HA) 60F0HA0 List $294.99** MX310/410Standard 20K* cartridge: (600XA) 60F0XA0 List $399.99** MX510/511/610/611Standard 60K* drum cartridge: (500ZA) 50F0ZA0 List $70.99** All 300/400/500/600 MS/MX machines
LARGE MX SERIES CARTRIDGES“Return Program” 6K* toner cartridge: (621) 62D1000 List $141.99** MX710/711/810/811/812“Return Program” 25K* toner cartridge: (621H) 62D1H00 List $331.99** MX710/711/810/811/812“Return Program” 45K* toner cartridge: (621X) 62D1X00 List $519.99** MX711/810/811/812“Return Program” 100K* drum cartridge: (520Z) 50F0Z00A List $47.99** All 710/711/810/811/812 MS/MX machines
Standard 25K* cartridge: (620HA) 62D0HA0 List $409.99** MX710Standard 45K* cartridge: (620XA) 62D0XA0 List $596.99** MX711/810/811/812Standard 100K* drum cartridge: (520ZA) 52D0ZA0 List $73.99** All 710/711/810/811/812 MS/MX machines
M1145/XM1145 toner: 24B6035; 16K List $184.63M3150/XM3150 toner: 24B6186; 16K List $190.95M1145/M3150 drum unit: 24B6040; 60K List $94.95
*Yield based on ISO/IEC 19752. **List prices (in U.S. American Dollars) current as of March 2014.
© 2014 UniNet Imaging Inc. All trademark names and artwork are property of their respective owners. Product brand names mentioned are intended to show compatibility only.UniNet Imaging does not warrant downloaded information. Unauthorized sale, reproduction or distribution of this article is prohibited. For additional support, please contact [email protected]
www.uninetimaging.com

LEXMARK MS/MX SERIES TONER & DRUM CARTRIDGE REMANUFACTURING INSTRUCTIONS
As you can see there are quite a few cartridges out there for these machines. Thankfully though as stated above there are only twophysically different toner cartridges (small and large) and two physically different drum units (small and large). What you need toknow is which machine your cartridge is going to be used in, and the required yield. By knowing that, you can choose the correctchip and toner load.
REQUIRED TOOLS1. Toner approved vacuum2. Small screwdriver (common style)3. Phillips head screwdriver (#1)4. Needle-nose pliers
REQUIRED SUPPLIES1. Replacement Toner for Lexmark MS (use correct load for your chip)2. Replacement Toner cartridge chip3. Drum padding powder4. Cotton Swabs5. Isopropyl Alcohol6. Cotton Pads
NOTE: For the purposes of these instructions we have used the small versions of the toner and drum cartridges. The larger versionsare slightly different physically, but the same steps apply.
© 2014 UniNet Imaging Inc. All trademark names and artwork are property of their respective owners. Product brand names mentioned are intended to show compatibility only.UniNet Imaging does not warrant downloaded information. Unauthorized sale, reproduction or distribution of this article is prohibited. For additional support, please contact [email protected]
www.uninetimaging.com

TONER CARTRIDGE INSTRUCTIONS
1. Remove the three screws on the right (gear) side end cap.
Remove the end cap.
LEXMARK MS/MX SERIES TONER & DRUM CARTRIDGE REMANUFACTURING INSTRUCTIONS
© 2014 UniNet Imaging Inc. All trademark names and artwork are property of their respective owners. Product brand names mentioned are intended to show compatibility only.UniNet Imaging does not warrant downloaded information. Unauthorized sale, reproduction or distribution of this article is prohibited. For additional support, please contact [email protected]
www.uninetimaging.com

2. Remove the fill plug and clean out all remaining toner fromthe hopper. Be careful not to disturb the toner port mechanism.
3. For the large toner cartridge only: remove the three screws and end cap on the opposite side.
LEXMARK MS/MX SERIES TONER & DRUM CARTRIDGE REMANUFACTURING INSTRUCTIONS
© 2014 UniNet Imaging Inc. All trademark names and artwork are property of their respective owners. Product brand names mentioned are intended to show compatibility only.UniNet Imaging does not warrant downloaded information. Unauthorized sale, reproduction or distribution of this article is prohibited. For additional support, please contact [email protected]
www.uninetimaging.com
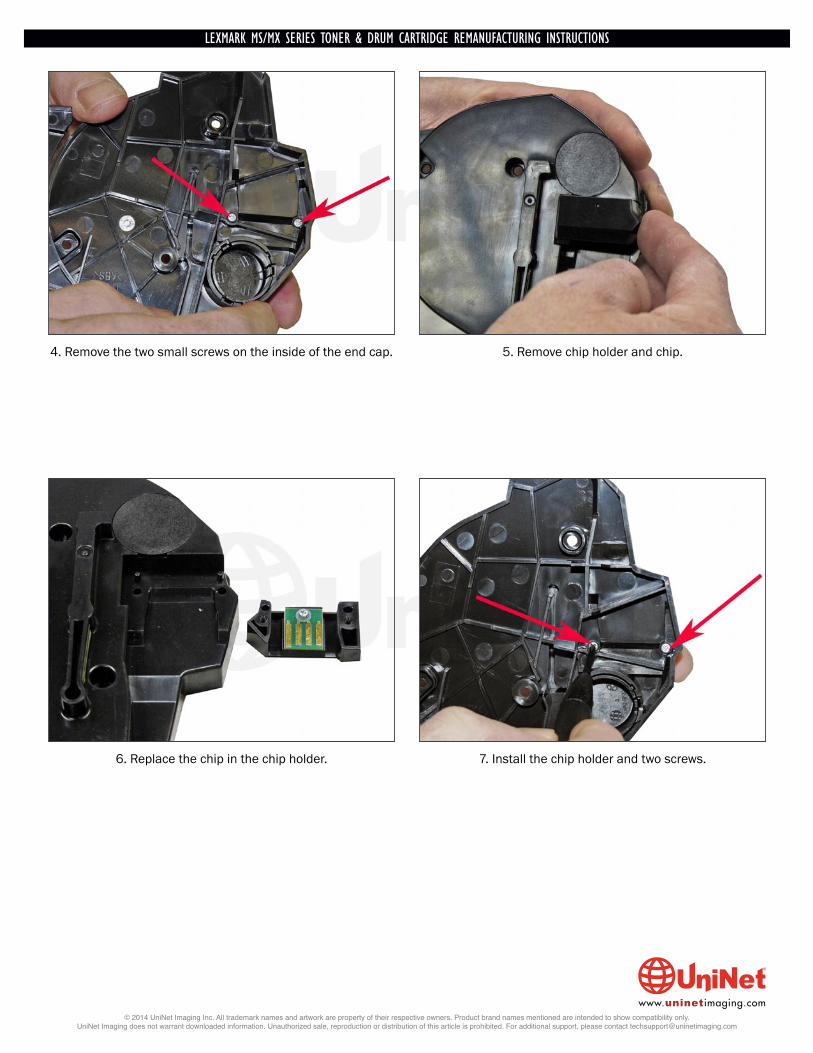
4. Remove the two small screws on the inside of the end cap. 5. Remove chip holder and chip.
6. Replace the chip in the chip holder. 7. Install the chip holder and two screws.
LEXMARK MS/MX SERIES TONER & DRUM CARTRIDGE REMANUFACTURING INSTRUCTIONS
© 2014 UniNet Imaging Inc. All trademark names and artwork are property of their respective owners. Product brand names mentioned are intended to show compatibility only.UniNet Imaging does not warrant downloaded information. Unauthorized sale, reproduction or distribution of this article is prohibited. For additional support, please contact [email protected]
www.uninetimaging.com

8. On the large cartridge: install the chip, end cap, and threescrews.
9. Fill the hopper with the appropriate toner load to match thechip you installed. Replace the fill plug.
10. Install the end cap and three screws.
LEXMARK MS/MX SERIES TONER & DRUM CARTRIDGE REMANUFACTURING INSTRUCTIONS
© 2014 UniNet Imaging Inc. All trademark names and artwork are property of their respective owners. Product brand names mentioned are intended to show compatibility only.UniNet Imaging does not warrant downloaded information. Unauthorized sale, reproduction or distribution of this article is prohibited. For additional support, please contact [email protected]
www.uninetimaging.com

OPC (DRUM) CARTRIDGE INSTRUCTIONS
LEXMARK MS/MX SERIES TONER & DRUM CARTRIDGE REMANUFACTURING INSTRUCTIONS
1. Remove the two screws from both sides of the handle.
© 2014 UniNet Imaging Inc. All trademark names and artwork are property of their respective owners. Product brand names mentioned are intended to show compatibility only.UniNet Imaging does not warrant downloaded information. Unauthorized sale, reproduction or distribution of this article is prohibited. For additional support, please contact [email protected]
www.uninetimaging.com

2. Pull the edge of the frame out slightly and removethe handle.
3. Remove the developer assembly.
4. With a small Phillips jeweler’s screwdriver, remove the drumaxle pin screw.
5. Remove the axle pin.
LEXMARK MS/MX SERIES TONER & DRUM CARTRIDGE REMANUFACTURING INSTRUCTIONS
© 2014 UniNet Imaging Inc. All trademark names and artwork are property of their respective owners. Product brand names mentioned are intended to show compatibility only.UniNet Imaging does not warrant downloaded information. Unauthorized sale, reproduction or distribution of this article is prohibited. For additional support, please contact [email protected]
www.uninetimaging.com

7. Remove the drum.
LEXMARK MS/MX SERIES TONER & DRUM CARTRIDGE REMANUFACTURING INSTRUCTIONS
© 2014 UniNet Imaging Inc. All trademark names and artwork are property of their respective owners. Product brand names mentioned are intended to show compatibility only.UniNet Imaging does not warrant downloaded information. Unauthorized sale, reproduction or distribution of this article is prohibited. For additional support, please contact [email protected]
www.uninetimaging.com
6. With a small pair of needle nose pliers, turn the locking ring until loose.
Pry the drive gear and ring from the drum axle shaft.

8. Remove the PCR and both PCR holders.
9. Remove the two screws and the wiper blade.
Clean out any toner from the waste chamber.
10. Clean the wiper blade sealing foam. Make sure the foam isnot damaged during cleaning and that it is positioned in itsproper location when done.
LEXMARK MS/MX SERIES TONER & DRUM CARTRIDGE REMANUFACTURING INSTRUCTIONS
© 2014 UniNet Imaging Inc. All trademark names and artwork are property of their respective owners. Product brand names mentioned are intended to show compatibility only.UniNet Imaging does not warrant downloaded information. Unauthorized sale, reproduction or distribution of this article is prohibited. For additional support, please contact [email protected]
www.uninetimaging.com

11. Pad the new wiper blade with your preferredwiper blade lubricant. Replace the blade and two screws intothe cartridge.
12. Clean the PCR.
Install the two PCR holders, and then install the PCR.
LEXMARK MS/MX SERIES TONER & DRUM CARTRIDGE REMANUFACTURING INSTRUCTIONS
© 2014 UniNet Imaging Inc. All trademark names and artwork are property of their respective owners. Product brand names mentioned are intended to show compatibility only.UniNet Imaging does not warrant downloaded information. Unauthorized sale, reproduction or distribution of this article is prohibited. For additional support, please contact [email protected]
www.uninetimaging.com

13. Install the cleaned drum.
Place the spring on the drum axle so that it fits into the slot.
14. Press the locking ring onto the drum shaft and turn to lock. 15. Install the drum drive gear.
LEXMARK MS/MX SERIES TONER & DRUM CARTRIDGE REMANUFACTURING INSTRUCTIONS
© 2014 UniNet Imaging Inc. All trademark names and artwork are property of their respective owners. Product brand names mentioned are intended to show compatibility only.UniNet Imaging does not warrant downloaded information. Unauthorized sale, reproduction or distribution of this article is prohibited. For additional support, please contact [email protected]
www.uninetimaging.com

16. Install the drum axle pin and screw.
LEXMARK MS/MX SERIES TONER & DRUM CARTRIDGE REMANUFACTURING INSTRUCTIONS
© 2014 UniNet Imaging Inc. All trademark names and artwork are property of their respective owners. Product brand names mentioned are intended to show compatibility only.UniNet Imaging does not warrant downloaded information. Unauthorized sale, reproduction or distribution of this article is prohibited. For additional support, please contact [email protected]
www.uninetimaging.com
17. On the developer unit, grasp the keyed shaft of the developer roller with a pair of needle nose pliers.
Turn the opposite-side white gear, so that it unlocks. Remove the gear.

18. Turn up the lock on the gear side of the developer roller. 19. Remove the developer roller.
LEXMARK MS/MX SERIES TONER & DRUM CARTRIDGE REMANUFACTURING INSTRUCTIONS
20. Using a size T-10 Torx screwdriver, remove the four screws from the doctor blade.
© 2014 UniNet Imaging Inc. All trademark names and artwork are property of their respective owners. Product brand names mentioned are intended to show compatibility only.UniNet Imaging does not warrant downloaded information. Unauthorized sale, reproduction or distribution of this article is prohibited. For additional support, please contact [email protected]
www.uninetimaging.com

22. Press the fill plug out from the inside. Make sure allremaining toner has been removed from the chamber.
LEXMARK MS/MX SERIES TONER & DRUM CARTRIDGE REMANUFACTURING INSTRUCTIONS
© 2014 UniNet Imaging Inc. All trademark names and artwork are property of their respective owners. Product brand names mentioned are intended to show compatibility only.UniNet Imaging does not warrant downloaded information. Unauthorized sale, reproduction or distribution of this article is prohibited. For additional support, please contact [email protected]
www.uninetimaging.com
21. Remove the doctor blade.
Clean out the toner from the supply chamber and feed roller.
Be careful not to damage the feed roller or the two doctor blade contacts!
NOTE: Once clean, you can see how the toner is transportedfrom the small feed hole through the entire developer unit.There is an auger system and mixing paddles that movethe toner. If you want to see them work, hold the chamber sothat the gears are on the left side. Turn the large white geartowards you.

23. Install the doctor blade and the four Torx screws. Make sure the contact on the right side (non-gear) is on top of the doctorblade, is screwed in place, and is making contact with the doctor blade.
24. Clean the developer roller with a dedicated developer rollercleaner. (If used) install the developer roller, keyed end towardsthe gear side of the chamber. Turn the locking arm until it locks.
25. Press on the large white gear, using pliers on the oppositeside of the developer roller. Turn the gear until locked.
LEXMARK MS/MX SERIES TONER & DRUM CARTRIDGE REMANUFACTURING INSTRUCTIONS
© 2014 UniNet Imaging Inc. All trademark names and artwork are property of their respective owners. Product brand names mentioned are intended to show compatibility only.UniNet Imaging does not warrant downloaded information. Unauthorized sale, reproduction or distribution of this article is prohibited. For additional support, please contact [email protected]
www.uninetimaging.com

26. Fill the hopper with 50g of new replacement toner and re-place the fill plug. If you are converting the drum unit to MICR,make sure you use the same MICR toner you are using for thetoner cartridge!
LEXMARK MS/MX SERIES TONER & DRUM CARTRIDGE REMANUFACTURING INSTRUCTIONS
© 2014 UniNet Imaging Inc. All trademark names and artwork are property of their respective owners. Product brand names mentioned are intended to show compatibility only.UniNet Imaging does not warrant downloaded information. Unauthorized sale, reproduction or distribution of this article is prohibited. For additional support, please contact [email protected]
www.uninetimaging.com
27. Hold the waste chamber walls out slightly and drop in the developer assembly.
Make sure the gears and bushings all fit in their slots properly.

28. Snap in the left side of the handle and then the right side.
Make sure the tabs lock!
LEXMARK MS/MX SERIES TONER & DRUM CARTRIDGE REMANUFACTURING INSTRUCTIONS
29. Install the screws on each side of the handle.
© 2014 UniNet Imaging Inc. All trademark names and artwork are property of their respective owners. Product brand names mentioned are intended to show compatibility only.UniNet Imaging does not warrant downloaded information. Unauthorized sale, reproduction or distribution of this article is prohibited. For additional support, please contact [email protected]
www.uninetimaging.com

LEXMARK MS/MX SERIES TONER & DRUM CARTRIDGE REMANUFACTURING INSTRUCTIONS
CARTRIDGE TROUBLESHOOTINGMS810 Cartridge Repetitive Defect Chart:OPC drum: 96.8 mmDeveloper roller: 47.8 mmPCR: 28.5 mmUpper fuser roller: 95.2 mm Lower fuser roller: 94.25 mm
MS310 Cartridge Repetitive Defect Chart:OPC drum: 97 mmDeveloper roller: 47 mmPCR: 38 mmUpper fuser roller: 80 mmLower fuser roller: 80 mm
Machine Error Codes:Most of the error messages appear to be in text, and do not need an explanation. No numeric messages are listed in the userguide except for the following...
42.xy = Cartridge region mismatchThe X = the printer region, and the Y = the cartridge region. Both must match each other.
Region Codes (see text at beginning of article):0 = Global1 = USA, Canada2 = European economic Area (EEA) Switzerland region3 = Asia Pacific, Australia, New Zealand region4 = Latin America5 = Africa, Middle East, rest of Europe9 = Invalid region
TAKING TEST PRINTSPrinter Menu:1. Press the “MENU” key 2. Press the DOWN ARROW until “REPORTS” Shows on the display3. Press the “Select” button” 4. Press the DOWN ARROW until the check mark is next to the page you wish to print 5. Press the “Select” button”6. These pages include:
A. Menu Settings pageB. Device statisticsC. Network Setup pageD. Profiles ListE. Print FontsF. Print DirectoryG. Asset report
© 2014 UniNet Imaging Inc. All trademark names and artwork are property of their respective owners. Product brand names mentioned are intended to show compatibility only.UniNet Imaging does not warrant downloaded information. Unauthorized sale, reproduction or distribution of this article is prohibited. For additional support, please contact [email protected]
www.uninetimaging.com