lexisnexis® coplogic™ solutions lexisnexis® command center
TRANSCRIPT
LexisNexis® Coplogic™ Solutions
LexisNexis® Command Center
User Guide
GLEH0008 – October 2016
Command Center User Guide GLEH0008 – October 2016
2
The recipient of this material (hereinafter "the Material") acknowledges that it contains confidential and proprietary data the disclosure to, or use of which by, third parties will be damaging to LexisNexis® Risk Solutions and its affiliated companies (hereinafter "LexisNexis"). Therefore, recipient agrees to hold the Material in strictest confidence, not to make use of it other than for the purpose for which it is being provided, to release it only to employees requiring such information, and not to release or disclose it to any other party. Upon request, recipient will return the Material together with all copies and modifications, if any.
LexisNexis shall not be liable for technical or editorial errors or omissions contained herein. The information in this publication is subject to change without notice and is provided “as-is” without a warranty of any kind. Nothing herein should be construed as constituting a warranty, as any applicable warranty is exclusively contained in your signed agreement with LexisNexis. All names in the text, or on the sample reports and screens shown in this document, are of fictitious persons and entities. Any similarity to the name of any real person, address, school, business or other entity is purely coincidental.
Due to the nature of the origin of public record information, the public records and commercially available data sources used in reports may contain errors. Source data is sometimes reported or entered inaccurately, processed poorly or incorrectly, and is generally not free from defect. This product or service aggregates and reports data, as provided by the public records and commercially available data sources, and is not the source of the data, nor is it a comprehensive compilation of the data. Before relying on any data, it should be independently verified.
The Command Center services are not provided by “consumer reporting agencies,” as that term is defined in the Fair Credit Reporting Act (15 U.S.C. § 1681, et seq.) (“FCRA”) and do not constitute “consumer reports,” as that term is defined in the FCRA. Accordingly, the Command Center service may not be used in whole or in part as a factor in determining eligibility for credit, insurance, employment or another purpose in connection with which a consumer report may be used under the FCRA.
LexisNexis and the Knowledge Burst logo are registered trademarks of Reed Elsevier Properties Inc., used under license. Coplogic is a trademark of Coplogic Inc. Other products and services mentioned in this document may be trademarks or registered trademarks of their respective companies.
Copyright © 2016 LexisNexis.
Command Center User Guide 3 GLEH0008 – October 2016
Contents
Introduction ............................................................................................................................................ 5 Important note regarding use of reports obtained through LexisNexis Command Center ........................... 5
Getting Started ........................................................................................................................................ 6 Sign-in for New Users ..................................................................................................................................... 7 Unsuccessful Sign-in Attempts ....................................................................................................................... 8 Forgotten Passwords ...................................................................................................................................... 9 Signing Out ..................................................................................................................................................... 9
The Home Page ...................................................................................................................................... 10
The Menu Bar ........................................................................................................................................ 11
Finding a Report..................................................................................................................................... 13 Initiating a Report Search ............................................................................................................................. 13 Results View ................................................................................................................................................. 14
Uploading Reports and Images ............................................................................................................... 15 Selecting Files to Upload .............................................................................................................................. 15 Combining Files Before Upload .................................................................................................................... 16 Deleting Selected Files Before Upload ......................................................................................................... 17 Uploading Files ............................................................................................................................................. 18 Viewing an Uploaded File ............................................................................................................................. 18 Deleting an Uploaded File ............................................................................................................................ 18
Managing Photos ................................................................................................................................... 19 Uploading Photos ......................................................................................................................................... 19
Uploading a Photo from the Find Report page ......................................................................................... 19
Uploading a Photo from the Uploaded Files page..................................................................................... 20
Viewing a Photo ........................................................................................................................................... 21
People Searches ..................................................................................................................................... 22 Initiating a People Search ............................................................................................................................. 22 Results View ................................................................................................................................................. 23
Analytics ................................................................................................................................................ 24 Generating an Analytical Report .................................................................................................................. 24 Viewing an Analytical Report ....................................................................................................................... 27 Viewing or Saving an Analytical Report as a PDF ......................................................................................... 29 Viewing or Saving an Analytical Report as a Spreadsheet ........................................................................... 30
Using Alerts ........................................................................................................................................... 31 Creating an Alert .......................................................................................................................................... 31 Managing Alerts ........................................................................................................................................... 32
Desk Officer Reporting System (DORS).................................................................................................... 34
iyeTek .................................................................................................................................................... 35
Changing Your User Settings ................................................................................................................... 36 Setting Your Security Questions ................................................................................................................... 36 Changing Your Password .............................................................................................................................. 37 Changing Your Contact Information ............................................................................................................. 38
Command Center User Guide 4 GLEH0008 – October 2016
User Administration ............................................................................................................................... 39 Adding a New User ....................................................................................................................................... 40 Viewing or Editing a User Profile .................................................................................................................. 41 Cloning a User Profile ................................................................................................................................... 42 Resetting a User Password ........................................................................................................................... 43 Unlocking a User Account ............................................................................................................................ 44 Deactivating/Reactivating a User Account ................................................................................................... 46 Deleting a User ............................................................................................................................................. 47
Appendix – User Group Definitions ......................................................................................................... 48
Command Center User Guide 5 GLEH0008 – October 2016
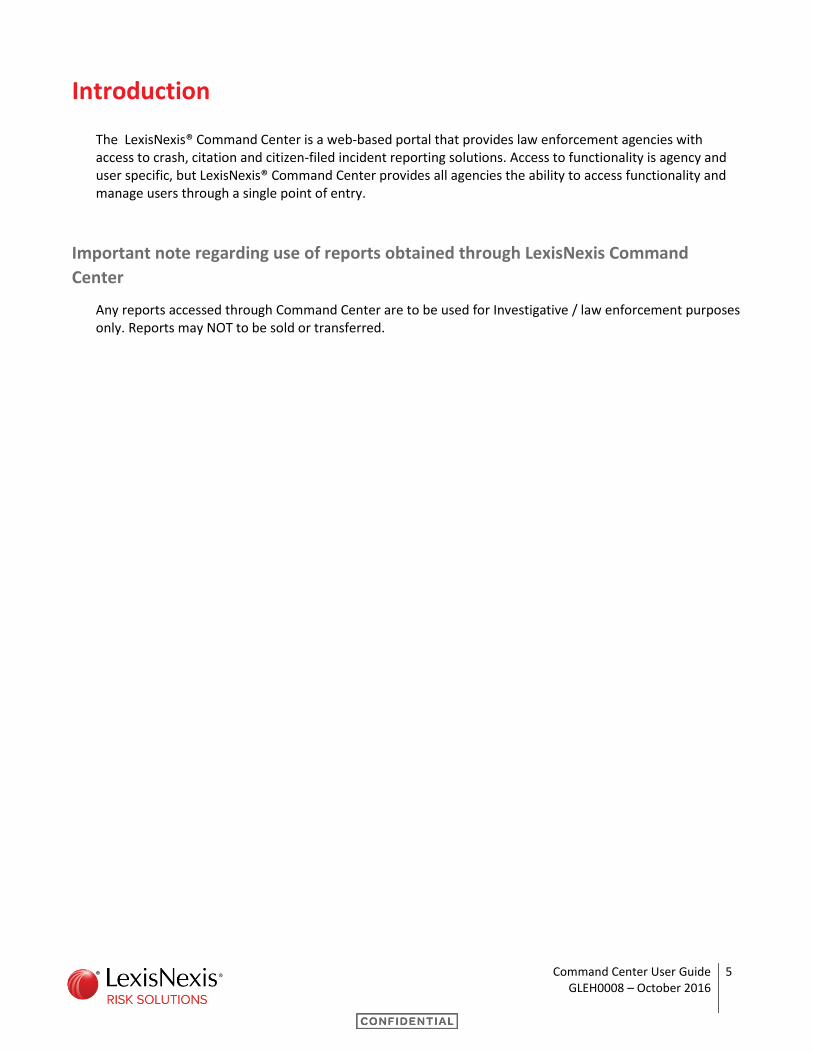
Introduction
The LexisNexis® Command Center is a web-based portal that provides law enforcement agencies with access to crash, citation and citizen-filed incident reporting solutions. Access to functionality is agency and user specific, but LexisNexis® Command Center provides all agencies the ability to access functionality and manage users through a single point of entry.
Important note regarding use of reports obtained through LexisNexis Command
Center
Any reports accessed through Command Center are to be used for Investigative / law enforcement purposes only. Reports may NOT to be sold or transferred.
Command Center User Guide 6 GLEH0008 – October 2016
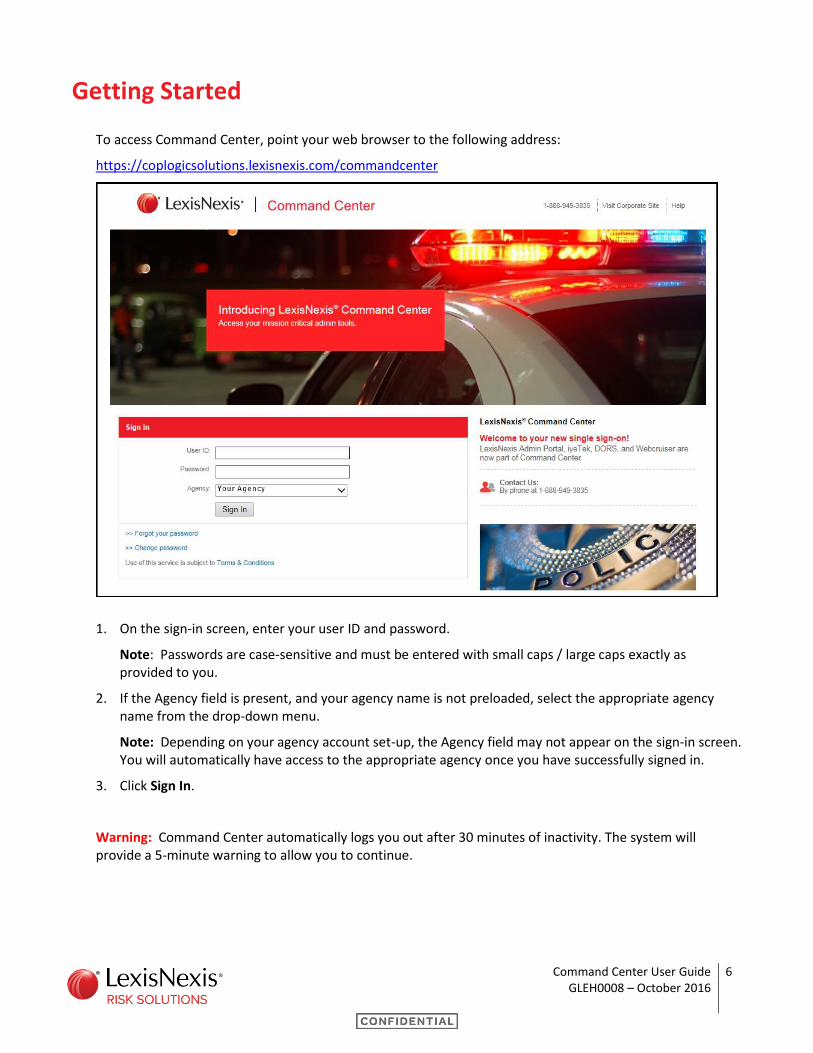
Getting Started
To access Command Center, point your web browser to the following address:
https://coplogicsolutions.lexisnexis.com/commandcenter
1. On the sign-in screen, enter your user ID and password.
Note: Passwords are case-sensitive and must be entered with small caps / large caps exactly as provided to you.
2. If the Agency field is present, and your agency name is not preloaded, select the appropriate agency name from the drop-down menu.
Note: Depending on your agency account set-up, the Agency field may not appear on the sign-in screen. You will automatically have access to the appropriate agency once you have successfully signed in.
3. Click Sign In.
Warning: Command Center automatically logs you out after 30 minutes of inactivity. The system will provide a 5-minute warning to allow you to continue.
Command Center User Guide 7 GLEH0008 – October 2016
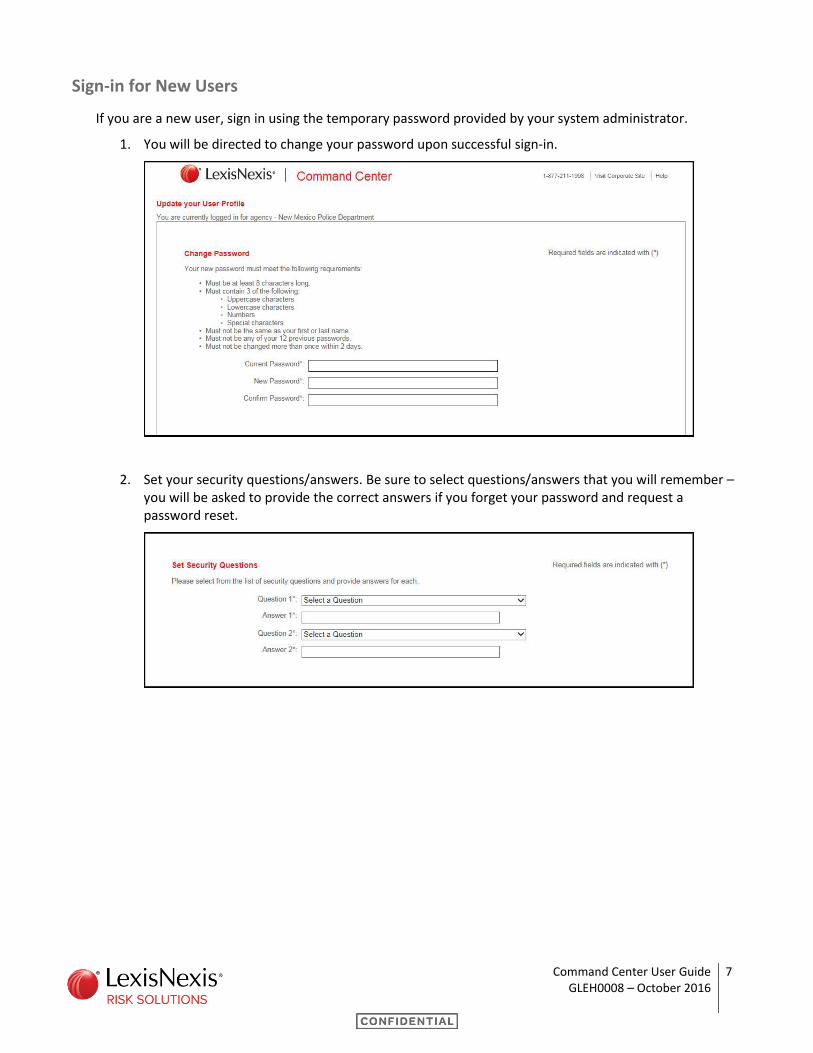
Sign-in for New Users
If you are a new user, sign in using the temporary password provided by your system administrator.
1. You will be directed to change your password upon successful sign-in.
2. Set your security questions/answers. Be sure to select questions/answers that you will remember – you will be asked to provide the correct answers if you forget your password and request a password reset.
Command Center User Guide 8 GLEH0008 – October 2016
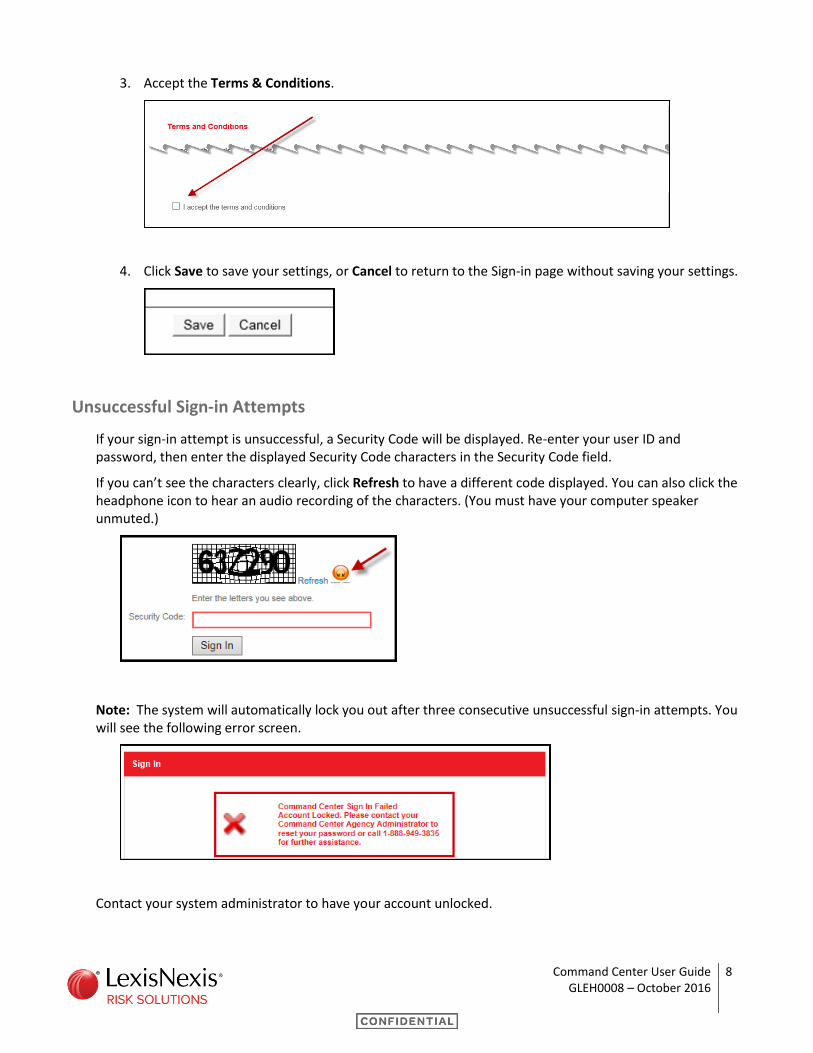
3. Accept the Terms & Conditions.
4. Click Save to save your settings, or Cancel to return to the Sign-in page without saving your settings.
Unsuccessful Sign-in Attempts
If your sign-in attempt is unsuccessful, a Security Code will be displayed. Re-enter your user ID and password, then enter the displayed Security Code characters in the Security Code field.
If you can’t see the characters clearly, click Refresh to have a different code displayed. You can also click the headphone icon to hear an audio recording of the characters. (You must have your computer speaker unmuted.)
Note: The system will automatically lock you out after three consecutive unsuccessful sign-in attempts. You will see the following error screen.
Contact your system administrator to have your account unlocked.
Command Center User Guide 9 GLEH0008 – October 2016
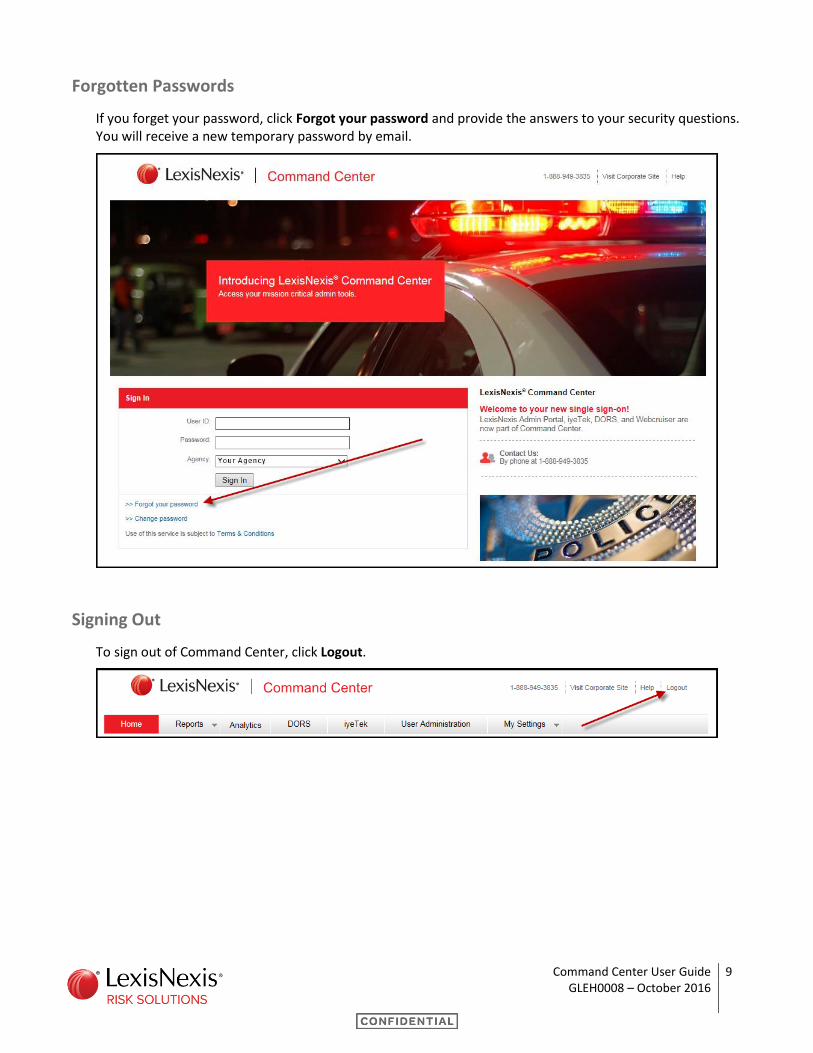
Forgotten Passwords
If you forget your password, click Forgot your password and provide the answers to your security questions. You will receive a new temporary password by email.
Signing Out
To sign out of Command Center, click Logout.
Command Center User Guide 10 GLEH0008 – October 2016
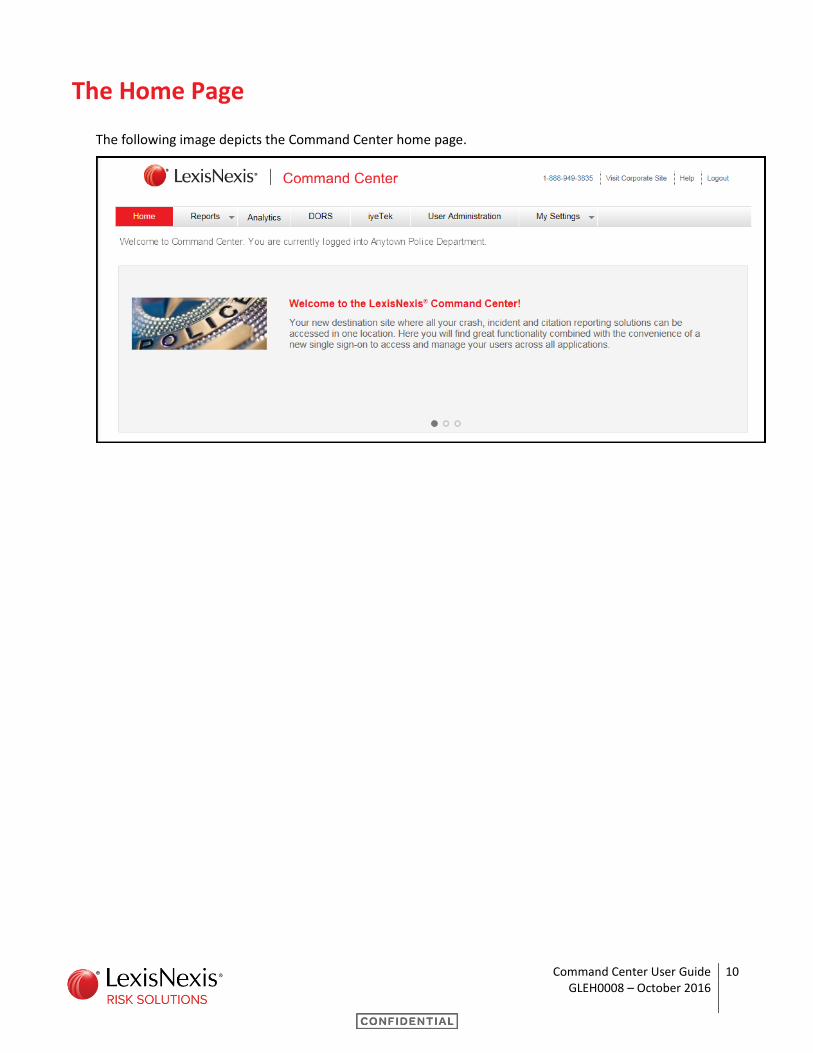
The Home Page
The following image depicts the Command Center home page.
Command Center User Guide 11 GLEH0008 – October 2016
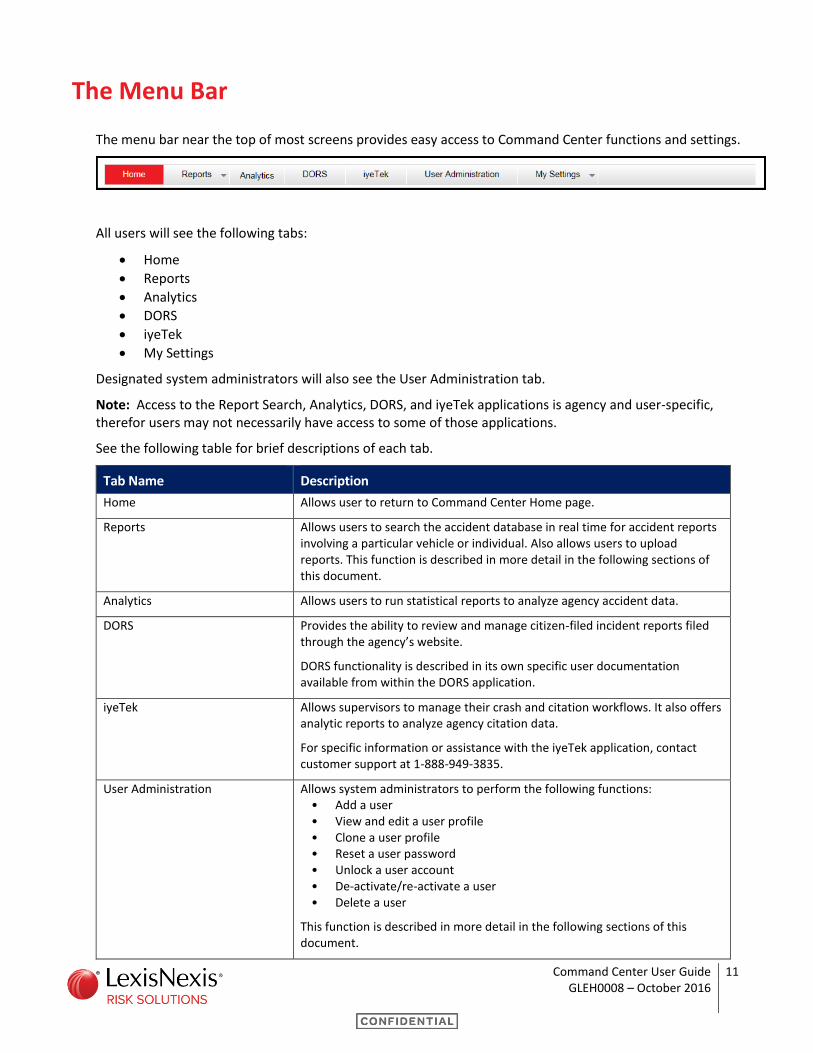
The Menu Bar
The menu bar near the top of most screens provides easy access to Command Center functions and settings.
All users will see the following tabs:
Home
Reports
Analytics
DORS
iyeTek
My Settings
Designated system administrators will also see the User Administration tab.
Note: Access to the Report Search, Analytics, DORS, and iyeTek applications is agency and user-specific, therefor users may not necessarily have access to some of those applications.
See the following table for brief descriptions of each tab.
Tab Name Description
Home Allows user to return to Command Center Home page.
Reports Allows users to search the accident database in real time for accident reports involving a particular vehicle or individual. Also allows users to upload reports. This function is described in more detail in the following sections of this document.
Analytics Allows users to run statistical reports to analyze agency accident data.
DORS Provides the ability to review and manage citizen-filed incident reports filed through the agency’s website.
DORS functionality is described in its own specific user documentation available from within the DORS application.
iyeTek Allows supervisors to manage their crash and citation workflows. It also offers analytic reports to analyze agency citation data.
For specific information or assistance with the iyeTek application, contact customer support at 1-888-949-3835.
User Administration Allows system administrators to perform the following functions: • Add a user • View and edit a user profile • Clone a user profile • Reset a user password • Unlock a user account • De-activate/re-activate a user • Delete a user
This function is described in more detail in the following sections of this document.
Command Center User Guide 12 GLEH0008 – October 2016
Tab Name Description
My Settings Allows a user to change the security questions, password, and email address and phone number associated with their user account.
This function is described in more detail in the following sections of this document.
Command Center User Guide 13 GLEH0008 – October 2016
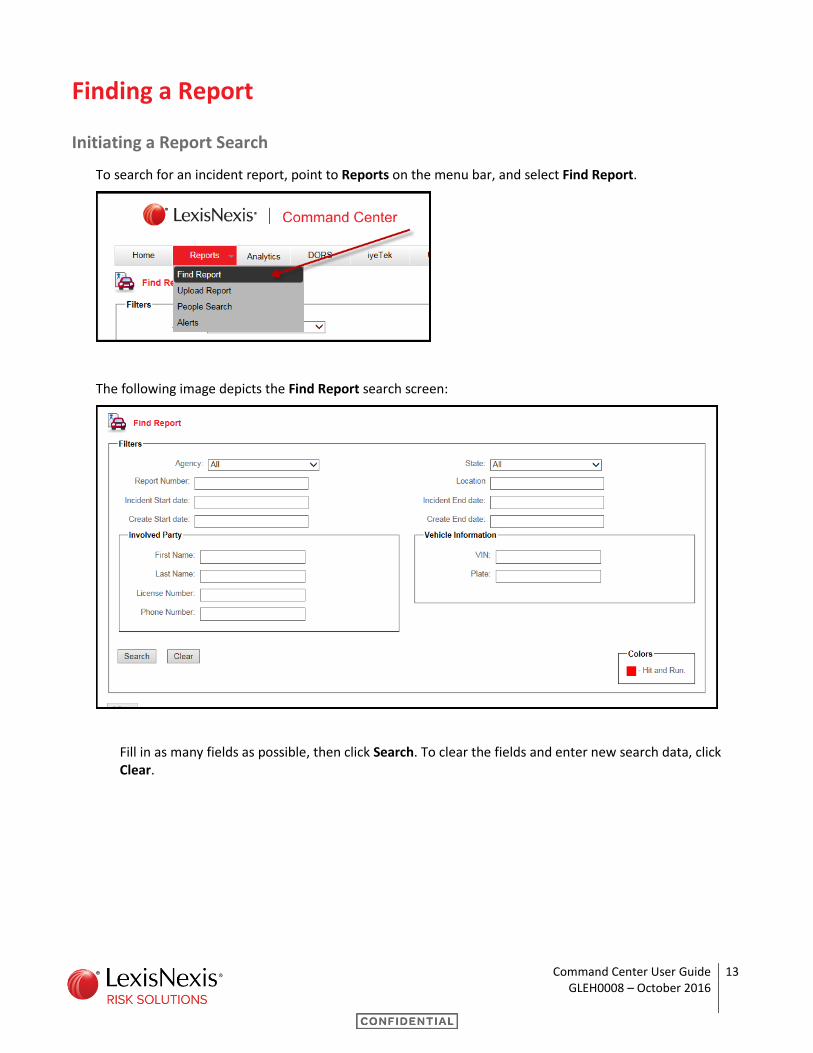
Finding a Report
Initiating a Report Search
To search for an incident report, point to Reports on the menu bar, and select Find Report.
The following image depicts the Find Report search screen:
Fill in as many fields as possible, then click Search. To clear the fields and enter new search data, click Clear.
Command Center User Guide 14 GLEH0008 – October 2016
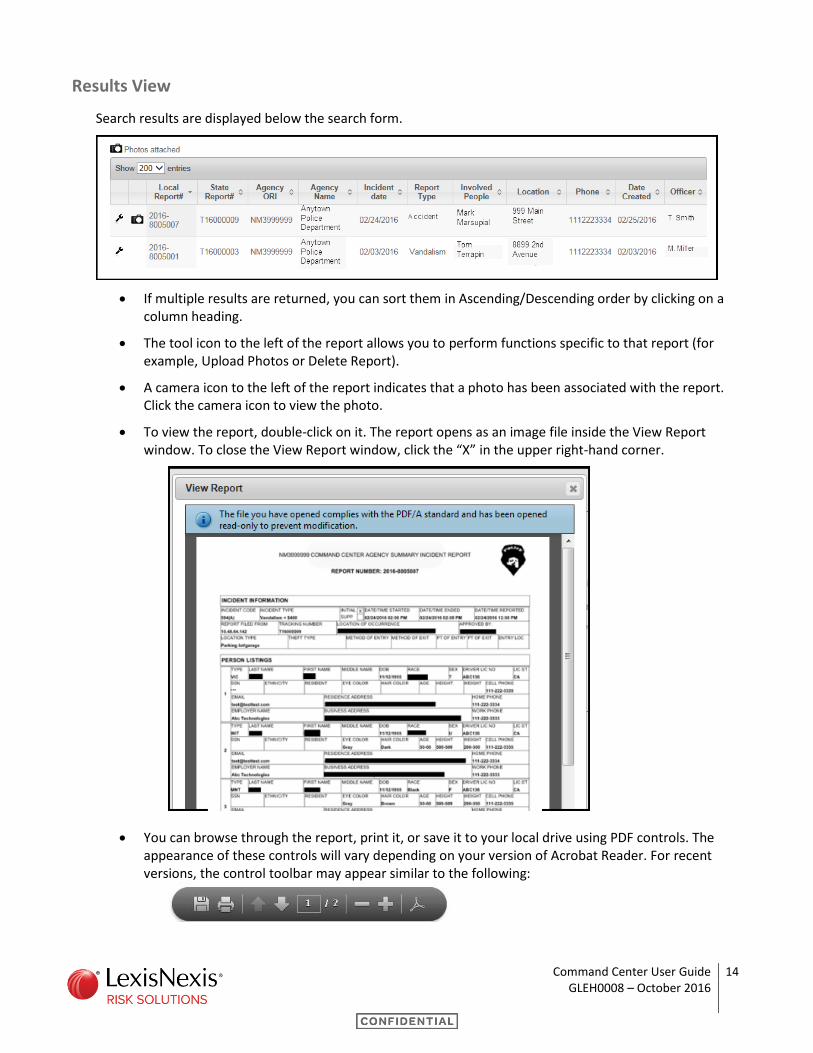
Results View
Search results are displayed below the search form.
If multiple results are returned, you can sort them in Ascending/Descending order by clicking on a column heading.
The tool icon to the left of the report allows you to perform functions specific to that report (for example, Upload Photos or Delete Report).
A camera icon to the left of the report indicates that a photo has been associated with the report. Click the camera icon to view the photo.
To view the report, double-click on it. The report opens as an image file inside the View Report window. To close the View Report window, click the “X” in the upper right-hand corner.
You can browse through the report, print it, or save it to your local drive using PDF controls. The appearance of these controls will vary depending on your version of Acrobat Reader. For recent versions, the control toolbar may appear similar to the following:
Command Center User Guide 15 GLEH0008 – October 2016
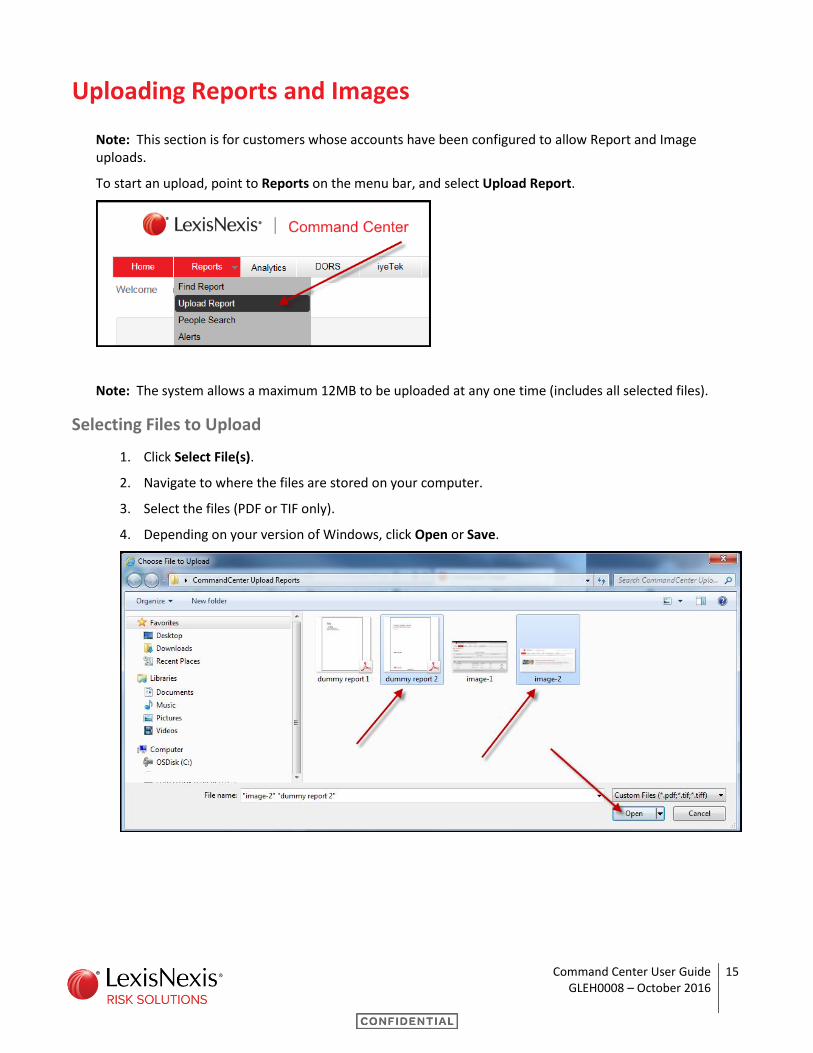
Uploading Reports and Images
Note: This section is for customers whose accounts have been configured to allow Report and Image uploads.
To start an upload, point to Reports on the menu bar, and select Upload Report.
Note: The system allows a maximum 12MB to be uploaded at any one time (includes all selected files).
Selecting Files to Upload
1. Click Select File(s).
2. Navigate to where the files are stored on your computer.
3. Select the files (PDF or TIF only).
4. Depending on your version of Windows, click Open or Save.
Command Center User Guide 16 GLEH0008 – October 2016
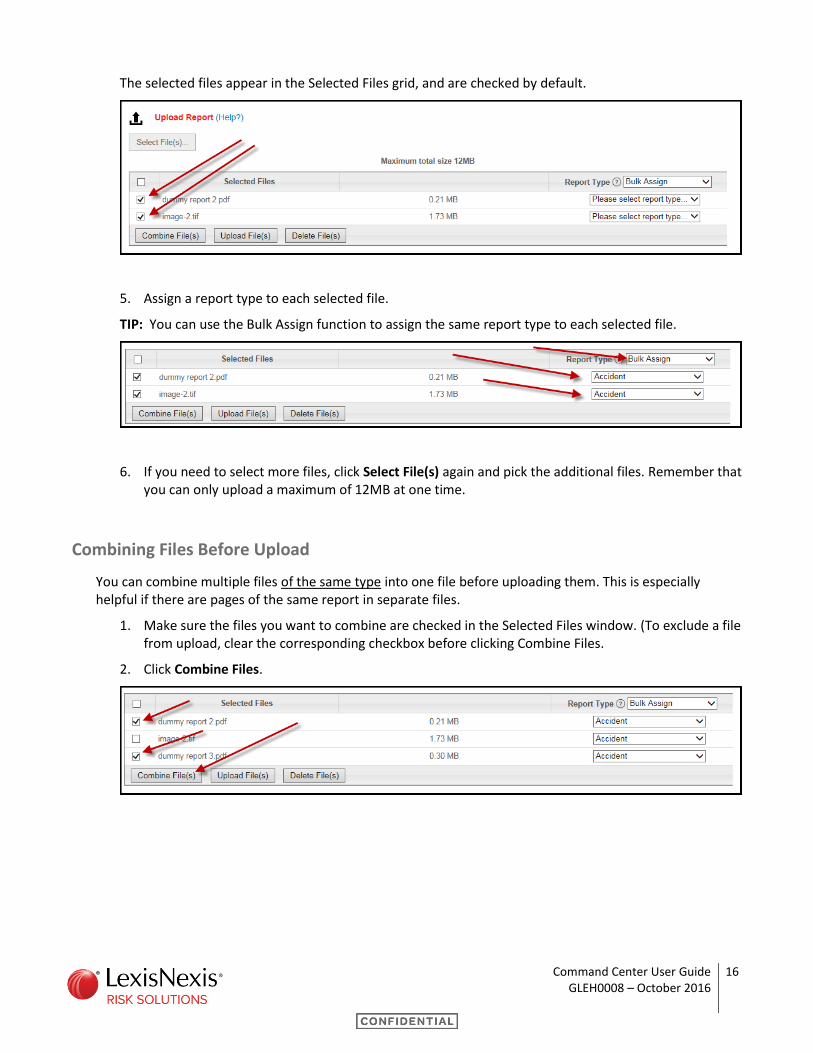
The selected files appear in the Selected Files grid, and are checked by default.
5. Assign a report type to each selected file.
TIP: You can use the Bulk Assign function to assign the same report type to each selected file.
6. If you need to select more files, click Select File(s) again and pick the additional files. Remember that you can only upload a maximum of 12MB at one time.
Combining Files Before Upload
You can combine multiple files of the same type into one file before uploading them. This is especially helpful if there are pages of the same report in separate files.
1. Make sure the files you want to combine are checked in the Selected Files window. (To exclude a file from upload, clear the corresponding checkbox before clicking Combine Files.
2. Click Combine Files.
Command Center User Guide 17 GLEH0008 – October 2016
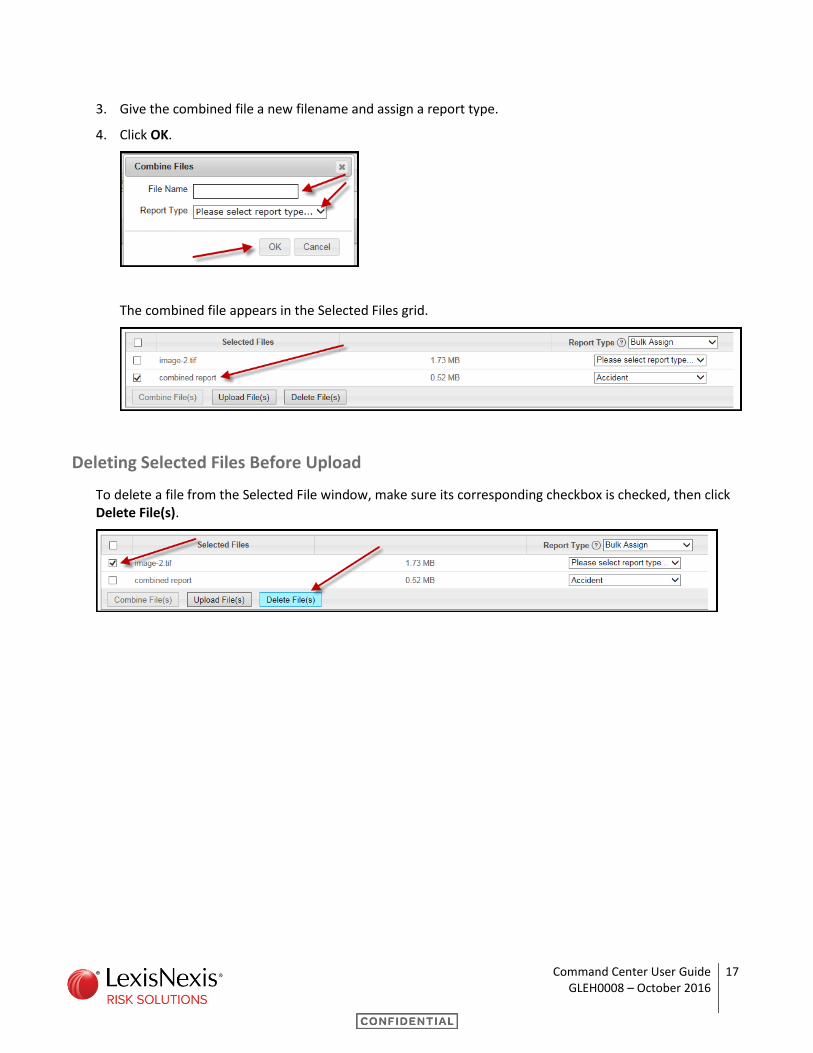
3. Give the combined file a new filename and assign a report type.
4. Click OK.
The combined file appears in the Selected Files grid.
Deleting Selected Files Before Upload
To delete a file from the Selected File window, make sure its corresponding checkbox is checked, then click Delete File(s).

Command Center User Guide 18 GLEH0008 – October 2016
Uploading Files
1. Make sure the desired file(s) are selected. For information on selecting files, see page 15.
2. Click Upload Files.
Note: If you try to upload a file without assigning a report type, “Please select report type” will be highlighted in the Selected Files window. Assign the desired report type and click Upload Files again.
You will see a message indicating that the upload was successful, and the file(s) will be reflected in the Uploaded Files section. (The Uploaded Files section is in the bottom half of the Upload Report screen.)
Note: Uploaded files will reflect a status either pending or processing. If the status is “Pending”, you can delete the file from this screen, so they don’t enter the processing workflow. However, once the status changes to “Processing”, only users with “Delete Reports” privileges can remove the report from the database.
Viewing an Uploaded File
1. To view a file, double-click on it in the Uploaded Files section.
The file opens in a new browser window.
2. When finished viewing, close the View Report window by clicking the small X in the upper right hand
corner.
Deleting an Uploaded File
You can delete uploaded files that are still in “Pending” status.
1. Select only the files you wish to delete.
2. Click Delete Files.
3. Click OK.
The files are removed from the Uploaded Files grid, and will not be sent for further processing.
Command Center User Guide 19 GLEH0008 – October 2016
Managing Photos
Uploading Photos
Command Center allows you to upload photos and associate them with a report. There are two methods available:
• from the Find Report page.
• from the Upload Report page once the report appears in the Uploaded Files section.
Note: Valid file formats are .jpg, .bmp, .tif, or .pdf.
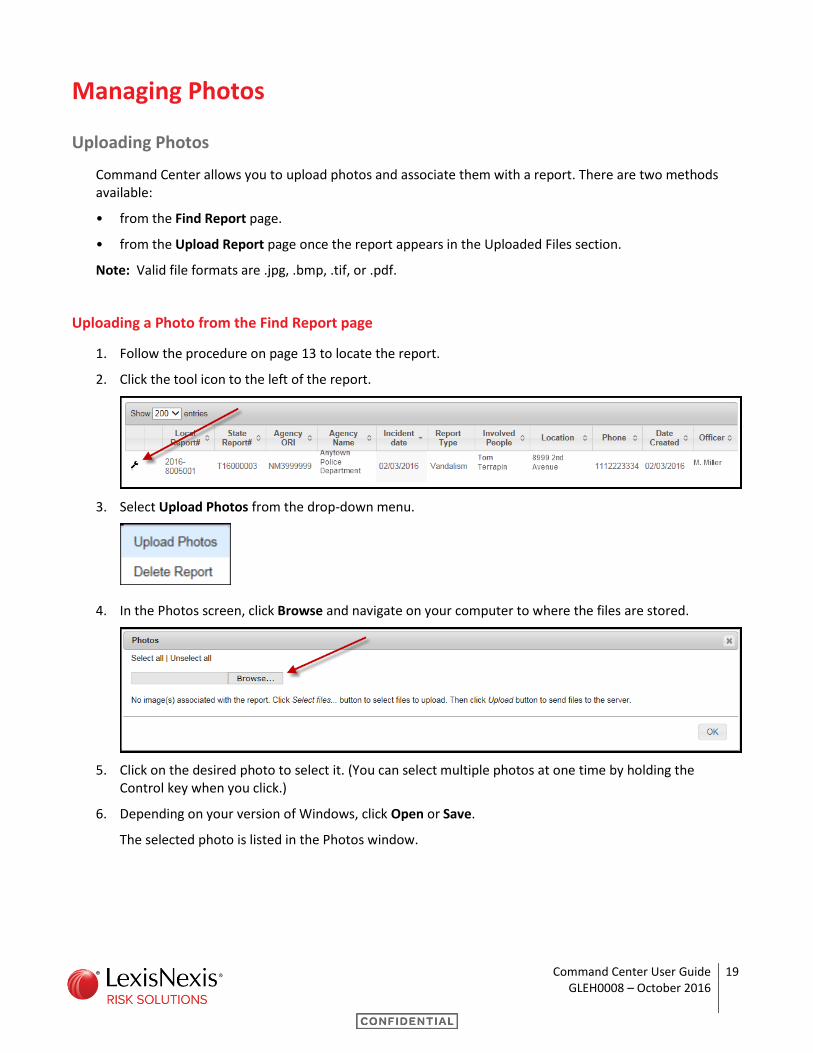
Uploading a Photo from the Find Report page
1. Follow the procedure on page 13 to locate the report.
2. Click the tool icon to the left of the report.
3. Select Upload Photos from the drop-down menu.
4. In the Photos screen, click Browse and navigate on your computer to where the files are stored.
5. Click on the desired photo to select it. (You can select multiple photos at one time by holding the Control key when you click.)
6. Depending on your version of Windows, click Open or Save.
The selected photo is listed in the Photos window.
Command Center User Guide 20 GLEH0008 – October 2016
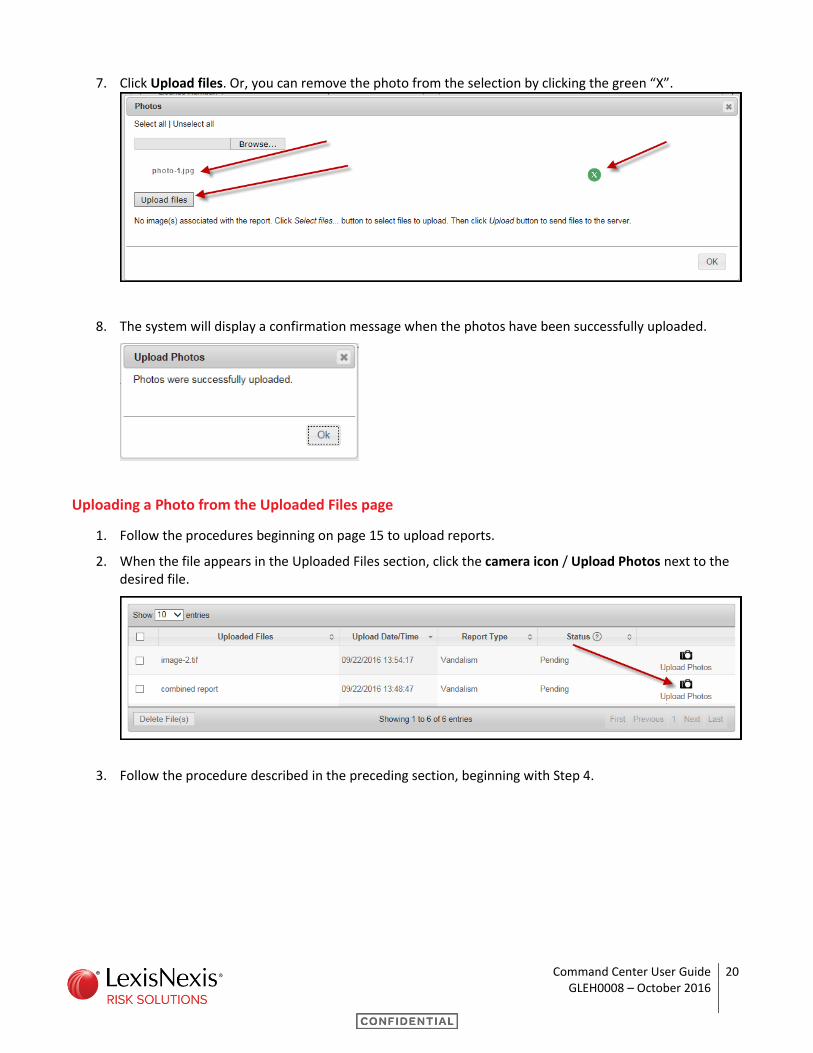
7. Click Upload files. Or, you can remove the photo from the selection by clicking the green “X”.
8. The system will display a confirmation message when the photos have been successfully uploaded.
Uploading a Photo from the Uploaded Files page
1. Follow the procedures beginning on page 15 to upload reports.
2. When the file appears in the Uploaded Files section, click the camera icon / Upload Photos next to the desired file.
3. Follow the procedure described in the preceding section, beginning with Step 4.
Command Center User Guide 21 GLEH0008 – October 2016
Viewing a Photo
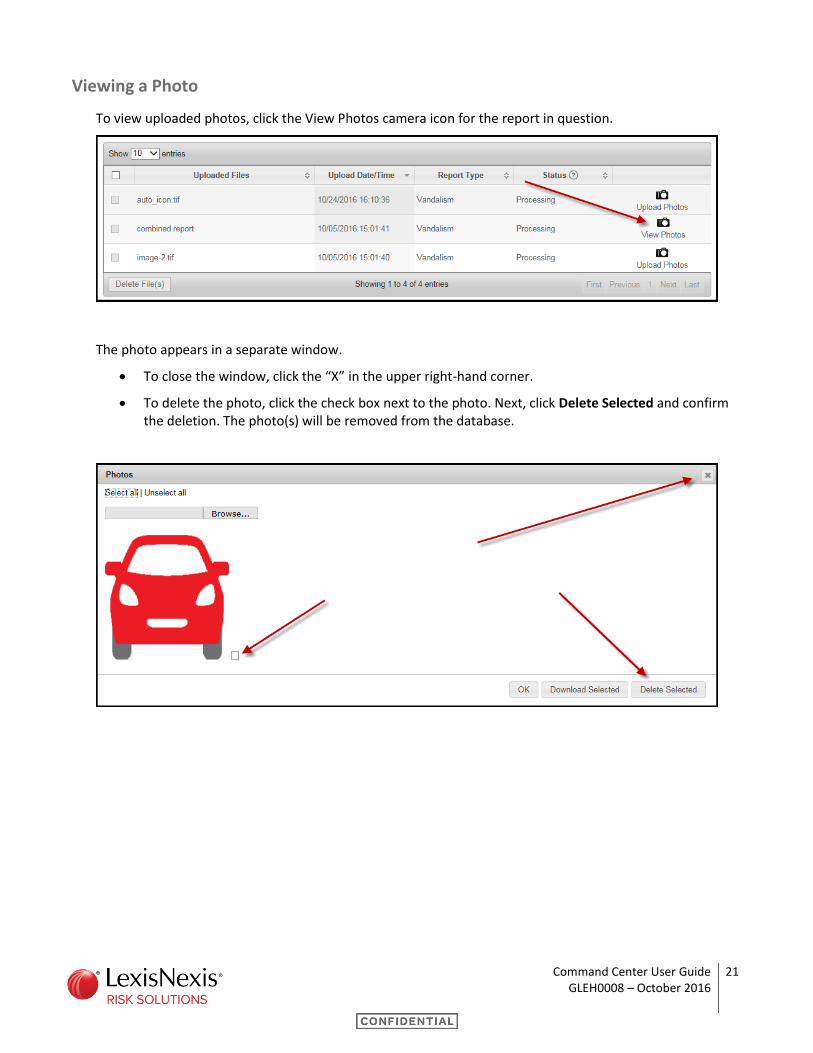
To view uploaded photos, click the View Photos camera icon for the report in question.
The photo appears in a separate window.
To close the window, click the “X” in the upper right-hand corner.
To delete the photo, click the check box next to the photo. Next, click Delete Selected and confirm the deletion. The photo(s) will be removed from the database.
Command Center User Guide 22 GLEH0008 – October 2016
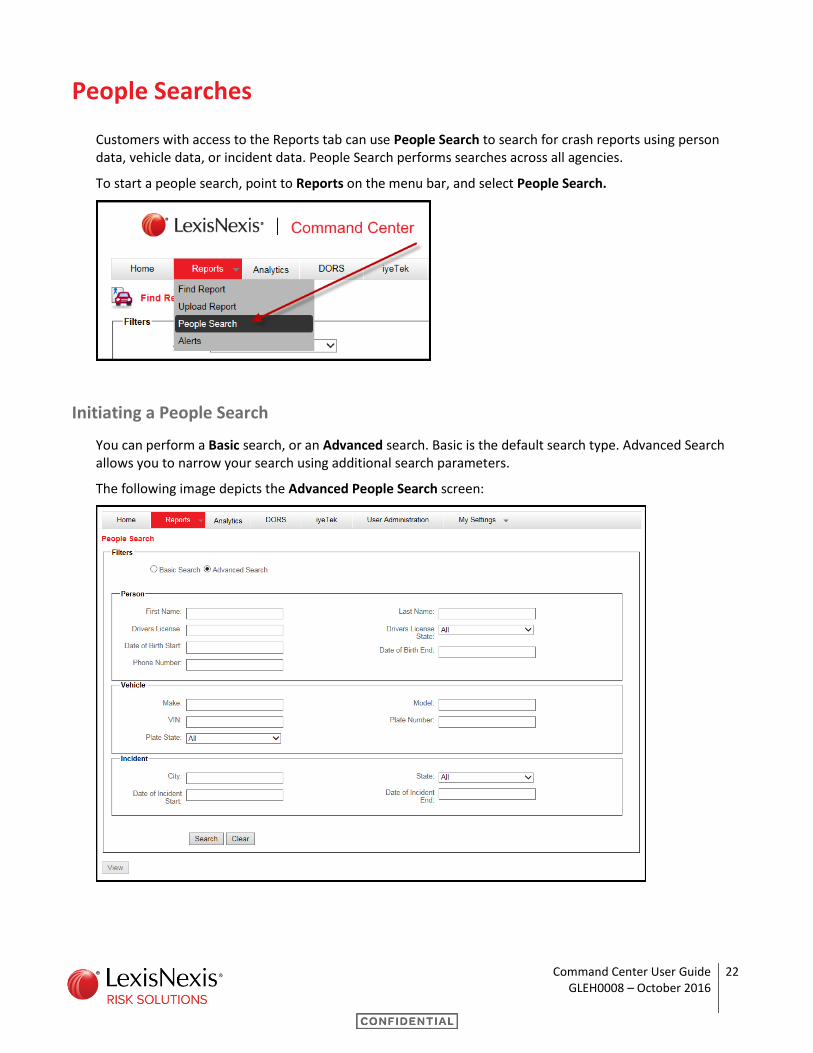
People Searches
Customers with access to the Reports tab can use People Search to search for crash reports using person data, vehicle data, or incident data. People Search performs searches across all agencies.
To start a people search, point to Reports on the menu bar, and select People Search.
Initiating a People Search
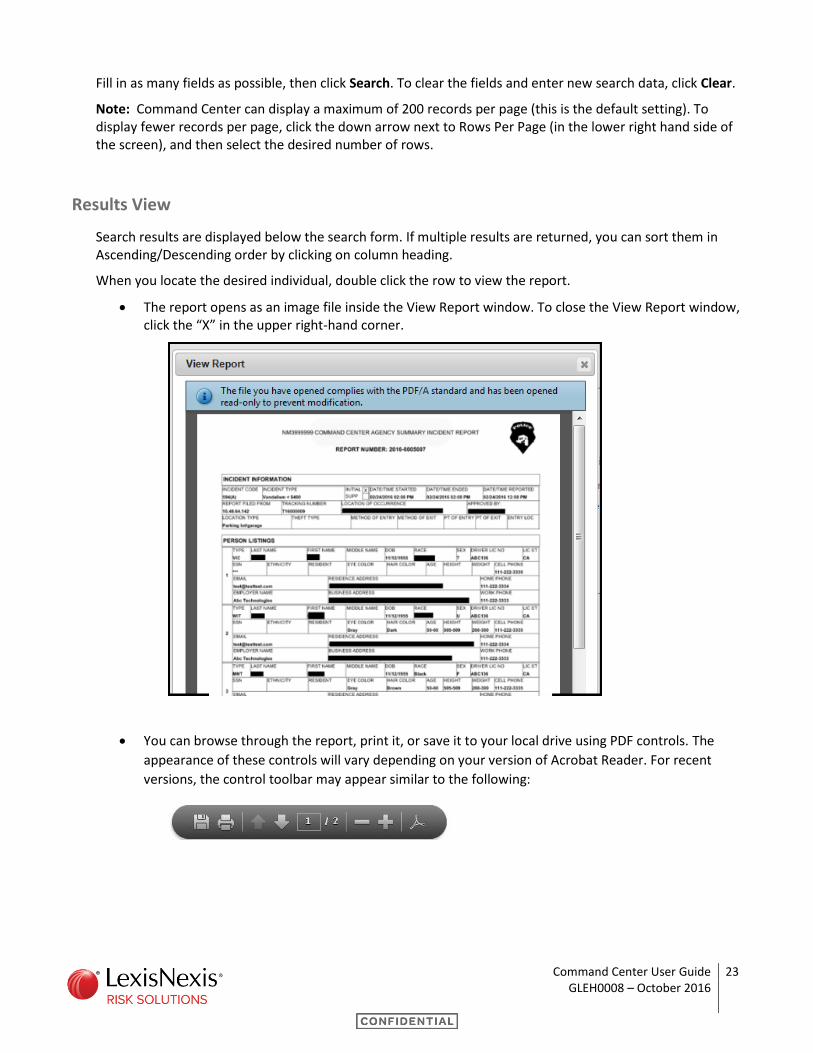
You can perform a Basic search, or an Advanced search. Basic is the default search type. Advanced Search allows you to narrow your search using additional search parameters.
The following image depicts the Advanced People Search screen:
Command Center User Guide 23 GLEH0008 – October 2016
Fill in as many fields as possible, then click Search. To clear the fields and enter new search data, click Clear.
Note: Command Center can display a maximum of 200 records per page (this is the default setting). To display fewer records per page, click the down arrow next to Rows Per Page (in the lower right hand side of the screen), and then select the desired number of rows.
Results View
Search results are displayed below the search form. If multiple results are returned, you can sort them in Ascending/Descending order by clicking on column heading.
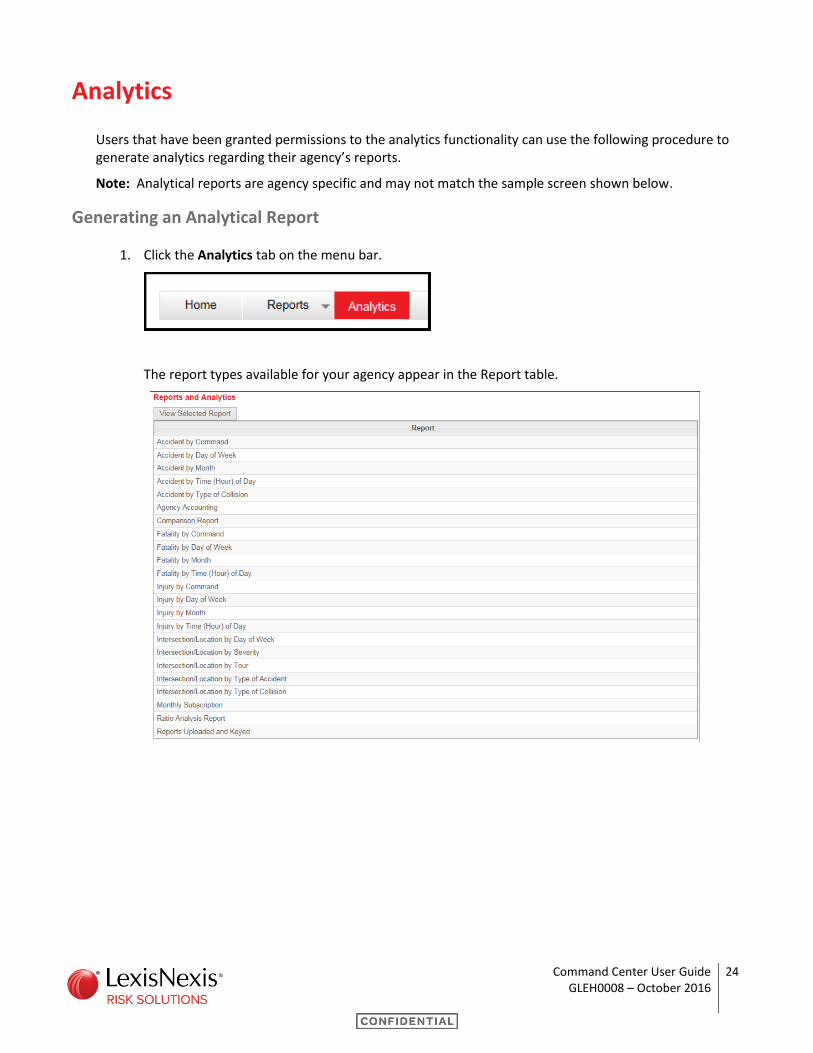
When you locate the desired individual, double click the row to view the report.
The report opens as an image file inside the View Report window. To close the View Report window, click the “X” in the upper right-hand corner.
You can browse through the report, print it, or save it to your local drive using PDF controls. The
appearance of these controls will vary depending on your version of Acrobat Reader. For recent
versions, the control toolbar may appear similar to the following:
Command Center User Guide 24 GLEH0008 – October 2016
Analytics
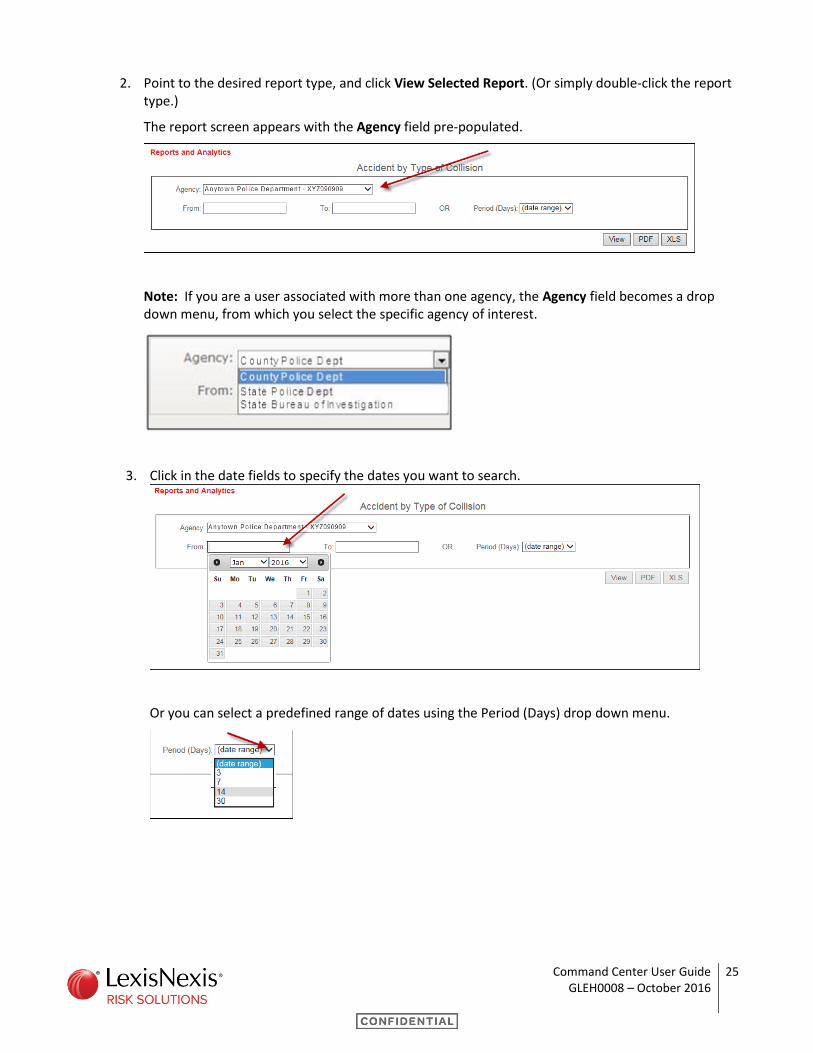
Users that have been granted permissions to the analytics functionality can use the following procedure to generate analytics regarding their agency’s reports.
Note: Analytical reports are agency specific and may not match the sample screen shown below.
Generating an Analytical Report
1. Click the Analytics tab on the menu bar.
The report types available for your agency appear in the Report table.
Command Center User Guide 25 GLEH0008 – October 2016
2. Point to the desired report type, and click View Selected Report. (Or simply double-click the report type.)
The report screen appears with the Agency field pre-populated.
Note: If you are a user associated with more than one agency, the Agency field becomes a drop down menu, from which you select the specific agency of interest.
3. Click in the date fields to specify the dates you want to search.
Or you can select a predefined range of dates using the Period (Days) drop down menu.
Command Center User Guide 26 GLEH0008 – October 2016
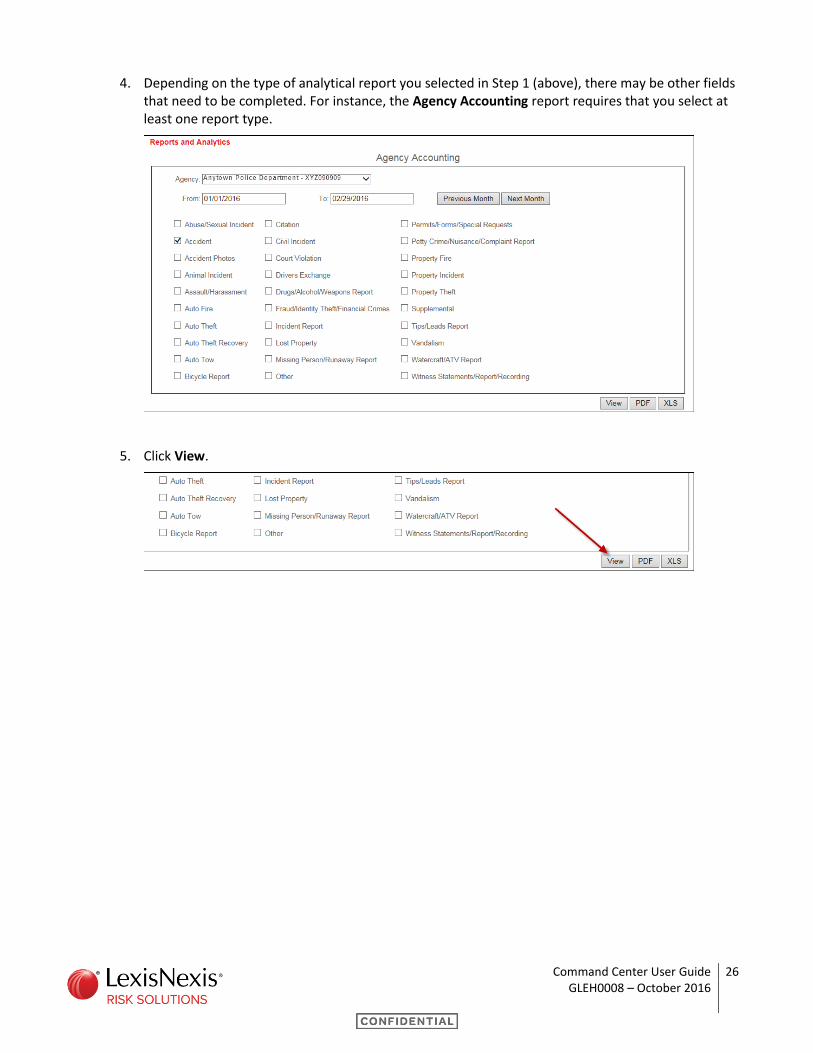
4. Depending on the type of analytical report you selected in Step 1 (above), there may be other fields that need to be completed. For instance, the Agency Accounting report requires that you select at least one report type.
5. Click View.
Command Center User Guide 27 GLEH0008 – October 2016
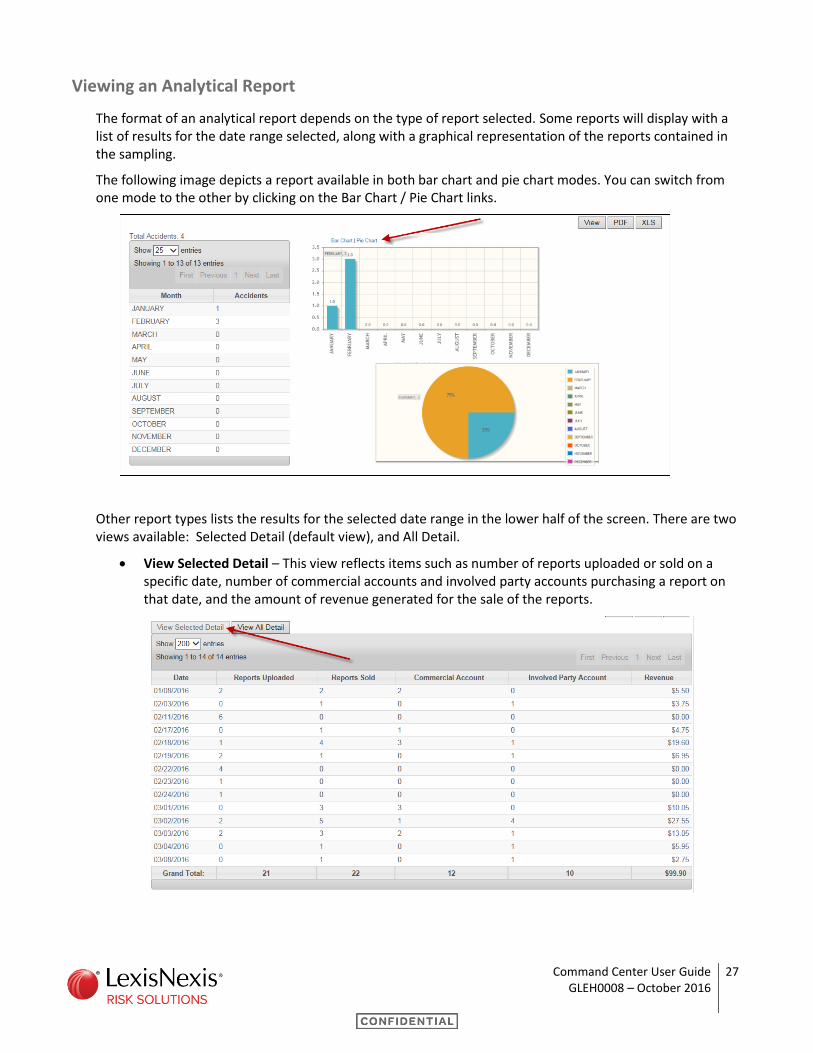
Viewing an Analytical Report
The format of an analytical report depends on the type of report selected. Some reports will display with a list of results for the date range selected, along with a graphical representation of the reports contained in the sampling.
The following image depicts a report available in both bar chart and pie chart modes. You can switch from one mode to the other by clicking on the Bar Chart / Pie Chart links.
Other report types lists the results for the selected date range in the lower half of the screen. There are two views available: Selected Detail (default view), and All Detail.
View Selected Detail – This view reflects items such as number of reports uploaded or sold on a specific date, number of commercial accounts and involved party accounts purchasing a report on that date, and the amount of revenue generated for the sale of the reports.
Command Center User Guide 28 GLEH0008 – October 2016
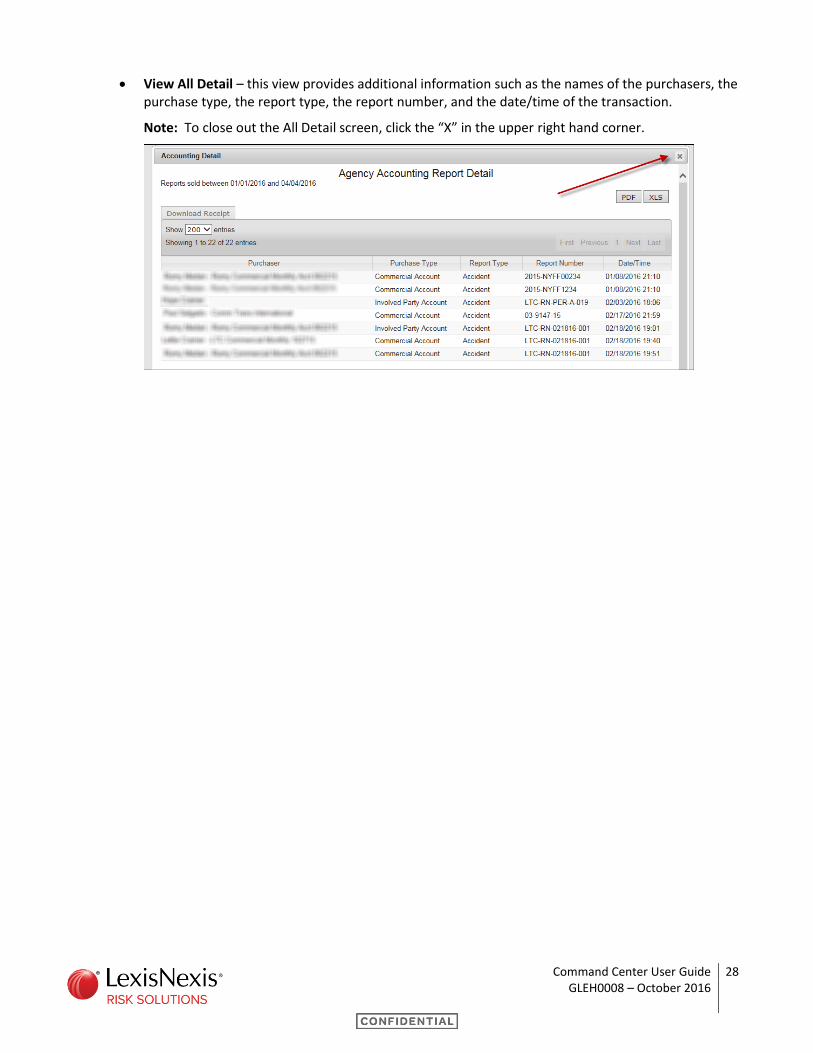
View All Detail – this view provides additional information such as the names of the purchasers, the purchase type, the report type, the report number, and the date/time of the transaction.
Note: To close out the All Detail screen, click the “X” in the upper right hand corner.
Command Center User Guide 29 GLEH0008 – October 2016
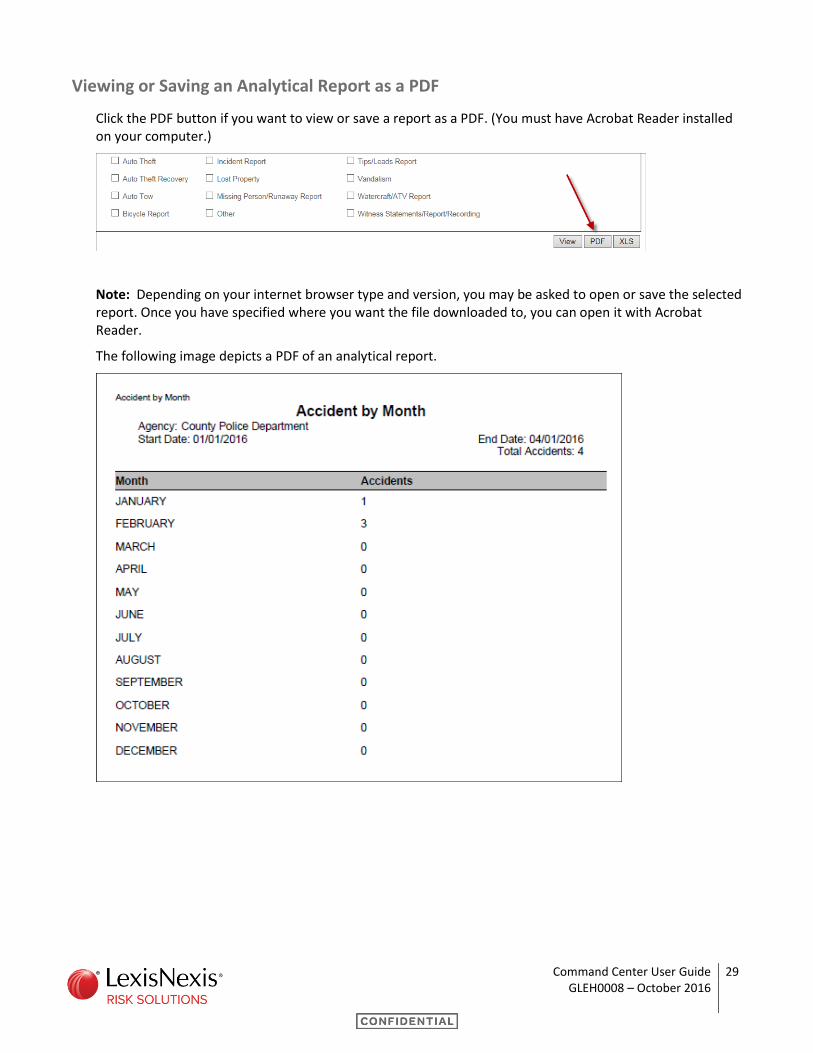
Viewing or Saving an Analytical Report as a PDF
Click the PDF button if you want to view or save a report as a PDF. (You must have Acrobat Reader installed on your computer.)
Note: Depending on your internet browser type and version, you may be asked to open or save the selected report. Once you have specified where you want the file downloaded to, you can open it with Acrobat Reader.
The following image depicts a PDF of an analytical report.

Command Center User Guide 30 GLEH0008 – October 2016
Viewing or Saving an Analytical Report as a Spreadsheet
Click the XLS button if you want to view or save the report as a spreadsheet. (You must have MS Excel installed on your computer.)
Note: Depending on your internet browser type and version, you may be asked to open or save the selected report. Once you have specified where you want the file downloaded to, you can open it with Excel.
The following image depicts an analytical report in Excel.
Command Center User Guide 31 GLEH0008 – October 2016
Using Alerts
The Alerts feature allows users to have the system automatically perform a search on a daily basis for a particular report. The system will perform the daily search for the duration specified by the user. If a duration is not specified, the default search duration is 180 days.
An example of how Alerts can be used:
You perform a search for John Smith – dob 1/1/1980. The system returns dozens of results, but none of them are the John Smith you are looking for.
You create an Alert, and the system performs a daily search for any additional persons matching the criteria you specify, and that differs from the original list of results.
Creating an Alert
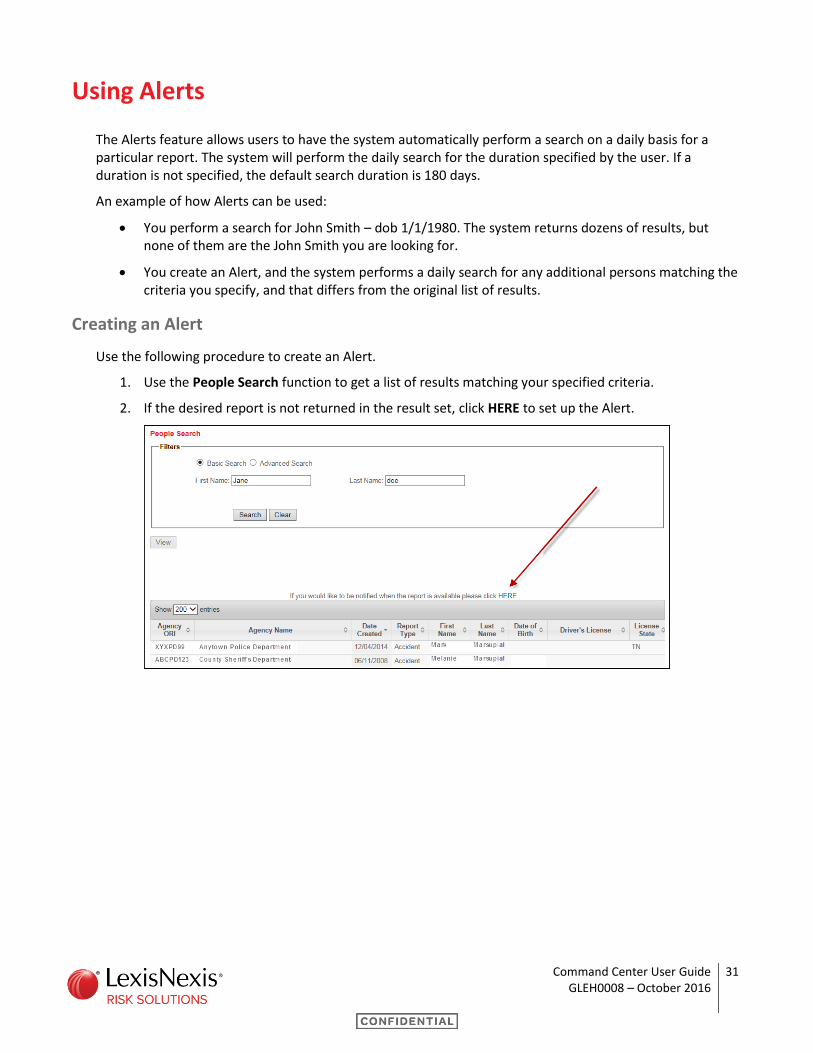
Use the following procedure to create an Alert.
1. Use the People Search function to get a list of results matching your specified criteria.
2. If the desired report is not returned in the result set, click HERE to set up the Alert.
Command Center User Guide 32 GLEH0008 – October 2016
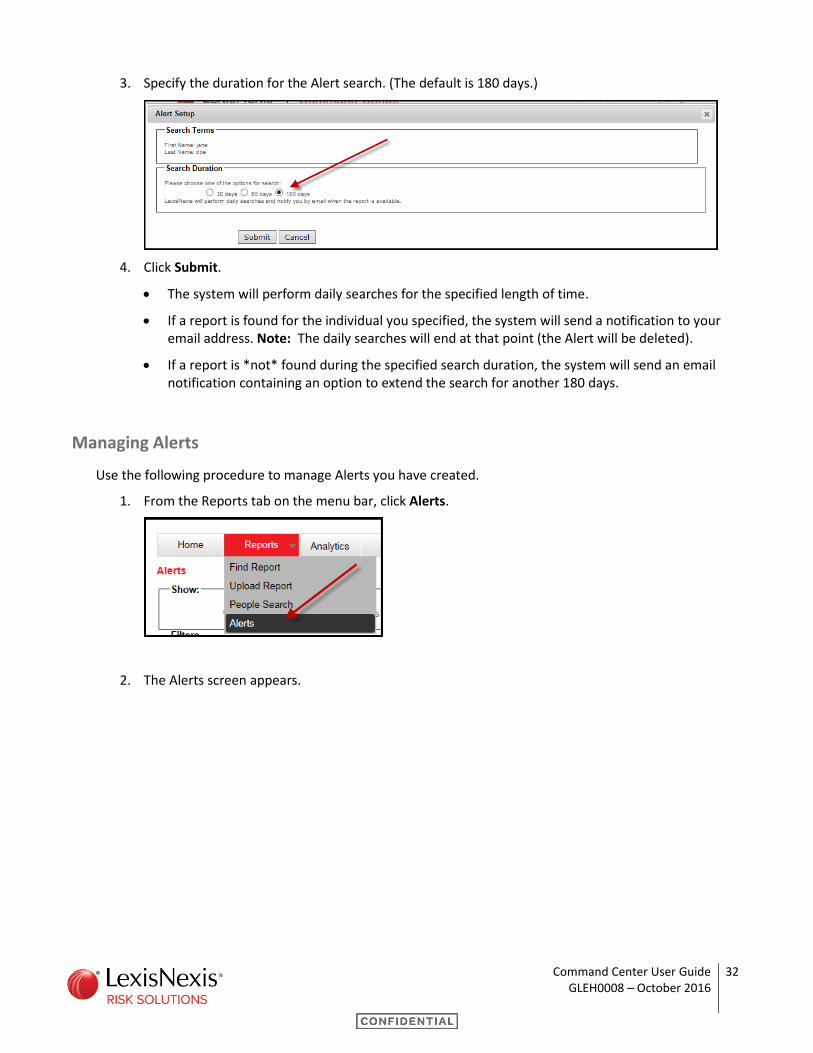
3. Specify the duration for the Alert search. (The default is 180 days.)
4. Click Submit.
The system will perform daily searches for the specified length of time.
If a report is found for the individual you specified, the system will send a notification to your email address. Note: The daily searches will end at that point (the Alert will be deleted).
If a report is *not* found during the specified search duration, the system will send an email notification containing an option to extend the search for another 180 days.
Managing Alerts
Use the following procedure to manage Alerts you have created.
1. From the Reports tab on the menu bar, click Alerts.
2. The Alerts screen appears.
Command Center User Guide 33 GLEH0008 – October 2016
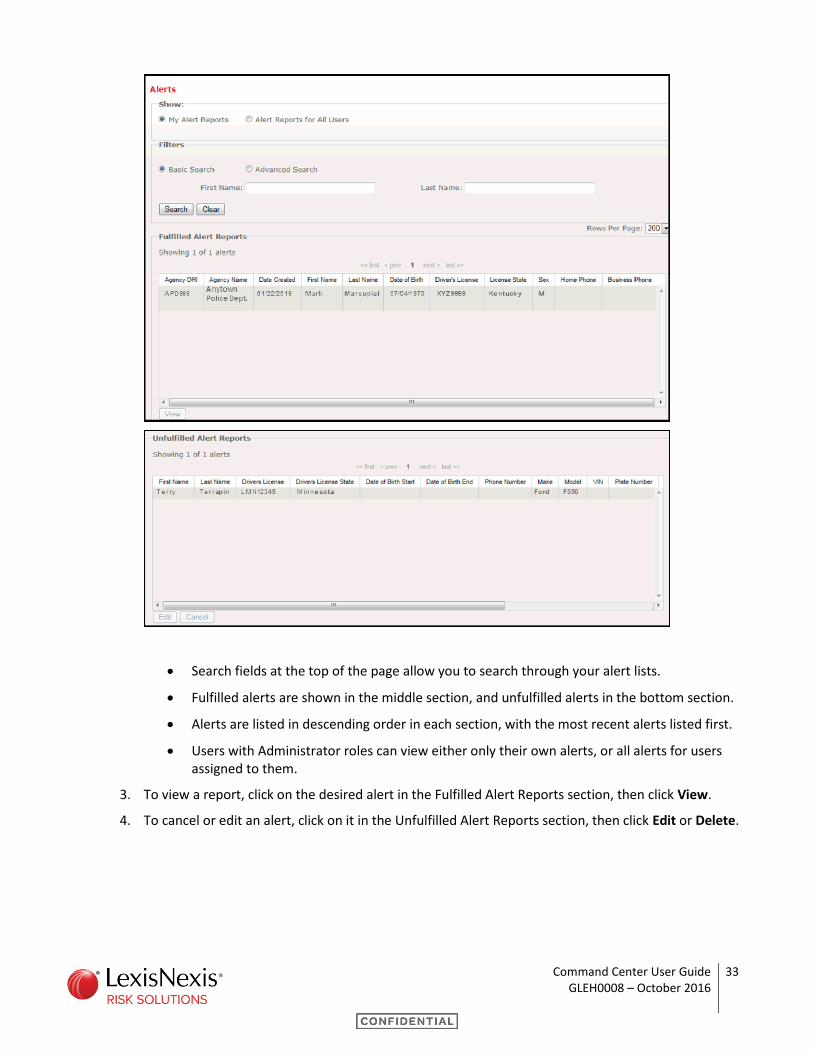
Search fields at the top of the page allow you to search through your alert lists.
Fulfilled alerts are shown in the middle section, and unfulfilled alerts in the bottom section.
Alerts are listed in descending order in each section, with the most recent alerts listed first.
Users with Administrator roles can view either only their own alerts, or all alerts for users assigned to them.
3. To view a report, click on the desired alert in the Fulfilled Alert Reports section, then click View.
4. To cancel or edit an alert, click on it in the Unfulfilled Alert Reports section, then click Edit or Delete.
Command Center User Guide 34 GLEH0008 – October 2016
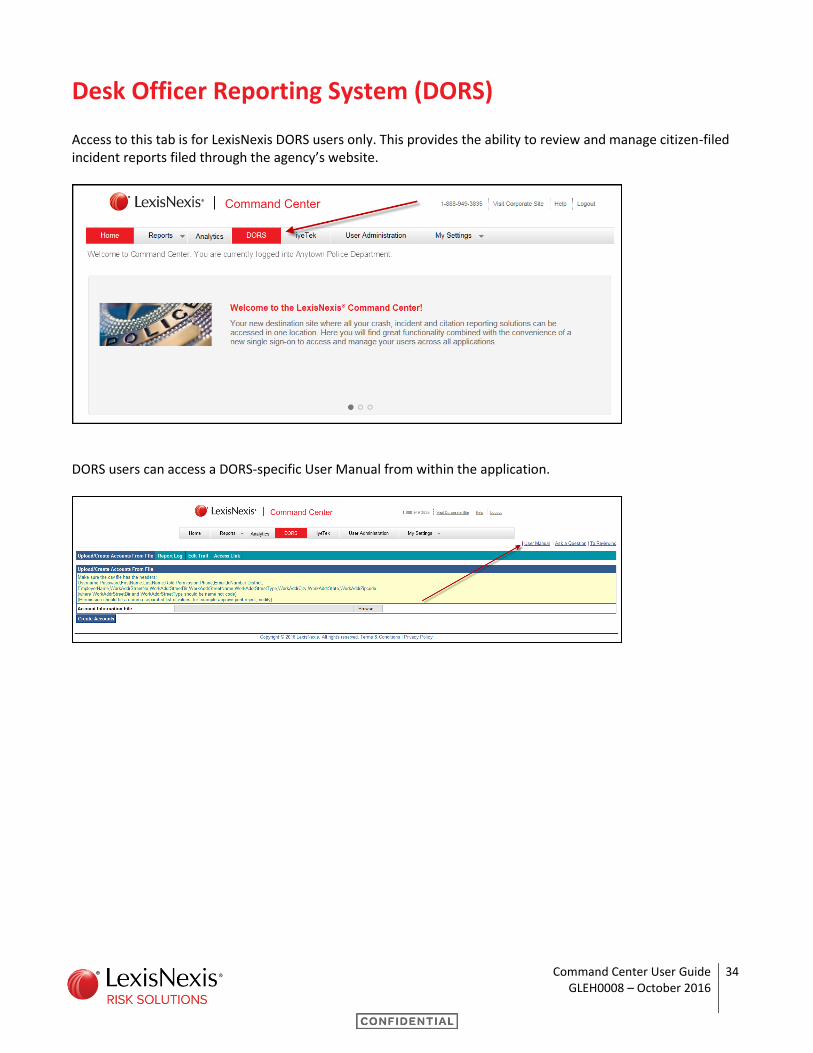
Desk Officer Reporting System (DORS)
Access to this tab is for LexisNexis DORS users only. This provides the ability to review and manage citizen-filed incident reports filed through the agency’s website.
DORS users can access a DORS-specific User Manual from within the application.
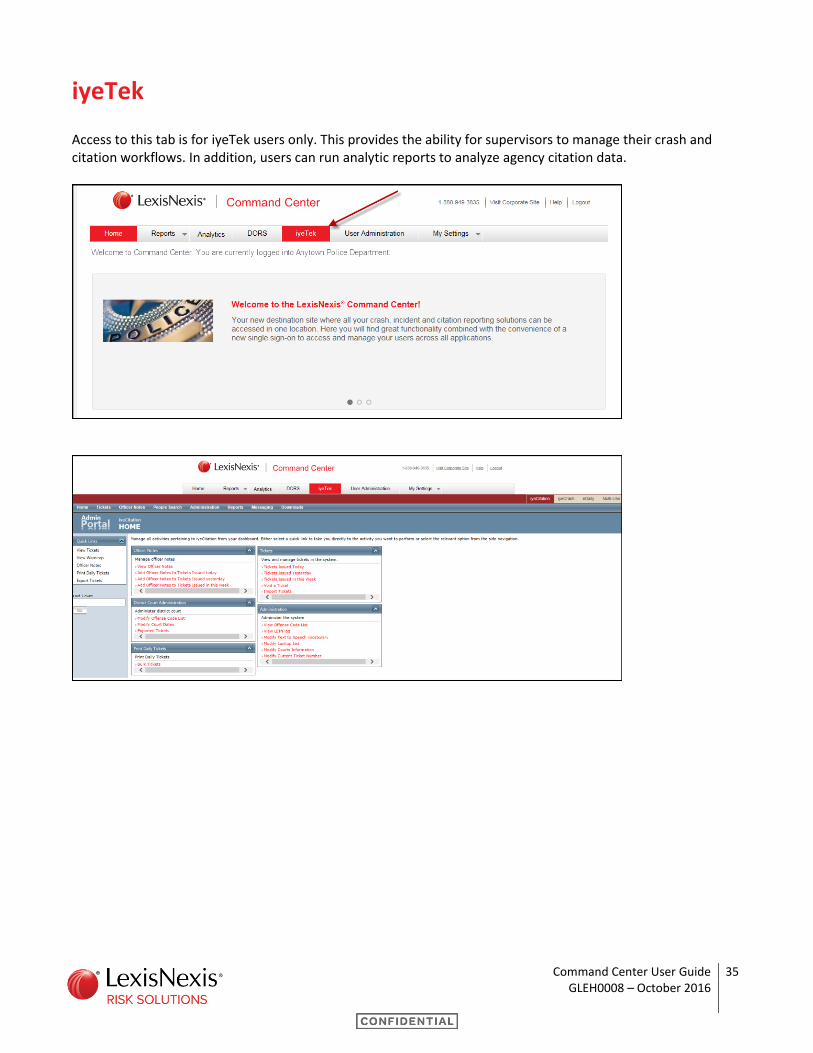
Command Center User Guide 35 GLEH0008 – October 2016
iyeTek
Access to this tab is for iyeTek users only. This provides the ability for supervisors to manage their crash and citation workflows. In addition, users can run analytic reports to analyze agency citation data.
Command Center User Guide 36 GLEH0008 – October 2016
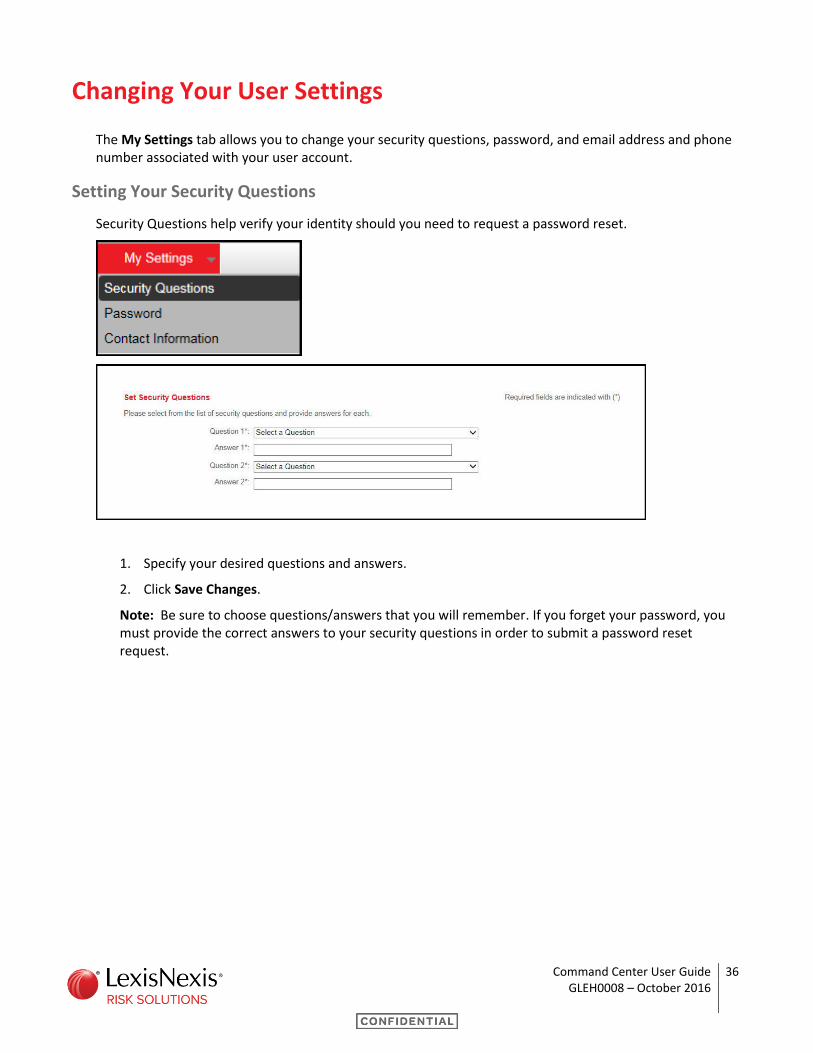
Changing Your User Settings
The My Settings tab allows you to change your security questions, password, and email address and phone number associated with your user account.
Setting Your Security Questions
Security Questions help verify your identity should you need to request a password reset.
1. Specify your desired questions and answers.
2. Click Save Changes.
Note: Be sure to choose questions/answers that you will remember. If you forget your password, you must provide the correct answers to your security questions in order to submit a password reset request.

Command Center User Guide 37 GLEH0008 – October 2016
Changing Your Password
You can change your password at any time from the My Settings tab in the menu bar.
1. Enter your current password, and new password in the appropriate fields.
2. Click Save Changes to make the changes complete.

Command Center User Guide 38 GLEH0008 – October 2016
Changing Your Contact Information
Use the following procedure to change your contact email and phone number.
1. Enter your email address and/or phone number in the appropriate fields.
2. Click Save Changes to make the changes complete.
Command Center User Guide 39 GLEH0008 – October 2016
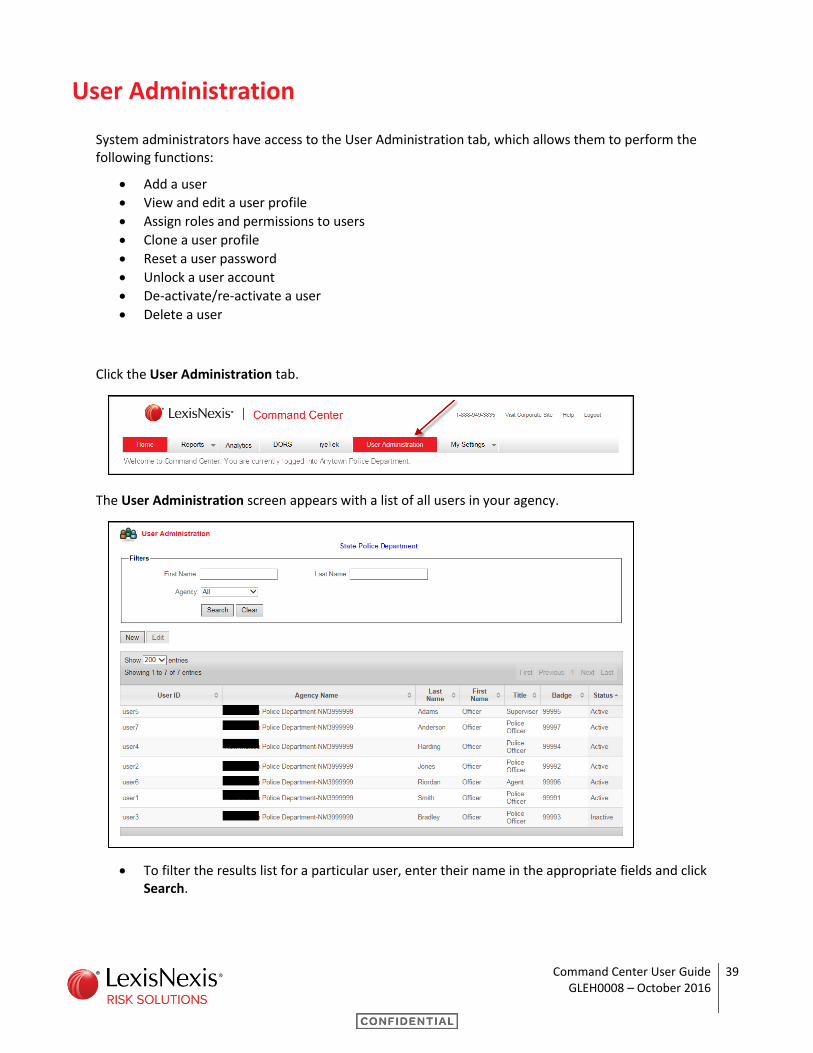
User Administration
System administrators have access to the User Administration tab, which allows them to perform the following functions:
Add a user
View and edit a user profile
Assign roles and permissions to users
Clone a user profile
Reset a user password
Unlock a user account
De-activate/re-activate a user
Delete a user
Click the User Administration tab.
The User Administration screen appears with a list of all users in your agency.
To filter the results list for a particular user, enter their name in the appropriate fields and click Search.
Command Center User Guide 40 GLEH0008 – October 2016
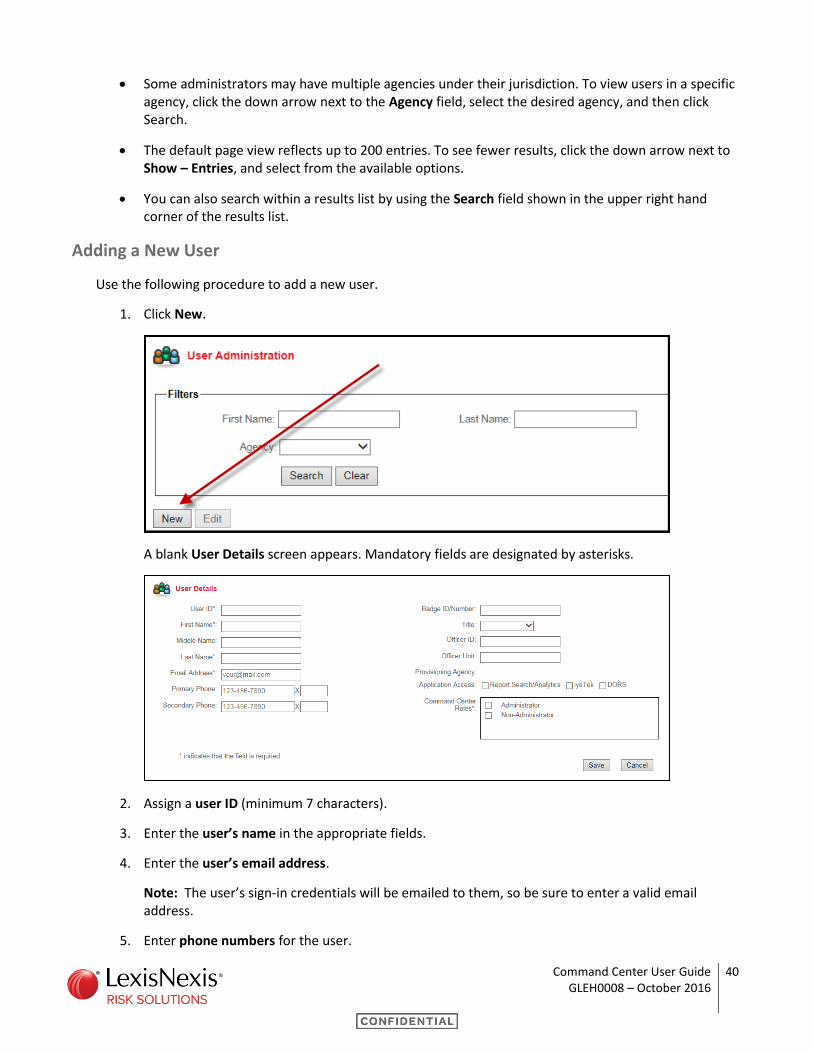
Some administrators may have multiple agencies under their jurisdiction. To view users in a specific agency, click the down arrow next to the Agency field, select the desired agency, and then click Search.
The default page view reflects up to 200 entries. To see fewer results, click the down arrow next to Show – Entries, and select from the available options.
You can also search within a results list by using the Search field shown in the upper right hand corner of the results list.
Adding a New User
Use the following procedure to add a new user.
1. Click New.
A blank User Details screen appears. Mandatory fields are designated by asterisks.
2. Assign a user ID (minimum 7 characters).
3. Enter the user’s name in the appropriate fields.
4. Enter the user’s email address.
Note: The user’s sign-in credentials will be emailed to them, so be sure to enter a valid email address.
5. Enter phone numbers for the user.
Command Center User Guide 41 GLEH0008 – October 2016
6. Fill in as many of the other fields as possible.
7. If you are assigned to manage multiple agencies, click the Provisioning Agency field and select the appropriate agency for the new user.
8. Specify the applications the user should have access to.
Note: For each application you specify, a new section will be displayed that must be completed for the new user. For iyeTek access, refer to Appendix A of this document to see definitions for iyeTek user groups.
9. Specify the appropriate Command Center Roles for the new user. (These roles are defined when the account is set up by LexisNexis).
10. Click Save.
The new user will receive two system-generated emails with Command Center in the subject field. The first email will contain their assigned user ID. The second email will contain their new temporary password, and advise them they must change the password the first time they sign in.
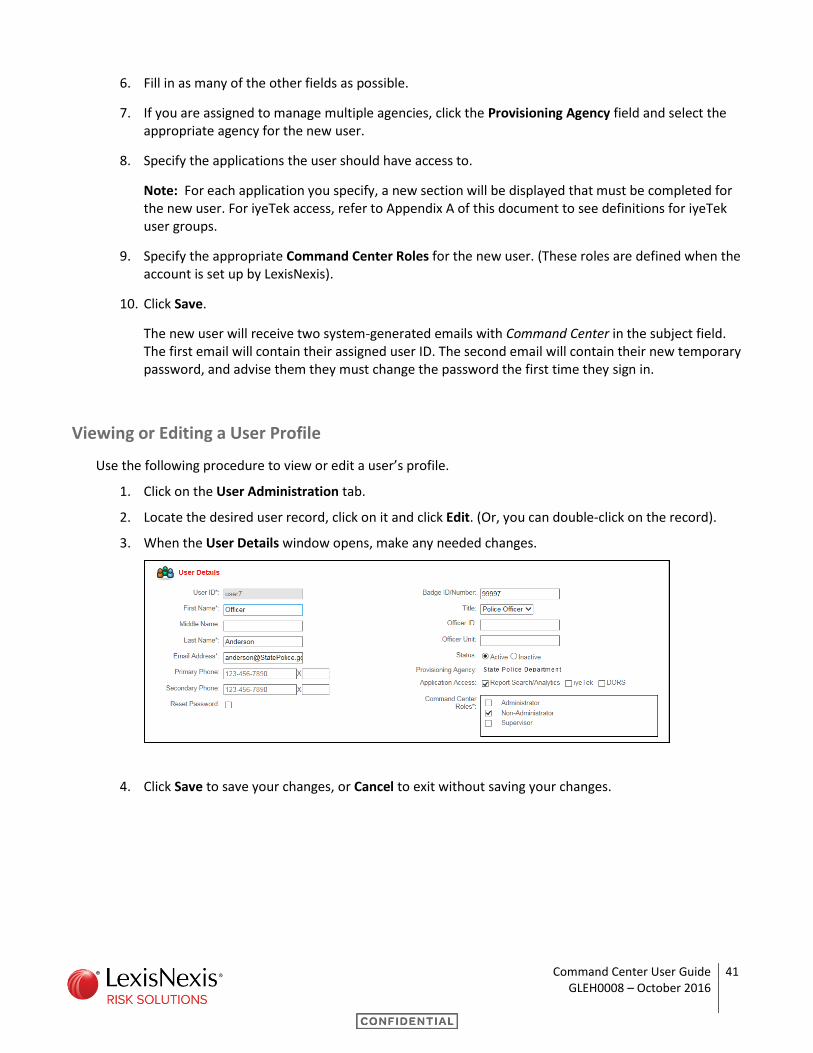
Viewing or Editing a User Profile
Use the following procedure to view or edit a user’s profile.
1. Click on the User Administration tab.
2. Locate the desired user record, click on it and click Edit. (Or, you can double-click on the record).
3. When the User Details window opens, make any needed changes.
4. Click Save to save your changes, or Cancel to exit without saving your changes.
Command Center User Guide 42 GLEH0008 – October 2016
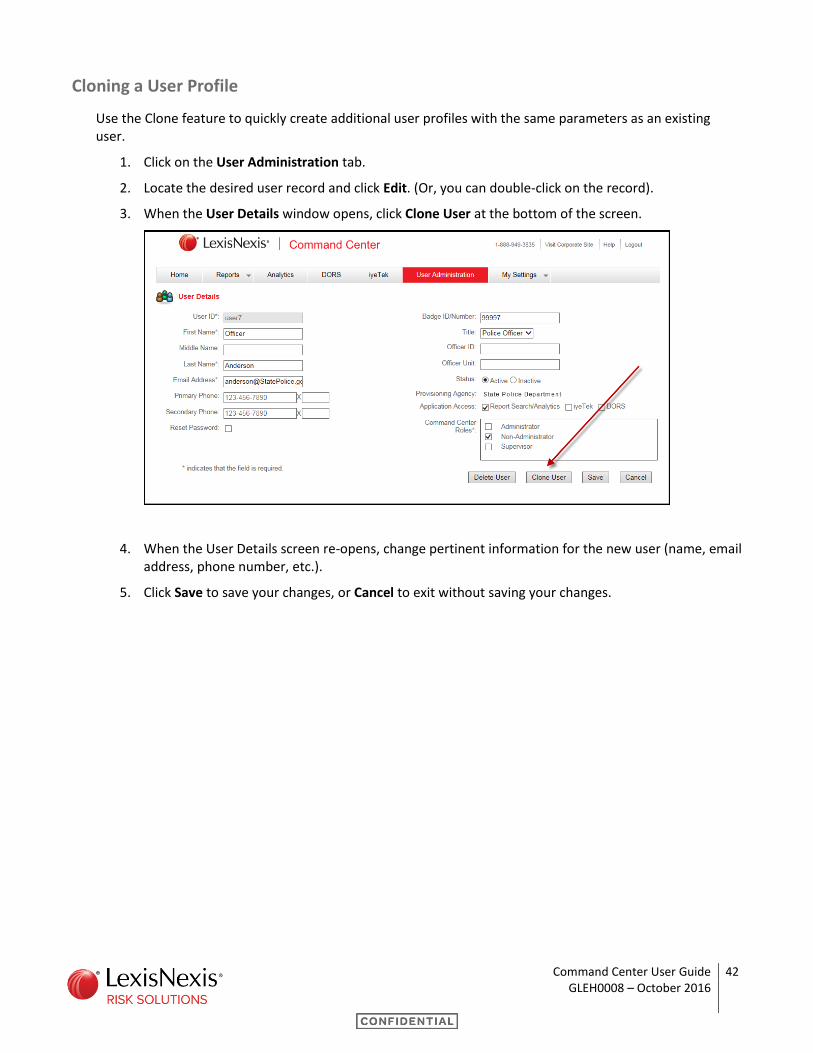
Cloning a User Profile
Use the Clone feature to quickly create additional user profiles with the same parameters as an existing user.
1. Click on the User Administration tab.
2. Locate the desired user record and click Edit. (Or, you can double-click on the record).
3. When the User Details window opens, click Clone User at the bottom of the screen.
4. When the User Details screen re-opens, change pertinent information for the new user (name, email address, phone number, etc.).
5. Click Save to save your changes, or Cancel to exit without saving your changes.
Command Center User Guide 43 GLEH0008 – October 2016
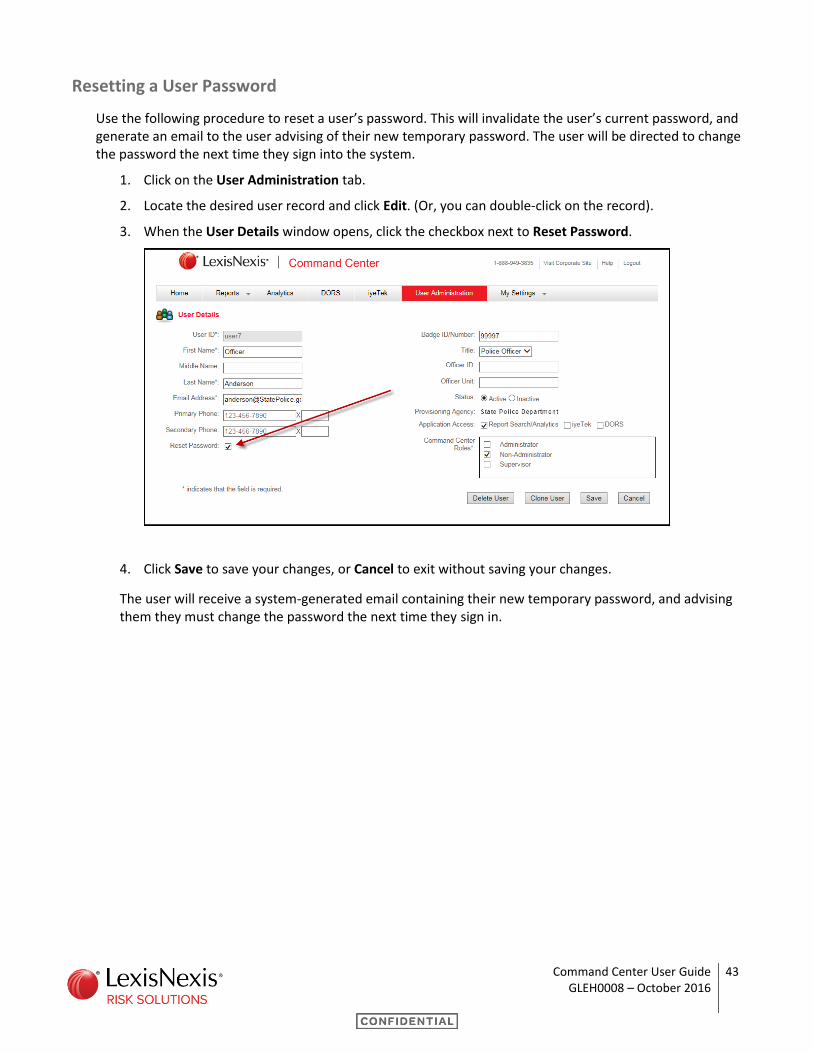
Resetting a User Password
Use the following procedure to reset a user’s password. This will invalidate the user’s current password, and generate an email to the user advising of their new temporary password. The user will be directed to change the password the next time they sign into the system.
1. Click on the User Administration tab.
2. Locate the desired user record and click Edit. (Or, you can double-click on the record).
3. When the User Details window opens, click the checkbox next to Reset Password.
4. Click Save to save your changes, or Cancel to exit without saving your changes.
The user will receive a system-generated email containing their new temporary password, and advising them they must change the password the next time they sign in.
Command Center User Guide 44 GLEH0008 – October 2016
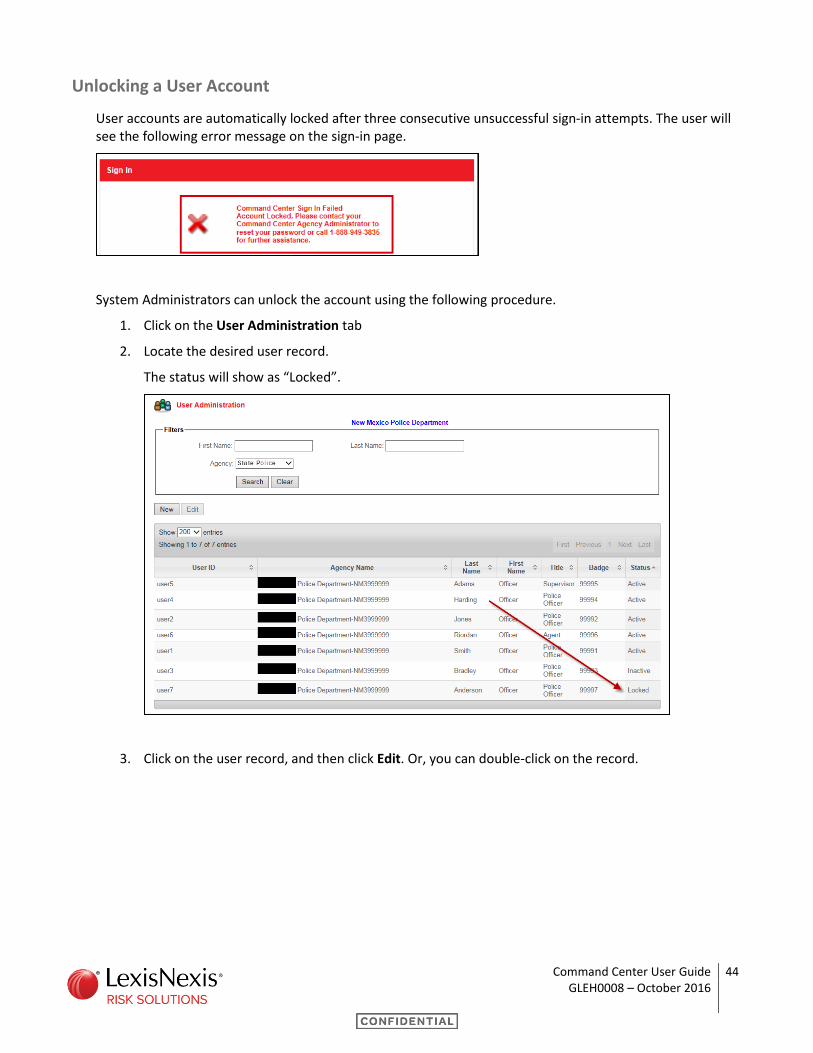
Unlocking a User Account
User accounts are automatically locked after three consecutive unsuccessful sign-in attempts. The user will see the following error message on the sign-in page.
System Administrators can unlock the account using the following procedure.
1. Click on the User Administration tab
2. Locate the desired user record.
The status will show as “Locked”.
3. Click on the user record, and then click Edit. Or, you can double-click on the record.
Command Center User Guide 45 GLEH0008 – October 2016
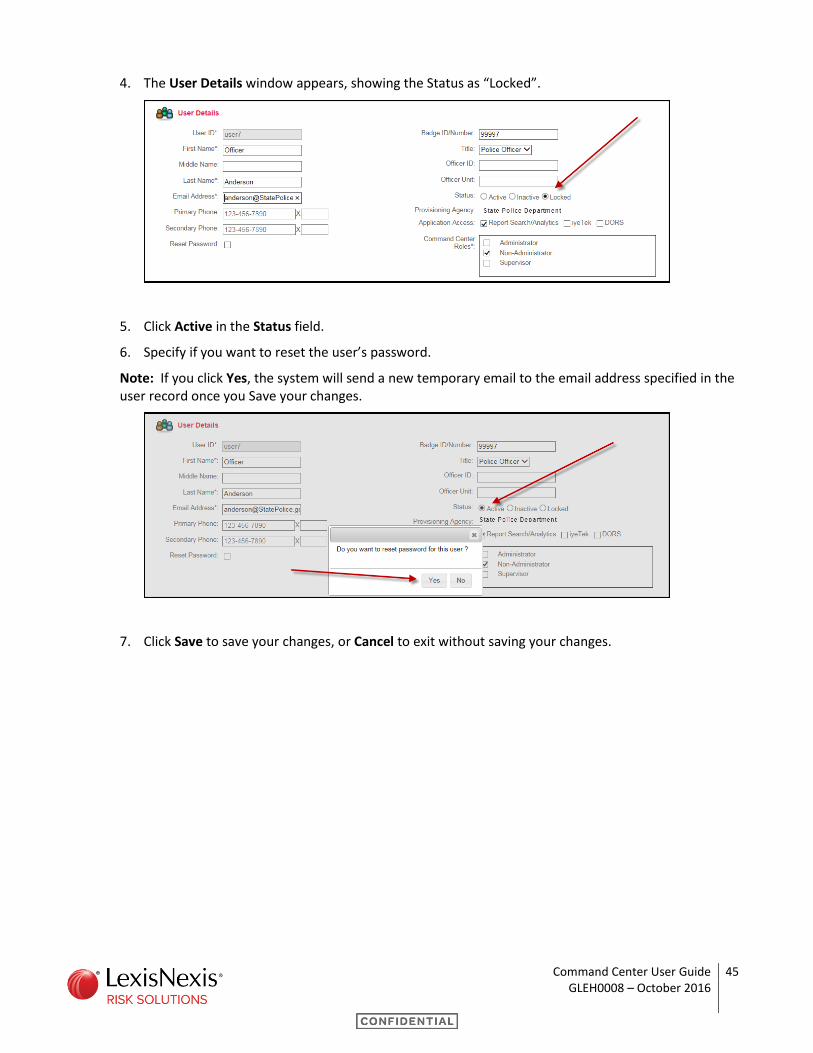
4. The User Details window appears, showing the Status as “Locked”.
5. Click Active in the Status field.
6. Specify if you want to reset the user’s password.
Note: If you click Yes, the system will send a new temporary email to the email address specified in the user record once you Save your changes.
7. Click Save to save your changes, or Cancel to exit without saving your changes.
Command Center User Guide 46 GLEH0008 – October 2016
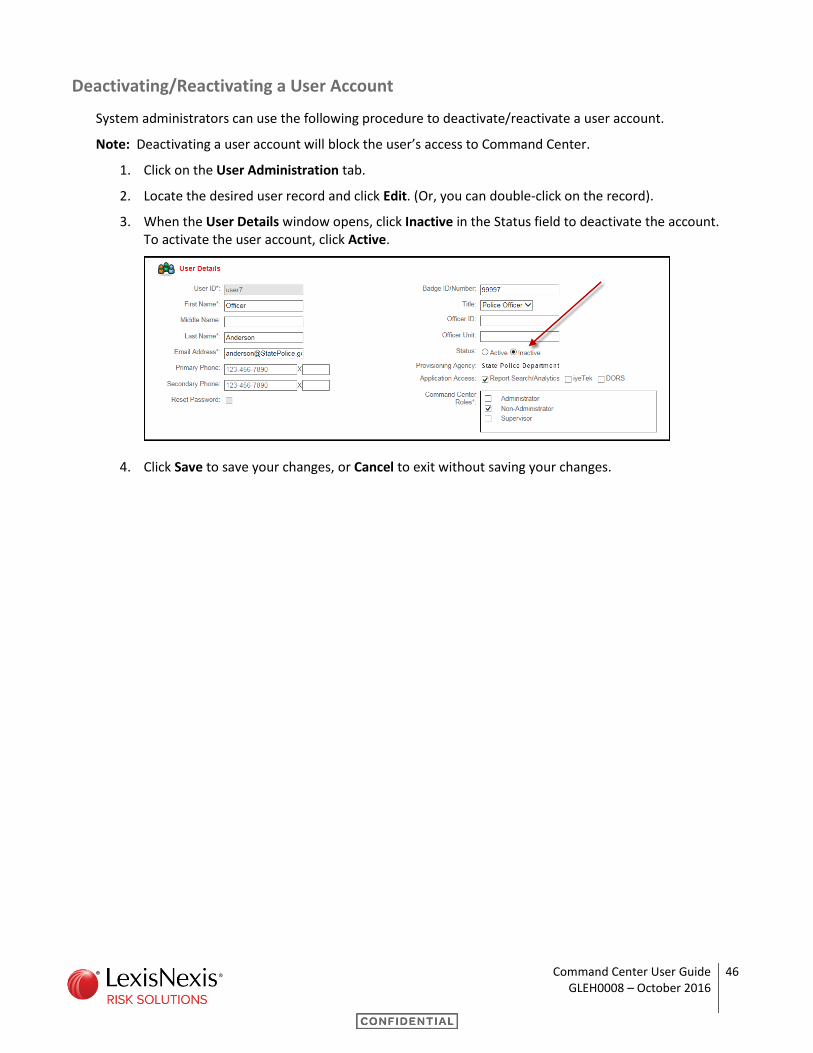
Deactivating/Reactivating a User Account
System administrators can use the following procedure to deactivate/reactivate a user account.
Note: Deactivating a user account will block the user’s access to Command Center.
1. Click on the User Administration tab.
2. Locate the desired user record and click Edit. (Or, you can double-click on the record).
3. When the User Details window opens, click Inactive in the Status field to deactivate the account. To activate the user account, click Active.
4. Click Save to save your changes, or Cancel to exit without saving your changes.
Command Center User Guide 47 GLEH0008 – October 2016
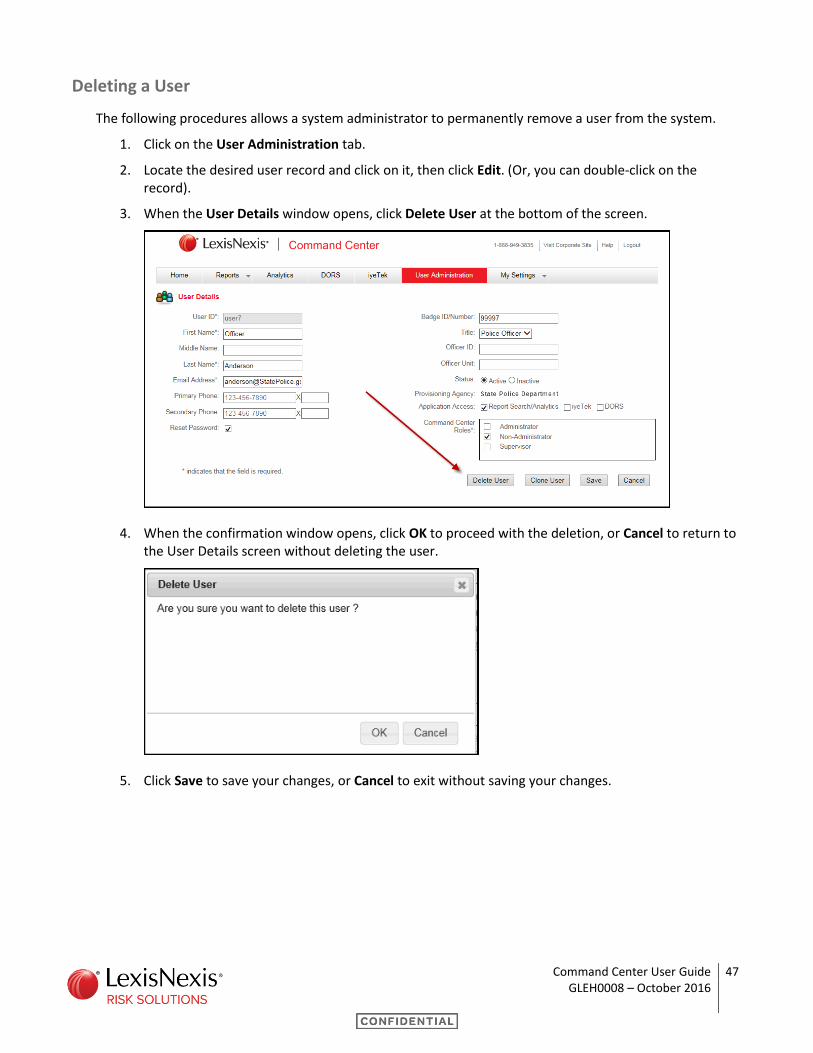
Deleting a User
The following procedures allows a system administrator to permanently remove a user from the system.
1. Click on the User Administration tab.
2. Locate the desired user record and click on it, then click Edit. (Or, you can double-click on the record).
3. When the User Details window opens, click Delete User at the bottom of the screen.
4. When the confirmation window opens, click OK to proceed with the deletion, or Cancel to return to the User Details screen without deleting the user.
5. Click Save to save your changes, or Cancel to exit without saving your changes.
Command Center User Guide 48 GLEH0008 – October 2016
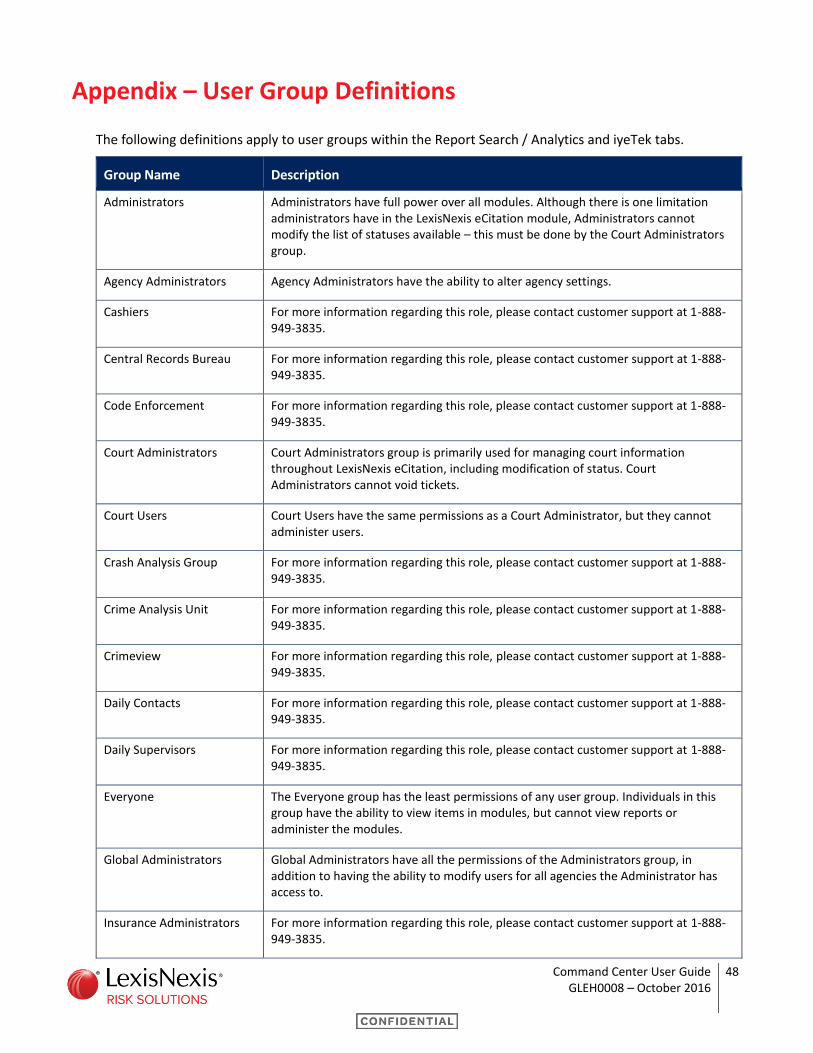
Appendix – User Group Definitions
The following definitions apply to user groups within the Report Search / Analytics and iyeTek tabs.
Group Name Description
Administrators Administrators have full power over all modules. Although there is one limitation administrators have in the LexisNexis eCitation module, Administrators cannot modify the list of statuses available – this must be done by the Court Administrators group.
Agency Administrators Agency Administrators have the ability to alter agency settings.
Cashiers For more information regarding this role, please contact customer support at 1-888-949-3835.
Central Records Bureau For more information regarding this role, please contact customer support at 1-888-949-3835.
Code Enforcement For more information regarding this role, please contact customer support at 1-888-949-3835.
Court Administrators Court Administrators group is primarily used for managing court information throughout LexisNexis eCitation, including modification of status. Court Administrators cannot void tickets.
Court Users Court Users have the same permissions as a Court Administrator, but they cannot administer users.
Crash Analysis Group For more information regarding this role, please contact customer support at 1-888-949-3835.
Crime Analysis Unit For more information regarding this role, please contact customer support at 1-888-949-3835.
Crimeview For more information regarding this role, please contact customer support at 1-888-949-3835.
Daily Contacts For more information regarding this role, please contact customer support at 1-888-949-3835.
Daily Supervisors For more information regarding this role, please contact customer support at 1-888-949-3835.
Everyone The Everyone group has the least permissions of any user group. Individuals in this group have the ability to view items in modules, but cannot view reports or administer the modules.
Global Administrators Global Administrators have all the permissions of the Administrators group, in addition to having the ability to modify users for all agencies the Administrator has access to.
Insurance Administrators For more information regarding this role, please contact customer support at 1-888-949-3835.
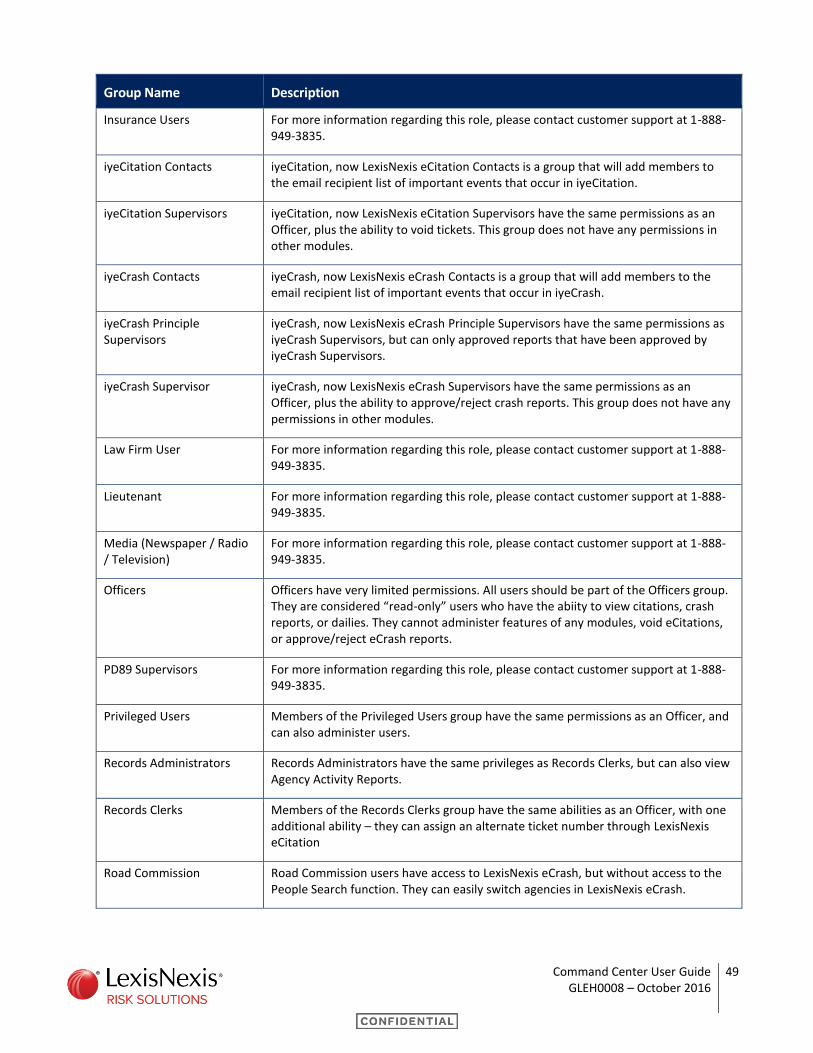
Command Center User Guide 49 GLEH0008 – October 2016
Group Name Description
Insurance Users For more information regarding this role, please contact customer support at 1-888-949-3835.
iyeCitation Contacts iyeCitation, now LexisNexis eCitation Contacts is a group that will add members to the email recipient list of important events that occur in iyeCitation.
iyeCitation Supervisors iyeCitation, now LexisNexis eCitation Supervisors have the same permissions as an Officer, plus the ability to void tickets. This group does not have any permissions in other modules.
iyeCrash Contacts iyeCrash, now LexisNexis eCrash Contacts is a group that will add members to the email recipient list of important events that occur in iyeCrash.
iyeCrash Principle Supervisors
iyeCrash, now LexisNexis eCrash Principle Supervisors have the same permissions as iyeCrash Supervisors, but can only approved reports that have been approved by iyeCrash Supervisors.
iyeCrash Supervisor iyeCrash, now LexisNexis eCrash Supervisors have the same permissions as an Officer, plus the ability to approve/reject crash reports. This group does not have any permissions in other modules.
Law Firm User For more information regarding this role, please contact customer support at 1-888-949-3835.
Lieutenant For more information regarding this role, please contact customer support at 1-888-949-3835.
Media (Newspaper / Radio / Television)
For more information regarding this role, please contact customer support at 1-888-949-3835.
Officers Officers have very limited permissions. All users should be part of the Officers group. They are considered “read-only” users who have the abiity to view citations, crash reports, or dailies. They cannot administer features of any modules, void eCitations, or approve/reject eCrash reports.
PD89 Supervisors For more information regarding this role, please contact customer support at 1-888-949-3835.
Privileged Users Members of the Privileged Users group have the same permissions as an Officer, and can also administer users.
Records Administrators Records Administrators have the same privileges as Records Clerks, but can also view Agency Activity Reports.
Records Clerks Members of the Records Clerks group have the same abilities as an Officer, with one additional ability – they can assign an alternate ticket number through LexisNexis eCitation
Road Commission Road Commission users have access to LexisNexis eCrash, but without access to the People Search function. They can easily switch agencies in LexisNexis eCrash.
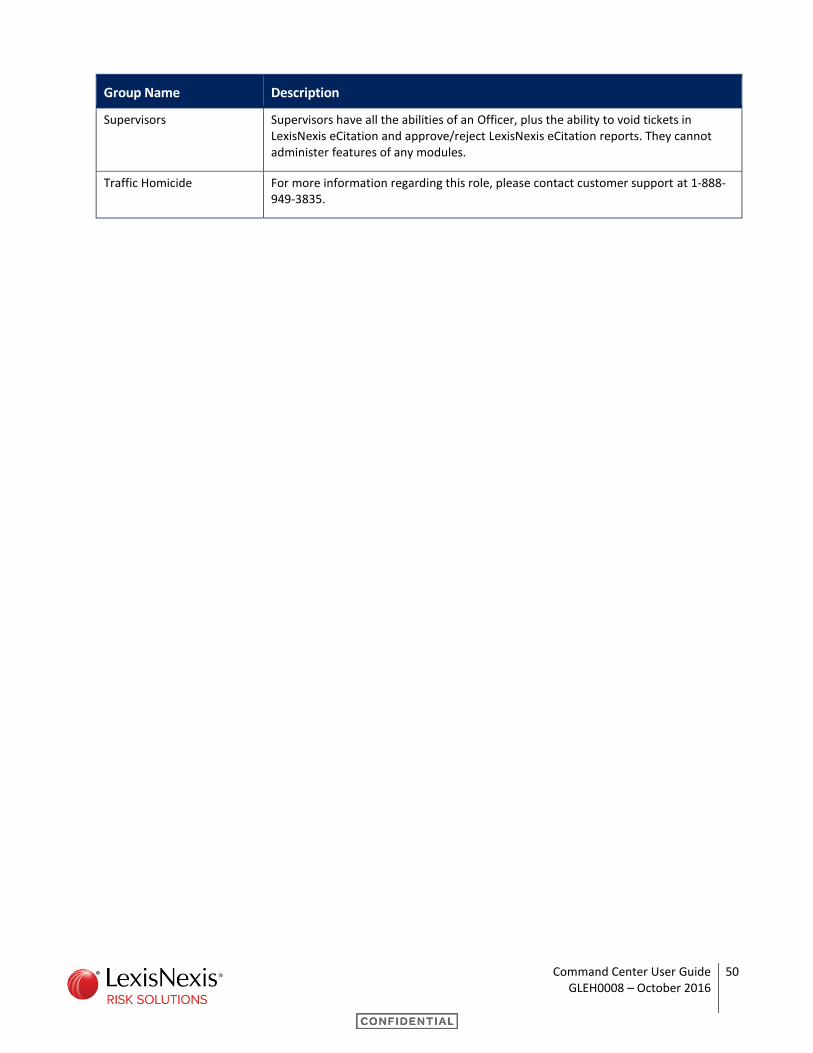
Command Center User Guide 50 GLEH0008 – October 2016
Group Name Description
Supervisors Supervisors have all the abilities of an Officer, plus the ability to void tickets in LexisNexis eCitation and approve/reject LexisNexis eCitation reports. They cannot administer features of any modules.
Traffic Homicide For more information regarding this role, please contact customer support at 1-888-949-3835.