lesson plan: creating coils - secondary-art - home plan: creating coils plo’s : • intermediate...
TRANSCRIPT

Lesson Plan: Creating Coils
PLO’s :• Intermediate skill building and knowledge of materi-als for ceramics• Developing knowledge and use of tools and equip-ment for ceramics• Developing knowledge and use of processes and tech-niques for ceramics• Developing knowledge of image development and design strategies by applying assigned strategies to personal artworks• Developing knowledge and use of visual elements and principles of art and design as they apply to ceram-ics and sculpture
Lesson Overview:
Students will learn a primary hand building technique in ce-ramics and will successfully build a 4-5 inch high coil pot of even thickness and free of imperfections. They will strength-en their skills and master coil building with the material of clay before moving onto using this hand building technique to create more complex designs.
Materials:ClayWireVariety of Wood tools and rubber ribsboard and plastic
Goals:-To learn how to coil build as a part of hand building-To learn to combining pinching and coiling to create even, consistent wall thicknesses.-To successfully build a coil pot as a part of basic understand-ing of hand building procedures.
Introduction: STATING OBJECTIVE (Why, What, How, What?):-State that the class will be learning to build coil pots and that it is an important, useful method of hand building in ceramics. -Proceed to hand out the worksheet.-Student’s objective is to first, build a coil pot of even thickness and at determined height then proceed to design a concept of decoration. They will then add the surface treatment they’ve decided on with the teacher. State that there will be a class critique or showing of work.
The Lesson
Key Points: STATING INFORMATION (Important things to remember):-They must sketch their pot both plain and decorated in their sketchbooks along with a statement of their concept for their surface treatment and then discuss with the teacher before they start their projects.-State their last wet day for this project (meaning last day for building)
Demonstration: STEPS FOR A SUCCESSFUL DEMO:-Have demo set up before class starts so you can begin on time and allow time for students to set up, sketch and have individual meeting and start their projects.-Have students bring their handout and round the front desk where the demo will be. -Go through steps of coil building as discussed in handout.1)show how to wedge2)Begin building and put emphasis on connecting coils and what I mean by pinching them together. Show that I’m strengthening the coils and not warping the pot out or shape, or over working the clay so it collapses.3) Do a quick decoration on the pot (one reductive, one additive as in PLO’s) to help initiate their brain storming for ideas.
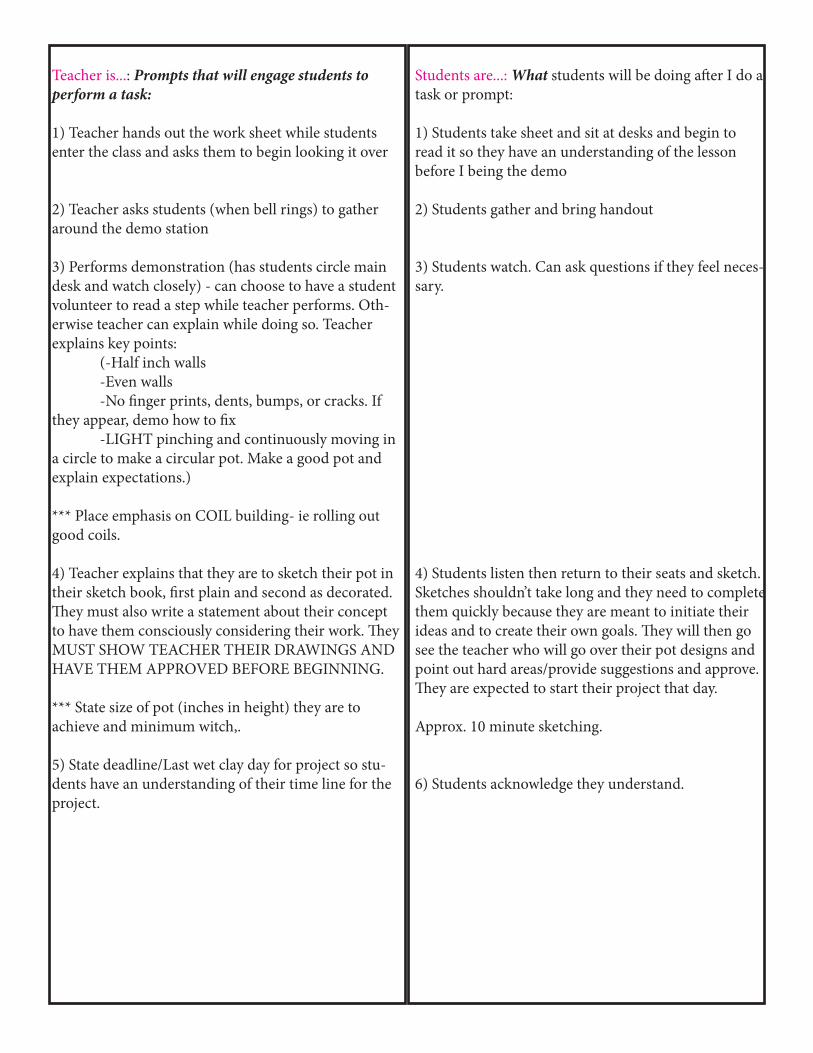
Teacher is...: Prompts that will engage students to perform a task:
1) Teacher hands out the work sheet while students enter the class and asks them to begin looking it over
2) Teacher asks students (when bell rings) to gather around the demo station
3) Performs demonstration (has students circle main desk and watch closely) - can choose to have a student volunteer to read a step while teacher performs. Oth-erwise teacher can explain while doing so. Teacher explains key points: (-Half inch walls -Even walls -No finger prints, dents, bumps, or cracks. If they appear, demo how to fix -LIGHT pinching and continuously moving in a circle to make a circular pot. Make a good pot and explain expectations.)
*** Place emphasis on COIL building- ie rolling out good coils.
4) Teacher explains that they are to sketch their pot in their sketch book, first plain and second as decorated. They must also write a statement about their concept to have them consciously considering their work. They MUST SHOW TEACHER THEIR DRAWINGS AND HAVE THEM APPROVED BEFORE BEGINNING.
*** State size of pot (inches in height) they are to achieve and minimum witch,.
5) State deadline/Last wet clay day for project so stu-dents have an understanding of their time line for the project.
Students are...: What students will be doing after I do a task or prompt:
1) Students take sheet and sit at desks and begin to read it so they have an understanding of the lesson before I being the demo
2) Students gather and bring handout
3) Students watch. Can ask questions if they feel neces-sary.
4) Students listen then return to their seats and sketch. Sketches shouldn’t take long and they need to complete them quickly because they are meant to initiate their ideas and to create their own goals. They will then go see the teacher who will go over their pot designs and point out hard areas/provide suggestions and approve. They are expected to start their project that day.
Approx. 10 minute sketching.
6) Students acknowledge they understand.

Closure: STUDENTS COMPLETING ACTIVITY (Share experience, critique, share work, etc):
Allow 10 minutes of clean up and show they what it means to clean up - WHITE GLOVE RULE! There should be NO dust on desks. Explain health reason of the dust (ie it causes lungs to harden). -Show them where to store work
**Remind them of the consequence of what happens when you don’t properly wrap your work.
-There will be a critique of the work and small gallery walk within class when the pots are complete (glazed).
Teacher Questions: QUESTIONS TO ASK DURING WORK TIME/END OF LESSON:-What other ways can you use coils to build?-Why would it be important that all the coils are consistent thickness?-What other things can you build coils with?-Do pieces built with coils always have to be a circle? What else can it be? -Why do you think this method of hand building is so useful?
Reflections: Your thoughts after lesson. How did it go?:
Notes:

CreatingCoils
Coiling is a common and useful form of hand building in ceramics where the artist uses long coils of clay (approximately the
thickness of one’s thumb) to create a form. We will be learning how to use coils to build by creating coil pots.
Draw your pot into your sketch book and show the teacher before beginning your project.
1) Retrieve your clay and wedge the material you will use to create consistency in the clay and to rid the clay of any air bubbles. Roll out long coils that are long enough to form a complete circumference of the pot you will be building. Do not wet your coils in any way as it will cause them to become slippery. Be sure to cover your coils with plastic while they’re waiting to be used so they don’t dry out.
2) Decide your bottom by rolling out a slab of clay (.5 inches thick) and cutting out the bottom of your pot. You may use a round container to use to trace your perfect circle. Score the circumference of the bottom and lay your first coil on top. Pull down the sides of the coil with your fingers, down into the bottom slab to merge the material together. Be sure to COMPRESS the clay particles to create a strong joining of the clay (but not so much that you press a hole!).
3) Score the top of your coil and lay down your second coil. With your finger or a wood tool, gently bring down the sides of the second coil onto the first to join them. Be sure to have a hand supporting the opposite side you’re working on to be sure not to warp your pot. After you’ve complete merging the circumference of the pot, support the pot with one hand and use the other hand to work around the pot, lightly pinching the clay to COMPRESS and thin the clay so that it is a consistent thickness (.5 inches thick).
4) Repeat score, adding coils and pinching until you achieve your desired height. 5) Be sure to finish your pot by using your hands, rubber ribs, and wet sponges to rid the pot of imperfections such as finger prints or dents. Make sure the pot is even and smooth. Make sure you consider your rim by making it even or creating a lip. Consider the bottom of your pot by creating a concave foot and/or cleaning off the sides by running a needle tool around the circumference.
6) Decorating your pot: Use your creativity and imagination to create a powerful concept for a design on your pot. You made use reductive or additive methods to build, extend or reduce your pot in any way. You can decide on creative methods for adding texture by us-ing your hands, tools, or by finding interesting things to press into the clay such as fabric, items fallen from nature, or stamps. This is your time to explore and discover on your own! Be sure to write down your concept into your sketch book so you can share and explain it to the class.