led daylite micro - designsforvision.com · the usb power supply is designed to meet multi-national...
TRANSCRIPT
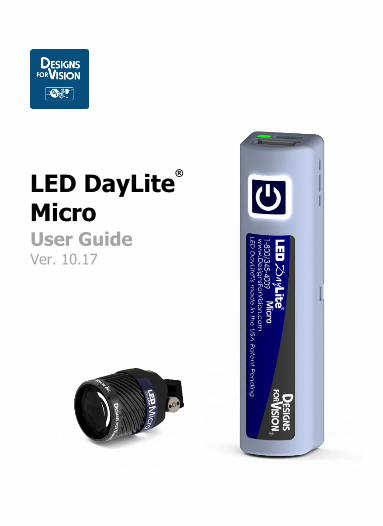
LED DayLite®
Micro User Guide Ver. 10.17
2 LED DAYLITE®
MICRO USER GUIDE
CONTENTS
Indications for Use ......................................................... 4
Device Description ......................................................... 4
Device Diagrams ............................................................ 5
Directions for Use .......................................................... 7
Charging the Battery ................................................. 6
Using the Headlight ................................................... 9
Understanding the Status Indicator ........................ 10
Holster Operation .................................................... 12
Inspection and Preventative Maintenance ................. 13
Important Safety Instructions...................................... 14
Plug Adapter Kit ........................................................... 16
Specifications ............................................................... 17
Description of Various Symbols ................................... 18
Warranty ...................................................................... 18
3 LED DAYLITE®
MICRO USER GUIDE
INDICATIONS FOR USE
The Designs for Vision® LED DayLite® Micro is a lightweight,
frame-mounted headlight that is designed for general
illumination in laboratory settings.
DEVICE DESCRIPTION
The Designs for Vision® LED DayLite® Micro provides bright,
portable light to the laboratory environment. The headlight
is designed to clip onto a wide variety of frames. It is
powered by a lithium ion battery and generates a 3” spot of
light at a 12-inch working distance. The light has a correlated
color temperature of 5800K and a maximum intensity of
60,000 lux. The unit can run on battery power for up to 10
hours before needing to be recharged.
The LED DayLite® Micro consists of the following:
Two Power Packs HDi™ Micro Headlight UV/Blue Light Filter (installed) Two Holsters Belt Clip
4 LED DAYLITE®
MICRO USER GUIDE
USB Power Supply Headlight Cable USB Power Cord Hex Drivers (2) T-Mount Bracket (sold separately) Operation Manual Registration Card Cable Wrap Kit
Always examine the unit and accessories for damage before
commencing use. Damaged accessories must not be used
and must be replaced. Use original Designs for Vision, Inc.
parts and accessories only. The use of unapproved parts may
void the warranty.
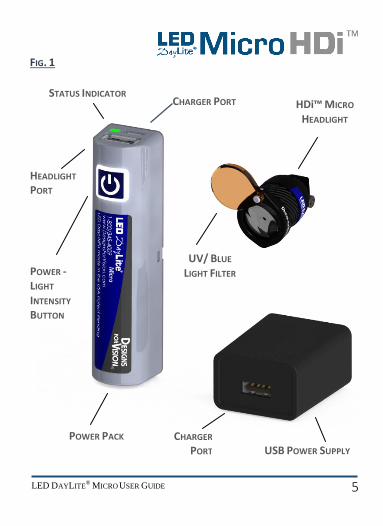
DEVICE DIAGRAMS
Your LED DayLite® Micro is designed to be simple and
lightweight. It consists of an HDi™ Micro Headlight, Power
Pack, and USB Power Supply. NOTE: The UV/blue light filter
comes attached to the HDi™ Micro Headlight, but is
removable. The following diagram identifies each part for
your reference in this manual:
5 LED DAYLITE®
MICRO USER GUIDE
STATUS INDICATOR HDi™ MICRO
HEADLIGHT
CHARGER PORT
HEADLIGHT
PORT
POWER -
LIGHT
INTENSITY
BUTTON
UV/ BLUE
LIGHT FILTER
POWER PACK USB POWER SUPPLY
CHARGER
PORT
FIG. 1
6 LED DAYLITE®
MICRO USER GUIDE
NOTE: The batteries need to receive a full charge before initial operation
DIRECTIONS FOR USE
CHARGING THE BATTERY
Remove the components from the shipping container,
checking that all parts on the packing list have been
received. Carefully remove the
headlight, power packs, USB
power supply and USB power
cord from the packaging carton.
The USB power supply is designed to meet multi-national
regulatory requirements and has multi-input voltage
capability to accommodate various line voltages from 100-
240 VAC. The power packs can be charged from any
standard 5V USB output however, it is recommended that
they are
charged with
the supplied
USB power
supply for
FIG. 2
7 LED DAYLITE®
MICRO USER GUIDE
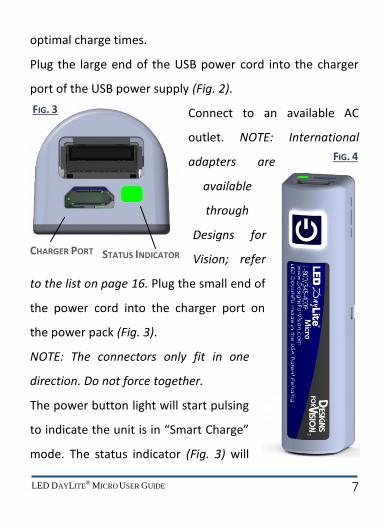
CHARGER PORT STATUS INDICATOR
optimal charge times.
Plug the large end of the USB power cord into the charger
port of the USB power supply (Fig. 2).
Connect to an available AC
outlet. NOTE: International
adapters are
available
through
Designs for
Vision; refer
to the list on page 16. Plug the small end of
the power cord into the charger port on
the power pack (Fig. 3).
NOTE: The connectors only fit in one
direction. Do not force together.
The power button light will start pulsing
to indicate the unit is in “Smart Charge”
mode. The status indicator (Fig. 3) will
FIG. 4
FIG. 3
8 LED DAYLITE®
MICRO USER GUIDE
display the current state of charge. The LED will change
colors as the battery charges; going from RED to ORANGE to
GREEN. When the power button light remains steady, the
unit is fully charged. You can now disconnect the power cord
from the power pack.
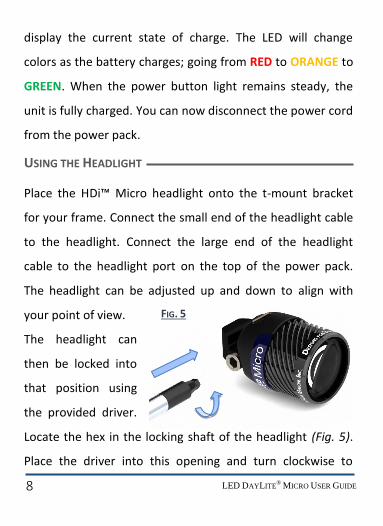
USING THE HEADLIGHT
Place the HDi™ Micro headlight onto the t-mount bracket
for your frame. Connect the small end of the headlight cable
to the headlight. Connect the large end of the headlight
cable to the headlight port on the top of the power pack.
The headlight can be adjusted up and down to align with
your point of view.
The headlight can
then be locked into
that position using
the provided driver.
Locate the hex in the locking shaft of the headlight (Fig. 5).
Place the driver into this opening and turn clockwise to
FIG. 5
9 LED DAYLITE®
MICRO USER GUIDE
tighten the shaft. To unlock the position, loosen the shaft by
turning counter-clockwise.
NOTE: The shaft will only turn a limited distance. Do not
force in either direction.
Press the power button on the front of your battery pack.
The headlight will turn on at high intensity. The power
button will illuminate and the status indicator will display
the current state of charge. A second press of the power
button will lower the light intensity of the headlight. A third
press turns the power pack off.
The LED DayLite® Micro also incorporates a Low Battery
Warning system. With approximately ten (10) minutes of
battery power remaining, the headlight will flash three
times. At five (5) minutes remaining, the headlight will flash
another three times. At 30 (thirty) seconds remaining, the
headlight will flash continually until the battery is
completely depleted.
10 LED DAYLITE®
MICRO USER GUIDE
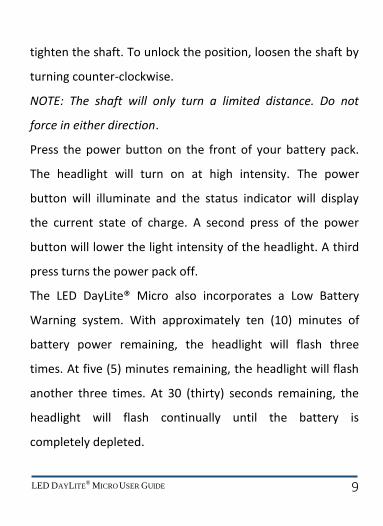
A UV/blue light filter is
provided to prevent
premature curing of
dental composites
(comes pre-installed).
To use, slide the filter
over the front of the headlight until completely seated (Fig.
6). Using the supplied tool, tighten the set screw on the
bottom of the filter to properly secure to the headlight. You
can now rotate the UV/blue light filter into and out of the
path of light, as required.
NOTE: Be careful to not overtighten set screw when
installing.
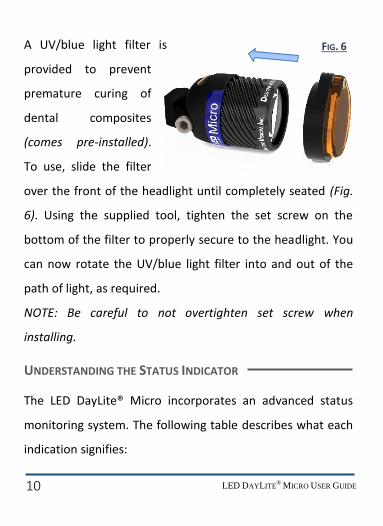
UNDERSTANDING THE STATUS INDICATOR
The LED DayLite® Micro incorporates an advanced status
monitoring system. The following table describes what each
indication signifies:
FIG. 6
11 LED DAYLITE®
MICRO USER GUIDE
SOLID GREEN: FULLY CHARGED BATTERY
SOLID/PULSING RED: LOW BATTERY
SLOW BLINK RED: BATTERY SPENT. PLEASE CONTACT
DESIGNS FOR VISION, INC. FOR FURTHER ASSISTANCE
FAST BLINK RED: GENERAL ERROR. PLEASE CONTACT
DESIGNS FOR VISION, INC. FOR FURTHER ASSISTANCE
NOTE: A spent battery should not be used. Contact Designs
for Vision Inc. for ordering a replacement.
REMARQUE: Une batterie usagée ne doit pas etre utilisée.
Contacter Designs for Vision Inc. pour le remplacement.
NOTE: Discard batteries in accordance with all regulations
and contact Designs for Vision, Inc. for a replacement.
12 LED DAYLITE®
MICRO USER GUIDE
REMARQUE: Mettre au rebut les batteries usagées
conformément aux lois et réglementations en vigueur
contacter Designs pour Vision, Inc. pour un remplacement.
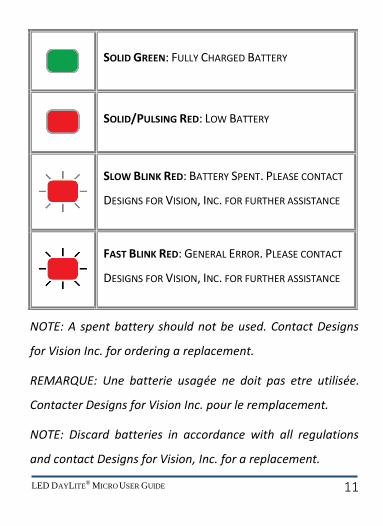
HOLSTER OPERATION
The LED DayLite® Micro is supplied with a holster to allow
you to swivel the power pack on your belt. Simply snap the
holster onto the back of the power pack in the orientation
shown (Fig. 7). The holster should hold
firmly to the
power pack.
To release, pull
back on one of
the tabs and lift
out power
pack. Slide the back of the holster into the opening on the
belt clip. Make sure you hear an audible “click” when
properly seated. You can now attach it to your belt to carry
it around with you.
FIG. 7
13 LED DAYLITE®
MICRO USER GUIDE
INSPECTION AND PREVENTATIVE MAINTENANCE
Clean lenses with a standard glass cleaner and a soft,
lint-free cloth, making sure not to scratch the surface.
It is recommended for disinfection that all the exposed
plastic sections of the headlight be wiped with Lysol IC
surface disinfectant/cleaner or an equivalent plastic-
safe cleaner. Note: Do not use alcohol, phenol,
ammonia, or iodine complex solutions
Wipe the sections rather than spraying onto plastic
parts. Note: Do not let liquids enter openings or ports.
Do not immerse parts in solutions. Using solutions
other than recommended may void warranty. Allowing
liquids to enter openings or ports may void warranty.
Wipe cables with plastic-safe cleaners, if necessary. Do
not allow cleaners to get onto the cable connectors as
it may cause the electrical terminals to corrode
It is suggested that power packs be replaced every 24
months to ensure proper operation
14 LED DAYLITE®
MICRO USER GUIDE
IMPORTANT SAFETY INSTRUCTIONS INSTRUCTIONS IMPORTANTES CONCERNANT LA SÉCURITÉ
NOTE: Save these instructions. This manual contains
important safety and operating instructions
REMARQUE: GARDEZ CES INSTRUCTIONS - Ce manuel
contient les consignes d’utilisation et de sécurité importantes
NOTE: Always examine the unit and accessories for
damage before commencing use. Damaged accessories must
not be used and must be replaced. Use original Designs for
Vision, Inc. parts and accessories only. The use of
unapproved parts may void the warranty.
REMARQUE: Toujours examiner l'appareil et les
accessoires pour verifier l’absence de dommage avant
chaque utilization. Accessoires endommagés ne doivent pas
être utilizes et doivent être remplacées. Utiliser uniquement
Designs for Vision, Inc. originaux pièces et accessoires.
L'utilisation de pièces non approuvées peut annuler la
garantie.
15 LED DAYLITE®
MICRO USER GUIDE
NOTE: To reduce the risk of battery explosion, follow
these instructions and those marked on the battery
REMARQUE: Afin de réduire le risque d’explosion de la
batterie, suivez ces instructions et celles indiquées sur la
batterie.
NOTE: Study all battery manufacturer’s specific
precautions such as removing or not removing cell caps
while charging and recommended rates of charge.
REMARQUE: Etudier toutes les precautions specifiques de
la batterie données par le fabriquant, comme enlever ou ne
pas enlever les bouchons de cellule pendant la charge, ainsi
que le niveau de charge recommendé.
NOTE: Do not Autoclave
REMARQUE: Ne pas stériliser à l'autoclave.
NOTE: For indoor use only
REMARQUE: utilizer uniquement à l’interieur.
16 LED DAYLITE®
MICRO USER GUIDE
NOTE: Disposal of the equipment and the accessories at
the end of their useful lives should be in accordance with all
national and local regulations
REMARQUE: la disposition de l'équipement et les
accessoires à la fin de leur durée de vie utile doit être
conforme à toutes les réglementations nationales et locales.
NOTE: If the equipment is used in a manner not specified
by Designs for Vision, Inc., the protection provided by the
equipment may be impaired.
REMARQUE: Si la méthode d'utilisation de l'équipement
diffère de celle décrite par Designs for Vision, Inc., la
protection assurée par l'équipement risque d'être altérée.
PLUG ADAPTER KIT
The following adapters are included in the Plug Adapter Kit:
United States Adapter European Adapter Australian Adapter UK Adapter UK Grounded Adapter
4911-0001-0016 4911-0001-0016 4911-0001-0016 4911-0001-0016 4911-0001-0016
17 LED DAYLITE®
MICRO USER GUIDE
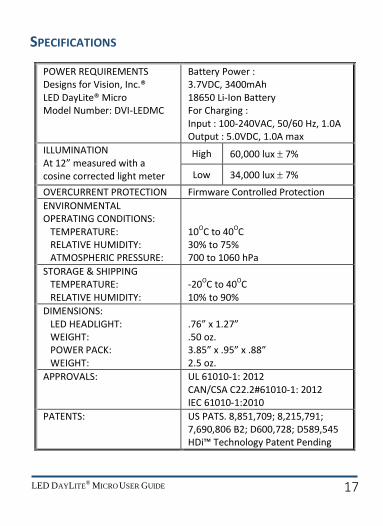
SPECIFICATIONS
POWER REQUIREMENTS Designs for Vision, Inc.® LED DayLite® Micro Model Number: DVI-LEDMC
Battery Power : 3.7VDC, 3400mAh 18650 Li-Ion Battery For Charging : Input : 100-240VAC, 50/60 Hz, 1.0A Output : 5.0VDC, 1.0A max
ILLUMINATION At 12” measured with a cosine corrected light meter
High 60,000 lux 7%
Low 34,000 lux 7%
OVERCURRENT PROTECTION Firmware Controlled Protection
ENVIRONMENTAL OPERATING CONDITIONS: TEMPERATURE: RELATIVE HUMIDITY: ATMOSPHERIC PRESSURE:
10OC to 40OC 30% to 75% 700 to 1060 hPa
STORAGE & SHIPPING TEMPERATURE: RELATIVE HUMIDITY:
-20OC to 40OC 10% to 90%
DIMENSIONS: LED HEADLIGHT: WEIGHT: POWER PACK: WEIGHT:
.76” x 1.27” .50 oz. 3.85” x .95” x .88” 2.5 oz.
APPROVALS: UL 61010-1: 2012 CAN/CSA C22.2#61010-1: 2012 IEC 61010-1:2010
PATENTS: US PATS. 8,851,709; 8,215,791; 7,690,806 B2; D600,728; D589,545 HDi™ Technology Patent Pending
18 LED DAYLITE®
MICRO USER GUIDE
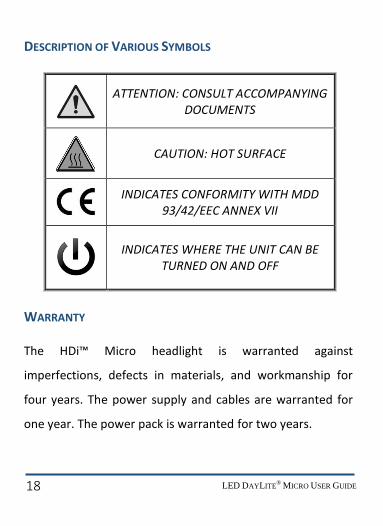
DESCRIPTION OF VARIOUS SYMBOLS
ATTENTION: CONSULT ACCOMPANYING DOCUMENTS
CAUTION: HOT SURFACE
INDICATES CONFORMITY WITH MDD 93/42/EEC ANNEX VII
INDICATES WHERE THE UNIT CAN BE TURNED ON AND OFF
WARRANTY
The HDi™ Micro headlight is warranted against
imperfections, defects in materials, and workmanship for
four years. The power supply and cables are warranted for
one year. The power pack is warranted for two years.
19 LED DAYLITE®
MICRO USER GUIDE
NOTES:

Toll Free 800/345-4009 Fax 631/585-3404 Web Site: www.DesignsForVision.com
E-mail: [email protected] P/N: 0075-1185-0095
4000 Veterans Memorial Hwy Bohemia, NY 11716