lecture 9 timer operations and programming. 2 introduction summary of timers timer programming...
TRANSCRIPT

Lecture 9
Timer Operations and Programming

2
Timer Operations and Programming
Introduction Summary of timers Timer programming sequence Summary of timer SFRs Timer 0: 8-bit auto-reload mode (mode 2)
Programming sequence (timer 0 in mode 2) Generating Interrupts on timer 0 overflow
Timer 3: 16-bit auto-reload mode (mode 0) Timer 3 programming sequence Generating interrupts on timer 3 overflow
Timer 2: 16-bit auto-reload mode (mode 1) Timer 2: programming example
Timer 2: 16-bit counter/timer with capture (mode 0)

3
Introduction
Timers are used for: interval timing, event counting or baud rate generation
In interval timing applications, a timer is programmed to overflow at a regular interval and the following:
Set the timer overflow flag or Generate an interrupt
The flag or interrupt is used to synchronise the program to perform an action such as checking the state of inputs and updating the DAC output or ADC input
This can also be used to generate waveforms at set frequencies Event counting is used to determine the number of occurrences of an
event, rather than to measure the elapsed time between events. In this case, the timer functions as a counter. An “event” is any external stimulus that provides a high-to-low transition at
the selected input pin The timers can also function as the baud rate generators for the
C8051F020’s internal serial ports (UART0 and UART1) “Baud rate” is the bit rate of the serial port
(the time period of a bit)

4
Summary of Timers
The C8051F020 has 5 counter/timers
Mode Timer 0 & 1 Timer 2 Timer 3 Timer 4
0 13-bit counter/timer16-bit
counter/timer with capture
16-bit timer with auto-
reload
16-bit counter/timer with
capture
1 16-bit counter/timer16-bit
counter/timer with auto-reload
16-bit counter/timer with
auto-reload
2
8-bit counter/timer with auto-reload
(Baud rate Generator for UART0 and
UART1, Timer 1 only)
Baud rate generator for
UART0
Baud rate generator for
UART1
3Two 8-bit
counter/timers (Timer 0 only)

5
Timer Programming Sequence
For Timers 0 and 1 Step 1: Select the desired clock by programming CKCON.3 (T0M) or
CKCON.4 (T1M). The clock input may be the system clock or the system clock divided by 12.
Step 2: Select the operating mode (T0M[1:0] or T1M[1:0] in TMOD)
Step 3: Write the starting value for count up sequence into the associated count registers (TL0, TL1, TH0 and TH1)
Step 4: [OPTIONAL] Enable timer interrupt (ET0 or ET1 in IE) and global interrupts (EA in IE)
Step 5: Set the appropriate control bits, and turn on Timer (TR0 or TR1 in TCON)

6
Timer Programming Sequence
For Timer 3 Step 1: Write the auto-reload value into the auto-reload registers (TMR3RLL
and TMR3RLH)
Step 2: Write the starting value for count up sequence into the count registers (TMR3L and TMR3H)
Step 3: Select the desired clock source (T3XCLK) and frequency (T3M) and set the control bits (TR3)
Step 4: [OPTIONAL] Enable timer interrupt (ET3 in EIE2) and global interrupts (EA in IE)
Step 5: Turn on Timer 3 (TMR3CN)
Note: “Auto-reload” means the hardware automatically reloads the count registers with the value from the reload register when the count overflows from 0xFFFF to 0x0000

7
Timer Programming Sequence
For Timers 2 and 4 Step 1: Select the desired system clock frequency (CKCON)
Step 2: Write the auto-reload value into the associated capture registers if using auto-reload mode (RCAP2L, RCAP2H, RCAP4L and RCAP4H)
Step 3: Write the starting value for count up sequence into the associated count registers (TL2, TL4, TH2 and TH4)
Step 4: Select the mode (C/Tx, CP/RLx) and set the appropriate control bits (TRx)
Step 5: [OPTIONAL] Enable timer interrupt (ET2 in IE or ET4 in EIE2) and global interrupts (EA in IE)
Step 6: Turn on Timer (T2CON and T4CON)

8
Summary of Timer SFRs
Timer SFRAffected Timers
Purpose AddressBit
Addressable
CKCON 0, 1, 2 and 4 Clock Control 8EH No
TCON
0 and 1
Timer Control 88H Yes
TMOD Timer Mode 89H No
TL0 Timer 0 Low Byte 8AH No
TL1 Timer 1 Low Byte 8BH No
TH0 Timer 0 High Byte 8CH No
TH1 Timer 1 High Byte 8DH No
T2CON
2
Timer 2 Control C8H Yes
RCAP2L Timer 2 Low Byte Capture CAH No
RCAP2H Timer 2 High Byte Capture CBH No
TL2 Timer 2 Low Byte CCH No
TH2 Timer 2 High Byte CDH No

9
Summary of Timer SFRs
Timer SFRAffected Timers
Purpose AddressBit
Addressable
TMR3CN
3
Timer 3 Control 91H No
TMR3RLL Timer 3 Low Byte Reload 92H No
TMR3RLH Timer 3 High Byte Reload 93H No
TMR3L Timer 3 Low Byte 94H No
TMR3H Timer 3 High Byte 95H No
T4CON
4
Timer 4 Control C9H No
RCAP4L Timer 4 Low Byte Capture E4H No
RCAP4H Timer 4 High Byte Capture E5H No
TL4 Timer 4 Low Byte F4H No
TH4 Timer 4 High Byte F5H No

10
Timer 0: 8-Bit Auto-Reload Mode (Mode 2)
This mode configures Timers 0 (and 1) to operate as 8-bit counter/timers with automatic reload of the start value
The timer low byte (TLx) operates as an 8-bit timer while the timer high byte (THx) holds a reload value
When the count in TLx overflows from FFH to 00H, the timer flag is set and the value in THx is automatically loaded into TLx
Counting continues from the reload value up to the next FFH overflow, and so on
This mode is convenient for creating regular periodic intervals, as the timer overflows at the same rate once TMOD and THx are initialized
TLx must be initialized to the desired value before enabling the timer for the first count to be correct
Timer 1 can be used as an 8-bit baud rate generator for UART0 and/or UART1 in mode 2
Timer Counter Registers

11
Timer 0: Programming Step 1
Select the desired clock by programming CKCON (Clock Control) Register
For Timer 0, program the bit T0M
Bit Symbol Description
7 - Unused. Read=000b; Write=Don’t care.
6 T4MTimer 4 Clock Select0: Timer 4 uses the system clock divided by 12.1: Timer 4 uses the system clock.
5 T2MTimer 2 Clock Select0: Timer 2 uses the system clock divided by 12.1: Timer 2 uses the system clock.
4 T1MTimer 1 Clock Select0: Timer 1 uses the system clock divided by 12.1: Timer 1 uses the system clock.
3 T0MTimer 0 Clock Select0: Timer 0 uses the system clock divided by 12.1: Timer 0 uses the system clock
2-0Reserve
dRead=000b. Must Write=000b

12
Timer 0—Programming Step 1
It is very important that while configuring a timer you take care not to disturb the mode of other timers
What would happen if you did this?
CKCON |= 0x04; //-- T0M = 1; Timer 0 uses SysClockCKCON &= 0xF0; //-- T0M = 0; Timer 0 uses SysClock/12
CKCON = 0x04;

13
Timer 0—Programming Step 2
Select the operating mode by programming the TMOD (Timer Mode) register
Bit Symbol Description
7 GATE1
Timer 1 Gate Control0: Timer 1 enabled when TR1(TCON.6)=1 irrespective of /INT logic level1: Timer 1 enabled only when TR1=1 AND /INT=logic 1
6 C/T1
Counter/Timer 1 Select0: Timer Function: Timer 1 incremented by clock defined by T1M bit (CKCON.4).1: Counter Function: Timer 1 incremented by high- to-low transition on external input pin (T1).
5-4 T1M1- T1M0 Timer 1 Mode Select
3 GATE0
Timer 0 Gate Control0: Timer 0 enabled when TR0(TCON.4)=1 irrespective of /INT logic level1: Timer 0 enabled only when TR0=1 AND /INT=logic 1
2 C/T0
Counter/Timer 0 Select0: Timer Function: Timer 0 incremented by clock defined by T0M bit (CKCON.3).1: Counter Function; Timer 0 incremented by high- to-low transition on external input pin (T0).
1-0 T0M1-T0M0 Timer 0 Mode Select
//-- Timer 0 in Mode 2//-- Set T0M[1:0] to 10b TMOD &= ~0x03;TMOD |= 0x02;
14
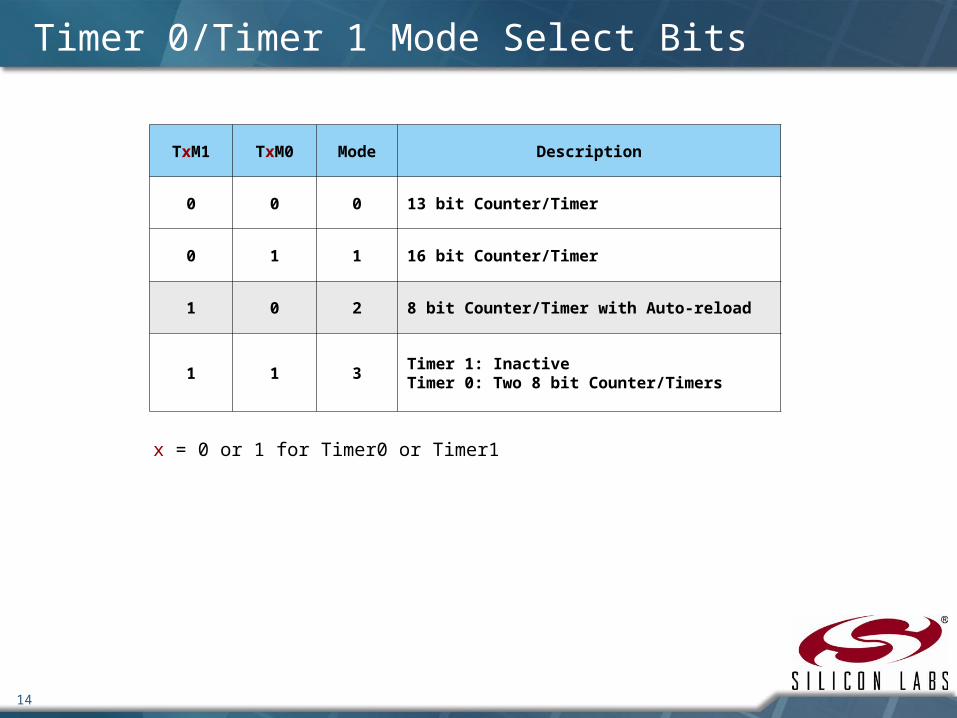
Timer 0/Timer 1 Mode Select Bits
TxM1 TxM0 Mode Description
0 0 0 13 bit Counter/Timer
0 1 1 16 bit Counter/Timer
1 0 2 8 bit Counter/Timer with Auto-reload
1 1 3Timer 1: InactiveTimer 0: Two 8 bit Counter/Timers
x = 0 or 1 for Timer0 or Timer1

15
Timer 0—Programming Step 3
Write the starting value for count up sequence in the appropriate register, TL0 in this case:
TL0 = 0xFF; //-- start value
Write the reload value in the appropriate register, TH0 in this case:
TH0 = 0x80; //-- reload value

16
Timer 0—Programming Step 5
Turn on the timer by programming the TCON (Timer Control) Register
Bit Symbol Description
7 TF1
Timer 1 Overflow FlagSet by hardware when Timer 1 overflows. This flag can be cleared by software but is automatically cleared when the CPU vectors to the Timer 1 interrupt service routine (ISR).0: No Timer 1 overflow detected1: Timer 1 has overflowed
6 TR1Timer 1 Run Control0: Timer 1 disabled1: Timer 1 enabled
5 TF0Timer 0 Overflow FlagSame as TF1 but applies to Timer 0 instead.0: No Timer 0 overflow detected1: Timer 0 has overflowed
4 TR0Timer 0 Run Control0: Timer 0 disabled1: Timer 0 enabled
3 IE1External Interrupt 1This flag is set by hardware when an edge/level of type defined by IT1 is detected. It can be cleared by software but is automatically cleared when the CPU vectors to the External Interrupt 1 ISR if IT1=1. This flag is the inverse of the /INT1 input signal’s logic level when IT1=0
2 IT1Interrupt 1 Type Select0: /INT1 is level triggered1: /INT1 is edge triggered
1 IE0 External Interrupt 0Same as IE1 but applies to IT0 instead.
0 IT0Interrupt 0 Type Select0: /INT0 is level triggered1: /INT0 is edge triggered
//--start Timer 0//--(TCON.4 = 1)
TR0 = 1;

17
Generating Interrupts on Timer 0 Overflow
When the count in TLx overflows from FFH to 00H, the timer overflow flag is set in the TCON register
For Timer 0 it is TF0 in TCON register (TCON.5)
To detect when a timer overflows, there are two options: By polling the timer overflow bit By enabling the timer overflow interrupt
This is done by programming the IE (interrupt enable) register

18
Interrupt Enable (IE) SFR
Bit Symbol Description
7 EAEnable All Interrupts0: Disable all interrupt sources.1: Enable each interrupt according to its individual mask setting.
6 IEGF0General Purpose Flag 0This is a general purpose flag for use under software control.
5 ET2Enable Timer 2 Interrupt0: Disable Timer 2 Interrupt.1: Enable interrupt requests generated by TF2 (T2CON.7).
4 ES0Enable UART0 Interrupt0: Disable UART0 Interrupt.1: Enable UART0 Interrupt.
3 ET1Enable Timer 1 Interrupt0: Disable Timer 1 Interrupt.1: Enable interrupt requests generated by TF1 (TCON.7).
2 EX1Enable External Interrupt 10: Disable external interrupt 1.1: Enable interrupt request generated by the /INT1 pin.
1 ET0Enable Timer 0 Interrupt0: Disable Timer 0 Interrupt.1: Enable interrupt requests generated by TF0 (TCON.5).
0 EX0Enable External Interrupt 00: Disable external interrupt 0.1: Enable interrupt request generated by the /INT0 pin.
ET0 = 1; // Enable interrupt // request generated// by Timer 0 overflow // flag, TF0 (TCON.5)
Once the interrupt generation is enabled, the ISR is automatically executed when the timer overflows

19
Timer3: 16-Bit Auto-Reload Mode (Mode 0)
Timer 3 is always configured as an auto-reload timer, with the reload value held in TMR3RLL and TMR3RLH
TMR3CN is the only SFR required to configure Timer 3
20
Timer 3 may be clocked by the external oscillator source (divided by 8) or the system clock (divided by 1 or 12 according to T3M)
When T3XCLK is set to 1, timer 3 is clocked by the external oscillator input (divided by 8) regardless of the system clock selection
When T3XCLK is 0, the timer 3 clock source is specified by bit T3M
Timer 3 can also be used to start an ADC Data Conversion
Timer3: 16-Bit Auto-Reload Mode (Mode 0)

21
Timer 3 Programming Sequence—Step 1a
Select the desired clock source (external oscillator or SYSCLK) by programming T3XCLK (TMR3CN.0)
Bit Symbol Description
7 TF3
Timer 3 Overflow FlagSet by hardware when Timer 3 overflows from FFFFH to 0000H. When the Timer 3 interrupt is enabled, setting this bit causes the CPU vectors to the Timer 3 ISR. This bit is not automatically cleared by hardware and must be cleared by software.
6-3 UNUSED Read=0000b, Write=don’t care
2 TR3Timer 3 Run Control0: Timer 3 disabled1: Timer 3 enabled
1 T3MTimer 3 Clock Select 0: Counter/Timer 3 uses the system clock divided by 12.1: Counter/Timer 3 uses the system clock.
0 T3XCLK
Timer 3 External Clock Select0: Timer 3 clock source defined by bit T3M (TMR3CN.1)1: Timer 3 clock source is the external oscillator input divided by 8. T3M is ignored.
//-- Stop Timer 3,//-- Clear TF3//-- use SYSCLK/12//-- timebaseTMR3CN = 0x00;
//-- use External//-- OscillatorTMR3CN |= 0x01;

22
Timer 3 Programming Sequence—Step 1b-2
If using SYSCLK, select whether divide-by-12 is required. Program the T3M (TMR3CN.1) bit.
TMR3CN |= 0x02; //-- use SYSCLK (NOT SYSCLK/12) timebase
Write the auto-reload value into the auto-reload registers (TMR3RLL+TMR3RLH or TMR3RL)
TMR3RL = 0xfff6;

23
Timer 3 Programming Sequence—Step 3 & 4
Write the starting value for count up sequence into the count registers (TMR3L+TMR3H or TMR3)
TMR3 = 0xffff; //-- set to reload immediately
Start the timer by setting TR3 (TMR3CN.2) to 1
TMR3CN |= 0x04; //-- Start Timer 3

24
Extended Interrupt Enable 2 (EIE2) SFR
Bit Symbol Description
7 EXVLDEnable External Clock Source Valid (XTLVLD) Interrupt0: Diable XTLVLD interrupt.1: Enable interrupt requests generated by XTLVLD (OXCXCN.7)
6 ES1Enable UART1 Interrupt0: Disable UART1 Interrupt.1: Enable UART1 Interrupt.
5 EX7Enable External Interrupt 70: Disable external interrupt 7.1: Enable interrupt request generated by the External Interrupt 7 input pin.
5 EX6Enable External Interrupt 60: Disable external interrupt 6.1: Enable interrupt request generated by the External Interrupt 6 input pin.
3 EADC1Enable ADC1 End of Conversion Interrupt0: Disable ADC1 End of Conversion interrupt.1: Enable interrupt requests generated by the ADC1 End of Conversion Interrupt.
2 ET4Enable Timer 4 Interrupt0: Disable Timer 4 Interrupt.1: Enable interrupt requests generated by TF4 (T4CON.7).
1 EADC0Enable ADC0 End of Conversion Interrupt0: Disable ADC0 End of Conversion interrupt.1: Enable interrupt requests generated by the ADC0 End of Conversion Interrupt.
0 ET3Enable Timer 3 Interrupt0: Disable Timer 3 Interrupt.1: Enable interrupt requests generated by TF3 (TMR3CN.7).
Set EIE2.0 (ET3) to 1 to enable interrupt requests by TF3 (Timer 3 overflow)
Each time the timer overflows, the ISR will be automatically executed
EIE2 |= 0x01; // Enable // Timer 3 // Interrupt // requests

25
Timer 2—16-Bit Auto-Reload Mode (Mode 1)
Reload value held in the capture registers (RCAP2L+RCAP2H or RCAP2)

26
Timer 2: 16-Bit Auto-Reload Mode (Mode 1)
Programming Steps Step 1: Select the desired system clock frequency (CKCON)
Step 2: Write the auto-reload value into the associated capture registers if using auto-reload mode (RCAP2L, RCAP2H)
Step 3: Write the starting value for count up sequence into the associated count registers (TL2, TH2)
Step 4: Select the mode (C/T2, CP/RL2), set the appropriatecontrol bits (TR2) to turn on Timer (T2CON)

27
T2CON—Timer 2 Control Register

28
Mode Configuration for Timer 2
RCLK0 TCLK0 CP/RL2 TR2 Mode
0 0 1 1 16 Bit Counter/Timer with Capture
0 0 0 1 16 Bit Counter/Timer with Auto-reload
0 1 X 1 Baud Rate Generator for UART0
1 0 X 1 Baud Rate Generator for UART0
1 1 X 1 Baud Rate Generator for UART0
X X X 0 Off

29
Timer 2—Programming Example
//-- Configure Timer2 to auto-reload and generate an interrupt at interval//-- specified by <counts> using SYSCLK/12 as its time base.void Init_Timer2 (unsigned int counts){
CKCON = 0x00; // Define clock (T2M). Timer 2 // uses system clock DIV BY 12
// CKCON |= 0x20; if you want to use system clockT2CON = 0x00;// T2CON.1 = 0 --> T2 set for Timer function// (C/T2) i.e.incremented by clock defined by T2M// T2CON.0 = 0 --> Allow Auto-reload on Timer2 overflow (CP/RL2)// T2CON.3 = 0 --> High-to-Low transitions on// T2EX ignored (EXEN2)// T2CON.2 = 0 --> Disable Timer2RCAP2 = -counts; // Init reload values in the Capture registersT2 = 0xFFFF; // count register set to reload
// immediately when the first clock occursIE |= 0x20; // IE.5, Enable Timer 2 interrupts (ET2)T2CON |= 0x04; // Start Timer2 by setting TR2 (T2CON.2) to 1
}

30
Timer 2—16-Bit Counter/Timer with Capture (Mode 0)
Under this mode, the timer functions as a normal 16 bit timer, setting the TF2 bit upon a FFFFH to 0000H transition of the count registers
An interrupt is generated if it is enabled
The key difference is that a capture function can be enabled to load the current value of the count registers into the capture registers at the falling edge of T2EX

31
Timer 2—16-Bit Counter/Timer with Capture (Mode 0)

32
To enable the capture feature, the EXEN2 (T2CON.3) bit must be set to 1
A high-to-low transition on the T2EX input pin causes the following to occur: The 16-bit value in timer 2 count registers (TH2, TL2) is loaded into
the capture registers (RCAP2H, RCAP2L)
The timer 2 external flag (EXF2) is set to 1
A timer 2 interrupt is generated if interrupt generation has been enabled
Timer 2—16-Bit Counter/Timer with Capture (Mode 0)

www.silabs.com/MCU