learning to think mathematically with the rekenrek · pdf filelearning to think mathematically...
TRANSCRIPT

Learning to ThinkMathematically
with the RekenrekA Resource for Teachers, A Tool for Young Children
Jeff Frykholm, Ph.D.

Learning to Think Mathematically with the Rekenrek
A Resource for Teachers, A Tool for Young Children
by Jeffrey Frykholm, Ph.D.
Published by The Math Learning Center
© 2008 The Math Learning Center. All rights reserved.
The Math Learning Center, PO Box 12929, Salem, Oregon 97309. Tel 1 (800) 575-8130
www.mathlearningcenter.org
Originally published in 2008 by Cloudbreak Publishing, Inc., Boulder, Colorado (ISBN 978-1-60702-483-5)
The Math Learning Center grants permission to reproduce and share print copies
or electronic copies of the materials in this publication for educational purposes.
For usage questions, please contact The Math Learning Center.
The Math Learning Center grants permission to writers to quote passages and illustrations,
with attribution, for academic publications or research purposes. Suggested attribution:
“Learning to Think Mathematically with the Rekenrek,” Jeffrey Frykholm, 2008.
The Math Learning Center is a nonprofit organization serving the education community.
Our mission is to inspire and enable individuals to discover and develop their mathematical
confidence and ability. We offer innovative and standards-based professional development,
curriculum, materials, and resources to support learning and teaching.
ISBN: 978-1-60262-565-5

Learning to Think Mathematically with the RekenrekA Resource for Teachers, A Tool for Young Children
Authored by Jeffrey Frykholm, Ph.D.
Overview: This book prepares teachers with the theoretical basis, practical knowledge, and expertise to use the powerful mathematical tool called the Rekenrek (also known as the arithmetic rack or number rack). Building on the idea that students must be able to “see” numbers within other numbers (e.g., 7 might be thought of as “5 and 2 more”), Learning to Think Mathematically with the Rekenrek helps students recognize number combinations of 5 and 10, develop a rich sense of numbers between 0 and 20, and build a strong set of intuitive strategies for addition and subtraction with single- and double-digit numbers.
Learning to Think Mathematically with the Rekenrek ii
About the Author
Dr. Jeffrey Frykholm is an Associate Professor of Education at the University of Colorado at Boulder. A former public school mathematics teacher, Dr. Frykholm has spent the past 19 years teaching young children, working with beginning teachers in preservice teacher preparation courses, providing professional development support for practicing teachers, and working to improve mathematics education policy and practices across the globe (In the U.S., Africa, South America, Central America, and the Caribbean). Dr. Frykholm also has authored over 30 articles in various math and science education journals for both practicing teachers, and educational researchers. He has been a part of research teams that have won in excess of six million dollars in grant funding to support research in mathematics education. He also has extensive experience in curriculum development, serving on the NCTM Navigations series writing team, and having authored two highly regarded curriculum programs: An integrated math and science, K-4 program entitled Earth Systems Connections (funded by NASA, 2005), and an innovative middle grades program entitled, Inside Math (Cambium Learning, 2009). Learning to think Mathematically with the Rekenrek is his third curriculum program, designed specifically for teachers in the elementary grades. Dr. Frykholm was a recipient of the highly prestigious National Academy of Education Spencer Foundation Fellowship, as well as a Fulbright Fellowship in Santiago, Chile to teach and research in mathematics education.

Learning to Think Mathematically with the Rekenrek iii
Table of Contents
CHAPTER ONE: ABOUT THE REKENREK ............................ 1
CHAPTER TWO: A RATIONALE FOR THE REKENREK ........... 3
CHAPTER THREE: ACTIVITIES WITH THE REKENREK .......... 5
LESSON 1: MEET THE REKENREK!............................................................. 7 LESSON 2: SHOW ME… 1-5 ....................................................................9 LESSON 3: MAKE 5 .............................................................................. 11 LESSON 4: SHOW ME… 5-10 ................................................................. 13 LESSON 5: MAKE 10, TWO ROWS ........................................................... 15 LESSON 6: FLASH ATTACK! ................................................................... 19 LESSON 7: COMBINATIONS, 0-10 ........................................................... 21 LESSON 8: COMBINATIONS, 10 - 20........................................................ 23 LESSON 9: DOUBLES............................................................................ 25 LESSON 10: ALMOST A DOUBLE ............................................................. 27 LESSON 11: PART-PART-WHOLE............................................................ 29 LESSON 12: IT’S AUTOMATIC… MATH FACTS ........................................... 31 LESSON 13: THE REKENREK AND THE NUMBER LINE .................................. 33 LESSON 14: SUBTRACTION… THE “TAKE AWAY” MODEL ............................. 35 LESSON 15: SUBTRACTION… THE “COMPARISON” MODEL.......................... 37
CHAPTER 4: WORD PROBLEMS WITH THE REKENREK ...... 39
WORD PROBLEMS LESSON 1: JOIN PROBLEMS.......................................... 41 WORD PROBLEMS LESSON 2: SEPARATE PROBLEMS .................................. 43 WORD PROBLEMS LESSON 3: PART-PART-WHOLE PROBLEMS ..................... 45 WORD PROBLEMS, LESSON 4: COMPARE PROBLEMS.................................. 47
NOTES… ....................................................................... 49

1
Chapter One: About the Rekenrek There is perhaps no task of greater importance in the early grades than to help young children develop powerful understandings of numbers – their meanings, their relationships to one another, and how we operate with them. Mathematics educators have long focused on these objectives, doing so through the use of various models. Counters, number lines, base-10 blocks, and other manipulatives have been used for decades to cultivate number sense and beginning understandings of addition and subtraction. While each of these models has been shown to be effective in fostering mathematical reasoning, researchers agree that each of these models is limited. More recently, the Rekenrek (also called an arithmetic rack) has emerged as perhaps the most powerful of all models for young learners. Developed by mathematics education researchers at the highly regarded Freudenthal Institute in the Netherlands, the Rekenrek combines various strengths inherent in the previously mentioned models in one compelling and accessible tool. The Rekenrek was designed to reflect the natural intuitions and informal strategies that young children bring to the study of numbers, addition, and subtraction. The Rekenrek provides a visual model that encourages young learners to build numbers in groups of five and ten, to use doubling and halving strategies, and to count-on from known relationships to solve addition and subtraction problems. With consistent use, over a short period of time children develop a rich sense of numbers, and intuitive strategies for solving problem contexts that require addition and subtraction. What is the Rekenrek? As noted above, the Rekenrek combines features of the number line, counters, and base-10 models. It is comprised of two strings of ten beads each, strategically broken into two groups: five red beads, and five white beads. Readily apparent in this model is an implicit invitation for children to think in groups of five and ten.
Of course, this model can also be adapted to accommodate children who may be either more or less advanced. One string of five or ten beads may be easily created, just as a teacher may wish to use two strings of twenty beads each. In any case, these alternative Rekenreks can be used to teach the same concepts for groups of children who may be at varying levels of cognitive development.

Learning to Think Mathematically with the Rekenrek 2
About the Rekenrek… The structure of the Rekenrek – highlighting groups of 5 – offers visual pictures for young learners at the beginning stages of understanding that one number may be a combination of two or more other numbers. With the Rekenrek, children quickly learn to “see” in groups of 5 and 10. Therefore, the child will see the number 7 as two distinct parts: one group of 5, and two more. Likewise, the child sees 13 as one group of 10, and 3 more.
5 and 2 more Research has consistently indicated the importance of helping children visualize number quantities as a collection of objects. Most adults, for example, do not need to count the individual dots on dice to know the value of each face. With similar intent in mind, using the Rekenrek with its inherent focus on 5 and 10 is instrumental in helping children visualize numbers, seeing them as collections of objects in groups. This strategy of seeing numbers “inside” other numbers – particularly 5 and 10 – is a precursor to the development of informal strategies for addition and subtraction that students will naturally acquire through repeated use with the Rekenrek. The activities in this book are sequenced to foster such development.
Seven is seen as “5 and 2 more” “5 and two more”
Thirteen is seen as “10 and 3 more” “5 and two more”
One row of 10 3 more “5 and two more”

Learning to Think Mathematically with the Rekenrek 3
Chapter Two: A Rationale for the Rekenrek It is always important to have a rationale for the methods we employ when teaching mathematics to young children. Using manipulatives without a rich understanding of the potential – and the possible pitfalls – of the tools can not only limit their effectiveness, but in some cases interrupt the natural and desired development of mathematical thinking among young children. Hence, the following paragraphs are intended to provide you with a brief summary of the theory that underlies the use of the Rekenrek. Cardinality
Typically, we convey the notion that numbers are synonymous with things to be counted. That is, we often stress the memorization of the number sequence as a sequential counting tool, not unlike the way in which children can recite the alphabet. While children do spend time counting in sequence – an important skill – we must also endeavor to help them develop cardinality, the recognition of a one-to-one correspondence between the number of objects in a set, and the numeral we use to denote that grouping of objects. Typically, children learn how to count before they understand that the last count word indicates the amount of the set – that is, the cardinality of the set. The Rekenrek helps young children to see numbers as groups (e.g., groups of 5, groups of 10, “doubles”, etc.), rather than having to count every object in every set. Subitizing
Educational psychologists and mathematics education researchers use the term subitizing as a construct used to describe the cognitive processes through which we recognize number patterns, and associate a numeral with a given quantity. While this construct can be rather complex depending on the way it is being elaborated, for the purposes of helping young children develop number sense through the use of the Rekenrek, we might best think of subitizing as the ability to instantly recognize particular groupings of objects within a larger grouping without having to count each individual element. The Rekenrek helps children build on their natural capacity to subitize in order to recognize quantities up to 10 (and beyond for more advanced students) without depending on the routine of counting. In the example below, the child uses the structure of the Rekenrek (5’s and 10’s) to subitize… to see 8 as a group of 5 and three more, without having to count any individual beads.
8 is subitized, and seen in two groups: One group of 5, and one group of 3. “5 and two more”

Learning to Think Mathematically with the Rekenrek 4
A Rationale for the Rekenrek… Decomposition: Part, Part, Whole
Once children are able to subitize, it is only a matter of time before they will be able to do more complex decomposition of numbers, a concept that is essential for
children to understand if they are to complete operations on numbers with meaning. Indeed, the two concepts are related. A student may subitize the number 12 as a group of 10, and 2 more. Some mathematics educators refer to this process as a part, part, whole
representation – determining the individual parts that comprise the whole. Later, we may use this notion to decompose the number 12 in order to operate on it. For example, as shown at the right, 4 x 12 might be thought of as 4 x 10 plus 4 x 2 as illustrated in this area model. The Rekenrek is instrumental in setting the stage for conceptual understanding of decomposition as it relates particularly to the operations.
Anchoring in Groups of Five and Ten
The importance of helping children group in 5’s and 10’s cannot be emphasized enough. Two common manipulative models that are often used with great success
are the 5-Frame and 10-Frame models. There are numerous and readily available activities for 5-frame and 10-frames that help children become comfortable with the notion of 10, the foundation upon which our entire number system is built. In some senses, the Rekenrek can be thought of as a dynamic 10-
frame model. Since 10 does play such a large role in our numeration system, and because 10 may be found by combining two groups of 5, it is imperative that we help children develop powerful relationships for each number between 1-20 to the important anchors of 5 and 10. Informal Strategies: Doubling, Halving, One/Two More, One/Two Less
The Rekenrek can aid in the development of informal strategies for addition and subtraction that are essential for later work with larger two and three-digit numbers. Students learn strategies like doubling and halving (and the associated number facts, e.g., 6 + 6 = 12) as well as the notion of “adding on” by ones and twos. With the Rekenrek, children quickly associate numbers in relation to each other. For example, seven can be seen as “2 less than 9” or, “one more than 6.”
10 2
4 40 8 4 x 12 40 + 8 = 48
10 frame
6 + 6… 2 groups of 5 = 10, and 2 more = 12

Learning to Think Mathematically with the Rekenrek 5
Chapter Three: Activit ies with the Rekenrek How to Begin with the Rekenrek
The remainder of this book provides teachers with a sequence of activities that can be used to develop number sense and confidence with informal strategies for addition and subtraction with numbers up to 20. Lessons have been labeled (Levels 1-3) to roughly correspond to grade levels K-1, 1-3, and 2-5. Of course, with some adaptation, most lessons can be used appropriately across each of these grade levels. Prior to presenting the activities, however, it is important to understand a few key strategies when introducing and using the Rekenrek. Starting Position
It is important to establish the norm that all problems begin with the beads on the right end of the strings. This convention is necessary to ensure that all students begin the problems with the same visualization. Of course, once involved in the problem context, children may make their own decisions about how to manipulate the beads. But the starting point should be emphasized uniformly, and students should learn that beads become “in play” as they are slid from left to right. Starting Position for the Rekenrek
Manipulating the Rekenrek
One of the ideas that will be reinforced throughout the activities is that beads should be moved in clusters whenever it is possible for children to do so. In an effort to promote subitization, encourage children through your own modeling to slide beads to the left (and at times to the right) in groups rather than counting individual beads, and moving them one at a time. For example, a group of four should be slid to the left as one group rather than four individual beads. Model thinking strategies such as:
“Well, I need 4 beads to the left. Four is one less than 5. So, I do not need all five beads – I can leave one behind and slide 4 beads across.”

Learning to Think Mathematically with the Rekenrek 6
Activities with the Rekenrek…
The Basic Rekenrek Adapting the Rekenrek
Depending on the age and level of your students, you may wish to adapt the Rekenrek to be more suitable for a given group. With the youngest children, perhaps it is best to start with a Rekenrek that contains only 5 beads. This orientation is similar to the 5-frame manipulative mentioned previously, where number relationships between zero and 5 can be emphasized.
Rekenrek for the youngest children
Strings of ten beads can be used to strengthen understanding of number relationships between zero and 10, focusing in particular on quantities of 5 and 10. With a string of t10 beads, it is important to distinguish 5 and 10 by using different colors.
Rekenrek for emphasizing numbers between 0 and 10
For more advanced students who are ready to add and subtract multi-digit numbers, the Rekenrek can be extended to include 40 beads. Students should continue thinking in groups of 5 and 10, even as the numbers get larger.

Learning to Think Mathematically with the Rekenrek 7
Lesson 1: Meet the Rekenrek!
Lesson Level: ONE and TWO
Lesson Objectives
• To introduce students to the Rekenrek as a visual model for math. • To help students see individual objects as small quantities (i.e., to learn how
to “subitize”). • To instruct students how to use the Rekenrek properly. • To help students “visualize” numbers.
Activity Background and Introduction
• Begin with a demonstration Rekenrek. With the youngest children, you may also choose to use one string of 5 or 10 beads instead of the traditional, two-row Rekenrek
• Begin with all beads on the right side of the Rekenrek (right side as you are facing the Rekenrek). Call this orientation, “Start Position”, and repeatedly emphasize the “Start Position” as you introduce the Rekenrek in these activities. Use only the top row in your demonstrations with younger children.
Lesson Progression
• From the Start Position, ask students what they notice about the Rekenrek. Encourage all answers, regardless of how random they might sound. Listen for the following responses:
o There are 2 colors, some red, some white. o There are 5 of each color. o There are 10 beads in each row.
• If students do not suggest these ideas, prompt them with comments like: “I wonder how many red beads there are on the top string?”; “I wonder if there are more red beads, or white beads?”; “I wonder how many beads there are in all?”
• At the end of these open ended questions, instruct the students to spend several minutes “playing” with the Rekenrek, and that they must come up with a discovery about the Rekenrek that they can share with their classmates.

Learning to Think Mathematically with the Rekenrek 8
Lesson 1: Meet the Rekenrek
• As you watch students become comfortable with the Rekenrek, be sure to encourage them to get in the habit of sliding beads in groups rather than one by one. You might even encourage this process with some practice:
o “Put your Rekenrek to Start Position. Now, without touching the
Rekenrek, count the first three beads in your mind. On the count of three, slide all three beads at once across the string. One… two… three!”
o Do this with several numbers. A suggested sequence might be: 3, 1, 2, 10. The point of these questions is to encourage the movement of beads in “one push” across the string.

Learning to Think Mathematically with the Rekenrek 9
Lesson 2: Show Me… 1-5
Lesson Level: ONE
Lesson Objectives
• To solidify students’ conceptions of numbers between 1 and 5. • To encourage students to see the numbers 1-5 as quantities rather than a
collection of discrete items. • To encourage students to visualize numbers in relation to 5 (e.g., 3 is 2 less
than 5).
Activity Background and Introduction
• Begin with a string of 5 red beads if available. If you are using the traditional Rekenrek, inform the students that you will be focusing only on the first 5 red beads for this lesson.
• This lesson reinforces the development of cardinality. Encourage students to act on groups of numbers rather than moving individual beads.
Lesson Progression
• Begin by sliding 5 red beads to the left. Ask students how many beads were moved.
• Instruct students that you will ask them to do the same – slide, in one push, the number of beads requested.
• Begin by saying, “On your Rekenrek, show me 5.” • Repeat this activity with other numbers from 1-5. A suggested activity might
be: 5, 1, 3, 2, 4, 3, 5, 1, 4, 2
Example: “Show me 3”
Slide beads to the left in one move.
• If you are using the traditional Rekenrek with 2 rows of 10 beads, you may
also wish to ask the same questions on the second row of beads. Being able to “show” numbers between 1 and 5 on the bottom row will be important in

Learning to Think Mathematically with the Rekenrek 10
Lesson 2: Show Me… 1-5 later activities in which students are representing larger numbers, or when they may be adding quantities together.
• Example:
“Show me 3 on the bottom row.”

Learning to Think Mathematically with the Rekenrek 11
Lesson 3: Make 5
Lesson Level: ONE
Lesson Objectives
• To recognize and represent number combinations that make five: e.g., 3 and 2 more.
• To recognize a number’s relationship to 5. For example, 3 might be thought of as 2 less than 5.
• To help children develop the ability to anchor on 5 and 10.
Activity Background and Introduction
• The importance of helping young children anchor on 5 and 10 cannot be stated strongly enough. The ability to see numbers as they relate to 5 and 10 is essential to develop strong mental math strategies for addition and subtraction.
• This activity helps develop strong conceptual understanding of the quantity of 5, and in particular combinations that may total five. For example, 4 and 1 more equal 5. Or, 8 might be thought of as 3 more than 5.
• With time, we want to encourage students to move toward anchoring on 10 rather than 5. Eventually, students’ conceptual understanding of “5” will transfer, and they will be use quantities of five instinctively as they become more advanced in their work with our base-10 system.
Lesson Progression
• Begin by instructing students that the goal of this activity is to “make 5” on the Rekenrek.
• As an example, move two beads to the left of the top string. Ask students how many beads need to be moved to the left to make a total of 5. By this point, students should already know that all the red beads on the top row are equal to five, and therefore they need to move all remaining red beads on the top row to the left. It may feel like a trivial task at first, but this lesson will grow in complexity. Demonstrate by using the following language:
“We have 2 red beads. We need to make 5 red beads. I need to slide 3 additional red beads to the left.”

Learning to Think Mathematically with the Rekenrek 12
Lesson 3: Make 5
• Continue by asking students to “make 5” from the given initial starting position. Follow these steps:
o Show me 3. o Make 5. o How many beads did you need to make 5? o So… in a sentence, “3 and 2 more are 5.”
• Ask for each of the combinations for 5 (0,5), (1,4), (2,3), (3,2),
(4,1), (5,0). • Still using the top row only, you may make this activity more
complex by starting with a number greater than 5. For example: o Show me 8. o Make 5. o How many beads did you have to remove to make 5? o So… in a sentence, “Taking 3 away from 8 makes 5.”
• An important extension is to do the same activity, only this time
using two rows of the Rekenrek and two pushes of the beads – one on the top row, and one on the bottom row.
• For example: o Show me 2 on the top row. o Now, using red beads only
on the bottom row, make 5. o How many beads on the
bottom row did you move to make 5?
o So… 2 and 3 more is 5 beads.
• The obvious difference here is that students cannot simply move all the red beads to the left to arrive at 5 as they could do when using only one string. Rather, they need to either use mental pictures of groups that combine to 5, or do mental grouping (addition) to arrive at a sum of 5. Students should be encouraged to recognize the symmetry between the two rows. 5 red beads exist both on the left and right of the two strings. Follow a similar progression, asking students to represent all combinations of 5.

Learning to Think Mathematically with the Rekenrek 13
Lesson 4: Show me… 5-10
Lesson Level: ONE & TWO
Lesson Objectives
• To solidify students’ conceptions of numbers between 5 and 10. • To encourage students to see the numbers 5 - 10 as quantities rather than a
collection of discrete items. • To encourage students to visualize numbers in relation to 5 and 10 (e.g., 7 is
2 more than 5; 8 is 2 less than 10).
Activity Background and Introduction
• Begin with a 10-bead string (5 red, 5 white). The traditional, two-row Rekenrek works well for these activities.
• This lesson continues to build on students’ understanding of cardinality. If students have difficulty using one push for numbers between 5 and 10, an intermediate step is to begin by pushing 5 across, and then pushing the remaining beads to arrive at the desired number.
Lesson Progression
• Begin a demonstration by sliding 5 red beads to the left. Ask students how many beads were moved. After discussion, return the beads to the left side of the Rekenrek.
• Repeat the process, now sliding 6 beads to the left. Ask students how many beads were moved. Ask them to explain how they knew 6 beads were pushed to the left.
• Instruct students that you will ask them to do the same – slide, in one movement if possible, the number of beads requested.
• Begin by saying, “On your Rekenrek, show me 10.” • Repeat this activity with other numbers between 5 - 10. A suggested
progression might be: 10, 9, 5, 7, 8, 6, 9, 10, 7
Example: “Show me 8”
Slide beads to the left in one movement.

Learning to Think Mathematically with the Rekenrek 14
Lesson 4: Show Me… 5-10
• As students represent numbers 5 – 10, some students may realize that the number 8, as illustrated in the previous figure, may be represented in a second form as well. For example, 8 could also be represented in the following form:
• It is important to highlight this alternate way in which numbers between 5 and 10 may be represented. Emphasize that in previous examples we were using only one push of beads. Now, we use no more than two pushes to form the number.
• As an extension to the lesson, go back to the original list of numbers to be
demonstrated. This time, ask students to show the numbers using both rows of beads – or two pushes of the beads. Flash cards may be used in this process: Show a number on a flashcard, and then ask students to represent that quantity on the Rekenrek.
• A suggested progression might be: 10, 9, 5, 7, 8, 6, 9, 10, 7
Examples: “Show me 9, using exactly 2 pushes.” “Show me 7, using exactly 2
pushes..”
• To extend student thinking and conceptual understanding, take a moment to
highlight the relationship between the numbers represented, and the quantity of ten. For example, with the two previous examples, you might ask:
o How many white beads are there? How are they arranged? o In order to have ten beads on the left, how many more red ones would I
need to push to the left? How many more white beads would I need to push to the left?
• These questions are important as they are a precursor for later work with the Rekenrek that includes anchoring on ten (the next lesson) addition and subtraction, adding on, using doubles, etc.

Learning to Think Mathematically with the Rekenrek 15
Lesson 5: Make 10, Two rows
Lesson Level: ONE AND TWO
Lesson Objectives
• To recognize and represent number combinations that make 10: e.g., 7 and 3 more.
• To recognize a number’s relationship to 10. For example, 8 might be thought of as 2 less than 10. Or, 13 might be thought of as 3 more than ten.
Activity Background and Introduction
• The importance of helping young children anchor on 5 and 10 cannot be stated strongly enough. The ability to see numbers as they relate to 10 is essential to developing our understanding of the base-ten number system, including each of the four operations.
• This activity helps develop strong conceptual understanding of the quantity of 10, and in particular combinations that may total 10. For example, 9 and 1 more equal 10.
Lesson Progression
• Begin by instructing students that the goal of this activity is to “make 10” on the Rekenrek.
• As an example, move the 5 red beads to the left of the top string. Ask students how many additional beads need to be moved to the left to make a total of 10.
• By this point, students should already know that there are 10 red and white beads on each row. Therefore they need to move all remaining white beads on the top row to the left.
• Some students will recognize that it is also possible to arrive at 10 by moving 5 additional red beads on the second row. Demonstrate both solutions, using descriptive language similar to the following:
Example: “We need to make 10 on the left. I already have 5 red beads. I need 5 more beads – either color, red or white, will work.

Learning to Think Mathematically with the Rekenrek 16
Lesson 5: Make 10: Two rows
• As one might infer from the previous example, it is preferable to “Make 10” using the second row of the Rekenrek. Initially, students should be encouraged to model the first number completely on the top row, and then proceed to make 10 with the other necessary beads on the bottom row. For example:
“Show me 6. Now make 10.”
• Students should represent the first number on the top row, then pause. Next, they “Make 10” using the bottom row. At the pause, encourage students to lift their Rekenreks in the air to show their starting number. Teachers can quickly see if students are representing the first number correctly. Use all 10 facts.
• You can extend this exercise to include multiple representations that involve both rows of the Rekenrek. Take, for example, a starting number of 7. There are multiple ways to represent 7, and therefore various strategies to subsequently make 10. Four examples are shown below.
Possible starting representations of 7 Variations to Make 10 Start with 7… slide three white beads on top
Start #1: “Show me 7”
Start with 7… slide three red beads on bottom Seen as: 7 and 3 more
Start with 7… slide three white;
Seen as 8 and 2 more Start #2: “Show me 7”
Start with 7… slide 3 red; Seen as: two groups of 5.

Learning to Think Mathematically with the Rekenrek 17
Lesson 5: Make 10: Two rows
A word about partitions with 10… Given that our numeral system is based on groups of ten, it is imperative that students leave this exercise with an improved understanding of combinations of numbers that equal 10. Partitioning groups of ten is also fundamental to the mental strategies students use for addition and subtraction. When students can decompose numbers fluidly, they are much more apt to develop not only facility with operations on whole numbers, but conceptual understanding as well. Implicitly, the Rekenrek fosters partitioning of all numbers. When we ask students, for example, to represent the number 9 on the Rekenrek, they are apt to use informal partitioning strategies of one kind or another. For example, we might expect students to model the following reasoning:
“I need 9. I know 9 is one less than 10. So I moved all the beads except one.” “I know 4 and 4 is 8. I need one more. So I put 4 on the top, and 5 on the bottom.” “Two groups of 5 equal ten. So I need one group of 5, and one group of 4.”
Although the physical representations of these solutions may look identical, it is important to recognize just how different the thinking strategies are. In each case, students are partitioning numbers based on relationships that they already know. Keep in mind that as helpful as the Rekenrek is in fostering this awareness of partitioning relationships, we also want to wean students of the Rekenrek (and other physical models) as soon as they are ready to do so. Of central importance in this process is helping students develop visual “snapshots” of these partitioning relationships. We are particularly concerned that they develop visual images of the various partitions on ten. Teachers can encourage the development of visual images in various ways. Asking students, for example, to explain how they would represent a number on the Rekenrek (not actually doing it) will promote visualization. Also, teachers may use flashcards to help link the visual representation of partitions of ten with the corresponding symbolic notation. In this way, students are more likely to develop not only visual pictures, but also connections between the various ways we might represent and talk about a given number. On the following page, each of the partitions of 10 is illustrated, along with the corresponding symbolic expression.

Learning to Think Mathematically with the Rekenrek 18
Lesson 5: Make 10: Two rows
9 + 1
8 + 2
5 + 5
6 + 4
7 + 3
2 + 8
3 + 7
4 + 6
1 + 9
Learning to Think Mathematically with the Rekenrek 19
Lesson 6: Flash Attack!
Lesson Level: ALL
Lesson Objectives
• To help students begin to “subitize” – i.e., see a collections of objects as one quantity rather than individual beads.
• To help students develop visual anchors around 5 and 10. • To help students make associations between various quantities. For
example, students may develop a relationship between 8 and 10: “I know there are ten beads in the row, and there were 2 beads left in the start position. So, there must be 8 in the row because 10 – 2 is 8.”
Activity Background and Introduction
• This is an entertaining activity in which students will show rapid improvement. Introduce the activity by saying, “I am going to show you some beads on my Rekenrek, and you will have to tell me how many you see. The more we do, the faster I will flash them – you will have less and less time to tell me the number of beads I push to the left.”
• The point of the activity is to wean students from their inclination to count every bead. Within a few minutes, most students will begin to subitize. When you flash 6 beads, for example, they will see 5 red beads, and one more.
Lesson Progression
• Start by pushing over 2 beads on the top row. Ask the students: “How many do you see?” Be sure they know that they should only look on the left side of the Rekenrek.
• Push over 4 beads, and ask the same question: “How many?” • Push over 5 beads: “How many?” • Now, tell the students you will start the “Flash Attack.” They will only have
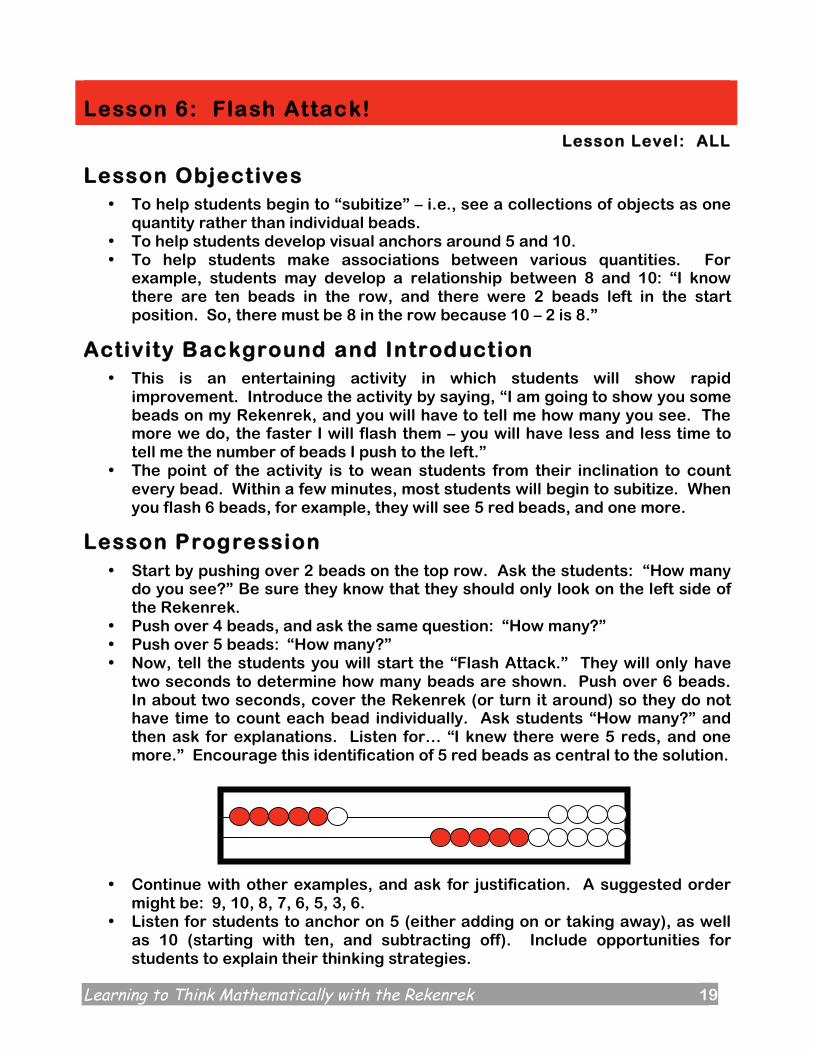
two seconds to determine how many beads are shown. Push over 6 beads. In about two seconds, cover the Rekenrek (or turn it around) so they do not have time to count each bead individually. Ask students “How many?” and then ask for explanations. Listen for… “I knew there were 5 reds, and one more.” Encourage this identification of 5 red beads as central to the solution.
• Continue with other examples, and ask for justification. A suggested order might be: 9, 10, 8, 7, 6, 5, 3, 6.
• Listen for students to anchor on 5 (either adding on or taking away), as well as 10 (starting with ten, and subtracting off). Include opportunities for students to explain their thinking strategies.

Learning to Think Mathematically with the Rekenrek 20
Lesson 6: Flash Attack!
After students are comfortable with numbers between 0-10, expand to two rows on the Rekenrek.
• Begin with both the top and bottom rows fully pushed over to the left. Ask
students: “How many beads are in the top row? The bottom row? Altogether in both rows?”
• Have children discuss their reasoning. Be sure to affirm solutions that include anchors of 5 and 10. Encourage students who are not using groups of 5 to try to see these important groupings.
Alternatively, you can also stretch students to look for new patterns as they determine the quantities being flashed. For example, you might show the following arrangement, and ask for explanations for how they knew, without counting each bead, that there were 4 beads moved to the left. Listen for a variety of strategies.
For more advanced students…
• For students who are more advanced in their thinking, you can play the same
“Flash Attack” game with numbers between 10 and 20. Follow the same procedures. Encourage students to articulate their thinking strategies. Affirm strategies that include anchoring on 5, 10, 15, or 20. Suggested order: 10, 15, 19, 16, 20, 13, 18, 12, 11, 17
Example: Flash Attack, 17. Students should come to see 17 as three groups of five, and two more.

Learning to Think Mathematically with the Rekenrek 21
Lesson 7: Combinations, 0-10
Lesson Level: TWO & THREE
Lesson Objectives • To develop fluency with addition number facts up to 10. • To develop an understanding of part-part-whole relationships. • To develop an understanding of missing addend problems (where the
“change” to a starting amount is unknown). • To develop informal strategies for solving addition problems.
Activity Background and Introduction
• Research has demonstrated that children often struggle with problems in which the addend is missing. Traditionally, students have learned addition facts in only form: two addends, followed by the equal sign… 4 + 5 = ?. It is critical that students be encouraged to solve problems when both addends are not available. For example: “I have 6 dollars, and I need 10. How many more dollars do I need?” In a number sentence, we can translate: 6 + ? = 10. There are many variations of part-part-whole statements, and the Rekenrek can be instrumental to the development of understanding in this area.
• The activities will help students learn number facts even as they develop understanding of part-part-whole relationships.
Lesson Progression
• Begin by informing students that they will work together with the teacher (and then a partner) to create a number.
• The teacher controls the top row of the Rekenrek, and the student controls the bottom row.
• Begin with the following example: o “We are going to work together to build the number 3. I will start. I
push two red beads over on the top row.” o Demonstrate. Encourage students to mirror your action, pushing over
2 red beads on their top row as well. o “Now it is your turn. How many do you need to push to the left on the
bottom row so that we can make the number 3?” o Students complete the problem, pushing over one bead on the bottom.
• Do a second example: o “Let’s make the number 7. I will start by pushing over 3 red beads.”
(Students mirror the same action.) “Now it is your turn. How many do you need to push on the bottom row to make 7 beads in all?”
• Monitor the thinking strategies of your students. Begin with the question: “How did you know you needed to slide 4 more beads over to the left?” If students are counting individual beads one at a time to find and check their answers, it is likely that they need more experience with the previous activities. Look for students to apply informal reasoning, anchoring strategies on 5 and 10, use doubles (3 and 3 = 6, so I need one more), etc.

Learning to Think Mathematically with the Rekenrek 22
Lesson 7: Combinations, 0-10
• Continue with additional examples. The following sequence is suggested: o “Let’s make 8. I will start with 5. How many more?” o “Let’s make 9. I will start with 6. How many more?” o “Let’s make 8. I will start with 3. How many more?” o “Let’s make 6. I will start with 3. How many more?” o “Let’s make 7. I will start with 3. How many more?” o “Let’s make 8. I will start with 2. How many more?” o “Let’s make 10. I will start with 3. How many more?” o “Let’s make 4. I will start with 2. How many more?” o “Let’s make 6. I will start with 4. How many more?” o “Let’s make 5. I will start with 3. How many more?” o “Let’s make 8. I will start with 4. How many more?”
• There are many other combinations that can be highlighted. Be sure to pause frequently to check the thinking strategies being utilized by your students. Again, it is crucial to recognize whether or not students are combining in groups, anchoring on 5, or using other informal strategies. If students are simply counting individual beads on the top row, and then counting by ones until they arrive at the desired answer, they are likely not ready for this activity, and should return to more basic uses of the Rekenrek.
• Be sure to include all of the “doubles” facts, i.e., 1+1, 2+2, 3+3, 4+4, and 5+5. While the doubles will be the explicit focus of a subsequent lesson, it is important to build students’ informal understanding of doubles as the doubles provide an additional, powerful anchor for addition and subtraction. In other words, when children are confronted with the problem, 7 + 8 =?, we hope that they will be able to anchor on the double of 7 or the double of 8: “Well… I know that 7 + 7 = 14, so… 7 + 8 must equal one more… 15.” Begin to build the foundation for the doubles in this activity.
• An example…
o “Let’s make 7. I’ll start with 4.” o “Show me 4 on your Rekenrek.” o “Now… on the bottom row,
how many more to make 7?”
o Question: “How did you know to move three on the bottom row?” o Examples of student thinking:
“I knew that if I moved over one bead on top, that would be 5 because 4 and 1 is 5. Then, I would need 2 more to get to 7. So, I pushed over 3 more beads.”
“I know that 2 groups of 4 beads is 8. That is one too many. So, I only needed to slide over 3 beads.”

Learning to Think Mathematically with the Rekenrek 23
Lesson 8: Combinations, 10 - 20
Lesson Level: TWO & THREE
Lesson Objectives • To develop fluency with addition number facts up to 20. • To develop an understanding of part-part-whole relationships. • To develop an understanding of missing addend problems (where the
“change” to a starting amount is unknown). • To develop informal strategies for solving addition problems.
Activity Background and Introduction
• This lesson builds on the previous set of activities, focusing now on number combinations between 10-20. Essentially, this lesson helps children develop confidence with all of the single digit addition facts.
• As noted previously, children often struggle with problems in which the addend is missing. Traditionally, students have learned addition facts in only one form: two addends, followed by the equal sign… 4 + 8 = ?. It is critical that students be encouraged to solve problems when both addends are not available, particularly problems with a result between 10 and 20. For example: “My friend and I have 17 dollars. 8 dollars are mine. How many dollars belong to my friend?” In a number sentence, we might translate: 8 + ? = 17. This lesson will help teachers emphasize many number relationships (between 10 – 20) in this fashion.
• The activities will help students learn number facts even as they develop understanding of part-part-whole relationships.
Lesson Progression
• Begin by informing students that they will work together with the teacher (and then a partner) to create a number.
• The teacher controls the top row of the Rekenrek, and the student controls the bottom row.
• Begin with the following example: o “We are going to work together to build the number 15. I will start. I
push 8 red beads over on the top row.” o Demonstrate. Encourage students to mirror your action, pushing over
8 beads (5 red, 3 white) on the top row of their Rekenrek as well. o “Now it is your turn. How many do you need to push to the left on the
bottom row so that we can make the number 15?” o Students complete the problem, pushing over 7 beads on the bottom.
• Do a second example: “Let’s make the number 12. I will start by pushing over 3 red beads.” (Students mirror the same action.) “Now it is your turn. How many do you need to push on the bottom row to make 12 beads in all?”
• At this point, pause to check the thinking strategies of your students. Begin with the question: “How did you know you needed to slide 9 more

Learning to Think Mathematically with the Rekenrek 24
Lesson 8: Combinations,10-20
beads over to the left?” If students are counting individual beads one at a time to find and check their answers, it is likely that they need more experience with the previous activities. Look for students to apply informal reasoning, anchoring strategies on 5 and 10, use of doubles, or other intuitive strategies.
• Continue with additional examples. The following sequence is suggested:
o “Let’s make 13. I will start with 5. How many more?” o “Let’s make 19. I will start with 9. How many more?” o “Let’s make 14. I will start with 7. How many more?” o “Let’s make 11. I will start with 3. How many more?” o “Let’s make 16. I will start with 9. How many more?” o “Let’s make 18. I will start with 9. How many more?” o “Let’s make 20. I will start with 10. How many more?” o “Let’s make 12. I will start with 6. How many more?” o “Let’s make 15. I will start with 6. How many more?” o “Let’s make 17. I will start with 8. How many more?”
• There are many other combinations that can be highlighted. Be sure to pause frequently to check in on the thinking strategies being utilized by your students.
• As noted in the previous lesson, include all of the “doubles” facts, i.e., 5+5, 6+6, 7+7, 8+8, 9+9, and 10+10.
• An example…
o “Let’s make 17. I’ll start with 8.” o “Show me 8 on your Rekenrek.” o “Now… on the bottom row,
how many more to get 17?”
o Question: “How did you know to move nine on the bottom row?” o Examples of student thinking:
“I knew that if I moved over all ten beads, that would be 18. That is one too many. So I only moved over 9 beads.”
“The two groups of red beads equal 10. There were 3 white beads on top which equals 13. So I needed 4 more white beads to get to 17.”

Learning to Think Mathematically with the Rekenrek 25
Lesson 9: Doubles
Lesson Level: TWO & THREE
Lesson Objectives
• To help students visualize doubles (e.g., 2 + 2 = 4). • To use doubles as an informal structure for solving addition and subtraction
problems.
Activity Background and Introduction • As noted previously, the doubles are key anchors for students. If they know
the doubles relationships well, they can use doubles to solve related problems. For example, the child who recognizes 4+4 as 8 is also likely to quickly recognize that 4+5 must be one more… 9. These strategies that stem from the doubles are important to foster with young children.
• Doubles relationships are also helpful in developing understanding of even and odd numbers. The visualizations that come with the doubles allow children to quickly discriminate between even and odd numbers, as well as the ways that the properties of even and odd numbers influence operations with them (e.g., two odds added together always result in an even).
Lesson Progression
• Begin with all beads on the Rekenrek pushed to the right side of the strings. • Slide the first red bead of each row to the left. Ask students to describe what
they see.
• Among other responses, listen for students to note that each string has the same number of beads pushed to the left.
• Continue this demonstration by pushing over two red beads on each line, and again asking students to describe what they see.
• Be sure to ask students to compare the number of beads on one line with the
over all total of beads pushed to the left – the sum. This will strengthen the students’ intuitions about the connection between a number and its double.

Learning to Think Mathematically with the Rekenrek 26
Lesson 9: Doubles
• Demonstrate all of the doubles up to five: 1+1, 2+2, 3+3, 4+4, 5+5. • After going through each of the doubles, and emphasizing the sums of even
pairings, you may wish to show students a collection of all the visualizations of the doubles pairings. Ask students what they can observe from these representations. These informal observations are the beginning of an understanding of even and odd numbers. (Odd numbers will be explored in the following lesson on near doubles.)
1+1 = 2 2+2 = 4 3+3 = 6 4+4 = 8 5+5 = 10
• Ask students what they notice about these visualizations. They might see them as vertical groups of two… as two horizontal lines of the same number of beads… even numbers… etc. For students with more developed conceptual understanding, it might be worth showing that both the sums of even pairs (2+2; 4+4), and the sums of odd pairs, result in an even answer.
• As students are ready, teachers should include the doubles between 6 and 10, following a similar teaching strategy. In this case, students should know to use their knowledge of a double of 5 (two groups of 5 red beads = 10) to compute related doubles.
• For example, consider 7 + 7 = 14. Students are likely to see two sets of doubles. First, they will recognize that two groups of 5 red beads is 10. Next, a pair of 2’s is 4. Hence, 7 + 7 = (5 + 5) + (2 + 2) = 10 + 4 = 14

Learning to Think Mathematically with the Rekenrek 27
Lesson 10: Almost a Double
Lesson Level: TWO & THREE
Lesson Objectives
• To use an understanding of doubles relationships to work with near-doubles. • To build understanding of the almost-double combinations (that are built
upon the doubles anchors) to help solve computation problems. • To recognize the difference between even numbers (can be represented as a
pair of equal numbers) and odd numbers (paired numbers plus one).
Activity Background and Introduction • Begin by illustrating the following on your demonstration Rekenrek.
• Ask students to find the double that is within the group of 5 beads on the left. • Visually separate the double (two groups of two) from the remaining 5th bead.
A pencil may be used to physically separate the beads.
• Ask students, “Now that you can see the double (i.e., 2 + 2 = 4), what can you say about a double plus one?”
• Illustrate the thinking by emphasizing the visualization, and also the symbolic equivalent:
2 + 3 = ? means… 2 + (2 + 1) = ? (2 + 2) + 1 = 4 + 1
Lesson Progression
• Continue with additional examples. As students to find the double within the representation, and then use that information to find the sum of the near-double.
• Visually compare the doubles with the near doubles, highlighting the differences between even and odd numbers (odd numbers have solo bead).

Learning to Think Mathematically with the Rekenrek 28
Lesson 10: Almost a Double
2 4 6 8 10
1 3 5 7 9
• You may wish to highlight the doubles that may be found within these “almost double” visualizations as has been illustrated on the examples of 5, 7 and 9.
• Using the idea of hidden doubles as a way to work with “almost doubles” number relationships is a powerful strategy. It is important to help students transfer this visual strategy to symbolic representations. Take the example of 7. Children should be encouraged to see the “6” that exists within this starting number.
4
+3
3 + 4 = 7 just as (3 + 3) +1 = 7
• By demonstrating this relationship, students begin to develop a relational view of the equal sign – that the equal sign means “the same as” rather than simply a symbol that indicates the answer is approaching.
• Develop this idea by doing several additional examples with the Rekenrek. Ask students to use the Rekenrek to “prove” whether or not the following are true. Have students visually identify each component of the statements.
- Does 6 + 7 = 12 + 1? - Does 3 + 2 = 4 + 1? - Does 4 + 5 = 8 + 1? - Does 8 + 9 = 16 + 1?

Learning to Think Mathematically with the Rekenrek 29
Lesson 11: Part-Part-Whole
Lesson Level: ONE & TWO
Lesson Objectives
• To develop an understanding of part-part-whole relationships in number problems involving addition and subtraction.
• To develop intuitive understandings about number fact relationships. • To develop a relational understanding of the equal sign. • To develop confidence and comfort with “missing addend” problems.
Activity Background and Introduction
• It is important to begin this activity by noting that the 10 beads on each row represent the “whole” on the Rekenrek. In these problems, students will solve for missing addends based on the understanding that the whole for one row is 10 beads, and the whole for both rows is 20 beads.
• Begin by highlighting that each row of beads is complete, or “whole”, with 10 beads. Any time we push some (but not all) of the beads to the left, we are dealing with a PART of the WHOLE.
Lesson Progression
• Begin by sliding 6 beads to the left on the top row. Cover the remaining beads on the right with your hand (or paper) so that the students can see only the 6 beads.
• Ask students: “How many beads do you see on the top row?”
• After using the Rekenrek up to this point, the child should recognize there are 6 beads without having to count each individual bead.
• Ask the second question: “How many beads am I covering up on the top row? How can you know for sure how many beads are covered?”
• Listen for answers like the following: o “5 and 1 more is 6. I counted up to 10 … 7, 8, 9, 10. 4 are covered.” o “I know that 6 + 4 = 10. I see 6, so 4 more.” o “I know that there are 5 red and 5 white on each row. I only see one
white, so there must be 4 more.” • In each case, students are demonstrating some understanding of part-part-
whole relationships. Be sure to emphasize the relationship between the three numbers, in this case: 6, 4, & 10.
• Follow this example for other numbers. A suggested sequence would be: 6, 5, 7, 4, 8, 3, 2, 9.
• When students have become comfortable with the part-part-whole problems between 1–10, extend the problems up to 20. Before starting these problems, be sure that the students know the WHOLE for both rows is 20.
Cover Remaining
Beads

Learning to Think Mathematically with the Rekenrek 30
Lesson 11: Part-Part-Whole
• Ask students: “How many beads are there on both rows?” Show all 20 beads, on the right side of the Rekenrek.
• Now, move 9 beads to the left, covering the remaining beads in the following arrangement.
• As students: “How many beads do you see now?” • Listen for the following types of answers:
o “5 and 1 more is 6. Add 3 more on the bottom to get 9.” o “9 because if I took away the three red ones on the bottom, and added
three white ones on top, I’d have 5 red and 4 white which is 9.” o “I saw double 3, which is 6. 3 more is 9.” o “If I added 2 more reds on the bottom it would be 10 and 1 white, which
is 11. So I took away 2 from 11 and got 9.” o “5 reds on top and 3 reds on the bottom is 8. 1 more white is 9.”
• Now ask students: “How many beads are hidden? How can you know for sure how many beads are covered?”
• Listen for the following types of reasoning: o “5 whites and 2 reds are missing on the bottom. 4 whites are missing
on top. 7 and 4 is 11.” o “If I slid the 3 red beads under the cover, and slid 3 whites ones to the
left, then there would be 5 red and 5 white hidden on the bottom, and 1 white hidden on top. So that is 11 hidden.”
o “Well, 10 and 10 are 20. Right now I can see 9, which is close to 10. Since it is 1 less than 10, then 11 must be hidden.”
o “4 beads are missing on top. 7 beads are missing on bottom. That is 11 beads altogether that are covered up.”
• Continue with other examples. A suggested sequence would be: 9, 12, 8, 13, 15, 7, 18, 17, 6, 16, 11, 14.
• Keep in mind that there are multiple ways to represent each of these numbers, which will lead to different part-part-whole relationships. For example, 12 might be represented in the following ways (there are other ways as well). Each of these representations will elicit different forms of thinking with respect to the part-part-whole relationships being explored.
Part = 12, shown as 10 and 2 Part = 12, shown as double 6
Cover Remaining
Beads
Cover Remaining
Beads
Cover Remaining
Beads

Learning to Think Mathematically with the Rekenrek 31
Lesson 12: It ’s Automatic… Math Facts
Lesson Level: TWO & THREE
Lesson Objectives
• To develop fluency with the addition number facts through 20. • To use informal strategies to compute number facts up to 10 + 10. • To reinforce anchoring on 10 and using doubles as helpful strategies to
complete the math facts through 20.
Activity Background and Introduction
• If students have completed each of the previous activities, they should be well on their way toward rapid recall of the addition facts up to 10 + 10. The Rekenrek is a powerful model that allows students to formalize the intuitions students often bring to the elementary classroom.
• In this activity, stress strategies over rote memorization. Strategies to highlight included:
• Can I first make 5, and then adjust accordingly? • Can I first make 10, and then adjust accordingly? • Can I find the double, and then adjust accordingly?
• Foster a relational understanding of the equal sign (as opposed to the equal sign being simply the indicator of “an answer” to a problem), by highlighting the relationships between the numbers that make up a given fact.
Lesson Progression
• Begin with a number fact such as: 4 + 5. • To foster a relational understanding of the equal sign, use the following
language when helping students work through the problem:
“4 + 5… That means we want to combine 4 + 5 beads.” “Begin by showing 4 on your Rekenrek.” “Now we must add 5 more beads.” “You may add the 5 beads in any way, on any row.” “How many beads are there in all?” “Without having to count each bead, how do you know that there are 9 beads? What was your strategy for knowing that 4 + 5 = 9?”
Listen for students to mention anchoring on 10, doubles, etc. Some possible statements might include:
“Well, I know that 5 + 5 is 10, so 5 + 4 is one less.” “Two 4’s is 8. So, I have one more than that, so 4 + 5 = 9.” “I know that 4 and 6 is 10, so it is one less.”

Learning to Think Mathematically with the Rekenrek 32
•
Lesson 12: It’s Automatic… Number Facts
• To promote automaticity (quick recall of number facts), it is important to use the Rekenrek to visually represent the number facts for children. For example, flash cards can be developed with beads on one side, and the answer on the other side.
Front Back
• It is important to reinforce the various strategies that students might use to compute the given number fact. In the example above, for instance, students may “double” on three, drawing a mental line after the third bead as shown below. In such a case, the student would understand 4 + 3 as… two groups of 3, and 1 more.
• With other number facts, however, other compensation strategies should be encouraged. For example, consider the number fact: 8 + 4 = 12.
• While some students might see doubles (two groups of 4 and 4 more), it is more likely in this instance that students will anchor on 10 by mentally sliding two additional beads to the left on the top row (making 10), and then compensating on the bottom row by removing 2 beads.
4
+ 3
4 + 3 =
7
4
+ 3
Add 2
Remove 2
8
+ 4
8 + 4 =
12

Learning to Think Mathematically with the Rekenrek 33
Lesson 13: The Rekenrek and the Number Line
Lesson Level: THREE
Lesson Objectives
• To foster a connection between the Rekenrek and the number line. • To complete simple addition and subtraction problems on the number line,
using strategies developed on the Rekenrek.
Activity Background and Introduction
• The number line is a well-known artifact in the math classroom, though often under-used. Understandings of numbers developed through the Rekenrek can easily be transferred to use with number lines.
• These strategies developed with numbers between 0 – 20 can later be used effectively with operations involving two and three digit numbers.
• Introduce the number line as a variation of the Rekenrek. An intermediate step is to use a free-standing string of beads, organized in groups of 5.
• Students may use this string of beads to do many of the activities suggested throughout this book.
• As noted below, follow the steps in this series of activities to transition from the number string to the use of the number line shown below. Make a copy of the number line below for each student in the class.
1 2 3 4 5 6 7 8 9 10 11 12 13 14 15 16 17 18 19 20
Lesson Progression
• Begin by asking students to “show” numbers both on the Rekenrek (or string of beads) and the number line.
o “Show me 6 beads. Now show me 6 on the number line.” o “Show me 18 beads. Now show me 18 on the number line.” o Continue with other numbers until students are comfortable locating
number on the number line. • Introduce the notion of “skip-counting” by 5 and 10 on the number line. This
is analogous to using one “push” to move 5 beads at a time… 10 beads at a time.
• Begin with the following examples, each of which starts with multiples of 5. o “Show me 5. Now, skip-count 5 more. What is your answer?” (10) o “Show me 5. Now skip-count by 10 more. What is your answer?” (15) o Show me 10. Now skip-count by 5 more. What is your answer?” (15)
• Model the skip-counts on the number line for students as shown below.

Learning to Think Mathematically with the Rekenrek 34
Lesson 13: The Rekenrek and the Number line
“Show me 5. Now skip jump 5 more. What is your answer?” 10
1 2 3 4 5 6 7 8 9 10 11 12 13 14 15 16 17 18 19 20
“Show me 10. Now skip jump 10 more. What is your answer?” 20
1 2 3 4 5 6 7 8 9 10 11 12 13 14 15 16 17 18 19 20
• After students are comfortable skip jumping by 5 and 10 when starting on
multiples of 5, begin to introduce the idea of a skip jump from a different starting point. For example:
o “Show me 6. Now skip jump 5 more. What is your answer?” (11) o “Show me 3. Now skip jump 10 more. What is your answer?” (13) o Be sure to use a variety of examples where both the starting point and
the skip jump amount vary. Continue to use skip jumps of 5 and 10 until students are very comfortable with the idea of jumping by 5 and 10.
o For more advanced students, introduce skip jumps of different amounts. Encourage them to use 5 and 10 as reference points, e.g., a jump of 8 might be completed by jumping 10, and then backing off by 2.
o Encourage students to articulate their thinking, focusing on the various strategies developed throughout this book. See the example below.
“Show me 5. Now skip jump by 8. What is your answer?” 13 1 2 3 4 5 6 7 8 9 10 11 12 13 14 15 16 17 18 19 20
“How did you arrive at 13? How did you skip along the number line?”
“Well, I knew I needed to jump by a total of 8. 8 can be broken down into 5 and 3. First I jumped by 5. 5 and 5 is 10. Then I added three … 11, 12, 13.”
Alternatively, a different student might have done the following:
“Well, I started by jumping by 10. But that was too much. So I came back 2 spaces so that I knew I had jumped by 8.”
1 2 3 4 5 6 7 8 9 10 11 12 13 14 15 16 17 18 19 20

Learning to Think Mathematically with the Rekenrek 35
• I have 14 beads. How many do I take away? (6)
• Start by taking away 4 on the bottom row.
• Now, take away 2 more on the top row.
• So… 14 – 6 = 8
Lesson 14: Subtraction… The “take away” model
Lesson Level: TWO &THREE
Lesson Objectives
• To support the idea that subtraction is one form of a relationship between 3 numbers.
• To understand the importance of using the concept of “10” as a primary reference point in subtraction problems.
• To foster recall of subtraction facts up to 20, using a “take away” approach that utilizes visualization strategies associated with the Rekenrek.
• To connect the concept of subtraction on the Rekenrek with the number line.
Activity Background and Introduction
• Subtraction can be thought of as one way to organize and think about three related numbers such as 3, 4 & 7. The expression “3 + 4 = 7” is related to “7 - ? = 4” is related to “? – 4 = 3”. The Rekenrek can help students foster understanding of these kinds of relationships, therefore strengthening students’ facility with subtraction.
• The focus of these activities is on subtraction facts where the minuend (the larger number) is between 10 and 20. If students can subtract effectively with numbers between 10 and 20 (e.g., 17 – 8), they can apply the same strategies to larger problems (e.g., 347 – 38). In this case, the first step in solving 347 – 38 requires the student to subtract 8 from 17, which can be modeled effectively on the Rekenrek, bead strings, and the number line.
• The strategy to be encouraged in these problems is for students to model the minuend (using only examples between 10 and 20) on two rows, with 10 beads on the top row. Then, when students subtract the second number, they do so using 10 as a reference. See examples below.
Lesson Progression
o Begin with the following question: “Suppose I have 14 balls, and you take 6 away. How many do I have left? How could you represent that problem on the Rekenrek?”
o Model the minuend (14) on the Rekenrek, covering the remaining beads.
Cover Remaining
Beads
Cover Remaining
Beads
Cover Remaining
Beads

Learning to Think Mathematically with the Rekenrek 36
Lesson 15: Subtraction
o Continue with additional examples. Suggested problems include:
o 11 – 6 o 13 – 4 o 16 – 7 o 12 – 5 o 17 – 9 o 19 – 10 o 14 – 8 o 15 – 7 o 18 – 9
o Be aware that students may represent the starting number in various ways. Continue to emphasize building the minuend with a full row of 10 beads on the top, and the remaining beads on the bottom row.
o Continue to ask students to articulate their solution strategies as in the following example.
o “How many beads do you see?” (13) “How many beads would be left if we took away 6 beads? Be prepared to explain your thinking.”
o Example of student thinking: “Well, first I took 3 beads off the bottom row, which left 10 beads. I still needed to take another 3 more off the top. So, 10 take away 3 is 7 beads left.
o These problems are excellent candidates to model with the number line developed in the previous lesson. For example, students might model this problem (13 – 6) in the following way.
1 2 3 4 5 6 7 8 9 10 11 12 13 14 15 16 17 18 19 20
Cover Remaining
Beads
Cover Remaining
Beads
Cover Remaining
Beads
Step 2: take 3 from bottom row
Step 2: take 3 from top row.
Step 2: Take 3 more from 10. 10 – 3 = 7
Step 1: Take 3 from 13. 13 – 3 = 10.
Step 1: Show 13 beads

Learning to Think Mathematically with the Rekenrek 37
• I have 8 dollars in my pocket. Show this on the top row.
• I owe you six dollars. Show this on the second row.
• Now… compare the two rows. Find the beads that are in common on both rows. How many beads are left over? How many more beads on the top row?
• Start by taking away 4 on the bottom row.
• Now, take away 2 more on the top row.
• So… 14 – 6 = 8
Lesson 15: Subtraction… The “Comparison” model
Lesson Level: TWO &THREE
Lesson Objectives
• To enhance students’ understanding of subtraction by introducing the comparison method of subtraction.
• To foster recall of subtraction facts up to 20, using a “comparison model” approach that utilizes visualization strategies associated with the Rekenrek.
Activity Background and Introduction
• In the previous lesson, the idea of “taking away” a given quantity from the minuend (starting value) was emphasized. This approach is probably the most common way for teachers to motivate subtraction – the process of taking away. Another model for subtraction is equally useful and perhaps more powerful. In this lesson, students will compare two quantities, noting the difference between the two as the answer to a subtraction problem. The Rekenrek is an excellent tool that can help students foster understanding of the comparison method of subtraction.
• The focus of these activities is on subtraction facts where the minuend (the larger number) is between zero and 10. This may be done with a 20 bead rekenrek. To emphasize this strategy with larger numbers, either use a 40 bead rekenrek (20 beads per string), or use two regular rekenreks (2 strings of 10 beads) to compare quantities. Once students can use this method successfully with numbers between zero and 20, they will be able to apply the same strategies to larger problems (e.g., 347 – 38). In this case, the first step in solving 347 – 38 requires the student to compare 47 and 38 (or 17 and 8). This can be modeled with the rekenrek.
Lesson Progression
• Begin with the following question: o “Suppose I owe you 6 dollars. I have 8 dollars in my pocket. How many
dollars will I have left after I pay you?” • Next, ask students how this problem could be modeled with the rekenrek?
o “Use the top row to model the money I have, and the second row to model the number of dollars I owe you.”
• Model the minuend (8) on the top row, and the subtrahend (6) on the second row, and help students understand the process in the following way.
It may be helpful to use a line to show the comparison.

Learning to Think Mathematically with the Rekenrek 38
Lesson 15: Subtraction
o Continue with additional examples. Suggested problems include:
o 5 - 4 o 9 - 6 o 7 - 3 o 8 – 5 o 9 – 7 o 6 – 3
o As students are ready, begin to use larger numbers such as the following. You may wish to use a 40 bead rekenrek (shown in the below), or use two regular (20 bead) rekenreks to compare the quantities. One student could model the minuend, and a partner could model the subtrahend. Then the two students could compare their rekenreks, deciding which beads were in common, and what was the left over (difference) part.
Example: 40 bead rekenrek 18 – 7
o Continue with the following problems. o 14 – 8 o 15 – 7 o 18 – 9 o 16 – 11 o 13 – 7 o 12 – 8 o 19 – 12 o 11 – 6 o 12 – 6 o 13 – 5 o 14 – 7 o 15 – 6 o 15 - 9
18
7
A difference of 11

Learning to Think Mathematically with the Rekenrek 39
Chapter 4: Word Problems with the Rekenrek
Cognitively Guided Instruction (CGI): A Framework for Thinking about Addit ion and Subtraction There is perhaps no better-known theory about children’s thinking in mathematics education than CGI. Developed throughout the last 20+ years, CGI provides teachers with a framework to understand how children intuitively approach addition and subtraction, and subsequently how we might best teach them to reason mathematically at a young age. One of the key premises behind CGI is the notion that there are multiple ways to express any given number relationship, each of which might solicit a different kind of thinking from children. Consider, for example, the following statement:
“Claudia had 4 apples. Robert gave her 3 more. Now how many apples does Claudia have?”
At first glance, this looks like a simple addition fact: 4 + 3 = 7. And indeed, it is. There is evidence in the research literature to suggest that most elementary teachers teach this relationship between 4, 3 and 7 in one of two ways: 4 + 3 = or 3 + 4 = We might call this an addition problem where the result is unknown. While it is certainly important that children know these number facts, there is so much more that can be done with this family of numbers. CGI provides a framework for looking at the ways in which we might broaden children’s thinking. Consider, for example, the ways in which this problem might be altered, and how these new forms of the same problem require a different form of thinking.
“Claudia had some apples. Robert gave her 3 more. Now she has 7 apples. How many did she have at the beginning?” (Here the Start is unknown.) “Claudia had 4 apples. Robert gave her some more. Now she has 7 apples. How many did Robert give her?” (Here the Change is unknown.) “Together, Claudia and Robert have 7 apples. Claudia has one more apple than Robert. How many apples do Claudia and Robert have?” (This is a Comparison problem.)
CGI Problem Types
The CGI framework outlines numerous problem types that require students to think about a particular number relationship. These categories of problems include:

Learning to Think Mathematically with the Rekenrek 40
CGI Word Problems and the Rekenrek…
Join Problems • Join, where the result is unknown • Join, where the start is unknown • Join, where the change is unknown
Separate Problems • Separate, where the result is unknown • Separate, where the start is unknown • Separate, where the change is unknown
Part-Part-Whole Problems • Part-Part-Whole, where the whole is unknown • Part-Part-Whole, where the part is unknown
Compare Problems • Compare, where the result is unknown • Compare, where the quantity is unknown
It is important to realize that with each different form of problem, students think differently about a given number relationship. When we only ask “result unknown” problems (e.g., 3 + 4 = ?), we deny our students the opportunity develop a rich sense of number relationships. Moreover, when we only ask “result unknown” problems, we foster a misconception among students where the equal sign becomes synonymous with, “Here comes the answer.” This is a very limited view of the equal sign, and leads to difficulties when students are asked to engage in algebraic reasoning when a relational understanding of the equal sign is required. For example, interesting studies have shown alarmingly high error patterns among middle school children when given the following problem: Put the correct answer in the square: 4 + 8 = + 5 Rather than filling in the box with 9, making the statement true, over 80% of elementary school children tested in 3 various studies made the mistake of putting a 12 in the box. Rather than viewing the equal sign as an indicator that both sides of the equation were in balance with each other, students often assume the equal sign indicates that an answer must follow. By using the various problems types highlighted in the CGI framework, we can begin to eliminate this misconception. In the following pages, various problem types from the CGI framework are shared, with examples of how the Rekenrek might be used to model and solve each problem. As you follow the examples, make up other problem contexts to challenge the thinking of your students. Repeated exposure to these various problem types at a young age is fundamental to the development of confidence and efficiency across all the number operations. Be prepared so spend several days on each of the lessons that follow. Although they are presented as one lesson, they contain numerous activities that will take time for students to understand and complete.

Learning to Think Mathematically with the Rekenrek 41
Word Problems Lesson 1: Join Problems
Lesson Level: TWO & THREE
Lesson Objectives
• Use the Rekenrek to model join problems, result unknown. • Use the Rekenrek to model join problems, change unknown. • Use the Rekenrek to model join problems, start unknown.
Activity Background and Introduction
• Join problems are typically the easiest type of word problem for students to understand and solve. Plan to spend several days covering these problems.
• For “result unknown” problems, students can use the Rekenrek to represent both parts of the problem (the starting value, and the change), and then use informal strategies to add the two amounts.
• For both the “change unknown” and “start unknown” problems, students may use the Rekenrek to work backwards to the desired answer, similar to the ways in which they have earlier solved problems like, “Show me 14. I’ll start with 8, how many more?”
• Illustrate examples of each of the problems below before giving students additional practice with “join” problems.
Lesson Progression
• Begin with a “Result Unknown” problem such as: “Marco had 7 playing cards. Tina gave him 4 more. How many playing cards does Marco have?” Model the problem with the Rekenrek:
o “On top, let’s show how many Marco has.” (Push 7 beads) o “On the second row, let’s show how many Tina gave.” (Push 4 beads) o “So… how many beads (that is, playing cards), are there in all?”
• Create additional “join, result unknown” problems for your students to solve. • Next, introduce a “Change Unknown” problem such as the following: “Marco
has 8 playing cards. How many more does he need to have 17 cards?” • Two strategies will be helpful for students. They may prefer to build up to 17
(“Let’s start with 8; how many more do we need for 17?”), or they may choose to work backwards, modeling a total of 17 beads, and then adjusting accordingly so that there are 8 beads on the top row.
• Model this second strategy by using language like, “Okay, Marco has a total of 17 in the end, so… let’s show 17 on the Rekenrek. We have to use both the top and bottom row.”
Students may solve this problem using skills they have acquired earlier, e.g., seeing “double 4, plus 3”, or compensating by removing one white bead on top, and adding one red bead on the bottom to make “two 5’s is 10, plus 1 more for 11.”

Learning to Think Mathematically with the Rekenrek 42
Word Problems Lesson 1: Join Problems
• “Now, we know he started out with only 8 cards. Can we adjust the Rekenrek to keep 17 beads, but only have 8 on the top row?”
Results in…
• This compensation strategy still leaves the Rekenrek with 17 beads. But now there are 8 beads on top, representing Marco’s initial starting point. The “change unknown” amount of 9 is now represented on the bottom row.
• Repeat a similar process with a “Start Unknown” problem. For example, “Marco had some playing cards. Tina gave him 6 more cards. Now he has 11 cards. How many did he have to start with?”
• Similarly, students can either build to 11 beads (not knowing how many were on the top row, but representing 6 on the bottom row), or they can start with 11, and work backwards as demonstrated above.
• For the latter strategy, use the Rekenrek to model the final amount of 11. Students may use any combination of beads on both rows to do so.
• Next, remind students that Tina gave Marco 6 beads. “Can we still keep 11 beads on the left side, but have 6 beads on the bottom row?” Students can manipulate the Rekenrek, maintaining 11 beads in all to show a total of 5 on the top row, and 6 on the bottom row.
• Create other “Join” word problems for students to solve. Vary the form.
o
Step 1: Model the final 17 beads
Step 2: Adjust the Rekenrek to leave only 8 beads on the top row, but still maintaining 17 total. Slide two white beads to the right on the top row; Slide two white beads to the left on the bottom row.
Step 1: Model the final 11 beads
Step 2: Adjust the Rekenrek to place 6 beads on the bottom row, but still maintaining 11 total. Slide 5 beads to the left on the bottom row; Slide 5 beads to the right on the top row.

Learning to Think Mathematically with the Rekenrek 43
Word Problems Lesson 2: Separate Problems
Lesson Level: TWO & THREE
Lesson Objectives
• Use the Rekenrek to model separate problems, result unknown. • Use the Rekenrek to model separate problems, change unknown. • Use the Rekenrek to model separate problems, start unknown.
Activity Background and Introduction
• Separate problems are typically linked with subtraction. Representing these problems on the Rekenrek can be challenging at times for students, depending on the nature of the problem, and the ability of students to visualize the problem context.
• Both the “Result unknown” and “Change unknown” forms of separate problems are done similarly to the way in which subtraction was introduced in a previous lesson (Lesson 14: Subtraction). We may start with the minuend, and take away beads (in groups when possible) until we arrive at the desired amount.
• “Separate Start Unknown” problems are perhaps the most difficult to represent on the Rekenrek as we do not know the original, starting value from which we must subtract. Great care must be taken in modeling these problems. Then, multiple practice problems should be given to solidify students’ understanding.
Lesson Progression
• Begin with a “Result Unknown” problem such as the following: “Lisa brought 11 forks to the picnic. She gave 6 forks to her teacher. How many does she have left?”
• Model this problem similarly to those done in Lesson 14. Begin by moving 11 beads to the left, 10 on the top row, 1 on the bottom row. Cover the remaining beads if it is helpful for students.
• Return to the problem. “We must remove 6 beads (6 forks). Start on the bottom row; take away 1 bead. How many more do we need to take away? 5 more.” Remove the final 5 beads from the top row.
• Next, model a separate problem, with the “Change Unknown.” For example, “Lisa had 7 forks. She gave some to her teacher. Now she has 2 left. How many did she give to her teacher?” Model the problem.
• Next motivate the idea that we need to take away some beads until there are
only two left. “How many beads are left in the end? Two. Let’s show only the beads that we need left at the end when we are done with the problem.”
•
Step 1: Model the original 7 beads (forks).
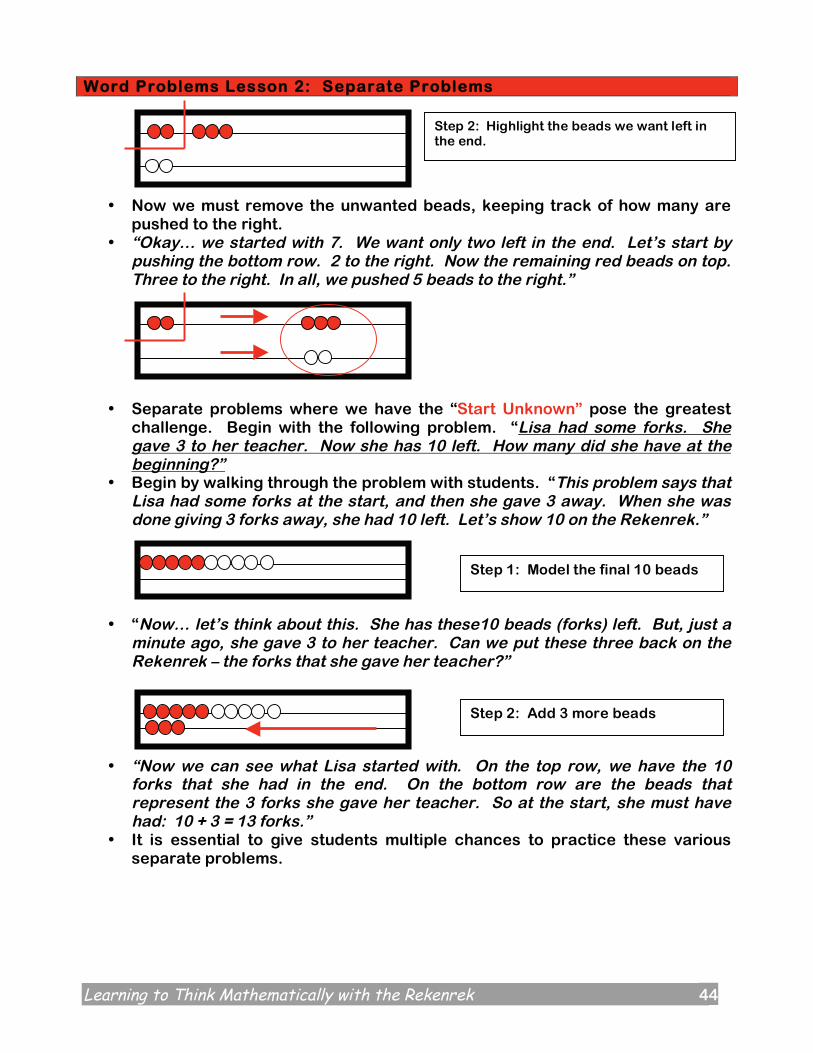
Learning to Think Mathematically with the Rekenrek 44
Word Problems Lesson 2: Separate Problems
• Now we must remove the unwanted beads, keeping track of how many are
pushed to the right. • “Okay… we started with 7. We want only two left in the end. Let’s start by
pushing the bottom row. 2 to the right. Now the remaining red beads on top. Three to the right. In all, we pushed 5 beads to the right.”
• Separate problems where we have the “Start Unknown” pose the greatest
challenge. Begin with the following problem. “Lisa had some forks. She gave 3 to her teacher. Now she has 10 left. How many did she have at the beginning?”
• Begin by walking through the problem with students. “This problem says that Lisa had some forks at the start, and then she gave 3 away. When she was done giving 3 forks away, she had 10 left. Let’s show 10 on the Rekenrek.”
• “Now… let’s think about this. She has these10 beads (forks) left. But, just a minute ago, she gave 3 to her teacher. Can we put these three back on the Rekenrek – the forks that she gave her teacher?”
• “Now we can see what Lisa started with. On the top row, we have the 10 forks that she had in the end. On the bottom row are the beads that represent the 3 forks she gave her teacher. So at the start, she must have had: 10 + 3 = 13 forks.”
• It is essential to give students multiple chances to practice these various separate problems.
Step 1: Model the final 10 beads
Step 2: Add 3 more beads
Step 2: Highlight the beads we want left in the end.
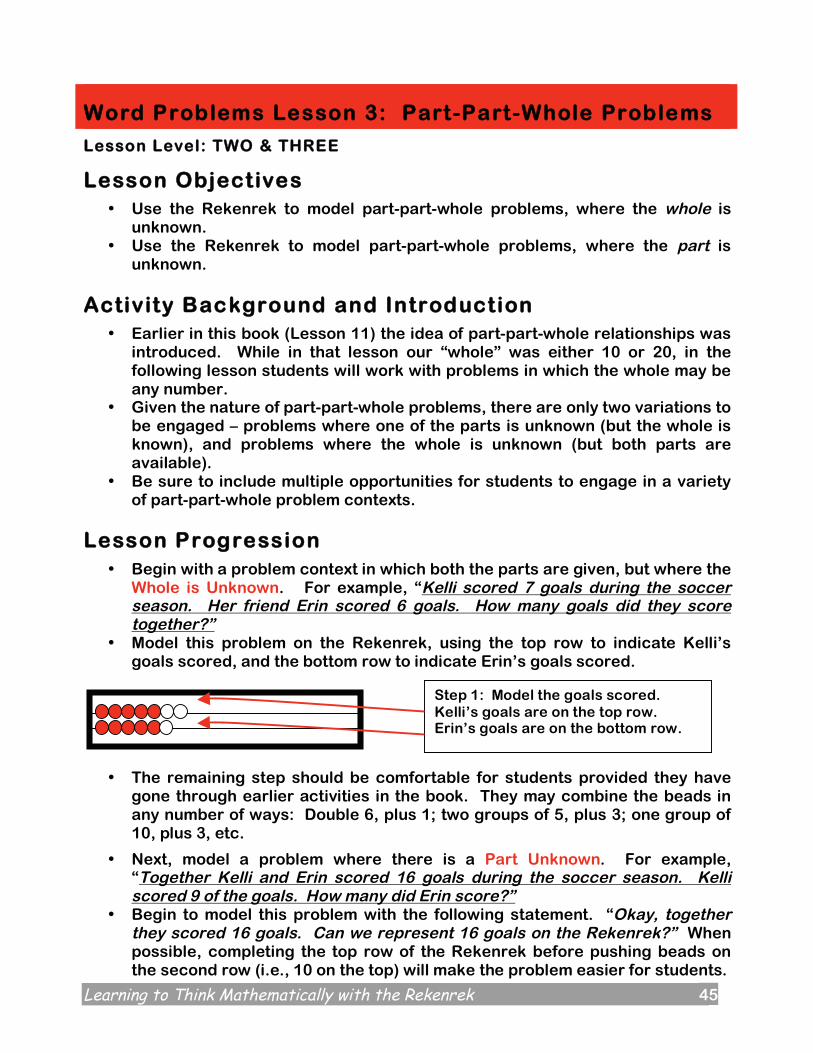
Learning to Think Mathematically with the Rekenrek 45
Word Problems Lesson 3: Part-Part-Whole Problems
Lesson Level: TWO & THREE
Lesson Objectives
• Use the Rekenrek to model part-part-whole problems, where the whole is unknown.
• Use the Rekenrek to model part-part-whole problems, where the part is unknown.
Activity Background and Introduction
• Earlier in this book (Lesson 11) the idea of part-part-whole relationships was introduced. While in that lesson our “whole” was either 10 or 20, in the following lesson students will work with problems in which the whole may be any number.
• Given the nature of part-part-whole problems, there are only two variations to be engaged – problems where one of the parts is unknown (but the whole is known), and problems where the whole is unknown (but both parts are available).
• Be sure to include multiple opportunities for students to engage in a variety of part-part-whole problem contexts.
Lesson Progression
• Begin with a problem context in which both the parts are given, but where the Whole is Unknown. For example, “Kelli scored 7 goals during the soccer season. Her friend Erin scored 6 goals. How many goals did they score together?”
• Model this problem on the Rekenrek, using the top row to indicate Kelli’s goals scored, and the bottom row to indicate Erin’s goals scored.
• The remaining step should be comfortable for students provided they have gone through earlier activities in the book. They may combine the beads in any number of ways: Double 6, plus 1; two groups of 5, plus 3; one group of 10, plus 3, etc.
• Next, model a problem where there is a Part Unknown. For example, “Together Kelli and Erin scored 16 goals during the soccer season. Kelli scored 9 of the goals. How many did Erin score?”
• Begin to model this problem with the following statement. “Okay, together they scored 16 goals. Can we represent 16 goals on the Rekenrek?” When possible, completing the top row of the Rekenrek before pushing beads on the second row (i.e., 10 on the top) will make the problem easier for students.
Step 1: Model the goals scored. Kelli’s goals are on the top row. Erin’s goals are on the bottom row.

Learning to Think Mathematically with the Rekenrek 46
Word Problems Lesson 3: Part-part-whole Problems
• “Now, what else do we know? We know that Kelli scored 9 goals. We need
to find out how many goals Erin scored. So… can we pull out the 9 goals that Kelli scored, and then see how many goals must have been Erin’s?”
• There are various ways in which students might choose to show the 9 goals Kelli scored. Perhaps they take 5 white beads, and 4 red beads on top. Perhaps they start on the bottom row, and remove 6 beads, followed by 3 more beads on the top row. With each problem, students may choose to use a different strategy that resonates with their intuitions.
• Now, the remaining beads can be attributed to Erin. “After removing 9 of the
goals – the ones that Kelli scored – we can see that there are 7 (5 red + 2 white) beads left. So… Erin must have scored 7 goals.”
• Provide students with ample opportunity to repeat this process with other part-part-whole contexts in which one of the parts is unknown.
Step 1: Model the 16 goals scored.
Step 2: Kelli scored 9 goals. Pull them out.
Remove Kelli’s 9 goals by starting with the bottom row (6), then top (3).
The remaining beads represent the number of goals that Erin scored: 5 + 2 = 7
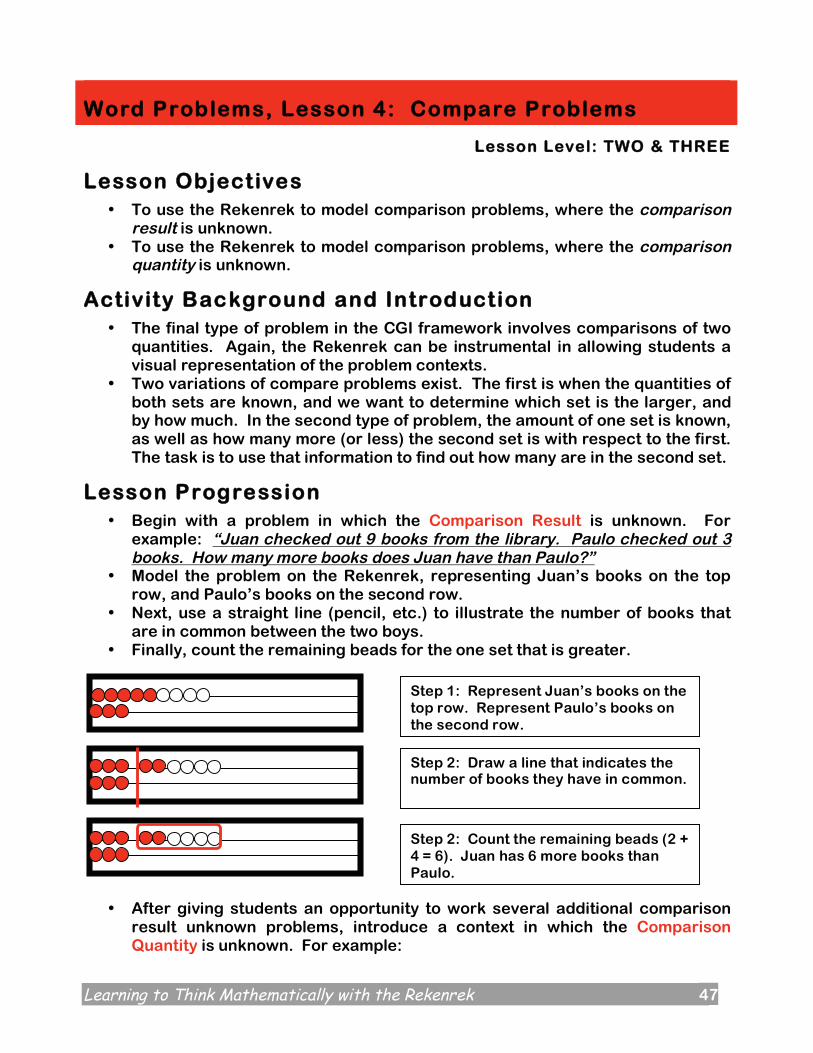
Learning to Think Mathematically with the Rekenrek 47
Word Problems, Lesson 4: Compare Problems
Lesson Level: TWO & THREE
Lesson Objectives
• To use the Rekenrek to model comparison problems, where the comparison result is unknown.
• To use the Rekenrek to model comparison problems, where the comparison quantity is unknown.
Activity Background and Introduction
• The final type of problem in the CGI framework involves comparisons of two quantities. Again, the Rekenrek can be instrumental in allowing students a visual representation of the problem contexts.
• Two variations of compare problems exist. The first is when the quantities of both sets are known, and we want to determine which set is the larger, and by how much. In the second type of problem, the amount of one set is known, as well as how many more (or less) the second set is with respect to the first. The task is to use that information to find out how many are in the second set.
Lesson Progression
• Begin with a problem in which the Comparison Result is unknown. For example: “Juan checked out 9 books from the library. Paulo checked out 3 books. How many more books does Juan have than Paulo?”
• Model the problem on the Rekenrek, representing Juan’s books on the top row, and Paulo’s books on the second row.
• Next, use a straight line (pencil, etc.) to illustrate the number of books that are in common between the two boys.
• Finally, count the remaining beads for the one set that is greater. • After giving students an opportunity to work several additional comparison
result unknown problems, introduce a context in which the Comparison Quantity is unknown. For example:
Step 1: Represent Juan’s books on the top row. Represent Paulo’s books on the second row.
Step 2: Draw a line that indicates the number of books they have in common.
Step 2: Count the remaining beads (2 + 4 = 6). Juan has 6 more books than Paulo.

Learning to Think Mathematically with the Rekenrek 48
Word Problems Lesson 4: Compare Problems
• “Juan checked out 10 books from the library. He checked out 8 more books than Paulo. How many books did Paulo check out from the library?”
• Begin by helping students visualize the context, using the Rekenrek to do so. For example, “Let’s think about everything that we know already. Juan checked out 10 books, and we know that he checked out more than Paulo did. Let’s show Juan’s books on the Rekenrek.”
• “Now, we know that Juan has 8 more books than Paulo checked out. Let’s
show that amount… the 8 books that Paulo doesn’t have.” Students will need to count 8 beads, and they may choose to do so in various ways: 4 sets of 2, 5 white and 3 more, two groups of 4, etc. One of these methods is shown below.
• “Now we can see how many books Paulo must have. He has 8 less books than Juan, or… 2 books.”
• Be aware that another method would be to represent the number of extra books that Juan has on the second row. Then, a direct comparison between the two rows may be completed, as illustrated below.
Step 1: Represent Juan’s books on the top row. He has 10 books.
Step 2: Illustrate the 8 books that Juan has, but Paulo does not have.
Step 3: Paulo’s books.
Step 1: Represent Juan’s books on the top row. He has 10 books.
Step 2: Represent 8 books that Juan has, and Paulo doesn’t have, on the second row.
Step 3: The remaining 2 beads indicate that Paulo must have had 2 books since Juan had 8 more at first.
