lcd televisionstatic.highspeedbackbone.net/pdf/toshiba_26av500u_manual.pdf · dear customer, thank...
TRANSCRIPT

HL117 (E/F) Web 213:276
HIGH-DEFINITION TELEVISION
26AV500U32AV500U37AV50U37AV500U42AV500U
VX3A00016400HDA51V3201I
Integrated High Definition LCD Television
© 2008 TOSHIBA CORPORATIONAll Rights Reserved
Owner’s RecordThe model number and serial number are on the back of your TV. Record these numbers in the spaces below. Refer to these numbers whenever you communicate with your Toshiba dealer about this TV.
Model number:
Serial number:
For an overview of steps for setting up your new TV, see page 9.
Note: To display a High Definition picture, the TV must be receiving a High Definition signal (such as an over-the-air High Definition TV broadcast, a High Definition digital cable program, or a High Definition digital satellite program). For details, please contact your TV antenna installer, cable provider, or satellite provider.

�
Dear Customer,Thank you for purchasing this Toshiba LCD TV. This manual will help you use the many exciting features of your new LCD TV. Before operating your LCD TV, please read this manual completely, and keep it nearby for future reference.
Safety PrecautionsWARNING: TO REDUCE THE RISK OF FIRE OR ELECTRIC SHOCK, DO NOT EXPOSE THIS APPLIANCE TO RAIN OR MOISTURE.
WARNINGRISK OF ELECTRIC SHOCK
DO NOT OPEN.
WARNING: TO REDUCE THE RISK OF ELECTRIC SHOCK, DO NOT REMOVE COVER (OR BACK). NO USER-SERVICEABLE PARTS INSIDE. REFER SERVICING TO QUALIFIED SERVICE PERSONNEL.
The lightning flash with arrowhead symbol, within an equilateral triangle, is intended to alert the user to the presence of uninsulated “dangerous voltage” within the product’s enclosure that may be of sufficient magnitude to constitute a risk of electric shock to persons.
The exclamation point within an equilateral triangle is intended to alert the user to the presence of important operating and maintenance (servicing) instructions in the literature accompanying the appliance.
WARNINGTo prevent injury, this apparatus must be securely attached to the floor/wall in accordance with the installation instructions. See item 20 on page 3 and instructions on page 5.
WARNING: If you decide to wall mount this television, always use a UL Listed wall bracket appropriate for the size and weight of this television. For more detail about UL Listed wall bracket, contact a Toshiba Authorized Service Center.The use of any wall bracket other than a UL Listed wall bracket appropriate for the size and weight of this television for wall mounting this television could result in serious bodily injury and/or property damage. See “Removing the Pedestal Stand” ( page 5).
NOTE TO CATV INSTALLERSThis is a reminder to call the CATV system installer’s attention to Article 820-40 of the U.S. NEC, which provides guidelines for proper grounding and, in particular, specifies that the cable ground shall be connected to the grounding system of the building, as close to the point of cable entry as practical. For additional antenna grounding information, see items 27 and 28 on page 4.
Congratulations on your purchase! As you enjoy your new product, please keep these safety tips in mind:
The Issue• The home theater entertainment experience is a growing trend
and larger flat panel displays are popular purchases. However, flat panel displays are not always supported on the proper stands or installed according to the manufacturer’s recommendations.
• Flat panel displays that are inappropriately situated on dressers,
bookcases, shelves, desks, speakers, chests or carts may fall over and cause injury.
TOSHIBA Cares!• The consumer electronics industry is committed to making home
entertainment enjoyable and safe.
Tune Into Safety• One size does NOT fit all. Follow the manufacturer’s recommendations
for the safe installation and use of your flat panel display.• Carefully read and understand all enclosed instructions for
proper use of this product.• Don’t allow children to climb on or play with furniture and
television sets.• Don’t place flat panel displays on
furniture that can easily be used as steps, such as a chest of drawers.
• Remember that children can become excited while watching a program, especially on a “larger than life” flat panel display. Care should be taken to place or install the display where it cannot be pushed, pulled over, or knocked down.
• Care should be taken to route all cords and cables connected to the flat panel display so that they cannot be pulled or grabbed by curious children.
Wall Mounting: If you decide to wall mount your flat panel display, always:• Use a mount that has been recommended by the display
manufacturer and/or listed by an independent laboratory (such as UL, CSA, ETL).
• Follow all instructions supplied by the display and wall mount manufacturers.
• If you have any doubts about your ability to safely install your flat panel display, contact your retailer about professional installation.
• Make sure that the wall where you are mounting the display is appropriate. Some wall mounts are not designed to be mounted to walls with steel studs or old cinder block construction. If you are unsure, contact a professional installer.
• A minimum of two people are required for installation. Flat panel displays can be heavy.
CHILD SAFETY:It Makes A Difference How and Where You Use Your Flat Panel Display

�
Important Safety Instructions1) Read these instructions.2) Keep these instructions.3) Heed all warnings.4) Follow all instructions.
5) Do not use this apparatus near water.
6) Clean only with dry cloth.
7) Do not block any ventilation openings. Install in accordance with the manufacturer’s instructions.
8) Do not install near any heat sources such as radiators, heat registers, stoves, or other apparatus (including amplifiers) that produce heat.
9) Do not defeat the safety purpose of the polarized or grounding type plug. A polarized plug has two blades with one wider than the other. A grounding type plug has two blades and a third grounding prong. The wide blade or the third prong are provided for your safety. If the provided plug does not fit into your outlet, consult an electrician for replacement of the obsolete outlet.
10) Protect the power cord from being walked on or pinched, particularly at plugs, convenience receptacles, and the point where they exit from the apparatus.
11) Only use attachments/accessories specified by the manufacturer.
12) Use only with the cart, stand, tripod, bracket, or table specified by the manufacturer, or sold with the apparatus. When a cart is used, use caution when moving the cart/apparatus combination to avoid injury from tip-over.
13) Unplug this apparatus during lightning storms or when unused for long periods of time.
14) Refer all servicing to qualified service personnel. Servicing is required when the apparatus has been damaged in any way, such as power-supply cord or plug is damaged, liquid has been spilled or objects have fallen into the apparatus, the apparatus has been exposed to rain or moisture, does not operate normally, or has been dropped.
Additional Safety Precautions14a) CAUTION: If the TV is dropped and the cabinet or
enclosure surface has been damaged or the TV does not operate normally, take the following precautions:
ALWAYS turn off the TV and unplug the power cord to avoid possible electric shock or fire.NEVER allow your body to come in contact with any broken glass or liquid from the damaged television. The LCD panel inside the TV contains glass and a toxic liquid. If the liquid comes in contact with your mouth or eyes, or your skin is cut by broken glass, rinse the affected area thoroughly with water and consult your doctor.ALWAYS contact a service technician to inspect the TV any time it has been damaged or dropped.
•
•
•
15) CAUTION: To reduce the risk of electric shock, do not use the polarized plug with an extension cord, receptacle, or other outlet unless the blades can be inserted completely to prevent blade exposure.To prevent electric shock, match wide blade of plug to wide slot; fully insert.
16) WARNING: To prevent the spread of fire, keep candles or other open flames away from this product at all times.
Installation, Care, and Service
InstallationFollow these recommendations and precautions and heed all warnings when installing your TV:
17) Never modify this equipment. Changes or modifications may void: a) the warranty, and b) the user’s authority to operate this equipment under the rules of the Federal Communications Commission.
18) DANGER: RISK OF SERIOUS PERSONAL INJURY, DEATH, OR EQUIPMENT DAMAGE! Never place the TV on an
unstable cart, stand, or table. The TV may fall, causing serious personal injury, death, or serious damage to the TV.
19) To avoid damage to this product, never place or store the TV in direct sunlight; hot, humid areas; or areas subject to excessive dust or vibration.
20) Always place the TV on the floor or a sturdy, level, stable surface that can support the weight of the unit. To secure the TV, use a sturdy strap from the hooks on the rear of the TV to a wall stud, pillar, or other immovable structure. Make sure the strap is tight, secure, and parallel to the floor.
pot VTedis VT
4" min.
Hook
Sturdy strap (as short as possible)
21) The apparatus shall not be exposed to dripping or splashing and that no objects filled with liquids, such as vases, shall be placed on the apparatus.
22) Never block or cover the slots or openings in the TV cabinet back, bottom, and sides. Never place the TV:
on a bed, sofa, rug, or similar surface;too close to drapes, curtains, or walls; orin a confined space such as a bookcase, built-in cabinet, or any other place with poor ventilation.
The slots and openings are provided to protect the TV from overheating and to help maintain reliable operation of the TV. Leave a space of at least 4 (four) inches around the TV.
(continued).
•
•
•
•
•
Grounding prong

�
23) Always place the back of the television at least four (4) inches away from any vertical surface (such as a wall) to allow proper ventilation.
24) Never allow anything to rest on or roll over the power cord, and never place the TV where the power cord is subject to wear or abuse.
25) Never overload wall outlets and extension cords.
26) Always operate this equipment from a 120 VAC, 60 Hz power source only.
27) Always make sure the antenna system is properly grounded to provide adequate protection against voltage surges and built-up static charges (see Section 810 of the National Electric Code).
Antenna lead-in wire
Antenna discharge unit (NEC Section 810-20)
Grounding conductors (NEC Section 810-21)
Power service grounding electrode system (NEC Art 250 Part-H)
Ground clamp
Electric service equipment
Ground clamps
28) DANGER: RISK OF SERIOUS
PERSONAL INJURY OR DEATH!
Use extreme care to make sure you are never in a position where your body (or any item you are in contact with, such as a ladder or screwdriver) can accidentally touch overhead power lines. Never locate the antenna near overhead power lines or other electrical circuits.Never attempt to install any of the following during lightning activity: a) an antenna system; or b) cables, wires, or any home theater component connected to an antenna or phone system.
CareFor better performance and safer operation of your TOSHIBA TV, follow these recommendations and precautions:
29) If you use the TV in a room whose temperature is 32 °F (0 °C) or below, the picture brightness may vary until the LCD warms up. This is not a sign of malfunction.
30) Always unplug the TV before cleaning. Gently wipe the display panel surface (the TV screen) using a dry, soft cloth only (cotton, flannel, etc.). A hard cloth may damage the surface of the panel. Avoid contact with alcohol, thinner, benzene, acidic or alkaline solvent cleaners, abrasive cleaners, or chemical cloths, which may damage the surface. Never spray volatile compounds such as insecticide on the cabinet. Such products may damage or discolor the cabinet.
•
•
31) WARNING:
RISK OF ELECTRIC SHOCK!
Never spill liquids or push objects of any kind into the TV cabinet slots.
32) While it is thundering, do not touch the connecting cables or apparatus.
33) For added protection of your TV from lightning and power surges, always unplug the power cord and disconnect the antenna from the TV if you leave the TV unattended or unused for long periods of time.
34) During normal use, the TV may make occasional snapping or popping sounds. This is normal, especially when the unit is being turned on or off. If these sounds become frequent or continuous, unplug the power cord and contact a Toshiba Authorized Service Center.
35) DANGER: RISK OF SERIOUS PERSONAL INJURY OR DEATH!
Never strike the screen with a sharp or heavy object.
36) • The LCD screen of this product can be damaged by ultraviolet radiation from the sun. When selecting a location for the television, avoid locations where the screen may be exposed to direct sunlight, such as in front of a window.
Never touch, press, or place anything on the LCD screen. These actions will damage the LCD screen. If you need to clean the LCD screen, follow the instructions in item 30 on this page.
Service
37) WARNING:
RISK OF ELECTRIC SHOCK!
Never attempt to service the TV yourself. Opening and removing the covers may expose you to dangerous voltage or other hazards. Failure to follow this WARNING may result in death or serious injury. Refer all servicing not specified in this manual to a Toshiba Authorized Service Center.
38) If you have the TV serviced:
Ask the service technician to use only replacement parts specified by the manufacturer.Upon completion of service, ask the service technician to perform routine safety checks to determine that the TV is in safe operating condition.
39) The cold cathode fluorescent lamp in the LCD panel contains a small amount of mercury.
When the TV reaches the end of its useful life, dispose of the used TV by the approved method for your area, or ask a qualified service technician to properly dispose of the TV.
Note: The lamp(s) inside this product contain mercury. Disposal may be regulated due to environmental considerations. For disposal or
recycling information, contact your local authorities or the Electronics Industries Alliance (www.eiae.org).
•
•
•
�
Choosing a location for your LCD TV
To Display your LCD TV on the included Pedestal Stand:Observe the following safety precautions:
1)ReadandFollowthepedestalassemblyinstructions.
CAUTION: Beforebeginningpedestalassembly,carefullylaythefrontoftheLCDPanelfacedownonaflat,cushionedsurfacesuchasaquiltorblanket.Leavethebottomoftheunitprotrudingovertheedgeofthesurfaceandassemblethepedestalasindicatedbelow.
Note: Extreme care should always be used when attaching the pedestal stand to avoid damage to the LCD panel.
2)PlacetheTVonasturdy,levelsurfacethatcansupporttheweightoftheTV.
3)BesuretosecuretheTVtoawall,pillar,surface,orotherimmovablestructure.(item20,page3).
To Display your LCD TV using a Wall Bracket:If you decide to wall mount your LCD TV, always use a UL-listed wall bracket appropriate for the size and weight of the LCD TV ( page 2) :
1)CAUTION: Twopeoplearerequiredforinstallation.2)Unplugandremoveanycablesand/orothercomponent
connectorsfromtherearoftheTV.3)Followtheinstructionsprovidedwithyourwallbracket.
Beforeproceeding,makesuretheappropriatebracket(s)areattachedtothewallandthebackoftheTVasdescribedintheinstructionsprovidedwiththewallbracket.
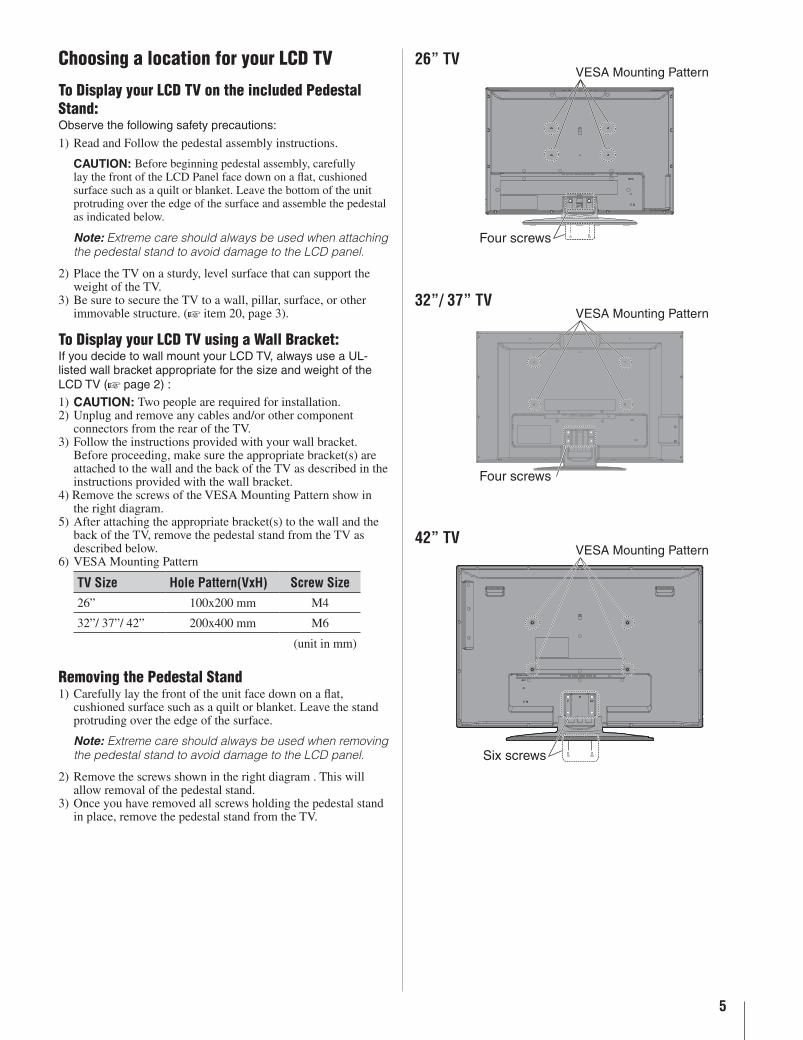
4)RemovethescrewsoftheVESAMountingPatternshowintherightdiagram.
5)Afterattachingtheappropriatebracket(s)tothewallandthebackoftheTV,removethepedestalstandfromtheTVasdescribedbelow.
6)VESAMountingPattern
TV Size Hole Pattern(VxH) Screw Size26” 100x200mm M4
32”/37”/42” 200x400mm M6
(unitinmm)
Removing the Pedestal Stand1)Carefullylaythefrontoftheunitfacedownonaflat,
cushionedsurfacesuchasaquiltorblanket.Leavethestandprotrudingovertheedgeofthesurface.
Note: Extreme care should always be used when removing the pedestal stand to avoid damage to the LCD panel.
2)Removethescrewsshownintherightdiagram.Thiswillallowremovalofthepedestalstand.
3)Onceyouhaveremovedallscrewsholdingthepedestalstandinplace,removethepedestalstandfromtheTV.
Six screws
Four screws
Four screws
�6” TV
��”/ �7” TV
��” TV
VESA Mounting Pattern
VESA Mounting Pattern
VESA Mounting Pattern
6
FCC Declaration of Conformity Compliance Statement (Part 15):TheToshiba 26AV500U, 32AV500U, 37AV50U, 37AV500U and 42AV500U TelevisionscomplywithPart15oftheFCCrules.Operationissubjecttothefollowingtwoconditions:(1)thisdevicemaynotcauseharmfulinterference,and(2)thisdevicemustacceptanyinterferencereceived,includinginterferencethatmaycauseundesiredoperation.Thepartyresponsibleforcompliancetotheserulesis:ToshibaAmericaConsumerProducts,L.L.C.82TotowaRd.Wayne,NJ07470.Ph:1-800-631-3811
Note: This equipment has been tested and found to comply with the limits for a Class B digital device, pursuant to Part 15 of the FCC rules. These limits are designed to provide reasonable protection against harmful interference in a residential installation. This equipment generates, uses, and can radiate radio frequency energy and, if not installed and used in accordance with the instructions, may cause harmful interference to radio communications. However, there is no guarantee that interference will not occur in a particular installation. If this equipment does cause harmful interference to radio or television reception, which can be determined by removing and applying power to the equipment, the user is encouraged to try to correct the interference by one or more of the following measures:
Reorientorrelocatethereceivingantenna.Increasetheseparationbetweentheequipmentandthereceiver.Connecttheequipmentintoanoutletonacircuitdifferentfromthattowhichthereceiverisconnected.Consultthedealeroranexperiencedradio/TVtechnicianforhelp.
Caution: Changes or modifications to this equipment not expressly approved by Toshiba could void the user’s authority to operate this equipment.
•
•
•
•
Important notes about your LCD TVThe following symptoms are technical limitations of LCD Display technology and are not an indication of malfunction; therefore, Toshiba is not responsible for perceived issues resulting from these symptoms.
Anafterimage(ghost)mayappearonthescreenifafixed,nonmovingimageisdisplayedforalongperiodoftime.Theafterimageisnotpermanentandwilldisappearinashortperiodoftime.TheLCDpanelcontainedinthisTVismanufacturedusinganextremelyhighlevelofprecisiontechnology;however,theremaybeanoccasionalpixel(dotoflight)thatdoesnotoperateproperly(doesnotlight,remainsconstantlylit,etc.).ThisisastructuralpropertyofLCDtechnology,isnotasignofmalfunction,andisnotcoveredunderyourwarranty.Suchpixelsarenotvisiblewhenthepictureisviewedfromanormalviewingdistance.
Note: Interactive video games that involve shooting a “gun” type of joystick at an on-screen target may not work with this TV.
Trademark InformationManufacturedunderlicensefromDolbyLaboratories.Dolbyandthedouble-DsymbolareregisteredtrademarksofDolbyLaboratories.HDMI,theHDMIlogoandHigh-DefinitionMultimediaInterfacearetrademarksorregisteredtrademarksofHDMILicensingLLC.
1)
2)
•
•

7
Contents
Important Safety Instructions .......................�
Installation, Care, and Service .....................�
Chapter 1: Introduction ..............................8WelcometoToshiba.................................................................8FeaturesofyournewTV.........................................................8Overviewofstepsforinstalling,settingup,andusing
yournewTV.....................................................................9TVfrontandsidepanelcontrolsandconnections................10TVbackpanelconnections....................................................11
Chapter �: Connecting your TV ....................1�Overviewofcabletypes........................................................12Abouttheconnectionillustrations.........................................12ConnectingaVCRandantennaorCableTV
(noCablebox)................................................................13ConnectingaVCRwithS-videoandacablebox.................14ConnectingaDVDplayerwithColorStream®(component
video),aVCR,andasatellitereceiver............................15Connectingacamcorder........................................................16ConnectinganHDMI™orDVIdevicetotheHDMIinput..17Connectingadigitalaudiosystem.........................................18Connectinganaudiosystem..................................................18Connectingapersonalcomputer(PC)...................................19
Chapter �: Using the remote control ..............�0Preparingtheremotecontrolforuse.....................................20Installingtheremotecontrolbatteries...................................20Remotecontroleffectiverange..............................................20Learningabouttheremotecontrol.........................................21Usingtheremotecontroltocontrolyourotherdevices........22RemoteControlfunctionalkeychart.....................................23Programmingtheremotecontroltocontrolyourother
devices.............................................................................24Remotecontrolcodes............................................................25
Chapter �: Menu layout and navigation ..........�7Mainmenulayout..................................................................27Navigatingthemenusystem..................................................28
Chapter �: Setting up your TV ......................�9Selectingthemenulanguage.................................................29Configuringtheantennainputsourceforthe
ANT/CABLEterminal....................................................29Viewingthedigitalsignalmeter............................................29Viewingthesystemstatus......................................................29ProgrammingchannelsintotheTV’schannelmemory........30
Programmingchannelsautomatically.............................30Manuallyaddingchannelsinthechannelmemory.........30Manuallydeletingchannelsinthechannelmemory.......31ChannelLabelsMenu.....................................................31
Chapter 6: Using the TV’s features ................��Selectingthevideoinputsourcetoview...............................32Tuningchannel.....................................................................32
FavoritesBrowser...........................................................32Tuningtothenextprogrammedchannel........................32Tuningtoaspecificchannel(programmedor
unprogrammed)........................................................32SwitchingbetweentwochannelsusingChannelReturn32
Selectingthepicturesize.......................................................33Adjustingthepicture.............................................................34
Selectingthepicturemode..............................................34Adjustingthepicturequality...........................................35
Usingtheclosedcaptionmode..............................................35Baseclosedcaptions.......................................................35DigitalCCSettings........................................................36
Adjustingtheaudio................................................................36Mutingthesound............................................................36Selectingstereo/SAPbroadcasts.....................................36Adjustingtheaudioquality.............................................37Selectingtheopticaloutputformat.................................38
UsingtheParentalControlmenu...........................................38EnteringthePINcode.....................................................38ChangingyourPINcode.................................................39IfyoustillcannotrememberyourPINcode...................39BlockingTVprogramsandmoviesbyrating(V-Chip)..39
UsingthePCsettingsfeature.................................................40SettingthePCAudio.............................................................41Settingthesleeptimer...........................................................41Settingthetimezone.............................................................42DisplayingTVstatusinformation.........................................42Understandingtheautopowerofffeature.............................42Understandingthelastmodememoryfeature.......................42
Chapter 7: Using the TV’s advanced features ...��Usingtheadvancedpicturesettingsfeatures.........................43
UsingDynamicContrast.................................................43UsingDynaLight™.........................................................43BacklightAdjustment......................................................43Usingthestaticgammafeature.......................................44Usingtheautoaspectratiofeature..................................44Selectingthecolortemperature......................................45UsingMPEGNoiseReduction.......................................45UsingCableClear®digitalnoisereduction.....................45
Chapter 8: Troubleshooting .........................�6Generaltroubleshooting........................................................46LEDindications.....................................................................47
Chapter 9: Appendix .................................�8Specifications.........................................................................48LimitedUnitedStatesWarranty
forLCDTelevisions26”andLarger....................... 50
LimitedCanadianWarrantyforToshibaBrandFlatPanelTelevisions.................. 51

8
Welcome to ToshibaThankyouforpurchasingthisToshibaLCDTV,oneofthemostinnovativeLCDTVsonthemarket.Thisdigitaltelevisioniscapableofreceivinganalogbasic,digitalbasicanddigitalunencryptedcabletelevisionprogrammingbydirectconnectiontoacablesystemprovidingsuchprogramming.Certainadvancedandinteractivedigitalcableservicessuchasvideo-on-demand,acableoperator'senhancedprogramguideanddata-enhancedtelevisionservicesmayrequiretheuseofaset-topbox.Formoreinformationcallyourlocalcableoperator.
Features of your new TVThefollowingarejustafewofthemanyexcitingfeaturesofyournewToshibawidescreen,integratedHD,LCDTV:
Integrated digital tuning (8VSB ATSC and QAM)eliminatestheneedforaseparatedigitalconverterset-topbox(inmostcases).Two HDMI™digital,high-definitionmultimediainterfaces1080iinputsupport( page17).HDMI™ (V.1.3 with Lip Sync) Lip-Sync allowsHDMIsourcedevicestoaccuratelyperformsynchronizationautomatically.Two sets of ColorStream® HDhigh-resolutioncomponentvideoinputs( page15).Digital Audio OutopticalaudioconnectionwithDolby®Digitalopticaloutputformat( page18).CableClear®digitalpicturenoisereduction( page45).PC IN (Analog RGB)computerterminal( page19).Channel LabelsallowsyoutoputtheCallLetters(e.g.ABC,HBO,etc.)onthescreenalongwiththestationnumbers,soyoualwaysknowwhatyou’rewatching( page31).
•
•
•
•
•
•••
Chapter 1: Introduction

Chapter 1: Introduction
9
Overview of steps for installing, setting up, and using your new TVFollowthesestepstosetupyourTVandbeginusingitsmanyexcitingfeatures.
Carefullyreadtheimportantsafety,installation,care,andserviceinformation.Keepthismanualforfuturereference.
ObservethefollowingwhenchoosingalocationfortheTV:
Read“ImportantnotesaboutyourLCDTV”( page6).PlacetheTVonthefloororasturdy,level,stablesurfacethatcansupporttheweightoftheunit.SecuretheTVtoawall,pillar,orotherimmovablestructure(page3).PlacetheTVinalocationwherelightdoesnotreflectonthescreen.PlacetheTVfarenoughfromwallsandotherobjectstoallowproperventilation.Inadequateventilationmaycauseoverheating,whichwilldamagetheTV.THISTYPEOFDAMAGEISNOTCOVEREDUNDERTHETOSHIBAWARRANTY.
DonotpluginanypowercordsuntilAFTERyouhaveconnectedallcablesanddevicestoyourTV.
BEFOREconnectingcablesordevicestotheTV,learnthefunctionsoftheTV’sconnectionsandcontrols( pages10–11).
Connectyourotherelectronicdevice(s)totheTV( pages12–19).
Installthebatteriesintheremotecontrol( page20).
See“Learningabouttheremotecontrol”( page21)foranoverviewofthebuttonsontheremotecontrol.
Programtheremotecontroltooperateyourotherdevice(s)( pages22–26).
AFTERconnectingallcablesanddevices,pluginthepowercordsforyourTVandotherdevices.TheLEDindicationwillberedwhentheTVisonstandbymode.TheLEDindicationwillbegreenwhenpressPOWERontheTVcontrolpanelorremotecontroltoturnontheTV.
1�
2�
•
•
•
•
3�
4�
5�
6�7�
8�
9�
See“Menulayoutandnavigation”foraquickoverviewofnavigatingtheTV’smenusystem( page27).
ProgramchannelsintotheTV’schannelmemory( page30).
FordetailsonusingtheTV’sfeatures,seeChapters6and7.
Forhelp,refertotheTroubleshootingGuide,Chapter8.
Fortechnicalspecificationsandwarrantyinformation,seeChapter9.
EnjoyyournewTV!
10�
11�
12�
13�14�
15�
Chapter 1: Introduction
10
TV front and side panel controls and connections
POWER
POWER
33
4
5
6
789
10
6
10
45
9
78
1 2
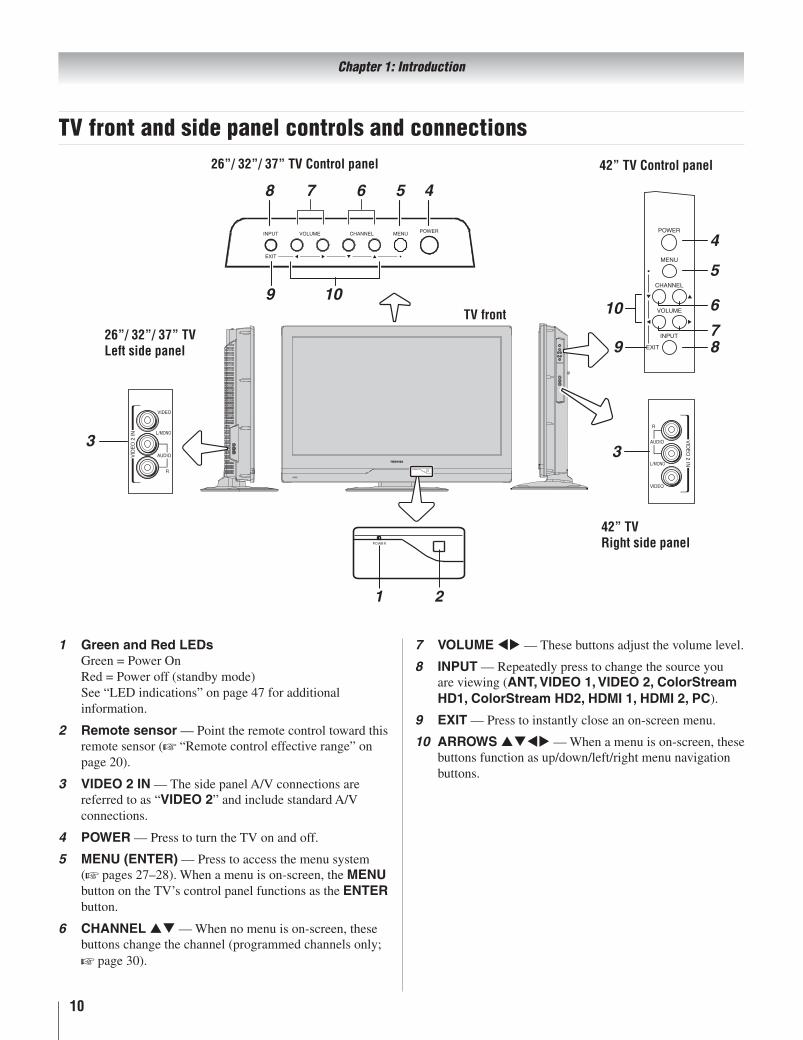
Green and Red LEDsGreen=PowerOnRed=Poweroff(standbymode)See“LEDindications”onpage47foradditionalinformation.
Remote sensor—Pointtheremotecontroltowardthisremotesensor(“Remotecontroleffectiverange”onpage20).
VIDEO 2 IN—ThesidepanelA/Vconnectionsarereferredtoas“VIDEO 2”andincludestandardA/Vconnections.
POWER—PresstoturntheTVonandoff.
MENU (ENTER)—Presstoaccessthemenusystem( pages27–28).Whenamenuison-screen,theMENUbuttonontheTV’scontrolpanelfunctionsastheENTERbutton.
CHANNELpq—Whennomenuison-screen,thesebuttonschangethechannel(programmedchannelsonly; page30).
1�
2�
3�
4�
5�
6�
VOLUMEtu—Thesebuttonsadjustthevolumelevel.
INPUT—Repeatedlypresstochangethesourceyouareviewing(ANT, VIDEO 1, VIDEO 2, ColorStream HD1, ColorStream HD2, HDMI 1, HDMI 2, PC).
EXIT—Presstoinstantlycloseanon-screenmenu.
ARROWSpqtu—Whenamenuison-screen,thesebuttonsfunctionasup/down/left/rightmenunavigationbuttons.
7�
8�
9�
10�
�6”/ ��”/ �7” TV Control panel ��” TV Control panel
TV front�6”/ ��”/ �7” TVLeft side panel
��” TVRight side panel
Chapter 1: Introduction
11
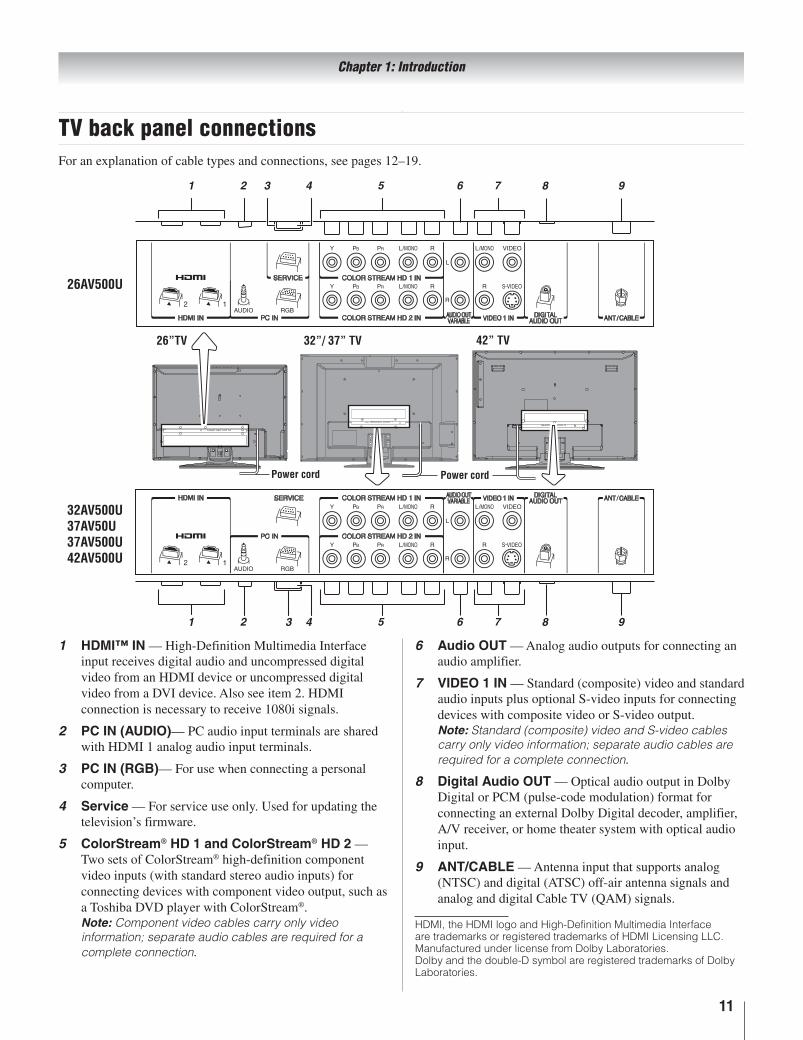
TV back panel connectionsForanexplanationofcabletypesandconnections,seepages12–19.
HDMI™ IN—High-DefinitionMultimediaInterfaceinputreceivesdigitalaudioanduncompresseddigitalvideofromanHDMIdeviceoruncompresseddigitalvideofromaDVIdevice.Alsoseeitem2.HDMIconnectionisnecessarytoreceive1080isignals.
PC IN (AUDIO)—PCaudioinputterminalsaresharedwithHDMI1analogaudioinputterminals.
PC IN (RGB)—Forusewhenconnectingapersonalcomputer.
Service—Forserviceuseonly.Usedforupdatingthetelevision’sfirmware.
ColorStream® HD 1 and ColorStream® HD 2—TwosetsofColorStream®high-definitioncomponentvideoinputs(withstandardstereoaudioinputs)forconnectingdeviceswithcomponentvideooutput,suchasaToshibaDVDplayerwithColorStream®.Note: Component video cables carry only video information; separate audio cables are required for a complete connection.
1�
2�
3�
4�
5�
Audio OUT—Analogaudiooutputsforconnectinganaudioamplifier.
VIDEO 1 IN—Standard(composite)videoandstandardaudioinputsplusoptionalS-videoinputsforconnectingdeviceswithcompositevideoorS-videooutput. Note: Standard (composite) video and S-video cables carry only video information; separate audio cables are required for a complete connection.
Digital Audio OUT—OpticalaudiooutputinDolbyDigitalorPCM(pulse-codemodulation)formatforconnectinganexternalDolbyDigitaldecoder,amplifier,A/Vreceiver,orhometheatersystemwithopticalaudioinput.
ANT/CABLE—Antennainputthatsupportsanalog(NTSC)anddigital(ATSC)off-airantennasignalsandanaloganddigitalCableTV(QAM)signals.
HDMI,theHDMIlogoandHigh-DefinitionMultimediaInterfacearetrademarksorregisteredtrademarksofHDMILicensingLLC.ManufacturedunderlicensefromDolbyLaboratories.Dolbyandthedouble-DsymbolareregisteredtrademarksofDolbyLaboratories.
6�
7�
8�
9�
��AV�00U�7AV�0U�7AV�00U��AV�00U
�6”TV ��”/ �7” TV ��” TV
�6AV�00U
Power cord Power cord

1�
Overview of cable typesCablescanbepurchasedfrommoststoresthatsellaudio/videodevices.Beforepurchasinganycables,besureofcon-nectortypesrequiredbyyourdevicesandthelengthofeachcable.
Coaxial (F-type) cable
Coaxial(F-type)cableisusedforconnectingyourantenna,cableTVservice,and/orcableconverterboxtotheANT/CABLEinputonyourTV.
Standard A/V cables (red/white/yellow)
StandardA/Vcables(compositevideo)usuallycomeinsetsofthree,andareforusewithvideodeviceswithanalogaudioandcompositevideooutput.Thesecables(andtherelatedinputsonyourTV)aretypicallycolor-codedaccordingtouse:yellowforvideo,redforstereorightaudio,andwhiteforstereoleft(ormono)audio.
S-video cable
S-videocableisforusewithvideodeviceswithS-videooutput.Separateaudiocablesarerequiredforacompleteconnection.
Note: An S-video cable provides better picture performance than a composite video cable. If you connect an S-video cable, be sure to disconnect the standard (composite) video cable or the picture performance will be unacceptable.
Component video cables (red/green/blue)
Componentvideocablescomeinsetsofthreeandareforusewithvideodeviceswithcomponentvideooutput.(ColorStream®isToshiba’sbrandofcomponentvideo.)Thesecablesaretypicallycolor-codedred,green,andblue.Separateaudiocablesarerequiredforacompleteconnection.
Note: Component video cables provide better picture performance than a standard (composite) video or S-video cable.
HDMI™ cable (with HDMI Logo “ ”)
HDMI(High-DefinitionMultimediaInterface)cableisforusewithdeviceswithanHDMIoutput.AnHDMIcablede-liversdigitalaudioandvideoinitsnativeformat.Thiscablecarriesbothvideoandaudioinformation;therefore,separateaudiocablesarenotrequiredforacompleteHDMIdeviceconnection( page17andpage19).
Note: HDMI cable provides better picture performance than a standard (composite) video or S-video cable.
Optical audio cable
OpticalaudiocableisforconnectingreceiverswithDolbyDigitalorPCM(pulse-codemodulation)opticalaudioinputtotheTV’sDIGITAL AUDIO OUTterminal( page18).
Analog RGB (15-pin) computer cable
AnalogRGB(15-pin)computercableisforconnectingaPCtotheTV’sPC INterminal( page19).
About the connection illustrationsYoucanconnectdifferenttypesandbrandsofdevicestoyourTVinseveraldifferentconfigurations.Theconnectionil-lustrationsinthismanualarerepresentativeoftypicaldeviceconnectionsonly.Theinput/outputterminalsonyourdevicesmaydifferfromthoseillustratedherein.Fordetailsoncon-nectingandusingyourspecificdevices,refertoeachdevice’sowner’smanual.
Chapter 2: Connecting your TV

Chapter 2: Connecting your TV
1�
Connecting a VCR and antenna or Cable TV (no Cable box)
IN from ANT
VIDEO AUDIO
OUT to TV
L R
RL
OUT
INCH 3CH 4
You will need:coaxialcablesstandardA/Vcables
For better picture performance, if your VCR has S-video, use an S-video cable (plus the audio cables) instead of the standard video cable. Do not connect both types of video cable to VIDEO 1 at the same time or the picture performance will be unacceptable.If you have a mono VCR, connect L/MONO on the TV to your VCR’s audio out terminal using the white audio cable only.
•
•
−
−
To view the antenna or Cable signal:SelecttheANTvideoinputsourceontheTV.*
To view the VCR:TurnONtheVCR.SelecttheVIDEO 1videoinputsourceontheTV.*
Toselect thevideo input source,press INPUT on the remotecontrol(page21).ToprogramtheTVremotecontroltooperateotherdevices,seeChapter3.
The unauthorized recording, use, distribution, or revision of television programs, videotapes, DVDs, and other materials is prohibited under the Copyright Laws of the United States and other countries, and may subject you to civil and criminal liability.
*
Stereo VCR
Chapter 2: Connecting your TV
1�
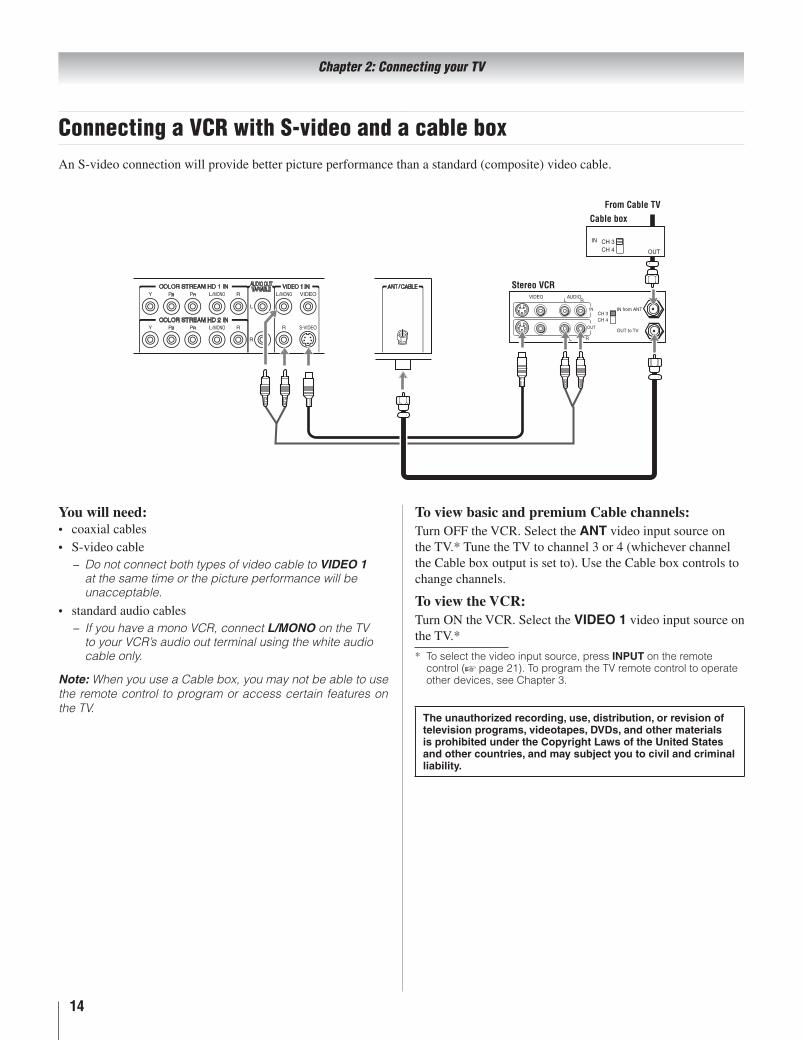
Connecting a VCR with S-video and a cable boxAnS-videoconnectionwillprovidebetterpictureperformancethanastandard(composite)videocable.
IN from ANT
VIDEO AUDIO
OUT to TV
L R
RL
OUT
INCH 3CH 4
IN
OUT
CH 3CH 4
You will need:coaxialcablesS-videocable
Do not connect both types of video cable to VIDEO 1 at the same time or the picture performance will be unacceptable.
standardaudiocablesIf you have a mono VCR, connect L/MONO on the TV to your VCR’s audio out terminal using the white audio cable only.
Note: When you use a Cable box, you may not be able to use the remote control to program or access certain features on the TV.
•
•
−
•
−
To view basic and premium Cable channels:TurnOFFtheVCR.SelecttheANTvideoinputsourceontheTV.*TunetheTVtochannel3or4(whicheverchanneltheCableboxoutputissetto).UsetheCableboxcontrolstochangechannels.
To view the VCR:TurnONtheVCR.SelecttheVIDEO 1videoinputsourceontheTV.*
Toselectthevideoinputsource,pressINPUTontheremotecontrol(page21).ToprogramtheTVremotecontroltooperateotherdevices,seeChapter3.
The unauthorized recording, use, distribution, or revision of television programs, videotapes, DVDs, and other materials is prohibited under the Copyright Laws of the United States and other countries, and may subject you to civil and criminal liability.
*
From Cable TVCable box
Stereo VCR

Chapter 2: Connecting your TV
1�
Connecting a DVD player with ColorStream® (component video), a VCR, and a satellite receiverYourTVhastwosetsofColorStream®(componentvideo)inputs.
IN from ANT
VIDEO AUDIO
OUT to TV
L R
RL
OUT
INCH 3CH 4
VIDEOOUT
COMPONENT VIDEO
PB PRY
AUDIOOUT
L
RS-VIDEOOUT
S-VIDEOOUT
VIDEOOUT
AUDIOOUT
COMPONENT VIDEO
L
RSatelliteIN
PB PRY
You will need:coaxialcablesstandardA/Vcables
For better picture performance, if your VCR has S-video, use an S-video cable (plus the audio cables) instead of the standard video cable. Do not connect both types of video cable to VIDEO 1 at the same time or the picture performance will be unacceptable.If you have a mono VCR, connect L/MONO on the TV to your VCR’s audio out terminal using the white audio cable only.
standardaudiocablescomponentvideocables
You can connect the component video cables (plus audio cables) from the DVD player or satellite receiver to either set of ColorStream terminals on the TV (HD 1 or HD 2). The ColorStream HD 1 and HD 2 terminals can be used with Progressive (480p, 720p) and Interlaced (480i, 1080i) scan systems. A 1080i signal will provide the best picture performance (1080p is not supported).If your DVD player or satellite receiver does not have component video, connect a standard A/V cable to VIDEO 2 on the side panel. If your DVD player has HDMI video, see page 17.
To view antenna or Cable channels:SelecttheANTvideoinputsourceontheTV.*
To view the DVD player:TurnONtheDVDplayer.SelecttheColorStream HD 1videoinputsourceontheTV.*
•
•
−
−
•
•
−
−
To view satellite programs using the component video connections:Turnonthesatellitereceiver.SelecttheColorStream HD 2videoinputsourceontheTV.*
To view the VCR or view and record antenna chan-nels:TurnONtheVCR.TunetheVCRtothechannelyouwanttowatch.SelecttheVIDEO 1videoinputsourceontheTV.*
To record a TV program while watching a DVD:TurnONtheVCR.TunetheVCRtothechanneltorecord.SelecttheColorStream HD 1videoinputsourceontheTV*toviewtheDVD.
Toselectthevideoinputsource,pressINPUTontheremotecontrol( page21).ToprogramtheTVremotecontroltooperateotherdevices,seeChapter3.
The unauthorized recording, use, distribution, or revision of television programs, videotapes, DVDs, and other materials is prohibited under the Copyright Laws of the United States and other countries, and may subject you to civil and criminal liability.
*
From antennaDVD player with component video
Stereo VCR
Satellite receiver with component video
From satellite dish

Chapter 2: Connecting your TV
16
Connecting a camcorder
You will need:standardA/Vcables
For better picture performance, if your camcorder has S-video, connect an S-video cable (plus the audio cables) to VIDEO 1 on the TV back instead of the VIDEO 2 on the TV side panel.
VIDEO AUDIOOUT
L
R
VIDEO AUDIOOUT
L
R
To view the camcorder video:SelecttheVIDEO 2videoinputsourceontheTV.*
Toselect thevideo input source,press INPUT on the remotecontrol( page21).ToprogramtheTVremotecontroltooperateotherdevices,seeChapter3.
•
−
*
��" TV
�6"/ ��"/ �7" TV
Camcorder
Camcorder
Chapter 2: Connecting your TV
17
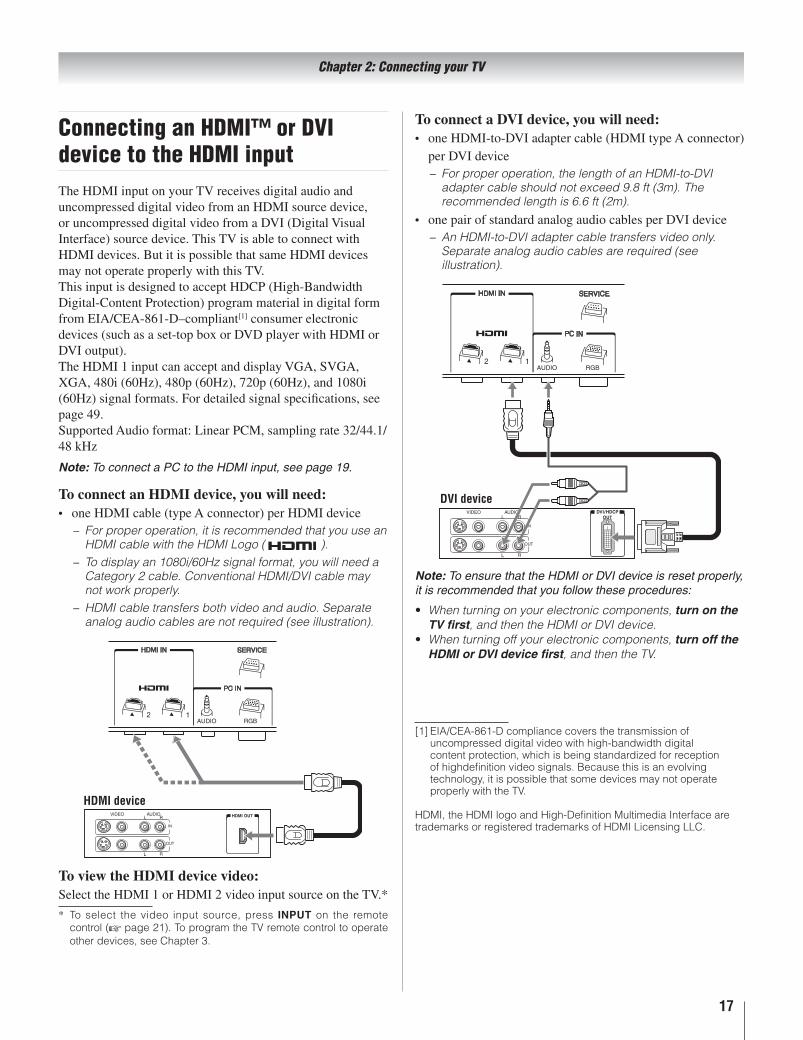
Connecting an HDMI™ or DVI device to the HDMI inputTheHDMIinputonyourTVreceivesdigitalaudioanduncompresseddigitalvideofromanHDMIsourcedevice,oruncompresseddigitalvideofromaDVI(DigitalVisualInterface)sourcedevice.ThisTVisabletoconnectwithHDMIdevices.ButitispossiblethatsameHDMIdevicesmaynotoperateproperlywiththisTV.ThisinputisdesignedtoacceptHDCP(High-BandwidthDigital-ContentProtection)programmaterialindigitalformfromEIA/CEA-861-D–compliant[1]consumerelectronicdevices(suchasaset-topboxorDVDplayerwithHDMIorDVIoutput).TheHDMI1inputcanacceptanddisplayVGA,SVGA,XGA,480i(60Hz),480p(60Hz),720p(60Hz),and1080i(60Hz)signalformats.Fordetailedsignalspecifications,seepage49.SupportedAudioformat:LinearPCM,samplingrate32/44.1/48kHz
Note: To connect a PC to the HDMI input, see page 19.
To connect an HDMI device, you will need:oneHDMIcable(typeAconnector)perHDMIdevice
For proper operation, it is recommended that you use an HDMI cable with the HDMI Logo ( ).To display an 1080i/60Hz signal format, you will need a Category 2 cable. Conventional HDMI/DVI cable may not work properly.HDMI cable transfers both video and audio. Separate analog audio cables are not required (see illustration).
VIDEO AUDIOL R
RL
IN
OUT
IN
HDMI OUT
To view the HDMI device video:SelecttheHDMI1orHDMI2videoinputsourceontheTV.*
Toselect thevideo input source,press INPUT on the remotecontrol( page21).ToprogramtheTVremotecontroltooperateotherdevices,seeChapter3.
•
−
−
−
*
To connect a DVI device, you will need:oneHDMI-to-DVIadaptercable(HDMItypeAconnector)perDVIdevice
For proper operation, the length of an HDMI-to-DVI adapter cable should not exceed 9.8 ft (3m). The recommended length is 6.6 ft (2m).
onepairofstandardanalogaudiocablesperDVIdeviceAn HDMI-to-DVI adapter cable transfers video only. Separate analog audio cables are required (see illustration).
VIDEO AUDIOL R
RL
OUT
IN
DVI/HDCPOUT
IN
Note: To ensure that the HDMI or DVI device is reset properly, it is recommended that you follow these procedures:
When turning on your electronic components, turn on the TV first, and then the HDMI or DVI device.When turning off your electronic components, turn off the HDMI or DVI device first, and then the TV.
[1]EIA/CEA-861-Dcompliancecoversthetransmissionofuncompresseddigitalvideowithhigh-bandwidthdigitalcontentprotection,whichisbeingstandardizedforreceptionofhighdefinitionvideosignals.Becausethisisanevolvingtechnology,itispossiblethatsomedevicesmaynotoperateproperlywiththeTV.
HDMI,theHDMIlogoandHigh-DefinitionMultimediaInterfacearetrademarksorregisteredtrademarksofHDMILicensingLLC.
•
−
•
−
•
•
HDMI device
DVI device

Chapter 2: Connecting your TV
18
Connecting a digital audio systemTheTV’sDIGITAL AUDIO OUTterminaloutputsaDolby®*Digital or2-channeldown-mixedPCM(pulse-codemodulation)signalforusewithanexternalDolby®Digitaldecoderorotherexternalaudiosystemwithopticalaudioinput.
You will need:opticalaudiocable(Useanopticalaudiocablethathasthelarger“TosLink”connectorandnotthesmaller“mini-optical”connector.)
LINE IN OpticalAudio INL R
To control the audio:
TurnontheTVandthedigitalaudiodevice.
Press ontheTV’sremotecontrolandopentheAudiomenu.
IntheOptical Output Formatfield,selecteitherDolby DigitalorPCM,dependingonyourdevice(“Selectingtheopticalaudiooutputformat”onpage38).
•
1�2�
3�
Note: Some audio systems may not be compatible with Dolby Digital bitstream signals. Older audio systems that are not compatible with standard optical out signals may not work properly, creating a high noise level that may damage speakers. THIS DAMAGE IS NOT COVERED BY YOUR WARRANTY.The DIGITAL AUDIO OUT terminal may not output some digital audio sources because of copy restrictions.
ManufacturedunderlicensefromDolbyLaboratories.Dolby,andthedouble-DsymbolareregisteredtrademarksofDolbyLaboratories.
Connecting an audio systemThisconnectionallowsyoutouseexternalspeakerswithanexternalanalogaudioamplifiertoadjustthesoundlevel.
You will need:standardaudiocables
LINE INL R
To control the audio:
TurnontheTVandthestereoamplifier.
Setupaoptimumvolumelevelofthestereoamplifier.ThenyoucanadjustthesoundvolumelevelfromtheTV’svolumecontrolortheamplifier’svolumecontrol.
MenuitemofSpeakerscanturntoOFFtomutetheTV’sbuiltinspeakers.
•
•
*
•
1�2�
3�
Dolby Digital decoder or other digital audio system
Analog audio amplifier

Chapter 2: Connecting your TV
19
Connecting a personal computer (PC)With either the PC IN or HDMI connection, you can watch your computer’s display on the TV and hear the sound from the TV’s speakers.
To connect a PC to the PC IN terminal on the TV:When connecting a PC to the PC IN terminal on the TV, use an analog RGB (15-pin) computer cable and a PC audio cable.
To use a PC, set the monitor output resolution on the PC before connecting it to the TV. The following signals can be displayed:
Format Resolution V. FrequencyVGA 640 × 480 60HzSVGA 800 × 600 60HzXGA 1024 × 768 60HzWXGA 1280 × 768 60HzWXGA 1360 × 768 60Hz
Other formats or non-standard signals will not be displayed correctly.To display the optimum picture, use the PC setting feature ( “Using the PC settings feature” on page 40).
Note: The PC audio input terminals on the TV are shared with the HDMI 1 analog audio input terminals ( page 41).Some PC models cannot be connected to this TV.An adapter is not needed for computers with a compatible mini D-sub15-pin terminal.
•
•
•
••
An adapter is not needed for computers with a compatible mini D-sub15-pin terminal.Depending on the DVD’s title and the specifications of the PC on which you are playing the DVD-Video, some scenes may be skipped or you may not be able to pause during multi-angle scenes.Signal names for mini D-sub 15-pin connector
Pin No. Signal name Pin No. Signal
name Pin No. Signal name
1 R 6 Ground 11 NC2 G 7 Ground 12 NC3 B 8 Ground 13 H-sync4 NC* 9 NC 14 V-sync5 NC 10 Ground 15 NC
*NC=Not connectedIf connecting a certain PC model that signal is particular, the PC signal may not be detected correctly.
To connect a PC to the HDMI terminal on the TV:When connecting a PC to the HDMI terminal on the TV, use an HDMI-to DVI adapter cable and analog audio cables ( PC IN AUDIO port just shared with DVI signal from HDMI1 port only). If connecting a PC with an HDMI terminal, use an HDMI cable (type A connector). Separate analog cables are not necessary ( page 17).
The HDMI 1 input can accept and display VGA, SVGA, XGA, 480i (60Hz), 480p (60Hz), 720p (60Hz), and 1080i (60Hz) signal formats. For detailed signal specifications, see page 49.
Note: The edges of the images may be hidden.If connecting a certain PC model that signal is particular, the PC signal may not be detected correctly.
•
•
•
•
••
Computer
PC audiooutput
PC audiocable
Conversion adapter (if necessary)
Computer
PC audiooutput
PC audiocable

20
Preparing the remote control for useYour TV remote control can operate your TV and many other devices such as cable converter boxes, satellite receivers, VCRs, DVD players, and HTIBs (home theater in a box), even if they are different brands.
If you have a Toshiba device:Your TV remote control is preprogrammed to operate most Toshiba devices ( page 24).
If you have a non-Toshiba device or a Toshiba device that the remote control is not preprogrammed to operate:You can program the TV remote control so it will operate the other device ( pages 22–26).
Installing the remote control batteries
Remove the battery cover from the back of the remote control.
Squeeze tab and lift cover.
Install two “AAA” size batteries, making sure to match the + and – signs on the batteries to the signs on the battery compartment.
Reinsert the battery cover in the remote control until the tab snaps.
Caution:
Dispose of batteries in a designated disposal area. Never throw batteries into a fire.Attention should be drawn to the environmental aspects of battery disposal.Never mix battery types or combine used batteries with new ones.Batteries shall not be exposed to excessive heat such as sunshine, fire or the like.
Note: Be sure to use AAA size batteries.Dispose of batteries in a designated disposal area.Batteries should always be disposed of with the
1�
2�
3�
•
•
•
•
•••
environment in mind. Always dispose of batteries in accordance with applicable laws and regulations.If the remote control does not operate correctly, or if the operating range becomes reduced, replace batteries with new ones.When necessary to replace batteries in the remote control, always replace both batteries with new ones. Never mix battery types or use new and used batteries in combination.Always remove batteries from the remote control if they are dead or if the remote control is not to be used for an extended period of time. This will prevent battery acid from leaking into the battery compartment.
Remote control effective rangeFor optimum performance, aim the remote control directly at the TV and make sure there is no obstruction between the remote control and the TV.
16.4 ft (5m)
•
•
•
Chapter 3: Using the remote control
Point remote control toward remote sensoron front of TV.
Chapter 3: Using the remote control
�1
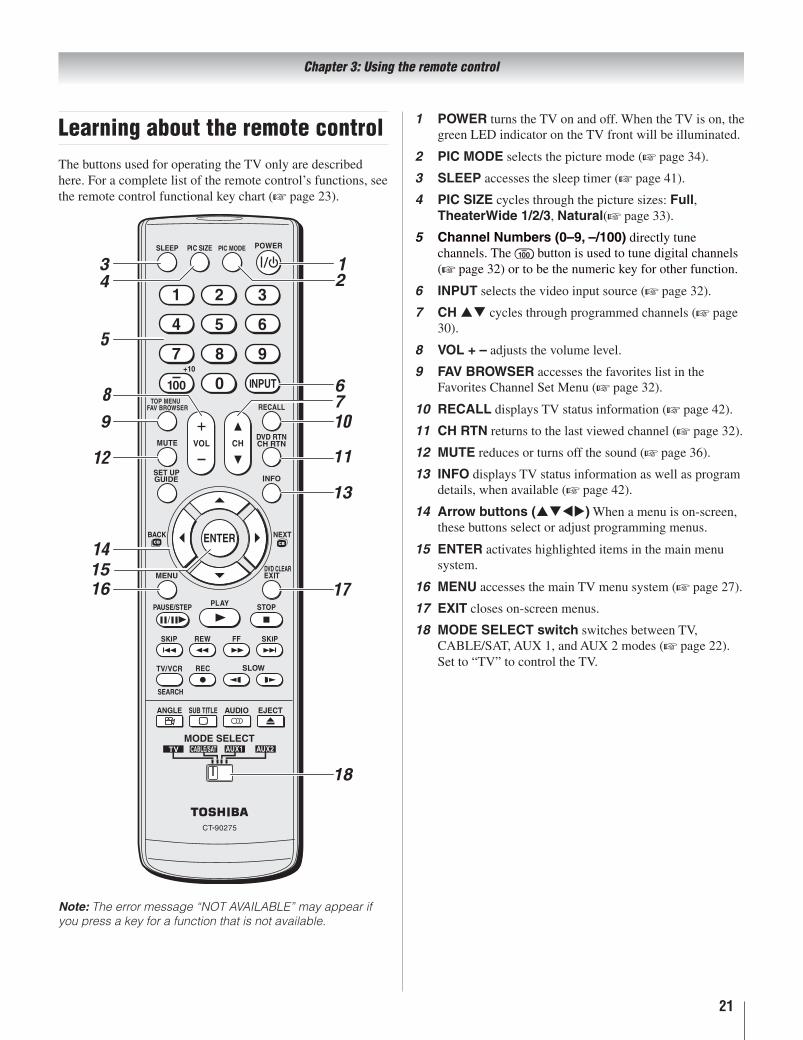
Learning about the remote controlThebuttonsusedforoperatingtheTVonlyaredescribedhere.Foracompletelistoftheremotecontrol’sfunctions,seetheremotecontrolfunctionalkeychart( page23).
Note: The error message “NOT AVAILABLE” may appear if you press a key for a function that is not available.
POWERturnstheTVonandoff.WhentheTVison,thegreenLEDindicatorontheTVfrontwillbeilluminated.
PIC MODEselectsthepicturemode(page34).
SLEEPaccessesthesleeptimer(page41).
PIC SIZEcyclesthroughthepicturesizes:Full,TheaterWide 1/2/3,Natural(page33).
Channel Numbers (0–9, –/100)directlytunechannels.The buttonisusedtotunedigitalchannels(page32)ortobethenumerickeyforotherfunction.
INPUTselectsthevideoinputsource(page32).
CHpqcyclesthroughprogrammedchannels(page30).
VOL + –adjuststhevolumelevel.
FAV BROWSERaccessesthefavoriteslistintheFavoritesChannelSetMenu(page32).
RECALLdisplaysTVstatusinformation(page42).
CH RTNreturnstothelastviewedchannel(page32).
MUTEreducesorturnsoffthesound(page36).
INFOdisplaysTVstatusinformationaswellasprogramdetails,whenavailable(page42).
Arrow buttons (pqtu)Whenamenuison-screen,thesebuttonsselectoradjustprogrammingmenus.
ENTERactivateshighlighteditemsinthemainmenusystem.
MENUaccessesthemainTVmenusystem(page27).
EXITcloseson-screenmenus.
MODE SELECT switchswitchesbetweenTV,CABLE/SAT,AUX1,andAUX2modes(page22).Setto“TV”tocontroltheTV.
1�
2�
3�
4�
5�
6�
7�
8�
9�
10�
11�
12�
13�
14�
15�
16�
17�
18�
Chapter 3: Using the remote control
��
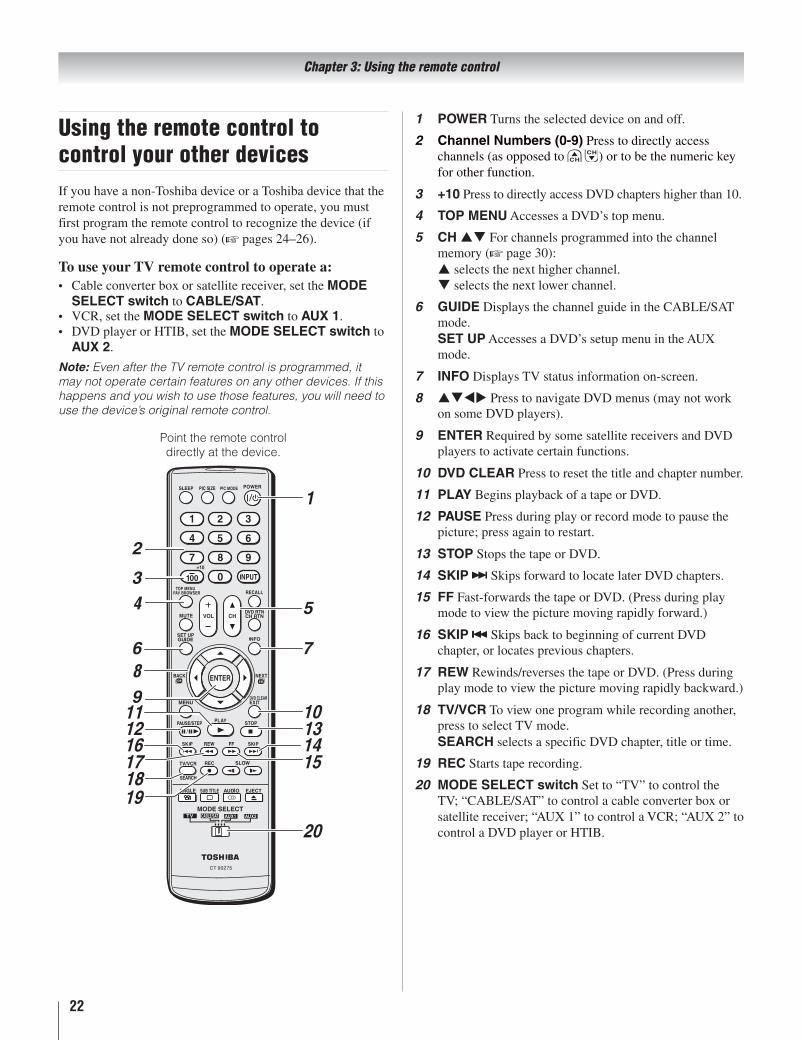
Using the remote control to control your other devicesIfyouhaveanon-ToshibadeviceoraToshibadevicethattheremotecontrolisnotpreprogrammedtooperate,youmustfirstprogramtheremotecontroltorecognizethedevice(ifyouhavenotalreadydoneso)( pages24–26).
To use your TV remote control to operate a:Cableconverterboxorsatellitereceiver,settheMODE SELECT switchtoCABLE/SAT.VCR,settheMODE SELECT switchtoAUX 1.DVDplayerorHTIB,settheMODE SELECT switchtoAUX 2.
Note: Even after the TV remote control is programmed, it may not operate certain features on any other devices. If this happens and you wish to use those features, you will need to use the device’s original remote control.
1617
1918
Pointtheremotecontroldirectlyatthedevice.
•
••
POWERTurnstheselecteddeviceonandoff.
Channel Numbers (0-9)Presstodirectlyaccesschannels(asopposedto )ortobethenumerickeyforotherfunction.
+10PresstodirectlyaccessDVDchaptershigherthan10.
TOP MENUAccessesaDVD’stopmenu.
CHpqForchannelsprogrammedintothechannelmemory( page30):pselectsthenexthigherchannel.qselectsthenextlowerchannel.
GUIDEDisplaysthechannelguideintheCABLE/SATmode.SET UPAccessesaDVD’ssetupmenuintheAUXmode.
INFODisplaysTVstatusinformationon-screen.
pqtuPresstonavigateDVDmenus(maynotworkonsomeDVDplayers).
ENTERRequiredbysomesatellitereceiversandDVDplayerstoactivatecertainfunctions.
DVD CLEARPresstoresetthetitleandchapternumber.
PLAYBeginsplaybackofatapeorDVD.
PAUSEPressduringplayorrecordmodetopausethepicture;pressagaintorestart.
STOPStopsthetapeorDVD.
SKIP SkipsforwardtolocatelaterDVDchapters.
FFFast-forwardsthetapeorDVD.(Pressduringplaymodetoviewthepicturemovingrapidlyforward.)
SKIP SkipsbacktobeginningofcurrentDVDchapter,orlocatespreviouschapters.
REWRewinds/reversesthetapeorDVD.(Pressduringplaymodetoviewthepicturemovingrapidlybackward.)
TV/VCRToviewoneprogramwhilerecordinganother,presstoselectTVmode.SEARCHselectsaspecificDVDchapter,titleortime.
RECStartstaperecording.
MODE SELECT switchSetto“TV”tocontroltheTV;“CABLE/SAT”tocontrolacableconverterboxorsatellitereceiver;“AUX1”tocontrolaVCR;“AUX2”tocontrolaDVDplayerorHTIB.
1�
2�
3�
4�
5�
6�
7�
8�
9�
10�
11�
12�
13�
14�
15�
16�
17�
18�
19�
20�

Chapter 3: Using the remote control
��
Remote Control functional key chartNote:
“---” = key does not send a signal in that remote control mode.“ TV” = key will affect the TV, even though the remote control is in another mode.* Not available for your TV.
REMOTE CONTROL KEY Toshiba TV CABLE SAT (satellite) AUX 1 (VCR) AUX � (DVD or HTIB) POWER Power Power Power Power PowerSLEEP Sleeptimer TV TV TV TVPICSIZE Picturesize TV TV TV TVPICMODE PICMODE TV TV TV TV1-9 Digit1-9 Digit1-9 Digit1-9 Digit1-9 Digit1-90 Digit0 Digit0 Digit0 Digit0 Digit0100/–/+10 –(subCH) --- –(subCH) 100 +10INPUT TV/Videoselect TV TV TV TVFAVBROWSER/TOPMENU
FAVBROWSERDVDTOPMenu*
--- --- --- TopMenu
MUTE Soundmute TV TV TV TVSETUP/GUIDE Guide* --- SATGuide --- SetupVOL+– Volumeup/down TV TV TV TV
CHpqChannelup/down
Channelup/down
Channelup/down
Channelup/down
---
RECALL RECALL TV TV TV TV
CHRTN/DVDRTNPreviouschannelDVDpreviousmenu*
--- --- --- DVDReturn
INFO Info --- Info --- DisplayENTER Enter --- Select,Enter --- Enter
pq Menuup/down ---Menuup/down
--- Menuup/down
t Menuleft/ChannelBrowser™*
--- Menuleft --- Menuleft
u Menuright/ChannelBrowser™*
--- Menuright --- Menuright
MENU Menu --- ActionMenu --- DVDMenu
EXIT/DVDCLEARExitDVDclear*
--- Exit --- DVDClear
PAUSE/STEP Pause* --- --- Pause PausePLAY Play* --- --- Play PlaySTOP Stop* --- --- Stop StopSKIP SkipREV* --- --- --- SkipREVSKIP SkipFWD* --- --- --- SkipFWDREW Rewind* --- --- Rewind RewindFF FastFWD* --- --- FastFWD FastFWDTV/VCR/SEARCH
DVDsearch* --- --- TV/VCR DVDsearch
REC RECMENU* --- --- Record(2click) ---SLOW– SLOWREW* --- --- --- ---SLOW+ SLOWFWD* --- --- --- ---ANGLE Angle* --- --- --- DVDAngleSUBTITLE Subtitle* --- --- --- DVDSubtitleAUDIO Audio* --- --- --- DVDAudioEJECT Eject* --- --- --- DVDEject
•••

Chapter 3: Using the remote control
��
Programming the remote control to control your other devicesYourToshibaTVremotecontrolispreprogrammedtooperatemostToshibadevices.ToprogramyourTVremotecontroltooperateanon-Toshibadevice(oraToshibadevicethatitisnotpreprogrammedtooperate),followthestepsbelow.Fordetailsonusingtheremotecontroltooperatethedevice,seepage22.
Intheremotecontrolcodetable( page25),findthecodeforyourdevice.Ifmorethanonecodeislisted,tryeachoneseparatelyuntilyoufindonethatworks.
SettheMODE SELECT switchtothetypeofdeviceyouareprogrammingtheremotecontroltooperate—CABLE/SAT(foracableconverterboxorsatellitereceiver),AUX1(foraVCRorTV/VCRcombo),orAUX2(foraDVDplayerorHTIB[hometheaterinabox]).
Whileholdingdown ,presstheChannelNumberbuttonstoenterthe3-digitcodeforyourdevice.
Totestthecode,turnonthedevice,pointtheremotecontrolatit,andpress .Seenotesbelow.
Ifthecorrectcodewasentered,thedevicewillturnoff.Ifthedevicedoesnotrespond,repeatsteps1–4usinganothercode.Ifthedevicedoesnotrespondtoanothercode,youwillneedtousetheremotecontrolthatcamewiththedevice.
RemembertosettheMODE SELECT switchbackto“TV”tocontroltheTV.
Forfuturereference,writedownthecode(s)youused:
DEVICE CODE DEVICE CODE
Note: In addition to POWER, confirm that all necessary keys on the TV remote control operate your device. If some keys are not operational, repeat the device code setup using another code (if other codes are listed for your device). If, after trying all listed codes, the necessary keys do not operate your device, use the device’s original remote control.Every time you change the batteries, you will need to reprogram the remote control.Some newer VCRs respond to either of two codes. These VCRs have a switch labeled “VCR1/VCR2.” If your VCR has this kind of switch and does not respond to the codes for your VCR brand, set the switch to the other position (“VCR1” or “VCR2”) and reprogram the remote control.
1�
2�
3�
4�
•
•
•
5�
6�
•
•
•

Chapter 3: Using the remote control
��
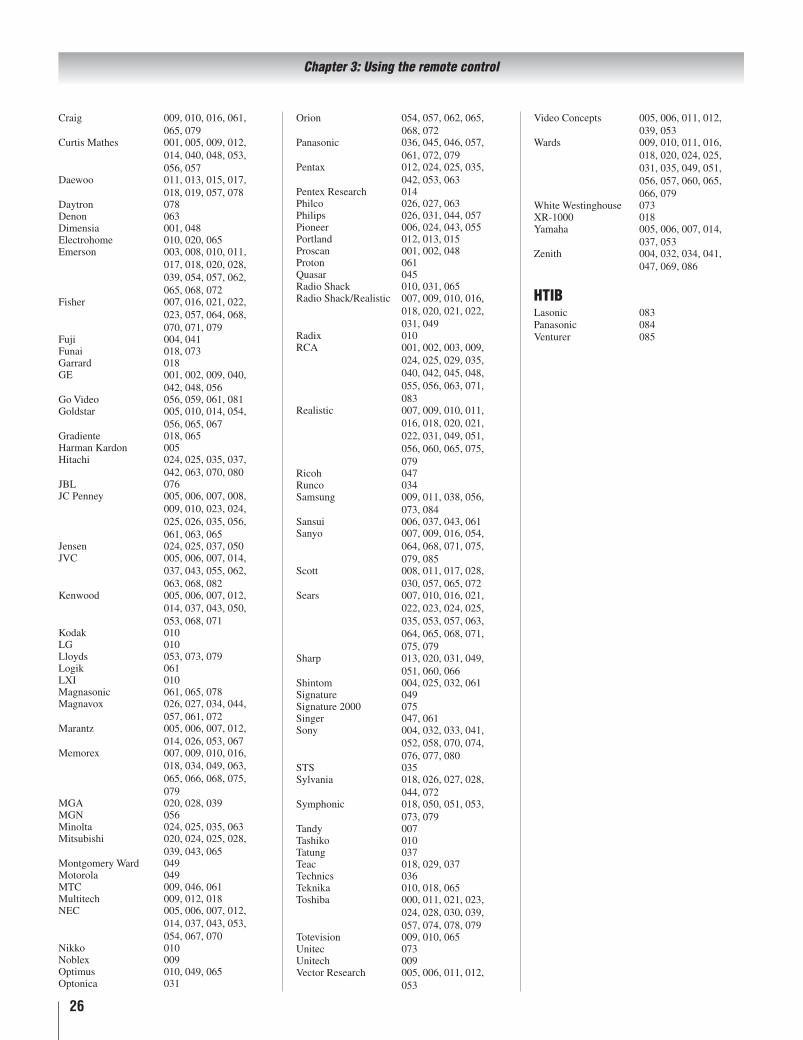
Remote control codesInsomecasesyoumaynotbeabletooperateyourdevicewiththeTVremotecontrol.YourotherdevicemayuseacodethatisnotrecognizedbytheTVremotecontrol.Ifthishappens,usethedevice’sremotecontrol.
Cable converter boxABC 061,062,063,082,
084,087,092,096,098
Archer 065,092,097,099Cableview 064,094Century 092Citizen 090,092,097Contec 083,085,086,088,
093,098Diamond 093GE 061,062Gemini 069,070,094Hamlin 093Hitachi 062,095,096Jasco 097Motorola/GI/Jerrold 062,069,071,082,
086,089,096,107Magnavox 072,096Memorex 092,104MultiCanal 090Novavision 101Panasonic 081,083,085Philco 087Philips 066,067,068,070,
072,073,074,075,092
Pioneer 076,077Proscan 061,062RadioShack 092,097,099RCA 064,081Realistic 065Recoton 102Samsung 077,090ScientificAtlanta 063,078,079,080,
088,098,101,105Sears 095Signature 062Signature2000 096Sprucer 081,085Starcom 069,082,087,096,
103,104Stargate 069,090Sylvania 095,100TeleView 090Texscan 100Tocom 071,084,085U.S.Electronics 087,096,098UnitedCable 082Universal 065,092,097,099,
102,103Wards 096
Satellite receiver Alphastar 038,059Chaparral 034DISHNetwork 057
Drake 020,040,044,046,050,053
Echostar 018,041,051ExpressVu 057Fujitsu 027GE 008,009,013GeneralInstruments 010,011,012,022,
023,031,049Hitachi 033Hughes 033HughesNetwork
Systems 019Intersat 048Janeil 027JVC 017,057Kenwood 029Magnavox 060Optimus 058Pansat 036,052Primestar 015,042Proscan 008,009,013RadioShack 022,023,030RCA 008,009,013,016Realistic 030Samsung 059Sony 014,055StarChoice 057,106StarTrak 025,026,037,054STS 024Toshiba 000,001,002,003,
004,005,006,007,020,031,056
Uniden 021,028,030,032,035,039,043,045,047,058
Zenith 027
TV/VCR Combo Action 078GE 059,062Goldstar 065Panasonic 065Precision 078Quasar 065Realistic 079Sony 074Toshiba 057Zenith 065Totevision 009,010,065
DVD/VCR ComboGoVideo DVD=087,
VCR=081JVC DVD=088,
VCR=082RCA DVD=089,
VCR=083Samsung DVD=090,
VCR=084Sanyo DVD=091,
VCR=085Zenith DVD=092,
VCR=086
DVD player Aiwa 006,015Apex 016,017BOSE 097Broksonic 018
Clarion 019Classic 020Daewoo 021Denon 022,023,024,025Emerson 026,027Fisher 028Funai 027GE 001,029,030GoVideo 087GPX 031Hitachi 005,032,033,034,
035JVC 003,007,036,042,
088Kenwood 037Konka 008,009Magnavox 004,038Memorex 039Mintek 040NAD 026Nakamichi 041Norcent 043Onkyo 044Oritron 058Panasonic 010,045,046,047,
048,049,050Philips 004,051Pioneer 052,053,054,055Proscan 001,056Qwestar 057,058RCA 001,002,059,089Sampo 060Samsung 061,062,086,090Sansui 073Sanyo 063,091Sharp 064,067Sherwood 074Sony 011,012,065,066,
068,069,070Sylvania 027Teac 071Technics 072Techwood 075Toshiba 000,013,076,077,
078Yamaha 079,080,081Zenith 014,082,092
Portable DVD playerAiwa 093Audiovox 094,095Panasonic 024,096,099RCA 098
VCRAdmiral 049Aiko 019Aiwa 018Akai 003,004,037,038,
039,058,069Audiovox 010Bell&Howell 007,068Broksonic 008,017Calix 010Carver 026CCE 019Citizen 009,010,011,012,
013,014,015,019,057,073
Colortyme 005
(continued)
Chapter 3: Using the remote control
�6
Craig 009,010,016,061,065,079
CurtisMathes 001,005,009,012,014,040,048,053,056,057
Daewoo 011,013,015,017,018,019,057,078
Daytron 078Denon 063Dimensia 001,048Electrohome 010,020,065Emerson 003,008,010,011,
017,018,020,028,039,054,057,062,065,068,072
Fisher 007,016,021,022,023,057,064,068,070,071,079
Fuji 004,041Funai 018,073Garrard 018GE 001,002,009,040,
042,048,056GoVideo 056,059,061,081Goldstar 005,010,014,054,
056,065,067Gradiente 018,065HarmanKardon 005Hitachi 024,025,035,037,
042,063,070,080JBL 076JCPenney 005,006,007,008,
009,010,023,024,025,026,035,056,061,063,065
Jensen 024,025,037,050JVC 005,006,007,014,
037,043,055,062,063,068,082
Kenwood 005,006,007,012,014,037,043,050,053,068,071
Kodak 010LG 010Lloyds 053,073,079Logik 061LXI 010Magnasonic 061,065,078Magnavox 026,027,034,044,
057,061,072Marantz 005,006,007,012,
014,026,053,067Memorex 007,009,010,016,
018,034,049,063,065,066,068,075,079
MGA 020,028,039MGN 056Minolta 024,025,035,063Mitsubishi 020,024,025,028,
039,043,065MontgomeryWard 049Motorola 049MTC 009,046,061Multitech 009,012,018NEC 005,006,007,012,
014,037,043,053,054,067,070
Nikko 010Noblex 009Optimus 010,049,065Optonica 031
Orion 054,057,062,065,068,072
Panasonic 036,045,046,057,061,072,079
Pentax 012,024,025,035,042,053,063
PentexResearch 014Philco 026,027,063Philips 026,031,044,057Pioneer 006,024,043,055Portland 012,013,015Proscan 001,002,048Proton 061Quasar 045RadioShack 010,031,065RadioShack/Realistic 007,009,010,016,
018,020,021,022,031,049
Radix 010RCA 001,002,003,009,
024,025,029,035,040,042,045,048,055,056,063,071,083
Realistic 007,009,010,011,016,018,020,021,022,031,049,051,056,060,065,075,079
Ricoh 047Runco 034Samsung 009,011,038,056,
073,084Sansui 006,037,043,061Sanyo 007,009,016,054,
064,068,071,075,079,085
Scott 008,011,017,028,030,057,065,072
Sears 007,010,016,021,022,023,024,025,035,053,057,063,064,065,068,071,075,079
Sharp 013,020,031,049,051,060,066
Shintom 004,025,032,061Signature 049Signature2000 075Singer 047,061Sony 004,032,033,041,
052,058,070,074,076,077,080
STS 035Sylvania 018,026,027,028,
044,072Symphonic 018,050,051,053,
073,079Tandy 007Tashiko 010Tatung 037Teac 018,029,037Technics 036Teknika 010,018,065Toshiba 000,011,021,023,
024,028,030,039,057,074,078,079
Totevision 009,010,065Unitec 073Unitech 009VectorResearch 005,006,011,012,
053
VideoConcepts 005,006,011,012,039,053
Wards 009,010,011,016,018,020,024,025,031,035,049,051,056,057,060,065,066,079
WhiteWestinghouse 073XR-1000 018Yamaha 005,006,007,014,
037,053Zenith 004,032,034,041,
047,069,086
HTIBLasonic 083Panasonic 084Venturer 085

�7
Main menu layoutThetablesbelowandonthenextpageprovideaquickoverviewofyourTV’smenusystem.
Toopenthemainmenus(illustratedbelow),press ontheremotecontrolorTVcontrolpanel.
Icon Item Option PageInputConfiguration Antenna/Cable 29
DTVSignalMeter [OpenstheDTVSignalMetermenu] 29
AutoChSearch [OpenstheAutoChSearchmenu] 30
AddOnChSearch [OpenstheAddOnChSearch] 30
ManualChSet [SetChViewableorNotViewable] 31
ChannelLabels [OpenstheChannelLabels] 31
MenuLanguage English/Français/Español 29
SystemStatus [OpenstheSystemInformationmenu] 29
Mode Sports/Standard/Movie/Preference 34
Contrast 0-100 35
Brightness 0-100 35
Color 0-100 35
Tint -50~+50 35
Sharpness 0-20 35
Settings Reset 35
AdvancedPicture [OpenstheAdvancedPicturemenu] 33,43,44,45
Language English/Français/Español 37
Bass 0-20 37
Treble 0-20 37
Balance L50~R50 37
OpticalOutputFormat DolbyDigital/PCM 18,38
Speakers On/Off 18
MTS Stereo/SAP/Mono 36,37
Settings Reset 38
TimeZone [Pacific/Alaska/Hawaii/Eastern/Central/Mountain] 42
SleepTimer Off/30/60/90mins 41
PCSettings [OpensthePCSettingsmenu] 40
ParentalControl [OpenstheParentalControlmenu] 38,39,40
DigitalCCSettings [OpenstheDigitalCCSettingsmenu] 36
DigitalCC Off/CS1/CS2/CS3/CS4/CS5/CS6 36
AnalogCC Off/CC1/CC2/CC3/CC4/T1/T2/T3/T4 35,36
Functionitemsmaybehavesomedifferencedependondifferentvideoinputsource.*
Chapter 4: Menu layout and navigation

Chapter 4: Menu layout and navigation
�8
IftheHDMIsignalisDVIformat,theMode,Color,TintandSharpnesswillbeinactive(=No).
Navigating the menu systemYoucanusethebuttonsontheremotecontrolorTVcontrolpaneltoaccessandnavigateyourTV’son-screenmenusystem.
Press toopenthemenusystem.Whenamenuisopen,usetheup/down/left/rightarrowbuttons(pqtu)ontheremotecontrolorTVcontrolpaneltomoveinthecorrespondingdirectioninthemenu.Press tosaveyourmenusettingsorselectahighlighteditem.(Ahighlightedmenuitemappearsinadifferentcolorinthemenu.)Allmenuscloseautomaticallyifyoudonotmakeaselectionwithin60seconds,excepttheDTVSignalMeter
*
•
•
•
•
menu,whichdoesn’tcloseautomatically.Tocloseamenuinstantly,press .•
**(Active=Yes,Inactive=No)
Icon Item ANT Video ColorStream HD HDMI PC
InputConfiguration Yes No No No No
DTVSignalMeter Yes No No No No
AutoChSearch Yes No No No No
AddOnChSearch Yes No No No No
ManualChSet Yes No No No No
ChannelLabels Yes No No No No
MenuLanguage Yes Yes Yes Yes Yes
SystemStatus Yes Yes Yes Yes Yes
Mode Yes Yes Yes Yes* No
Contrast Yes Yes Yes Yes Yes
Brightness Yes Yes Yes Yes Yes
Color Yes Yes Yes Yes* No
Tint Yes Yes Yes Yes* No
Sharpness Yes Yes Yes Yes* No
Settings Yes Yes Yes Yes Yes
AdvancedPicture Yes Yes Yes Yes Yes
Language Yes No No No No
Bass Yes Yes Yes Yes Yes
Treble Yes Yes Yes Yes Yes
Balance Yes Yes Yes Yes Yes
OpticalOutputFormat Yes No No No No
Speakers Yes Yes Yes Yes Yes
MTS Yes No No No No
Settings Yes Yes Yes Yes Yes
TimeZone Yes No No No No
SleepTimer Yes Yes Yes Yes Yes
PCSettings No No No No Yes
ParentalControl Yes Yes No No No
DigitalCCSettings Yes No No No No
DigitalCC Yes No No No No
AnalogCC Yes Yes No No No

�9
Selecting the menu languageYoucanchoosefromthreedifferentlanguages(English,FrenchandSpanish)fortheon-screendisplayofmenusandmessages.
To select the menu language:
Press andopentheSetup menu.
HighlightMenu Language.
Pressuor toselectyourpreferredmenulanguage.
Press toclosetheSetup menu.
Configuring the antenna input source for the ANT/CABLE terminal
To configure the ANT input source:
Press andopentheSetup menu.
HighlightInput Configuration. Pressuor toselecttheinputsource(CableorAntenna)whichinputsignalconnectingtoANT/CABLEterminalontheTV.
1�2�3�4�
1�2�3�
Viewing the digital signal meterYoucanviewthedigitalsignalmeterintheANTdigitalTVinputsourceonly.
To view the digital signal meter:
Press andopentheSetupmenu.
HighlightDTV Signal Meter.
Pressuor ,anewsetofDTV Signal Metermenuiconswillappearasshownbelow.
Viewing the system status
To view the system status:
Press andopentheSetup menu.
HighlightSystem Status.
Pressuor ,theSystem Informationmenuwillappearasbelow.
1�2�3�
1�2�3�
Chapter 5: Setting up your TV

Chapter 5: Setting up your TV
�0
Programming channels into the TV’s channel memoryWhenyoupress or ontheremotecontrolorTVcontrolpanel,yourTVwillstoponlyonthechannelsyouprogrammedintotheTV’schannelmemory.FollowthestepsbelowtoprogramchannelsintotheTV’schannelmemory.
Programming channels automaticallyYourTVcanautomaticallydetectallactivechannelsinyourareaandstoretheminitsmemory.Afterthechannelsareprogrammedautomatically,youcanmanuallyaddoreraseindividualchannelsinthechannelmemory.
Note: You must configure the antenna input source before programming channels ( page 29).The automatic channel programming process erases channels that were previously programmed into the TV’s memory.To tune the TV to a channel not programmed in the channel memory, you must use the Channel Number buttons on the remote control.Programming channels when the antenna input is configured for Cable will take substantially longer than when the antenna input is configured for Antenna. This is normal; however, once channel programming is finished, you should not have to repeat the programming process again unless your Cable TV service lineup changes significantly.
To program channels automatically:
Configuretheantennainputsource,ifyouhavenotalreadydoneso( page29).
Press andopentheSetup menu.
HighlightAuto Ch Search.
Pressuor tobeginchannelprogramming(AnewsetofAuto Ch Searchmenuiconswillappearasshownbelow.)
•
•
•
•
1�
2�3�
4�
TheTVwillautomaticallycyclethroughalltheantennachannels,andstoreallactivechannelsinthechannelmemory.WhiletheTViscyclingthroughthechannels,themessage“Progress(%)”appearsawhitebartoindicatethescanningstatus(asshownabove).
Tocancelchannelprogramming,press ontheremotecontrol.Whenchannelprogrammingisfinished,press or toviewtheprogrammedchannels.
Manually adding channels in the channel memoryAuto Ch Searchcansearchandsavechannelinformationintothechannelmemory.TherearetwowaystoaddchannelinformationintothechannelmemoryiftheprogramarenotexistinChannelmemorypreviously:
(1)To add On Ch Search:
Press andopentheSetup menu.
HighlightAdd On Ch Search.
Pressuor tobeginchannelprogramming(AnewsetofAddOnChSearchmenuiconswillappearasbelow.)
(2)Manually to add channel on a physical channel
For analog Channel:
UsetheChannelNumberstoenterthechannelnumberthatyouwanttoadddirectly.(digitalCHmayusetheDash ontheremotecontrol,forexample,56-1)
Press or ontheremotecontroltosavethisaddingchanneltoChannelmemory.
5�
1�2�3�
1�
2�

Chapter 5: Setting up your TV
�1
Manually deleting channels in the channel memoryThereisnomethodreallytodeletethechannelmemoryexceptexecutingAutoChSearchwithaemptyRFinput.ButthereisasimplewaytodisableundesiredChannel.
Press andopentheSetup menu
HighlightManual Ch Set.
Pressuor ,anewsetofManual Channel Set Menuwillappearasbelow.
Presspqbuttonstohighlightthechannel.
Press tocycleselectChannelisViewableorNotViewable.
* IftheChannelismarkedto"Not Viewable".Thechannelwillbeskipwhenyoupress" "or" ",unlessyousetitto"Viewable" orpressChannelNumberdirectly.
Channel memory checking tableAllthechannelsearchresultcanbeseenontheManualChSet.
Press andopentheSetup menu
HighlightManual Ch Set.andaddingordeletingchannelmemory.Pleasereferabovedescription.
1�2�
3�
4�5�
1�2�
Channel Labels MenuAlistofcommonchannellabels(logos)forvariouschannels(ABC,CBS,etc.)willbeprogrammedintotheTV.YouwillbeabletoviewandassigntheselogosfromtheChannelLabelswindow.Ifthedesiredchannellabelisnotprovidedinthelist,youwillbeabletomanuallyenter/editlabelsusingthearrowbuttons.
Press andopentheSetup menu
HighlightChannel Labels.
Pressuor ,ChannelLabelsMenuwillappearasbelow.
LeftblockisoriginalchannelNo,rightblockisnewchannellabel.Arrowbuttonscaneditit(maximum7characterareavailable).
Press tosaveyoursetting.AndyoucanseethenewChannelLabelontop-leftofthescreenorpress buttonontheremotecontroltoshowchannelinformation.
1�2�
3�
4�
5�
32
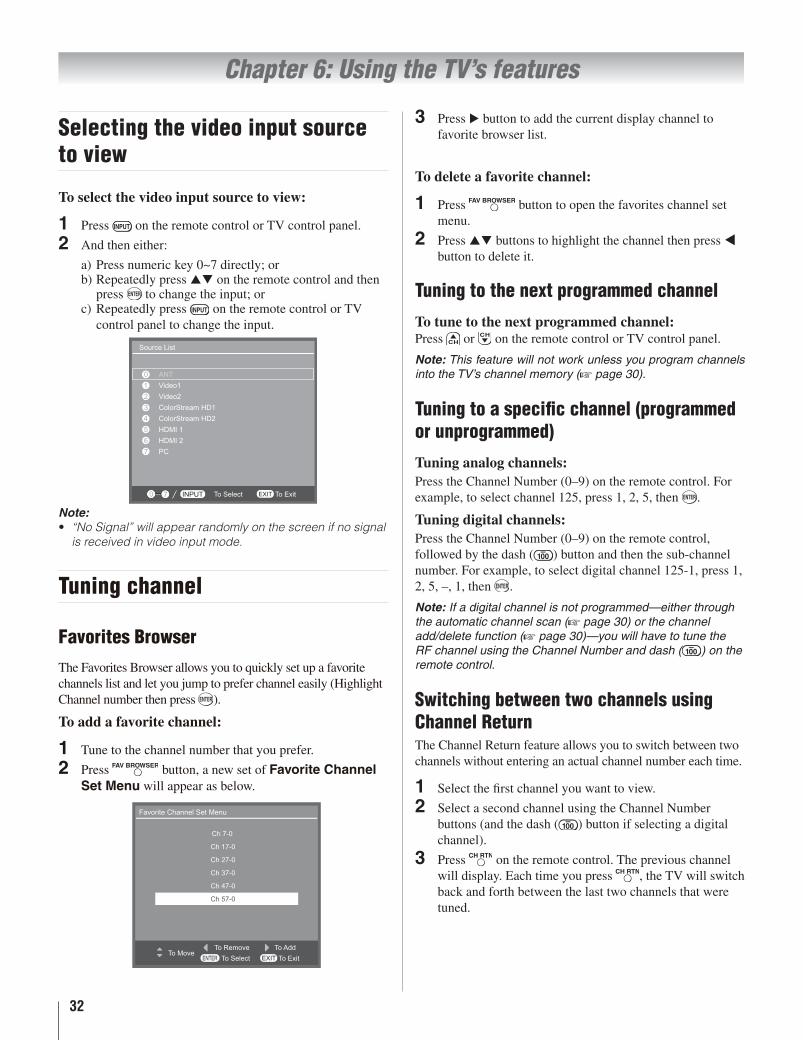
Selecting the video input source to view
To select the video input source to view:
Press on the remote control or TV control panel.
And then either:
a) Press numeric key 0~7 directly; orb) Repeatedly press on the remote control and then
press to change the input; orc) Repeatedly press on the remote control or TV
control panel to change the input.
Note:“No Signal” will appear randomly on the screen if no signal is received in video input mode.
Tuning channel
Favorites BrowserThe Favorites Browser allows you to quickly set up a favorite channels list and let you jump to prefer channel easily (Highlight Channel number then press ).
To add a favorite channel:
Tune to the channel number that you prefer.
Press button, a new set of Favorite Channel Set Menu will appear as below.
1�2�
•
1�2�
Press button to add the current display channel to favorite browser list.
To delete a favorite channel:
Press button to open the favorites channel set menu.
Press buttons to highlight the channel then press button to delete it.
Tuning to the next programmed channel
To tune to the next programmed channel:Press or on the remote control or TV control panel.
Note: This feature will not work unless you program channels into the TV’s channel memory ( page 30).
Tuning to a specific channel (programmed or unprogrammed)
Tuning analog channels:Press the Channel Number (0–9) on the remote control. For example, to select channel 125, press 1, 2, 5, then .
Tuning digital channels:Press the Channel Number (0–9) on the remote control, followed by the dash ( ) button and then the sub-channel number. For example, to select digital channel 125-1, press 1, 2, 5, –, 1, then .
Note: If a digital channel is not programmed—either through the automatic channel scan ( page 30) or the channel add/delete function ( page 30)—you will have to tune the RF channel using the Channel Number and dash ( ) on the remote control.
Switching between two channels using Channel ReturnThe Channel Return feature allows you to switch between two channels without entering an actual channel number each time.
Select the first channel you want to view.
Select a second channel using the Channel Number buttons (and the dash ( ) button if selecting a digital channel).
Press on the remote control. The previous channel will display. Each time you press , the TV will switch back and forth between the last two channels that were tuned.
3�
1�
2�
1�2�
3�
Chapter 6: Using the TV’s features

Chapter 6: Using the TV’s features
33
Selecting the picture sizeYou can view many program formats in a variety of picture sizes—Full, TheaterWide 1, TheaterWide 2, TheaterWide 3 and Natural.
Note: The “picture size” illustrations are examples only. The format of the image (in any of the picture sizes) will vary depending on the format of the signal you are currently watching. Select the picture size that displays the current program the way that looks best to you.
You can save separate picture size preferences for each input on your TV.
To select the picture size using the remote control:
Repeatedly press , picture size will change cyclically as below.
FullTheaterWide 1 TheaterWide 2 TheaterWide 3NaturalFull
To select the picture size using the menu system:
Press and open the Video menu.
Highlight Advanced Picture.
Press or , a new set of Advanced Picture menu icons will appear as below.
Press buttons to highlight Picture Size.
Press or , picture mode is changed cyclically.
FullTheaterWide 1 TheaterWide 2 TheaterWide 3NaturalFull
Note: RGB timing only support Natural and Full, no matter the RGB timing is via D-SUB to PC IN or via DVI to HDMI 1.
Using these functions to change the picture size (i.e., changing the height/ width ratio) for any purpose other than your private viewing may be prohibited under the Copyright Laws of the United States and other countries, and may subject you to civil and criminal liability.
1�2�3�
4�5�
Note: If you select one of the TheaterWide® picture sizes, the top and bottom edges of the picture (including subtitles or captions) may be hidden.
Natural picture sizeThe image is displayed close to its originally formatted proportion. Some program formats will display with sidebars and/or bars at the top and bottom.
Natural picture size example
TheaterWide 1 picture size (for 4:3 format programs)The center of the picture remains close to its original proportion, but the left and right edges are stretched wider to fill the screen.
TheaterWide 1 picture size example
TheaterWide 2 picture size (for letter box programs)
The picture is stretched wider to fill the width of the screen, but only slightly stretched taller.The top and bottom edges of the picture may be hidden.
A B C D E F G - - - - - - - - - - - - - - - -
TheaterWide 2 picture size example
•
•
•
•

Chapter 6: Using the TV’s features
34
TheaterWide 3 picture size (for letter box programs with subtitles)
The picture is stretched wider to fill the width of the screen, but only slightly stretched taller.
TheaterWide 3 picture size example
Full picture size (for 16:9 [480i, 480p] source programs only)
If receiving a squeezed 4:3 format program, the picture is stretched wider to fill the width of the screen, but not stretched taller.None of the picture is hidden.
Full picture size example
•
•
•
Adjusting the picture
Selecting the picture modeYou can select your desired picture settings from four different modes, as described below.
Mode Picture QualitySports Bright and dynamic picture (factory setting)
Standard Standard picture settings (factory setting)
MovieLower contrast for darkened room (factory setting)
Preference Your personal preferences
To select the picture mode:Repeatedly press , picture mode will change cyclically as below:
SportsStandardMoviePreferenceSports.
To select the picture mode using the menu system:
Press and open the Video menu.
Highlight Mode.
Press or , picture mode is changed cyclically.
SportsStandardMoviePreferenceSports
Note: The picture mode you select affects the current input only. You can select a different picture mode for each input.
1�2�3�

Chapter 6: Using the TV’s features
35
Adjusting the picture qualityYou can adjust the picture quality (Contrast, Brightness, Color, Tint, Sharpness, Dynamic Contrast, Backlight and DynaLight™) to your personal preferences.
Selection Adjusted Range EffectContrast 0~100 lower~higher
Brightness 0~100 darker~lighter
Color 0~100 paler~deeper
Tint -50~+50 reddish~greenish
Sharpness 0~20 softer~sharper
Dynamic Contrast On / Off N/A
Backlight 0~10 darker~lighter
DynaLight* On / Off N/A
DynaLight™ This function automatically strengthens the black coloring of dark areas in the video according to the level of darkness.
To adjust the picture quality:
Press and open the Video menu.
Highlight each item you want to adjust (Dynamic Contrast, Backlight and DynaLight are under Advance Picture item.)
Press , a new adjustment bar will appear.
Press or to adjust the setting value.
Press to save and back to previous menu icon, or press to save and quit system menu.
Dynamic Contrast and DynaLight only toggle press or to set On/Off.
*
1�2�
3�4�5�
Reset Factory Defaults of VideoTo reset all image quality of Video to their factory default values:
Press and open the Video menu.
Highlight Settings.
Press or , Video settings will recover to factory default values.
Using the closed caption mode
Base closed captionsThe closed caption mode has two options:
Captions—An on-screen display of the dialogue, narration, and sound effects of TV programs and videos that are closed captioned (usually marked “CC” in program guides).Text—An on-screen display of information not related to the current program, such as weather or stock data (when provided by individual stations).
To view Analog captions or text:
Press and open the Prefer menu.
Highlight Analog CC.
Press or cyclically to select CC type that you want.
OffCC1CC2CC3CC4T1T2T3T4Off
Note: When colorstream input is used, the analog CC setting defaults to Video.
To view captions: Highlight CC1, CC2, CC3, or CC4. (CC1 displays translation of the primary language in your area.)
Note: If the program or video you selected is not closed captioned, no captions will display on-screen.
1�2�3�
•
•
1�2�3�
•

Chapter 6: Using the TV’s features
36
To view text: Highlight T1, T2, T3, or T4.
Note: If text is not available in your area, a black rectangle may appear on screen. If this happens, set the Analog CC Mode to OFF.
To view Digital captions:
Press and open the Prefer menu.
Highlight Digital CC.
Press or cyclically to select CC type that you want.
OffCS1CS2CS3CS4CS5CS6Off
Note: A Closed caption signal may not display in the following situations:
This feature is available for digital channels only.When a videotape has been dubbed.When the signal reception is weak.When the signal reception is non-standard.
Digital CC Settings You can customize the closed caption display characteristics by changing the background color, opacity, text size, type, edge, and color.
Note:This feature is available for digital channels only.
You cannot set the Caption Text and Background as the same color.
To customize the closed captions:
Press and open the Prefer menu.
Highlight Digital CC Settings.
Press or , a new set of Digital Closed Caption menu icons will appear as below.
•
1�2�3�
••••
•
•
1�2�3�
Style item default setting is Automatic, and you can adjust it by yourself. (Press or to set Style item to Custom)
Press buttons then press or cyclically to select prefer status (refer below table). And there is a preview area on screen for you reference.
Caption Size Automatic, Small, Standard, Large
Caption Text Type
Automatic, Default, Mono w. Serif, Prop. w. Serif, Mono w/o Serif, Prop. w/o Serif, Casual, Cursive, Small Capitals
Caption Text Edge
Automatic, None, Raised, Depressed, Uniform, Left Drop Shadow, Right Drop Shadow
Caption Text Color
Automatic, Black, White, Red, Green, Blue, Yellow, Magenta, Cyan
Text Foreground Opacity
Automatic, Transparent, Translucent, Solid, Flashing
Background Color
Automatic, Black, White, Red, Green, Blue, Yellow, Magenta, Cyan
Text Background Opacity
Automatic, Transparent, Translucent, Solid, Flashing
Caption Text Edge Color
Automatic, Black, White, Red, Green, Blue, Yellow, Magenta, Cyan
Adjusting the audio
Muting the soundPress to partially reduce (1/2 MUTE) or turn off (MUTE) the sound. Each time you press , the mute mode will change in the following order:
Mute Volume1/2 Mute
Selecting stereo/SAP broadcastsThe multi-channel TV sound (MTS) feature allows you to output high-fidelity stereo sound. MTS also can transmit a second audio program (SAP) containing a second language, music, or other audio information (when provided by individual stations).
When the TV receives a stereo or SAP broadcast, the word “Stereo” or “SAP” appears on-screen when is pressed. The MTS feature is not available when the TV is in VIDEO mode.
4�
5�
Preview window

Chapter 6: Using the TV’s features
37
To listen to stereo sound:
Press and open the Audio menu.
Highlight MTS.
Press or to select Stereo, SAP and Mono.
StereoSAPMonoStereo
Stereo
Note:
You can typically leave the TV in Stereo mode because it will automatically output the type of sound being broadcast (stereo or monaural).If the stereo sound is noisy, select Mono to reduce the noise.
To listen to a second audio program on an analog station (if available):Select SAP in step 3 above.
Note:
A second audio program (SAP) can be heard only on those TV stations that offer it. For example, a station might broadcast another language as a second audio program. If you have SAP on, you will see the current program on the screen but hear the other language instead of the program’s normal audio.
If you have SAP on and the station you are watching is not broadcasting a second audio program, the station’s normal audio will be output. However, occasionally there is no sound at all in SAP mode. If this happens, set the MTS feature to Stereo mode.
To listen to an alternate language on an ATSC digital station (if available):
Press and open the Audio menu.
Highlight Language.
Press or to select English, Français and Español.
EnglishFrançaisEspañolEnglish
Stereo
1�2�3�
•
•
•
•
1�2�3�
Adjusting the audio qualityYou can adjust the audio quality by adjusting the bass, treble, and balance.
To adjust the audio quality:
Press and open the Audio menu.
Highlight the item you want to adjust (Bass, Treble, or Balance).
Press , a new adjustment bar will appear as below.
Press or to adjust the level.
makes the bass or treble weaker or increases the balance in the left channel (depending on the item selected). makes the bass or treble stronger or increases the balance in the right channel (depending on the item selected).
Press to save and back to previous menu icon, or Press to save and quit system menu.
1�2�
3�
4�•
•
5�

Chapter 6: Using the TV’s features
38
Reset Factory Defaults of AudioTo reset all tone quality of Audio to their factory default values:
Press and open the Audio menu.
Highlight Settings.
Press or , all Audio settings will recover to factory default values.
Selecting the optical output formatYou can use this feature to select the optical output format when you connect a Dolby Digital decoder or other digital audio system to the DIGITAL AUDIO OUT terminal on the TV (see “Connecting a digital audio system” on page 18).
To select the optical output format:
Press and open the Audio menu.
Highlight Optical Output Format. Press or cyclically to select either Dolby Digital or PCM, depending on your device.
Stereo
Press to save and quick system menu.
1�2�3�
1�2�3�
4�
Using the Parental Control menuThe Parental Control menu includes US Ratings, Canadian Rating , Advanced Rating, Advanced Parental Lock and New PIN Code . You can use these features after entering the correct PIN code.
Entering the PIN codePress and open the Prefer menu.
Highlight Parental Control.
Press or to displays the PIN code entry screen. Using the numeric key to key in password. (Default password is 0000)
If the wrong PIN code is entered, the message “Password Error,Retry:” appears. Enter the code again.
When the correct PIN code is entered, the Parental Control Menu opens.
1�2�
3�
•
•

Chapter 6: Using the TV’s features
39
Changing your PIN code
There is available to change PIN code.
Press correct PIN code as above to open the Parental Control Menu.
Highlight New PIN Code.
Press or , A new menu icon will displays as below.
Using the numeric key to press the New Password of four-digit PIN code, then key in new password again to confirm. A successful message will appear.
If you still cannot remember your PIN codeWhile the PIN code entering screen is displayed, press four times within five seconds. The PIN code will be cleared and you can enter a new PIN code.
1�
2�
3�
4�
Blocking TV programs and movies by rating (V-Chip)Some TV programs and movies include signals that classify the content of the program (violence, sex, dialog, language). The V-Chip feature in this TV detects the signals and blocks the programs according to the ratings you select. (For rating descriptions, see the tables on the next page).
To block and unblock TV programs and movies:
Press correct PIN code as above to open the Parental Control Menu.
Press buttons to highlight US Ratings.
Press or , A new menu icon "Parental Control Menu" will appear.
Press buttons and to select the level of
blocking you prefer. A box with an “ ” is a rating that will be blocked.
* If you place an" " in the box "None" Rated, program rated "None" will be blocked; however, programs that do not provide any rating information will not be blocked.
**Right side are two default blocked setting that named "Children" & "Youth" for you to choose directly, the default rating as below.
1�
2�3�
4�

Chapter 6: Using the TV’s features
40
Independent rating system for broadcasters
Ratings Description and Content themes
TV-MA
Mature Audience Only (This program is specifically designed to be viewed by adults and therefore may be unsuitable for children under 17.)L) Crude or indecent language S) Explicit sexual activity V) Graphic violence
TV-14
Parents Strongly Cautioned (This program contains some material that many parents would find unsuitable for children under 14 years of age.)D) Intensely suggestive dialog L) Strong, coarse language S) Intense sexual situations V) Intense violence
TV-PG
Parental Guidance Suggested (This program contains material parents may find unsuitable for younger children.)D) Some suggestive dialog L) Infrequent coarse language S) Some sexual situations V)Moderate violence
TV-G General Audience (Most parents would find this program suitable for all ages.)
TV-Y7 Directed to Older Children (This program is designed for children age 7 and above.
TV-Y All Children (This program is designed to be appropriate for all children.)
Independent rating system for movies
Ratings Description and Content themesX X-rated (For adults only)
NC-17 Not intended for anyone 17 and under
R Restricted (Under 17 requires accompanying parent or adult)
PG-13 Parents Strongly Cautioned (Some material may be inappropriate for children under 13)
PG Parental Guidance Suggested (Some material may not be suitable for children)
G General Audience (Appropriate for all ages)
Note:
”Canadian Ratings” is for Canada area (if available), operation is same as “US Ratings”.If “RRT5 ” is available on your program provider. You can set “Advanced Rating” to On, and get a item “Advanced Parental Lock”. Press or , a new menu icon will appear and you can follow menu instruction to set up ratings.
•
•
Using the PC settings featureYou can view an image from a PC on the TV screen. When a PC is connected to the TV's PC IN terminal, you can use the PC Settings feature to make adjustments to the image. If the edges of the picture are cut off, readjust the H-Position and V-Position. If the picture is affected by interference, readjust the Clock and Phase.
To adjust the PC settings:
Repeatedly press to select PC input mode ( “Selecting the video input source to view” page 32).
Press and open the Prefer menu.
Highlight PC Settings menu.
Note: If a PC is not connected or there is no pc input signal, this feature will be grayed out in the Prefer menu.
Press or , a new set of PC Settings menu icon will displays as below.
Press or to highlight the item you want to adjust.
Press , a new adjustment bar will appear as below. Press or to make the appropriate adjustments.
Note: The screen is disrupted momentarily when adjusting the PC settings. This is not a sign of malfunction.
To execute "Auto Adjust" is recommend when you input a PC timing every time. The image will be auto adjusting by system internally to get an optimum H/V-Position, Clock and Phase.
1�
2�3�
4�
5�
6�

Chapter 6: Using the TV’s features
41
H-Position: Moves the picture left/right. The adjustment range is -50~+50 (default value is 0).*V-Position: Moves the picture up/down. The adjustment range is -10~+10 (default value is 0).*Clock: Helps to reduce noise and sharpen the picture. The adjustment range is -10~+10 (default value is 0).*Phase: Helps to reduce noise and minimize periodic vertical stripes on the screen. The adjustment range is -15~+16 (default value is 0).*
The default settings may vary depending on the input signal format.
Setting the PC AudioIf the INPUT source is set to PC. The PC IN audio phone jack is applied for PC IN when PC IN terminal is connecting with an analog RGB cable. ( page 19)
Note: Because the PC Audio input is shared with HDMI 1. If INPUT source is set to “HDMI 1,”And the HDMI 1 signal is DVI format. This PC Audio input will apply for HDMI 1. (Also see item 2 on page 11.)
•
•
•
•
*
Setting the sleep timerYou can set the sleep timer to turn off the TV after a set length of time (maximum of 90 minutes).
To set the sleep timer using the remote control:Press on the remote control to set the length of time until the TV turns off. Repeatedly press to increase the time in 30-minute increments, to a maximum of 90 minutes.
To set the sleep timer using the on-screen menus:
Press and open the Prefer menu.
Highlight Sleep Timer.
Press or to increase the time in 30-minute increments.
Off30 Min60 Min90 MinOff
Note: When a power failure occurs, the sleep timer setting may be cleared.
To display the remaining sleep timer:Press on the remote control or same as above process using the on-screen menus.
To cancel the sleep timer:Repeatedly press until it is set to Off.
1�2�3�

Chapter 6: Using the TV’s features
42
Setting the time zone
To set the time zone:
Press and open the Prefer menu.
Highlight Time Zone.
Press or to select Pacific, Alaska, Hawaii, Eastern, Central and Mountain.
PacificAlaskaHawaiiEasternCentral MountainPacific
Note: After you change the Time Zone setting, when you press , you will see that the program duration has been changed. For more details on , see" To display TV status information using INFO" section on this page.
Displaying TV status information
To display TV status information using RECALL:Press on the remote control.The following information will display (if applicable):
Current input (Video 1, Video 2, etc.)Channel number (if in ANT mode)Channel label (if set)Digital signal strength indicator (bar graph in top right corner of box)Stereo or SAP audio statusVideo resolutionAspect ratio of incoming video signal (4:3 or 16:9)V-Chip rating status
To close the RECALL screen:Press on the remote control.
1�2�3�
•
•
•
•
•
•
•
•
To display TV status information using INFO:Press on the remote control.The following additional information will display for off air digital channels (if applicable):
TitleDurationDetailed description
To close the Information screen:Press on the remote control.
Understanding the auto power off featureThe TV will automatically turn itself off after approximately 15 minutes if it is tuned to a vacant channel or a station that completes its broadcast for the day. This feature functions in ANT mode only.
Understanding the last mode memory featureIf the power is cut off while you are viewing the TV, the Last Mode Memory feature automatically turns on the TV when the power is resupplied.
Note: You should unplug the TV’s power cord if it is possible that you will be away from the TV for an extended period of time after the power is restored.
•
•
•

43
Using the advanced picture settings features
Using Dynamic ContrastWhen dynamic contrast is set to ON, the TV will detect changes in the picture quality that affect the appearance of your contrast settings and then automatically adjust the video.
To select dynamic contrast preferences:
Press and open the Video menu.
Highlight Advanced Picture and press u or .
Highlight Dynamic Contrast item, and press u or to select On or Off.
1�2�
3�
Using DynaLight™When DynaLight™ is set to ON, the TV will detect changes in the picture quality that affect the appearance of your backlight settings and then automatically adjust the video.
To select DynaLight:
Press and open the Video menu.
Highlight Advanced Picture and press u or .
Highlight DynaLight and press u or to select On or Off.
Backlight AdjustmentThere is a function to let you to adjust the Backlight.
To select Backlight adjustment:
Press and open the Video menu.
Highlight Advanced Picture and press u or .
Highlight Backlight and press , a new adjustment bar will appear as below.
Press or u to adjust the setting value.
Press to save and back to previous menu icon, or press to save and quit system menu.
To ExitTo Move
Advanced Picture
CableClearMPEG Noise ReductionColor Temperature
Low
Off
OffAuto Aspect RatioOff
WarmColor Temperature
2
Off
TheaterWide1
DynaLightBacklightDynamic ContrastPicture Size
Off
SettingsStatic Gamma
Reset
On
0
Low
To ChangeENTER EXIT
Note: If you want to adjust the Backlight item, the DynaLight item should be set to Off, otherwise the Backlight item will be grayed out in the Advanced Picture menu.
1�2�3�
1�2�3�
4�5�
Chapter 7: Using the TV’s advanced features
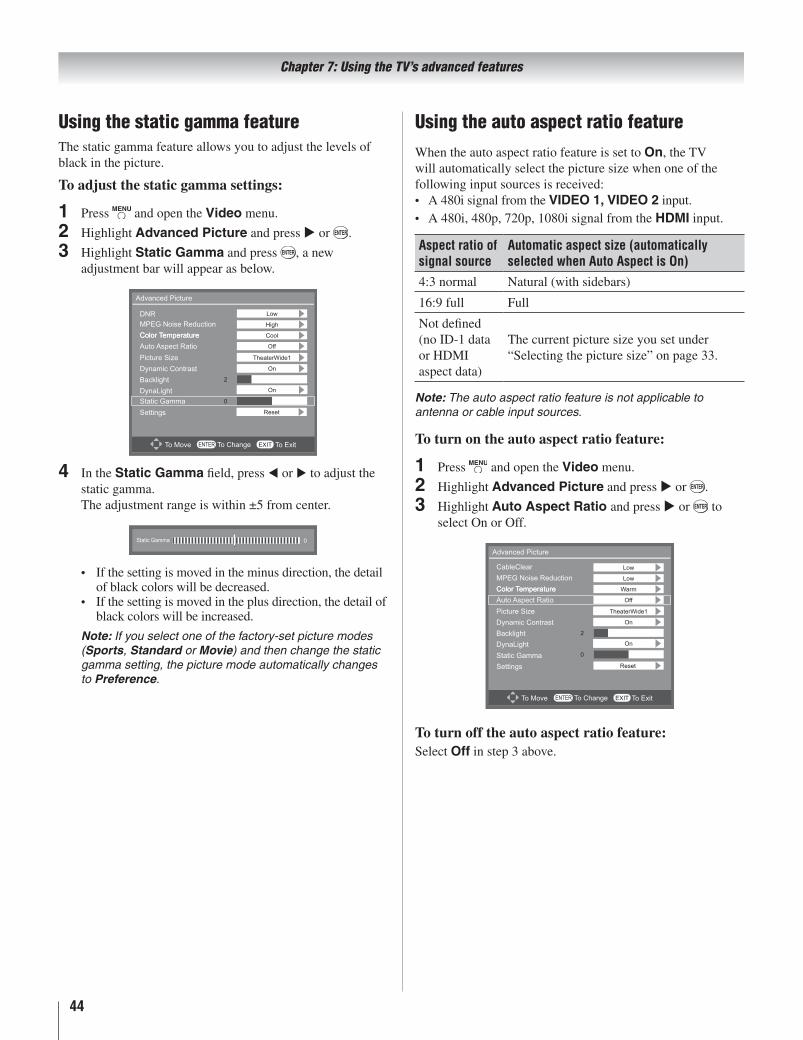
Chapter 7: Using the TV’s advanced features
��
Using the static gamma featureThestaticgammafeatureallowsyoutoadjustthelevelsofblackinthepicture.
To adjust the static gamma settings:
Press andopentheVideomenu.
HighlightAdvanced Pictureandpressuor .
HighlightStatic Gammaandpress ,anewadjustmentbarwillappearasbelow.
IntheStatic Gammafield,presstorutoadjustthestaticgamma.Theadjustmentrangeiswithin±5fromcenter.
Ifthesettingismovedintheminusdirection,thedetailofblackcolorswillbedecreased.Ifthesettingismovedintheplusdirection,thedetailofblackcolorswillbeincreased.
Note: If you select one of the factory-set picture modes (Sports, Standard or Movie) and then change the static gamma setting, the picture mode automatically changes to Preference.
1�2�3�
4�
•
•
Using the auto aspect ratio featureWhentheautoaspectratiofeatureissettoOn,theTVwillautomaticallyselectthepicturesizewhenoneofthefollowinginputsourcesisreceived:
A480isignalfromtheVIDEO 1,VIDEO 2input.A480i,480p,720p,1080isignalfromtheHDMIinput.
Aspect ratio of signal source
Automatic aspect size (automatically selected when Auto Aspect is On)
4:3normal Natural(withsidebars)
16:9full Full
Notdefined(noID-1dataorHDMIaspectdata)
Thecurrentpicturesizeyousetunder“Selectingthepicturesize”onpage33.
Note: The auto aspect ratio feature is not applicable to antenna or cable input sources.
To turn on the auto aspect ratio feature:
Press andopentheVideomenu.
HighlightAdvanced Pictureandpressuor .
HighlightAuto Aspect Ratio andpressuor toselectOnorOff.
To turn off the auto aspect ratio feature:SelectOffinstep3above.
•
•
1�2�3�
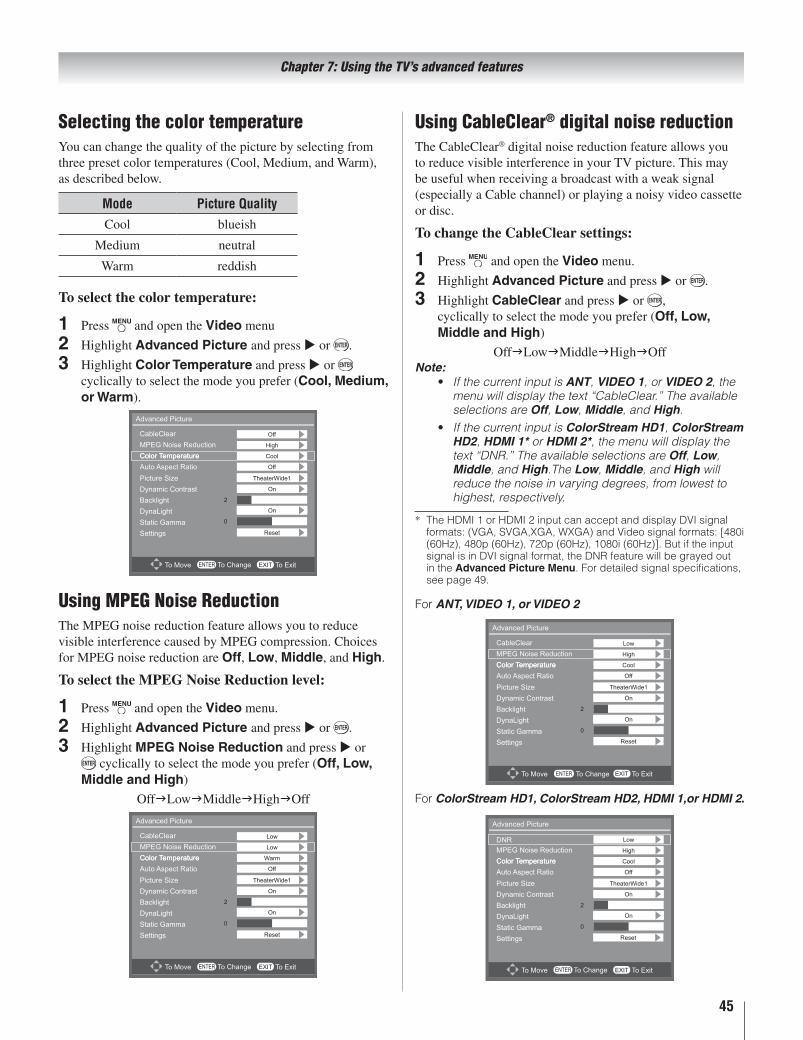
Chapter 7: Using the TV’s advanced features
��
Selecting the color temperatureYoucanchangethequalityofthepicturebyselectingfromthreepresetcolortemperatures(Cool,Medium,andWarm),asdescribedbelow.
Mode Picture QualityCool blueish
Medium neutral
Warm reddish
To select the color temperature:
Press andopentheVideomenu
HighlightAdvanced Picture andpressuor .
HighlightColor Temperatureandpressuor cyclicallytoselectthemodeyouprefer(Cool, Medium, or Warm).
Using MPEG Noise ReductionTheMPEGnoisereductionfeatureallowsyoutoreducevisibleinterferencecausedbyMPEGcompression.ChoicesforMPEGnoisereductionareOff,Low,Middle,andHigh.
To select the MPEG Noise Reduction level:
Press andopentheVideomenu.
HighlightAdvanced Picture andpressuor .
HighlightMPEG Noise Reductionandpressuorcyclicallytoselectthemodeyouprefer(Off, Low,
Middle and High)
OffLowMiddleHighOff
1�2�3�
1�2�3�
Using CableClear® digital noise reductionTheCableClear®digitalnoisereductionfeatureallowsyoutoreducevisibleinterferenceinyourTVpicture.Thismaybeusefulwhenreceivingabroadcastwithaweaksignal(especiallyaCablechannel)orplayinganoisyvideocassetteordisc.
To change the CableClear settings:
Press andopentheVideomenu.
HighlightAdvanced Pictureandpressuor .
HighlightCableClearandpressuor ,cyclicallytoselectthemodeyouprefer(Off, Low, Middle and High)
OffLowMiddleHighOffNote:
If the current input is ANT, VIDEO 1, or VIDEO 2, the menu will display the text “CableClear.” The available selections are Off, Low, Middle, and High.If the current input is ColorStream HD1, ColorStream HD2, HDMI 1* or HDMI 2*, the menu will display the text “DNR.” The available selections are Off, Low, Middle, and High.The Low, Middle, and High will reduce the noise in varying degrees, from lowest to highest, respectively.
TheHDMI1orHDMI2inputcanacceptanddisplayDVIsignalformats:(VGA,SVGA,XGA,WXGA)andVideosignalformats:[480i(60Hz),480p(60Hz),720p(60Hz),1080i(60Hz)].ButiftheinputsignalisinDVIsignalformat,theDNRfeaturewillbegrayedoutintheAdvanced Picture Menu.Fordetailedsignalspecifications,seepage49.
For ANT, VIDEO 1, or VIDEO 2
For ColorStream HD1, ColorStream HD2, HDMI 1,or HDMI 2.
1�2�3�
•
•
*

General troubleshootingBeforecallingaservicetechnician,pleasecheckthischapterforapossiblecauseoftheproblemandsomesolutionsyoucantry.
Black box on-screenTheclosedcaptionfeatureissettooneoftheTextmodes(T1,T2,T3,orT4).SettheclosedcaptionfeaturetoOff(page35,36).
Other problemsIfyourTV’sproblemisnotaddressedinthisTroubleshootingsectionortherecommendedsolutionhasnotworked,pleaseunplugtheACpowercordatleast5secondthenplugpowercordagaintorestarttheTV.
TV will not turn onMakesurethepowercordispluggedin,andthenpress
.Theremotecontrolbatteriesmaybedead.Replacethebatteriesortrythecontrolpanelbuttons.
Picture problemsGeneral picture problems
Checktheantenna/cableconnections(Chapter2).Press ontheremotecontrolorTVandselectavalidvideoinputsource(page32).IfnodeviceisconnectedtoaparticularinputontheTV,nopicturewilldisplaywhenyouselectthatparticularinputsource.Fordeviceconnectiondetails(Chapter2).Antennareceptionmaybepoor.Useahighlydirectionaloutdoorantenna(ifapplicable).Thestationmayhavebroadcastdifficulties.Tryanotherchannel.Adjustthepicturequalities(page35).IfyouareusingaVCR,makesure ontheremotecontrolissetcorrectly(page22).DonotconnectbothastandardvideocableandanS-videocabletotheVIDEO 1inputatthesametime.
Noisy pictureIfyouarewatchingananalogchannel(off-airbroadcastorCableTV),youcansettheCableClear®featuretoreducevisibleinterferenceintheTVpicture(page45).
Video Input Selection problemsIftheSource List windowdoesnotappearwhenyoupress ontheremotecontrolorTV,press asecondtime,whichwillchangetothenextvideoinputsourceanddisplaytheSource List window.
Poor color or no colorThestationmayhavebroadcastdifficulties.Tryanotherchannel.AdjusttheTintand/orColor(page35).
Poor composite or S-video pictureIftheTVisconnectedtoanexternalA/Vdevice(e.g.,DVDplayer,videogamesystem,set-topbox,etc.)tryusingaColorStreamorHDMIvideoconnectioninstead.
•
•
•
•
••
•
•
••
•
•
•
•
•
•
Picture and sound are out of syncAswithallproductsthatcontainadigitaldisplay,inrareinstances,whenviewingcertaincontent(e.g..televisionbroadcasts,videogames,DVDs),youmaynoticethatthesoundandpictureareslightlyoutofsync.Thisphenomenoncanbecausedbyvariousfactorsincluding,withoutlimitation,videoprocessingwithintheTV,videoprocessinginanattachedgamingsystem,andvideoprocessingordifferentcompressionratesusedbybroadcastersintheirprogramming.Youmaywanttotryoneormoreofthefollowingsuggestions,whichmayhelptoreducetheeffectofthisphenomenon:
IftheTVisconnectedtoanA/Vreceiverthathasaprogrammableaudiodelayfeature,usethisfeaturetohelpsynchronizethesoundtothepicture.IfyounoticethisphenomenononlyoncertainTVchannels,pleasecontactyourlocalbroadcast,cable,orsatelliteprovidertoinformthemofthisissue.
Sound problemsChecktheantenna/cableconnections(Chapter2).Thestationmayhavebroadcastdifficulties.Tryanotherchannel.Thesoundmaybemuted.PressVOL+ and VOL-.Ifyouhearnosound,trysettingtheMTSfeaturetoStereomode(page36,37).IfyouarenotreceivingasecondaudioprogramfromaknownSAPsource,makesuretheMTSfeatureissettoSAPmode(page36,37).Ifyouhearaudiothatseems“incorrect”fortheprogramyouarewatching(suchasmusicoraforeignlanguage),theSAPmodemaybeon.SettheMTSfeaturetoStereomode(page36,37).
Remote control problemsMakesuretheremotecontrolissettothecorrectdevicemode(page21).RemoveallobstructionsbetweentheremotecontrolandtheTV.Theremotecontrolbatteriesmaybedead.Replacethebatteries(page20).YourTVremotecontrolmaynotoperatecertainfeaturesonyourexternaldevice.Refertotheowner’smanualforyourotherdevicetodetermineitsavailablefeatures.IfyourTVremotecontroldoesnotoperateaspecificfeatureonanotherdevice,usetheremotecontrolthatcamewiththedevice(pages22–26).
Channel tuning problemsMakesuretheremotecontrolissettothecorrectdevicemode(page21).Thechannelmaybesettingto"Not Viewable" bytheManual Ch Setfeature.Pleaseset"Viewable"tounblockthechannel(page31).Ifyouareunabletotunedigitalchannels,checktheantennaconfiguration(page29).Ifyouarestillunabletotunedigitalchannels,clearallchannelsfromthechannellist(page31)andreprogramchannelsintothechannelmemory(page30).
•
–
–
••
••
•
•
•
•
•
•
•
•
•
Chapter 8: Troubleshooting
�6

Chapter 8: Troubleshooting
�7
Closed caption problemsIftheprogramorvideoyouselectedisnotclosed-captioned,nocaptionswilldisplay(page35,36).Iftextisnotavailable,ablackrectanglemayappear.Ifthishappens,turnofftheclosedcaptionfeature(page35,36).Aclosed-captionsignalmaynotdisplaycorrectlyinthefollowingsituations:a)whenavideotapehasbeendubbed;b)whenthesignalreceptionisweak;orc)whenthesignalreceptionisnonstandard(page35,36).
Rating blocking (V-Chip) problemsIfyouforgetyourPINcode:Press fourtimeswithinfiveseconds.ThePINcodewillbeclearedandyoucanenteranewPINcode.TheV-ChipfeatureisavailablefortheU.S.V-Chipsystem,orCanada(ifavailable)(page39,40).
HDMI problemsFor HDMI cables
MakesuretousecableswiththeHDMILogo( )(page17).
For Legacy HDMI sourceSomelegacyHDMIsourcesmaynotworkproperlywiththelatestHDMITVproducts,duetonewstandardadoption.
•
•
•
•
•
•
•
LED indicationsThegreenorredLEDlightsontheTVfrontindicatetheTV’sstatus,asdescribedbelow.
POWER
POWER
LED Indication Condition1) Green The TV is operating properly.
2) Red Power off (standby mode)
Iftheproblemstillexists:IntheU.S.,callTACPConsumerSolutionsat1-800-575-5469.InCanada,locatethenearestToshibaauthorizedservicedepotbydirectingyourwebbrowsertowww.toshiba.ca;click“HomeEntertainment,”andthenclick“Support.”
•
•
TV front
LED Indication

�8
SpecificationsNote:
This model complies with the specifications listed below.
Designs and specifications are subject to change without notice.
This model may not be compatible with features and/or specifications that may be added in the future.
Television SystemNTSCstandardATSCstandard(8VSB)DigitalCable(64QAM,256QAM;in-the-clear,
unencrypted)
Channel CoverageVHF:2through13UHF:14through69CableTV:Midband(A-8throughA-1,AthroughI)
Superband(JthroughW)Hyperband(AAthroughZZ,AAA,BBB)Ultraband(65through94,100through135)
Power Source:120VAC,60Hz
Power Maximum Current26AV500U: 0.85A32AV500U: 1.30A37AV50U: 1.65A37AV500U: 1.65A42AV500U: 1.95A
Power Consumption26AV500U: 0.4Winstandbymode32AV500U: 0.4Winstandbymode37AV50U: 0.4Winstandbymode37AV500U: 0.4Winstandbymode42AV500U: 0.4Winstandbymode
Audio Power: 7W+7Wfor26”/32”;10W+10Wfor37”/42”
Video/Audio TerminalsS-VIDEO INPUT:
Y:1V(p-p),75ohm,negativesync.C:0.286V(p-p)(burstsignal),75ohm
VIDEO/AUDIO INPUT:VIDEO:1V(p-p),75ohm,negativesync.AUDIO:150mV(rms)(30%modulationequivalent,22k
ohmorgreater)ColorStream® (component video) HD INPUT:
VIDEO:Y:1V(p-p),75ohmPR:0.7V(p-p),75ohmPB:0.7V(p-p),75ohmSuggestedformats:1080i,720p,480p,480i
AUDIO:150mV(rms),22kohmorgreater
•
•
•
HDMI™ INPUT:HDMIcompliant(typeAconnector)HDCPcompliantAudioLipSyncsupportedSuggestedformats:Seetableonthenextpage.HDMIAudio:2-channelLinear-PCM;32/44.1/48kHz
samplingfrequency;16/20/24bitspersampleDIGITAL AUDIO OUTPUT:
OpticaltypePC INPUT:
15-PinD-subAnalogRGB
Dimensions26AV500U: Width:2'2-1/8"(664mm) Height:1'8-1/8"(511.4mm) Depth:10-9/16"(269mm)32AV500U: Width:2'7-1/8"(790mm) Height:1'11-1/16"(586.4mm) Depth:1'-1/8"(308.4mm)37AV50U/37AV500U: Width:2'11-7/8"(910mm) Height:2'1-3/4"(654mm) Depth:1'-1/8"(308.4mm)42AV500U: Width:3'4-11/16"(1,034mm) Height:2'5-7/16"(748mm) Depth:1'1-7/16"(341mm)
Mass (Weight)26AV500U:27.5lbs(12.5kg)32AV500U:40.7lbs(18.5kg)37AV50U:49.8lbs(22.6kg)37AV500U:49.8lbs(22.6kg)42AV500U:59.9lbs(27.2kg)
Operating conditionsTemperature:32ºF-95ºF(0ºC-35ºC)Humidity:20-80%(nomoisturecondensation)
Supplied AccessoriesRemotecontrolwithtwosize“AAA”batteriesOwner’smanual(thisbook)CleaningclothPowercord
••••
Chapter 9: Appendix

Chapter 9: Appendix
�9
HDMI input supports the following signal formats:
Format Resolution V. Frequency H. Frequency Pixel Clock FrequencyVGA 640×480 59.940Hz 31.469kHz 25.175MHz
SVGA 800×600 60.320Hz 37.880kHz 40.000MHz
XGA 1024×768 60.000Hz 48.360kHz 65.000MHz
WXGA 1280×768 59.876Hz 47.776kHz 79.500MHz
WXGA 1360×768 60.015Hz 47.712kHz 85.500MHz
480i 720×480i 59.940Hz 15.730kHz 27.000MHz
480p 720×480p 59.940Hz 31.470kHz 27.000MHz
720p 1280×720p 60.000Hz 45.000kHz 74.250MHz
1080i 1920×1080i 60.000Hz 33.750kHz 74.250MHz
Note: The PC IN AUDIO port just shared with the HDMI 1 for DVI signal and doesn't suport HDMI 2.•

Chapter 9: Appendix
�0
Limited United States Warranty for LCD Televisions 26” and Larger
ToshibaAmericaConsumerProducts,L.L.C.(“TACP”)makesthefollowinglimitedwarrantiestooriginalconsumersintheUnitedStates.
THESE LIMITED WARRANTIES EXTEND TO THE ORIGINAL CONSUMER PURCHASER OR ANY PERSON RECEIVING THIS LCD TELEVISION AS A GIFT FROM THE ORIGINAL CONSUMER PURCHASER AND TO NO OTHER PURCHASER OR TRANSFEREE. LCD TELEVISIONS PURCHASED IN THE U.S.A. AND USED ANYWHERE OUTSIDE OF THE U.S.A., INCLUDING, WITHOUT LIMITATION, CANADA AND MEXICO, ARE NOT COVERED BY THESE WARRANTIES. LCD TELEVISIONS PURCHASED ANYWHERE OUTSIDE OF THE U.S.A., INCLUDING, WITHOUT LIMITATION, CANADA AND MEXICO, AND USED IN THE U.S.A., ARE NOT COVERED BY THESE WARRANTIES.
Limited One (1) Year Warranty on Parts and LaborTACPwarrantsthisLCDTelevisionanditspartsagainstdefectsinmaterialsorworkmanshipforaperiodofone(1)yearafterthedateoforiginalretailpurchase.DURING THIS PERIOD, TACP WILL, AT TACP’S OPTION, REPAIR OR REPLACE A DEFECTIVE PART WITH A NEW OR REFURBISHED PART WITHOUT CHARGE TO YOU FOR PARTS OR LABOR. During this period,TACPAuthorizedServiceStationpersonnelwillcometoyourhomewhenwarrantyserviceisrequired.Dependingonthetypeofrepairrequired,theservicewilleitherbeperformedinyourhomeortheLCDTelevisionwillbetakentoaTACPAuthorizedServiceStationforrepairandreturnedtoyourhomeatnocosttoyou.
Rental UnitsThewarrantyforLCDTelevisionrentalunitsbeginsonthedateofthefirstrentalorthirty(30)daysafterthedateofshipmenttotherentalfirm,whichevercomesfirst.
Limited Warranty for Commercial UnitsTACPwarrantsLCDTelevisionsthataresoldandusedforcommercialpurposesasfollows:allpartsarewarrantedagainstdefectsinmaterialsorworkmanshipforaperiodofninety(90)daysafterthedateoforiginalretailpurchase.DURINGTHISPERIOD,TACPWILL,ATTACP’SOPTION,REPAIRORREPLACEADEFECTIVEPARTWITHANEWORREFURBISHEDPARTWITHOUTCHARGETOYOU.
Owner’s Manual and Product Registration CardReadthisowner’smanualthoroughlybeforeoperatingthisLCDTelevision.
CompleteandmailtheenclosedproductregistrationcardorregisteryourLCDTelevisiononlineatwww.tacp.toshiba.com/serviceassoonaspossible.ByregisteringyourLCDTelevisionyouwillenableTACPtobringyounewproductsspecificallydesignedtomeetyourneedsandhelpustocontactyouintheunlikelyeventasafetynotificationisrequiredundertheU.S.ConsumerProductSafetyAct.Failure to complete and return the product registration card does not diminish your warranty rights.
Your ResponsibilityTHE ABOVE WARRANTIES ARE SUBJECT TO THE FOLLOWING CONDITIONS:
(1) Youmustretainyouroriginalbillofsaleorprovideotherproofofpurchase.
(2) AllwarrantyservicingofthisLCDTelevisionmustbeperformedbyanAuthorizedTACPServiceStation.
(3) ThewarrantiesfromTACPareeffectiveonlyifthisLCDTelevisionispurchasedandoperatedintheContinentalU.S.A.orPuertoRico.
(4) Laborservicechargesforsetinstallation,setup,adjustmentofcustomercontrols,andinstallationorrepairofantennasystemsarenotcoveredbythiswarranty.Receptionproblemscaused
byinadequateantennasystems,misalignedsatellitedishes,cabletelevisiondistribution,VCRs,DVDplayers/recorders,personalcomputerlevelIEEE-1394devices,andanyotherconnectedsignalsourcedeviceareyourresponsibility.
(5) Warrantiesextendonlytodefectsinmaterialsorworkmanshipaslimitedabove,anddonotextendtoanyLCDTelevisionorpartsthathavebeenlostordiscardedbyyouortodamagetotheLCDTelevisionorpartscausedbyfires,misuse,accident,ActsofGod(suchaslightningorfluctuationsinelectricpower),improperinstallation,impropermaintenance,oruseinviolationofinstructionsfurnishedbyTACP;useormalfunctionthroughsimultaneoususeofthisLCDTelevisionandconnectedequipment;ortounitsthathavebeenmodifiedorhadtheserialnumberremoved,altered,defaced,orrenderedillegible.
How to Obtain Warranty ServiceIf,afterfollowingalloftheoperatinginstructionsinthismanualandreviewingthesectionentitled“Troubleshooting,”youfindthatserviceisneeded:
(1) TofindthenearestTACPAuthorizedServiceStation,visitTACP’swebsiteatwww.tacp.toshiba.com/serviceorcontactTACP’sConsumerSolutionCentertollfreeat1-800-575-5469.
(2) YoumustpresentyouroriginalbillofsaleorotherproofofpurchasetotheTACPAuthorizedServiceStation.
For additional information, visit TACP’s website: www.tacp.toshiba.com
ALL WARRANTIES IMPLIED BY THE LAW OF ANY STATE OF THE U.S.A., INCLUDING THE IMPLIED WARRANTIES OF MERCHANTABILITY AND FITNESS FOR A PARTICULAR PURPOSE, ARE EXPRESSLY LIMITED TO THE DURATION OF THE LIMITED WARRANTIES SET FORTH ABOVE. WITH THE EXCEPTION OF ANY ARRANTIES IMPLIED BY THE LAW OF ANY STATE OF THE U.S.A. AS HEREBY LIMITED, THE FOREGOING WARRANTY IS EXCLUSIVE AND IN LIEU OF ALL OTHER WARRANTIES, GUARANTEES, AGREEMENTS, AND SIMILAR OBLIGATIONS OF TACP WITH RESPECT TO THE REPAIR OR REPLACEMENT OF ANY PARTS. IN NO EVENT SHALL TACP BE LIABLE FOR CONSEQUENTIAL OR INCIDENTAL DAMAGES (INCLUDING, BUT NOT LIMITED TO, LOST PROFITS, BUSINESS INTERRUPTION, OR MODIFICATION OR ERASURE OF RECORDED DATA CAUSED BY USE, MISUSE OR INABILITY TO USE THIS LCD TELEVISION).
Noperson,agent,distributor,dealer,orcompanyisauthorizedtochange,modify,orextendthetermsofthesewarrantiesinanymannerwhatsoever.ThetimewithinwhichanactionmustbecommencedtoenforceanyobligationofTACParisingunderthewarrantyorunderanystatuteorlawoftheUnitedStatesoranystatethereofisherebylimitedtoninety(90)daysfromthedateyoudiscover,orshouldhavediscovered,thedefect.ThislimitationdoesnotapplytoimpliedwarrantiesarisingunderthelawofanystateoftheU.S.A.
THIS WARRANTY GIVES YOU SPECIFIC LEGAL RIGHTS AND YOU MAY ALSO HAVE OTHER RIGHTS WHICH MAY VARY FROM STATE TO STATE IN THE U.S.A. SOME STATES OF THE U.S.A. DO NOT ALLOW LIMITATIONS ON THE DURATION OF AN IMPLIED WARRANTY, WHEN AN ACTION MAY BE BROUGHT, OR THE EXCLUSION OR LIMITATION OF INCIDENTAL OR CONSEQUENTIAL DAMAGES. THEREFORE, THE ABOVE PROVISIONS MAY NOT APPLY TO YOU UNDER SUCH CIRCUMSTANCES.
[0305]
Chapter 9: Appendix
�1
Limited Canadian Warranty for Toshiba Brand Flat Panel Televisions
ToshibaofCanadaLimited(“TCL”)makesthefollowinglimitedwarrantiestooriginalconsumersinCanada.THESE LIMITED WARRANTIES EXTEND TO THE ORIGINAL CONSUMER PURCHASER OR ANY PERSON RECEIVING THIS TOSHIBA BRAND FLAT PANEL TELEVISION (the “TELEVISION(S)” or “Television(s)”) AS A GIFT FROM THE ORIGINAL CONSUMER PURCHASER AND TO NO OTHER PURCHASER OR TRANSFEREE.
TELEVISIONS PURCHASED IN CANADA, AND USED ANYWHERE OUTSIDE OF CANADA INCLUDING, WITHOUT LIMITATION, THE UNITED STATES AND MEXICO, ARE NOT COVERED BY THESE WARRANTIES.
TELEVISIONS PURCHASED ANYWHERE OUTSIDE OF CANADA, INCLUDING, WITHOUT LIMITATION, THE UNITED STATES AND MEXICO, AND USED IN CANADA, ARE NOT COVERED BY THESE WARRANTIES.
Limited One (1) Year Warranty on Parts and Labour
SubjecttothemorelimitedwarrantyiftheTelevisionisusedforanycommercialorbusinesspurposesassetoutbelow,TCLwarrantstheTelevisionanditspartsagainstmaterialdefectsinmaterialsorworkmanshipthatresultintheTelevisionfailingforaperiodofone(1)yearafterthedateoforiginalretailpurchase.DURING THIS PERIOD, TCL WILL, AT TCL’S OPTION, REPAIR OR REPLACE A DEFECTIVE PART WITH A NEW OR REFURBISHED PART WITHOUT CHARGE TO YOU FOR PARTS OR LABOUR.
(a) FORTELEVISIONS32INCHESORLESS:YOU MUST DELIVER THE ENTIRE TELEVISION TO A TCL TELEVISION AUTHORIZED SERVICE PROVIDER (“ASP”). YOU MUST PAY FOR ALL TRANSPORTATION AND INSURANCE CHARGES FOR THE TELEVISION TO AND FROM THE ASP.
(b) FORTELEVISIONSOVER32INCHES:Duringthisperiod,ASPpersonnelwillcometoyourhomewhenwarrantyserviceisrequired.Dependingonthetypeofrepairrequired,theservicewilleitherbeperformedinyourhomeortheTelevisionwillbetakentoanASPforrepairandreturnedtoyourhomeatnocosttoyou.IN-HOME SERVICE ONLY APPLIES WITHIN 100 KILOMETERS OF AN ASP. IF YOU ARE NOT WITHIN 100 KILOMETERS OF AN ASP, YOU MUST DELIVER THE ENTIRE TELEVISION TO AN ASP. YOU MUST PAY FOR ALL TRANSPORTATION AND INSURANCE CHARGES FOR THE TELEVISION TO AND FROM THE ASP.
Limited Warranty for Commercial Units
TCLwarrantsTelevisionsthatareusedforanycommercialorbusinesspurposesasfollows:allpartsarewarrantedagainstmaterialdefectsinmaterialsorworkmanshipthatresultintheTelevisionfailingforaperiodofninety(90)daysafterthedateoforiginalretailpurchase.DURING THIS PERIOD, TCL WILL, AT TCL’S OPTION, REPAIR OR REPLACE THE DEFECTIVE PART WITH A NEW OR REFURBISHED PART WITHOUT CHARGE TO YOU.
(c) FORTELEVISIONS32INCHESORLESS:YOU MUST DELIVER THE ENTIRE TELEVISION TO AN ASP. YOU MUST PAY FOR ALL TRANSPORTATION AND INSURANCE CHARGES FOR THE TELEVISION TO AND FROM THE ASP.
(d) FORTELEVISIONSOVER32INCHES:Duringthisperiod,ASPpersonnelwillcomeon-sitewhenwarrantyserviceisrequired.Dependingonthetypeofrepairrequired,theservicewilleitherbeperformedon-siteortheTelevisionwillbetakentoanASPforrepairandreturnedatnocosttoyou.ON-SITE SERVICE ONLY APPLIES WITHIN 100 KILOMETERS OF AN ASP. IF YOU ARE NOT WITHIN 100 KILOMETERS OF AN ASP, YOU MUST DELIVER THE ENTIRE TELEVISION TO AN ASP. YOU MUST PAY FOR ALL TRANSPORTATION AND INSURANCE CHARGES FOR THE TELEVISION TO AND FROM THE ASP.
Rental Units
ThewarrantyforTelevisionrentalunitsbeginswiththedateoffirstrentalorthirty(30)daysfromthedateofshipmenttotherentalfirm,whichevercomesfirst.
Your Responsibility
THE ABOVE WARRANTIES ARE SUBJECT TO THE FOLLOWING CONDITIONS:
(1) Youmustprovideyourbillofsaleorotherproofofpurchase.(2) AllwarrantyservicingofthisTelevisionmustbeperformedby
anASP.(3) ThewarrantiesfromTCLareeffectiveonlyiftheTelevisionis
(i)purchasedasnewandunopenedfromTCLorfromTCL’sauthorizeddistributors,dealersorresellers(“ADR’s”)and(ii)located/operatedinCanada.
(4) Labourchargesforsetinstallation,setup,adjustmentofcustomercontrols,andinstallationorrepairofantennasystemsarenotcoveredbythesewarranties.Receptionproblemscausedbyinadequateantennasystemsareyourresponsibility.
(5) Warrantiesextendonlytomaterialdefectsinmaterialsorworkmanshipaslimitedabove,anddonotextendto:a. Service,repairsorreplacementmadenecessaryby
accident,misuse,abuse,moisture,liquids,dust,dirt,neglect,accident,damage,24/7applications,improperinstallation,improperoperation,impropercleaning,impropermaintenance,normalwearandtear,screenburnorimageretentioncausedbyprolongeddisplayofstaticimagesand/orphosphoraging,oranyotherexternalcauseorevent,actoromissionoutsidethecontrolofTCL,includingfire,theft,actsofGod,alteration,powerfailures,powersurgesorpowershortages,lightning,otherelectricalfaults,orrepairs,modificationsorreplacementsbypersonsotherthanthoseauthorizedbyTCLtoservicetheTelevision;
b. Replacementofmissing,discardedorlostparts,theprovisionofretrofits,orpreventivemaintenance;
c. RepairofdamagethatiscosmeticonlyordoesnotaffecttheTelevisionfunctionality,suchaswearandtear,scratchesanddents;
d. ServiceonToshiba-brandedaccessoryitems(suchaccessoryitemsmaybecoveredbytheirownwarranty);
e. Serviceonthirdpartyproductsorservicemadenecessarybyuseofincompatiblethirdpartyproducts;
f. ServicemadenecessarybythesimultaneoususeofthisTelevisionandconnectedequipment;
g. ModificationstotheTelevisionnotapprovedinwritingbyTCL,andservicemadenecessarybytheuseorinstallationofnon-ToshibamodificationstotheTelevision;
h. ServiceofaTelevisiononwhichtheTOSHIBAlabelorlogo,ratinglabelorserialnumberhavebeendefacedorremoved;
i. On-siteserviceandrepairoftheTelevision;andj. DamagetotheTelevisioncausedbyfailuretofollowthe
specifications,Usermanualsorguidesastousageand/orstorage.

Chapter 9: Appendix
��
Disclaimer and Limitation of Remedy
TO THE EXTENT NOT PRECLUDED BY LAW, ALL OTHER EXPRESS AND IMPLIED WARRANTIES, CONDITIONS AND REPRESENTATIONS FOR THIS TELEVISION, INCLUDING THE IMPLIED WARRANTIES, CONDITIONS AND REPRESENTATIONS OF MERCHANTABILITY AND FITNESS FOR A PARTICULAR PURPOSE, ARE HEREBY DISCLAIMED AND EXCLUDED. IF THE APPLICABLE LAW, STATUTORY OR OTHERWISE, PRECLUDES THE EXCLUSION OF ANY IMPLIED WARRANTIES, CONDITIONS AND REPRESENTATIONS THEN SUCH IMPLIED WARRANTIES, CONDITIONS AND REPRESENTATIONS ARE OTHERWISE LIMITED IN DURATION TO THE TERM OF THIS EXPRESS WRITTEN LIMITED WARRANTY. TO THE EXTENT NOT PRECLUDED BY LAW, STATUTORY OR OTHERWISE, THIS WRITTEN WARRANTY SUPERCEDES AND SPECIFICALLY DISCLAIMS ANY OTHER WARRANTY, CONDITION OR REPRESENTATION NOT STATED IN THIS WARRANTY, WHETHER MADE BY TCL, TOSHIBA CORPORATION, THEIR AFFILIATES, ADRs AND ASPs AND WHETHER MADE ORALLY OR IN WRITING (INCLUDING ANY STATEMENT IN ANY BROCHURE, PRESS RELEASE, ANNOUNCEMENT, ADVERTISEMENT, POINT OF SALE DISPLAY, ETC.).
YOUMUSTREADANDFOLLOWALLSET-UPANDUSAGEINSTRUCTIONSINTHEAPPLICABLEUSERGUIDESAND/ORMANUALS.IFYOUFAILTODOSO,THISTELEVISIONMAYNOTFUNCTIONPROPERLYANDYOUMAYSUFFERDAMAGE.THISWARRANTYWILLNOTCOVERANYSERVICETHATISREQUIRED,INPARTORINWHOLE,ASARESULTOFANYFAILURETOFOLLOWTHESET-UPANDUSAGEINSTRUCTIONS.THISWARRANTYDOESNOTAPPLYANDSHALLBEVOIDANDUNENFORCEABLEIFTHETELEVISIONISOPENED,SERVICED,ORREPAIREDBYPERSONSOTHERTHANTHOSEAUTHORIZEDBYTCLTOSERVICEORREPAIRTHETELEVISION.
IFTHETELEVISIONFAILSTOWORKASWARRANTEDABOVE,YOURSOLEANDEXCLUSIVEREMEDYSHALLBEREPAIRORREPLACEMENTOFTHEDEFECTIVEPART.INNOEVENTWILLTCL,TOSHIBACORPORATION,THEIRAFFILIATES,ADRsORASPs(THE“RELATED PARTIES”)BELIABLETOYOUORANYTHIRDPARTYFORANYDAMAGES,MONEY,REIMBURSEMENT,COSTSOREXPENSES.THISLIMITATIONAPPLIESTODAMAGES,MONEY,REIMBURSEMENT,COSTSOREXPENSESOFANYKINDWHATSOEVERINCLUDINGANYDIRECTORINDIRECTDAMAGES,DAMAGETOPROPERTYORERSON,LOSTPROFITS,LOSTSAVINGS,INCONVENIENCEOROTHERSPECIAL,INCIDENTAL,EXEMPLARYORCONSEQUENTIALDAMAGES,WHETHERFORBREACHOFWARRANTY,BREACHOFCONTRACT,TORT(INCLUDINGNEGLIGENCE),UNDERASTATUTEORNDERANYOTHERLAWORFORMORACTION,ORWHETHERARISINGOUTOFTHEUSEOFORINABILITYTOUSETHETELEVISION,VENIFANYOFTHERELATEDPARTIESHASBEENADVISEDOFTHEPOSSIBILITYOFSUCHDAMAGESOROFANYCLAIMBYANYOTHERPARTY.
Noperson,agent,distributor,dealerorcompanyisauthorizedtochange,modifyorextendthetermsofthesewarrantiesinanymannerwhatsoever.
Arbitration and Dispute Resolution
Totheextentnotprecludedbylaw,anyclaim,dispute,controversyordisagreement(whetherforbreachofwarranty,breachofcontract,tort(includingnegligence),underastatuteorunderanyotherlaworformofaction)againstanyoftheRelatedPartiesarisingoutof,orotherwiserelatingto:(i)thiswarranty;(ii)theTelevision;(iii)anyoralorwrittenrepresentations,statements,brochures,pressreleases,advertising,announcement,pointofsaledisplay,orpromotionalmaterialrelatingtotheTelevision;(iv)therelationshipsthatresultfromthiswarranty,(theforegoingclaims,disputescontroversiesanddisagreementsarecollectivelyreferredtoasthe“Dispute”),shallbereferredtoandresolvedbyfinalandbindingarbitration(totheexclusionofthecourts).Totheextentnotprecludedbylaw,youagreetowaiveanyrightthatyoumayhavetocommenceorparticipateinanyrepresentative
orclassproceedingagainsttheRelatedPartiesrelatingtoanyDispute.Ifandwhereapplicableandtotheextentnotprecludedbylaw,youfurtheragreetooptoutofanysuchrepresentativeorclassproceedings.ArbitrationofanyDisputewillbeconductedintheforumandinthemannerasagreedtobetweenyouandTCL.Failingsuchagreement,thearbitrationwillbeconductedbyonearbitratorpursuanttothelawsandrulesrelatingtoarbitrationgenerallyinforceinthejurisdictioninwhichyouresideatthetimethattheDisputearises.Totheextentnotprecludedbylaw,noclaim,dispute,controversyordisagreementofanyotherpersonmaybejoinedorcombinedwithanyDisputebyyou,withoutthepriorwrittenconsentofTCL.
Critical Applications
TheTelevisionyouhavepurchasedisnotdesignedforany“criticalapplications.”“Criticalapplications”meanslifesupportsystems,medicalapplications,connectionstoimplantedmedicaldevices,commercialtransportation,nuclearfacilitiesorsystemsoranyotherapplicationswhereTelevisionfailurecouldleadtoinjurytopersonsorlossoflifeorcatastrophicpropertydamage.
IFTHECUSTOMERUSESTHETELEVISIONINANYCRITICALAPPLICATION,THECUSTOMER-ANDNOTTCL,ITSAFFILIATES,ADRsORASPs-ASSUMESOLEANDFULLRESPONSIBILITYFORSUCHUSE.TCLRESERVESTHERIGHTTOREFUSETOSERVICEANYTELEVISIONUSEDINACRITICALAPPLICATION.TCL,ITSAFFILIATES,ADRsANDASPsHEREBYDISCLAIMANYANDALLLIABILITY,DAMAGESANDCONSEQUENCESARISINGOUTOFTHESERVICEORREFUSALTOSERVICESUCHTELEVISIONANDFURTHERDISCLAIMANYANDALLLIABILITY,CONSEQUENCESANDDAMAGESTHATMAYARISEORRESULTFROMTHEUSEOFTHETELEVISIONINANYCRITICALAPPLICATIONS.
General Provisions
Ifandtotheextentthatanyprovisionofthislimitedwarrantyshouldgenerallybefoundtobeunenforceable,theunenforceableprovisionshallbeseveredfromthewarrantyanddeemednottoformpartofthewarranty.Theremainingprovisionsofthiswarrantyshallbeandremainvalidandenforceable.IfandtotheextentthatanyprovisionofthislimitedwarrantyasitrelatestoanyoftheRelatedPartiesisfoundtobeinvalidorunenforceableinrespectofthatparty(the“Excluded Party”),theExcludedPartyshallbedeemedtobeseveredorexcludedfromtheprovision,andtheprovisionshallremainvalid,enforceableandapplicableinrespectoftheotherorremainingRelatedParties.
Totheextentpermittedbylaw,thislimitedwarrantyshallbegovernedandconstruedinaccordancewiththelawsofOntario.
Ifthereisanyinconsistencybetweenthislimitedwarranty,ontheonehand,andanystatementinthepackagingoftheTelevisionorinanyotherdocumentenclosedwith,orusedinthecontextofthepromotionorsaleof,theTelevision,ontheotherhand,theprovisionsofthislimitedwarrantyshallprevail.
How to Obtain Warranty Services
If,afterfollowingalloftheoperatinginstructionsinthismanualandcheckingthe“Troubleshooting”section,youfindthatserviceisneeded:
(1) TofindthenearestASP,visitTCL’swebsiteatwww.toshiba.ca,orcalltollfree1-800-268-3404
(2) PresentyourbillofsaleorotherproofofpurchasetotheASP.
Foradditionalinformation,visitTCL’swebsiteatwww.toshiba.ca

��
Notes

TOSHIBA AMERICA CONSUMER PRODUCTS, L.L.C.CorporateHeadquarters:82TOTOWAROAD,WAYNE,NJ07470,U.S.A.NATIONALSERVICEDIVISION:1420-BTOSHIBADRIVE,LEBANON,TN37087,U.S.A.
TOSHIBA OF CANADA LTD.HEADOFFICE:191McNABBSTREET,MARKHAM,ONTARIO,L3R8H2,CANADA–TEL:(905)470-5400SERVICECENTERS:TORONTO:191McNABBSTREET,MARKHAM,ONTARIOL3R8H2,CANADA–TEL:(905)470-5400MONTREAL:18050TRANSCANADA,KIRKLAND,QUEBEC,H9J4A1,CANADA–TEL:(514)390-7766VANCOUVER:13551COMMERCEPARKWAY,SUITE110,RICHMOND,B.C.,V6V2L1,CANADA–TEL:(604)303-2500
CableClear,ColorStream,andTheaterWideareregisteredtrademarksofToshibaAmericaConsumerProducts,L.L.C.ChannelBrowserandDynaLightaretrademarksofToshibaAmericaConsumerProducts,L.L.C.
PRINTEDINCHINA(HDA51V3201I)