lcd color tv - c.searspartsdirect.com · trusurround technology is incorporated under license lrom...
TRANSCRIPT

LCD Color TV
Operating Instructions
KL V-S19A10KL V-S23A 10
KL V-$26A 10KL V-$32A 10
© 2005 Sony Corporation

Owner's RecordTile model _md serial numbers _u+elocated at the rear ol tile TV. Record
these numbers in tile spaces provided below. Relk:l- to fl_em whenever
you call upon your Sony dealer regarding tiffs product,
Model No.
Serial No.
Contacting SonyIt, alter readin_ these operating instructions, you have _dditional
questions related to the use ol your Sony TV, please call our Custolner
lnlorlnation Selvices Center at I-8(X)-222-SONY (7669) (US
residents only) or 1-877-89%SONY (7669) (Canadian residents only ),
2

WARNINGTo redu,-v tile risk of fire or electric shock, do
not expose Ibis itpparatlls to rain or IllOiStllre,
This symbol is intended to
alert the ilser Io tile presenceof uninsulaled 'dangerousvoltage" wilhin tileprodllcl S enclosure thai
may be ol sufficientmagnitude to constitute arisk of electric shock to
persons.
This symbol is intended to
alert Ifie ilser [o tile presence
ol ilnpoltant operalillg alld
maintenance (servicing)instructions in tile literature
accompanying fileappliance.
Tile apparatus shall not be exposed to dripping
or splashing and no objects filled wilh liquids,
such as vases, shall be placed on ll/e apparatus.
CAUTION
To pre_ ent electric shock, do not use Ibispolarized AC plug with an extension cord,receptacle or other outlet unless tile blades canbe fully inserted to prevent blade exposure.
Note on Caption VisionThis TV pro_ ides display of TV closedcaptioning ill accordance with §15.119 of tileFCC rules.
For Customers in the UnitedStatesllyou have any questions about this product,
you may call; Sony Customer hllormalkmServices Center 1-8t)0-222-7669 or
htlp://www,sony ,coin/
Declaration of ConformityTrade Name: SONYModel: KLV-S 19A 10/KLV-S 23A 10/
KLV-S26A 10/KLV-S32A 10
Responsible Party: Sony Electronics Inc.Address: 16450 W. Bemardo Dr,
San Diego, CA 92127 U.S.A.Telephone Number: 858-942-2230
This device complies wifll part 15 of the
FCC rules. Operation is subject m tile
lollowing two conditions: (1) This device
may not cause harmlhl interfi:rence, and (2)
this device must accept any interlcrcncc
received, including interlcrcnce thai may
cause undesired opcralioll.
NOTIFICATION
Tills equipment has been tested and lound tocomply with file limits lor a Class B digitalde_ice, pursuant to Part 15 oldie FCC Rules.These limits are designed m provide reasonableprotection against harmlul inlertPrence in aresklenfial inskdlation. This equipmentgenerates, uses and can radiate radio fi'cquencyenergy and, il not installed and used inaccordance with the instluctions, may causeharmfifl immqcrcnce to radio communications.
H()_,Ve_, el" _ [llere is llO gllilran tee [h21[ ill[ erlPr_llCe
will not occur ill a particular installation. It fillsequipment does cause harnlflfl interlcrcnce toradio or telcvision reception, which can bedetermined by turning tile equipment ofland on,the user is encouraged to tl3, to conect tile
interlcrcnce by one or more of tile lollowingmeasures:
[] Reorient or relocate tile receivingantenna.
[] Incrca_ tile separation betweml theequipment and receiver.
[] Connect tile equipment into an outlet on acircuit dillcrcnt lrom lhat to which ll/e
receiver is connected.
[] Consuh the dealer or an experiencedradio/TV lechnician lor help.
Yoll arc cautioned Ihal any changes ormodificalions nol expressly approved in thisinamml could void your aulhorily to operatethis equipmmlt.
For Customers in Canada
This Class B digital apparatus complies wid_Canadian ICES-003.
Safety[] Operate tile TV only on 120 V-240 V AC.
[] Use tile AC power coM specified by Sonyand suitable lbr tile vollage where yoll ilseit.
[] The plug is designed, lot safi:ty purposes,
1o fit inlo the wall oullcl only one way. Ifyou arc unable to insert file plug fully inlotile outlet, contact yotlr dealer.
[] If any liquid or solid object should bdlinside lhe cabinet, unplug the TVimnledialely and have it checked byqualified smwice personnel belorcoperating it lhrther.
[] If you will not be using tile TV fi)r severaldays. disconnect the pow-cr by pulling fileplug itself. Never pull on the cord.
[] For details concerning salcty precautkms,see "hnportant Salcly Instructions" <inpage 4 and "hnportant Salt:guards" onpage 5.
Installing[] The TV should be installed near an easily
accessible power outlet.
[] To prevent internal heat buildup, do notblock the ventilation openings.
[] Do not install tile TV in a hot or hmnid
place, or in a place subject to excessivedusl or mechanical vibration.
[] Avoid operating tile TV at lemperalurcsbdow 5°C (41°F).
[] If tile TV is transported directly liom acold to a warm location, or if tile room
temperature changes suddenly, tile picturemay be blurred or show poor color due tomoisture condensation. In this case,
please wait a lk:whotlrs lo lel file ii/oisttlrcevaporale belore turning on file TV.
[] To obtain tile best picture, do not exposethe screen to direct illunlinatkm or direct
sunlight. It is rccolllnlcllded to ilse spotlighling direcmd down l?om the ceiling orto cover file windows that lace the screen
with opaque drapery. It is desirable toinstall the TV in a room where the floorand walls are not of a reflective material.
CAUTIONUse tile lollowing Sony appliance(s) only withthe lblk_wing WALL-MOUNT BRACKET.
Use will/olher WALL-MOUNT BRACKET
may cause instability and possibly resuh iniJ_iury.
SONY APPLIANCE MODEL NO.
KLV-SI9AI0
KLV-S23AI0
KLV-S26A 10
KLV-S32AI0
SONY WALL-MOUNT BRACKET MODEL NO.
SU-WL11 (KLV-SI9A10)
SU-WL31 (KLV-S23A 10/KLV-S26A 10/
KLV-S32AI0)
To CustomersSufficient expertise is required lor installing thespecified product. Be sure to subcontract tileinstallation to Sony dealers or licen_dconlractors and pay adequale altention lo salclyduring file installalion.
(C(mtim_ed)
3

For Customers in the United StatesThis product contains mercury. Disposal of this product may be regulated
if soM in the United States. For disposal or recycling inlormafion, pleasecontact your local authorities or tile Elecnonics lndusnies Alliance
(ht tp://ww w.eiae.org).
To Sony DealersFor installation ol SONY WALL-MOUNT BRACKET, he sure to read
and lbllow tile insmlctions supplied with tho_ optkmld products,
Trademark Information' PlayStation" is a trademark ol Sony Computer Entertainment, Inc.
TruSurround, SRS and tile (0)+ symbol are trademarks ot SRS Labs,
lnc. TruSurround technology is incorporated under license lrom SRS Labs,
lnc.
Licensed by BBE Sound, Inc. undcr USP4638258, 4482866. ' BBE" and
BBE symbol arc trademarks of BBE Sound, Inc.
Macintosh is a trademark licensed to Apple Computer. lnc.. registered in
tile U.S.A and other countries.
Wega, Steady Sound and CineMotkm arc registered trademarks of SonyCorporatioll+
For KLV-S23A 10/KLV-S26A IO/KLV-S32A 10
As an ENERGY STAR ¢) Parmcr, Sony Corporation hasdetermined that this product meets the ENERGY STAR/_guklelines lor energy elt]ciency.
ENERGY STAR _) is a U.S. registered mark.p!I!NI[_'iNR
H_ml This TV inc°rl)°rates High-Definiti .....Multinledia Interlace (HDMP M) technology.HDMI, the HDMI logo and High-Definition Multimedia Interlace aretradenmrks or registered trademarks of HDMI Licensing LLC.
Important Safety Instructions1} Read these instructions.
2) Keep these instructions.
31 Heed all warnmgs.41 Follow- all instructions,
51 Do not use this apparatus near water.
6) Clean only with dry cloth.71 Do not block any ventilation openings. Install in
accordance with the manufacturer's instructions.
8t Do not install near any heat sources ,,, ..... _+,suchasradiators,heatregisters,qoves, or other apparatus (uacludtng _]:mnplifiersl that produce heat.
9) Do not defeat the safety purpose of the polarizedor grounding-type plug. A polarized plug has two
blades with one wider than the other. A groundingtype plug has two blades and a third grounding
prong. The wide blade or the third prong areprovided for your safety. If the provided plug
does not fit into your outlet, consult an electricianfor replacement of the obsolete outlet.
10}Protect the power cord from being walked on orpinched particularly at plugs, convemencereceptacles, and the point where they exit from
the apparatus.
11'_Only use attachments/accessories specified by themanufacturer.
121Use only with the cart. stand, tripod, bracket, ortable specified by the manufacturer, or sold with
the apparatus. When a cart is used. use cautionwhen moving the cart/apparatus combination to
avoid injury from tip-over.
131Unplug this apparatus during lighming storms or
when unused for long period._ of time.14_Refer all ,ervicing to qualified service personnel.
Servicing is required when the apparatus has beendamaged in any way, such as power-supply cordor plug is damaged, liquid has been spilled or
objects have fallen into the apparatus, theapparatus has been exposed to ram or moisture.
does not operate normally, or has been dropped.
4

ImportantSafoguardsBefol_ using your TV, please read these instructfi lib completely, _md
keep rids manual tor/umrc reference
Carefully ob_rve and comply with all warnings, cautions and
instructions placed on the unit or described in the operanng instructionsor service manuah
WARNINGTo guard ,gainst in jury, the following b,sic s,lEty precautions shouM be
observed in the installation, use alld Selwicing of the unit.
[] Clean the cabinet of the TV wifll a dry soft cloth. To remove d ust
fi'om tile semen, wipe it gently with a soft clofll. Stubborn srains
may be removed with a cloth slightly dampened with _ solution of
mild soap and wari](l water. Never use strong solvents sucll a_
thinner or benzine tbr cleaning.
[] If using, chemicMly pretreated cloth, please tbllow tile
instruction provided on tile package.
[] If tile picture becon/cs dark after using tile TV tbr a long period of
time. it may be necessar 3 to clean the inside of the TV. Consult
qualified service personnel
OverloadingOonoto erio.,dwaiioutIet .e ten i.........convenience receptacles beyond their capacity, w-_2-_'>%5___
since this cml resuh in fire or electric shock.
PowerUse
Power SourcesTilts unit should be operated only Iicom the type o]
p wer source indicated on the inforlllatioll label. _,
If you are not sure of the type of electric;d power _@_1_, {.,_4_
suppliedto yourt........ onsult5'ourdealeror _] ! "_/_),ocalp..........panyGrounding or PolarizationThis unit is eqLdpped with a polarized AU power cord plug (_l plughaving one blade wider than the otheri, or wit]l a throe-wire groundingtype plug (a plug having a third pin tbr grounding). Follow tileklstructions below:
For the unit with a polarized AC power cordplugThis plug will tit into tile power outlet only one way.
This is a satkty feature. If you m'e unable to inserttile plug lully into tile outlet, try reversing the plug.
If tile plug still fails to fit. conracl your electrician to
have a suit;tble outlet installec Do not detk_,t the _ .
s;,fety purpose of the polarized plug by %rcing it in.
Wall outletDo not i1se a poor fitting omlet.
Insert tile plug fully into the outlet. If it is loose, lr
May Callse arcing _lnd result ill tire.
Contact your electrician to have the outlet
changed.
WiringFor yore _at_ty, unplug tile AC power cord when wiring cables.
Electric shockDo not touch tile AC power cord or the unit with a
wet hand. 11 you plug/unplug file AC power cord
ti'om the unit with a wet hand, it may cause electricsilo&.
Cleaning
I- Clean tile AC power plug regularly.
If tile [?lug is covered with dust and it picksup inolsrure, its filsulation lna} deterior_te
and result in fire. Unplug the AC power
plug and clean it regularly.
[] Unplug file AC power cord whencleaning this unit. If not, it may resultin electric shock.
Always turn tile unit off when it is not being used.When tile unit is left unattended and unused for
long periods of it ........ plug it fronl tl .... II outlet _'_ '_ ,_j!e_as a precaution .gainst the possibility of nn {_ <_["_' ,_l
internal malfunction that could create a fh'c _,-Z_Jhazard.
Soundlfa snappfilg or popping sound fi'onl tile TV is
continuous or fi'eqaent while the TV is opermmg,
unplug the TV and consult your dealer or selwicetechnid an. lr is normal for TV' s to make occasional
snapping or popping sounds, particulm'ly when
being lunled on or oii.
AC Power CordIt" you damage tile AC power cord, it nlay result in tire or elecmc shock
[] Do not pinch, bend. oJ twist the cord excessively. The corn lines
may be bared and cut. and cause sholl-circuiL resulting m lily orelectric sllock.
[] Do not convert or damage the AC power cord
[] Do not put anytbing heavy on the AC power cord. Do not pull the
AC I: Jwer cord
[] Keep the AC power cord away fi'om heat bOUl_es.
[] Be sure to grasp tile plug when disconnecting tile AC f Jwer cord
If the AC power cord is damaged, stop u_ing it and ask your dealer or
Sony service center to exchallge it.
BatteriesDo not dispose of b_ffteries in a tim.Do not shol] circuit, disasseillble or overheat tile batteries.
Disposal of used batteriesTL pisser ve our environi]fleni, dispose ot ii_,ed batteries accordin_ [o your
local laws or regt]lations.
Ventilation holes _J__'//--_lNever push objects of any kind into tile unit through, v)¢_ _]
tile cabinet slots as they may touch dang ..... +[ [_1 lvoltagepoin,.....llo, outpai s,ll ,tcouldresultin [Ft rloilafir_ or electric shthe unit :k. Nex er spill liquid of any kind _[_.. JJJ
Objects and Liquid EntryDo not place any objects on tile unit.Tile app;m_ms shall not be ex )osed to dri ) )ino or _
_i _ ;. splashing and no objects filled with liquids, such ¢% _ ;_,: ¢_"
_}[li_ _ ........AttachmentsShallbe placed on the appar.t .... -_]
Do llOt use z_tRJchlnents not recon/nlended by the
nl*lnui*lclurer= as they nlay C[lUSe hazards.
Continued
5

Medical institutionDo not place this unit ill a ph_ce wllel_ medicaleqmpmcnt i_ in use.
Itmay cause nlal/unction _ f medicM instruments.
Moisture and flammable objects[] Do no_ use I lugged sets near
LCD screen[] Although tile LCD screen is made with high-precision technolt g3
and has eflEctive pixels of 99.99 _ or more. black dots nlay appearor bright points of light (rod, blue, or green) may appear constantlyon the LCD screen. This is a structural property of the LCD paneland i_ not a mMthncfion.
[] Do not expose the LCD screen surface to tile sun. Doing so maydamage the screen suriace,
[] Do not push or scratch tile LCD screen, or place objects on top orthe TV. The image may be tmeven or tile LCD panel may be
"" _" damat_ed.wareA -- ior exanlpIe, lie ir a bathtub. F # *
• . • _• • • . • • . . _15 _-I-_ r [] If tile WV is used in a cold plnce a smear Allay Occur In tile plcturewasnDowi Kltcnell SInK )r lmlnory t iI_ 111 • ' ....
• . _ I_- _ _ f_; or the picture mz,y become dark. This does not indicate a fluhu'e.
a wet b_en!ellt, or ne .......... l!l.mg pool, I_.l__ These pl ............. inlpr ..... tile tenlperature ri_s.
etc. It may result m fire or e ecmc shock. _ _C,-,-._ " [] Ghosting may occur when still pictures z,re displayed
V- Do not let this unit get wet. Never spill liquidoI any kind on the unit. If any liquid or solidobject does iqll through, do nOToperate theunit. It ilia} result in electric shock ordamage to tile unit. Have it checkedinmlediately by qualified personnel,
K] To prevent fire_ keep flammable objects or open flame/e.g.candles) away f?om the unto
AccessoriesDo 1101 place tile unit on all unstable cart. stand, tableor shelf. The unit ma,
continuously. It Allaydis;ippear airer a t)w nlonlenta.
[] The soven mad cabinel get warm when tile TV is in use. This fi nota malfunction.
[] Avoid spraying insect repellent wfih volatile n/arenM m tilescreen
[] Avoid prolonged contact with rubber oi plastic made nlaterial.
Fluorescent lampThis TV uses a special fluorescent lamp _,sits light source. If the screvnimage becomes dark_ flickers_ or does not appear, tile fluorescent lanlphas run down and should be wplaced. For replacemenL consult qualifiedservice personnel.
Installation
parr of tile TV should overhang ally edg_cart or stand: any overhanging edge is a salkt y hazardAn appliance and curt combination Should be movedwith cam. Quick stops, excessive/Prce_ and unevmlsurfi, ces may cause the appliance and cartconlbinatioll lo overturn.
Broken piecesDo not throw mlytlmw at the unit.The screen glass may break by tim inlpact and cause serious inJul_,.
Cable wiringTake cal_ nor vo catch your/Eet on the cables. It may damage the unit
HeatDo not touch tile surface of tile TV.
It lmnains hot. even for some time _,fler tile TV is turned off
Volume adjustment[] Adjust tile volullle s as not to trouble your neAghbors. Sound
carries very easily at night time. TheretL, re. closing the windows
or ublng he_ ]phones is suggested.V- When using headphones, adjust tile volume so as to avoid
excessive levels. _s hearing damage Allayresult.
Disposal of the TV[] Do not dispose tile TV with general househt Mwaste.
[] The LUD contains a small amoum of liquid cwstal. Tilefluorescent robe used in this display contains mercury. Follow' our local ordinances and re=ulations lPr d] ,posah
Handling of broken glass and liquid crystalleakagelfthe LCD _anel gets damaged, crystalline liquid leakage n/_y occm_ o_scattered broken glass l/_la}result. Do not touch broken glass orcwstalline liquid which is toxic . with b,ire hands as cuts or polsoning_skin irritation may occur. Also. do not let glass f?agmenrs or leakedcwstalline liquid get into your eyes or mouth. Should either contact your
Installation[] WheAl installing or removing tile TV
on tile wall. be sure to use qualifiedcontractors. Wall lnount installationrequires tile use of a wHll-tnoun[bracket. If the TV is installed or
removed fi'om tile wall by a personOtiler than a qualified contractor, theunit ma} fall and cause serious injuEif the unit is not installed securely
[] To prevent injury, this apparam_lllUst be securely attached It) tilestand/wall in accordance with tile
installation Anhtrucrlons.
[] Carrying tile model KLV-S32A10
reqmres Two or lnOl_ people•
Placement for viewingIt is reconmlended to watch the TV at a distance of 3 to 7 tinlcs that of
tile screen height, and in moder*_te brignmess. Watching tile TV lbr toolong or in a dark morn will c,rose eye [htigue.
Optional accessoriesObsmwe tile following when installing tile TV using awMl-momlt bracket. 1lille TV is not secured properly.it ma) tall and cause injury[] Be sure to/bllow tile operating instructions
supplied with the wall-mount bracket wheninstalling the unit
[] Be sure to att ,ch tile brackets supplied with tilewall-mount bracket
Protruding locationDo not install tile TV it? protruding locations. If you install tile utlit ill tile
following locations, injury may result•[] Do not install tile unit in a location where tile unit protrudes, such
o: pillars.[] Do not install tile unit in a location thai may cause injury,
Oilseyes or mouth, rinse the contacted re'ca thoroughly with water and
consult yoLIr doer, ,r. Do 11ol install] tilts unit in restatlranta where oily vapors occur. Dustabsorbing oil nlay enter illtO tile unit and dalltage tile I/nit.
6

CorrosionUse of this TV near the seasbol_ may sulz]ect the sel m excessive saltcon_sion mid internal damage and result in deterioration of the TV'spertiomtance. If the _t will be subjected to these conditions, steps shouldbe taken m reduce the humidity and tcmperatme of the area whele theTV is located.
VentilationThe slots and openings, ill tile TV am provided tZ_rnecessary ventilationTo ensure reliable operation of tile unit. and to protect it fromovm'heating, these slots and openings n/us[ never be blocked _ r covered
Unless proper ventilation is provide& tile ullit may ,/j;gather dust and get dirty. For pt per vellfilationobserve the following:
V- Do not install the unit turned backward o1"
ddewa_V- Do not install the unit turned wer or upside
down.
[] Never co' er tile slots and openings willl a ._ ,_cloth or uther materials. _2 _ Air circulation is blocked,
V- Never block tile slots m_d openings byplacing tile Llniton a bed. sofiL rug orother simihtr suriace.
[] Never place tile unit in a confined space, such _2)as a bookcase or built-in cabinet, unless _2"_i4-_v:-n&),r/-
proper ventilation is providec
E l_ave some space m'ound the unit m3d tile ACtower adaptor. Otherwise. adequate air-circulation may beblocked causing overheating and cause tire or damage the unit.
When installing the unit on the wa allow this much space.
" " 30cm
_1171a inches'
Iocm _ loon-
TT;;;l" _ 4 mcnes
1loom 14 mcnes_
KLV-S 19A 10 onl
When install ng the AC power adaptor, allow this much soace.
a j
10 CM
/ (4 Inches) ,lOom .
.'" (4 InchesjT _/ ....................1 -;/ / .............. I
, / , (4 Inches) /
I " lOcm
i ," (4 inches_710 c_7_ /,"
(4 Inches) , /_2 ............................. .,-
Never install the unit as follows:
Air circulation is blocked,
Outdoor useDo not install tills unit outdoors, lfthe unit is exposedto rain. it ma 2 result in fire _.)Ielectric shock. If the unitis exposed to direct sunlight, tile UmTmay heat up andcause damage to tile umt.
Vehicle and ceilingDo not install this mm m a vehicle or hang li'om tileLolling.
B umping of tile vehicle may cause me um_ TO_idldownand cause injury,
Ship and vesselDo not illstal] this unit ill a shi I or vessel• If the Llnit is ->
exposedt ........ ter, itm_y ..... fire ordain age the _k'-Jq I<'g.J.• .-;z-_"z--Jw*_,_..--4 -
Preventing the TV from toppling "':>/-overTake lneasul_s to pl_vent tile unit ]'i'om [oppling over and causing illjUr}
To prevent tile unit iixJlll toppling over. secure tile unit lo tile wall orpillar.
When installing the unit using a stand, allow this much soace Installing on a level surfaceIf you install tile unit on a non-level surface, tile unitmay fall or drop mid cause injury or dmnage.
Continued )
7

Placing on a stable surfaceIf you place the unit Oll _.111unslable surthce, the unit
tlla_ fall and cause iniury or dalllage
FallDo not hang anyddng on tile unit.
rile unit may tall fi'onl tile stand or wall-nlount
bracket, causing damage or serious inlury.
AC power cordUnplug tile AC 1"_wer cord when nloving the unit _-- --
Do llOt move tile unit with the AC power cord I [[
plugged in. It may damage tile AC power co "dand _a"-
r_sult in fire or electric shock. _
Do not Mlow anything to rest on or roll over the L_.M_J tl
p ....... d, and do not place the unit wher_ the _1
power cord is subiect to wear or _/buse.
Antennas
Service
Damage requiring serviceUnplug tile unit fbom the wall outlet and rethr smwicing to qualified
service personnel under tile following conditions:
[] When the power cord or plug is
damaged or frayed.
[] If liquid has been NJilled into the unit.
[] If tile surface oi the TV cracks, do not touch it, unpmg tile AC
power cord
[] If tile unit has been exposed ro rain orwater.
[] If tile unit has been subjected to excessive
shock by being dropped, or the cabinet has
been damaged.
Outdoor Antenna GroundingIf _.11/outdoor antenna is installed, follow tile precautions below. All [] If tile unit :loes not operate nornlally when
uutdoor antenna system should not be located in tile vicinity of overhead ibllowing the operating instructions. Adjust
power lines or other electric light or power circuits, or whel_ it carl come only tho_e controls thar m_ bpeclfted in tile
in contact with such power lines or circuits, operating instructions. Improper adj u_mlenT oi
WHEN INSTALLING AN OUTDOOR ANTENNA SYSTE_ [. other controls nla 3 lesult in damage and will
EXTREME CARE SHOULD BE TAKEN TO KEEP FROM oiTen require extensive work by a qu_ liftedtecllnicil 11to restore the unit to llornlal
CONTACTING SUCH POWER LINES OR CIRCUITS AS CONTACT
w ITH THEM IS ALMOST INVARIABLY FATAL. opcrarion.
Be sure the antenna sysrenl is grounded so as to provide some prorecu onagainsl voltage surgea m_dbuilt-up static charges.
Section glO of the National Eleca'icM Code NEC' in USA and Section
54 of the Canadian Electrical Code in Canada provides information witbrespect to proper grounding of file nlast and supporting su'ucmiv.grounding of file lead-in wire to an antenna discharge uniL size of
grounding conductors, location of antenna discharge unto connection IVgmueding electrodes, and requirelnents for the grounding dectrode
Antenna Grounding According to the NationalElectrical Code, ANSI/NFPA 70
_'_ Antenna lead-in wire
%[] When the unit exhibits a distinct change An
---22,performance, it indicates need [br smwice.
ServicingDo not attenlpt to Selwice tile i/rift yoursel_ sillce
opening tile cabinet may expose you to dangerous
voltages or other hazards. Rethr all servicing m
_aalified service personnel
Replacement partsWhen replacement palls am r_quire& be sure tile
service technician certifies ill writing that he!she has
used replacement parts specified by tile manufacturer
tll; t have the same characteristics as the original parts.
Unauthorized substituri_ ns nlay result in tire. electric
shock or other hazards.
NEC: National Electrical Code
Antenna discharge unit{NEC Section 810-20_
Grounding conductorsNEC Section 810-21 )
Ground clamps
Power service groundingelectrode s)'stemNEC Art 250 Part H
Safety check
Upon completion of any service or ix:pair s to tile unit, • \ [_-_ .......
checks O,s specified by tl ........... fiJctutvr) to ''/_('/_ -_kdeternline fllat tile unit is in sal_ operating condition. {,2/{) @
and to _, ceruiy. Ask a qualified service technician t_
dispose of the unit.
LightningFor added protection for this TV during a lightning srorln, or whell it is
left unattended and unused tL_r long periods of time. unplug it t]ronl the
wall outlet and disconnect the antenna. This will prevent damage to the
receiver due to lightning and power-line surges.
8

Welcome .............................................................. 10
Package Contents .......................................... 10Features ......................................................... 10
Installing the TV .................................................. 11
Preventing the TV from Toppling Over .......... 11
Bundling the Connecting Cables .................... 12
Adjusting the Viewing Angle of the TV ........... 12TV Controls and Con hectors ............................. 13
Front and Top Panel ...................................... 13Side Panel ...................................................... 14
Rear Panel ..................................................... 15
Making Video and Audio Connections ........... 17Basic Connections ............................................. 18
Cable System or VHF/UHF Antenna
System ........................................................... 18
Cable Box/Digital Cable Box .......................... 18Satellite Receiver and Cable/Antenna ........... 19
HD Equipment ................................................ 20
Connecting Optional Equipment ....................... 22VCR, Cable and Antenna ............................... 22
DVD Player .................................................... 24
HDMI-Equipped Device ................................. 26
DVI-HDTV-Equipped Device .......................... 27
Personal Computer ........................................ 28
Camcorder or "PlayStation". .......................... 29
Setting Up the Channel List ............................... 30
Using Initial Setup .......................................... 30
Button Descriptions ........................................... 32
Programming the Remote Control .................... 34
Using Other Equipment with Your RemoteControl .......................................................... 36
Special Buttons on the Remote Control ........... 38
Using the Wide Screen Mode ........................ 38
Using the Jump Function ............................... 39
Using the Freeze Function ............................. 39
Using the Power Saving Function .................. 39
Using the Sleep Function ............................... 40
Overview of WEGA GATE ................................... 42
Navigating and Select ......................................... 44
Using Favorites in WEGA GATE ........................ 44
Using TV List in WEGA GATE ............................ 45
Using External Inputs in WEGA GATE .............. 45
Using Settings in WEGA GATE .......................... 45
Overview of the Settings .................................... 46
Using the Video Settings ................................... 48
Selecting Video Options ................................. 48
Using the Audio Settings .................................. 49
Selecting Audio Options ................................. 49
Using the Screen Settings ................................. 51
Selecting Screen Options ............................... 51
Using the Channel Settings .............................. 53
Selecting Channel Options ............................. 53
Using the Parent Settings ................................. 55
Selecting Parent Options ................................ 55
US Models: Selecting Custom Rating
Options ........................................................... 56
Viewing Blocked Programs ............................ 56
Canadian Models: Selecting Custom Rating
Options ........................................................... 57
Viewing Blocked Programs ............................ 57
Using the Clock/Timers Settings ...................... 58
Selecting Clock/Timers Options ..................... 58
Using the Setup Settings ................................... 60
Selecting Setup Options ................................. 60
Troubleshooting .................................................. 62
Trouble Symptoms and Remedies ................. 62
Contacting Sony .................................................. 64
Specifications ...................................................... 65Index .............................................................. 67
9

We ome
Thank you for purchasing this Sony HDTV Ready LCD TV. This manual isfor models KLV-SI9AI0, KLV-S23AI0, KLV-S26AI0 and KLV-S32AI0.
Package Contents Along with your new TV. the packaging box contains a remote control, size
AA batteries. 75-ohm coaxial cable (ferrite core attached), AC power cord,AC power adaptor (KLV-S 19A 10 only), HD 15-HD 15 cable, Support belt,securing screw, wood screw, Operating Instructions, Quick Setup Guide,Leaflet (Installing the Wall-Mount Bracket, KLV-SI9AI0 only) andwarranty card.See page 66 for the quantity of each supplied accessory.
Features Some of the features that you will enjoy with your new TV include:
[] WEGA GATE: WEGA GATE is a new feature that allows you to easilynavigate to the most convenient TV functions: favorite channels, TVchannel list, external input list, or settings.
[] CineMotion®: Provides an optimized display by automaticallydetecting film content and applying a reverse 3:2 pulldown process.Moving pictures will appear clearer and more natural-looking.
[] Wide Screen Mode: Watch conventional 4:3 aspect ratio broadcasts inwide screen (16:9) mode.
[] Favorite Channels: With the WEGA GATE function, allows you toselect from 8 of your favorite channels.
[] Steady Sound®: Equalizes volume levels so there is consistent outputbetween programs and commercials.
[] Component Video Input: Offers the best video quality for DVD (480pand 480i), and digital set-top box (1080i, 720p, 480p and 480i)connections.
[] Parental Control: V-Chip technology allows parents to blockunsuitable programming fiom younger viewers.
[] HDMI (High-Definition Multimedia Interface): Provides anuncompressed, all-digital audio/video interface between this TV andany HDMI-equipped audio/video component, such as a set-top box,DVD player, and A/V receiver. HDMI supports enhanced, or high-definition video, plus two-channel digital audio.
[] Light Sensor: Allows the picture brightness level to be optimized toambient light. The effect fiom the Light Sensor depends on the settingof Picture Mode and Power Saving. The factory setting is Of[.
[] Caption Vision/Info Banner: Allows Closed Caption and/or ChannelProgramming Information to be displayed.
10

Installing the TV
Preventing the TV
from Toppling Over
Attaching the Support Belt
Introducing the TV
1 Screw the support belt (supplied) to the TV stand with a wood screw
(supplied).
2 Attach the support belt to the stand, and screw the belt with a securing
screw (supplied) using a coin, etc.
3 Adjust the length by pulling the support belt towards you while holding
the TV stand.
_-j Be sure to take measures to prevent the TV from toppling over andcausing injury.
The supplied wood screw may not be used depending on the type of TVstand. In this case or when the secunng strength is not enoughprepare commercial screws to fit to the TV stand. Use commercialscrews of 3 to 4 mm diameter. Consult your dealer about the types ofscrew.
When Mounting on a Wall
Be sure to use the following optional wall-mount brackets to hang the TV onthe wall.
KLV-S 19A 10: SU-WLI 1KLV-S23A 10/KLV-S26A 10/KLV-S32A 10:SU-WL31
See the Instruction Guide supplied with the wall-mount blacket on how tomount the TV on the wall.
11

Introducing the TV
Bundling theConnecting Cables
You can bundle tile connecting cables as illustrated below.
1 Bundle the connecting cables.
KLV-S19A10 KLV-S23A10
KLV-S26A10 KLV-S32A10
2 Route the connecting cables through tile hook.
:S-J Do not bundle the AC power cord fo[ KLV-S23A10, KLV,S26A10 andKLV-S32A10 in the stand with other connecting cables.
Adjusting theViewing Angle of theTV
This TV can be adjusted within tile angles shown below.
Adjust the angle back and forth(tilt)
3 ° 8 °
Right view ".._-I_'
Front
Adjust the angle left and right(swivel)
Top view
15° t- 15°
15 ° 15 °
Front
_'3 When adjusting the angle ho!d the stand with one hand [_:_.
' t° avO d slipping O[ tipping th e s!and:
12

TV Controls and Connectors
Introducing the TV
Front and Top Panel
_d
[] ENTER Press to confirm the selection or setting.
[] WEGA GATE Press to display WEGA GATE. Press again to exit WEGA GATE.
[] TVNIDEO Press repeatedly to cycle through the video equipment connected to the TV's video inputs.
[] 4--- ÷ Press to adjust the vohune. In the WEGA GATE screen, these buttons serve as left/right
- VOLUME + buttous.
[] _ _ Press to scan through channels. To scan quickly through channels, press and hold down either
- CHANNEL + CHANNEL. In the WEGA GATE screen, these buttons serve as up/dov,.'n buttons.
[] POWER Press to turn on and oft'the TV.
[] (IR) Infrared Receives IR signals from the remote control.
Receiver/Light Senses room light level and adjusts the screen brightness accordingly (see page 61 for details).
Sensor Do not put anything near the sensor, as its function may be affected.
[] PIG OFF LED When lit, indicates that the Picture Off feature is activated. For details, see page 61.
[] TIMER LED When lit, indicates one of the timers is set. When the timer is set, this LED will remain lit even
if the TV is turned off. For details, see page 58.
[] POWER LED Lights up in green when the TV is turned on. If the LED blinks in red continuously, this may
indicate the display unit needs servicing (see "Contacting Sony" on page 2).
[] Speaker Outputs audio signal.
The CHANNE L + button has a tactile dot, Use it as a reference when operatingthe TV.
13

Introducing the TV
Side Panel
Left side
I
/ VDEO 2
V
I!a
VUDEO
FL/NONO}
f_
\,QO _''
Right side
[] VIDEO 2 IN Connects to the S VIDEO otltptlt jack on yotlr camcorder or other video equipment that has
S VIDEO S VIDEO. Provides better picture quality than composite video ([_).
[] VIDEO 2 IN Connect to the composite video and audio output jacks on your camcorder or other video
VIDEO/ equipment.AUDIO L
(MONO)/AUDIO R
[] Headphones Connects to your headphones. If your headphones do not match the jack, use a suitable plug
jack adaptor (not supplied). See page 49 for details.
[] PC IN (RGB IN) Connect to a personal computer's video output connector. Can be connected to other Analog
6 RGB devices Stlch as Video Conferencing or Set-top Boxes.
See "PC Input Signal Compatibility Chart" on page 52 for the signal to be displayed.
[] HDMI IN 5 HDMI (High-Definition Multimedia Interface) provides an uncompressed, all-digital
HDMI/ audio/video interface between this TV and any HDMI-equipped audio/video component, such
L-AUDIO-R as a set-top box, DVD player, and A/V receiver. HDMI supports enhanced, or high-definition
video, plus two-channel digital audio.
The AUDIO IN (L/R) of HDMI IN is for DVI connection. See page 27 for details.
14

Introducing the TV
Rear Panel
KLV-S19A10 KLV-S23A10
DC IN
% %
",.I
KLV-S26A10KLV-S32A10
(Continued)
15
Introducing the TV
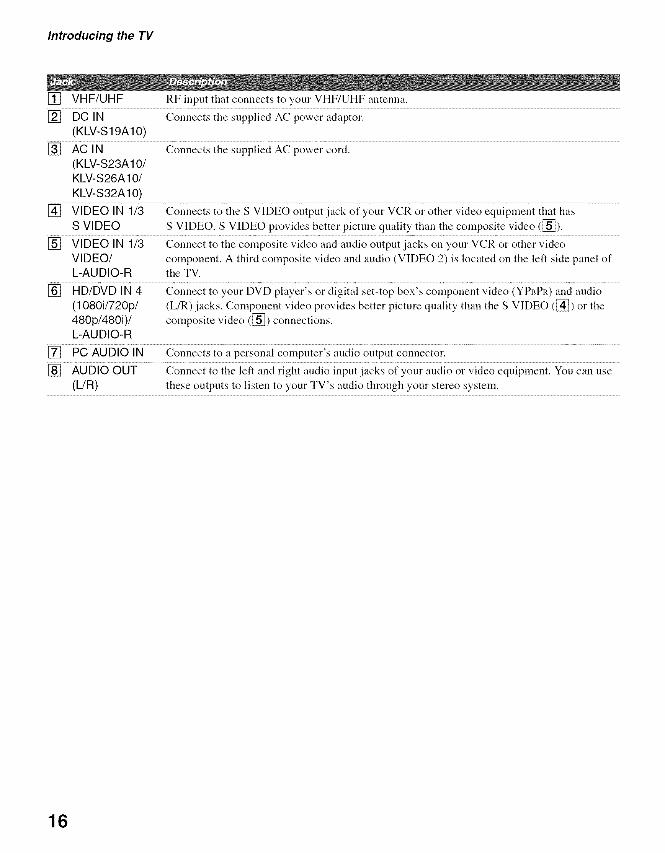
[] VHF/UHF RF input that connects to your VHF/UHF antenna.
[] DC IN Connects the supplied AC power adaptor.(KLV-S19A10)
[] AC IN Connects the supplied AC power cord.(KLV-S23A10/KLV-S26A10/
KLV-S32A10)
[] VIDEO IN 1/3 Connects to the S VIDEO output jack of your VCR or other video equiplnent that hasS VIDEO S VIDEO. S VIDEO provides better picture quality than the composite video ([_).
[] VIDEO IN 113 Connect to the composite video and audio output jacks on your VCR or other videoVIDEO/ component. A third composite video and audio (VIDEO 2) is located on the left side panel ofL-AUDIO-R the TV.
[] HD/DVD IN 4 Connect to your DVD player's or digital set-top box's component video (YPL_PR)and audio(1080i1720p1 (L/R) jacks. Component video provides better picture quality than the S VIDEO ([_) or the480p1480i)1 composite video ([_]) connections.L-AUDIO-R
[] PC AUDIO IN Connects to a personal computer's audio output connector.
[] AUDIO OUT Connect to the left and right audio input jacks of your audio or video equipment. You can use(L/R) these outputs to listen to your TV's audio through your stereo system.
16

To display clear crisp pictures, first you must connect your TV correctly and
also need to choose the correct display format (see "Changing the wide
screen mode" on page 38). It is strongly recommended to connect the
antenna using the supplied 75-ohm coaxial cable to receive optimum picture
quality signal. A 300-ohm twin lead cable can be easily affected by radio
noise and the like, resulting in signal deterioration. [fyou use a 300-ohm
twin lead cable, keep it as far away as possible from the TV.
Making Video andAudio Connections
Your TV includes several types of video inputs. When connecting your TV,use the inputs that are available on your devices that provide the best videoperformance, as described below.
Best VideoPerformance
H_mi HDMI No(High-Definition Multimedia Interface)
@ @ @ Component video,_ p_ po (480i/480p/720p/1080i) Yes
woEo@ S VIDEO L-AUDIO-R
..... @ Composite video
RF/Coaxial No
.S_ When You connect video equipment to both the VIDEO and the S VIDEO input jacks,make sure Auto YC in the Setup settings is set to On to view the S VIDEO input (seepage 61).
o
".-.I
17

ConnecUng_e TV
Basic Connections
Cable System orVHF/UHF Antenna
System
Cable or VHF only or VHF/UHF75-ohm coaxialcable __ Rear of TV
VHF/UHF jack
From tile Channel settings, select Cable On o1:Cable Off tbr your type ofinput signal.
.'S-?A ferrite core is factory attached to the supplied 75-ohm coaxial cable.Do not detach the ferrite core from the coaxial cable.
,Z'2_The ferrite core is attached to one end of (not the center of) the supplied75-ohm coaxial cable. When connecting the cable to the TV, insert theend with the ferrite core into the VHF/UHF jack;
Cable Box/DigitalCable Box
"_° The supplied remotecontrol can beprogrammed to operateyour cable box (see"Programming the RemoteControl" on page 34).
"_° To change channels usingthe cable box, set your TVto channel 3 or 4depending on the cablebox channel output.
"_° If you will be controlling allchannel selection throughyour cable box, considerusing the Channel Fixfeature to set your TV tochannel 3 or 4 (see page53).
Use this hookup it."[] You subscribe to a cable TV system that uses scrambled or encoded
signals requiring a cable box to view all channels, and
[] You do not intend to hook up any other audio or video equipment to
your TV.
1 Connect the coaxial connector from your cable service to the cable
box's [N jack.
2 Using the supplied 75-ohm coaxial cable, connect the cable box's OUT
jack to the TV's VHF/UHF jack.
7S-ohm coaxialCable cable
Rear of TV
_" VHF/UHF jackt 2
IN _ OUTjack jack
Cable box
Also, set Cable to On in the Channel settings (see page 53).Notes on Using This Connection
Use the cable box/digital cable Tulle the TV to the channel the cable box is set to and then use the cable box tobox switch channels.
Set up the remote control to Program the remote control. See "Programming the Remote Control" on page 34.operate the cable box/digital cablebox
Activate the remote control to Press SAT/CABLE (FUNCTION).operate the cable box/digital cablebox
C'oi_troi c;;gie box/_iigitai cable gee _Operating a Cabie gox;; on page 361box functions with the remotecontrol
Prevent the accidental switching When using the cable box, you need the TV to stay on the channel the cable box is setof TV channels to. You can use the TV's Channel Fix feature to lock in a specific channel. For
details, see "Using the Channel Settings" on page 53.
18

Connecting the TV
Satelfite Receiverand Cable/Antenna
"_° If you connect the DigitalSatellite Receiver withcomponent video cables,see page 20.
This scenario shows a SAT Box connected through the video inputs and theCable/Antenna connected through the VHF/UHF input. Satellite signals areselected by the SAT Box through the video inputs while TV signal isselected by the TV tuner.To connect a satellite receiver
1 Connect the satellite antenna cable to the satellite receiver's satellite
input jack.2 Use an A/V and S VIDEO cables to connect the satellite receiver's
AUDIO and S VIDEO output jacks to the TV's AUDIO and S VIDEOinput jacks (VIDEO 1 or 3).
3 Connect the supplied 75-ohm coaxial cable fiom the antenna to theTV's VHF/UHF input jack.
4 Run the Initial Setup program, as described in "Setting Up the ChannelList" on page 30.
._lf your Satellite receiver is not equipped with S VIDEO, useaVIDEO cable (yellow) instead of the S VIDEO cable.
o
".,t
75-ohm coaxial 3cable
_. Rear of TV
S VIDEO cable .... ....
." S VIDEO .............. .....-* --_I_ ......................
VIDEO _ WDEO}
(ye,ow) ...... ......._ MONO
AUDIO-L ..............)x,Y _, ,_ _ i Au_'o .........AN c_able (white) _ _i _ ::
AUDIO-R ......................./ _ :: ,,(red) I _: :i [ " ;::::t};
Notes on Using This Connection
Watch the satellite receiver Press WEGA GATE to select the Satellite input (Video 1, 2 or 3) inthe External Inputs list.
or
Press TVNIDEO repeatedly to select the satellite receiver input
(Video 1,2 or 3).
Set up the remote control to operate the satellite You must program the remote control. See "Programming thereceiver Remote Control" on page 34.
Activate the remote control to operate the Press SAT/CABLE (FUNCTION).satellite receiver
Control satellite receiver functions with the See "Operating a Satellite Receiver" on page 36.remote control
Label video inputs to easily identify equipment See the instructions t_r setting up Label Video Inputs on page 61.connected to the TV
19

ConnecUng_e TV
lid Equipment
"_1"If your equipment has anHDMI or DVIconnector,see page 26.
Disconnect all power sources before making any connections.
1 Using a component video cable, connect your equipment's YP,PR
output jacks to the TV's YP_PI_ input jacks. Use the HD/DVD IN 4connections.
S_-3Component video (YPBpR) connection is necessary to view 480p,720p, and 1080i formats, Note that this TV displays all format types
picture in a resolution of 1,280 dots x 768 lines (KLV-S19A10)and 1;366 dots x 768 lines (KLV-S23A10, KLV-S26A10 and KLV-
S32A10).
Using an audio cable, connect your equipment's AUDIO output jacks to
the TV's AUDIO input jacks.
_ZJ The YPBPR jacks do not provide audio, so audio cab!es must beconnected to provide sound.
Component _,,,,,,,,,,,_video cable
2
Audio cable
HD Equipment withComponent Video
PB
PR
AUDIO-L(white)
AUDIO-R
(red)
Rear of TV
_ Some of the HD equipment you can connect to receive the
broadcasting signals are digital cable box, digital satellite receiverand digital TV receiver.
2O

Connecting the TV
Notes on Using This Connection
Watch the HD equipment Press WEGA GATE to select the HD equipment input (Video 4) in the External
Inputs list.
or
Press TV/VIDEO repeatedly to select the HD equipment input (Video 4).
Set up the remote control to You must program the remote control. See "Programming the Remote Control" on
operate the HD equipment page 34.
ActJv;_ie the relnote control to................Press SAT/EABLE (FUNCTION) ...............................................................................................................
operate the HD equipment
Control HD equipment functions See "Using Other Equipment with Your Remote Control" on page 36.
with the remote control ,._
Label video inputs to easily See the instructions for setting up Label Video Inputs on page 61. ""1identify equipment connected to '<
the TV
21

Connecffng_e TV
Connecting Optional Equipment
You can connect a wuiety of optional equipment to your TV. This section
provides SOlne of the individual connections you can make. For multiple
connections please refer to the Quick Setup Guide.
VCR, Cable andAntenna
"_° The most common setup isthe Cable input into theVCR Antenna IN, the VCRAntenna Out to the
VHF/UHF input.
This scenario shows a VCR with Cable signals connected through the videoinputs and the Antenna connected through the VHF/UHF input. The Cableor VCR signals are selected by the VCR through the video inputs while TV
signal (Antenna) is selected by the TV tuner.
To connect the VCR and cable
1 Connect the CATV cable to the VCR's VHF/UHF input jack.
2 Connect the supplied 75-ohm coaxial cable from the antenna to the
TV's VHF/UHF input jack.
3 Use an A/V and S VIDEO cables to connect the VCR's AUDIO and
S VIDEO output jacks to the TV's AUDIO and S VIDEO input jacks
(VIDEO 1 or 3).
4 Run the Initial Setup Program, as described in "Setting Up the Channel
List" on page 30.
_!f your VCR is not equipped with S VIDEO, use a VIDEO cable(yellow) instead of the S VIDEO cable.
CATV cable
1
75-ohmcoaxial cable '_
1rV,F/UaF
Rear of TV t......................
S VIDEO cable
A/V cable
(white)AUDIO-R
(red)
22

Connecting the TV
Notes on Using This Connection
Watch the VCR Press WEGA GATE to select the VCR input (Video 1,2 or 3) in the External Inputslist.
or
Press TV/VIDEO repeatedly to select the VCR input (VIDEO 1, 2 or 3).
Watch cable channels Press WEGA GATE to select the VCR input (Video 1,2 or 3) ill the External Inputs
list.
or
Press TV/VIDEO repeatedly to select the VCR input (VIDEO 1, 2 or 3).
Set up the relnote control to You must program the remote control. See "Programu_ing the Remote Control" on
operate the VCR page 34.
Activate the remote control to Press DVD/VCR (FUNCTION).
operate the VCR
Control VCR fimctions with the See "Operating a VCR" on page 36.remote control
Label video inputs to easily See the instructions for setting up Label Video Inputs on page 61.
identify equipment connected to
the TV
¢3o
"d
23

ConnecUng_e TV
DVD Player For best results, use this connection if your DVD player has componentvideo (YPBPI0jacks.
To connect a DVD player with component video connectors
1 Use a component video cable to connect tile DVD player's YP_PR
output jacks to the TV's YPBPR input jacks (HD/DVD IN 4).
_ The YPBPR jacks on your DVD p!ayer are sometimes labele d Y, CBand CR, or Y, B-Y and R-Y. If so, connect the cables to theirmatching color jacks.
Use an audio cable to connect the DVD player's AUDIO output jacks to
the TV's AUDIO input jacks (HD/DVD IN 4).
_Z:I The ¥PePR jacks do not provide audio, SOaudi0 cab!es must beconnected to provide sound.
2
ComtSonentvideo cable
AUDIO-L(white)
(red)
Audio cable
DVD Player
Rear of TV
24

Connecting the TV
Notes on Using This Connection
Watch the DVD player Press WEGA GATE to select the DVD player input (Video 4) in the External Inputslist.
or
Press TV/VIDEO repeatedly to select the DVD player input (Video 4).
Set up the remote control to You nmst prograln the remote control. See "Programming the Remote Control" on
operate the DVD player page 34.
Acfiv;_ie the remoie coi_trol to ................Press DVD)VCR (FUNCTION) ...............................................................................................................................
operate the DVD player e_
Control DVD fimctions with the See "Operating a DVD Player or DVD Changer" oil page 36.
remote control ,,_
Label video inputs to easily See the instructions for setting tip Label Video Inputs oil page 61. ""1identify equiplnent connected to '<the TV
To connect a DVD player with S VIDEO and audio connectors
If your DVD player does not have component video (YPBPR) jacks, or the
component video inputs are already connected to another device, use thisconnection.
1 Use an S VIDEO cable to connect the DVD player's S VIDEO output
jack to the TV's S VIDEO input jack (VIDEO 1 or 3).
2 Use an audio cable to connect the DVD player's AUDIO output jacks to
the TV's AUDIO input jacks (VIDEO I or 3).
_j If your DVD player is not equipped with S VIDEO, use a VIDEO cable(yellow) instead of the S VIDEO cable.
25
ConnecUng_e TV
HDMI-EquippedDevice
HDMI-Equipped Device
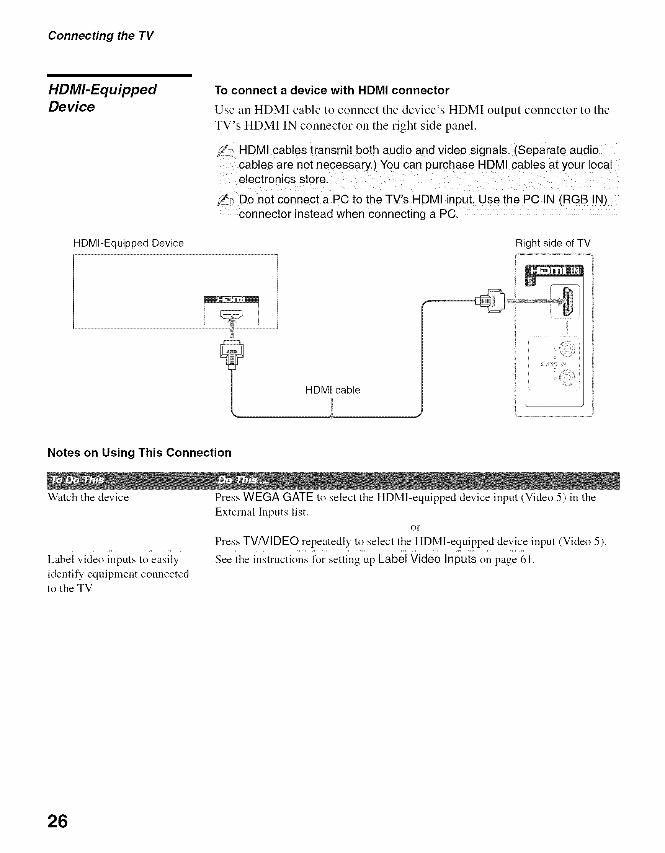
To connect a device with HDMI connector
Use an HDM[ cable to connect tile device's HDMI output connector to theTV's HDMI IN connector on the right side panel.
HDMI cables transmit both audio and video signals. (Separate audiocables are no t necessary,) You can purchase HDMI cables at your localelectronics store.
_'_ Do not connect a PC to the TV!s HDMI input. Use the PC IN (RGB IN)connector instead when connecting a PC.
Right side of TV
HDMI cable
...............................................................9
Notes on Using This Connection
Watch the device Press WEGA GATE to select the HDMl-equipped device input (Video 5) in theExternal Inputs list.
or
Press TVNI DEO repeatedly to select the HDMI-equipped device input (Video 5).
Label video inputs to easily See the instructions for setting up Label Video Inputs on page 61.identify equipment connectedto the TV
26

Connecting the TV
DVI-HDTV-EquippedDevice
To connect a device with DVI-HDTV connector
If the device does not have an HDMI connector, you can connect tile TV's
HDMI IN connector to the device's DVI-HDTV output connector using aDVI to HDMI cable.
1 Use a DVI to HDMI adapter or cable to connect the device's DVI-
HDTV output connector to the TV's HDMI IN connector on the right
side panel.
_q The DV!-HD-IV V!DEO connector does not provide audio, so audiocables must be connected to provide sound when a DVI to HDMI
adapter is used.
Do not connect aPC to the TVIs HDMI input. Use the PC !N (RGBIN) connector instead when connecting a PC.
Use an Audio cable to connect tile device's AUDIO output jacks to tileTV's AUDIO input jacks on the right side panel.
DVI-HDTV-Equipped Device
Dii
Right side of TV
o
"..-I,<
DVI to HDMI
adapter or cable
Audio cable
AUDIO-R (red)
AUDIO-L (white)
Notes on Using This Connection
Watch the device Press WEGA GATE to select the DVl-HDTV-equipped input (Video 5) in theExternal Inputs list.
or
Press TV/VI DEO repeatedly to select the DVI-HDTV-equipped device input(Video 5).
Label video inputs to easily See the instructions for setting up Label Video Inputs on page 61.identify equipment connectedto the TV
27

Connecfing_e TV
Personal Computer
"_° When connecting to anApple Macintoshcomputer, use thesupplied HD15-HD15cable to connect PC IN of
the TV to video outputconnector of thecomputer. For someApple Macintoshcomputers, it may benecessary to use anadapter (not supplied). Ifthis is the case, connectthe adapter to thecomputer beforeconnecting the HD15-HD15 cable.
"_° If the picture is noisy,flickering or not clearadjust the Phase andPitch in the ScreenSettings on page 52.
To connect a PC (personal computer)
If you connect your PC to the TV. you can watch you] personal computer'sdisplay on the TV.
When your PC is connected to the TV with the supplied HDI 5-HDI5 cable
and optional audio cable, you can view and listen to the PC's video and
audio output on the TV.
/ Right side of TV
............. ......Rear of TV
/ iiiiii i
To PC AUDIO IN jackii ii
/ i iiiiii
/ i!/ !i
////
/
To D-Sub output terminal
Audio cable .............
Audio output terminal
Notes on Using This Connection
Watch the PC Press WEGA GATE to select the PC input (Video 6) in the External Inputs list.
or
Press TVNI DEO repeatedly to select the PC input (Video 6).
Label video inputs to easily See the instructions for setting up Label Video Inputs on page 61.
identify equipment connected
to the TV
28

Connecting the TV
Camcorder or
"PlayStation "For easy connection to a camcorder or "PlayStation", the TV has left side
A/V input jacks, If you prefer, you can connect the camcorder to the TV's
rear A/V input jacks,
To connect a camcorder or "PlayStation"
Use an A/V and S VIDEO cables to connect the camcorder or "PlayStation"
AUDIO and S VIDEO output jacks to the TV's AUDIO and S VIDEO input
jacks (VIDEO 2) on the left side of panel,
/___3If your camcorder is not equipped with S VIDEO, use a VIDEOcable (yellow) instead of the S V!DEO cable.
:_j If You have a mono camcorder, connect its audio output jack to theTV's L MONO audio input jack.
"PlayStation"
o
Left side of TV
S VIDEO
VIDEOI J
(yellow)
AUDIO-L
(white)\ --------------------AUDIO-R
(red)
A/V cable
Notes on Using This Connection
Watch the camcorder or Press WEGA GATE to select the camcorder or game input (Video 2) in the External
"PlayStation" Inputs list.or
Press TVNIDEO repeatedly to select the camcorder or game input (Video 2).
Label video inputs to easily See the instructions for setting up Label Video Inputs on page 61.identify equipment connected tothe TV
29

ConnecUng_e TV
Setting Up the Channel List
After you finish connecting your TV. you need te run [nitial Setup, which
automatically sets up awtilable channels. Tile Initial Setup screen appears
when you turn on your TV tor the first time after booking it up. If you do not
want to set up the channels at this time, you can do it later by selecting the
Auto Program option in the Channel settings (see page 53).
f___The Auto Program feature does not apply for !nsta!lations that use a
The factory default setting for channel selection is Cable On. Forantenna connectionsl run the Auto Program again after selecting CableOff from the settings.
Using Initial Setup To run Initial Setup the first time you turn on your TV1 Press POWER to turn on the TV,
The Initial Setup screen appears.
2 Press 4"or • to select the on-screen display language. Then press @.
The message "First please connect cable/antenna" appears.
f_._jBy default, Auto Program is set to scan cable TV channels.
3 Press CH + to start Auto Program.
Auto Program automatically creates a list of receivable channels. Whenfinished, the lowest numbered channel is displayed. When all the receiwtblechannels are stored, the Show/Hide Channels settings appear.
To scan available VHF/UHF antenna channels instead of the cable TVchannels
1 Select Settings in WEGA GATE, then go te Channel settings.
2 Set Cable to Off.
3 Start Auto Program by pressing CH +.
To perform Auto Program again, follow the above instructions.
Depending on your signal source, be sure to set Cable to On or Off
accordingly (see page 53).
,_ The Initia! Setup menu wi!l appear each time the -rv is turned on untilyou complete the scanning for the available channels.
3O


Button Descriptions
"_° The 5 button, CH + button,m_- (Play) button andMTS/SAP button have atactile dot. Use them as areference when operatingthe TV.
[] MUTING Press to nmte the sound. Press again or press VOL + to restore
the sound.
[] DISPLAY Press once to display the current channel number, chalmel
label, time and Wide Mode settings. The OSD (on screen
display) will be canceled after a few seconds or press again to
immediately cancel the display.
[] 06WER P_&;__ep&aiLiiyio_y_ieih_oughihepo;ier_;iving;_iode_i.....SAVING Standard, Reduced, Picture Off. See Power Saving on
page 61.
[] FREE2E Press io freeze {i_e piciiirel Tt, e curreni prograi_ appe;;rs in ii_e
sub screen when freeze is selected. Press repeatedly to restore
the picture. You can use this feature to w'rite down information
such as phone numbers, recipes, etc.
..... _J S°me func!ions wil! n°t be avai!ab!e in freeze.
[] JUMP Press to jump back and forth between two channels. The TValternates between the current channel and the last channel that
v,.'as selected.
settings.
[] WEGA GATE Press to navigate to TV flmctions. See "Introducing WEGA
GATE" on page 42.
[] FONCTi6N P;&_iohave{i_ere;l_oie_on_roiope_aieii_e&luip;_eniyo{;Buttons want. See "Programming the Remote Control" on page 34.
Operating operate the video equiplnent you have programmed into the
Buttons remote control. See "Using Other Equiplnent with Your
Relnote Control" on page 36.
Rewind
I_ Play
Fast forward
|| Pause
• Stop
• Record
[] EN0 ........PreLio_ii_piXyibe iopii_enuo_you_fi_DN_RI .......................................
Press again to exit from the lnenu.
[] VOE +/= ..................................Press io actjusi it, e _,oh;;_ei .....................................................................................................................................................
32

Watching the TV
"_° The 5 button, CH + button,I_- (Play) button andMTS/SAP button have atactile dot. Use them as a
reference when operatingthe TV.
[] SOUND Press repeatedly to cycle through the sound modes: Dynamic,
Natural, Clear Voice. See "Selecting Audio Options" on
page 49.
[] PICTURE Press repeatedly to cycle through the available video picture
modes: Vivid, Standard, Pro. The video picture modes can be
also accessed in the Video settings. See "Selecting Video
Options" on page 48.
[] POWER .....................Press to iurn oi_ aria offihe TV ...........................................................................................................
[] M%/SA0 f;;;; r;p;;ie_iy io_y_i;ii_rou_hii_eMuiii:cha;mei@VSounci(MTS) options: Stereo, Auto SAP (Second Audio Program),
and Mono. The MTS setting can be also accessed in the Audio
settings. See "Selecting Audio Options" on page 49.
[] TV/VIDEO Press repeatedly to cycle through the video equipment
connected to the TV's video inputs.
:I!_ See page 61 on setting UP the video input labels,including skip function.
[] 0 : 9 EN? Press0 - 9 io seieci a channeli ihe cham_ei chimges after
seconds. Press ENT to change channels immediately.
[] iJi/;_; @ fr_;; i2i2g_; io ;_oveii_eoi_:;;re&_;ur;orl% ;eie_i;1_iie;_2press @.
[] F1 Press to select the flmction of your video equipment which is
programmed on the TV's remote control. See pages 36, 37 for
specific functions.
Press to select the function of your video equipment which is
programmed on the TV's remote control. See pages 36, 37 for
specific functions.
30, 45, 60 or 90) that you want the TV to remain on before
shutting off. To cancel Sleep Timer, press SLEEP repeatedly
until Sleep Off appears.
[] Gui DE Press io dispi@ ihe prograi_ guide of your saieiiiie progra;_provider.
[] CH +_Z Pressio scan ihrot;gh channeisl To sc;m qu;ckiy ihrough .....
chaunels, press and hold down either CH.
[] ?VJSAT .........................FirEs; io swiich beiween ihe TV ;rod {i_e saieiiiie rece;ver wi;en
FUNCTION is switched on SAT/CABLE.
(_) Press to select the sound effect modes: TruSurround,Simulated, Off. The sound effect modes can be also accessed
in the Audio settings. See "Selecting Audio Options" on
page 49.
[] WIDE Press repeatedly to step through the Wide Screen Mode
settings: Wide Zoom Normal Full, Zoom. The Wide Screen
Mode settings can be also accessed in the Screen settings. See
page 51.
:/__j GUIDE and IV/SAT buttons are function al when the SAT!CABLEfunction button is selected.
"..I
33

Watching the TV
Programming the Remote Control
Tile remote control is preset to operate Sony brand video equipment.
DVD/VCR 601 (Sony Dream System)
SAT/Cable 801 (Sony Satellite Receiver)
Follow the steps below to program your TV's remote control to operate theother video equipment.
Find the three-digit code for your equipment frolll the "Manufacturer'sCodes" listed on page 35. If more than one code number is listed, try
entering from the code listed first.
Insert two size AA batteries
(supplied) by matching the
In} and O on the batteries to
the diagram inside the
remote control's battery
conlpartnlent.
[] Press and hold the _) or _ FUNCTION button you want to
program on the remote control and press the _ button simultaneously.
The selected FUNCTION button (DVD/VCR or SAT/CABLE) willflash.
[] Enter the three-digit manufacturer's code number using the (_)-(_)
buttons while the button is lit, approximately 10 seconds.
[] Press @ button.
When the programming is correct, the selected FUNCTION button willflash twice slowly, and when not, flashes five times quickly.
To check if the code works
Aim your TV's remote control at the equipment, and press the greenPC)WE R button. If the equipment responds, the programming is completed.If not, try the next code listed.
_ If no code is input within the above specified time. or an invalid orincorrect code number is input, the remote control automatically goesback to the previous setting.
_ In some cases, you may not be able to program your remote control tooperate other equipment. In such cases, use the equipment's owrqremote control.
Dead batteries or removing the batteries may cause the programmablecodes to be lost and revert back to factory settings. Reprogramming thecodes may be necessary.
34

Watching the TV
Manufacturer's Codes
DVD Players
Sony 751
General Electric 755
Hitachi 758
JVC 756
Magna', ox 757
Mitsubishi 761
Panasonic 753
Philips 757
Pioneer 752
RCA/PROSCAN 755
Smnsung 758
Toshiba 754
Zenith 760
DVD Changers
Sony 765
Panasonic 766
DVD/VCR Combo Units
Sony 767
Citizen 332 Sharp 327, 328
Craig 302,332 Signature 2000 (M. 338, 327
Curtis Mathes 304, 338, 309 Ward)
D,,e_; io ...... 34i, 3i2, 3ii9 .......... SV20i_i .... 338 ...............................................
DBX ..............................................................................................................................................................314, 336, 337 Sylvania 308, 309, 338, 310
Dimensia 304 Symphonic 338
Emerson 319,320,316,317, Tashiro 332318,341
Fisher 330, 335
Funai 338
General Electric 329, 304, 309
Go Video 322,339, 340
Goldstar 332
Tatung 314, 336, 337
Teac 314, 336, 338 337
Technics 309, 308
Toshiba 312.311
Wards .... 327,328, 335,331,
332 _"
Hiibii..... 5682_i1423651538 Yiiiii:,li.............................3 i_2_3623_i8337 $_"
314, 336, 337 "1
jV( ......... 314_ 336£ 337, '<346, 347 Sony 230
L{3......... 332............... 226
Lx] (SEARSi 33L 36L 33623352 J_,-r;m)c. i./ 20i'2 5052 56312842
338 Motorola 205.206. 207.2(18,
Ma)nak ox................... 508'2 3092316 ....... 218, 222
Toshiba ................ 773 ......................... Maria .................................332..... Ptll ts01{ic.............................................................219', 2201 2£i ............................
Siir}is{[_g..........................774 ..........................................................Meii{orex .... 31)91335 ............... Pi{}r{ee",
]_ ..... 775............ Mi_i;iiTi 36525{i£ ........... Scienfii'icAtlmi:a 209,:21{}2211groks(£hic 776 ....... MitsuNshi#_4GA .......3232324, 325, 326 T°c°ln ...... 216, 217
P2iii_;dlic............... _77................. M_iiii_;gi_............ _ _ ..... 2_i 1{......................................................................
HDD/DVD Combo Units NEC 314, 336, 337 Satellite Receivers
Sony 770, 771. 772
5.1ch DVD AV System
Sony (DAV) 601. 602. 603. 604
Olympic 309, 308Opiiii£i; .... 327
.......................... Sony 801
Orioll 317 Dish Network 810
Pan:,sonic 308, 3{}9,306. 307 Eci],,si_.]r.............. 81{)
......... ;iEi c i:.......................................................................Philco 308, 309 Hiti{{.i_i.................... 805 .............
AV Receivers
Sony 764
VCRs
Sony 301. 302. 303
Admiral (M. Ward) 327
Aiwa* 338, 344
Audio Dynamic 314, 337
Broksonic 319, 317
Canon 309, 308
Philips 308 3( 9 31(............................. 2 ....
Pioneer 308
RCA/PROSCAN 304, 305, 3(!8,309,311,312,313,310,329
324. 338
Sansui 314
Samsung 322, 313, 321
Sanyo 33(}, 335
Scott 312, 313, 321,335,
323,324 325, 326
Hughes 8(}4
Milsubishi 809
PaiiaSoi/k., 8{53 ....
RcXM_6scX_ .... 8{i_868 ....
Toshiba 806, 807
>i_;i;!P;i';...................i............._1i;i....................'Samsung 812
* If an Aiwa VCR does not work
even though you enter the code
for Aiwa, enter the code for Sonyinstead.
35

Watching the TV
Using Other Equipment with Your Remote ControlTo operate other connected equipment with your TV. first turn to page 35
and program the necessary code. For operating video equipment, press
TV/VIDE© repeatedly until you see the video input on the screen for your
connected equipment. Remote control operation tips are provided below.
_/_ Some functions cannot be operated depending on the equipment, Inthat case, operate by the remote control supplied with the equipment.
Operating a Cable Box
Activate the remote control to operate SAT/CABLE (FUNCTION) Select a channel 0-9, ENTthe cable box Change chmmels CH +/-
Turn on/oil POWER Back to previous channel JUMP
Operating a Satellite Receiver
Activate the remote control to operate SAT/CABLE (FUNCTION) Display SAT Guide GUIDEthe satellite receiver
Turn on/off POWER Display SAT Menu MENU
Select a challnel 0-9, ENT Move highlight (ctusor) tt. I!,* ,_.
Change channds CH +/- Select ilem @
Back to previous channel JUMP Swilch between tile TV and salellile TV/SATbroadcasts
Display channel number DISPLAY
Operating a VCR
Aclivate the remole control to operate DVD/VCR (FUNCTION) Fast lorwardtile VCR Rewind tile tape "_
Turn oil/oil' POWER II (press again to l'eSulne................................................................... PauseChmage channels CH +/- normal playback)
Record I_ while pressing • Search the picture lkn-ward or backward I_ or "_ during playback...................... (release to resullle llOrlllal
Play _ playback)
Stop •
Operating a DVD Player or DVD Changer
Activate the remole control to operate DVD/VCR (FUNCTION) Step through different _ to step lorward or _ tothe DVD tracks ol the disc step backwm'd
Ttu'n on/off POWER Step through diflerenl chapters of tile OH + 1o step forward ordisc OH -to slep backward
If you have a DVD changer, F1to skip disk Select a track directly .... 0:9 ENT .......................
Play _" Display the menu (setup) MENU
Stop • Display tile top menu TOP MENU
Pause II (press again to resume Operate lhe DVD menu t, I_ 4, ,_, @normal playback)
36

Watching the TV
Operating a 5.1ch DVD AV System (Sony DAV)
Activate the remote control to operate DVD/VCR (FUNCTION) Playthe DVD Stop •
Turn on/off POWE R Pause | |
Selecl other equipnmnt connected to F1 Search the picture t_n'ward or backward _ or _ dLu'ing playbackthe DAV
Skip a disk F2 Move highlight (ctu_or) tl, t, _, _.
Pb'!"y pvp .................................................MEN ................................................................................................................................................Display the menu (_tup) MENU Chmlge volume VOL +1-, MUTING
Operating a DVD/VCR Combo Unit
Activate the remote control to operate DVDNCR (FUNCTION) Search the picture l_nward or backward _ or _ during playbackthe DVD/VCR
Turn on/off POWER Move highlighl (cursor) tt. l!, I, ,#
If you have a DVD/VCR combo component, and select (DVD) @Select the DVD F 1 ..........................................................................................................................................Select the VCR F 2 Record (VCR) liD" wtfile pressing •
Display the DVD menu MENU Chm_ge chmmels (VCR) 0-9, ENT (using tuner)
Play _ Specily the previous chapler/track CH -
Stop • Specily the next chapter/track CH +
Pause In
Operating a DVD/HDD Combo Unit
Activate tile remote control to operate DVD/VCR (FUNCTION)the DVD/HDD
Turn on/off POWER
Search the picture f<wward or backwmd _ or _ during playback
Move highlighl (cursor) tt. l!, .*, ,*.
and select @
Select tile HDD F 1 Record _ while pressing •Select the DVD F 2 .................
Specily the previous chapter/track CH -Play _ Specily the next chapter/track CH +
Stop • Display the inellll (setup) MENU
Pause |1 Display the top nlenu TOP MENU
Operating an AV Receiver
Turn on/oil POWER
Challge volunle VOL +/-, MUTING
"1
37

Watching the TV
Special Buttons on the Remote Control
Using the WideScreen Mode
"_° When the TV receives a720p or 1080i signal that is4:3 aspect ratio picture witha black bar at each side,Full returns the picture toits original size.
"_° You can also access theWide Mode settings in theScreen settings. Fordetails, see page 51.
_MODE_
4:3 Original source 16:9 Original source
(Standard definition source) (High definition source)|
_ When the TVreceives a 72op or 10801 signal, Normal cannot beselected.
Changing the wide screen mode
4:3 Original source ....16:9 Original sourceStandard definition source High definition source
I, I,Wide Zoom Wide Zoom
Normal Normal
This mode is not available
Full Full
Zoom Zoom
38

Watching the TV
Using the JumpFunction
You can change or jump between tile last two channels.
..............Previous channel
Using the FreezeFunction
"_° While the picture isfrozen, the soundcontinues to be outputnormally.
You can use this feature to write down information such as phone numbers,recipes, etc. When you press the button once, the current screen is frozenand the sub screen appears. When you press the button twice, only the frozenscreen is displayed; when you press it a third time, the normal screen returns.
FREEZE
Current program Frozen picture
Move the sub screen
with tl. ,1!._, ,1,.
To cancel the Freeze function mode
Press FREEZE until tile normal screen appears.
._ With Freeze function active, some functions are unavailab!e, such asWEGA GATE.
3"
"-.I
Using the PowerSaving Function"_" If you turn off the TV when
the Power Saving mode ison, the mode stays on nexttime you turn on the TVexcept Picture Off.
"_° You can set the PowerSaving mode to on usingthe settings screen.Select Power Saving inthe Setup settings, thenset it to Standard orReduced.
"_° When Picture Off isselected, the PIC OFFLED lights.
You can reduce tile power consumption of tile TV.
POWERSAVNG
To cancel the Power Saving mode
Press POWER SAVING repeatedly until "Power Saving: Standard"appears.
39

Watching the TV
Using the SleepFunction
You can set the TV to turn off automatically after a predetermined period oftime (15, 30, 45, 60, or 90 minutes).
"_° If you turn the TV off, andthen turn it on again, theSleep timer returns toSleep Off.
"_° "TV will turn off soon"appears one minutebefore the TV shuts off.This message may notappear if you areperforming otheroperations in the settings.
"_° You can set the Sleeptimer to on using theClock/Timers settings.Select Sleep in theClock/Timers settings,then set it to 15, 30, 45,60, 90 or Off.
SLEEP
While the Sleep timer is actiw_ted, the TIMER LED on the TV lights up inred.
To cancel the Sleep timer
Press SLEEP repeatedly until Sleep Offappears or turn the TV power to offthen turn on the TV again.
40


Overview of WEGA GATE
WEGA GATE provides one button access tbr controlling your TV. It enablesyou to perform a variety of tasks intuitively with a control panel on thescreen rather than a variety of remote control button presses.When you press the WEGA GATE button, you can pertbrm basic TVoperation: your titvofite channels, watching TV, images from externalequipment or setting menus.
1 Press WEGA GATE on the remote,
WEGA GATE control panel appears.
2 Press tl./I!, to highlight the item.
3 Press @ to select.
Press WEGA GATE to exil
42
Introducing WEGA GATE
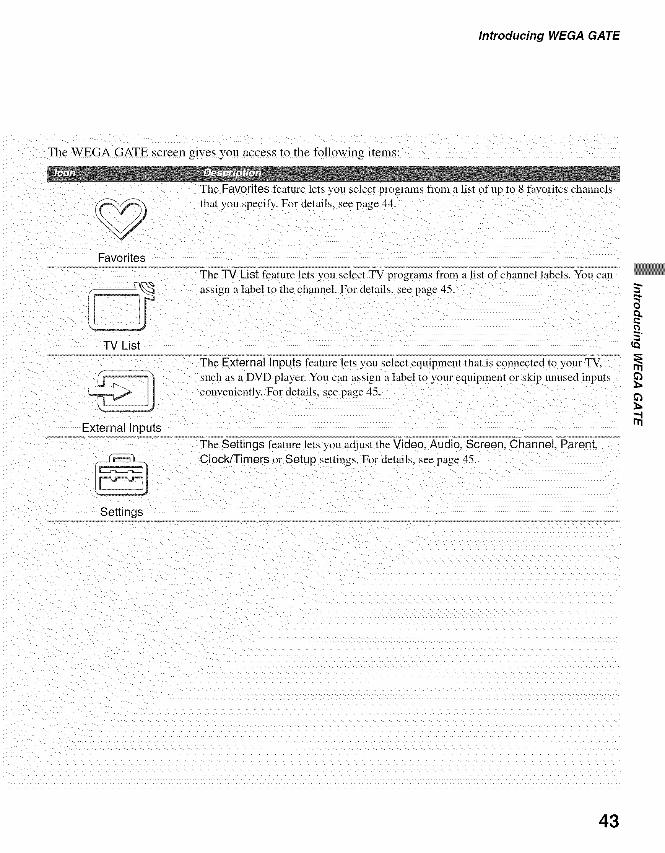
The WEGA GATE screen gives you access to the following items:
The Favorites feature lets you select programs from a list of up to 8 favorites channels
v_ that you specify. For details, see page 44.
Favorites
(
TV List
External Inputs
Settings
The TV List feature lets you select TV programs from a list of channel labels. You can
assign a label to the ch_mneL For details. ,_ee page 45.
The External Inputs feature lets you _elect equipment that is connected to your TV.
such as a DVD player. You call assign a label to your equipment or skip unused inputs
convemently. For details, see page 45.
The Settings feature lets you adjust the Video. Audio. Screen. Channel. Parent.
Clock/Timers or Setup settings. For details, see page 45.
5"
_b
.I
43

Introducing WEGA GATE
Navigating and Select
Use your remote control to navigate through WEGA GATE and the settings.
Display WEGA GATE control panel Press WEGA GATE.
Display Settings Press WEGA GATE and select Settings.
Move through Settings Press tl. ,1!.I, ,,_.
Select an option to change Press @.
Move back to upper layer Press RETURN or select Return in the settings.
Select (confirm) changed setting
ExitWEGA GATEcontrol panel or Settings Press WEGA GATE.
Using Favorites in WEGA GATEThe Favorites feature lets you select progralns froln a list efup to 8 favoritechannels that you specify. You can create a list using the Add to Favoritesoption.
1 Select Favorites from the WEGA GATE control panel and press @.
The Favorite Channels list appears. Make your selection.
!)ii ii_
Press _1_, to highlight the desired channel and press @.
• To add the current channel to the list of Favorite Channels, highlight
Add to Favorites and press @.
• When the Favorite Channels list is full, remove a channel from yourlist using Favorite Channels in the Channel settings and try again.(see page 53)
44
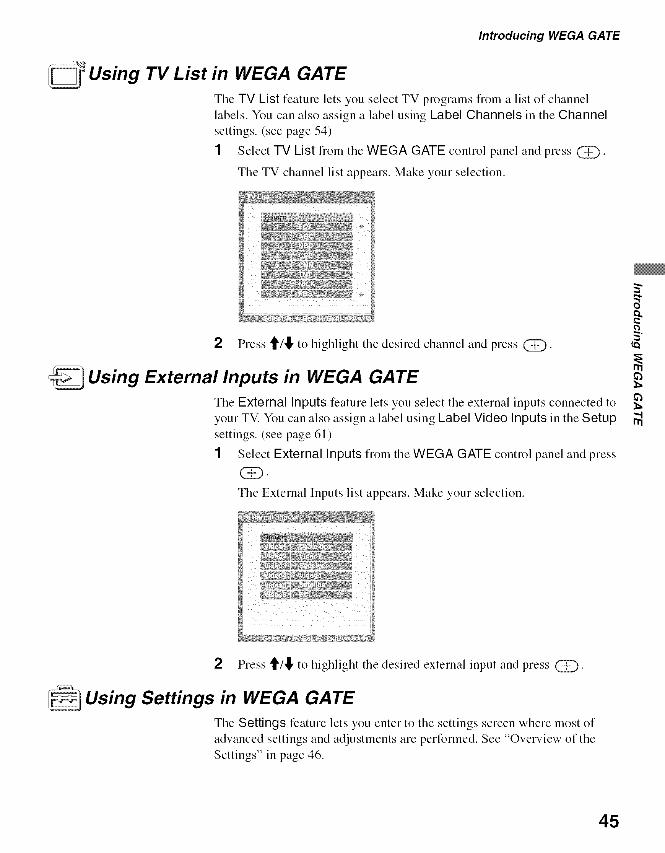
Introducing WEGA GATE
I_ Using TV List in WEGA GATEThe TV List feature lets you select TV programs fl'om a list of channellabels. You can also assign a label using Label Channels in the Channelsettings. (see page 54)
1 Select TV List from the WEGA GATE control panel and press @.
The TV channel list appears. Make your selection.
2 Press _/_, to highlight the desired channel and press @. _"
_ Using External Inputs in WEGA GATE
The External Inputs feature lets you select the external inputs connected to :_your TV. You can also assigna label using Label Video Inputs in the Setup r_settings. (see page 61)
1 Select External Inputs floln the WEGA GATE control panel and press
(D.
The External Inputs list appears. Make your selection.
++ ++++ _++ ;++++ +++%++_,++,+
2 Press _/_, to highlight the desired external input and press @.
Using Settings in WEGA GATEThe Settings feature letsyou enter to the settings screenwhere most ofadwmced settings and adjustments are performed. See "Overview of theSettings" in page 46.
45

Overview of the SettingsTile Settings provides you access to tile following features:
Video CineMotion (page 48)
Black Corrector (page 48)
R_: NR (pages 48)Picture:
4o Backlight (pages 48)
Hue: 0 _
:_larpr/ess _J
_or}/leMotL _1 :
r_)_kc_i _ _.....Mediun/
...... Max _iiiiiii,lii_i:_il
Picture Mode (page 48)
Reset (page 48)
Picture (page 48)
Brightness (page 48)
Color (page 48)
Hue (page 48)
Sharpness (page 48)
Color Temp. (page 48)
Audio Sound Mode (page 49)
Reset (page 49)Treb,e(page................. Bass (page 49)
Balance (page 49)
Steady Sound (page 49)Effect (page 49)
MTS (page 49)
Speaker (page 50)
Audio Out (page 50)
Screen Wide Mode (page 51)
4:3 Default (page 51 )
Overscan (page 52)
V Center (page 52)H Center (page 52)
Phase (page 52)
Pitch (page 52)
Reset (page 52)
Channel Favorite Channels (page 53)
Cable (page 53)
Channel Fix (page 53)
..... Auto Program (page 53)
Show/Hide Channels (page 54)Label Channels (page 54)
46

Using the Settings
Parent Lock (page 55)
Sdect Country:
Select Country (page 55)Change Password (page 55)
Clock/Timers Sleep (page 58)Timer 1 (page 58)Timer 2 (page 58)Current Time (page 59)
Setup ..............................................................................................................................................capiion Vision (page 60) _"Info Banner (page 60)Label Video Inputs (page 61)Language (page 61)Auto YC (page 61)Power Saving (page 61)Light Sensor (page 61)
47

Using the Settings
Using the Video SettingsTo select the Video settings
1. Press 2. Select 3. Highlight 4. Press
WEGA GATE Settings Video re select
girlie (23 TV
Reset: Standard
'_ Picture Pro
Color: 60 w ¸_*_Hue: 0 _ _,_,_
_ Sharpness: 18 __'SJ Color Tern#,: Coo_
B}_k Correcter: On
_j NR: Medium_ Back/igh_: Max
To exit the Video settings, press { L0 i. - ..............................................
Selecting VideoOptions
"_° To change from onePicture Mode to another,use PICTURE on theremote control.
"_° You can alter the PictureMode options (Vivid,Standard, Pro) for eachvideo input (including theTV antenna input).
"_° You can alter the Videosettings (Picture,Brightness, Color, etc.) foreach Mode.
"_° Color, Hue, Sharpness,CineMotion, BlackCorrecter and NR are notavailable for PC input.
Tile Video settings includes tile following options:To highlight an option and to change settings, press tl. I!,_, *.
Press @ to confirm the selection.
Picture Vivid Select for enhanced picture contrast and
Mode sharpness.
Custonliz, ed Standard Select for standard picture settings.
pictl_re viewing Recommended for home entertainment.
Pro Select for professional monitor like appearance
settings.
Reset Reset all settings and adjustments to the default setting for each
Picture Mode (Vivid, Standard, Pro) (except for the options
grayed out).
Picture Adiust to increase picture contrast, or decrease picture contrast.
Brightness Adjust to brighten or darken the picture.
Color Adjust to increase or decrease color intensity.
Hue Adjust to increase or decrease the green tones.
Sharpness Adjust to sharpen or soften the picture.
Color Temp• Cool Select to give the white colors a bluish tint.
White adju._tment Neutral Select to give the white colors a neutral tint.
Warm Select to give the white colors a reddish tint•
CineMotion Provides an optimized display by automatically detecting fihn
content and applying a reverse 3-2 pulldown process. Moving
pictures will appear clearer and more natural-looking.
Black Correcter Select On to enhance the black colors to give the picture strong
contrast.
NR Select to reduce the noise level of connected equipment. It is
(Noise also effective on the signal from the VHF/UHFjack. Select from
reduction) High, Medium, Low and Off.
Backlight Adjust to brighten or darken the backlight.
48

Using the Settings
Using the Audio SettingsTo select the Audio settings
1. Press 2. Select
WEGA GATE Settings
3. HighlightAudio
Reset: Natural4. Pre_ Treble: Clear Voice /
10 select 12 Bass: _ ........
}_.; Balance: O _........... S_eady Sound: Off_" Effect: Oft
-[-_%_ ._{, MT_: Stereo2P_ Speaker: On
©To exit the Audio settings, press _.
Selecting AudioOptions
"_° To change from one SoundMode option to another,use SOUND on the remotecontrol.
"_° Treble, Bass and Balanceare adjustable when theAudio Out option is set toVariable.
"_° Sound Mode settings areindependent of Treble/Basssettings.
"_° To change from one Effectoption to another, use(0) on the remotecontrol.
"_° To change from one MTSoption to another, useMTS/SAP on the remotecontrol.
"_° MTS is not available whenVideo, Component, HDMIor PC input is selected.
Tile Audio settings includes tile following options:To lliglllight an option and to change settings, press • • * *.
Press @ to confirm tile selection.
Sound Mode Dynamic Select to enhance treble and bass.
Cu,_tomiz,ed Natural Flat setting.
soundlL_reni,lg Clear Voice Suitable for Spoken dialogue. .................................................................
Reset Reset the following settings; Treble, Bass and Balance to thedefault setting.
Treble Adjust to increase or decrease higher-pitched sounds.
Bass Adjust to increase or decrease lower-pitched sounds.
Balance Adjust to emphasize left or right speaker balance.
Steady Sound Auto Select to stabilize the volume.
Off Select to turn off Steady Sound.
Effect TruSurround Select t_r surround sound (for stereo programsonly).
Simulated Adds a snrround-like effect to mono programs.
Off Select t_r normal stereo or mono reception.
MTS Stereo Select for stereo reception when viewing a
Enjoy stereo, program broadcast in stereo.
bilingual and Auto SAP Select to automatically switch the TV to second
mono programs' audio programs when a signal is received. If no
SAP signal is present, the TV remains in Stereo
lnode.
Mono Select for mono reception. Use to reduce noise
during weak stereo broadcasts.
-g.
(Continued)
49

Using the Settings
"_° Headphones are off whenthe Speaker option is set toOff.
"_° Variable in Audio Outoption is available onlywhen the Speaker option isset to Off.
Speaker On Select to turn on the TV speakers.
Off Select to turn off the TV speakers and listen to
the TV's sound only through your external audio
receiver and speakers.
Audio Out Variable The TV's speaker are turned off, and the audio
Ea,_y control qf output from your audio system can still be
vohtme controlled by the TV's remote control.
adfl_s'tment_s Fixed The TV's speakers are turned off and the audio
output of the TV is fixed. Use your audio
receiver's remote control to adjust the volume
(and other audio settings) through your audio
system.
5O

Using the Settings
Using the Screen SettingsTo select the Screen settings
1. Press 2. Select
WEGA GATE Settings
3. HighLight 4. Press
Screen to select
#¢fd_ M(Cde: Wide Z_r4:3 Defaull Normal
FullZoom
To exit the Screen settings, press _ #_÷_,_®!_!se}N Bac_;NEx!t
Selecting ScreenOptions"_° To change from one Wide
Mode option to another,use WIDE on the remotecontrol.
"_," For Wide Zoom and Zoommodes, you can adjust thevertical position of thepicture. For details, seepage 52.
"_° Normal, Full1 and Full2 areavailable for Wide Mode
when PC input is selected.
"_° 4:3 Default functions onlywhen the TV receives 480ior 480p signals.
"_° If 4:3 Default option is setto anything but Off, theWide Mode settingchanges only for thecurrent channel. When youchange channels (orinputs), Wide Mode isautomatically replaced withthe 4:3 Default setting for4:3 sources. To retain thecurrent Wide Mode settingas channels and inputs arechanged, set 4:3 Default toOff.
Tile Screen settings includes tile following options:To highlight an option and to change settings, press tH!,_, *.
Press @ to confirm the selection.
Wide Mode Wide Zoom Select to enlarge to fill screen with mininaunaSeh'_t a WMe distortion.
Mode to use for Normal Select to display 4:3 picture in original size
4:3 sour_e_ when the original source is 4:3 (Standard
definition source).
Full Select to enlarge the original picture
horizontally to fill the screen when the original
source is 4:3 (Standard definition source). When
the original source is 16:9 (High definition
source), select this mode to display 16:9 picture
in original size.
Zoom Select to enlarge the original picture without
distorting the aspect ratio.
4:3 Default Wide Zoom Select to enlarge the 4:3 picture to fill the 16:9
Select the ch!#mlt screen, keeping the original image as nlnch as
Screen Mode to possible.
u_efi_r 4:3 Normal Select to return the 4:3 picture to its original
soun e_s size.
Full Select to enlarge the 4:3 picture horizontally
only, to fill the 16:9 screen.
Zoom Select to enlarge the 4:3 picture horizontally and
vertically to an equal aspect ratio that fills the
16:9 screen. Useful for watching Letterbox
movies.
Off Select to continue using the current Wide Screen
Mode setting when the channel or input is
changed.
_ Not available for PC input.
(Continued)
-g.
51

Using the Settings
"_" 4:3 Default and Overscanare not available for PCInput.
"_,"The setting of V Center andH Center can be between- 50 and + 50 for PC input.
"_° H Center feature is useful ifTV is connected to gameequipment.
"_° Adjust Phase and Pitchwith Wide Mode set toNormal.
Overscan Normal Displays a standard size picture.
+1/+2 Allows you to adjust the viewable picture area
size. This is useful for viewing ticker tape or
banners at the top or bottom of the screen.
......................... S_ Not avai!ab!e fo r PC inpu t. .................. ......... .....
V Center Allows you to move the position of the picture up and down in
(Vertical Center) the window. Available only in Wide Zoom and Zoom modes.
Press tt/!l, and press @ to choose a correction between +10
and -10 (Zoom mode), and +10 and -10 (Wide Zoom mode).
H Center Allows you to move the position of the picture left and right in
(Horizontal the window. This function allows for horizontal ac[justment of
Center) the picture being displayed.
Phase Adjust after Pitch to fine tune overall sharpness.
_ Available only for PC input.
Pitch Adjust uneven sharpness on screen.
Reset Clear Wide Mode, V Center, H Center, Phase and Pitch
adjustmeuts you made to the factory settings.
,_ Available only for PC input.
PC Input Signal Compatibility Chart
Resolution.................................................................................................................................. Horizontal frequency Vertical VEGA standard
Signals Horizontal × Vertical (kHz) fiequency (Hz)
........ (P!xe!! .......................................... !L!!,e) ...................................................... .............................
VGA 640 x 48(1 31.5 60 *
64ii .... >_ 48i) .....................37.9 73 _ .......
............. d4[i .... x ........ 4g0 ........................ 37.5 75 _ ....
720 × 4(X} 31.5 7(1
SVGA.... 8ii[i x ....... 6[XJ .................... 35.2 56 _ .....
...... 80ii ......... x ..... 60e ....................................... 37.9 60 7 ....
..... 8()(i ................ ...... 6i:_ .............................................................46.9 75 7
......................................_d6.........................................x..................................................g_) ....................................................................................................................................................................................................................48.1 72 _ ......................................
xGA i()24 .... _ 768 ...................... 48.4 60
...................i65_...................................................................%g...........................................................................................................................................................56.5 7o 7 ......................iii24 ....... ..... 768 .................................................................................................................................6(1 75
WXGA.......... J280 ...... x ...... ;768 .................... 47.4 60
.... J580 .................... ...................... 768 ................................................47.8 60 _ ...........
...........................i58() ..................... Y ...................................;768 .......................................................................................................................................................................................................................60.3 75 _ .....
............ i361J ........................................ 768 .....................................................................................47.7 60 _ ......................
• : Corresponding to the VGA signal
_:j Th s TV does not support Sync on Green or Compos te Sync
#¢Z-3If a signal other than in the above chart is input, it may not be d splayed properly or may not be displayedas You seL
:'.f'-2 Using the Vertical frequency (Hz) of the personal computer at 60 is recommended.
52

Using the Settings
Using the Channel SettingsTo select the Channel settings
1. Press 2. Select
WEGA GATE Settings
3. Highlight 4. PressChannel to select
Ch_-el.............................. (D TVFavorite Channels
('_ Cha_/f_el Fix! O11
i: A_to Program:_Z.:_' Show/Hid_ Cha_rlels
Label Chahnel_
To exit the Channel settings, press . .........................................................
Selecting ChannelOptions
"_° Also, you can access theFavorite Channels list onthe WEGA GATE controlpanel.
The Channel settings includes tile following options:To llighlight an option and to change settings, press _, *.
Press @ to confirm tile selection.
Favorite Lets you set up a list of up to 8 of your favorite channels.
Channels 1 Press @ to select Program.
2 Press t1./'!" to highlight a Favorite Channel number (1-8)
which you want to make your Favorite Channel, then press
@ to select it.
Press tt/!l, to scroll through the channels until you find the
channel that you would like to edit and then press @ toselect it.
4 To select other Favorite Channel numbers, repeat steps 2-3.
5 Press I. to return to the Channel settings, or press WEGA
GATE to exit Settings.
Cable On Select if you are receiving cable channels with a
CATV cable.
Off ........... _seiect if you are using antenna. .....
_You should run Auto Program alter changing thecable setting,
Channel Fix Off Turns off Channel Fix.
Us@d _Ilen you 2-6 Select one of these channels if something is
have a cable box counected to the VHF/UHF jack.or a ,satellite
Video 1,4 Use this setting if you have connected theFd( ¢c!i£'dl"
cotmected equipment to the A/V input jacks.
Auto Program Automatically sets up the channel list on the TV for all
receix, able channels.
-g.
(Continued)
53

Using the Settings
"_° Channels that you set to behidden can be accessed
only with the 0-9 buttons.
"_° Also, you can access theTV channel list on theWEGA GATE controlpanel.
Show/Hide Allows you to show or hide channels that appear when you useChannels the CH +/- buttons.
1 Press tl,/I!, to scroll through the channels until you find the
channel you want to show or hide. Then press @ toselect it.
2 Press tl./,I, to determine if the channel will be shown or
hidden.
3 To show or hide more channels, repeat steps 1 and 2.
4 Press I. to return to the Channel settings or press WEGA
GATE to exit Settings.
Label Channels Allows you to assign labels (such as station call letters) to
channel nmnbers.
1 Press tl./,_ to scroll through the channel nmnbers. Then
press @ to select the channel number that you want to
assign a label.
2 Press tl, 4!,I- * to highlight Label and press @.
3 Press tl./I!, to scroll through the label characters (A-Z, 0-9,
etc.). Then press @ to select the highlighted character.
Repeat to add tip to 5 characters to the label.
4 To assign labels to more channels, repeat steps 1-3.
5 Press I. to return to the Channel settings, or press WEGA
GATE to exit Settings.
54
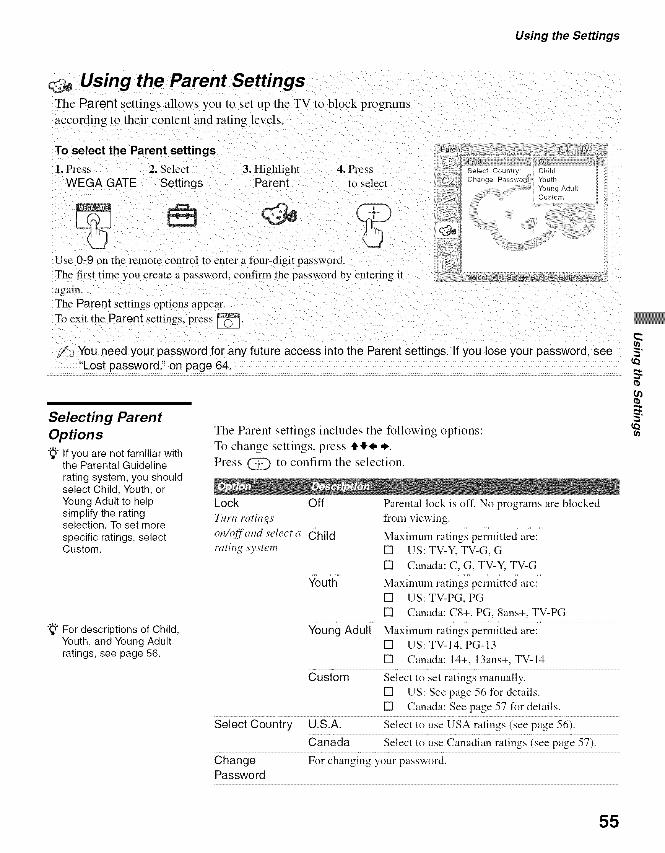
Using the Settings
Using the Parent SettingsThe Parent settings allows you to set up the TV to block programs
according to their content and rating levek
To select the Parent settings
1. Press 2. Select 3. Highlight 4. PressWEGA GATE Settings Parent to select
Use 0-9 on the remote control to enter a four-digil password.
The first time you create a password, confirm the password by entering it
again.
The Parent settings options appear.
To exit the Parent settings, press _.
Q 7",¢
Of_
Child
uum
dung _llul[
Custorr
(Z_'_3You need your password for any future access into the Parent settings. If you lose your password, see _"
•Lost password." on page 64. "_
Selecting ParentOptions"_° If you are not familiar with
the Parental Guidelinerating system, you shouldselect Child, Youth, orYoung Adult to helpsimplify the ratingselection. To set morespecific ratings, selectCustom.
"_° For descriptions of Child,Youth, and Young Adultratings, see page 56.
Tile Parent settings includes tile following options:To change settings, press ,i,,!,_,*.
Press @ to confirm the selection.
Lock Off Parental lock is off. No programs are blocked
Turn rating_ from viewing.
on/qffand select a Child Maxilmnn ratings permitted are:
raring sys'tem [] US: TV-Y, TV-G, G
[] Canada: C, G, TV-Y, TV-G
Youth Maximum ratings permitted are:
[] US: TV-PG, PG
[] Canada: C8+, PC, 8ans+, TV-PG
Young Adult Maximum ratings permitted are:
[] US: TV-14, PC-13
[] Canada: 14+, 13ans+, TV-14
Custom Select to set ratings manually.
[] US: See page 56 for details.
[] Canada: Seepage 57 for details.
Select Country U.S.A. Select to use USA ratings (see page 56).
Canada Select to use Canadian ratings (see page 57).
Change For changing your password.Password
q)
55
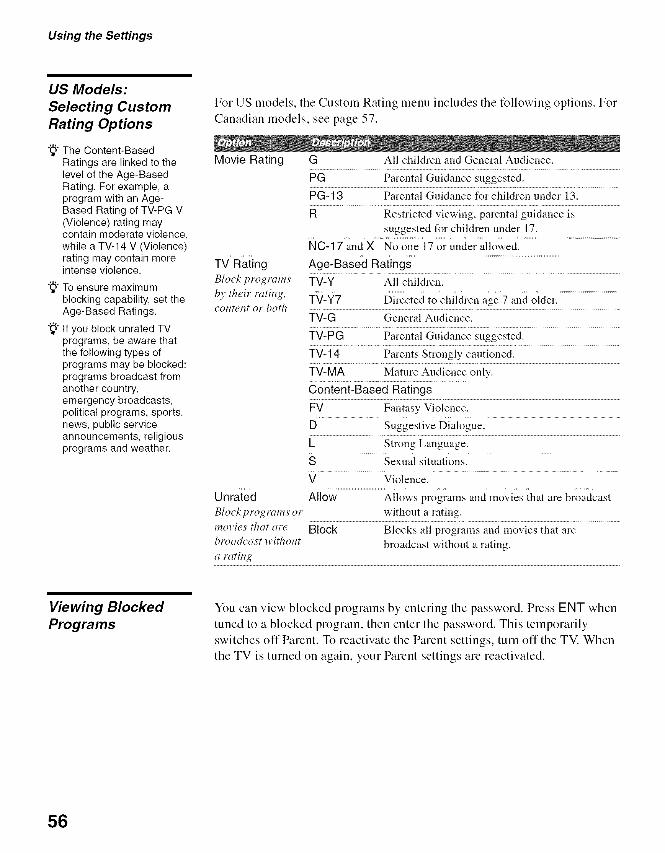
Using the Settings
US Models:
Selecting Custom
Rating Options
"_" The Content-BasedRatings are linked to thelevel ol the Age-BasedRating. For example, aprogram with an Age-Based Rating of TV-PG V(Violence) rating maycontain moderate violence,while a TV-14 V (Violence)rating may contain moreintense violence.
"_°To ensure maximumblocking capability, set theAge-Based Ratings.
"_° If you block unrated TVprograms, be aware thatthe following types ofprograms may be blocked:programs broadcast fromanother country,emergency broadcasts,political programs, sports,news, public serviceannouncements, religiousprograms and weather.
For US models, tile Custom Rating menu includes tile following options. For
Canadian models, see page 57.
Movie Rating G All children and General Audience.
PG Parental Guidance suggested.
PG-13 Parental Guidance for chiMren under 13.
R Restricted viewing, parental guidance is
suggested for children under 17.
NC-17 and X No one 17 or under allowed.
TV Rating Age-Based Ratings
Block t_rograms ' TV-Y All children.
b), their ratit_g, TV-Y7 Directed to children age 7 and okter.Colltcnt of both .................
TV-G General Audience.
TV-PG Parental Guidance suggested.
TV-14 Parents Strongly cantioned.
TV-MA Mature Audience only.
Content-Based Ratings
FV Fantasy Violence.
D Suggestive Dialogne.
L Strong Language.
S Sexual situations.
V Violence.
Unrated Allow Allows programs and movies that are broadcast
Blockt)rogramsor ........ without a r_/t!ng. ....................................................
movies' that are Block Blocks all programs and movies that are
broadca._t without broadcast without a rating.
a ratin_
Viewing BlockedPrograms
You can view blocked pregmms by entering the password. Press ENT whentuned to a blocked program, then enter the password. This temporarilyswitches off Parent. To reactiwtte the Parent settings, turn offthe TV. When
the TV is turned on again, your Parent settings are reactivated.
56
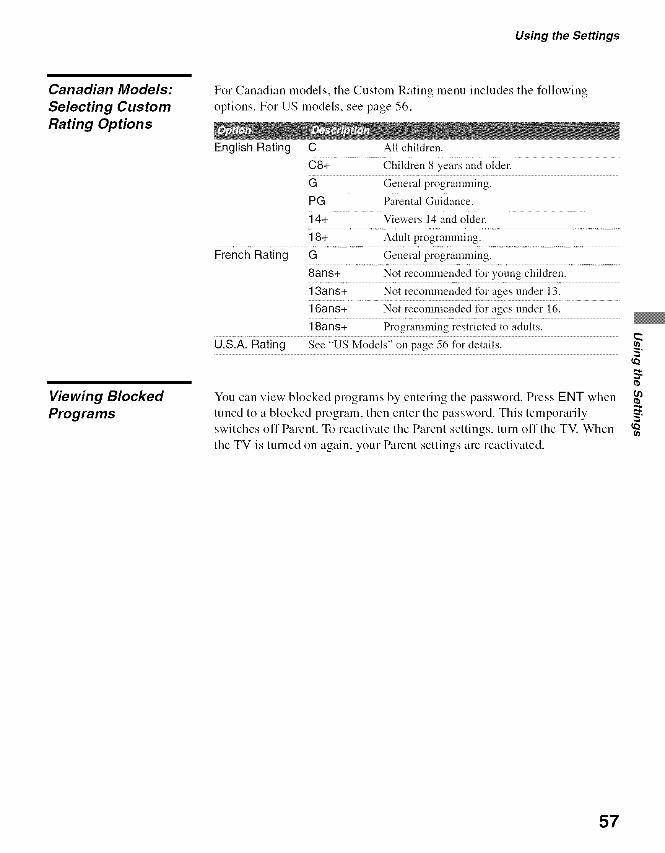
Using the Settings
Canadian Models:
Selecting CustomRating Options
Viewing BlockedPrograms
For Canadian models, tile Custom Rating menu includes the followingoptions. For US models, see page 56.
English Rating C All children.
C8+ Children 8 years and older.
G General programming.
PG Parental Guidance.
] 4+ Viewers 14 and older.
18+ Adult programming.
French Rating G General progralmning.
Sans+ Not recommended for young children.
13ans+ Not recomlnended for ages under 13.
16ans+ Not recommended for ages tinder 16.
18ans+ Programming restricted to adults.
U.S.A. Rating See "US Models" on page 56 for details.
You can view blocked programs by entering the password. Press ENT when
tuned to a blocked program, then enter the password. This temporarily
switches off Parent. To reactiwtte the Parent settings, turn offthe TV. When
the TV is turned on again, your Parent settings are reactivated.
57

Using the Settings
Q Using the Clock/Timers SettingsTo Select the Clock/Timers settings
1. Press 2. Select
WEGA GATE Settings3. Highlight 4. Pre_,,
Clock/Timers to select
z
SelectingClock/Timers
Options
"_° To return to the Timersettings after programmingone of the Timers orcurrent time, press *.
"_° Timer will be set to Offwhen:
• Auto Program is executed• Channel Fix is set• the AC power cord is
disconnected and thenreconnected to turn theTV on and the CurrentTime is displayed as
The Clock/Timers settings includes the following options:To highlight an option and to change settings, press t1.,!,_,*.
Press @ to confirm the selection.
Sleep Set the time in minutes (15 minutes,30 minutes,45 minutes, 60 minutes, 90 minutes, or Off) that you want
the TV to remain on before shutting oft" automatically.
Timer 1 You cart use the Timers to program the TV to turn on and off
Timer 2 and tune to a specific channel at two scheduled viewing times.
Timer 1 and Timer 2 are not available to be set until you setthe Current Time.
1 Press ,11./,I,to highlight Timer 1 or Timer 2. To set the
timer, press ._ or @.
2 Press tl,/!1, to highlight one of the following options, then
press @.
Set
On
Oil
Select to set the Timer by day, time,
duration, and channel.
Select to turn on the timer.
Select to turn offthe Timer. (Your
previous settings are saved.)
3 If you selected Set in step 2, press 4"/11"to set the day(s),
hour, minute, duration, and channel number. Press @
or .I, to confirm each setting and move to the next setting.
Press I. to go back to the previous setting and select On to
turn on the timer. TIMER LED on the front panel will
light, indicating the tinter has been set.
4 Press WEGA GATE to exit Settings.
58

Using the Settings
Current Time Select to set the current time (day, hour, minute, and AM/PM).
1 Press @ to select Current Time.
2 Press 11411,to set the current time (day, hour, minute, and
AM/PM). Press @ or * to confirm each setting and
move to the next setting. Press I. to go back to the previous
setting.
3 Press WEGA GATE to exit Settings.
59

Using the Settings
Using the Setup Settings
Selecting SetupOptions
Tile Setup settings includes tile following options:To highligllt an option and to change settings, press ,i. ,!. _, *.
Press @ to confirm tile selection.
Caption Vision Allows you to select from several closed caption modes (for
programs that are broadcast with closed caption).
Off Caption Vision is turned off.
CC1, CC2, Displays a printed version of the dialog or sound
CC3, CC4 effects of a program. (Should be set to CC1 formost programs.)
Textl,Text2, Displays network/station information presentedText3,Text4 using either half or the whole screen (if
available).
Info Banner Set to On or Off. When on, displays the program name (if thebroadcaster offers this service). Displays for up to four secondswhen the channel is changed or the DISPLAY button is pressed.
6O

Using the Settings
"_° If you have assignedVideo Labels, you canaccess the External Inputslist on the WEGA GATEcontrol panel.
"_° The Skip label is useful forinputs to which noequipment is connected.
"_° To change from onePower Saving option toanother, use POWERSAVING on the remotecontrol.
"_° In low light ambient therange of the backlightcontrol is reduced when
the light sensor is set toOn.
Label Video Allows you to identify A/V equipment you connected to the TV,
Inputs such as a VCR, DVD, etc. For example, if you have a DVD
player connected to the VIDEO 4 jack, you can select the label
DVD for the VIDEO 4 input. Then when you press TVNIDEO
to change inputs, the Video Label you assigned to that input
appears on screen.
1 Press tl./,I, to highlight the video input (VIDEO 1-6) to
which you want to assign a label. Then press @ to
select the input.
2 Press tl./4 to highlight one of the displayed labels. Then
press @ to select the label.
You can select from the t_llowing labels for each input:
Video 1-3 Video 1-3, VHS, DVD, Receiver, Satellite,Cable Box, 8ram, DTV, Game, LD, Beta,Skip
Video 4-5 Video 4-5, DVD, Satellite, Cable Box, DTV,HD, Game, PVR, Skip
Video 6 Video 6, PC, DVD, HD, Game, Skip
S-? If you select Skip your TV skips thi s input when you
press the TV/VlDEO button.
Language Select to display all on-screen Settings in your language of
choice: English, Espafiol, Franqais.
Au{o YC When co;mecting both x)iDE0 IN and s VIDEO INI you can
select the jack from which the TV receives the input signal. The
TV is factory set to receive S VIDEO input signals.
1 Press TVNIDEO repeatedly until the desired video input
appears.
2 Alter selecting the Auto YC option, to watch the pictures
input from the S VIDEO input jack:
Press ,1,1€. to select On, then press @.
To watch the pictures input from the VIDEO input jack:
Press t1.1!1,to select Off, then press @.
3 Press WEGA GATE to exit Settings.
Power Saving Standard Select to view' picture without the benefit ofPower Saving.
Reduced Select to view picture with reduced powerconsumption.It also enhances the black level.
Picture Off Select to turn off the picture. Audio stays onwith your selected volume setting.
Light Sensor Select On to enable the automatic brightness control. The lightsensor measures the room brightness which allows the TV toautomatically adjust the picture brightness based on tile picture
settings and the ambient room light conditions.
,__,_Be sure net to put anything around the sensor, as itsfunction may be affected.See page 13 on the sensor.
61

Troubleshooting
Trouble Symptomsand Remedies
No picture (screen not lit), no 121 If your TV does not turn on, and a red light keeps flashing, your TV may
sound, need service. Call your local Sony Service Center.
No picture.
No picture. [21 Check Power Saving settings (page 6 1).
Cannot receive any channels. [21 Make sure the power cord is connected securely.
Turn on the power of the TV.Check antenn_dcable connections.
Cannot receive upper channels 1121 Set Cable to Off in the Channel settings (page 53).
(UHF) when using an antenna, rl Perform Auto Program to add receivable channels that are not presently, in
the TV's memory (page 53).
TV is locked to one channel, rl Check your Channel Fix setting (page 53).
Perform Auto Program to add receivable channels that are not presently, in
the TV's memory (page 53).
Cannot receive any channels rl Perform Auto Program to add receivable channels that are not presently in
when using cable TV. the TV's memory (page 53).
Make sure Cable in the Channel settings is set to On (page 53).
Cannot receive or select 121 Perform Auto Program to add receivable channels that are not presently, in
channels, the TV's memory (page 53).
The TV turns off automatically. 1121 Check if the Sleep timer is activated (page 58).
No picture from some video 1121 Check the connection between the optional video equipment and the TV.
sources. 1121 Press TV/VIDEO on the remote control (page 33).
If you connect video equipment to the S VIDEO input of the TV. set Auto
YC to On in the Setup settings (page 61 ).
Press WEGA GATE on the remote control. Select your desired input from
the External Inputs list.
Poor pictm'e.
Double images or ghosts. 1121 Check antenna/cable connections.
Check the antenna location and direction.
62

Other Information
Only snow and noise appear on 1121 Check if the antenna is broken or bent.
the screen. 121 Check if the antenna has reached the end of its serviceable life. (3-5 years in
nomlal use, 1-2 years at the seaside.)
Dotted lines or stripes. 1121 Keep the TV away from noise sources such as cars, motorcycles, or hair-
dryers.
No color/Dark picture/Color is 121 Press PICTURE to select the desired Picture mode (page 33).
not correct [121 Adjust the Picture Mode options in the Video settings (page 48).
The picture is too bright. 1121 Press PICTURE to select the desired Picture mode (page 33).
Noisy picture. 1121 Make sure that the antenna is connected using the supplied 75-ohm coaxial
cable.
Keep the antenna cable away from other connecting cords.
rl Do not use 300-ohm twin lead cables as interference may occur.
No sound/Noisy sound
Good pictureln0sonnd. 1121 Check: thevohmaecoi_tmi.
Press MUTING or VOL + so that "Muting" disappears from the screen
(page 32).
Disconnect your headphones.
Set Speaker to On in the Audio settings (page 50). If it is set to Off, sound
is not outpnt from the TV's speakers regardless of the TV's vohnne control.
Audio noise. 1121 Make sure that the antenna is connected using the supplied 75-ohm coaxial
cable.
Keep the antenna cable away from other connecting cords.
Do not use 300-ohm twin lead cables as interference may occur.
Press MT$/SAP to select Mono (page 33).
Striped noise during 1121 This is caused by video head interference. Keep your VCR away from the
playback/recording of a VCR. TV.
Leave a space of 30 cm ( 11 7/8 inches) between yonr VCR and the TV to
avoid noise.
Avoid installing your VCR in front of the TV or at the side of the TV.
Cannot operate settings item. [121 If the option you wmat to select appears in a pale color, you cannot select it.
Wide Screen Mode changes 1121 The current Wide Screen Mode setting is automatically replaced with the
automatically. 4:3 Default setting when yon change the channel or video inpnt, if 4::3
Default in the Screen settings is set to other than Off. If yon want to lock in
the Wide Screen Mode selected with the VVIDE button, set 4:3 Default to
Off in the Screen settings (page 51).
Remote control does not operate. 1121 The batteries could be weak. Replace the batteries.
Check the polarity of the batteries.
Press the TV (FUNCTION) button first for TV operation.
Point the remote control at the remote control sensor of the TV.
Install the TV away from fluorescent lights.
Press FUNCTION button for corresponding device you want to control.
0
(Continued)
63

Other Information
Cannot change channels with the [21 If you are using another device to change chanuels, be sure you have not
remote control, inadvertently switched your TV from channel 3 or 4 setting. Use the
Channel Fix option to "fix" the channel based on the type of hookup
(page 53).
If you are using another device to control chanuels, be sure the FUNCTION
button for that device has been pressed. For example, if you are using your
cable box to control channels, be sure to press SAT/CABLE (page 32).
Lost password. [21 Select the Parent settings on the settings screen, then enter the following
master password: 4357. The master password clears your previous password
and allows you to enter a new password (page 55).
Contacting SonyIf. after reading these operating instructions, you have additional questions related to the use of your SonyTV. please call our Customer Information Services Center at 1-800-222-SONY (7669) (US residents only)
or 1-877-899-SONY (7669) (Canadian residents only).
Before calling Sony customer support, please write down the model and serial numbers of your TV. You'll
find this information on the fiont cover of this manual.
64

Other Information
SpecificationsTelevision system:Americ:m TV stmxlard
Channel coverage:VHF: 2-13/IJHF: 14-69/('ATV: 1-125
Antenna:
75<)hm external terminal for VHF/UHF
Screen size (measm'ed diagonally):KLV-SI9AIO: 19 inchesKLV-S23A 1O: 23 inches
KLV-$26A 1O: 26 inchesKLV-S32A IO: 32 inches
Panel System:
LCD (Liquid Crystal Display) Panel
Display resolution (horizontal × vertical):KLV-SI9AI0:1.280 clots × 768 lines
KLV-S23A I0/KLV-S26A 10/KLV-S32A 10:1.366 clots × 768 lines
VIDEO IN 1/2/3:
S VIDEO (4-pin mini DIN):
Y: l.I) Vp-p. 75 ohms unbalanced, syncnegative
C: 0.286 Vp-p/Burst signal), 75 ohmsVIDEO: 1 Vp-p, 75 ohms unbalanced, sync negativeAUDIO: 500 enVrms (l(_Y/b modulation)
hnpedance: 47 kilohms
HD/DVD IN 4:
YPI3PR(Component Video):Y: 1.0 Vp-p. 75 ohms unbalanced, sync
negativePB: 0.7 Vp-p. 75 ohms
PI(: 0.7 Vp-p. 75 ohmsSignal format: 480i. 480p, 720p, 1080i500 enVrms/I(X)% modulation)
hnpedance: 47 kilohms
AUDIO:
HDMI IN 5:
HDMI: Video: 480i. 480p, 720p, 1080iAudio:Two channel linear PCM 32. 44.1
and 48 kHz. 16. 20 and 24 bitsAUDIO: 500 mVrms (IlX)% modulation)
hnpedance: 47 kilohms
AUDIO OUT:
5(X)mVrms (10091 modulalion)
More than 1Vrms at the maximum volume setting (Variable)More than 500 mVrms (Fixed)
PC IN 6:
D-sub 15-pin, analog RGB. 0.7 Vp-p, 75 ohms, positiveSee the PC Input Signal Compatibility (!hart on page 52
PC AUDIO INPUT:
Stere() mini jack, 0.5 Vrms. I kilohm
Headphones:
Stere() mini jackhnpedance:
Speaker:
Full range:
Speaker output:
16 ohms
4 × 10 cm (1 51s × 4inches) (2)
(KLV-S 19A 101KLV-S23 A 10)
4.2× 15 cm(l 11116)< 6inches)(2)
(KLV-S26A 1O)
5.5 x 15 cm (2 1/4 × 6 inches) (2)
(KLV-S32A lI))
KLV-S 19A 101KLV-S23A 10:5 W + 5 WKLV-S26A 101KLV-S32A 10: I0 W + 10 W
Power requirement:KLV-S23 A 10/KLV-S26A 10/KLV-S 32A 10:
120 V-240 V AC. 50/60 Hz
KLV-SI9AI0:18 V DC. with AC power adaptor
AC power adaptor for KLV-Sl9A10:
Model name: AC-FDO08
Rating: Input AC 100 V-240 V50/60 Hz, 128 W
OutputDC 18V6.11A
Power consumption:In use: KLV-S 19A 10:95 W
KLV-S23AI0:110 WKLV-S26AI0:120 W
KLV-S32AI0:155 W
In standby: KLV-S 19A 10: Less than 1.3 WKLV-$23A 10/KLV-S26A I0/
KLV-S32AI0: Less than I W
Dimensions (W/H/D):KLV-SI9AI0: (with stand) 468 × 402 × 218 mm
(18 1/2 × 15 7/s × 8 5/8 inches)
/without stand) 468 × 364 × 84 mm(18 1/2 × 14 3/s × 3 3/s inches)
KLV-S23AI0:/with stand) 566 × 448 × 218 mm
(22 3/<<× 17 "_/4× 8 5/s inches)
/without stand) 566 × 411 × 89 mm(22 3/<<× 16 I/4 × 3 5/s inches)
KLV-S26AI0:/with stand) 658 × 517 × 309 men(26 × 20 3/<_× 12 I/4 inches)
/without stand) 658 × 474 × 90 mm(26× 18 3/4× 3 5/s inches)
KLV-S32A10:/with stand) 792 × 608 × 309 men(31 1/4 × 24 × 12 I/4 inches)
/without stand) 792 × 564 × 99 mm(31 1/4× 22 1/4× 4inches)
((kmtinued)
0
65

Other Information
Mass:
KLV-SI9AI0: (with stand/9.9 kg (21 lb. 14 oz.)(without stand) 6.3 kg (13 lb. 15 oz.)
KLV-S23A10: (with stand) 12.3 kg (27 lb. 2 oz.)(without stand) 8.7 kg (19 lb. 3 oz.)
KLV-S26AI0: (with stand/ 16.6 kg (36 lb. 10 oz.)(without stand) 12.8 kg (28 lb. 4 oz./
KLV-S32A10: (with stand) 20.5 kg (45 lb. 4 oz.)(without stand/ 16.7 kg (36 lb. 14 oz./
Supplied accessories:
Remote control RM-YA001 (I)
Size AA batteries (2)75<_hm coaxial cable (1)
AC power cord (1)
AC power adaptor (1) (KLV-S 19A 10 only)HDI5-HDI5 cable (1)
Support belt (1), securing screw (1) and wood screw (I)Operating Instructions ( 1)
Quick Setup Guide (11Leaflet (Installing the W:dl-Mount Bracket,
KLV-S 19A I0 only) (1)Warranty Card (1)
Optional accessories:
Headphones plug adaptorConnecting cablesWalFMount Bracket SU-WLI 1 (KLV-SI9AI0)
SU-WL31 (K LV-S23A 10/KLV-S26A 10/
KLV-S32A 101
Optional accessories' availability may dependon its stock.
Design and specifications are subject to changewithout notice.
66

4:3 Default, screen setting 515.1 Channel DVD using with
remote control 37
AAC IN ] 6Audio Out 50
AUDIO OUT jack, described 16Audio setting 46, 49Auto Program 30, 53Auto SAP, MTS setting 49Auto YC 61
Bbacklight, adjusting 48balance, adjusting 49
bass, adjusting 49bilingual audio 49black corrector 48
brightness, adjusting 48
Ccable
channel setting 53with VCR, connecting 22
cable box
using with remote control 36Camcorder connection 29
Caption Vision 10, 60CH buttons 13, 33Channel fix 53
Channel setting 46, 53channels
creating labels 54setting up 30
CineMotion 10, 48
Clear Voice, Sound Mode 49Clock/Timers setting 47, 58closed caption modes 60color, adjusting 48Cool, Color Temp. 48
DDC IN 16DISPLAY button 32
DVD playerusing with remote control 36with A/V connectors,
connecting 25DVD/VCR (FUNCTION) button
32
DVI-HDTV equipped deviceconnection 27
Dynamic, Sound Mode 49
I=effect setting 49ENT button 13, 33
External Inputs, WEGA GATE43, 45
FFl button 33F2 button 33Favorite Channels 53Favorites, WEGA GATE 43, 44
Fixed, audio setting 50Freeze 39
FREEZE button 32
Full mode, screen setting 38, 51Full l mode, screen setting 51Full2 mode, screen setting 51FUNCTION buttons 32
G
GUIDE button 33
H
14Center, adjusting 52HD/DVD IN jack (1080i/720p/
480p/480i), described 16HDMI IN jack, described 14
HDMI-equipped deviceconnection 26
Headphones jack, described 14High-Definition Multimedia
Interface (14DMI) 10
hue, adjusting 48
IInfo Banner 10, 60
Infrared Receiver (IR) 13
d, KJUMP 39JUMP button 32
LLabel
channels 54videos 61
Language, setup setting 61Light Sensor
described 10, 13setting 61
Lock, parent setting 55
MMENU button 32, 36
Mono, MTS setting 49MTS 49MTS/SAP button 33MUTING button 32
N
Natural, Sound Mode 49Neutral, Color Temp. 48Normal mode, screen setting 38,
51
Normal mode, setting 51NR (Noise Reduction 48
_Continued)
67

O
off, turning offthe TV 13on, turning on the TV 13Overscan 52
P, QParent setting 47, 55parental control, described 10Password 55PC AUDIO IN 16PC IN 14
Personal Computer connection28
phase, adjusting 52PIC OFF LED 13PICTURE button 33
Picture modes, selecting 48Picture off. power saving 61picture, adjusting 48pitch, adjusting 52POWER button 13, 33POWER LED 13
Power Saving 39, 61POWER SAVING button 32Pro mode 48
problems, troubleshooting 62-64
R
ratings, Parent setting 56-57ratings, viewing blocked
programs 56, 57Reduced, power saving 61remote control
programming 34-35RETURN button 32
S
S VIDEO jack, described 14, 16SAT/CABLE (FUNCTION)
button 32
satellite receiver, using withremote control 36
Screen setting 46, 51Select Country 55setting up channels 30
SettingsAudio 46, 49Channel 46, 53Clock/Timers 47, 58Parent 47, 55Screen 46, 51Setup 47, 60Video 46, 48
Settings, WEGA GATE 43, 45Setup setting 47, 60sharpness, adjusting 48Show/Hide channels 54
Simulated, Effect 49
Sleep 40, 58SLEEP button 33SOUND button 33
Sound modes, selecting 49speaker
turning on/off 50using external speakers 50
Standard mode 48
Standard, power saving 61Steady Sound
described 10setting 49
Stereo, MTS setting 49Support Belt 11swivel 12
T, Utilt 12
time, Clock/Timers setting 58Timer 58TIMER LED 13TOP MENU button 32
treble, adjusting 49troubleshooting 62-64TruSurround, Effect 49
turning on/off the TV 13TV (FUNCTION) button 32TV List, WEGA GATE 43, 45
TV/SAT, (O) button 33TV/VIDEO button 13, 33
V
V Center, adjusting 52Variable, audio setting 50
VCR
using with remote control 36with cable, connecting 22
VHF/UHF jack, described 16
Video setting 46, 48
VIDEO/AUDIO (L/R) jacks,described 14, 16
Vivid mode 48
VOL buttons 13, 32
W, X, YWarm, Color Telnp. 48WEGA GATE 10, 42WEGA GATE button 13, 32WIDE button 33
Wide mode 38, 51Wide Screen, described 10
Wide Zoom mode, screen setting38, 51
Wide Zoom mode, setting 51
Z
Zoom mode, screen setting 38,51
68

$R$(@)H mm
http:/!www.sonyonet/
Printed on 100% recycled paper.
Printed in Japan
2589826130