lc-1000/ lc-2000 loadout manual - systems …systemsequipment.com/download/manuals/lc1000 lc2000...
TRANSCRIPT

LC-1000/ LC-2000
Loadout
Manual
S Y S T E M SEquipment Corporation


*********************************************************************************************
All equipment is tested for proper operation before shipping from the factory. Although no difficulty is typically expected, SYSTEMS cannot guarantee and will not warrant that this product will function safely and as described, if equipment is replaced by others, if additional equipment or software is installed, or if this equipment is used for other purposes.
*********************************************************************************************


WARRANTY
Systems Equipment Corporation, hereafter referred to as SYSTEMS, warrants its
products to be free from defects in material and workmanship under normal use and
service for a period of one (1) calendar year from date of shipment from the factory.
SYSTEMS' obligation shall be limited to repairing or replacing materials, parts, or
software determined, by SYSTEMS, to be defective in workmanship or suitability of
purpose. Notice of warranty claims must be submitted by the Buyer in writing to
SYSTEMS no later than fourteen (14) calendar days following the warranty's
expiration date.
All defective products must be returned to SYSTEMS for warranty service. All
transportation and insurance costs incurred are the responsibility of the Buyer. When
a defective product is so permanently installed that it cannot be readily removed and
returned, SYSTEMS will provide repair service at the site of installation. All
transportation and lodging expenses for on-site warranty service are the
responsibility of the Buyer. All non-warranty parts and labor will be billed to the
Buyer at the prevailing on-site service rate. All repaired or replaced parts are
warranted to be free from defects of material and workmanship for a period of ninety
(90) days from the date of installation or until the termination of the original
warranty, whichever is longer.
SYSTEMS assumes no liability for consequential damages of any kind and the Buyer,
by acceptance of delivery, releases and indemnifies SYSTEMS from any liability for
the consequence of use or misuse of any of the products provided by SYSTEMS or
used in conjunction with products provided by SYSTEMS.
The foregoing warranties constitute the entire warranty and are to be held expressly
in lieu of any other verbal, implied or assumed warranties, including those which
apply to the merchantability, fitness of purpose, or promptness of delivery of
products, or any other material obligation on the part of SYSTEMS.
TERMS and CONDITIONS
Shipping: All equipment is FOB Waukon, IA USA
Payment Schedule:
All prices quoted are in US dollars. All checks submitted for payment are to be drawn on US
banks 1.5 % per month service charge on delinquent accounts.
Taxes: All taxes, levies, or duties that may result from this transaction are the sole responsibility of the buyer.
Codes:
Certification to any applicable electrical or building codes or other governing specification is the sole responsibility of the
buyer.


TABLE OF CONTENTS
Introduction ................................................................................................................................................... 1
Quick Start ..................................................................................................................................................... 3
Start Up Copyright Screen.............................................................................................................................. 5
Program Navigation....................................................................................................................................... 7
Main Operating Screen .................................................................................................................................. 9
HOT KEYS ................................................................................................................................................................................... 9
TRUCK .......................................................................................................................................................................................... 9
NET............................................................................................................................................................................................... 9
GROSS........................................................................................................................................................................................... 9
DROPS ........................................................................................................................................................................................ 11
JOB .............................................................................................................................................................................................. 11
CUSTOMER................................................................................................................................................................................. 11
SILO / SCALE............................................................................................................................................................................. 11
MATERIAL.................................................................................................................................................................................. 11
WEIGH IN / WEIGH OUT OPTIONS ..................................................................................................................................... 11
Loading—Truck Scale ................................................................................................................................. 15
ALT-L AUTOMATIC LOADING ............................................................................................................................................... 15
Messages ................................................................................................................................................................................. 17
ALT-M MANUAL TICKET........................................................................................................................................................ 19
Loading – Reverse Weigh Silo...................................................................................................................... 21
ALT-L AUTOMATIC LOADING ............................................................................................................................................... 21
Messages ................................................................................................................................................................................. 23
ALT-M MANUAL TICKET........................................................................................................................................................ 25
Loading—Weigh Batcher ............................................................................................................................ 29
ALT-L AUTOMATIC LOADING ............................................................................................................................................... 29
Messages ................................................................................................................................................................................. 31
ALT-M MANUAL TICKET........................................................................................................................................................ 33
Loading Pup Trucks—All Systems .............................................................................................................. 35
Low Silo Bypass ........................................................................................................................................... 37
Material Flow Errors .................................................................................................................................... 39
Aborted Loads .............................................................................................................................................. 41
llllF1-Lists................................................................................................................................................. 43 HELP........................................................................................................................................................................................... 43
TRUCK LIST ............................................................................................................................................................................... 43
CUSTOMER LIST........................................................................................................................................................................ 43

JOB LIST ..................................................................................................................................................................................... 45
SILO CONTENTS ....................................................................................................................................................................... 45
MATERIAL LIST......................................................................................................................................................................... 45
CUSTOMER COMMENTS .......................................................................................................................................................... 45
TICKET LIST .............................................................................................................................................................................. 45
REPORT MENU ......................................................................................................................................................................... 47
UTILITY MENU .......................................................................................................................................................................... 47
ESC............................................................................................................................................................................................. 47
SYSTEM SHUTDOWN ................................................................................................................................................................ 47
mmmmF2-Context Sensitive List......................................................................................................................49 nnnnF3-Ticket List ....................................................................................................................................... 51
CORRECTION TICKETS............................................................................................................................................................ 51
CASH TICKETS .......................................................................................................................................................................... 51
HAND-GENERATED TICKETS ............................................................................................................................................... 53
DITTO TICKET.......................................................................................................................................................................... 53
FIND TICKET ............................................................................................................................................................................ 53
PRINT TICKET........................................................................................................................................................................... 55
DISPLAY TICKET ...................................................................................................................................................................... 55
ooooF4-Utility Menu ....................................................................................................................................57 UNRESOLVED TICKETS........................................................................................................................................................... 57
WEIGH IN / OUT MODE ........................................................................................................................................................ 57
LOADOUT MODE..................................................................................................................................................................... 57
CHANGE POSTING DATE ....................................................................................................................................................... 57
SELECT COPY MODE ............................................................................................................................................................... 59
GATE CHECK ............................................................................................................................................................................ 59
SYSTEM SETUP .......................................................................................................................................................................... 59
Loading Setup......................................................................................................................................................................... 63
Ticket Setup............................................................................................................................................................................ 67
Software Setup ........................................................................................................................................................................ 69
FILE MAINTENANCE ............................................................................................................................................................... 75
Archiving Tickets.................................................................................................................................................................... 75
Erasing Lists .......................................................................................................................................................................... 75
REPORT MENU ......................................................................................................................................................................... 77
PRINT TRUCK LIST................................................................................................................................................................... 77
PRINT JOB LIST ......................................................................................................................................................................... 77
PRINT CUSTOMER LIST ........................................................................................................................................................... 77
BACKUP TO DISKETTE ............................................................................................................................................................ 77
RESTORE FROM DISKETTE ..................................................................................................................................................... 79
TRAINING MODE / RESUME LOADOUT MODE ................................................................................................................ 79
EXIT PROGRAM ........................................................................................................................................................................ 81
ESC............................................................................................................................................................................................. 81
pppp F5-Unresolved Tickets............................................................................................................................83
qqqq F6-Weigh In / Out or LoadOut..............................................................................................................85
rrrr F7-System Shutdown ..............................................................................................................................89

ssss F8-Comments......................................................................................................................................... 91
tttt F9-Cash Sale........................................................................................................................................... 93
uuuu F10-Fill / Empty Inventory Pictograph .................................................................................................. 95
F11-Copy Mode..................................................................................................................................... 97 F12-Tare a Truck .................................................................................................................................. 99 Hand-Generated Tickets............................................................................................................................. 101
Electronic Data Transfer—RedRover .........................................................................................................103
Sleep Mode..................................................................................................................................................105
Troubleshooting..........................................................................................................................................107
LC-1000/ LC-2000 Database Formats......................................................................................................... 111
STRUCTURE FOR DATABASE: TICKET.DBF..................................................................................................................... 112
Explanation of fields in TICKET.DBF .............................................................................................................................. 113
STRUCTURE FOR DATABASE: TRUCK.DBF...................................................................................................................... 118
Explanation of fields in TRUCK.DBF ............................................................................................................................... 118
STRUCTURE FOR DATABASE: JOB.DBF ............................................................................................................................. 120
Explanation of fields in JOB.DBF....................................................................................................................................... 120
STRUCTURE FOR DATABASE: CUSTOMER.DBF............................................................................................................. 122
Explanation of fields in CUSTOMER.DBF...................................................................................................................... 122
STRUCTURE FOR DATABASE: MIXES.DBF ....................................................................................................................... 123
Explanation of fields in MIXES.DBF................................................................................................................................ 123
STRUCTURE FOR DATABASE: SILOS.DBF......................................................................................................................... 124
Explanation of fields in SILOS.DBF.................................................................................................................................. 124
STRUCTURE FOR DATABASE: SCALES.DBF ..................................................................................................................... 126
Explanation of fields in SCALES.DBF............................................................................................................................. 126
Index ...........................................................................................................................................................128
Jog Gate Addendum ............................................................................................................................................................. 131


L C - 1 0 0 0 / L C - 2 0 0 0 S I L O L O A D O U T C O M P U T E R
SYSTEMS Equipment Corporation VER A60426 Page 1
INTRODUCTION An LC-2000 Material Loading Computer is a hardware/software system used to:
• Automatically load asphalt from a single silo onto trucks • Maintain silo inventory • Perform weigh-in/weigh-out (i.e., quarry) operations • Maintain ticket, job, customer, truck, and material databases • Transmit databases to/from another computer via a modem An LC-1000 Material Loading Computer is an expanded version of the LC-2000 in that the software and hardware are capable of supporting up to 4 silos. Except for the number of silos, the operation of these programs is identical. Hereafter, the software and hardware for either an LC-1000 or an LC-2000 will be referred to collectively as the "LoadOut". The primary databases maintained by the LoadOut are: • Ticket • Job • Customer • Mixes • Silos • Truck • Scales • Comment The LoadOut has several other databases it uses for its own purposes. In particular, the Attributes database contains configuration data to customize the program for the customer's individual needs. The databases are in FoxPro 2.6 DBF format. Consequently, most accounting and spreadsheet programs can directly read them. The set of units used for the internal databases is English pounds (i.e., lbs.), dollars, and miles. Weighing indicators can be calibrated in any of several different measurement units, but the program will always convert the measurement internally to lbs. In addition, the operator may choose a third set of units for display and printing in which case the program will convert from lbs. to the operator’s choice.

L C - 1 0 0 0 / L C - 2 0 0 0 S I L O L O A D O U T C O M P U T E R
SYSTEMS Equipment Corporation VER A60426 Page 2

L C - 1 0 0 0 / L C - 2 0 0 0 S I L O L O A D O U T C O M P U T E R
SYSTEMS Equipment Corporation VER A60426 Page 3
QUICK START To load a truck and generate a ticket, follow these steps: • Enter a truck in the truck field by typing in a number or selecting it from the truck list • If the job should be different from the one shown in the job field, enter a job in the job field
by typing in a number or selecting it from the job list – because customers are tied to jobs, the customer will automatically be selected
• If the material in the silo is different from the one shown in the material field, type in the material name or select another from the material list
• The program will perform internal checks to verify that loading can proceed. When the program is ready, (Alt-L)oad will be displayed in the bottom center of the screen. Otherwise, this area will display a message indicating the problem that needs attention.
• While holding down the a key, press the L key to begin the load. When the load completes, the ticket is printed and saved to the internal ticket database, the loading horn will sound if enabled, and the cursor will return to the truck field making the program ready for the next load.
L C - 1 0 0 0 / L C - 2 0 0 0 S I L O L O A D O U T C O M P U T E R
SYSTEMS Equipment Corporation VER A60426 Page 4
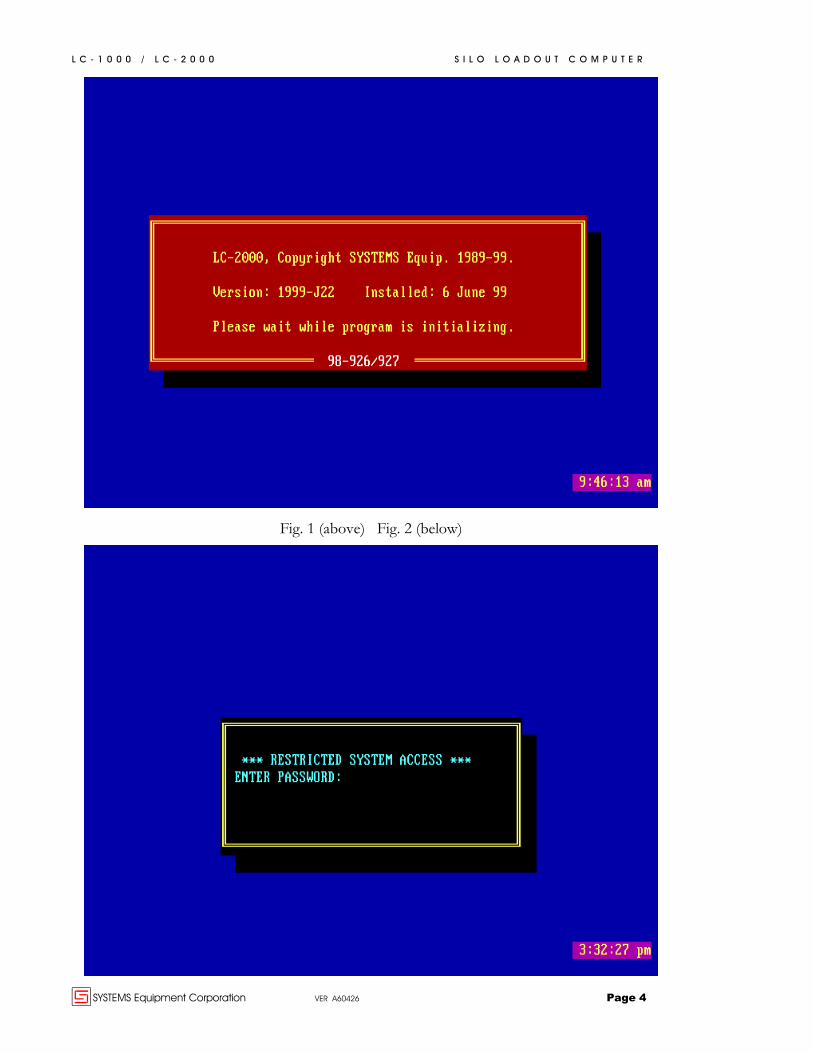
Fig. 1 (above) Fig. 2 (below)

L C - 1 0 0 0 / L C - 2 0 0 0 S I L O L O A D O U T C O M P U T E R
SYSTEMS Equipment Corporation VER A60426 Page 5
START UP COPYRIGHT
SCREEN When the program first starts, it performs several initialization and configuration procedures. During this time, the copyright screen as shown in Fig. 1 will be displayed. If it is necessary to adjust configuration parameters, press any alpha key while the copyright screen is displayed. After a short delay, the configuration password screen will appear as shown in Fig. 2. If you are authorized to make configuration changes, type the password where indicated. Refer to the Software Setup section regarding configuration changes that can be made. After the changes have been accepted, the program will restart and re-display the copyright screen.
�SPECIAL NOTE
Pressing the aL keys while the copyright screen is displayed invokes an internal version of the FIELDMOD utility (included in your installation directory) from which Attribut.DBF can be modified.

L C - 1 0 0 0 / L C - 2 0 0 0 S I L O L O A D O U T C O M P U T E R
SYSTEMS Equipment Corporation VER A60426 Page 6

L C - 1 0 0 0 / L C - 2 0 0 0 S I L O L O A D O U T C O M P U T E R
SYSTEMS Equipment Corporation VER A60426 Page 7
PROGRAM NAVIGATION To move between fields on the main screen, use the w and y keys. When the cursor is flashing in an input field, simply type in the truck, job, or material desired or press m. The m key brings up the list associated with the field the cursor resides in. For example, if the cursor is in the material field, pressing the m key brings up the materials list. A selection can then be made from the list. Many of the screens in the program require that you make a selection from the displayed list. Use the following keystrokes to navigate through a list: • Use w to move up one line • Use y to move down one line • Use {to move up one full screen • Use } to move down one full screen • Use g to go to the top of the list • Use d to go to the bottom of the list • Use e to accept the highlighted item • Use ^ to close the list without changing the current selection In addition, many of the lists include options for adding, changing, deleting, etc., list entries. These are indicated at the bottom of the list. For example, the truck list shows (N)ew Truck to add a new truck. To add a truck, simply press N for the New Truck screen. From the Silos list, you can also add materials by pressing the M key.

L C - 1 0 0 0 / L C - 2 0 0 0 S I L O L O A D O U T C O M P U T E R
SYSTEMS Equipment Corporation VER A60426 Page 8
Fig.3a
Hot Keys
Truck Field
Net Field
Drops Field
Gross Field
Job Field

L C - 1 0 0 0 / L C - 2 0 0 0 S I L O L O A D O U T C O M P U T E R
SYSTEMS Equipment Corporation VER A60426 Page 9
MAIN OPERATING SCREEN
A typical Main Operating Screen is shown in Figures 3a, 3b, and 3c. The Main Operating Screen is divided into ten distinct display areas:
Hot Keys Hot keys along the top of the screen give the operator quick access to frequently used lists and menu functions. For example, as the operator moves the cursor through the data entry fields, the hot keys change to give the operator access to the underlying database associated with the particular field.
Truck The truck area allows the operator to type the name of a truck in the truck database. If the truck exists, the remaining fields are automatically retrieved and entered. If the truck does not already exit, the truck list opens with the closest spelling highlighted.
Net In LoadOut mode, the NET field contains the net amount that will be loaded onto the truck. This value comes from the truck database when a truck is selected. The operator can temporarily change the NET for the current load by typing in a different value, as long as the value does not exceed GROSS - TARE. With the cursor in the NET field, the operator can change to GROSS mode by typing a G character. In NET mode, the program will load the truck to the selected net weight. In GROSS mode, the program will load the truck up to the indicated gross weight of the truck, irrespective of the NET value.
Gross The GROSS field contains the gross weight of the truck. This value comes from the truck database when a truck is selected. The operator cannot change the value here (use the TRUCK list to effect changes to GROSS). In LoadOut mode, the GROSS is the maximum weight the program will load onto the truck. Lesser amounts can be loaded if the NET field is less than GROSS. With the cursor in the GROSS field, the operator can change to NET mode by typing an N character.

L C - 1 0 0 0 / L C - 2 0 0 0 S I L O L O A D O U T C O M P U T E R
SYSTEMS Equipment Corporation VER A60426 Page 10
Figures 3a & 3b
Net Field
Drops Field
Job Field
Customer Field
Silo/Scale Field
Material Field
Weigh In / Weigh Out Options

L C - 1 0 0 0 / L C - 2 0 0 0 S I L O L O A D O U T C O M P U T E R
SYSTEMS Equipment Corporation VER A60426 Page 11
Drops The DROPS field specifies the number of drops conducted to load the truck. This value also comes from the truck database when a truck is selected. The operator can temporarily change the value here for the current load (use the TRUCK list to effect permanent changes.)
Job The JOB field specifies the job to which the load will be assigned. A job is always attached to a customer. When an existing job is typed in, both the job and the customer fields are completed. If the job does not exist in the database, the job list opens to the nearest spelling. The operator can make a selection or enter a new job.
Customer The CUSTOMER field specifies to whom the load will be billed. Since every job must specify a customer, picking a job causes this field to be filled in automatically.
Silo / Scale In LoadOut mode the silo is selected from the PLC via the console selector switch, if multiple silos exist. If only one silo exists, the cursor will not stop at this screen location because there is only one possible silo. Behind the scenes, the appropriate scale indicator will be selected automatically because every silo is assigned to the appropriate scale by software. In Weigh In/Weigh Out mode, the operator can choose a truck scale if multiple truck scales exist – if only one truck scale exists, this field is bypassed.
Material The material being loaded is displayed in this area. For a LoadOut system, the material automatically reflects the material in the selected silo. Typing in a different material changes the data in this field if the material already exists in the database. If the material does not exist, the material list opens to allow the operator to add a material. In Weigh In/Weigh Out mode, this field retains the value entered until the operator changes materials.
Weigh In / Weigh Out Options This input area is only active when the system has a truck scale and the operator chooses Weigh In/Weigh Out mode (see q key). Otherwise, this area is overlaid with cash ticket or silo inventory information. The choices in this area consist of 3 mutually exclusive pairs: Material received in or material delivered out Cash transaction or credit transaction Use tare on file or defer tare When material is received into your inventory from a supplier, the ‘received’ option should be selected – otherwise when the material is delivered out of your inventory to a customer, the ‘delivered’ option should be chosen.

L C - 1 0 0 0 / L C - 2 0 0 0 S I L O L O A D O U T C O M P U T E R
SYSTEMS Equipment Corporation VER A60426 Page 12

L C - 1 0 0 0 / L C - 2 0 0 0 S I L O L O A D O U T C O M P U T E R
SYSTEMS Equipment Corporation VER A60426 Page 13
When the transaction is a cash transaction, the ‘cash’ option should be chosen – otherwise choose a ‘credit’ transaction. If the truck tare is known at the time of a transaction, choose ‘use tare’. Choosing ‘defer tare’ causes the ticket to be retained in an ‘unresolved’ database and will not be printed until a tare is entered for the truck. The tare is entered by weighing the truck on the scale, using the tare from the database, or manually entering a tare value. See the discussion for the key regarding obtaining a truck tare.

L C - 1 0 0 0 / L C - 2 0 0 0 S I L O L O A D O U T C O M P U T E R
SYSTEMS Equipment Corporation VER A60426 Page 14
Fig. 4

L C - 1 0 0 0 / L C - 2 0 0 0 S I L O L O A D O U T C O M P U T E R
SYSTEMS Equipment Corporation VER A60426 Page 15
LOADING—TRUCK SCALE • Enter the load information, starting with the Truck ID. Depending on which information
copy mode is used (see F11—Copy Mode), typing the Truck ID in the truck id field and pressing ENTER may bring up Job and Customer information.
• If the Job ID is not the desired job for this load, type the correct Job ID in the job field. • Next, make sure that the desired silo is selected to draw from (multiple silo systems only).
Verify that the material shown on the screen is the material to load onto the truck. Rejected Material may not be loaded because it is a special category for those systems having a slat conveyor reject gate.
Once all of the load information has been entered, the truck is on the scale, and other safety conditions have been met, the bottom area of the screen shows (Alt-L)oad Truck and (Alt-M)anual Ticket. To execute a cash ticket, press F9 before loading (see the section Cash Tickets).
Alt-L Automatic Loading Verify that conditions are safe to load. Remove manual interlocks, such as opening the safety gate for the selected silo. Comments are special records stored in a separate Comments database. They can be used to flag special conditions that apply to certain customers (for example, credit limits). If a comment exists for the selected customer, a window will pop up displaying the comment and prompt the operator to press Y for yes to continue the load (see F8—Customer Comments). If N is selected, the program returns to the main screen without loading the truck. The system checks its safeties again and waits for a stable (no motion) weight from the weighing indicator. The silo gate opens and begins to drop the prescribed amount of material. After the proper amount has dropped, the system closes the silo gate and waits for a stable ending weight. A brief message appears on the screen indicating that the program is learning new values for the freefall and flow rate. In some cases, if circumstances prohibit learning new values (drop too small, for example), the message indicates why the program has bypassed this step. If the Horn After Batch (sec) setting in Loading Setup is greater than zero, the end-of-batch horn blows. On loads that require multiple drops—if the value for Automatic Loading Delay in Loading Setup is greater than zero, that number of seconds is counted down and the next drop begins. If the value is zero, the operator must press aL to begin each drop. After the load is completed, if the Horn Load Complete (sec) value is greater than zero, the horn blows.

L C - 1 0 0 0 / L C - 2 0 0 0 S I L O L O A D O U T C O M P U T E R
SYSTEMS Equipment Corporation VER A60426 Page 16
Fig 5 (above) Fig. 6 (below)
Typical ‘Before Load‘ Message Location
Typical ‘During Load’ Message Location

L C - 1 0 0 0 / L C - 2 0 0 0 S I L O L O A D O U T C O M P U T E R
SYSTEMS Equipment Corporation VER A60426 Page 17
The ticket is saved to the hard drive in the computer and ticket(s) are printed if printer(s) are attached and enabled. Pressing and holding a and pressing the A causes the system software to abort the load as soon as it is able.
���� CAUTION
THIS IS NOT A SUBSTITUTE FOR A HARDWARE EMERGENCY STOP BUTTON!
Use a properly wired hardware emergency stop to shut the silo gate in an emergency. Although aA will cause the software to attempt to shut the gate, in case of damage to or failure of system hardware, this might not happen fast enough to prevent bodily injury or property damage. Please see the section on aborted loads for more detail.
MessagesMessagesMessagesMessages If any system safety or incomplete information on the loading screen is preventing the start of the load, messages will appear at the bottom of the screen. If any of the system safeties is triggered during a drop, the system will attempt to close the silo gate and a message will be displayed on the screen. The following table describes the messages, their causes, and a possible remedy:
Message Cause Remedy
BEFORE LOADING:
Truck not defined No Truck ID has been entered
Type Truck ID in Truck ID field
Job not defined No Job ID has been entered Type Job ID in Job ID field
Can’t load rejected material
Material in selected silo is Rejected Material
Change material in selected silo
Net too large Net weight requested for load is greater than the truck’s maximum gross weight minus the tare weight for the truck
Reduce the net weight for the load and/or increase the maximum gross weight allowed for the truck
Too many drops Net weight requested for the load divided by the requested number of drops is smaller than the Smallest Drop Weight safety setting
Decrease number of drops
Waiting for truck Weight on scale is less than the Minimum Truck Weight safety setting
Drive truck onto scale or reduce Minimum Truck Weight setting

L C - 1 0 0 0 / L C - 2 0 0 0 S I L O L O A D O U T C O M P U T E R
SYSTEMS Equipment Corporation VER A60426 Page 18
Fig. 7 (above) Fig. 8 (below)
First Step of a Manual Ticket
Final Step of a Manual Ticket

L C - 1 0 0 0 / L C - 2 0 0 0 S I L O L O A D O U T C O M P U T E R
SYSTEMS Equipment Corporation VER A60426 Page 19
Low Silo Low Silo Bindicator indicates a silo is almost empty
Use the Low Silo Bypass or wait for more material
DURING LOADING:
Waiting for stable weight (informational only—not an error)
Weighing indicator shows weight in motion
Wait for weight to stabilize, reduce time system waits for stable weight, check scale for instability or increase indicator filtering
Material flow error (see section on material flow errors)
Material stopped flowing before the system expected it to for the number of seconds in the Seconds Before Material Flow Error setting
Fill silo, check silo gates, abort load or increase setting for Seconds Before Material Flow Error
Truck moved off scale
Weight on scale dropped by a large amount
Drive truck back onto scale or abort load.
Alt-M Manual Ticket If the load is too small to load accurately with the automatic system (for example, a pickup truck), material can still be loaded if the operator controls the silo gate manually. In manual mode, the program captures weights when instructed to do so by the operator. The operator controls the hardware from the manual panel controls. Pressing and holding a and pressing M prompts the operator to press the ENTER key to take the starting weight for the drop. After a stable starting weight is captured, the operator is prompted to load material onto the truck and press the ENTER key when done. A stable end weight is taken and the operator is given the choice to either load more material onto the truck or quit and generate a ticket. Using the arrow keys allows the different options to be selected.

L C - 1 0 0 0 / L C - 2 0 0 0 S I L O L O A D O U T C O M P U T E R
SYSTEMS Equipment Corporation VER A60426 Page 20
Fig. 9

L C - 1 0 0 0 / L C - 2 0 0 0 S I L O L O A D O U T C O M P U T E R
SYSTEMS Equipment Corporation VER A60426 Page 21
LOADING – REVERSE WEIGH
SILO • Enter the load information, starting with the Truck ID. Depending on which information
copy mode is used (see F11—Copy Mode), typing the Truck ID in the truck id field of the screen and pressing ENTER may bring up Job and Customer information.
• If the Job ID is not the desired job for this load, type the correct Job ID in the job field. • Next, make sure that the desired silo is selected to draw from (multiple silo systems only).
Verify that the material shown on the screen is the material to load onto the truck. Rejected Material may not be loaded.
Once all of the load information has been entered and other safety conditions have been met, the bottom area of the screen shows (Alt-L)oad Truck and (Alt-M)annual Ticket. To execute a cash ticket, press F9 before loading (see the section Cash Tickets).
Alt-L Automatic Loading Verify that conditions are safe to load. Remove manual interlocks, such as opening the safety gate, for the selected silo. If a comment exists for the selected customer, a window will pop up with the comment and prompt the operator to press Y for yes to continue the load (see F8—Customer Comments). If N is selected, the program returns to the main screen without loading the truck. The system then waits for the gob hopper at the top of the silo to cycle open and closed. If the loadout system is controlling the gob hopper, it will immediately cause it to open for the prescribed amount of time, then close. The system checks its safeties again and waits for a stable (no motion) weight from the weighing indicator. The silo gate opens and begins to drop the prescribed amount of material. After the proper amount has dropped, the system closes the silo gate and waits for a stable ending weight. A brief message appears on the screen indicating that the program is learning new values for the freefall and flow rate. In some cases, if circumstances prohibit learning new values (drop too small, for example), the message indicates why the program has bypassed this step. If the Horn After Batch (sec) value in Loading Setup is greater than zero, the end-of-batch horn blows. On loads that require multiple drops, if the value for Automatic Loading Delay in Loading Setup is greater than zero, that number of seconds is counted down. The system waits for the gob hopper at the top of the silo to cycle open and closed, then the next drop begins. If the value is zero, the operator must press aL to begin each drop. After the load is completed, if the Horn Load Complete (sec) value is greater than zero, the horn blows. The ticket is saved to the hard drive in the computer and ticket(s) are printed if printer(s) are attached and enabled.

L C - 1 0 0 0 / L C - 2 0 0 0 S I L O L O A D O U T C O M P U T E R
SYSTEMS Equipment Corporation VER A60426 Page 22
Fig. 10 (above) Fig. 11 (below)
Typical ‘Before Load‘ Message Location
Typical ‘During Load’ Message Location

L C - 1 0 0 0 / L C - 2 0 0 0 S I L O L O A D O U T C O M P U T E R
SYSTEMS Equipment Corporation VER A60426 Page 23
Pressing and holding a and pressing the A causes the system software to abort the load as soon as it is able.
���� CAUTION
THIS IS NOT A SUBSTITUTE FOR A HARDWARE EMERGENCY STOP BUTTON!
Use a properly wired hardware emergency stop to shut the silo gate in an emergency. Although aA will cause the software to attempt to shut the gate, in case of damage to or failure of system hardware, this might not happen fast enough to prevent bodily injury or property damage. Please see the section on aborted loads for more detail.
MessagesMessagesMessagesMessages If any system safety or incomplete information on the loading screen is preventing the start of the load, messages will appear at the bottom of the screen. If any of the system safeties is triggered during a drop, the system will attempt to close the silo gate and a message will be displayed on the screen. The following table describes the messages, their causes, and a possible remedy:
Message Cause Remedy
Before loading
Truck not defined No Truck ID has been entered
Type Truck ID in Truck ID field
Job not defined No Job ID has been entered Type Job ID in Job ID field
Can’t load rejected material
Material in selected silo is Rejected Material
Change material in selected silo
Net too large Net weight requested for load is greater than the truck’s maximum gross weight minus the tare weight for the truck
Reduce the net weight for the load and/or increase the maximum gross weight allowed for the truck
Too many drops Net weight requested for the load divided by the requested number of drops is smaller than the Smallest Drop Weight safety setting
Decrease number of drops
Silo < Drop Size Silo doesn’t contain enough material to make the current drop.
Wait for gob hopper to add enough material or reduce the net weight for the load

L C - 1 0 0 0 / L C - 2 0 0 0 S I L O L O A D O U T C O M P U T E R
SYSTEMS Equipment Corporation VER A60426 Page 24
Fig. 12 (above) Fig. 13 (below)
First Step of a Manual Ticket
Final Step of a Manual Ticket

L C - 1 0 0 0 / L C - 2 0 0 0 S I L O L O A D O U T C O M P U T E R
SYSTEMS Equipment Corporation VER A60426 Page 25
Low Silo Silo is below the Minimum Silo Weight
Use the Low Silo Bypass or wait for more material
During Loading
Waiting for stable weight (informational only—not an error)
Weighing indicator shows weight in motion
Wait for weight to stabilize, reduce time system waits for stable weight, check scale for instability or increase indicator filtering
Small Drop Size Options
The next drop requires more material than the silo contains
Wait for gob hopper to add enough material or reduce the net weight for the load
Material flow error (see section on material flow errors)
Material stopped flowing before the system expected it to for the number of seconds in the Seconds Before Material Flow Error setting
Fill silo, check silo gates, abort load or increase setting for Seconds Before Material Flow Error
Gob hopper opened unexpectedly
Gob hopper opened while silo gate was open, causing possible weighing inaccuracy
The message is dismissed automatically, but to prevent inaccurate drops in the future, reduce Maximum Batch Weight setting, increase the number of drops, and/or increase the time the gob hopper is closed each cycle
Alt-M Manual Ticket If the load is too small to load accurately with the automatic system (for example, a pickup truck), material can still be loaded if the operator controls the silo gate manually. In manual mode, the program captures weights when instructed to do so by the operator. The operator controls the hardware from the manual panel controls. The operator should pay particular attention to synchronizing manual drops with the gob hopper gates because dumping material from the gob hopper while the silo gates are open will corrupt the weight readings.

L C - 1 0 0 0 / L C - 2 0 0 0 S I L O L O A D O U T C O M P U T E R
SYSTEMS Equipment Corporation VER A60426 Page 26

L C - 1 0 0 0 / L C - 2 0 0 0 S I L O L O A D O U T C O M P U T E R
SYSTEMS Equipment Corporation VER A60426 Page 27
Pressing and holding a and then pressing M prompts the operator to press the ENTER key to take the starting weight for the drop. If the system controls the gob hopper, it opens the gob hopper at this time; otherwise, it waits for the gob hopper to open and close. After a stable starting weight is captured, the operator is prompted to load material onto the truck and press the ENTER key when done. In order to get an accurate weight it is crucial that the operator closes the silo gates well before the gob hopper opens again. A stable end weight is taken and the operator is given the choice to load more material onto the truck or quit and generate a ticket. Using the arrow keys allows the different options to be selected.

L C - 1 0 0 0 / L C - 2 0 0 0 S I L O L O A D O U T C O M P U T E R
SYSTEMS Equipment Corporation VER A60426 Page 28
Fig. 14

L C - 1 0 0 0 / L C - 2 0 0 0 S I L O L O A D O U T C O M P U T E R
SYSTEMS Equipment Corporation VER A60426 Page 29
LOADING—WEIGH BATCHER • Enter the load information, starting with the Truck ID. Depending on which information
copy mode is used (see F11—Copy Mode), typing the Truck ID in the truck id field of the screen and pressing ENTER may bring up Job and Customer information.
• If the Job ID is not the desired job for this load, type the correct Job ID in the job field. • Next, make sure that the desired silo is selected to draw from (multiple silo systems only).
Verify that the material shown on the screen is the one to load on the truck. Rejected Material may not be loaded.
Once all of the load information has been entered and other safety conditions have been met, the bottom area of the screen shows (Alt-L)oad Truck and (Alt-M)anual Ticket. To execute a cash ticket, press F9 before loading (see the section Cash Tickets).
Alt-L Automatic Loading Verify that conditions are safe to load. Remove manual interlocks, such as opening the safety gate for the selected silo. Press and hold a on the keyboard while pressing L. If a comment exists for the selected customer, a window will pop up with the comment and prompt the operator to press Y for yes to continue the load (see F8—Customer Comments). If N is selected, the program returns to the main screen without loading the truck. The system checks its safeties again and waits for a stable (no motion) weight from the weighing indicator The silo gate opens and begins to drop the prescribed amount of material. After the proper amount has dropped, the system closes the silo gate and waits for a stable weight. Once the weight in the batcher has stabilized, the batcher begins to dump into the truck. When material stops flowing out of the batcher, the system closes it and waits for a stable end weight. A brief message appears on the screen indicating that the program is learning new values for the freefall and flow rate. In some cases, if circumstances prohibit learning new values (drop too small, for example), the message indicates why the program has bypassed this step. The horn blows if the Horn After Batch (sec) value in Loading Setup is greater than zero. On loads that require multiple drops, if the value for Automatic Loading Delay in Loading Setup is greater than zero, that number of seconds is counted down and the next drop is begun. If the value is zero, the operator must press aL to begin each drop. After the load is completed, if the Horn Load Complete (sec) value is greater than zero, the horn blows. The ticket is saved to the hard drive in the computer and ticket(s) are printed if printer(s) are attached and enabled.

L C - 1 0 0 0 / L C - 2 0 0 0 S I L O L O A D O U T C O M P U T E R
SYSTEMS Equipment Corporation VER A60426 Page 30
Fig. 15 (above) Fig. 16 (below)
Typical ‘Before Load‘ Message Location
Typical ‘During Load’ Message Location

L C - 1 0 0 0 / L C - 2 0 0 0 S I L O L O A D O U T C O M P U T E R
SYSTEMS Equipment Corporation VER A60426 Page 31
Pressing and holding a and pressing the A causes the system software to abort the load as soon as it is able. CAUTION: THIS IS NOT A SUBSTITUTE FOR A HARDWARE EMERGENCY STOP BUTTON! Use a properly wired hardware emergency stop to shut the silo or batcher gate in an emergency. Although aA will cause the software to attempt to shut the gates, in case of damage to or failure of system hardware, this might not happen fast enough to prevent bodily injury or property damage. Please see the section on aborted loads for more detail.
MessagesMessagesMessagesMessages If any system safety or incomplete information on the loading screen is preventing the start of the load, messages will appear at the bottom of the screen. If any of the system safeties is triggered during a drop, the system will attempt to close the silo gate and a message will be displayed on the screen. The following table describes the messages, their causes, and a possible remedy:
Message Cause Remedy
Before loading
Truck not defined
No Truck ID has been entered Type Truck ID in Truck ID field
Job not defined No Job ID has been entered Type Job ID in Job ID field
Can’t load rejected material
Material in selected silo is Rejected Material
Change material in selected silo
Net too large Net weight requested for load is greater than the truck’s maximum gross weight minus the tare weight for the truck
Reduce the net weight for the load and/or increase the maximum gross weight allowed for the truck
Too many drops Net weight requested for the load divided by the requested number of drops is smaller than the Smallest Drop Weight safety setting
Decrease number of drops
Batch too large Net weight requested for the load divided by the requested number of drops is larger than the Maximum Batch Weight safety setting
Reduce the net weight for the load and/or increase number of drops
Low Silo Low Silo Bindicator indicating a silo is almost empty
Use the Low Silo Bypass or wait for more material

L C - 1 0 0 0 / L C - 2 0 0 0 S I L O L O A D O U T C O M P U T E R
SYSTEMS Equipment Corporation VER A60426 Page 32
Fig. 17 (above) Fig. 18 (below)
First Step of a Manual Ticket
Final Step of a Manual Ticket

L C - 1 0 0 0 / L C - 2 0 0 0 S I L O L O A D O U T C O M P U T E R
SYSTEMS Equipment Corporation VER A60426 Page 33
During Loading
Waiting for stable weight (informational only—not an error)
Weighing indicator showing weight in motion
Wait for weight to stabilize, reduce time system waits for stable weight, check scale for instability or increase indicator filtering
Material flow error (see section on material flow errors)
Material stopped flowing before the system expected it to for the number of seconds in the Seconds Before Material Flow Error setting
Fill silo, check silo gates, abort load or increase setting for Seconds Before Material Flow Error
Holding batcher-press any key to dump
aH has been pressed during loading
Press any key to dump batcher
Batcher holds [amount], dump batcher manually and press any key to continue
Material still contained [stuck] in batcher is greater than MINBATCHERWEIGHT in ATTRIBUT.DBF (default: 250 lbs.)
Get as much material as possible out of the batcher (bang batcher gates with the manual button) then press any key to get a tare weight for this drop.
Alt-M Manual Ticket If the load is too small to load accurately with the automatic system (for example, a pickup truck), material can still be loaded if the operator controls the silo and batcher gates manually. In manual mode, the program captures weights when instructed to do so by the operator. The operator controls the hardware from the manual panel controls. Pressing and holding a and pressing M prompts the operator to press the e key to capture the full batcher weight for the drop. At this point, after manually opening the silo gate to put the desired amount of material in the batcher, the operator should press e to capture a stable starting batch weight. The operator is then prompted to press e to read the empty batcher weight. At this point, the operator empties the batcher and presses e. A stable end weight is taken and the operator is given the choice to load more material on the truck or quit and generate a ticket. Using the arrow keys allows the different options to be selected.

L C - 1 0 0 0 / L C - 2 0 0 0 S I L O L O A D O U T C O M P U T E R
SYSTEMS Equipment Corporation VER A60426 Page 34
L C - 1 0 0 0 / L C - 2 0 0 0 S I L O L O A D O U T C O M P U T E R
SYSTEMS Equipment Corporation VER A60426 Page 35
LOADING PUP TRUCKS—ALL
SYSTEMS If a truck has a pup truck number entered, the data for the pup truck will automatically appear on the main screen after the primary truck has been loaded. The operator can temporarily change any of the pup truck information, except the truck number, directly from the main screen. See the section F1-Lists regarding how to enter a pup truck number. Because the system regards a truck and its pup truck as separate loads, separate tickets will be printed.

L C - 1 0 0 0 / L C - 2 0 0 0 S I L O L O A D O U T C O M P U T E R
SYSTEMS Equipment Corporation VER A60426 Page 36
Fig. 19 (above) Fig. 20 (below)
.
Low Silo Indication
Low Silo Bypass Indication

L C - 1 0 0 0 / L C - 2 0 0 0 S I L O L O A D O U T C O M P U T E R
SYSTEMS Equipment Corporation VER A60426 Page 37
LOW SILO BYPASS Some systems have bindicators that indicate when the level of material in a silo has gone too low. This warning is usually to prevent load segregation, damage to the cone, or damage to the lower part of the silo. If the intent of the operator is to empty the silo, the bindicators can be disregarded and loading from the silo can continue. When the program receives an indication of a low silo condition, it will not allow another drop unless the operator acknowledges the condition. Fig. 19 shows the warning. Notice that the aL option is inhibited. The operator can bypass the condition or perform manual loads. If the operator wants the computer to control the drop, bypass is required. The manual ticket option will allow the operator to keep the gate open to completely empty a silo. (See section on loading for more information on manual tickets.) To activate the Low Silo Bypass, press and hold a, then press B. The screen will show that you have activated the bypass as seen in Fig. 20. If there is a low silo bypass horn, it will sound until the end of the load or until the system is no longer bypassed. The aL option is available again and you can load normally. To cancel Low Silo Bypass press
aB again.

L C - 1 0 0 0 / L C - 2 0 0 0 S I L O L O A D O U T C O M P U T E R
SYSTEMS Equipment Corporation VER A60426 Page 38
Fig. 21 (above) Fig. 22 (below)

L C - 1 0 0 0 / L C - 2 0 0 0 S I L O L O A D O U T C O M P U T E R
SYSTEMS Equipment Corporation VER A60426 Page 39
MATERIAL FLOW ERRORS When the system has opened the silo gate, it expects changing weight readings. If the weight is not changing, or is changing in the wrong direction, a material flow error results. Most commonly, material flow errors result from running out of material in the silo. Errors can also happen because the system is trying to open the silo gate, but due to a hardware disconnect or interlock in the manual system, it cannot. Often this is a result of the hardware Emergency Stop button being engaged unintentionally (for example, someone accidentally leaned on it). Another frequent cause is the Low Air Interlock. Because sometimes gates react slowly, the operator can set the number of seconds that the system detects no flow before causing a material flow error. This is described more detailed in Loading Setup. There are two or three recovery choices from a no-flow error depending on whether the system is controlling multiple silos. They are: • Terminate the load—Saves and prints a ticket for the material on the truck unless the
amount is zero. • Continue loading from this silo—Prompts the operator to enter the number of additional
drops to perform. Entering zero drops terminates the load. • Continue loading from another silo [If more than one silo in the system]—Prompts the
operator to enter which material will print on the ticket and how many additional drops to perform. Entering zero drops terminates the load.
�NOTE
Changing the material to print on the ticket can cause a discrepancy between what the LoadOut reports for material inventories and the inventories the plant computer reports. This is because the LoadOut extracts its material report information from the ticket database.

L C - 1 0 0 0 / L C - 2 0 0 0 S I L O L O A D O U T C O M P U T E R
SYSTEMS Equipment Corporation VER A60426 Page 40
Fig. 23

L C - 1 0 0 0 / L C - 2 0 0 0 S I L O L O A D O U T C O M P U T E R
SYSTEMS Equipment Corporation VER A60426 Page 41
ABORTED LOADS Pressing and holding a while pressing A during loading causes the system software to abort the load as soon as it is able.
� CAUTION
This is not a substitute for a hardware emergency stop button!
Use a properly wired hardware emergency stop button to shut the silo gate in an emergency. Although aA will cause the software to attempt to shut the gate, in case of damage to or failure of system hardware, this might not happen fast enough to prevent bodily injury or property damage. There are three recovery choices from an aborted load. They are: • Resume loading— Prompts the operator to enter the number of additional drops to
perform. Entering zero drops terminates the load. • Save data and print a ticket—Stores ticket information for the amount loaded to the ticket
database and prints a ticket if printers are attached and enabled. • Do not save data and do not print a ticket—Returns the operator to main screen without
storing ticket data or printing a ticket. To maintain accuracy, silo inventory is adjusted to reflect material removed from the silo on systems so equipped.

L C - 1 0 0 0 / L C - 2 0 0 0 S I L O L O A D O U T C O M P U T E R
SYSTEMS Equipment Corporation VER A60426 Page 42
Fig. 1-1

L C - 1 0 0 0 / L C - 2 0 0 0 S I L O L O A D O U T C O M P U T E R
SYSTEMS Equipment Corporation VER A60426 Page 43
llll F1-LISTS From any location on the main screen, the list of databases may be accessed by pressing l. The list appears as shown in Fig. 1-1. To make a selection from the list, use the w or y keys to move through the list or simply type a highlighted key. The following items are available: • Help • Truck List • Customer List • Job List • Silo Contents • Material List • Customer Comments • Ticket List • Report Menu • Utility Menu • ESC • System Shutdown
Help The Help screen displays a brief explanation of the function of each of the F-keys. If you forget the function of any F-key, simply hit l twice from the main screen to bring up this list.
Truck List The truck list shows the trucks already typed into the truck database along with the gross, net, and tare weights, expressed in the selected set of units and the number of drops used for loading. Permanent additions or modifications to the truck database are done here. The visible fields in a truck record are: truck number gross weight tare weight net weight drops pup truck To attach a pup truck entry to a primary truck, add the pup truck to the database first, then add, or edit the primary truck entry. See the section Loading Pup Trucks.
Customer List The customer list shows the list of customers entered into the database. A customer may be attached to multiple jobs. When entering a new customer, you can also flag it as being as private customer. This is useful is some accounting systems where customers are sorted by private (i.e., non-governmental) and non-private classifications.

L C - 1 0 0 0 / L C - 2 0 0 0 S I L O L O A D O U T C O M P U T E R
SYSTEMS Equipment Corporation VER A60426 Page 44
Fig. 1-1

L C - 1 0 0 0 / L C - 2 0 0 0 S I L O L O A D O U T C O M P U T E R
SYSTEMS Equipment Corporation VER A60426 Page 45
Job List The job list shows the list of jobs entered into the database. Every job must have a customer attached and every job must be unique. This means that job ‘HWY101’, for example, cannot be attached to more than one customer.
Silo Contents The silo contents list shows the silos available in the plant. From this screen you can change the amount of material in the silo being displayed for silo inventory, adjust the values the program uses for freefall and flow rate, and change the material designation.
� NOTE
Freefall and flow rate values change throughout the day because the program continually adjusts them as new information becomes available.
Material List The material list displays the current list of materials entered into the system, the inventory on hand for each material, and the price per unit.
Customer Comments Customer comments provide a means of attaching information regarding customers. For example, to add a comment that a particular customer is strictly COD, select the customer from the list, and then press s to add the appropriate comment. After you press aL to load but just before loading begins, the comment message box appears to display the comment and give the operator the option to cancel or continue the load. If the SYSTEMS Equipment RedRover utility is installed on a remote computer, comments provide a means for your accounting department to inform the plant operator of special customer conditions by sending comment records via a modem connection. See the section Electronic Data Transfer – RedRover.
Ticket List Choosing the ticket list pops up a window listing the tickets currently on file. Pressing the n key from the main screen will also direct you to the ticket list. Refer to the section on the n key for a description of the features available.

L C - 1 0 0 0 / L C - 2 0 0 0 S I L O L O A D O U T C O M P U T E R
SYSTEMS Equipment Corporation VER A60426 Page 46

L C - 1 0 0 0 / L C - 2 0 0 0 S I L O L O A D O U T C O M P U T E R
SYSTEMS Equipment Corporation VER A60426 Page 47
Report Menu The report menu option displays a sub-menu from which you can print or display the following detailed reports: truck report customer report job report material report load report cash load report private customer report haul sheet
Utility menu Choosing the utility menu pops up a menu listing common daily maintenance utilities. Pressing the o key from the main screen will also direct you to the utility menu. Refer to the section on the o key for a description of the features available.
ESC Pressing the ESC key dismisses the list menu.
System Shutdown Choosing system shutdown allows you to terminate the program. All operating parameters and data are saved prior to program termination. Shutting down can also be done from the main screen by pressing the r key. Refer to the section on the r key.

L C - 1 0 0 0 / L C - 2 0 0 0 S I L O L O A D O U T C O M P U T E R
SYSTEMS Equipment Corporation VER A60426 Page 48

L C - 1 0 0 0 / L C - 2 0 0 0 S I L O L O A D O U T C O M P U T E R
SYSTEMS Equipment Corporation VER A60426 Page 49
mmmm F2-CONTEXT SENSITIVE
LIST When the cursor is in the truck, job, or material field, pressing the m key pops up the list that applies. For example, when the cursor is in the job field, pressing m brings up the job list. This feature provides faster access to the lists that are routinely used throughout the day.

L C - 1 0 0 0 / L C - 2 0 0 0 S I L O L O A D O U T C O M P U T E R
SYSTEMS Equipment Corporation VER A60426 Page 50
Fig. 3-1 (above) Fig. 3.2 (below)
Erroneous Ticket
Correction Information
Ticket Options Ticket Types
L C - 1 0 0 0 / L C - 2 0 0 0 S I L O L O A D O U T C O M P U T E R
SYSTEMS Equipment Corporation VER A60426 Page 51
nnnn F3-TICKET LIST The ticket list shows all tickets generated since the list was last archived. See Fig. 3-1. From the ticket list you can: • correct a ticket – change the job/customer, material, and/or truck on a ticket that was
incorrectly generated • ditto a ticket – copy the truck and job/customer from a ticket to the main screen • find tickets – locate all tickets with a specified 1) Ticket number (precludes all other criteria) 2) Start date 3) End date 4) Job 5) Customer 6) Truck 7) Material • reprint a ticket • display a ticket
Correction Tickets To correct an erroneously generated ticket, select the ticket from the ticket list by highlighting it with the w or y keys, and then press C. The screen shown is Fig. 3-2 appears. The upper portion of the screen displays the information that exists on the erroneous ticket. You can enter the information that should appear on the corrected ticket in the lower portion of the screen. In the field highlighted by the cursor, simply type in the correct information or press the m key to bring up the list that applies (from these lists you can add, change, etc., records as needed). When the new information appears as it should, hold down the a key and press C. Two tickets are generated and printed – one, which undoes the erroneous ticket by generating a ticket where the net weight is subtracted, and a second ticket where the correct information is applied. The original erroneous ticket will be marked with a “V” (for “void”) in the left-hand column of the ticket list indicating it is now a void ticket. The undo ticket is marked with a “C” (for “corrected”). The re-issued ticket is marked with an “R” (for “re-issued”). No further changes can be made to the void or corrected ticket. If later an error is found in the re-issued ticket, simply repeat the above procedure. When this happens, this re-issued ticket will become a void ticket and two more tickets will be issued.
Cash Tickets Cash tickets are marked with the “$” symbol in the left-hand column.

L C - 1 0 0 0 / L C - 2 0 0 0 S I L O L O A D O U T C O M P U T E R
SYSTEMS Equipment Corporation VER A60426 Page 52
Fig. 3-3 (above) Fig. 3-4 (below)

L C - 1 0 0 0 / L C - 2 0 0 0 S I L O L O A D O U T C O M P U T E R
SYSTEMS Equipment Corporation VER A60426 Page 53
Hand-Generated Tickets Hand-generated tickets are marked with the “H” symbol in the left-hand column. See the section Hand-Generated Tickets.
Ditto Ticket The ditto feature allows you to copy the information shown on a particular ticket to the main screen. This is useful when you need to load a truck using the same information used the last time the truck was loaded. Simply highlight a ticket in the list and press the e key. If the
system is in LoadOut mode, the material is not copied because the material is obtained from
the currently selected silo.
In Weigh-In/Weigh-Out mode, the material is copied to the main screen.
Find Ticket The F key allows you to search the ticket database for tickets of a specified nature. The screen shown in Fig. 3-3 appears. You can find tickets using combinations of: Ticket number (precludes any other criteria) Posting start date Posting end date Job Customer Truck Material For example, to find all tickets issued between February 1, 1987, and August 5, 1987, to job NEWJOB, enter 02/01/1987 in the Start Date field, enter 08/05/1987 in the End Date field, and enter NEWJOB in the job field. To include all trucks, materials, etc., delete the data or type ALL in the corresponding fields. When all criteria appear as they should, move to the <Find> command button and press e. If any tickets meeting the criterion are found, a screen similar to Fig. 3-4 appears. To print the list for future reference, simply press the P key.

L C - 1 0 0 0 / L C - 2 0 0 0 S I L O L O A D O U T C O M P U T E R
SYSTEMS Equipment Corporation VER A60426 Page 54
Fig. 3-5
Correction Ticket Information
Ticket Number Being Displayed
Options

L C - 1 0 0 0 / L C - 2 0 0 0 S I L O L O A D O U T C O M P U T E R
SYSTEMS Equipment Corporation VER A60426 Page 55
Print Ticket The print ticket option allows you to reprint a ticket. Simply highlight the desired ticket and press the P key.
Display Ticket To view a ticket as it would appear in the standard ticket format, highlight the desired ticket and press the e key. A screen similar to Fig. 3-5 appears.
� NOTE
When correction tickets are involved, you can use the Band F keys to move backwards and forwards through the series to view all tickets in the correction sequence.
You can also reprint individual tickets by pressing the P key or print all the tickets in the series by pressing the A key.

L C - 1 0 0 0 / L C - 2 0 0 0 S I L O L O A D O U T C O M P U T E R
SYSTEMS Equipment Corporation VER A60426 Page 56
Fig. 4-1 (above) Fig. 4-2 (below)
Copy Mode Options

L C - 1 0 0 0 / L C - 2 0 0 0 S I L O L O A D O U T C O M P U T E R
SYSTEMS Equipment Corporation VER A60426 Page 57
oooo F4-UTILITY MENU The day-to-day maintenance and configuration tasks are accomplished using the utility menu. Press the o key to pop up the menu. Notice that several of the items have their own hot key, shown in parentheses, such as Unresolved Tickets. Many of the items invoke additional sub-menus. See Fig. 4-1. To make a selection from the menu, type the highlighted hot key shown or use the w or y keys to highlight a selection, then press e.
Unresolved Tickets If you have a truck scale, choosing unresolved tickets pops up a window listing the unresolved tickets currently on file. An unresolved ticket occurs when gross information about a Weigh-In/Weigh-Out ticket is captured but the truck tare weight is not yet known. Pressing the p key from the main screen will also direct you to the unresolved ticket list. Refer to the section on the p key for a description of the features available.
Weigh In / Out Mode
LoadOut Mode Assuming you have a truck scale, these two menu items allow you to toggle between weigh in/weigh out mode and loadout mode. You can also toggle modes by pressing q from the main screen. If you are in LoadOut mode, the words “Weigh In / Out Mode” appear indicating that you can switch to LoadOut mode, and visa versa.
Change Posting Date The posting date is useful when the date that should appear on the tickets is different from the calendar date. For example, when an operator’s shift begins at 7:00 PM and the date printed on your tickets should not change at midnight, set the posting date as required. Choosing the “change posting date” option displays the same screen that appears when the program initializes.

L C - 1 0 0 0 / L C - 2 0 0 0 S I L O L O A D O U T C O M P U T E R
SYSTEMS Equipment Corporation VER A60426 Page 58
Fig. 4-3 (above) Fig. 4-4 (below)
Gate Check Options

L C - 1 0 0 0 / L C - 2 0 0 0 S I L O L O A D O U T C O M P U T E R
SYSTEMS Equipment Corporation VER A60426 Page 59
Select Copy Mode The copy mode designates how tickets are dittoed from the ticket list. The location of the copy mode indicator is shown in Fig. 4-2. The copy mode may be set to Manual Ticket or Truck In TICKET mode, after you have made a truck selection, the program finds the last ticket in the ticket list and fills in the job/customer information from that ticket (the material is also copied when operating in Weigh-In/Weigh-Out mode). In TRUCK mode, the program locates the last ticket on which this truck was used (which may not necessarily be the very last ticket) and fills in the job/customer information from that ticket (the material is also copied when operating in Weigh-In/Weigh-Out mode). Manual copy mode requires that you make the job/customer selection without program assistance. If individual trucks are hauling to different locations, use truck mode to let the program keep track of these details for you. If all trucks are hauling to the same location and new trucks are coming in to help with the haul, use ticket mode so that the new trucks get the correct information.
Gate Check Gate check is a maintenance feature that lets you open silo or weigh batcher gates from the keyboard. It is important to note that this feature is not intended for truck loading – only as verification that the electronic link between the computer and the silo gates is functional. Choosing gate check displays a screen as shown in Fig. 4-3. If your system is not a weigh batcher, the second line will not appear. BE ABSOLUTELY CERTAIN THAT THERE IS NO MATERIAL IN THE SILO AND/OR WEIGH BATCHER AND THAT NO PERSONNEL ARE IN THE IMMEDIATE VICINITY BEFORE USING THIS FEATURE. Press the indicated key to open a gate. If a gate fails to open but can be opened with a manual panel button; the problem is most likely located at the fuse on the PLC output module.
System Setup Choosing System Setup displays a sub-menu as shown in Fig. 4-4. Each of these options can pop up other screen for data input. Loading Setup – this option allows you to alter parameters such as gob hopper timing, silo capacity, etc. See the discussion that follows for details. Ticket Setup – this option allows you to change how your tickets are printed and what information goes on them.

L C - 1 0 0 0 / L C - 2 0 0 0 S I L O L O A D O U T C O M P U T E R
SYSTEMS Equipment Corporation VER A60426 Page 60

L C - 1 0 0 0 / L C - 2 0 0 0 S I L O L O A D O U T C O M P U T E R
SYSTEMS Equipment Corporation VER A60426 Page 61
Software Setup – this option affects how the program is configured. Since errors in these parameters can cause your program to malfunction, a password is required to proceed. If you need access to these parameters, you should contact your program supplier to obtain it.

L C - 1 0 0 0 / L C - 2 0 0 0 S I L O L O A D O U T C O M P U T E R
SYSTEMS Equipment Corporation VER A60426 Page 62
Fig. 4-5 (above) Fig. 4-6 (below)
Parameters Depend On Type of System

L C - 1 0 0 0 / L C - 2 0 0 0 S I L O L O A D O U T C O M P U T E R
SYSTEMS Equipment Corporation VER A60426 Page 63
Loading SetupLoading SetupLoading SetupLoading Setup Loading setup will invoke a series of screens, the order and content of which depends on how your plant is set up. Fig. 4-5 shows the first screen. This screen is for a system where the first silo uses a truck scale. If a reverse weigh scale is used the second entry would be for minimum silo weight and the third would be for smallest drop weight. For a weigh batching system, the second line would be for maximum batch weight and the third for smallest drop weight.
NOTE
The number and order of these screens depends on how many scales and silos your system has. The smallest drop weight will be changed throughout the day because the program continually adjusts this value as new information becomes available.
Fig. 4-6 is the next screen after all silos have been processed. The PLC has a timer output for controlling a gob hopper. The first line in the list is the number of seconds the PLC will turn on this output to hold the gob hopper open (call this time T1). The second line is the number of seconds to hold the gob hopper closed (call this time T2). The third line applies to reverse weigh silos. It is the amount of time before the gob hopper opens that the program will terminate a drop to prevent the gob hopper discharge from corrupting an accurate silo weight reading (call this time T3). In essence, the program anticipates when the gob hopper is about open and will terminate a drop prematurely (when the drop time exceeds T2 – T3) to prevent a corrupted weight measurement. These parameters should be adjusted taking into account your plant production rate (T2), the capacity of your gob hopper (T1), and the amount of time required by your system for a weight reading to stabilize (T3).

L C - 1 0 0 0 / L C - 2 0 0 0 S I L O L O A D O U T C O M P U T E R
SYSTEMS Equipment Corporation VER A60426 Page 64
Fig. 4-7

L C - 1 0 0 0 / L C - 2 0 0 0 S I L O L O A D O U T C O M P U T E R
SYSTEMS Equipment Corporation VER A60426 Page 65
Fig. 4-7 shows the last screen in Loading Setup – the Common Parameters screen. These parameters are explained below: Use Metric Units – setting this parameter to “Y” enables displaying metric units (either kgs or mgms, depending on the setting of “Display in Tons”). Setting this parameter to “N” enables English units – either lbs. or tons Display In Tons – used in conjunction with the preceding parameter, this parameter determines whether major units (i.e., tons or mgms) are displayed or whether minor units (i.e., lbs. or kgs) are displayed. The following table summarizes how these two parameters interact:
Use Metric Units
N Y
N Lbs. Kgs Display In Tons
Y Tons Mgms
Horn Load Complete – setting this parameter to any value other than zero determines how many seconds that the loading horn will sound after the last drop of a load. Horn After Batch - – setting this parameter to any value other than zero determines how many seconds the loading horn will sound after each drop is completed, excluding the last drop. Since the load complete horn is the same as the batch complete horn, you may want to set this value to zero to avoid confusing the truck driver. Auto-Load Delay – this parameter determines how many seconds should elapse after the end of a drop before the program automatically starts the next drop. The purpose of this delay is to allow time for the truck to re-position before the next drop commences. NOTE: To disable automatic drops, set this parameter to zero. You will then need to manually start every drop by pressing the a L keystroke combination. Stability Delay – this time determines how long after shutting the silo gate the program waits before looking for a stable weight from the indicator. The smaller this value is, the faster (and potentially less accurately) the drop will complete. For reverse weigh systems, this time is related to T3 discussed in Loading Setup; i.e., T3 should be set two or three seconds longer than the stability delay. Delay Before Material Flow Alarm – this value determines the length of time used by the program to determine when flow has stopped, typically due to an empty silo. Bridged material may free itself. A value of 7 seconds is a good compromise between long waits for empty silos and false material flow errors.

L C - 1 0 0 0 / L C - 2 0 0 0 S I L O L O A D O U T C O M P U T E R
SYSTEMS Equipment Corporation VER A60426 Page 66
Fig. 4-7 (above) Fig. 4-8 (below)

L C - 1 0 0 0 / L C - 2 0 0 0 S I L O L O A D O U T C O M P U T E R
SYSTEMS Equipment Corporation VER A60426 Page 67
Load Tolerance – this is a percentage value applied to the end of each load. If the net load is short by more than this percentage value, the program pauses with an option screen allowing you to complete the remainder of the load manually. Free Fall Constant – this value determines how rapidly new information from each drop is incorporated into what the program thinks the freefall is. Freefall is the amount of weight the load increases after the command to shut is gate is given. The freefall can change throughout the day due to temperature changes, amount of material in the silo, distance from silo gate to truck bed, etc. The program adjusts for these changes continually. The freefall constant determines how rapidly the program adjusts. When the freefall constant is set at zero, no adjustments are made (i.e., the freefall is fixed). Any value larger than zero, up to 50, applies that percentage of the freefall from the most recent drop to the value held internally by the program. If your system contains high vibration and you know the freefall fairly accurately, use a lower value. If your system is stable and you would like the program to adjust rapidly to changing conditions, use a larger value. Flow Rate Constant – this value is similar to the freefall constant but applies to updates the program makes to information it is collecting regarding the flow rate. The flow rate is used to anticipate when to shut the gates. It is also used to pre-load the PLC with a gate closure time so that if the LoadOut computer fails (a sudden power outage, for example), the PLC can safely shut the gates without receiving a command from the LoadOut computer. In most cases, the value you choose here should track the value you’re using for the freefall. Silo Inventory Prescale – for systems that receive measured pulses from the plant computer, this value determines the increase in production each pulse represents. For example, The SYSTEMS Equipment ADP-100 provides one pulse for each ton produced at the point of A/C injection. The LoadOut increases the inventory in the silo selected for filling each time a pulse arrives. Note reverse weigh silos do not need an inventory pulse because the silo weight can be directly measured.
Ticket SetupTicket SetupTicket SetupTicket Setup Fig. 4-8 shows the screen displayed when Ticket Setup is chosen. Company Name – these three fields are used to enter information about your company that will appear on printed tickets. Generally, your company’s address is entered here. Next Ticket Number – this field allows you to advance the ticket number. You cannot reduce the ticket number unless you first archive all tickets in the current ticket database. Refer to F4, File Maintenance, for instructions on how to archive the ticket database.

L C - 1 0 0 0 / L C - 2 0 0 0 S I L O L O A D O U T C O M P U T E R
SYSTEMS Equipment Corporation VER A60426 Page 68
Fig. 4-9 (above) Fig. 4-10 (below)

L C - 1 0 0 0 / L C - 2 0 0 0 S I L O L O A D O U T C O M P U T E R
SYSTEMS Equipment Corporation VER A60426 Page 69
Default to cash tickets – this option allows you to remain in cash ticket mode continually. If you set this option to “N”, you can enter cash mode for one ticket by pressing the t key on the main screen. After the load is completed and the cash ticket is printed, the program reverts to credit mode. Setting this option to “Y” keeps the program in cash mode after each load completes. Print Summary Results Only – in situations where only a single line summary ticket is require rather than a full invoice ticket, set this option to “Y”. Print Drops On Ticket – some states require that statistics for each drop be printed on each full invoice ticket. Set this option to “Y” if you would like to enable this feature. Form Length In Inches – if your blank ticket paper for the standard ticket is not 5.5”, you can change the ticket length by entering the page length here. Standard printer paper is 11” long yielding two tickets per sheet. Number Of Copies – if you need multiple copies each time you print a ticket, enter the desired number here. Note this number also applies to re-printed tickets. Print Alternate Units – some States require both metric and English units on tickets while other States prohibit multiple system of units. If you want both sets of units printed, enter “Y” here. Entering “N” prints only your selected set of units. See Loading Setup regarding how to select a set of units. Use custom ticket format – if you use preprinted ticket sheets and have purchased a custom ticket format file to your specifications, entering a “Y’ for this option will instruct the program to use it. Otherwise entering a “N” here causes the internal standard ticket format to be used.
Software SetupSoftware SetupSoftware SetupSoftware Setup
Before you can modify any data in Software Setup, you must enter a password. The purpose of the password is to prevent accidental entrance into this area where erroneous entries can cause the program to malfunction. After passing the password screen, a series of screens is displayed. The first screen is shown in Fig. 4-9. If this computer is the only loadout computer, or is the server in a Plant Local Area Network (i.e., the master computer), enter “Y” to network master. The station number is a unique number identifying LC-x000 computers. If your computer is the master computer, enter “1”. Otherwise, enter a number that uniquely identifies your computer. Note that the station number appears on the ticket, i.e. “004325-1”. Because multiple computers can generate the same ticket numbers, adding the station number to the ticket number allows your accounting department to determine the computer that generated the ticket. If your computer is the master, enter the number of computers in the network. If it’s the only computer, enter “1”.

L C - 1 0 0 0 / L C - 2 0 0 0 S I L O L O A D O U T C O M P U T E R
SYSTEMS Equipment Corporation VER A60426 Page 70
Fig. 4-11 (above) Fig. 4-12 (below)

L C - 1 0 0 0 / L C - 2 0 0 0 S I L O L O A D O U T C O M P U T E R
SYSTEMS Equipment Corporation VER A60426 Page 71
Fig. 4-10 shows the scales setup screen. Enter the number of weighing indicators used in your system. The LC-2000 system supports only one indicator – the LC-1000 can support several. Every scale attached to the system will display a screen as shown in Fig. 4-10 where the serial port parameters are entered. It is important that these parameters be correct because an erroneous parameter here can cause the program to malfunction. Following the weighing indicator parameter screen is the silo parameter screen as shown in Fig. 4-11. In this screen, the type of silo (i.e., TS for truck scale, WB for weigh batcher, or BW for reverse weigh) and the weighing indicator attached to it are specified. The drawing position parameter specifies the position, from left to right that the silo inventory pictograph should appear on inventory sub-window. Specifying a drawing position allows the pictographs to be drawn on the screen as seen from the operator’s perspective. There will be one screen similar to Fig. 4-11 for every silo in the system. The screen that follows, Fig. 4-12, contains several miscellaneous set-up parameters: Print each drop – enter ‘Y’ if you’d like the gross, net, and tare weights for each drop printed on standard tickets (not available for custom tickets) Print overloaded tickets – if your location prohibits generating tickets for overloaded trucks, choose ‘Y’ here. Overload limit – this is the amount over the maximum gross weight of a truck in which an overload condition is declared Keystroke rate – this is the time interval at which the program temporarily stops waiting for keystrokes to perform internal tasks. A value of 0.25 seconds is typical. To make the keyboard more responsive, increase this value. Decreasing the value causes the computer to capture weight reading more rapid at the expense of keyboard response. Background weight rate – this is the amount of time that the program requests information from the indicator when not loading a truck. Read silo rate – the program reads silo information from the PLC at this time interval. Watchdog time – this is the time in seconds of the longest possible drop before the computer gives an error and closes the gate. Minimum freefall time – this is the minimum amount of time the silo gates must be open during a drop before the program will consider a new freefall value as valid. Reject quantity – the accumulated amount of material that has been rejected through the reject gate.

L C - 1 0 0 0 / L C - 2 0 0 0 S I L O L O A D O U T C O M P U T E R
SYSTEMS Equipment Corporation VER A60426 Page 72
Fig. 4-13

L C - 1 0 0 0 / L C - 2 0 0 0 S I L O L O A D O U T C O M P U T E R
SYSTEMS Equipment Corporation VER A60426 Page 73
Disconnect PLC – in case of a PLC failure, set this parameter to “Y” to cause the program to ignore the PLC. Manual loading can proceed until the PLC is repaired. The next screen, as shown in Fig. 4-13, has the communication parameters of the PLC. These parameters are vital because if there are incorrect entries the computer will have no control over the hardware. The initial question is about silo inventory. If you don’t have a reverse weigh silo, and the plant computer has a tons-out pulse, the computer can keep an approximate inventory of each silo. If you do have a reverse weigh silo then the indicator will determine the silo inventory. The inventory is displayed graphically on the main screen with a pictograph for each silo. The other parameters on this screen determine the connection to the PLC and great care should be taken before modifying them. The next page of the setup accepts remote serial printer parameters. If a small sales slip type printer is used then answer yes to this question. The printer described here is not the ticket printer and would require an additional cable to the computer. The next section asks for if there is a remote modem used for downloading the databases (see the section Electronic Data Transfer – RedRover). The databases can be copied to a different computer in a different location for accounting purposes Silo information is entered in the next section of the setup. Each silo gets a page that is used to input different things depending on what type of scale is being used. This section is identical to the Loading Setup section. Please refer to that section for the final screens in the software setup.

L C - 1 0 0 0 / L C - 2 0 0 0 S I L O L O A D O U T C O M P U T E R
SYSTEMS Equipment Corporation VER A60426 Page 74
Fig. 4-14

L C - 1 0 0 0 / L C - 2 0 0 0 S I L O L O A D O U T C O M P U T E R
SYSTEMS Equipment Corporation VER A60426 Page 75
File Maintenance Choosing File Maintenance displays a sub-menu as shown in Fig. 4-14. The purpose of this section is to provide an easy way to clean up old databases that won’t be needed anymore. There is a danger of deleting useful lists, so great care must be taken when entering this section.
WARNING
ONCE YOU HAVE ERASED A LIST, YOU CANNOT GET IT BACK.
The ticket database is treated differently than the others because there is always a possibility of needing to regenerate an old ticket. That is why the ticket list is archived instead of erased. Older tickets are removed to a location on the LoadOut computer that the program will not normally access. An example of where erasing lists would be used is a portable asphalt plant that has just moved to a different area with different customers, trucks, etc. Adding to the old lists would be possible but the lists could be very large and there could be confusion between new and old jobs, customers, and trucks.
Archiving TicketsArchiving TicketsArchiving TicketsArchiving Tickets To archive tickets, press 1 from the File Maintenance menu. The next menu will ask for a range of tickets to archive by date. Choose the date that would include all of the tickets that are to be archived. To retrieve a ticket from an archive, press 7 from the File Maintenance menu. The program recovers all archived tickets and makes available all ticket list options. See the F3-Ticket List section. When you are done working with the archived tickets the program will reload the current working ticket database.
Erasing ListsErasing ListsErasing ListsErasing Lists To erase a list, press the number of the list you wish to delete in the File Maintenance menu. The program will then ask you to enter Y or N for deleting the list. If you answer yes, the program will then ask you if you are sure you want to delete the list. It asks twice because an erased list cannot be restored.
WARNING
DO NOT ERASE A LIST UNLESS YOU ARE SURE THAT YOU INTEND TO LOSE ALL THE DATA IN THAT LIST.

L C - 1 0 0 0 / L C - 2 0 0 0 S I L O L O A D O U T C O M P U T E R
SYSTEMS Equipment Corporation VER A60426 Page 76
Fig. 4-15 (above) Fig. 4-16 (below)

L C - 1 0 0 0 / L C - 2 0 0 0 S I L O L O A D O U T C O M P U T E R
SYSTEMS Equipment Corporation VER A60426 Page 77
Report Menu The report menu option displays a sub-menu from which you can print or display the following detailed reports: truck report customer report job report material report load report cash load report private customer report haul sheet The first four items that have reports are for the lists used by the program. The reports that are generated show all tickets involving that item. Because the procedure is the same for these reports, this manual will only show the example of the truck report. After choosing the truck report, a menu will ask if a single truck or all of the trucks should be included. Then it will ask for the date range of interest. With this information, the program will either print the report or view the report on the screen. The remaining items that are available for reports are handled differently since they cannot be created about an individual truck, customer, job, or material. Therefore, the menu that appears after selecting one of these reports asks only for the dates of interest. In addition, the option to view the report on the screen is not available so printing is the only form of output.
Print Truck List This option from the utility menu simply prints all the trucks that are on the truck list.
Print Job List This option from the utility menu simply prints all the jobs that are on the job list.
Print Customer List This option from the utility menu simply prints all the customers that are on the customer list.
Backup to Diskette The backup option will take all of the databases and put them on a floppy disk for retrieval later. If the time comes to get the data from the disk the Restore from Diskette option is used. If the lists are too large to fit on one disk, the program will ask for another disk until all files are saved. The person making the backup should label the disk or disks for future reference. If multiple disks are needed the disk number should also be included on the label.

L C - 1 0 0 0 / L C - 2 0 0 0 S I L O L O A D O U T C O M P U T E R
SYSTEMS Equipment Corporation VER A60426 Page 78
Fig. 4-17
Denotes Training Mode
L C - 1 0 0 0 / L C - 2 0 0 0 S I L O L O A D O U T C O M P U T E R
SYSTEMS Equipment Corporation VER A60426 Page 79
Backup to Diskette is very different from the File Maintenance menu. The backup will not effect the lists in any way. It is simply a method to protect your data in case of a computer problem. It is wise to periodically backup your data so that if something unforeseen happens, the amount of time required getting the system back to normal in minimized.
Restore from Diskette The restore option will ask for a diskette that has data from the Backup to Diskette option. With the disk in the computer, this option will overwrite all data currently in the program with the data that is on the diskette.
���� CAUTION
BECAUSE RESTORE FROM DISKETTE OVERWRITES DATA, THE PROGRAM WILL LOSE ANY NEW DATA, INCLUDING TICKETS, ENTERED SINCE THE BACKUP WAS RECORDED.
This option should only be used when there has been a major problem with all of the lists. Any tickets generated after the backup will be lost along with trucks, customers, jobs, and materials.
Training Mode / Resume LoadOut Mode The next option in the utility menu toggles between LoadOut Mode and Training Mode. Training mode simulates LoadOut operations using an entirely different set of practice databases—external hardware is disconnected. The computer will simulate the gates, silos, trucks, and weighing indicators. This mode is used for training operators so they can get a feel for how the program works before they control the real thing. Because training mode has the exact feel of the program, it is necessary to put a message on the screen warning that the program is in this mode. Fig. 4-16 shows how the main screen appears in training mode. All of the data in training mode is kept is a different location than the LoadOut data. There is no way to transfer training data to the LoadOut. The truck, job, customer, and material lists cannot be shared. The tickets that are generated in training mode are not useful for anything other than practicing with the program. To get out of training mode, use the Utility menu and choose the Resume Loadout Mode option.

L C - 1 0 0 0 / L C - 2 0 0 0 S I L O L O A D O U T C O M P U T E R
SYSTEMS Equipment Corporation VER A60426 Page 80

L C - 1 0 0 0 / L C - 2 0 0 0 S I L O L O A D O U T C O M P U T E R
SYSTEMS Equipment Corporation VER A60426 Page 81
Exit Program This option is the same as the System Shutdown Option in the Lists Menu. Choosing Exit Program allows you to terminate the program. All operating parameters and data are saved prior to program termination. The exception is any parametric data entered in training mode that would affect the actual running mode – this data is discarded. Shutting down can also be done from the main screen by pressing the r key twice. Refer to the section on the r key.
ESC Pressing the ESC key dismisses the utility menu.

L C - 1 0 0 0 / L C - 2 0 0 0 S I L O L O A D O U T C O M P U T E R
SYSTEMS Equipment Corporation VER A60426 Page 82
Fig. 5-1

L C - 1 0 0 0 / L C - 2 0 0 0 S I L O L O A D O U T C O M P U T E R
SYSTEMS Equipment Corporation VER A60426 Page 83
pppp F5 -UNRESOLVED TICKETS LC-1000 / LC-2000 systems with truck scales can also perform weigh-in/weigh-out (i.e., quarry) operations. If a truck arrives loaded and the tare weight is unknown, a partial ticket can be generated for which all information is known except the tare weight (and consequently the net weight). Refer to the Defer Tare option in Weigh-In / Weigh–Out. These partially resolved tickets are saved in a database awaiting further processing. To view the list of unresolved tickets, press p from the main screen, press N from the utility menu, or use the w or y keys to highlight the row and press e . The unresolved ticket screen appears as shown in Fig. 5-1. Note that in the ticket number column, either the word “bought” or “sold” appears rather than a ticket number. This is because no tickets have been generated yet. You can highlight an unresolved ticket from this screen and press e to copy it to the main screen. Unresolved tickets do not take part in any summary calculations. When a tare weight is captured using the F12 key from the main screen, the updated tare is used to compute the net weight for any unresolved tickets where this truck appears. These tickets are then moved to the main ticket database and printed. The load date and time that appear on the ticket is the date and time the ticket was entered into the unresolved database (the date and time the material crossed the scale). The ticket numbers assigned will be the next available ticket numbers although the original unresolved ticket might have been started many days earlier.

L C - 1 0 0 0 / L C - 2 0 0 0 S I L O L O A D O U T C O M P U T E R
SYSTEMS Equipment Corporation VER A60426 Page 84
Fig.6-1

L C - 1 0 0 0 / L C - 2 0 0 0 S I L O L O A D O U T C O M P U T E R
SYSTEMS Equipment Corporation VER A60426 Page 85
qqqq F6 -WEIGH IN / OUT OR
LOADOUT For configurations with truck scales, the q key toggles between Weigh In/Weigh Out mode and LoadOut mode. The mode the program is currently executing in is shown below the on-screen scale read-out. The caption will be a green bar and read “LoadOut” when operating in loadout mode – the caption will be red and read “Weigh In / Weigh Out” when operating in weigh-in / weigh-out mode. To switch modes, simply press the q key. Weigh In/Weigh Out mode is for quarry type operations. It is capable of using the truck scale to weigh, ticket and inventory all materials coming into and out of the plant. There are three pairs of choices when a loaded truck drives onto the scale. Each choice can be one or the other, NOT BOTH. The operator must tell the system: • Is the load being RECEIVED into the yard or DELIVERED to a customer? • Is the transaction a CASH SALE or purchase or is it a CREDIT SALE or purchase? • Should a ticket be generated now that will USE TARE on file, or should the system DEFER
TARE until the truck comes back empty? Ideally, a transaction where the plant is receiving material will happen in these steps: • A loaded truck drives onto the scale • Enter the truck ID, job ID and material being received • Choose a1 Received and whether the purchase is cash or credit • Choose a6 Defer Tare • aG to Generate Ticket • The system records all of the information in the unresolved database, but does not yet print
a ticket • The horn blows if present and if the Horn Load Complete (sec) setting is greater than zero
(see Loading Setup for more details) • The truck drives off of the scale and dumps material on the pile • The empty truck drives back onto the scale • Press to get a tare weight for the truck (see Tare for more details) • The unresolved ticket is resolved, stored into the ticket database, and a ticket is printed if
printer(s) are connected and enabled. The unresolved ticket is deleted. The tare need not be deferred if there is a recent, accurate tare on file for the truck. If the USE TARE option is selected, a ticket is printed immediately after pressing aG.

L C - 1 0 0 0 / L C - 2 0 0 0 S I L O L O A D O U T C O M P U T E R
SYSTEMS Equipment Corporation VER A60426 Page 86
L C - 1 0 0 0 / L C - 2 0 0 0 S I L O L O A D O U T C O M P U T E R
SYSTEMS Equipment Corporation VER A60426 Page 87
A transaction where the plant is delivering material should happen in these steps: • An empty truck drives onto the scale • Enter the truck ID • Press to get a tare weight for the truck (see Tare for more details) • The truck drives off of the scale and is loaded with material from the pile • The loaded truck drives back onto the scale • Enter the truck ID, job ID and material being received • Choose a4 Delivered and whether the sale is cash or credit • Choose a3 Use Tare • aG to Generate Ticket • Information is stored to the database and a ticket is printed if printer(s) are connected and
enabled • The horn blows if present and if the Horn Load Complete (sec) setting is greater than zero
(see Loading Setup for more details)
� NOTE
The material list holds inventory information for each of the materials (see material list for more information). In order to retain compatibility with the LoadOut system, negative amounts represent material inventory (stockpile) and positive amounts represent amounts shipped.

L C - 1 0 0 0 / L C - 2 0 0 0 S I L O L O A D O U T C O M P U T E R
SYSTEMS Equipment Corporation VER A60426 Page 88
.Fig. 7-1

L C - 1 0 0 0 / L C - 2 0 0 0 S I L O L O A D O U T C O M P U T E R
SYSTEMS Equipment Corporation VER A60426 Page 89
rrrr F7 -SYSTEM SHUTDOWN To exit the program, press the r key. In the event that you accidentally pressed the r key during daily operation, another screen appears asking you to verify your choice. The default option on this screen is “Yes”. You can select this option by pressing e. Pressing r will also select “Yes” so simply pressing the r key twice in succession is a fast and convenient way to exit the program.

L C - 1 0 0 0 / L C - 2 0 0 0 S I L O L O A D O U T C O M P U T E R
SYSTEMS Equipment Corporation VER A60426 Page 90
Fig. 8-1 (above) Fig. 8-2 (below)
Denotes Comments for This Customer
Options for Customer Comments

L C - 1 0 0 0 / L C - 2 0 0 0 S I L O L O A D O U T C O M P U T E R
SYSTEMS Equipment Corporation VER A60426 Page 91
ssss F8 -COMMENTS Comments are informational records attached to the customers you choose. For example, if a particular customer should always pay in cash, you can add a comment to alert the LoadOut operator to this fact. When a comment record is attached to a customer, a flashing asterisk appears to the right of the customer number as shown in Fig. 8-1. After the customer field has been completed on the main screen, you can view, edit, add, or delete the comment by pressing s or use l -Customer Comments, as shown in Fig. 8-2. If a comment record exists for the selected customer, a red alert message appears on the screen after you press a L to begin loading the truck. At this point, you can choose to continue loading or cancel the load. Comments are a very useful way for your accounting department, using RedRover from a distant location, to warn the operator of special conditions. See the section Electronic Data Transfer – RedRover.

L C - 1 0 0 0 / L C - 2 0 0 0 S I L O L O A D O U T C O M P U T E R
SYSTEMS Equipment Corporation VER A60426 Page 92
Fig. 9-1
Cash Ticket Inputs

L C - 1 0 0 0 / L C - 2 0 0 0 S I L O L O A D O U T C O M P U T E R
SYSTEMS Equipment Corporation VER A60426 Page 93
tttt F9 -CASH SALE The LoadOut can be configured to always run in cash mode or to execute an occasional cash sale (see o, (S)ystem Setup, (T)icket Setup, Default to cash tickets). In either case, pressing t brings up the price/tax window as shown in Fig. 9-1 from which you can modify the price per unit and tax rate. Prices are stored internally in units of dollars per
pound. If the operator switches to a different set of units, prices are automatically converted
to reflect the new set of units.
If you use cash tickets only occasionally, you can cancel the cash ticket before the load starts by pressing t again. Otherwise, continue with the normal load process. Once the load has completed, the program will return to credit ticket mode.

L C - 1 0 0 0 / L C - 2 0 0 0 S I L O L O A D O U T C O M P U T E R
SYSTEMS Equipment Corporation VER A60426 Page 94
Fig. 10-1 (above) Fig. 10-2 (below)
Silo Inventory Pictographs

L C - 1 0 0 0 / L C - 2 0 0 0 S I L O L O A D O U T C O M P U T E R
SYSTEMS Equipment Corporation VER A60426 Page 95
uuuu F10-FILL / EMPTY
INVENTORY PICTOGRAPH For truck scale and weigh batching silos, you can reset the silo inventory pictograph to either filled or empty by pressing u. If the operator needs to frequently switch the silo that is filling, or small calibration errors exist, etc., the count of material inventory in a silo can become slightly inaccurate during the course of a day. At a known point, such as an empty silo or a high silo alarm, this option can be used to adjust the pictograph quickly and easily. To make a selection from the list of displayed choices, use the w or y keys to move through the list. The following are the available choices: • [Selected Silo] has been emptied. This choice sets the amount in the silo inventory
pictograph for the selected silo to zero. • [Selected Silo] has been filled. This choice sets the amount in the silo inventory pictograph
for the selected silo to the silo capacity entered in loading setup.
This feature is not necessary for a reverse weigh silo because the program can directly determine the amount of material in the silo by simply reading the silo weight.

L C - 1 0 0 0 / L C - 2 0 0 0 S I L O L O A D O U T C O M P U T E R
SYSTEMS Equipment Corporation VER A60426 Page 96
Fig. 11-1
Copy Mode Options

L C - 1 0 0 0 / L C - 2 0 0 0 S I L O L O A D O U T C O M P U T E R
SYSTEMS Equipment Corporation VER A60426 Page 97
F11-COPY MODE The copy mode controls how the program automatically completes the main screen when the operator enters a truck number. From any location on the main screen, the operator may change the information copy mode by pressing . To make a selection from the list of choices, use the w or y keys to move through the list. The chosen copy mode appears at the bottom right corner of the main screen (i.e., TRUCK, TICKET, or MANUAL). The following are the available copy modes: • Manually enter every field—this choice requires that operator type in the job/customer
information for every load. In Weigh In/Weigh Out mode, the material description must be changed manually, if necessary. In LoadOut mode, the material description is taken from the selected silo.
• Copy job/customer information from the last TICKET—this choice automatically uses
the job/customer information from the last ticket in the ticket database. In this mode, the operator only has to type the job/customer information if the current load is going to a different job. The material description will be copied from the ticket when operating in Weigh In/Weigh Out mode. In LoadOut mode, the material description is taken from the selected silo.
• Copy job/customer information from the last load for this TRUCK—this choice
automatically uses the job/customer information from the last ticket for this truck (it is possible that the last ticket for this truck may not be the same as the last ticket in the ticket database). In this mode, the operator only has to type the job/customer information if the truck is going to a different job. The material description will be copied from the ticket when operating in Weigh In/Weigh Out mode. In LoadOut mode, the material description is taken from the selected silo.

L C - 1 0 0 0 / L C - 2 0 0 0 S I L O L O A D O U T C O M P U T E R
SYSTEMS Equipment Corporation VER A60426 Page 98
Fig. 12-1
Truck Tare Options
L C - 1 0 0 0 / L C - 2 0 0 0 S I L O L O A D O U T C O M P U T E R
SYSTEMS Equipment Corporation VER A60426 Page 99
F12-TARE A TRUCK If the system has a truck scale, the operator may tare a truck from any location on the main screen, by pressing . If no truck has been entered in the truck area, the truck list will come up to allow selection of a truck to tare. Once a truck is selected, a list of choices is displayed. To make a selection from the list, use the w or y keys to move through the list or simply type a highlighted key. The following items are available: • Read Scale Tare This choice reads the current weight on the indicator, stores it to the database as the selected truck’s tare weight, and resolves unresolved Weigh In/Weigh Out tickets for that truck. The load horn is sounded to alert the driver that the tare has been taken. • Use Database Tare This choice resolves unresolved Weigh In/Weigh Out tickets for a truck using the tare weight stored in the database. • Manually Enter Tare This choice allows the operator to type in the weight to be stored as the truck’s tare in the database and resolve unresolved Weigh In/Weigh Out tickets for that truck. • Cancel Return to the main screen.

L C - 1 0 0 0 / L C - 2 0 0 0 S I L O L O A D O U T C O M P U T E R
SYSTEMS Equipment Corporation VER A60426 Page 100

L C - 1 0 0 0 / L C - 2 0 0 0 S I L O L O A D O U T C O M P U T E R
SYSTEMS Equipment Corporation VER A60426 Page 101
HAND-GENERATED TICKETS Tickets may be added to the ticket database when the net weight information cannot be obtained from your LoadOut system. This is most useful, for example, when your weighing indicator is damaged and the weight information is obtained from an independent scale. With hand-generated tickets, you can use this independent weight information to keep your ticket database consolidated. To enter a hand-generated ticket, fill out the main screen as you normal would prior to loading a truck. When the information has been entered, hold down the a key and press P. The ticket information will be added and printed. A message “Hand Generated Ticket” will be clearly printed on the ticket. Reprinted tickets will also print this message. The ticket will appear in the ticket database with “H” on the left-hand side of the display. This feature should only be used when absolutely necessary to keep your ticket database organized.

L C - 1 0 0 0 / L C - 2 0 0 0 S I L O L O A D O U T C O M P U T E R
SYSTEMS Equipment Corporation VER A60426 Page 102

L C - 1 0 0 0 / L C - 2 0 0 0 S I L O L O A D O U T C O M P U T E R
SYSTEMS Equipment Corporation VER A60426 Page 103
ELECTRONIC DATA
TRANSFER—REDROVER RedRover is a program (purchased separately) that transfers data between a remote location and a LC-x000 computer. In order to use RedRover, an MS-DOS-compatible ISA modem must be installed in both the LC-x000 computer and the remote computer, and RedRover must be installed on the remote computer. From the remote computer, RedRover can access the LC-x000 databases and perform the following functions:
• retrieve tickets from an LC-x000 computer for any combination of start date, end date, truck, job, customer, and material (editing the ticket database is not supported). Once retrieved, these tickets can be incorporated into your company’s accounting system electronically
• edit the truck database • edit the job database • edit the customer database • edit the materials database • edit the comments database RedRover allows your accounting department to electronically retrieve tickets into your accounting system, eliminating most of the manual re-typing that would otherwise be required. RedRover also allows database editing from a central accounting location, freeing the operator to run the plant.

L C - 1 0 0 0 / L C - 2 0 0 0 S I L O L O A D O U T C O M P U T E R
SYSTEMS Equipment Corporation VER A60426 Page 104

L C - 1 0 0 0 / L C - 2 0 0 0 S I L O L O A D O U T C O M P U T E R
SYSTEMS Equipment Corporation VER A60426 Page 105
SLEEP MODE If an MS-DOS-compatible ISA modem is installed in the LC-x000 computer and a remote computer has RedRover installed, you may leave the computer LC-x000 running unattended (overnight, for example) so that it’s databases may be accessed. In order to prevent phosphor screen burning, the LC-x000 computer may be put in a “sleep” mode. In sleep mode, the program ignores all external hardware and monitors only an installed modem and the keyboard. When in sleep mode, the program clears the screen to a blue background and periodically scrolls a simple message across the screen, indicating it is “sleeping”. To enter sleep mode, press and hold a, then press S. To wake up a sleeping LC-x000 computer, hold down the a key, then press the S key again.

L C - 1 0 0 0 / L C - 2 0 0 0 S I L O L O A D O U T C O M P U T E R
SYSTEMS Equipment Corporation VER A60426 Page 106
IN A B
4 5 6 7
0 1 2 3
VAC
110
7 7
26
3
4 5
NCCB
10
D2-16NA
0CA
3
415 6
2
D2-16NA
80-132VAC
10-20mA
50/60Hz
0CA
7
26
3
73
415 6
2
4 5
NCCB
10
24
IN
VDC
A B
4 5 6 7
0 1 2 3
D2-16ND3-2
20-28VDC
8mA
D2-06B 110/220VAC
24VDC OUT
_0.2A
+
205
Koyo
85-264VAC
50/60 Hz
G
Direct
Logic
0H
D2-240 CPU
PORT 2
PORT 1
CH4
CH3
CH2
RUN
CPU
BATT
PWR
CPU DL240
CPU
CH1
RUN
TERM
0CA
7
26
3
73
415 6
2
4 5
NCCB
10
24
IN
VDC
A B
4 5 6 7
0 1 2 3
D2-16ND3-2
20-28VDC
8mA
0+
0-
0G
0N
3
7
D2-08TR
RELAY
5-240VAC
1A 50/60Hz
5-30VDC
5mA-1A
C 5 6
0 2C
4
1
L
L0 1 2 3
4 5 6 7
OUT
D2-08TR
3
7
D2-08TR
RELAY
5-240VAC
1A 50/60Hz
5-30VDC
5mA-1A
C 5 6
0 2C
4
1
L
L0 1 2 3
4 5 6 7
OUT
D2-08TR
Power Light
Normally
ON
Run Light
Normally
ON
CPU Light
Normally
OFF
Input 4A0
Light should
be lit when
gob hopper
opens
A/B Switch
Should be on
“A” to view
status of first
eight inputs
Output 50
Light should be
lit when system
trying to open
silo 1
Module 2
Module 1
Module 3
Module 4
Module 5
Module 6

L C - 1 0 0 0 / L C - 2 0 0 0 S I L O L O A D O U T C O M P U T E R
SYSTEMS Equipment Corporation VER A60426 Page 107
TROUBLESHOOTING The following is a list, in no particular order, of things that might come up and things to try before you call your dealer for service.
Symptom Problem Suggested Remedy
No picture on monitor • Computer/monitor not plugged in
• Plug computer/monitor in
• Computer/monitor not turned on
• Turn computer/monitor on
• Cable disconnected between computer and monitor
• Check cabling between devices (15 pin VGA cable, may have in-line extensions)
• Loadout has been shut down improperly
• Respond with Y for yes. To prevent from happening in future:
• Always shut down loadout with F7
Before loadout program starts, screen has message: “n lost allocation units in n chains. Convert lost chains to files?” • Loadout has experienced a
power sag or surge • Use an uninterruptible
power source (ups). If on a generator, don’t turn on the loadout until generator is up to power

L C - 1 0 0 0 / L C - 2 0 0 0 S I L O L O A D O U T C O M P U T E R
SYSTEMS Equipment Corporation VER A60426 Page 108
RX2
INPUT
Y4
D0-05AR
OUTPUT
X6
X4
X0X1X2X3
X5
05Direct
LOGIC
Koyo
X7
Y0Y1Y2Y3
Y5
PWR
RUN
CPU
TX1
RX1
TX2
95-240V~
30VA 50-60Hz
6-240V~2. 0A 50-60Hz
X1
X0-X7: INPUT
AC(N)
AC(L)
C0
GLG
X0
X3
X2
C1
90-120V~7-15mA
50-60Hz
Y0
C2
X4
X6
X7
X5
Y3
Y5
Y1
Y2
Y4
C3
Y0-Y5: OUTPUT
6-27V - 2.0A
Power Light
Normally
ON
Run Light
Normally ON
CPU Light
Normally OFF
Output Y0
Light should be lit when
system trying to open silo 1
Input X0
Light should be lit
when gob hopper
open

L C - 1 0 0 0 / L C - 2 0 0 0 S I L O L O A D O U T C O M P U T E R
SYSTEMS Equipment Corporation VER A60426 Page 109
Loadout program starts and gives message beginning “The weighing indicator has not responded…”
• Computer cannot establish communications with weighing indicator
• Check weighing indicator power
• Check cabling between indicator and computer (usually SYSTEMS 1011 or 1311 cable—9 or 25 pin serial cable at computer end)
Loadout program starts and gives message beginning “The silo PLC is not responding…”
• Computer cannot establish communications with PLC [usually SYSTEMS 1190 enclosure (LC-1000) or DL-05 (LC-2000)]
• Check PLC power. SYSTEMS 1190 enclosure has a power switch on door AND a fuse inside. PLC CPU’s also have power light.
• Check PLC cabling (SYSTEMS 1336 cable—9 pin serial cable at computer end, RJ-12 (phone) jack at PLC end—goes into PLC port 2)
• Check that PLC is in RUN mode (RUN light on CPU should be ON)
• Check that PLC does not have a CPU error (CPU light on CPU should be OFF)
1. Gate check utility does not open gate
• Manual hardware emergency stop button engaged
• Disengage e-stop
• Manual system interlock not made
• Check manual system interlocks, i.e.: low air, safety gates, gob hopper/batcher limit switches
System says (Alt-L)oad, operator presses aL, gates won’t open, system gives message: “Material Flow Error”
• PLC wiring not connected to silo gate solenoid
• Check interconnect wiring
• No panel power at PLC output
• PLC has two sets of Hot, Neutral and Ground—one to supply it and one to control hardware. Make sure the second set is hooked up to panel (control) power

L C - 1 0 0 0 / L C - 2 0 0 0 S I L O L O A D O U T C O M P U T E R
SYSTEMS Equipment Corporation VER A60426 Page 110
• PLC output burned out • Select Draw From silo 1, do gate check, watch PLC output indicator light for silo 1 [50 in 1190 enclosure (LC-1000); Y0 on DL-05 PLC (LC-2000)]
• Replace PLC Output Module or Module Fuse
2. Gate check utility does open gate
• Freefall is larger than desired drop size
• Use fewer drops or ticket this load manually
• Manual hardware emergency stop button engaged
• Disengage e-stop System says (Alt-L)oad, operator presses aL, gates won’t open, system gives message: “Waiting for Gob Hopper” and never moves on (reverse weigh only)
• PLC wiring not connected to gob hopper open signal; PLC input burned out
• Check interconnect wiring to PLC input [4A0 in 1190 enclosure (LC-1000); X0 on DL-05 PLC (LC-2000)]; verify PLC indicator light lights
System does not respond to typed commands
• Keyboard disconnected • Turn computer power off (just this once!) plug keyboard back into computer
Printer is not printing tickets
• Printer cable disconnected • Check printer cable (parallel printer cable—25-pin at computer end, 50 contact Centronics at printer end)

L C - 1 0 0 0 / L C - 2 0 0 0 S I L O L O A D O U T C O M P U T E R
SYSTEMS Equipment Corporation VER A60426 Page 111
LC-1000 / LC-2000 DATABASE
FORMATS This document describes the fields in the databases used by an LC-x000 Material Loading Computer System. These databases are generated using Microsoft FoxPro 2.6 for MS-DOS in a dBase IV format. As such, they are directly readable by Microsoft Excel, Lotus 1-2-3, and other spreadsheet or database programs. This list of databases does not include all databases used by the program. The order of the fields listed below may not occur in the actual database in the order shown. As improvements are made to the program, the order, size, and characteristics of these fields may change. Any analysis program you may develop should NOT rely on field order. Notes regarding algebraic signs: Material sold to customers is defined as being positive in sign and adds to the material inventory as positive. The net amount shown on the ticket will be positive. In addition, gross and tare weights are positive. Material bought from customers is defined as being negative in sign and adds to the material inventory as a negative number. In other words, if your material inventory is negative, it represents the net amount you have on hand. If the material inventory is positive, it represent the net amount sold to customers. If a correction is made to a ticket, two additional tickets are issued - one undo ticket to correct the material inventory and another redo ticket to issue out the correction. The algebraic sign maintained in the ticket database uses the following convention for gross, tare, and net weights:
Loadout Weigh Out Weigh In
Inventory Ticket: Positive Positive Negative
Undo Ticket: Negative Negative Positive
Redo Ticket: Positive Positive Negative
In order to maintain a consistent numeric system, the program will assign the same sign to the gross and tare weights that it assigns to the net weight as shown in the table above. This is so that correction tickets, sales taxes, shipping charges, etc. are correctly computed. Obviously it is not possible to have negative weights - the algebraic sign simply serves to indicate the direction material is moving and to maintain accurate computations. For computational purposes:
Net Weight = Gross Weight – Tare Weight
The absolute value of the net is the amount of inventory change and the sign indicates the direction material is moving (i.e., positive when sold to a customer and negative when bought from a customer).

L C - 1 0 0 0 / L C - 2 0 0 0 S I L O L O A D O U T C O M P U T E R
SYSTEMS Equipment Corporation VER A60426 Page 112
Structure for database: TICKET.DBF A ticket record contains all information necessary to reconstruct the event at the time the ticket was generated. Therefore, jobs, customers, trucks, materials, etc. can be deleted from their respective databases without destroying the information needed to describe the ticket.
Field Field Name Type Width Decimals
1 TICKET Character 8
2 MIX Character 20
3 MIXDSCRPT1 Character 8
4 MIXDSCRPT2 Character 8
5 NET Numeric 18 4
6 PRICE Numeric 18 8
7 JOB_NUM Character 10
8 CUST_NUM Character 10
9 TRUCK Character 8
10 PUPTRUCK Character 8
11 LOADDATE Date 8
12 LOADTIME Character 5
13 POSTDATE Date 8
14 LINK_FORW Character 8
15 LINK_BACK Character 8
16 JOB_L1 Character 35
17 JOB_L2 Character 35
18 JOB_L3 Character 35
19 JOB_L4 Character 35
20 ZONE Character 10
21 ZONECHARGE Numeric 18 8
22 TAX_RATE Numeric 18 8
23 DISTANCE Numeric 18 8
24 PER_MILE Numeric 18 8
25 PER_LOAD Numeric 18 8
26 PER_LB Numeric 18 8
27 CUST_R1 Character 35
28 CUST_R2 Character 35
29 CUST_R3 Character 35
30 CUST_R4 Character 35
31 COMMENT Logical 1
32 MIX_NUM Numeric 2
33 MAX_GROSS Numeric 18 8
34 GROSS Numeric 18 8
35 TARE Numeric 18 4
36 MEASURTARE Logical 1
37 DROPS Numeric 2
38 TRKCOMMENT Character 35
39 PUPMAXGROS Numeric 18 8
40 PUPGROSS Numeric 18 8

L C - 1 0 0 0 / L C - 2 0 0 0 S I L O L O A D O U T C O M P U T E R
SYSTEMS Equipment Corporation VER A60426 Page 113
Field Field Name Type Width Decimals
41 PUPTARE Numeric 18 4
42 PUPMEASTAR Logical 1
43 PUPDROPS Numeric 2
44 CHANGEDATE Date 8
45 CHANGETIME Character 5
46 CT Logical 1
47 CTL Numeric 3
48 CASH Logical 1
49 TAX Numeric 18 8
50 TOTAL Numeric 18 8
51 WEIGHMASTR Character 32
52 RESOLVED Character 8
53 MANUALLOAD Logical 1
54 TODAYSNET Numeric 18 8
55 JTD Numeric 18 8
56 TODAYLOADS Numeric 3
57 COMPOSE Logical 1
58 TICKCOMNT1 Character 35
59 TICKCOMNT2 Character 35
60 TICKCOMNT3 Character 35
61 TICKCOMNT4 Character 35
** Total ** 979
Explanation of fieExplanation of fieExplanation of fieExplanation of fields in TICKET.DBFlds in TICKET.DBFlds in TICKET.DBFlds in TICKET.DBF Field Field name Type Width Dec Start End
1 TICKET Character 8 1 8 A unique value field of the form NNNNNN-S where NNNNNN is a 6-digit ticket number and S is the station number from which the ticket was generated. 2 MIX Character 20 9 28 The name of the mix or material that was used when this ticket was created 3 MIXDSCRPT1 Character 8 29 36 An optional additional mix descriptive field. 4 MIXDSCRPT2 Character 8 37 44 An optional additional mix descriptive field. 5 NET Numeric 18 4 45 62 The net weight expressed in lbs. on this ticket. 6 PRICE Numeric 18 8 63 80 The price, in dollars per lb., for the material on this ticket.

L C - 1 0 0 0 / L C - 2 0 0 0 S I L O L O A D O U T C O M P U T E R
SYSTEMS Equipment Corporation VER A60426 Page 114
7 JOB_NUM Character 10 81 90 The job this material was sent to or came from. 8 CUST_NUM Character 10 91 100 The customer to bill or pay for the material on this ticket. 9 TRUCK Character 8 101 108 The truck the material on this ticket was hauled on. 10 PUPTRUCK Character 8 109 116 The number of drops used to load pup truck, if applicable. 11 LOADDATE Date 8 117 124 The date this ticket was generated. 12 LOADTIME Character 5 125 129 The time of day this ticket was generated. 13 POSTDATE Date 8 130 137 The date on which this ticket should be posted to the owner’s accounts. This field may differ from LOADDATE. 14 LINK_FORW Character 8 138 145 If this ticket is involved in a correction ticket sequence, this field contains the ticket number of the next ticket in the sequence. If this field is empty, this ticket is the final correction ticket. 15 LINK_BACK Character 8 146 153 If this ticket is involved in a correction ticket sequence, this field contains the ticket number of the previous ticket in the sequence. If this field is empty, this ticket is the original ticket from which the correction sequence begins. 16 JOB_L1 Character 35 154 188 17 JOB_L2 Character 35 189 223 18 JOB_L3 Character 35 224 258 19 JOB_L4 Character 35 259 293 These fields are the free-form job fields used for operator description of the job on this ticket. 20 ZONE Character 10 294 303 The zone in which this job lies. 21 ZONECHARGE Numeric 18 8 304 321 The charge, in dollars, for hauling the load on this ticket to ZONE. 22 TAX_RATE Numeric 18 8 322 339 The tax rate to be applied to this ticket. 23 DISTANCE Numeric 18 8 340 357 The distance, in miles, to this job.

L C - 1 0 0 0 / L C - 2 0 0 0 S I L O L O A D O U T C O M P U T E R
SYSTEMS Equipment Corporation VER A60426 Page 115
24 PER_MILE Numeric 18 8 358 375 The shipping charge, in dollars per mile, which applies to this ticket. 25 PER_LOAD Numeric 18 8 376 393 The shipping charge, in dollars per load, which applies to this ticket. 26 PER_LB Numeric 18 8 394 411 The shipping charge, in dollars per lb., which applies to this ticket. 27 CUST_R1 Character 35 412 446 28 CUST_R2 Character 35 447 481 29 CUST_R3 Character 35 482 516 30 CUST_R4 Character 35 517 551 These fields are the free-form customer fields used for operator description of the customer on this ticket. 31 COMMENT Logical 1 552 552 This field contains ‘T’ if the customer on this ticket has a credit comment. 32 MIX_NUM Numeric 2 553 554 The number of the mix on this ticket. Used internally by the LC-x000 program and has no significance to the operator. 33 MAX_GROSS Numeric 18 8 555 572 The maximum gross weight, in lbs., for the truck specified on this ticket. 34 GROSS Numeric 18 8 573 590 The gross weight, in lbs., of the load on this truck. 35 TARE Numeric 18 4 591 608 The tare weight, in lbs., of the truck on this ticket. 36 MEASURTARE Logical 1 609 609 This field equals 'T' if the tare is measured by a scale - equals 'F' if entered by hand. 37 DROPS Numeric 2 610 611 The number of drops used to load this truck. 38 TRKCOMMENT Character 35 612 646 An optional field to store additional information about the truck. This information is not used unless it is printed on a custom ticket or custom report. 39 PUPMAXGROS Numeric 18 8 647 664 If a pup truck is involved in this ticket, the maximum allowable gross, in lbs, for the pup truck. 40 PUPGROSS Numeric 18 8 665 682 The truck the material on this ticket was hauled on.

L C - 1 0 0 0 / L C - 2 0 0 0 S I L O L O A D O U T C O M P U T E R
SYSTEMS Equipment Corporation VER A60426 Page 116
41 PUPTARE Numeric 18 8 683 700 If a pup truck was used, the tare weight, in lbs., of the pup truck on this ticket. 42 PUPMEASURTAR Logical 1 701 701 This field equals 'T' if the ticket used a pup truck and the pup truck tare is measured by a scale - equals 'F' if entered by hand. 43 PUPDROPS Numeric 2 702 703 The truck the material on this ticket was hauled on. 44 CHANGEDATE Date 8 704 711 45 CHANGETIME Character 5 712 716 If this ticket is involved in a correction sequence, these fields specify the date and time the correction was made. 46 CT Logical 1 717 717 A correction ticket flag. This field will be set to ‘T’ if this ticket is involved in a correction ticket. 47 CTL Numeric 3 718 720 Used internally for correction tickets. 48 CASH Logical 1 721 721 This field will be set equal to ‘T’ if this ticket was a cash ticket. 49 TAX Numeric 18 8 722 739 50 TOTAL Numeric 18 8 740 757 These fields are maintained for historical reasons. Use ‘PRICE’ and ‘TAX_RATE’ along with shipping charge fields to compute the value of the material on this ticket. 51 WEIGHMASTR Character 32 758 789 The operator who generated the ticket. If this is a correction ticket, it will contain the name of the operator who created the correction. 52 RESOLVED Character 8 790 797 A field used internally to track Weigh In/Weigh Out (quarry operation) tickets where the gross weight is known before the truck has been tared. 53 MANUALLOAD Logical 1 798 798 If this ticket was generated manually, this field will contain ‘T’. 54 TODAYSNET Numeric 18 8 799 816 Stores a temporary job summary for the current day. This field is used to avoid recomputing summaries repeatedly – not useful otherwise. 55 JTD Numeric 18 8 817 834 Stores a temporary job summary for tickets remaining in the database. This field is used to avoid recomputing summaries repeatedly – not useful otherwise.

L C - 1 0 0 0 / L C - 2 0 0 0 S I L O L O A D O U T C O M P U T E R
SYSTEMS Equipment Corporation VER A60426 Page 117
56 TODAYSLOADS Numeric 3 0 835 837 Stores a temporary load count for the current day. This field is used to avoid recomputing summaries repeatedly – not useful otherwise. 57 COMPOSE Logical 1 838 838 A flag used internally. 58 TICKCOMNT1 Character 20 839 859 This field can be used by accounting personnel for ticket specific information. Currently not used by loadout software. 59 TICKCOMNT2 Character 20 860 880 This field can be used by accounting personnel for ticket specific information. Currently not used by loadout software. 60 TICKCOMNT3 Character 20 881 901 This field can be used by accounting personnel for ticket specific information. Currently not used by loadout software. 61 TICKCOMNT4 Character 20 902 922 This field can be used by accounting personnel for ticket specific information. Currently not used by loadout software.

L C - 1 0 0 0 / L C - 2 0 0 0 S I L O L O A D O U T C O M P U T E R
SYSTEMS Equipment Corporation VER A60426 Page 118
The following is an explanation of other databases used by the program. This list is not a complete list of all databases used. Many of the fields are important only in the operation of the program and have no meaning to the operator. An explanation is given only for those fields pertinent to the operator.
Structure for database: TRUCK.DBF Field Field name Type Width Dec Start End
1 NUMBER Character 8 1 8
2 PUP_TRUCK Character 8 9 16
3 NET Numeric 18 4 17 34
4 LJOB Character 10 35 44
5 DROPS Numeric 1 45 45
6 LCUST Character 10 46 55
7 LTICKET Character 8 56 63
8 GROSS Numeric 18 4 64 81
9 LAST Logical 1 82 82
10 TARE Numeric 18 4 83 100
11 TARE_DATE Date 8 101 108
12 TARE_TIME Character 5 109 113
13 MEASURTARE Logical 1 114 114
Explanation of fields in TRUCK.DBFExplanation of fields in TRUCK.DBFExplanation of fields in TRUCK.DBFExplanation of fields in TRUCK.DBF
Field Field name Type Width Dec Start End
1 NUMBER Character 8 1 8 The truck number, which appears on the ticket when this truck is loaded. 2 PUP_TRUCK Character 8 9 16 Optional field used to specify a pup truck being pulled by this truck. 3 NET Numeric 18 4 17 34 The net weight, in lbs., to load onto this truck. 4 LJOB Character 10 35 44 5 DROPS Numeric 1 45 45 The number of drops to use when loading this truck. 6 LCUST Character 10 46 55 7 LTICKET Character 8 56 63 8 GROSS Numeric 18 4 64 81 The maximum gross weight, in lbs., this truck can be legally loaded to. 9 LAST Logical 1 82 82 10 TARE Numeric 18 4 83 100

L C - 1 0 0 0 / L C - 2 0 0 0 S I L O L O A D O U T C O M P U T E R
SYSTEMS Equipment Corporation VER A60426 Page 119
The current tare weight, in lbs. 11 TARE_DATE Date 8 101 108 The date of the last tare for this truck. 12 TARE_TIME Character 5 109 113 The time of day this truck was tared. 13 MEASURTARE Logical 1 114 114 Indicates if the tare weight was measured by instruments or entered manually.

L C - 1 0 0 0 / L C - 2 0 0 0 S I L O L O A D O U T C O M P U T E R
SYSTEMS Equipment Corporation VER A60426 Page 120
Structure for database: JOB.DBF Field Field name Type Width Dec Start End
1 JOB_NUM Character 10 1 10
2 CUST_NUM Character 10 11 20
3 ZONE Character 10 21 30
4 ZONECHARGE
Numeric 18 8 31 48
5 TAX_RATE Numeric 18 8 49 66
6 DISTANCE Numeric 18 8 67 84
7 PER_MILE Numeric 18 8 85 102
8 PER_LOAD Numeric 18 8 103 120
9 PER_LB Numeric 18 8 121 138
10 L1 Character 35 139 173
11 L2 Character 35 174 208
12 L3 Character 35 209 243
13 L4 Character 35 244 278
14 LAST Logical 1 279 279
15 JOB_EXTRA Character 64 280 343
Explanation of fields in JOB.DBFExplanation of fields in JOB.DBFExplanation of fields in JOB.DBFExplanation of fields in JOB.DBF
Field Field name Type Width Dec Start End 1 JOB_NUM Character 10 1 10 The job name. 2 CUST_NUM Character 10 11 20 This field ties the job to a customer in CUSTOMER.DBF. Every job must have a customer attached. 3 ZONE Character 10 21 30 See the ticket database explanation of this field. 4 ZONECHARGE Numeric 18 8 31 48 See the ticket database explanation of this field. 5 TAX_RATE Numeric 18 8 49 66 See the ticket database explanation of this field. 6 DISTANCE Numeric 18 8 67 84 See the ticket database explanation of this field. 7 PER_MILE Numeric 18 8 85 102 See the ticket database explanation of this field.

L C - 1 0 0 0 / L C - 2 0 0 0 S I L O L O A D O U T C O M P U T E R
SYSTEMS Equipment Corporation VER A60426 Page 121
8 PER_LOAD Numeric 18 8 103 120 See the ticket database explanation of this field. 9 PER_LB Numeric 18 8 121 138 See the ticket database explanation of this field. 10 L1 Character 35 139 173 11 L2 Character 35 174 208 12 L3 Character 35 209 243 13 L4 Character 35 244 278 See the ticket database explanation of these fields. 14 LAST Logical 1 279 279 15 JOB_EXTRA Character 64 280 343 For internal use.

L C - 1 0 0 0 / L C - 2 0 0 0 S I L O L O A D O U T C O M P U T E R
SYSTEMS Equipment Corporation VER A60426 Page 122
Structure for database: CUSTOMER.DBF Field Field name Type Width Dec Start End
1 R1 Character 35 1 35
2 R2 Character 35 36 70
3 R3 Character 35 71 105
4 R4 Character 35 106 140
5 LAST Logical 1 141 141
6 CUST_NUM Character 10 142 151
7 CUST_EXTRA Character 64 152 215
Explanation of fields in CUSTOMER.DBFExplanation of fields in CUSTOMER.DBFExplanation of fields in CUSTOMER.DBFExplanation of fields in CUSTOMER.DBF
Field Field name Type Width Dec Start End
1 R1 Character 35 1 35 2 R2 Character 35 36 70 3 R3 Character 35 71 105 4 R4 Character 35 106 140 See the ticket database explanation of these fields. 5 LAST Logical 1 141 141 6 CUST_NUM Character 10 142 151 The customer name, which is tied to a job or series of jobs. When a job is chosen, the customer the job is attached to is automatically selected and will appear on the ticket along with the selected job. 7 CUST_EXTRA Character 64 152 215 For internal use.

L C - 1 0 0 0 / L C - 2 0 0 0 S I L O L O A D O U T C O M P U T E R
SYSTEMS Equipment Corporation VER A60426 Page 123
Structure for database: MIXES.DBF Field Field name Type Width Dec Start End
1 MIX Character 20 1 20
2 INVENTORY
Numeric 18 4 21 38
3 LLOADS Numeric 5 39 43
4 LAST Logical 1 44 44
5 MIX_NUM Numeric 2 45 46
6 PRICE Numeric 18 8 47 64
ExpExpExpExplanation of fields in MIXES.DBFlanation of fields in MIXES.DBFlanation of fields in MIXES.DBFlanation of fields in MIXES.DBF
Field Field name Type Width Dec Start End
1 MIX Character 20 1 20 The name of the mix appearing on a ticket. 2 INVENTORY Numeric 18 4 21 38 This field keeps a running inventory of material shipped or received. Material sold is considered a positive number and material bought is considered negative. Thus if more material of this type is bought than is sold, this field will be contain a negative number. 3 LLOADS Numeric 5 39 43 4 LAST Logical 1 44 44 5 MIX_NUM Numeric 2 45 46 Used internally. 6 PRICE Numeric 18 8 47 64 The price assigned to this material. In many cases, the operator will assign zero to this field at the plant site, then apply the company’s price when the tickets are posted to the accounting books at the home office.

L C - 1 0 0 0 / L C - 2 0 0 0 S I L O L O A D O U T C O M P U T E R
SYSTEMS Equipment Corporation VER A60426 Page 124
Structure for database: SILOS.DBF
Field Field name Type Width Dec Start End
1 SILO Numeric 1 1 1
2 MIX Character 20 2 21
3 QUANTITY Numeric 18 8 22 39
4 LOWSILO Logical 1 40 40
5 SCALE_ID Numeric 1 41 41
6 FREEFALL Numeric 18 8 42 59
7 FULLFLOWRT Numeric 18 8 60 77
8 APPARENTFF Numeric 18 8 78 95
9 SILOTYPE Character 2 96 97
10 CAPACITY Numeric 18 8 98 115
11 MINIMUM Numeric 18 8 116 133
12 MAXIMUM Numeric 18 8 134 151
13 SDW Numeric 18 8 152 169
14 NAME Character 8 170 177
15 POSITION Character 8 178 185
16 FLORATECNT Numeric 3 186 188
17 DRIBBLEWT Numeric 18 8 189 206
Explanation of fields in SILOS.DBFExplanation of fields in SILOS.DBFExplanation of fields in SILOS.DBFExplanation of fields in SILOS.DBF
Field Field name Type Width Dec Start End
1 SILO Numeric 1 1 1 Identifies the silo to the program. 2 MIX Character 20 2 21 The material currently loaded in this silo. 3 QUANTITY Numeric 18 8 22 39 The current amount of material, in lbs., in this silo. 4 LOWSILO Logical 1 40 40 This field contain ‘T’ if this silo is in a ‘low silo’ condition. 5 SCALE_ID Numeric 1 41 41 6 FREEFALL Numeric 18 8 42 59 The freefall weigh, in lbs., to apply when loading from this silo. 7 FULLFLOWRT Numeric 18 8 60 77 8 APPARENTFF Numeric 18 8 78 95 9 SILOTYPE Character 2 96 97 Contains ‘TS’, “WB’, or ‘BW’, depending on the type of silo. 10 CAPACITY Numeric 18 8 98 115

L C - 1 0 0 0 / L C - 2 0 0 0 S I L O L O A D O U T C O M P U T E R
SYSTEMS Equipment Corporation VER A60426 Page 125
The maximum material capacity, in lbs., for this silo. 11 MINIMUM Numeric 18 8 116 133 The significance of this field depends on the type of silo. 12 MAXIMUM Numeric 18 8 134 151 If silo is a weigh batcher, this field specifies the maximum capacity, in lbs., of the batch hopper. 13 SDW Numeric 18 8 152 169 The smallest drop weight, in lbs., possible for this silo. 14 NAME Character 8 170 177 15 POSITION Character 8 178 185 POSITION specifies where to draw the silo on the inventory graph – used to show silo(s) from the operator’s perspective. 16 FLORATECNT Character 3 186 188 17 DRIBBLEWT Numeric 18 189 206 These fields are for future use.

L C - 1 0 0 0 / L C - 2 0 0 0 S I L O L O A D O U T C O M P U T E R
SYSTEMS Equipment Corporation VER A60426 Page 126
Structure for database: SCALES.DBF Field Field name Type Width Dec Start End
1 SCALE_ID Numeric 1 1 1
2 SCALE_TYPE Character 2 2 3
3 BRAND Character 2 4 5
4 MODEL Character 5 6 10
5 PORT Character 4 11 14
6 RATE Character 6 15 20
7 IRQ Character 4 21 24
8 ADDRESS Character 4 25 28
9 PARITY Character 4 29 32
10 DATABITS Character 4 33 36
11 STOPBITS Character 4 37 40
12 FLOWCTRL Character 4 41 44
13 CHANNEL Character 8 45 53
ExplanationExplanationExplanationExplanation of fields in SCALES.DBF of fields in SCALES.DBF of fields in SCALES.DBF of fields in SCALES.DBF
Field Field name Type Width Dec Start End 1 SCALE_ID Numeric 1 1 1 SCALE_ID uniquely identifies the scale head / weighing indicator. 2 SCALE_TYPE Character 2 2 3 Identifies the type of scale. Acceptable entries are “TS” (i.e., truck scale), “WB” (weigh batcher), and “BW” (back weigh or reverse weigh). 3 BRAND Character 2 4 5 This entry identifies the manufacturer of the scale head / weighing indicator. The program uses this entry to select the correct communications format. 4 MODEL Character 5 6 10 This entry identifies the manufacturer’s model number of the scale head / weighing indicator. The program uses this entry to select the correct communications format. 5 PORT Character 4 11 14 This field specifies the MS-DOS serial port. Valid entries are “COM1”, “COM2”, “COM3”, and “COM4”. 6 RATE Character 6 15 20 This field specifies the serial port baud rate.

L C - 1 0 0 0 / L C - 2 0 0 0 S I L O L O A D O U T C O M P U T E R
SYSTEMS Equipment Corporation VER A60426 Page 127
7 IRQ Character 4 21 24 This field specifies the MS-DOS hardware interrupt number used by this serial port. Each indicator is assigned a unique interrupt. Non-standard IRQs may be assigned if the serial port hardware is configured appropriately. 8 ADDRESS Character 4 25 28 This field specifies the MS-DOS serial port address this indicator communicates through. Valid entries are “03F8”, “02F8”, “03E8”, and “02E8”. 9 PARITY Character 4 29 32 Specifies the parity used by the serial port. Valid entries are “E”, “O”, and “N”. 10 DATABITS Character 4 33 36 Specifies the number of data bits encoded into each serial port character. This field is usually set at either “7” or “8”. 12 FLOWCTRL Character 4 41 44 Specifies what type of flow control to use. This field is usually blank (i.e., no flow control). 13 CHANNEL Character 8 45 53 This field specifies a channel number if a Rice Lake 810 indicator is installed. Depending on the number of RL 810 channels installed, this field is set to “1”, “2”, “3”, or “4”. Ignore this field if no Rice Lake 810 indicators are present.

L C - 1 0 0 0 / L C - 2 0 0 0 S I L O L O A D O U T C O M P U T E R
SYSTEMS Equipment Corporation VER A60426 Page 128
INDEX
A
Abort a Load ......................................................................................................... 17, 23, 31, 41
Accounting Programs................................................................................................................ 1
Archiving Tickets.................................................................................................................... 75
Attribute Database ................................................................................................................ 1, 5
Auto-Load ............................................................................................................................... 65
B
Backup to Diskette............................................................................................................ 77, 79
Batcher ..............................................................................................................See Gob Hopper
C
Cash Sale................................................................................................................................. 94
Cash Ticket ................................................................................................................. 11, 69, 94
Change Posting Date............................................................................................................... 57
Communication....................................................................................................................... 73
Company Information............................................................................................................. 67
Configuration .................................................................................................................. 1, 5, 57
Copy Mode.............................................................................................................................. 98
Correction Tickets....................................................................................................... 51, 53, 55
Customer Comments................................................................................. 15, 21, 29, 43, 45, 92
D
Diskette ............................................................................................................................. 77, 79
Display Ticket ......................................................................................................................... 55
Ditto Ticket ................................................................................................................. 51, 53, 59
E
Empty the Silo......................................................................................................................... 37
English Units........................................................................................................................... 65
Erasing Lists............................................................................................................................ 75
Error .................................................................................................. 19, 25, 33, 39, 51, 71, 110
Exit Program ..................................................................................................................... 81, 90
F
F10-Fill / Empty Inventory Graph .......................................................................................... 96
F11-Copy Mode ...................................................................................................................... 98
F12-Tare a Truck .................................................................................................................. 100
F1-Lists ................................................................................................................................... 43
F2 Hot Key.............................................................................................................................. 49
F3-Ticket List.......................................................................................................................... 51
F4-Utility Menu ...................................................................................................................... 57
F5-Unresolved Tickets............................................................................................................ 83

L C - 1 0 0 0 / L C - 2 0 0 0 S I L O L O A D O U T C O M P U T E R
SYSTEMS Equipment Corporation VER A60426 Page 129
F6-Weigh In / Out or LoadOut ............................................................................................... 85
F7-System Shutdown.............................................................................................................. 90
F8-Comments.......................................................................................................................... 92
F9-Cash Sale ........................................................................................................................... 94
File Format................................................................................................................................ 1
File Maintenance......................................................................................................... 67, 75, 79
Find Ticket .............................................................................................................................. 53
Floppy Disk............................................................................................................................. 77
Flow Rate ................................................................................................................................ 67
Free Fall .................................................................................................................................. 67
G
Gate Check.............................................................................................................................. 59
Gob Hopper............................................................................... 21, 23, 25, 27, 59, 63, 110, 111
H
Hardware......................................................................... 1, 17, 23, 31, 39, 41, 73, 79, 110, 111
Horns....................................................................................... 3, 15, 21, 29, 37, 65, 85, 88, 100
I
Incorrect Ticket ....................................................................................................................... 51
L
LC-1000 .................................................................................................................................... 1
LC-2000 .................................................................................................................................... 1
Loading – Reverse Weigh Silo ............................................................................................... 21
Loading – Truck Scale ............................................................................................................ 15
Loading – Weigh Batcher ....................................................................................................... 29
Loading Setup ....................................................................................................... 59, 63, 65, 73
LoadOut Mode .................................................................................................................. 57, 79
Low Silo Bypass ................................................................................................... 19, 25, 31, 37
M
Main Operating Screen ............................................................................................................. 9
Manual Ticket ............................................................................................................. 19, 25, 33
Material Flow Error ................................................................................ 19, 25, 33, 39, 65, 110
Metric Units ............................................................................................................................ 65
Modem ................................................................................................................................ 1, 73
Moving Between Fields ............................................................................................................ 7
P
Password ....................................................................................................................... 5, 61, 69
Posting Date ............................................................................................................................ 57
Print Ticket.............................................................................................................................. 55
Printer.......................................................................................... 17, 21, 29, 69, 73, 85, 88, 111
Program Navigation .................................................................................................................. 7
Pup Trucks .............................................................................................................................. 35

L C - 1 0 0 0 / L C - 2 0 0 0 S I L O L O A D O U T C O M P U T E R
SYSTEMS Equipment Corporation VER A60426 Page 130
Q
Quarry ........................................................................................................................... 1, 83, 85
Quick Start ................................................................................................................................ 3
R
RedRover .................................................................................................... 45, 73, 92, 104, 106
Report Menu ..................................................................................................................... 47, 77
Restore from Diskette ............................................................................................................. 79
Reverse Weigh ........................................................................................ 21, 63, 67, 71, 73, 111
S
Search Ticket Database........................................................................................................... 53
Select Copy Mode................................................................................................................... 59
Silo Inventory.......................................................................................................................... 67
Sleep Mode ........................................................................................................................... 106
Software Setup .............................................................................................................. 5, 61, 69
State Requirements ................................................................................................................. 69
System Parameters .......................................................................... 5, 47, 59, 61, 65, 71, 73, 81
System Setup........................................................................................................................... 59
System Shutdown.................................................................................................. 43, 47, 81, 90
T
Tare a Truck.......................................................................................................................... 100
Ticket Number ............................................................................................................ 67, 69, 83
Ticket Setup ...................................................................................................................... 59, 67
Training Mode ........................................................................................................................ 79
Troubleshooting .................................................................................................................... 108
Truck Scale ........................................................................... 11, 15, 57, 63, 71, 83, 85, 96, 100
U
Units........................................................................................................................ 1, 43, 65, 69
Unresolved Tickets ........................................................................................................... 57, 83
Utility Menu............................................................................................................................ 57
W
Weigh Batcher ............................................................................................................ 29, 63, 96
Weigh In / Out Mode ........................................................................................................ 57, 85

L C - 1 0 0 0 / L C - 2 0 0 0 S I L O L O A D O U T C O M P U T E R
SYSTEMS Equipment Corporation VER A60426 Page 131
Jog Gate AddendumJog Gate AddendumJog Gate AddendumJog Gate Addendum
This addendum addresses the jog gate (also known as a dribble gate) feature available in program versions 2000-B27 and later. This feature controls a pair of gates where, during the beginning of a drop, both gates are opened to speed up a load and, as the drop nears completion, the secondary gate is closed to provide a more-controlled material flow. On silos with only one gate air cylinder, the jog gate is the main gate. This feature is available only for truck scales and reverse weigh silos and is not available for weigh batching silos. Idealized Flow Rate Close Secondary Gate Dribble Weight Tons/Sec Close Jog Gate Freefall Time, seconds The figure above shows an idealized flowrate (not to be confused with total drop weight) using a jog and secondary gate. With both gates open, maximum flow develops. At some point before closing the jog gate, the secondary gate must be closed so that smooth, uniform flow can develop before closing the jog gate. The point at which the secondary gate is closed is set by a silo parameter named “Dribble Weight”. The value of this parameter is accessible from the main screen by pressing F1 for lists, then selecting (S)ilo Contents (the Silo Maintenance screen will appear), then pressing (A)djust Freefall and Flowrate. The Change Freefall … screen will appear where the last entry allows you to modify the dribble weight.

L C - 1 0 0 0 / L C - 2 0 0 0 S I L O L O A D O U T C O M P U T E R
SYSTEMS Equipment Corporation VER A60426 Page 132
If the dribble weight is set very large (ie, larger than the drop size) the program will not allow the secondary gate to open during the drop. If the dribble weight is set to 0, both gates will open and close together as though there was a single control signal controlling both gates. To properly use this feature, you need to pick a value that balances fast loading with accurate loading depending on the difference in gate size, the speed of the gates, etc. Start with a value of 4 tons (or equivalent) and adjust it up or down until drops are accurate while being as fast as possible – your emphasis should be on accuracy, however. Once a workable value has been determined, leave it there. For small drops, the program can determine when or when not to use the secondary gate. If you have found an appropriate dribble weight, then change the value manually to 0 without adjusting the freefall upwards, the actual freefall will be much larger. The program will overload until it has adjusted the freefall to account for the changed conditions. If you have program update diskettes, install the update now. Start the LoadOut program. Your databases will automatically be updated but, by default, the feature will be disabled. Terminate the program. At the MS-DOS prompt run the FIELDMOD utility from the command line by typing FIELDMOD. A list of databases will appear. Use the down-arrow key until SILOS.DBF is highlighted, then press the ENTER key to begin editing the database. Use the TAB key to locate the parameter named “Has_dribgt”, then change the parameter from “F” to “T”. Press the ENTER key, then the ESCAPE key continually until the utility program is terminated. Restart the LoadOut program. Follow the procedure above by pressing F1 to set the dribble weight value to 4 tons (or its equivalent in the system of units you are using). You may need to experiment to find the proper value the works best with your hardware. LC-1000 LoadOuts can control up to 4 silos. Each silo jog gate has an independent PLC output for opening the jog or main gate. These terminal numbers are 50, 51, 52, and 53, respectively, inside the 1190 PLC enclosure. The secondary gate, however, has only one output from the PLC, terminal 56 inside the 1190 PLC enclosure, and must be wired through your draw-from selector switch to properly route the signal to the appropriate secondary air cylinder solenoid. LC-2000 LoadOuts can control only one silo. The jog or main gate control output is terminal Y0 on the DL-05 PLC. The secondary gate control output is terminal Y2 on the DL-05 PLC.