law firm administrator guide - truefiling
TRANSCRIPT

www.imagesoftinc.com
25900 W. 11 Mile Rd., Suite 100 ▪ Southfield, MI 48034 ▪ phone: (855) 959-8868
TrueFiling
Administrator Guide
Release 1.0.36

© 2015 ImageSoft, Inc.
Copyright
© 2015 ImageSoft, Inc. All rights reserved
If this guide is distributed with software that includes an end user agreement, this guide is furnished
under license and may be used or copied only in accordance with the terms of that license. Except as
permitted by any such license, no part of this guide may be reproduced, stored in a retrieval system,
or transmitted in any form or by any means (electronic, mechanical, photocopying, recording, or
otherwise), or for any purpose without the express written permission of ImageSoft, Inc.
This guide is provided only to inform the user and is subject to change without notice. ImageSoft, Inc.
assumes no responsibility or liability for any errors that may exist within this document.
If ImageSoft, Inc. and you have entered into a nondisclosure agreement, then this document or
accompanying materials provided by ImageSoft, Inc. contains certain information that is confidential
information of ImageSoft, Inc. and which may be used or copied only according to the terms of such
nondisclosure agreement.

© 2015 ImageSoft, Inc.
Revision History
Revision
Number Date Description
1.0.32.0 05.21.15 Updated for TrueFiling release 1.0.32
1.0.33.0 07.02.15 Updated for TrueFiling release 1.0.33
1.0.34.0 07.19.15 Updated for TrueFiling release 1.0.34
1.0.35.0 08.17.15 Updated for TrueFiling release 1.0.35
1.0.36.0 10.02.15 Updated for TrueFiling release 1.0.36

© 2015 ImageSoft, Inc. i
Table of Contents
TRUEFILING LAW FIRM ADMINISTRATOR ................................................................................................... 1
Administrator Overview ............................................................................................................................ 1
Administrator Duties ................................................................................................................................ 1
Identifying the Courts TrueFiling Supports ............................................................................................. 2
CREATING A TRUEFILING LAW FIRM SITE................................................................................................... 3
Searching for your Firm’s Site and Administrator .................................................................................. 3
Requesting Access to Your Firm’s TrueFiling Account ....................................................................... 7
Creating a TrueFiling Law Firm Site and an Administrator Account ................................................... 10
Firm Settings ..................................................................................................................................... 15
COURT FAVORITES .................................................................................................................................... 17
Adding a Court as a Favorite ................................................................................................................ 17
Removing a Court as a Favorite ........................................................................................................... 18
Viewing Favorite Courts ........................................................................................................................ 19
MANAGING LOGIN USERS ........................................................................................................................ 20
Receiving a Request to Join your Firm’s Site ...................................................................................... 20
Inviting Login Users ............................................................................................................................... 21
Sample Login User Invitation Email ................................................................................................. 25
Ensuring the TrueFiling Invitation is Accepted .................................................................................... 26
Editing a Login User’s Rights, Role, and Profile .................................................................................. 28
Removing a Login User from your Firm ................................................................................................ 29
Removing Yourself (Administrator) from the Firm............................................................................... 30
RESETTING A LOGIN USER’S PASSWORD ............................................................................................... 31
MANAGING PAYMENT ACCOUNTS ............................................................................................................ 33
Filtering Payment Accounts .................................................................................................................. 34
Creating a New Account ........................................................................................................................ 34
Modifying a Payment Account .............................................................................................................. 36
Deleting a Payment Account ................................................................................................................ 37
Viewing Payment History ...................................................................................................................... 38
Creating a Receipt PDF ..................................................................................................................... 39
Creating a CSV File............................................................................................................................ 39
INDEX ............................................................................................................................................................ A

TrueFiling Administrator Guide TrueFiling Law Firm Administrator
© 2015 ImageSoft, Inc. 1
TrueFiling Law Firm Administrator
TrueFiling enables a law firm to share access to case information and filings for a firm using a single
TrueFiling Law Firm site. The site is created by a member of the firm usually denoted as a TrueFiling
Law Firm Administrator.
Administrator Overview
Unlike other e-filing systems, TrueFiling requires that each member of the firm use their email
address to access the firm’s TrueFiling Law Firm site. Only a TrueFiling administrator can invite other
users to join the firm’s site. It is the administrator’s responsibility to ensure that every user accessing
the site uses their own credentials and email address.
NOTE: TrueFiling does not encourage sharing TrueFiling credentials to gain access to a firm’s site.
Every user accessing TrueFiling must be invited using their email address as the user name.
TrueFiling supports multiple administrators for the same Law Firm site. The original TrueFiling site
administrator can promote any member of the firm to an administrator. Similarly, an administrator
can return any other administrator back to regular member status.
Administrator Duties
Administrators are responsible for:
Creating their firm’s TrueFiling Law Firm site
Inviting / managing Login Users
Managing payment accounts
Managing firm settings
TrueFiling Administrator Guide TrueFiling Law Firm Administrator
© 2015 ImageSoft, Inc. 2
Identifying the Courts TrueFiling Supports
To view the courts TrueFiling supports:
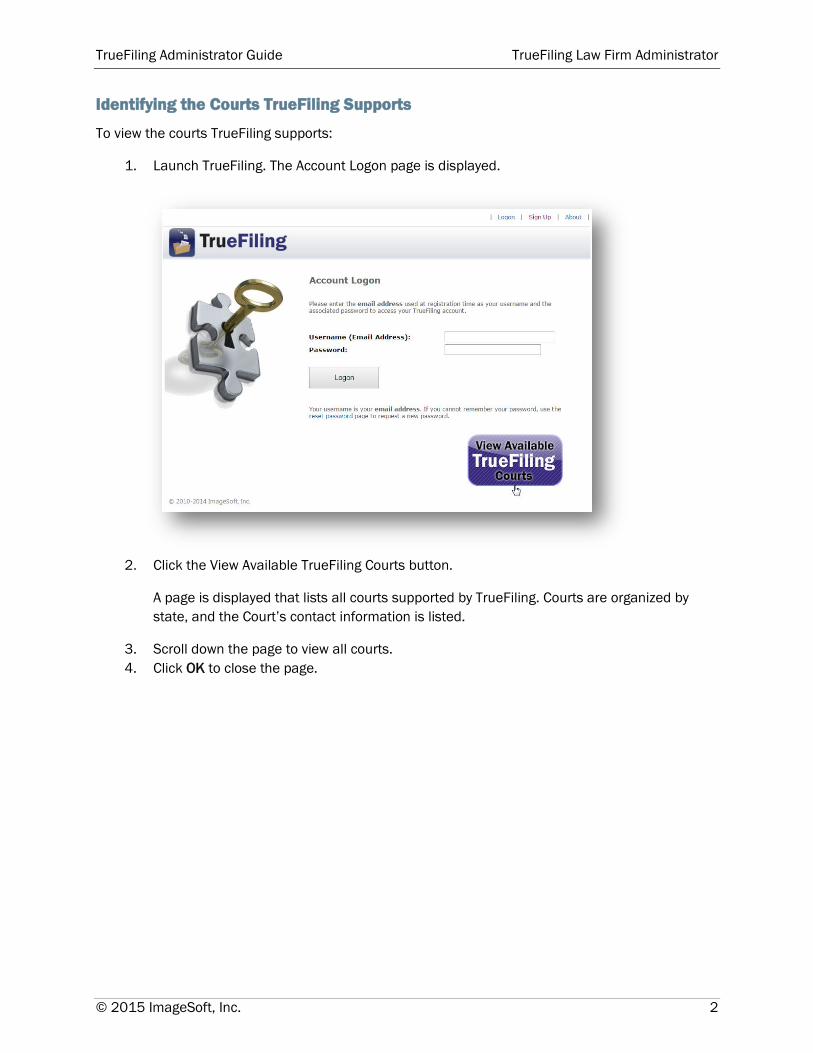
1. Launch TrueFiling. The Account Logon page is displayed.
2. Click the View Available TrueFiling Courts button.
A page is displayed that lists all courts supported by TrueFiling. Courts are organized by
state, and the Court’s contact information is listed.
3. Scroll down the page to view all courts.
4. Click OK to close the page.

TrueFiling Administrator Guide Creating a TrueFiling Law Firm Site
© 2015 ImageSoft, Inc. 3
Creating a TrueFiling Law Firm Site
One member of the firm will act as the administrator responsible for creating the firm’s TrueFiling
Law Firm site.
Searching for your Firm’s Site and Administrator
As the potential administrator, you should first determine if another member of your firm has already
created the site and established an administrator.
1. Use any modern Internet browser to navigate to https://www.truefiling.com. The Account
Logon page is displayed.
2. Click Sign Up in the upper-right corner of the page.

TrueFiling Administrator Guide Creating a TrueFiling Law Firm Site
© 2015 ImageSoft, Inc. 4
The Welcome page is displayed. This page lists the options available regarding your firm
and TrueFiling.
3. Choose Option 3 (Not sure) to determine if your firm has a TrueFiling site and administrator.
Instructions on how to proceed are provided.
4. Click the click here link (circled in the above image) to launch the Firm Lookup page. Use
this page to search for your firm’s site in TrueFiling.

TrueFiling Administrator Guide Creating a TrueFiling Law Firm Site
© 2015 ImageSoft, Inc. 5
5. Input your email address in the Username (Email Address) field.
6. Type the characters shown in the image into the Captcha field. You can click New Captcha
to display a different image, if needed.
7. Click Lookup. The Search Firm – Confirmation page, which confirms the search for your
firm’s administrator is complete, is displayed.
8. Click OK. The Account Logon page is re-displayed.
An email message containing a link to the search results will be sent to the email address
you provided. You will receive the email within 10 minutes.
NOTE: Based on your email provider, the email may be directed to your spam or junk
folder. Check your spam filtering rules and verify the [email protected]
email is on your whitelist.

TrueFiling Administrator Guide Creating a TrueFiling Law Firm Site
© 2015 ImageSoft, Inc. 6
The following is a sample email message you’ll receive that contains the link to the search
results.
9. Click this link. The Firm Lookup Results page is displayed.
10. Locate your Firm and Admin.
If your firm is not listed, and you are absolutely certain no potential administrators exist for
your firm, proceed to Creating a TrueFiling Law Firm Site and an Administrator Account later
in this guide.
If your firm is listed on the Firm Lookup Results page, a TrueFiling Law Firm site has already
been created. Do not create another site. Instead, click Email Administrator to request
access to your firm’s site. Proceed to the next section - Requesting Access to Your Firm’s
TrueFiling Account for details.

TrueFiling Administrator Guide Creating a TrueFiling Law Firm Site
© 2015 ImageSoft, Inc. 7
Requesting Access to Your Firm’s TrueFiling Account
If your firm already has a TrueFiling site, you can request an invitation from your firm’s administrator.
NOTE: This process is the same process non-administrative users will use to request access to your
firm’s TrueFiling account.
1. On the Firm Lookup Results page, click the Email Administrator link beside your firm name
to send an email request to your administrator for site access.
The following page, which indicates your request email has been sent to the administrator,
is displayed.
2. Click OK to close the page. The Account Logon page is displayed.
NOTE: Within this process, TrueFiling sends an email message to the selected firm
administrator. The administrator must invite you to join the firm’s TrueFiling site, and
you must respond to the invitation in order to join and log in.
3. Locate and open the invitation message email from your firm’s administrator.
The email contains a temporary password you’ll use when accepting the invitation.

TrueFiling Administrator Guide Creating a TrueFiling Law Firm Site
© 2015 ImageSoft, Inc. 8
The invitation is valid for seven days. If you do not respond to the invitation, after
seven days you’ll need to request another invitation from your firm administrator.
4. Click this link to access the Invitation Confirmation page.
The Invitation Confirmation page is displayed in your default browser. The Invitation Code
field is auto-populated with a system-generated code.
5. Verify the Username listed is your email address.
6. Input the temporary password provided in the invitation email in the Password field.
NOTE: If the TrueFiling administrator resends an invitation, any prior confirmation links
will be invalidated. Thus, every re-invitation request will generate a new temporary
password.
7. Click Confirm Registration.
TrueFiling Administrator Guide Creating a TrueFiling Law Firm Site
© 2015 ImageSoft, Inc. 9
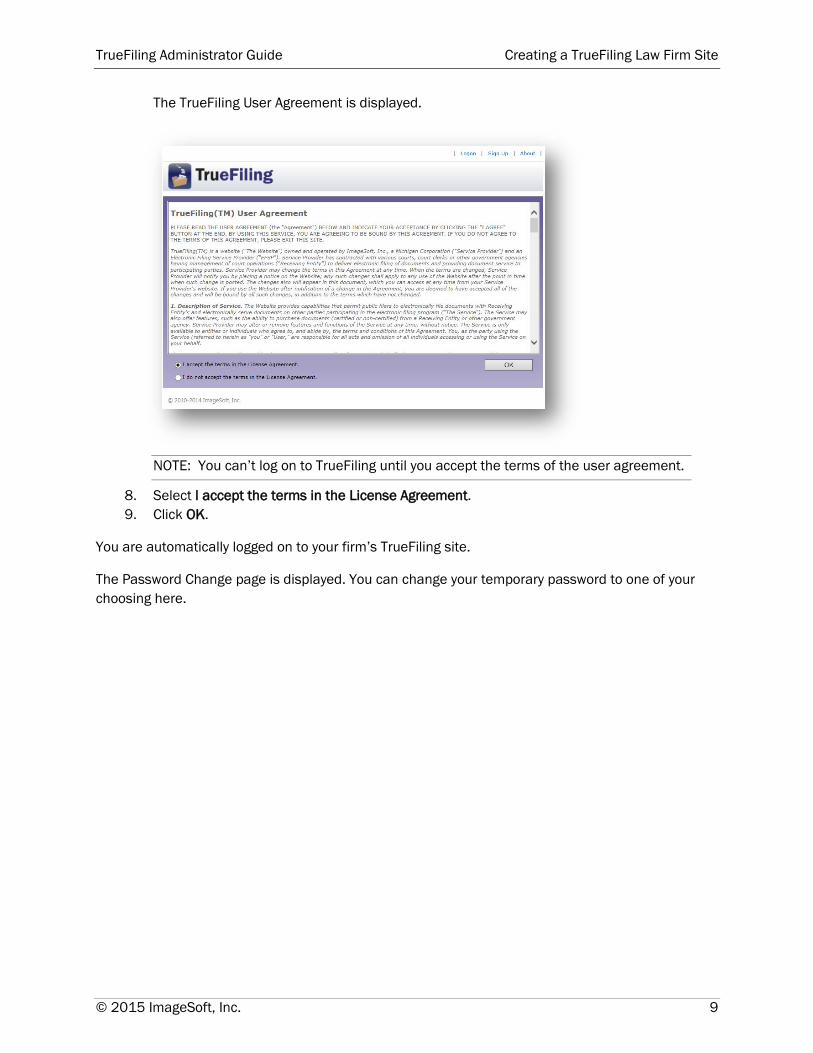
The TrueFiling User Agreement is displayed.
NOTE: You can’t log on to TrueFiling until you accept the terms of the user agreement.
8. Select I accept the terms in the License Agreement.
9. Click OK.
You are automatically logged on to your firm’s TrueFiling site.
The Password Change page is displayed. You can change your temporary password to one of your
choosing here.

TrueFiling Administrator Guide Creating a TrueFiling Law Firm Site
© 2015 ImageSoft, Inc. 10
Creating a TrueFiling Law Firm Site and an Administrator Account
TrueFiling enables a law firm to share access to case information and filings using a single TrueFiling
Law Firm site. This site is created by a member of the firm who is usually denoted as the TrueFiling
administrator.
A self-represented filer can also create their own TrueFiling site through which they can file and e-
serve documents. The filer will be the site’s administrator.
Before you attempt to create a new TrueFiling Law Firm site, make sure no other member of
your firm has created one. See Searching for your Firm’s Site and Administrator earlier in this
guide.
To create your firm’s TrueFiling Law Firm site:
1. Use any modern Internet browser to navigate to https://www.truefiling.com. The Account
Logon page is displayed.
2. Click Sign Up in the upper-right corner of the page.

TrueFiling Administrator Guide Creating a TrueFiling Law Firm Site
© 2015 ImageSoft, Inc. 11
The Welcome page, which lists the options available for creating a TrueFiling account, is
displayed.
Please read all three options carefully before making a choice. Choose Option 2 only if you
are certain no one from your firm has ever enrolled in TrueFiling.
3. In Option 2, select the click here link.
TrueFiling Administrator Guide Creating a TrueFiling Law Firm Site
© 2015 ImageSoft, Inc. 12
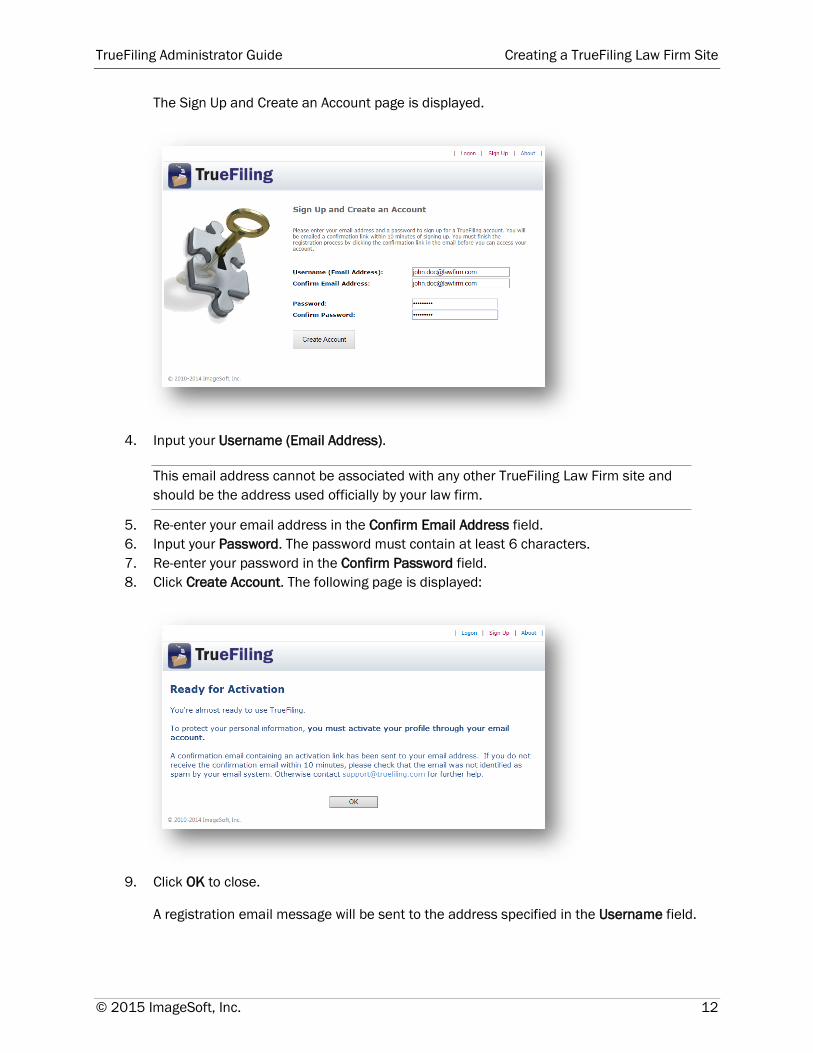
The Sign Up and Create an Account page is displayed.
4. Input your Username (Email Address).
This email address cannot be associated with any other TrueFiling Law Firm site and
should be the address used officially by your law firm.
5. Re-enter your email address in the Confirm Email Address field.
6. Input your Password. The password must contain at least 6 characters.
7. Re-enter your password in the Confirm Password field.
8. Click Create Account. The following page is displayed:
9. Click OK to close.
A registration email message will be sent to the address specified in the Username field.
TrueFiling Administrator Guide Creating a TrueFiling Law Firm Site
© 2015 ImageSoft, Inc. 13
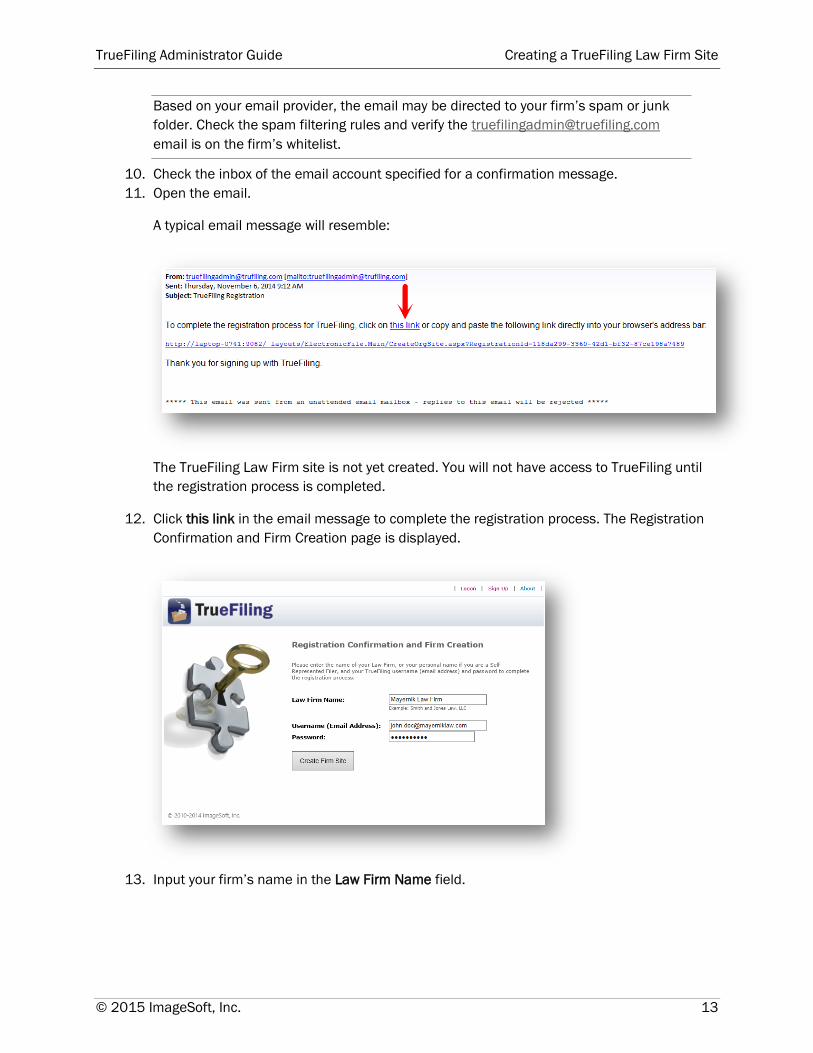
Based on your email provider, the email may be directed to your firm’s spam or junk
folder. Check the spam filtering rules and verify the [email protected]
email is on the firm’s whitelist.
10. Check the inbox of the email account specified for a confirmation message.
11. Open the email.
A typical email message will resemble:
The TrueFiling Law Firm site is not yet created. You will not have access to TrueFiling until
the registration process is completed.
12. Click this link in the email message to complete the registration process. The Registration
Confirmation and Firm Creation page is displayed.
13. Input your firm’s name in the Law Firm Name field.

TrueFiling Administrator Guide Creating a TrueFiling Law Firm Site
© 2015 ImageSoft, Inc. 14
NOTE: The Law Firm Name entered here is used during e-service and is listed on the
automatically generated Proof of Service filings. The firm name should be the same
name that is on the firm’s letterhead.
14. Verify the Username (Email Address) field lists the email address used in the sign up
process.
15. Input the Password you specified on the Sign Up and Create an Account page.
16. Click Create Firm Site.
The TrueFiling License Agreement page is displayed once the TrueFiling Law Firm Site is
created.
17. Read the entire user agreement.
NOTE: You can’t use TrueFiling until you accept the terms of the user agreement.
18. Select I accept the terms in the License Agreement.
19. Click OK. Your firm TrueFiling site has been created.
The Firm Settings page is displayed. Use this page to specify the TrueFiling settings for your firm.

TrueFiling Administrator Guide Creating a TrueFiling Law Firm Site
© 2015 ImageSoft, Inc. 15
Firm Settings
Firm Name
Specify how your firm’s name is to display throughout your TrueFiling site.
NOTE: If you change your firm’s name here, from this point forward, any contact or attorney
associated with your firm will be identified using the updated name. However, the firm name listed
on any existing case detail page for any firm contacts or attorneys will not be updated.

TrueFiling Administrator Guide Creating a TrueFiling Law Firm Site
© 2015 ImageSoft, Inc. 16
Time Zone
Use the drop-down arrow and select the time zone to be used by the TrueFiling website for your firm.
All times displayed in TrueFiling (for example, the timestamps listed in the Filing History) default to
the time zone specified.
Notification Email
All TrueFiling email notifications sent to filers will be copied to the email address specified here.
If this address is specified as a primary recipient for a notification, the message will not be copied -
only one notification will be sent.
Servicing Email
All servicing emails sent to a member of the firm will be copied to the email address specified here.
Payment Account Sharing
Specify if all users can share all payment accounts or if they instead must use their own payment
account information.
Client Matter Number
Specify if a Client Matter Number is required when a new filing (Legacy) or bundle (Streamlined) is
created.
Main Office Address
Specify your firm’s contact information:
Address
Email address
Website (if any)
Phone and fax numbers
The state specified in the firm’s address will become the default state listed in the State field in all
forms within TrueFiling. That is, whenever a TrueFiling form (for example adding a new attorney)
requires a state to be specified, the State field is auto-filled with this state in the form.

TrueFiling Administrator Guide Court Favorites
© 2015 ImageSoft, Inc. 17
Court Favorites
Through TrueFiling, a law firm can electronically file and serve documents to multiple courts using a
single TrueFiling Law Firm site.
A court must be identified as a favorite in order for you to be able to file in that court. Any TrueFiling
login user can specify their own personal court favorites. Court favorites are not shared among login
users.
Adding a Court as a Favorite
You can add or remove a court as a favorite from the:
Favorites page
Case Search page
Case Initiation page
Using the Favorites page to illustrate how to add a court as a personal favorite:
1. Select Main Pages >> Favorites in the navigation pane. The Favorites page is displayed.
2. Click the Court Lookup button.

TrueFiling Administrator Guide Court Favorites
© 2015 ImageSoft, Inc. 18
The Select Favorite Courts dialog is displayed.
3. Click the Add to Favorites link for the appropriate court.
The court is now identified as a personal favorite. It will be listed on your Favorites page
and will be available in the Court field drop-down list on the Case Search page.
4. Continue to add courts as needed.
5. Click Close to leave the page.
If your firm’s TrueFiling site has no Court Favorites specified, the Select Favorite Courts dialog will
display by default when you log on. You must select your favorite courts here. When you close the
dialog, your default page will display.
Removing a Court as a Favorite
You can remove a court as a favorite.
1. Select Main Pages >> Favorites in the navigation pane. The Favorites page is displayed.
2. Click the Court Lookup button. The Select Favorite Courts dialog is displayed.

TrueFiling Administrator Guide Court Favorites
© 2015 ImageSoft, Inc. 19
3. Click the Remove From Favorites link for the appropriate court.
4. Click Close to leave the page.
The court is removed as a favorite. You won’t be able to file in that court, and it will no longer be
available in the Court field drop-down list on the Case Search page.
Viewing Favorite Courts
On the Favorites page, the Favorites Courts section lists courts you’ve specified as favorites.
1. Select Main Pages >> Favorites in the navigation pane. The Favorites page is displayed.
2. Scroll down to access the Favorite Courts section.
You can file in the courts listed here. These courts will be available in the Court field drop-down list
on the Case Search page.

TrueFiling Administrator Guide Managing Login Users
© 2015 ImageSoft, Inc. 20
Managing Login Users
Administrators manage the firm’s Login Users who have rights to log on to their site and submit
filings.
NOTE: Under no circumstances should members of the law firm share usernames and passwords.
Receiving a Request to Join your Firm’s Site
When a potential TrueFiling user requests access to your firm’s site via the Firm Lookup Result page,
TrueFiling sends you, the administrator, an email message requesting an invitation to join on their
behalf. The message will resemble:
Follow the instructions in the email. See Inviting Login Users in the next section for complete details
on inviting the user to join your firm.

TrueFiling Administrator Guide Managing Login Users
© 2015 ImageSoft, Inc. 21
Inviting Login Users
To invite a new user to join your TrueFiling Law Firm site:
1. Select Settings >> Contacts & Attorneys in the navigation pane.
2. Determine what role the new user will have: Attorney, Self-Represented Filer, or Contact. A
contact can be an employee, client, or firm staff.
The Unclassified section lists existing Login Users whose roles and responsibilities
must be updated. See Editing a Login User’s Profile for details on how to change a
user’s role.
3. Click the Add New … option in the appropriate section; for example, Add New Attorney.

TrueFiling Administrator Guide Managing Login Users
© 2015 ImageSoft, Inc. 22
A dialog similar to the following is displayed:
An asterisk (*) indicates a required field.
4. Input the new user’s Contact Information.
5. Confirm the new user’s Role is correct. Select another role from the drop-down list, if
needed.
6. If the user is an Attorney, input their Attorney Number. If the user’s role is Firm
Staff/Employee/Client, the Attorney Number field is disabled. If their role is Self-
Represented Filer, the Attorney Number field defaults to Pro Per and cannot be edited.
7. If the user is an Attorney or Self-Represented Filer, select the state in which their Attorney
Number is valid (State Issued field). This field is disabled if the user’s role is specified as
Firm Staff/Employee/Client.
8. To grant TrueFiling filing access to this user, select the box beside the Allow this person to
login and submit filings option.
9. To grant administrator rights to this user, select the box beside the Allow this person to be a
firm administrator option. This option cannot be selected unless the user has been granted
filing access – see Step 8 above.
10. Select the acknowledgement checkbox to confirm this person is not a member of opposing
counsel.
NOTE: You must select the box to verify this individual is associated with you or your
law firm and is not a member of opposing counsel. If the box is not checked, this user
cannot be added.
11. Click OK to close the dialog.

TrueFiling Administrator Guide Managing Login Users
© 2015 ImageSoft, Inc. 23
If the email address specified is associated with another filing organization, an Invalid User
Request message is displayed indicating the Login User cannot be created using the email
address specified.
If the email address specified is that of an existing firm member, this message is displayed:

TrueFiling Administrator Guide Managing Login Users
© 2015 ImageSoft, Inc. 24
A placard for the new user is added to the appropriate section of the Contacts & Attorneys page.
An invitation email will be sent to the user.

TrueFiling Administrator Guide Managing Login Users
© 2015 ImageSoft, Inc. 25
Sample Login User Invitation Email
The following is a sample invitation email the invited user will receive. The message includes a
temporary password they will use the first time they log on to TrueFiling.
Based on the recipient’s email provider, the invitation email may be delivered to their spam or junk
folder. Instruct the recipient to check their spam filtering rules and verify the
[email protected] email is on their whitelist.
The invited user must complete the registration process by clicking the link provided. They will
not have access to your firm’s TrueFiling site until the registration process is completed.

TrueFiling Administrator Guide Managing Login Users
© 2015 ImageSoft, Inc. 26
Ensuring the TrueFiling Invitation is Accepted
When the administrator invites a user to join the firm, TrueFiling automatically sends an email
message containing a confirmation link and temporary password. All invited users must confirm the
invitation request by clicking the link in the invitation email message.
To ensure the invited user completes the TrueFiling registration process:
1. Select Settings >> Contacts & Attorneys in the navigation pane.
2. Locate the invited user on the Contacts and Attorneys page.
3. Click the user’s placard. The Edit dialog for the user is displayed.
If the user has not yet accepted the invitation, this dialog includes a link to resend the
invitation.
4. Click Resend Invitation. Another invitation email will be sent to this user.
5. Click OK to leave the dialog.
NOTE: Resending an invitation will invalidate all prior confirmation links. Thus, every
re-invitation request will generate a new temporary password and invitation code.

TrueFiling Administrator Guide Managing Login Users
© 2015 ImageSoft, Inc. 27
6. Instruct the invited user to check their email account and open the invitation message.
NOTE: Based on the recipient’s email provider, the invitation email may be delivered
to their spam or junk folder. Instruct the recipient to check their spam filtering rules
and verify the [email protected] email is on their whitelist.
The invited user must click this link in the message and then complete the steps required to finish
the registration process.
The invitation is valid for seven days. If the user doesn’t respond to the invitation within that time
frame, they’ll need to request another invitation from the administrator.
TrueFiling Administrator Guide Managing Login Users
© 2015 ImageSoft, Inc. 28
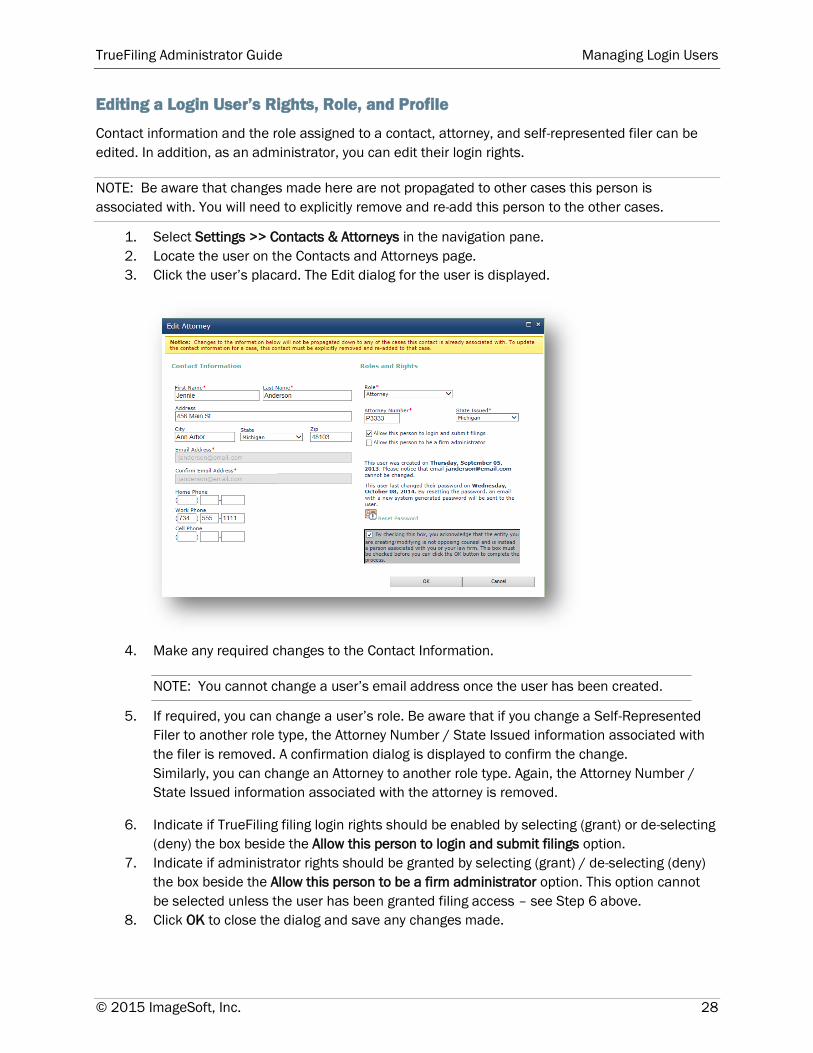
Editing a Login User’s Rights, Role, and Profile
Contact information and the role assigned to a contact, attorney, and self-represented filer can be
edited. In addition, as an administrator, you can edit their login rights.
NOTE: Be aware that changes made here are not propagated to other cases this person is
associated with. You will need to explicitly remove and re-add this person to the other cases.
1. Select Settings >> Contacts & Attorneys in the navigation pane.
2. Locate the user on the Contacts and Attorneys page.
3. Click the user’s placard. The Edit dialog for the user is displayed.
4. Make any required changes to the Contact Information.
NOTE: You cannot change a user’s email address once the user has been created.
5. If required, you can change a user’s role. Be aware that if you change a Self-Represented
Filer to another role type, the Attorney Number / State Issued information associated with
the filer is removed. A confirmation dialog is displayed to confirm the change.
Similarly, you can change an Attorney to another role type. Again, the Attorney Number /
State Issued information associated with the attorney is removed.
6. Indicate if TrueFiling filing login rights should be enabled by selecting (grant) or de-selecting
(deny) the box beside the Allow this person to login and submit filings option.
7. Indicate if administrator rights should be granted by selecting (grant) / de-selecting (deny)
the box beside the Allow this person to be a firm administrator option. This option cannot
be selected unless the user has been granted filing access – see Step 6 above.
8. Click OK to close the dialog and save any changes made.

TrueFiling Administrator Guide Managing Login Users
© 2015 ImageSoft, Inc. 29
Removing a Login User from your Firm
As administrator, you can remove a login user from your firm’s site.
1. Select Settings >> Contacts & Attorneys in the navigation pane. The Contacts and Attorneys
page is displayed.
2. Click the X in the upper-right corner of the appropriate placard to remove the contact.
3. Click Remove on the confirmation dialog displayed. The Contacts and Attorneys page is re-
displayed; the contact is removed from the firm.
If this Login User was associated with a case, this process will not remove them as a case
contact from that case. However, when the Case Detail page is displayed, the user is
identified in the Case Contacts section as “Removed from Firm.”

TrueFiling Administrator Guide Managing Login Users
© 2015 ImageSoft, Inc. 30
Removing Yourself (Administrator) from the Firm
As an administrator, you can remove yourself from the firm’s site if:
Another confirmed firm administrator exists
OR
You are the last administrator, and there are no other Login Users in the firm.
Removing yourself as the last firm administrator and member will abandon your firm’s
TrueFiling Law Firm site.

TrueFiling Administrator Guide Resetting a Login User’s Password
© 2015 ImageSoft, Inc. 31
Resetting a Login User’s Password
Non-administrative users may request a password reset from the administrator. The reset operation
will send an email message containing a system-generated password to the user, which they will use
to log on. Once in TrueFiling, they can reset their password.
To reset a Login User’s password:
1. Select Settings >> Contacts & Attorneys in the navigation pane.
2. Locate the invited user on the Contacts and Attorneys page.
3. Click the user’s placard. The Edit dialog for the user is displayed.
4. Click Reset Password to reset the user’s password.
A confirmation dialog is displayed.
5. Click OK to close the dialog.
An email message containing a new, system-generated password will be sent to the user.
The message will resemble:

TrueFiling Administrator Guide Resetting a Login User’s Password
© 2015 ImageSoft, Inc. 32
NOTE: Based on the recipient’s email provider, the invitation email may be delivered to their spam or
junk folder. Instruct the recipient to check their spam filtering rules and verify the
[email protected] email is on their whitelist.

TrueFiling Administrator Guide Managing Payment Accounts
© 2015 ImageSoft, Inc. 33
Managing Payment Accounts
TrueFiling enables law firms to securely store payment accounts for all filers of the TrueFiling Law
Firm site to use. Although non-administrative login users can create payment accounts for the firm, it
is recommended that administrators maintain the payment accounts for the site.
You can manage the credit card accounts used for payment when your firm submits a bundle to the
Court. You can also track your firm’s payment history.
The Payment Accounts page is used to create and manage the payment accounts your firm will use
to submit filings to the Court. This page is arranged by payment processor type.
Not all courts use the same payment processor. As a result, your firm must create payment accounts
for each processor used by the courts your firm will file in.
Click Settings >> Payment Accounts in the navigation pane to access the Payment Accounts page.
This page is arranged based on payment processor type. Each court that uses that that processor is
listed.
Payment accounts are added based on payment processor type requirements. For example, if your
firm files in Court A and Court B, and both courts use the same processor, one payment account will
be created for that payment processor. This account can then be used for payment in both courts.
However, if Court A and Court B use different processors, an account must be added for each
processor type to be enable your firm’s filers to file in both courts.

TrueFiling Administrator Guide Managing Payment Accounts
© 2015 ImageSoft, Inc. 34
When a filer submits their bundle to the Court and selects the payment account on the Bundle Detail
page, the accounts available in that court are listed in the Payment Account field drop-down list.
NOTE: As administrator, you will specify whether your firm’s TrueFiling filers will share payment
accounts or if they’ll use individual accounts to submit their fillings to the Court. If accounts will be
shared, all payment accounts are available to all firm filers. If payment accounts aren’t to be shared,
each filer must use their own account. See Firm Settings in this guide for details on setting this
option.
Filtering Payment Accounts
The Payment Accounts page can be filtered to display payment accounts only for courts the filer has
identified as favorites or for all the courts TrueFiling serves.
Creating a New Account
TrueFiling supports Visa, MasterCard, and American Express as valid types of payment accounts.
To create a new account:
1. Select Settings >> Payment Accounts in the navigation pane. The Payment Accounts page
is displayed.
2. Locate the processor section that lists the court(s) your firm files in.
3. Click Create New Account in the appropriate section.

TrueFiling Administrator Guide Managing Payment Accounts
© 2015 ImageSoft, Inc. 35
4. Input the Account Information and Card information.
5. Click OK to complete and close the dialog. The credit card will be validated before being
added as a firm account.
A placard for the new account is added to the Payment Accounts page.
6. Continue to add payment accounts as required for each payment processor used.

TrueFiling Administrator Guide Managing Payment Accounts
© 2015 ImageSoft, Inc. 36
Modifying a Payment Account
You can edit payment account information.
Be aware that changes made to an account used by one payment processor don’t propagate to other
processors. For example, if an address change must be made to an account, the change must be
made to each instance of the account among the payment processors.
To modify an existing credit card payment account:
1. Select Settings >> Payment Accounts in the navigation pane. The Payment Accounts page
is displayed.
2. Locate the account to edit in the appropriate processor section.
3. Click on the account’s placard. The Account Information dialog is displayed.
4. Make any required changes.
NOTE: The Account Name and Card Number are read only and cannot be changed.
If you want to change the Card Number, you must delete the account and create a new
one with the correct number.
5. Click OK to complete and close the dialog. The Payment Accounts page is re-displayed.

TrueFiling Administrator Guide Managing Payment Accounts
© 2015 ImageSoft, Inc. 37
Deleting a Payment Account
If payment accounts are shared among a firm’s Login Users, any user can delete an account. If
payment accounts aren’t shared, only the user that added the account can delete it.
Payment account sharing preferences are set by administrative users on the Firm Settings page.
Be aware that deleting a payment account from one processor will not delete it from the other
processors. Perform the delete operation for each instance of the account you want to delete.
To delete an account:
1. Select Settings >> Payment Accounts in navigation pane. The Payment Accounts page is
displayed.
2. Locate the account to remove and click the X in the upper-right corner of the account
placard. A confirmation dialog is displayed.
NOTE: As noted in the confirmation dialog, if you have any unpaid filings that were
submitted with this credit card, the filings may be rejected if you delete the payment
account.
3. Click OK to delete the account; click Cancel to cancel the operation.
If payment accounts are shared, firm administrators will receive an email notifying them that account
has been deleted. If accounts aren’t shared, the email will be sent only to the Login User that deleted
the account.

TrueFiling Administrator Guide Managing Payment Accounts
© 2015 ImageSoft, Inc. 38
Viewing Payment History
You can view a comprehensive payment history for your firm for a specified time period, as well as
print out receipts for select transactions.
1. Select Settings >> Payment Accounts in navigation pane. The Payment Accounts page is
displayed.
2. Click View Payment Information. The Payment History Report page is displayed.
3. Input the start date (Payment on or after) and end date (Payment on or before).
You can filter the payments that will be displayed based on Matter Number. Specifying a
Matter Number is optional.
4. Click View Activity on the Payment History Report Page. The payment history is displayed.
5. You can select payment information for a specific case by selecting a case number from the
Case(s) drop-down list.

TrueFiling Administrator Guide Managing Payment Accounts
© 2015 ImageSoft, Inc. 39
Creating a Receipt PDF
You can create a PDF file of selected transaction receipts.
1. After the Payment History Report is generated, select the checkbox in the Receipt column
to print a receipt for a transaction.
2. Click Create Receipt PDF. A dialog prompts you to open or save the document.
Open – the document is opened in a separate window.
Save: Save – the document is saved in the Downloads folder; a default file name is
created.
Save As – a Save As dialog is displayed where you can specify the file name and
location.
Save and open – the document is saved in the Downloads folder and is opened in a
separate window.
Cancel – cancel the operation.
3. Specify how you want to access the PDF file.
Creating a CSV File
You can generate a csv file that contains the transaction data.
1. After the Payment History Report is generated, click Create csv file on the Payment History
Report page. A dialog asks how you want to access the file.
Open – the document launches in Microsoft Excel in a separate window.
Save – the file is saved to the local system’s Downloads folder; a default file name is
created.
Save as – a Save As dialog is displayed where you can specify the file name and location.
2. Specify how you want to access the file; click Cancel to cancel the operation.

TrueFiling Administrator Guide Index
© 2015 ImageSoft, Inc. A
Index
A
Administrator, 1
Duties, 1
Email, 6
Search for, 3
C
Client Matter Number, 16
Court
Add as favorite, 17
Favorites, 17
Remove as favorite, 18
View favorites, 19
Courts in TrueFiling, 2
Credit card account, 33
Create new, 34
Delete, 37
Edit existing, 36
Sharing, 16
F
Favorite courts
View, 19
Favorites
Add a court, 17
Courts, 17
Remove a court, 18
Firm
Mailing address, 16
Settings, 15
Firm Lookup Results page, 6
Firm site
Create, 3
Search for, 3
I
Invitation to join firm, 20, 21
L
Login rights
Edit, 28
Login User
Edit login rights, 28
Edit profile, 28
Edit Role, 28
Invitation, 20, 21
Manage, 20
Remove from firm, 29
Unclassified, 21
N
Notification email, 16
P
Password
Reset, 31
Payment account
Create new, 34
Credit card, 33
Delete, 37
Edit existing, 36
Payment processor, 33
Sharing, 16
Payment processor, 33
Payments
Create csv file, 39
History, 38
Receipt, 39
View, 38
R
Remove Login User, 29
Reset password, 31
S
Servicing
Firm email address, 16
Servicing email, 16
Settings, 15
Sign up, 3, 10
Site email address, 16
Site search, 3
T
Time zone, 16
TrueFiling
Administrator, 1
Create firm site, 3, 10, 12

TrueFiling Administrator Guide Index
© 2015 ImageSoft, Inc. B
Firm settings, 15
Search for administrator, 3
Search for site, 3
Sign up, 3, 10
Site time zone, 16
Supported courts, 2
User Agreement, 14
Welcome page, 4
TrueFiling invitation
Confirm receipt, 26
U
Unclassified Login User, 21
W
Welcome page, 4