laser printer installation manual -...
TRANSCRIPT
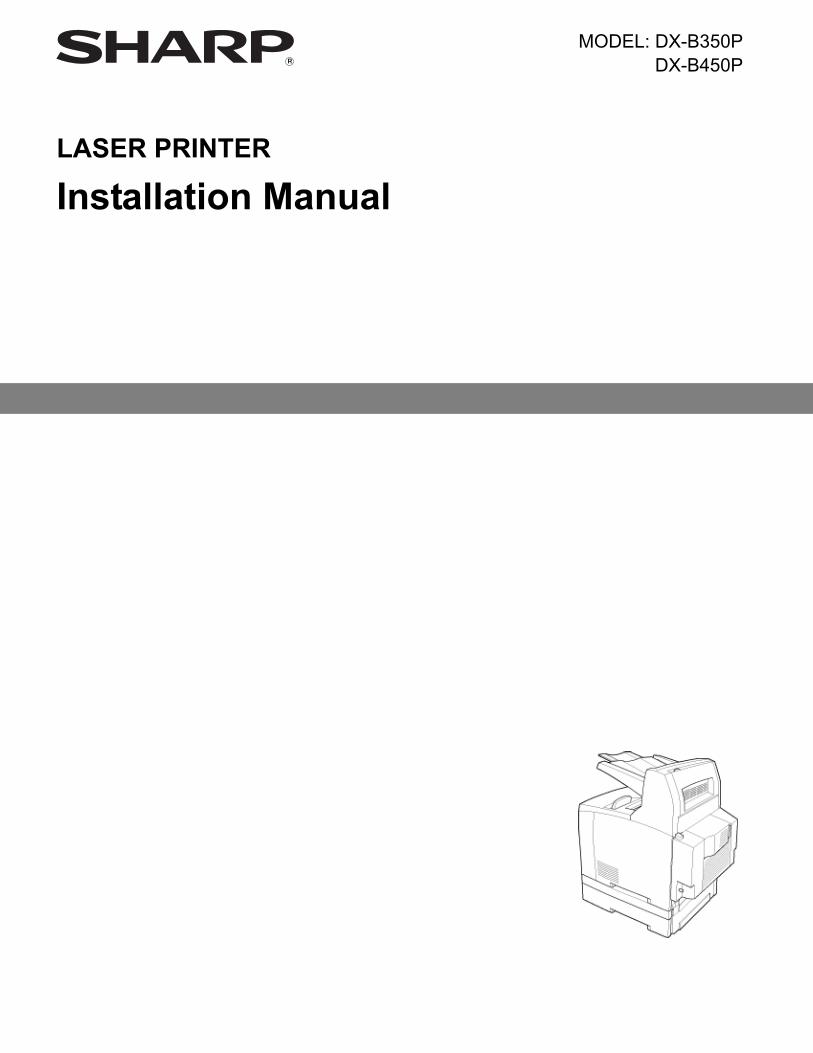
LASER PRINTER
Installation Manual
MODEL: DX-B350P
DX-B450P


Contents
1 Introduction.............................................................................................................. 1-1Conventions ....................................................................................................................................... 1-1General Safety Guidelines.................................................................................................................. 1-1
Safety Precautions........................................................................................................................1-1Handling the Printer......................................................................................................................1-2Laser Information for North America............................................................................................1-2
Printer Orientation.............................................................................................................................. 1-3Warranty............................................................................................................................................. 1-3
Declaration of Conformity.............................................................................................................1-4Notice for Users in the USA .........................................................................................................1-4Compliance...................................................................................................................................1-5
Supplies.............................................................................................................................................. 1-6Storage of Supplies ......................................................................................................................1-6Storing Toner Cartridges...............................................................................................................1-6Supply of Spare Parts and Consumables......................................................................................1-6
2 Basic Installation...................................................................................................... 2-1Checking Your Package...................................................................................................................... 2-1Preparing a Location for the Printer ................................................................................................... 2-1
Installation Precautions.................................................................................................................2-1Space Requirements ....................................................................................................................2-2
Installation Procedure......................................................................................................................... 2-3Removing the Tape ......................................................................................................................2-3Installing the Toner Cartridge .......................................................................................................2-3Loading Paper...............................................................................................................................2-5Connecting an Interface ...............................................................................................................2-8Connecting the Power Cord .........................................................................................................2-8Turning the Printer On ..................................................................................................................2-9
Using the Operator Panel................................................................................................................... 2-9Selecting a Display Language .......................................................................................................... 2-10Printing a Configuration Summary ................................................................................................... 2-10Setting an IP Address Manually ....................................................................................................... 2-10Using the Embedded Web Site........................................................................................................ 2-10Driver Installation ............................................................................................................................. 2-11
Configuration of Driver Options..................................................................................................2-113 Specifications........................................................................................................... 3-1
General Specification ......................................................................................................................... 3-1
TOC-1

TOC-2 Installation Manual
Chapter 1: Introduction
This manual is intended to provide guidance for the proper installation of your printer. If you require more information to install your printer, consult the User’s Guide located on the CD-ROM. For further help, please contact your dealer or responsible representative.
Conventions
The following conventions are used throughout this manual to emphasize certain procedures or information:
NOTE: A note is a tip or extra information that may be helpful in installing or using the printer.
General Safety Guidelines
Before operating the printer, read the following instructions carefully:
• Follow all the operating procedures provided in this manual.• Follow all the hazard warnings on the printer and in the manual. Failure to do so
can cause injury to yourself or damage to the printer.• Do not perform any operation or action in any way other than provided in this
manual. When in doubt, contact your dealer or service company.• Keep in mind that hazard warnings in this manual or on the printer cannot cover
every possible case, as it is impossible to predict and evaluate all circumstances beforehand. Be alert and use your common sense.
Safety Precautions
This printer is available in the power specifications 110 V and 230 V. The specifications that apply to your printer depend on your machine configuration. To prevent fire or shock hazards, connect the power plug only to a properly rated power outlet.
CAUTION: A caution message provides information that may help you avoid equipment damage, process failure, or inconvenience. Read all caution messages carefully.
WARNING! A warning message indicates the possibility of personal injury if a specific procedure is not performed exactly as described in the manual. Pay close attention to these sections and read them fully to prevent possible injury.
1-1
General Safety Guidelines
Introduction
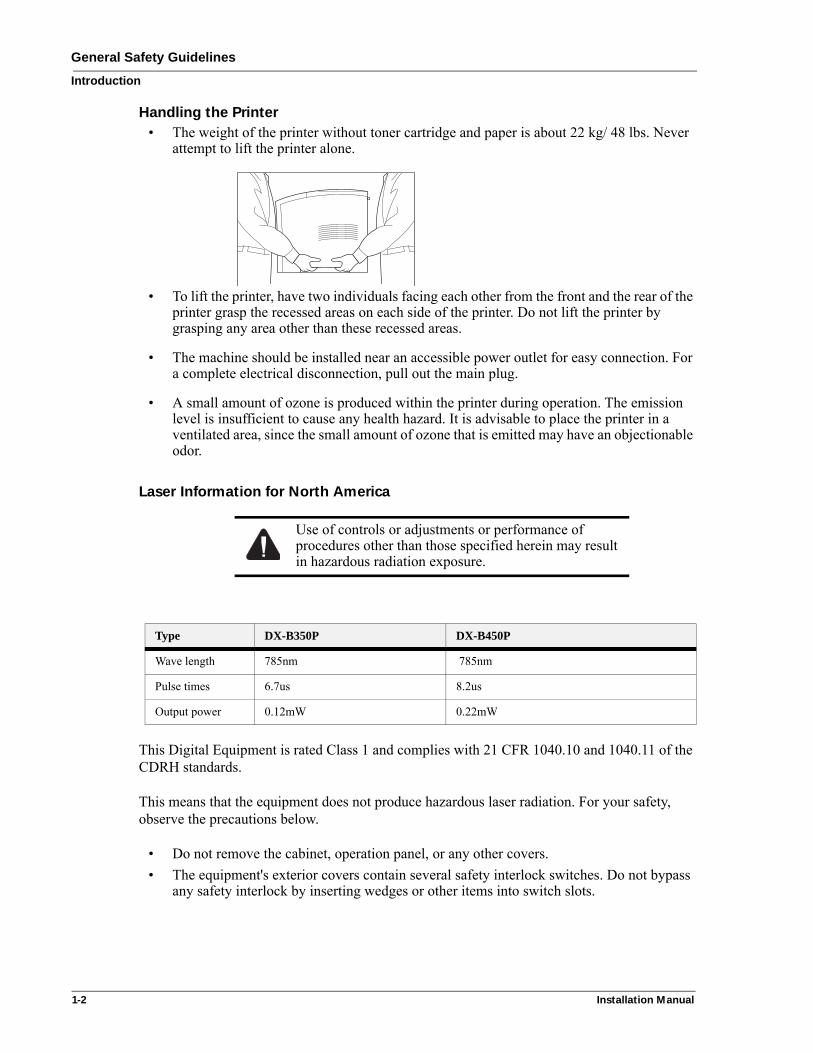
Handling the Printer
• The weight of the printer without toner cartridge and paper is about 22 kg/ 48 lbs. Never attempt to lift the printer alone.
• To lift the printer, have two individuals facing each other from the front and the rear of the printer grasp the recessed areas on each side of the printer. Do not lift the printer by grasping any area other than these recessed areas.
• The machine should be installed near an accessible power outlet for easy connection. For a complete electrical disconnection, pull out the main plug.
• A small amount of ozone is produced within the printer during operation. The emission level is insufficient to cause any health hazard. It is advisable to place the printer in a ventilated area, since the small amount of ozone that is emitted may have an objectionable odor.
Laser Information for North America
This Digital Equipment is rated Class 1 and complies with 21 CFR 1040.10 and 1040.11 of the CDRH standards.
This means that the equipment does not produce hazardous laser radiation. For your safety, observe the precautions below.
• Do not remove the cabinet, operation panel, or any other covers.• The equipment's exterior covers contain several safety interlock switches. Do not bypass
any safety interlock by inserting wedges or other items into switch slots.
Use of controls or adjustments or performance of procedures other than those specified herein may result in hazardous radiation exposure.
Type DX-B350P DX-B450P
Wave length 785nm 785nm
Pulse times 6.7us 8.2us
Output power 0.12mW 0.22mW
1-2 Installation Manual
Printer OrientationIntroduction
Printer Orientation
Throughout this manual, the four sides of the printer are referred to as front, rear, right, and left. The front of the printer is the side near the Operator Panel, and the rear of the printer is opposite the front. The left and right sides of the printer are defined as the sides to the left and right, respectively, of a person who is facing the front of the printer.
Warranty
While every effort has been made to make this document as accurate and helpful as possible, SHARP CORPORATION makes no warranty of any kind with regard to its content. All information included herein is subject to change without notice. SHARP is not responsible for any loss or damages, direct or indirect, arising from or related to the use of this operation manual.
This equipment has been tested and found to comply with the limits for a Class B digital device, pursuant to Part 15 of the FCC Rules. These limits are designed to provide reasonable protection against harmful interference in a residential installation. This equipment generates, uses and can radiate radio frequency energy and, if not installed and used in accordance with the instructions, may cause harmful interference to radio communications. However, there is no guarantee that interference will not occur in a particular installation. If this equipment does cause harmful interference to radio or television reception, which can be determined by turning the equipment off and on, the user is encouraged to try to correct the interference by one or more of the following measures:
• Reorient or relocate the receiving antenna.• Increase the separation between the equipment and receiver.• Connect the equipment into an outlet on a circuit different from that to which the receiver
is connected.• Consult the dealer or an experienced radio/TV technician for help.
FCC Regulations state that any unauthorized changes or modifications to this equipment not expressly approved by the manufacturer could void the user's authority to operate this equipment.
Installation Manual 1-3

Warranty
Introduction
Declaration of Conformity
SHARP Laser Printer, DX-B350P/DX-B450P
This device complies with Part 15 of the FCC Rules. Operation is subject to the following two conditions: (1) This device may not cause harmful interference, and (2) this device must accept any interference received, including interference that may cause undesired operation.
Responsible Party: SHARP ELECTRONICS CORPORATIONSharp Plaza, Mahwah, New Jersey 07495TEL: 1-800-BE-SHARP
Notice for Users in the USA
BE SURE TO ASK YOUR AUTHORIZED SHARP DEALER ABOUT THE WARRANTY THAT YOUR SELLING DEALER EXTENDS TO YOU. In order to assure you, the end-user, of warranty protection, Sharp extends a limited warranty to each of its authorized dealers and, in turn, requires each of its authorized dealers to extend its own warranty to you on terms that are no less favorable than those given to the dealer by Sharp. You should be aware, however, that Sharp does not itself extend any warranties, either express or implied, directly to you, the end-user, and no one is authorized to make any representations or warranties on behalf of Sharp. Specifically, SHARP DOES NOT EXTEND TO YOU, THE END-USER, ANY EXPRESS WARRANTY OR ANY IMPLIED WARRANTY OF MERCHANTABILITY, FITNESS FOR USE OR FITNESS FOR ANY PARTICULAR PURPOSE IN CONNECTION WITH THE HARDWARE, SOFTWARE OR FIRMWARE EMBODIED IN, OR USED IN CONJUNCTION WITH THIS PRODUCT. Sharp is not responsible for any damages or loss, either direct, incidental or consequential, which you, the end-user, may experience as a result of your purchase or use of the hardware, software or firmware embodied in or used in conjunction with this Product. Your sole remedy, in the event that you encounter any difficulties with this Product, is against the authorized dealer from which you purchased the Product.
DX-B350P Laser PrinterDX-B450P Laser Printer
In the event that this authorized dealer does not honor its warranty commitments, please contact the General Manager, Business Products Group, Sharp Electronics Corporation, Sharp Plaza, Mahwah, New Jersey 07495-1163, so that Sharp can try to help assure complete satisfaction of the warranty rights to which you are entitled from the authorized dealer.
1-4 Installation Manual

WarrantyIntroduction
Compliance
Products that have earned the ENERGY STAR® are designed to protect the environment through superior efficiency.DX-B450P model requires the optional DX-DUX2 duplex module to fully qualify for ENERGY STAR®.
The EcoLogo Program guidelines are applied to only the products in Canada. The products that meet the EcoLogo Program guidelines carry the logo shown to the left. The products without the logo may not meet the EcoLogo Program guidelines.
Installation Manual 1-5

Supplies
Introduction
Supplies
Standard supplies for this product that can be replaced by the user include paper and toner cartridges. Be sure to use only SHARP-specified products for the toner cartridges.
Storage of Supplies
1. Store the supplies in a location that is:• clean and dry,• at a stable temperature,• not exposed to direct sunlight.
2. Store paper in the wrapper and lying flat.3. Paper stored in packages standing up or out of the wrapper may curl or become damp,
resulting in paper misfeeds.
Storing Toner Cartridges
Store a new toner cartridge box horizontally. Do not store it standing on end. If stored standing on end, the toner may not distribute well even after shaking the cartridge vigorously, and will remain inside the cartridge without flowing out.
Supply of Spare Parts and Consumables
The supply of spare parts for repair of the machine is guaranteed for at least 7 years following the termination of production. Spare parts are those parts of the machine which may break down within the scope of the ordinary use of the product, whereas those parts which normally exceed the life of the product are not to be considered as spare parts. Consumables too, are available for 7 years following the termination of production.
1-6 Installation Manual

Chapter 2: Basic Installation
Checking Your Package
Before installing the printer, check that all the items are contained in the package. Should any components be missing or damaged, contact your dealer.
Preparing a Location for the Printer
Installation Precautions
Before unpacking your laser printer, it is recommended that you read the following to assist locating a suitable spot for your new laser printer. To make optimum use of the printer, observe the following precautions when locating the printer.
• Place the printer on a horizontal, sturdy and stable surface. The printer may cause injury if it falls over.
• Do not subject the printer to direct sunlight or a malfunction may result.
Printer
Starter Toner Cartridge DX-B450P is 10K page yield at 5% coverage on A4/LetterDX-B350P is 6K page yield at 5% coverage on A4/Letter
Power cord
Paper tray (A4/Letter, 150 sheets) Paper tray (A4/Letter, 550 sheets)
Installation Manualand CD-ROM
The installation surface must be stable and very sturdy to support the considerable weight of the printer. If the printer falls over, there is a severe risk of injuries.
2-1

Preparing a Location for the Printer
Basic Installation
• Do not place the printer in a location with poor ventilation, or high level of dust, otherwise a fire hazard or electric shock may result.
• Do not place the printer near heaters or similar objects, otherwise a fire hazard may result.• Never block the ventilation openings of the printer, otherwise the internal temperature
will build up and cause a fire hazard.• Do not place the printer near alcohol, benzine, or other volatile and flammable materials,
or a fire hazard may result.
Space Requirements
A certain amount of space is required for proper operation of the printer and also for performing printer maintenance and replacing consumables. Use the following figures to plan for appropriate clearances when determining a location for your printer.
NOTE: Be sure to leave ample space between the ventilation openings on the printer and the nearest wall orother surface, otherwise overheating may occur leading to a fire hazard. For easy operation,maintenance and replacing of consumables, you should also leave the clearances shown belowaround the printer. Installation of the printer should be carried out by qualified service personnel.
255 mm
300 mm
200 mm
402 mm
200 mm (7-7/8 in)
402 mm (15-53/64) in)
255 mm
(10-3/64in)
300 mm
(11-52/64in)
2-2 Installation Manual

Installation ProcedureBasic Installation
Installation Procedure
Removing the Tape
When the printer is first taken out of the packaging box, the covers of the printer are taped as shown in the diagram. Remove the tapes. Remove the fuser locking device by pushing the tabs as shown on the instructions at the rear of the printer.
NOTE: The small lever to back of the unit is used for an optional part that is not available on this printer.The lever should remain in the down position.
Installing the Toner Cartridge
When installing the Toner Cartridge, take note of the following points below:
• Never throw a Toner Cartridge into an open flame. It can cause an explosion and you can get burned.
• Keep the toner cartridge in a location out of reach of children.• Do not forcibly open the toner cartridge.• Do not subject it to direct sunlight or strong light. • When installing the Toner cartridge, select a location not subject to strong light and try to
finish the installation within 5 minutes. • Do not touch the surface of the photosensitive drum. • Do not stand or place the Toner Cartridge upside down. The drum might get damaged.
Installation Manual 2-3
Installation Procedure
Basic Installation
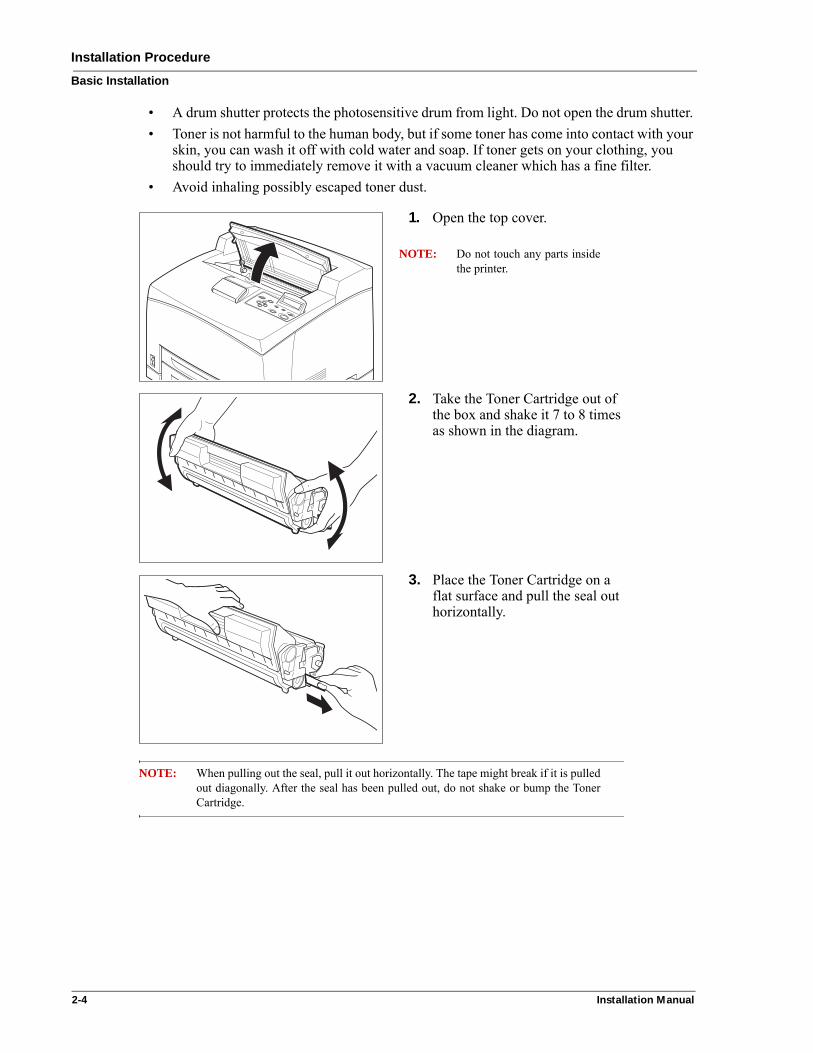
• A drum shutter protects the photosensitive drum from light. Do not open the drum shutter. • Toner is not harmful to the human body, but if some toner has come into contact with your
skin, you can wash it off with cold water and soap. If toner gets on your clothing, you should try to immediately remove it with a vacuum cleaner which has a fine filter.
• Avoid inhaling possibly escaped toner dust.
1. Open the top cover.
NOTE: Do not touch any parts insidethe printer.
2. Take the Toner Cartridge out of the box and shake it 7 to 8 times as shown in the diagram.
3. Place the Toner Cartridge on a flat surface and pull the seal out horizontally.
NOTE: When pulling out the seal, pull it out horizontally. The tape might break if it is pulledout diagonally. After the seal has been pulled out, do not shake or bump the TonerCartridge.
2-4 Installation Manual

Installation ProcedureBasic Installation
Loading Paper
See the User’s Guide on CD-ROM for details on the type and size of paper that can be loaded in the paper tray.
4. Hold the Toner Cartridge by the grip and insert it into the slot inside the printer.
NOTE: Do not touch any parts inside the printer. Ensure that the Toner Cartridge is firmlyset.
5. Close the top cover securely.
1. Place the paper tray on a flat surface.
Installation Manual 2-5
Installation Procedure
Basic Installation
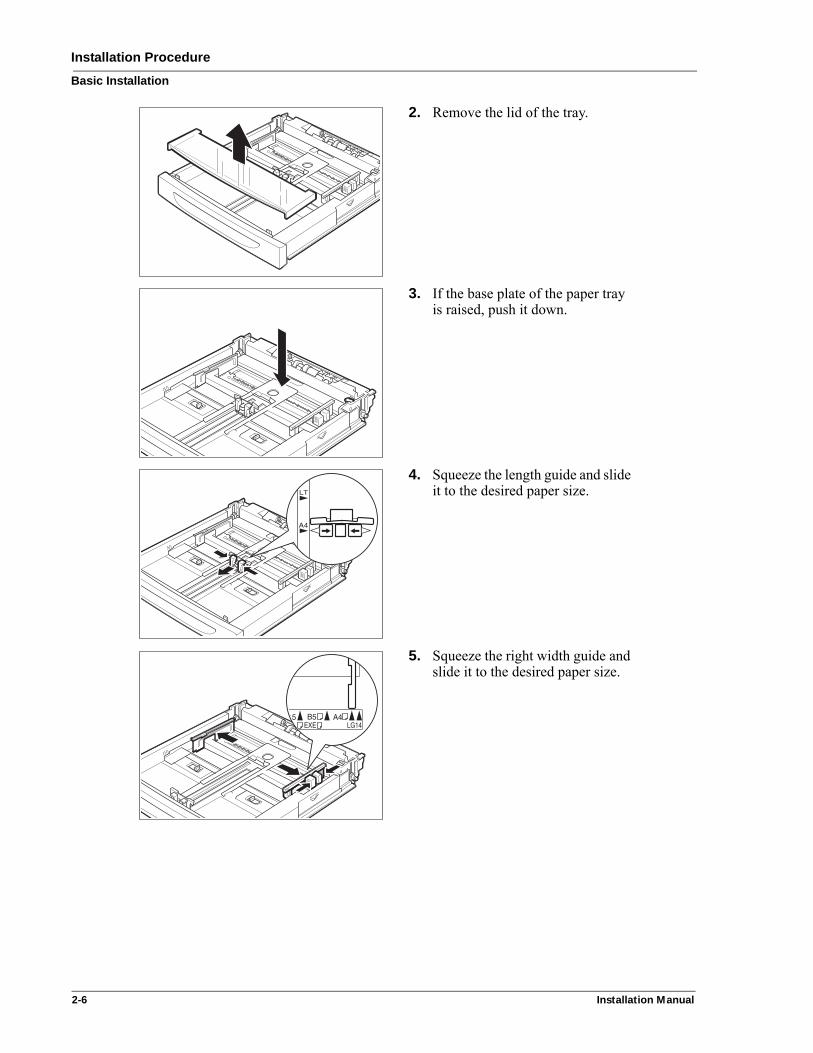
2. Remove the lid of the tray.
3. If the base plate of the paper tray is raised, push it down.
4. Squeeze the length guide and slide it to the desired paper size.
5. Squeeze the right width guide and slide it to the desired paper size.
2-6 Installation Manual
Installation ProcedureBasic Installation
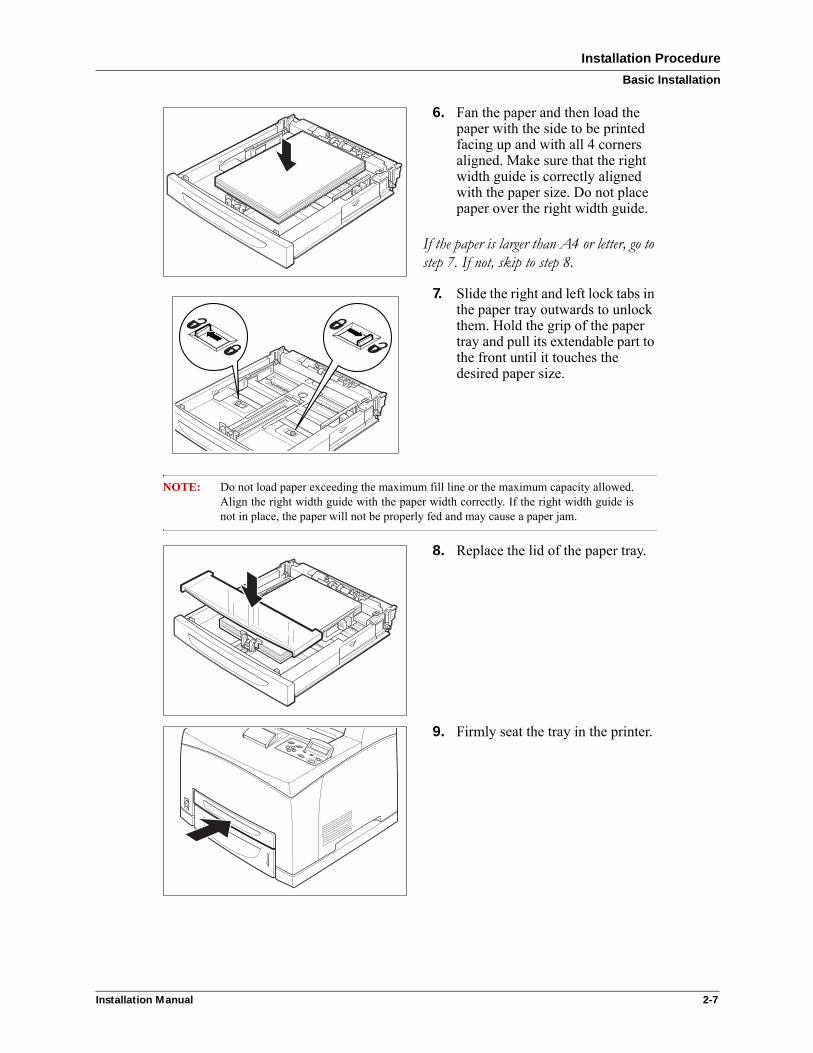
6. Fan the paper and then load the paper with the side to be printed facing up and with all 4 corners aligned. Make sure that the right width guide is correctly aligned with the paper size. Do not place paper over the right width guide.
If the paper is larger than A4 or letter, go to step 7. If not, skip to step 8.
7. Slide the right and left lock tabs in the paper tray outwards to unlock them. Hold the grip of the paper tray and pull its extendable part to the front until it touches the desired paper size.
NOTE: Do not load paper exceeding the maximum fill line or the maximum capacity allowed.Align the right width guide with the paper width correctly. If the right width guide isnot in place, the paper will not be properly fed and may cause a paper jam.
8. Replace the lid of the paper tray.
9. Firmly seat the tray in the printer.
Installation Manual 2-7
Installation Procedure
Basic Installation
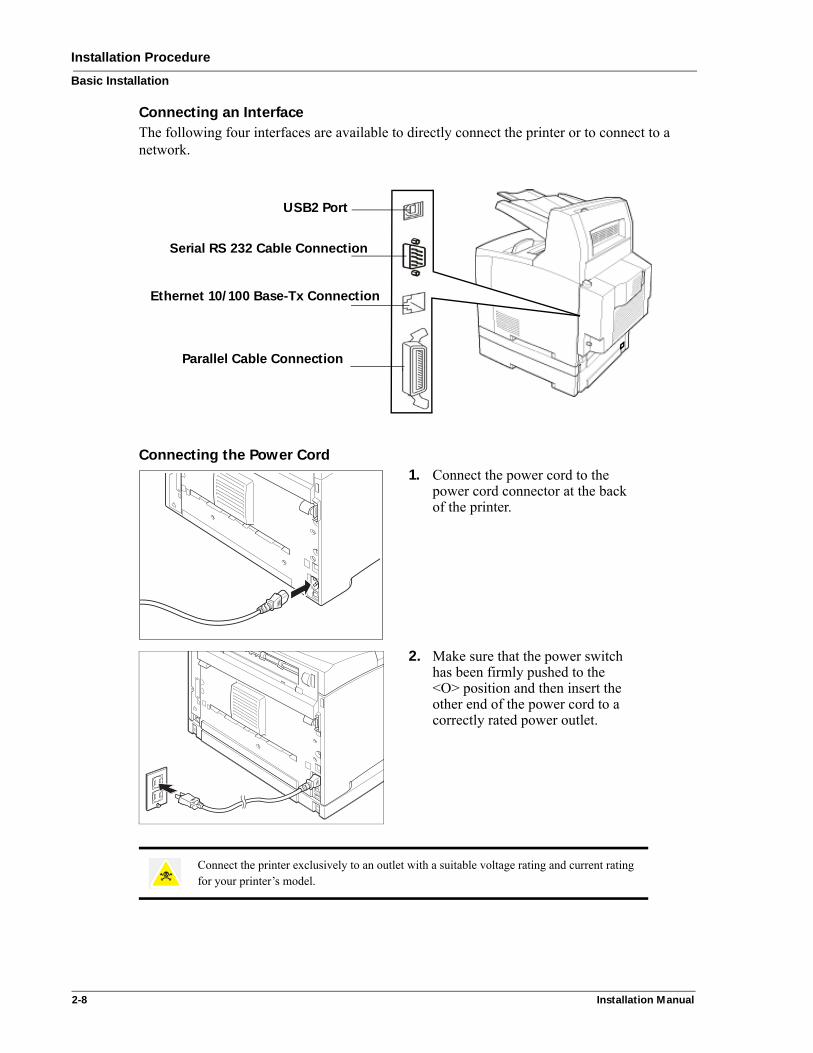
Connecting an Interface
The following four interfaces are available to directly connect the printer or to connect to a network.
Connecting the Power Cord
1. Connect the power cord to the power cord connector at the back of the printer.
2. Make sure that the power switch has been firmly pushed to the <O> position and then insert the other end of the power cord to a correctly rated power outlet.
Connect the printer exclusively to an outlet with a suitable voltage rating and current rating for your printer’s model.
USB2 Port
Serial RS 232 Cable Connection
Parallel Cable Connection
Ethernet 10/100 Base-Tx Connection
2-8 Installation Manual

Using the Operator PanelBasic Installation
Turning the Printer On
NOTE: The printer motors run for 2 or 3 minutes when you first turn the power on.
The printer displays a series of messages and then displays READY when it is available for use.
NOTE: While turned on, the printer will go into the standby state if it remains idle for a period of time.
When you have finished using the printer for the day or you do not intend to use it for a long period of time, switch off the power.
Using the Operator Panel
To configure the printer, press the MENU button and use the NEXT, RETURN and PREVIOUS buttons to navigate through the Operator Panel options and the SELECT button to choose the option. You can use the CANCEL button to exit any current selection.
1. Press the power switch to the <I> position to turn the power on.
INFO
CANCEL
START/STOPFAULTACTIVE
SELECT
MENUSTATUS
NEXT
RETURN
PREVIOUS
LCD Display
Installation Manual 2-9
Selecting a Display Language
Basic Installation
Selecting a Display Language
The default language for all LCD display messages, the Configuration Summary, and the Test Page is English. You can change to one of several languages. Navigate through the System Menu to select the desired language:
NOTE: The language that you select will be reflected on all LCD display messages, and also the content ofthe Configuration Summary.
Printing a Configuration Summary
Your printer can print a Configuration Summary that lists the currently selected status of menu options, media selections in trays, options installed and other relevant information about your printer. To print a Configuration Summary, press the INFO button on the Operator Panel.
Setting an IP Address Manually
This action is only needed if you must set an IP address manually. If you receive an IP address from a DHCP source, then you do not need this action. DHCP is On by default. You must turn DHCP Off by navigating through the Interface and Network Setup Menus in the Operator Panel.
Using the Embedded Web Site
The printer has an embedded web site that can be used to set many configuration items and observe the status of the printer. If the printer is connected to a network, point your browser to the printer's IP address to use this to configure the printer. Consult the User’s Guide located on the CD-ROM for further help.
2-10 Installation Manual
Driver InstallationBasic Installation
Driver Installation
1. Load the CD into the drive.2. After the installer program auto loads, select I Accept to the License Agreement on the
opening screen.3. Follow the instructions on the screen.
NOTE: The installer and driver will automatically use the language currently configured by Microsoft onthe PC in use. If the driver or installer does not support the language in use, it will use English.
NOTE: For plug and play using USB or parallel interfaces, it is recommended to follow the wizard and justinstall the driver. Then power the printer on so that the system can find the printer and install thecorrect driver.
NOTE: The installer will automatically install a PCL6 driver. If PCL5 or PostScript 3 is desired, use theMicrosoft “Add Printer” Wizard in the Printers and Faxes folder. Use the “Have Disk” option andpoint the Add Printer Wizard to the appropriate folder on the CD.
Configuration of Driver Options
The printer driver is installed with a base printer configuration. This means optional features such as a duplexer will be unavailable until the option is added to the driver’s configuration. The driver configuration can be performed automatically or manually. Driver options are added as follows:
1. From the Windows Control Panel, select Printer and Faxes. This control is named simply Printers on Windows Vista.
2. Find your printer in the list and right-click. A pop-up menu appears
3. Select Properties. A Properties dialog appears.
4. Click on the Configuration tab. The Properties dialog changes to show a list of the available options. Each item will either show None or Installed, except for memory which shows the amount of memory installed. For Auto Configuration, go to step 5. For Manual configuration, go to step 6.
5. Auto Configuration - Click the Auto Configuration button. The driver will automatically configure the available options. Go to step 7.
6. Manual Configuration - Select the option in the list that you wish to change. Below the list is a drop down list that allows you to add or remove an option by selecting Installed or None.
If the option is memory, select the amount of memory installed.
7. Press OK or Apply.
Installation Manual 2-11

Driver Installation
Basic Installation
2-12 Installation Manual

Chapter 3: Specifications
General Specification
Specification DX-B350P DX-B450P
Printing speed Up to 35 ppm LetterUp to 34 ppm A4
Up to 45 ppm LetterUp to 43 ppm A4
Processor MIPS RM7035 533MHz
Memory 128 MB expandable to 640 MB, User Flash 12 MB
Warm-up time Maximum of 17 seconds from power on at 71.6 F (22° C)
First Page Output Time Approximately 9 secondsExact speed varies depending on system configuration, software programs, and document complexity.
Approximately 8 secondsExact speed varies depending on system configuration, software programs, and document complexity.
Resolution 1200 dpi and 600 dpi
Weight 46.3 lbs (21 kg) unpacked not including Toner Cartridge
47.4 lbs (21.5 kg) unpacked not including Toner Cartridge
Dimensions 16-39/64 in (w) x 15-59/64 (h) x 18-21/64 (d)(421.8 mm (w) x 404.3(h) x 465.4 (d))
Media
Sizes Letter (8.5 x 11in), Legal (8.5 x 14in), Legal13 (8.5 x 13in), Executive (7.25 x 10.5in), Invoice (5.5 x 8.5in), COM9 (3.875 x 8.875in), COM10 (4.125 x 9.5in), Monarch (3.875 x 7.5in), A4 (210 x 297mm), A5 (148 x 210mm), A6 (105 x 148mm), B5 (182 x 257mm), C5 (162 x 229mm), DL (110 x 220mm), Custom - W: 76.2 mm (3.0 in) - 215.9 mm (8.5 in) and L: 127.0 mm (5.0 in) - 355.6 mm (14.0 in) Paper that is smaller than W: 98.4 mm (3.9 in) x L: 148.0 mm (5.8in) must be placed in Tray 1.Paper that is smaller than W: 88.9 mm (3.5 in) x L: 139.7 mm (5.5in) cannot be duplexed or output to the Offset Catch tray.
Paper type Plain (64-105 gsm), Transparency, Pre-Punched, Letter Head, Color, Pre-Printed, Bond, Labels, Cardstock, Postcard, Envelope, Thick 1 (106-159 gsm), Thick 2 (160-216 gsm)
Plain (68-105 gsm), Transparency, Pre-Punched, Letter Head, Color, Pre-Printed, Bond, Labels, Cardstock, Postcard, Envelope, Thick 1 (106-159 gsm), Thick 2 (160-216 gsm), Thick 3, Thin (64-67 gsm)For rough or uneven media such as envelope, choose Thick 3. When using Thick 3, duplex is not available.
Standard Input Paper tray A4/Letter: 150 sheetsPaper tray A4/Letter: 550 sheets
Standard Output 500 sheets
Options
Memory Options Memory: Standard System Memory: 128 MBOptional Memory:
Expansion Memory: 256 MB, 512 MB ***Hard Disk: 40GB or more, 2.5 inch IDE ***Compact Flash: Socket Standard, 1 GB, 2 GB, 4 GB ***
*** Please contact your local dealer or authorized service representative for additional details.
3-1
3-2 Installation Manual
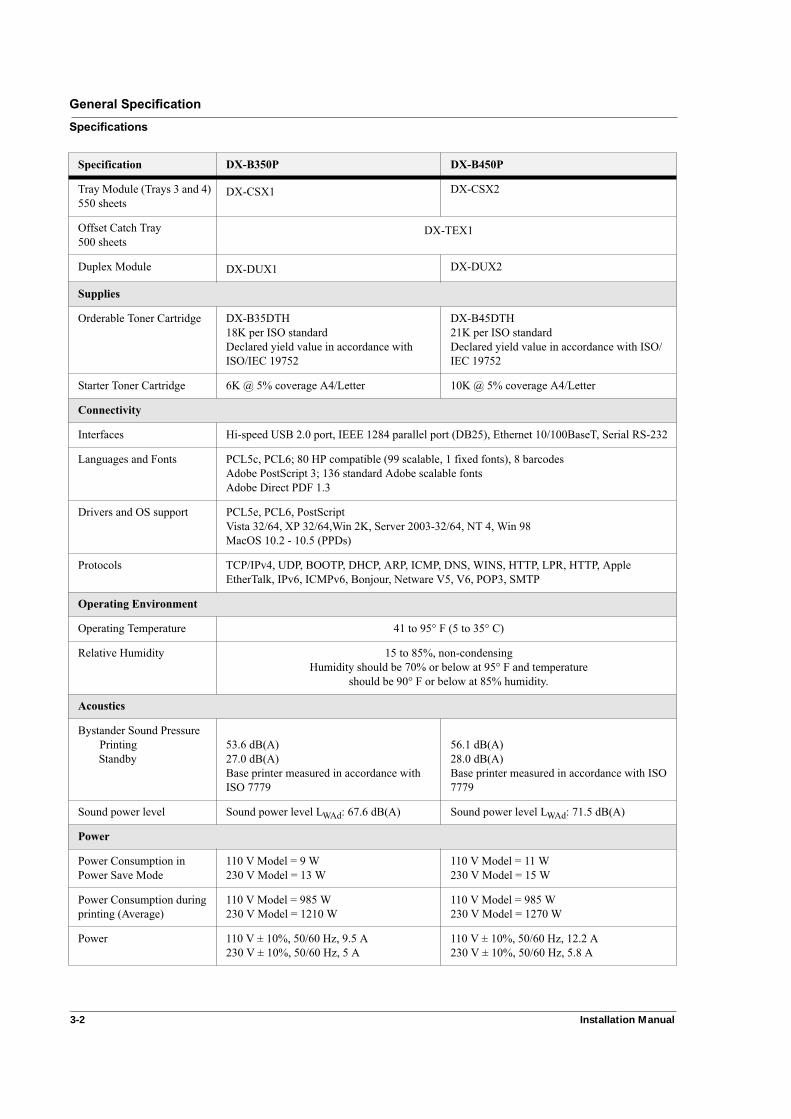
General Specification
Specifications
Tray Module (Trays 3 and 4)550 sheets
DX-CSX1 DX-CSX2
Offset Catch Tray500 sheets
DX-TEX1
Duplex Module DX-DUX1 DX-DUX2
Supplies
Orderable Toner Cartridge DX-B35DTH 18K per ISO standardDeclared yield value in accordance with ISO/IEC 19752
DX-B45DTH21K per ISO standardDeclared yield value in accordance with ISO/IEC 19752
Starter Toner Cartridge 6K @ 5% coverage A4/Letter 10K @ 5% coverage A4/Letter
Connectivity
Interfaces Hi-speed USB 2.0 port, IEEE 1284 parallel port (DB25), Ethernet 10/100BaseT, Serial RS-232
Languages and Fonts PCL5c, PCL6; 80 HP compatible (99 scalable, 1 fixed fonts), 8 barcodesAdobe PostScript 3; 136 standard Adobe scalable fontsAdobe Direct PDF 1.3
Drivers and OS support PCL5e, PCL6, PostScriptVista 32/64, XP 32/64,Win 2K, Server 2003-32/64, NT 4, Win 98MacOS 10.2 - 10.5 (PPDs)
Protocols TCP/IPv4, UDP, BOOTP, DHCP, ARP, ICMP, DNS, WINS, HTTP, LPR, HTTP, Apple EtherTalk, IPv6, ICMPv6, Bonjour, Netware V5, V6, POP3, SMTP
Operating Environment
Operating Temperature 41 to 95° F (5 to 35° C)
Relative Humidity 15 to 85%, non-condensingHumidity should be 70% or below at 95° F and temperature
should be 90° F or below at 85% humidity.
Acoustics
Bystander Sound PressurePrintingStandby
53.6 dB(A)27.0 dB(A)Base printer measured in accordance with ISO 7779
56.1 dB(A)28.0 dB(A)Base printer measured in accordance with ISO 7779
Sound power level Sound power level LWAd: 67.6 dB(A) Sound power level LWAd: 71.5 dB(A)
Power
Power Consumption in Power Save Mode
110 V Model = 9 W 230 V Model = 13 W
110 V Model = 11 W 230 V Model = 15 W
Power Consumption during printing (Average)
110 V Model = 985 W230 V Model = 1210 W
110 V Model = 985 W230 V Model = 1270 W
Power 110 V ± 10%, 50/60 Hz, 9.5 A230 V ± 10%, 50/60 Hz, 5 A
110 V ± 10%, 50/60 Hz, 12.2 A230 V ± 10%, 50/60 Hz, 5.8 A
Specification DX-B350P DX-B450P

General SpecificationSpecifications
NOTE: Office equipment with LWAd > 63 dB(A) is not suitable for operation in rooms where predominantlyintellectual work is done. Due to their noise emissions, these devices should be set up in separaterooms.
Compliance
ENERGY STAR® Qualified Products that have earned the ENERGY STAR® are designed to protect the environment through superior efficiency.DX-B450P model requires the optional DX-DUX2 duplex module to fully qualify for ENERGY STAR®.
EcoLogo (Canada) The EcoLogo Program guidelines are applied to only the products in Canada. The products that meet the EcoLogo Program guidelines carry the logo. The products without the logo may not meet the EcoLogo Program guidelines.
Not applicable
Specification DX-B350P DX-B450P
Connect the printer exclusively to an outlet with a suitable voltage rating and current rating for your printer’s model.
Installation Manual 3-3

General Specification
Specifications
3-4 Installation Manual

SHARP ELECTRONICS CORPORATION1 Sharp Plaza, Mahwah, New Jersey 07495-1163.
www.sharpusa.com
SHARP ELECTRONICS OF CANADA LTD. 335 Britannia Road East, Mississauga, Ontario, L4Z 1W9
DX
-B350P
/DX
-B450P
Installation Manual
This manual has been printed using a vegetable-based soy oil ink to help protect the environment.
