lady “b” summer banner - d84hh6b7xqhqq.cloudfront.net · lady “b” summer banner by deb...
TRANSCRIPT

Lady “B” Summer Bannerby Deb Antonick
Lady “B” Summer BannerBy Deb Antonick
Palette: Decoart Americana SoSoft AcrylicsAntique Gold #14400 Baby Blue Deep #14402Baby Pink Deep #14403 Brown #14408Burnt Sienna #14409 Canary Yellow #14413Crimson #14416 Dioxazine Purple #14420Green #14422 Green Apple #14423Lamp Black #14430 Pine Green #14438Soft Peach #14447 Red Pepper #14445True Blue #14451 White #14455Wine #14456 Wisteria #14457SoSoft Transparent Medium #70867 (2-2oz. bottles)
Decoart Americana AcrylicsBurnt Umber #13064 Buttermilk #13003Coral Blush #13515 Country Red #13018Evergreen #13082 Foliage Green #13259Light Buttermilk #13164 Napa Red #13165Purple Cow #13262 Wedgewood Blue #13038Winter Blue #13190
Surface:Canvas Banner #40135 Arch Top Banner Holder #62669
Misc. Supplies:Palette Paper Pad #70560 Gray Graphite Paper #70141Identi Pen Black #70830 DecoArt MultiPurpose Sealer #87392Soft Grip Embossing & Stylus – set of 3 #70125
Brushes:Papillon by the Artist’s ClubHighlighter Set #20173 Liner, size 2 #20148Angular Shader, size ½” #20111; size ¼” #20109Shader, size 4 #20126; size 6 #20127; size 8 #20129
Deb’s Techniques:Drybrush method: I drybrush all of my highlights unless otherwise mentioned using the various #20173 highlighter brushes.The brush must be dry. When drybrushing, I load my paint from a dry surface, not a wet palette as the moisture will get into the brush and make the paint go on smudgy. I also keep an old towel handy; it is great for cleaning the brush between colors.To start, load the brush by tipping it into the fi rst color, wipe most of the paint off on a paper tow-el. Lightly brush the surface in a circular or side to side motion. The harder you press, the more color you will get. Start light to see how heavy you need to go. The fi rst drybrush coat should
1
allow some of the background to still show through.Clean the brush as best you can on your old towel, then pick up the next color as required. Apply in the same manner using less. Float / Shade: Float color with the angle shader. For painting on Fabric I do not use water. Use the Transparent medium for all fl oating, shading, highlighting and blending. Dress the brush in clean Transparent medium then load and blend the color as you normally would when shading.Line: Unless otherwise stated, all lining is done with identi-pen.Basecoat: Use the brush that best fi ts the area size.
The Painting Process: Basecoat - Starting with the fi rst color, take a clean ½” angle shader brush and dip it into the Transparent Medium then coat the starting area, this is clear so it is ok to go over the edges. Work on small areas at a time, i.e.: complete the head, and then move to the ears.With the brush still wet with the medium, pick up a little bit of the basecoat color. Try not to cover any other elements that will be a different color. I also try not to cover up the inked lines although you can go back when the project is completed and dry and touch up the lines if need-ed.The basecoat does not need to be perfect; it is ok for the background to show through, I think it adds to the fi nished look.Shade - Once you have basecoated the starting area, corner load the same brush with the shading color. Pat the shading in softly to blend. Clean the brush with water and dry well with paper towel. Highlight - Dress the brush with Transparent Medium, corner load into the highlight color, pat to blend.Repeat this process for each individual element of the project.
Preparation:The banner that I used is already for painting. If you are unsure of your sur-face, it is recommended that you wash and dry the fabric before use. Do not use any fabric softeners in the wash or the dryer as this will create coating on the fabric. Iron the fabric fl at.Trace the design onto the fabric with graphite paper; be sure to trace all the design elements.Ink the design using a permanent marker, I recommend the Identi-pen or a Fine Point Sharpie can also be used.You are now ready to paint.
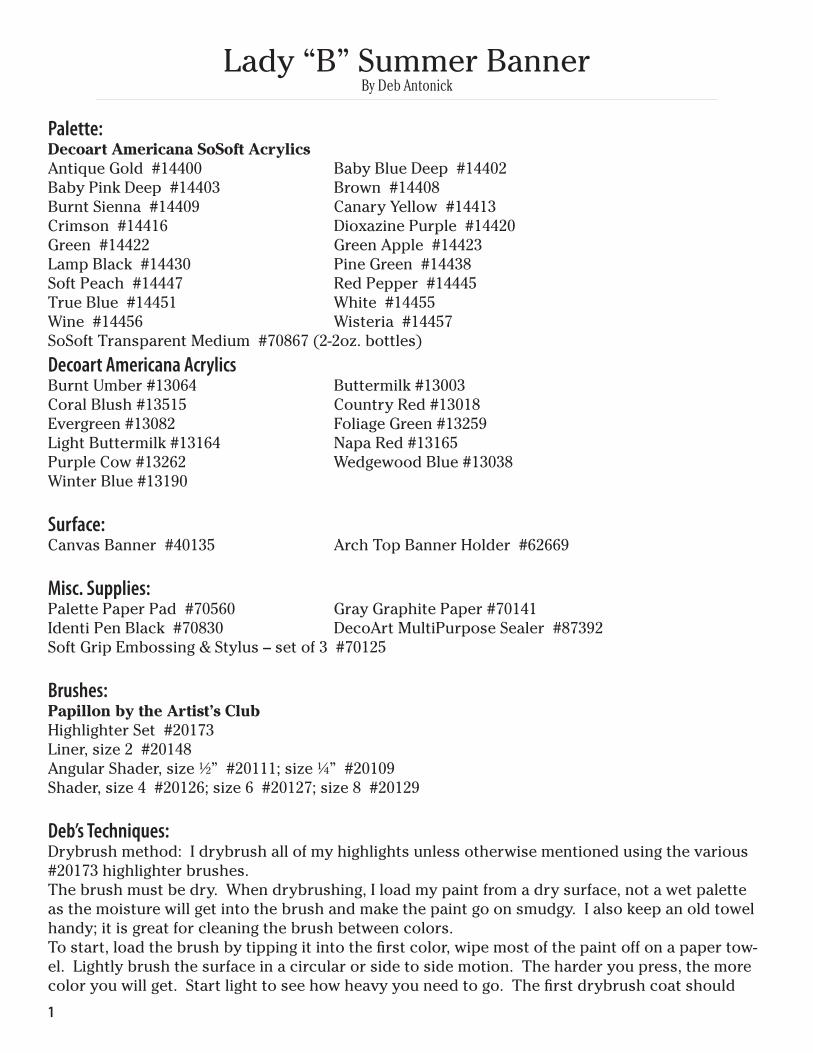
Painting Instructions: Refer to the color photo for shading and detail placement. Note: use the “shading dots” on the pat-tern as a guide for shading. To start with, it is important to not use water for this project. In place of water
2

we are going to use the Transparent Medium. Your brush will be dressed in the medium during the whole painting process. The only time I used water was to clean my brushes between colors.The project is painted using the wet-on-wet process so you will be painting (basecoat, shade and highlight) each element separately. Starting with the head, then an arm, etc. Very little paint is required – a little goes a long way.Let’s get started.Angel face, hands and Legs:• Starting with the angel face, take a clean ½” angle shader brush and dip it into the Transparent Medium then coat the whole head, this is clear so it is ok to go over the edges. • With the brush still wet with the medium, pick up a little bit of Soft Peach and basecoat the face. Normally you will try not to cover over any other elements that will be a different color, but in this case the face fea-tures can be added later. I also try not to cover up the inked lines although you can go back when the project is completed and dry and touch up the lines if needed.• The basecoat does not need to be perfect; it is ok for the background to show through, I think it adds to the fi nished look. • Once you have basecoated the face with Soft Peach, corner load the same brush with Burnt Sienna and shade down the sides of the face and under the hat. Pat the shading in softly to blend. • Clean the brush with water and dry well with paper towel. • Dress the brush with Transparent Medium, corner load into the Ivory and fl oat along the bottom (chin) of the face, pat to blend.• Deepen the Burnt Sienna shading under the hat only now with Brown. • Repeat this process for the neck, hands and the legs.• Dot the eyes with Lamp Black.• Drybrush the cheeks with the highlighter brush loaded with a touch of the Transparent Medium and Red Pepper - wipe excess paint off onto a paper towel before applying the cheeks. ** Using the process listed above, paint the remaining design elements as follows:
Hat:• Basecoat the hat with Antique Gold.• Shade with Burnt Sienna.• Deepen shading with Brown.•Float highlight on top of hat and brim with Canary 3

Yellow.Bow:• Basecoat with Baby Blue Deep• Shade with True Blue.• Float highlights with Ivory.• Dot bow with Ivory.
Leaves:• Basecoat with Green Apple• Shade with Green. • Deepen shading with Pine Green.• Float tints in the vines with Antique Gold and Baby Pink Deep.
Black & Yellow Bodice:• Basecoat the bodice arms and yellow stripes with Canary Yellow. • Shade with Antique Gold.• Deepen shading with Burnt Sienna.• Black stripes are Lamp Black.
Red Skirt:• Basecoat with Red Pepper.• Shade with Crimson.• Deepen Shading with Wine.• Drybrush highlights with Baby Pink Deep.• Float highlights with Baby Pink Deep.
Black & Yellow Underskirt:• Basecoat Yellow stripes with Canary Yellow. • Shade with Antique Gold. • Deepen shading with Burnt Sienna. • Drybrush highlights with Ivory to brighten.• Black stripes – Base with Lamp Black. Dot with Ca-nary Yellow.• Red Dots – Base with Red Pepper. Shade with Crim-son.
Water Can:• Base with a brush mix of Lamp Black + White (for a soft gray).• Shade with Lamp Black• Drybrush highlights with Ivory.
Bees:• Basecoat Yellow stripes with Canary Yellow. • Shade with Antique Gold. • Deepen shading with Burnt Sienna. • Drybrush highlights with Ivory to brighten.• Black stripes – Base with Lamp Black. Dot with Ca-
4

5
nary Yellow.• Wings – Base with Ivory. Highlight the tips with White.• Dot eyes with White, dot pupils with Lamp Black.
Lady Bug:• Basecoat with Red Pepper.• Shade with Crimson.• Base body and spots with Lamp Black.• Dot eyes with White, dot pupils with Lamp Black.
Butterfl y:• Basecoat with Red Pepper.• Shade with Crimson.• Highlight the wing tips with Canary Yellow• Base body and spots with Lamp Black.• Line stripes on the body with Canary Yellow. • Dot eyes with White, dot pupils with Lamp Black.
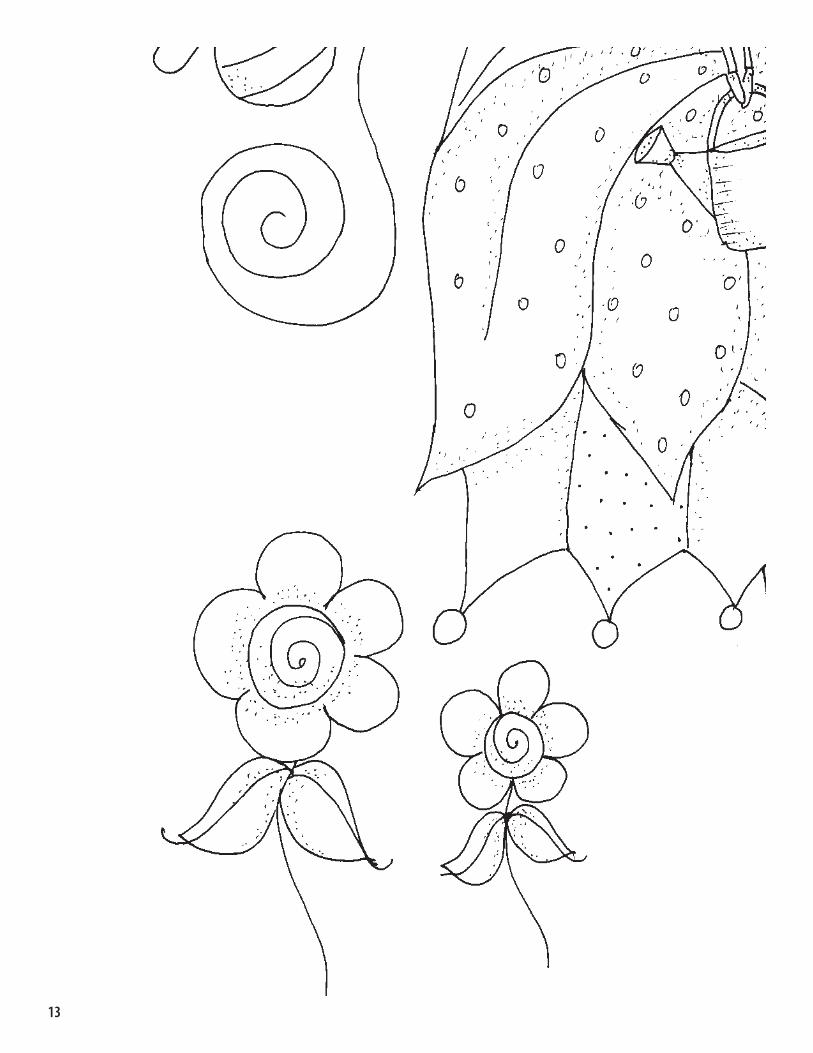
Blue Flowers:• Basecoat with Baby Blue Deep• Shade with True Blue. • Float highlights on the tips of the petals with Baby Pink Deep, Canary Yellow and Wisteria.
Purple Flowers:• Basecoat with Wisteria.• Shade with Dioxazine Purple.• Float highlights on the tips of the petals with Baby Pink Deep, Canary Yellow and Baby Blue Deep.
Flower Centres:• Basecoat the fl ower centres with Antique Gold. • Shade with Burnt Sienna. • Highlight with Ivory.
Leaves:• Basecoat with Green Apple• Shade with Green. • Deepen shading with Pine Green.
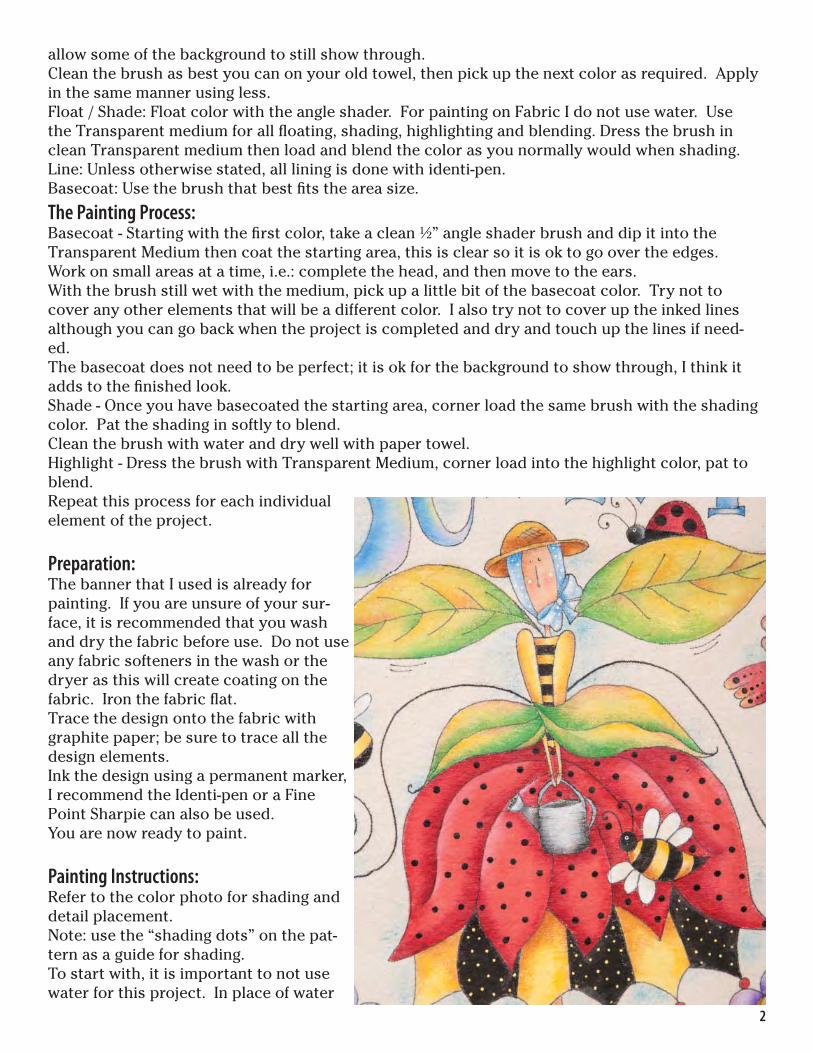
Lettering:• Basecoat the letters with Baby Blue Deep. • Shade the left sides with True Blue. • Float highlights on the right sides of the letters here and there with Baby Pink Deep, Canary Yellow and Wisteria.

6
Border:Alternate the checks as Follows:• Red – Basecoat with Red Pepper. Shade with Crim-son• Yellow – Basecoat with Canary Yellow. Shade with Antique Gold.Soften the design:To make everything look a little softer, I use just White and very little of the Transparent Medium and dry-brush some brighter highlights. Using the photo as a guide, drybrush white on the yel-low dress and bee wings.
Wooden Banner Hanger:Seal the wood pieces with DecoArt MultiPurpose Sealer. Allow to dry well and sand. Wipe away sand-ing dust with a damp cloth.• Basecoat the wooden banner with Buttermilk.• Sand lightly• Trace on the lettering, heart and leaves.• Line the lettering, heart and leaves with the Identi-Pen (or permanent marker)• Shade around the lettering, heart and leaves with Burnt Umber• Drybrush the background with Light Buttermilk.• Basecoat the letters with a wash of Winter Blue. • Shade the left side of the letters with Wedgewood Blue.• Float highlights on the right sides here and there with Foliage Green, Coral Blush and Purple Cow.• Basecoat the leaves with a wash of Foliage Green. Shade with Evergreen.• Basecoat the heart with a wash of Country Red. Shade with Napa Red. Highlight the upper right of the heart with Ivory.Once the project is dry you should be able to see all your lines again. If not, you can always re-ink some of your lines.
Finishing:Varnish the banner hanger only and enjoy.
7

1” x 1”
To ensure your pattern is at 100%, this box should measure 1” x 1” when printed.
Pattern at 100%
8

9

10

11

12
13

14

Copyright 2013 by Deb Antonick and Crafts Americana Group, Inc. All Rights Reserved. #331761
No. *A331761*© Artist’s Club ®. All rights reserved. For private, non-commercial use only. Please see our web site for terms of use.