lab7.pdf
DESCRIPTION
AndroidTRANSCRIPT

COMP 4521 (Spring 2012) Week 8 1
COMP4521 EMBEDDED SYSTEMS SOFTWARE
LAB WEEK # 8: GRAPHICS SUPPORT IN ANDROID
INTRODUCTION
In this lab we will learn some graphics related features and functions that are supported in
Android. We will use some graphics related functions to enhance our previous application.
Thereafter, we will construct a simple ball game using more advanced graphical functions.
OBJECTIVES
Learn to add special visual effects to layouts using Drawable and objectAnimator.
Create a simple ball game using View and SurfaceView.
USING THE DRAWABLE CLASS TO ENHANCE THE COURSE INFO
APPLICATION
1. Locate the SDK of Android for Eclipse (if necessary).
2. Create an Android Virtual Device (AVD) (if necessary). Make sure to turn on Audio
Playback support in the AVD. Edit the AVD if necessary.
3. Import an existing project. We will start from our result of lab week #6.
4. Add a new color in the /res/values/colors.xml. The name of the color is orange, and the
value is #ffa500.
5. Modify the welcome layout. Four widgets need to be modified in this layout:
a) Add id and visual style to the second LinearLayout of the file.
android:id="@+id/WelcomeInnerLayout"
android:background="@drawable/back_gradient"
b) Add ids to the two ImageViews so that later we can apply animations. The upper one
is WelcomeTopImage, the lower one is WelcomeBottomImage.
c) Delete the TextView displaying the clickpromt string.
6. Modify the list_item.xml. This will affect how the menu items are displayed. Add a style
file as the background:
android:background="@drawable/menu_selector"

COMP 4521 (Spring 2012) Week 8 2
7. Add visual style files. In /res, create a new folder drawable. Notice that we have already
referred to back_gradient.xml in the previous step. Create this file, and use following
code as its content. It defines the shape of the area, the visual effect (gradient), the start
color and end color, and the direction of gradient. This is an example of the use of a
Shape.
<shape xmlns:android="http://schemas.android.com/apk/res/android"
android:shape="rectangle">
<gradient
android:startColor="#003366"
android:endColor="#006699"
android:angle="270"/>
</shape>
8. Create two other style files in /res/drawable. The first is highlighted.xml. It’s used to
define the selected menu items.
<shape xmlns:android="http://schemas.android.com/apk/res/android"
android:shape="rectangle">
<solid
android:color="@color/orange"
/>
</shape>
The second is menu_selector.xml. It defines under which conditions the style in
highlighted.xml will be displayed. This is an example of the use of State.
<?xml version="1.0" encoding="utf-8"?>
<selector xmlns:android="http://schemas.android.com/apk/res/android">
<item android:state_pressed="true"
android:drawable="@drawable/highlighted" /> <!-- pressed -->
<item android:state_selected="true"
android:drawable="@drawable/highlighted" /> <!-- selected -->
<item android:state_focused="true"
android:drawable="@drawable/highlighted" /> <!-- focused -->
<item android:drawable="@drawable/back_gradient" /> <!-- default -->
</selector>
The conditions in menu_selector.xml will be automatically judged and result in related
displays.
9. Create animation for the welcome screen. All files describing animation should be put in
/res/anim. Create a file fade_in.xml. The source code is as follows:
<?xml version="1.0" encoding="utf-8"?>
<set
xmlns:android="http://schemas.android.com/apk/res/android"
android:shareInterpolator="false">
<alpha
android:fromAlpha="0.0"
android:toAlpha="1.0"
android:duration="5000">
</alpha>
</set>
It defines the starting transparency, the end transparency, and the duration of fade in.
COMP 4521 (Spring 2012) Week 8 3
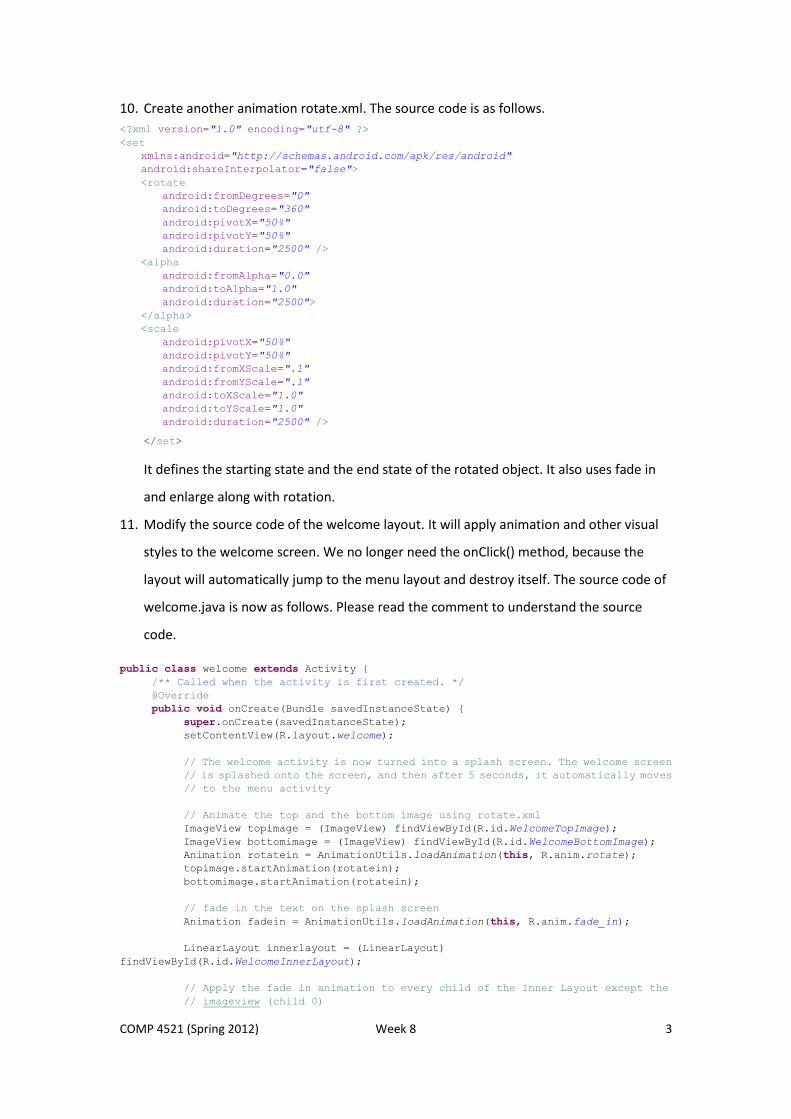
10. Create another animation rotate.xml. The source code is as follows.
<?xml version="1.0" encoding="utf-8" ?>
<set
xmlns:android="http://schemas.android.com/apk/res/android"
android:shareInterpolator="false">
<rotate
android:fromDegrees="0"
android:toDegrees="360"
android:pivotX="50%"
android:pivotY="50%"
android:duration="2500" />
<alpha
android:fromAlpha="0.0"
android:toAlpha="1.0"
android:duration="2500">
</alpha>
<scale
android:pivotX="50%"
android:pivotY="50%"
android:fromXScale=".1"
android:fromYScale=".1"
android:toXScale="1.0"
android:toYScale="1.0"
android:duration="2500" />
</set>
It defines the starting state and the end state of the rotated object. It also uses fade in
and enlarge along with rotation.
11. Modify the source code of the welcome layout. It will apply animation and other visual
styles to the welcome screen. We no longer need the onClick() method, because the
layout will automatically jump to the menu layout and destroy itself. The source code of
welcome.java is now as follows. Please read the comment to understand the source
code.
public class welcome extends Activity {
/** Called when the activity is first created. */
@Override
public void onCreate(Bundle savedInstanceState) {
super.onCreate(savedInstanceState);
setContentView(R.layout.welcome);
// The welcome activity is now turned into a splash screen. The welcome screen
// is splashed onto the screen, and then after 5 seconds, it automatically moves
// to the menu activity
// Animate the top and the bottom image using rotate.xml
ImageView topimage = (ImageView) findViewById(R.id.WelcomeTopImage);
ImageView bottomimage = (ImageView) findViewById(R.id.WelcomeBottomImage);
Animation rotatein = AnimationUtils.loadAnimation(this, R.anim.rotate);
topimage.startAnimation(rotatein);
bottomimage.startAnimation(rotatein);
// fade in the text on the splash screen
Animation fadein = AnimationUtils.loadAnimation(this, R.anim.fade_in);
LinearLayout innerlayout = (LinearLayout)
findViewById(R.id.WelcomeInnerLayout);
// Apply the fade in animation to every child of the Inner Layout except the
// imageview (child 0)

COMP 4521 (Spring 2012) Week 8 4
for (int i = 1; i < innerlayout.getChildCount(); i++) {
TextView text = (TextView) innerlayout.getChildAt(i);
text.setAnimation(fadein);
// Declare an animation listener for the Fade in animation to complete. Once
// done, then invoke
// the animation listener and do the operations in the listener.
fadein.setAnimationListener(new Animation.AnimationListener() {
public void onAnimationEnd(Animation animation) {
// Create the Activity corresponding to the Menu screen
startActivity(new Intent(welcome.this,menu.class));
// Destroy the welcome screen activity
welcome.this.finish();
}
public void onAnimationRepeat(Animation animation) {
// TODO Auto-generated method stub
}
public void onAnimationStart(Animation animation) {
// TODO Auto-generated method stub
}
});
}
}
}
12. Run the application. Notice the animation of the welcome screen and the change of the
menu buttons. Please try other styles as a practice.

COMP 4521 (Spring 2012) Week 8 5
MAKE ANIMATION USING OBJECTANIMATOR
1. Now we use another approach, the objectAnimator to implement the animation we
have done in the first part. First, we need to modify rotate.xml to define the
objectAnimators. Notice the different effect of each objectAnimator.
<?xml version="1.0" encoding="utf-8"?>
<set xmlns:android="http://schemas.android.com/apk/res/android"
android:ordering="sequentially" >
<set>
<objectAnimator
android:duration="2500"
android:pivotX="50%"
android:pivotY="50%"
android:propertyName="rotationX"
android:valueFrom="0"
android:valueTo="360"
android:valueType="floatType" />
<objectAnimator
android:duration="2500"
android:propertyName="alpha"
android:valueFrom="0"
android:valueTo="1"
android:valueType="floatType" />
<objectAnimator
android:duration="2500"
android:propertyName="scaleX"
android:valueFrom="0.1"
android:valueTo="1.0"
android:valueType="floatType" />
<objectAnimator
android:duration="2500"
android:propertyName="scaleY"
android:valueFrom="0.1"
android:valueTo="1.0"
android:valueType="floatType" />
</set>
</set>
2. Modify the source code of welcome.java. We make use of the objectAnimators in
rotate.xml to define different animations for different components.
public class welcome extends Activity {
/** Called when the activity is first created. */
@Override
public void onCreate(Bundle savedInstanceState) {
super.onCreate(savedInstanceState);
setContentView(R.layout.welcome);
// The welcome activity is now turned into a splash screen. The welcome
// screen is splashed
// onto the screen, and then after 5 seconds, it automatically moves to
// the menu activity
// Animate the top and the bottom image using rotate.xml
ImageView topimage = (ImageView) findViewById(R.id.WelcomeTopImage);
ImageView bottomimage = (ImageView) findViewById(R.id.WelcomeBottomImage);
AnimatorSet rotatein = (AnimatorSet) AnimatorInflater.loadAnimator(
this, R.anim.rotate);
AnimatorSet rotatein2 = (AnimatorSet) AnimatorInflater.loadAnimator(

COMP 4521 (Spring 2012) Week 8 6
this, R.anim.rotate);
rotatein.setTarget(topimage);
rotatein2.setTarget(bottomimage);
rotatein.start();
rotatein2.start();
// fade in the text on the splash screen
LinearLayout innerlayout = (LinearLayout)
findViewById(R.id.WelcomeInnerLayout);
ObjectAnimator textanim = (ObjectAnimator) ObjectAnimator.ofFloat(
innerlayout, "alpha", 0f, 1f);
textanim.setDuration(5000);
textanim.start();
// Declare an animation listener for the textanim animation to complete.
// Once done, then invoke
// the animation listener and do the operations in the listener.
textanim.addListener(new AnimatorListenerAdapter() {
public void onAnimationEnd(Animator animation) {
// Create the Activity corresponding to the Menu screen
startActivity(new Intent(welcome.this, menu.class));
// Destroy the welcome screen activity
welcome.this.finish();
}
});
}
}
3. Run the application.

COMP 4521 (Spring 2012) Week 8 7
A SIMPLE BALL GAME
1. In this part we will create a simple ball game by extending the View class and using its
onDraw() method. Unlike in the previous part, we are not using files describing
animation or visual styles; all the visual effects are controlled by the source code.
2. Create a new project. The package name is hkust.comp4521.graphics, application name
is Balls, and create an activity called Main.
3. Delete the default TextView in the main layout. Instead, we have a DrawView, which we
will later define:
<hkust.comp4521.graphics.DrawView
xmlns:android="http://schemas.android.com/apk/res/android"
android:id="@+id/drawview"
android:layout_width="fill_parent"
android:layout_height="fill_parent" />
4. Modify the source code. We need 6 classes for our application. The first one is Main.java,
which will only create a new activity. The content of main screen is defined in
DrawView.java.
public class Main extends Activity {
/** Called when the activity is first created. */
@Override
public void onCreate(Bundle savedInstanceState) {
super.onCreate(savedInstanceState);
requestWindowFeature(Window.FEATURE_NO_TITLE);
setContentView(R.layout.main);
// Load the View to draw on
// Ths basically creates the screen using the DrawView class which is an
// extension of the View class
// setContentView(new DrawView(this));
DrawView drawview = (DrawView) findViewById(R.id.drawview);
}
}
5. DrawView.java is responsible for creating the visual layout of the application. There are
four main parts of the layout: the ball, the box in which the ball moves, the paddle which
will reflect the ball when the ball hits it, and a message showing the score. The
superclass of DrawView.java is android.view.View.
public class DrawView extends View {
private Ball ball;
private Box box;
private Paddle paddle;
private StatusMessage statusMsg;
public DrawView(Context context, AttributeSet attrs) {
super(context, attrs);
setFocusable(true);
this.requestFocus();

COMP 4521 (Spring 2012) Week 8 8
// declare the bounding box, paddle, ball and status message
box = new Box(0xff006699); // ARGB
paddle = new Paddle(Color.RED);
ball = new Ball(Color.GREEN);
statusMsg = new StatusMessage(Color.CYAN);
}
@Override protected void onDraw(Canvas canvas) {
canvas.drawColor(Color.WHITE); //if you want another background color
// Draw the components
box.draw(canvas);
paddle.draw(canvas);
ball.draw(canvas);
statusMsg.draw(canvas);
// Update the position of the ball, including collision detection and reaction.
ball.moveBall(box, paddle);
statusMsg.update(ball);
// Delay for a short while before forcing another redraw of the screen
try {
Thread.sleep(30);
} catch (InterruptedException e) { }
// A call to invalidate causes the Android framework to call the onDraw method of
the DrawView
// Thus every time the screen is refreshed, the framework is again forced to call
the onDraw
// method. This creates the animation on the screen to simulate the game playing
invalidate();
}
// Called back when the view is first created or its size changes.
@Override
public void onSizeChanged(int w, int h, int oldW, int oldH) {
// Set the movement bounds for the ball
box.set(0, 0, w, h);
paddle.set(0, 0, w, h);
}
// Key-up event handler
@Override
public boolean onKeyUp(int keyCode, KeyEvent event) {
switch (keyCode) {
case KeyEvent.KEYCODE_DPAD_RIGHT: // Move paddle to the right
paddle.moveright();
break;
case KeyEvent.KEYCODE_DPAD_LEFT: // Move paddle to the left
paddle.moveleft();
break;
case KeyEvent.KEYCODE_DPAD_UP: // Increase ball speed
ball.speedX++;
ball.speedY++;
break;
case KeyEvent.KEYCODE_DPAD_DOWN: // Decrease ball speed
ball.speedX--;
ball.speedY--;
break;
case KeyEvent.KEYCODE_DPAD_CENTER: // Stop the ball
ball.speedX = 0;
ball.speedY = 0;
break;
}
return true; // Event handled
}
}

COMP 4521 (Spring 2012) Week 8 9
6. The 4 components in DrawView, the ball, the box, the paddle and the status message
are defined respectively in 4 classes. First, Ball.java:
public class Ball {
float radius = 5; // Ball's radius
float x = radius + 20; // Ball's center (x,y)
float y = radius + 40;
float speedX = 5; // Ball's speed (x,y)
float speedY = 3;
int score = 0;
private RectF bounds; // Needed for Canvas.drawOval
private Paint paint; // The paint style, color used for drawing
// Constructor
public Ball(int color) {
bounds = new RectF();
paint = new Paint();
paint.setColor(color);
}
public void moveBall(Box box, Paddle paddle) {
// Get new (x,y) position
x += speedX;
y += speedY;
// Detect collision and react
if (x + radius > box.xMax) {
speedX = -speedX;
x = box.xMax-radius;
} else if (x - radius < box.xMin) {
speedX = -speedX;
x = box.xMin+radius;
}
if ((y + radius > paddle.yMin) && (x - radius > paddle.xMin) && (x + radius <
paddle.xMax)) {
speedY = -speedY;
y = paddle.yMin - radius;
score++;
} else if (y + radius > box.yMax){
speedY = -speedY;
y = box.yMin + radius;
score--;
}else if (y - radius < box.yMin) {
speedY = -speedY;
y = box.yMin + radius;
}
}
public void draw(Canvas canvas) {
bounds.set(x-radius, y-radius, x+radius, y+radius);
canvas.drawOval(bounds, paint);
}
}
7. Box.java:
// This class keeps track of the bounding box within which the ball must move
public class Box {
int xMin, xMax, yMin, yMax;
private Paint paint; // paint style and color
private Rect bounds;
public Box(int color) {
paint = new Paint();
paint.setColor(color);
bounds = new Rect();
}
public void set(int x, int y, int width, int height) {
xMin = x + 1;

COMP 4521 (Spring 2012) Week 8 10
xMax = x + width - 1;
yMin = y + 1;
yMax = y + height - 1;
// The box's bounds do not change unless the view's size changes
bounds.set(xMin, yMin, xMax, yMax);
}
// Draw the box onto the canvas
public void draw(Canvas canvas) {
canvas.drawRect(bounds, paint);
}
}
8. Paddle.java:
public class Paddle {
int xMin, xMax, yMin, yMax;
private Paint paint; // paint style and color
private Rect bounds;
private int w;
private int movesize;
public Paddle(int color) {
paint = new Paint();
paint.setColor(color);
bounds = new Rect();
movesize = 20;
}
public void set(int x, int y, int width, int height) {
// paddle size is set to one fifth of the screen width and initially centered
// on the screen
xMin = x+2*width/5;
xMax = x + 3*width/5;
yMin = y+height-10;
yMax = y + height - 5;
w = width;
// The box's bounds do not change unless the view's size changes
bounds.set(xMin, yMin, xMax, yMax);
}
public void moveright() {
// move the paddle to the right
if (xMax < w){
xMin += movesize;
xMax += movesize;
}
bounds.set(xMin, yMin, xMax, yMax);
}
public void moveleft() {
// move the paddle to the left
if (xMin > 0){
xMin -= movesize;
xMax -= movesize;
}
bounds.set(xMin, yMin, xMax, yMax);
}
// draw the paddle onto the canvas
public void draw(Canvas canvas) {
canvas.drawRect(bounds, paint);
}
}

COMP 4521 (Spring 2012) Week 8 11
9. StatusMessage.java:
public class StatusMessage {
// Status message to show the score.
private StringBuilder statusMsg = new StringBuilder();
private Formatter formatter = new Formatter(statusMsg);
private Paint paint;
// Constructor
public StatusMessage(int color) {
paint = new Paint();
// Set the font face and size of drawing text
paint.setTypeface(Typeface.MONOSPACE);
paint.setTextSize(16);
paint.setColor(color);
}
public void update(Ball ball) {
// Build status message
statusMsg.delete(0, statusMsg.length()); // Empty buffer
formatter.format("Score = %d", ball.score);
}
public void draw(Canvas canvas) {
canvas.drawText(statusMsg.toString(), 10, 30, paint);
}
}
10. To maintain the orientation of the screen, add a parameter in the AndroidManifest.xml.
android:screenOrientation="portrait"
11. Run the application. Click the 4 direction keys and enter to see what will happen, and go
back to the source code to understand how the functions are implemented. Finally,
enjoy the game and try your best to get a high score!
COMP 4521 (Spring 2012) Week 8 12
ANOTHER APPROACH: USING SURFACEVIEW
1. In this part we will use another approach to implement the ball game. The SurfaceView
class provides a dedicated drawing surface embedded inside of a view hierarchy.
2. Modify the source code of DrawView.java. Now we use SurfaceView as its superclass. An
extra thread is created to control the surface.
public class DrawView extends SurfaceView implements SurfaceHolder.Callback {
private DrawViewThread drawviewthread;
private Ball ball;
private Box box;
private Paddle paddle;
private StatusMessage statusMsg;
public DrawView(Context context, AttributeSet attrs) {
super(context, attrs);
getHolder().addCallback(this);
setFocusable(true);
this.requestFocus();
// declare the bounding box, paddle, ball and status message
box = new Box(0xff006699); // ARGB
paddle = new Paddle(Color.RED);
ball = new Ball(Color.GREEN);
statusMsg = new StatusMessage(Color.CYAN);
}
public void drawGameBoard(Canvas canvas) {
canvas.drawColor(Color.WHITE); //if you want another background color
// Draw the components
box.draw(canvas);
paddle.draw(canvas);
ball.draw(canvas);
statusMsg.draw(canvas);
// Update the position of the ball, including collision detection and reaction.
ball.moveBall(box, paddle);
statusMsg.update(ball);
}
public void stopGame(){
if (drawviewthread != null){
drawviewthread.setRunning(false);
}
}
public void releaseResources(){
}
// Called back when the view is first created or its size changes.
@Override
public void onSizeChanged(int w, int h, int oldW, int oldH) {
// Set the movement bounds for the ball
box.set(0, 0, w, h);
paddle.set(0, 0, w, h);
}

COMP 4521 (Spring 2012) Week 8 13
// Key-up event handler
@Override
public boolean onKeyUp(int keyCode, KeyEvent event) {
switch (keyCode) {
case KeyEvent.KEYCODE_DPAD_RIGHT: // Move paddle to the right
paddle.moveright();
break;
case KeyEvent.KEYCODE_DPAD_LEFT: // Move paddle to the left
paddle.moveleft();
break;
case KeyEvent.KEYCODE_DPAD_UP: // Increase ball speed
ball.speedX++;
ball.speedY++;
break;
case KeyEvent.KEYCODE_DPAD_DOWN: // Decrease ball speed
ball.speedX--;
ball.speedY--;
break;
case KeyEvent.KEYCODE_DPAD_CENTER: // Stop the ball
ball.speedX = 0;
ball.speedY = 0;
break;
case KeyEvent.KEYCODE_BACK:
stopGame();
}
return true; // Event handled
}
public void surfaceChanged(SurfaceHolder holder, int format, int width,
int height) {
// TODO Auto-generated method stub
}
public void surfaceCreated(SurfaceHolder holder) {
// TODO Auto-generated method stub
drawviewthread = new DrawViewThread(holder);
drawviewthread.setRunning(true);
drawviewthread.start();
}
public void surfaceDestroyed(SurfaceHolder holder) {
// TODO Auto-generated method stub
boolean retry = true;
drawviewthread.setRunning(false);
while (retry){
try {
drawviewthread.join();
retry = false;
}
catch (InterruptedException e){
}
}
}
public class DrawViewThread extends Thread{
private SurfaceHolder surfaceHolder;
private boolean threadIsRunning = true;
public DrawViewThread(SurfaceHolder holder){
surfaceHolder = holder;
setName("DrawViewThread");
}
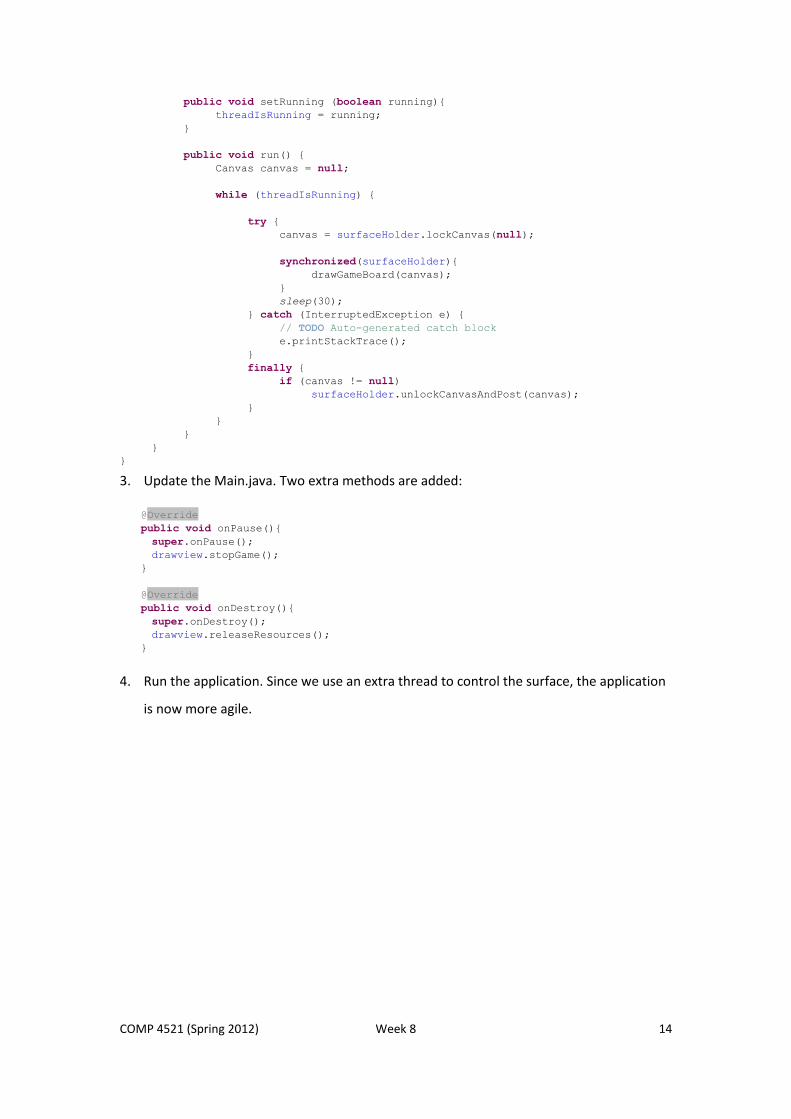
COMP 4521 (Spring 2012) Week 8 14
public void setRunning (boolean running){
threadIsRunning = running;
}
public void run() {
Canvas canvas = null;
while (threadIsRunning) {
try {
canvas = surfaceHolder.lockCanvas(null);
synchronized(surfaceHolder){
drawGameBoard(canvas);
}
sleep(30);
} catch (InterruptedException e) {
// TODO Auto-generated catch block
e.printStackTrace();
}
finally {
if (canvas != null)
surfaceHolder.unlockCanvasAndPost(canvas);
}
}
}
}
}
3. Update the Main.java. Two extra methods are added:
@Override
public void onPause(){
super.onPause();
drawview.stopGame();
}
@Override
public void onDestroy(){
super.onDestroy();
drawview.releaseResources();
}
4. Run the application. Since we use an extra thread to control the surface, the application
is now more agile.