lab manual '97
TRANSCRIPT

EEAP 282
INTRODUCTION TO MICROPROCESSORS
LAB MANUAL

Copyright F. Merat 1997

-iii- Copyright 1997 F.Merat
Portions of these notes were developed at the University of Washington by
Bert Sullam, BSEE student Murray Mar, MSEE student Bill Moritz, Professor
for use in their EE 372, Introduction to Microprocessors course. In particular some of the UNIX material is courtesy of Professor Moritz and we use this material with his permission.
ETHICS It is expected that students taking EEAP282 will adhere to the principles of the CWRU Student Code of Ethics. This especially pertains to using other user’s accounts or letting other students use your account. This also pertains to disrupting computer operations and reading electronic mail not meant for you. A copy of the CWRU Code of Ethics is in the directory /usr/pub. Please read it and follow it.
-1- Copyright 1997 F.Merat
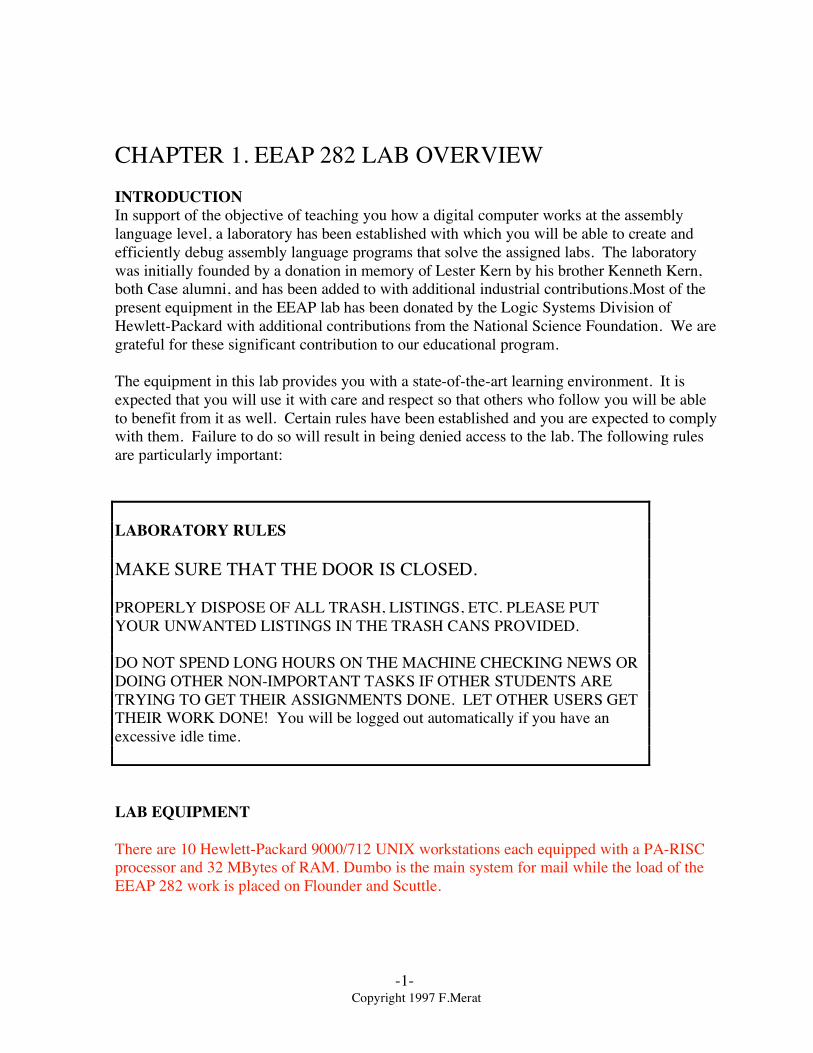
CHAPTER 1. EEAP 282 LAB OVERVIEW INTRODUCTION In support of the objective of teaching you how a digital computer works at the assembly language level, a laboratory has been established with which you will be able to create and efficiently debug assembly language programs that solve the assigned labs. The laboratory was initially founded by a donation in memory of Lester Kern by his brother Kenneth Kern, both Case alumni, and has been added to with additional industrial contributions.Most of the present equipment in the EEAP lab has been donated by the Logic Systems Division of Hewlett-Packard with additional contributions from the National Science Foundation. We are grateful for these significant contribution to our educational program. The equipment in this lab provides you with a state-of-the-art learning environment. It is expected that you will use it with care and respect so that others who follow you will be able to benefit from it as well. Certain rules have been established and you are expected to comply with them. Failure to do so will result in being denied access to the lab. The following rules are particularly important: LABORATORY RULES MAKE SURE THAT THE DOOR IS CLOSED. PROPERLY DISPOSE OF ALL TRASH, LISTINGS, ETC. PLEASE PUT YOUR UNWANTED LISTINGS IN THE TRASH CANS PROVIDED. DO NOT SPEND LONG HOURS ON THE MACHINE CHECKING NEWS OR DOING OTHER NON-IMPORTANT TASKS IF OTHER STUDENTS ARE TRYING TO GET THEIR ASSIGNMENTS DONE. LET OTHER USERS GET THEIR WORK DONE! You will be logged out automatically if you have an excessive idle time. LAB EQUIPMENT
There are 10 Hewlett-Packard 9000/712 UNIX workstations each equipped with a PA-RISC processor and 32 MBytes of RAM. Dumbo is the main system for mail while the load of the EEAP 282 work is placed on Flounder and Scuttle.

-2- Copyright 1997 F.Merat
PROGRAM DEVELOPMENT PROCESS During the semester you will be given a series of lab assignments. The process you will use to solve each can be summarized as follows: 1. Make sure you understand the problem you are trying to solve. If necessary write it out in your own words. 2. Design an algorithm that will solve the problem. This can be done in a high level computer language, pseudocode or flowcharts. The important thing is to have the operation of the program com- pletely thought out before you begin writing the program. 3. Enter and edit the source code using an editor. Add comments to the code so that later, when you want to debug it, you will understand what each line of the program is for. 4. Convert the source code to machine language using an assembler, which generates an object file. 5. Convert the object file to an executable file using the linker. 6. Run the executable file. Note any problems in the operation of the program. Now go back to step 2 and revise your program. You should continue this cycle of operations until your program operates correctly. LAB WRITEUP SPECIFICATIONS The Laboratory Write Up in EEAP 282 is to allow the student to demonstrate a thorough understanding of the programming concepts being taught in the assignment. Format
Reports should be in neat, concise form and turned in on time. The best reports will cover all vital information in detail without excessive verbiage on unnecessary details. All lab reports should be typed on 8-1/2 by 11 inch white paper. Pcs of all types can be easily accessed in the Smith computer lab, so it is hoped that all diagrams will be produced using a computer. You will be graded on how well you conform to this format.
Title Page
Each laboratory report submitted should include on its title page: a. Your name (typed) and signature b. Lab assignment number and title

-3- Copyright 1997 F.Merat
c. Abstract d. Checkout signature (only for specified lab assignments) e. Statement of authenticity. (labs will not be graded without this. See example title pg.)
Abstract
A 2 or 3 sentence description of the lab assignment and an overview of your solution to it.
Questions
Answers to any questions posed in the lab assignment.
Program Listings
Listings of source code and the assembly listing file (with the symbol table) should be included. When specified, you should also include sample output of the program.
The following is an example layout of the laboratory writeup title page:

Name:
________________________________ Typed
________________________________ Signature
By signing this page I am indicating that this lab and the work described in the lab report is my own.
TITLE: ____________________________________________________________ Abstract: [ ] Checked by ___________________________ ______________

-5- Copyright 1997 F.Merat
CHAPTER 2. HP-UX Our HP system uses a version of the UNIX operating system called HP-UX. UNIX is generally considered to be a very powerful operating system (OS) but also EXTREMELY unfriendly. It is very easy to mistype a command and do something like delete all your files. Therefore, be careful that you only enter correct commands. It is not necessary that you learn the details of UNIX. We will provide you with all that you will NEED to know in these documents and during class discussions. If you wish to learn more, you may find the following references helpful: 1. User Guide to the UNIX System, 2nd Ed. by Thomas and Yates, Osborne McGraw-Hill
1985
2. The UNIX Programming Environment by Kernighan and Pike, Prentice-Hall 1984.
3. Introducing UNIX System V by Rachel Morgan and Henry McGilton, McGraw-Hill 1987.
4. UNIX Primer Plus by Mitchell Waite, Donald Martin and Stephen Prata, Howard Sams & Company, 1983.
STUDENT ACCOUNTS An account has been established for all students who are on the official class list. All of your work will be done in that account. Each account is protected by a password so that only you have access to your files. LAB HOURS EEAP 282 students will have the option of working at any time in the Kern Lab by using their student ID’s to operate the electronic locks on the building and lab doors. You must be registered for the course to have Kern Lab and building access. Your Id will be authorized to open the building doors after hours. LOGIN To login, select one of the UNIX workstations (use only scuttle or flounder if you are telnet’ing to the Kern Lab). Press [Return] until the message "login:" appears on the screen. It may be preceded by different characters such as “%” or a message such as “scuttle 21:” Don’t worry about this; the only important thing is that “login” appear somewhere. At this point you may enter your account name. You will then be asked for a password. The first time you login you will set your password. Passwords must have more than 6 characters. They must contain at least 2 alphabetic characters and at least 1 numeric digit. It is also

-6- Copyright 1997 F.Merat
recommended that you do not use words that are in Webster’s dictionary for your password as they can be easily broken by a computer hacker. Remember your password and keep it secret. Your passwd will be checked against 1,099,535 words in Passwords can and should be changed periodically. New passwords must differ from the old by at least 3 characters. To change your password (once your are logged in), enter the command: passwd [RET] You will be asked to enter your old password, followed by a new password, and then asked to confirm the new password. This opperation must be performed on Dumbo. The password database is distrubuted from one machine. NOTE: Passwords ARE case sensitive on the Kern Lab computers. LOGGING OUT When you are through using the system, you should logout. This can only be done while the operating system is expecting a command. At this point the terminal will display a prompt such as "%" or “>“ or a message such as scuttle 21:. To exit, simply enter: logout [RET] Your session will be terminated. BASIC UNIX COMMANDS From the universe of possible UNIX commands, the following very small set has been selected for your use. These, along with the additional commands discussed in later sections of these notes, are all that you will need to know for this course. UNIX supports a very sophisticated file system. However, it will only be necessary that you know how to select file names. When you are ready to enter your source code for a particular lab, you will use either the "vi" or "sk" editor. At that time you will create the file name associated with that particular lab. You should use some recognizable convention for naming your files such as "labX" where X is replaced by the number of the lab you are working on. COPY FILES [cp] You may make a copy of any file using the "cp" command. You should make backup copies of your source files at least so that in the event you accidentally delete one you will have a spare. The system does NOT create these backups for your automatically as does VMS on a VAX for example. The syntax is: cp <filename1> <filename2>[RET] {Note the two spaces in this command.}

-7- Copyright 1997 F.Merat
All filenames must be unique. If you specify the name of an existing file as <filename2. above, the existing file is destroyed (without warning of course)! DELETE A FILE [rm] Files may be removed from your directory using the "rm" or "remove" command. The syntax is: rm -i <filename>[RET] The i option forces interactive mode, i.e. the system will respond by displaying the name of the file followed by a "?". To actually delete the file, enter "y". Remember, once deleted the file is gone forever!!! DIRECTORY OF FILES [ls] A directory of your files can be obtained on the terminal by entering the command: ls <directory (optional)>[RET] If no directory is specified following the ls, you will get a listing of files in your current directory. Several options can be used to get more detailed information: ls lists the files in your current directory ls -a lists all files in your current directory including invisible files such as
.login (C shell) or .environ (PAM shell) Note: A leading period in a file name indicates an invisible file.
ls -l gives a detailed listing of all files in your current directory ls -f same as ls but appends a “/” to directory names PRINTING A TEXT FILE [lp] To obtain a hard copy printout of an ASCII or text file, you can use the "print" command as follows: lp <filename>[RET] This will send your file to the line printer spooler and it will be printed in turn with all the other print jobs. If the printer doesn't start printing within a few seconds, make sure that the line printer is ONLINE, that the paper is not jammed and indeed that there is paper in the printer. If it still doesn't print, your instructor or TA will have to reset the printer. To remove your job from the printer, DO NOT OPEN THE COVER. Rather, take the printer OFFLINE if necessary and press FORM FEED to eject a blank page. You may then tear off your listing from the back of the printer. When you are done, put the printer back ONLINE.

-8- Copyright 1997 F.Merat
Try this: >[6] % telnet printservices >Trying... >Connected to slc16.INS.CWRU.Edu. >Escape character is '^]'. > > >SunOS UNIX (slc16) > >login: status <<<---BE SURE TO LOG IN AS STATUS THIS GETS YOU THE LIST AND LETS YOU CHECK THE PRINT QUEUE >Last login: Tue Oct 8 18:29:23 from b63495.STUDENT.C >SunOS Release 4.1.2 (INS-SLC-ENET) #3: Thu Aug 5 13:06:29 EDT 1993 > > INS Print Queue Display > > Type the number corresponding to the printer whose status > you wish to examine. > > 1. wade-large (PostScript) > 2. wade-small (PostScript) > 3. fribley-large (PostScript) > 4. fribley-small (PostScript) > 5. KSL (PostScript Letter) > 6. ksl-duplex (Letter Two-sided) > 7. ksl-legal (Legal Simplex) > 8. ksl-duplex-legal (Legal Two-sided) > 9. ksl-drilled (Letter Simplex Drilled) > 10. ksl-drilled-duplex (Letter Two-sided Drilled) > 11. ksl-dstitch (Letter Simplex Dual-stitch) > 12. ksl-pstitch (Letter Simplex Portrait-stitch) > 13. ksl-lstitch (Letter Simplex Landscape-stitch) > 14. ksl-duplex-dstitch (Letter Two-sided Dual-stitch) > 15. ksl-duplex-pstitch (Letter Two-sided Portrait-stitch) > 16. ksl-duplex-lstitch (Letter Two-sided Landscape-stitch) > 17. ksl-ledger (Ledger Simplex) > 18. ksl-duplex-ledger (Ledger Two-sided) > 19. ksl-duplex-drilled-dstitch (Letter Two-sided Drilled Dual-stitch) > 20. ksl-duplex-drilled-pstitch (Letter Two-sided Drilled Portrait-stitch) > 21. ksl-duplex-drilled-lstitch (Letter Two-sided Drilled Landscape-stitch) > 22. all printers > 23. no printers -- exit this program

-9- Copyright 1997 F.Merat
> >Enter a number: 6 > INS Print Spooler > Display for printer ksl-duplex > > >Jobs submitted but not yet spooled: > > Name Owner Size > ---- ----- ---- > > >Jobs currently spooled and printing: > RENAME A FILE [mv] You can change the name of a file by using the "mv" command. The syntax is: mv <oldfilename> <newfilename>[RET] Again, make sure that <newfilename> does not already exist in your directory. TYPE A FILE [more] To look at the contents of a file on the terminal, simply enter: more <filename>[RET] If the listing is longer than one screen, the listing stops and prompts you for MORE? to which you can respond:
space display next page carriage return display next line q quit display
ADVANCED HP-UX COMMANDS There are a number of advanced commands which the EEAP 282 student might find of interest. In particular, these include:
elm a much more sophisticated version of mailx script for printing copies of the current screen (useful in the Kern Lab)

-10- Copyright 1997 F.Merat
Additional information about these commands can be gotten by sending mail to “help” or by checking the man pages for the above commands. Other commands which may be of interest are discussed below: ALIASES The C Shell (which is the standard shell used in EEAP282) provides a convenient way (called 'alias') to customize your environment on the system by creating commands that you need or that are easier to use than the basic UNIX commands. These can be created on the spot and used only during that particular login session or created and stored in a special file used by the C shell called .cshrc so that they are available each time you login. To create your own aliases, the format is: alias (newcommandline) (oldcommandline) [RET] For example, you may wish to create an alias that does the assembling for you without having to remember all the details of the syntax. This may be done by entering the following line: alias a 'as68k -L lab0.s > lab0.lis'[RET] Note that this alias also automatically creates an output listing to the file “lab0.lis.” Now if you look at the list of aliases by typing ‘alias[RET], you will see that the alias a has been added to your list. To carry out the assembly of the lab0 source file, simply enter: a[RET] By adding the above alias line to your .cshrc file or .login file (using an editor), the command will be available each time you login. Note that the file is normally invisible and will not be seen with the ls command unless the -a option is used. Example .cshrc file: # # Default user .cshrc file (/bin/csh initialization). # Usage: Copy this file to a user's home directory and edit it to # customize it to taste. It is run by csh each time it starts up. # Set up default command search path: # # (For security, this default is a minimal set.) # set path=( /bin /usr/bin) # Set up C shell environment: if ( $?prompt ) then # shell is interactive. set history=20 # previous commands to remember.

-11- Copyright 1997 F.Merat
set savehist=20 # number to save across sessions. set system=`hostname` # name of this system. set prompt = "$system \!: " # command prompt. # Sample alias: alias h history alias rm 'rm -i' alias mv 'mv -i' alias dir 'ls -laF' alias cls clear alias vt100 'setenv TERM vt100' alias asm68k 'rm \!*.lis; as68k -L \!*.s > \!*.lis' alias link68k 'rm \!*.llis; ld68k -L -o \!*.x \!*.o > \!*.llis' alias testlink 'rm \!*.llis; ld68k -L -c testlinkcom.k -o \!*.x \!*.o>\!*.llis' # More sample aliases, commented out by default: # alias d dirs # alias pd pushd # alias pd2 pushd +2 # alias po popd # alias m more endif
Better yet, you can make the alias generic by allowing the user to enter a parameter at the time the alias is invoked. This is done as follows: alias a 'as68k -L \!*.s' where the '\!*' represents the parameter (or file name) to be used. This alias would then be executed as: a lab0[RET] rather than just 'a[RET]' as above. Finally, you can concatenate commands by using a ';' between commands so that it would be possible to create the following alias: alias al 'as68k -L > \!*.lis \!*.s > \!*.lis; ld68k -L -o \!*.x \!*.o > \!*.llis' which would assemble the file specified, generate a list file, run the linker using a previously defined command file, and create a linker symbol file. This particular alias might generate an error message if a file of the same name as one of the listings previously exists. In general, you should assemble and link your files separately rather than as one single alias as shown above. You may wish to create your own aliases and then add them to your .cshrc or .login file for assembling, linking, and transferring.

-12- Copyright 1997 F.Merat
HISTORY The C Shell provides a way to save your most recent commands and execute them later using the history feature. The following paragraphs will explain how to use the main features of history.
1. Seeing your current history list. The most recent 15 commands can be viewed by entering either: 'h [RET]' or 'history [RET]'. ('h' works on this system because of an alias. You will see a number associated with each command.
2. Rerunning a previous event.
An entry in your history list can be rerun by simply entering '!nn[RET]' where 'nn' is the event number. The most recent command can be executed again by simply entering '!![RET]'. Finally, you can retrieve a command from the list by using a substring to designate the command. For example, if your list contains the entries: 16 copy lab0.S lab0.bak ... 19 cat lab0a.S lab0b.S . lab0.S the 'copy' line could be rerun by entering '!co[RET]' (or '!16[RET]') where 'co' is a substring that uniquely identifies the desired command.
MAIL HPUX has a mail facility that permits users to communicate with each other. If you see a message "You have mail." on the terminal, that means that someone has sent you a message. You will continue to get this message when you log on until you have read the message and deleted it. Just reading it does not delete it. To read the mail, simply enter 'mail[RET]' at the prompt. The mail message will be displayed and a '?' will appear. This means you are in the mail utility. To read the first message type ‘n’ for next message. The message will be displayed. If you want to immediately delete it after you have read it simply type ‘d’. If you want to go to the next message, type ‘n’. Repeat this procedure until you have read all your mail. Remember that simply reading your mail will NOT stop the “You have mail.” message. For a list of all mail commands, enter 'h[RET]'. To leave mail and return to the command level, enter 'q[RET]'. To send mail to a user, you must know the username of your addressee. Once that is determined, simply enter the following, for example: mail help[RET] {Enter your message here. Correct it as you go using the [DEL] key.} Once you have finished your message, enter [CTRL][d] to terminate the message. You can also terminate and send the message by typing “.” on a blank line followed by a carriage

-13- Copyright 1997 F.Merat
return. A [EOT] indicates that your message has been sent and you will be returned to the command level.} There is a more interactive mail utility “mailx” that is much nicer for sending mail. When used it will prompt you for the subject of the mail and format it like a memo. Otherwise it is identical to “mail”. Try it; you will like it. NEWS The 'news' feature of HPUX permits us to keep you informed of current events such as lab and homework assignments. To check to see if there is any new 'news', simply enter: 'news[RET]' at the prompt. The system keeps track of which news items you have read and will not bore you with old material. If you want to see all the news, regardless of currency, enter: news -a[RET] at the prompt. You can display specific news items again by entering: 'news <item_name>[RET]' where <item_name> refers to the name of the news story you wish to see. These news items are stored in the directory /usr/news. HP-UX DIRECTORY STRUCTURE When using HP-UX you are always “in” a directory—your current directory. When you log in, HP-UX places you in your home directory. The basic HP-UX directory structure is shown in Figure 1 which shows only the upper two levels. The lower levels are usually created to reflect specific user applications and needs and are not shown. The highest directory is called root and is indicated by the “/” symbol. Each directory under the root contains logically (to HP-UX) related files and directories. These are known as child directories. Each directory can contain one or more child directories and their use is highly recommended to organize your work. For students in EEAP 282 your home directory is
/home/courses/282/<your account name> To find out what directory you are in use the command pwd To return to your home directory from anywhere use the command cd ~ These commands are more fully described below.

-14- Copyright 1997 F.Merat
/
bin dev etc lib users users2 tmp
•••
•••
•••
•••
•••
•••
•••
These directories typically contain system libraries, executable binary files, device handlers and drivers, etc.
The user home directories are under users and users2, emulation software is contained in usr, and temporary files are put in tmp.
(root)
• • •
CURRENT DIRECTORY [pwd] To find out what directory you are currently in, i.e. your current directory, use the pwd or “print working directory” command. Its syntax is: pwd[RET] You would interact with files and programs in your current directory exactly as we have shown in the previous commands. However, to work with files outside your current directory you must specify a path name which exactly locates the file. There are two types of path names: absolute and relative. An absolute path name lists the complete path from the root directory. For example, /users/fm/lab1/prog.c would specify the file named “prog.c” located in the directory lab1 which is, in turn, located in the directory fm which is, in turn, located in the directory users which is, in turn, located in the directory root. This notation can be used in place of <filename> in any of the HP-UX commands to specify files located outside your current directory. This notation is unambiguous but can get cumbersome when several directories must be specified. To simplify commands, you can use relative pathnames which refer to files relative to your current directory. You can use the notation “.” to refer to your current directory and “..” to refer to the directory in which your current directory can be found. This is known as the parent directory. As an example of using this notation, suppose your current directory is /users/fm and you want to refer to a file in /users/db. You could use the notation “../db/filename” to reference the specific file you wanted. As another example, root could be referred to as “../..”.
MAKING DIRECTORIES [mkdir] You can create subdirectories or delete them to organize information within your own directory. You should not create directories in any directory that is not within your own home directory. You may make a directory using the "mkdir" command. The syntax is:

-15- Copyright 1997 F.Merat
mkdir <directory_path>[RET] All directory names must be unique. If you specify the name of an existing directory as <directory_path>, the existing directory may be deleted (without warning of course)! Note that directory paths may be specified using either realtive or absolute pathnames. The use of absolute pathnames is recommended until you really understand the UNIX directory structure.
REMOVING DIRECTORIES [rmdir] You can delete directories using the "mkdir" command. The syntax is: rmdir <directory_path>[RET] A directory MUST be empty to be deleted. If it is not empty, you will receive a warning message (one of the few UNIX warning messages) and the delete directory command will be aborted.
CHANGING DIRECTORIES [cd] It is far easier to work with files that are in your current directory than ones that are elsewhere because you do not need to specify any pathname, just the file name. This makes it advantageous to change your working directory to whereever you have stored the files you want to use. You can change your current directory using the cd command. The syntax is: cd <directory_path>[RET] Note that <directory_path> is any valid absolute or relative directory path. If you want to quickly return to your home directory use the cd command without any <directory_path>. This is very handly when you have forgotten what directory you are currently in.

-16- Copyright 1997 F.Merat
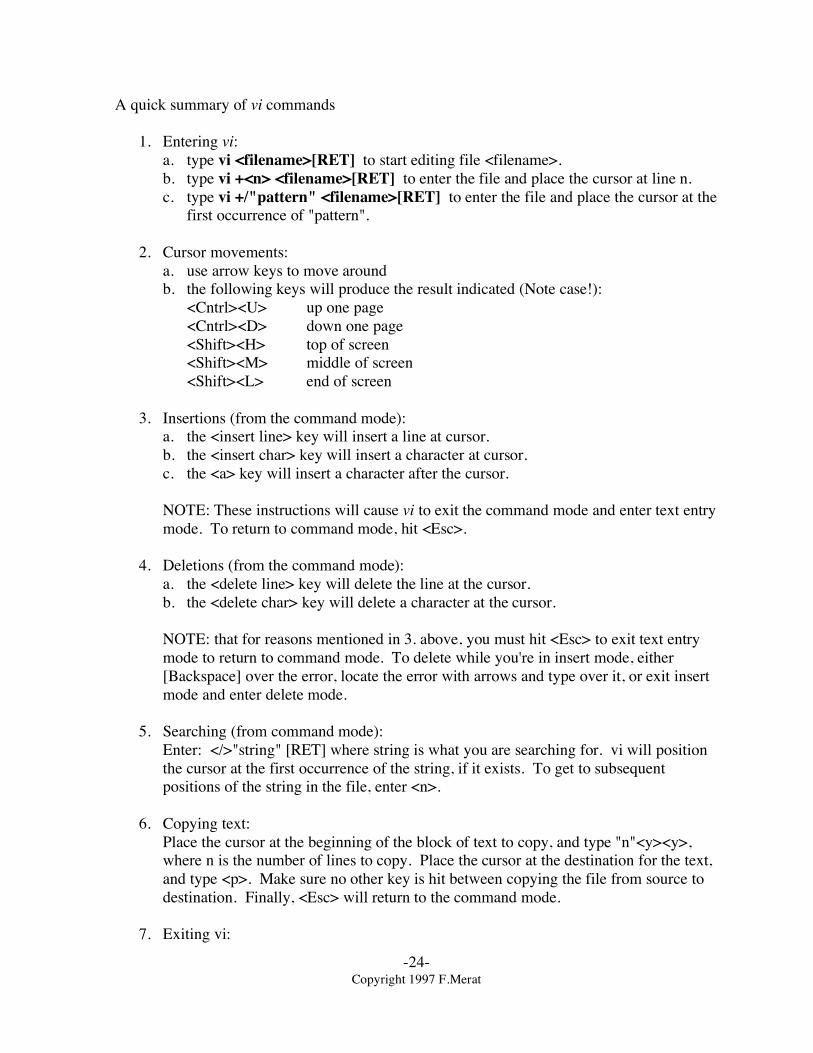
CHAPTER 3. THE vi EDITOR OVERVIEW The vi editor is the standard full-screen editor provided with UNIX systems. It has a rather large repertoire of commands which makes it overpowering to a first-time user. In this chapter we will cover only a subset of the full range of vi commands that will be appropriate for editing C or assembly source code files or English text. Vi may be used to edit files containing ASCII characters. It cannot handle files containing non-ASCII characters or the ASCII NUL character (the C character ‘\O’). The only other restriction on an ASCII file to be edited is that a single line cannot contain more than 1023 characters. The vi editor can be thought of as being made up of three modes: command, last line ( a form of command) and text entry. When in command mode, all data typed in will be interpreted as commands; when in last line mode, all the data you type in will be interpreted as a command and displayed on the bottom line (last line) of your display screen; when in text entry mode, all entered data is transferred to the screen, and subsequently to your file. When you first enter vi, you are in command mode, which allows you to select the method of text entry (which includes appending, inserting, and editing), parse through the file, save or abandon the file, and exit the editor. Note that you must be in command mode to issue a command, or text entry mode to enter text, and that you must exit one mode before entering the other. The screen always shows a range of consecutive lines in the file. With standard dumb terminals that have a display area of 24 lines, vi shows 23 lines of the file. One line on the screen, at the bottom, is used in last line mode. Vi has simple, one-letter commands which move the cursor around on the screen. The arrow keys are also usable to control cursor movement and are recommended since you do not have to remember the one-letter commands. Other commands may be used to change the information displayed on the screen at the current cursor position. These changes will be reflected in the edited file only when the file is subsequently saved. In addition to commands in the cursor movement and text replacement categories, there are many more commands for controlling vi. INVOKING vi If you have an existing file called “prog.c,” you can edit it with the command vi prog.c This command causes vi to make a temporary copy of the file, to display the first screen of the file, to place information about the size of the file on the bottom line of the screen, and, finally, to place the cursor at the beginning of the first line of the file.

-17- Copyright 1997 F.Merat
If you want to use vi to create a new file the same form of the command can be used vi newprog.c where “newprog.c” is the name of a new file. This command causes vi to clear the screen, place tilde characters down the left side of the screen, put an information line at the bottom of the screen that tells you that you are creating a new file, and to move the cursor to a blank line at the top of the screen. Each tilde character represents a non-existent line in the file. As you add lines to the file, the tildes will be gradually displaced from the screen. Vi does not show completely blank lines on the screen to avoid causing confusion as to when a file contains blank lines. Sometimes vi can also use the ‘at’ symbol (@) to represent a non-existent line in the file such as after you have deleted lines from the file. CURSOR MOVEMENT COMMANDS The simplest cursor movement commands are those that move the cursor one position vertically or horizontally. The arrow keys on your keyboard will work as cursor movement commands. Because not all keyboards have arrow keys vi has commands to move the cursor. In addition, the space and backspace characters move the cursor horizontally just as they normally would. The space character does not overwrite any characters displayed on the screen; only the cursor moves. The linefeed (or carriage return) key can be used to move the cursor down. The four lower-case letters: h, j, k and l duplicate the function of the arrow keys and can be used as alternative cursor movement commands. You do not have to hit the carriage return key after the command. For example, when you type h, the cursor moves left one column. If you attempt to do something illegal such as move up past the beginning of the file the terminal will beep. Note that these commands only work in command mode. Many other cursor movements are listed in table 1. This table and two others have, for convenience, been collected together in a “Vi Reference Guide” section at the end of this chapter. To gain experience with vi, it is a good idea to experiment with these commands on a sample file. Some of the cursor commands are relatively sophisticated. A step up in sophistication is the w command (short for word) which moves the cursor to the beginning of the next word in the file. Two related commands are b (move to the beginning of the previous word) and e (move to the end of the current word). A command which is extremely useful to C programmers is %. If the cursor is currently located on a bracket character ( one of {, }, ( or )), the cursor is moved to the matching bracket in the program. This command makes it relatively easy to check whether your brackets are properly matched. If vi cannot find a matching bracket, it will not move the cursor and will beep. Be aware, however, that vi can become confused if your C program has macros that generate unbalanced brackets or has comments or string constants that contain unbalanced brackets. An important command is / which is used for searching. When you type /, the cursor jumps to the bottom line on the screen where you must type a pattern, terminated by either a carriage

-18- Copyright 1997 F.Merat
return or the escape character, which you want to search for. If all you want to do is locate the next occurrence of some text, say the word “interrupt”, you would type /interrupt and this will cause vi to move the cursor to the beginning of the next occurrence of “interrupt” in the file. The single letter command n (next) repeats the last search. The single letter command N is similar, except that it repeats the last search backwards through the file. If you want to search backwards initially, you should use ? instead of /. After performing a backwards search, n will repeat the search scanning backwards through the file. If you use N after a search begun with ?, the search will be repeated forward through the file. The string following the / or ? command is a pattern. Certain characters called special characters have special meaning in a pattern. The special characters are ^ $ . * [ \ If you do not want to learn the details of pattern construction you can simple avoid the use of these special characters, or you can remember to precede these characters with the escape symbol (\) or you can set the nomagic option (see below). On the other hand, if you want, for example, to search for the character sequence $bill$, you have to type the vi command as /\$bill\$ Since we are not really interested in the vi editor patterns will not be discussed. You can refer to the system vi manual or to any other good UNIX reference. TEXT REPLACEMENT COMMANDS The commands for inserting, deleting and replacing text in the file are summarized in Table 3. In general, these commands fall into two main categories: character operators and line operators. Character operators operate upon characters within a line and line operators operate on entire lines. For example, the character i may be used to insert characters into the middle of a line, whereas the o command is used to insert entire lines into the file. Typically, you will be able to edit meaningful programs using just the insert and delete character and line keys on the keyboard. Insertion If you want to insert characters into the current line, you would normally use either the i (insert) command or the a (append) command. The i command inserts characters immediately after the cursor position. The a command inserts characters immediately before the cursor position. Any number of characters may be inserted. Text insertion stops when the escape character is typed. You may insert carriage returns causing the line to be split into two lines. Variations on the character insertion commands are A, used to append characters to the end of the current line, and I, used to insert characters at the beginning of the current line.

-19- Copyright 1997 F.Merat
To insert one or more lines into the file, either the o or the O command is used. These commands are known as the open commands because they cause the text on the screen to be opened up. When you type o, a blank line is created below the current line and the cursor is positioned at the beginning if this new line. Any text you type is now entered on the new line. Whenever you type a carriage return another line is inserted. Text insertion stops only when you type the escape character. The O command is similar, the difference being that the new line is inserted immediately above the current line in the file. Deletion The normal command used for deleting a character from the middle of a line is x. Supposedly the letter “x” was chosen because its effect is analogous to deleting words on an ordinary typewriter by typing “x”’s over the text. When x is typed, the character underneath the cursor is simply deleted. You can also use the key labeled Del or the Delete Char keys to delete a character. If you wish to delete several characters, you may precede the delete character with the character count , i.e. 5x. If you wish to delete an entire word from the line, you should position the cursor to the start of the word and then type dw for delete word. The D command will delete all characters from the current cursor position to the end of the line. Deleting an entire line is accomplished with the dd command which deletes the current line. Several lines can be deleted by preceding this command with a number, i.e. 13dd will delete thirteen lines. Replacement With the exception of the r and R commands, replacement is equivalent to a deletion followed by an insertion. The r command is used to replace a single a single character. The character under the cursor is replaced with whatever single character you type after the r. For example, if you type rq, the character at the current cursor position is changed to the letter q. You should not type an escape character after using r. Note that the character following the r can be a carriage return. Typing r<CR> has the effect of splitting the current line into two lines, causing a re-arrangement of the displayed lines on your screen. The R command is basically the r command repeated and is used to effect a one-for-one replacement of several characters. The first character you type after the R overwrites the character that is currently under the cursor. The cursor is then advanced by one column and the next character you type will replace the second character from where the cursor originally was, etc. Replacement stops only when an escape character is typed in. Note that you can replace text only on the same line. You cannot, for example, jump to the line below by typing a return or linefeed character and carry on replacing text there. The effect of typing a return is to split the current line into two lines. To replace one character with several characters you use the s (substitute) command. After typing s, all characters up to an escape character, replace the one character that was underneath the cursor. If you wish to replace, for example, three adjacent characters with several characters, you could use the command 3s. When you type the substitute command,

-20- Copyright 1997 F.Merat
the last character to be replaced is changed to a dollar character. This indicates the extent of the change you are about to perform. The dollar symbol will disappear if you enter replacement text over it, or when you terminate the replacement text. Replacing an entire line is performed with the S or the cc command. After typing either command, you may enter any number of replacement lines, stopping when an escape character is typed. Several lines may be replaced by preceding the command with a count. For example, 5cc is used to replace five consecutive lines. Other Editing Actions Some other commands which can change the file but which did not fit under the previous headings are very useful. The most important command is the u (undo) command. If you have just executed a command that changed the file and you can see that your change is incorrect, just type u to undo the effect of the change. The file will be changed back to its state before your previous command. Note that the undo command has no history, a second u simply undoes the previous undo. You frequently need to move or copy a block of lines to another place in the file. A block of lines can be moved by the following sequence of commands. Position the cursor on either the top or bottom line (it does not matter) of the block to be moved and then type the command
mz which marks the current line and gives it the name z. Move the cursor to the other end of the block. Type the command
d’z which deletes all the lines from the current line to the line labeled z and places them in a special buffer. Position the cursor to the line immediately before where you want to place the block of lines and type
P which puts all the lines contained in the buffer back into the file. Note that you do not have to use the name z with the P command. Copying a block of lines is almost identical to moving them except that the y (yank) command is used instead of the d (delete) command, i.e. use y’z instead of d’z. If you only want to move or copy a few lines, the preceding instructions can be simplified. For example, to move three lines, move the cursor to the first line and type
3dd to delete the lines. Then position the cursor at the desired insertion point and type p. To copy three lines, use the command
3yy to copy the lines into the buffer. Command Structure

-21- Copyright 1997 F.Merat
You can type a number before your command whenever it makes sense: 8k moves the cursor up eight lines; 8dw deletes eight consecutive words; 5rx replaces five consecutive characters with the letter x; etc. The general form of the delete instruction is
d <motion command> where any command that causes cursor motion can be used. For example, d5l will delete five consecutive characters, dj will delete the current and the following line, and dG will delete all lines up to the end of the file. The yank and change commands have exactly the same structure as the delete command. MISCELLANEOUS COMMANDS Whenever you type a colon character, the cursor jumps to the command line at the bottom of the screen and changes to the last line form of the command mode. The types of commands that are executed in this mode typically have to do with system interaction such as file operations or executing shell commands. To save the file and terminate the session use the command wq. To quit without saving any changes use the command q!. (Remember that these commands must be preceded with a colon.) To merge another file into the file being edited, position the cursor to the line preceding the desired insertion point and use the :r command. You can execute shell commands from within the vi editor. This is very useful, for example, in checking the names of your files before you save a file under a new name. To execute a shell command, type the command
:shell which will create a subshell. To execute a single command such as “ls”, type
:!ls Vi also has a number of options to control its operation which may be displayed or changed with the :set command. To see all the option settings that are in effect type
:set all To set an option, type the name of that option after the set command. For example, to have line numbers displayed on the screen type
:set number To disable the option, precede the name of the option with the word no. Thus, to turn off the display of line numbers you would type
:set nonumber This command can be used to show the text entry mode on the screen or to eliminate the effects of magic characters in patterns, i.e.
:set showmode :set nomagic

-22- Copyright 1997 F.Merat
RECOVERING FROM PROBLEMS Several types of problems commonly arise from using vi.. Vi provides mechanisms for recovering from most of these simple problems. Garbage on the screen: Type the escape character. This might make the terminal beep. Then type Ctrl-L to clear the screen and completely redraw it. If nothing happens, try Ctrl-R instead. Accidental deletions: If you immediately detect the deletion you can undo the deletion with the u command. If you were not looking at the screen, you may have already typed following instructions and the u command only undoes the previous instruction. However, vi keeps the last nine blocks of deleted text in named buffers. To reinsert the text from the most recent deletion, type the command
“1p To reinsert the next to last block of deleted text, use the command
“2p and so forth. Losing your place in the file: If you are editing a large file and you accidently execute some command that positions you somewhere else you can return to your starting position by typing
‘‘ (two single quote characters). System crashes Vi always makes a temporary copy of your file . Even if the system crashes or your workstation is turned off, this temporary file is preserved. To restore this file simply type
vi -r filename (where filename is the name of the file you were editing when the crash occurred) the next time you use the computer. You will typically lose a few lines of text (from your last editing commands) but the majority of the file will have been recovered. Weird mode indicated by a command line colon Note that ":" is the command prompt from the ex editor (another UNIX editor accessible from vi). If at any time you enter this mode (when this happens, it means you've exited the screen editor and entered the line editor), simply hit [return]. Although the prompt may stay at the bottom of the screen, you will be returned to vi's command mode. Vi REFERENCE GUIDE

-23- Copyright 1997 F.Merat
Vi is in one of three states at any time. The normal state is the Command state in which you can enter cursor commands, text deletion commands, etc. When you type a command like o (open) or i (insert), vi switches to the insert state. In this state, all the text you type is inserted into the file. Only the Escape character or an interrupt (such as from hitting the Break key) takes vi out of this state and back to the command state. When you type one of the characters: :,/,?, or !, the cursor jumps to the bottom of the screen and all further text is echoed on that line. When the cursor is on the bottom line, vi is in the last-line state. Hitting the Return or the Escape key at the end of the line causes the command to be executed and then vi returns to the normal command state. A partially typed command on the last line can be canceled by backspacing past the beginning of the line or by an interrupt (hitting the Break key). All the vi commands described in this chapter are displayed in Tables 1 thru 3 below. Only about half of the available vi commands are listed.
-24- Copyright 1997 F.Merat
A quick summary of vi commands
1. Entering vi: a. type vi <filename>[RET] to start editing file <filename>. b. type vi +<n> <filename>[RET] to enter the file and place the cursor at line n. c. type vi +/"pattern" <filename>[RET] to enter the file and place the cursor at the
first occurrence of "pattern".
2. Cursor movements: a. use arrow keys to move around b. the following keys will produce the result indicated (Note case!):
<Cntrl><U> up one page <Cntrl><D> down one page <Shift><H> top of screen <Shift><M> middle of screen <Shift><L> end of screen
3. Insertions (from the command mode): a. the <insert line> key will insert a line at cursor. b. the <insert char> key will insert a character at cursor. c. the <a> key will insert a character after the cursor.
NOTE: These instructions will cause vi to exit the command mode and enter text entry mode. To return to command mode, hit <Esc>.
4. Deletions (from the command mode):
a. the <delete line> key will delete the line at the cursor. b. the <delete char> key will delete a character at the cursor.
NOTE: that for reasons mentioned in 3. above, you must hit <Esc> to exit text entry mode to return to command mode. To delete while you're in insert mode, either [Backspace] over the error, locate the error with arrows and type over it, or exit insert mode and enter delete mode.
5. Searching (from command mode):
Enter: </>"string" [RET] where string is what you are searching for. vi will position the cursor at the first occurrence of the string, if it exists. To get to subsequent positions of the string in the file, enter <n>.
6. Copying text:
Place the cursor at the beginning of the block of text to copy, and type "n"<y><y>, where n is the number of lines to copy. Place the cursor at the destination for the text, and type <p>. Make sure no other key is hit between copying the file from source to destination. Finally, <Esc> will return to the command mode.
7. Exiting vi:
-25- Copyright 1997 F.Merat
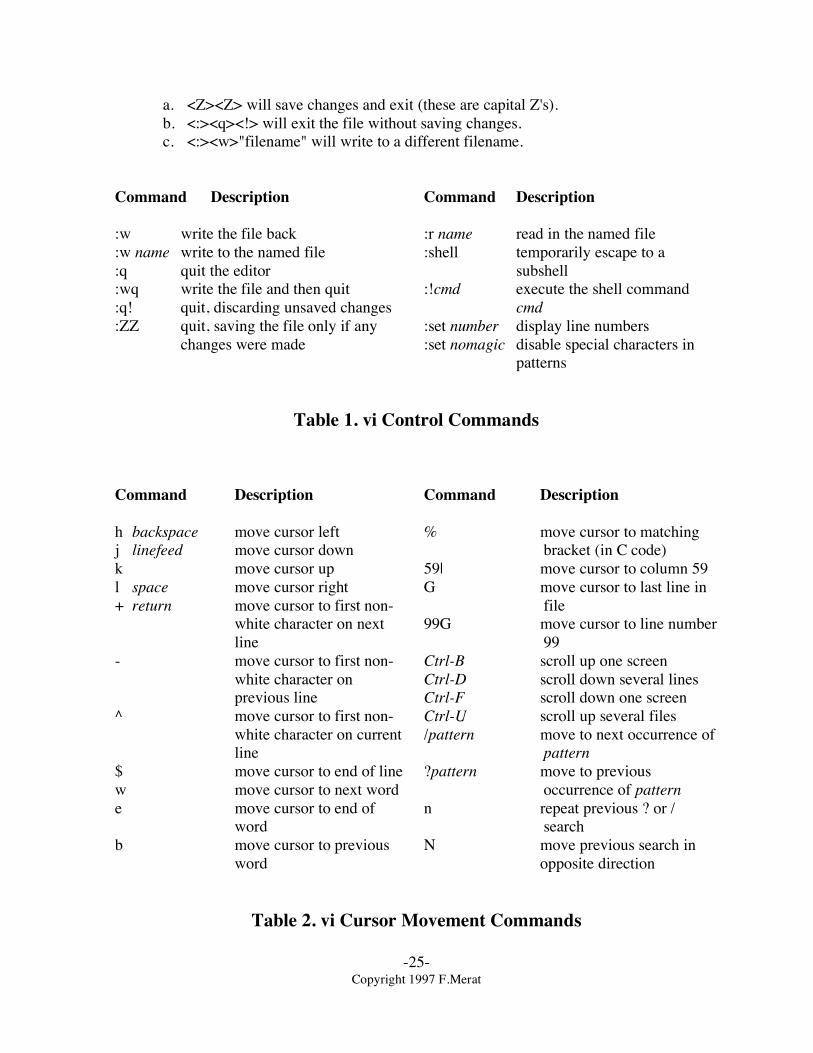
a. <Z><Z> will save changes and exit (these are capital Z's). b. <:><q><!> will exit the file without saving changes. c. <:><w>"filename" will write to a different filename.
Command Description :w write the file back :w name write to the named file :q quit the editor :wq write the file and then quit :q! quit, discarding unsaved changes :ZZ quit, saving the file only if any
changes were made
Command Description :r name read in the named file :shell temporarily escape to a
subshell :!cmd execute the shell command
cmd :set number display line numbers :set nomagic disable special characters in
patterns
Table 1. vi Control Commands
Command Description h backspace move cursor left j linefeed move cursor down k move cursor up l space move cursor right + return move cursor to first non-
white character on next line
- move cursor to first non-white character on previous line
^ move cursor to first non-white character on current line
$ move cursor to end of line w move cursor to next word e move cursor to end of
word b move cursor to previous
word
Command Description % move cursor to matching
bracket (in C code) 59| move cursor to column 59 G move cursor to last line in
file 99G move cursor to line number
99 Ctrl-B scroll up one screen Ctrl-D scroll down several lines Ctrl-F scroll down one screen Ctrl-U scroll up several files /pattern move to next occurrence of
pattern ?pattern move to previous
occurrence of pattern n repeat previous ? or /
search N move previous search in
opposite direction
Table 2. vi Cursor Movement Commands

-26- Copyright 1997 F.Merat
Command Description x delete one character D delete characters up to end
of line dw delete one word dd delete one line i text insert text at cursor
position a text insert text after cursor
position I text insert text at start of line A text insert text at end of line o text insert lines after current
line O text insert lines at cursor
position r c replace current character
with c R text replace several characters s text substitute text for current
character
Command Description S text substitute text for current
line cc text substitute text for current
line cw text change one word J join current line to next
line u undo last change made . repeat the last edit
command yy yank a copy of the current
line into a buffer m c mark the current line with
the name c d’c delete lines from here to
line marked with c y’c yank lines from here to
line marked with c p put contents of buffer at
cursor position P put contents of buffer
before cursor position
Table 3. vi Text Editing Commands

-27- Copyright 1997 F.Merat
CHAPTER 4. THE M68000 ASSEMBLER ASSEMBLER STATEMENTS A source program is a logical sequence of source statements designed to perform a specific task. A source statement may be either an assembly-language instruction, a comment, or an assembler directive. ASSEMBLY LANGUAGE INSTRUCTION Assembly-language instructions are composed of up to five fields as follows: Line Number [Label[:]] Mnemonic [Operand] [Comment] The line number is an editor- or assembler-generated source line identifier of up to four decimal digits. The other four fields are user-generated. Of these, only the mnemonic field is always required in an instruction. The label and comment fields are always optional (and are so identified by showing them enclosed in square brackets) and may be used at the discretion of the programmer. The operand field is only used with instructions that require an operand; otherwise it must be omitted. The 68000 assembler uses a free format in which the fields may appear anywhere on a line. However, each field MUST be separated from the preceding field by at least one blank space. THE LABEL FIELD The label field is the first user-generated field in a line. Any assembly-language instruction can be labeled, but labels are most often used in conjunction with jump to subroutine, and branch instructions. These instructions place a new value in the program counter, and thereby alter the sequential execution of a program. The label identifies the instruction to which program control is to be transferred. If present, a label field will be a string of from 1 to 30 alphanumeric characters in which the first character must be alphabetic (A-Z). All 30 characters are significant, but only the first 8 characters are listed on the symbol table printout. The symbols, A0 through A7, D0 through D7, CCR, SR and USP are register designators used by the assembler and must not be used as a label. If a label starts in the first column, it must be terminated with at least one blank space. If the label starts in any other column, it must be terminated with a colon (:). The colon is not a part of the label. THE MNEMONIC FIELD

-28- Copyright 1997 F.Merat
The mnemonic field holds the three-, four, or five-letter acronym for the assembly-language instruction. The assembler uses an internal look-up table to translate this acronym, called a mnemonic, into its binary equivalent. Some instructions for the 68000 require one operand, others require two operands, and still others require no operands. The mnemonic "tells" the assembler how many operands, and which types of operands, should be obtained from the operand field. We will not list the legal mnemonics here, but they are listed and described in our textbook. A summary table of instructions is included in Table 4.1. The 68000 can operate on byte, word, and long-word data. Some instructions can operate on just one size of data, others can operate on two sizes of data, and still others can operate on all three sizes of data. For instructions that can operate on more than one size, the 68000 must be "told" which size of data is being operated on. This is done by appending a special assembler suffix, called a data size code, to the mnemonic. For example, an instruction that adds a value in data register D0 to a value in data register D1 will have the form
ADD.X D0,D1 where the suffix, .X, specifies the length of data being added, and may be .B (for byte), .W (for word), or .L (for long word). If the data size code is omitted, the assembler assumes that word-size data is being processed. Therefore, an add instruction can have any of four variations: ADD.B D0,D1 Adds the low-order byte of D0 to the low-
order byte of D1 ADD.W D0,D1 Adds the low-order word of D0 to the low-
order word of D1 ADD.L D0,D1 Adds the entire 32-bit long-word contents of
D0 to the entire 32-bit long-word contents of D1
ADD D0,D1 Adds the low-order word of D0 to the low-order word of D1. Word-size data is ASSUMED.
THE OPERAND FIELD The operand field may or may not be omitted, depending on the instruction. If present, the operand field will contain one or two operands, separated from the mnemonic field by at least one blank space. If two operands are required, they must be separated by a comma. For these instruction types, the first operand is the source operand and the second operand is the destination operand. The source operand references the value that will be added to, subtracted from, compared to, or stored into the destination operand. For this reason, the source operand is never altered by the operation, whereas the destination operand is almost always altered by

-29- Copyright 1997 F.Merat
the operation. The addressing characteristics of operands for each of the instructions in the instruction set for the 68000 will be covered in class. THE COMMENT FIELD The optional comment field is used as a personal convenience by the programmer to make the program easier to follow. The comment field is ignored by the assembler, but is included in the listing. If used, comments must be separated from the preceding field by at least one blank space. Some assemblers use special characters such as semi-colons (";") to begin comment fields. STAND-ALONE COMMENTS In addition to providing brief explanations for individual lines in a program, comments are also used by themselves to introduce a program or a portion of code, to list the registers and memory locations affected, or for a variety of other documentation tasks. To include stand-alone comments in a source program, enter an asterisk (*) into column 1; at assembly time, the assembler will recognize the asterisk as the beginning of a comment line and will ignore that line. ASSEMBLER DIRECTIVES Assembler directives, or "pseudo-operations," provide directions to the assembler. They assign the object program to certain areas in memory, define symbols, allocate memory locations for temporary storage, control the form of the printout, and perform a variety of minor housekeeping functions. With the exception of the define constant (DC) directive, directives are not translated into object code. Like assembly-language instructions, assembler directives are comprised of up to five fields as shown below: Line Number [Label] Directive [Operand] [Comment] As previously mentioned for assembly-language instructions, the line number is an editor- or assembler-generated source line identifier of up to four or more decimal digits. The other four fields are user-generated. Of these, only the directive field is always required. Note that the label, operand and comment fields are enclosed in brackets which designates them as "optional" fields. This needs some clarification, however. The comment field is the only field that is always optional; it may be used or omitted at your discretion. Labels can be used with only five directives, and operands are used only with directives that require an operand. As with assembly-language instructions, assembler directive statements can be entered with a free format in which the fields may appear anywhere on a line. However, each field must be separated from the preceding field by at least one blank space. ASSEMBLY CONTROL DIRECTIVES
-30- Copyright 1997 F.Merat
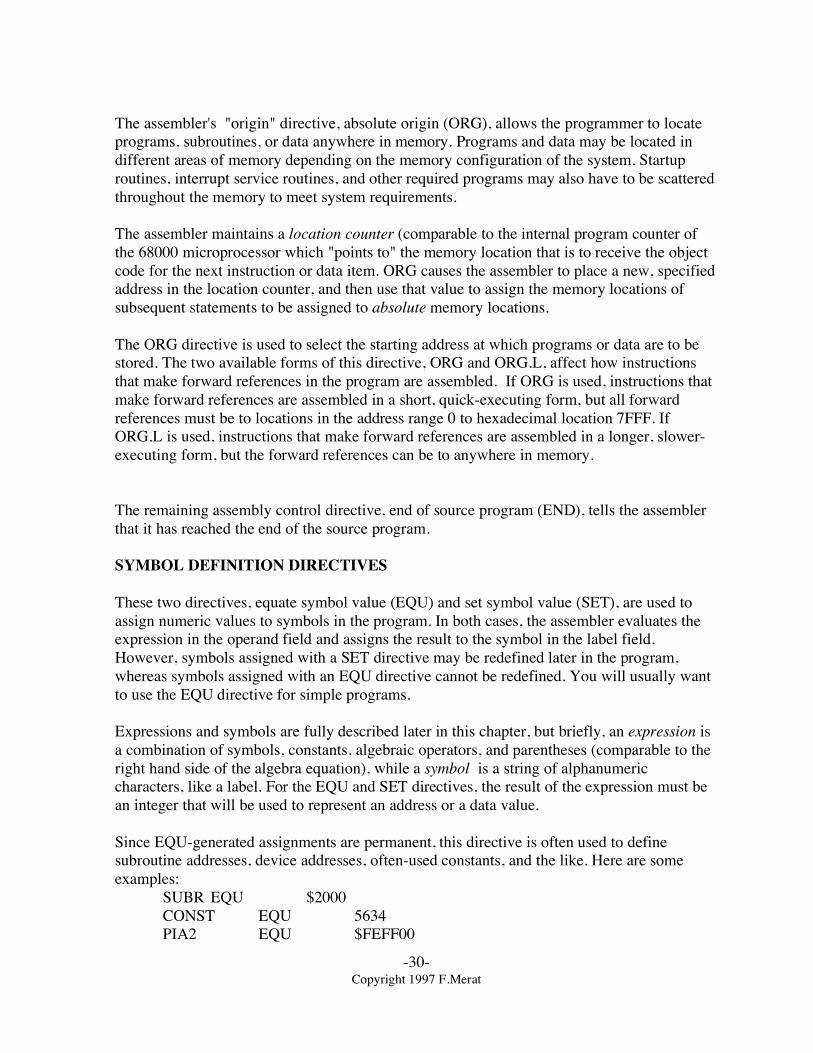
The assembler's "origin" directive, absolute origin (ORG), allows the programmer to locate programs, subroutines, or data anywhere in memory. Programs and data may be located in different areas of memory depending on the memory configuration of the system. Startup routines, interrupt service routines, and other required programs may also have to be scattered throughout the memory to meet system requirements. The assembler maintains a location counter (comparable to the internal program counter of the 68000 microprocessor which "points to" the memory location that is to receive the object code for the next instruction or data item. ORG causes the assembler to place a new, specified address in the location counter, and then use that value to assign the memory locations of subsequent statements to be assigned to absolute memory locations. The ORG directive is used to select the starting address at which programs or data are to be stored. The two available forms of this directive, ORG and ORG.L, affect how instructions that make forward references in the program are assembled. If ORG is used, instructions that make forward references are assembled in a short, quick-executing form, but all forward references must be to locations in the address range 0 to hexadecimal location 7FFF. If ORG.L is used, instructions that make forward references are assembled in a longer, slower-executing form, but the forward references can be to anywhere in memory. The remaining assembly control directive, end of source program (END), tells the assembler that it has reached the end of the source program. SYMBOL DEFINITION DIRECTIVES These two directives, equate symbol value (EQU) and set symbol value (SET), are used to assign numeric values to symbols in the program. In both cases, the assembler evaluates the expression in the operand field and assigns the result to the symbol in the label field. However, symbols assigned with a SET directive may be redefined later in the program, whereas symbols assigned with an EQU directive cannot be redefined. You will usually want to use the EQU directive for simple programs. Expressions and symbols are fully described later in this chapter, but briefly, an expression is a combination of symbols, constants, algebraic operators, and parentheses (comparable to the right hand side of the algebra equation), while a symbol is a string of alphanumeric characters, like a label. For the EQU and SET directives, the result of the expression must be an integer that will be used to represent an address or a data value. Since EQU-generated assignments are permanent, this directive is often used to define subroutine addresses, device addresses, often-used constants, and the like. Here are some examples: SUBR EQU $2000 CONST EQU 5634 PIA2 EQU $FEFF00

-31- Copyright 1997 F.Merat
You can also define one symbol in terms of another. For example: LAST EQU FINAL STRT3 EQU START+3 The symbol in the operand field must, of course, have been previously defined. Since SET-generated assignments can be temporary, this directive is used to define variable data, such as masking patterns or conversion factors. For example, the following SET directives may appear in the same program: MASK1 SET $FFFE MASK1 SET $FFFD In this example, as the program is assembled, any reference to MASK1 will be replaced with the value $FFFE until the second SET directive is encountered. At that time, any reference to MASK1 will cause the value $FFFD to be used. MEMORY ALLOCATION DIRECTIVES The define constant (DC) and define storage (DS) directives are used to allocate one or more consecutive locations in read/write memory. The referenced locations can be either initialized with some specific set of values (with a DC directive) or simply reserved for later use by the program (with a DS directive). Note that like some assembly-language instruction mnemonics, the DC and DS directives require data-size codes to specify whether bytes (.B), words (.W), or long words (.L) are being allocated. The DC directive can be used to set up data tables, ASCII message tables, indirect addresses, and the like. To do this, the assembler will evaluate each expression in the operand field as a numeric value, and place that value in the associated location in memory. Multiple operands must be separated by commas. Here are a few examples:
TABLE DC.W 10,5,7,2 Word locations starting at TABLE receive the binary equivalents of the decimal values 10,5,7, and 2, respectively.
ALBL DC LABEL+1 Word location ALBL receives the address of LABEL+1, in a word-size operand.
TABL1 DC.L 10,5,7,2 Long words starting at TABL1 receive the binary equivalents of the decimal values 10,5,7, and 2, right justified.
Characters enclosed in an ASCII string need not be separated with commas, but simply enclosed within single quotes ('). For example, the directive
ATBLE DC.B 'A2EF' will store the ASCII values for the characters A, 2, E, and F into the four byte locations that start at label ATBLE.

-32- Copyright 1997 F.Merat
If you enter an odd number of byte operands, either ASCII or non-ASCII, the assembler will attempt to eliminate a possible misalignment by filling the remaining odd bytes with zeros. For example:
STRNG DC.B 'ABDCE' Memory receives ASCII codes for the characters A through E in five contiguous bytes. The sixth byte will be 0 unless the next source statement is another DC.B.
CONST DC.B 43 Location CONST received decimal 43. The odd byte will receive 0 unless the next source statement is another DC.B.
If you enter an odd number of ASCII operands with a DC.W or DC.L directive, the assembler will fill unallocated bytes on the right with zero. For example:
NUMBR DC.L '12345' Memory will have '1234' and '5'000 in eight contiguous bytes.
N1 DC 'X' Memory will have 'X' and 0 in two contiguous bytes.
The DS directive allows you to assign a name to a memory area and declare the number of locations to be allocated, without initializing those locations any way. Consider these examples:
TEMP0 DS.B 10 Allocate 10 contiguous bytes. TEMP1 DS.W 10 Allocate 10 contiguous words.
Unlike the DC directive, the DS directive has no built-in protection against address misalignment. If you wish to force alignment on a word boundary, follow a DS.B directive with DS 0. The listing control directives are fully described in the M68000 FAMILY RESIDENT STRUCTURED ASSEMBLER REFERENCE MANUAL. A short explanation of how that manual describes each instruction is covered in Appendix 3. However, it is worthwhile to discuss the characteristics of expressions that can appear in the operand field of an assembly-language instruction or an assembler directive. EXPRESSIONS IN THE OPERAND FIELD An expression is a combination of symbols, constants, algebraic operators and parentheses that is evaluated (by the assembler) as an integer-valued data or address operand. SYMBOLS
-33- Copyright 1997 F.Merat
Like labels, symbols are strings of from 1 to 30 alphanumeric characters that begin with a letter (A-Z). All 30 characters are significant, but only the first 8 characters will be listed when the symbol table is printed. The symbols A0 through A7, D0 through D7, CCR, SR, SP and USP are special register names used by the assembler that can appear in the operand field, but not in the label field. A symbol can have an absolute value or a relative value. A symbol will have an absolute value if:
• it is assigned an absolute value by an EQU or SET directive, or • if an ORG statement has preceded the definition of the symbol.
A symbol will have a relative value if: • it is assigned a relative value by an EQU or SET directive.
CONSTANTS The assembler will accept both numeric constants and ASCII literals. A string of decimal digits (e.g., 12345) is interpreted as a decimal number, and a string of hexadecimal digits preceded by a dollar sign (e.g., $ABCD) is interpreted as a hexadecimal number. An ASCII literal is a string of up to four ASCII characters enclosed within single quotes (e.g., 'ABCD'). ALGEBRAIC OPERATORS The assembler allows you to combine terms of an expression with the use of four arithmetic operators, four logical operators, and one special operator. The arithmetic operators are: + (add), - (subtract), * (multiply), and / (divide). For example, the equate sequence
START EQU $2000 STARTP6 EQU START+6 STARTM1 EQU START-1
assigns symbols STARTP6 and STARTM1 with the addresses $2006 and $1FFF, respectively. The logical operators have the following definitions:
Logical AND (&) causes each bit in the left expression to be logically ANDed with the corresponding bit in the right expression. Logical OR (!) causes each bit in the left expression to be ORed with the corresponding bit in the right expression. Shift left (<<) causes the left expression to be left-shifted by the number of bit positions specified in the right expression. The left expression is filled with zeros from the right. Shift right (>>) causes the left expression to be right-shifted by the number of bit positions specified in the right expression. The left expression is filled with zeros from the left.
-34- Copyright 1997 F.Merat
The special operator , unary minus (-), causes a term in the expression to be negated, or subtracted from zero. This operator can only occur at the beginning of an expression or immediately before a left parenthesis. HOW EXPRESSIONS ARE EVALUATED As mentioned at the beginning of this section, expressions are a combination of symbols, constants, algebraic operators, and parentheses. At assembly time, the assembler evaluates parenthetical expressions first, and processes the innermost parentheses before the outer ones. Next, the operators are processed in this order: unary minus, shift, AND and OR, multiply and divide, add and subtract. Operators of the same precedence (for example, "*" and "/") are evaluated from left to right. All intermediate values are truncated to a 32-bit integer value. The result of an expression is also a 32-bit integer.

-35- Copyright 1997 F.Merat
CHAPTER 5. HP 9000 ASSEMBLY, LINKING AND DEBUGGING OVERVIEW After you have finished entering and editing your source file, you are ready for the assembly and linking process. The basics of the 68000 assembler format were described in Chapter 4. This chapter will describe the operations of actually assembling the file described in Chapter 4, The assembler translates assembly language source files (such as were described in Chapter 4) into relocatable 68000 code modules. The assembler also generates symbolic information for use with the debugger. Assuming the name of your original source program is lab1.s (the extension .s is usually used on the HP system to designate a source file), the assembler will generate a relocatable or “object” file named lab1.o. At this point, your code is relocatable because all addressing references are relative. Your program will also be checked for syntax errors. If errors are detected, you may have them listed to the display (default), or in an optional listing file. If you wish, you may print the listing file and use it as a reference to correct the errors. These options, and the commands that invoke them, are outlined in the following sections. After your program assembles error free it may be linked. There are two major purposes to the linking process. First, your program must be "located" somewhere in the 68000 logical address space. During the linking process, you must specify the areas of memory in which you wish the program to reside. The linker will then take your relocatable file (also called "object" file), and convert the instructions to “absolute” addresses which will be used to place the instructions in the microprocessor memory. Second, if your program is very long, it is usually more convenient to deal with portions of it separately. This technique is called modular programming and will be described in more detail (with an example) at the end of this chapter. During linking, all the program modules are combined into one executable file. The output file from the linker should be in the IEEE MUFOM 695 (Microprocessor Universal Format for Object Modules) format required by the debugger. Error checking is done by the linker to insure that your program modules do not overlap in memory, and that all external references are resolved. If the input relocatable file is lab1.o the linker will produce the files:
lab1.X IEEE MUFOM absolute object file for the debugger lab1.L linker symbol file.
The debugger is a program that (in software) simulates the operation of a 68000 series microprocessor and can be used to test the object code produced by the linker. The debugger gives you complete control of the execution environment allowing you to set breakpoints, single step through the program, alter or examine register and memory contents, and simulate input/output. These options are described in greater detail below.

-36- Copyright 1997 F.Merat
When you set breakpoints and then execute your program, execution continues until a breakpoint is encountered at which point the debugger stops execution. You can associate a macro with a breakpoint so that when the breakpoint is encountered the macro is executed automatically. These macros can be used to check variable and register values and optionally restart the debugger or return to command mode. Single-stepping lets you execute the program one microprocessor instruction at a time, a very handy feature for debugging. The debugger lets you simulate input/output by linking with pre-prepared UNIX files for input and writing to UNIX files for output. Interrupts are specified in terms of machines cycles and can be single or repetitive.
ASSEMBLING YOUR FILE The form of the command is: as68k [options] <filename> [ > <list_filename> ] [RET] ASSEMBLER OPTIONS (as shown the options must be preceded by a dash): -L (progname.o) Specifies that a listing of the program (including errors) should be written to a disk file. The name of the listfile file must be specified by the optional “> <list_filename>“ at the end of the command line. The ">" symbol is necessary and specifies <list_filename> as the destination of the listing.
EXAMPLES: 1. as68k lab1.s [RET]
Without options, only the object file is generated. If you want a listfile, you must request it. This command is useful when there are only a few errors in your program and you do not need a printout of the entire listing. Any errors will be listed to the display.
2. as68k -L lab1.s > lab1.lis [RET]
Assemble the source file lab1.s producing the relocatable file lab1.o, then generate the listfile lab1.lis which will include symbol cross-references of the assembly.

-37- Copyright 1997 F.Merat
PRINTING YOUR ASSEMBLER LISTING FILE ON THE LAB LINEPRINTER There are two reasons to print your assembler list file:
1. This file lists your syntax errors at the places they occur, and therefore, a hardcopy of the file is a convenient reference when you are correcting these errors.
2. After the program assembles error free, you need the list file as a reference in
the emulation/debugging process. Since the relative addresses of the instructions and symbols are listed, you can easily follow the program execution when you are single stepping, setting breakpoints, analyzing traces, etc.
To print your list file (assuming that you called it "lab1.lis") enter: lp lab1.lis [RET] LINKING YOUR FILE The form is: ld68k [options] <sourcefile> [RET] LINKER OPTIONS (as shown the options must be preceded by a dash): -o <filename> Specifies the name of the linker output (including errors) file. This option must typically be present or you will generate an error message. NOTE: You do not need the -o option if you use a linkler command file as specified by the -c option (not used in this course). -L ... <other linker commands> ... > <filename> Specifies that the output load map listing will be writted to the standard file.
EXAMPLES: 1. ld68k -o demo demo [RET]
Link the input relocatable file demo.o (the linker assumes the extension is .o unless explicitly specified) producing the output absolute file demo.x (the linker uses the default extension .x).

-38- Copyright 1997 F.Merat
2. ld68k -o lab1 -L demo > demo.llis [RET]
Link the input relocatable file demo.o (the linker assumes the extension is .o unless explicitly specified) producing the output absolute file lab1.x (the linker uses the default extension .x). The linker output listing file is piped to demo.llis.
DEBUGGING YOUR FILE The form of the command is: db68k [options] <filename> [RET] The debugger by default looks for source files in your current directory. This can be changed using the shell variable HP_DEBUG_PATH. DEBUGGER OPTIONS (as shown the options must be preceded by a dash): The options specify the use of input and output files by the debugger.
-c Execute the command file whose name immediately follows this option. -j Record all debugger commands in a journal file whose name immediately
follows this option. -l Record all debugger commands in an OUTOUT command file whose
name immediately follows this option. -s Use the startup file whose name immediately follows this option.
Filename must be an IEEE MUFOM absolute file created by the linker. This is the default file produced by the linker whne you use no options. It must contain executable code and is expected to have the extension “.x”. For example, the command db68k prog1 will cause the debugger to automatically look for the file prog1.x in your current directory. The debugger is a windowed system with each window (not all are simultaneously viewable) containing program information. The general form of the assembly language screen (which automatically comes up when the input is an assembly language module) is shown below:

-39- Copyright 1997 F.Merat
=======================Monitor=====================12===========Stack=======14== |1 || 00000010=4E724E72 | |2 0000000C=4E724E72 | |3 00000008=4E724E72 | |4 00000004=4E724E72 | |5 SP->00000000=4E724E72 | ================================================================================ Code 11 =======Registers=====13== 00001400 3E7C 19FE MOVEA.W #$19FE,A7 |PC=00001400 pi=00000000| 00001404 6100 0048 BSR.W CLEAR D0=00000000 A0=00000000| 00001408 307C 1000 MOVEA.W #$1000,A0 D1=00000000 A1=00000000| 0000140C 303C 0026 MOVE.W #$26,D0 D2=00000000 A2=00000000| 00001410 6100 004E BSR.W TRANSFER D3=00000000 A3=00000000| 00001414 303C 000A MOVE.W #$A,D0 D4=00000000 A4=00000000| 00001418 6100 0052 BSR.W DELAY D5=00000000 A5=00000000| REPEAT: D6=00000000 A6=00000000| ====================================Journal=================================10== | auto halt at address 0x00001400. | | | | | STATUS: Command 68000 MODULE: mov_mesg BREAK #: 0 HELP=F5 > BBreakpoint Debugger Expression File Memory Program Symbol Window Execution HP-UX_Shell Macro Option Pause Quit Level Directory ?(Help
This is the format that you see on a vt100 terminal. The display on a UNIX workstation is much nicer and larger. The upper left of the screen is the monitor window (#12) that can be used to keep a running display of the current value of selected variables. The window to its right is the stack window (#14) and maintains a current display of what the stack pointer is pointing to and its contents. The window (#11) in the right middle of the screen is the code window which shows the current assembly code you are debugging. Essentially, this is a window onto the output from the assembler. It shows the absolute address of each instruction and its hex and mnemonic specification. Immediately to the right of the code window is the register window (#13). This window keeps a current display of the values of the 68000 registers and program counter. The window that stretches across the screen immediately below the code and register windows is the journal window (#10). This window keeps track of all debugger commands you have executed since you first envoked the debugger. This is not a particularly useful window in this course. The bottom area of the screen which begins with STATUS: is the command line. This is where you enter commands (after the debugger prompt >) and execute them by pressing the return key. You can enter commands anytime the cursor is displayed. To enter the debgugger: Use the command db68k <filename>. The debugger will automatically look for the .x extension of the filename produced by the linker. To exit the debugger: Debugger Quit Yes <return> The code window comes up active, you can scroll around in it using the arrow keys.

-40- Copyright 1997 F.Merat
As it first comes up the display does not show all of the register window. Specifically, it does not show the status register which you need for lab#2. To get it, type Window Active Assembly Registers <return>. This will close the journal window and show the bottom of the register window. You cannot run your program unless you are in the code window. Exception vector 8 at <address> is a very common error message. It often means that you are trying to execute from a memory location containing 4E72. The window shown below is what you might see after executing lab2. Note the code window #11 and the register window #13. The register window is short because the journal window popped up in response to requesting a display of memory at $2000. Note that $2000 does contain CFF2 whereas all the surrounding memory contains 4E72 the uninitialized contents. =======================Monitor=====================12===========Stack=======14== |1 || 00000010=4E724E72 | |2 0000000C=4E724E72 | |3 00000008=4E724E72 | |4 00000004=4E724E72 | |5 SP->00000000=4E724E72 | ================================================================================ =========================Code======================11== Registers 13 | | 00001000 3039 0000 FFFE MOVE.W $00FFFE,D0 | PC=00001022 pi=00001020 | | 00001006 D078 0001 ADD.W $0001,D0 D0=0000CFF2 A0=00002000 | 0000100A D078 0001 ADD.W $0001,D0 D1=00000000 A1=FFFFCFF0 | 0000100E D079 0000 FFFE ADD.W $00FFFE,D0 D2=00000000 A2=00000000 | 00001014 D078 0002 ADD.W $0002,D0 D3=00000000 A3=00000000 | 00001018 41F8 2000 LEA $2000,A0 D4=00000000 A4=00000000 | 0000101C 3278 2000 MOVEA.W $2000,A1 D5=00000000 A5=00000000 | 00001020 3080 MOVE.W D0,(A0) D6=00000000 A6=00000000 = ====================================Journal=================================10==| |> Memory Display Byte 2000h || | 00002000 CF F2 4E 72 4E 72 4E 72 4E 72 4E 72 4E 72 4E 72 ..NrNrNrNrNrNrNr || | 00002010 4E 72 4E 72 4E 72 4E 72 4E 72 4E 72 4E 72 4E 72 NrNrNrNrNrNrNrNr |S STATUS: Command 68000 MODULE: lab2 BREAK #: 0 HELP=F5 > > Memory Display Byte 2000h Breakpoint Debugger Expression File Memory Program Symbol Window Assign Block_Operation Display Map Inport Outport Unload_BBA Register
HINTS: You will get an error message if your assembly code does not start at the right memory location. A typical error is to forget the ORG statement and start your program at $0. The debugger expects you to specify hexadecimal as, for example, 1000h. Specifying 1000 indicates a decimal number which can cause an error when you attempt to run the program; specifying $1000 will immediately cause an error message.

-41- Copyright 1997 F.Merat
SOME APPROPRIATE DEBUGGER COMMANDS ARE: Debugger Quit Yes <return> Quits the debugger. Window Active Assembly Registers <return> Removes the journal window and
shows the Status Register. Program Step From 1000h <return> Resets the code window to $1000
and executes the instruction at $1000. Note that only one instruction is executed.
Program Step <return> Executes the instruction currently
highlighted. This command following the initial Program Step From 1000h would execute the instruction at $1006.
Memory Register @PC=1000h <return> Sets the current value of the PC to
$1000, i.e. this is the next instruction to be executed.
The debugger will look like it is in error until you specify the correct value of the program counter (PC). Until you do so you will NOT see your code and you will not see the name of your program. The PC can be set using the command Memory Register @PC=1000h. You can also automatically set the PC if you use the following construct
ORG $1000 main: MOVE.W $FFFE,D0 <rest of your program> <another subroutine or two> <data statements> end main
This program structure defines the name main (through the use of end main) as the starting value of the executable program segment, your main program, and automatically sets the PC to point to main (in this case $1000) whenever the debugger is invoked. Note that the name main can be any name of your choice as long as the label and the end <label> statement match.

-42- Copyright 1997 F.Merat
The following window definition, file io, print macro and breakpoint declaration could be put in a .com file for automatic execution by the debugger. Open Window 57 <redirects window output to a file> File User_Fopen Create 57 File varTrace.out Debugger Macro Add vartrace() { $Expression Fprintf 57, “The value of ‘temperature’ is :%.2f\n”,*temperature$; /* Returns non-zero value so debugger will return to executing code after breakpoint. */ /* If a zero is returned, the debugger halts execution. */ return(1); } . Breakpoint Inst updateSys\#117; varTrace () Return If you set your environmental variable to the proper terminal type you will get the following error. Error: unable to open fast alpha output device scuttle 11: setenv TERM vt100

-43- Copyright 1997 F.Merat
APPENDIX 1. SUMMARY OF ADDRESSING MODES Data Register Direct: EA = Dn Example: MOVE D2,D3 Address Register Direct: EA = An Example: MOVE A2,D3 Address Register Indirect: EA = (An) Example: MOVE (A2),D3 Address Register Indirect With Postincrement: EA = (An); An = An + 1, 2 or 4 Example: MOVE.B (A2)+,D3 Address Register Indirect With Predecrement: An = An - 1, 2 or 4; EA = (An) Example: MOVE.W -(A2),D3 Address Register Indirect With Displacement: EA = (An) + d Example: MOVE.B -2(A2),D4 MOVE.B 10(A3),D4 Address Register Indirect With Index: EA = (An) + (Ri) + d Example: MOVE.B -5(A5,D0.L),D4 MOVE.B 20(A6,D5.W),D4 Absolute Long/Short Addressing: EA = absolute address Example: MOVE.W 1000,D3 Example: MOVE.L 1000,D4 Program Counter With Displacement: EA = (PC) + d Example: MOVE.L LAEL(PC),D5 Program Counter With Index: EA = (PC) + (Ri) + d Example: MOVE.W LABEL(PC,D5.L),D6
-44- Copyright 1997 F.Merat
Immediate Data: no effective address Example: MOVE.L #1000,D3

-45- Copyright 1997 F.Merat
APPENDIX 2. ASSEMBLY ERROR CODES Error messages generated during an assembly may originate from the assembler or from a higher level language such as Pascal (many assemblers are written in Pascal) or from the operating system environment. Assembler-generated messages may be of two forms: 1. ****** ERROR xxx -- nnnn where xxx is the number of the error (defined in the list in this appendix), and nnnn is the number of the line where the previous error occurred. Errors indicate that the assembler is unable to interpret or implement the intent of a source line. 2. ****** WARNING xxx -- nnnn where xxx is the number of the error (defined in the list in this appendix), and nnnn is the number of the line where the previous error occurred. Warnings may indicate possible recoverable errors in the source code, or that a more optimal instruction format is possible. ERROR CODE MEANING OF ERROR (500) No error. (501) Missing Argument.
The argument is missing or contains an illegal character, etc. Mismatch on common/noncommon section type.
(502) Operator expected but not found. (503) A symbol was found whicxh is invalid in this context. (504) Right parenthesis not valid in this context. (505) Operator not valid in this context. (506) Expression terminator found prematurely. (507) Operand expected but not found. (508) Unbalanced parentheses. (509) Complex relocatable value not valid in this context.

-46- Copyright 1997 F.Merat
(510) Stack underflow (internal error). (511) Invalid operands for \” operator. (512) Invalid operands for & operator. (513) Invalid operands for | operator. (514) Invalid operands for || operator. (515) Invalid operands for = operator. (516) Invalid operands for <> operator. (517) Invalid operands for >= operator. (518) Invalid operands for > operator. (519) Invalid operands for < operator. (520) Invalid operands for <= operator. (521) Invalid operands for >> operator. (522) Invalid operands for << operator. (523) Invalid operands for * operator. (524) Invalid operands for / operator. (525) Invalid character.
This message is produced as a result of a variety of syntactical errors. A character may be invalid within the context where it is found. The input line may be too long. A register name may be found where one is not allowed.
(526) Closing string delimiter missing.
(527) String longer than 4 characters invalid in this context.
(528) Invalid opcode.
(529) Invalid opcode/qualifier combination.
(530) Undefined symbol.

-47- Copyright 1997 F.Merat
(531) Invalid nesting of IF >>> ENDC. (532) Invalid nesting of IF ... ELSEC ... ENDC.
The opcode mnemonic is not a valid instruction, directive, or macro call. A macro defined within another macro, or conditional assembly statements are nested too deeply. ELSEC, ENDC, or ENDM has been used without preceding IF or MACRO.
(533) Missing ENDC.
(534) IF stack overflow; limit is 16 nesting levels.
(535) This directive is not permitted in absolute assembly.
(536) Code generation not permitted in OFFSET section.
(537) Integer value is outside its legal range.
(538) Label required on this directive.
(539) Duplicate IDNT directive (ignored).
(540) Relocatable expression invalid in this context. A relocatable expression is used for a field that is not 16 or 32 bits long. An operand that should be absolute is relocatable. An ORG directive m akes a reference to an external symbol.
(541) Comma expected but not found.
SYNTACTIC ERRORS 200 Illegal character (in context) 201 Size code/extension is invalid 202 Syntax error 203 Size code/extension not allowed 204 Label required 205 End directive missing 206 Register ranges for the MOVEM instruction must be specified in
increasing order 207 A and D registers can't be intermixed in a MOVEM register range OPERAND/ADDRESS MODE ERRORS 210 Missing operand(s) 211 Too many operands for this instruction 212 Improper termination of operand field

-48- Copyright 1997 F.Merat
213 Illegal address mode for this operand 214 Illegal forward reference 215 Symbol/expression must be absolute 216 Immediate source operand required 217 Illegal register for this instruction 218 Illegal operation on a relative symbol 219 Memory shifts may only be a single bit 220 Invalid shift count 221 Invalid section number SYMBOL DEFINITION 230 Attempt to define a reserved symbol 231 Attempt to redefine a macro; new definition ignored 232 Attempt to redefine the command line location 234 Redefined symbol 235 Undefined symbol 236 Phasing error on Pass2 237 Start address must be in this module, if specified 238 Undefined operation (opcode) 239 Named common symbol may not be XDEF DATA SIZE RESTRICTIONS 250 Displacement size error 251 Value too large 252 Address too large for forced absolute short 253 Byte mode not allowed for this opcode 254 Multiplication overflow 255 Division by zero MACRO ERRORS 260 Misplaced macro, MEXIT or ENDM directive 261 Macro definitions may not be nested 262 Illegal parameter designation 263 A period may only occur as the first character in a macro name 264 Missing parameter reference 265 Too many parameters in this macro call 266 Reference preceded macro definition 267 Overflow of input buffer during macro text expansion CONDITIONAL ASSEMBLY ERRORS 270 Unexpected 'ENDC' 271 Bad ending to conditional assembly structure (ENDC expected) STRUCTURED SYNTAX ERRORS 280 Misplaced structured control directive (ignored) 281 Missing ENDI

-49- Copyright 1997 F.Merat
282 Missing ENDF 283 Missing ENDW 284 Missing UNTIL 285 Unresolved syntax error in the preceding parameterized structured
control directive; recovery attempted with the current line 286 "=" expected; characters up to "=" ignored 287 "<" expected; characters up to "<" ignored 288 ">" expected; characters up to ">" ignored 289 "DO" expected; remainder of line ignored 290 "THEN" expected; remainder of line ignored 291 "TO" or "DOWNTO" expected; "TO" assumed 292 Illegal condition code specified MISCELLANEOUS 300 Implementation restriction 301 Too many relocatable symbols referenced <linkage editor restricted> 302 Relocation of byte field attempted 303 Absolute section of length zero defined (link error) 304 Nested "include" files not allowed; ignored 305 File name required in operand field 310 Illegal syntax for "P=nnnnn" option - option ignored 311 Illegal processor number for "P=nnnnn" option - option ignored 312 Processor option does not agree with command line option -- option
ignored 313 The MASK2 directive is legal only when the processor is an M68000 INTERNAL ERRORS 400 . 499 SOURCE CODE NOT OPTIMAL OR RECOVERABLE ERRORS 500 This byte will be sign-extended to 32 bits 501 Missing parameter reference in macro source 502 Too many parameters in this macro call 503 WARNING - processor type should not be changed after any
executable code is generated 504 WARNING - processor type should not be changed after the user
once sets it 550 This branch could be short 551 This absolute address could be short NOTE If more than 10 errors occur in one line, the message
-50- Copyright 1997 F.Merat
***** too many errors on this line will be generated.

-51- Copyright 1997 F.Merat
APPENDIX 2. CWRUnet THE KERN LAB MACHINES The following computers are physically located in the Kern Lab and accessable through CWRUnet by the names and/or IP addresses shown below:
doc 129.22.56.16 grumpy 129.22.56.17 sneezy 129.22.56.18 bashful 129.22.56.19 happy 129.22.56.20 dopey 129.22.56.21 sleepy 129.22.56.22 donald 129.22.56.23 huey 129.22.56.24 dewey 129.22.56.25 louie 129.22.56.26
In general the CWRUnet nameserver recognizes these machines. However, when logging in from a remote machine which doesn’t know these names you will have to use the IP addresses. You may use any of these machines except snowhite which is reserved for running the Kern Lab network. If too many users are logged onto a single machine it may slow down to unacceptable levels. You can check the users on any machine by typing the command
users which will return of list of the users on that particular machine. In general, if there are more than three users on a machine you may want to switch to another machine. Another useful command is
usage which returns a list of how many users are on each machine. This is very useful in finding a relatively unused machine. In general, any of the ducks (donald, huey, dewey, and louie) are considerably faster than the dwarves. GENERAL NETWORK USAGE: When you are connecting across the network via fiber optics or modem the terminal type needs to be verified and changed as appropriate. It is a smart idea to check your assumed terminal type immediately after you login. To do this type env and the machine should respond with a message like [5] % env HOME=/users/merat PATH=/bin:/usr/bin:/usr/contrib/bin:/usr/local/bin:/usr/hp64000/bin LOGNAME=merat

-52- Copyright 1997 F.Merat
SHELL=/bin/csh MAIL=/usr/mail/merat TZ=EST5EDT TERM=unknown This is real bad because it indicates that the system does not know what your terminal type is. If you logged on from the Kern Lab computers you should have the terminal type 300h, i.e. TERM=300h, which is the appropriate terminal type for the Hewlett-Packard workstations. However, when you are connected to the Kern Lab through CWRUnet (either fiber optic or modem) you need to make sure that your terminal type has been set to TERM=vt100. You can do this by simple entering [5] % setenv TERM vt100 This properly enables the vi editor and the debugger screens to work with your terminals. If you are interested, the vi editor and the debugger also support vt220 terminals and hewlett-packard 700/92 and 700/94 terminals. You should immediately suspect that something is wrong with the TERM variable when your keys do not work properly. If you are logged in through CWRUnet a typical indication that you did not set your terminal type properly is the error message “Unable to open fast device.” An additional problem with CWRUnet software and remote logins via modem are the backspace (delete) key and cursor keys. The DELETE key is very trickly; most terminal emulation programs will have a command or switch of the form MAP DEL-->BS which maps the delete command onto your keyboard backspace key. This option is also present in the TELNET software. Check this option if you have problems with using delete or backspace. [I could use any info about this problem from people for specific computers.] Problems with the arrow (cursor) keys usually indicates that your terminal type has not been set properly. FILE TRANSFER: If you have an editor on your pc or macintosh that you like to use, you might consider doing the editing on your machine and then transferring (called uploading) your edited file to the Kern Lab system. The process of transferring files from the Kern Lab to your machine is called downloading. If you have TELNET (CWRUnet users) you probably also have a program called FTP (file transfer protocol). This can be used to transfer programs between machines. Unfortunately, this is most useful for transferring files between machines running the same operating system (MAC, DOS, UNIX, VMS, etc.). This option is very useful for backing up your files from the Kern Lab onto your local disk and (perish the thought) restoring your files from the same disk. A local disk is whatever you are running from with YOUR computer — it might be a floppy or a hard disk. The only problem is that the files make no sense to your local computer. To upload files from your computer (created using another word processor) you must first create a text only file. Word processors such as WORD are WYSIWYG (what you see is what you get) word processors which automatically continue text from line to line. This is called word wrap. Guess what, UNIX doesn’t do it!
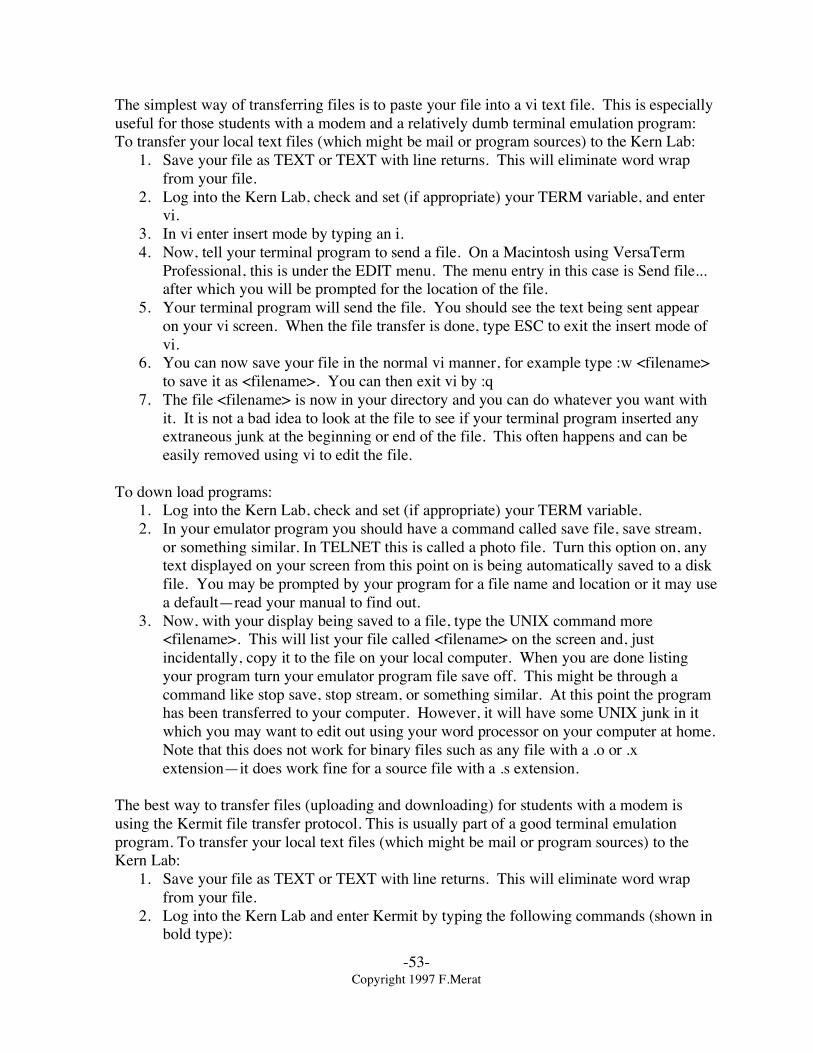
-53- Copyright 1997 F.Merat
The simplest way of transferring files is to paste your file into a vi text file. This is especially useful for those students with a modem and a relatively dumb terminal emulation program: To transfer your local text files (which might be mail or program sources) to the Kern Lab:
1. Save your file as TEXT or TEXT with line returns. This will eliminate word wrap from your file.
2. Log into the Kern Lab, check and set (if appropriate) your TERM variable, and enter vi.
3. In vi enter insert mode by typing an i. 4. Now, tell your terminal program to send a file. On a Macintosh using VersaTerm
Professional, this is under the EDIT menu. The menu entry in this case is Send file... after which you will be prompted for the location of the file.
5. Your terminal program will send the file. You should see the text being sent appear on your vi screen. When the file transfer is done, type ESC to exit the insert mode of vi.
6. You can now save your file in the normal vi manner, for example type :w <filename> to save it as <filename>. You can then exit vi by :q
7. The file <filename> is now in your directory and you can do whatever you want with it. It is not a bad idea to look at the file to see if your terminal program inserted any extraneous junk at the beginning or end of the file. This often happens and can be easily removed using vi to edit the file.
To down load programs:
1. Log into the Kern Lab, check and set (if appropriate) your TERM variable. 2. In your emulator program you should have a command called save file, save stream,
or something similar. In TELNET this is called a photo file. Turn this option on, any text displayed on your screen from this point on is being automatically saved to a disk file. You may be prompted by your program for a file name and location or it may use a default—read your manual to find out.
3. Now, with your display being saved to a file, type the UNIX command more <filename>. This will list your file called <filename> on the screen and, just incidentally, copy it to the file on your local computer. When you are done listing your program turn your emulator program file save off. This might be through a command like stop save, stop stream, or something similar. At this point the program has been transferred to your computer. However, it will have some UNIX junk in it which you may want to edit out using your word processor on your computer at home. Note that this does not work for binary files such as any file with a .o or .x extension—it does work fine for a source file with a .s extension.
The best way to transfer files (uploading and downloading) for students with a modem is using the Kermit file transfer protocol. This is usually part of a good terminal emulation program. To transfer your local text files (which might be mail or program sources) to the Kern Lab:
1. Save your file as TEXT or TEXT with line returns. This will eliminate word wrap from your file.
2. Log into the Kern Lab and enter Kermit by typing the following commands (shown in bold type):
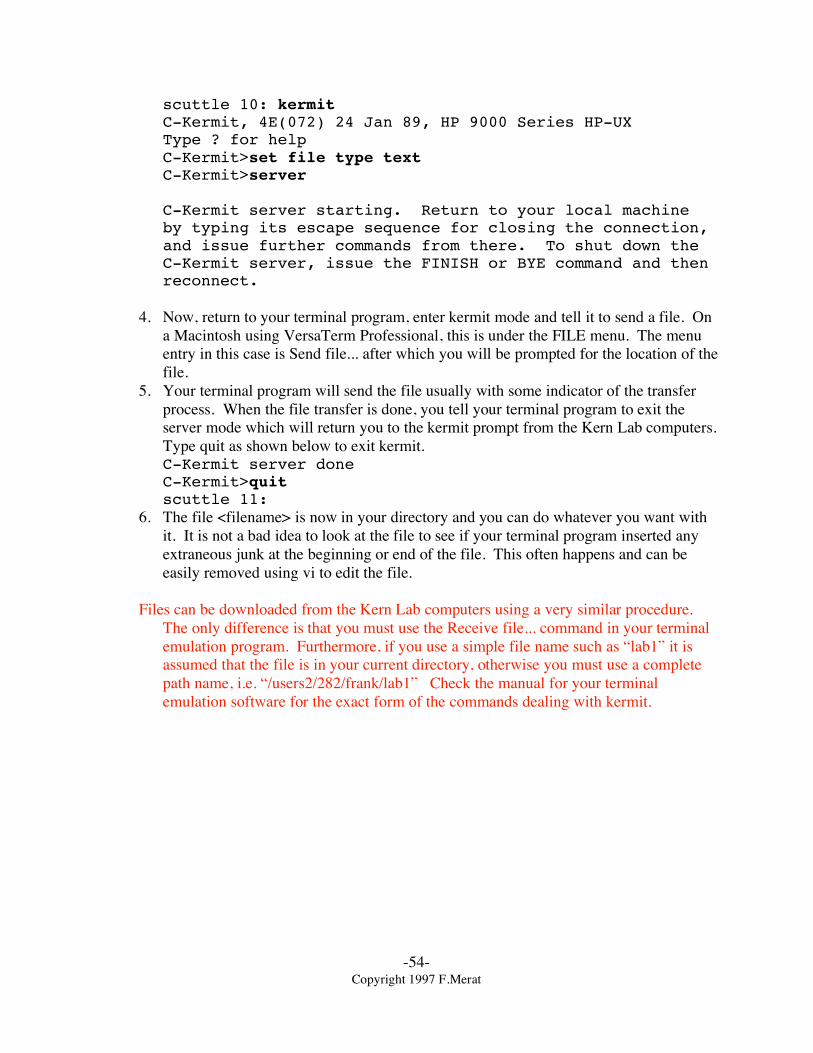
-54- Copyright 1997 F.Merat
scuttle 10: kermit C-Kermit, 4E(072) 24 Jan 89, HP 9000 Series HP-UX Type ? for help C-Kermit>set file type text C-Kermit>server C-Kermit server starting. Return to your local machine by typing its escape sequence for closing the connection, and issue further commands from there. To shut down the C-Kermit server, issue the FINISH or BYE command and then reconnect.
4. Now, return to your terminal program, enter kermit mode and tell it to send a file. On
a Macintosh using VersaTerm Professional, this is under the FILE menu. The menu entry in this case is Send file... after which you will be prompted for the location of the file.
5. Your terminal program will send the file usually with some indicator of the transfer process. When the file transfer is done, you tell your terminal program to exit the server mode which will return you to the kermit prompt from the Kern Lab computers. Type quit as shown below to exit kermit. C-Kermit server done C-Kermit>quit scuttle 11:
6. The file <filename> is now in your directory and you can do whatever you want with it. It is not a bad idea to look at the file to see if your terminal program inserted any extraneous junk at the beginning or end of the file. This often happens and can be easily removed using vi to edit the file.
Files can be downloaded from the Kern Lab computers using a very similar procedure.
The only difference is that you must use the Receive file... command in your terminal emulation program. Furthermore, if you use a simple file name such as “lab1” it is assumed that the file is in your current directory, otherwise you must use a complete path name, i.e. “/users2/282/frank/lab1” Check the manual for your terminal emulation software for the exact form of the commands dealing with kermit.