lab docs/0 - introt… · web viewcreate account for user. create folder for user to keep their...
TRANSCRIPT
Intro to LinuxLinux is a UNIX-like operating system that was designed to provide personal computer users a free or very low-cost operating system comparable to traditional and usually more expensive UNIX systems. Linux has a reputation as a very efficient and fast-performing system.
Scenario:You are an IT Analyst. You’ve received a ticket requiring you to setup a computer for a new user.
Objectives:In this lab exercise you will complete the following tasks:
Install operating system Create account for user Create folder for user to keep their files Move user’s files to new folder Configure the local IP address Remotely connect to a different machine Copy a file from the remote machine Install an application Reset the root password
Remember to read the report requirements at the end of this document to see what is necessary to hand into the instructor.
This lab is to be completed as a team. The report is to be written as a team.
Logon On to VM Ware – According to the “Getting Started” document provided by your instructor.
Step 1 Locate the virtual machine folder that has been assigned to you (contact your instructor if you don’t have one), and select the Introlinux machine.
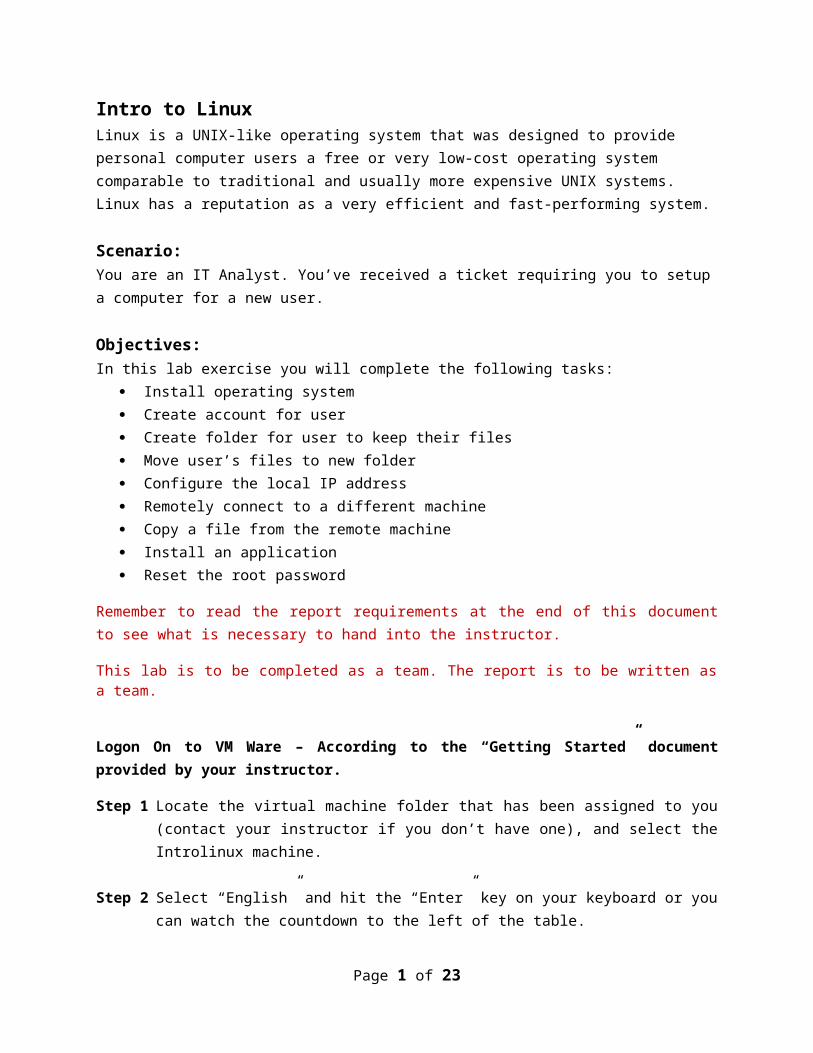
Step 2 Select “English” and hit the “Enter” key on your keyboard or you can watch the countdown to the left of the table.
When you see this icon , click enter.
Page 1 of 17
jo
TASK 1: Install operating system
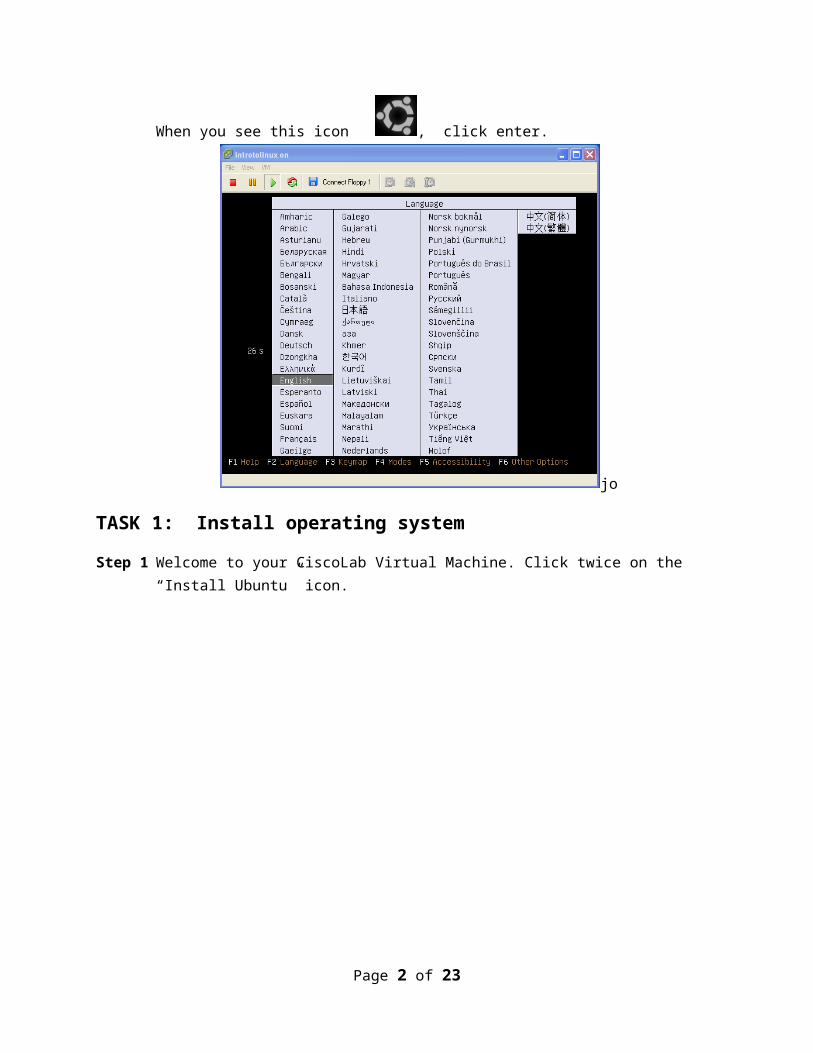
Step 1 Welcome to your CiscoLab Virtual Machine. Click twice on the “Install Ubuntu” icon.
Page 2 of 17
Step 2 Make certain that English is selected on the welcome screen and click the “Forward” button.
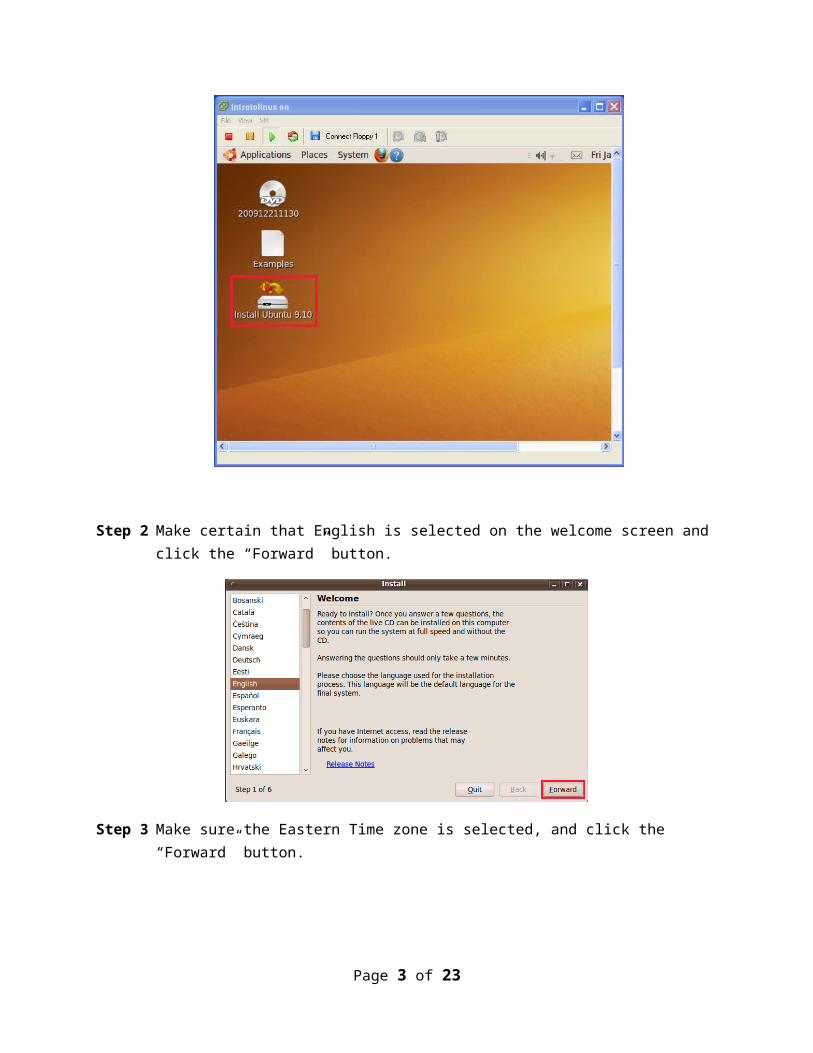
Step 3 Make sure the Eastern Time zone is selected, and click the “Forward” button.
Step 4 Make sure that the suggested option “USA” is selected and click “Forward”
Page 3 of 17
Step 5 Make sure “Erase and use the entire disk” is selected and click “Forward.”
Step 6 Fill in the following fields: (TAKE A SCREENSHOT or WRITE THIS INFO. DOWN)a. In the “What is your name?” field, add the userID of a fictitious user using the first initial,
last name naming convention. i.e. John Doe would be jdoe, Nittany Lion would be nlion.b. Type “administrator” (no quotes) in the “What name do you want to use to log in?” box.c. Type “Password” (no quotes) in both of the password boxes.d. Change the name of the computer to your name. I used the fictitious user.e. Make sure “Require my password to log in” is checked and click “Forward”
Page 4 of 17

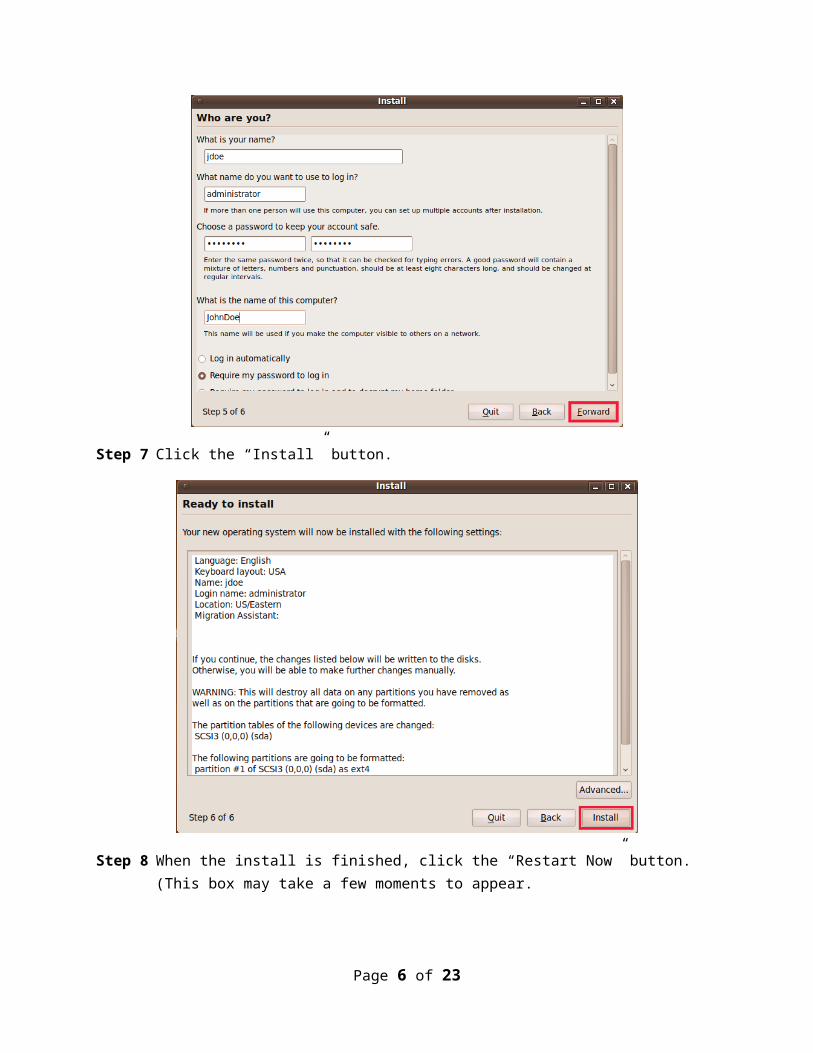
Step 7 Click the “Install” button.
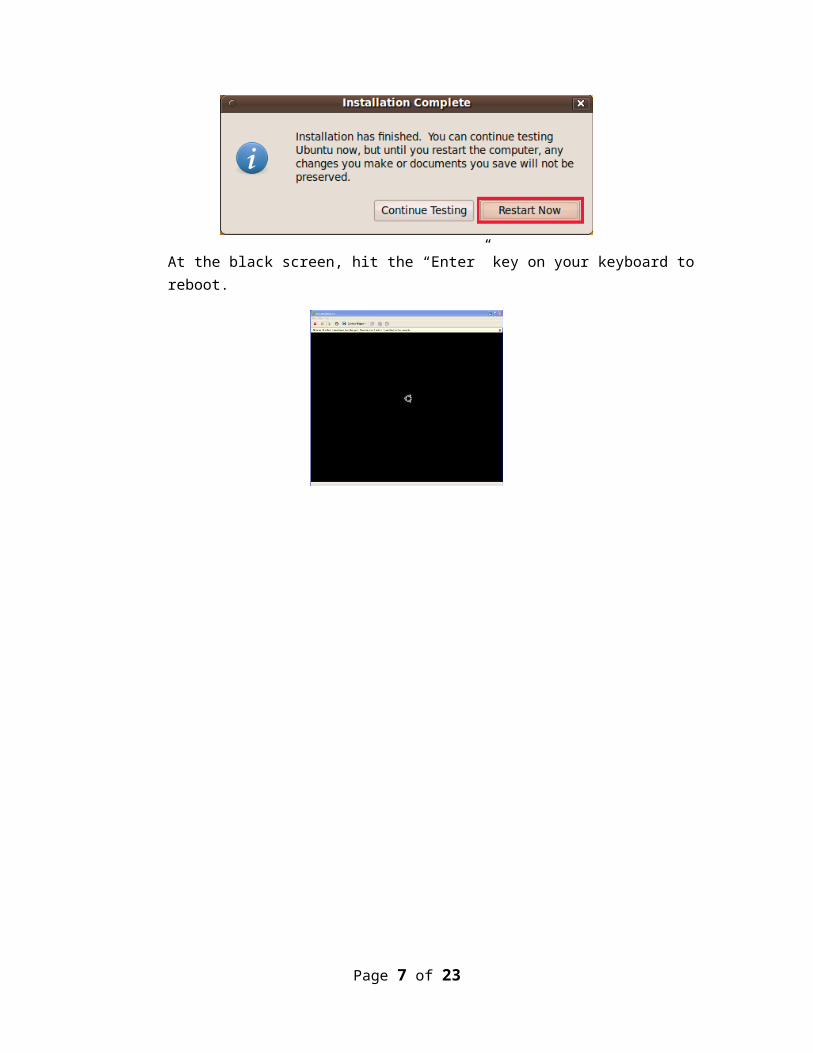
Step 8 When the install is finished, click the “Restart Now” button. (This box may take a few moments to appear.
At the black screen, hit the “Enter” key on your keyboard to reboot.
Page 5 of 17
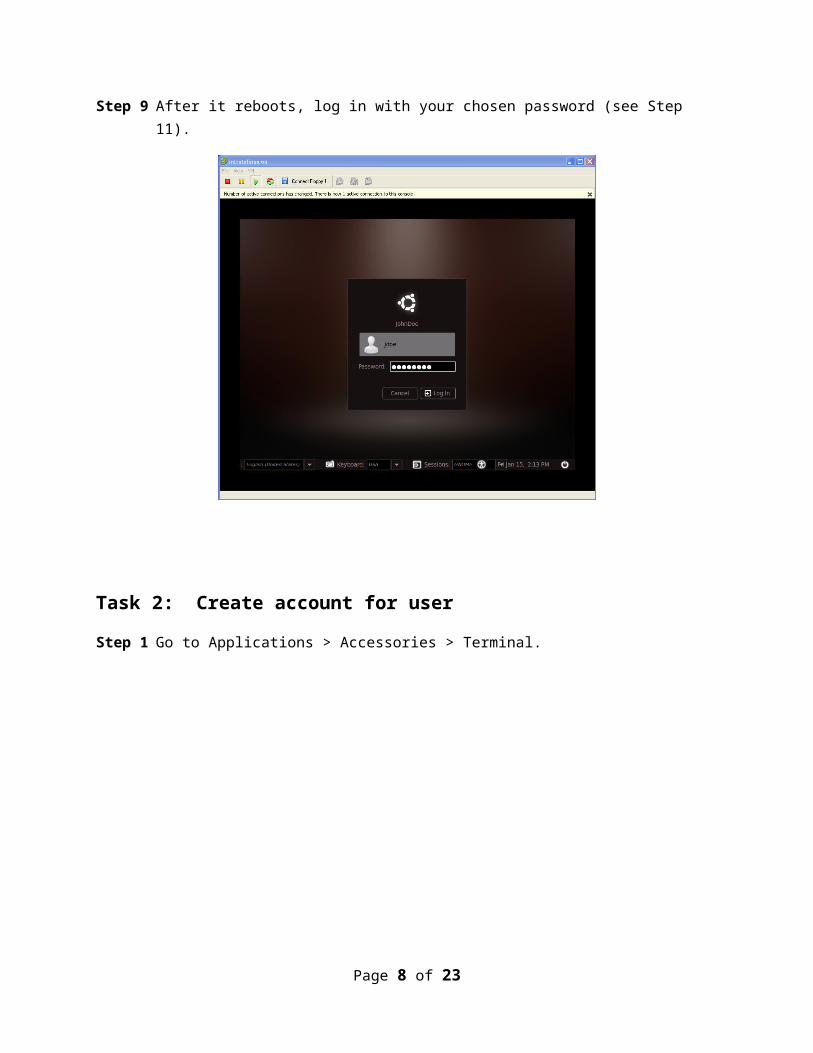
Step 9 After it reboots, log in with your chosen password (see Step 11).
Task 2: Create account for user
Step 1 Go to Applications > Accessories > Terminal.
Page 6 of 17
The command prompt will appear.
Step 2 Type: sudo useradd –m –e 2011-10-01 jdoe
-m -e (one year from now).
This creates the userID, and creates a folder for the user in the /home directory and sets the account to expire in a year.
Step 3 Type in the word “password” (no quotes). a. NOTE: You will not see anything being typed.
Page 7 of 17
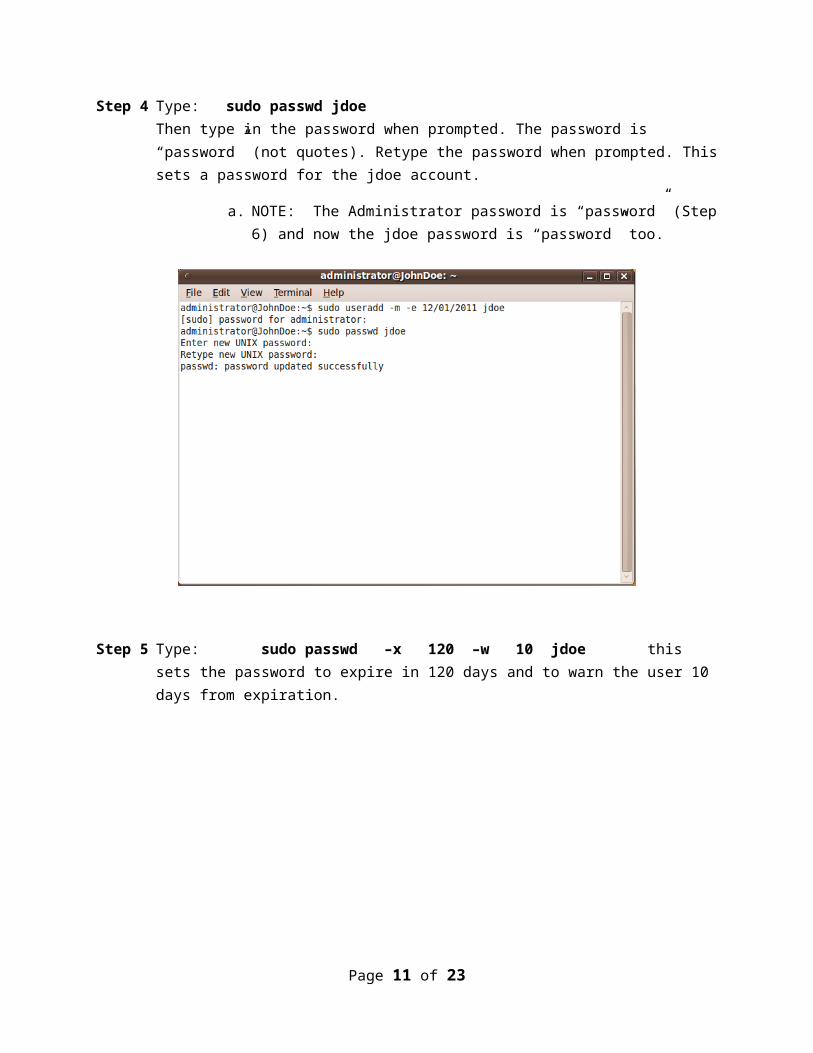
Step 4 Type: sudo passwd jdoeThen type in the password when prompted. The password is “password” (not quotes). Retype the password when prompted. This sets a password for the jdoe account.
a. NOTE: The Administrator password is “password” (Step 6) and now the jdoe password is “password” too.
Step 5 Type: sudo passwd –x 120 –w 10 jdoe this sets the password to expire in 120 days and to warn the user 10 days from expiration.
Page 8 of 17

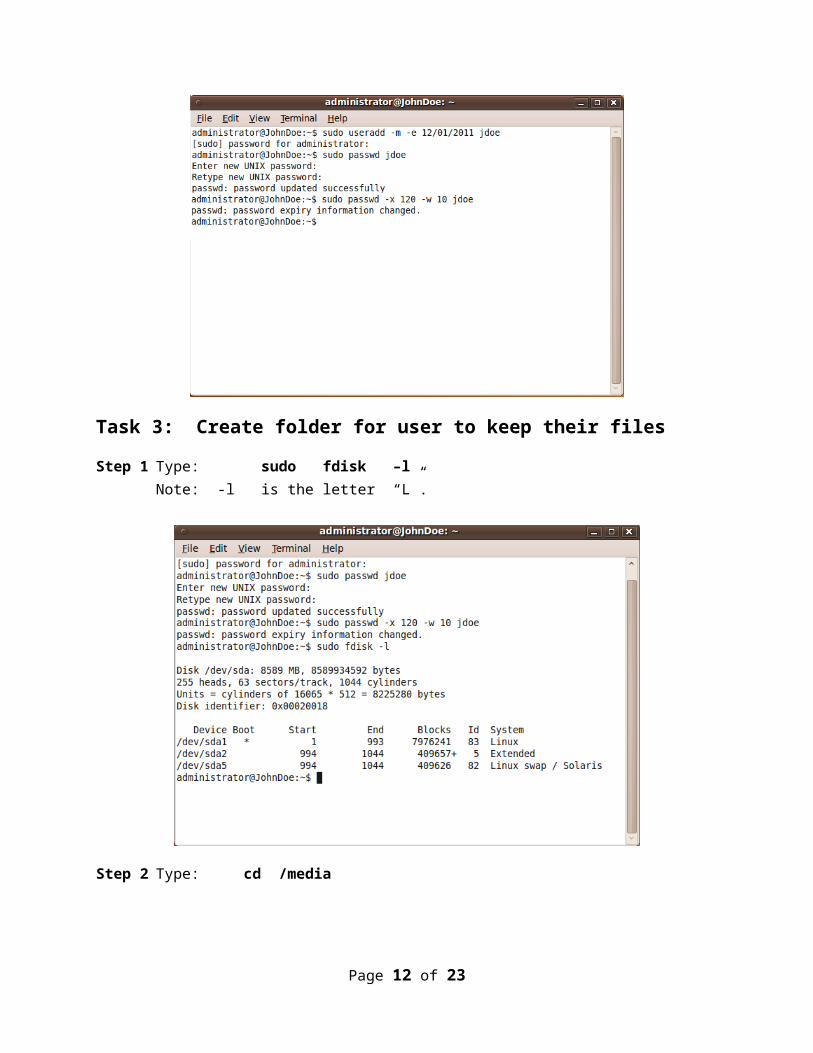
Task 3: Create folder for user to keep their files
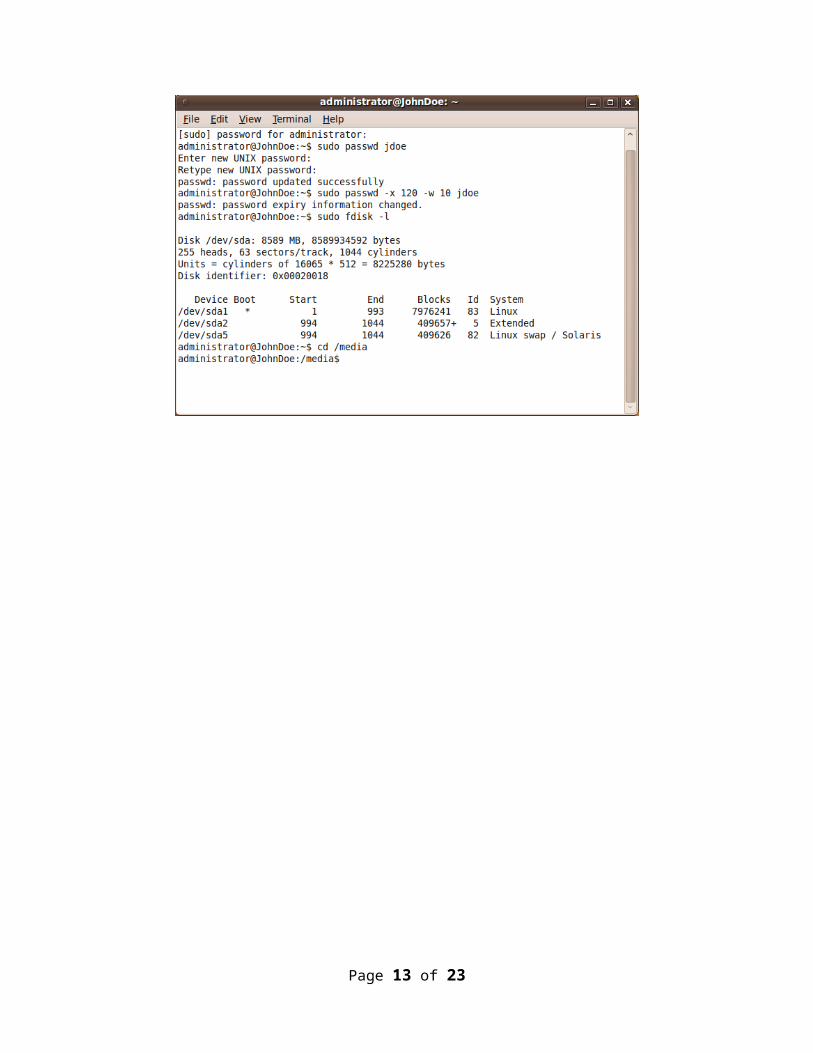
Step 1 Type: sudo fdisk –l Note: -l is the letter “L”.
Step 2 Type: cd /media
Page 9 of 17

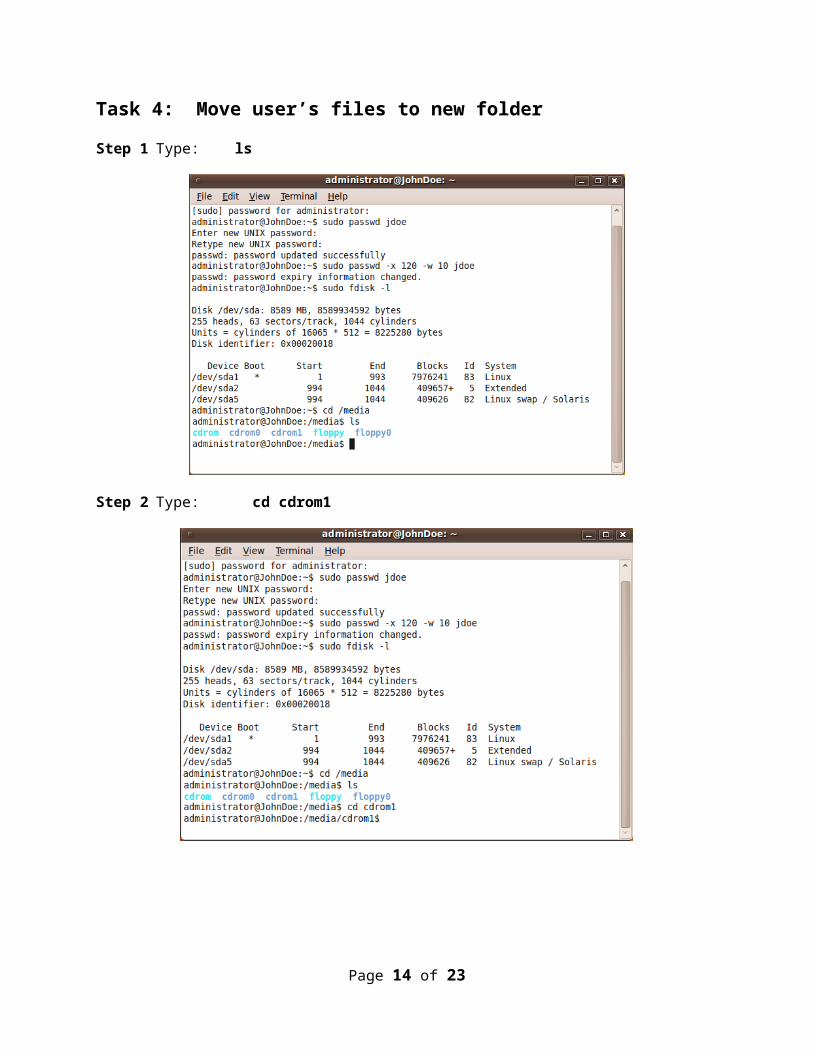
Task 4: Move user’s files to new folder
Step 1 Type: ls
Step 2 Type: cd cdrom1
Page 10 of 17
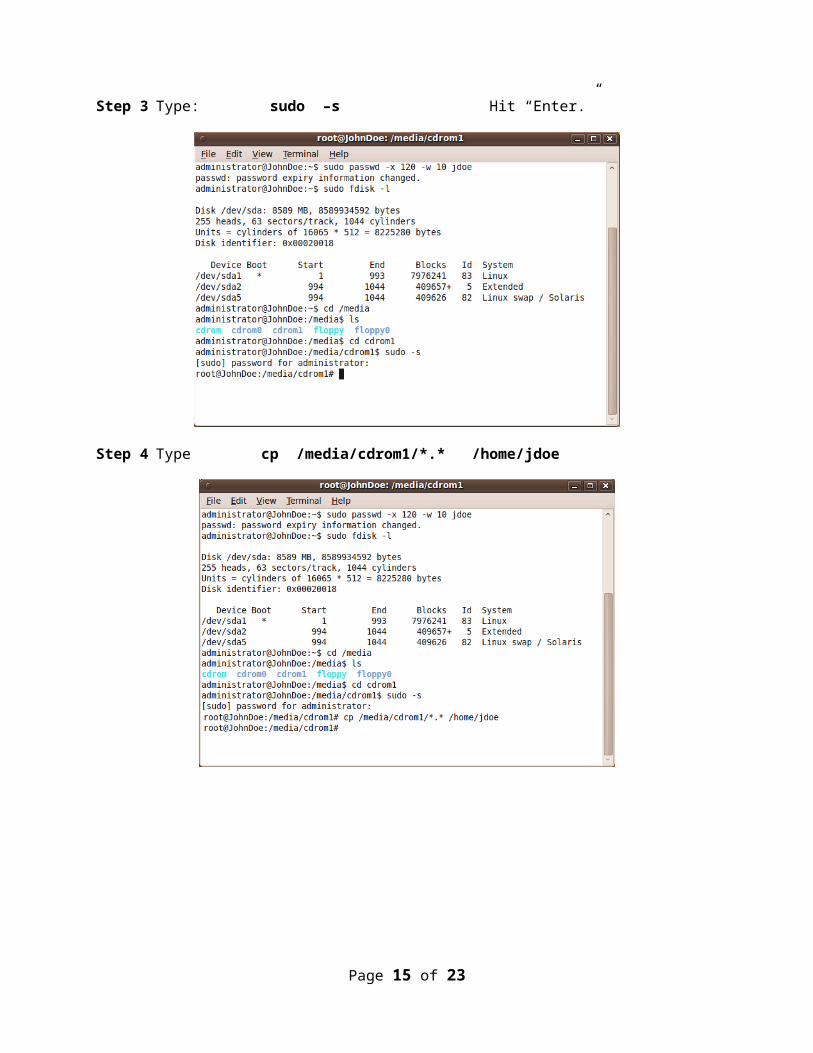
Step 3 Type: sudo –s Hit “Enter.”
Step 4 Type cp /media/cdrom1/*.* /home/jdoe
Page 11 of 17
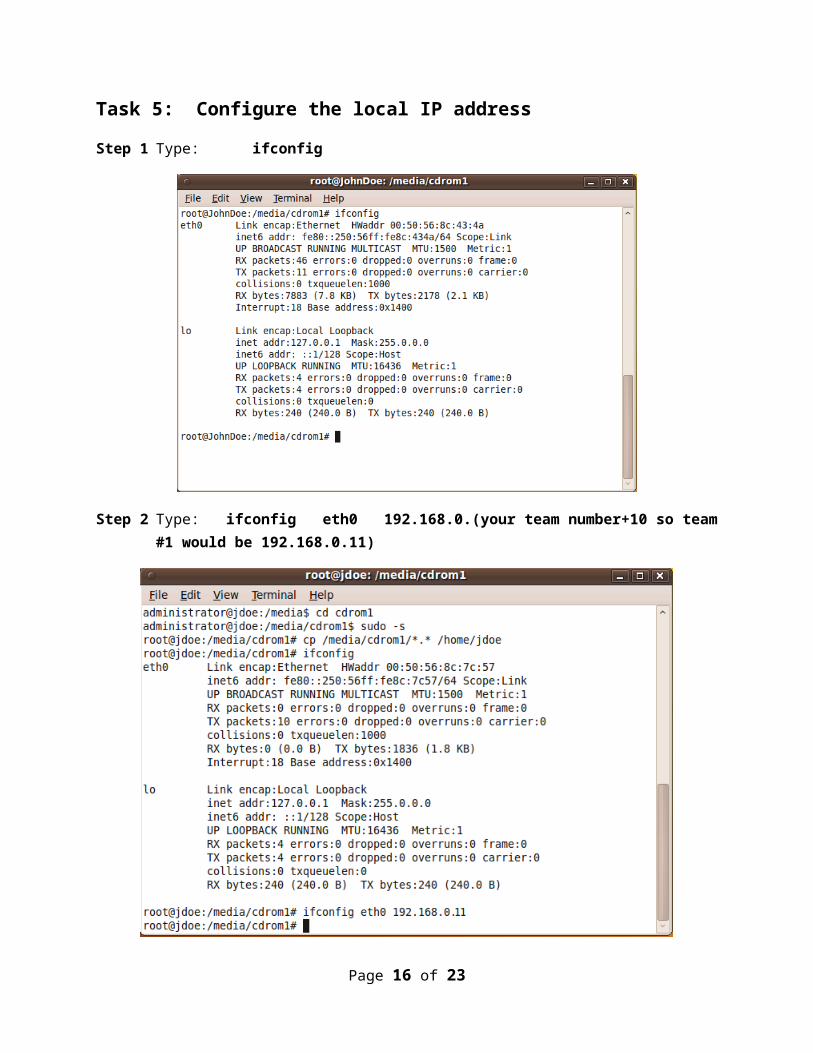
Task 5: Configure the local IP address
Step 1 Type: ifconfig
Step 2 Type: ifconfig eth0 192.168.0.(your team number+10 so team #1 would be 192.168.0.11)
Page 12 of 17
Task 6: Remotely connect to a different machine
Step 1 Type: ping 192.168.0.2
Hit “ Ctrl C” key on your keyboard to get the pinging to stop.
a. Type: scp -r [email protected]:/home/administrator/truecrypt-7.0-linux-x86.tar.gz /home/administrator
Step 2 Type in the in the server’s password: “password” (no quotes).
Task 7: Copy a file from the remote machine
Step 1 Type: cd /home/administrator
Step 2 Type: tar xzvf truecrypt-7.0-linux-x86.tar.gz
Page 13 of 17
Task 8: Install an application
Step 1 Go to places/administrator and doubleclick truecrypt-7.0-setup-x86, then select install truecrypt. Then accept the licence terms, hit ok, then enter the password Password and hit ok, hit enter in the window showing the installation and you’re done.
newcommute
Step 2 Type: rm true*
Task 9: Reset the root password
Step 1 Type: mkdir /home/(the fictitious userid)/accounting
Step 2 Type: passwd (hit enter), then enter a new root password
Step 3 Type: date (current date and time)
a. Time is expressed as month,day,time in military time, year. So January 27th 10:05am, 2010 would be written as 012710052010
Page 14 of 17
Report:
Clearly state your results of this project. You are expected to hand in a report in the following format:
A cover page (including Lab title) with your name or team name. A table of contents with page numbers Use double-spaced type for convenient grading Number pages. Font size 12, single column Save the Microsoft Word document with your name or team name in the title. Upload the
document into the appropriate ANGEL dropbox.
The report should have the following sections. Each section should cover all the topics described below.
Section I: Task 1 You should have the following parts:
1. Describe the purpose of Task 1.2. Include a screenshot of the “Install” box completely filled out (Step 6). You do not need to
include “Require my password to login” in the screenshot.
Section II: Task 2 You should have the following parts:
1. Describe the purpose of Task 2.2. Include a screenshot of Task 2 – Step 5. This will show all the steps in Task 2.
Section III: Task 3You should have the following parts:
1. Describe the purpose of Task 3.2. What does the command sudo fdisk –l accomplish?3. Include a screenshot of Task 3 – Step 2.
Section IV: Task 4 You should have the following parts:
1. Describe the purpose of Task 4.2. Describe the purpose of the command sudo -s3. Include a screenshot of Task 4 – Step 4
Section V: Task 5You should have the following parts:
1. Describe the purpose of Task 5.2. Include a screenshot of Task 5 – Step 2.
Section VI: Task 6You should have the following parts:
Page 15 of 17
1. Describe the purpose of Task 6.2. Include a screenshot of Task 3 – Step 6.
Section VII: Task 7You should have the following parts:
1. Describe the purpose of Task 7.2. Explain what this command does: : tar xzvf truecrypt-6.3a-ubuntu.tar.gz
Section VIII: Task 8You should have the following parts:
1. Describe the purpose of Task 8.2. Include a screenshot of Task 8 – Step 2.
Section IX: Task 9You should have the following parts:
1. Describe the purpose of Task 9.2. Include a screenshot of Task 9 – Step 3.
Grading Rubric
This project has a number of specific requirements. The requirement for each section is documented in the above project instruction “Report.” Whether you receive credit depends on the following situations:
You will get full credit on one item, if it is correctly reported as required and well written.
You will get half credit on one item, if it is reported as required but there is something definitely wrong.
You will not get any credit for one item, if it is not reported.
Credit for each section is as follows.
1. Section I: Screenshot (10%): Each item is worth 5 percent.
2. Section II: Screenshots (10%): Each item is worth 5 percent.
3. Section III: Screenshots (15%): Each item is worth 5 percent.
4. Section IV: Screenshots (15%): Each item is worth 5 percent.
5. Section V: Screenshots (10%): Each item is worth 5 percent.
6. Section VI: Screenshots (10%):
Page 16 of 17

Each item is worth 5 percent.7. Section VII: Screenshots (10%):
Each item is worth 5 percent.8. Section VII: Screenshots (10%):
Each item is worth 5 percent.9. Section IX: Screenshots (10%):
Each item is worth 5 percent.
Note
Be sure to include your name and email address in the report. The report should be turned in before class on the specified due date. Late submissions will be issued a grade deduction especially if permission is not obtained from the instructor. The instructor reserves the right to grant or reject extra time for report completion.
Page 17 of 17