l298 compact motor driver v1.1
TRANSCRIPT

The
Ltd
®
The L298 is a strong, useful dual-motor driver IC but it’s tough to use by itself. The Solarbotics Compact L298 Motor Driver Kit tames this beast, and puts it into a convenient package featuring:
> 6 to 26V operation, 4A total drive current> Accessible 5V regulated voltage> Motor direction indicator LEDs> EMF protection diodes> Small 40mm (1.527”) square footprint
Tight & tidy - it’s a great motor interface
DocRev: Jan 5 2008
Produced by
Compact
L298 Motor Driver

1 - Red printed circuit board (PCB).1 - L298 motor driver chip1 - LM2937 voltage regulator chip1 - 22µF capacitor1 - 0.1µF capacitor1 - 3-position terminal block2 - 2-position terminal block2 - 47k Enable pull-up resistors (Yellow / Violet / Orange / Gold) 2 - 2.2k LED current limit resistors - (Red / Red / Red / Gold)2 - Red LEDs2 - Green LEDs8 - 1N5818 Schottky EMF-protection Diodes2 - 3-position interface socket strips
We strongly suggest you inventory the parts in your kit to make sure you have all the parts listed. If anything is missing, contact Solarbotics Ltd. for replacement parts information.
Disclaimer of LiabilitySolarbotics Ltd. is not responsible for any special, incidental, or consequential damages resulting from any breach of warranty, or under any legal theory, including lost profits, downtime, good-will, damage to or replacement of equipment or property, and any costs or recovering of any material or goods associated with the assembly or use of this product. Solarbotics Ltd. reserves the right to make substitutions and changes to this product without prior notice.
Parts List
LM2937Voltage
Regulator
L298 22µFCap
3-position Terminal block
2-position Terminal blocks
2.2kResistors
3-position interface sockets1N5818 Diodes
IndicatorLEDs
PCB
0.1µFCap
The Compact L298 Motor Driver

(1)
IntroductionThe L298 chip is the bigger brother to the L293 chip (a popular small-motor driver IC), but the L298 handles more current, and more voltage - just what you need for those robots that need more power!
One of the first realizations in robotics is that making something move isn’t an easy task. You simply can’t take a “brain” circuit and connect it to a motor and expect anything to happen. The motor will simply say “HAH!” at the puny output signal from the brains, and stay still. What the brain needs is an enforcer. Muscle. Something to convince the motor to do things the way the brains want it to be done.
There are many ways to strengthen (”buffer”) a signal so it’s strong enough to drive a large load like a motor. Transistor H-bridge circuits, buffer chips, and dedicated motor driving chips are all suitable candidates, with their own benefits and limitations.
We’re using the well-proven L298 for this design, as it has practically all the features you’d need in a good motor driver, including thermal-shutdown, meaning that it will slow down and stop if overloaded (rather than melting down in a catastrophic manner!).
Adding a low-drop out regulator lets you tap off 5V for any other circuitry you may want to drive, and the indicator LEDs are always very useful when monitoring the behaviors of your circuit.
We’re quite pleased on how well the Compact L298 Motor Driver turned out, and we hope it’s as helpful to you in your designs as it has been for us!
Get to work - you’ve got a motor needing a driver!
The Compact L298 Motor Driver

(2)
Construction
Step 2: The 2.2k ResistorThe 2.2k resistors (red / red / red / gold) are inserted into positions R3 and R4. Follow the same procedure as previous.
These resistors limit the current to the indicator LEDs.
Step 1: The 47k ResistorsThe 47k resistors (yellow / purple / orange / gold) (colorful, eh?) are inserted into the spots marked R1 and R2. These tie the enable lines to a default “on” condition.
Snug them up close to the circuit board, bend the leads over, and solder them into place .
When done, clip off the excess leads.
Actually to be proper your suppose to clip the excess leads off then solder them, but do whatever you find easiest.
The Compact L298 Motor Driver

(3)
ConstructionThe Compact L298 Motor Driver
Note that the stripe goes to square pad!
Step 3: Diodes (And lot’s of them!)There are eight 1N5818 Shottkey diodes used to shunt the back EMF generated by the motor. When the motor has it’s power suddenly cut off, the coils in the motor generate a reverse voltage spike that can kill logic chips. Two diodes are needed for each side of each motor to shunt these voltage spikes away from the circuitry. As a side effect, these diodes will provide regenative braking as well. This means that if you spin the motor it will power up the rest of the circuit!
It is very important that these diodes be installed the correct way! A forward biased diode will short out the output of the motor driver and make it not work. The improperly installed diode may blow up too!
NOTE: Make sure that the striped side of the diode goes to the square pad, and the stripe matches the stripe position on the PCB!
Install the diodes at positions ‘D1’ through ‘D8’.

(4)
Step 4: 0.1µF cap installationThis small 0.1µF cap provides high frequency noise filtering on the input side of the regulator. This cap is bi-polar and can be installed either way at position ‘C2’.
Construction
Step 5: Installing the LED’sThere are four LEDs to indicate the state of each output. The logic is fairly obvious: The LED is on when the output is high. The LEDs must be installed so that the flat sides face each other. Or, simply make sure that the shorter lead (the cathode) goes to the square pad.
We suggest installing one LED of each color per side, so it’s easy to identify a single motor’s rotation direction by color.
The Compact L298 Motor Driver

(5)
Step 6: Installing the interface socket strips:No magic here: Put them in and solder them down in the positions shown.
This will be where your input signals will tell the L298 what to do. The sockets let you use simple wire jumpers. Or for a permanent installation, solder your interface wires directly to the pads.
Construction
Step 7: Installing the Terminal blocksPut them in and solder them down, making sure that the side holes face outward! It’s kinda hard to install motor and power wires into holes facing the wrong way...
The Compact L298 Motor Driver
(6)
Construction
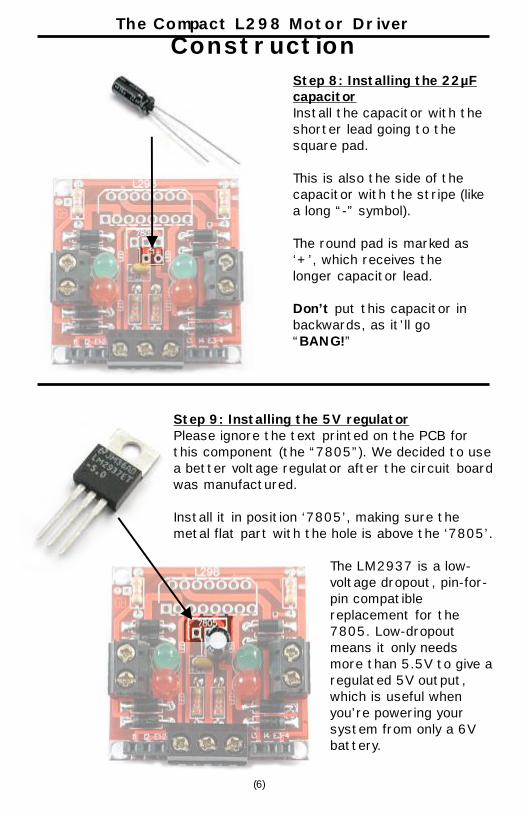
Step 8: Installing the 22µF capacitorInstall the capacitor with the shorter lead going to the square pad.
This is also the side of the capacitor with the stripe (like a long “-” symbol).
The round pad is marked as ‘+’, which receives the longer capacitor lead.
Don’t put this capacitor in backwards, as it’ll go “BANG!”
Step 9: Installing the 5V regulatorPlease ignore the text printed on the PCB for this component (the “7805”). We decided to use a better voltage regulator after the circuit board was manufactured.
Install it in position ‘7805’, making sure the metal flat part with the hole is above the ‘7805’.
The LM2937 is a low-voltage dropout, pin-for-pin compatible replacement for the 7805. Low-dropout means it only needs more than 5.5V to give a regulated 5V output, which is useful when you’re powering your system from only a 6V battery.
The Compact L298 Motor Driver

(7)
Final construction
Step 10: Installing the L298The time has come to install the heart and soul of the compact motor driver the L298 chip.
The chip is oriented with the metal tab towards the back of the PCB. The chip has its pins keyed so that it would take a bit of ...skill... to install it backwards!
If all has gone well, it should look something like this. Now you’re ready to use it!
The Compact L298 Motor Driver

(8)
TestingSo now that it’s all built let’s give it a quick test shall we?
Attach a battery or suitable voltage source across the supply line, a 9V battery works well.
Run a jumper wire from any one of the inputs to the regulated 5V output to see if the corresponding LED lights up.
To test the enables you will need three jumper wires. Have two wires connected from opposite polarities to the input lines (one from ‘+5V’, one from ‘-’). Run a third jumper from the ‘+5’ to ‘E1-2’ to turn it on (LED lights up). Move the third jumper from ‘+5’ to ‘-’ to turn the LED off. See below for wiring examples - much easier to understand!
When you have motors connected to the two side terminals, their operation will be affected the same way.
The Compact L298 Motor Driver
6V or better Battery (9V is good for testing)
+-+5V
Reg. Out
Test #1:- Run jumperfrom ‘+5V’ to‘E1/E2’ (or ‘E3-4’).- Run a jumper from‘+5V’ to L1- Run a jumper from‘-’ to L2The GREEN LED should light
-Swap the L1/L2 wires andthe RED LED should light
(repeat test for other side)
Test #2:With jumpers from test #1 still in place, move jumperfrom ‘E1-2’ to ‘-’.LED should turn off.
(9)
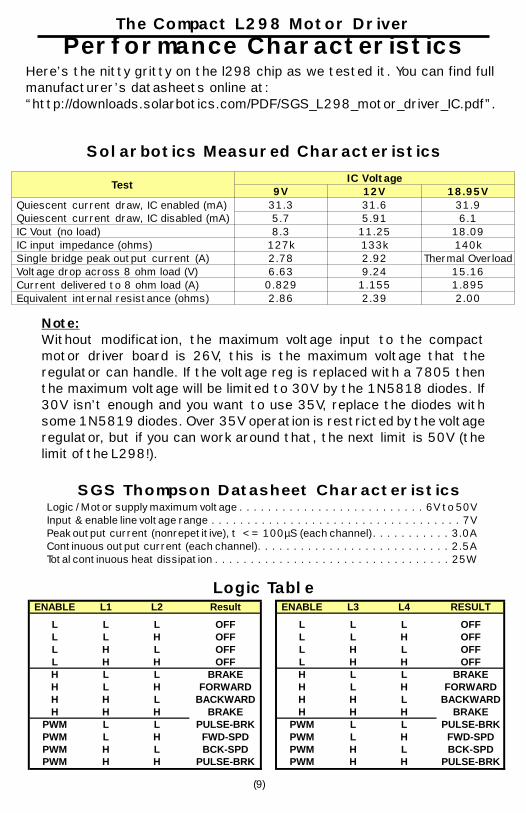
Performance CharacteristicsHere’s the nitty gritty on the l298 chip as we tested it. You can find full manufacturer’s datasheets online at: “http://downloads.solarbotics.com/PDF/SGS_L298_motor_driver_IC.pdf”.
SGS Thompson Datasheet CharacteristicsLogic / Motor supply maximum voltage . . . . . . . . . . . . . . . . . . . . . . . . . . 6V to 50VInput & enable line voltage range . . . . . . . . . . . . . . . . . . . . . . . . . . . . . . . . . . . 7VPeak output current (nonrepetitive), t <= 100µS (each channel). . . . . . . . . . . 3.0AContinuous output current (each channel). . . . . . . . . . . . . . . . . . . . . . . . . . . 2.5ATotal continuous heat dissipation . . . . . . . . . . . . . . . . . . . . . . . . . . . . . . . . . 25W
Note: Without modification, the maximum voltage input to the compact motor driver board is 26V, this is the maximum voltage that the regulator can handle. If the voltage reg is replaced with a 7805 then the maximum voltage will be limited to 30V by the 1N5818 diodes. If 30V isn’t enough and you want to use 35V, replace the diodes with some 1N5819 diodes. Over 35V operation is restricted by the voltage regulator, but if you can work around that, the next limit is 50V (the limit of the L298!).
Solarbotics Measured Characteristics
Logic Table
The Compact L298 Motor Driver
TestIC Voltage
9V 12V 18.95V
Quiescent current draw, IC enabled (mA)Quiescent current draw, IC disabled (mA)
31.3 31.6 31.9
5.7 5.91 6.1
IC Vout (no load) 8.3 11.25 18.09
IC input impedance (ohms) 127k 133k 140k
Single bridge peak output current (A) 2.78 2.92 Thermal Overload
Voltage drop across 8 ohm load (V) 6.63 9.24 15.16
Current delivered to 8 ohm load (A) 0.829 1.155 1.895
Equivalent internal resistance (ohms) 2.86 2.39 2.00
ENABLE L1 L2 Result ENABLE L3 L4 RESULT
L L L OFF L L L OFFL L H OFF L L H OFFL H L OFF L H L OFFL H H OFF L H H OFFH L L BRAKE H L L BRAKEH L H FORWARD H L H FORWARDH H L BACKWARD H H L BACKWARDH H H BRAKE H H H BRAKE
PWM L L PULSE-BRK PWM L L PULSE-BRKPWM L H FWD-SPD PWM L H FWD-SPDPWM H L BCK-SPD PWM H L BCK-SPDPWM H H PULSE-BRK PWM H H PULSE-BRK

Motor
ImplementationThe Compact L298 Motor Driver
+-
Regulated5V to externalcircuitry
6 to 26V DCPower Supply
Motor
I1 I2 E I3 I4 E
-+5V
Manual Motor Direction Switching: With ‘-’ on ‘I1’ and ‘+5V’ on ‘I2’, the lower LED illuminates, and the motor spins one direction.
You may get motion with only one or two jumpers, but it is not recommended to leave it with only partially wired.
Put in all three wires for best results!
Dir1
NPN
10k
1k
+
10k
Motor Brake
Dir2
Input
++
One-switch Motor Control:This side shows how to wire up a one-switch control system that rotates the motors both ways with a center “brake” (off) position. Remember, to totally disable the chip, connect the ‘E’ pin to ground.
MotorMotor
MicroController
P1P2P3P4P5
MIcrocontroller Control of the Compact Motor Driver: By tieing the two enable lines together, and routing this line with the other four control lines to your microcontroller, you’ll be able to drive each motor in either direction, brake (turn off) either motor, and with the enable lines, turn off the whole chip.
If you don’t have the luxury of five control lines, You can reduce it to two (one for each motor) if you use the above “One Switch” motor control circuit, and the high-impedance mode of your I/O pins (for the “brake” mode). A high output will spin the motor one way, a low output will spin it the other way, and setting the pin to “input” or “high-impedance” mode will turn it off.
+-
For kits, parts and technical support, contact us at:Solarbotics Ltd.
201 35th Avenue NE, Calgary, Alberta, Canada T2E 2K5Ph: (403) 232-6268 Toll-Free Ph: 1-866-276-2687
Fax: (403) [email protected] / www.solarbotics.com