kyo era fleet servi es devi e registration …...kyocera document solutions inc. kyo era fleet servi...
TRANSCRIPT

KYOCERA Document Solutions Inc.
KYOCERA FLEET SERVICES
DEVICE REGISTRATION GUIDE
VERSION 1.2

KFS Version: 1.2
Device Registration Guide
GSS Copyright © 2016 KYOCERA Document Solution
All Rights Reserved.
Page 2 of 31
TABLE OF CONTENTS
1 Overview ........................................................................................................................................................ 3
1.1 Locating Registration URL and Access code ................................................................................................... 3
2 Registration.................................................................................................................................................... 4
2.1 Command Center (CC)/Command Center RX (CCRX) ..................................................................................... 5
2.1.1 CCRX ....................................................................................................................................................... 5
2.1.2 Command Center ................................................................................................................................... 7
2.2 Device Panel ................................................................................................................................................... 9
2.3 Device Registration Diagonostic Tool (DRDT) .............................................................................................. 13
2.3.1 Download the tool ............................................................................................................................... 13
2.3.2 Configuring settings ............................................................................................................................. 13
2.3.2.1 Registration settings and unregistration settings ............................................................................ 14
2.3.3 Discovering devices .............................................................................................................................. 14
2.3.4 Device authentication .......................................................................................................................... 16
2.3.5 XMPP settings ...................................................................................................................................... 17
2.4 Gateway (GW) ............................................................................................................................................. 18
2.4.1 Registering GW .................................................................................................................................... 19
2.4.2 Basic setup ........................................................................................................................................... 20
2.4.2.1 GAteway IB Proxy Options ............................................................................................................... 20
2.4.2.2 Gateway PC Proxy Options .............................................................................................................. 20
2.4.3 Discovering devices .............................................................................................................................. 21
2.4.4 Registering devices .............................................................................................................................. 22
3 Trouble shooting .......................................................................................................................................... 23
3.1 KFS group data ............................................................................................................................................. 23
3.2 Check Internet connection ........................................................................................................................... 23
3.2.1 Internet browser status ....................................................................................................................... 23
3.2.2 Accessing the internet ......................................................................................................................... 25
3.3 Device Registration status ........................................................................................................................... 27
3.3.1 Device panel steps ............................................................................................................................... 27
3.3.2 CCRX steps ........................................................................................................................................... 27
3.3.3 Determine the current server with CC/CCRX ....................................................................................... 28
3.3.3.1 CCRX ................................................................................................................................................. 28
3.3.3.2 CC ..................................................................................................................................................... 29
3.3.4 How to enable registration settings .................................................................................................... 30

KFS Version: 1.2
Device Registration Guide
GSS Copyright © 2016 KYOCERA Document Solution
All Rights Reserved.
Page 3 of 31
3.4 Proxy settings ............................................................................................................................................... 30
3.4.1 Proxy settings off ................................................................................................................................. 30
3.4.2 Proxy settings on.................................................................................................................................. 31
3.5 Domain name system (DNS) settings ........................................................................................................... 31
3.5.1 CCRX steps ........................................................................................................................................... 31
3.6 Error codes ................................................................................................................................................... 31
1 OVERVIEW
KYOCERA Fleet Services utilizes the Remote Services firmware installed in KYOCERA devices to create a
communication channel between the device and the software.
Note: Beware of the following conditions prior to registering any devices
Registration URL and Access code is always necessary. A group must be created in the KFS Manager prior
to registration.
If the network is using a proxy server, contact the local IT department for proxy information needed to
register the device successfully.
1.1 LOCATING REGISTRATION URL AND ACCESS CODE
A group must be created in KFS Manager prior to registering a device. Once the group is created, use the Details of
the group to register the device.
1. In either Devices view or Administration view, access the Groups list
2. Locate the group the devices are getting registered into

KFS Version: 1.2
Device Registration Guide
GSS Copyright © 2016 KYOCERA Document Solution
All Rights Reserved.
Page 4 of 31
Devices view
Administration view
3. Click on the Details button to locate the Registration URL and Access code
2 REGISTRATION
There are different methods to register a device to KFS Manager.
Command Center (CC)/Command Center RX (CCRX)
Device panel
Device Registration Diagnostic Tool (DRDT)
Gateway

KFS Version: 1.2
Device Registration Guide
GSS Copyright © 2016 KYOCERA Document Solution
All Rights Reserved.
Page 5 of 31
2.1 COMMAND CENTER (CC)/COMMAND CENTER RX (CCRX)
The following are steps to register a device to KFS Manager through the different versions of Command Center.
Note: The device must be connected to the local network.
2.1.1 CCRX
1. Enter the IP address of the device into a browser’s search bar
2. Log into CCRX
3. Select Management Settings on the left navigation menu. In the dropdown select Remote Services

KFS Version: 1.2
Device Registration Guide
GSS Copyright © 2016 KYOCERA Document Solution
All Rights Reserved.
Page 6 of 31
4. If Remote Services is Off, select On
Note: Device restart may be required.
If Remote Services is On, click on Settings
5. To register the device in Pending management status Use Access Code [To register the device in Managed
status skip to step 6.]
In URL put the Registration URL from the KFS Manager
Including Proxy Authentication if necessary
Enter the Access Code of the KFS group the device is getting registered to
Description (optional)
Click Submit
6. To register the device in Managed management status Use User Name and Password
Note: This is the user name and password of KFS and not CCRX.

KFS Version: 1.2
Device Registration Guide
GSS Copyright © 2016 KYOCERA Document Solution
All Rights Reserved.
Page 7 of 31
In URL put the Registration URL from the KFS Manager
User name: Enter the Username:Accesscode in that format with a colon separating the two
Enter the KFS user password
Including Proxy Authentication if necessary
Description (optional)
Click Submit
2.1.2 COMMAND CENTER
1. Enter password (Default is admin00)
2. Click the Advanced tab
3. Click Remote Services on the left navigation

KFS Version: 1.2
Device Registration Guide
GSS Copyright © 2016 KYOCERA Document Solution
All Rights Reserved.
Page 8 of 31
4. If Remote Services is Off, select On
Note: Device restart may be required.
If Remote Services is On, click on Settings
5. To register the device in Pending management status Use Access Code [To register the device in Managed
status skip to step 6.]
In URL put the Registration URL from the KFS Manager
Including Proxy Authentication if necessary
Enter the Access Code of the KFS group the device is getting registered to
Description (optional)
Click Submit

KFS Version: 1.2
Device Registration Guide
GSS Copyright © 2016 KYOCERA Document Solution
All Rights Reserved.
Page 9 of 31
6. To register the device in Managed management status Use User Name and Password
Note: This is the user name and password of KFS and not CCRX.
In URL put the Registration URL from the KFS Manager
User name: Enter the Username:Accesscode in that format with a colon separating the two
Enter the KFS user password
Including Proxy Authentication if necessary
Description (optional)
Click Submit
2.2 DEVICE PANEL
The following are steps to register a device to KFS Manager with the device panel.
1. Select System Menu from the panel or the button on the key pad

KFS Version: 1.2
Device Registration Guide
GSS Copyright © 2016 KYOCERA Document Solution
All Rights Reserved.
Page 10 of 31
2. Select System/Network
3. Log into the device

KFS Version: 1.2
Device Registration Guide
GSS Copyright © 2016 KYOCERA Document Solution
All Rights Reserved.
Page 11 of 31
4. Select Remote Services Settings
5. If Remote Services is Off, select Change and turn it On
Note: Device restart may be required.
If Remote Services is On, click on Next for Server Settings
6. To register the device in Pending management status Use Access Code [To register the device in Managed
status skip to step 7.]
In URL put the Registration URL from the KFS Manager
Including Proxy Authentication if necessary
Enter the Access Code of the KFS group the device is getting registered to

KFS Version: 1.2
Device Registration Guide
GSS Copyright © 2016 KYOCERA Document Solution
All Rights Reserved.
Page 12 of 31
Description (optional)
Select Register
7. To register the device in Managed management status Use User Name and Password
Note: This is the user name and password of KFS and not CCRX.
In URL put the Registration URL from the KFS Manager
User name: Enter the Username:Accesscode in that format with a colon separating the two
Enter the KFS user password
Including Proxy Authentication if necessary
Description (optional)
Select Register

KFS Version: 1.2
Device Registration Guide
GSS Copyright © 2016 KYOCERA Document Solution
All Rights Reserved.
Page 13 of 31
2.3 DEVICE REGISTRATION DIAGONOSTIC TOOL (DRDT)
Multiple devices can be registered at once with the DRDT. The tool will discover all the devices in the network
according to the settings and register the devices to the specified server.
2.3.1 DOWNLOAD THE TOOL
The tool is available for download on the KFS Manage.
1. Upon login, navigate to the Product downloads view
2. Click on the name of the tool to activate the download
3. Once the download is complete, extract the tool from the zip file
2.3.2 CONFIGURING SETTINGS
There are multiple steps that need to be completed before devices can be registered. Make sure that all the
necessary settings are configured to prevent registration error.
If an error were to occur, it will be located on the bottom right of the screen.

KFS Version: 1.2
Device Registration Guide
GSS Copyright © 2016 KYOCERA Document Solution
All Rights Reserved.
Page 14 of 31
2.3.2.1 REGISTRATION SETTINGS AND UNREGISTRATION SETTINGS
Click on the Registration settings button to configure information needed to register and unregister
devices to and from KFS. This is where Proxy settings are also configured.
In the Server settings:
1. In URL, enter the Registration URL from KFS Manager
2. In Access code, enter the access code of the group the devices will be registered to
3. To register the devices in Managed management status, select User credentials and enter User name
and Password
4. Check if a proxy is used. If no, skip to Step #8
5. Select the Use the proxy checkbox
6. Enter the information for Host name, Port, User name, and Password
7. Click the Start diagnostic button in proxy and registration settings (optional)
8. Click on the Ungristration tab and repeat above steps
9. Click OK
2.3.3 DISCOVERING DEVICES

KFS Version: 1.2
Device Registration Guide
GSS Copyright © 2016 KYOCERA Document Solution
All Rights Reserved.
Page 15 of 31
Devices must be connected to the network in order to be discovered and added to the tool. Once the devices are
added, they can be registered to KFS.
1. Click on the Add devices button
2. Select a Discovery method
a. Search for network printers: will discover all printers connected to the network
b. Search by host name or IP address: will give options (Local network, Host name, IP address, IP
range) to limit the search
3. Click Next
4. Enter the Communication settings and Device login information
5. Click Next
6. Look over the configuration summary
7. Click Start
8. After the discovery is completed and the list of devices appear, select the checkboxes of the devices to
register to KFS
9. Click the Register devices button
10. Review the data and click OK

KFS Version: 1.2
Device Registration Guide
GSS Copyright © 2016 KYOCERA Document Solution
All Rights Reserved.
Page 16 of 31
11. The progress dialogue shows when registration is complete and if there are errors
2.3.4 DEVICE AUTHENTICATION
It is possible that the device authentication settings have been changed for security reasons. In that case, in order
for the DRDT to register the device, the unique device authentication information needs to be specified here.

KFS Version: 1.2
Device Registration Guide
GSS Copyright © 2016 KYOCERA Document Solution
All Rights Reserved.
Page 17 of 31
1. Select the devices you want to configure
2. Click on the Device authentication button
3. Enter User name, Password for CCRX devices
4. If applicable, enter the Command Center password (default password: admin00)
5. Select Authentication mode
6. Click OK
2.3.5 XMPP SETTINGS
XMPP settings is used to check whether or not there is a connection issue between the device and KFS Manager.
This will be useful if the device is registered to KFS, but the status does not indicate Ready or if tasks fail to start. If
the XMPP diagnostics fail, then you will know it is an XMPP issue and you might need to consult with the local IT
team.
Unless specifically told to connect to a specific server, there should not be a need to manually configure any of the
XMPP settings.
1. Click on the XMPP settings button

KFS Version: 1.2
Device Registration Guide
GSS Copyright © 2016 KYOCERA Document Solution
All Rights Reserved.
Page 18 of 31
2. Click on the Obtain settings button
3. Click Start diagnostic button
4. The diagnostic progress will start and display results after it is finished. Click OK.
5. Click OK to close the dialogue
2.4 GATEWAY (GW)
Gateway is a communication mechanism that allows communication between KFS and third party devices and
legacy KYOCERA devices. Gateway can also be used to register KYOCERA Device Agents (DA) that have Remote
Services firmware. Once the GW is connected to the local network, it can discover devices and register them to the
indicated KFS group.
There are two GW options: Gateway for IB and Gateway for Windows. GW IB runs on custom hardware and GW
Win runs locally on a Windows PC.
There are two logins for GW.
Service: Allows users to register devices in Managed status
(Default user name: Service/ password: Service#1234)
Admin: Can only register devices in Pending status
(Default user name: Admin/ password: Admin#1234)

KFS Version: 1.2
Device Registration Guide
GSS Copyright © 2016 KYOCERA Document Solution
All Rights Reserved.
Page 19 of 31
GW IB is a separate console; therefore, if you do not already possess one, you must contact KDC, RHQ, or your
service provider.
Note: The images in this section are taken with a Admin login on GW IB.
Disclaimer: GW PC runs on Windows operating systems. It is recommended to use a Windows Server OS as typical
installations will require 24/7 operation. The Windows version of GW requires the 32bit version of the Java SDK.
The full SDK must be installed on the system. The Java Runtime (JRE) by itself is insufficient. The 64bit version of
Java is currently not compatible. More information is available in the KFS Gateway Installation Guide.
2.4.1 REGISTERING GW
1. Log into the GW (Default: https://{URL}:8443/gatewayapp)
2. Navigate to Preferences
3. Fill out the information in General tab to register the GW to KFS
Manager URL: Enter the Registration URL from KFS Manager
Note: Make sure to not enter “https://” into the text field
Manager login (optional): Enter KFS credentials if desired. If not, simply deselect the checkbox
Access code: Enter the Access code for the group you want to register the GW to
Description (optional)
4. Click Register

KFS Version: 1.2
Device Registration Guide
GSS Copyright © 2016 KYOCERA Document Solution
All Rights Reserved.
Page 20 of 31
GW IB
2.4.2 BASIC SETUP
After registering the GW to KFS, navigate to Basic setup tab if you need to configure proxy settings.
2.4.2.1 GATEWAY IB PROXY OPTIONS
For GW IB, Proxy settings has an option to Use Gateway as a single point of communication. The box can be set as
the proxy server. By selecting this checkbox, all of the communication for device registered via GW will be
channeled through the GW proxy. This option is available only on GW IB. The Windows version of GW does not
include an embedded proxy. The system upon which GW PC runs can be configured with your own proxy solutions
and used to channel all communications.
The following are other options users can consider for GW IB:
Customer does not have a proxy server; Devices with Remote Services firmware connect directly to KFS, others devices connect to GW IB
Customer has their own proxy server and does not use GW IB as a proxy; Devices with Remote Services firmware connect to corporate proxy, other devices connects to GW IB
Customer does not have their own proxy server, so they use GW IB as a proxy; Devices with Remote Services firmware and other devices connect directly to GW IB
Customer has their own proxy server and also uses GW IB as an additional proxy; Devices with Remote Services firmware and other devices connect directly to GW IB which forwards all traffic to another proxy
2.4.2.2 GATEWAY PC PROXY OPTIONS
Though GW PC does not have a setting to configure single point communication, there are other options to yield
the same result. The options are as followed:
Customer does not have a proxy server; Devices with Remote Services firmware connect directly to KFS, other devices connect to GW PC

KFS Version: 1.2
Device Registration Guide
GSS Copyright © 2016 KYOCERA Document Solution
All Rights Reserved.
Page 21 of 31
Customer has their own separate proxy server; Devices with Remote Services firmware connect to corporate proxy, other devices connects to GW PC
Customer has GW PC installed on their corporate proxy server; Devices with Remote Services firmware and other devices connect directly to the proxy/GW PC
Customer has GW PC which is also the proxy server and they have their own separate proxy server; Devices with Remote Services firmware and other devices connect directly to the GW PC which forwards all traffic to another proxy
2.4.3 DISCOVERING DEVICES
Before devices can be registered to KFS, first you must discover the devices on the network.
1. Navigate to Devices view
2. Click Add devices button
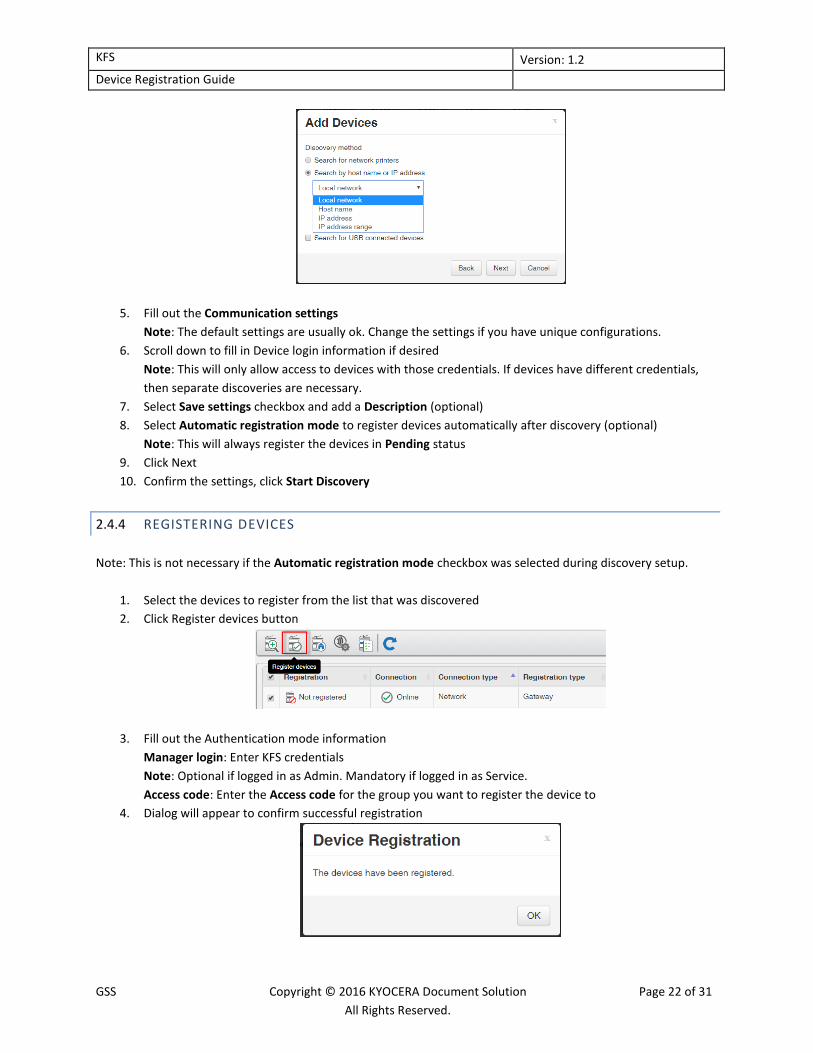
3. Select a setting when Add Devices wizard appears, click Next
New settings: If there are no saved settings or none that fit your needs. You can save this setting later.
Saved settings: Pick from the list if there is a previous setting that was saved that meets the criteria
4. Select a Discovery method, click Next
Search for network printers: This will discover all printers on the network
Search by host name or IP address: This option will limit the search by specifying some parameters
Search for USB connected devices: Select this if there are USB connected devices in the office
KFS Version: 1.2
Device Registration Guide
GSS Copyright © 2016 KYOCERA Document Solution
All Rights Reserved.
Page 22 of 31
5. Fill out the Communication settings
Note: The default settings are usually ok. Change the settings if you have unique configurations.
6. Scroll down to fill in Device login information if desired
Note: This will only allow access to devices with those credentials. If devices have different credentials,
then separate discoveries are necessary.
7. Select Save settings checkbox and add a Description (optional)
8. Select Automatic registration mode to register devices automatically after discovery (optional)
Note: This will always register the devices in Pending status
9. Click Next
10. Confirm the settings, click Start Discovery
2.4.4 REGISTERING DEVICES
Note: This is not necessary if the Automatic registration mode checkbox was selected during discovery setup.
1. Select the devices to register from the list that was discovered
2. Click Register devices button
3. Fill out the Authentication mode information
Manager login: Enter KFS credentials
Note: Optional if logged in as Admin. Mandatory if logged in as Service.
Access code: Enter the Access code for the group you want to register the device to
4. Dialog will appear to confirm successful registration

KFS Version: 1.2
Device Registration Guide
GSS Copyright © 2016 KYOCERA Document Solution
All Rights Reserved.
Page 23 of 31
3 TROUBLE SHOOTING
The following are some tips on what could be the solution to registration issues.
3.1 KFS GROUP DATA
Check that the Registration URL, Access code, User name, and Password are correct. Make sure that it is actually
the registration URL and not the web address.
3.2 CHECK INTERNET CONNECTION
Check that the device is connected to the network and has access to the internet. If the device cannot access the
internet after following the below steps, then it is likely the reason device registration is failing.
Note: Internet browser does not need to be on to register. This is just a means to check if the device is connected
to the network.
3.2.1 INTERNET BROWSER STATUS
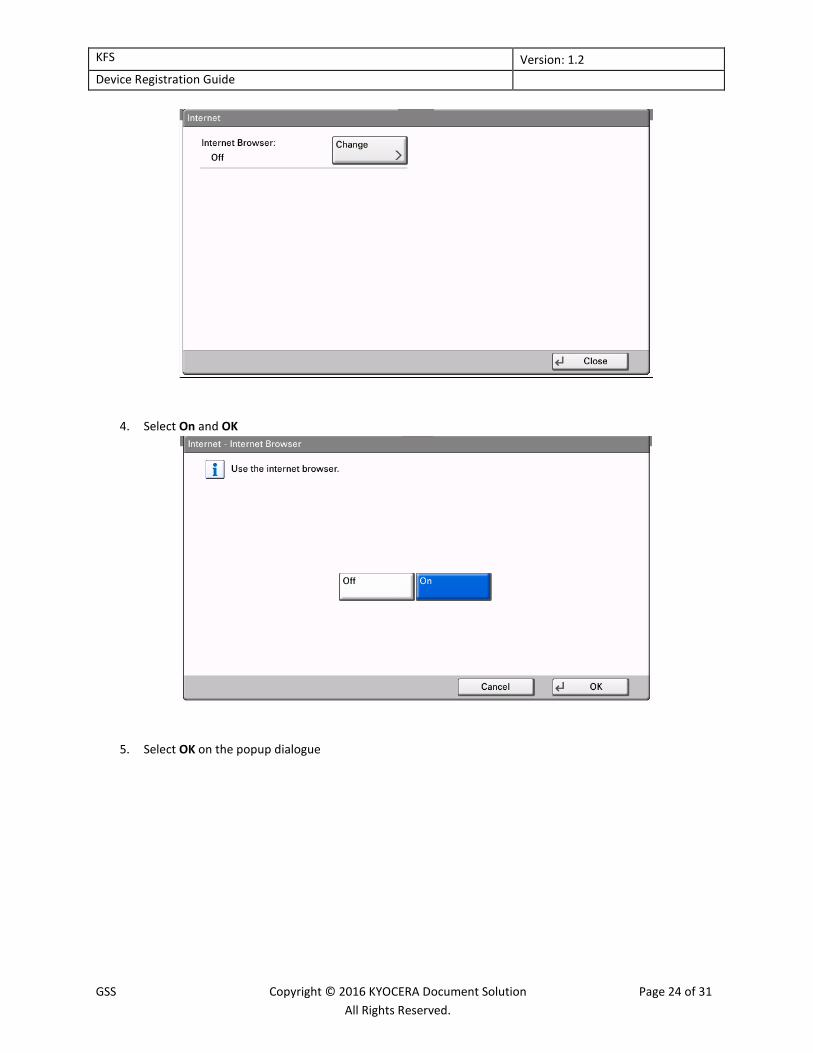
Make sure the device has Internet browser setting on.
1. Access System Menu on the device
2. On the second page of the menu, select Internet
3. Check that Internet Browser is On. If not, Select Change
KFS Version: 1.2
Device Registration Guide
GSS Copyright © 2016 KYOCERA Document Solution
All Rights Reserved.
Page 24 of 31
4. Select On and OK
5. Select OK on the popup dialogue

KFS Version: 1.2
Device Registration Guide
GSS Copyright © 2016 KYOCERA Document Solution
All Rights Reserved.
Page 25 of 31
6. Select the Internet Browser icon. Select Save
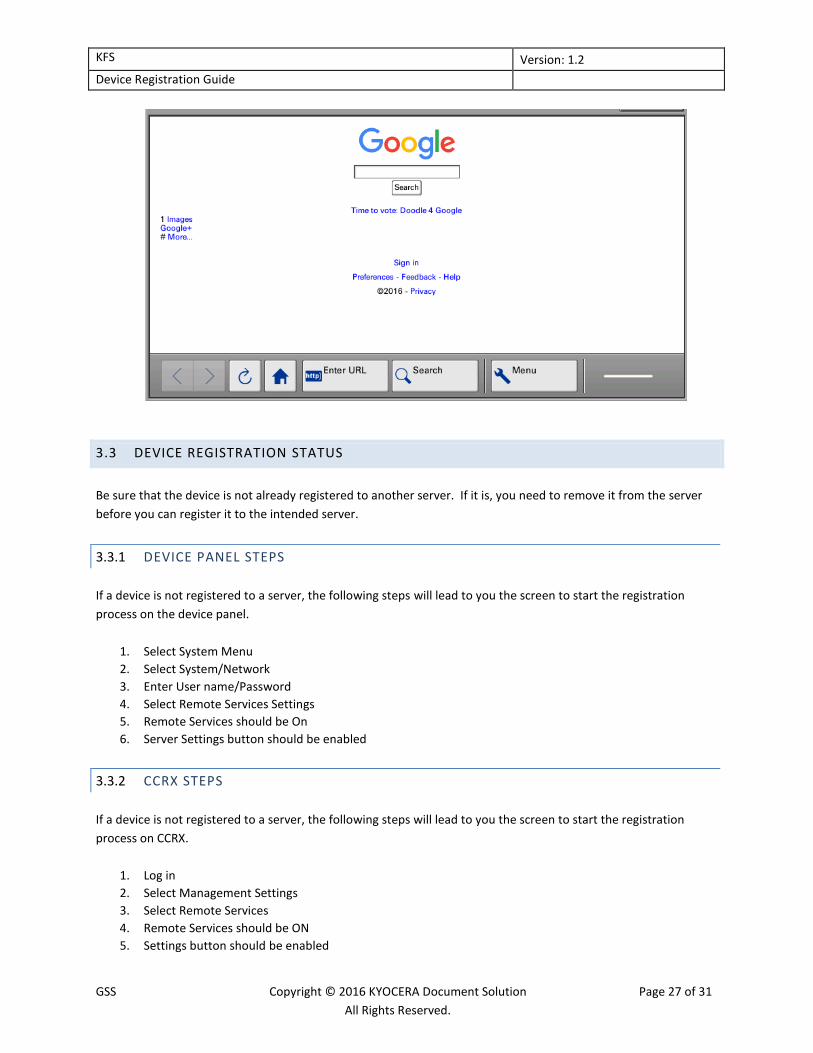
3.2.2 ACCESSING THE INTERNET
1. Select the Internet Browser icon on the device panel

KFS Version: 1.2
Device Registration Guide
GSS Copyright © 2016 KYOCERA Document Solution
All Rights Reserved.
Page 26 of 31
2. The menu will appear and you can enter in the URL of your choice
KFS Version: 1.2
Device Registration Guide
GSS Copyright © 2016 KYOCERA Document Solution
All Rights Reserved.
Page 27 of 31
3.3 DEVICE REGISTRATION STATUS
Be sure that the device is not already registered to another server. If it is, you need to remove it from the server
before you can register it to the intended server.
3.3.1 DEVICE PANEL STEPS
If a device is not registered to a server, the following steps will lead to you the screen to start the registration
process on the device panel.
1. Select System Menu
2. Select System/Network
3. Enter User name/Password
4. Select Remote Services Settings
5. Remote Services should be On
6. Server Settings button should be enabled
3.3.2 CCRX STEPS
If a device is not registered to a server, the following steps will lead to you the screen to start the registration
process on CCRX.
1. Log in
2. Select Management Settings
3. Select Remote Services
4. Remote Services should be ON
5. Settings button should be enabled

KFS Version: 1.2
Device Registration Guide
GSS Copyright © 2016 KYOCERA Document Solution
All Rights Reserved.
Page 28 of 31
3.3.3 DETERMINE THE CURRENT SERVER WITH CC/CCRX
If the Settings button is disabled, it means the device is already registered to a server. Use CC/CCRX to determine
the server the device is registered to.
3.3.3.1 CCRX
1. Log in to CCRX
2. Select Management Settings
3. Select Remote Services
4. Settings button should be disabled
5. Click on the Configuration button
6. Scroll down to the Option section
7. Locate the Remote Services entry
8. The URL will identify the server which the device is registered to

KFS Version: 1.2
Device Registration Guide
GSS Copyright © 2016 KYOCERA Document Solution
All Rights Reserved.
Page 29 of 31
3.3.3.2 CC
1. Log in to CC
2. Select Settings on the left navigation
3. Select Advanced tab
4. Select Remote Services on the left navigation
5. Settings button should be disabled
6. Click on the Device/Printer hyperlink
7. Locate the Remote Services section on the lower right column
8. The URL will identify the server which the device is registered to

KFS Version: 1.2
Device Registration Guide
GSS Copyright © 2016 KYOCERA Document Solution
All Rights Reserved.
Page 30 of 31
3.3.4 HOW TO ENABLE REGISTRATION SETTINGS
Remote Services feature may be disabled on the device. They must be on in order for the features to be available
on the device panel, CCRX, and DRDT.
1. Enter Maintenance mode
2. Enter U520
3. Select OFF
4. Power cycle the device
5. Repeat steps to turn Remote Services back on
3.4 PROXY SETTINGS
Proxy settings are not required. If a customer network does not require or support proxy settings, the setting
needs to be off.
3.4.1 PROXY SETTINGS OFF
1. Log into CCRX
2. Select Network Settings
3. Select General
4. Turn Proxy Settings Off
OR from the Registration screen
1. Select Settings for Proxy
2. Check Proxy Settings

KFS Version: 1.2
Device Registration Guide
GSS Copyright © 2016 KYOCERA Document Solution
All Rights Reserved.
Page 31 of 31
3.4.2 PROXY SETTINGS ON
1. Log into CCRX
2. Select Network Settings
3. Select General
4. Turn Proxy Settings On
5. Check Proxy Server (HTTP) information
6. Check Port Number (HTTP) information
7. During registration, fill out the correct proxy information
Note: Proxy credentials are filled out during registration and not saved on the device.
8. User Name (Proxy Authentication)
9. Password (Proxy Authentication)
3.5 DOMAIN NAME SYSTEM (DNS) SETTINGS
Some customers may have a DNS set up. If settings are set up incorrectly, it may block internet connection from
devices. Follow the steps to check settings and contact local IT department for assistance.
3.5.1 CCRX STEPS
1. Log into CCRX
2. Select Network Settings
3. Select TCP/IP
4. Check DNS settings
3.6 ERROR CODES
Sometimes CCRX will display an error code when it is unable to register a device to a server.
500 error: is a general server error
400 errors: usually means some sort of communication error