ks3/4 art desn - madame tussauds...a self-portrait is a piece of artistic work, in which the artist...
TRANSCRIPT
ART & DESIGNSTUDENT TASK SHEET 1
SECONDARY
KS3/4
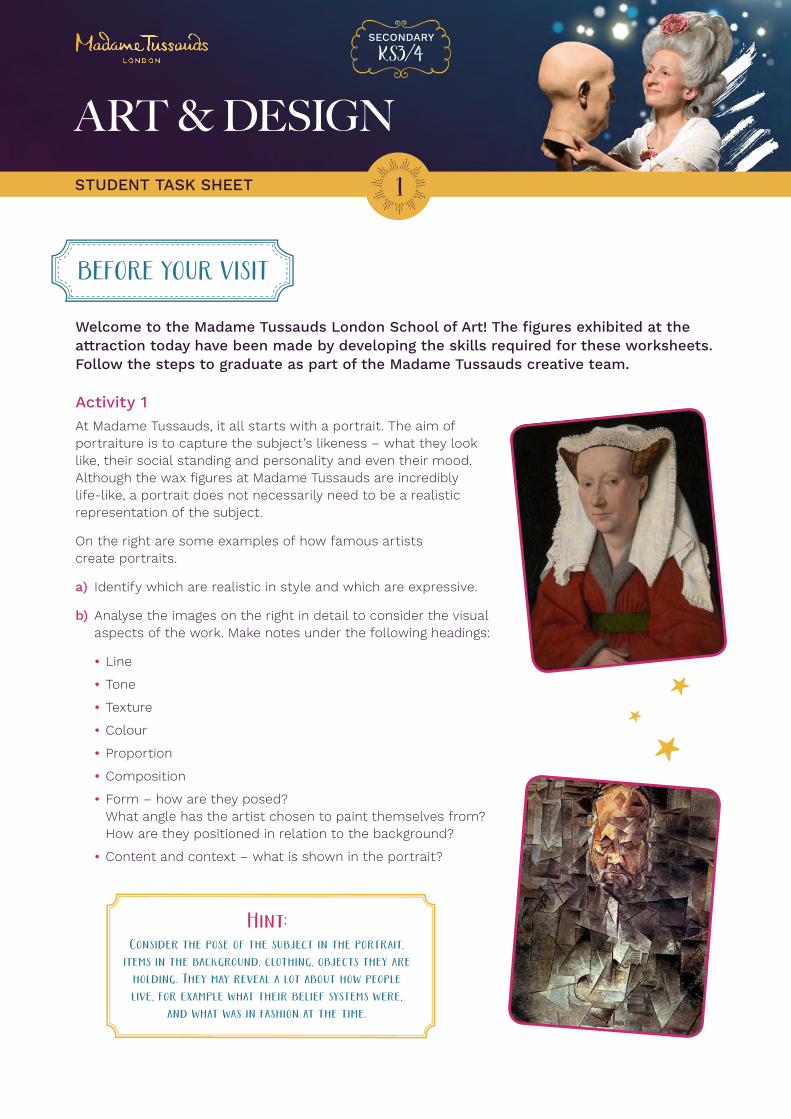
Activity 1At Madame Tussauds, it all starts with a portrait. The aim of portraiture is to capture the subject’s likeness – what they look like, their social standing and personality and even their mood. Although the wax figures at Madame Tussauds are incredibly life-like, a portrait does not necessarily need to be a realistic representation of the subject.
On the right are some examples of how famous artists create portraits.
a) Identify which are realistic in style and which are expressive.
b) Analyse the images on the right in detail to consider the visual aspects of the work. Make notes under the following headings:
• Line
• Tone
• Texture
• Colour
• Proportion
• Composition
• Form – how are they posed? What angle has the artist chosen to paint themselves from? How are they positioned in relation to the background?
• Content and context – what is shown in the portrait?
Hint: Consider the pose of the subject in the portrait,
items in the background, clothing, objects they are holding. They may reveal a lot about how people live, for example what their belief systems were,
and what was in fashion at the time.
Welcome to the Madame Tussauds London School of Art! The figures exhibited at the attraction today have been made by developing the skills required for these worksheets. Follow the steps to graduate as part of the Madame Tussauds creative team.
BEFORE YOUR VISIT

SECONDARY
KS3/4
2STUDENT TASK SHEET
ART & DESIGNBEFORE YOUR VISIT
Activity 2A self-portrait is a piece of artistic work, in which the artist creates a likeness of themselves. Self-portraits can often tell us a lot about how an artist perceives themselves or how they would like to be perceived by others.
a) Can you name three famous artists who have created self-portraits? Talk about it with the person next to you if you need to.
b) Look at the self-portraits below. What can we understand about…
Their personality?
Their mood and emotions?
How they perceive themselves?
What time in history the painting was produced in?
What were they trying to show?

SECONDARY
KS3/4
3STUDENT TASK SHEET
ART & DESIGNBEFORE YOUR VISIT
Activity 3At Madame Tussauds, the sculptors use callipers to measure every part of their subject’s face and body before creating a wax figure.* You will have to rely on your powers of observation to make sure that your self-portrait is accurate.
a) Start by describing your face as you see it in a mirror. On a separate piece of paper, record the following details:
• How would you describe the shape of your face?
• What shape are your eyes?
• Describe your nose and mouth?
• What is your hair like?
• What is your skin tone?
• Describe what colours you might use to mix it as a paint colour?
b) Use a mirror to help you draw a self-portrait. Follow instructions below to help you.
1. Draw a horizontal line to show the level of your eyes. Draw a second line to mark the bottom of your nose. Eyes are always halfway between the top of the head and the bottom.
2. Draw a vertical line of symmetry. Draw a third line to show where your mouth appears. The mouth is around half way between the nose and the bottom of the face.
3. Draw five ovals across the eye line.
4. Draw in the shape of your face.
c) Time to evaluate! When you have finished your self-portrait, look at it closely.
• Does it look like you? If not, why not?
• What could you develop or alter to make it look even better?
Swap portraits with the person sitting next to you.
• What are the best things about their portrait?
• Give them some tips on how they might develop it further.
21 3 4
Wherever you see a * visit the website
to find some more
insider facts!

SECONDARY
KS3/4
4STUDENT TASK SHEET
ART & DESIGNBEFORE YOUR VISIT
Activity 4At Madame Tussauds guests can walk up to their favourite famous figure and walk around them. It is important to create a good likeness from all angles.
a) Use a wooden mannequin or any 3D object to help you practice representing a figure from a number of angles.
1. Sketch the figure from the front.
2. Now move the mannequin. Sketch it from a sideways angle.
3. Move the mannequin to a reverse facing position. Sketch it from behind.
Activity 5Now you have practised your portrait skills, it’s time to experiment! Many artists have created self-portraits which show their mood or feelings (e.g. Picasso and Van Gogh).
a) Create a self-portrait that expresses a particular feeling or mood. You could use colour, marks and textures to suggest what that feeling or mood might be.
You might also like to use symbols (or emojs!) to suggest a mood or emotion. Look at the work of Frida Kahlo. She was a Mexican artist who experienced a lot of physical and emotional pain in her life and she often used symbols in her work to reflect that pain.
b) Swap self-portraits with one of your classmates and evaluate each other’s work. Think about the following:
• Can you tell what mood or emotion is shown in the image?
• Is the composition of the picture effective?
c) Write a poem to go with your painting, expressing the same feeling or mood.
Hint: Dark, heavy marks or sharp shapes might suggest anger
or pain.
Pale, delicate marks might suggest uncertainty.
Pale colours or a lot of blue might suggest sadness
or calm.
A lot of bright, vibrant colours might suggest
happiness.
1 2 3

SECONDARY
KS3/4
5STUDENT TASK SHEET
ART & DESIGN
You’ve passed the first module of Madame Tussauds’ School of Art course and now the Art Director would like you to showcase some further skills during your visit to the attraction.
Activity 1You need to start by investigating why self-portrait is so important to Madame Tussauds and answer the following questions.
a) How did Marie Grosholtz begin her career?
b) Why was the exhibition so popular in the 1800s?
c) How was this different from the common portraits at the time?
DURING YOUR VISIT

SECONDARY
KS3/4
6STUDENT TASK SHEET
ART & DESIGNDURING YOUR VISIT
Activity 2The Art Director has tasked you with replicating one of the figures on display.
In order to produce a realistic portrait, it is important to observe your subject closely. At Madame Tussauds, the wax figures are usually the result of one or more ‘sittings’*. A ‘sitting’ is when Madame Tussauds sculptors and artists travel to meet the famous person in order to capture reference material. During the first sitting over 200 measurements are taken, and photographs shot from every angle to ensure the finished wax figure is as accurate as possible. The eyes, hair and skin are all colour matched from samples so the team has an extensive set of references to work from. The sculptors also take note of every mole, freckle, and blemish visible in order to ensure the finished wax figure really captures the subject’s personality.
a) Researching your subject before you start sculpting can really help you with creating your sculptural portrait. Make notes on the headings below, all these things will help you produce a portrait that is life like:
Chose a famous person to act as your case study.
What do they wear?
What do they do with their hair?
What are their interests?
What are your feelings about them?
What do you think they are feeling?
b) Make a number of sketched studies of a figure of your choosing from different angles (in the same way as you practiced in class) so that you really get to know how they look from all sides.
Wherever you see a * visit the website to find some more insider facts!

SECONDARY
KS3/4
7STUDENT TASK SHEET
ART & DESIGNDURING YOUR VISIT
Activity 3When you have completed your drawings and have added these to your portfolio, complete the following activity:
a) Take pictures of your chosen figure from all angles (you will need these for when you are back in the class)
b) Collect further non-visual data – the questions below should help you take notes:
What do you think the poses suggest?
What do the costumes tell you about the figure?

SECONDARY
KS3/4
8STUDENT TASK SHEET
ART & DESIGNDURING YOUR VISIT
Activity 4Now take a look at Behind the Scenes at Madame Tussauds and find out how the sculptures are made.
a) Fill in the gaps to complete the diagram.
1. Research
2. Design
4. Making
3. Planning

SECONDARY
KS3/4
9STUDENT TASK SHEET
ART & DESIGN
Activity 1At Madame Tussauds, it’s not always possible to create a wax figure from real life, for example, when a famous person is a historical figure like Charles Dickens*. a) Using the photographs you took in during your visit, add further sketches of the famous figure
of your choice to your portfolio.
b) Now answer the following questions:
• Do you think it is better to work from a photograph of your subject or in real-life at Madame Tussauds?
• Which was easiest?
• Which sketch was most like your subject?
Wherever you see a * visit the website to find some more insider facts!
AFTER YOUR VISIT

SECONDARY
KS3/4
10STUDENT TASK SHEET
ART & DESIGNAFTER YOUR VISIT
Activity 2Before you make your sculpture, you must finalise your tools and materials. Sculptures can be made from many different kinds of materials. At Madame Tussauds we use wax to create the figures*. This helps us to create the best likeness of the famous people we are modelling. Other materials can be used in sculpture as well.
a) Which of the following do you think would be best for sculpting portraits and why?
Material Why the material is suitable/unsuitable for a sculpture
Glass
Metal
Clay
Ice
Wood
Papier-Mâché
Plaster
b) Think about how you would create a sculpture of your chosen figure from your visit. What materials are available to you and how will you use them?
Activity 3You are almost ready to create your sculpture and graduate from Madame Tussauds’ School of Art!
a) When you are creating your sculpture, consider the following:
• Scale – How big will your piece be?
• Techniques – What techniques will you use to build the 3D form?
• Texture – Will your piece be smooth or textured? Will some parts of the sculpture need a different texture like skin or hair?
• Colours – How will you finish off the surface of the piece? Will you stain or paint it? Discuss the possibilities with your teacher. If you are going to stain or paint your sculpture at a later stage, make notes or record sample colours to make sure that you can match the colours.
Wherever you see a * visit the website to find some more insider facts!

SECONDARY
KS3/4
11STUDENT TASK SHEET
ART & DESIGNAFTER YOUR VISIT
Activity 4Everybody has different tones to their skin, hair, eyes and teeth and all these need to be recorded when creating a sculpture*. The colourists at Madame Tussauds have a palette with various flesh tone colours. These are oil based paints that are mixed to achieve an exact match to the famous person’s colouring.
a) If you have sculpted your model from clay, papier-mâché or modroc, it will now need painting:
• Mix up your paint to achieve the right tones for your sculpture. You may find you need to use blue or even green for the basic skin colour for a particular area.
• You may choose to use colour expressively rather than realistically.
• You will still need to consider which colours work together and which contrast to achieve a successful result.
• Think about how you will apply the paint. Will you put it on smoothly with a brush? Will you use a sponge for application? Will you tap the paint off the brush to create a spatter effect?
• Apply the paint carefully to your sculpture. There are many different colours of skin. You may need to build up several layers of colour to achieve a realistic effect.
Hint: When painting your sculpture, start with lighter colours. It is easier to start light and continue layering paint on until the end result is darker rather than starting darker and trying to take your colour lighter.
More Fun at HomeBring all your ideas and work together to create the following:
a) A diagram with your name in the middle and think about what words best represents you.
b) A personal identity box from card using a net or old shoe box. This could include:
• Your self-portrait as the central point
• Photographs of friends or family
• Images of your hobbies and interests
• Pictures of places you have been or visited
Hint:You could also visit the Madame Tussauds website to journey through the different exhibition areas of the attraction
to give you inspiration on the topics of interest you could cover.
Collect images for your collage along the way!
Wherever you see a * visit the website to find some more insider facts!