kiteworks web user's guide
TRANSCRIPT

Web User’s GuideJuly 2015

Copyright � 2015 Accellion, Inc. All rights reserved.
These products, documents, and materials are protected by copyright law and distributed under licenses restricting use, copying, distribution, and decompilation.
Accellion, the Accellion logo, and kiteworks are registered trademarks of Accellion, Inc. kiteworks is a trademark of Accellion. All other trademarks are properties of their respective owners.
Corporate Headquarters
Accellion 1804 Embarcadero Road, Suite 200Palo Alto, CA 94303, USA
Contact Us
p. 1.650.485.4300 | f. 1.650.485.4308www.accellion.com

kiteworks Web User’s Guide Page iii
Table of Contents
Preface .......................................................................................................................................... vii
Welcome ...................................................................................................................................... viiAudience ...................................................................................................................................... viiWhat’s New.................................................................................................................................. vii
kiteworks Update 3: July 2015 ............................................................................................... viikiteworks Update 2: May 2015 ............................................................................................. viiikiteworks Update 1: April 2015............................................................................................. viii
Using kiteworks ........................................................................................................................ 9
What is kiteworks?......................................................................................................................... 9Supported Browsers ................................................................................................................. 9
Sign In........................................................................................................................................... 10Two‐Factor Authentication .................................................................................................... 11
Get Oriented: A Guided Tour ....................................................................................................... 12The Navigation Pane: Getting Around in kiteworks ............................................................... 13Where You Work .................................................................................................................... 14
Detail View: Explore Your Files and Folders ...................................................................... 14List View: Manage Your Files and Folders ......................................................................... 15
Recent Activities View: Track Your Work ............................................................................... 17Go Mobile............................................................................................................................... 18
Collaborate................................................................................................................................... 19Folder Management and Actions................................................................................................. 20
Create a New Folder............................................................................................................... 21Share Access to a Folder......................................................................................................... 22
Roles .................................................................................................................................. 23Change User Roles ............................................................................................................. 25Delete a User ..................................................................................................................... 26
Manage Your Storage Quota .................................................................................................. 27Send an Email to the Users of a Folder .................................................................................. 27Folder Actions......................................................................................................................... 29
Edit Folder Properties........................................................................................................ 29Manage Notifications ........................................................................................................ 30Download an Entire Folder ................................................................................................ 31

Page iv kiteworks Web User’s Guide
Troubleshooting........................................................................................................... 32Use Zip Files for Easy Transfer of Multiple Files .......................................................... 32
Delete a Folder .................................................................................................................. 33Recent Activities ..................................................................................................................... 33Make a Folder a Favorite........................................................................................................ 34Access Enterprise Content Sources (License‐Enabled)........................................................... 34
Add a New Enterprise Content Source to kiteworks ......................................................... 36SharePoint and SharePoint Online............................................................................... 37File Share (CIFS/SMB/DFS)........................................................................................... 37Documentum ............................................................................................................... 38OpenText Content Server ............................................................................................ 39eDOCS .......................................................................................................................... 39Dropbox ....................................................................................................................... 40Microsoft OneDrive ..................................................................................................... 40
Remove an Enterprise Content Source from kiteworks .................................................... 42File Management and Actions ..................................................................................................... 42
Add or Upload Files ................................................................................................................ 43Upload to Folder................................................................................................................ 43Upload File(s) via Applet.................................................................................................... 44
Troubleshooting........................................................................................................... 45Drag and Drop into kiteworks............................................................................................ 46
Drag and Drop between Folders.................................................................................. 47Upload to the Move Tray................................................................................................... 48
Download ............................................................................................................................... 48Online Viewer .................................................................................................................... 49
Download File(s) via Applet.................................................................................................... 51Troubleshooting ................................................................................................................ 52
Push File ................................................................................................................................. 52Lock/Unlock............................................................................................................................ 53Delete and Recover a Deleted File ......................................................................................... 54
Delete a File ....................................................................................................................... 54Recover a Deleted or Expired File...................................................................................... 54
Detail View................................................................................................................... 55List View....................................................................................................................... 56
Delete a File Permanently ................................................................................................. 56Detail View................................................................................................................... 57List View....................................................................................................................... 58
View and Change Versions ..................................................................................................... 58Download Version ............................................................................................................. 60Make Current..................................................................................................................... 60Delete Version ................................................................................................................... 60Add New Version ............................................................................................................... 61
The Move Tray........................................................................................................................ 61Move Tray Actions: Copy and Move.................................................................................. 61Upload Files Directly to the Move Tray ............................................................................. 63Use the Move Tray to Collaborate with Outside Users on Enterprise Content Files......... 63
Change File Expiration Date ................................................................................................... 65Mail......................................................................................................................................... 66
When you send or receive a file, send a file preview, or save an email draft, that activity

kiteworks Web User’s Guide Page v
appears in the folder using the detail view and .......................................................... 66Email a File......................................................................................................................... 67Email a Preview of a File .................................................................................................... 69Request a File .................................................................................................................... 72
Add Tasks and Comments ...................................................................................................... 77Tasks .................................................................................................................................. 77
Assign a Task ................................................................................................................ 78Change the Status of a Task......................................................................................... 79
Comments ......................................................................................................................... 80Add a Comment ........................................................................................................... 80Respond to a Comment ............................................................................................... 81
Search Functions .......................................................................................................................... 82Basic Search............................................................................................................................ 82Enhanced Search .................................................................................................................... 83
Search Filtering .................................................................................................................. 85Edit Settings ................................................................................................................................. 86
Account Info ........................................................................................................................... 87Display Name..................................................................................................................... 87Profile Picture .................................................................................................................... 87Password ........................................................................................................................... 88
Preferences ............................................................................................................................ 88Language............................................................................................................................ 89Time Zone .......................................................................................................................... 89Message Signature ............................................................................................................ 89
Contacts and Groups .............................................................................................................. 89Manage Contacts............................................................................................................... 90
Add a Contact .............................................................................................................. 90Edit a Contact............................................................................................................... 91Delete a Contact .......................................................................................................... 91Add a Group................................................................................................................. 91Edit a Group ................................................................................................................. 93
SFTP Keys................................................................................................................................ 94Generate SFTP ................................................................................................................... 94Add SFTP............................................................................................................................ 95Delete SFTP........................................................................................................................ 95
kiteworks Resources............................................................................................................ 97
Appendix A: Icons and Symbols ................................................................................. 99
Appendix B: EC Compatibility .................................................................................... 105

Page vi kiteworks Web User’s Guide

kiteworks Web User’s Guide Page vii
1Preface
WelcomeAt Accellion, enterprise security is our primary focus. Second is our commitment to business mobility. Whether you are sharing files within your organization, or collaborating with multiple teams across the globe, we are committed to providing you with the definitive platform for working with content securely. Welcome to kiteworks™.
The kiteworks solution gives you powerful and secure access to content wherever you are, so you can share with confidence. With kiteworks, you can work seamlessly from web browser, to desktop, to tablet and smartphone—and you are always connected to your files.
AudienceThis documentation is intended for users of the kiteworks solution by Accellion.
What’s NewEach release of the documentation tracks with the current version of the software.
kiteworks Update 3: July 2015• You can now drag and drop files directly between kiteworks folders
• New mail view.
• Folder Upload is now listed in the Activity Stream.
• Users can now upload an entire folder structure via web applet.
• Folders can be sent as a zip file for sharing.
• Mobile sync/push makes a file available on all devices for offline viewing.
• Ability to generate or add SFTP key pairs.

Preface
What’s New
Page viii kiteworks Web User’s Guide
kiteworks Update 2: May 2015• Updated the User Interface with the following improvements; refer to Get Oriented: A Guided Tour:
• Moved the main buttons to the left and added labels for easier navigation.
• Lightened the background for improved readability.
• Toggle button to switch between List view and Detail view for increased productivity.
• Added icons next to the actions in the dropdown menus for easier recognition.
kiteworks Update 1: April 2015• Enhanced the Request a File feature to allow files within the folder to be viewable to all users.
• Added mail to the Enhanced Search feature.
• Added the ability to Change File Expiration Date of a file.
• Added OpenText eDOCS DM to the available EC connectors.
• Administrative enhancements to the kiteworks Web User’s Guide.

kiteworks Web User’s Guide Page 9
1Using kiteworks
What is kiteworks?kiteworks™ is a secure file‐sharing solution from Accellion that enables you to securely and easily access and share enterprise information any time, anywhere. You can access your files and folders in the office and on the go, and can be sure that your files are up‐to‐date and protected. kiteworks gives you powerful and secure access to content wherever you are, so you can share with confidence.
The concepts discussed here can also be applied to your mobile device. For more information about the mobile app, Go Mobile.
Supported BrowsersThe kiteworks interface supports the following browsers:
The Java applet supports Java 6 update 31 and up.
Table 1. Supported Browsers
Browser Version and Notes
Internet Explorer IE 9.0 and up
Note Drag & Drop and multiple file select are not supported in IE9 because of the limited HTML 5 support in IE9. Accellion recommends using IE 10.0 and up.
Firefox Firefox 26 and up
Chrome Chrome 31 and up
Safari Safari 5.1.10 and up
Note Some default settings in Safari may need to be changed for the Java applet to function properly. Refer to Troubleshooting for more information.

Using kiteworks
Sign In
Page 10 kiteworks Web User’s Guide
Sign InYou receive an email as below from your Administrator, indicating that your kiteworks account has been created. Click Activate, and you are taken to the kiteworks URL, where you can sign in.
The following screen appears.
Note Bookmark this page for future reference; this is your access point to kiteworks.
Add your user name (your email address) and password. If you haven’t logged in before and this option is available, click I don’t have an account yet. You will be prompted to create a password.
If you have forgotten your password, click Forgot password, and your Administrator will process your request, usually by sending you a new activation link.

kiteworks Web User’s Guide Page 11
Using kiteworks
Sign In
Two‐Factor AuthenticationTwo‐Factor Authentication (2FA) is a license‐enabled feature that requires an additional security step when users log in to kiteworks. 2FA enhances the regular authentication by adding a “possession factor” (something the user has, such as a token, SMS‐based phone or device, or email connection) with a “knowledge factor” (something the user knows, such as a password) into the authentication process.

Using kiteworks
Get Oriented: A Guided Tour
Page 12 kiteworks Web User’s Guide
Get Oriented: A Guided TourThe kiteworks web interface is made up of a navigation pane at the left of the screen that governs all views, and a detail view and list view.
• The Navigation Pane: Getting Around in kiteworks
• Where You Work
• Recent Activities View: Track Your Work
Detail View:
Navigation Panel
List View:
Folder SelectedActions on files
or folders
File Selected
Folder and File Selected
Actions on files or folders

kiteworks Web User’s Guide Page 13
Using kiteworks
Get Oriented: A Guided Tour
The Navigation Pane: Getting Around in kiteworksAt the left of the screen is a navigation pane from which you can perform high‐level functions and navigate through your views of kiteworks.
The icons are described in the following table.
Table 2. Top Menu Icons
Button (selected) Description Notes
All files Lists all the folders to which you have access. For more information, refer to Where You Work.
Shared folders Filters the list of folders to those you have shared with other users or folders that have been shared with you. The view is identical to the detail view, with unshared folders filtered out of the list. For more information, refer to Detail View: Explore Your Files and Folders and Share Access to a Folder.
Favorites Filters the list of folders to those you have marked as a favorite. The view is identical to the detail view, but shows only the folders you have marked as favorites. For more information, refer to Detail View: Explore Your Files and Folders and Make a Folder a Favorite.
Recent activities Jumps to the Activity view for managing tasks, comments, and other activities. For more information, refer to Recent Activities View: Track Your Work.
Mail Opens the Email Files window. For more information, refer to Email a File.
Move tray Opens the Move Tray panel. For more information, refer to The Move Tray.

Using kiteworks
Get Oriented: A Guided Tour
Page 14 kiteworks Web User’s Guide
Where You WorkYou have two options of how to best perform the actions you wish on your files and folders. To can see and perform actions on each item individually, use the detail view (Detail View: Explore Your Files and Folders). To see and perform actions on folders and files in the context of the file and folder structure in kiteworks, use the list view (List View: Manage Your Files and Folders).
Detail View: Explore Your Files and FoldersThe detail view is your default view, accessed by clicking the view icon. The detail view shows the folders and files to which you have access, as well as details about each file and folder.
The specific sections of this screen are described in the following table.
Navigation Pane
Folder Selected:
File Selected:
A
C
F
G
D
FiFiFilelele SSSelelelecececteteted:d:d:
H
I
B
E
Table 3. Detail View
Identifier Description Notes
A Search, Help, Settings Use the banner bar for performing Search Functions, accessing the Help, and how to Edit Settings for your account.
B List view Allows you to toggle the view to the list view. Refer to List View: Manage Your Files and Folders.
C Path to folder structure Shows how deeply into the folder structure the current folder resides. You can click each level to navigate through the file structure.
D Actions Allows you to perform actions on selected files and folders, including uploading new files, adding new folders, requesting files, and other actions specific to the selected file or folder.
E Contents of selected folder Shows all contents of the current folder.
F Folder details Shows information about the selected folder, including your role in that folder. For more information about the folder, click the “expand” button ( ).

kiteworks Web User’s Guide Page 15
Using kiteworks
Get Oriented: A Guided Tour
List View: Manage Your Files and FoldersThe list view, accessed by clicking the View button, shows you information about how to manage your files and folders within a navigational structure.
G Activities related to the folder Includes information about invitations, file uploads, locked/unlocked files, etc.
H Thumbnail of the file Shows a thumbnail of supported file types. To view the file without downloading the file, click the “eye” button ( ).
I File collaboration buttons Shows you Tasks, Comments, and Versions relating to the selected file.
Table 3. Detail View
Identifier Description Notes
Actions on selected files or folders
Folder Selected
File Selected
A
B C
E
F
G
H
G
D
File and Folder Selected
I
J

Using kiteworks
Get Oriented: A Guided Tour
Page 16 kiteworks Web User’s Guide
The specific sections of this screen are described in the following table.
Table 4. List View
Identifier Description Notes
A Search, Help, Settings Use the banner bar for performing Search Functions, accessing the Help, and how to Edit Settings for your account.
B Detail View Allows you to toggle the view to the Detail view. Refer to Detail View: Explore Your Files and Folders.
C Path to folder structure Shows how deeply into the folder structure the current folder resides. You can click each level to navigate through the file structure.
D Actions Allows you to perform actions on selected files and folders, including uploading new files, adding new folders, requesting files, and other actions specific to the selected file or folder.
E Contents of selected folder Shows all folders and sources in the system. Click the triangles to expand or collapse the folders.
F List of files/folders Lists the contents of the current folder. To select the file or folder, click the box next to the file or folder. To select all items in the folder, click the box in the header.
G Search Allows you to perform an Basic Search of the contents of files, folders, and emails sent/received.
H Selected item(s) header Shows you what is currently selected in the folder, and shortcuts to the actions you can perform on those items.
I Filter Allows you to filter the folder to show:
• All items
• Those managed by you
• Those you have marked as a favorite
• Those you have deleted
J Action shortcut icons Shows you shortcuts to those actions you can perform on the items in the folder, including managing who has access to the folder, emailing the file, and others.

kiteworks Web User’s Guide Page 17
Using kiteworks
Get Oriented: A Guided Tour
Recent Activities View: Track Your WorkTo see the status of tasks and other activities in kiteworks, in the left Navigation pane, click Recent Activities. It is here that you monitor new files sent to or shared with you, view all activities, manage tasks, and view comments.
The icons are described in the following table.
A
B
C
E
F
D
G
E
G
Table 5. Activity View
Identifier Description Notes
A Search, Help, Settings
The top navigation bar has entries for performing Search Functions, accessing the Help, and how to Edit Settings for your account.
B Date Shows today’s date, or the date you have selected using the Date Range picker.
C Activities Includes recent activities, upcoming tasks, tasks due today, comments you have made, and emails sent or received on today’s date or the date that you have selected.
D Activity Toggle Toggles between all activity and your activities.
E Activity Filter Filters activity shown on the activity list.
F Activity List Includes comments, tasks, status of tasks, a history of uploads, downloads, file and folder management activities, people management activities, and other information pertaining to your files in kiteworks.
G Quota used If you have a limit to the amount of storage you can use, your usage is shown here.

Using kiteworks
Get Oriented: A Guided Tour
Page 18 kiteworks Web User’s Guide
Go MobileThe kiteworks Mobile App gives you access to all of your files from your mobile device. The devices supported by kiteworks include phones and tablets for iOS and Android.
To get started, download the mobile app from the iTunes or Android stores. The link to download the app is in the Help screen on kiteworks:
Should your device become lost, stolen, or somehow compromised, your kiteworks Administrator can remotely wipe your device of all files accessed via the kiteworks Mobile App. Contact your Administrator immediately if your device is no longer secure.
For specific details about Accellion’s mobile offerings, refer to the kiteworks Mobile User’s Guide or contact your kiteworks Administrator.

kiteworks Web User’s Guide Page 19
Using kiteworks
Collaborate
CollaborateYou can collaborate with others in four distinct ways:
1 Folder Management and Actions
Sharing folders enables you to collaborate and share files with groups of people inside and outside of your organization. The process involves creating a folder, adding files to that folder, and then adding people to the folder, giving them access. The extent of their access is determined by you, the creator and manager. Permissions, or “Roles”, that you assign to others can range from being managers of those files (with the ability to add users, upload, download, lock, edit, and delete files), to only having the ability to view the files that exist in that folder.
You can perform the following actions on folders:
• Create a New Folder
• Share Access to a Folder
• Edit Folder Properties
• Manage Notifications
• Download an Entire Folder
• Add or Upload Files to a folder
• Delete a Folder
2 File Management and Actions
When the recipient receives the Mail, she/he clicks the link and downloads that file to his or her own system from kiteworks.
You can perform the following actions on files:
• Email a File or Email a Preview of a File
• Add or Upload Files
• Download or Download File(s) via Applet
• Lock/Unlock
• Delete and Recover a Deleted File
• View and Change Versions
• Add to The Move Tray
3 Add Tasks and Comments
Those people who have access to a shared folder in kiteworks can add a comment to individual files. Owners, Managers, and Collaborators can also assign tasks to other users in the folder. These tasks are tracked on the Activities View and on the activities listed underneath the file.
4 Access enterprise content sources (License‐Enabled)
With the Enterprise Connect feature enabled, kiteworks provides access to remote file shares and cloud storage solutions such as SharePoint, CIFS, Box, Google Drive, and others. Access to enterprise content sources is managed by your kiteworks Administrator.

Using kiteworks
Folder Management and Actions
Page 20 kiteworks Web User’s Guide
Folder Management and ActionsFolders enable users to collaborate and easily share the files within the folder. Note that what you’re allowed to do depends on what role you have in that folder. See Roles for more information.
When you navigate to a folder using the detail view, the following information appears.
Folder information includes the following details:
Table 6. Folder Details Information
Detail Header Description and Notes
Last Modified The date the last activity occurred within the folder.
Created The date the folder was created.
By The user name of the person who created the folder.
Permissions Your role in the folder. For more information, refer to Roles.
Location The folder structure in which the folder resides (“breadcrumb” to the current folder). Also indicates whether the folder was previously “owned” by another user (refer to Roles).
Link The link to the folder. You can copy this link and send it to other users of the folder, and those users will be able to follow the link to the folder.If a user hasn't been explicitly added to a folder, the user won’t be able to access the folder using the shared link.
Deleted The number of files and folders that have been deleted in the folder, and the size of those deleted folders.
If you click the “expand” icon in the lower‐right corner ( ), the following information appears:
Expiration The date that the folder expires and will be deleted.
Allow Sync Whether the folder allows sync; for more information, refer to the kiteworks Desktop Client User’s Guide or contact your Administrator.
Quota Your total quota available to you in your kiteworks system. To change this quota, contact your Administrator.

kiteworks Web User’s Guide Page 21
Using kiteworks
Folder Management and Actions
Create a New FolderTo add a folder, perform the following steps.
1 In kiteworks, navigate to where you would like the new folder to exist.
2 In the upper‐right corner of the screen, click New ( ) and select Create folder. The New folder window appears.
3 Name the folder and add a description.
4 Set a folder expiration date and determine whether sync will be permitted. The default is to not allow sync.
Note These options are only available for root folders; i.e., folders that exist in the kiteworks Files folder, not a nested folder within kiteworks Files. Nested folders inherit the setting of the root folder. (For more information about sync, refer to the kiteworks Desktop Client Installation and User’s Guide, located in the help button on kiteworks).
5 Set an expiration date for the files in the folder. To set no expiration, leave the File expiration field blank.
6 Click Save. The folder is now created.

Using kiteworks
Folder Management and Actions
Page 22 kiteworks Web User’s Guide
Share Access to a FolderTo invite others to collaborate on the files in a particular folder, perform the following steps.
1 Navigate to the folder that you would like to share.
2 In the upper‐right corner of the screen, click Actions and select Manage People. The Manage people window appears, listing all of the users who have access to the folder.
3 Click Add new user. The Add new field appears at the top of the window.
4 Type in the email address(es) of the person or people with whom you would like to share. If you add more than one user, separate each address with a comma.
5 Using the drop‐down list, select the role you would like the user(s) to have in the collaboration. (For more information about roles, refer to Roles.)
Note If you would like different users to have different roles, you must add them separately.
6 Check to indicate whether that new user should be notified via automatic email that s/he has been added to the folder.
7 Click Add. A confirmation message appears at the top of the window.
8 Click to close the window.

kiteworks Web User’s Guide Page 23
Using kiteworks
Folder Management and Actions
RolesRoles are assigned by the manager of a specific shared folder; your role determines what functions you are allowed to perform in that shared folder.
The available roles that can be assigned to users in a folder are:
Viewer
The only action the user can perform is to view the files in a folder via the Accellion interface. Viewers cannot download a file to their device or desktop, they can only view files using the Online Viewer.
Downloader
Used for someone who needs to be able to download and view the files in a folder, but not upload new versions, upload new files, or assign tasks to others with access to that folder.
Collaborator
Used for someone who needs full access to the files in a folder, but does not need to manage other users’ access to the folder.
Manager
The second‐highest level of control of a folder; generally assigned to someone who needs full access to all files within a folder and to control others’ access to a folder.
Owner
The highest level of control of a folder; assigned by default to the person who creates a folder. Any content in the Owner’s folder counts against his quota.
Note The roles listed below are examples only. Adjust the roles based on your particular organization’s needs.
Table 7. Examples and Use Cases of Each Role
Use Case Viewer Downloader Collaborator Manager Owner
Legal Defending counsel The clientAdmin. assistant
ParalegalsLegal team
Co‐counsel to the lead lawyer
Lead lawyer
Research Funding organization
UndergradsAdmin. assistants
Research assistantsGrad students
Professors involved in the research
Research lead
High‐tech business Temp. employeesConsultants
Planning/LogisticsAdmin. assistants
EngineersMarketersTech Writers
Vice‐PresidentTeam ManagersDep’t Managers
Project Manager
Medical PatientsApproved family members
NursesAssistantsBilling Dep’t
SpecialistsTechnicians
Primary care doctorLead doctor
Case ManagerDep’t Head
Government Enlisted personnelNGOs/Contractors with limited security clearance
Non‐commissioned officersNGOs/Contractors with full security clearance
LieutenantsEnsigns
Lieutenant Commander
Commander

Using kiteworks
Folder Management and Actions
Page 24 kiteworks Web User’s Guide
The following table lists details about the specific roles and duties/responsibilities of each role.
Table 8. User Roles and Access Privileges
Permission Control Vi
ewer
Downloa
der
Collabo
rator
Man
ager
Owne
r
Notes
View files Yes Yes Yes Yes Yes View files without downloading the file to a desktop or device. Refer to Online Viewer.
View file expiration
Yes Yes Yes Yes Yes View the date a file expires. Refer to Change File Expiration Date.
View Activities — Yes Yes Yes Yes View activities for a file or folder. Refer to Recent Activities View: Track Your Work.
Download — Yes Yes Yes Yes Download a file or folder to the desktop or to a mobile device. Refer to Download, Download an Entire Folder, or Download File(s) via Applet.
Send file — Yes Yes Yes Yes Send a file to an internal or outside entity. Refer to Email a File.
Add Comment — Yes Yes Yes Yes Add comments to a file or folder and see comments made by others. Refer to Add a Comment.
Subscribe for notifications
— Yes Yes Yes Yes Request to receive an email notification any time an action is performed on a folder. Refer to Manage Notifications.
Be assigned a task — Yes Yes Yes Yes Users with Viewer privileges cannot be assigned a task. Refer to Add Tasks and Comments.
Send message — — Yes Yes Yes Send an email to all users in a folder. Refer to Send an Email to the Users of a Folder.
View users — — Yes Yes Yes View the users and their roles in a folder.
View other’s tasks — — Yes Yes Yes View tasks that have been assigned to other users. Refer to Add Tasks and Comments.
Assign tasks — — Yes Yes Yes Add a task to a file, set a due date, and assign the task to a user. Refer to Add Tasks and Comments.
Upload — — Yes Yes Yes Upload files to a folder. Refer to Upload to Folder.
Edit — — Yes Yes Yes Edit files using the integrated mobile editor. Refer to the kiteworks Mobile App User’s Guide for your particular device.
View/promote versions
— — Yes Yes Yes Access previous versions of the file and promote a previous version to become the latest version. Refer to View and Change Versions.
Delete versions — — Yes Yes Yes Delete a previous version of the file permanently. Refer to View and Change Versions.
Lock/unlock — — Yes Yes Yes Locking a file means the file cannot be edited. Refer to Lock/Unlock.
Delete files — — Yes Yes Yes Deleted files remain on the system for a set number of days before being permanently deleted. Refer to Delete and Recover a Deleted File.

kiteworks Web User’s Guide Page 25
Using kiteworks
Folder Management and Actions
Change User RolesTo change the role of an existing user in a folder, perform the following steps.
1 Navigate to the folder that you would like to share.
2 In the upper‐right corner of the screen, click Actions and select Manage People ( ). The Manage people window appears, listing all of the users who have access to the folder.
Change file expiration date or status
— — Yes Yes Yes Adjust the file expiration date or whether there is a file expiration date. Refer to Change File Expiration Date.
Delete folders — — — Yes Yes Deleted folders remain on the system for a set number of days before being permanently deleted. Refer to Delete and Recover a Deleted File.
Manage users — — — Yes Yes Add a user to a folder and set that user’s role within the folder; remove a user from accessing to a folder. Refer to Share Access to a Folder.
Create nested folders
— — — Yes Yes Create a nested folder under an existing folder. Refer to Create a New Folder.
Rename folders — — — Yes Yes Rename the folder or edit the folder description. Refer to Edit Folder Properties.
Permanently delete
— — — Yes Yes Permanently remove an item from the system so that it may not be restored and so that it no longer uses storage quota. Refer to Delete a File Permanently.
Enable/disable sync
— — — Yes Yes Enable and disable sync for a folder. Refer to Edit Folder Properties.
Delete others’ tasks or comments
— — — Yes Yes Remove or edit other users’ tasks or comments. (The comment or task creator can always delete or edit his own comments or tasks.) Deleting a comment also deletes all replies to that comment. Refer to Add Tasks and Comments.
Have uploaded files count against your quota
— — — — Yes When you are the owner of a folder whatever files or folders are uploaded to that folder by anyone else counts against your personal quota, set by your Administrator. For more information about quotas, refer to Manage Your Storage Quota.
Table 8. User Roles and Access Privileges
Permission Control Vi
ewer
Downloa
der
Collabo
rator
Man
ager
Owne
r
Notes

Using kiteworks
Folder Management and Actions
Page 26 kiteworks Web User’s Guide
3 Using the drop‐down menu, select the user’s new role.
Note If there are nested folders within the selected folder, you are prompted whether you would like to change the user’s new role to all nested folders.
You may only be able to “promote” the user to a higher level. To “demote” a user, you must go to the root folder to which the user was originally assigned.
4 A confirmation message appears at the top of the window. Click to close the window.
Delete a UserYou can only delete a user from a folder to which he was originally assigned; that is, you cannot delete a user from a nested folder when he has access to the parent folder.
1 Navigate to the folder to which the user has access.
2 In the upper‐right corner of the screen, click Actions and select Manage People ( ). The Manage People window appears, listing all of the users who have access to the folder.
3 Next to the user’s name, click the “delete” icon ( ). (If the icon does not appear, navigate up one level in the folder hierarchy, until the icon appears.)
4 A confirmation window appears, asking whether the deletion applies to all nested folders. Click your preference.
A confirmation message appears. The user no longer has access to the folder and its contents.

kiteworks Web User’s Guide Page 27
Using kiteworks
Folder Management and Actions
Manage Your Storage QuotaYour Administrator sets your storage quota. This quota applies to all folders that you own, and all files that are uploaded to the Move Tray (see Add or Upload Files). Having any other role in other folders does not affect your storage quota.
To manage your storage quota most efficiently, follow these best practices:
• Clear the Move Tray of files that you have uploaded (see The Move Tray).
• In folders that you own, delete unnecessary files (refer to Delete and Recover a Deleted File).
• Permanently delete files or folders that you have deleted from your folders (refer to Delete a File Permanently).
• Remove unnecessary previous versions of files in a folder (see View and Change Versions).
• Contact your kiteworks Administrator to increase your storage quota.
Send an Email to the Users of a FolderYou may need to send an email to users sharing a folder. This procedure is not to email a file to them, but simply to communicate with them via email.
To send an email to the users of a folder, perform the following steps.
1 Navigate to the folder.
2 In the upper‐right corner of the screen, click Actions and select Send message. The Send message window appears.

Using kiteworks
Folder Management and Actions
Page 28 kiteworks Web User’s Guide
3 From the list of users listed on the screen, click either TO or BCC. You can also click TO or BCC at the top of the list, selecting all users.
4 Type in the Subject and Body of the email.
Note If you have set a “signature” on the Settings page (refer to Message Signature), your signature is appended to your email.
5 Click Send. Your email is sent to the selected users as being from you (your listed display name).
6 When the recipient(s) click Sign In, they are taken to the folder from which you sent the message.
After signing in...

kiteworks Web User’s Guide Page 29
Using kiteworks
Folder Management and Actions
Folder ActionsWhen you select a folder, you can perform the following actions on that folder:
Create folder; see Create a New Folder
Upload; see Add or Upload Files
Request files; see Request a File
Recent activities; see Recent Activities
Manage people; see Share Access to a Folder
Set as favorite; see Make a Folder a Favorite
Send message; see Send an Email to the Users of a Folder
Edit properties; see Edit Folder Properties
Manage notifications; see Manage Notifications
Download current folder; see Download an Entire Folder (to enable the applet, refer to Message Signature)
Delete current folder; see Delete a Folder
Your ability to perform these functions may be limited by your role in that folder. For more information, refer to Roles.
Edit Folder PropertiesIf you are an Owner or Manager of a folder, you can edit the folder’s properties. These properties include the name and description of the folder, the folder expiration date, and the file expiration date.
Note If the folder is a “root” folder, that is, at the top of the folder hierarchy under “kiteworks Files”, you can edit the folder expiration date. Otherwise, this date cannot be edited.
In “root” folders, you can also edit whether the folder can be synced using the kiteworks Desktop Client. For more information about syncing, refer to the kiteworks Desktop Client Installation and User’s Guide. To download the Desktop Client, from the Help screen on the kiteworks interface, click Desktop Client for Mac or Windows.
To edit the properties of a folder, perform the following steps.
1 Navigate to the folder you would like to edit.

Using kiteworks
Folder Management and Actions
Page 30 kiteworks Web User’s Guide
2 In the upper‐right corner of the screen, click Actions and select Edit Properties. The Edit properties window appears.
3 Make the changes to the field(s) you wish to edit.
4 Click Submit. The properties have now been changed.
Manage NotificationsIf you are an Owner, Manager, Contributor, or Downloader in a folder, you can manage the notifications (email messages) that you receive about activity that occurs within the folder.
To edit the circumstances in which you receive notifications, perform the following steps.
1 Navigate to the folder you would like to manage.
2 In the upper‐right corner of the screen, click Actions and select Manage notifications. The Manage notifications window appears.
3 Click the activity for which you would like to receive a notification. Also indicate whether this change should apply to all nested folders within this folder.
4 Click Submit. You will then receive an email notification whenever that type of activity occurs within the folder.

kiteworks Web User’s Guide Page 31
Using kiteworks
Folder Management and Actions
Download an Entire FolderTo download the entire folder and its contents, perform the following steps.
1 Navigate to the folder you would like to download.
2 In the upper‐right corner of the screen, click Actions and select Download current folder.
3 Your browser may prompt you to allow Java permission to run. Click to allow it. Your operating system’s Select destination window appears.
4 Navigate to the location to which you would like the folder to be downloaded, and click Save.
5 You are shown the status of the download, and when the download is complete, you are shown “Download complete”.
6 Click to close.
If you click Cancel during the download, the download stops and, depending on how much of the download has progressed, the folder may be partially downloaded to the location you specified.

Using kiteworks
Folder Management and Actions
Page 32 kiteworks Web User’s Guide
TroubleshootingWhen you upload multiple files or folders using the applet, you must have Java installed on your system and your Administrator must have enabled the use of the applet.
If you have trouble with the applet, perform the following checks on your Java installation.
1 To check whether you have the most recent version and to download the newest version of Java, go to http://java.com and follow the steps.
2 If you have the most recent version of Java installed and are still having trouble, you may need to clear your Java cache. For instructions on how to do this, go to http://www.java.com/en/download/help/plugin_cache.xml and follow the instructions detailed there.
3 For Safari users on a Mac:
Run the applet in “Unsafe Mode” so it can access the files on your hard drive to upload them to kiteworks. The Java applet is blocked by default from running properly in the latest version of Safari on the latest version of Mac OS.
To change this setting manually, refer to Safari: About Internet Plugin Management.
Caution Enable Unsafe Mode only for trusted websites (like kiteworks) to keep your content secure.
For more help, contact your kiteworks Administrator.
Use Zip Files for Easy Transfer of Multiple FilesIf the folder to upload to kiteworks contains a large number of files, you may find it easier to create a zip file with all of the files in it. You can then upload the single zip file to kiteworks, so other users only have to download the single file.
1 In Windows systems, go to your desktop file management tool and right‐click the folder that contains the large number of files.
2 Click Send To and select Compressed (zipped) folder. The zip file is created.
3 Open kiteworks and navigate to the location that you would like the file to reside.
4 In the upper‐right corner of the screen, click Upload ( ). The Add new files menu appears.
5 From here, you can either:
• Drag the zip file and drop into the window.
OR• Click Choose Files, which opens the File Upload dialog box. From here, navigate to the zip file.
Select the file, and click Open.
6 Click Add. The zip file that contains all of the files you compressed is now located in the folder you selected and is available for download to those people with download access to the folder.

kiteworks Web User’s Guide Page 33
Using kiteworks
Folder Management and Actions
Delete a FolderIf you are an Owner or Manager of a folder, you can delete that folder and the folders nested within. The file may be recoverable after deletion, depending on Administrative settings. For more information about recovering files or folders, refer to Recover a Deleted or Expired File.
To delete a folder, perform the following steps.
1 Navigate to the folder you would like to delete.
2 In the upper‐right corner of the screen, click Actions and select Delete current folder. A confirmation window appears.
3 Click Yes. The folder is now deleted.
Note When you delete a folder, all nested folders are also deleted.
Recent ActivitiesWhen you are using the list view, you have the same access to all of the information shown in the detail view; however, you access that information differently.
To view recent activities in a folder, perform the following steps.
1 Using the list view, navigate to the folder about which you would like to see the recent activities.
2 In the upper‐right corner of the screen, click Actions and select Recent activities. The Recent activities window appears.
You can filter the activities that appear by:
Folders, for folder‐related actions (such as adding folders or changing the folder properties; adding, editing, or deleting users of the folder)
Files, for file‐related actions (such as uploading new, deleting, downloading, and viewing files; changing expiration dates; adding, deleting, and promoting versions of files)
Mail, for emails sent, received, deleted, and drafts saved
Tasks, for tasks relating to the files in the folder and progress of a task
Comments, for comments and replies made on files in the folder
3 Click Close.

Using kiteworks
Folder Management and Actions
Page 34 kiteworks Web User’s Guide
Make a Folder a FavoriteYou can filter the folder lists to show only those folders marked as “favorites”. When a folder is marked as a favorite, a blue star appears in the details about the folder.
Only folders can be marked as favorites. Individual files cannot be marked as favorites.
1 To mark a folder as a favorite, navigate to the folder to the folder.
2 In the upper‐right corner of the screen, click Actions and select Set as favorite ( ). The folder is now a “favorite” and the action is recorded as an Activity.
To show only favorite folders in your folder list, in the left Navigational bar, click Favorites ( ).
Access Enterprise Content Sources (License‐Enabled)With the Enterprise Connect feature enabled, kiteworks provides access to file share data when remote interface access is enabled.
Access to enterprise content sources is managed by your Accellion Administrator and you have access to the enterprise content sources based on your Active Directory privileges. Depending on the permissions set by your Administrator, you may also be able to add your own connections to different enterprise content sources.
Your Administrator can also configure your system to include your own Home Directory in a Windows, Unix, or Linux system.
The enterprise content sources appear when you are in the list view (refer to List View: Manage Your Files and Folders) or if you navigate to the highest level in the folder hierarchy in the detail view (refer to Detail View: Explore Your Files and Folders).
Detail View:
List View:
A
B
C
Actions on selected files or folders
B
C
A

kiteworks Web User’s Guide Page 35
Using kiteworks
Folder Management and Actions
From the enterprise content folders, you can perform the varying actions on files, depending on the source. Contact your Administrator for more information.
You use kiteworks to access files and folders, but you cannot make any changes to the folder hierarchy. The folder hierarchy continues to be managed outside of kiteworks. You can, however, add files and versions (where supported).
Refer to Use the Move Tray to Collaborate with Outside Users on Enterprise Content Files for tips on how to collaborate with others across multiple platforms.
Table 9. Enterprise Sources
Identifier Description Notes
A Types of Sources:
Box Icon indicates that the content source is Box.
Note End‐users cannot add a new Box source. To add a new Box source, contact your Administrator.
Documentum Icon indicates that the content source is Documentum.
Dropbox Icon indicates that the content source is Dropbox.
Note When you move files from a Dropbox source to kiteworks, the “Return to Content Source” action is not available. The action of moving the file from the Move Tray deleted the file from the source.
eDOCS Icon indicates that the content source is eDOCS. Note that the functionality using eDOCS is limited at this time.
Google Drive Icon indicates that the content source isGoogle Drive.
Note End‐users cannot add a new Google Drive. To add a new Google Drive, contact your Administrator.
Home Share Icon indicates that the content source is the home directory of your operating system. To add your Home Directory, contact your Administrator.
kiteworks Icon indicates that the content is in kiteworks.
OpenText Content Server Icon indicates that the content source is OpenText.
SharePoint or Microsoft OneDrive
Icon indicates that the content source is SharePoint 2007, 2010 or 2013, SharePoint Online, Microsoft OneDrive.
File Shares Icon indicates that the content source is Windows File Shares (CIFS / SMB / DFS).
B Details about the files and folders Lists details or files and folders contained in the selected folder.
C Actions on the files and folders Actions that you can perform on the selected files or folders.

Using kiteworks
Folder Management and Actions
Page 36 kiteworks Web User’s Guide
Add a New Enterprise Content Source to kiteworksWhen you have access to files from enterprise content sources, you may be able to add them to kiteworks, depending on your Administrator’s settings.
1 In the upper‐right corner of the screen, click New ( ) and select Add enterprise content source. The Add enterprise content source window appears.
Each enterprise content source prompts you for different information, depending on the source’s requirements. The Source types that you see are those that have been enabled by your Administrator. If you would like to add a source that is not listed, contact your Administrator.
2 Fill out the prompted information for the type of source:
• SharePoint and SharePoint Online; also applies to Microsoft OneDrive
• File Share (CIFS/SMB/DFS)
• Documentum
• OpenText Content Server
• eDOCS
• Dropbox
3 Click Add. The new enterprise content source should be added.
Note You may need to enter additional credentials to add a new content source. If this happens, you are shown an error message that says “Invalid credential”. The Add Enterprise content source window re‐appears, with the addition of Login ID and Password fields.
Fill in these fields and click Add.

kiteworks Web User’s Guide Page 37
Using kiteworks
Folder Management and Actions
SharePoint and SharePoint Online On the Add Enterprise content source window, under Source type, select SharePoint or SharePoint Online.
The following information must be added to the screen:
• Source name — You can choose any name for the source.
• Source URL — The URL to SharePoint site.
For example, for the SharePoint site http://sp2010‐demo/marketing/default.aspx the Source URL should be http://sp2010‐demo/marketing/default.aspx
• Description (optional) — Used to describe the connection.
File Share (CIFS/SMB/DFS)On the Add Enterprise content source window, under Source type, select File Share.

Using kiteworks
Folder Management and Actions
Page 38 kiteworks Web User’s Guide
The following information must be added to the screen:
• Source name — You can choose any name for the source.
• Source URL — The path to File Share.
• Description (optional) – Used only to describe the connection.
DocumentumOn the Add Enterprise content source window, under Source type, select Documentum.
The following information must be added to the screen:
• Source name — You can choose any name for the source.
• Source URL — The URL to Documentum site.
• Repository — The name of the Documentum Repository to which you want to connect.
• Description (optional) — Used only to describe the connection.

kiteworks Web User’s Guide Page 39
Using kiteworks
Folder Management and Actions
OpenText Content ServerOn the Add Enterprise content source window, under Source type, select OpenText Content Server.
The following information must be added to the screen:
• Source name — You can choose any name for the source.
• Source URL — The URL to OpeText Content Server site.
• Workspace — The name of the OpenText Workspace to which you want to connect.
• Description (optional) — Used only to describe the connection.
eDOCSOn the Add Enterprise content source window, under Source type, select OpenText Content Server.

Using kiteworks
Folder Management and Actions
Page 40 kiteworks Web User’s Guide
The following information must be added to the screen:
• Source name — You can choose any name for the source.
• Source URL — The URL to eDOCS site.
• Library — The name of the eDOCS library to which you want to connect.
• Description (optional) — Used only to describe the connection.
DropboxOn the Add Enterprise content source window, under Source type, select Dropbox. (This option is enabled by your kiteworks Administrator.)
The following information must be added to the screen:
• Source name — You can choose any name for the source.
• Description (optional) — Used only to describe the connection.
Microsoft OneDrivekiteworks supports OneDrive as a personal storage tool; each user provides his/her own connection details. The process to add a OneDrive source is slightly different than simply adding a new enterprise source.
To add a OneDrive source, perform the following steps.
1 Navigate to the top‐level of all folders.
2 In the upper‐right corner of the screen, click New ( ) and select Add enterprise content source ( ). The Add Enterprise content source window appears.
3 Under Source type, select SharePoint Online.

kiteworks Web User’s Guide Page 41
Using kiteworks
Folder Management and Actions
4 Add the OneDrive URL through “.com”, for example: https://<yourcompany>-my.sharepoint.com/personal/<user name>
5 Add a description for the folder (optional).
6 Click Add. The content source has now been added.
Note You may need to enter additional credentials to add a new content source. If this happens, an error message appears with “Invalid credential”. The Add Enterprise content source window then re‐appears, with the addition of Login ID and Password fields. Fill in these fields and click Add.

Using kiteworks
File Management and Actions
Page 42 kiteworks Web User’s Guide
Remove an Enterprise Content Source from kiteworksTo remove an enterprise content source from kiteworks, perform the following steps.
1 Using the list view (refer to List View: Manage Your Files and Folders), select the source you would like to delete.
2 In the upper‐right corner of the screen, click Actions and select Delete enterprise content source ( ). A confirmation screen appears.
3 Click OK. The enterprise content source is now removed from your list of enterprise sources.
File Management and ActionsWhen you select a file, you can perform actions on that file from the Actions menu in the upper‐right corner of the screen.
You can perform the following functions on files:
• Email a File and Email a Preview of a File

kiteworks Web User’s Guide Page 43
Using kiteworks
File Management and Actions
• Push File
• Download and Download File(s) via Applet
• Lock/Unlock
• Delete a File
• Add New Version
• Add to The Move Tray
• Return to Content Source (for files that were copied or moved from an enterprise content source; see Access enterprise content sources (License‐Enabled)
• Change File Expiration Date
Note Your ability to perform these functions may be limited by your role in that folder. For more information, refer to Roles.
Add or Upload FilesThere are four methods to upload a file from your desktop to kiteworks. Choose the one that works best for your circumstances:
• Upload to Folder
• Upload File(s) via Applet
• Drag and Drop into kiteworks
• Upload to the Move Tray
Upload to FolderThis procedure uploads files directly to a folder in kiteworks.
1 Navigate to the folder in which the file(s) will reside.
2 In the upper‐right corner of the screen, click Upload . The Add new files window appears.
3 From here:
a. Click Choose Files, which opens the File Upload dialog box. From here, navigate to your file(s). Select the file, and click Open.
OR
a b
c
Folder Name
Using kiteworks
File Management and Actions
Page 44 kiteworks Web User’s Guide
b. Click use java applet to upload files. If you choose this option, refer to Upload File(s) via Applet.
ORc. Drag the file(s) and drop into the window.
Note The source location for the file must be from your operating system or desktop; the files cannot be located in another app, for example, Microsoft Outlook.
4 Click Add. The file is now located in the folder you selected and is available to those people with access to the folder.
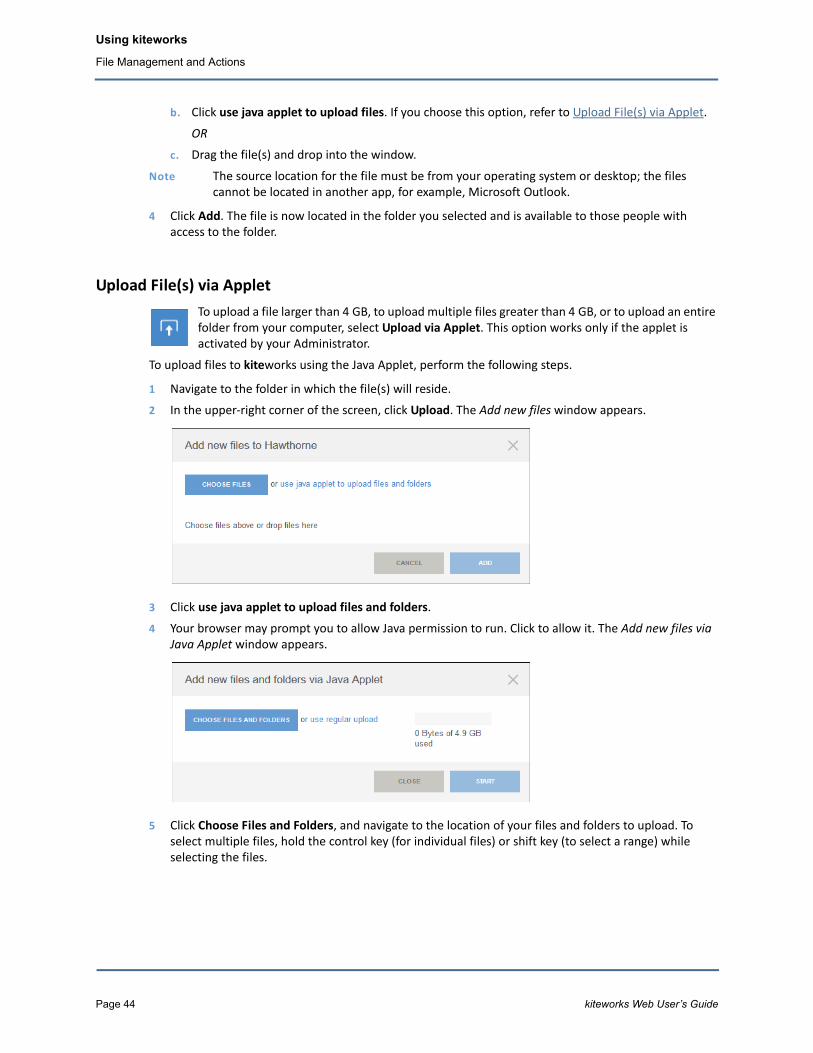
Upload File(s) via AppletTo upload a file larger than 4 GB, to upload multiple files greater than 4 GB, or to upload an entire folder from your computer, select Upload via Applet. This option works only if the applet is activated by your Administrator.
To upload files to kiteworks using the Java Applet, perform the following steps.
1 Navigate to the folder in which the file(s) will reside.
2 In the upper‐right corner of the screen, click Upload. The Add new files window appears.
3 Click use java applet to upload files and folders.
4 Your browser may prompt you to allow Java permission to run. Click to allow it. The Add new files via Java Applet window appears.
5 Click Choose Files and Folders, and navigate to the location of your files and folders to upload. To select multiple files, hold the control key (for individual files) or shift key (to select a range) while selecting the files.

kiteworks Web User’s Guide Page 45
Using kiteworks
File Management and Actions
6 Click Start. The uploading process begins, showing you the progress of the upload.
If any errors occur while uploading a file, the error is shown in this window. If errors occur, you are shown a list of those files that were unsuccessfully uploaded, with the option to try again.
7 When the upload is complete, a Success message appears, showing you a list of those files that were uploaded.
8 Click or Close to close.
TroubleshootingWhen you upload multiple files or folders using the applet, you must have Java installed on your system and your Administrator must have enabled the use of the applet.
If you have trouble with the applet, perform the following checks.
1 To check whether you have the most recent version and to download the newest version of Java, go to http://java.com and follow the steps.
2 If you have the most recent version of Java installed and are still having trouble, you may need to clear your Java cache. For instructions on how to do this, go to http://www.java.com/en/download/help/plugin_cache.xml and follow the instructions listed there.
3 For Safari users on a Mac:
Run the applet in “Unsafe Mode” so it can access the files on your hard drive to upload them to kiteworks. The Java applet is blocked by default from running properly in the latest version of Safari on the latest version of Mac OS.
To change this setting manually, refer to Safari: About Internet Plugin Management.
Caution Enable Unsafe Mode only for trusted websites (like kiteworks) to keep your content secure.
For more help, contact your kiteworks Administrator.

Using kiteworks
File Management and Actions
Page 46 kiteworks Web User’s Guide
Drag and Drop into kiteworksPerform the following steps to add a new file into kiteworks.
1 Navigate to the folder in which the file(s) will reside.
2 From your operating system’s file browser or desktop, drag the file you would like to upload to kiteworks. A blue dotted outline appears around the destination folder.
Note The source location for the file must be from your operating system or desktop; the files cannot be located in another app, for example, Microsoft Outlook.
In this case, the file could be dropped in the selected folder, in any of the sub‐folders in the selected folder, or in the Move Tray.
3 Drop the file into your preferred location. A confirmation window appears. (To add more files to the same location, click Choose Files.)
4 Click Add. After processing, the file is now uploaded to the location you specified.
Possible locations to drop the file
Current folder selected

kiteworks Web User’s Guide Page 47
Using kiteworks
File Management and Actions
Drag and Drop between FoldersTo move files between folders, perform the following steps.
1 Select the list view ( ), which shows all of the folders available to you.
2 Select the file(s) to move, and drag the file to the destination folder. A blue dotted outline appears around the destination folder.
3 A dialog window appears, asking whether you intend to copy the file(s) or move the file(s).
When you move a file to another folder, the file history, comments, and tasks move with the file. The file will be soft‐deleted in the source location (it will be recoverable) and a new copy will be created in the destination.
When you copy a file to another folder, the copied file does not retain its history or associated tasks or comments. The original file remains in its original location and is copied to the destination folder.
4 A confirmation message appears, and the file has been copied or moved to the location you specified.
Note You cannot move locked files, but you can copy files that are locked.

Using kiteworks
File Management and Actions
Page 48 kiteworks Web User’s Guide
Upload to the Move TrayThis procedure uploads files directly to the Move Tray. From there, you can move or copy the file to another location in kiteworks. Until the file is moved or copied to another shared folder, no one can access this file. For more information about the Move Tray, refer to The Move Tray.
To upload a file to the Move Tray, perform the following steps.
1 In the left Navigation menu, click Move Tray ( ). The Move Tray panel appears.
2 In the Move Tray panel, click the “ ” icon and select Add files. The Add new files to tray window appears. From here, you can either:
• Drag the file(s) and drop into the window
OR• Click Choose File, which opens the File Upload dialog box of your operating system. From here,
navigate to and select the file(s), and click Open.
3 Click Add. The file is now located in the Move Tray and can be copied or moved to another folder in kiteworks.
Caution If you clear the tray or delete a file without uploading the file to another location in the system, the file will be deleted from kiteworks. It is un‐recoverable.
DownloadTo view or edit a file, you must first download that file to your desktop. This action extracts the file from the kiteworks server.
Note If your user role is set to View Only in a folder, you may not download the file and can only view the file using the Online Viewer.
To download a file, perform the following steps.
1 Navigate to and select the file you would like to download.
File Actions from the Move TrayAdd Files to the Move Tray

kiteworks Web User’s Guide Page 49
Using kiteworks
File Management and Actions
2 In the upper‐right corner of the screen, click Actions and select Download.
A window from your OS appears, prompting you to either directly open the file, or to save it to a particular location.
3 Select your preference using the radio buttons. If you choose to save the file, you will be prompted to specify where you would like the file to be saved.
4 Click OK. Your file is then downloaded to your system and opened using your specified program, or downloaded to your specified location.
Online ViewerIf you have a Viewer role in a folder, you cannot download any file from that folder. The only way you can view that file is to use the Online Viewer. If the user were to attempt to take a screen shot, the image becomes obscured.
Note You cannot use the Online Viewer on enterprise content files; this feature is only available for kiteworks files. For more information about enterprise content, refer to Access enterprise content sources (License‐Enabled).
Note Files larger than 25 MB or that take longer than one minute to render are not supported. To view this file, download it then open it. If you have a View Only role, contact the owner or manager of the folder to have him/her change your role.
Using kiteworks
File Management and Actions
Page 50 kiteworks Web User’s Guide
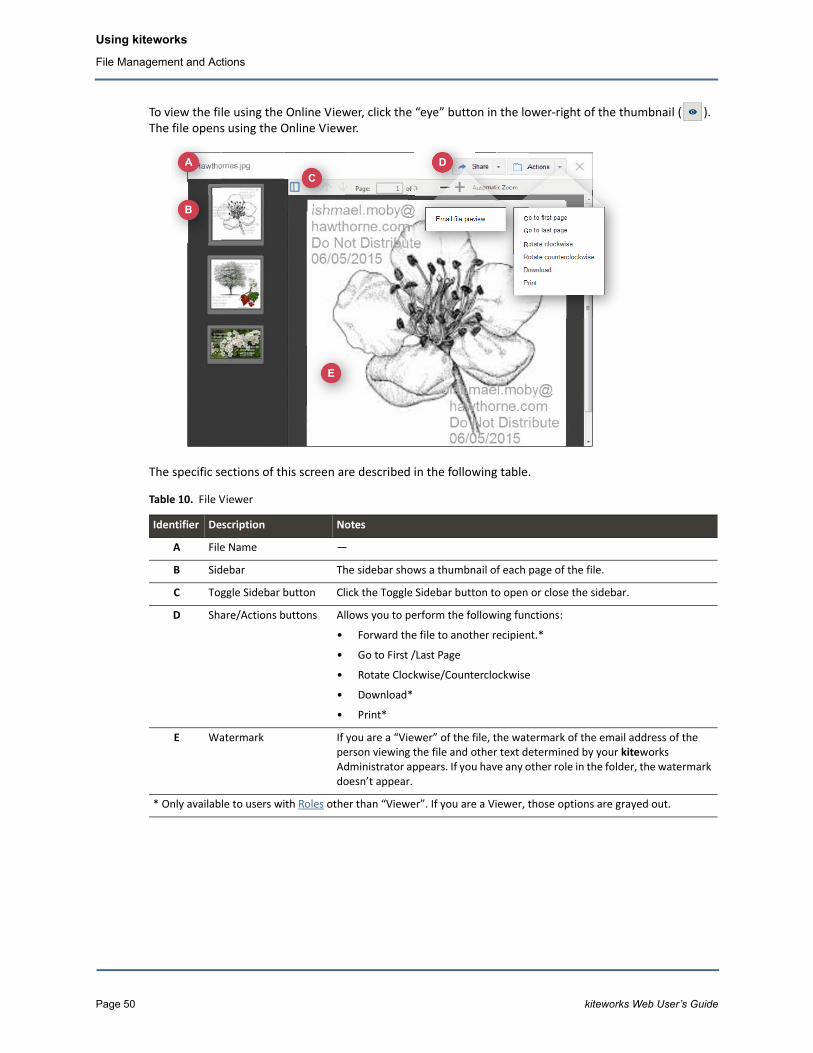
To view the file using the Online Viewer, click the “eye” button in the lower‐right of the thumbnail ( ). The file opens using the Online Viewer.
The specific sections of this screen are described in the following table.
Table 10. File Viewer
Identifier Description Notes
A File Name —
B Sidebar The sidebar shows a thumbnail of each page of the file.
C Toggle Sidebar button Click the Toggle Sidebar button to open or close the sidebar.
D Share/Actions buttons Allows you to perform the following functions:
• Forward the file to another recipient.*
• Go to First /Last Page
• Rotate Clockwise/Counterclockwise
• Download*
• Print*
E Watermark If you are a “Viewer” of the file, the watermark of the email address of the person viewing the file and other text determined by your kiteworks Administrator appears. If you have any other role in the folder, the watermark doesn’t appear.
* Only available to users with Roles other than “Viewer”. If you are a Viewer, those options are grayed out.
A
B
CD
E
D

kiteworks Web User’s Guide Page 51
Using kiteworks
File Management and Actions
Download File(s) via AppletIf the file is larger than 4 GB or if you want to download multiple files, you must select Download via Applet from the File actions menu. This option only functions if the applet is activated in your settings.
To download using the Applet, perform the following steps.
1 Navigate to and select the file(s) you would like to download.
2 In the upper‐right corner of the screen, click Actions and select Download via applet ( ).
3 Your browser may prompt you to allow Java permission to run. Click to allow it. Your operating system’s Select destination window appears.
4 Navigate to the location to which you would like the file(s) to be downloaded, and click Save.
5 You are shown the status of the download, and when the download is complete, Download complete appears.
6 Click to close.

Using kiteworks
File Management and Actions
Page 52 kiteworks Web User’s Guide
TroubleshootingWhen you upload multiple files or folders using the applet, you must have Java installed on your system and your Administrator must have enabled the use of the applet.
If you have trouble with the applet, perform the following checks on your Java installation.
1 To check whether you have the most recent version and to download the newest version of Java, go to http://java.com and follow the steps.
2 If you have the most recent version of Java installed and are still having trouble, you may need to clear your Java cache. For instructions on how to do this, go to http://www.java.com/en/download/help/plugin_cache.xml and follow the instructions detailed there.
3 For Safari users on a Mac:
Run the applet in “Unsafe Mode” so it can access the files on your hard drive to upload them to kiteworks. The Java applet is blocked by default from running properly in the latest version of Safari on the latest version of Mac OS.
To change this setting manually, refer to Safari: About Internet Plugin Management.
Caution Enable Unsafe Mode only for trusted websites (like kiteworks) to keep your content secure.
For more help, contact your kiteworks Administrator.
Push FilePush a file so that it will download locally onto all devices synced with his kiteworks folder, making it available for viewing offline.
1 Navigate to the folder in which the file(s) resides.
2 In the actions for the file, choose Push File

kiteworks Web User’s Guide Page 53
Using kiteworks
File Management and Actions
3 A confirmation window will appear. To confirm that you want to push this file so that it will download locally onto all devices synced with this kiteworks folder, click yes. Otherwise, click no.
Lock/UnlockYou can lock and unlock files so others cannot edit and re‐upload the file while you work on it. When a file is locked, other users sharing the folder cannot delete or update that file. They can, however, download and comment on the file.
A locked file can be unlocked only by the user who locks it, or by the folder’s Owner or Manager.
To lock a file, with the file selected, click Actions, and select Lock ( ). The file is now locked, with indicators as such on both views of the file. Only you can upload a new version of the locked file.
Note A locked file does not become unlocked automatically when you upload a new version of the file. When you upload a file that you have locked, you must explicitly unlock it for others to be able to update it.
To unlock a file, from the Actions drop‐down menu, click Unlock ( ). The file is now unlocked and can be updated by other users.
Detail View
List View

Using kiteworks
File Management and Actions
Page 54 kiteworks Web User’s Guide
Delete and Recover a Deleted FileYou can Delete a File from a folder if you are an owner, manager, or collaborator in that folder. If the file is deleted accidentally or the file expires, you may be able to Recover a Deleted or Expired File.
Delete a FileTo delete a file, perform the following steps.
1 To delete a file, with the file selected, click Actions and select Delete ( ). A confirmation window appears.
2 Click Yes. The file has now been deleted from kiteworks.
Recover a Deleted or Expired FileIf you have deleted a file accidentally or the file expires (refer to Change File Expiration Date), you may be able to recover that file.
Depending on whether you prefer to work in the detail view or the list view, follow the steps below.
Note File recovery is not supported for enterprise content sources. If you move a file out of an enterprise source and wish to recover the deleted file, you must go to the source to retrieve it.

kiteworks Web User’s Guide Page 55
Using kiteworks
File Management and Actions
Detail ViewTo recover the deleted file, perform the following steps using the detail view.
1 Navigate to the folder from which the file was deleted. Deleted files and folders are listed in the information section of that folder.
2 Click the listed deletions in the details about the folder.
3 Select the file(s) or folder(s) that you would like to recover.
4 Click Recover. The item re‐appears in the folder.
If the file had expired and you recover the file, the new expiration date is the default that has been set by your administrator. It would be as if you uploaded the file as a new file.
You have 14 days to recover your file. Your kiteworks Admin can change that default, however. For more information about recovering deleted files, contact your Admin.
1
2
3
4

Using kiteworks
File Management and Actions
Page 56 kiteworks Web User’s Guide
List ViewTo recover the deleted file, perform the following steps in the list view.
1 Navigate to the folder in which the file was deleted.
2 Click the Filter icon ( ). A list of possible ways to filter the contents of the folder appears.
3 Select Deleted. A list of deleted items appears.
4 Click the downward arrow ( ). A list of file actions appears.
5 Click Recover ( ). The file re‐appears in the folder.
If the file had expired and you recover the file, the new expiration date is the default that has been set by your administrator. It would be as if you uploaded the file as a new file.
You have 14 days to recover your file. Your kiteworks Admin can change that default, however. For more information about recovering deleted files, contact your Admin.
Delete a File PermanentlyTo increase your storage in a folder, delete files or folders permanently. Depending on whether you prefer to work in the detail view or the list view, follow the steps below.
1
2
3
44
5

kiteworks Web User’s Guide Page 57
Using kiteworks
File Management and Actions
Detail ViewTo delete a file permanently, perform the following steps.
1 Navigate to the folder in which the file was deleted. Deleted files and folders are listed in the information section of that folder.
2 Click on the listed deletions in the details about the folder.
3 Select the file(s) or folder(s) that you would like to delete permanently.
4 Click Permanently Delete.
After a confirmation message appears, file or folder is now deleted and not recoverable. It is also now removed from your storage quota.
1
2
4
2
3
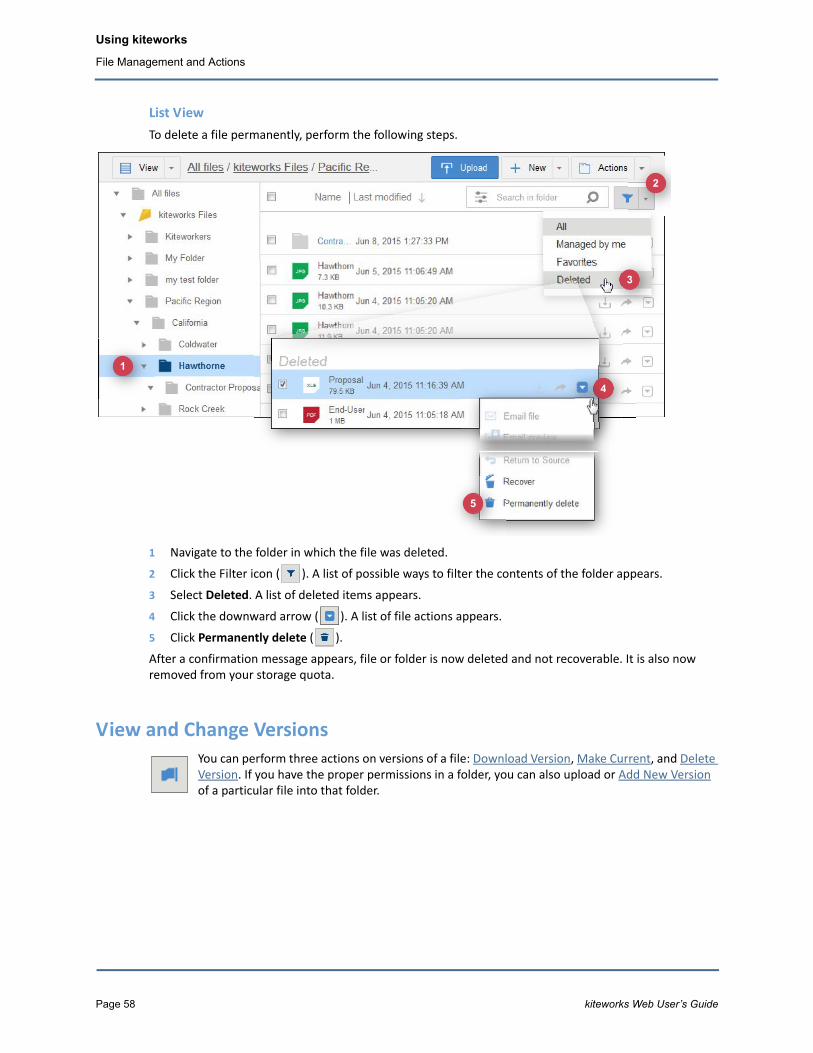
Using kiteworks
File Management and Actions
Page 58 kiteworks Web User’s Guide
List ViewTo delete a file permanently, perform the following steps.
1 Navigate to the folder in which the file was deleted.
2 Click the Filter icon ( ). A list of possible ways to filter the contents of the folder appears.
3 Select Deleted. A list of deleted items appears.
4 Click the downward arrow ( ). A list of file actions appears.
5 Click Permanently delete ( ).
After a confirmation message appears, file or folder is now deleted and not recoverable. It is also now removed from your storage quota.
View and Change VersionsYou can perform three actions on versions of a file: Download Version, Make Current, and Delete Version. If you have the proper permissions in a folder, you can also upload or Add New Version of a particular file into that folder.
1
2
3
44
5

kiteworks Web User’s Guide Page 59
Using kiteworks
File Management and Actions
Figure 1. Detail View
DownloadMake Current
Delete Version

Using kiteworks
File Management and Actions
Page 60 kiteworks Web User’s Guide
Figure 2. List View
Download VersionTo download a previous version of the file, click the download icon for the version you would like to download. You are then prompted either open the file using a particular program, or to save the file to a particular folder.
Make CurrentTo make a previous version of the file into the current version, click the flag icon. This does not discard the newest version, but makes the selected file the current version. The other versions are still accessible to other users, should they wish to see them.
Delete VersionTo discard a version of the file, select the version of the file you wish to delete and click the “remove” icon. A confirmation window appears. Confirm that you would like to delete that version, and the file is deleted. It will not be available for others to view.
DownloadMake Current
Delete Version

kiteworks Web User’s Guide Page 61
Using kiteworks
File Management and Actions
Add New VersionTo add a new version of an existing file, perform the following steps.
1 Select the file that has a new version to be uploaded.
2 Click the Actions button, and select Add new version ( ). The Add new version menu appears.
3 Click Choose file. The File Upload menu appears.
4 Navigate to the new version of the file that is saved on your system.
Note The new version does not necessarily have to have the exact same name as the file currently existing in kiteworks.
5 Click Open.
6 Click Add. The file is now uploaded and is the new current version.
Caution If you upload a file with the exact same name as a file already existing in that folder, the file replaces the current version with the one you have just uploaded. The file is not overwritten, as collaborators, managers, and the owner still have access to previous versions of the same file. To undo this action, Make Current the previous version.
The Move TrayThe Move Tray is a staging area for moving files within kiteworks. To move files in kiteworks, drag the file(s) into the tray, and from the tray, drag to a new location.
Click the Move Tray icon in the navigation panel. The Move Tray column appears.
Move Tray Actions: Copy and MoveWhen you move a file to another folder, the file history and comments move with the file. The file is deleted from the tray and from its original location when the move is completed.

Using kiteworks
File Management and Actions
Page 62 kiteworks Web User’s Guide
Note When you move files specifically from a Dropbox source, they are deleted from the source and moved from the Move Tray to the location you specify. Previous versions and comments and tasks associated with the file are deleted.
When you copy a file to another folder, the copied file does not retain its history or comments. It remains in its original location and in the tray.
To move or copy files, perform the following steps.
1 Add the file to the move tray. There are three ways to put a file into the Move Tray:
a. Drag the file from its current location (either on your desktop or within kiteworks) into the open Move Tray or onto the Move Tray icon on the navigation panel.
ORb. Select the file in kiteworks, and from the Actions menu, select Add To Move Tray.
ORc. In the Move Tray, click the Add new icon ( ) and select Add files; then navigate to the file
location and add the file to the Move Tray.
When the file has been moved to the Move Tray, a small numeral appears with the Move Tray icon in the navigation panel. This indicates the number of files that currently exist in the Move Tray.
2 Navigate to the folder location where you would like to move the item.
3 In the Move Tray, select the file(s) to be moved.
4 At the top of the gray Move Tray menu, click the Actions icon ( ). A list of actions you can perform on those file appears.
5 Click the action you wish to perform. (Note that you can email a file directly from the Move Tray. For more information, refer to Email a File.)
Note To close the Move Tray, click the “ ” in the left corner of the tray, or click the move tray icon ( ) in the navigation panel.

kiteworks Web User’s Guide Page 63
Using kiteworks
File Management and Actions
Upload Files Directly to the Move TrayYou can upload files directly to the Tray from your desktop. To do this, drag the file from your desktop to the Move Tray.
Until the file is moved or copied to another shared folder, no one can see the file in your Move Tray.
The size of these files counts against your total quota allowed in kiteworks.
Caution If you clear the tray or delete the file without uploading it to another location in the system, the file will be deleted. It is un‐recoverable.
Use the Move Tray to Collaborate with Outside Users on Enterprise Content Files The Move Tray can be used to collaborate on files pulled from multiple enterprise content sources: SharePoint, Windows File Shares, etc. You can consolidate files from many content sources into the Move Tray, then move the files to a Shared Folder to simplify collaboration.
You can also email multiple files from multiple sources in a single email using the Move Tray.
For more information about enterprise content collaboration, refer to Access enterprise content sources (License‐Enabled).
To use the Move Tray to collaborate on files from multiple enterprise content sources, perform the following steps.
1 Add files from your source to your move tray.
Drag and Drop
Drag and Drop

Using kiteworks
File Management and Actions
Page 64 kiteworks Web User’s Guide
2 In kiteworks files, create a new folder or navigate to an existing folder to which you invite users (refer to Create a New Folder and Share Access to a Folder).
3 Copy the files from your Move Tray to the new folder (refer to Move Tray Actions: Copy and Move).
Note If the source of the file is Dropbox, you are shown the option of moving the file in addition to copying it. If you select Move, a confirmation message appears.
In the detail view, you are shown the source of the file in addition to its current location.
4 Perform your collaboration with subscribers to the folder you have created.

kiteworks Web User’s Guide Page 65
Using kiteworks
File Management and Actions
5 When collaboration is complete, upload the files back to the source location (click Return to Content Source from the Actions menu).
Note If the original source was from Dropbox and you moved the file instead of copying the file, the “Return to Content Source” action will not be available. The action of moving the file from the Move Tray deleted the file from the source. In this case, upload the edited file directly back to Dropbox.
Change File Expiration DateAn expiration date for a file is the date at which the file will cease to exist in a folder and will appear as a deleted file.

Using kiteworks
File Management and Actions
Page 66 kiteworks Web User’s Guide
Users with an Owner or Manager role in a folder can change the date or expiration status of a file. Depending on your Administrator’s settings, users with a Collaborator role may be able to extend the expiration date of a file. All users can view the expiration date of a file.
1 To change the expiration date for a file, click the Actions button and select File expiration, or, on the detail view, click the expiration date. A calendar window appears.
2 Select the new expiration date.
3 Click Submit. The updated expiration date changes.
Note You cannot set the file expiration past the folder expiration date, which is set by the creator of the folder, or owner. To change the folder expiration date, refer to Edit Folder Properties.
Depending on your Administrator’s settings, you may be able to Recover a Deleted or Expired File.
MailYou can Email a File from kiteworks to another user. Instead of attaching the file itself to the email, kiteworks adds a link to the file and puts it in the email. When the recipient receives the email, s/he clicks the link and downloads that file to his or her own system.
You can also Email a Preview of a File, which means that instead of sending a link to a downloadable file, you send a link to a view‐only version of the file that cannot be edited.
When you send or receive a file, send a file preview, or save an email draft, that activity appears in the folder using the detail view and .

kiteworks Web User’s Guide Page 67
Using kiteworks
File Management and Actions
To find out more information about the mail or to download, resend, or withdraw a file that was emailed, click the mail as shown above. The options available to you then appear.
Note If attached files are updated before the email is sent or re‐sent, the file that is sent is the one that originally was attached to the email. The updated file is not sent automatically.
If you have saved a draft, click the activity, and you are given the option to either edit the email or delete the draft.
When you withdraw a file, the activity still appears in the Activity stream, but the link to the file is grayed out.
What is the difference between sending a file and sharing a folder?
When you share a folder, you allow other users to access the files within that folder, the extent to which depends on the permissions (“Roles”) you assign to each user. However, you cannot specify individual roles for a single file within a folder. All files in the folder are shared according to each user’s assigned role.
When you send a file, you email that file to the recipient, regardless of whether they have access to the folder in which it resides.
For more information about sharing a folder, refer to Share Access to a Folder. For more details about user roles, refer to Roles.
Why would I want to send a file or file preview over sharing a folder?
Suppose you have a single file that you would like to share with an individual, but do not want to give that person access of any kind to the folder in which that file resides. In this case, you would want to email the file. The recipient receives the email from you with a link to the file, which the recipient can use to download or view the file.
Whether you send the file or file preview depends on how much control you would like the recipient to have over that file (download, forward, print, edit, etc.). If you want the recipient to do anything other than view the file, send the file. Otherwise, send a file preview.
Email a FileTo share a single file with another individual, email the file via kiteworks. These files are downloadable by the recipient, and the recipient can edit and distribute that file without regard to the file’s original security level.
To send — or email — a file, perform the following steps.
1 Navigate to the file to send, and select that file.

Using kiteworks
File Management and Actions
Page 68 kiteworks Web User’s Guide
2 Using one of the three methods below, select Email files.
3 Fill in all of the fields.
To send the file to multiple recipients, separate email addresses with a comma.
If the link at the bottom of the Email File screen is a live link, you can set Security Settings for your recipient(s). You have two options:
• Only listed recipients: Recipients cannot forward files to others. (This is the default.)
• Anyone ‐ no authentication required: Recipients can forward files to others.
To add additional files to the email, perform the following steps.
a. To add files from your desktop, click Add files and select Upload local file or Upload using Java Applet. (For more information about the Applet, refer to Upload File(s) via Applet.) To add files from kiteworks, click Browse kiteworks. A new window appears.
b. Navigate to the location of the file to add to the email.
c. Select the file(s) to attach to the email. The file(s) is now listed under “Attached files” on the Email File screen.
4 Click Send. An email containing a link to the file is sent to the person(s) you specified as a recipient, and the activity is listed on the Activity view.
Note If you click Cancel, you are prompted to save or discard your draft. If you save the draft, the action of saving the draft is listed on the Activity view. To access the draft, from the Activity view (refer to Recent Activities View: Track Your Work), click on the activity. You then have the option to open the draft and discard, edit, or send it.
1 2
3

kiteworks Web User’s Guide Page 69
Using kiteworks
File Management and Actions
5 If the recipients don’t receive the email in a short while, advise them to check their spam filter, as the email may have been mis‐identified. Also advise them to add your email address to their list of accepted contacts.
(Alternatively, you can click the “Email” button on the navigation panel, select Compose, then add a file to that email. Skip to Step 3 above.)
Email a Preview of a FileEmailing a “preview” of a file means that instead of sending a link to an editable and downloadable file, you send a link to view the file online, which cannot be edited. This feature is only available for files 20 MB or smaller.
As a recipient, you can only view the file and cannot forward it.

Using kiteworks
File Management and Actions
Page 70 kiteworks Web User’s Guide
To send — or email — a preview of a file, perform the following steps.
1 Navigate to the file to send, and select that file.
2 Using one of the two methods below, select Email file preview.
3 Fill out all of the listed fields.
• To
The email address of the recipient(s); separate each email address with a comma.
• Subject/Message
Determined by you; if you have a signature set in your personal settings, the signature will appear here.
• Add custom text to watermark
If you select this box, a watermark that you determine appears overlaid on the file. This watermark is not affixed permanently to the file. It only appears to the recipient when the file is sent as a preview.
Your Administrator may also add some default fields after your text. In this case, this includes “Sent to”, the name of the person sending the file, the date it was sent, and an admin‐determined text that, in this case, says “AdminDefault”.
Watermark set by your Administrator
1
2
1

kiteworks Web User’s Guide Page 71
Using kiteworks
File Management and Actions
• Attached Files
The name of the preview that is attached.
4 Click Send. The recipient receives an email with a link to the file preview.
5 The recipient clicks the link and is directed to a kiteworks screen.
6 The recipient clicks the “eye” button in the lower‐right of the thumbnail ( ). The file opens, using the Online Viewer.
Watermark
Text from the body of the email
Click to view the file
A
B
CD
E
D

Using kiteworks
File Management and Actions
Page 72 kiteworks Web User’s Guide
The specific sections of this screen are described in the following table.
The default expiration date for the link to the file is 30 days following the date that it was sent. To change this date, contact your Administrator.
Request a FileAnother way to collaborate using the email function of kiteworks is to request a file from an individual who may or may not be part of your kiteworks contacts or have access to your kiteworks folders.
When you request a file from an external contact, you provide to that person a link that he or she can use to upload the file to you, where you can then download it securely.
Note This feature is managed by your Administrator. If you cannot request a file, contact your Administrator to enable this feature.
To request a file, perform the following steps.
1 Navigate to the folder in which you would like the requested file to reside.
Table 11. File Viewer
Identifier Description Notes
A File Name —
B Sidebar The sidebar shows a thumbnail of each page of the file.
C Toggle Sidebar button Click the Toggle Sidebar button to open or close the sidebar.
D Share/Actions buttons Allows you to perform the following functions:
• Go to First /Last Page
• Rotate Clockwise/Counterclockwise
E Watermark If you are a “Viewer” of the file, the watermark of the email address of the person viewing the file and other text determined by your kiteworks Administrator appears. If you have any other role in the folder, the watermark doesn’t appear.

kiteworks Web User’s Guide Page 73
Using kiteworks
File Management and Actions
2 Click the New button ( ) and select Request files. The Request files window appears.
3 Fill out the listed fields.
To (required) The recipients can be anyone, regardless of whether they are members of your organization. Separate multiple addresses with a comma. Each recipient receives a unique upload link.
Subject (required) The subject of the email that will be sent.
Message (optional) The message of the email.
Advanced Options:
Require authentication for file uploads Indicate whether uploader will need an authenticated kiteworks account to upload the file. If the user does not have a kiteworks account, s/he will be prompted to create an account before uploading.
Note If the uploader is within your organization’s domain, s/he would need a license. If the uploader is outside of your organization’s domain, s/he would be a restricted user and would not use a license.
Upload Link Expires This is how long the invitation to upload a file will be valid. The default is one week from the current date. You can select another date, or indicate that the link will never expire.
Maximum Uploads (required) This is the number of files each uploader is allowed to upload using this invitation.
Viewable Files When users upload files to the folder using this invitation, they cannot see the other files that are in the folder, either already existing or uploaded by other users. You may, however, indicate files that the uploader can see, either to view or download. To select those files that can be viewable, perform the following steps.
a. Click Select Files. The Viewable files window appears, showing all files that currently exist in the folder.
b. Select the extent of the uploader’s ability to use those files (Viewed or View and Downloaded).

Using kiteworks
File Management and Actions
Page 74 kiteworks Web User’s Guide
c. Select the files to include.
d. Click Next.
4 Click Send Request. An email is then sent to your contact(s), with the following info.
At the same time, you receive a notification in Recent Activities View: Track Your Work, for each person from whom you requested files. You have the option to withdraw the request from this view. (If you withdraw the request, the withdrawal also appears in the Activity feed.)

kiteworks Web User’s Guide Page 75
Using kiteworks
File Management and Actions
5 The contact clicks the Sign In button, and after authentication (if required), is taken to the following screen, using his or her default browser.
In this case, because the Requester indicated that the “Proposal Worksheet” is both viewable and downloadable, the “view” icon ( ) and the “download” icon ( ) appear next to the “Proposal Worksheet” file.
6 The uploader clicks Select Files, which opens the his/her operating system explorer, and navigates to the requested file. Alternatively, s/he can drag and drop the files into the space indicated on the page.
7 The uploader then clicks Upload, and the files are uploaded to the location that you specified when you sent the original request. The uploader also gets confirmation that the upload was successful by a new field on the Uploader window: Files uploaded by me.

Using kiteworks
File Management and Actions
Page 76 kiteworks Web User’s Guide
Note Optional: If the uploader wishes to make a comment about any of the uploaded files, s/he can click the “comment” icon ( ), make the comment, and click Save. Only authenticated users can make comments on their files.
Note If the uploader uses the link from the invitation email to return to the upload page, s/he can upload the file again, and the file will be versioned to the new version. Be aware, however, that this version counts towards the maximum number of uploads that you specified in the invitation message.
8 The files are now uploaded with the associated comments made by the uploader. You, the requester, can view all of the files uploaded by the uploaders.
Uploaders can only see those files uploaded by them and the files you marked as viewable in the Request File window.If, in the request, you specified that the uploader must be authorized by kiteworks before uploading, the uploaded files will show the user name of the uploader in parentheses as a part of the file name; for example, FileName(UploaderEmailAddress).doc.
Caution If a user already has a role in the folder, the permissions that come with that role still apply. For example, if the user is already a Viewer in the folder, he will be able to view all files uploaded to the folder, including those uploaded by those listed in the invitation.

kiteworks Web User’s Guide Page 77
Using kiteworks
File Management and Actions
9 In the meantime, you, the requester, receive an email with the link to the file that was uploaded.
10 You can download the file by clicking the Download button in that email, or you can go to your kiteworks folder structure to verify that the file was uploaded correctly.
Add Tasks and Comments Those people who have access to a shared folder in kiteworks can add a comment to the folder. Owners, Managers, and Collaborators can also assign tasks to other users based on the contents of a folder.
TasksAs an owner, manager, or collaborator, you can assign a task to other people who have access to a folder.

Using kiteworks
File Management and Actions
Page 78 kiteworks Web User’s Guide
Assign a TaskTo assign a task, navigate to the file associated with the task, and perform the following steps in the detail view.
1 Click the tasks icon. The Add a task field opens, where you describe the task.2 Click the “person” icon ( ) to see a list of people to whom you can assign the task. These are people
who have access to the folder. Select the person.
3 Click the “calendar” icon ( ) and select a due date.
4 Click Submit. The task now appears in the detail list when the file is selected. The assignee also receives an email with the details about the task.
The assignee can now indicate the status on the task, from “Defined”, “In progress”, or “Completed”.
1
3
4
2

kiteworks Web User’s Guide Page 79
Using kiteworks
File Management and Actions
Change the Status of a TaskWhen a task is assigned to you, you can notify the originator of the task the status of that task. To change the status of a task, perform the following steps.
1 Click on the task. Two icons appear: Edit ( ) and Delete ( ). Click the “edit” icon.
2 Click in the Status field. A drop‐down menu appears, and select the status you wish: “Defined” (the default when a task is assigned), “In progress”, or “Completed”.
3 Click Submit.
1
23
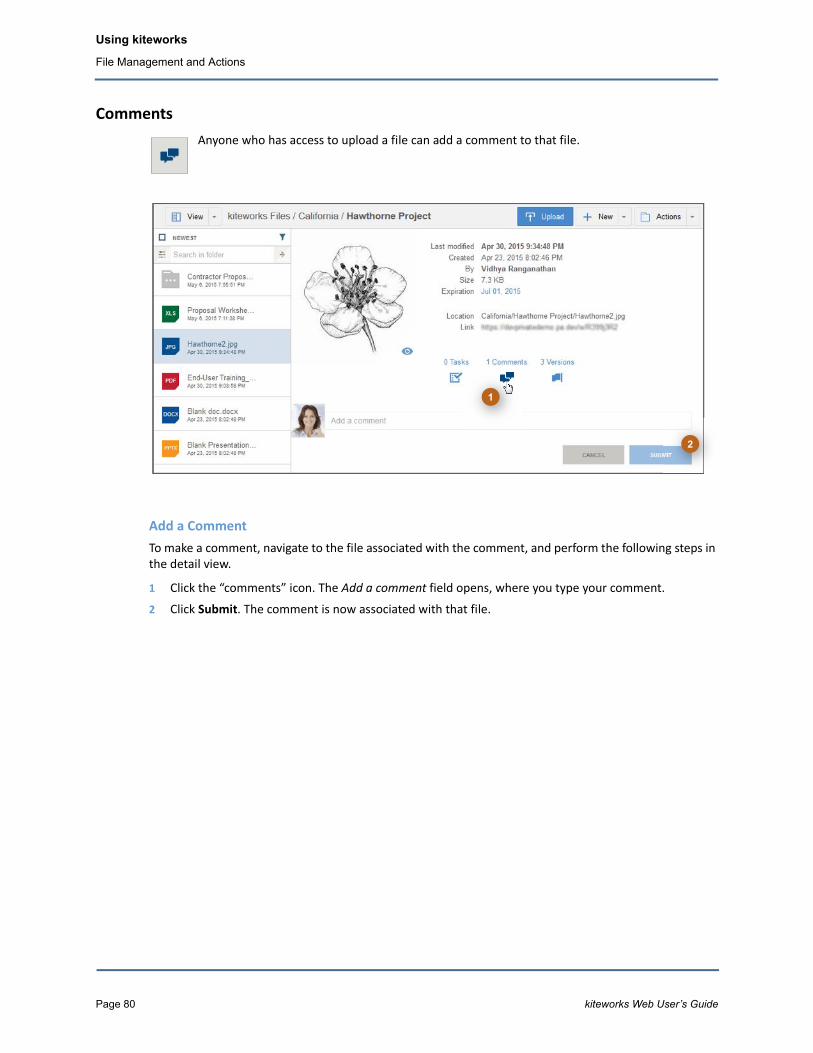
Using kiteworks
File Management and Actions
Page 80 kiteworks Web User’s Guide
CommentsAnyone who has access to upload a file can add a comment to that file.
Add a CommentTo make a comment, navigate to the file associated with the comment, and perform the following steps in the detail view.
1 Click the “comments” icon. The Add a comment field opens, where you type your comment.
2 Click Submit. The comment is now associated with that file.
1
2

kiteworks Web User’s Guide Page 81
Using kiteworks
File Management and Actions
Respond to a CommentTo respond to a comment, perform the following steps.
1 Click on the comment. Three icons appear: Reply ( ), Edit ( ), and Delete ( ).
2 Click the “reply” icon. The Reply to this comment field opens, where you type your reply.3 Click Submit.
1
2
333

Using kiteworks
Search Functions
Page 82 kiteworks Web User’s Guide
Search Functionskiteworks offers two types of search: Basic Search and Enhanced Search. The basic search queries the names of files and folders. Enhanced Search queries the names of files, folders, mail, text in the file, and metadata, and is enabled by your kiteworks administrator.
Basic Searchkiteworks supports a standard search of names of files and folders. This search simply returns the names of files or folders that contain your search term.
Detail View
List ViewEnhanced Search
Basic Search
Basic Search
Enhanced Search
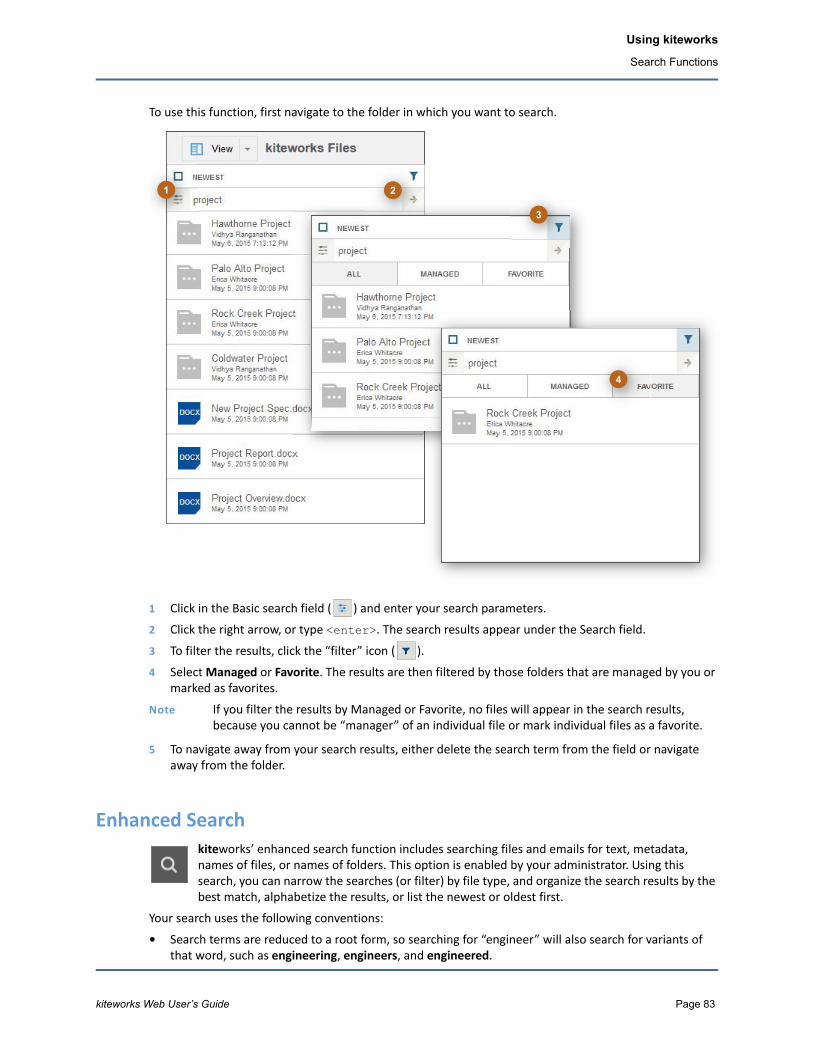
kiteworks Web User’s Guide Page 83
Using kiteworks
Search Functions
To use this function, first navigate to the folder in which you want to search.
1 Click in the Basic search field ( ) and enter your search parameters.
2 Click the right arrow, or type <enter>. The search results appear under the Search field.
3 To filter the results, click the “filter” icon ( ).
4 Select Managed or Favorite. The results are then filtered by those folders that are managed by you or marked as favorites.
Note If you filter the results by Managed or Favorite, no files will appear in the search results, because you cannot be “manager” of an individual file or mark individual files as a favorite.
5 To navigate away from your search results, either delete the search term from the field or navigate away from the folder.
Enhanced Searchkiteworks’ enhanced search function includes searching files and emails for text, metadata, names of files, or names of folders. This option is enabled by your administrator. Using this search, you can narrow the searches (or filter) by file type, and organize the search results by the best match, alphabetize the results, or list the newest or oldest first.
Your search uses the following conventions:
• Search terms are reduced to a root form, so searching for “engineer” will also search for variants of that word, such as engineering, engineers, and engineered.
1 2
3
4

Using kiteworks
Search Functions
Page 84 kiteworks Web User’s Guide
• Short and common words are not included in a search (such as a, an, and, is, it, or, not, etc.)
• When a query has multiple words, all words will appear in the returned document(s).
• To search for a phrase, enclose it in double quotes, for example: “Coldwater Project”.
When you have a list of results, you can view the file, share (e‐mail) the file, or delete the file. You can also click the link to go to the folder in which the file is located.
To search, perform the following steps.
1 On the top bar, in the Search field, type the string of words or phrase for which you want to search.
2 Type <enter>. The list of folders, files, and emails that contain the text you searched for is listed in the results.
3 From this list, you can sort the results by best match, alphabetically, or by date. For each individual file, you can share, preview, or delete the files.
a. Share — Refer to Email a File.
b. Delete — Delete a File from the server. Due to the nature of the search system, it may take a few minutes for the item to be deleted from the search results.
c. Preview — Refer to Online Viewer.
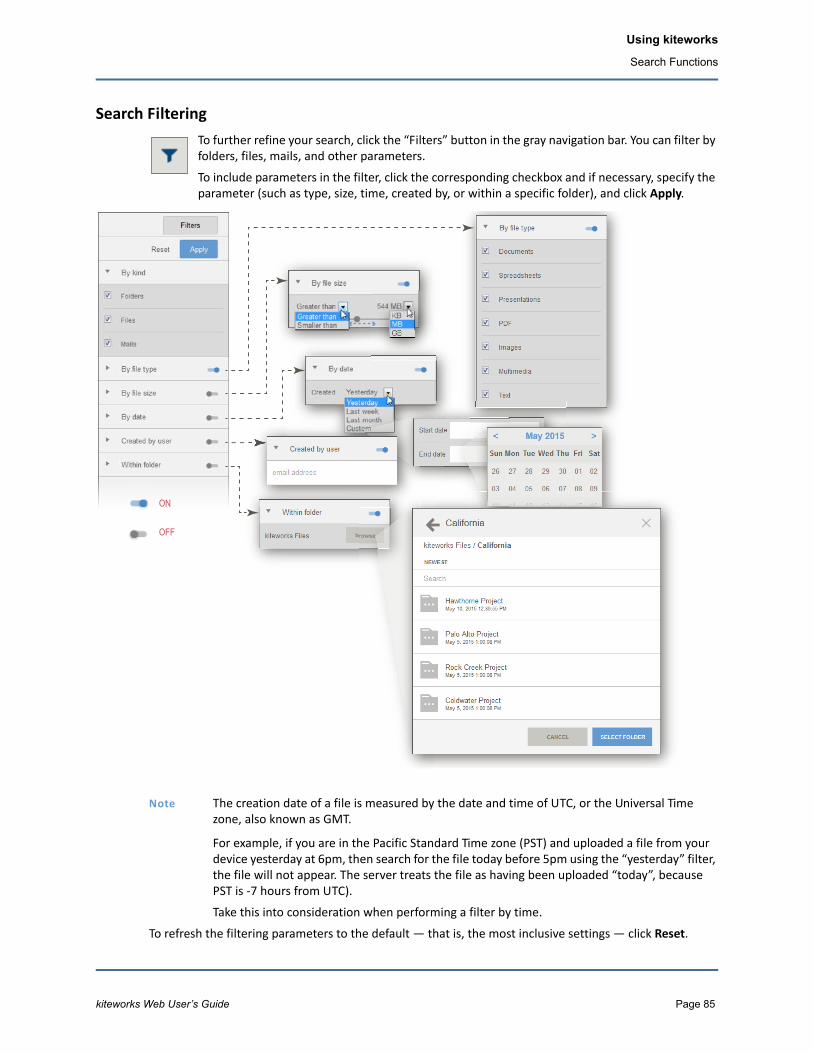
kiteworks Web User’s Guide Page 85
Using kiteworks
Search Functions
Search FilteringTo further refine your search, click the “Filters” button in the gray navigation bar. You can filter by folders, files, mails, and other parameters.
To include parameters in the filter, click the corresponding checkbox and if necessary, specify the parameter (such as type, size, time, created by, or within a specific folder), and click Apply.
Note The creation date of a file is measured by the date and time of UTC, or the Universal Time zone, also known as GMT.
For example, if you are in the Pacific Standard Time zone (PST) and uploaded a file from your device yesterday at 6pm, then search for the file today before 5pm using the “yesterday” filter, the file will not appear. The server treats the file as having been uploaded “today”, because PST is ‐7 hours from UTC).
Take this into consideration when performing a filter by time.
To refresh the filtering parameters to the default — that is, the most inclusive settings — click Reset.
ON
OFF

Using kiteworks
Edit Settings
Page 86 kiteworks Web User’s Guide
Edit SettingsYour personal settings include your account info, preferences, and contacts. Edit these settings by clicking your display name at the top right from any screen. The following menu appears. (If you have Administrative access to kiteworks, Switch to admin portal option also appears.)
To sign out, click Sign out. When you sign back in to kiteworks, the system “remembers” which view you were using and which folder you were accessing when you were last signed in, and you are returned to the same screen.
To edit your settings, click Settings. The Settings panel appears, with the following menus on the left‐hand side of the screen.
From these options, you can personalize your own kiteworks experience, including:
• Account Info • Preferences
• Display Name
• Profile Picture
• Password
• Language
• Time Zone
• Message Signature
• Message Signature
• Contacts and Groups
• Manage Contacts
• Add a Contact
• Edit a Contact
• Delete a Contact
• Add a Group
• Edit a Group

kiteworks Web User’s Guide Page 87
Using kiteworks
Edit Settings
Account InfoYour account information consists of a display name, email address, profile picture, and password.
Display NameTo change your Display Name, perform the following steps.
1 From the Settings screen, click Account Info.
2 Type your new Display Name in the Display Name field (typically, <firstname> <lastname>).3 Click Submit. Your Display Name has now been changed.
Note Depending on the settings that your Administrator has set, it is possible that you may not be able to make these changes. If this is the case, contact your Administrator for assistance.
Note You cannot change your email address here; this must be performed by your Admin.
Profile PictureYour profile photo appears next to every activity that you perform. Accellion suggests using a basic photo of your face, in .jpg or .png format. If the photo you use is not square, the image may appear distorted, especially on mobile devices. Note that the photo cannot exceed 2 MB.
To upload or change your profile photo, perform the following steps.
1 From the Settings screen, click Account Info. Your profile picture appears.

Using kiteworks
Edit Settings
Page 88 kiteworks Web User’s Guide
2 Click Upload a new photo. Your operating system’s file manager opens.
3 Navigate to your new profile photo and click Open.
4 When prompted “Are you sure you want to upload <file name> as profile image?”, click Yes.
5 On the Account Info screen, click Submit. Your new photo now appears as your profile photo.
PasswordYour password must meet the standards set by your Admin, and may require at least one capital letter, and at least one symbol (!@#$%&*).
Depending on your environment, you may or may not be able to change your password. If your login is based on your LDAP password or your organization utilizes SSO, your process may be different. Contact your Administrator with questions about changing your password.
To change your password (if permitted), perform the following steps.
1 From the Settings screen, click Account Info. The Account Info screen appears.2 Type in your current password.
3 Type in your new password.
4 Type in your new password for verification.
5 Click Submit. Your password has now been changed.
PreferencesPreferences consist of a Language preference, Time Zone indicator, Message Signature, and Message Signature. If your organization has more than one server location, your preferences may also include a Locations option.
To see your current preferences, from the Settings screen, click Preferences. The Preferences screen appears.

kiteworks Web User’s Guide Page 89
Using kiteworks
Edit Settings
LanguageThe language that is the default for your operating system will be the default language for kiteworks. To change your default language, perform the following steps.
1 Under Language, click the downward arrow.
2 Select your preferred language from the list shown.
3 Click Submit. Your preferred language has now been changed.
Time Zonekiteworks records when you perform any action. It is important that the time zone setting be set with your locale. When traveling, be sure to update this setting appropriately.
To change your time zone, perform the following steps.
1 Under Time Zone, click the downward arrow.
2 Select your time zone from the list shown.
3 Click Submit. Your time zone setting has now been changed.
Message SignatureWhen you send an email using the kiteworks interface, you can add a signature to append to your email. Typically, this consists of your name, title, and contact information.
To add or edit your signature, perform the following steps.
1 Under Message Signature, type the text you would like appended to your emails.
2 Click Submit. Your Message Signature has now been updated.
Contacts and GroupsYour contacts are those people to whom you send emails from kiteworks, or have added as people with sharing rights to your folders. These contacts appear in a drop‐down menu or are auto‐filled when sending emails. These are also the people listed as possible collaborators when you set up a shared folder. Whenever you send an email via kiteworks or invite someone to collaborate in a folder, your contacts list retains the information for future reference.
A Group is a collection of contacts that you have added to your settings. In the Contacts section of the settings, you can edit the members of a group, including their email addresses.
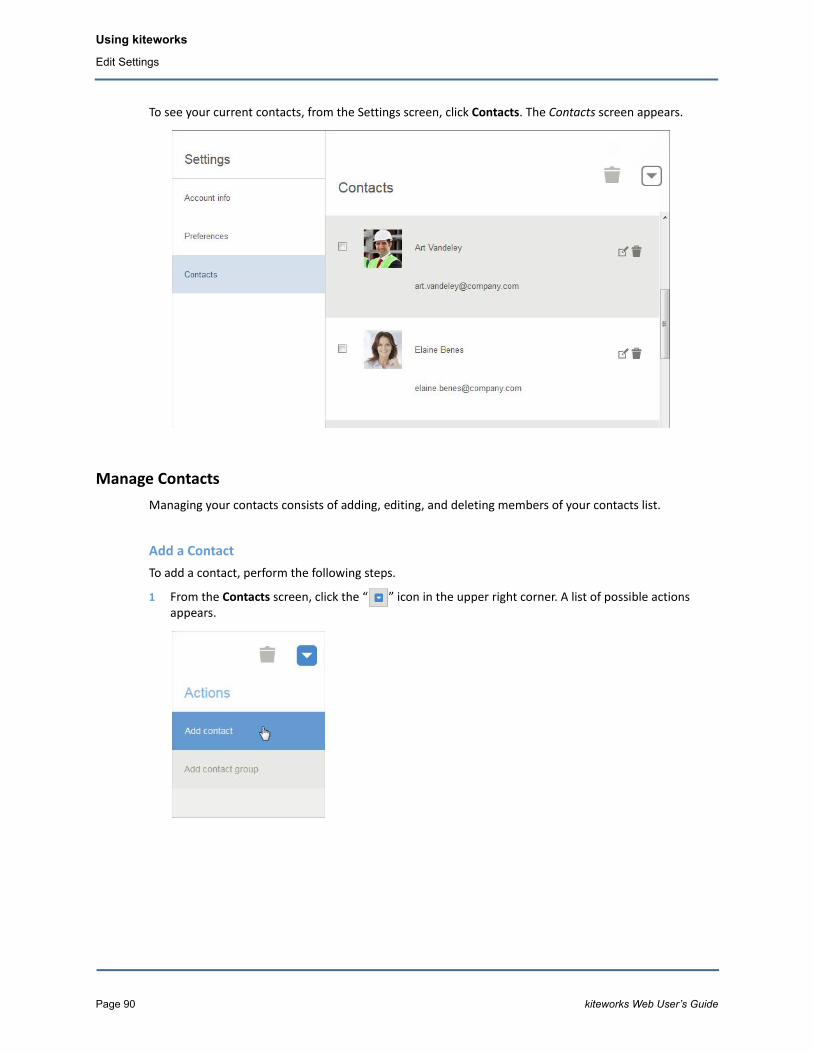
Using kiteworks
Edit Settings
Page 90 kiteworks Web User’s Guide
To see your current contacts, from the Settings screen, click Contacts. The Contacts screen appears.
Manage ContactsManaging your contacts consists of adding, editing, and deleting members of your contacts list.
Add a ContactTo add a contact, perform the following steps.
1 From the Contacts screen, click the “ ” icon in the upper right corner. A list of possible actions appears.

kiteworks Web User’s Guide Page 91
Using kiteworks
Edit Settings
2 Click Add Contact. The Add contact window appears.
3 Type the display name of the contact (generally, <firstname> <lastname>) and add the contact’s email address.
4 Click Submit. The name now appears in the list of contacts.
Edit a ContactTo edit an existing contact, perform the following steps.
1 In the Contacts screen, next to the contact you would like to edit or delete, there are two icons:
Click the “edit” icon on the left. The Edit contact screen appears.
2 Make your edits.
3 Click Submit. Your edits are now saved.
Delete a ContactTo delete an existing contact, perform the following steps.
1 In the Contacts screen, next to the contact you would like to edit or delete, there are two icons:
2 Click the “delete” icon on the right. The Delete contact confirmation screen appears.
3 Click Yes. The selected contact has been deleted from your contacts list.
Add a GroupA group is a collection of contacts within your Contacts list. To send a message or file preview to a group, just type the Name of the group in any “To” field.
Add a group from the same location as you would add a contact.

Using kiteworks
Edit Settings
Page 92 kiteworks Web User’s Guide
To add a group, perform the following steps.
1 From the Contacts screen, click the “ ” icon in the upper right corner. A list of possible actions appears.
2 Click Add contact group. The Add contact group window appears.
3 In the Name field, add the name of the group.
4 In the Email field, add the email addresses of the members of the group. Separate email addresses with a comma.
5 Click Submit. The group appears in your list of contacts.

kiteworks Web User’s Guide Page 93
Using kiteworks
Edit Settings
Edit a GroupTo edit an existing group, perform the following steps.
1 In the Contacts screen, next to the group you would like to edit or delete, there are two icons:
1 Click the “edit” icon on the left. The Edit contact group screen appears.
2 Make your edits.
3 Click Submit. Your edits are now saved.

Using kiteworks
Edit Settings
Page 94 kiteworks Web User’s Guide
SFTP KeysIf your administrator has enabled SFTP access for you, you can generate or add your own STFP key pairs in your account settings. Note that your generated SFTP keys are secure information, and like a passwords, should not be shared or sent over unsecure communications.
Generate SFTPTo have kiteworks generate an SFTP for you to use:
1 From the Settings screen, click SFTP keys.
2 Click the generate SFTP key button, and in the window that opens, type the name and a pass phrase for your SFTP key, and click generate.
3 A window will pop up showing your SFTP key, you can copy and paste this to a file on your computer. Close the window.
4 Confirm that you want to close the window by clicking yes.
2 5
1
3
4
7
8
6
9
kiteworks Web User’s Guide Page 95
Using kiteworks
Edit Settings
Add SFTPTo add an existing SFTP key to kiteworks:
5 Click the add SFTP key button.
6 Title the SFTP key
7 Paste your existing SFTP key into the key field.
8 Click submit to save the SFTP key.
Delete SFTPTo delete an SFTP key in kiteworks:
9 Click the delete button next to the SFTP key you want to remove, and in the window that appears, confirm the deletion by clicking yes.

Using kiteworks
Edit Settings
Page 96 kiteworks Web User’s Guide

kiteworks Web User’s Guide Page 97
2kiteworks Resources
If you have questions that were not answered by this guide, visit our knowledge base at:
https://support.accellion.net/
For support on technical issues, visit our support portal at:
http://www.accellion.com/support

kiteworks Resources
Page 98 kiteworks Web User’s Guide

kiteworks Web User’s Guide Page 99
AAppendix A: Icons and Symbols
Table 1. kiteworks Icons and Descriptions
Icon Description Notes
Navigation Panel
All files Lists all the folders to which you have access. For more information, refer to Where You Work.
Shared folders Filters the list of folders to those you have shared with other users or folders that have been shared with you. The view is identical to the detail view, with unshared folders filtered out of the list. For more information, refer to Detail View: Explore Your Files and Folders and Share Access to a Folder.
Folder with Content The three dots indicate that the folder contains files or folders.
Favorites Filters the list of folders to those you have marked as a favorite. The view is identical to the detail view, but shows only the folders you have marked as favorites. For more information, refer to Detail View: Explore Your Files and Folders and Make a Folder a Favorite.
Recent activities Jumps to the Activity view for managing tasks, comments, and other activities. For more information, refer to Recent Activities View: Track Your Work.
Mail Opens the Email Files window. For more information, refer to Email a File.
Move tray Opens the Move Tray panel. For more information, refer to The Move Tray.

Appendix A: Icons and Symbols
Page 100 kiteworks Web User’s Guide
File and Folder Actions
Actions Opens a menu of actions you can perform on a file or folder; refer to Folder Management and Actions and File Management and Actions.
Add files, Create folder, or Request files
Reveals elements to add to the current folder; refer to:
• Add or Upload Files
• Create a New Folder
• Request a File
Calendar Click this button to select a date. Refer to:
• Tasks
• Change File Expiration Date
• Search Filtering
Close Click this button to close a window or the Move Tray.
Comments When a file is selected, click this icon to add a comment that will be associated with the file. Refer to Comments.
Create Folder ‐ list view In the list view, allows you to create a nested folder in the current folder. Refer to Create a New Folder.
Delete/Discard Discards a file, a version of a file, a comment, or a task. Refer to:
• Delete and Recover a Deleted File
• Add Tasks and Comments
Detail view In the top gray bar, click this button to switch between the list view and detail view. This button selects the detail view. Refer to Detail View: Explore Your Files and Folders.
Download With a file selected, allows you to download the file to your desktop so you can open it using the appropriate program (Microsoft Word, etc.). You can also download the file using the Java applet. Refer to:
• Download
• Download File(s) via Applet
Download Version When viewing versions of a file, this button downloads a previous version of the file to your desktop so you can open the file in its associated program. Refer to Download Version.
Edit Allows you to edit a comment, task, contact, or group. Refer to:
• Add Tasks and Comments
• Change the Status of a Task
• Edit a Contact
• Edit a Group
Email • Email files; refer to Mail and Email a File.
• Email all people who have access to the folder; refer to Send an Email to the Users of a Folder.
Table 1. kiteworks Icons and Descriptions
Icon Description Notes

kiteworks Web User’s Guide Page 101
Appendix A: Icons and Symbols
Email Preview Allows you to send an un‐editable version of a file to users both in‐ and outside of your network. Refer to Email a Preview of a File.
Expand With a folder selected, allows you to expand the folder information to view the expiration date, whether the folder allows sync, and the set quota.
Favorite (Action) Sets the folder as a “Favorite”, so it is easily found again using the navigation panel. Refer to Make a Folder a Favorite.
File/Folder Actions When using the list view, opens the list of actions you can perform on the selected file or folder. Refer to List View: Manage Your Files and Folders.
Filter Allows you to filter the items that appear, including:
• Search results (by many different categories; refer to Search Filtering)
• Folders (Managed, Favorites, Deleted)
• Files
• Activities (refer to Recent Activities)
List view In the top gray bar, click this button to switch between the list view and detail view. This button selects the list view. Refer to List View: Manage Your Files and Folders.
Lock Allows you to lock the selected file so no one other than yourself can upload a new version or delete the file. Refer to Lock/Unlock.
Manage People Allows the user to add, delete, or change access for others to access the folder; refer to Share Access to a Folder.
Move Tray: Copy Copies the selected file from the Move Tray to the current folder.
Move Tray: Move Moves the selected file from the Move Tray to the current folder.
Notifications Opens the Manage notifications window to set the circumstances in which you receive emails for a particular activity. Refer to Manage Notifications.
On/Off Indicates the filters used in your Enhanced Search results. Refer to Search Filtering.
Properties Opens the Edit properties window to change the properties of a folder. Refer to Edit Folder Properties.
Reply Allows you to reply to a comment or task. Refer to Add Tasks and Comments.
Table 1. kiteworks Icons and Descriptions
Icon Description Notes

Appendix A: Icons and Symbols
Page 102 kiteworks Web User’s Guide
Return to Source Returns a file to its enterprise content source; refer to Use the Move Tray to Collaborate with Outside Users on Enterprise Content Files.
Request file Allows you to add files to a folder by requesting files from others. Refer to Request a File.
Retrieve deleted items Allows you to retrieve files that have been deleted. Refer to Recover a Deleted or Expired File.
Search Allows you to perform an enhanced search of files and their contents. Refer to Enhanced Search.
Search ‐ go Button to implement the Search. You can also type <enter>. Refer to Search Functions.
Search in folder Allows you to search for folder and file names within a specific folder. Refer to Basic Search.
Settings Your personal settings include your account info, preferences, and contacts. Refer to Edit Settings.
Share Opens the Email file and Email preview menu; allows you to send files to users both in‐ and outside of your network.
• Refer to Mail and Email a File
• Refer to Email a Preview of a File
Task When a file is selected, click this icon to add a task. Refer to Add Tasks and Comments.
Task: Assign a person Click this button to assign a task to a user of a shared folder. Refer to Add Tasks and Comments.
Unlock Indicates that the file can be unlocked by you. Refer to Lock/Unlock.
Upload Opens the Add new files window; this is a shortcut to add new files to a selected folder. Refer to Add or Upload Files.
Upload ‐ list view In the list view, opens the Add new files window. Refer to Add or Upload Files.
Versions • When a file is selected, click this icon to add a new version of the file to kiteworks. Refer to Add New Version.
• Makes a previous version of a file the Current one. Refer to Make Current.
View icon in thumbnail When a file is selected using the detail view, this button allows you to view the file without downloading it to your desktop, using the online viewer. Refer to Online Viewer.
Table 1. kiteworks Icons and Descriptions
Icon Description Notes

kiteworks Web User’s Guide Page 103
Appendix A: Icons and Symbols
Table 2. Enterprise Source Icons
Icon Description Notes
Add new source From the Actions menu at the highest point in the hierarchy, allows you to add a new source to kiteworks. Refer to Add a New Enterprise Content Source to kiteworks.
Box Icon indicates that the content source is from Box. Note that end‐users cannot add a new Box connector. To add a new Box connector, contact your Administrator.
Documentum Icon indicates that the content source is Documentum.
Dropbox Icon indicates that the content source is Dropbox.
eDOCS Icon indicates that the content source is eDOCS. Note that the functionality using eDOCS is limited at this time.
Google Drive Icon indicates that the content source is a Google Drive. Note that end‐users cannot add a new Google Drive. To add a new Google Drive, contact your Administrator.
Home Share Icon indicates that the content source is the home directory of your operating system. To add your Home Directory, contact your Administrator.
kiteworks Icon indicates that the content is in kiteworks.
OpenText Content Server Icon indicates that the content source is OpenText.
SharePoint or Microsoft OneDrive
Icon indicates that the content source is Microsoft OneDrive, SharePoint 2013, SharePoint Online, or SharePoint 2007 or 2010.
File Shares Icon indicates that the content source is Windows File Shares/CIFS or Distributed File Systems (DFS).

Appendix A: Icons and Symbols
Page 104 kiteworks Web User’s Guide

kiteworks Web User’s Guide Page 105
BAppendix B: EC Compatibility
Figure 1. Enterprise Connect Compatibility and Functionality
Add Source by E
nd User
Access F
ile Based on ACL
Download/Upload
Share File with Internal /
External Users
Check In / C
heck Out
Edit / Annotate Files
Add to Folder from ECM
Send File from ECM
Retrieve fro
m FolderEnterprise Content
Management (ECM ) Source
Icon
Windows Shared Folders: CIFS, SMB v.1, WMB v.2
MobileWeb
MobileWeb
MobileWeb
MobileWeb
MobileN/A --- --- ---
Distributed File System: DFS
MobileWeb
MobileWeb
MobileWeb
MobileWeb
MobileN/A --- --- ---
SharePoint 2007:SP2007
MobileWeb
MobileWeb
MobileWeb
MobileWeb
MobileMobile Web
--- --- ---
SharePoint Online (beta):Office 365
MobileWeb
MobileWeb
MobileWeb
MobileWeb
MobileMobile Web
--- --- ---
EMC Documentum (beta):Platforms 7, 6.7, 6.6
MobileWeb
MobileWeb
MobileWeb
MobileWeb
MobileMobile Web
--- --- ---
OpenText Content Server: Platform 10, v. 9.7.1 (Livelink)
MobileWeb
MobileWeb
MobileWeb
MobileWeb
MobileMobile Web
--- --- ---
SharePoint 2013:SP2013
MobileWeb
MobileWeb
MobileWeb
MobileWeb
MobileMobile Web
Via SP Plugin
Via SP Plugin
Via SP Plugin
SharePoint 2010:SP2010
MobileWeb
MobileWeb
MobileWeb
MobileWeb
MobileMobile Web
Via SP Plugin
Via SP Plugin
Via SP Plugin
Google Drive: Business
Only by Admin
MobileWeb
MobileWeb
MobileWeb
N/A Mobile --- --- ---
OpenText:eDocs
Web MobileWeb
Down-load only
MobileWeb
N/A Mobile --- --- ---

Appendix B: EC Compatibility
Page 106 kiteworks Web User’s Guide
Figure 2. (Continued)
Add Source by E
nd User
Access F
ile Based on ACL
Download/Upload
Share File with Internal /
External Users
Check In / C
heck Out
Edit / Annotate Files
Add to Folder from ECM
Send File from ECM
Retrieve fro
m FolderEnterprise Content
Management (ECM ) Source
Icon
OneDrive:Office 365
Only by User
MobileWeb
MobileWeb
MobileWeb
MobileMobile Web
--- --- ---
Box Only by Admin
MobileWeb
MobileWeb
MobileWeb
N/A Mobile --- --- ---
Home Directory:Windows, Unix, Linux
Only by Admin
MobileWeb
MobileWeb
MobileWeb
N/A Mobile --- --- ---
Dropbox Web MobileWeb
MobileWeb
MobileWeb
MobileN/A --- --- ---