kinetis sdk freescale freedom frdm-kl03z platform · pdf filekinetis sdk freescale freedom...
TRANSCRIPT

Freescale Semiconductor, Inc.
KSDKKL03UG User’s Guide Rev. 1.0.0, 09/2014
___________________________________________________________________
Kinetis SDK Freescale Freedom
FRDM-KL03Z Platform User’s Guide
1 Introduction
This document describes the hardware and
software environment setup for the Kinetis SDK
(KSDK). It also explains how to build and run
demo applications provided in the KSDK release
package.
2 Overview
2.1 Kinetis SDK
Kinetis SDK is a Software Development Kit that
provides software support for the core and
peripherals for Freescale devices with the ARM
Cortex®-M core. The KSDK includes a
Hardware Abstraction Layer (HAL) for each
peripheral and peripheral drivers built on the
HAL. Example applications are provided to
demonstrate peripheral driver and HAL usage to
highlight the main features of the targeted SoCs.
Also, the KSDK contains the latest available
RTOS kernels, and other software components
used on the supported evaluation boards.
Contents
1 Introduction ............................................................... 1
2 Overview .................................................................. 1
2.1 Kinetis SDK ..................................................... 1
2.2 Hardware requirement ..................................... 2
2.3 Toolchain requirement ..................................... 2
3 Kinetis Design Studio IDE (KDS) version 1.1 Hardware Configurations .................................................. 2
3.1 FRDM-KL03Z Introduction ............................... 2
4 Build and Run a KSDK Demo Application ................ 3
4.1 IAR Embedded Workbench ............................. 3
4.2 GCC ARM Embedded Tool ........................... 10
4.3 KEIL MDK Embedded Tool ........................... 16
4.4 Kinetis Design Studio IDE .............................. 22
5 Revision history ...................................................... 36

Kinetis SDK Freescale Freedom FRDM-KL03Z Platform User’s Guide, Rev. 1.0.0, 09/2014
2 Freescale Semiconductor, Inc.
2.2 Hardware requirement
A Freescale Freedom FRDM-KL03Z platform is required.
2.3 Toolchain requirement
IAR Embedded Workbench version 7.20.2
ARM® GCC 4.8.3 2014q1
Keil MDK 5.11 with Freescale Kinetis KLxx Series Device Support pack 1.1.0
Kinetis Design Studio IDE (KDS) version 1.1
3 Kinetis Design Studio IDE (KDS) version 1.1 Hardware
Configurations
This section describes how to set up the FRDM-KL03Z for the KSDK application.
3.1 FRDM-KL03Z Introduction
3.1.1 FRDM-KL03Z features
KL03Z32VFK4 MCU (48 MHz, 32 KB Flash, 2 KB RAM, low power, 24 QFN package)
Capacitive touch slider, MMA8451Q accelerometer, Tri-color LED
Flexible power supply options – USB, coin cell battery, external source
Easy access to MCU I/O
Tri-color user‐controllable LEDs
Two (2) user push-button switches for NMI interrupts and LLWU wake up (SW2/SW3)
Thermistor sensor to measuring temperature
Battery-ready, power-measurement access points
Form factor compatible with Arduino R3 pin layout
New OpenSDA debug interface
Mass storage device flash programming interface (default) – no tool installation required to
evaluate demo apps
P&E Debug interface provides run-control debugging and compatibility with IDE tools

Kinetis SDK Freescale Freedom FRDM-KL03Z Platform User’s Guide, Rev. 1.0.0, 09/2014
Freescale Semiconductor, Inc. 3
3.1.2 FRDM-KL03Z first look
Figure 1 FRDM-KL03Z
4 Build and Run a KSDK Demo Application
This section describes the configuration process for the IAR Embedded Workbench, GCC ARM
Embedded Tool, Keil µVision IDE, and Kinetis Design Studio IDE to build, run, and debug demo
applications provided in the Freescale KSDK.
The Hello_world demo application, targeted for the FRDM-KL03Z platform, is used as an example.
Note that the SDK libraries must be built before building a demo application. To build the SDK libraries,
see Appendix A of this document.
4.1 IAR Embedded Workbench
Because the platform driver library is already included in the lib folder of the demo application project,
you can open the demo application project and build the demo applications directly whenever the
platform_lib.a is ready.
Demo applications workspace files are located in:
<install_dir>/demos/<demo_name>/<compiler>/<board_name>/<demo_name>.eww
If the hello worlddemo application is used as an example, the IAR workspace file is located here:
<install_dir>/demos/hello_world/iar/frdmkl03z48m/hello_world.eww

Kinetis SDK Freescale Freedom FRDM-KL03Z Platform User’s Guide, Rev. 1.0.0, 09/2014
4 Freescale Semiconductor, Inc.
1. To build a demo application, click the “Make” button.
Figure 2 Build hello world demo application
When the build is complete, IAR displays this information in the build window:
Figure 3 Build hello world demo successfully
4.1.1 Run a demo application
Downloading and debugging the KSDK demo applications in IAR Embedded Workbench is a standard
process for all applications. Use these steps to download and run the application:
1. Download and install the latest OpenSDA drivers from www.pemicro.com/opensda.
2. After the successful installation of the OpenSDA driver, connect the OpenSDA USB connector, J9
for the FRDM-KL03Z platform, to the USB port on a PC.

Kinetis SDK Freescale Freedom FRDM-KL03Z Platform User’s Guide, Rev. 1.0.0, 09/2014
Freescale Semiconductor, Inc. 5
3. Open the terminal application on a PC, such as PuTTy, and connect to the OpenSDA COM port
number. At that point, Windows Device Manager shows the COM port number assigned to the
OpenSDA.
Figure 4 OpenSDA serial port in Device Manager
4. Configure the terminal settings as shown here:
a. 9600 baud rate
b. No parity
c. 8 data bits
d. 1 stop bit
Figure 5 Terminal (PuTTY) configurations

Kinetis SDK Freescale Freedom FRDM-KL03Z Platform User’s Guide, Rev. 1.0.0, 09/2014
6 Freescale Semiconductor, Inc.
5. Ensure that the debugger configuration is correct in the project options.
Figure 6 Flash loader configurations
Kinetis SDK Freescale Freedom FRDM-KL03Z Platform User’s Guide, Rev. 1.0.0, 09/2014
Freescale Semiconductor, Inc. 7
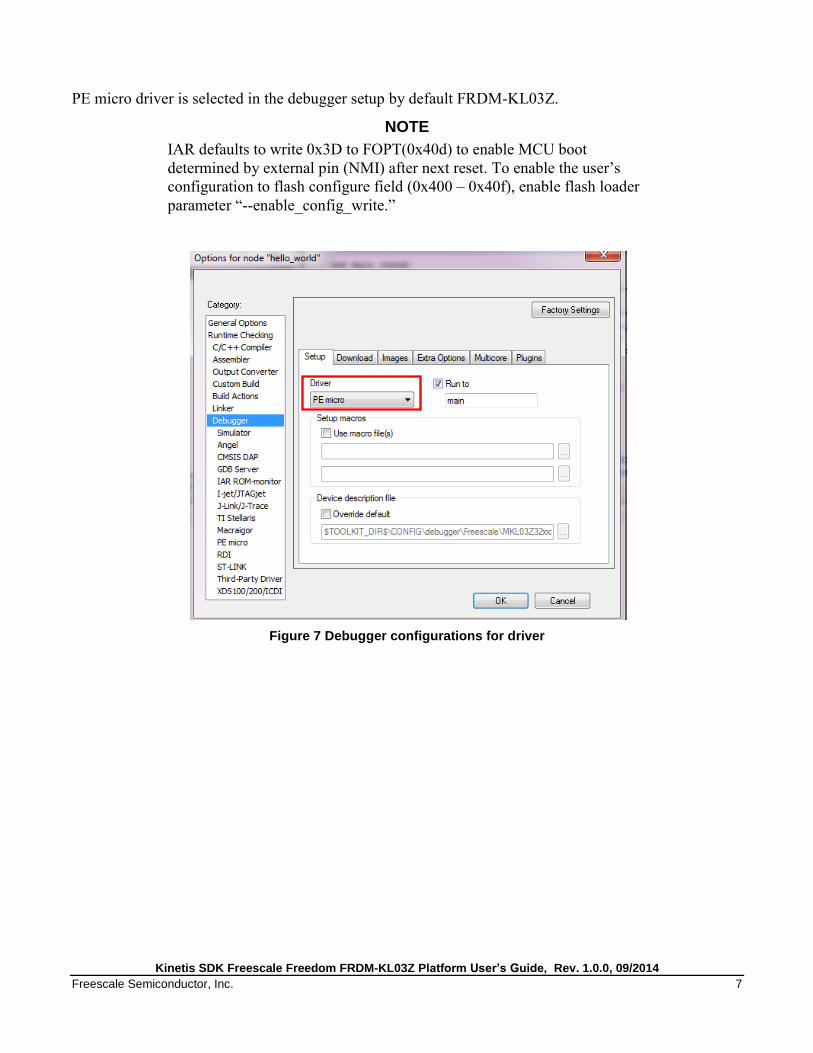
PE micro driver is selected in the debugger setup by default FRDM-KL03Z.
NOTE
IAR defaults to write 0x3D to FOPT(0x40d) to enable MCU boot
determined by external pin (NMI) after next reset. To enable the user’s
configuration to flash configure field (0x400 – 0x40f), enable flash loader
parameter “--enable_config_write.”
Figure 7 Debugger configurations for driver

Kinetis SDK Freescale Freedom FRDM-KL03Z Platform User’s Guide, Rev. 1.0.0, 09/2014
8 Freescale Semiconductor, Inc.
OpenSDA-USB and SWD are configured in the PE micro settings as shown:
Figure 8 Debugger configurations for PE micro
6. After the application is built successfully, click on the “Download and Debug” button to download
the application to the target device.
Figure 9 Download and debug button

Kinetis SDK Freescale Freedom FRDM-KL03Z Platform User’s Guide, Rev. 1.0.0, 09/2014
Freescale Semiconductor, Inc. 9
7. After the application is downloaded to the target device, the debugger stops executing at the start
of the main() function:
Figure 10 Stop at main () when run debugging
You can resume application execution by clicking the “Go” button.
Figure 11 Go Button
8. The hello world application should now be running and the following banner should be displayed
on the terminal. If this is not the case, check your terminal settings and terminal connections.
Figure 12 Hello World demo running
For example, it echoes any character that is typed:
Figure 13 Help command
Kinetis SDK Freescale Freedom FRDM-KL03Z Platform User’s Guide, Rev. 1.0.0, 09/2014
10 Freescale Semiconductor, Inc.
4.2 GCC ARM Embedded Tool
4.2.1 Environment setup
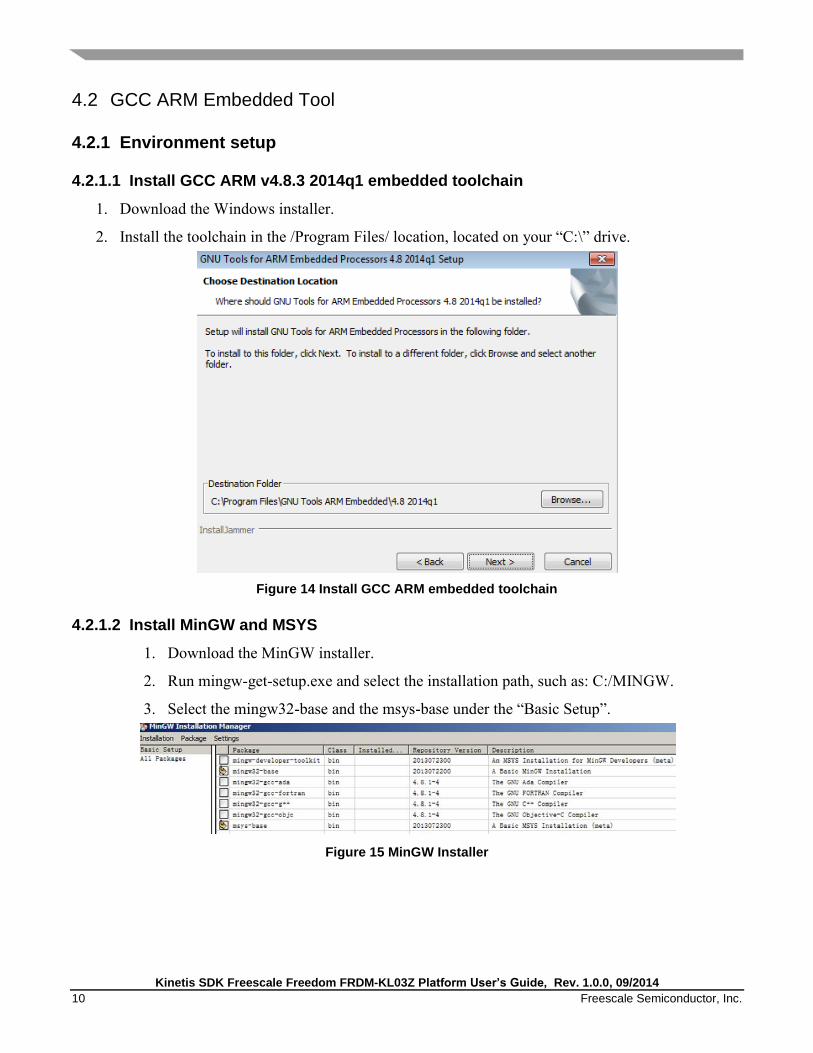
4.2.1.1 Install GCC ARM v4.8.3 2014q1 embedded toolchain
1. Download the Windows installer.
2. Install the toolchain in the /Program Files/ location, located on your “C:\” drive.
Figure 14 Install GCC ARM embedded toolchain
4.2.1.2 Install MinGW and MSYS
1. Download the MinGW installer.
2. Run mingw-get-setup.exe and select the installation path, such as: C:/MINGW.
3. Select the mingw32-base and the msys-base under the “Basic Setup”.
Figure 15 MinGW Installer

Kinetis SDK Freescale Freedom FRDM-KL03Z Platform User’s Guide, Rev. 1.0.0, 09/2014
Freescale Semiconductor, Inc. 11
4. Click “Apply Changes” from the “Installation” menu to install packages.
Figure 16 MinGW Installer apply change
4.2.1.3 Configure system environment
1. Update the system environment variable “Path” to include the MinGW installation folder, such as
the <drive>\MINGW\msys\1.0\bin;<drive>:\MINGW\bin.
Figure 17 Environment variable update

Kinetis SDK Freescale Freedom FRDM-KL03Z Platform User’s Guide, Rev. 1.0.0, 09/2014
12 Freescale Semiconductor, Inc.
2. Run the GCC Command prompt in “Start”, “All Programs”. Then, run the GNU Tools ARM
Embedded 4.8.3 2014q1.
Figure 18 PATH environment
3. If you build in the Windows command line, add the environment variable ARMGCC_DIR. Its
value is the short name of ARM GCC install path.
Figure 19 Add environment variable
4. If you build in GIT-bash or cygwin, set by "export
ARMGCC_DIR=C:/PROGRA~/GNUTOO~1/4298B~1.820". Use '/' as a separator.

Kinetis SDK Freescale Freedom FRDM-KL03Z Platform User’s Guide, Rev. 1.0.0, 09/2014
Freescale Semiconductor, Inc. 13
5. To build using the KDS IDE GCC toolchain, add the system environment variable KDSGCC_DIR
and its value is the path of KDS IDE GCC toolchain. Note that you should use a short name here.
Then, “mingw32-make toolchain=kdsgcc”.
4.2.2 Build the platform driver library
Before building and debugging any demo application in KSDK, the driver library project should be built
to generate the library archives: ksdk_platform_lib.a. Because this library contains all binary codes for
HAL and the peripheral drivers specific to the chip, each SoC has its own platform.a library archives.
To build the platform library, change the current directory in GCC command prompt to:
<install_dir>/lib/ksdk_platform_lib/gcc/<device_name>/
For example:
<install_dir>/lib/ksdk_platform_lib/gcc/KL03Z4/
Run the command mingw32-make build=debug or mingw32-make build=release.
When the build is complete, the ksdk_platform_lib.a is generated in the directory according to the build
target:
Debug - <install_dir>/lib/ksdk_platform_lib/gcc/<device_name>/Debug
Release - <install_dir>/lib/ksdk_platform_lib/gcc/<device_name>/Release
Demo applications use the ksdk_platform_lib.a to call the HAL and peripheral driver functions.
4.2.3 Build a demo application
Change the directory in GCC command prompt to this:
<install_dir>/demos/hello_world/gcc/frdmkl03z48m
Run the mingw32-make build=debug target=flash command.
When the build is complete, the hello_world.elf and the hello_world.bin are generated in this path:
<install_dir>/demos/hello_world/gcc/frdmkl03z48m/Flash_Debug
4.2.4 Run a demo application
This section describes how to download and debug the applications by using J-Link.
Note
To use an external debugger, such as J-Link, you may need to disconnect
the OpenSDA SWD from the KL03.
Kinetis SDK Freescale Freedom FRDM-KL03Z Platform User’s Guide, Rev. 1.0.0, 09/2014
14 Freescale Semiconductor, Inc.
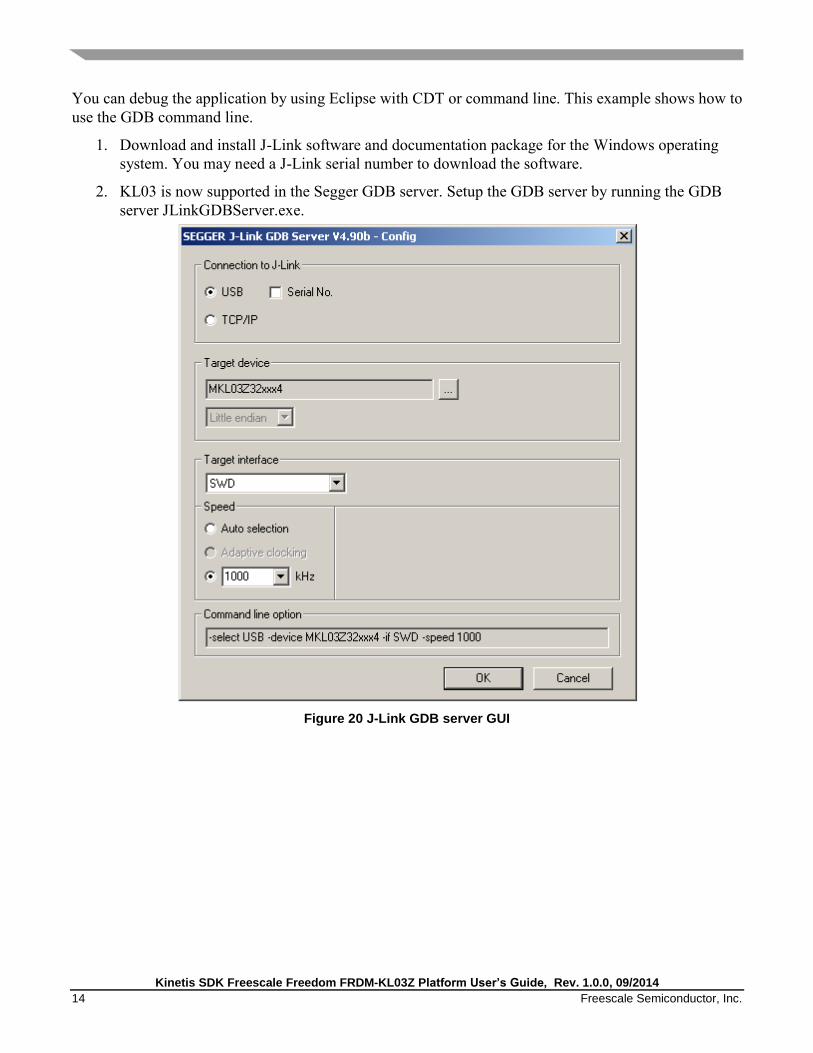
You can debug the application by using Eclipse with CDT or command line. This example shows how to
use the GDB command line.
1. Download and install J-Link software and documentation package for the Windows operating
system. You may need a J-Link serial number to download the software.
2. KL03 is now supported in the Segger GDB server. Setup the GDB server by running the GDB
server JLinkGDBServer.exe.
Figure 20 J-Link GDB server GUI
Kinetis SDK Freescale Freedom FRDM-KL03Z Platform User’s Guide, Rev. 1.0.0, 09/2014
Freescale Semiconductor, Inc. 15
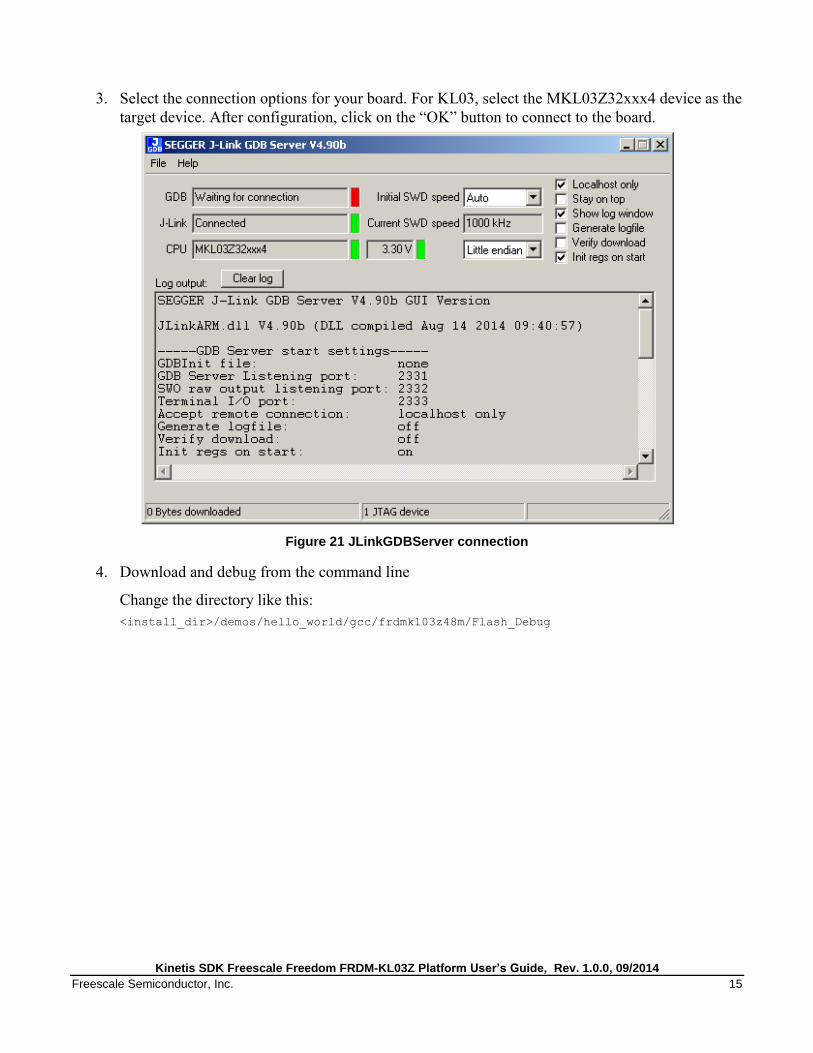
3. Select the connection options for your board. For KL03, select the MKL03Z32xxx4 device as the
target device. After configuration, click on the “OK” button to connect to the board.
Figure 21 JLinkGDBServer connection
4. Download and debug from the command line
Change the directory like this:
<install_dir>/demos/hello_world/gcc/frdmkl03z48m/Flash_Debug

Kinetis SDK Freescale Freedom FRDM-KL03Z Platform User’s Guide, Rev. 1.0.0, 09/2014
16 Freescale Semiconductor, Inc.
5. Run the arm-none-eabi-gdb to start the GDB. After the GDB is launched, run the commands to
load and start the application like this:
target remote localhost:2331
monitor reset
monitor flash breakpoints = 1
monitor flash download = 1
load hello_world.elf
monitor go
Figure 22 Run arm-none-eabi-gdb
4.2.5 Debugging
Use the GDB general debug command to do debug. To quit the debugging, use the monitor halt to halt the
target CPU, then quit the debug.
4.3 KEIL MDK Embedded Tool
4.3.1 Environment Setup
4.3.2 Downloading and Installing the KEIL MDK 5.11
To download the KEIL MDK 5.11 (or later), follow these instructions:

Kinetis SDK Freescale Freedom FRDM-KL03Z Platform User’s Guide, Rev. 1.0.0, 09/2014
Freescale Semiconductor, Inc. 17
1. Go to www.keil.com to download the KEIL MDK 5.11 (or later).
2. To install software tools, follow the installer package instructions once you receive your
download.
3. Navigate to www.keil.com/dd2/pack/ to locate “Freescale Kinetis KLxx Series Device Support
and Examples” to find the latest version 1.20 or later. Download and install it to support KL03Z
device.
4.3.3 Downloading and Installing the OpenSDA patch for KEIL MDK
To download and install the OpenSDA patch for the KEIL MDK 5.11, follow these instructions:
1. Navigate to the Freescale Kinetis OSJTAG Drivers V1.20 at
www.keil.com/download/docs/408.asp.
2. At the Freescale Kinetis OSJTAG Drivers V1.20 download page, click the
FSLKINETISDRIVERSV118.EXE (or higher) link and follow the onscreen instructions for
saving this file to your computer.
3. Navigate to the location where you saved this file, double click the executable, and follow the
onscreen instructions for installing these files.
4.3.4 Build a demo application
Because the platform driver library is already included in the lib folder of the demo application project,
open the demo application project and build the demo applications directly whenever the platform_lib.a is
ready.
Demo applications workspace files are located in:
<install_dir>/demos/<demo_name>/<compiler>/<board_name>/<demo_name>.uvmpw
If the hello_world demo application is used as an example, the KEIL workspace file is located here:
<install_dir>/demos/hello_world/uv4/frdmkl03z48m/hello_world.uvmpw

Kinetis SDK Freescale Freedom FRDM-KL03Z Platform User’s Guide, Rev. 1.0.0, 09/2014
18 Freescale Semiconductor, Inc.
1. To build a demo application, click the “Build” button:
Figure 23 Build button
When the build is complete, Keil displays this information in the “Build” window:
Figure 24 Keil build window
4.3.5 Run a demo application
Downloading and debugging KSDK demo applications in KEIL MDK Embedded Workbench is a
standard process for all applications. Use these steps to download and run the application:
1. Download and install the latest OpenSDA drivers from www.pemicro.com/opensda.
2. After the successful installation of the OpenSDA driver, connect the OpenSDA USB connector, J9
for the FRDM-KL03Z platform, to the USB port on a PC.
3. Open the terminal application on a PC, such as PuTTy, and connect to the OpenSDA COM port
number. At that point, Windows Device Manager shows the COM port number assigned to the
OpenSDA.

Kinetis SDK Freescale Freedom FRDM-KL03Z Platform User’s Guide, Rev. 1.0.0, 09/2014
Freescale Semiconductor, Inc. 19
4. Configure the terminal settings as shown here:
a. 9600 baud rate
b. No parity
c. 8 data bits
d. 1 stop bit
5. Ensure that the debugger configuration is correct in the project options.
The PE micro driver is selected in the debugger setup by default for FRDM-KL03Z.
Figure 25 PE micro driver Debug
6. Select the correct device and click “Settings”.
Figure 26 PE micro Settings

Kinetis SDK Freescale Freedom FRDM-KL03Z Platform User’s Guide, Rev. 1.0.0, 09/2014
20 Freescale Semiconductor, Inc.
7. Make the correct configuration in the window below.
Figure 27 PE micro Configuration
8. After the application is built successfully, click the “Download and Debug” button to download
the application to the target device.
Figure 28 Download and Debug button

Kinetis SDK Freescale Freedom FRDM-KL03Z Platform User’s Guide, Rev. 1.0.0, 09/2014
Freescale Semiconductor, Inc. 21
9. After the application is downloaded to the target device, the debugger stops executing at the start
of the main() function.
Figure 29 Debugger
You can resume application execution by clicking on the “Go” button:
Figure 30 Go button

Kinetis SDK Freescale Freedom FRDM-KL03Z Platform User’s Guide, Rev. 1.0.0, 09/2014
22 Freescale Semiconductor, Inc.
10. The hello world application should now be running and following banner should be displayed on
the terminal. If this is not the case, check your terminal settings and terminal connections.
Figure 31 Hello world running
NOTE
Default startup_MKL03Z4.s file define 0x3D to FOPT.
Figure 32 Default startup
So if boot is to be determined by the external pin (NMI) after downloading code to flash, the user
can change this setting to another configuration to get another boot sequence.
4.4 Kinetis Design Studio IDE
4.4.1 Environment Setup
Install the Kinetis Design Studio IDE (KDS) and fix the environment variable (only for Windows users.
See Appendix B for details).

Kinetis SDK Freescale Freedom FRDM-KL03Z Platform User’s Guide, Rev. 1.0.0, 09/2014
Freescale Semiconductor, Inc. 23
4.4.2 Build a demo application
If the platform driver is already included in the lib folder and the ksdk_platform_lib.a is generated, users
can directly open the demo application project and build it in the KDS IDE.
Demo application project files are located in :
<install_dir>/demos/<demo_name>/<compiler>/<board_name>
The Hello World demo application for the FRDM-KL03Z is used as an example. The KDS IDE
workspace file is located at:
<install_dir> /demos/hello_world/kds/frdmkl03z48m
1. You can click “File” “Import” to open the project. Use browse to select root directory and KDS
IDE automatically opens the project in sub directories.
Figure 33 KDS IDE project import
2. To build a demo application, click the “Build” button:
Figure 34 Build test demo application

Kinetis SDK Freescale Freedom FRDM-KL03Z Platform User’s Guide, Rev. 1.0.0, 09/2014
24 Freescale Semiconductor, Inc.
When the build is complete, KDS IDE displays this information in the build output window:
Figure 35 Build hello world demo application successfully
4.4.3 Run a demo application
1. For the driver installation, refer to Appendix C for OpenSDA J-Link setup and serial terminal
configuration.
2. In the Project Explorer, right click the project containing the embedded application that users want
to debug. Or in the tool bar, click “Run” “Debug configuration”.
Figure 36 Open the debug configuration

Kinetis SDK Freescale Freedom FRDM-KL03Z Platform User’s Guide, Rev. 1.0.0, 09/2014
Freescale Semiconductor, Inc. 25
3. For the FRDM-KL03Z platform, the OpenSDA debug adapter running a compatible J-Link
firmware is used. Double click the GDB SEGGER J-Link to create a new debug configuration.
4. Click the Main tab and check that the correct project and C/C++applications are chosen. The
C/C++ Applications file should be an “.elf” file in your project directory.
5. The Hello World demo for the FRDM-KL03Z is used as an example. The project should be
“hello_world_frdmkl03z48m”. The C/C++ Application should be
“debug/hello_world_frdmkl03z48m.elf.”
Figure 37 Main tab for a GDB SEGGER J-link Debugging configuration
6. Click the “Debugger” tab and select the correct device name “MKL03Z32xxx4”.

Kinetis SDK Freescale Freedom FRDM-KL03Z Platform User’s Guide, Rev. 1.0.0, 09/2014
26 Freescale Semiconductor, Inc.
7. The remaining fields of the “Debugger” tab can be left with the default value. This establishes a
connection to the remote target as a local host.
Figure 38 Debugger tab for GDB SEGGER J-link Debugging configuration
8. Click “Apply”, then click the “Debug” button. This launches the debugger.
Figure 39 Debug perspective

Kinetis SDK Freescale Freedom FRDM-KL03Z Platform User’s Guide, Rev. 1.0.0, 09/2014
Freescale Semiconductor, Inc. 27
9. You can resume application execution by clicking the “Resume” button, or press F8 to execute the
application.
Figure 40 Run button
10. The hello world application should now be running in PuTTy, and the following banner should be
displayed in the terminal. If this is not the case, check your terminal settings and the terminal
connections.
Figure 41 hello world demo running
Note that default startup files (startup_MKL03Z4.s) write FOPT to 0x3D.
Figure 42 startup_MKL03Z4.s file
The boot is determined by the external pin (NMI) after downloading code to flash, and the user can
change this setting to another configuration to get another boot sequence.

Kinetis SDK Freescale Freedom FRDM-KL03Z Platform User’s Guide, Rev. 1.0.0, 09/2014
28 Freescale Semiconductor, Inc.
Appendix A: Build the platform driver library
Before building and debugging any demo application in KSDK, the driver library project should be built
to generate the library archive ksdk_platform_lib.a. Because this library contains all binary codes for HAL
and the peripheral drivers specific to the chip, each SoC has its own platform.a library archive.
1. Build the platform driver library in IAR. To build the platform library, open the workspace file in IAR.
The platform driver library project is located in:
<install_dir>/lib/ksdk_platform_lib/iar/<device_name>
The workspace file is named ksdk_platform_lib.eww:
<install_dir>/lib/ksdk_platform_lib/iar/<device_name>/ksdk_platform_lib.eww
The project file is named ksdk_platform_lib.ewp:
<install_dir>/lib/ksdk_platform_lib/iar/<device_name>ksdk_platform_lib.ewp
To build the platform driver library for the KL03, open the workspace file in IAR:
<install_dir>/lib/ksdk_platform_lib/iar/<device_name>/ksdk_platform_lib.eww
In the IAR Embedded Workbench project file, two compiler/linker configurations (build “targets”) are
supported:
Debug - the compiler optimization is set to low. The debug information is generated for the binary. This
target should be used for developing and debugging.
Release - the compiler optimization is set to maximum. The debug information is not generated. This
target should be used for the final application release.
Note:
Code is downloaded to Flash instead of RAM in both Debug and Release
configurations.
Choose the appropriate build target: Debug or Release. Then click the “Make” button (highlighted by a red
rectangle below):
Figure 43 Platform driver library build

Kinetis SDK Freescale Freedom FRDM-KL03Z Platform User’s Guide, Rev. 1.0.0, 09/2014
Freescale Semiconductor, Inc. 29
When the build is complete, the platform_lib.a is generated in the directory according to the build target:
Debug - <install_dir>/lib/ksdk_platform_lib/iar/<device_name>/Debug
Release - <install_dir>/lib/ksdk_platform_lib/iar/<device_name>/Release
Demo applications use the ksdk_platform_lib.a to call the functions of the HAL and the peripheral drivers.
2. Build the platform driver library in Keil.
To build the platform driver library for the KL03, open the workspace file in KEIL:
<install_dir>/lib/ksdk_platform_lib/uv4/<device_name>/ksdk_platform_lib.uvmpw
In the KEIL Embedded Workbench project file, two compiler/linker configurations (build “targets”) are
supported:
Debug - the compiler optimization is set to low. The debug information is generated for the binary. This
target should be used for developing and debugging.
Release - the compiler optimization is set to maximum. The debug information is not generated. This
target should be used for the final application release.
Note:
Code is downloaded to Flash instead of RAM in both Debug and Release
configurations.
Choose the appropriate build target: Debug or Release, then click on the “Rebuild” button (highlighted by
a red rectangle below):
Figure 44 Platform driver library build
When the build is complete, the ksdk_platform_lib.lib is generated in the directory according to the build
target:
Debug - <install_dir>/lib/ksdk_platform_lib/uv4/<device_name>/Debug
Release - <install_dir>/lib/ksdk_platform_lib/uv4/<device_name>/Release

Kinetis SDK Freescale Freedom FRDM-KL03Z Platform User’s Guide, Rev. 1.0.0, 09/2014
30 Freescale Semiconductor, Inc.
Demo applications use the ksdk_platform_lib.lib to call the functions of the HAL and the peripheral
drivers.
3. Build the platform driver library in the Kinetis Design Studio IDE.
To build the platform library, open the workspace file in Kinetis Design Studio IDE. The platform driver
library project is located in:
<install_dir>/lib/ksdk_platform_lib/kds/<device_name>
To build the platform driver library for the KL03, open the workspace file in Kinetis Design Studio IDE:
< install _dir>/lib/ksdk_platform_lib/kds/KL03Z4/
Use “File” “Import” to open the project.
In the KDS IDE file, two compiler/linker configurations (build “targets”) are supported. To view the
configurations, click the arrow shown in this target.
Figure 45 KDS IDE Complier/Linker selection
Debug - the compiler optimization is set to low. The debug information is generated for the binary. This
target should be used for developing and debugging.
Release - the compiler optimization is set to maximum. The debug information is not generated. This
target should be used for the final application release.
Note:
Code is downloaded to Flash instead of RAM in both Debug and Release
configurations.

Kinetis SDK Freescale Freedom FRDM-KL03Z Platform User’s Guide, Rev. 1.0.0, 09/2014
Freescale Semiconductor, Inc. 31
Choose the appropriate build target: Debug or Release, then click the “Build” button (highlighted by a red
rectangle below):
Figure 46 KDS IDE Platform driver library build
When the build is complete, the ksdk_platform_lib.a is generated in the directory according to the build
target:
Debug - <install_dir>/lib/ksdk_platform_lib/kds/<device_name>/Debug
Release - <install_dir>/lib/ksdk_platform_lib/kds/<device_name>/Release
Demo applications use the ksdk_platform_lib.a to call the functions of the HAL and the peripheral drivers.

Kinetis SDK Freescale Freedom FRDM-KL03Z Platform User’s Guide, Rev. 1.0.0, 09/2014
32 Freescale Semiconductor, Inc.
Appendix B: Kinetis Design Studio environment variable
fix and swap tool chain
Finish the installation of the KDS-VX.X.exe in your PC. Then, follow these steps:
In the startup menu, right-click “Computer” and choose “Properties”.
In the left column, click the “Advanced System Settings”.
Figure 47 Computer system setting

Kinetis SDK Freescale Freedom FRDM-KL03Z Platform User’s Guide, Rev. 1.0.0, 09/2014
Freescale Semiconductor, Inc. 33
Figure 48 Environment variables for KSDK
Swapping tool chains: To solve the tool chain issue integrated in the KDS IDE, take these steps to
swap tool chains:
o First, download the latest GNU GCC ARM as a zip file from
https://launchpad.net/gcc-arm-embedded, and install the file.
o Navigate to the KDS IDE install directory, locate the <install_dir>/ KDS_1.0.2/toolchain, and
copy the all files in path “<install dir>/GNU Tools ARM Embedded\4.8 2014q2” to the folder.

Kinetis SDK Freescale Freedom FRDM-KL03Z Platform User’s Guide, Rev. 1.0.0, 09/2014
34 Freescale Semiconductor, Inc.
o Change link option for each project, open menu Project > Properties > C/C++
Build>Setting>Miscellaneous, change default value of “other linker flags” to
“-specs=nano.specs -specs=nosys.specs”.
Figure 49 Change link option
Kinetis SDK Freescale Freedom FRDM-KL03Z Platform User’s Guide, Rev. 1.0.0, 09/2014
Freescale Semiconductor, Inc. 35
Appendix C: OpenSDA J-Link firmware updated
To update the firmware of OpenSDA firmware to OpenSDA-J-Link:
1. Navigate to www.segger.com/opensda.html to get the latest firmware for the OpenSDA J-Link.
2. Hold down the Reset Button (located in 3.1.2) and then power the board by connecting to the USB
port (located in 3.1.2). Notice that the LED blinking indicates that the board is now in Bootloader
mode. You can release the Reset Button at this point.
3. Open Windows Explorer and locate the "BOOTLOADER" thumb drive.
4. Drag the JLink_OpenSDA.sda file onto the thumb drive (any application or firmware file can be
drag-and-dropped onto the device at this point).
5. Remove and replace the USB cable. The Freescale Freedom platform is now updated to the latest
firmware or application.

Kinetis SDK Freescale Freedom FRDM-KL03Z Platform User’s Guide, Rev. 1.0.0, 09/2014
36 Freescale Semiconductor, Inc.
5 Revision history
This table summarizes revisions to this document.
Revision History
Revision number Date Substantial changes
1.0.0 9/2014 Initial release

Document Number: KSDKKL03UG
Rev. #1.0.0
09/2014
How to Reach Us:
Home Page:
freescale.com
Web Support:
freescale.com/support
Information in this document is provided solely to enable system and software implementers to use Freescale products. There are no express or implied copyright licenses granted hereunder to design or fabricate any integrated circuits based on the information in this document.
Freescale reserves the right to make changes without further notice to any products herein. Freescale makes no warranty, representation, or guarantee regarding the suitability of its products for any particular purpose, nor does Freescale assume any liability arising out of the application or use of any product or circuit, and specifically disclaims any and all liability, including without limitation consequential or incidental damages. “Typical” parameters that may be provided in Freescale data sheets and/or specifications can and do vary in different applications, and actual performance may vary over time. All operating parameters, including “typicals,” must be validated for each customer application by customer’s technical experts. Freescale does not convey any license under its patent rights nor the rights of others. Freescale sells products pursuant to standard terms and conditions of sale, which can be found at the following address: freescale.com/SalesTermsandConditions.
Freescale, the Freescale logo, and Kinetis are trademarks of Freescale Semiconductor, Inc., Reg. U.S. Pat. & Tm. Off. All other product or service names are the property of their respective owners. ARM, ARM Powered logo, and Cortex are registered trademarks of ARM Limited (or its subsidiaries) in the EU and/or elsewhere. All rights reserved.
© 2014 Freescale Semiconductor, Inc.