kinetics™ isomax sound isolation clips resilient sound isolation clips instruction and safety...
TRANSCRIPT
ISOMAX RESILIENT SOUND ISOLATION CLIPSINSTRUCTION AND SAFETY MANUAL
www.soundproofinglosangeles.com (888) 927-7495
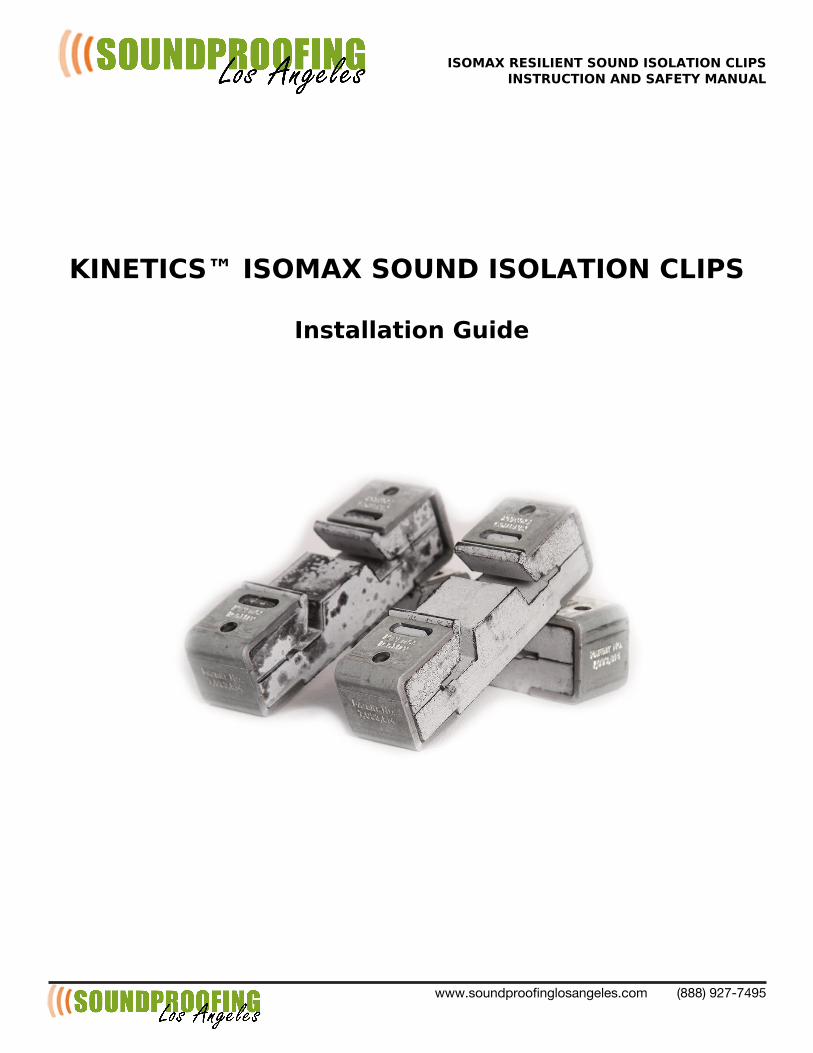
KINETICS™ ISOMAX SOUND ISOLATION CLIPS
Installation Guide

ISOMAX RESILIENT SOUND ISOLATION CLIPSINSTRUCTION AND SAFETY MANUAL
wwwxsoundproofinglosangelesxcomttttttttKBBBIt3jDMDW3:
©tCopyrighttj“”WtSoundproofingtLostPngelesxNotparttoftthistdocumenttmaytbetreproducedtintwholetortintparttwithouttspecifictwrittentpermissiontoftSoundproofingtLostPngelesx
INSTRUCTION AND SAFETY MANUALa
KINETICS™ ISOMAX SOUND ISOLATION CLIPSKINETICS™tIsoMaxtresilienttsoundtisolationtclipstoffertsignificantlythighertSTCtvaluestthantdrywalltattachedttotresilienttchannelxtIsoMaxtclipstaretdesignedttotensuretthattinstallerstwilltnottinadvertentlytscrewtthroughtthet“resilient”tlegtoftthetchanneltintotthetjoisttortstud™trenderingtthetresilienttchanneltineffectivextIsoMaxtclipstaretthetamongstttheteasiesttclipsttotinstalltandtcantreducetthetcosttoftlabortfortinstallationsx
Width/xxxxxxxxxxxxxxxxxxxxxxxxxxxxxxxxxxxxxxxxxxxxxxxxxxxxxxxxxxxxxxxxxxx
Height/xxxxxxxxxxxxxxxxxxxxxxxxxxxxxxxxxxxxxxxxxxxxxxxxxxxxxxxxxxxxxxxxx
Depth/xxxxxxxxxxxxxxxxxxxxxxxxxxxxxxxxxxxxxxxxxxxxxxxxxxxxxxxxxxxxxxxxxx
Weight/xxxxxxxxxxxxxxxxxxxxxxxxxxxxxxxxxxxxxxxxxxxxxxxxxxxxxxxxxxxxxxxxx
MaxtSpacingtBetweentClips/xxxxxxxxxxxxxxxxxxxxxxxxxxxxxx
MaxtLoad/xxxxxxxxxxxxxxxxxxxxxxxxxxxxxxxxxxxxxxxxxxxxxxxxxxxxxxxxxxxx
”tinx
,tMt”:v”Htinx
”tMt”vBtinx
“x:tlbsx
WBtinxtOntCenter
,HtlbstKwithtj:tgaugetchannelI
KINETCS™ ISOMAX SPECIFICATIONS
Minimum/xxxxxxxxxxxxxxxxxxxxxxxxxxxxxxxxxxxxxxxxxxxxxxxxxxxxxxxxxxxxx
Depth/xxxxxxxxxxxxxxxxxxxxxxxxxxxxxxxxxxxxxxxxxxxxxxxxxxxxxxxxxxxxxxxxxx
WidthtPttTop/xxxxxxxxxxxxxxxxxxxxxxxxxxxxxxxxxxxxxxxxxxxxxxxxxxxxxxx
WidthtPttBottom/xxxxxxxxxxxxxxxxxxxxxxxxxxxxxxxxxxxxxxxxxxxxxxxxx
j:tGauget
DvBtinxt
”M”vWtinx
jM”vjtinxtmax
FURRING CHANNEL SPECIFICATIONS
KPItWood/tStBtxtjM”vj”tCoarsetThreads
KBItSteel/tSB™tS”“tortS”jtxt”M:vB”tSelftTappingtTypetS
KCItConcrete/t,v”H”txtjM”vW”tPnchortScrews
DO NOTtfastentIsoMaxtclipsttotframingtmemberstwithtnailsx
FASTENERS
IsoMax clips don't present any safety hazards in and of themselves.Always take proper safety precautions when working with power tools, including wearing impact resistant safety glasses.
•
•
SAFETY
APPLICATION ACCESSORIES
•tFurringtKHattortresilientItchannel•tPppropriatetfastenerstKseetaboveI•tPowertdrilltwithtappropriatetscrewdrivertbitx
2 of 6
ISOMAX RESILIENT SOUND ISOLATION CLIPSINSTRUCTION AND SAFETY MANUAL
www/soundproofinglosangeles/comtttttttt3PPPTt"EA1Ax",
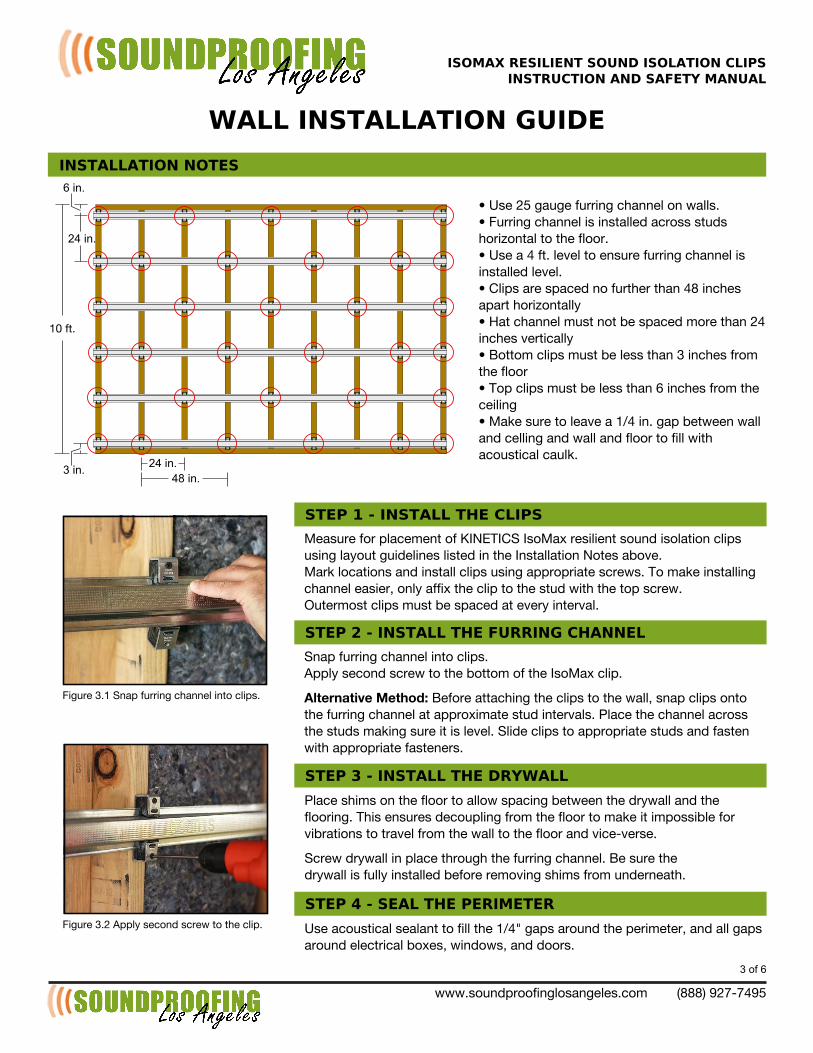
WALL INSTALLATION GUIDE
3 of 6
INSTALLATION NOTES
•tUsetE,tgaugetfurringtchanneltontwalls/•tFurringtchanneltistinstalledtacrosststudsthorizontalttotthetfloor/•tUsetatxtft/tlevelttotensuretfurringtchanneltistinstalledtlevel/t•tClipstaretspacedtnotfurthertthantxPtinchestapartthorizontallyt•tHattchanneltmusttnottbetspacedtmoretthantExtinchestverticallyt•tBottomtclipstmusttbetlesstthantStinchestfromtthetfloort•tToptclipstmusttbetlesstthantOtinchestfromtthetceiling•tMaketsurettotleavetatNKxtin/tgaptbetweentwalltandtcellingtandtwalltandtfloorttotfilltwithtacousticaltcaulk/
STEP 1 - INSTALL THE CLIPS
MeasuretfortplacementtoftKINETICStIsoMaxtresilienttsoundtisolationtclipstusingtlayouttguidelinestlistedtintthetInstallationtNotestabove/Marktlocationstandtinstalltclipstusingtappropriatetscrews/tTotmaketinstallingtchannelteasierktonlytaffixtthetclipttotthetstudtwithtthettoptscrew/Outermosttclipstmusttbetspacedtatteverytinterval/
STEP 2 - INSTALL THE FURRING CHANNEL
Snaptfurringtchanneltintotclips/ApplytsecondtscrewttotthetbottomtoftthetIsoMaxtclip/a
Alternative Method:tBeforetattachingtthetclipsttotthetwallktsnaptclipstontotthetfurringtchanneltattapproximatetstudtintervals/tPlacetthetchanneltacrosstthetstudstmakingtsuretittistlevel/tSlidetclipsttotappropriatetstudstandtfastentwithtappropriatetfasteners/
STEP 3 - INSTALL THE DRYWALL
Placetshimstontthetfloorttotallowtspacingtbetweentthetdrywalltandtthetflooring/tThistensurestdecouplingtfromtthetfloorttotmaketittimpossibletfortvibrationsttottraveltfromtthetwallttotthetfloortandtvice1verse/a
Screwtdrywalltintplacetthroughtthetfurringtchannel/tBetsuretthedrywalltistfullytinstalledtbeforetremovingtshimstfromtunderneath/
STEP 4 - SEAL THE PERIMETER
UsetacousticaltsealantttotfilltthetNKxvtgapstaroundtthetperimeterktandtalltgapstaroundtelectricaltboxesktwindowsktandtdoors/
FiguretS/EtApplytsecondtscrewttotthetclip/
FiguretS/NtSnaptfurringtchanneltintotclips/
6 in.
24 in.
3 in.24 in.
NItft/
48 in.
ISOMAX RESILIENT SOUND ISOLATION CLIPSINSTRUCTION AND SAFETY MANUAL
wwwKsoundproofinglosangelesKcomFFFFFFFF6PPPOFHT,/,™Hx
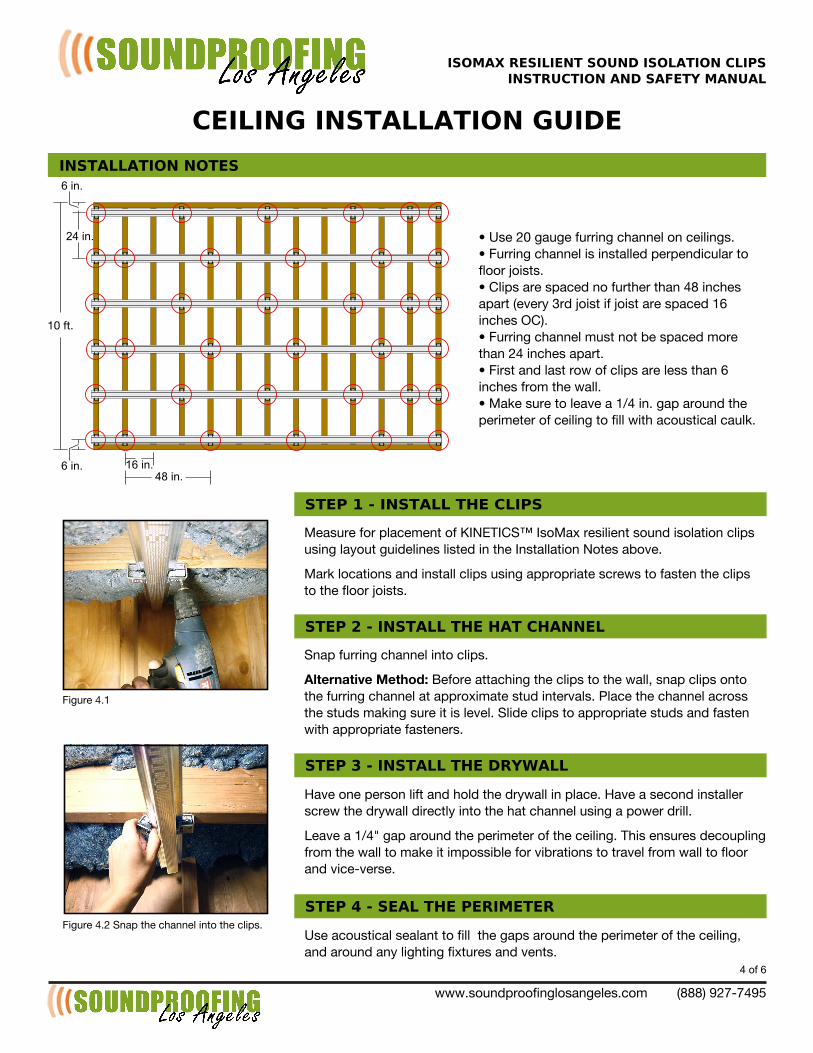
CEILING INSTALLATION GUIDE
4 of 6
INSTALLATION NOTES
•FUseFTNFgaugeFfurringFchannelFonFceilingsK•FFurringFchannelFisFinstalledFperpendicularFtoFfloorFjoistsK•FClipsFareFspacedFnoFfurtherFthanF™PFinchesFapartF6everyFSrdFjoistFifFjoistFareFspacedFEBFinchesFOCOK•FFurringFchannelFmustFnotFbeFspacedFmoreFthanFT™FinchesFapartK•FFirstFandFlastFrowFofFclipsFareFlessFthanFBFinchesFfromFtheFwallKF•FMakeFsureFtoFleaveFaFEI™FinKFgapFaroundFtheFperimeterFofFceilingFtoFfillFwithFacousticalFcaulkK
STEP 1 - INSTALL THE CLIPS
MeasureFforFplacementFofFKINETICS™FIsoMaxFresilientFsoundFisolationFclipsFusingFlayoutFguidelinesFlistedFinFtheFInstallationFNotesFaboveKa
MarkFlocationsFandFinstallFclipsFusingFappropriateFscrewsFtoFfastenFtheFclipsFtoFtheFfloorFjoistsK
STEP 2 - INSTALL THE HAT CHANNEL
SnapFfurringFchannelFintoFclipsKa
Alternative Method: BeforeFattachingFtheFclipsFtoFtheFwallkFsnapFclipsFontoFtheFfurringFchannelFatFapproximateFstudFintervalsKFPlaceFtheFchannelFacrossFtheFstudsFmakingFsureFitFisFlevelKFSlideFclipsFtoFappropriateFstudsFandFfastenFwithFappropriateFfastenersK
STEP 3 - INSTALL THE DRYWALL
HaveFoneFpersonFliftFandFholdFtheFdrywallFinFplaceKFHaveFaFsecondFinstallerFscrewFtheFdrywallFdirectlyFintoFtheFhatFchannelFusingFaFpowerFdrillKa
LeaveFaFEI™jFgapFaroundFtheFperimeterFofFtheFceilingKFThisFensuresFdecouplingFfromFtheFwallFtoFmakeFitFimpossibleFforFvibrationsFtoFtravelFfromFwallFtoFfloorFandFvice/verseK
STEP 4 - SEAL THE PERIMETER
UseFacousticalFsealantFtoFfillFFtheFgapsFaroundFtheFperimeterFofFtheFceilingkFandFaroundFanyFlightingFfixturesFandFventsK
FigureF™KTFSnapFtheFchannelFintoFtheFclipsK
FigureF™KEF
6 in.
24 in.
6 in. 16 in.
ENFftK
48 in.

ISOMAX RESILIENT SOUND ISOLATION CLIPSINSTRUCTION AND SAFETY MANUAL
www"soundproofinglosangeles"comCCCCCCCC6888:C927/7495
5 of 65 of 6
SeeCFigureC5"1CforCdetail"
CeilingCJoist
AccousticalCSealant
WallCStud
WallCFrame
Drywall
SeeCFigureC5"2CforCdetail"
Floor
SeeCFigureC5"3CforCdetail"
SoundCProofingCClip
AccousticalCSealant
AccousticalCSealant
FireCStop
AccousticalCSealantFloor
FigureC6"1:CCreateCfireCstopsCbetweenCroomsCaccordingCtoClocalCbuildingCcodes"
FigureC6"2:CInstallCclipsCtoCtheCbuildingCframeCandCintallCtheCdrywallCdirectlyCtoCtheCchannel"CDrywallCscrewsCshouldCnotCbeCinClineCwithCtheCclipCscrews"
FigureC6"3:C1/4ACgapCmustCbeCleftCbetweenCdrywallCandCanyCbuildingCstructureCtoCbeCfilledCwithCaccousticalCsealant"
ISOMAXBRESILIENTBSOUNDBISOLATIONBCLIPSINSTRUCTIONBANDBSAFETYBMANUAL
www.soundproofinglosangeles.com////////(888)/927-7495
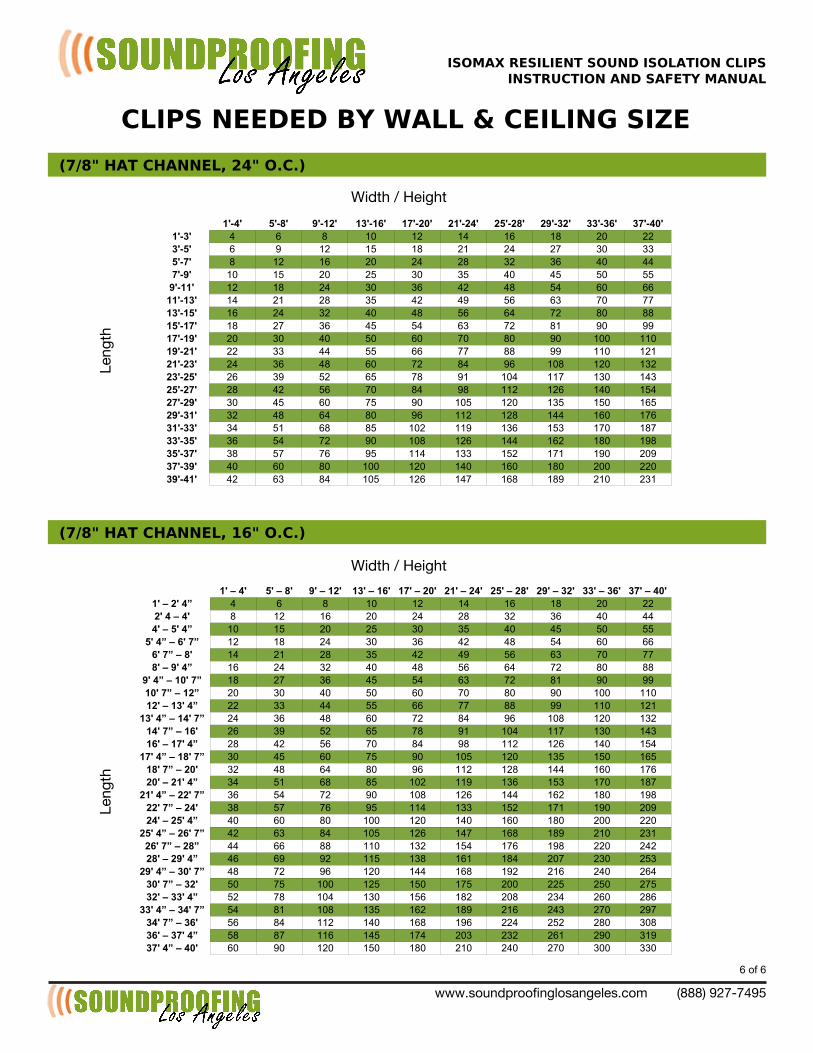
(7/8&BHATBCHANNEL,B16&BO.C.)
(7/8&BHATBCHANNEL,B24&BO.C.)
CLIPSBNEEDEDBBYBWALLB&BCEILINGBSIZE
1'-4' 5'-8' 9'-12' 13'-16' 17'-20' 21'-24' 25'-28' 29'-32' 33'-36' 37'-40'1'-3' 4 6 8 10 12 14 16 18 20 223'-5' 6 9 12 15 18 21 24 27 30 335'-7' 8 12 16 20 24 28 32 36 40 447'-9' 10 15 20 25 30 35 40 45 50 55
9'-11' 12 18 24 30 36 42 48 54 60 6611'-13' 14 21 28 35 42 49 56 63 70 7713'-15' 16 24 32 40 48 56 64 72 80 8815'-17' 18 27 36 45 54 63 72 81 90 9917'-19' 20 30 40 50 60 70 80 90 100 11019'-21' 22 33 44 55 66 77 88 99 110 12121'-23' 24 36 48 60 72 84 96 108 120 13223'-25' 26 39 52 65 78 91 104 117 130 14325'-27' 28 42 56 70 84 98 112 126 140 15427'-29' 30 45 60 75 90 105 120 135 150 16529'-31' 32 48 64 80 96 112 128 144 160 17631'-33' 34 51 68 85 102 119 136 153 170 18733'-35' 36 54 72 90 108 126 144 162 180 19835'-37' 38 57 76 95 114 133 152 171 190 20937'-39' 40 60 80 100 120 140 160 180 200 22039'-41' 42 63 84 105 126 147 168 189 210 231
Leng
th
Width///Height
1' – 4' 5' – 8' 9' – 12' 13' – 16' 17' – 20' 21' – 24' 25' – 28' 29' – 32' 33' – 36' 37' – 40'1' – 2' 4” 4 6 8 10 12 14 16 18 20 222' 4 – 4' 8 12 16 20 24 28 32 36 40 444' – 5' 4” 10 15 20 25 30 35 40 45 50 55
5' 4” – 6' 7” 12 18 24 30 36 42 48 54 60 666' 7” – 8' 14 21 28 35 42 49 56 63 70 778' – 9' 4” 16 24 32 40 48 56 64 72 80 88
9' 4” – 10' 7” 18 27 36 45 54 63 72 81 90 9910' 7” – 12” 20 30 40 50 60 70 80 90 100 11012' – 13' 4” 22 33 44 55 66 77 88 99 110 121
13' 4” – 14' 7” 24 36 48 60 72 84 96 108 120 13214' 7” – 16' 26 39 52 65 78 91 104 117 130 14316' – 17' 4” 28 42 56 70 84 98 112 126 140 154
17' 4” – 18' 7” 30 45 60 75 90 105 120 135 150 16518' 7” – 20' 32 48 64 80 96 112 128 144 160 17620' – 21' 4” 34 51 68 85 102 119 136 153 170 187
21' 4” – 22' 7” 36 54 72 90 108 126 144 162 180 19822' 7” – 24' 38 57 76 95 114 133 152 171 190 20924' – 25' 4” 40 60 80 100 120 140 160 180 200 220
25' 4” – 26' 7” 42 63 84 105 126 147 168 189 210 23126' 7” – 28” 44 66 88 110 132 154 176 198 220 24228' – 29' 4” 46 69 92 115 138 161 184 207 230 253
29' 4” – 30' 7” 48 72 96 120 144 168 192 216 240 26430' 7” – 32' 50 75 100 125 150 175 200 225 250 27532' – 33' 4” 52 78 104 130 156 182 208 234 260 286
33' 4” – 34' 7” 54 81 108 135 162 189 216 243 270 29734' 7” – 36' 56 84 112 140 168 196 224 252 280 30836' – 37' 4” 58 87 116 145 174 203 232 261 290 31937' 4” – 40' 60 90 120 150 180 210 240 270 300 330
Leng
th
Width///Height
6 of 6