keyestudio diy electronic scale
TRANSCRIPT

Eckstein Keyestudio
https://eckstein-shop.de/Keyestudio
keyestudio DIY Electronic Scale

Eckstein Keyestudio
https://eckstein-shop.de/Keyestudio
Content
1. Introduction ..................................................................................................................................... 1
2. Principle .......................................................................................................................................... 1
3. Features ........................................................................................................................................... 1
4. Kit List ............................................................................................................................................ 2
5. Installation Method ......................................................................................................................... 4
6. Connection Method ....................................................................................................................... 14
7. Connection Diagram ..................................................................................................................... 14
8. Debugging Step ............................................................................................................................. 15
9. Result............................................................................................................................................. 26
10. Download Address of Related Material ...................................................................................... 27

Eckstein Keyestudio
https://eckstein-shop.de/Keyestudio
1. Introduction
Electronic scale is commonly seen in our daily life, with function of weighting. Professional scales
on market have more functions and its precision is higher. Is there any possibility for enthusiasts
to DIY their own electronic scale with what they have learned? Absolutely you can! It is easy to
make an open source electronic scale. You just need a weighting module, an AD chip (hx711)
specialized in weighting, and Arduino with corresponding library. Everything becomes so easy!
2. Principle
Electronic scale weigh force according to slight deformation causing by pressing metal. It uses the
most commonly used strain gauge to measure deformation. In a typical application, utilize the
strain gauge adhered on face of this sensor, to measure the force bore by the sensor.
HX711 is a chip of 24 bit A\D converter, designed for high precision weighing sensor. Compared
with other same-type chips, this chip features high integration, quick response and strong
anti-interference, integrated external circuit needed by other chips including stabilized voltage
supply and on-chip clock oscillator. It decreases cost of complete machine of the scale, and in the
same time improve its performance and reliability. The interface and programs of this chip and
MCU chip are very simple. All control signals are driven by pins, without programming register of
inner chip. Input and select switch to choose arbitrarily channel A or B, connecting it to a
low-noise programmable amplifier. The gain in channel A is 128 or 64 bit, and its corresponding
amplitude of different input signals in full loaded is respectively ±20mV or ±40mV. The gain
in channel B is fixed 32, used to detect system parameters. Stabilized voltage supply offered by
chip can directly supply power for external sensor and A\D converter, there no need for additional
analog power on main board. Clock oscillator doesn't need any external device. Automatic reset
simplifies initialization when opening up.
3. Features
Channel A or B can choose different input.
The gain is 64 or 128 in the low-noise programmable amplifier.
Stabilized voltage supply offered by chip can directly supply power for external sensor and A\D
converter.
Clock oscillator doesn't need any external device. If necessary, it can use external crystal oscillator
or clock.
Automatic reset function
All control signals are driven by pins, without programming register of inner chip.
Alternative 10Hz or 80Hz of output data rate

Eckstein Keyestudio
https://eckstein-shop.de/Keyestudio
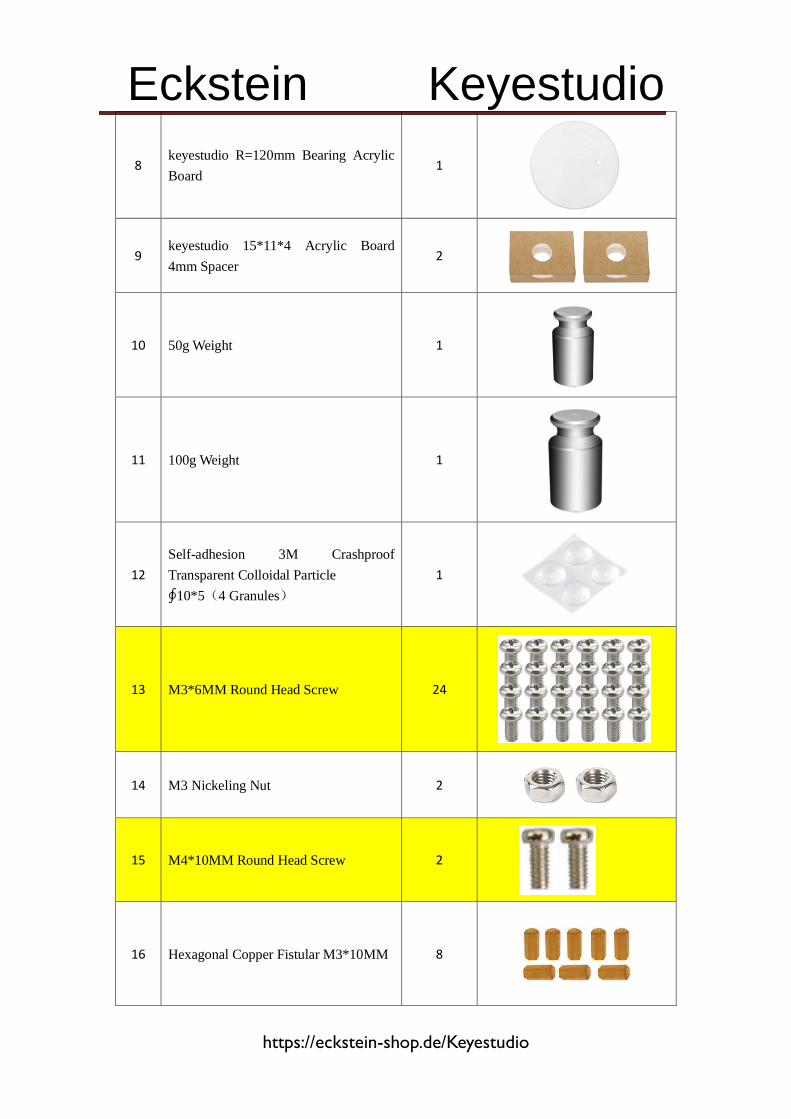
4. Kit List
No. Product Name Quantity Picture
1 Keyestudio Board 1
2 I2C 1602 LCD 1
3 keyestudio Digital Push Button 1
4 keyestudio HX711 Weighing Module 1
5 5KG Rheostat Sensor 1
6 Tabula Board(Upper Board) 1
7 Tabula Board(Bottom Board) 1
Eckstein Keyestudio
https://eckstein-shop.de/Keyestudio
8 keyestudio R=120mm Bearing Acrylic
Board 1
9 keyestudio 15*11*4 Acrylic Board
4mm Spacer 2
10 50g Weight 1
11 100g Weight 1
12
Self-adhesion 3M Crashproof
Transparent Colloidal Particle
∮10*5(4 Granules)
1
13 M3*6MM Round Head Screw 24
14 M3 Nickeling Nut 2
15 M4*10MM Round Head Screw 2
16 Hexagonal Copper Fistular M3*10MM 8

Eckstein Keyestudio
https://eckstein-shop.de/Keyestudio
17 Hexagonal Copper Fistular M3*40MM 3
18 Female to Female Dupont Line15CM 20
19 USB Cable 1
20 18650 Battery Case 1
5. Installation Method
1. Stick 4pcs transparent colloidal particle to the bottom board.
4pcs
Self-adhesion
3M Crashproof
Transparent
Colloidal
Particle

Eckstein Keyestudio
https://eckstein-shop.de/Keyestudio
2. Twist 4 pcs M3*6MM round head screws on the bottom board.
3. Install 4 pcs hexagonal copper Fistulars to the screws.
4. Pay attention to plug keyestudio Board into the corresponding holes of 4 fistulars.
4pcs
M3*6MM
Round Head
Screw
Colloidal
Particle
4pcs
Hexagonal
Copper
Fistular
M3*10MM
keyestudio
Board

Eckstein Keyestudio
https://eckstein-shop.de/Keyestudio
5. Twist 3pcs head screw to the fistulars to fix the keyestudio board.
6. Attach the bottom board using 1 screw.
7. Install a button using 1 screw.
3pcs
M3*6MM
Round Head
Screw
Colloidal
Particle
keyestudio
Digital Push
Button
1pcs
M3*6MM
Round Head
Screw
Eckstein Keyestudio
https://eckstein-shop.de/Keyestudio
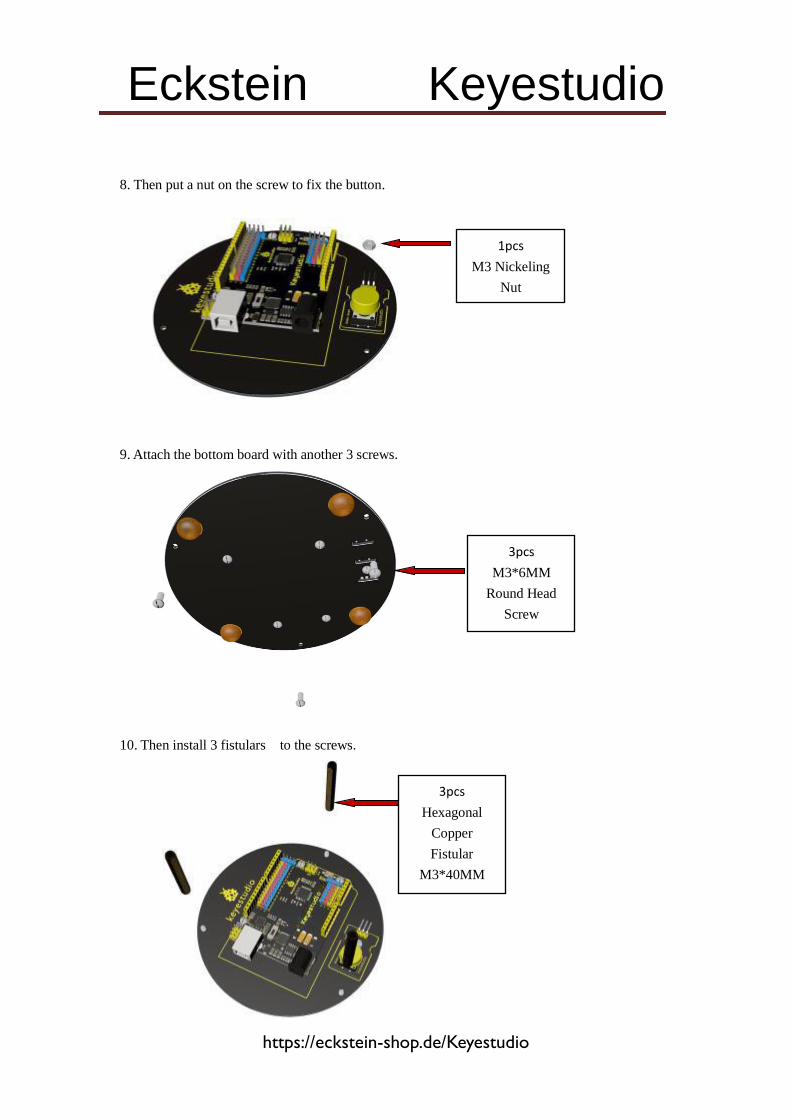
8. Then put a nut on the screw to fix the button.
9. Attach the bottom board with another 3 screws.
10. Then install 3 fistulars to the screws.
1pcs
M3 Nickeling
Nut
3pcs
M3*6MM
Round Head
Screw
Colloidal
Particle
3pcs
Hexagonal
Copper
Fistular
M3*40MM

Eckstein Keyestudio
https://eckstein-shop.de/Keyestudio
11. Attach the weighing module to the upper board.
12. Plug 1 screw into the module .
13. Then fix the module with a nut.
keyestudio
HX711
Weighing
Module
1pcs
M3*6MM
Round Head
Screw
1pcs
M3 Nickeling
Nut

Eckstein Keyestudio
https://eckstein-shop.de/Keyestudio
14. Put another screw on the upper board.
15. Put the Acrylic board on the screw.
16. Attach the 5KG rheostat sensor to the upper board using a M4*10MM round head screw and
mind the direction of the sensor(arrow pointing up).
5KG Rheostat
Sensor
1pcs
M4*10MM
Round Head
Screw
1pcs
keyestudio
15*11*4
Acrylic Board
4mm Spacer

Eckstein Keyestudio
https://eckstein-shop.de/Keyestudio
17. Install 4 screws on the upper board.
18. Then put 4 fistulares on the 4 screws.
19. Plug the LCD into 4 fistulars.
4pcs
Hexagonal
Copper
Fistular
M3*10MM
4pcs
M3*6MM
Round Head
Screw

Eckstein Keyestudio
https://eckstein-shop.de/Keyestudio
I2C 1602 LCD
20. Fix the LCD using 4 screws.
21. Then plug the upper board into the bottom board.
4pcs
M3*6MM
Round Head
Screw
Colloidal
Particle

Eckstein Keyestudio
https://eckstein-shop.de/Keyestudio
Upper Board
22. Fix the boards with 3 screws.
23. Put the Acrylic board above 5KG rheostat sensor.
24. Attach the bearing acrylic to acrylic board above.
3pcs
M3*6MM
Round Head
Screw
Colloidal
Particle
keyestudio
15*11*4
Acrylic Board
4mm Spacer
Colloidal
Particle
Bottom Board

Eckstein Keyestudio
https://eckstein-shop.de/Keyestudio
M4*10MM
Round Head
Screw
25. Finally fix the bearing acrylic with 5KG rheostat sensor using a screw.
26.Installation is complete shown as following figure.
keyestudio
R=120mm
Bearing
Acrylic Board

Eckstein Keyestudio
https://eckstein-shop.de/Keyestudio
6. Connection Method
1)VCC can be any value among 2.6-5.5 . Because we use Arduino, just connect to 5V, and to
GND.
2)Connect SCK to Pin 9, DT to Pin 10 on Arduino; you can change the pins in program.
3)Connect E+ to positive driving voltage, E- to negative, A+ to positive output voltage and A-
to negative on bridge sensor.(E+ to red wire, E- to black wire, A+ to green or blue wire , A- to
white wire )
4)Connect B+ and B- to sensor of channel B, or connect to power supply through partial pressure
circuit, in order to detect supply voltage. If not, you had better connect to GND. But disconnect
GND is OK.
7. Connection Diagram

Eckstein Keyestudio
https://eckstein-shop.de/Keyestudio
(pay attention:"-" is equivalent to G, "+" is equivalent to "V")
8. Debugging Step
The following is a specific applied sample:
Parameters of sensor shown as folloing:
Full-range Output Voltage=Excitation x Sensitivity 1.0mV/V
For example: 5V supply voltage multiplied by 1.0mV/V sensitivity equals to 5mV full-range.
In fact when supply voltage of the module I choose is 5V, supply voltage of sensor is 4V, so
full-range voltage of my sensor is 4mV. I can choose 128 bit , the highest gain factor in channel A ,
to get highest precision.
Figure of a Complete Electronic Scale

Eckstein Keyestudio
https://eckstein-shop.de/Keyestudio
In the picture , the module connected to sensor is HX711, Arduino UNO is in the lower right
corner, bridge sensor is hung on lazy arm(my connection mode is to use sling to measure tension
value). The shorter the wire between HX711 module and sensor the better. If it is too long, the
module will get disturbed and it has better exceeding 30cm. If necessary to lengthen, you maybe
can use wire that can shield electromagnetism and signal amplifier.
1. Open sample codes in Arduino, and you can see they are very easy:
***************************************************************
#include <HX711.h> // Header files with library
HX711 hx(9, 10); // Data pin definition
void setup() {
Serial.begin(9600);
}
void loop()
{
double sum = 0; // In order to reduce the error, take out 10 values every
time and calculate the average value.
for (int i = 0; i < 10; i++) // The more loops, the higher the accuracy, and of course,
the more time it takes
sum += hx.read(); //Cumulative
Eckstein Keyestudio
https://eckstein-shop.de/Keyestudio
Serial.println(sum/10); //Calculate average value, average value is minus by another
average value
}
***************************************************************
These sample codes are very simple, but there are a lot of sample without function:
HX711(byte sck, byte dout, byte amp = 128, double co = 1); // define SCK and DOUT pin, gain
factor(default 128) and correction factor(default 1)
void set_amp(byte amp); // changing gain factor and corresponding channel, and invoking read()
at least one time to work
bool is_ready(); // whether turning beck hx711 is useful, and it is invoked in read()
long read(); // turning beck sensor voltage value, if hx711 not working, the program stops this
function
double bias_read(); // turning beck:(read() - deviant) * correction factor
void tare(int t = 10); // adding tare to deviant and influencing the invoking of read()
void set_co(double co = 1); // modifying correction factor(default 1)
void set_offset(long offset = 0); // modifying deviant (default 1) , you can see hx711 also can use 4
parameters mode to define, and stipulate gain factor and correction factor. You can change gain
and correction factor at any time during program running , and utilize deviant to remove tare.
The only one needed to explain is the first function HX711 hx(9, 10); // only defining SCK and
DOUT pin, the default of gain of AMP in channel A is 128 bit, the default of correction factor is
1;
HX711 hx(9, 10, 64); // defining SCK and DOUT pin, the default of gain of AMP in channel A is
64 bit, the default of correction factor is 1;
HX711 hx(9, 10, 32, 1.4); // defining SCK and DOUT pin, the default of gain of AMP in channel
A is 32 bit, the default of correction factor is 1.4;
As for choosing channel and gain factor mentioned in materials, The gain in channel A is 128 or
64 bit, and its corresponding full-load voltage is respectively ±20mV or ±40mV. The gain in
channel B is fixed 32 and full-load voltage is 80mV. Input voltage of each channel can’t be more
than their full-load voltage. Of course, you can change channel and gain factor at any time, as long
as you use function of set_amp(amp) during programming, but the value of amp only can be 128,
64 or 32.
Stressing again, if you choose gain factor of 32 bit, the data read out is of channel B.
Firstly, use samples coming with library to test, and you can see the value after hanging on
100g weight on a tray:

Eckstein Keyestudio
https://eckstein-shop.de/Keyestudio
186184.00
186176.59
186177.40
186170.09
186169.70
186162.70
186175.00
186163.40
186160.20
186163.00
186170.79
186174.20
186174.90
186177.70
186179.00
186178.50
186173.59
186168.09
186170.59
186151.20
186184.59
186165.70
186188.09
186176.09
186173.00
186170.79
186163.40
186160.90
186184.20
186163.40
186173.09
186166.50
186155.79
186183.00
186173.59
186173.70
186163.79
186158.40
186170.50
186172.40
After a 50g weight is taken out, the value are:

Eckstein Keyestudio
https://eckstein-shop.de/Keyestudio
163012.09
163010.70
163043.00
163042.20
163021.90
163012.90
163015.09
163027.79
163019.79
163043.00
163024.90
163006.50
163016.70
163001.40
163028.00
163010.79
163026.79
163008.70
163004.70
163018.09
163020.50
163019.40
163028.70
163033.90
163014.90
163016.09
163008.50
163032.59
163030.79
163010.20
163036.50
163018.29
163015.00
163029.59
163006.50
163026.00
163028.09
162995.50
163014.59
163024.09
Calculating roughly:

Eckstein Keyestudio
https://eckstein-shop.de/Keyestudio
186170-163020=23150
so the correction factor is about 50/23150=0.0021598272138229
2. Then the codes are (at the moment you can decrease properly reading rate, and add
“delay” , like reading value at 30 seconds at one time):
***************************************************************
#include <HX711.h>
HX711 hx(9, 10, 128, 0.0021598272138229);
void setup() {
Serial.begin(9600);
}
void loop() {
delay(500);
double sum = 0;
for (int i = 0; i < 10; i++)
sum += hx.read();
Serial.println(sum/10);
}
***************************************************************
After compiling codes into Arduino, take out all weights, and just keep the body, you can
get:
139712.00
139695.29
139705.29
139713.09
139713.70
139706.50
139709.59
139705.90
139692.90
139715.79
139735.59
139703.90
139711.59
139708.59
139730.70
139716.40
139689.79
139705.59

Eckstein Keyestudio
https://eckstein-shop.de/Keyestudio
139692.20
139701.50
139730.09
139728.09
139723.40
139715.20
139705.79
139711.29
139686.20
139701.29
139711.50
139684.70
139687.20
139712.70
139680.09
139699.09
139683.79
139697.29
139725.50
139723.90
139711.70
139702.40
139684.09
139704.70
139703.90
139696.90
3.That means the deviant approximates to 139700. So we can invoke the function of deviant
in setup(using bias_read() to read value with correction factor and deviant, compared with
read() as a reference)
***************************************************************
#include <HX711.h>
HX711 hx(9, 10, 128, 0.0021598272138229);
void setup() {
Serial.begin(9600);
hx.set_offset(139700);
}
void loop() {
delay(500);
double sum0 = 0;
double sum1 = 0;
for (int i = 0; i < 10; i++) {

Eckstein Keyestudio
https://eckstein-shop.de/Keyestudio
sum0 += hx.read();
sum1 += hx.bias_read();
}
Serial.print(sum0/10);
Serial.print(" ");
Serial.println(sum1/10);
}
***************************************************************
The data read out is changed into:
139692.70 0.00
139695.00 -0.01
139702.00 -0.01
139685.29 -0.03
139715.59 0.03
139696.40 0.01
139687.59 -0.03
139690.50 -0.00
139694.00 -0.01
139685.70 -0.02
139693.59 -0.01
139692.50 -0.03
139695.50 -0.01
139702.90 0.02
139709.09 0.02
139716.50 0.03
139695.59 -0.00
139705.70 0.02
139698.29 -0.01
139699.79 -0.01
139711.59 0.02
139698.40 0.01
139710.90 0.02
139703.59 0.01
139709.29 0.02
139704.29 0.00
139715.90 0.02
139709.90 0.02
139702.40 0.00
139696.79 -0.00
139712.40 0.00
139682.09 -0.03

Eckstein Keyestudio
https://eckstein-shop.de/Keyestudio
139693.59 -0.02
139690.70 -0.02
139676.09 -0.05
139699.00 0.00
139688.09 -0.04
139686.50 -0.02
139710.29 0.01
139708.29 0.02
139688.09 -0.02
139697.00 -0.01
139690.90 -0.01
139706.70 0.03
139705.50 0.01
139713.00 0.02
139702.70 -0.00
139708.00 0.01
139700.59 0.00
139701.40 0.01
139694.90 -0.01
Check again the data after putting on a 50g weight:
162869.29 50.03
162878.79 50.06
162885.00 50.07
162891.29 50.09
162894.79 50.09
162880.20 50.07
162863.70 50.05
162901.29 50.09
162874.79 50.05
162889.09 50.07
162885.70 50.09
162890.00 50.09
162880.09 50.06
162886.29 50.08
162886.00 50.06
162874.50 50.05
162882.00 50.08
162820.59 50.00
162818.79 49.99

Eckstein Keyestudio
https://eckstein-shop.de/Keyestudio
162860.09 50.02
162875.09 50.05
162866.40 50.04
162848.79 49.99
162866.90 50.04
162864.70 50.03
162862.09 50.04
162884.00 50.06
162852.70 50.01
162863.20 50.02
162864.50 50.03
Putting on another 100g weight:
186051.20 100.01
186050.10 100.03
186049.99 100.03
186048.29 99.99
186049.50 100.02
186048.20 99.98
186054.79 100.05
186054.60 100.04
186047.40 99.98
186049.79 100.00
186049.99 100.03
186054.70 100.04
186052.50 100.03
186048.00 99.98
186049.29 100.00
186048.29 99.99
186053.90 100.03
186049.09 100.01
186048.80 99.97
186047.90 99.98
186050.60 100.01
186050.50 100.00
186050.20 100.02
186048.40 99.99
186054.09 100.05
186048.32 99.99
186048.69 100.02
186053.99 100.05
186049.65 100.00

Eckstein Keyestudio
https://eckstein-shop.de/Keyestudio
186048.30 99.98
186050.09 100.02
186050.20 100.04
186049.59 100.02
186049.70 100.03
186049.59 100.02
186049.60 100.02
You can see the first decimal has changed for 0.1. That means reading correction factor is not
precise enough, but it fits completely precision at 1g.
4. Next, it is to perfect program and increase removing tare function. Install a button on
Arduino. In order to prevent electromagnetic interference and mistakes, we use a button
usually inputting high level. When we press button, it inputs low level. Connect this button
to D0 port:
***************************************************************
#include <HX711.h>
HX711 hx(9, 10, 128, 0.0021598272138229);
void setup() {
Serial.begin(9600);
hx.set_offset(139700);
}
void loop() {
if(digitalRead(0) == LOW) hx.tare();
double sum0 = 0;
double sum1 = 0;
for (int i = 0; i < 10; i++) {
sum0 += hx.read();
sum1 += hx.bias_read();
}
Serial.print(sum0/10);
Serial.print(" ");
Serial.println(sum1/10);
}
***************************************************************
Every time you press the button, tare is removed.
5. One more code added 1602 liquid crystal:

Eckstein Keyestudio
https://eckstein-shop.de/Keyestudio
***************************************************************
#include <HX711.h>
#include <Wire.h>
#include <LiquidCrystal_I2C.h>
HX711 hx(9, 10, 128, 0.0021598272138229);
LiquidCrystal_I2C lcd(0x27,16,2);
void setup() {
Serial.begin(9600);
hx.set_offset(139700);
lcd.init(); // initialize the lcd
lcd.backlight();
lcd.begin(16,2);
}
void loop() {
if(digitalRead(0) == LOW)
hx.tare();
double sum0 = 0;
double sum1 = 0;
for (int i = 0; i < 10; i++) {
sum0 += hx.read();
sum1 += hx.bias_read();
}
lcd.clear();
lcd.setCursor(2,0);
lcd.print("keyes-scale");
lcd.setCursor(5, 1);
lcd.print(sum1/10);
lcd.print("g");
delay(10);
}
***************************************************************
Because of influences of different factor ,such as temperature, environment, wires and more,
actual error is about 1%.
9. Result
Put a 50g weight on tray, and the result is shown as below.

Eckstein Keyestudio
https://eckstein-shop.de/Keyestudio
10. Download Address of Related Material
See video from:
Get libraries of HX711, LiquidCrystal_I2C and Wire from: