kamps 978-0-240-81469-8 00003 - elsevier...kamps 978-0-240-81469-8 00003...
TRANSCRIPT

Focus On Photographing People30
Gorgeous light, fantastic pose …
but out of focus! What a shame!
Kamps 978-0-240-81469-8 00003
06-ch03-30-59-9780240814698.indd 3006-ch03-30-59-9780240814698.indd 30 17/12/10 4:48 PM17/12/10 4:48 PM
31Photography Basics
LIKE ANY ART FORM, there are two sides to photography. You need to have artistic ideas—often referred to as a photographer’s vision or the photog-rapher’s eye . The flipside of that coin is the technical skills you need in order to get photos to look the way you want them to.
There is no point in taking photos that are technically perfect but incredibly boring. Similarly, it doesn’t help if you can compose the most fantastic photo graphs in your mind’s eye but you can’t translate this mental image into a physical one by adjusting the settings on your camera.
In this chapter, we sidestep the creative side of photography and take a closer look at the technical skills involved, including how ISO, aperture, and shutter speed work.
Photography Basics
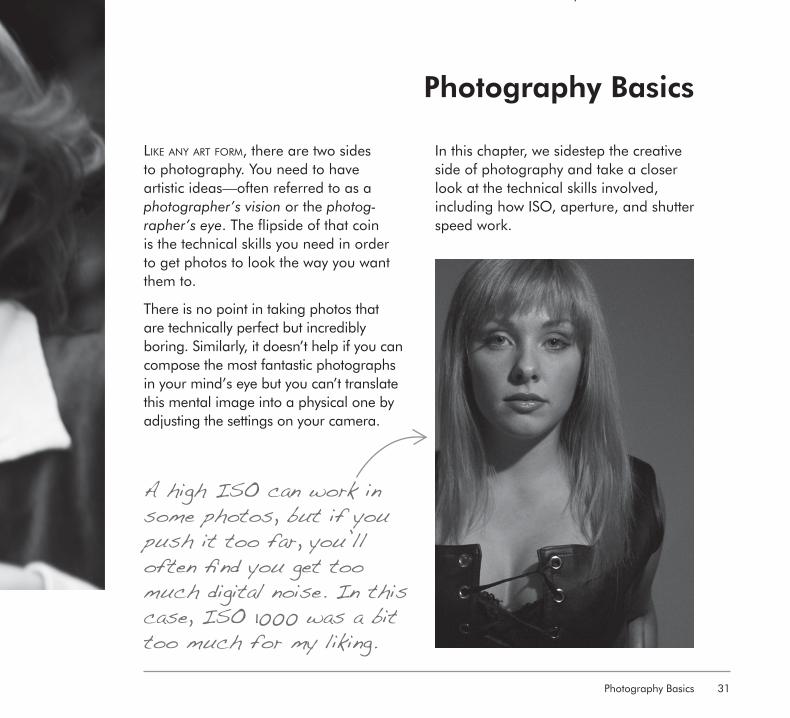
A high ISO can work in some photos, but if you push it too far, you’ll often fi nd you get too much digital noise. In this case, ISO 1000 was a bit too much for my liking.
Kamps 978-0-240-81469-8 00003
06-ch03-30-59-9780240814698.indd 3106-ch03-30-59-9780240814698.indd 31 17/12/10 4:48 PM17/12/10 4:48 PM
Focus On Photographing People32
What affects an exposure? Put extremely simply, a camera is a lightproof box. In the past, the box contained film, but these days, we’re mostly working with digital cameras. In a digital camera, you’ll find an imaging chip. This imaging chip has one simple task: to measure any light that hits it. When you take
a photograph, thousands and thousands of tiny little light meters measure how much light has gone through your lens, into the camera body.
When you are taking photos, all you are doing is adjusting how much light actually goes into the camera body. You do that by adjusting three settings on your camera: the shutter speed, the aperture, and the ISO.
Imagine for a second that your camera body is a bucket, and you have been asked to fill this bucket. You have three different water hoses available to you: one the size of a straw, one the size of a cigar, and one the size of a drain pipe. Needless to say, you will be able to fill the bucket with water with any of the three hoses—the difference is how long it takes.
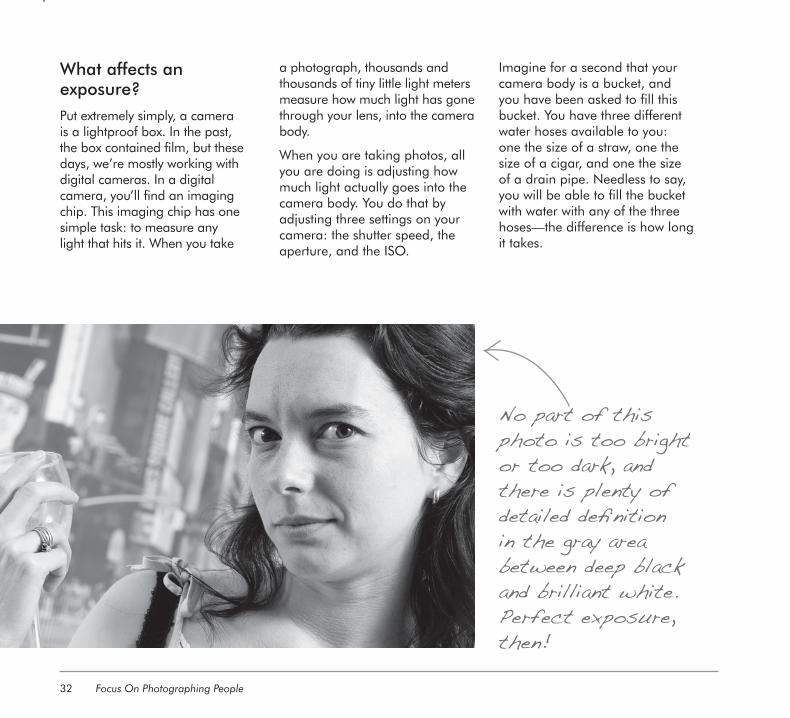
No part of this photo is too bright or too dark, and there is plenty of detailed defi nition in the gray area between deep black and brilliant white. Perfect exposure, then!
Kamps 978-0-240-81469-8 00003
06-ch03-30-59-9780240814698.indd 3206-ch03-30-59-9780240814698.indd 32 17/12/10 4:48 PM17/12/10 4:48 PM

Photography Basics 33
choosing to use the biggest water pipe to fill the bucket. Choosing a small aperture does the opposite.
The other control we spoke about is your shutter speed. This is the amount of time your camera lets light through the shutters inside your camera. A fast shutter speed might be just 1/1000 of a second—this doesn’t let through a lot of light. A slower shutter speed could be 1/50 of a second. A 1/50 -second shutter speed means that the shutter is open 20 times longer
than a 1/1000 -second shutter speed. You may have guessed it: that also means it lets through 20 times more light.
Finally, we can control our exposure by adjusting the ISO value on your camera; we’ll talk about that in more detail later in this chapter.
THE WORD FAST IN PHOTOGRAPHY Photographers often speak about fast and slow in ways that can be a little confusing. I’m trying to be consistent in this book, but the following list might come in handy.
• A fast shutter speed is a shutter that is open only for a brief period of time (i.e., lets through less light).
• A fast lens is a lens with a large maximum aperture (i.e., lets through more light).
• Fast film (or, more commonly, a fast ISO on a digital camera) is a higher ISO rating—like ISO 1000 instead of ISO 200.
• People rarely speak about a fast aperture , but if they do, they refer to a large aperture (i.e., lets through more light).
Funky effect
courtesy of
a Lensbaby
lens. Perfec
t
exposure, to
o!
Photography is similar. Inside your lens is a diaphragm, which is basically a device that can change the size of a hole. As you would imagine, a big hole lets a lot of light through, and a small hole lets less light through. This hole is known as an aperture . Selecting a large aperture is like
Kamps 978-0-240-81469-8 00003
06-ch03-30-59-9780240814698.indd 3306-ch03-30-59-9780240814698.indd 33 17/12/10 4:48 PM17/12/10 4:48 PM

Focus On Photographing People34
Overriding the camera’s decisions: Manual mode Exposure is often the first stumbling block for new photo-graphers. Of course, there are techniques you can use
where you are using a “wrong” exposure on purpose, but that can be extremely tricky to get right. If you’re just starting out, it might be a good idea to aim to get your exposures “right.” Once you can consistently create
correctly exposed images, then you can throw all caution to the wind and experiment to your heart’s content!
There is some good news in all of this, however: The light sensor in
In this photo, the model’s face is so bright that you can’t even see her skin anymore. That means I overexposed it by accident.
Kamps 978-0-240-81469-8 00003
06-ch03-30-59-9780240814698.indd 3406-ch03-30-59-9780240814698.indd 34 17/12/10 4:49 PM17/12/10 4:49 PM

Photography Basics 35
Overexposure doesn’t always have to be a bad thing. In this photo, I decided to go for a stark contrast, and the large “blown-out” areas look pretty good.
Kamps 978-0-240-81469-8 00003
06-ch03-30-59-9780240814698.indd 3506-ch03-30-59-9780240814698.indd 35 17/12/10 4:49 PM17/12/10 4:49 PM

Focus On Photographing People36
This image contains a lot of black, but because the bright bits look so good, the overall effect is stunning.
WHEN YOU KNOW BETTER THAN YOUR CAMERA Your camera tends to get the exposure right, but there are situations where the light meter gets consistently confused. If you’re taking photos in snow, for example, the camera might try to expose the snow correctly, which leaves what you are trying to photograph way too dark. The opposite happens sometimes when you’re taking photos with large dark backgrounds.
To convince your camera that it’s wrong and that you’re right, you can change the EV (Exposure Value) adjustment. Check your camera manual to learn how to do it—dial in a negative value if your pictures are coming out too bright, and a positive value if they’re too dark.
Your camera still does all the thinking, but will adjust its exposure with the amount you’ve dialed in.
modern cameras is an impressive piece of technology, and you’ll rarely find that your camera gets it wrong. If it does, you have a few options: Use EV adjustment
(see the sidebar “When you know better than your camera”), or use Manual Exposure mode to wrench all control from your camera.
Kamps 978-0-240-81469-8 00003
06-ch03-30-59-9780240814698.indd 3606-ch03-30-59-9780240814698.indd 36 17/12/10 4:49 PM17/12/10 4:49 PM

Photography Basics 37
Moving away from automatic camera modes You’ve probably seen the mode wheel on top of your camera: It’s the one that shows “P” (for Program mode), “T” or “Tv” (for Time mode—or Shutter Time Priority), “A” or “Av” (for Aperture Priority), and “M” (for Manual). Many cameras also have a series of creative modes, such as for night-time photography,
portrait photography, landscape photography, and so on.
Since we’re aspiring to be “proper” photographers, it’s time to ditch the automatic modes for good—no more automatic modes! By the time you’ve read this chapter, you’ll know every-thing you need to know, and you’ll never need to cheat again. If you ask me, that’s the first step toward becoming a real photographer!
To take your first step away from the automatic modes, but if you still want the camera to do the heavy lifting for you, choose P (for Program mode). In this mode the camera will select the aperture and shutter time for you, but you can turn a wheel on the camera to adjust the bias of an exposure. To do this, half-press your shutter button. This will cause the camera to measure the light and calculate an exposure.
These days, I rarely use anything other than Aperture Priority or Manual Exposure modes.
Kamps 978-0-240-81469-8 00003
06-ch03-30-59-9780240814698.indd 3706-ch03-30-59-9780240814698.indd 37 17/12/10 4:49 PM17/12/10 4:49 PM

Focus On Photographing People38
Check your camera manual for how you change the bias of an exposure when you’re in Program mode. On most cameras, you’ll have an adjustment wheel near your index finger: turn it one way and it will give you a bigger aperture and a faster shutter speed; turn it the other way, and
it’ll select a smaller aperture and slower shutter speed. Your exposure will still come out “correct” according to the camera, but at least you can influence what the camera is doing.
BIAS Shutter speeds and apertures come in pairs. For a given scene, 1/200 of a second and f/8 may be the perfect combination of shutter speed and aperture. However, you can increase the shutter speed (to, say, 1/800 of a second), if you also select a larger aperture (in this case, since we quadrupled the speed of our exposure, we would have to use f/4.0).
When you make this change, the amount of light that hits the sensor inside your camera stays the same—but you are changing the bias of the photo. This comes in useful if you want to use a small (or large) aperture or a fast (or slow) shutter speed for creative effect or to create a particular photo.
AUTOMATIC OR PROGRAM MODE? In Automatic mode, you’re using your SLR camera as a very expensive point-and-shoot camera. Great for quick snaps, but it means you let the camera do all the work, and you don’t get the creative influence you want.
Start shooting in Program mode instead. The camera still chooses your aperture and shutter time for you, but you can select the ISO and you can override the camera’s decisions by choosing an EV bias (i.e., to trick the camera into over- or underexposing your images).
Better still, try to start thinking about what you want to achieve with your images, and use T (Shutter Priority), A (Aperture Priority) or even M (Manual mode), instead of Automatic or Program mode!
Program mode can give some fantastic pictures—just point and shoot!
Kamps 978-0-240-81469-8 00003
06-ch03-30-59-9780240814698.indd 3806-ch03-30-59-9780240814698.indd 38 17/12/10 4:49 PM17/12/10 4:49 PM
Photography Basics 39
Shutter and aperture priority A little later in this chapter, we look at how aperture and shutter speed affect your photography.
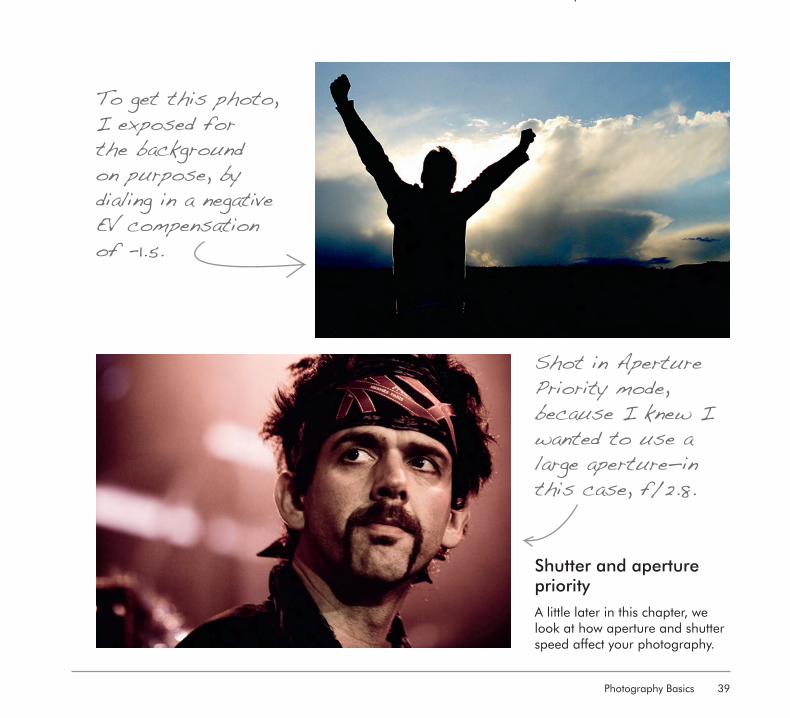
To get this photo, I exposed for the background on purpose, by dialing in a negative EV compensation of -1.5.
Shot in Aperture Priority mode, because I knew I wanted to use a large aperture—in this case, f/2.8.
Kamps 978-0-240-81469-8 00003
06-ch03-30-59-9780240814698.indd 3906-ch03-30-59-9780240814698.indd 39 17/12/10 4:50 PM17/12/10 4:50 PM

Focus On Photographing People40
Put simply, a photo taken with a slow shutter speed will look very different from a photo with a fast shutter speed. Similarly, a photo taken with a large aperture will look significantly different from one taken with a small aperture. We also talk about the creative effects of large and small depth of field later in this chapter.
Once you know what the effects of the various shutter speeds and apertures are, you’ll find that
you’ll want to take advantage of these differences when you’re taking photos of people.
In Aperture Priority (A or Av on your mode dial) mode, you select the aperture you’d like to use, and the camera uses its light meter to calculate what the appropriate shutter time is, given the lighting situation. You would use Aperture Priority mode either to dial in the creative effects you want to achieve (for portraiture, a large aperture for shallow depth
of field is the most common effect you might want to aim for), or when you simply want to ensure that you have the fastest shutter speed available at any given time. To ensure your camera always uses the fastest shutter speed possible, you simply choose the biggest aperture for your lens—your camera will then match this with the fastest shutter speed.
Unsurprisingly, Shutter Priority (S, T, or Tv) mode does the opposite: You choose the shutter
To give a feeling of speed, I shot this photo with a relatively slow, 1/25 of a second, shutter speed.
Kamps 978-0-240-81469-8 00003
06-ch03-30-59-9780240814698.indd 4006-ch03-30-59-9780240814698.indd 40 17/12/10 4:50 PM17/12/10 4:50 PM

Photography Basics 41
time, and your camera measures the available light and selects the aperture for you. You would use Shutter Priority when you want a specific effect that can
be achieved by using a slow or fast shutter speed. If you want to convey a feeling of speed, you might use a slow shutter speed, such as 1/20 of a second (because this causes some motion blur). To freeze motion, you may choose to use a fast shutter speed, like 1/1000 of a second or faster.
In both Aperture and Shutter Priority modes, you can still increase or decrease the exposure by changing the EV setting—just like in Program mode.
Focusing properly As we discussed in the Chapter 1 , if you manage to get the eyes in focus, you’ve won half the battle. In some cases, of course, that’s easier said than done.
Many photography books will tell you to use manual focus,
but personally, I think that’s hogwash. The autofocus on most modern SLR cameras is faster and more accurate than the manual focusing skills of every single professional photographer I know.
If you’ve ever been frustrated by the focusing on your camera, the good news is there are a few
UNDERSTAND YOUR LIMITS! In both Aperture and Shutter Priority modes, bear in mind that if you select a very large aperture when you’re outside in bright sunlight, the “correct” exposure might be an extremely fast shutter speed, faster than your camera body might be able to do. If this happens, your camera will over expose the image. It will choose the fastest shutter speed it can, but if that isn’t enough, you’re out of luck.
The same happens with Shutter Priority mode: you can choose 1/1000 second exposures all you like, but if you’re indoors and your lens only supports f/3.5 as its largest aperture, it may well be that your photos come out too dark.
When these two situations occur, you won’t get correctly exposed photos. Your camera will try to warn you of what is going on: The aperture or shutter speed readout in your viewfinder blinks.
If the eyes are in focus, you’ve got the focus right!
Kamps 978-0-240-81469-8 00003
06-ch03-30-59-9780240814698.indd 4106-ch03-30-59-9780240814698.indd 41 17/12/10 4:50 PM17/12/10 4:50 PM
Focus On Photographing People42
tricks you can use. Autofocus works best if you aim your camera at something that’s full of contrast and well lit. Point your camera at somebody’s T-shirt, and there’s a good chance that you’ll find the autofocus “hunting,” that is, going back and forth trying to focus. Help it along by aiming your camera at the edge of the neck and the T-shirt instead, and autofocus will work in a fraction of a second.
The correct way to focus is as follows. If you are using a zoom lens, zoom all the way in. Aim your camera lens square at your subject’s eye, and press the shutter button halfway. This will cause your camera to autofocus and do a light reading. Now, while keeping the button
half-pressed, zoom back out, compose your photo, and then press the button the whole way.
It might take a little bit of time to get used to the half-pressing-the-shutter-button technique: You might find that you take a few photos without meaning to, or that you accidentally let go of the button. Don’t give up; this is how the pros do it, so you may as well get used to it. Trust me, once you get it down pat, your photos will start coming out much, much better.
Shutter speed Put simply, shutter speed is the amount of time the shutter in your camera is open when you take a photograph. A fast shutter
WHY FOCUSING USED TO BE EASIER If you’ve ever used an old-fashioned SLR with manual focusing, you were probably quite successful in getting the focus right. That’s because old SLRs used to have a special focusing screen inside the pentaprism on top of the camera (the bit you look into). This focusing screen would make it a lot easier to focus, but it would also make the viewfinder much darker.
Modern cameras have sacrificed ease of focusing for a brighter viewfinder. A good choice, I think, but the result is that you will, in most cases, probably have to start trusting your autofocus.
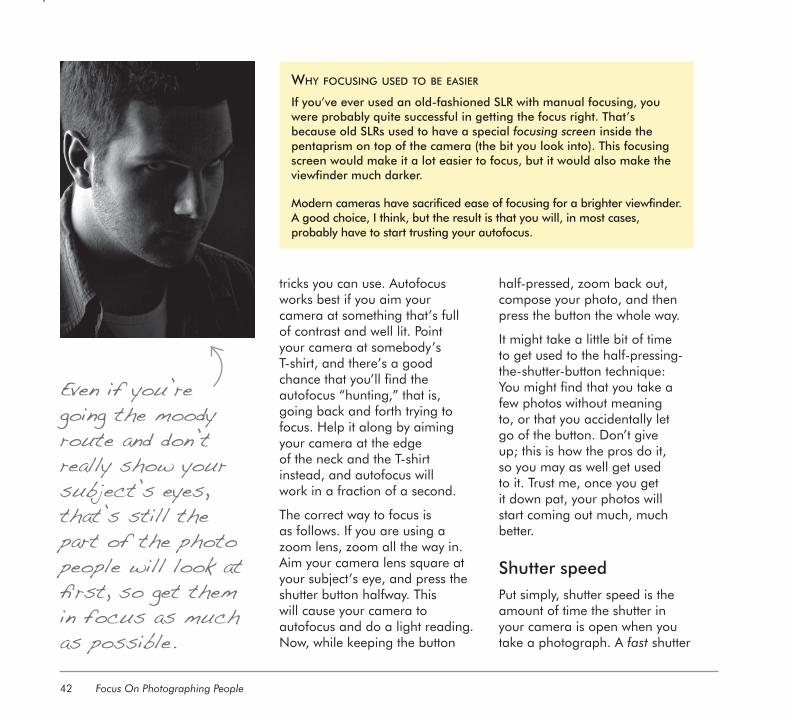
Even if you’re going the moody route and don’t really show your subject’s eyes, that’s still the part of the photo people will look at fi rst, so get them in focus as much as possible.
Kamps 978-0-240-81469-8 00003
06-ch03-30-59-9780240814698.indd 4206-ch03-30-59-9780240814698.indd 42 17/12/10 4:51 PM17/12/10 4:51 PM

Photography Basics 43
A slow shutter s
peed
can give a f
eeling of
movement, like in
this photo
of a belly
dancer in a
ction.
A fast shutter s
peed
helps freez
e motion,
which helpe
d me
capture the
passion
in this con
cert
photo.
Kamps 978-0-240-81469-8 00003
06-ch03-30-59-9780240814698.indd 4306-ch03-30-59-9780240814698.indd 43 17/12/10 4:51 PM17/12/10 4:51 PM

Focus On Photographing People44
speed means that the shutter is open for a short period of time, while a slow shutter speed means that the shutter is open for longer.
There are no hard-and-fast rules about what makes a fast or a slow shutter speed; it all depends
on the circumstances. When photographing a cyclist at full speed, you have two choices: You may have to use a faster shutter speed to freeze the motion, or you might decide to use a slightly longer shutter speed to give a feeling of movement. I would
suggest that you might need a shutter speed of around 1/2000 to do the former, and around 1/60 or so to do the latter, but the only way to know for sure is to experiment.
If you’re most interested in shutter speeds to get the effect you’re aiming for, it might be a good idea to use the Shutter Priority mode on your camera. Select the shutter speed you desire, and let the camera select the corresponding aperture. If you find that your shutter speed is too fast for the maximum aperture of your camera, you may have to adjust to a higher ISO—400–1600, for example; more about that later in this chapter.
Aperture explained Aperture is the second major control when you’re out and about taking photos. Aperture comes from a Latin word meaning “opening” or “gap”—and that’s pretty much all it is. Inside your camera lens is a device called a diaphragm . This is simply a series of plastic or metal bits that interlock in such a way that they can move to create a variable-sized hole.
A slow
shutter
speed makes
her hand
look slight
ly
blurry, and
the photo
becomes
more dynamic.
Kamps 978-0-240-81469-8 00003
06-ch03-30-59-9780240814698.indd 4406-ch03-30-59-9780240814698.indd 44 17/12/10 4:51 PM17/12/10 4:51 PM

Photography Basics 45
Three different apertures, three completely different images. Use a large aperture to blur the background in your portraits.
Kamps 978-0-240-81469-8 00003
06-ch03-30-59-9780240814698.indd 4506-ch03-30-59-9780240814698.indd 45 17/12/10 4:51 PM17/12/10 4:51 PM

Focus On Photographing People46
BUY A NIFTY FIFTY I mention this several times throughout this book, but it’s an important point: Buy a prime lens. Seriously, you won’t regret it. A 50mm f/1.8 lens is a lot cheaper than you’d expect, is available for most cameras, and is great fun.
The large aperture is perfect for portraiture and low-light photography, and it is a lightweight lens that is perfect for traveling with.
A shallow depth
of fi eld can
help the vie
wer
focus onwhat’s
important.
A large aperture, say f/2.8, lets in a lot of light; a small aperture, such as f/8.0 and smaller, will (unsurprisingly) let through less light. This is something you can use to help you. If you are taking photos in bright sunlight, you can use a smaller aperture—f/5.6 is a great baseline—to reduce the amount of light it has to deal with. As you know after reading the previous section, reducing the amount of light means that you can use a slower shutter speed—perfect to get a feeling of speed in your action shots.
As you may have guessed, the opposite is also true. If you use a larger aperture, you let more light into your camera, and you can use faster shutter speeds. If you are already at the biggest aperture your lens can muster, then your only option is to swap to a different lens.
Kamps 978-0-240-81469-8 00003
06-ch03-30-59-9780240814698.indd 4606-ch03-30-59-9780240814698.indd 46 17/12/10 4:52 PM17/12/10 4:52 PM
Photography Basics 47
Aperture and creative effects You’ll remember that shutter speed has two effects. A fast shutter speed lets less light into the camera but also helps freeze motion. A slow shutter speed (60 and below) lets in more light but can be used for creative motion blur effects.
Aperture, like shutter speed, has other effects on your pictures beyond just letting less or more
light onto your imaging sensor. Aperture affects how big your picture’s depth of field is.
“Depth of what ?” you say. Don’t worry, it’s a lot less complicated than it sounds. It’s easiest to explain with a photograph though; have a look at the photos on page 48 . As you can see, some parts of this photo are sharply in focus, while others aren’t. If only a small sliver of the photo is in focus, we say that a picture has a shallow depth
of focus . If all (or most) of the photograph is in focus, it has a deep depth of focus .
You can dial in the depth of focus by adjusting your aperture: A large aperture (such as f/2.8) gives a shallower depth of field than a smaller aperture (such as f/8). In portraiture, you can use this effect to isolate your subjects from the background, especially when you are taking photos in busy places, like out on the street.
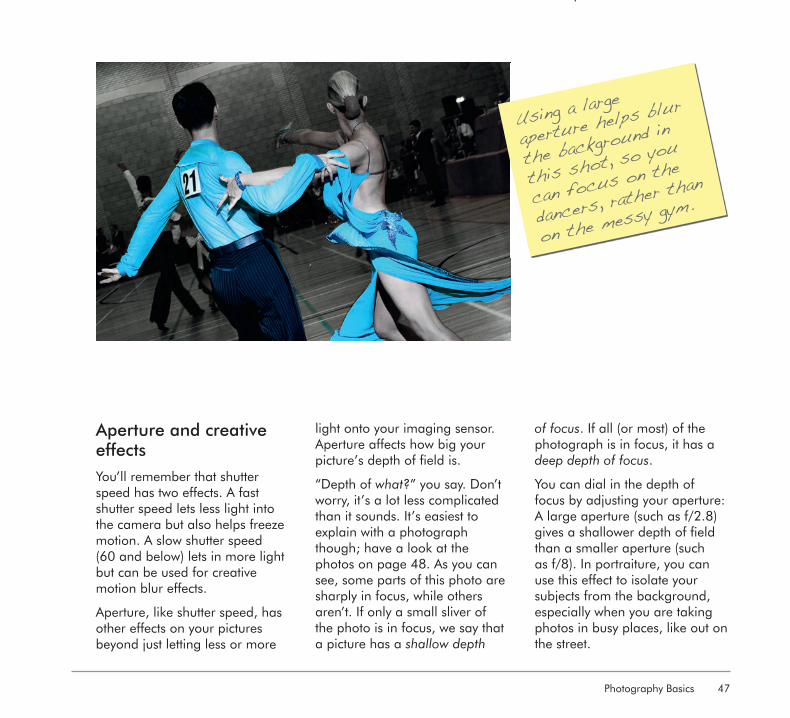
Using a large
aperture hel
ps blur
the backgr
ound in
this shot, s
o you
can focus on
the
dancers, ra
ther than
on the messy
gym.
Kamps 978-0-240-81469-8 00003
06-ch03-30-59-9780240814698.indd 4706-ch03-30-59-9780240814698.indd 47 17/12/10 4:52 PM17/12/10 4:52 PM

Focus On Photographing People48
A large (f/2.8)
aperture hel
ps blur
the backgr
ound. If
I had wanted
the
people in f
ocus,
I could have used
a smaller apertu
re
such as f/5.6.
There are oth
er
situations where y
ou
want the bac
kground
in focus, like
here;
f/16 did the tr
ick.
Kamps 978-0-240-81469-8 00003
06-ch03-30-59-9780240814698.indd 4806-ch03-30-59-9780240814698.indd 48 17/12/10 4:52 PM17/12/10 4:52 PM

Photography Basics 49
How ISO works We’re starting to understand shutter speed and apertures, but there’s one more variable in the big equation that is a perfect exposure: ISO.
Your shutter speed is the amount of time your shutter is open. Your aperture regulates how big the hole inside your lens is. Both of these settings physically restrict how much light reaches the imaging sensor. ISO is slightly different, in that it adjusts the sensitivity of the sensor: An exposure of 1/60 of a second at f/4.0 is the same physically no matter what ISO you set your camera to.
The difference is that as you go up the ISO scale, your camera multiplies the amount of light it has measured by the ISO. So, a scene photographed at ISO 400 will come out twice as bright as the same scene with the camera set to ISO 200. ISO 800 is twice as bright as ISO 400, and ISO 1600 is twice as bright as that again.
ISO has a downside, too, of course: At higher ISOs, you’ll start seeing a lot of digital
In badly lit v
enues,
shooting in
high
ISO can be a lif
e-
saver—ISO 1600 in
this case.
noise in your images, and they will start looking a little fuzzy.
Kamps 978-0-240-81469-8 00003
06-ch03-30-59-9780240814698.indd 4906-ch03-30-59-9780240814698.indd 49 17/12/10 4:53 PM17/12/10 4:53 PM

Focus On Photographing People50
ISO AND FILM SPEEDS Back in the days of film, you would choose which film speed you wanted. The difference was that ISO 400 film was a lot more sensitive than ISO 100 film; so if you knew you were going to take photos in low light, you could help your camera along by loading the appropriate film.
Obviously, your digital SLR doesn’t accept film, but it still has an ISO setting, which is equivalent to changing the film in an old-fashioned camera. The good news is that you don’t have to wait until the end of the roll before you change. If you want to, you can switch ISO between every single photograph.
With newer dSLR cameras, don’t be afraid of shooting in high ISO—the noise can in some circumstances actually add to the photo. This one, for example, was shot at an incredible ISO 12,800.
Pros and cons of using ISO There is a downside with shooting at a higher ISO: Your pictures are significantly more affected by digital noise. For some scenes, this may not matter all that much, but you’ll often find that you lose some degree of color definition and sharpness.
Kamps 978-0-240-81469-8 00003
06-ch03-30-59-9780240814698.indd 5006-ch03-30-59-9780240814698.indd 50 17/12/10 4:53 PM17/12/10 4:53 PM
Photography Basics 51
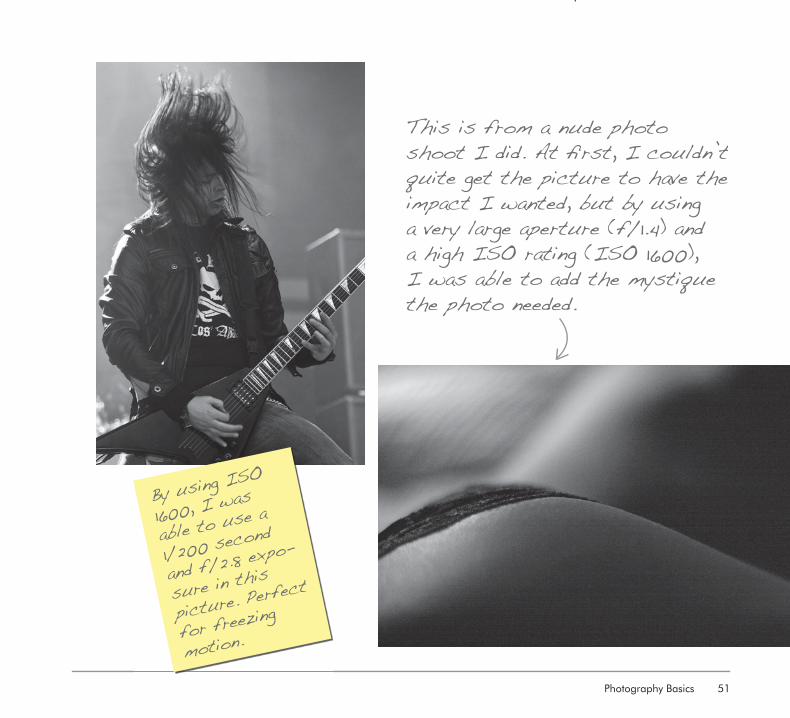
By using ISO
1600, I was
able to use a
1/200 second
and f/2.8 ex
po-
sure in this
picture. Pe
rfect
for freezin
g
motion.
This is from a nude photo shoot I did. At fi rst, I couldn’t quite get the picture to have the impact I wanted, but by using a very large aperture (f/1.4) and a high ISO rating (ISO 1600), I was able to add the mystique the photo needed.
Kamps 978-0-240-81469-8 00003
06-ch03-30-59-9780240814698.indd 5106-ch03-30-59-9780240814698.indd 51 17/12/10 4:53 PM17/12/10 4:53 PM

Focus On Photographing People52
An exercise i
n happy
mediums: f/2.5,
1/200 second, an
d
ISO 200 made a
photo that
works
well overall.
Personally, I don’t mind so much, but it means that high-ISO pictures tend to look better in black and white than in color.
As a general rule, try to stick to the lowest ISO you can. In practice, that means if you are shooting at ISO 400, f/4, and a 1/1000 second shutter speed, you can consider taking the photo at ISO 100, f/4, and a 1/250 second shutter speed instead.
Shutter, aperture, and ISO: Putting it all together As you’ve probably gathered by now, there is no real right and wrong when it comes to getting the right exposure. The challenge is
Kamps 978-0-240-81469-8 00003
06-ch03-30-59-9780240814698.indd 5206-ch03-30-59-9780240814698.indd 52 17/12/10 4:53 PM17/12/10 4:53 PM

Photography Basics 53
Kamps 978-0-240-81469-8 00003
06-ch03-30-59-9780240814698.indd 5306-ch03-30-59-9780240814698.indd 53 17/12/10 4:54 PM17/12/10 4:54 PM

Focus On Photographing People54
to find the right balance between shutter speed, aperture, and ISO.
The right balance is a fine line between the technical consid-erations (how much light do I need to get the right exposure?) and creative concerns about motion blur versus freezing motion, shallow versus deep depth of field, and little or a lot of digital noise.
It is worth noting that throughout this book I’m often using extremes to make a point—I’ll include photos taken either at f/1.4 or at f/16 to illustrate the difference between an extremely shallow or a very deep depth of field—but in real life, you’ll be choosing whatever you feel works best for what you are trying to achieve.
Picking the right lens A lot has been said about what is the “right” lens for portraiture. Some swear by a 50mm, others say that a 100mm is the best choice. I even know some pho-tographers who prefer shooting portraits with a wide-angle.
The human eye has a field of vision that is similar to a 50mm lens, and
Nothing’s
impossible:
This photo
was taken with
a 17–35mm
wide-angle le
ns.
portraits taken around that focal length tend to look quite natural. One top tip, however, is that people tend to look better when seen through a longer lens. Try it yourself: Break out your telephoto lens, take a few steps back, and
take a photo of one of your friends. Compare that to a photo taken with a wide-angle lens, and see which one you prefer!
In addition to being more flattering, another advantage
Kamps 978-0-240-81469-8 00003
06-ch03-30-59-9780240814698.indd 5406-ch03-30-59-9780240814698.indd 54 17/12/10 4:54 PM17/12/10 4:54 PM

Photography Basics 55
of telephoto lenses is that when you shoot wide open, you get a more limited depth of field and are able to throw the background out of focus nicely.
Remember that photographing people is as much about interacting with your models as it is about technique and equipment.
Having said all that (and because I’m sure you’re wondering), my lens of choice for portraiture these days is a Canon 50mm f/1.4, with my Sigma 70–200mm f/2.8 coming in a close second.
Shooting with a
long focal l
ength
(200mm in this
case) is of
ten
more fl atteri
ng
than with a
wide-angle le
ns.
Kamps 978-0-240-81469-8 00003
06-ch03-30-59-9780240814698.indd 5506-ch03-30-59-9780240814698.indd 55 17/12/10 4:54 PM17/12/10 4:54 PM
Focus On Photographing People56
White balance I could write a whole book on white balance, spending pages upon pages on the technical details of how to white balance
your photos as perfectly as possible; how to balance natural light with artificial light; and how color temperature relates to the various color spectra, and so on.
You’ll be immensely relieved to know that I’m not going to ramble on about it for too long, however. For purposes of portraiture, there is one incredibly quick way of getting
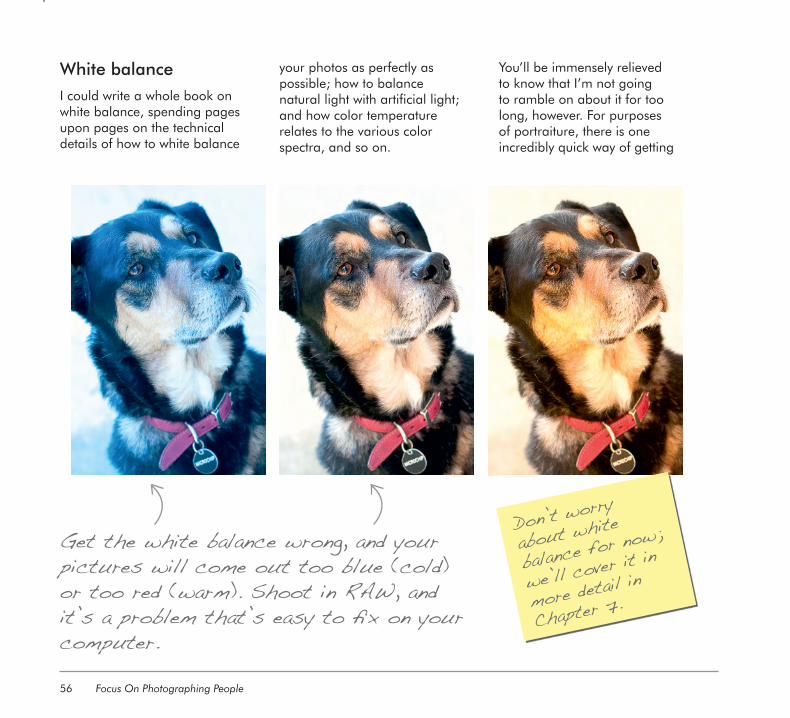
Get the white balance wrong, and your pictures will come out too blue (cold) or too red (warm). Shoot in RAW, and it’s a problem that’s easy to fi x on your computer.
Don’t worry
about white
balance for
now;
we’ll cover i
t in
more detail in
Chapter 7 .
Kamps 978-0-240-81469-8 00003
06-ch03-30-59-9780240814698.indd 5606-ch03-30-59-9780240814698.indd 56 17/12/10 4:54 PM17/12/10 4:54 PM
Photography Basics 57
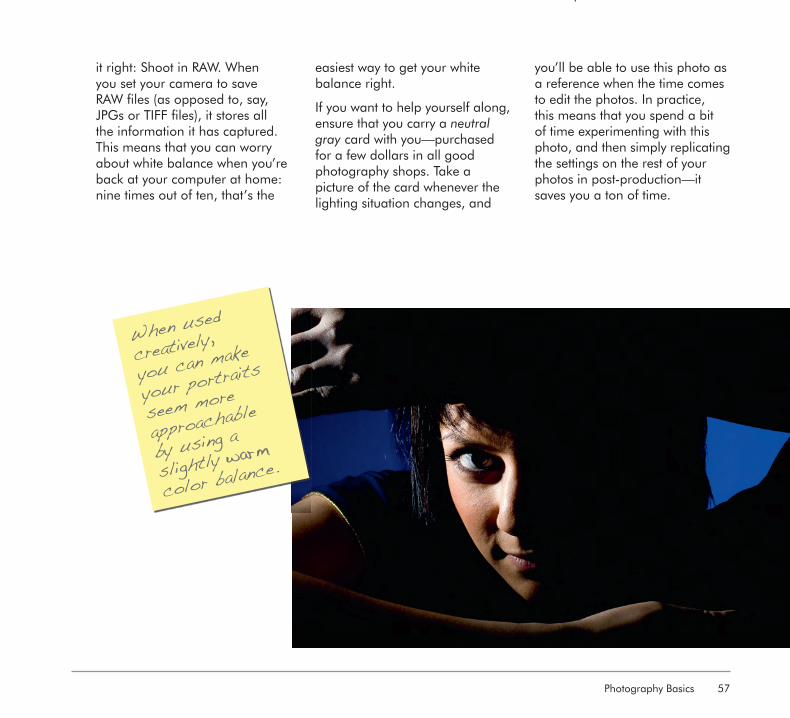
When used
creatively,
you can make
your portraits
seem more
approachab
le
by using a
slightly warmwarm
color balan
ce.
it right: Shoot in RAW. When you set your camera to save RAW files (as opposed to, say, JPGs or TIFF files), it stores all the information it has captured. This means that you can worry about white balance when you’re back at your computer at home: nine times out of ten, that’s the
easiest way to get your white balance right.
If you want to help yourself along, ensure that you carry a neutral gray card with you—purchased for a few dollars in all good photography shops. Take a picture of the card whenever the lighting situation changes, and
you’ll be able to use this photo as a reference when the time comes to edit the photos. In practice, this means that you spend a bit of time experimenting with this photo, and then simply replicating the settings on the rest of your photos in post-production—it saves you a ton of time.
Kamps 978-0-240-81469-8 00003
06-ch03-30-59-9780240814698.indd 5706-ch03-30-59-9780240814698.indd 57 17/12/10 4:55 PM17/12/10 4:55 PM

Focus On Photographing People58
Shooting in RAW I’ve mentioned it a couple of times already, but a good thing cannot be repeated often enough. Grab your camera right now, go into the settings, change the file format to RAW, and don’t change it back.
To understand why, we have to take a look at how your camera works. When it takes a picture, it has collected a whole lot of raw data. Every single one of the individual little sensors inside your camera (if you’ve got a 14 megapixel camera, there are
Shooting in RAW is an especially good idea if you’re taking photos in complicated lighting situations, like in this Presidents of the USA gig.
Kamps 978-0-240-81469-8 00003
06-ch03-30-59-9780240814698.indd 5806-ch03-30-59-9780240814698.indd 58 17/12/10 4:55 PM17/12/10 4:55 PM
Photography Basics 59
14 million individual little light meters on your imaging chip!) has made a measurement.
What happens next depends on your camera settings. If you have your camera set to JPG, it will write all this information to a single, 8 bit JPG file. The problem with this is that your camera has to make a series of decisions in order to do this. Sharpness, color saturation, and
white balance are calculated and written to the file, but when this happens, you are in effect losing a lot of information. If your camera gets it right, that’s not a problem, but what if you later decide that you wanted to use less sharpness, a different color saturation, or a different white balance? Suddenly, you’re out of luck: The data that was originally available has been discarded,
and all you are left with is what was written to the JPG file.
In contrast, a RAW file usually has a lot more color information (12 or 14 bit), and contains all the information the camera originally recorded. This means that when you get back to your computer, you get a lot more information you can manipulate—always a good thing.
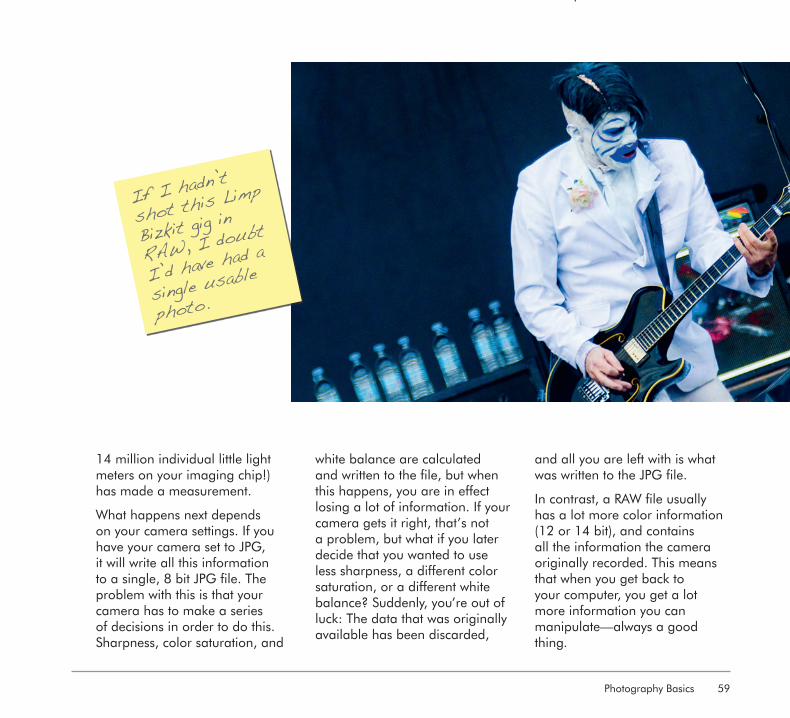
If I hadn’t
shot this L
imp
Bizkit gig in
RAW, I doubt
I’d have had
a
single usable
photo.
Kamps 978-0-240-81469-8 00003
06-ch03-30-59-9780240814698.indd 5906-ch03-30-59-9780240814698.indd 59 17/12/10 4:55 PM17/12/10 4:55 PM