kaltura admin console quick start guide
TRANSCRIPT
© 2011 Kaltura Inc. All rights reserved.
Kaltura Admin Console Quick Start Guide
Login
Publisher Management
How to search and view the details of registered publishers
How to access a KMC account of a registered publisher
How to access a KMC account using a specific KMC user login
How to set a specific configuration for a publisher account
How to configure a publisher’s Remote Storage & Delivery profile
How to block/unblock a publisher account
How to remove a publisher account
How to add a new publisher account
How to adjust the usage packages options menu
How to retrieve and export publisher usage information
User Management
How to view the details of authorized Kaltura Admin Console users
How to block, unblock or remove a Kaltura Admin Console user
How Kaltura Admin Console users and roles are defined
How to add a new Kaltura Admin Console user
How to change the role of a Kaltura Admin Console user
How to change your Kaltura Admin Console user login information
Batch Process Control
How to view and control batch tasks currently queued or running in your site
How to view and control batch tasks that failed in your site
How to view or adjust the setup of batch services in your site
How to understand the batch processing lifecycle of a media entry
How to troubleshoot media entry problems in your site

© 2011 Kaltura Inc. All rights reserved.
Monitoring
How to monitor the servers, network and services in your site
Developers
How to learn about Kaltura API methods for using or extending your online
video platform functionalities
How to test Kaltura API methods for using or extending your online video
platform functionalities
How to view server caching statistics
Distribution
How to create and configure Generic Distribution Provider Settings
How to create and configure a Distribution Profile
Appendix A – Adjusting the Usage Packages Menu
© 2011 Kaltura Inc. All rights reserved.
Login
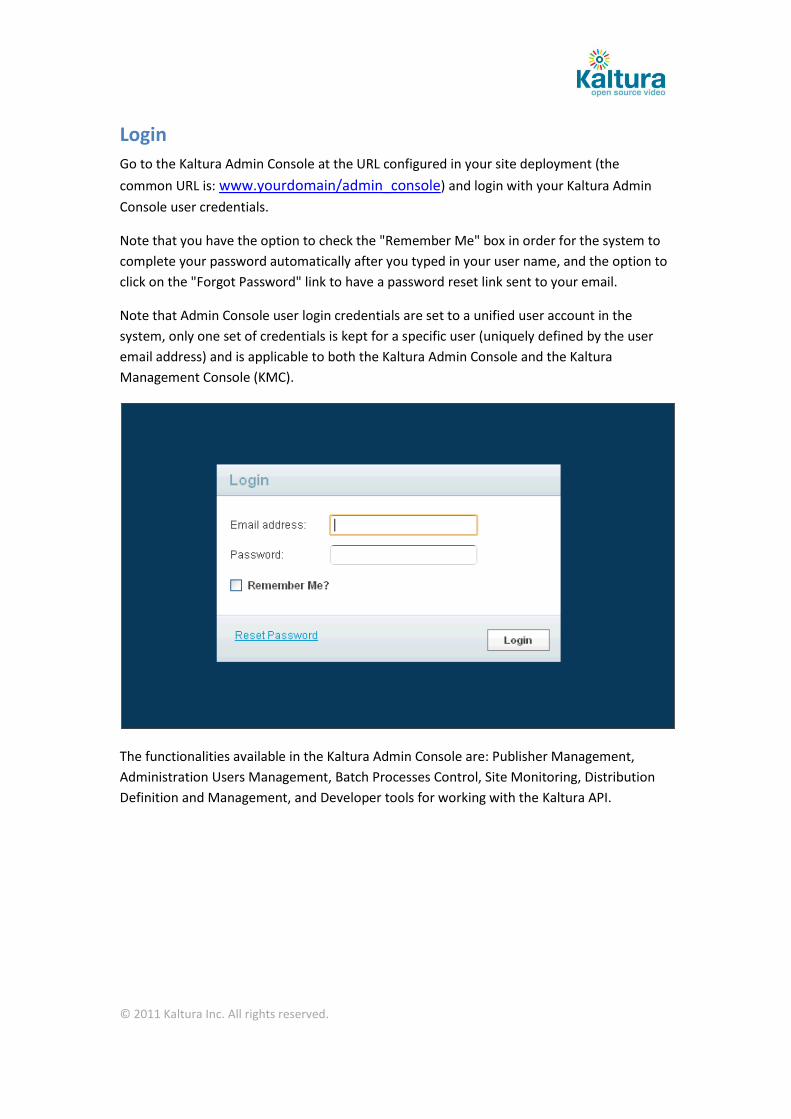
Go to the Kaltura Admin Console at the URL configured in your site deployment (the
common URL is: www.yourdomain/admin_console) and login with your Kaltura Admin
Console user credentials.
Note that you have the option to check the "Remember Me" box in order for the system to
complete your password automatically after you typed in your user name, and the option to
click on the "Forgot Password" link to have a password reset link sent to your email.
Note that Admin Console user login credentials are set to a unified user account in the
system, only one set of credentials is kept for a specific user (uniquely defined by the user
email address) and is applicable to both the Kaltura Admin Console and the Kaltura
Management Console (KMC).
The functionalities available in the Kaltura Admin Console are: Publisher Management,
Administration Users Management, Batch Processes Control, Site Monitoring, Distribution
Definition and Management, and Developer tools for working with the Kaltura API.

© 2011 Kaltura Inc. All rights reserved.
Publishers Tab
Here you can review and fully control the publishers that are registered on your Kaltura
video platform deployment. You can see all the publishers' details and their usage
information. Additionally, you can manage your publishers’ content accounts, create new
publishers, block publishers, remove publishers, and change their settings. The Publishers
tab contains three functionality options: Publisher Management, Add New Publisher and
Publisher Usage.
Publisher Management Page
From this page you may manage all the aspects of your publishers.
How to search and view the details of registered publishers
You may search for a specific publisher by entering a publisher ID, publisher name, or by
entering a free text keyword (search will be applied in the publisher description, publisher
URL or publisher’s administrator email address). After you choose your search criteria
and/or relevant keyword, click on the "Search" button.

© 2011 Kaltura Inc. All rights reserved.
Publisher Actions
The following actions may apply on every publisher account from the right most column of
the publisher’s information table.
How to access a KMC account of a publisher
In order to manage a publisher KMC account, choose the account you wish to manage, and
select the "manage" action from the dropdown menu. The specific publisher’s management
console (KMC) then opens in a separate tab and you can see its full details.
Choosing this action gives you full access to the specific publisher KMC account. From the
publisher KMC account, you can monitor and control all of the publisher’s account activities
and fully support publishers in any questions or problems they might be experiencing.
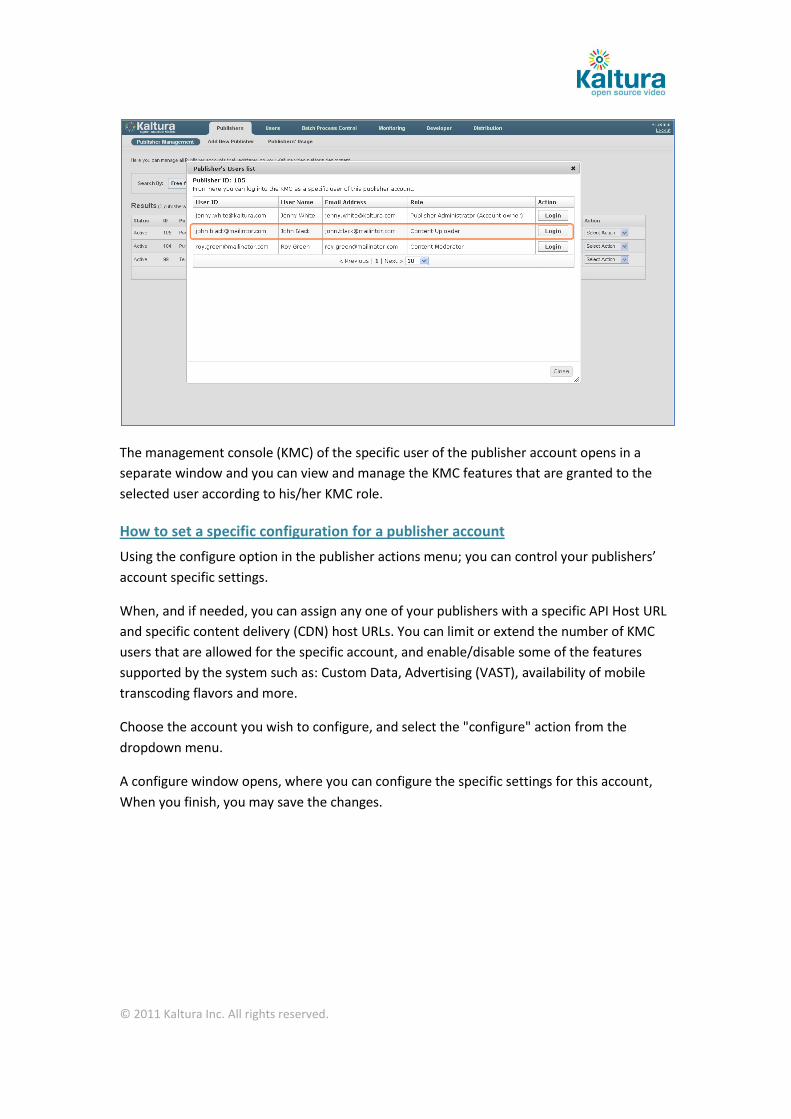
How to access a KMC account using a specific KMC user login
In order to view a list of users associated with a specific KMC account and to login to this
KMC account as a specific user, choose the publisher account whose user you wish to
manage, and select the "KMC Users" action.
The publisher's user list opens in a separate window. Click "Login" for the KMC user that you
want to manage.
© 2011 Kaltura Inc. All rights reserved.
The management console (KMC) of the specific user of the publisher account opens in a
separate window and you can view and manage the KMC features that are granted to the
selected user according to his/her KMC role.
How to set a specific configuration for a publisher account
Using the configure option in the publisher actions menu; you can control your publishers’
account specific settings.
When, and if needed, you can assign any one of your publishers with a specific API Host URL
and specific content delivery (CDN) host URLs. You can limit or extend the number of KMC
users that are allowed for the specific account, and enable/disable some of the features
supported by the system such as: Custom Data, Advertising (VAST), availability of mobile
transcoding flavors and more.
Choose the account you wish to configure, and select the "configure" action from the
dropdown menu.
A configure window opens, where you can configure the specific settings for this account,
When you finish, you may save the changes.

© 2011 Kaltura Inc. All rights reserved.
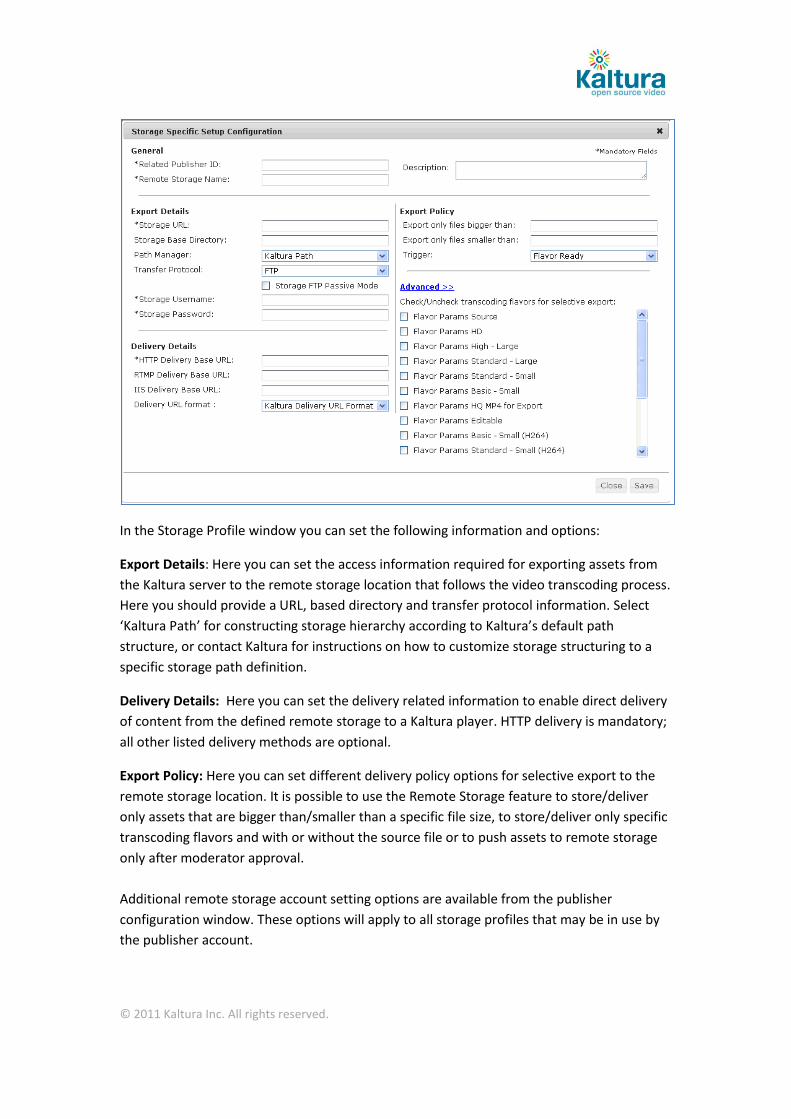
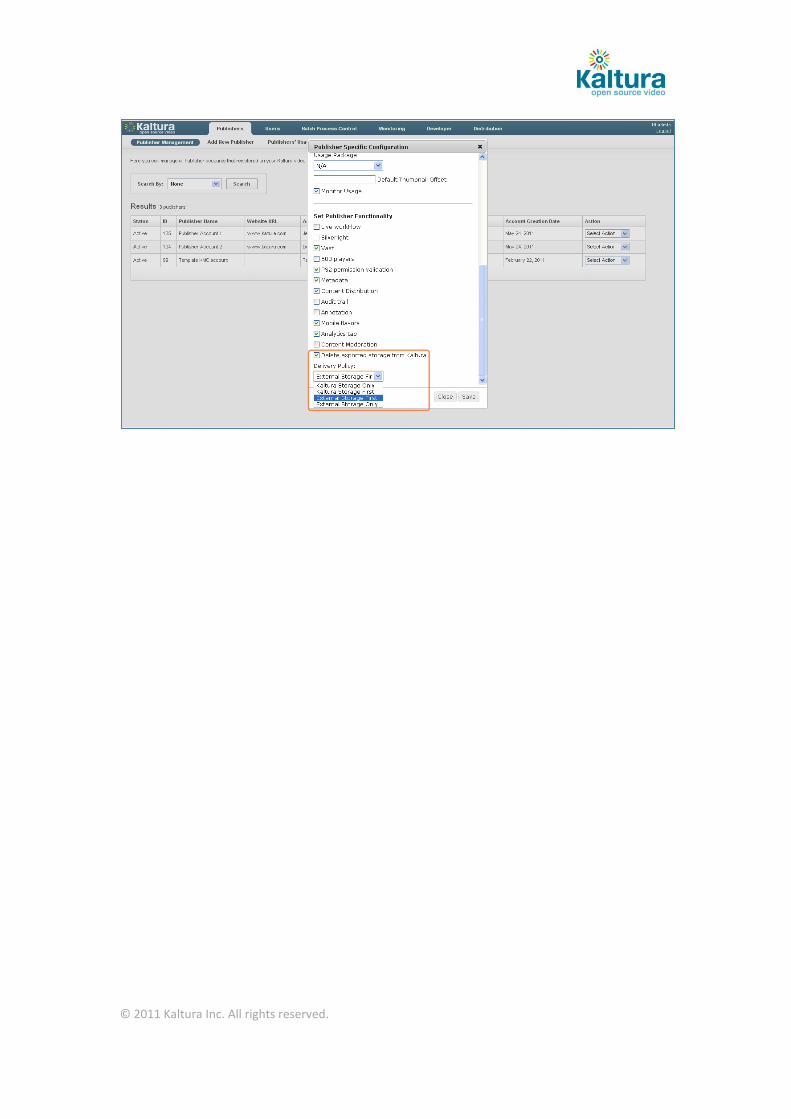
How to configure a publisher’s Remote Storage & Delivery profile
Using the Remote Storage action in the Publisher Management Page you can define and set
a remote storage and delivery profile for a specific publisher account. The remote storage
and delivery solution can be used to enable storage and delivery of video assets from a
network storage location that is external to the Kaltura Platform. This is commonly used to
leverage a publisher’s CDN network storage solution (e.g., Akamai’s NetStorage).Selecting
this option will lead you to the Remote Storage Profiles page for creating or editing publisher
specific Remote Storage profiles. Please note that access to the Remote Storage profiles
page is possible only through this action option.
For creating a new storage profile, click the “Create New” button to open the Storage
Specific Setup window.
© 2011 Kaltura Inc. All rights reserved.
In the Storage Profile window you can set the following information and options:
Export Details: Here you can set the access information required for exporting assets from
the Kaltura server to the remote storage location that follows the video transcoding process.
Here you should provide a URL, based directory and transfer protocol information. Select
‘Kaltura Path’ for constructing storage hierarchy according to Kaltura’s default path
structure, or contact Kaltura for instructions on how to customize storage structuring to a
specific storage path definition.
Delivery Details: Here you can set the delivery related information to enable direct delivery
of content from the defined remote storage to a Kaltura player. HTTP delivery is mandatory;
all other listed delivery methods are optional.
Export Policy: Here you can set different delivery policy options for selective export to the
remote storage location. It is possible to use the Remote Storage feature to store/deliver
only assets that are bigger than/smaller than a specific file size, to store/deliver only specific
transcoding flavors and with or without the source file or to push assets to remote storage
only after moderator approval.
Additional remote storage account setting options are available from the publisher
configuration window. These options will apply to all storage profiles that may be in use by
the publisher account.
© 2011 Kaltura Inc. All rights reserved.
© 2011 Kaltura Inc. All rights reserved.
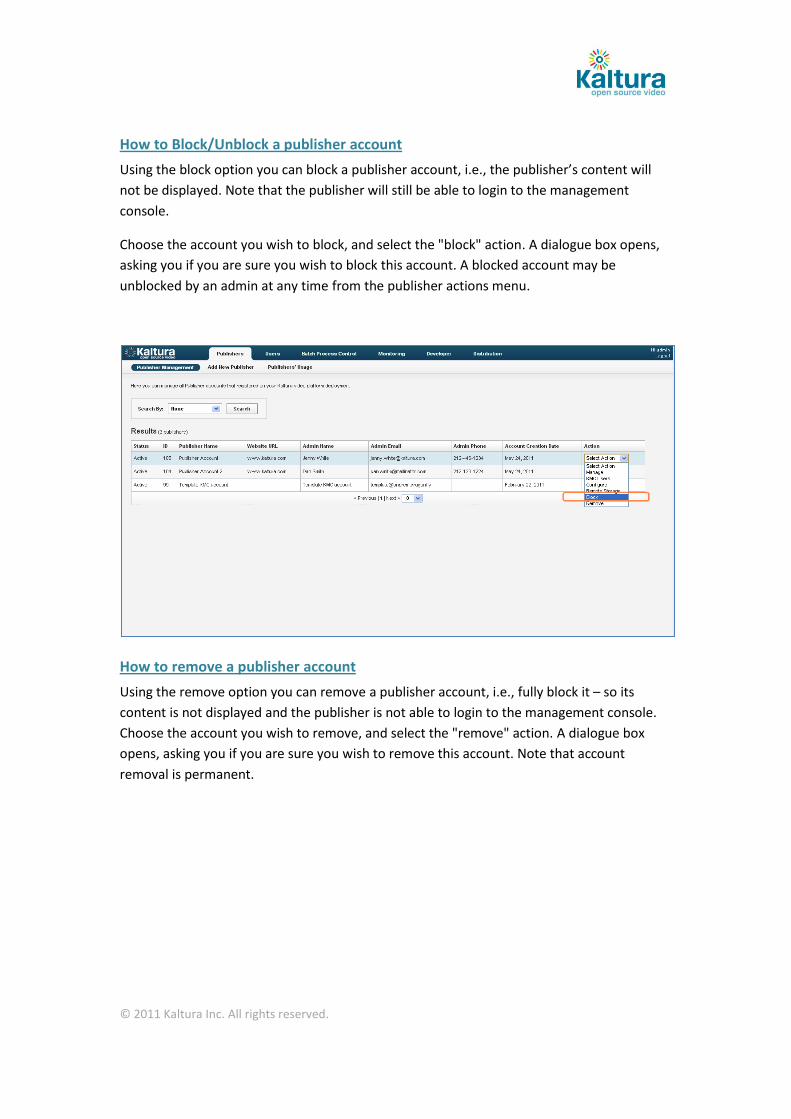
How to Block/Unblock a publisher account
Using the block option you can block a publisher account, i.e., the publisher’s content will
not be displayed. Note that the publisher will still be able to login to the management
console.
Choose the account you wish to block, and select the "block" action. A dialogue box opens,
asking you if you are sure you wish to block this account. A blocked account may be
unblocked by an admin at any time from the publisher actions menu.
How to remove a publisher account
Using the remove option you can remove a publisher account, i.e., fully block it – so its
content is not displayed and the publisher is not able to login to the management console.
Choose the account you wish to remove, and select the "remove" action. A dialogue box
opens, asking you if you are sure you wish to remove this account. Note that account
removal is permanent.

© 2011 Kaltura Inc. All rights reserved.

© 2011 Kaltura Inc. All rights reserved.
Add New Publisher Page
How to add a new publisher account
Here you can add a new publisher account. Fill-in all the publisher's details such as name,
company description, the email address and phone number of the administrator etc. The
Publisher’s “Usage Package” may be selected to assign a specific usage package to the new
publisher. If the usage package selection is not relevant, you can select the N/A option. For
instructions on how to adjust the “Usage Packages” menu, please refer to Appendix A.
Once the publisher is created in the system, the publisher's administrator will receive an
email containing his credentials to the Kaltura Management Console (KMC).
Please note that Admin Console users are able to create multiple KMC accounts for any
purpose while using the email address used for their Kaltura Admin Console user account,
however, actual publisher accounts, that are not associated with an Admin Console user are
limited to enable one KMC account per email address, this limitation is set mainly to secure
the credentials of publisher account owners.

© 2011 Kaltura Inc. All rights reserved.
Publisher Usage Page
How to retrieve and export publisher usage information
Here you may see all the info about the publisher's usage – including number of entries,
number of views, total bandwidth usage, storage usage and more. You may search for
specific publishers by entering publisher ID, name or free text, or you can filter the list of
publishers by selecting a specific status (active, blocked, removed) or by date range of
account creation.
Note that you can click on the "Export to CSV" link at the bottom in order to export the
information to a CSV formatted file, for further analysis and/or for billing purposes.
© 2011 Kaltura Inc. All rights reserved.
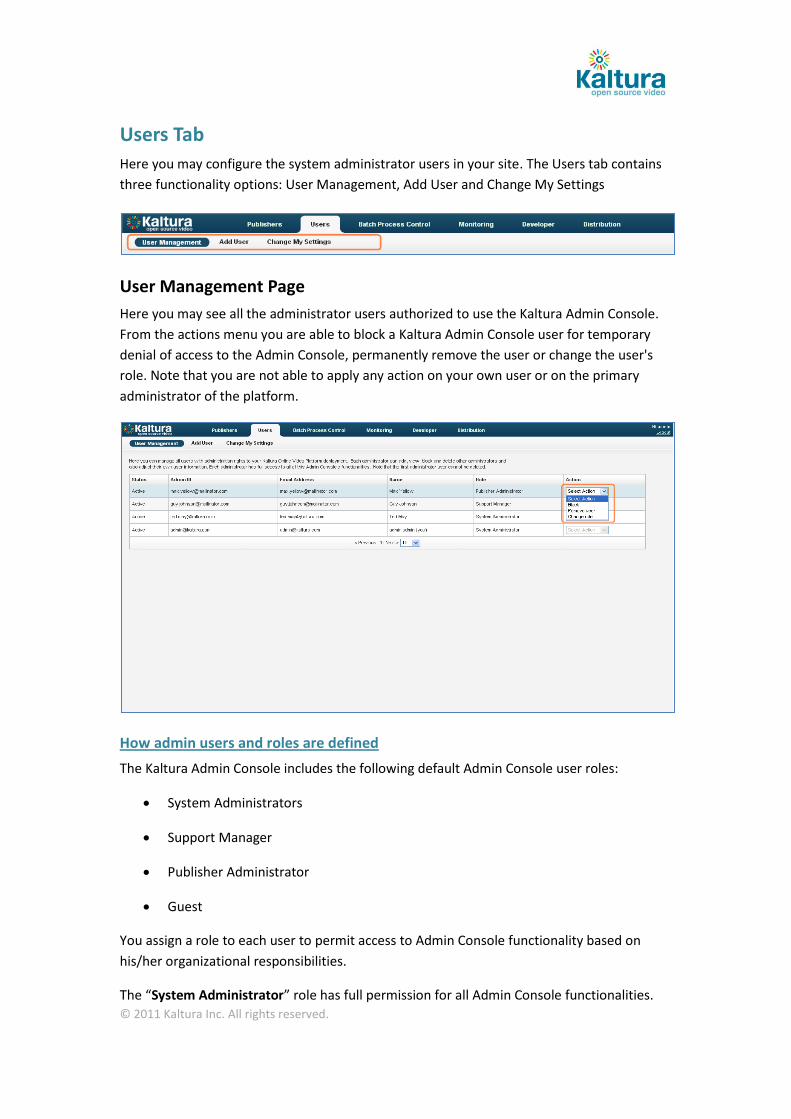
Users Tab
Here you may configure the system administrator users in your site. The Users tab contains
three functionality options: User Management, Add User and Change My Settings
User Management Page
Here you may see all the administrator users authorized to use the Kaltura Admin Console.
From the actions menu you are able to block a Kaltura Admin Console user for temporary
denial of access to the Admin Console, permanently remove the user or change the user's
role. Note that you are not able to apply any action on your own user or on the primary
administrator of the platform.
How admin users and roles are defined
The Kaltura Admin Console includes the following default Admin Console user roles:
System Administrators
Support Manager
Publisher Administrator
Guest
You assign a role to each user to permit access to Admin Console functionality based on
his/her organizational responsibilities.
The “System Administrator” role has full permission for all Admin Console functionalities.

© 2011 Kaltura Inc. All rights reserved.
The “Support Manager” role has the following permissions:
Publisher Management page
o Access to publisher KMC accounts (Manage option)
o Access to KMC Users list (and KMC user login)
o Access to Publisher Configuration page (Configure option)
o Block publisher
Add publisher
Publishers’ Usage
Batch Process Control (view only)
Distribution Profiles
Developer
The “Publisher Administrator” role has the following permissions:
Publisher Management page
o Access to publisher KMC accounts (Manage option)
o Access to KMC Users list (and KMC user login)
o Access to Publisher Configuration page (Configure option)
o Block publisher
Add publisher
Publishers’ Usage
Developer
The “Guest” role is pre-defined with no access to any of the Admin Console functionalities,
but is reserved to enable tailored permission settings according to specific needs.
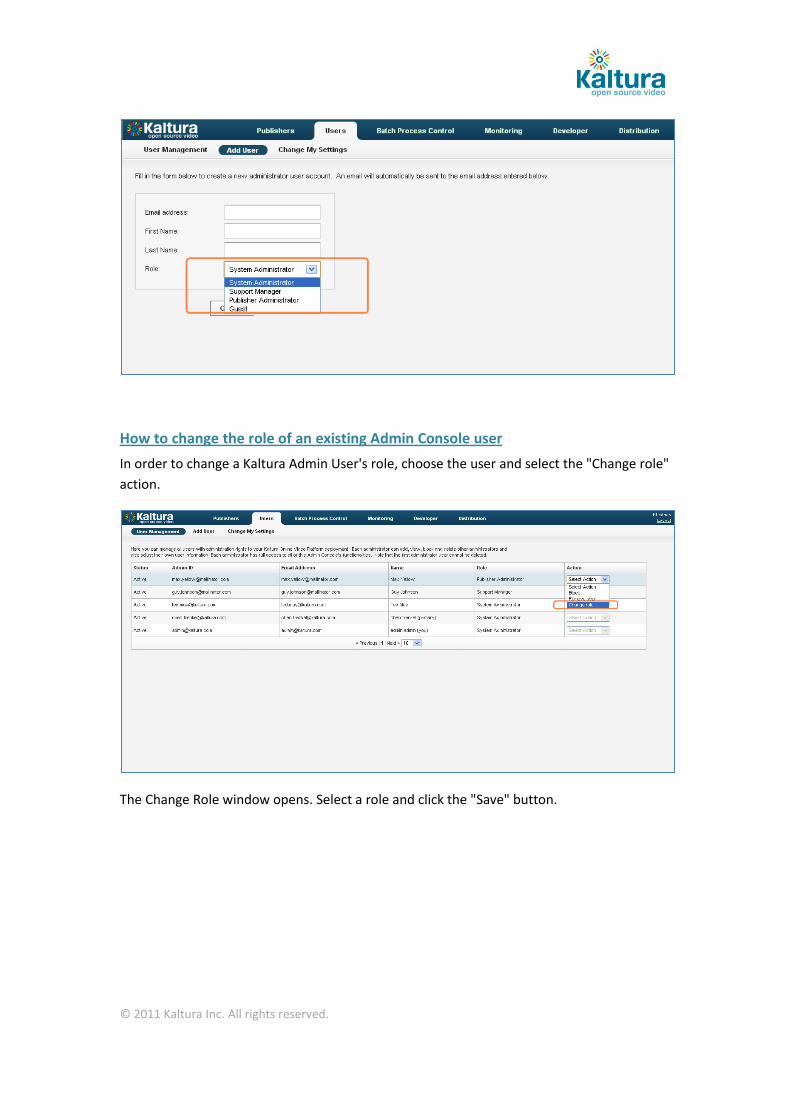
Add New User Page
Here you may create a new administrator user to the site. Fill in the new administrator user
details, select a role and click the "Create" button. Then, the new user will receive an email
with credentials for the Kaltura Admin Console.
For descriptions of roles, please refer to How admin users and roles are defined.
© 2011 Kaltura Inc. All rights reserved.
How to change the role of an existing Admin Console user
In order to change a Kaltura Admin User's role, choose the user and select the "Change role"
action.
The Change Role window opens. Select a role and click the "Save" button.

© 2011 Kaltura Inc. All rights reserved.

© 2011 Kaltura Inc. All rights reserved.
Change My Settings Page
Here each Kaltura Admin Console user may change his/her own login credentials to the
Admin Console. Following this action an email message will be sent to him/her with the new
login credentials information. Note that any change to user’s credentials will apply also to
any KMC user account such user may be associated with.

© 2011 Kaltura Inc. All rights reserved.
Batch Process Control Tab
Here you can control all the aspects of the Kaltura platform batch processes. The Batch
Process Control tab contains five functionality options: In-progress Tasks, Failed Tasks,
Setup, Entry Lifecycle and Entry Investigation.
In-Progress Tasks Page
Here you may see all ongoing batch tasks in your site. You can be constantly updated on the
current situation and understand your system’s batch processing behavior.
The page contains two tables: the in-progress tasks table lists the batch tasks that are
currently processed and the in-queue tasks table lists the batch tasks that are waiting to be
processed. In both tables you’ll find useful information on the characters of each batch task.
This may include an option to cancel a batch task currently in queue or abort a batch task
currently in progress. Please note that an action that you take on a ‘parent’ entry affects its
‘children’ entries as well.
You may filter the in-progress tasks by using several filters, such as date range for task
creation, Entry ID, Publisher ID or the specific task type. These filters will apply on both of
the tables in this page.
Clicking a task name within the table will display additional information on the specific batch
task parameters. Clicking an entry name leads to the entry lifecycle page.
The page refreshes every 30 seconds (can be adjusted). You may pause and resume the
automatic refresh or refresh manually by clicking on the "Refresh Now" button.
© 2011 Kaltura Inc. All rights reserved.
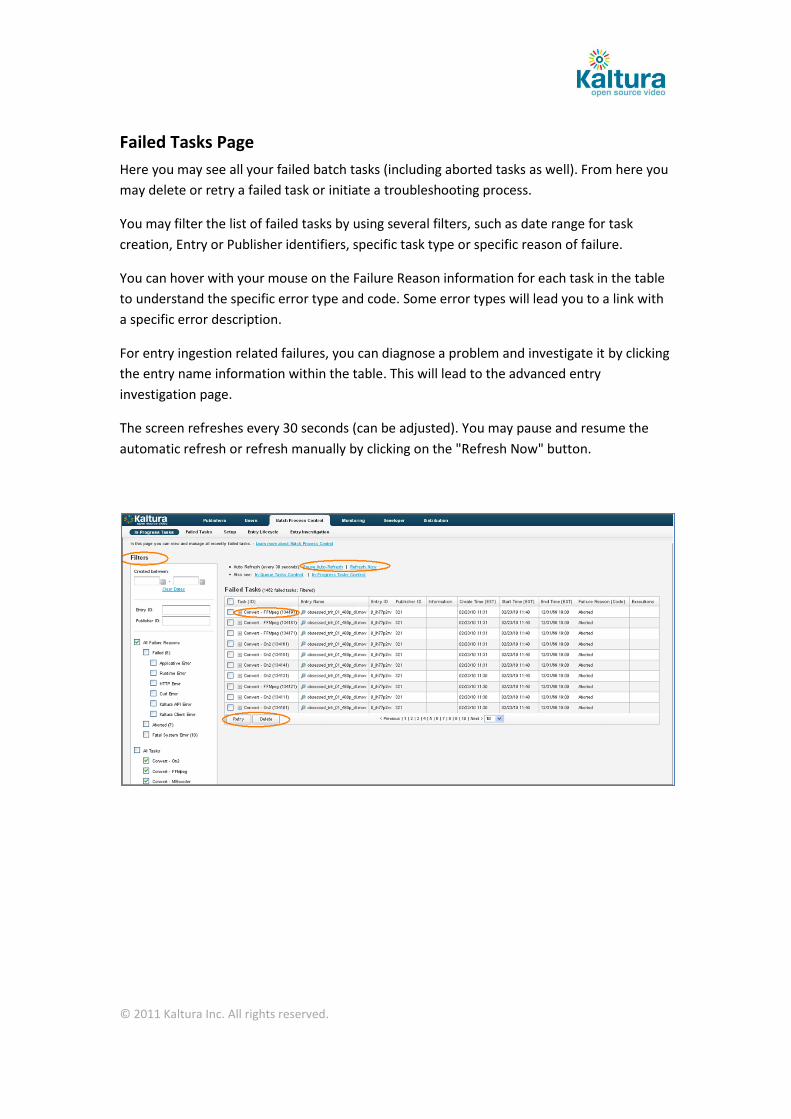
Failed Tasks Page
Here you may see all your failed batch tasks (including aborted tasks as well). From here you
may delete or retry a failed task or initiate a troubleshooting process.
You may filter the list of failed tasks by using several filters, such as date range for task
creation, Entry or Publisher identifiers, specific task type or specific reason of failure.
You can hover with your mouse on the Failure Reason information for each task in the table
to understand the specific error type and code. Some error types will lead you to a link with
a specific error description.
For entry ingestion related failures, you can diagnose a problem and investigate it by clicking
the entry name information within the table. This will lead to the advanced entry
investigation page.
The screen refreshes every 30 seconds (can be adjusted). You may pause and resume the
automatic refresh or refresh manually by clicking on the "Refresh Now" button.
© 2011 Kaltura Inc. All rights reserved.
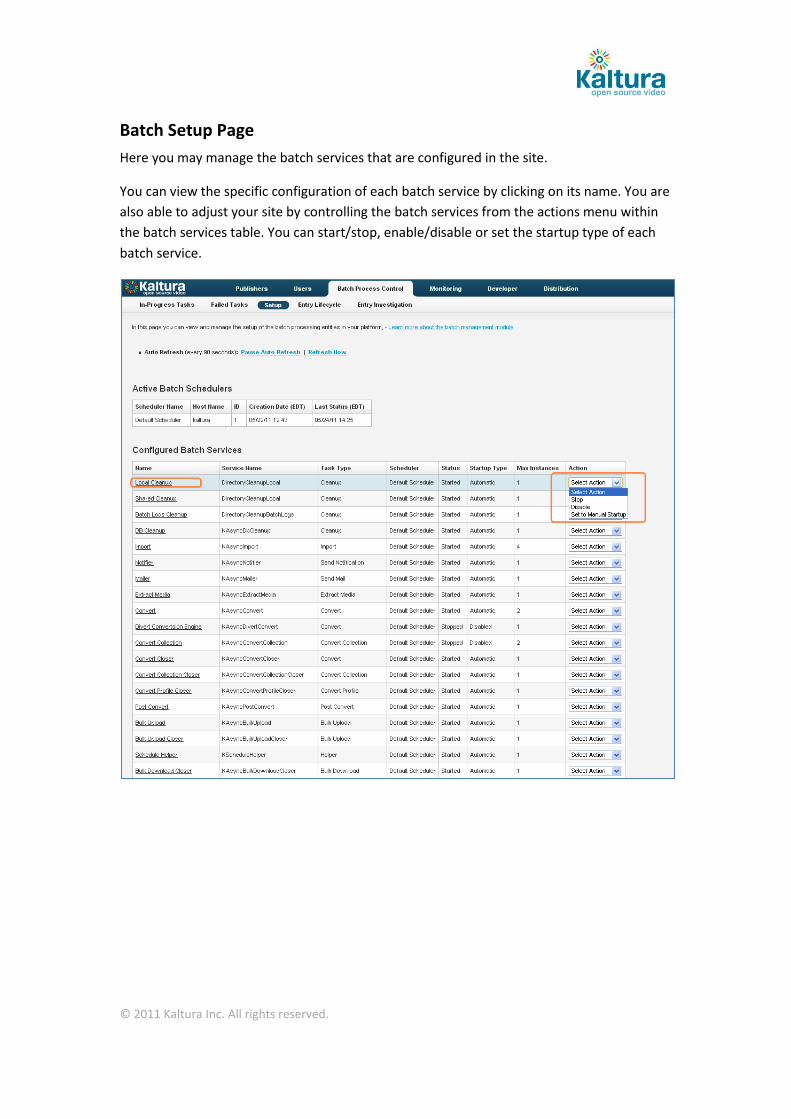
Batch Setup Page
Here you may manage the batch services that are configured in the site.
You can view the specific configuration of each batch service by clicking on its name. You are
also able to adjust your site by controlling the batch services from the actions menu within
the batch services table. You can start/stop, enable/disable or set the startup type of each
batch service.

© 2011 Kaltura Inc. All rights reserved.
Entry Lifecycle Page
Here you may see the full process that a specific entry has gone through during its ingestion
to the Kaltura platform. This may include import related tasks as well as transcoding related
tasks. By tracking a specific entry lifecycle you can spot entry specific problems as well as
more general problems in the system. You can access this page by clicking any entry name in
the in-progress tasks page. When entering this page from the batch control process menu,
the entry ID must be provided for loading the relevant information. Clicking the entry name
leads to the advanced entry investigation page. Clicking the publisher name leads to the
publisher KMC account.

© 2011 Kaltura Inc. All rights reserved.
Entry Investigation Page
Here you can fully research a specific entry and view detailed information about its
parameters, its batch processing history, the information related to its transcoding flavors
and the actual files on disk related to it. This page is the place for Kaltura platform experts
to go to fully investigate what went wrong during the entry ingestion process. You can
export this page to an external file and send it to the Kaltura support team as input for
further investigation by Kaltura experts.
© 2011 Kaltura Inc. All rights reserved.
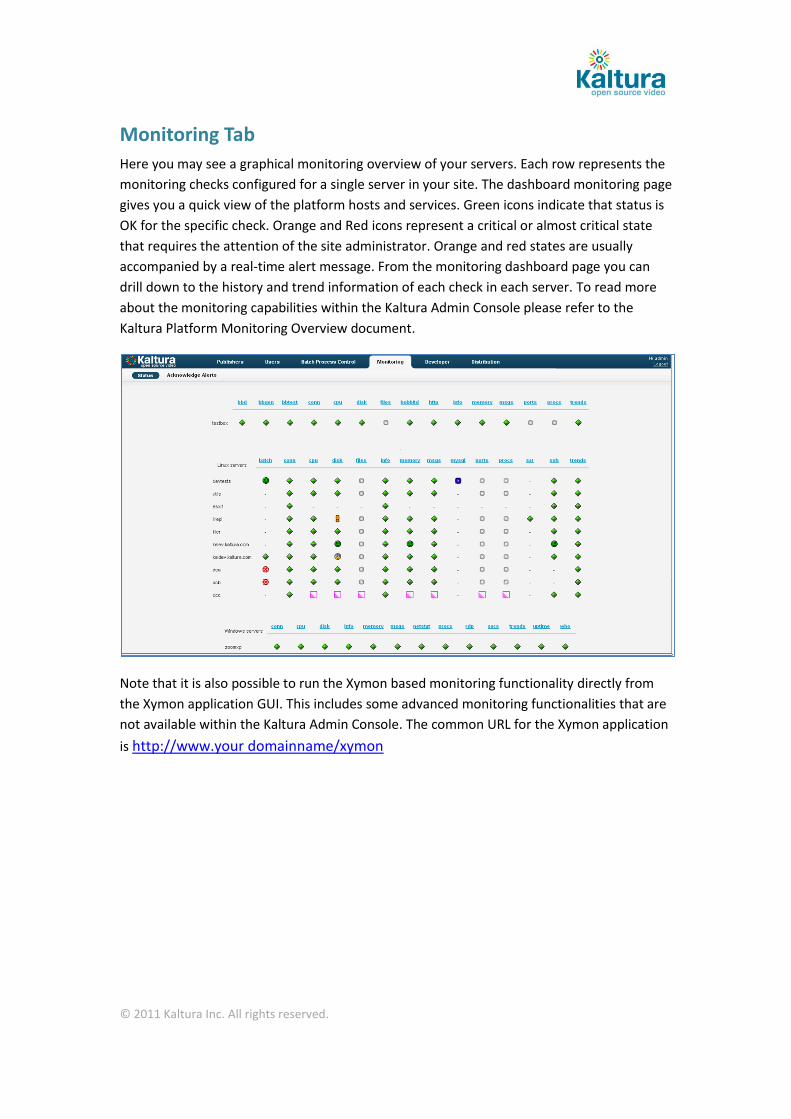
Monitoring Tab
Here you may see a graphical monitoring overview of your servers. Each row represents the
monitoring checks configured for a single server in your site. The dashboard monitoring page
gives you a quick view of the platform hosts and services. Green icons indicate that status is
OK for the specific check. Orange and Red icons represent a critical or almost critical state
that requires the attention of the site administrator. Orange and red states are usually
accompanied by a real-time alert message. From the monitoring dashboard page you can
drill down to the history and trend information of each check in each server. To read more
about the monitoring capabilities within the Kaltura Admin Console please refer to the
Kaltura Platform Monitoring Overview document.
Note that it is also possible to run the Xymon based monitoring functionality directly from
the Xymon application GUI. This includes some advanced monitoring functionalities that are
not available within the Kaltura Admin Console. The common URL for the Xymon application
is http://www.your domainname/xymon

© 2011 Kaltura Inc. All rights reserved.
Developer Tab
API Documentation
Here you can learn about the different Kaltura REST API methods available, either for
extending the services offered in your site or for advanced integration of any website with
your online video platform.
Test Console
Here you can test the different Kaltura REST API methods available. Automatic code
generation (currently available for Java, PHP and C#) is included. You can select specific API
services and actions and the relevant code is automatically generated to simply copy-and-
paste into your work.

© 2011 Kaltura Inc. All rights reserved.
API Client Libraries
Here you can download the API Client libraries in different programming languages.
© 2011 Kaltura Inc. All rights reserved.
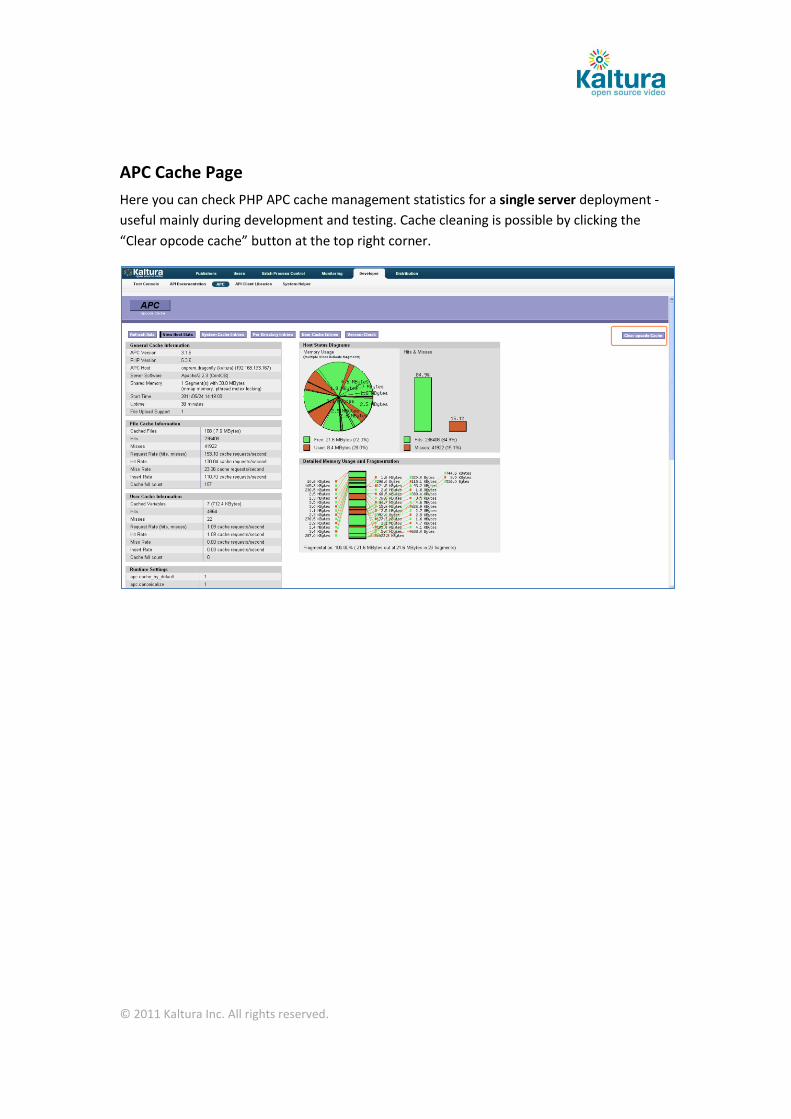
APC Cache Page
Here you can check PHP APC cache management statistics for a single server deployment -
useful mainly during development and testing. Cache cleaning is possible by clicking the
“Clear opcode cache” button at the top right corner.
© 2011 Kaltura Inc. All rights reserved.
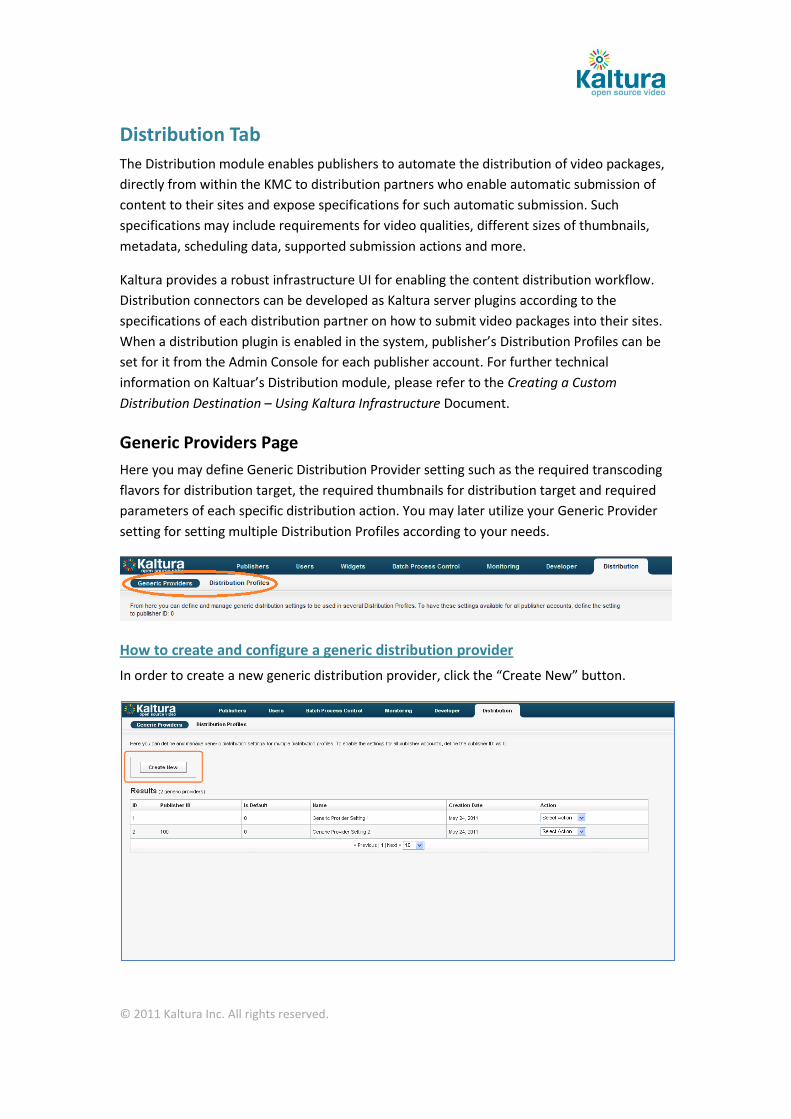
Distribution Tab
The Distribution module enables publishers to automate the distribution of video packages,
directly from within the KMC to distribution partners who enable automatic submission of
content to their sites and expose specifications for such automatic submission. Such
specifications may include requirements for video qualities, different sizes of thumbnails,
metadata, scheduling data, supported submission actions and more.
Kaltura provides a robust infrastructure UI for enabling the content distribution workflow.
Distribution connectors can be developed as Kaltura server plugins according to the
specifications of each distribution partner on how to submit video packages into their sites.
When a distribution plugin is enabled in the system, publisher’s Distribution Profiles can be
set for it from the Admin Console for each publisher account. For further technical
information on Kaltuar’s Distribution module, please refer to the Creating a Custom
Distribution Destination – Using Kaltura Infrastructure Document.
Generic Providers Page
Here you may define Generic Distribution Provider setting such as the required transcoding
flavors for distribution target, the required thumbnails for distribution target and required
parameters of each specific distribution action. You may later utilize your Generic Provider
setting for setting multiple Distribution Profiles according to your needs.
How to create and configure a generic distribution provider
In order to create a new generic distribution provider, click the “Create New” button.

© 2011 Kaltura Inc. All rights reserved.
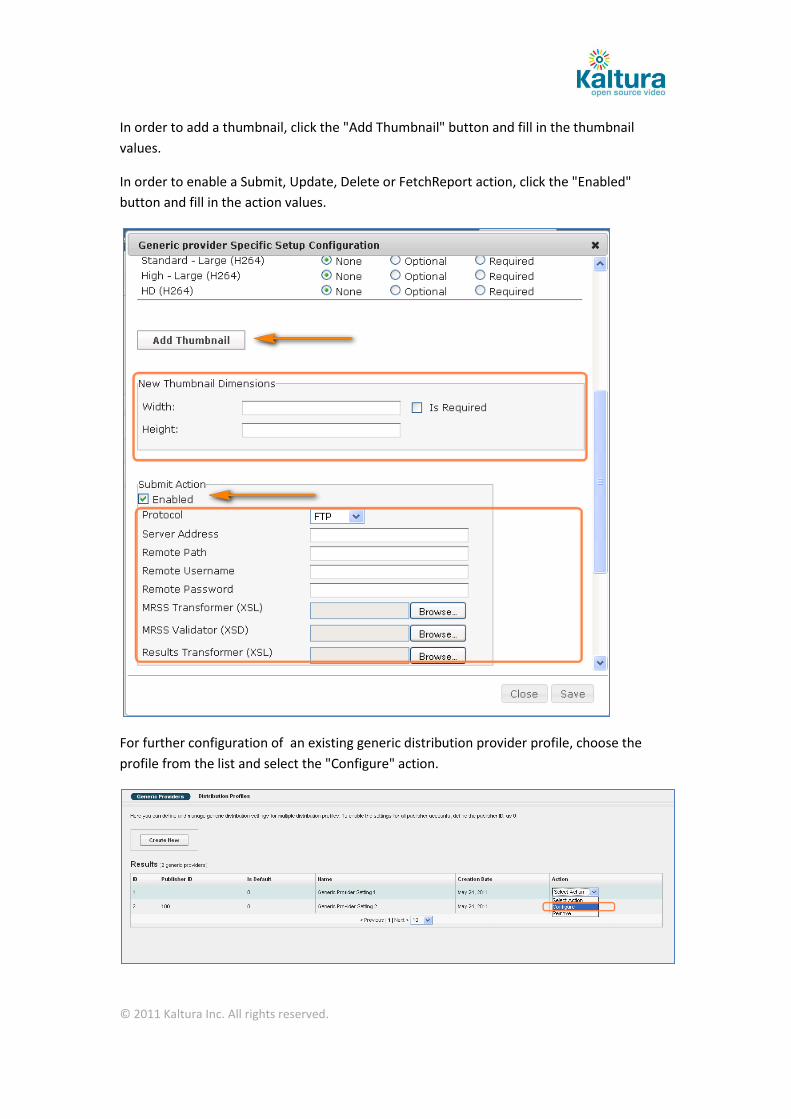
The Configuration window opens. Fill in the required generic provider identifiers. To enable
settings for all publisher accounts, define the publisher ID as 0. To enable setting for a
specific publisher account, define the specific publisher ID. To define the default generic
provider, check the "Is Default" box. Then you may fill in other configuration values. Scroll
down for more options.
© 2011 Kaltura Inc. All rights reserved.
In order to add a thumbnail, click the "Add Thumbnail" button and fill in the thumbnail
values.
In order to enable a Submit, Update, Delete or FetchReport action, click the "Enabled"
button and fill in the action values.
For further configuration of an existing generic distribution provider profile, choose the
profile from the list and select the "Configure" action.

© 2011 Kaltura Inc. All rights reserved.
Distribution Profiles Page
From this page you may manage all aspects of distribution profiles for publisher accounts
and create new distribution profiles.
In order to allow a specific publisher to distribute content to a certain distribution partner,
an administrator must create a distribution profile for the specific distribution partner for
the specific publisher’s KMC account.
How to search and view the details of a distribution profile
You may search for a specific distribution profile by entering a publisher ID, publisher name
or free text. After you choose your search criteria, click on the "Search" button.
How to create a distribution profile
In order to create a new distribution profile, enter the publisher ID, select the provider type
and click the "Create New" button.
© 2011 Kaltura Inc. All rights reserved.
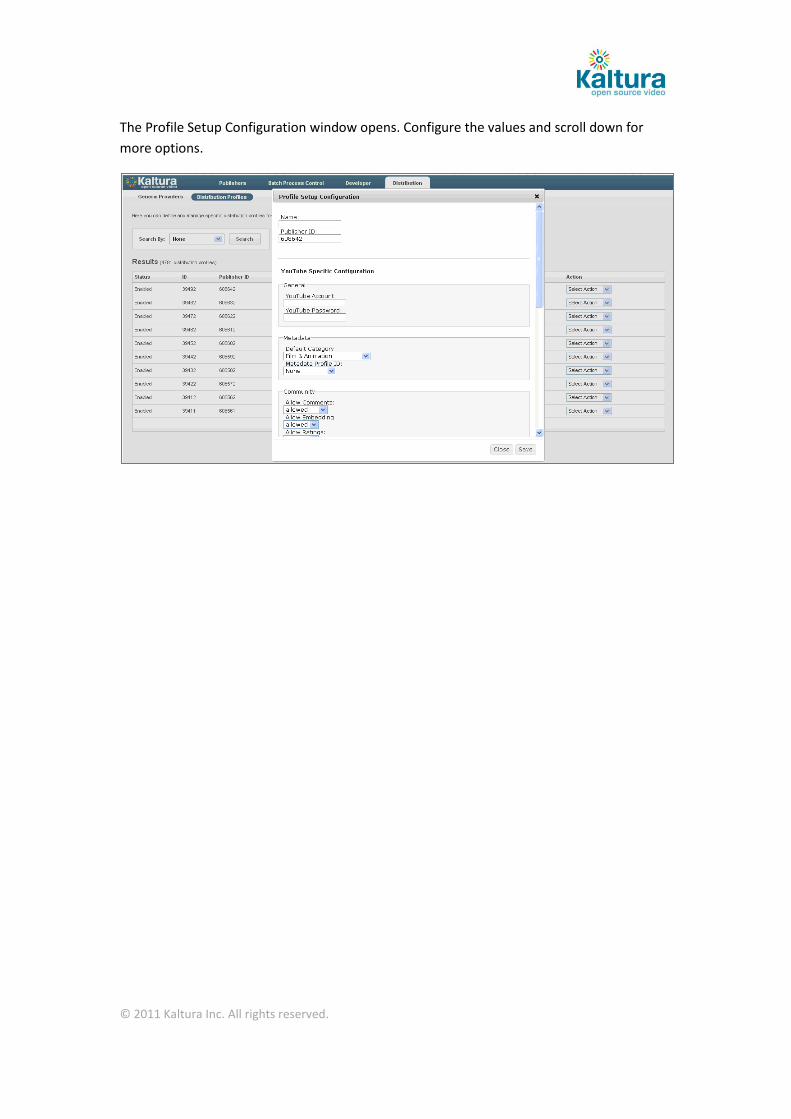
The Profile Setup Configuration window opens. Configure the values and scroll down for
more options.
© 2011 Kaltura Inc. All rights reserved.
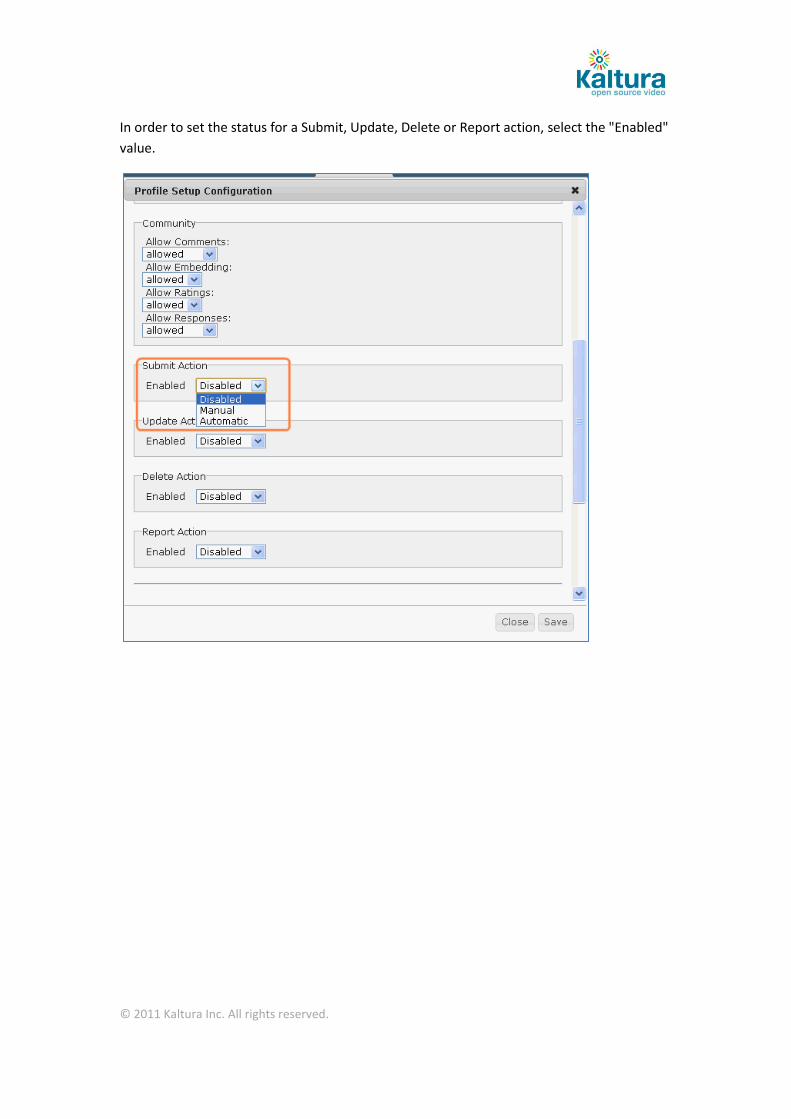
In order to set the status for a Submit, Update, Delete or Report action, select the "Enabled"
value.

© 2011 Kaltura Inc. All rights reserved.
In order to add a thumbnail, click the "Add Thumbnail" button and fill in the thumbnail
values.
In order to configure an existing distribution profile, choose the profile from the list and
select the "Configure" action.
© 2011 Kaltura Inc. All rights reserved.
Appendix A – Adjusting the Usage Packages Menu
It is possible to adjust the names of the Usage Packages assigned to the publishers
registered in your site to better fit the packages offered by your business unit.
For adjusting Usage Packages options, you can edit the patnerPackages.xml file available at
the following location.
/opt/kaltura/app/alpha/apps/kaltura/config/partnerPackages.xml
Please update your changes on every server in your site that runs a Kaltura application code,
it is recommended that you consult with the Kaltura technical team before applying such
changes.