k ub t n e i o 1 n 2 tiu it o g m ceeclalaectect i t c i htrhtr nm … · 2018-12-19 ·...
TRANSCRIPT
—
INTRODUCTION
This document explains how to install the Furse
ESP 415 M1R Surge Protective Device (SPD) to
ABB 3-phase power distribution boards:
640T1PB3MD, 640T3PB3MD, 680T3PB3MD,
124T1PB3MD, 124T3PB3MD, 128T1PB3MD,
184T1PB3MD, 188T1PB3MD, 188T3PB3MD,
CU640PB3MD, CU680PB3MD, CU124PB3MD,
CU128PB3MD, CU184PB3MD, CU188PB3MD,
CU12504T5PB3MD
1. Safety note:
Warning! Installation by person with
electrotechnical expertise only.
Warnung! Installation nur durch
elektrotechnische Fachkraft.
Avvertenza! Fare installare solo da un
elettricista qualificato.
Avertissement! Installation uniquement par
des personnes qualifiées en électrotechnique.
3. Installation
3.1 Prepare the panel
Remove all covers to allow access to the
panel.
Check that the first 3-phase outgoing way on
the left hand side of the PSPB panel is
available.
If not then relocate this connection further up
the panel board to free the first outgoing way
for use by the SPD.
Fit 3P 125A MCCB (ordered separately) to the
(now vacant) first outgoing way on the left
hand side of PSPB panelboard.
3.2 Mount the SPD
Mount the Furse SPD (Furse reference
ESP 415 M1R) with it's supplied baseplate,
using the fixings provided (see Figure 1).
The display is mounted in the front door of
the panelboard, using the drilling detail
shown in Figure 10. Then connect the cable
between base unit and display.
3.4 Check/test the installation
Check the performance of the SPD following
Sections 4-6 of these instructions.
3.5 Protect the installation
If the installation is safe and the SPD is
performing correctly, refit the covers to the
panel and the SPD enclosure to ensure
electrical safety.
4. Installation check
4.1 Check the performance of the SPD. Switch
the power supply on. Check that a green LED
per phase and neutral is lit. If lit, the unit is
fully operational.
4.2 Watch the WARNING light for 30 seconds. If it
is flashing or lit there is a problem with your
installation (see Section 5).
5. Neutral-earth warning light
If the WARNING light is illuminated there is an
excessive voltage present between neutral
and earth. The WARNING light should never
be illuminated.
(a) Illumination at time of installation
If the WARNING light flashes as soon as the
mains supply to the SPD is turned on, one of
the phase/live cables may have been
connected to neutral and the neutral to
phase/live.
Isolate or disconnect the SPD immediately.
Check the phase/live and neutral connections
and if a mistake has been made, correct it.
If all the phase/live and neutral connections
are correct, there is a fault with the mains
supply (see (b) - below).
Note: The SPD may have suffered damage -
check the status indication
(see Section 6).
(b) Illumination at any time
The WARNING light will flash when the neutral
to earth voltage exceeds 30 Volts.
The faster the flashing, the higher the voltage
between neutral and earth (at very high
voltages the WARNING light may appear to be
permanently illuminated). Disconnect the
SPD immediately and check the mains supply.
The SPD should not be reconnected until the
cause of the fault has been identified and
rectified.
Note: The SPD may have suffered damage -
check the status indication
(see Section 6).
6. Status Indication
The Furse ESP 415 M1R SPD gives a
continuous visual display of its status. The
SPD has a two colour indicator light, for each
phase and neutral:Figure 1. Furse ESP 415 M1 SPD positioned on mounting plate.
Figure 7. Close up of connections including earth cable from SPD to baseplate.
Figure 6. Earth connection (SPD to earth bar).
Figure 5. N connection (SPD to neutral bar).
Figure 4. L3 connection (SPD to MCCB).
Figure 3. L2 connection (SPD to MCCB).
Figure 2. L1 connection (SPD to MCCB).
Advertencia! La instalación deberá ser
realizada únicamente por electricistas
especializados.
2. Before installation
2.1 Check that the voltage between neutral and
earth does not exceed 10 Volts.
If this voltage does exceed 10 Volts, the
installation is unsafe.
Find and rectify the cause of this fault before
proceeding.
2.2 Make sure that the supply voltage is suitable
for the unit.
Supply Rated Voltage (VRMS)
Unit Voltage Range (VRMS)
ESP 415 M1R Phase to Phase
380/400/415 346-484
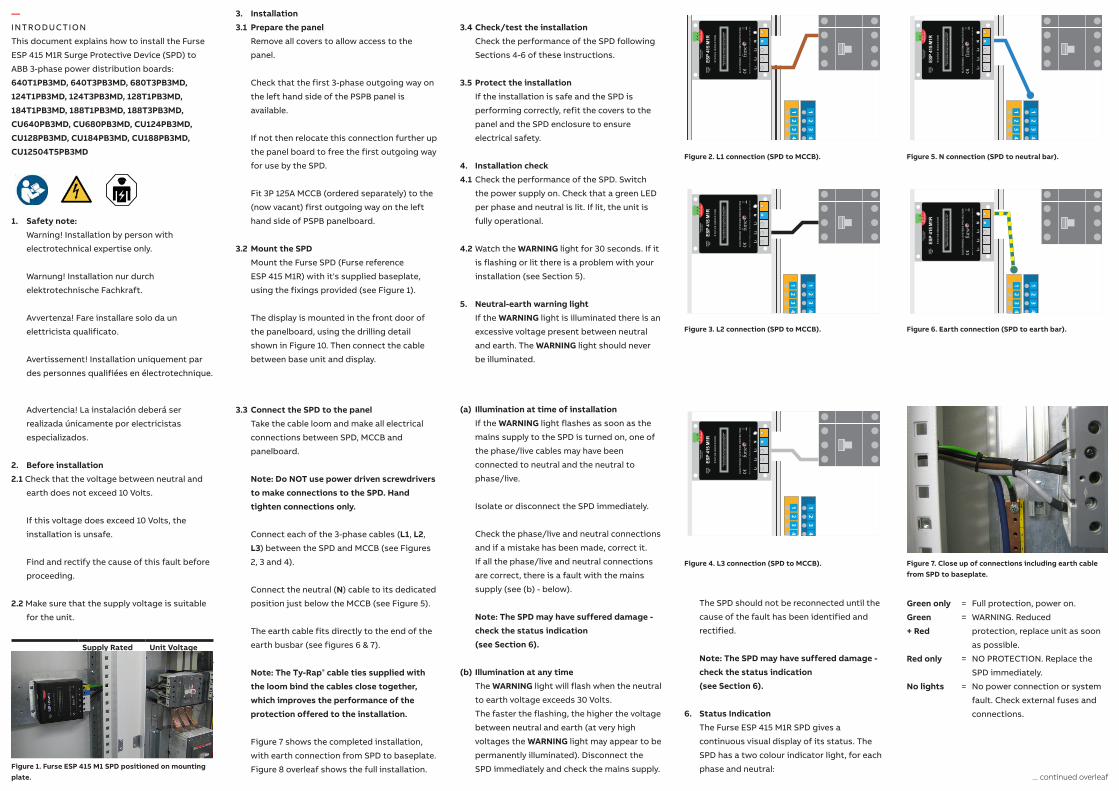
3.3 Connect the SPD to the panel
Take the cable loom and make all electrical
connections between SPD, MCCB and
panelboard.
Note: Do NOT use power driven screwdrivers
to make connections to the SPD. Hand
tighten connections only.
Connect each of the 3-phase cables (L1, L2,
L3) between the SPD and MCCB (see Figures
2, 3 and 4).
Connect the neutral (N) cable to its dedicated
position just below the MCCB (see Figure 5).
The earth cable fits directly to the end of the
earth busbar (see figures 6 & 7).
Note: The Ty-Rap® cable ties supplied with
the loom bind the cables close together,
which improves the performance of the
protection offered to the installation.
Figure 7 shows the completed installation,
with earth connection from SPD to baseplate.
Figure 8 overleaf shows the full installation.
Green only = Full protection, power on.
Green = WARNING. Reduced
+ Red protection, replace unit as soon
as possible.
Red only = NO PROTECTION. Replace the
SPD immediately.
No lights = No power connection or system
fault. Check external fuses and
connections.
12
34
NO
Volt
fre e
c ont
act
ESP
415
M1
STAT
US
IND
ICAT
ION
ELEC
TRO
NIC
SYST
EMS
PRO
TEC
TIO
N
Mad
eb y
WJ
F urs
e&
Co
Ltd ,
ESP
Di v
isio
n,W
ilfor
dR
oad,
Not
t ingh
a m,N
G2
1EB
,UK
L1
L 1L 2
L 3N
NW
AR
NIN
G
PATE
NT
APP
LIED
FOR
Iflit
/fl a
s hin
gdi
s con
nect
unit
&ch
eck
Ne u
tra l
toEa
r th
supp
lyv o
lt age
L2L3
NC
C
GR
E EN
FULL
PRO
T EC
TIO
N
NO
PRO
TEC
TIO
N
RED
UC
EDP R
OTE
CTI
ON
( re p
l ace
unit )
GR
EEN
&R
ED
RED
Let -t
hrou
ghv o
lt ag e
600V
3ph
a se/
50H
z(L
ive
toN
eut r
al,L
ive
toEa
rth
&N
eutr
alto
Eart
h)Vm
ax48
0 Vrm
s
12
34
12
34
12
34
12
34
12
34
NO
Volt
fre e
c ont
act
ESP
415
M1
STAT
US
IND
ICAT
ION
ELEC
TRO
NIC
SYST
EMS
PRO
TEC
TIO
N
Mad
eb y
WJ
F urs
e&
Co
Ltd ,
ESP
Di v
isio
n,W
ilfor
dR
oad,
Not
t ingh
a m,N
G2
1EB
,UK
L1
L 1L 2
L 3N
NW
AR
NIN
G
PATE
NT
APP
LIED
FOR
Iflit
/fl a
s hin
gdi
s con
nect
unit
&ch
eck
Ne u
tra l
toEa
r th
supp
lyv o
lt age
L2L3
NC
C
GR
E EN
FULL
PRO
T EC
TIO
N
NO
PRO
TEC
TIO
N
RED
UC
EDP R
OTE
CTI
ON
( re p
l ace
unit )
GR
EEN
&R
ED
RED
Let -t
hrou
ghv o
lt ag e
600V
3ph
a se/
50H
z(L
ive
toN
eut r
al,L
ive
toEa
rth
&N
eutr
alto
Eart
h)Vm
ax48
0 Vrm
s
12
34
12
34
12
34
12
34
12
34
12
34
NO
Volt
fre e
c ont
act
ESP
415
M1
STAT
US
IND
ICAT
ION
ELEC
TRO
NIC
SYST
EMS
PRO
TEC
TIO
N
Mad
eb y
WJ
F urs
e&
Co
Ltd ,
ESP
Di v
isio
n,W
ilfor
dR
oad,
Not
t ingh
a m,N
G2
1EB
,UK
L1
L 1L 2
L 3N
NW
AR
NIN
G
PATE
NT
APP
LIED
FOR
Iflit
/fl a
s hin
gdi
s con
nect
unit
&ch
eck
Ne u
tra l
toEa
r th
supp
lyv o
lt age
L2L3
NC
C
GR
E EN
FULL
PRO
T EC
TIO
N
NO
PRO
TEC
TIO
N
RED
UC
EDP R
OTE
CTI
ON
( re p
l ace
unit )
GR
EEN
&R
ED
RED
Let -t
hrou
ghv o
lt ag e
600V
3ph
a se/
50H
z(L
ive
toN
eut r
al,L
ive
toEa
rth
&N
eutr
alto
Eart
h)Vm
ax48
0 Vrm
s
12
34
12
34
12
34
12
34
12
34
NO
Volt
fre e
c ont
act
ESP
415
M1
STAT
US
IND
ICAT
ION
ELEC
TRO
NIC
SYST
EMS
PRO
TEC
TIO
N
Mad
eb y
WJ
F urs
e&
Co
Ltd ,
ESP
Di v
isio
n,W
ilfor
dR
oad,
Not
t ingh
a m,N
G2
1EB
,UK
L1
L 1L 2
L 3N
NW
AR
NIN
G
PATE
NT
APP
LIED
FOR
Iflit
/fl a
s hin
gdi
s con
nect
unit
&ch
eck
Ne u
tra l
toEa
r th
supp
lyv o
lt age
L2L3
NC
C
GR
E EN
FULL
PRO
T EC
TIO
N
NO
PRO
TEC
TIO
N
RED
UC
EDP R
OTE
CTI
ON
( re p
l ace
unit )
GR
EEN
&R
ED
RED
Let -t
hrou
ghv o
lt ag e
600V
3ph
a se/
50H
z(L
ive
toN
eut r
al,L
ive
toEa
rth
&N
eutr
alto
Eart
h)Vm
ax48
0 Vrm
s
12
34
12
34
12
34
12
34
12
34
12
34
NO
Volt
fre e
c ont
act
ESP
415
M1
STAT
US
IND
ICAT
ION
ELEC
TRO
NIC
SYST
EMS
PRO
TEC
TIO
N
Mad
eb y
WJ
F urs
e&
Co
Ltd ,
ESP
Di v
isio
n,W
ilfor
dR
oad,
Not
t ingh
a m,N
G2
1EB
,UK
L1
L 1L 2
L 3N
NW
AR
NIN
G
PATE
NT
APP
LIED
FOR
Iflit
/fl a
s hin
gdi
s con
nect
unit
&ch
eck
Ne u
tra l
toEa
r th
supp
lyv o
lt age
L2L3
NC
C
GR
E EN
FULL
PRO
T EC
TIO
N
NO
PRO
TEC
TIO
N
RED
UC
EDP R
OTE
CTI
ON
( re p
l ace
unit )
GR
EEN
&R
ED
RED
Let -t
hrou
ghv o
lt ag e
600V
3ph
a se/
50H
z(L
ive
toN
eut r
al,L
ive
toEa
rth
&N
eutr
alto
Eart
h)Vm
ax48
0 Vrm
s
12
34
12
34
12
34
12
34
12
34
NO
Volt
fre e
c ont
act
ESP
415
M1
STAT
US
IND
ICAT
ION
ELEC
TRO
NIC
SYST
EMS
PRO
TEC
TIO
N
Mad
eb y
WJ
F urs
e&
Co
Ltd ,
ESP
Di v
isio
n,W
ilfor
dR
oad,
Not
t ingh
a m,N
G2
1EB
,UK
L1
L 1L 2
L 3N
NW
AR
NIN
G
PATE
NT
APP
LIED
FOR
Iflit
/fl a
s hin
gdi
s con
nect
unit
&ch
eck
Ne u
tra l
toEa
r th
supp
lyv o
lt age
L2L3
NC
C
GR
E EN
FULL
PRO
T EC
TIO
N
NO
PRO
TEC
TIO
N
RED
UC
EDP R
OTE
CTI
ON
( re p
l ace
unit )
GR
EEN
&R
ED
RED
Let -t
hrou
ghv o
lt ag e
600V
3ph
a se/
50H
z(L
ive
toN
eut r
al,L
ive
toEa
rth
&N
eutr
alto
Eart
h)Vm
ax48
0 Vrm
s
12
34
12
34
12
34
12
34
12
34
12
34
NO
Volt
fre e
c ont
act
ESP
415
M1
STAT
US
IND
ICAT
ION
ELEC
TRO
NIC
SYST
EMS
PRO
TEC
TIO
N
Mad
eb y
WJ
F urs
e&
Co
Ltd ,
ESP
Di v
isio
n,W
ilfor
dR
oad,
Not
t ingh
a m,N
G2
1EB
,UK
L1
L 1L 2
L 3N
NW
AR
NIN
G
PATE
NT
APP
LIED
FOR
Iflit
/fl a
s hin
gdi
s con
nect
unit
&ch
eck
Ne u
tra l
toEa
r th
supp
lyv o
lt age
L2L3
NC
C
GR
E EN
FULL
PRO
T EC
TIO
N
NO
PRO
TEC
TIO
N
RED
UC
EDP R
OTE
CTI
ON
( re p
l ace
unit )
GR
EEN
&R
ED
RED
Let -t
hrou
ghv o
lt ag e
600V
3ph
a se/
50H
z(L
ive
toN
eut r
al,L
ive
toEa
rth
&N
eutr
alto
Eart
h)Vm
ax48
0 Vrm
s
12
34
12
34
12
34
12
34
12
34
NO
Volt
fre e
c ont
act
ESP
415
M1
STAT
US
IND
ICAT
ION
ELEC
TRO
NIC
SYST
EMS
PRO
TEC
TIO
N
Mad
eb y
WJ
F urs
e&
Co
Ltd ,
ESP
Di v
isio
n,W
ilfor
dR
oad,
Not
t ingh
a m,N
G2
1EB
,UK
L1
L 1L 2
L 3N
NW
AR
NIN
G
PATE
NT
APP
LIED
FOR
Iflit
/fl a
s hin
gdi
s con
nect
unit
&ch
eck
Ne u
tra l
toEa
r th
supp
lyv o
lt age
L2L3
NC
C
GR
E EN
FULL
PRO
T EC
TIO
N
NO
PRO
TEC
TIO
N
RED
UC
EDP R
OTE
CTI
ON
( re p
l ace
unit )
GR
EEN
&R
ED
RED
Let -t
hrou
ghv o
lt ag e
600V
3ph
a se/
50H
z(L
ive
toN
eut r
al,L
ive
toEa
rth
&N
eutr
alto
Eart
h)Vm
ax48
0 Vrm
s
12
34
12
34
12
34
12
34
12
34
12
34
NO
Volt
fre e
c ont
act
ESP
415
M1
STAT
US
IND
ICAT
ION
ELEC
TRO
NIC
SYST
EMS
PRO
TEC
TIO
N
Mad
eb y
WJ
F urs
e&
Co
Ltd ,
ESP
Di v
isio
n,W
ilfor
dR
oad,
Not
t ingh
a m,N
G2
1EB
,UK
L1
L 1L 2
L 3N
NW
AR
NIN
G
PATE
NT
APP
LIED
FOR
Iflit
/fl a
s hin
gdi
s con
nect
unit
&ch
eck
Ne u
tra l
toEa
r th
supp
lyv o
lt age
L2L3
NC
C
GR
E EN
FULL
PRO
T EC
TIO
N
NO
PRO
TEC
TIO
N
RED
UC
EDP R
OTE
CTI
ON
( re p
l ace
unit )
GR
EEN
&R
ED
RED
Let -t
hrou
ghv o
lt ag e
600V
3ph
a se/
50H
z(L
ive
toN
eut r
al,L
ive
toEa
rth
&N
eutr
alto
Eart
h)Vm
ax48
0 Vrm
s
12
34
12
34
12
34
12
34
12
34
NO
Volt
fre e
c ont
act
ESP
415
M1
STAT
US
IND
ICAT
ION
ELEC
TRO
NIC
SYST
EMS
PRO
TEC
TIO
N
Mad
eb y
WJ
F urs
e&
Co
Ltd ,
ESP
Di v
isio
n,W
ilfor
dR
oad,
Not
t ingh
a m,N
G2
1EB
,UK
L1
L 1L 2
L 3N
NW
AR
NIN
G
PATE
NT
APP
LIED
FOR
Iflit
/fl a
s hin
gdi
s con
nect
unit
&ch
eck
Ne u
tra l
toEa
r th
supp
lyv o
lt age
L2L3
NC
C
GR
E EN
FULL
PRO
T EC
TIO
N
NO
PRO
TEC
TIO
N
RED
UC
EDP R
OTE
CTI
ON
( re p
l ace
unit )
GR
EEN
&R
ED
RED
Let -t
hrou
ghv o
lt ag e
600V
3ph
a se/
50H
z(L
ive
toN
eut r
al,L
ive
toEa
rth
&N
eutr
alto
Eart
h)Vm
ax48
0 Vrm
s
12
34
12
34
12
34
12
34
12
34
... continued overleaf
Installation Instructions for Mains Wire-In Protectors | 1
Safety note:
Warning! Installation by person with electrotechnical expertise only.
Warnung! Installation nur durch elektrotechnische Fachkraft.
Avvertenza! Fare installare solo da un elettricista qualificato.
Avertissement! Installation uniquement par des personnes qualifiées en électrotechnique.
Advertencia! La instalación deberá ser realizada únicamente por electricistas especializados.
ESP protector installation should be conducted by a qualified competent person and comply with all relevant Regulations and Legislation (including BS 7671 Wiring Regulations and Building Regulations). Incorrect installation will impair the effectiveness of ESP protectors.
Always handle cables by their insulation. Never work on ESP protectors, earthing or their cables during a storm.
1. Key points of installation 1.1 Install protectors very close to the power supply to be protected, either within the distribution panel or directly alongside it.
1.2 Mount units within a panel or WBX enclosure.
1.3 Units are installed in parallel.
1.4 Connect to phase(s), neutral and earth.
NOTE: Units must have a neutral
connection (see 3.4).
1.5 Units installed at power distribution boards can be installed either: - on the load side of the incoming
isolator- on the closest available out going way to the incoming supply
1.6 Provide a means of isolation for the ESP unit.
1.7 The connecting leads to phase/live terminals should be suitably fused (up to 125 Amps) ensuring full discrimination with the immediate upstream supply fuse.
1.8 Connecting leads should be 10 mm2 multi-stranded copper conductor (terminals can accept up to 25 mm2).
1.9 Keep the connecting leads as short as possible and ideally less than 25 cm (10 inches) in length. This may be better achieved with the equivalent M1R remote display variant which permits optimum positioning of both protector and display.
1.10 Bind the connecting leads tightly over their entire length.
1.11 Maximum torque for power terminals is 2.9Nm, wire stripping length 17mm.
1.12 Maximum torque for remote contact is
0.25Nm, wire stripping length 7mm.
1
Installation instructionsESP M1/M1R mains protectors

7. Remote indication
A remote indication of the reduced protection
state is provided for linking the SPD to a
building management system, remote
telemetry, PLC or directly to an indication
light or buzzer.
The SPD has both a normally open and a
normally closed volt free contact.
The terminal for the volt free contact accepts
1.5 mm2 cable (solid or stranded conductor)
and is located on the top of the SPD.
It has three terminals, marked:
NO = Normally Open
NC = Normally Closed
C = Common
The normally open (NO) contact is open when
the SPD is healthy and power is present. The
normally closed (NC) contact is closed when
the SPD is healthy and power is present.
As well as providing warning of the reduced
protection state, the normally closed volt free
contact can also be used to signal power loss
on one or more phases, eliminating the need
for special relays. See Figure 9.
The SPD’s remote indication is rated at
1 Amp, 250 V AC. A minimum load of 10 mA,
5 V DC is required to ensure reliable contact
operation.
Unit HealthyReduced or No protection
NO NC NO NC
Power Present
OPEN CLOSED CLOSED OPEN
Power Absent
CLOSED OPEN CLOSED OPEN
Figure 9. Operation of normally closed (NC) and normally open (NO) volt free contact.
8. Maintenance Maintenance should be conducted at least
once a year and also following lightning activity.
Visually check: – Visual status indication lights (see
Status indication for interpretation) – Condition of connecting leads and
terminations
9. Application notes9.1 ESP coordination Furse ESP 415 M1R SPDs are designed to
fully coordinate with Furse SPDs of equivalent system voltage on the same installation.
No additional de-coupling elements such as inductors are needed to ensure Furse SPDs achieve coordination.
Always ensure Furse SPDs are used on the same installation to ensure coordination.
Mixing Furse SPDs with alternative manufacturers’ units could result in damage to both protection units and connected equipment through poor coordination.
9.2 Insulation tests (flash testing) The SPD should be fully disconnected
from the circuit before testing.
Otherwise the SPD may treat the insulation test as a transient overvoltage and control the voltage to a low level - thereby defeating the object of the test.
9.3 Use of powered screwdrivers The use of powered screwdrivers is not
recommended unless measures are taken to ensure screws are tightened correctly and not damaged (maximum torque value is 2.65 Nm for these terminals).
EnvironmentConsider the protection of the environment! Used electrical and electronic equipment must NOT be disposed of with domestic waste. The device contains valuable raw materials which can be recycled. Therefore, contact ABB for disposal of this equipment.
Figure 8. Completed installation.
Figure 10. Display drilling template.
55.0
mm
70.5mm
90.0mm
3.5mm (x4)
15mm minimum
35.5
mm
Contact us
ABB FurseUK OfficeWilford RoadNottingham NG2 1EBTel: +44 (0) 115 964 3700Fax: +44 (0) 115 986 0071National Sales Tel: +44 (0) 333 999 9900National Sales Fax: +44 (0) 333 999 9901E-Mail: [email protected]
www.furse.com
© Copyright 2018 ABB. All rights reserved.
Specifications subject to change without notice.
— INSTALLATION INSTRUCTIONS
for mains wire-in SPD
© C
op
yrig
ht A
BB
. 11/
2018
9A
KK
1070
46A
84
18