joy in the word - snowissharing.weebly.com
TRANSCRIPT

Making Bible Stories Memorable
Ages 2 To 10
For:
Mothers and Child Studies
Family Studies
Bible Class Studies
Home Schools
Kathy Vernor White
JOY IN THE WORD

2
Dedicated with love to
Jacob Kelso Raymer
And
Macie Nell Foreman
and all children everywhere to help them to hunger and
thirst joyfully after the righteousness of God
A special thank you to a dear friend, Linda Plyler Martin,
who typed the manuscript
Remnant Legacy Publishing
330 N. Dixie Dr.
Lake Jackson, Texas 77566
Copyright 1999
Revised 2004
Special permission is granted to make copies for
home and classroom use, but not for sell.
Kathy is available for hands on instruction dealing with this book. Also, she is able to do
talks on Bible subjects for women and children. She can be contacted at

3
Suggestions For Using This Book
Introduction The purpose of this book is to get kids excited about Bible study—to learn by
doing. My three children and I had a wonderful time making our Bible notebooks, and I
want to share the joy we experienced in God’s Word. Children learn so much by doing.
Most every lesson in this book has manipulative cut-out paper figures to reinforce the
Bible story. Please let the child do all he is able—drawing, cutting, coloring, etc.
Perfectionism is not expected. Be patient with his efforts. The more he does, the more
readily he will be able to remember the Bible facts.
As each picture is done , date it and put it in the correct order in the notebook.
Older students can add their compositions to their notebooks.
The lesson divisions are taken from Rainbow Lessons, by Jane Britnell, with
permission. In fact, you may want to order the Old Testament and the New Testament
volumes to go with this book. They have a very short Bible lesson, a memory verse, and
questions. Also, there are suggestions on Bible activities. You may order these books
from:
Eugene Britnell
P.O. Box 505
Athens, Al 35612
They cost about $6 per volume. You would probably want to buy one book per child.
For the Old Testament Rainbow Lessons, age 4 is recommended—and age 5 for the
New. I started my children at age 2, and some mothers have used them with older children
about 7 or 8.
In Rainbow Lessons, as well as this book, there are 52 lessons in the Old
Testament. (one extra in this book) and 52 lessons in the New Testament. By
concentrating on one lesson each week, the whole Bible can be covered in two years.
If you do not purchase Rainbow Lessons, you will need to pick out your own
memory verse for each lesson. Write these verses on 3x 5 cards and draw a picture on the
back. Decorate a special memory verse box. Cut a slit on the top. You can play all kinds
of games with the memory verse cards. One thing to do is to hold the picture up and let the
child say the memory verse.
Mothers and Children
Mothers can use this book to do Bible stories with their children. One book should
be enough for the whole family. Mothers should use their judgement in dealing with each
child according to his abilities. Small children will delight in making pictures and acting
out the stories with the paper figures. Mom, the drawings are easy to do—just glorified
stick figures. You can do it! Trace if you have to. Use a copy machine if you feel a need.
Some of the pictures may need to be enlarged.
Typical schedule:
Monday—Read the Bible. For the young, summarize the story with the
Bible in front of you. Rainbow Lessons shortens it beautifully for the
very young.. Draw picture. Pick out memory verse.

4
Tuesday—Do craft. Draw picture for memory verse and work on it.
Review story.
Wednesday—If another craft, do it. Review lesson. Say memory verse.
Thursday—Review lesson, work on memory verse. Do craft, if there is
one.
Friday—Finish up crafts. Review lesson. Say memory verse. Review
all lessons and memory verses.
Family Studies
Daddy is the leader here as he directs his family in a study of God’s Word. He may
read the Bible out loud. Each child may make his own notebook or a single family
notebook may be made. A schedule similar to the one for mothers and children may be
adapted. A special night may be chosen to act out the Bible story with members of the
family acting out parts. Again, one book should be enough for the entire family.
Bible Class
When used with the younger class have the construction paper pieces already cut
out. Do try to let them do as much as possible. Care should be taken with the gluing
because it is important to leave some spaces glue-free and a young class is very hectic. (I
would generally apply the glue for them. Also I would cut out several figures at one
time...one for each student.) Their notebooks were kept in the classroom until they were
finished. If used in the older classes the students can do more.
Older Home Schooler
The older home schooler can do much on his own...reading, drawing, cutting,
gluing. I would advice that the home schooler write a composition about the scriptures for
that week. Several subjects can be covered in this way: Bible, English composition, art,
geography, and history.
Typical schedule:
Monday—Read the Bible. Pick out memory verse. Start work on
memorizing it. For geography: find out where the Bible event takes
place.
Tuesday—Review story. Work on memory verse. Do craft. Start on
composition.
Wednesday—Review story. Work on memory verse. Work on
composition. Work on crafts.
Thursday—Finish up crafts. Work on memory verse. Work on
composition.
Friday—Finish up composition. Review Bible story. Say memory
verse. Review all stories and memory verses.

5
More Suggestions
Several stories have more than one craft. Do not feel like you have to do
them all. Pick out the ones you like. The Old Testament has more crafts than the
New Testament. You may even spend more than a week on a lesson. The Creation
story is one that you could easily spend 2 or 3 weeks.
Please draw the pictures on construction paper. Even though it is not stated
in every craft. It is colorful and it is heavier than notebook or typing paper. The
child can also manipulate it easier and it holds up better over the years.
I realize not all children will benefit from this craftsy-artsy notebook way of
doing things. But if your child loves art and making things, may you both have joy
and excitement as the Bible is discovered.
Supplies Needed
3 ring, 3 inch notebook (or two 2 inch notebooks, if you want to have
separate notebooks for the Old and New Testaments)
Notebook paper
Glue
Compass
Colored construction paper
Crayons
Water-based markers
Brads
Gold foil or wrapping paper
Aluminum foil
Embroidery thread
Map colors
Star stickers
Cotton
Hole punch (3-hole punch is handy)
Scissors
Cheap necklace chain
Reinforcements (for notebook paper
Tape
Box (to hold little supplies)
Old magazines

6
THE OLD TESTAMENT

7
Lesson 1 – Creation
Gen. 1 & 2
1st Craft -"The Days of Creation"
Cut out seven small rectangles from construction paper and number each. Glue the
numbers down the left-hand side of notebook paper. Draw and cut out colored drawings of
creation. Before you glue down the pictures you may wish to play a matching game with
your child or students. Glue each picture beside its number. Put paper into notebook.
8
2rd
Craft - "God Made the Pretty World"
Cut a picture of scenery from a magazine. Have your child point out things in the picture
that God made. Write the things under the picture.
3rd
Craft - "God Made Pretty Flowers"
Cut out magazine pictures of flowers. You may wish to use a seed catalog. Make a collage
of flowers on a sheet of paper. A seed catalog is great!
4th
Craft – “God Made the Animals”
Cut out pictures of animals from magazines. Glue the pictures on a sheet of paper labeled
"God Made the Animals." Use several sheets if you want.
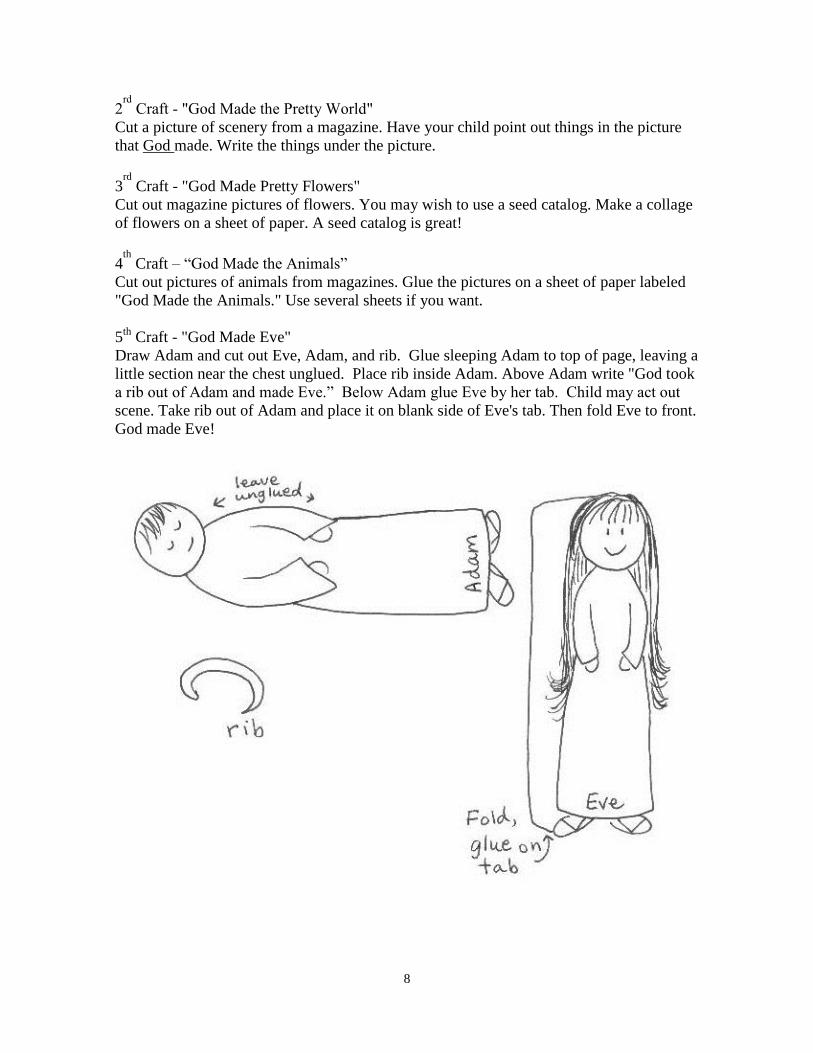
5th Craft - "God Made Eve"
Draw Adam and cut out Eve, Adam, and rib. Glue sleeping Adam to top of page, leaving a
little section near the chest unglued. Place rib inside Adam. Above Adam write "God took
a rib out of Adam and made Eve.” Below Adam glue Eve by her tab. Child may act out
scene. Take rib out of Adam and place it on blank side of Eve's tab. Then fold Eve to front.
God made Eve!

9
6th Craft - "God Made My Family:
Draw stick figures of child's family. Label each person. Let child color drawing.
7th
Craft - "God Made My Friends"
Draw small stick figures of child's friends. Let the child help you label the people.
Lesson 2 - Adam and Eve Disobey
Gen. 3
1st Craft – “In the Garden”
Draw and cut out trees, Adam, Eve, and the snake. Arrange 5 trees in a circle on notebook
paper and glue down. Glue last tree in the center. Draw flowers and animals among the
trees. Also put fruit on the trees. On the back of a happy Adam and Eve draw sad faces,.
Cut two rectangles about 1 x 3 inches. Glue one tab on sides and bottom (leaving top
open) near tree in the center. Do another the same way outside of the garden. Glue snake
on the tree in the center. Let Adam and Eve be happy in the garden. When they are forced
out of the garden, turn them around to reveal their sad faces.

10
2nd
Craft – “Satan Tempts Eve”
Draw and cut out Eve and attach arm with brad where marked. Cut the tree top and cut
slot for fruit at bottom. Glue tree to notebook paper being careful not to glue slot for fruit.
Draw tree trunk, snake, and extra fruit. Cut fruit and fit in slot. Eve reaches up and takes
forbidden fruit from tree. Label picture.
11
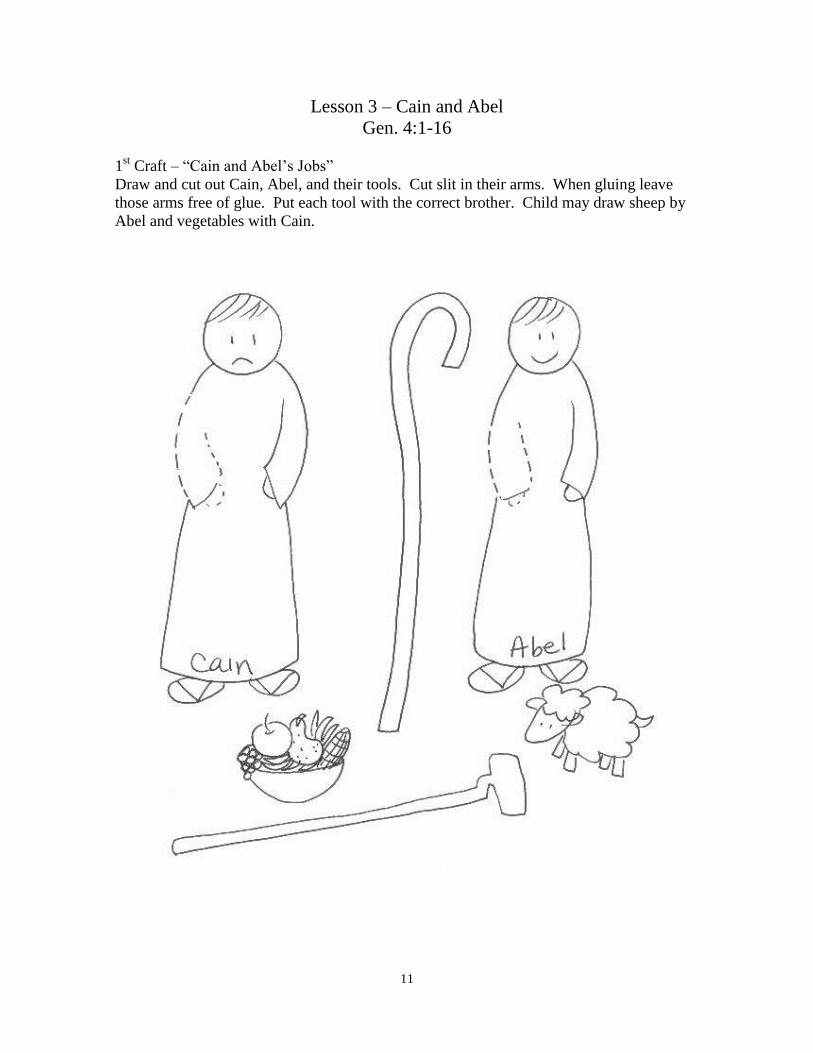
Lesson 3 – Cain and Abel
Gen. 4:1-16
1st Craft – “Cain and Abel’s Jobs”
Draw and cut out Cain, Abel, and their tools. Cut slit in their arms. When gluing leave
those arms free of glue. Put each tool with the correct brother. Child may draw sheep by
Abel and vegetables with Cain.

12
2nd
Craft – “Cain and Abel’s Sacrifice”
Trim a sheet of construction paper to fit a sheet of notebook paper. Fold the bottom third
of 2 sheets of construction paper over making a pocket. Draw one altar on each pocket.
Label altar Cain’s and the other altar Abel’s. Cut out fruit and/or vegetables from a
magazine. Glue them on construction paper and cut out. Draw a lamb on construction
paper and glue cotton it. Let child put the correct sacrifice on each altar.
Lesson 4 – Noah’s Ark
Gen. 6:9 – 9:17
1st Craft – “40 Days and 40 Nights”
Draw and cut out water, ark, and the animals from construction paper. Glue the water on
sides and bottom to the notebook page, leaving about 1 ½ inch pocket at the top. Glue the
ark on sides and bottom, leaving an opening at the top.. Child may put the animals in the
ark and put the ark in the water. (Notice: The ark is drawn here to be closer to the
dimensions given in Genesis than the usual tub-shaped ark.)

13

14

15
2nd
Craft—“The First Rainbow”
Trim a blue sheet of construction paper to the size of notebook paper. Draw and cut out
the mountain, the ark, and the rainbow sections. Glue rainbow, mountain, and ark. Label
picture.
16
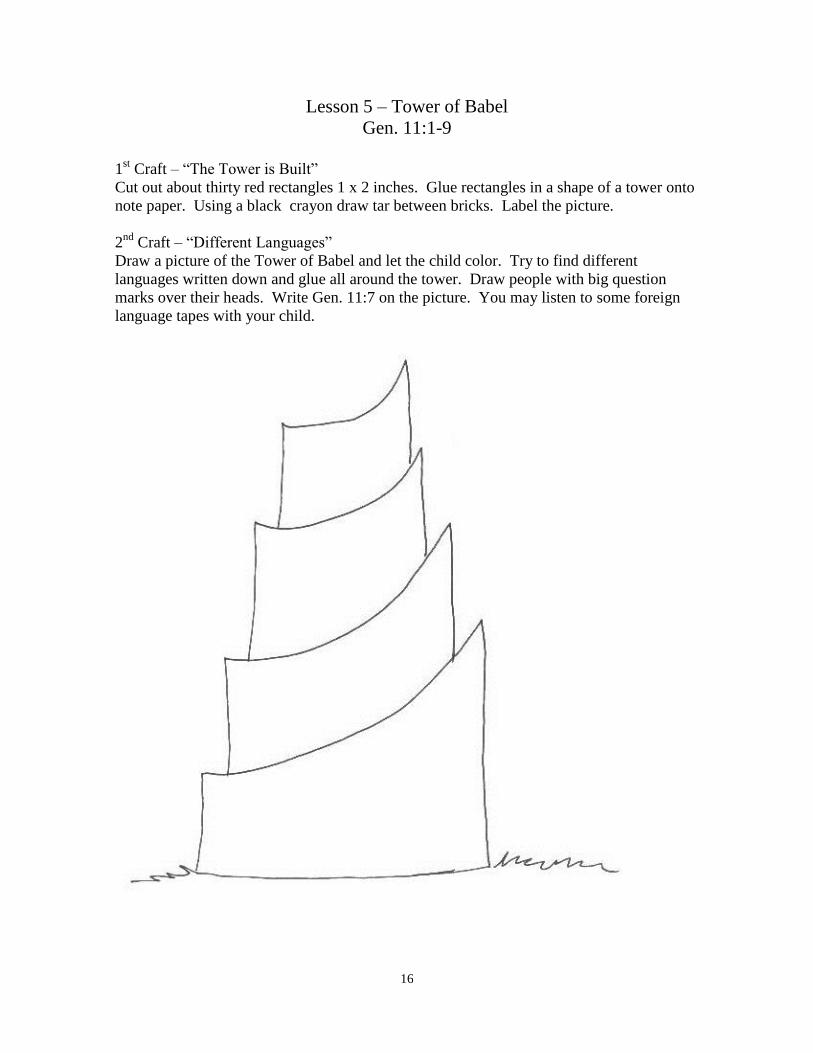
Lesson 5 – Tower of Babel
Gen. 11:1-9
1
st Craft – “The Tower is Built”
Cut out about thirty red rectangles 1 x 2 inches. Glue rectangles in a shape of a tower onto
note paper. Using a black crayon draw tar between bricks. Label the picture.
2nd
Craft – “Different Languages”
Draw a picture of the Tower of Babel and let the child color. Try to find different
languages written down and glue all around the tower. Draw people with big question
marks over their heads. Write Gen. 11:7 on the picture. You may listen to some foreign
language tapes with your child.

17
Lesson 6 – Lot’s Wife
Gen. 19:1-28
1
st Craft – “Lot Pitches His Tent Near Sodom”
Draw and cut out tent, Lot, his wife, and his two daughters. Cut a slit into the tent. Glue
tent down on the edges. Put Lot and his family in tent. Color grass or cut green
construction paper.

18
2nd
Craft – “Pillar of Salt”
In left-hand corner draw Sodom and Gomorrah on notebook paper. Draw fire consuming
it. Draw and cut out Lot and his two daughters and his wife. Draw road from Sodom.
Glue Lot and his two daughters on the road near the bottom. By her tab glue Lot’s wife by
her husband. Turn her backwards and put glue all over her back. Sprinkle salt over the
glue. Label picture.

19
Lesson 7 - “Abraham, Sarah, and Isaac”
Gen. 22:1-19
1
st Craft – “Name Change”
Draw and cut out Abraham and Sarah. Cut out two squares and fold in half. Glue
Abraham and Sarah on notebook page. Glue bottoms of each flap under Abraham and
Sarah. On the one under Abraham write “Abram” on top. Open it up and write
“Abraham”. On the flap under Sarah write “Sarai,” and on the inside write “Sarah”.
2nd
Craft – “Abraham, Sarah, and Baby Isaac”
Draw and cut out Abraham and Sarah, and Isaac. Cut slits in Sarah’s arms. Glue Abraham
and Sarah onto notebook paper, keeping glue away from Sarah’s arms. Put baby Isaac in
Sarah’s arms.

20
3rd
Craft – “Abraham offers Up Isaac”
Draw and cut out the mountain, the altar, Abraham, Isaac, the bush, the wood, and the ram.
On back of Isaac draw him with hands and feet tied and a big frown on his face. Cut slit in
mountain. Glue the bush down so the top and right side could be used as storage. Cut a
slit in the ram’s horns so it can be caught in the bushes. Put tab of altar in the mountain
slit. Let child act out story.

21

22
4th
Craft – “Three Promises”
Cut down a black sheet of construction paper to fit a notebook page. With a white crayon
draw two lines to divide the construction paper into thirds. Number the sections one
through three. At the top write “GOD’S PROMISES TO ABRAHAM.” Draw and cut out
the land of Canaan and Jesus in the manger. In first section glue the land of Canaan. In
the second, let child stick on stars. In the last section glue baby Jesus. These promises are
given in Gen 12:2-4 and Gen. 22:17-18.

23
Lesson 8 - “Isaac and Rebekah”
Gen. 24-28
1
st Craft – Research Camels. If possible take the family to a zoo and look at all the animals
God made, but especially notice the camels. See if you can take a camel ride. Talk about
how different it would be if we had to travel by camel. See how much water camels can
drink at one time and measure it out in a big container. Have each child draw a picture of a
camel.
2nd
Craft – Draw a map of the Bible land region talked about in these chapters and trace the
route. Estimate the time of journey by the way they traveled.
3rd
Craft – “Rebekah Waters the Camels”
Draw and cut out the figures below. Glue Abraham’s servant in the upper right-hand
corner. Glue the well on sides and bottom. Glue the camel and trough in the lower right-
hand corner. Make a slit in Rebekah’s arm. Fold the “water” and glue to the back of the
pot. Let child make Rebekah water the camel by pouring water out of the waterpot. I hope
she won’t get wet, but store Rebekah in the well. Label picture.

24
4th
Craft – “Baby Jacob and Esau”
Draw and cut out the bed, the quilt, Jacob and Esau. Let child draw red hair on Esau. Put
names “Esau” and “Jacob” above bed. Glue bed down. Glue quilt down on bottom and
sides. Let child put Jacob and Esau to bed in the correct places.
25
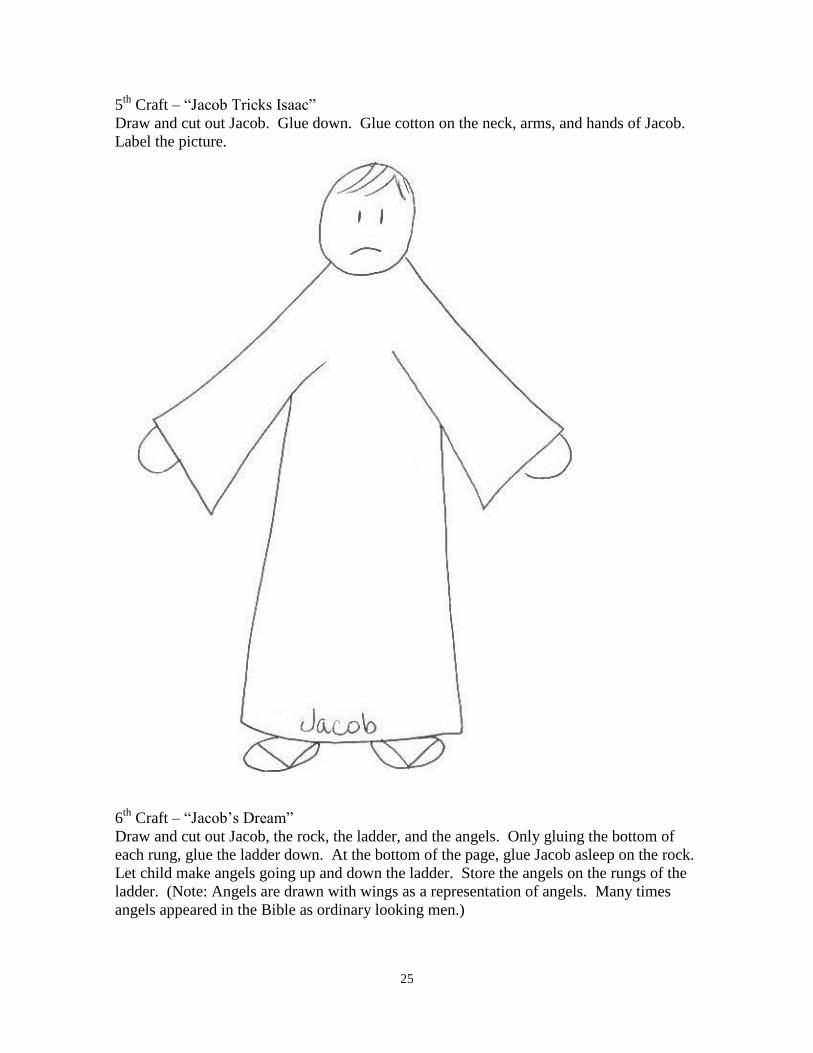
5th
Craft – “Jacob Tricks Isaac”
Draw and cut out Jacob. Glue down. Glue cotton on the neck, arms, and hands of Jacob.
Label the picture.
6th
Craft – “Jacob’s Dream”
Draw and cut out Jacob, the rock, the ladder, and the angels. Only gluing the bottom of
each rung, glue the ladder down. At the bottom of the page, glue Jacob asleep on the rock.
Let child make angels going up and down the ladder. Store the angels on the rungs of the
ladder. (Note: Angels are drawn with wings as a representation of angels. Many times
angels appeared in the Bible as ordinary looking men.)

26

27
Lesson 9 – Jacob’s Sons
Gen. 29:1-30:34,32:28
Cut out thirteen circles about 1 ¼ inches in diameter. Cut out an arrow about ½ x 3 inches
long. Glue twelve circles in a circle like a clock. Put a smiling face on each circle. Label
each son of Jacob. Glue the remaining circle onto the arrow. Make a smiling face. This is
Jacob, the father. Label him. As child says the sons, move the arrow.
Lesson 10 – Joseph’s Coat
Gen. 37
1
st Craft “Joseph’s Coat”
Draw and cut out the strips of Joseph’s beautiful coat below. Cut out the strips in different
colors of construction paper. Glue onto notebook paper and label.
28
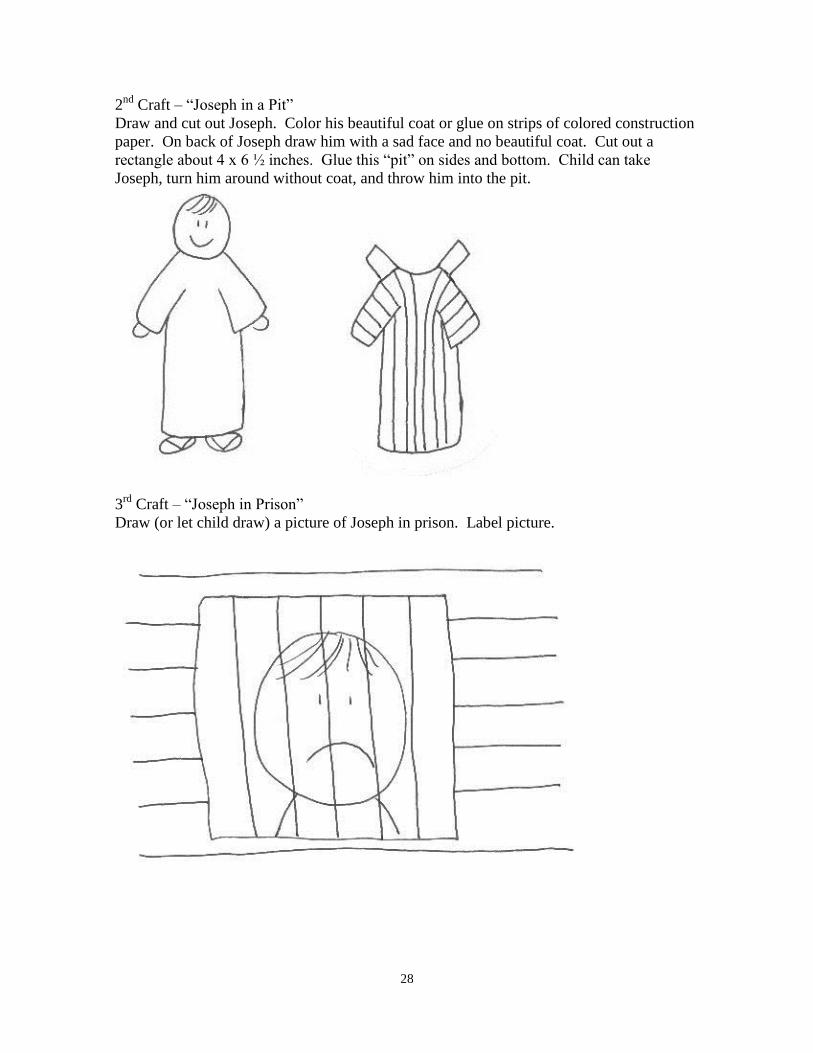
2nd
Craft – “Joseph in a Pit”
Draw and cut out Joseph. Color his beautiful coat or glue on strips of colored construction
paper. On back of Joseph draw him with a sad face and no beautiful coat. Cut out a
rectangle about 4 x 6 ½ inches. Glue this “pit” on sides and bottom. Child can take
Joseph, turn him around without coat, and throw him into the pit.
3rd
Craft – “Joseph in Prison”
Draw (or let child draw) a picture of Joseph in prison. Label picture.

29
Lesson 11 – Joseph
Gen 41:41-45:28
1
st Craft – “Pharoah’s Dream”
Draw and cut out all pieces below. Glue Joseph in middle of page. Glue the bottom of the
flaps. First flap has fat cows on top. When top is lifted, skinny cows are seen. Second
flap has fat head of grain on top. Open flap to see skinny head of grain.
2nd
Craft – “Joseph is Rewarded”
Draw and cut out Joseph, his wife, Joseph’s clothes, and chariot. Glue chariot on sides and
bottom, making a pocket at the top. Cut gold embroidery thread or a cheap necklace chain
to make a necklace for Joseph. Tape thread or chain down in back. Put fancy clothes on
Joseph. Draw a rind on Joseph’s hand. Let Joseph and his wife ride in the chariot.

30
3rd
Craft – “Joseph’s Silver Cup”
Draw and cut out the bag and the silver cup. Cover the cup with aluminum foil. Glue the
bag on sides and the bottom, leaving about a two-inch pocket at the top. Put cup in sack
and label the picture.

31
Lesson 12 – Baby Moses
Ex. 1:1-2:10
Draw and cut out Moses, the basket, and the water. Glue the water onto notebook paper on
the sides and bottom. Leave a 1 ½ inch pocket at the top. Glue the basket together at the
sides only. Put Moses in the basket and the basket in the water. Draw reeds around the
water, and maybe Miriam’s face peeking through. Label the picture.

32
Lesson 13 – Moses
Ex. 2:11-4:17
1
st Craft – “The Burning Bush”
Draw and cut out Moses, his feet, the fire, and the bush. Glue the bush on the right and
glue the fire onto the bush. Connect Moses’ feet with a brad to the bottom of his robe.
Glue Moses down, leaving the feet circle unglued. Have child “take off” Moses shoes by
turning the circle. Label the picture.
33
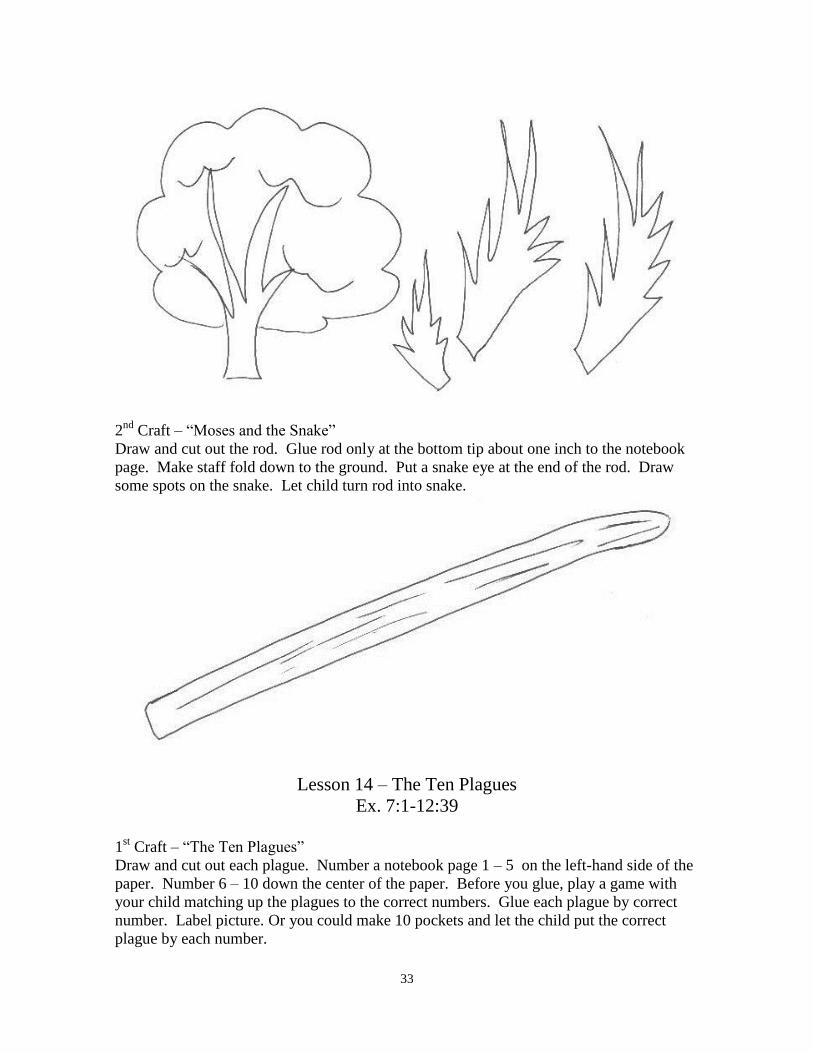
2nd
Craft – “Moses and the Snake”
Draw and cut out the rod. Glue rod only at the bottom tip about one inch to the notebook
page. Make staff fold down to the ground. Put a snake eye at the end of the rod. Draw
some spots on the snake. Let child turn rod into snake.
Lesson 14 – The Ten Plagues
Ex. 7:1-12:39
1
st Craft – “The Ten Plagues”
Draw and cut out each plague. Number a notebook page 1 – 5 on the left-hand side of the
paper. Number 6 – 10 down the center of the paper. Before you glue, play a game with
your child matching up the plagues to the correct numbers. Glue each plague by correct
number. Label picture. Or you could make 10 pockets and let the child put the correct
plague by each number.

34

35
2nd
Craft “Blood Around the Door”
Draw and cut out the door (3 x 7 inches). Glue door to notebook page. Let child draw
house around the door with a small branch. Let child paint on the door posts with red
finger paint. Tell child the significance of blood around the door (Ex. 12:13). Label
picture.
Lesson 15 – “The Red Sea”
Ex. 4:10-31
Cut out a rectangle about 3 ½ x 9 inches. On top 4 inches draw the Israelites. On the next
2 inches draw the Egyptians. Draw and cut out the water. Cut water down the middle.
Glue on left-hand side about 2 inches and the right-hand side about 2 inches so the water
can fold back. Inside the “dry” spot make 2 slits, both 3 ¾ inches long. Make 1 slit 2
inches from the bottom and the other slit 3 inches above the first slit. Thread Israelite and
Egyptian tab through the slits. As Israelites go through, open the waters. When Egyptians
go through, slam the water together on them.

36
Lesson 16 – The Ten Commandments
Ex. 19:16-20:23
1
st Craft – “Tablets of Stone”
Draw and cut out the tablets from gray construction paper. Write the Ten Commandments
on them. Glue to the notebook paper. (Note: Some Bible supply stores have Ten
Commandment stickers. These might be fun for the child to learn with.)

37
2nd
Craft – “The Golden Calf”
Glue a rectangle of gold foil to construction paper and draw and cut out a golden calf.
Glue the calf only at the base so it can be knocked over. Let child draw a crowd around
the calf. Label picture.
38
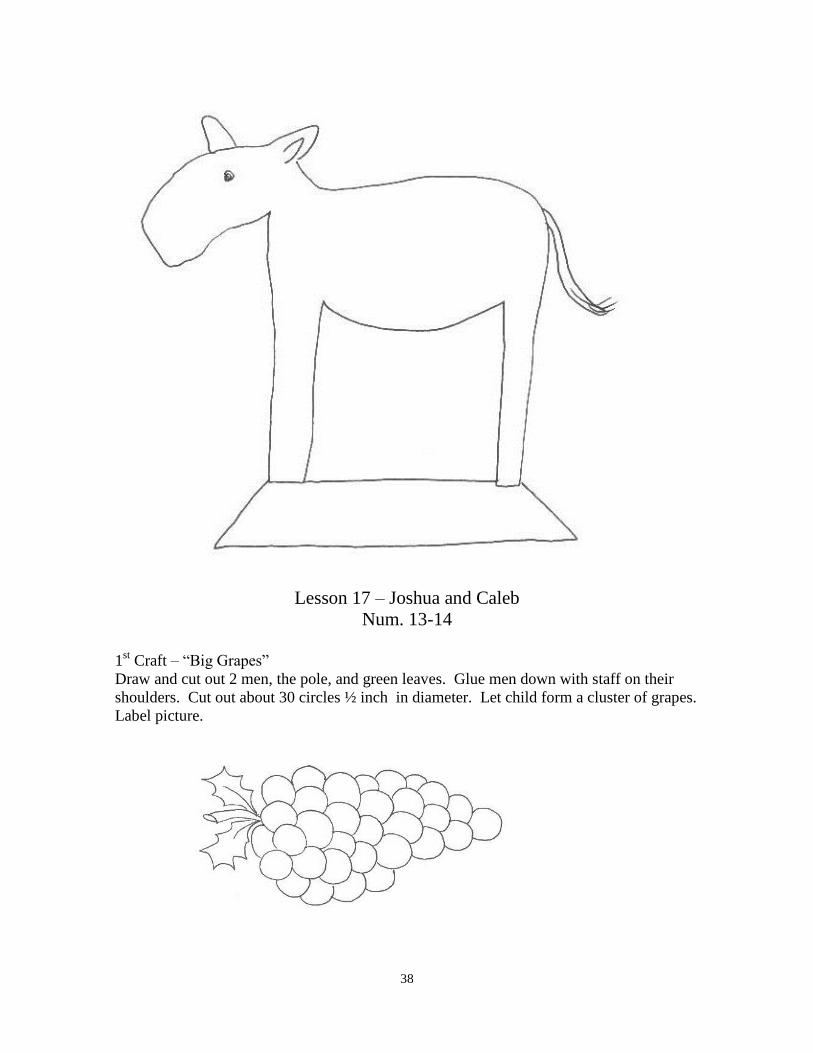
Lesson 17 – Joshua and Caleb
Num. 13-14
1
st Craft – “Big Grapes”
Draw and cut out 2 men, the pole, and green leaves. Glue men down with staff on their
shoulders. Cut out about 30 circles ½ inch in diameter. Let child form a cluster of grapes.
Label picture.

39
2nd
Craft – “Twelve Spies”
Draw and cut out the figures below and the circle on the next page. Around the circle
write, “Will God give us a land that flows with milk and honey?” Attach the circle to the
notebook page with a brad. At the top of the circle, within the cutout, glue Joshua and
Caleb. Have a voice bubble to them that says, “YES!” Turn the cutout downward and
glue 10 men and make them saying, “NO!”

40
Lesson 18 – Moses Disobeys
Num. 20:1-13
1
st Craft – “Hitting the Rock”
Draw and cut out Moses, his arm, the rock (from brown construction paper), and the 2
rectangles (1 brown and 1 blue) about 1 x 5 inches. Attach Moses’ arm in the correct
place. Glue down Moses to the left, leaving unglued around the brad. Glue rock onto the
right. Fold rectangle in half with black (or brown) showing. Glue with fold at bottom onto
the rock. When Moses hits the rock, fold down so blue water can show. Explain to the
child how Moses disobeyed.

41
2nd
Craft – “No Promised Land for Moses”
Let child draw Moses with a sad face, the rod in his hand, and the rock. Label picture,
“God said, ‘Moses, you cannot go into the promised land.’”
Lesson 19 – “The Talking Donkey”
Num. 22:22-35
Draw and cut out the angel, Balaam and the donkey, and Balaam’s arm. Attach Balaam’s
arm with brad. Glue angel on the left-hand side of the notebook page. Glue donkey and
Balaam down, not gluing around brad. Let child make Balaam hit donkey. Make a voice
bubble to the donkey saying, “Why have you hit me three times?”

42
Lesson 20 – Moses Dies
Num. 27:18-23, Deut. 34
Draw and cut out Moses, the Promised Land, and the mountain. Glue down the mountain,
leaving a pocket where Moses can be “buried.” Draw Promised Land in distance and color
beautifully. Let child take Moses to the top of the mountain, then let him bury Moses in
the mountain.

43
Lesson 21 – Rahab
Josh. 2
Draw and cut out the house and the strips of flax. Draw Rahab looking out of the window
(cut a piece of red embroidery thread about 6 ½ inches long and let hang from her window
so the spies can escape. Tape end on the backside of the bottom of the window. Cut out a
5 x 7 inch rectangle for the wall. Glue down the wall and the house. Glue the strips of flax
on the rooftop. Under the flax draw 2 men. Label picture.

44

45
Lesson 22 – The Walls of Jericho
Josh. 6
1
st Craft - “Jericho”
Cut another 5 x 7 rectangle to be the walls of Jericho. Glue about 1 ½ inches at the
bottom. Fold down the wall. Draw and cut out the city of Jericho in flames. Glue behind
walls, so the city does not show when the walls are up.

46
2nd
Craft - “The Five Kings”
Draw and cut out the 5 kings, the cave, the rocks, and the ground. Glue the ground down
on sides and bottom. Glue the cave down on sides. Fold a little tab on the rock. Glue on
tab of rocks so rocks can be put over the opening of cave. Open rock and put 5 kings into
the cave.

47
2nd
Craft – “God’s Part”
Cut out rectangles 1 x 3 inches from: gold foil, aluminum foil, orange construction paper
(colored with brown) and gray construction paper. Draw and cut out the name of God. Fix
paper like shown below.

48
Lesson 23 – Achan’s Tent
Josh. 7:1-8:29
Draw and cut out the tent, coat, and grass. Glue grass down on sides and bottom. Over the
grass, glue the tent, with slit cut. Cut 2 rectangles ½ x 1 inch. Cover one with gold foil
and the other with aluminum foil. Have child decorate the coat. Open door of tent by
folding back. Have child hide Achan’s stolen goods in the ground inside the tent.

49
Lesson 24 – The Sun Stood Still
Josh. 10
1
st Craft – “The Sun Stood Still”
Cut out an orange circle about 5 inches in diameter from construction paper. Draw light
beams with an orange crayon. Label the picture, “God Made the Sun Stand Still.”

50
Lesson 25 – The Land Divided
Josh. 13-14
Trace the following map. Cut each section out of different colors of construction paper.
Use blue for the Sea of Galilee and the Dead Sea. Label each tribe. Let child glue
together like a puzzle. With a blue crayon, draw the Jordan River.

51
Lesson 26 – Judges
Judges 3:8-11,15,31-4:4
Draw and cut out the 4 rectangles and the middle arrow. Arrange rectangles like shown
and label. Draw outside arrows to each rectangle. Label page, “The Cycle of the Judges.”
Explain the big words to the child. Tell how the Israelites again and again disobeyed God.
God then sent punishment, the people were sorry, and then God sent judges to save them..
The cycle continues throughout the Book of Judges.
2nd
Craft – “Judges of Israel”
Draw and cut out the tablet on the next page. Write names. Fold in half. On front write,
“Judges of Israel.” Glue to notebook. paper on back of the tablet. The child may
memorize the judges.

52
3rd
Craft – “Deborah”
Draw and cut out Deborah, the grass, and the palm tree. Glue the grass on sides and
bottom, leaving the top open. Glue on the palm tree. Label the picture, “Deborah was the
only woman judge.”

53
Lesson 27 – Gideon
Judges 7
Trim a sheet of black construction paper to the size of a notebook page. Cut out the man,
the fire, the pitcher, and the trumpet. Cut pitcher in two, using a zigzag pattern. Glue
man, trumpet, and fire onto the black page. Glue the pitcher only at the bottom. Child can
“break” pitcher and reveal the fire..
54
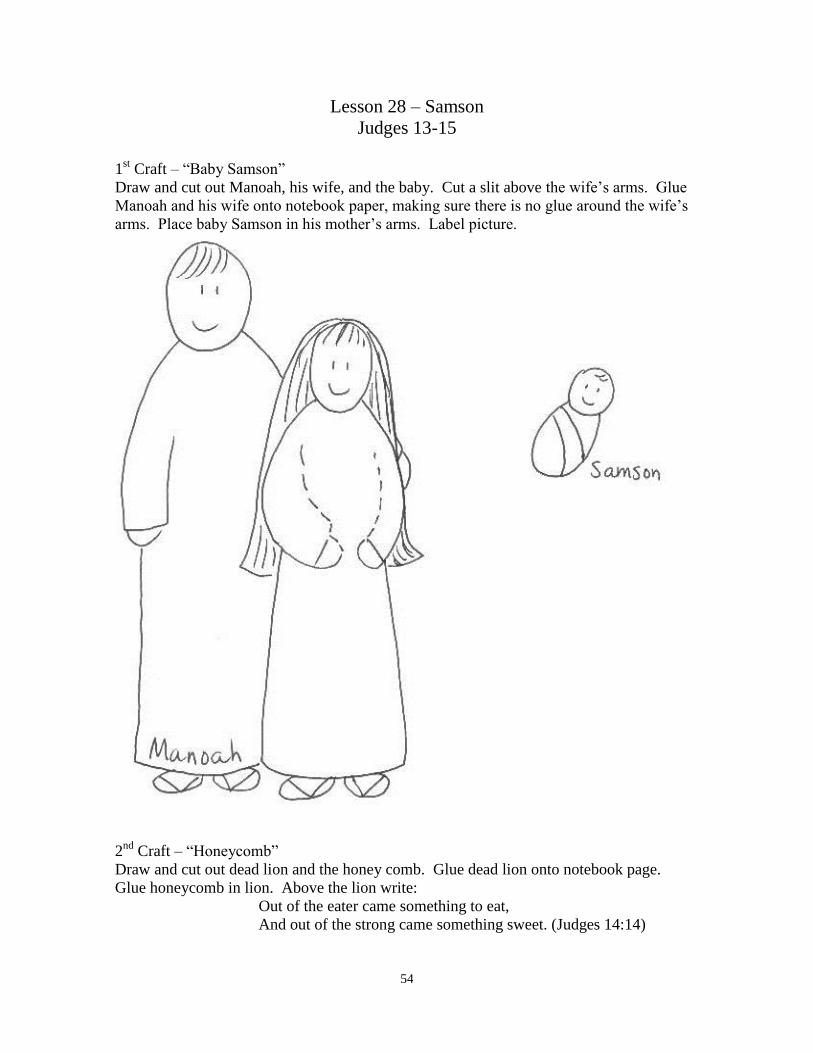
Lesson 28 – Samson
Judges 13-15
1
st Craft – “Baby Samson”
Draw and cut out Manoah, his wife, and the baby. Cut a slit above the wife’s arms. Glue
Manoah and his wife onto notebook paper, making sure there is no glue around the wife’s
arms. Place baby Samson in his mother’s arms. Label picture.
2nd
Craft – “Honeycomb”
Draw and cut out dead lion and the honey comb. Glue dead lion onto notebook page.
Glue honeycomb in lion. Above the lion write:
Out of the eater came something to eat,
And out of the strong came something sweet. (Judges 14:14)

55
3rd
Craft – “Foxes”
Draw and cut 4 foxes out of brown construction paper, the grain field, and the 2 flames of
fire. Put brown embroidery thread for their tails. Tie 2 sets of tails together. Glue a flame
on each set of tails. Glue the grain field onto the notebook page. Glue the foxes in the
grain field. Label picture.
56
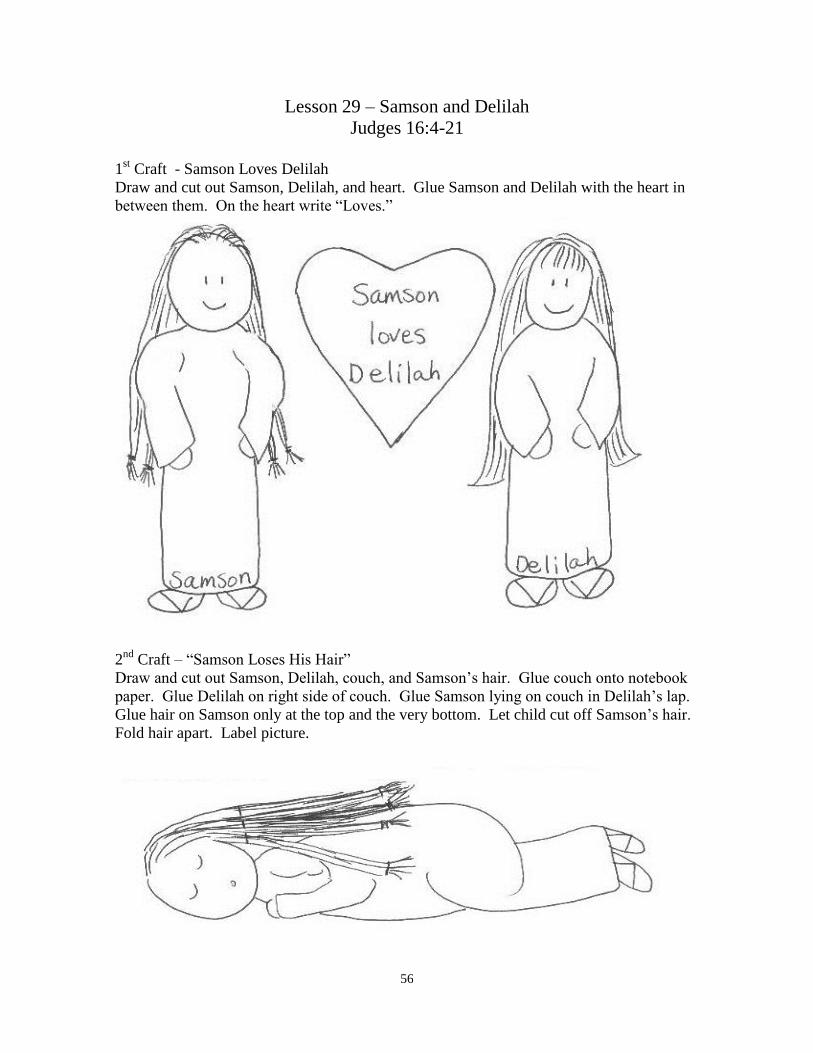
Lesson 29 – Samson and Delilah
Judges 16:4-21
1
st Craft - Samson Loves Delilah
Draw and cut out Samson, Delilah, and heart. Glue Samson and Delilah with the heart in
between them. On the heart write “Loves.”
2nd
Craft – “Samson Loses His Hair”
Draw and cut out Samson, Delilah, couch, and Samson’s hair. Glue couch onto notebook
paper. Glue Delilah on right side of couch. Glue Samson lying on couch in Delilah’s lap.
Glue hair on Samson only at the top and the very bottom. Let child cut off Samson’s hair.
Fold hair apart. Label picture.

57
Lesson 30 – Samson Dies
Judges 16:21-31
Draw and cut out the Philistines’ temple and Samson. Cut a zigzag in the temple roof.
Glue the temple at the very bottom of the pillars (about 2 ½ inches) Glue Samson between
the pillars at the bottom of his robe. When Samson knocks the pillars down, fold the
temple down. Also fold Samson down.

58

59
Lesson 31 – Naomi, Ruth, and Boaz
Ruth
1
st Craft – “Ruth in the Fields”
Draw and cut out the grain field, Ruth, basket and individual stalks of grain. Glue the
sides and the bottom of the grain field, leaving a 1 inch pocket at the top. Glue Ruth near
the grain. Glue basket only around handle, sides and bottom (do not glue near the opening
of the basket). Stick grain in the pocket of the grain field. Ruth can pick up the grain and
put it in her basket. Label picture.

60
2nd
Craft – “Obed”
Draw and cut out Boaz, Ruth, and baby Obed. Cut slit in Ruth’s arms. Glue Boaz and
Ruth onto notebook paper, being sure not to glue around Ruth’s arms. Place baby Obed in
Ruth’s arms. Label picture.
Lesson 32 – Hannah and Elkanah
I Sam. 1,2
1
st Craft – “Hannah Prays for a Son”
Draw and cut out Hannah. In voice bubble make her praying, “Dear Lord, please give me
a son.”

61
2nd
Craft – “Samuel is Born”
Draw and cut out Hannah and baby Samuel. Cut slit in Hannah’s arms. Glue Hannah onto
notebook paper, keeping glue away from Hannah’s arms. Put baby Samuel in his mother’s
arms. Write on picture, “Hannah prayed for a baby. God gave her Samuel.”

62
3rd
Craft – “Coats for Samuel”
Draw and cut out Hannah, Samuel, and the coat. Glue down in correct spots. Label
picture.
Lesson 33 – Samuel
I Sam. 3
Draw and cut out 2 beds, Eli, and Samuel. Glue 1 bed at the top left-hand side on sides
and bottom, leaving the mattress unglued. Glue the other bed the same way at the right-
hand bottom corner. On back of sleeping Samuel draw a running Samuel. On the back of
Eli draw a sleeping Eli. Now put Samuel to bed and act out the story. Label picture.

63
Lesson 34 – King Saul
I Sam. 8-9
Draw and cut out Samuel, Saul, pot, and oil. Cut slit in Samuel’s hand. Fold up oil and
glue behind the pot. Pot can rest in Samuel’s hand. Glue Saul on the ground near Samuel.
Let Samuel “pour” oil onto Saul’s head, anointing him as the first king of Israel.

64
Lesson 35 – Saul, Jonathan, and David
I Sam. 13-16
1
st Craft – “Saul Turns Away”
Draw and cut out the heart and the name of God. Glue the name of God up in the right-
hand corner. Fold heart in half. Glue bottom left of heart to the center of the page. Write
“Saul” on the heart. Fold heart over and draw a frowning face. At bottom of the page
write, “Saul did not trust in God.”
2nd
Craft – “Saul Disobeys God”
Draw and cut out the animals, the voice bubble, Samuel, and Saul. Glue down the animal
pen at the upper right-hand corner. Glue Samuel and Saul at the bottom of the page. Glue
voice bubble to Samuel. Write “I Sam. 15” on picture. Talk to your child about what I
Sam. 15:22 means.

65
Lesson 36 – David and Goliath
I Sam. 17
Draw and cut out David, Goliath, the pouch, the slingshot and 5 smooth stones. Glue
Goliath down only at his feet and calves. Glue David to the left. Glue on pouch on sides
and bottom, leaving top open. Put the stones in the pouch. Attach the slingshot with a
brad. Label picture.

66

67
Lesson 37 – Jonathan and David
I Sam. 18-20
Draw and cut out Jonathan, David, the little boy, the bow, and 3 arrows. Cut a green
rectangle about 1 ½ x 6 inches for the grass. Glue the grass down on sides and bottom.
Glue down the rock only on the left side and the bottom. Have child tell the story of I
Sam. 20. Label picture.

68
Lesson 38 – David and Saul
I Sam. 24
Draw and cut out the cave, the ground, David, Saul, and his coat. Glue the ground down
on sides and bottom. Glue the cave down on sides, bottom, and top, leaving open around
the door. Glue King Saul’s coat on Saul near the top. On back of Saul make a frowning
face. On the back of David draw another figure of David. Have child cut a piece of King
Saul’s coat. Glue the piece on David’s hands. Label picture.

69
Lesson 39 – King David
I Sam. 31, II Sam. 1:1-2:4, I Chron. 17,22
1
st Craft – “David Becomes King”
Draw and cut out David and crown. Glue David down. If you wish, cover the crown with
aluminum foil. Glue crown onto David. Write, “David becomes the second king of
Israel.”
2nd
Craft – “David Wants to Build the Temple:
Draw and cut out Nathan, David and voice bubbles. Make David saying, “I want to build a
temple for the Lord.: Make Nathan saying, “You are a man of war. Your son shall build
the temple, not you.

70
Lesson 40 – Absalom
II Sam. 14:25-27,18:6-17
Draw and cut out Absalom and the tree. Glue tree down leaving unglued on lower right
branches. Fit Absalom into branches. Let child draw leaves on the tree. Label page.

71
Lesson 41 – Wise King Solomon
I Kings 1:39,2:12,3:5-15,6,11:1-13
1
st Craft – “Three Kings of Israel”
Draw and cut out the 3 numerals, Saul, David, and Solomon. Glue 1, 2, and 3 going down
the page. Then glue each king by the appropriate number. Label picture.
2nd
Craft – “Wisdom”
Draw and cut out the objects below and on the next page. Put the voice bubbles in the
proper space. You may wish to put a little flap over wisdom, so you can lift it up and see
what Solomon asked for.

72
3rd
Craft – Solomon Builds the Temple”
Draw and cut out the temple on gold foil. Glue onto notebook page. Label picture.
(I Kings 6:22)

73
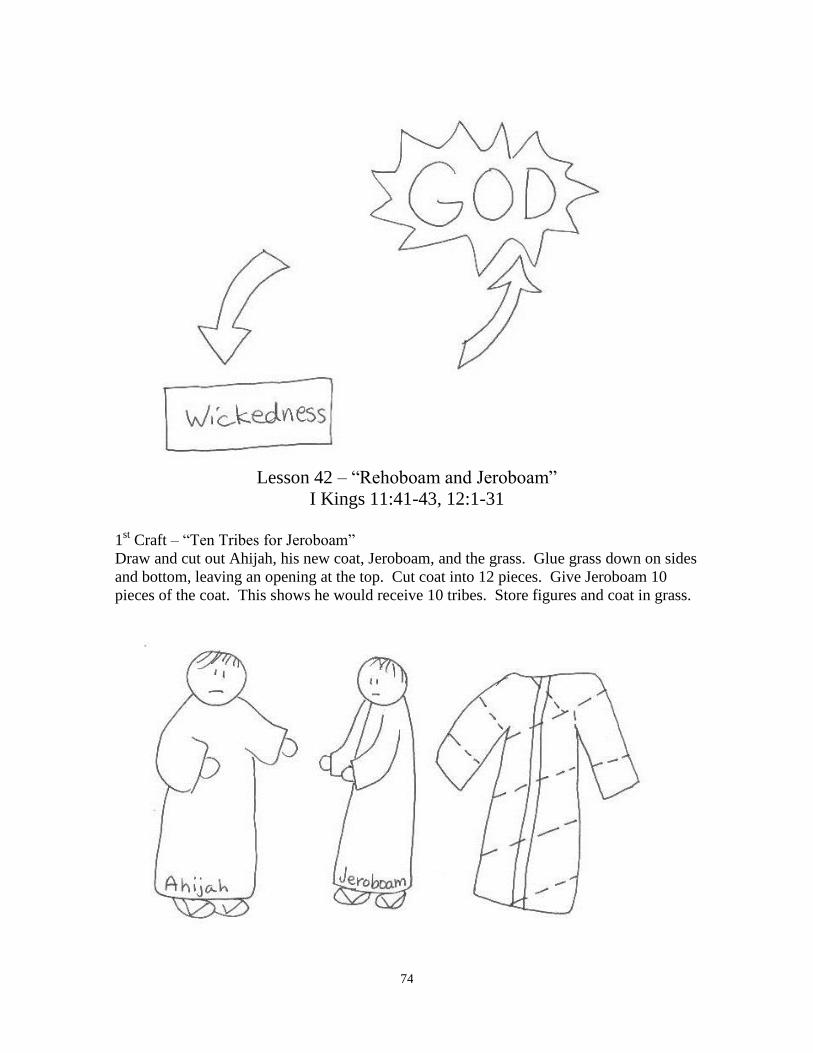
3rd
Craft – “Solomon Turns Away From God”
Draw and cut out Solomon. Glue him by the left tab so he can turn. Draw arrow pointing
from Solomon up to God in the upper right-hand corner. Turn Solomon and draw a sad
face here. Draw an arrow pointing down to wickedness in the lower left-hand corner.
Label picture, using I Kings 11:1-13.
74
Lesson 42 – “Rehoboam and Jeroboam”
I Kings 11:41-43, 12:1-31
1
st Craft – “Ten Tribes for Jeroboam”
Draw and cut out Ahijah, his new coat, Jeroboam, and the grass. Glue grass down on sides
and bottom, leaving an opening at the top. Cut coat into 12 pieces. Give Jeroboam 10
pieces of the coat. This shows he would receive 10 tribes. Store figures and coat in grass.

75
2nd
Craft – “The Divided Kingdom”
Make a map of the Divided Kingdom similar to the one below. If you wish, cut out pieces
from construction paper and glue them on the notebook page. Using gold foil, make 2
gold calves. Glue 1 at Dan and one at Bethel.

76
Lesson 43 – Elijah
I Kings 17:1-6
Draw and cut out Elijah, stream, black ravens, and bread. Glue stream and Elijah at the
bottom of the page. Glue ravens in the sky. Glue bread into each of their beaks. Talk
about how God provided for Elijah. Label picture.
Lesson 44 – Fire for the Altar
I Kings 18:17-40
Draw and cut out the altar, the sacrifice, the wood, the mountain, and the fire. Glue down
the mountain. Glue the altar, the wood, and the sacrifice on the mountain. With a blue
crayon to represent water, color over the sacrifice, the altar, and the ditch around the
bottom of the altar. Fold “fire” under ½ inch. Glue the back of this tab to the top of the
page so the fire can come over the top of the page. Label picture.

77

78
Lesson 45 - The Fiery Chariot
II Kings 2:1-15
Draw and cut out Elijah and the fiery chariot and Elisha. Color the chariot so it looks as
though it was on fire. Glue Elisha on the left-hand side of the notebook paper. Tape an
embroidery thread to the chariot. Thread end of thread through a hold punched at the
right-hand corner of the page. Cut a rectangle about a 1 x 2 inch strip and tape to the end
of the embroidery thread so it will not come out. Label picture.
Lesson 45A – The Shuammite Woman
II Kings 4:8-37
1
st Craft – “Elisha’s Room”
Draw and cut out the bed, the table, the chair, and the lamp for Elisha’s room. Glue onto
notebook paper.

79
2nd
Craft – “The Shuammite’s Son”
Draw and cut out the Shuammite woman, her son, Elisha, Gehazi, the staff, and the bed.
Also cut out a floor about a 1 x 5 ½ inch rectangle. Glue down the floor, leaving the top
open. Glue the bed down on top. On back of the Shuammite woman draw a sad face. On
back of the Shuammite’s son draw a happy face. Act out story from II Kings 4:18-37,
complete with 7 sneezes. Label picture.

80
Lesson 46 – Naaman
II Kings 5:1-14
Draw and cut out sad Naaman and the muddy Jordan River. Glue water down on the sides
and bottom. Make terrible leprosy spots all over Naaman. Turn Naaman over and on his
back draw him again with a big happy smile. Dip Naaman (leprosy side) in the Jordan
River 7 times. After the 7th
time, turn him around and he is cleansed of leprosy!

81
Lesson 47 – Jonah
Jonah 1-2
Draw and cut out Jonah and the great fish. On the back of Jonah draw a happy face when
he gets out of the great fish. Glue the fish carefully around the edges, leaving mouth area
unglued. Jonah can be “swallowed” by the great fish. Label the picture.
Lesson 48 – Isaiah
Is. 1:16-20,7:14,9:6,53
1st Craft – “Isaiah’s Prophecies
Draw and cut out Isaiah and the voice bubble on the next page. Glue Isaiah on a page and
put a voice bubble with it.

82
2nd
C raft – “Keep Heart Clean”
Draw and cut out a big heart about 7 inches long. Write in it, “I will keep my heart turned
to GOD!”
3rd
Craft – “The Silent Lamb”
Draw the sheep below on notebook page. Cover it in cotton. Write the verse Is. 53:7b on
the page.

83
Lesson 49 – Daniel
Dan. 1-2
1
st Craft – “The Vegetarians”
Draw and cut out the figures below and their vegetarian meals. Glue onto notebook paper.
At the bottom of the page write, “Daniel, Shadrach, Meshach, and Abednego trusted in
God. They would not eat the king’s meat.
2nd
Craft – “Nebuchanezzar’s Dream”
Draw and cut out the statue and rock on the next page out of construction paper. Out of
gold foil cut a head and glue to the construction paper head. Out of aluminum foil cut the
chest and arms and glue to construction paper form. Color the belly and thighs brass (or
bronze) on the construction paper. Make the legs gray for iron. Then color the feet a
mixture of iron and clay (brown and gray). Glue the statue by his feet and fold it down.

84
To the right of the statue write: Gold: Babylonian; Silver: Medo-Persian; Brass (or
Bronze): Greek; Iron: Romans. These 4 section represent the Babylonian kingdom and the
3 kingdoms that followed. Cut out rectangle about 1 x 6 inches and glue on sides and
bottom (to store rock). Make rock crash into the statue and knock the statue over. Explain
meaning of the rock and statue. (Dan. 2:25-45)

85
Lesson 50 – Shadrach, Meshach, and Abednego
Dan. 3
1
st Craft – “Refusing to Bow”
Draw and cut out the figures below. Draw the statue on gold foil. Glue onto the right-
hand side of notebook paper. Glue down Shadrach, Meshach, and Abednego on the left-
hand side. Draw a crowd of people bowing down. At top of page write, “Shadrach,
Meshach, and Abednego did not bow down to the idol. They trusted in God.”

86
2nd
Craft – “The Fiery Furnace
Draw and cut out the flames below in red, orange, and yellow construction paper. Draw
and cut out, also, Shadrach, Meshach, and Abednego, and the Son of Man (make Him
white). Glue on the biggest flame all around the edges. Glue the next biggest flame with
the top unglued and the smallest flame with its top unglued. The 3 figures can walk in the
flames. Label the picture.

87
Lesson 51 – Daniel in the Lion’s Den
Dan. 6
1
st Craft – “Daniel Praying”
Draw and cut out picture of Daniel praying. Make a window behind him. Label picture.

88
2nd
Craft – “Lion’s Den”
Draw and cut out Daniel, the black pit, and the lions. Trim a sheet of black construction
paper to size of notebook paper. Glue pit down on sides and bottom, leaving the top open.
Glue the lions in the pit. Label picture with a white crayon.

89
Lesson 52 – Queen Esther
Esther
Draw and cut out the objects below. Also cut out a floor about 1 x 6 inches. Glue the
floor, leaving the top open. Attach King Ahaserus’ arm with a brad. Put brad on Esther’s
arm. Glue the king on his throne onto the page on the right-hand side, being careful to
avoid glue around the brad. You may wish to use gold foil to make Esther and King
Ahaserus’ crowns. Let King hold out his scepter, and make Esther walk towards him to
touch the scepter when she holds out her arm. Label picture.

90
THE NEW TESTAMENT

91
Lesson 1 – Jesus in the Manger
Luke 1:26-35,2:1-7
1st Craft – “No Room at the Inn”
Draw and cut out the inn. Cut the windows and door open on three sides. Draw and cut
out Mary and Joseph and glue them to the notebook paper. Glue down inn without getting
glue on the windows and door. Draw lots of people in the windows. Draw the innkeeper
in the doorway. Make him say in a bubble, “We are full. No room for you!”

92
2nd Craft – “Jesus is Born”
Draw and cut out Joseph, Mary, Baby Jesus, hay, and manger. Cut slit in Mary’s arms.
Glue Joseph and Mary down being careful not to get glue around the slit in Mary’s arms.
Glue hay onto manger. Glue manger down, leaving an opening near the top so baby Jesus
can fit into manger. Mary can also “hold” baby Jesus.
Lesson 2 - Shepherds
Luke 2:8-20
1st Craft – “Angels Came”
Draw and cut out shepherds with sheep, angel, and host of angels. Trim black construction
paper to size of notebook paper. Glue shepherds at bottom. Put sticker stars in sky. Cut
tab about one inch by nine inches. Cut second tab about one inch by five inches. Glue
angel to long tab and glue end of tab on top of the back of construction paper. Glue host of
angels on bottom on shorter tab. Glue top of tab on top of construction paper near other
tab. You can make the one angel appear to the shepherds, then the host of angels.

93
Lesson 3 – Wise Men Took Gifts
Matt. 2:1-12
1st Craft – “The Wise Men Come”
Draw and cut out the wise men. (We really don’t know that there were three wise men).
Trim a sheet of black construction paper to fit a notebook page. In upper right hand
corner, cut out a star shape. Place gold fold or aluminum foil behind sheet. Glue around
edge.

94
2nd
Craft – “Gifts of the Wise Men”
Draw and cut out containers for frankincense and myrrh. Cut gold out of gold foil.. Label
page, “Gifts of the Wise Men” and glue gifts onto sheet. Label gifts.
Lesson 4 – “Going to Egypt”
Matt 2:13-23
Trim a sheet of black construction paper to the size of notebook paper. Draw and cut out
Joseph, Mary, Jesus and donkey. Draw road with white crayon at bottom of page. Glue
Joseph. Glue donkey only on head and legs so Mary and Jesus can slip on and off. Put
stars in the sky.

95
Lesson 5 – Jesus in the Temple
Luke 2:40-52
Draw and cut out the buildings, Joseph and Mary, and Jesus and the teachers. Cut doors
open on 3 buildings. Glue them down, leaving doors unglued. Glue temple down by the
left tab. On inside glue down Jesus and the teachers. On inside of temple make pocket
(about 1x 3 inches) to hold Joseph and Mary. On back of Joseph and Mary draw sad faces.
Draw roads and act out the story. Where can Jesus be found?

96
Lesson 6 – Jesus is Baptized
Matt. 3
Draw and cut out Jesus, John, and the dove. Cut out blue rectangle 4 x 6 inches for the
water. Also cut out a tab about 1/2 x 5 inches. Glue down water on sides and bottom ,
leaving about a 2 inch pocket at the top. Glue dove on bottom of tab. Fold the tab about 1
inch from the top and glue down at the top of the page. Have John and Jesus get into the
water. Have John baptize Jesus, then have the dove ascend from the heavens and land on
Jesus.
Lesson 7 – Jesus is Tempted
Matt 4:1-11 and Luke 4:1-13
Draw and cut out 2 circles about 5 inches in diameter.. Glue bottom circle (with the
temptations drawn) to the notebook page. Cut a 1/3 section out of the top circle. Attach
second circle in center with brad. Discuss the temptations of Jesus.
97
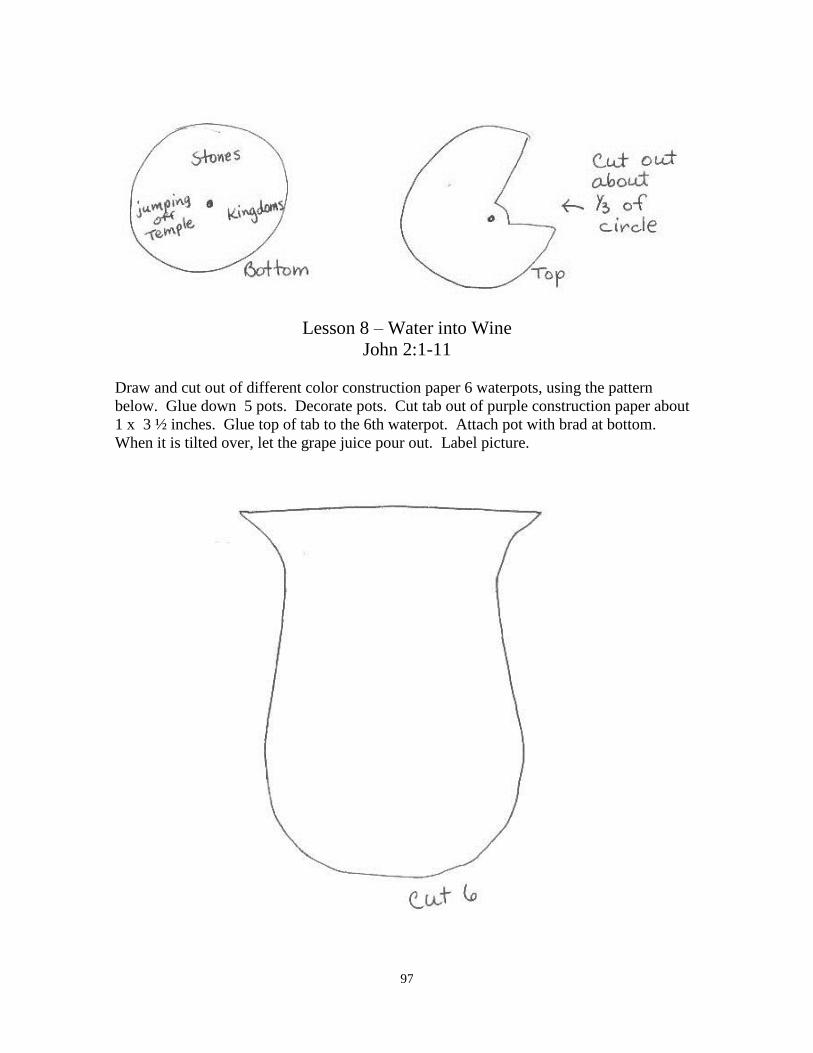
Lesson 8 – Water into Wine
John 2:1-11
Draw and cut out of different color construction paper 6 waterpots, using the pattern
below. Glue down 5 pots. Decorate pots. Cut tab out of purple construction paper about
1 x 3 ½ inches. Glue top of tab to the 6th waterpot. Attach pot with brad at bottom.
When it is tilted over, let the grape juice pour out. Label picture.

98
Lesson 9 – The Samaritan Woman
John 3-4
1st Craft – “Nicodemus”
On construction paper draw and cut out Jesus, Nicodemus, baby, voice bubble, and person
being baptized. Glue Nicodemus and Jesus sitting down. Put voice bubble to Jesus “You
must be born again.” In Nicodemus’ mind glue down the baby. In Jesus’ mind glue the
person being baptized.

99
2nd
Craft – “The Woman at the Well”
On construction paper draw and cut out Jesus, the Samaritan woman, the top of the well,
voice bubble, grass, and the pitcher. Glue grass on sides and bottom. Glue well top to top
of the grass. Cut slit in well. Get a piece of embroidery thread to tape to the pitcher.
Woman can lower her pitcher into well. Glue Jesus sitting on the well. Glue voice bubble
to Jesus, making Him say, “You must worship in spirit and truth.” Store woman in grass.

100
Lesson 10 – Pool of Bethseda
John 5
On construction paper draw and cut out Jesus, the lame man, pool, grass, and pallet. Draw
a happy face on back of the lame man. Glue grass down on sides and bottom, making a 1
inch pocket at the top. Glue pool above grass. Have lame man lying on pallet. When
Jesus tells the lame man to walk, have the lame man to get up and fold up his pallet. Put
on his happy face. Title picture.

101
Lesson 11 – Twelve Apostles
Mark 3:13-19
Draw and cut out Jesus, Peter, Andrew, James, John, and sailboat. Cut a 3 x 6 inch
rectangle for the water and a 2 x 6 inch rectangle for the grass. Glue grass down on sides
and bottom. Put water above grass. Glue water down on sides and bottom, leaving
opening 1 inch from top. Put sailboat into water. Get section of orange sack for fish net
(or buy a hairnet). Lay fish net out to dry on the grass. In voice bubble make Jesus say,
“Follow me and I will make you fishers of men.” Store figures and net inside grass.
Lesson 12 – Learning to Pray
Matt. 5-13
Read Matt. 6:9-13. Talk to child about this prayer that Jesus prayed. Cut some rectangles
and squares out of various colors of construction paper (about 2 x 2 1/2 inches). Have
child draw himself praying at the bottom of the page. Talk to child about things he should
pray for, and write these things on the rectangles and squares. Glue these around the top
of the page. Say a prayer together.

102
Lesson 13 – “The Sermon on the Mount”
Matt. 5-7
1st Craft – “The Sermon on the Mount”
Draw and cut out Jesus on the mountain . In voice bubble write, “Blessed are the poor in
spirit, for theirs is the kingdom of heaven.” Let child draw lots of people listening to
Jesus’ sermon.

103
2nd
Craft – “Salt and Light”
Trim a piece of black construction paper to fit notebook paper. Draw a line horizontally to
divide in half. Write “You are the salt of the world” in top half. Spread glue in this
section and sprinkle salt over glue. Thump off excess. On bottom half write “You are the
light of the world.” Draw and cut out candle below. Make light beams coming off the
flame with a white or yellow crayon or cut thin strips of construction paper and glue
coming off flame. Explain to the child the importance of light and salt.
3rd
Craft – “Treasures”
Cut out 2 squares from construction paper about 4 x 4 inches. On one write, “Treasures
on Earth”. Let the child draw things he values on this earth. (Or cut out jewelry from a
jewelry ad and glue on.) Glue at top of the notebook page. On the other square write,
“Treasures in Heaven.” Have child draw himself and then have an arrow pointing upward
to God. If there is room have child draw a Bible. Talk to your child about the treasures
that will last for eternity.

104
4th
Craft – “Birds and Flowers”
Draw and cut out flowers and bird below. Glue on sheet of blue construction paper that
has been trimmed to a notebook page. Write, “God takes care of the flowers and the birds.
He will take care of me.”
105
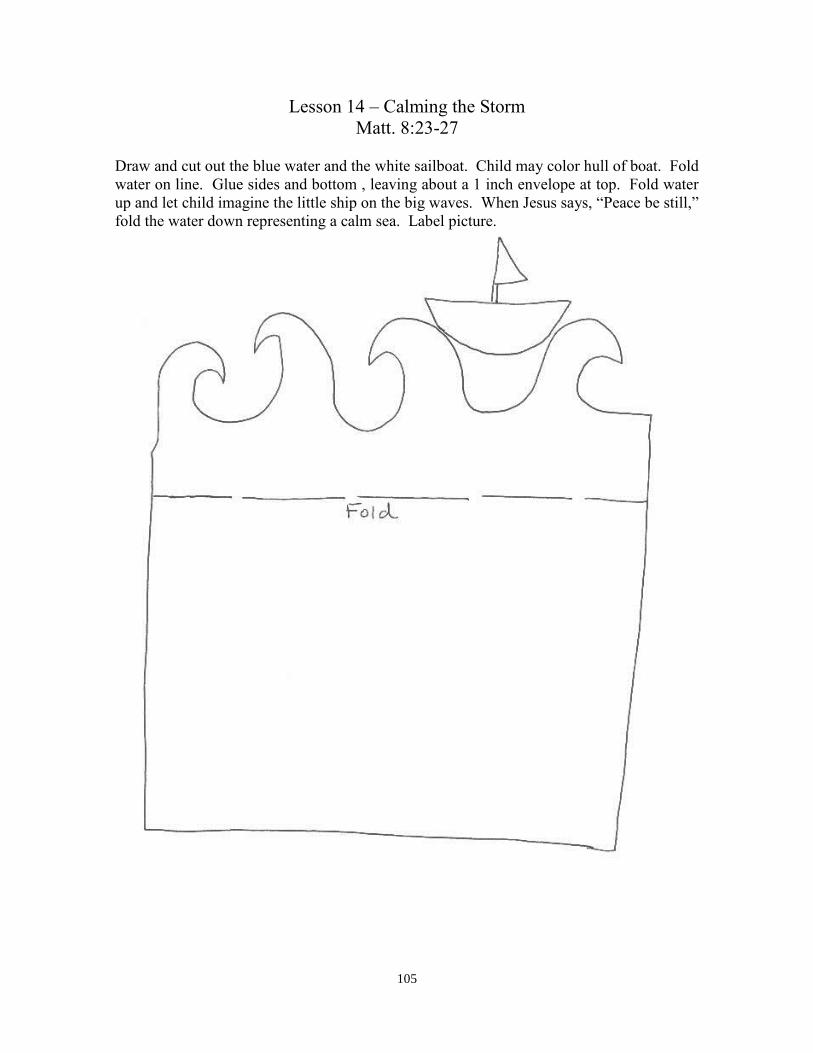
Lesson 14 – Calming the Storm
Matt. 8:23-27
Draw and cut out the blue water and the white sailboat. Child may color hull of boat. Fold
water on line. Glue sides and bottom , leaving about a 1 inch envelope at top. Fold water
up and let child imagine the little ship on the big waves. When Jesus says, “Peace be still,”
fold the water down representing a calm sea. Label picture.
106
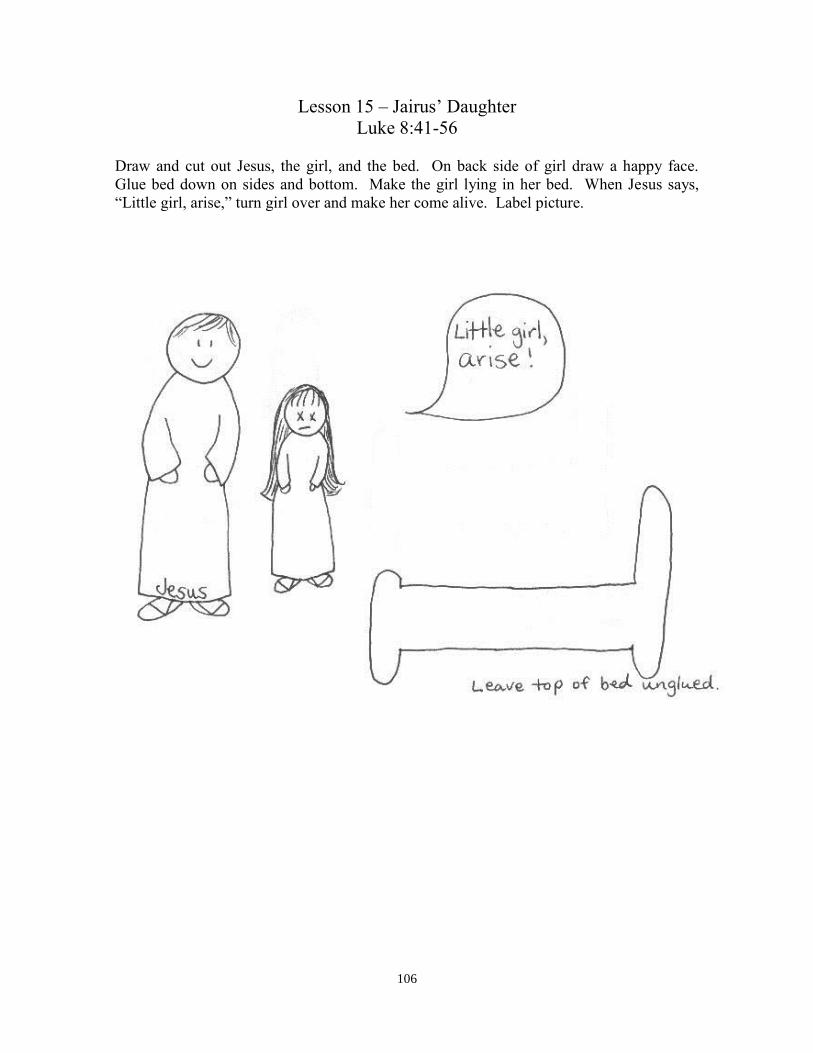
Lesson 15 – Jairus’ Daughter
Luke 8:41-56
Draw and cut out Jesus, the girl, and the bed. On back side of girl draw a happy face.
Glue bed down on sides and bottom. Make the girl lying in her bed. When Jesus says,
“Little girl, arise,” turn girl over and make her come alive. Label picture.

107
Lesson 16 – Five Loaves and Two Fishes
Mark 6:30-46
Draw and cut out the 5 loaves of bread, 2 fish, and the basket. Glue the basket down on
handle, sides and bottom, leaving a pocket at the top. Let the child put bread and fish into
basket.

108
Lesson 17 – Jesus Walks on Water
Matt. 14:22-33
Draw and cut out water, sailboat and extra hull, Peter, and Jesus. Draw a sad face on the
back of Peter. Glue hull onto sailboat on sides. Glue water at sides and bottom, leaving
about a 1 inch pocket at top. Put Peter in boat. Make Jesus come, walking on the water.
Let Peter come out of the boat to Jesus. Have Peter sink in the water. Label picture.

109
Lesson 18 – The Transfiguration
Matt. 17:1-13
Draw and cut out Peter, James, John, and the mountain. Also cut out a rectangle about 2
by 6 inches for the grass. Draw Jesus on white construction paper and cut out. Glue the
grass only on the sides and the bottom. Glue the mountain down above the grass. Label
picture.

110
Lesson 19 – The Good Shepherd
John 10:1-18
Draw and cut out Jesus. Use the sheep pattern to cut out several sheep. Cut out a 2 x 6
inch rectangle out of green construction paper. Label picture “We want to follow Jesus.”
Glue green grass down on sides and bottom, leaving a pocket at the top. You can label the
sheep with child’s name and friends and/or family. Talk to child about how Jesus is a
good shepherd and we must obey him.

111
Lesson 20 – The Good Samaritan
Luke 10:25-37
Draw on construction paper and cut out the robbers, the traveler, the Levite, the priest, the
Samaritan, the donkey, the road sign, and the road. On back of the traveler draw a happy
face. Glue the road down, leaving a pocket at the wide point to store the figures. Label the
picture. Let child tell the story using the figures.

112

113
Lesson 21 – Lost Sheep, Lost Coin
Luke 15:3-10
1
st Craft – “The Lost Sheep”
Draw and cut out shepherd, sheep, and bushes. On back of the shepherd draw a sad face.
Glue bushes down on sides and bottom, leaving a pocket in the top. Glue cotton onto the
sheep. Hide the sheep in the bushes. Have a sad shepherd look for the sheep. Have the
shepherd’s face turn to joy when he finds the lost sheep. Label the picture.

114
2nd
Craft – “The Lost Coin”
Cut 2 rectangles out of construction paper, one should be 1 ½ x 3 inches, and one 6 x 9
inches. Cut out 10 silver coins from aluminum foil. Glue the larger rectangle on the sheet
of notebook paper. Glue down 9 coins leaving a space for number 10. Glue the tab down
by one edge. On the inside of that tab glue the 10th coin. The lost coin was lost (pull tab
down) now it is found. Label picture.
3rd
Craft – “Lost Things”
As you look at the whole chapter of Luke 15, you see 4 things that were lost. As you
consider these things you can more rightly determine how to deal with the lost in the
world. Make a page like the pattern below. Use a brad to point the arrow to the lost things.

115
Lesson 22 – Prodigal Son
Luke 15 :11-32
Draw and cut out the grass below, and the pigs and figures on the next page. Glue down
the grass on sides and bottom. On back of the prodigal son make a sad face. Act out the
story with the figures. Make the prodigal sad as he sits among the pigs. Label the picture.

116

117
Lesson 23 – Lazarus, Mary, and Martha
John 11:1-46
Draw and cut out Jesus, Lazarus, Mary, Martha, and mountain. Cut out a 2 x 6 inch
rectangle for the ground. Cut rock on dotted lines and fold back. Glue mountain above
ground, being careful not to glue the rock. On back of Jesus, Mary, and Martha draw sad
faces. On back of dead Lazarus draw an alive Lazarus. Put Lazarus in the tomb. When
Lazarus comes out of the tomb, turn him over. Store figures in the tomb.

118
Lesson 24 - Zacchaeus
Luke 19:1-10
Draw and cut out tree leaves and grass (2 x 6 inch rectangle) from green construction
paper, tree trunk from brown construction paper, Jesus and Zacchaeus. Glue the tree
leaves up high on the notebook paper. Glue down the tree trunk, leaving a one and one-
half inch pocket in one of the trunks. Glue down grass on bottom and sides. Have
Zacchaeus climb the tree and sit in the “pocket” of the trunk. Act out the story. Label
picture.

119
Lesson 25 – Jesus Rides to Jerusalem
Matt 21:1-11, Luke 19:28-41
Draw and cut out Jesus on the donkey, the road (2 x 6 rectangle), the clothes, the palm
leaves, and the clothes. Glue down road at sides and bottom about 3 inches from the
bottom of the paper. Have child draw lots of people. Glue palm leaves and clothes at the
bottom of the page. Have Jesus ride down the road. Label picture.
Lesson 26 – The Money Changers
Matt. 21:12-16, John 2:13-25
Draw and cut out Jesus, table, arm, and handle for whip. Attach arm with brad. Glue
Jesus down. Get a piece of embroidery thread about 6 inches long and tie onto the whip
handle. Glue whip in Jesus’ hand. Glue about an inch at the bottom of the legs of the
table. This way the table can be knocked over.

120
Lesson 27 – Thirty Pieces of Silver
Matt. 26:14-16, Mark 14:10-11
Cut out 30 pieces of silver (about 1 inch in diameter) from aluminum foil. Glue onto
notebook page. Label picture.

121
Lesson 28 – The Lord’s Supper
Matt 26:19-30, Luke 22:15-23
Draw and cut out cup, bread, and 2 flaps about 2 x 3 inches. Glue the bread and cup onto
notebook paper. Fold the flaps into halves lengthwise. Glue by bottom one flap under the
bread. Write “bread” on the top flap. Open inside and write “Jesus’ body.” Glue the other
flap under the cup. On top write “fruit of the vine.” Open the flap and on the inside write
“Jesus’ blood.”
Lesson 29 – Judas’ Kiss
Luke 22:39-53, John 18:1-12
Draw and cut out Peter, his arm and sword, Malchus, and ear. Glue Malchus down. Glue
bottom half of his ear. Attach Peter’s arm with brad. Glue Peter next to Malchus. When
Peter cuts off Malchus’ ear, bend Malchus’ ear down. Draw Jesus in background. Make
voice bubble that says, “Put up your sword.:

122
Lesson 30 – Judas Dies
Matt. 27:3-10
Draw and cut out tree trunk, tree foliage, and Judas. Glue down tree trunk, leaving a spot
free of glue on one horizontal limb. Cut a 4 inch piece of embroidery thread. Tie around
Judas’ neck and tie around tree limb (where it is unglued) and tie. Explain to your child
that hanging oneself is very wrong. Label picture.
Lesson 31 – Jesus’ Trial
Matt. 26:57-68,27:1-2,ll-25, Mark 15:15-21
Draw and cut out Jesus, strip of grass (about a 2 x 6 rectangle), and His coat. Be sure to
make coat purple. Find some stem of thorns outside and wrap them around Jesus’ head.
Tape down in the back. Also outside find a thin stick about 5 inches long (Mark 15:19).
Glue grass down at sides and bottom. Leave opening at top to store stick. Glue Jesus
down, leaving shoulders free of glue so tabs of the coat can go on.

123
Lesson 32 – Jesus on the Cross
Matt. 27:26-44
Trim a black piece of black construction paper to fit a note book page. With a white
crayon make the drawing below. Write Mark 15:33 at the bottom.

124

125
Lesson 33 – Joseph’s Tomb
Matt. 27:45-66
Draw and cut out the mountain, the rock, and Jesus. Fold arms down to the front, and on
the back side of Jesus draw a sad face of death. Cut out a piece of white material (linen
would be great). If you have no material, white construction paper can be used (1 ¾ x 8
1/2 inches). Fold in half. Place Jesus inside the material. Glue the ground on sides and
bottom, making a pocket at the top. Glue mountain on paper, leaving rock unglued. Cut
out a 2 x 7 inch rectangle for the ground. Fold rock back and put Jesus into the tomb.
Label picture.
Lesson 34 – “He is Not Here...”
Matt. 28:1-15,Lk. 24:1-12
1
st Craft - “The Grave is Empty”
Use tomb from the previous lesson to act out this lesson. Jesus is in the tomb. “After 3
days” bring Jesus out and turn Him to the other side which shows a much alive and
victorious Jesus.
126
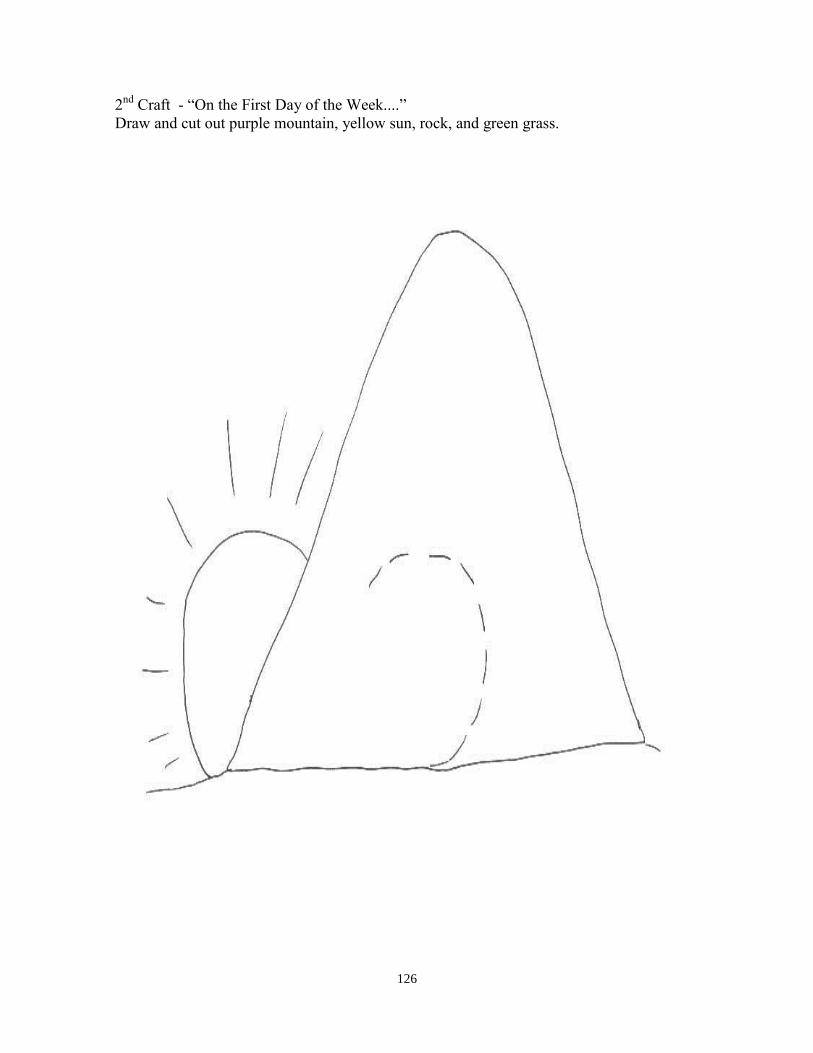
2nd
Craft - “On the First Day of the Week....”
Draw and cut out purple mountain, yellow sun, rock, and green grass.

127
Lesson 35 – The Apostles See Jesus
John 20:19-29
Draw and cut out Jesus, the apostles, and the voice bubbles. Glue Jesus on the tab so he
can be gone, then appear in the locked room.
Lesson 36 – Back to Heaven
Luke 24:50-53,Mark 16:14-20,Acts 1:1-12
Draw and cut out the apostles, Jesus, and clouds. Punch a hole in top of page. Glue the
clouds (over the hole) so they are glued only on the sides. Glue the apostles down. Tape
embroidery thread (about 7½ inches long) to the back of Jesus. Thread the embroidery
thread through the hole. At end of thread tape a rectangle about 1½ x 3 inches so thread
will stay in place. The child can make Jesus ascend into the heavens by pulling the tab.
Label picture.

128

129
Lesson 37 – Peter Preaches
Acts 2
Trim a sheet of yellow construction paper to the size of notebook paper. Draw the twelve
Apostles on the sheet. Draw and cut out twelve “tongues of fire.” Let child glue a tongue
of fire above each apostle. Write “The Church Begins at Pentecost.”

130
Lesson 38 – Ananias and Sapphira
Acts 4:31-5:11
Draw and cut out Peter, Ananias, and Sapphira. Cut out rectangle 2½ x 7 inches. Glue the
rectangle at the bottom of the page, gluing only the sides and the bottom. Let child act out
the story using the three figures. Label picture.
131
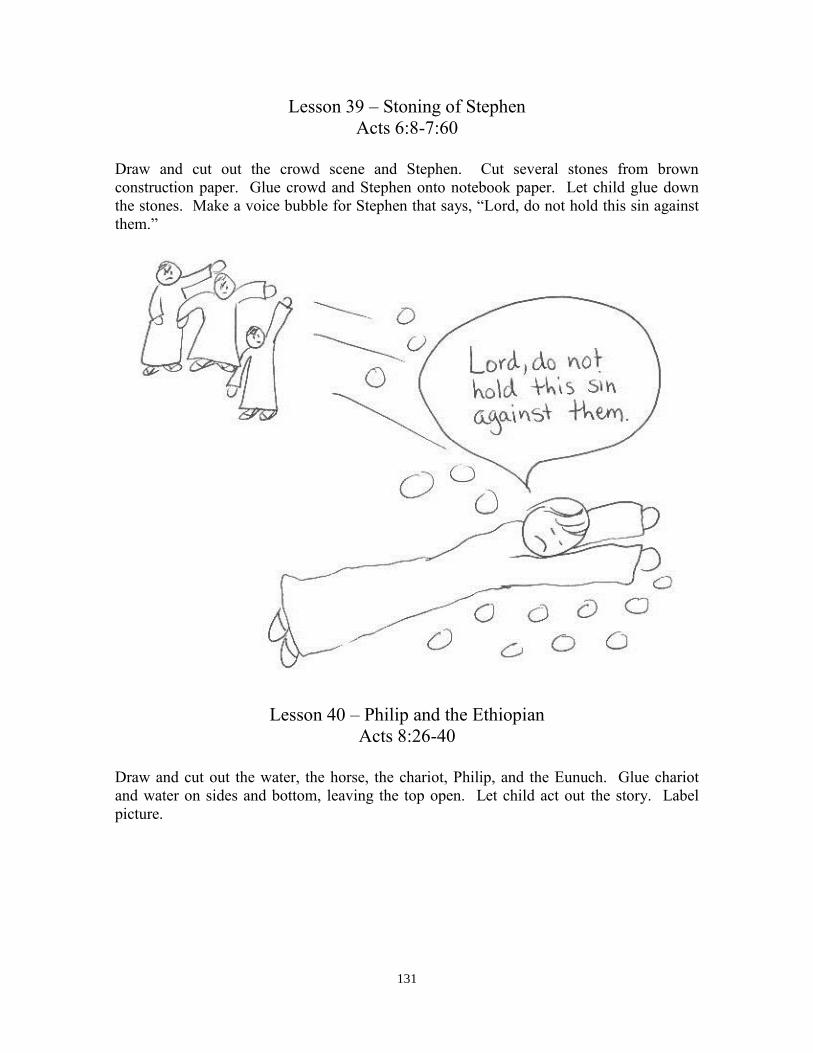
Lesson 39 – Stoning of Stephen
Acts 6:8-7:60
Draw and cut out the crowd scene and Stephen. Cut several stones from brown
construction paper. Glue crowd and Stephen onto notebook paper. Let child glue down
the stones. Make a voice bubble for Stephen that says, “Lord, do not hold this sin against
them.”
Lesson 40 – Philip and the Ethiopian
Acts 8:26-40
Draw and cut out the water, the horse, the chariot, Philip, and the Eunuch. Glue chariot
and water on sides and bottom, leaving the top open. Let child act out the story. Label
picture.

132
Lesson 41 – Saul
Acts 9:1-8
Draw and cut out Saul, the road sign, and the bright light. Draw road across the bottom of
the paper. Attach Saul on the left-hand side of the road with a brad. Glue road sign down.
Fold the bright light about one inch from the edge. Glue that one inch tab on the back of
the paper on the right near the top. The light can be flipped over to the front and then Saul
can fall down on his face.

133

134
Lesson 42 –Saul Becomes a Christian
Acts 9:9-22
Draw and cut out Saul and two circles (about ½ inch in diameter). Glue Saul onto paper.
Glue the circles over his eyes only at the bottom. When the scales fall off, fold the circles
down.

135
Lesson 43 – Dorcas
Acts 9:36-43
Write at the top of the page, “Dorcas made clothes for the poor.” Out of scraps cut out
several dresses using the pattern below or make up your own. Glue dresses onto paper.
Lesson 44 – Peter Teaches Cornelius
Acts 10:1-48
Draw and cut out Peter on the housetop and the sheet with the many animals. Glue Peter
on the housetop at the bottom of the page. Fold the sheet of animals down about one inch
at the four corners. Glue the back of the tabs to the back of the top of the page. As Peter is
on the rooftop, the animals can be folded over.

136
Lesson 45 – Paul, Barnabas, John Mark
Acts 13 :1-14:28
1
st Craft – “Paul’s Missionary Journeys”
Find a map of the missionary journeys of Paul. Trace the land area. Let child color with
map colors. Trace the first journey of Paul.
2nd
Craft – “Saul’s Name is Changed”
Cut out a square about 5 x 5 inches. Fold in half. Glue bottom down onto notebook paper.
Write “Saul” on top flap. Open up and write “Paul.” Label.
3rd
Craft – “Go Into All the World”
Draw and cut out the model of the world out of blue and green construction paper. Glue
together and glue onto page. Write Mark 16:15 on the page.
137
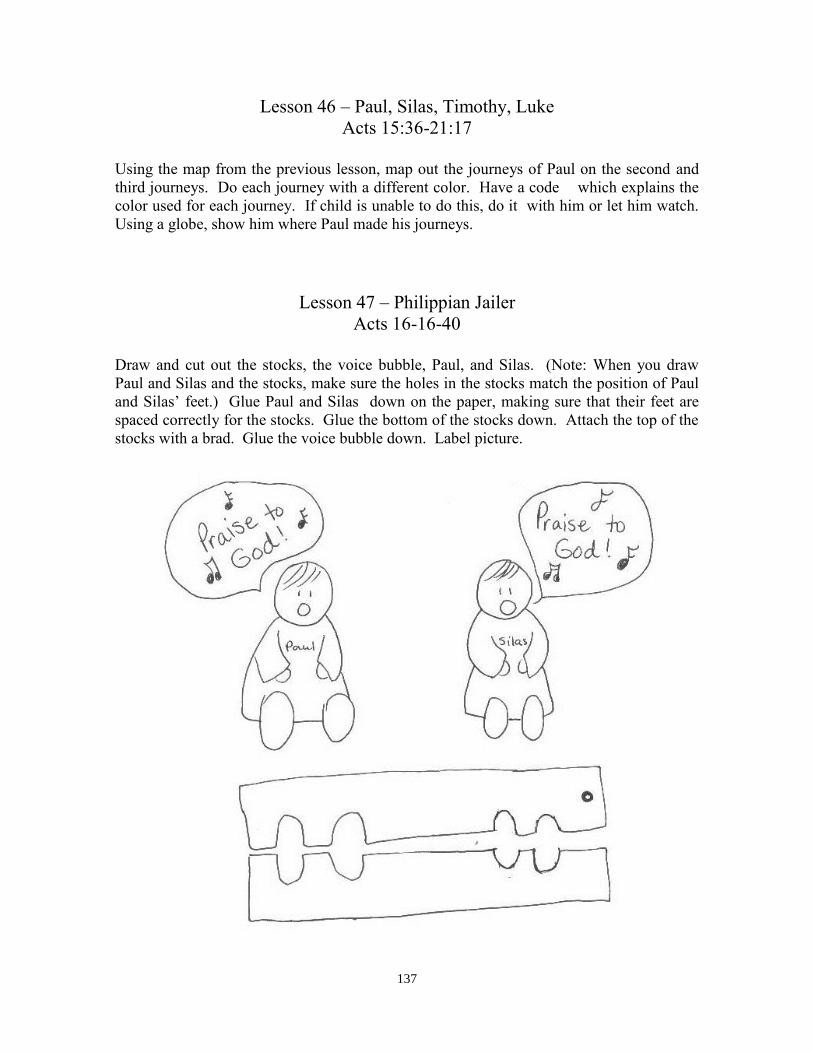
Lesson 46 – Paul, Silas, Timothy, Luke
Acts 15:36-21:17
Using the map from the previous lesson, map out the journeys of Paul on the second and
third journeys. Do each journey with a different color. Have a code which explains the
color used for each journey. If child is unable to do this, do it with him or let him watch.
Using a globe, show him where Paul made his journeys.
Lesson 47 – Philippian Jailer
Acts 16-16-40
Draw and cut out the stocks, the voice bubble, Paul, and Silas. (Note: When you draw
Paul and Silas and the stocks, make sure the holes in the stocks match the position of Paul
and Silas’ feet.) Glue Paul and Silas down on the paper, making sure that their feet are
spaced correctly for the stocks. Glue the bottom of the stocks down. Attach the top of the
stocks with a brad. Glue the voice bubble down. Label picture.

138
Lesson 48 – Agrippa and Paul
Acts 26:1-32
Draw and cut out King Agrippa, Festus, Bernice, Paul, and the two voice bubbles. Glue
King Agrippa, Festus and Bernice at the top right-hand corner of the page. Make King
Agrippa saying, “Almost you persuade me to be a Christian.” Glue Paul at the bottom left-
hand corner. Let child draw chains on Paul’s hands and feet. Or, if you have a cheap
(perhaps broken) necklace chain, use that for Paul’s hands and feet. Make Paul saying, “I
would that you be a Christian as I am, except for these chains.” Label picture.

139
Lesson 49 – Onesimus
Philemon
Draw and cut out the scroll, Onesimus, Paul, and Philemon. Cut a slit by Onesimus and
Philemon’s arm to hold scroll. Cut out a rectangle about 3 x 6 inches. Glue this rectangle
down on the sides and bottom, leaving a pocket at the top. Let child act out the story.
Store figures in the pocket.
Lesson 50 – Paul’s Epistles
Acts 27-28, I Tim., II Tim., Titus
1
st Craft – “The Letters of Paul”
Draw and cut out the scroll. Write the names of Paul’s epistles on it and to whom they
were written. Glue to the notebook page. (As an extra activity, write Paul’s fourteen
letters on 3 x 5 cards. Shuffle and let child put in order. You may also do this with all the
New Testament books and the Old Testament books.)

140
2nd
Craft – “The Sufferings of Paul”
Read II Cor. 11:24-28. Draw and cut out the circles below in different colored
construction paper. Glue onto notebook page. Label page, “The Sufferings of Paul.”

141
Lesson 51 – More Epistles
James, I & II Peter, I,II, & III John, Jude
Draw and cut out the scroll. List the other epistles.

142
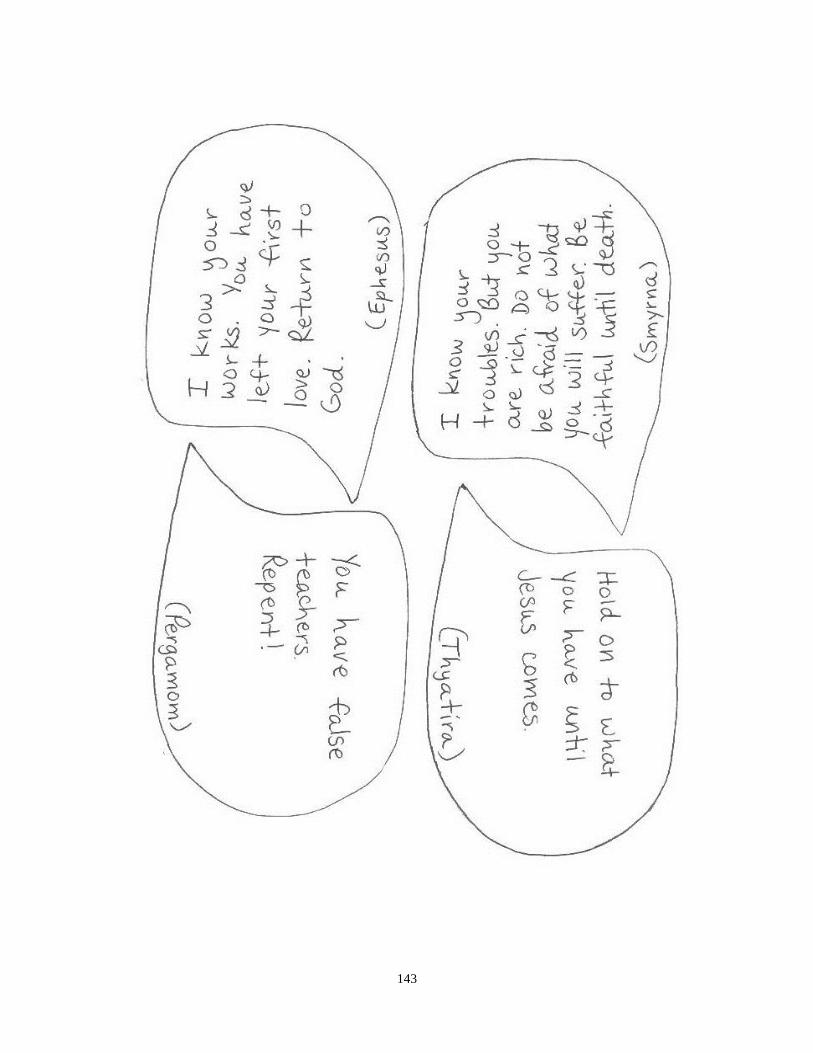
Lesson 52 - John Wrote Revelation
Revelation
On notebook page list the seven churches of Asia. Draw and cut out John seven times and
the voice bubbles. Glue each John on an individual sheet of notebook paper. At the top of
each page write one of the churches of Asia. Glue the correct voice bubble to the
appropriate church.
143

144

145