jeehell a320 fmgs installation guidejeehell.org/en - installation guide.pdf · 2019-06-14 ·...
TRANSCRIPT

JeeHell A320 FMGS
Installation Guide
Version 52.2

JeeHell
A320 FMGS
Beta 52.2
Installation Guide
Quick Back to Contents : Click here
Version 52.2
09 / 06 / 2019
Page 2 / 49
CONTENTS
Click on a chapter in the table below to jump directly to its page.
Recent additions/modifications are marked with the ◄ symbol.
1. Foreword ..................................................................................... 4
2. Read carefully before installation ............................................. 6
2.1 - One or more Computers? ........................................................................... 6
2.2 - Compatible Operating Systems ................................................................. 6
2.3 - Interface to Microsoft ® FSX or Lockheed Martin Prepar3D ◄ ............. 6
2.4 - NavData ........................................................................................................ 6
2.5 - Flight Simulator A320 Flight Model ........................................................... 7
2.6 - If an older version is already installed ...................................................... 7
2.7 - Displays Fonts ............................................................................................. 7
3. Basic installation ........................................................................ 9
3.1 - FSX(P3D) / FMGS Server computer ........................................................... 9
3.1.1 - JeeHell A320 FMGS software components ...................................................... 9
3.1.2 - Other components .......................................................................................... 10
3.2 - The other computers ................................................................................. 10
3.2.1 - Five computers possible configuration ........................................................... 10 3.2.2 - Possible configurations with less computers .................................................. 10
3.3 - Installing the FMGS server on a networked computer .......................... 13
3.4 - Installing joysticks / pedals on networked computers .......................... 13
4. Installing the software ............................................................. 16
4.1 - Installer ◄ ................................................................................................. 16
4.2 - Axis Calibration – Buttons Setup ............................................................. 23
4.3 - FMGS_Server and FSX / P3D on separate PCs ...................................... 28
4.4 - NavData Installation .................................................................................. 30
4.5 - Simpatcher manual installation ............................................................... 30
5. Starting the software ............................................................... 32
5.1 - Starter and StarterENGRUN ..................................................................... 32
5.2 - Updates ...................................................................................................... 32
5.3 - Minimized applications ............................................................................. 32
5.4 - Navdata loading ......................................................................................... 33
5.5 - Check it works ........................................................................................... 33
JeeHell
A320 FMGS
Beta 52.2
Installation Guide
Quick Back to Contents : Click here
Version 52.2
09 / 06 / 2019
Page 3 / 49
5.6 - Setup Screen displays (size, rotation, position) .................................... 34
5.7 - Auto Pilot and Fly-By-Wire ....................................................................... 35
5.8 - Sound Module ............................................................................................ 35
5.9 - Intercomm Module..................................................................................... 36
5.10 - EGPWS terrain database ◄ .................................................................... 38
5.11 - Weather Radar ......................................................................................... 42
5.12 - FMGS Server “Aircraft Options” menu ................................................. 44
5.13 - You're now ready to use JeeHell A320 FMGS ....................................... 46
5.14 - Uninstallation ........................................................................................... 46
6. Frequently Asked Questions (FAQ) ........................................ 47
JeeHell
A320 FMGS
Beta 52.2
Installation Guide
Quick Back to Contents : Click here
Version 52.2
09 / 06 / 2019
Page 4 / 49
1. Foreword
A320 FMGS software is a freeware solution to replicate the real Airbus A320's Flight Management & Guidance System (FMGS) and main electronic instruments for Microsoft's Flight Simulator® and Lockheed Martin Prepar3D®. My aim with this software is to achieve the greatest realism possible, given the limitations of FS, my free time and my programming skills. As of this writing, the following systems are modeled:
FMGS
AP/FD & FBW
Primary Flight Display (PFD)
Navigation Display (ND)
Flight Control Unit (FCU)
Multifunction Control & Display Unit (MCDU)
Engine /Warning Display (E/WD)
Status Display (SD)
Overhead panel and subsequent ACFT systems
Brakes triple indicator
Stand-By instruments,
The 3 RMPs, the 3 ACPs, and ECAM Panel,
Thrust levers, flaps, spoilers, landing gear handle + A/BRK Panel,
I started this project to fit my home-cockpit hardware. The commercial alternatives are very expensive, their price tag is prohibitive regarding the money I want to spend on a FS hobby.
All commands can be interfaced with hardware through FSUIPC.
The Software can be interfaced with the following hardware (non exhaustive list):
OpenCockpits IOcards,
Flight Deck Solutions (including FCU Glare3 and MCDU),
CPFlight (FCU / EFIS / Glare Wings),
CockpitPassion,
Skalarki I/O,
CockpitSonic.
Check the manufacturer guide, and also the Hardware Module folder after installation.
When installing, you will need to select the hardware options necessary for your simulator, which will install then in the « Hardware Modules » folder.

JeeHell
A320 FMGS
Beta 52.2
Installation Guide
Quick Back to Contents : Click here
Version 52.2
09 / 06 / 2019
Page 5 / 49
If you have any questions, remarks or anything you want to say, you can do so either via e-mail ( jeehell “at” jeehell.org) or through MyCockpit.org forums
This Guide details how to install the software on one or more computers.
DISCLAIMER:
This software is by no means related to Airbus, EADS or any affiliated group. It is intended to use only as a recreational software together with Microsoft Flight Simulator. Do not use as a part of training toward any kind or aeronautical certification, be it private pilot or commercial pilot training.
This software should cause no harm to your computer. In the very unlikely event damage occurred to your system, I won't take any liability. Use at your own risk.
The use and distribution of this software in any professional environment is prohibited without a proper licence. Check the License.txt file to know what are the rights you have with this version..
JeeHell A320 FMGS Co-written with Michel PICQUE
Copyright 2019 Jean Luc NITARD

JeeHell
A320 FMGS
Beta 52.2
Installation Guide
Quick Back to Contents : Click here
Version 52.2
09 / 06 / 2019
Page 6 / 49
2. Read carefully before installation
2.1 - One or more Computers?
JeeHell A320 FMGS can be installed on a single computer where FSX or P3D runs.
Such a setup is useful to test the software and get to know it. But you'll find yourself quickly limited by performance...
You'll also have issues with multiple screens etc... and won't have the greatest experience possible.
JeeHell A320 FMGS is designed to work on home network using a server/client architecture.
The Server, along with AP/FBW and a few other software, must be installed on FS computer.
The other “satellite” applications (PFD, ND, MCDU, Overhead, EWD, SD, STBY Airspeed Indicator, STBY Altimeter (FT and meter), STBY Horizon, DDRMI, Clock, ISIS, Triple Brakes Indicator, …), can be installed on remote computers linked by your network.
Check chapter 3 for more information on networking the system. It will help you avoid common mistakes.
2.2 - Compatible Operating Systems
You need a PC with MS® Windows running. It has been tested successfully with XP(32bits), Seven (64bits), Windows 8.x and Windows 10, it should work with Vista but won't work on any other OS such as Linux, OSX, ...
2.3 - Interface to Microsoft ® FSX or Lockheed Martin Prepar3D ◄
FSX / P3D (V1.x to V4.5): the communication with Flight Simulator is based on « SimConnect » (you do not need any third party software). Note for FSX: you need both Service Packs 1&2 for FSX (or « FSX Acceleration »).
The software is no longer compatible with FS9 (FS2004).
2.4 - NavData
Before launching installation, you should install the navigation database (navdata).
Both Navigraph and Aerosoft NavDataPro support the navdata format, they each have
RRRRRRRRRRRRRRRRRRRRRRR

JeeHell
A320 FMGS
Beta 52.2
Installation Guide
Quick Back to Contents : Click here
Version 52.2
09 / 06 / 2019
Page 7 / 49
qualities and issues, it is up to you to decide.
If you chose Aerosoft NavDataPro :
Aerosoft does not offer a test database, you'll have to buy at least one AIRAC.
You'll find NavDataPro user guide on the Aerosoft website (English and German).
If you chose Navigraph :
AIRAC cycle 1506 is available for free as a courtesy of Navigraph. You can download it here.
Check Navigraph website to get paid updates.
See Chapter 4.4 for more information on navdata installation.
2.5 - Flight Simulator A320 Flight Model
This software uses proprietary autopilot and FBW systems. They are only tuned to the specially made A320 packages provided with the software.
Since version B48.0, there are two versions:
A320-214 with CFM 56 engines,
A320-233 with IAE V2500 engines.
The default, A321 model of FSX, and third party add-ons, are not compatible with JeeHell A320 FMGS.
2.6 - If an older version is already installed
Prior to B22 version, there was no installer, and no traces in Windows registry. You can simply delete the FMGS folder and files.
Since B22 version, you can uninstall using the uninstaller wizard in FMGS folder. You can also uninstall from Windows Configuration Panel.
You can keep the configuration files between each version : look at chapter 5.14.
2.7 - Displays Fonts
Thanks to Christoph Paulus, the FMGS software comes with two custom fonts. The CockpitMCDU.ttf is dedicated to the MCDU while CockpitScreens.ttf can be used for all other DU's (PFD, ND, E/WD and SD).
These fonts were kindly “donated” to my project, but remain the intellectual property of Christoph. Do not redistribute them without his consent. They are NOT for commercial use.

JeeHell
A320 FMGS
Beta 52.2
Installation Guide
Quick Back to Contents : Click here
Version 52.2
09 / 06 / 2019
Page 8 / 49
The fonts will be installed automatically by the installer.
I really would like to thank Christoph for the work he has done!! Please also check
out his CPDLC AOC-Client, which is 100% compatible with my software.
JeeHell
A320 FMGS
Beta 52.2
Installation Guide
Quick Back to Contents : Click here
Version 52.2
09 / 06 / 2019
Page 9 / 49
3. Basic installation
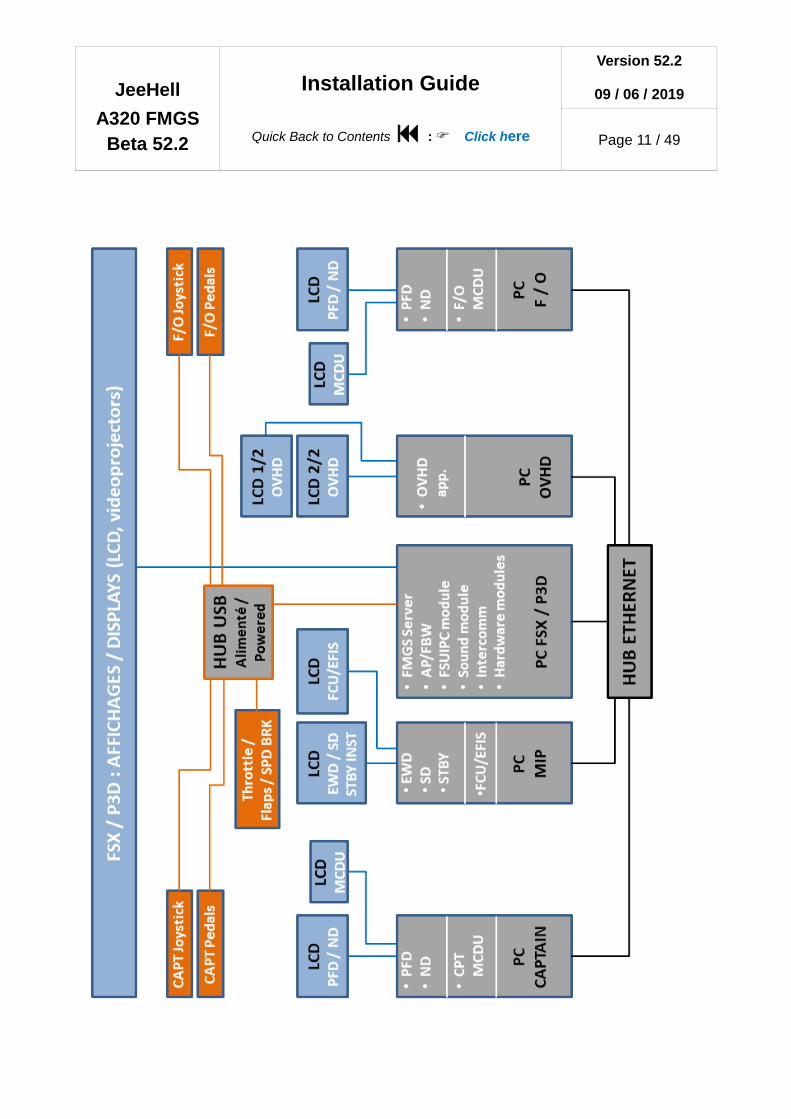
The various software modules are meant to work in a networked environment. This chapter will describe a simple architecture: one computer is dedicated to FSX/P3D and FMGS server; other applications will be run on remote computers, depending on your needs.
Of course not all configurations/combinations could be tested…
You will find two diagrams below, showing:
An installation without hardware (but still including a joystick, a single throttle lever, and an axis for the rudder).
An installation with full hardware.
3.1 - FSX(P3D) / FMGS Server computer
This is the core of the system. It has to be the most powerful computer in your simulator, as it needs to be able to comfortably run FSX/P3D.
I won’t give a requirement list for this computer, as hardware evolves fast. However:
CPU + Mother Board + Memory + Graphics adapter should be the best you can afford.
Hard drive is not to be neglected, an SSD drive will probably help.
Of course, the power supply must be powerful enough for high ends CPU/graphics adapter.
You need to get a strict minimum of 25 FPS in FSX/P3D. Below that threshold, the AP/FBW and other components may start to misbehave.
3.1.1 - JeeHell A320 FMGS software components
On the FSX/P3D PC, the following components will be installed:
Master FSX/P3D PC,
FMGS Server and AP/FBW,
Sounds module,
Intercom,
FSUIPC support,
Other hardware support (CPFlight, FDS, Skalarki, CockpitSonic, OpenCockpits,…).
This will be the core of the FMGS system. It will reduce the network traffic on time critical data such as hardware input.

JeeHell
A320 FMGS
Beta 52.2
Installation Guide
Quick Back to Contents : Click here
Version 52.2
09 / 06 / 2019
Page 10 / 49
3.1.2 - Other components
For the same reasons, it is best to have the following hardware software installed on the FSX/Server PC:
Opencockpit’s SIOC and hardware
All hardware.
The USB hardware will gain in stability if you use powered USB hubs, particularly on the devices which do not have their own power supply.
3.2 - The other computers
3.2.1 - Five computers possible configuration
OVHD PC: this computer will run the graphical OVHD application on one or two (touch)screens. It does not require a powerful PC configuration.
Central MIP PC: this computer will run the EWD, SD and STBY instruments.
Captain PC: this computer will run the captain side instrumentation, PFD, ND and MCDU. The ND being quite resource intensive, a rather powerful PC is required, though not necessarily high end.
First officer PC: same as Captain PC, but for the First Officer side.
3.2.2 - Possible configurations with less computers
If you have an hardware OVHD panel, you do not need the graphical interface, thus saving the need for the OVHD PC.
If you build a single seat simulator, you of course only need to have the relevant side computer.
On a powerful computer, with enough video outputs, you can group the CPT and F/O side.
JeeHell
A320 FMGS
Beta 52.2
Installation Guide
Quick Back to Contents : Click here
Version 52.2
09 / 06 / 2019
Page 11 / 49

JeeHell
A320 FMGS
Beta 52.2
Installation Guide
Quick Back to Contents : Click here
Version 52.2
09 / 06 / 2019
Page 12 / 49

JeeHell
A320 FMGS
Beta 52.2
Installation Guide
Quick Back to Contents : Click here
Version 52.2
09 / 06 / 2019
Page 13 / 49
3.3 - Installing the FMGS server on a networked computer
Contrary to what has just been presented, since B46 it is possible to install the FMGS Server on a PC other than the one on which FSX/P3D runs.
The purpose of this option is to try to lighten the load of the FSX / P3D PC, in order to increase some FPS.
We will not describe here all the possible configurations (number of PCs, use and load of the network,...), because these are certainly almost as numerous as the number of users of JeeHell A 320 FMGS ...
A configuration is presented on page 14, as an example.
The installation specifics are indicated in yellow, and then described in chapter 4.3.
3.4 - Installing joysticks / pedals on networked computers
Since B50 version, joysticks and pedals axes can now be installed, configured and used from a networked PC that can be neither FMGS Server PC nor FSX / P3D PC.
In the same way as above, a configuration is presented on page 15, as an example.
The installation specifics are indicated in yellow, and then described in chapter 4.

JeeHell
A320 FMGS
Beta 52.2
Installation Guide
Quick Back to Contents : Click here
Version 52.2
09 / 06 / 2019
Page 14 / 49

JeeHell
A320 FMGS
Beta 52.2
Installation Guide
Quick Back to Contents : Click here
Version 52.2
09 / 06 / 2019
Page 15 / 49

JeeHell
A320 FMGS
Beta 52.2
Installation Guide
Quick Back to Contents : Click here
Version 52.2
09 / 06 / 2019
Page 16 / 49
4. Installing the software
4.1 - Installer ◄
It is necessary to run the installer package « A320FMGS Bxx.exe » with administrator rights, on all computers.
Avoid installing in a folder such as C:\Program files! It is recommended to keep the default path: C:\A320FMGS .
First, you need to specify which version of FSX or P3D you use :
If you scroll down the list, you will notice several sections. First the « Applications » section, followed by the « Modules Hardware » section and finally the « Software panels » section.
On each computer, select which component(s) you need, as was discussed in preceding chapter.
JeeHell
A320 FMGS
Beta 52.2
Installation Guide
Quick Back to Contents : Click here
Version 52.2
09 / 06 / 2019
Page 17 / 49
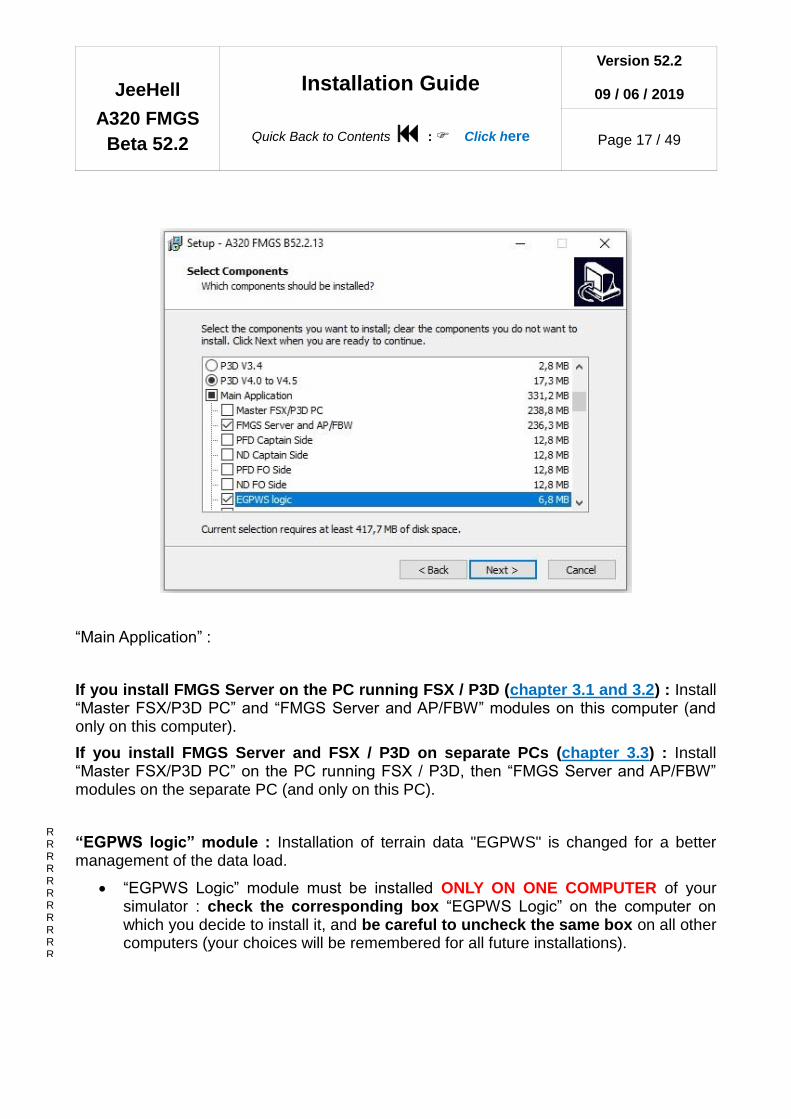
“Main Application” :
If you install FMGS Server on the PC running FSX / P3D (chapter 3.1 and 3.2) : Install “Master FSX/P3D PC” and “FMGS Server and AP/FBW” modules on this computer (and only on this computer).
If you install FMGS Server and FSX / P3D on separate PCs (chapter 3.3) : Install “Master FSX/P3D PC” on the PC running FSX / P3D, then “FMGS Server and AP/FBW” modules on the separate PC (and only on this PC).
“EGPWS logic” module : Installation of terrain data "EGPWS" is changed for a better management of the data load.
“EGPWS Logic” module must be installed ONLY ON ONE COMPUTER of your simulator : check the corresponding box “EGPWS Logic” on the computer on which you decide to install it, and be careful to uncheck the same box on all other computers (your choices will be remembered for all future installations).
RRRRRRRRRRRRRRRRRRRRRRRR
JeeHell
A320 FMGS
Beta 52.2
Installation Guide
Quick Back to Contents : Click here
Version 52.2
09 / 06 / 2019
Page 18 / 49
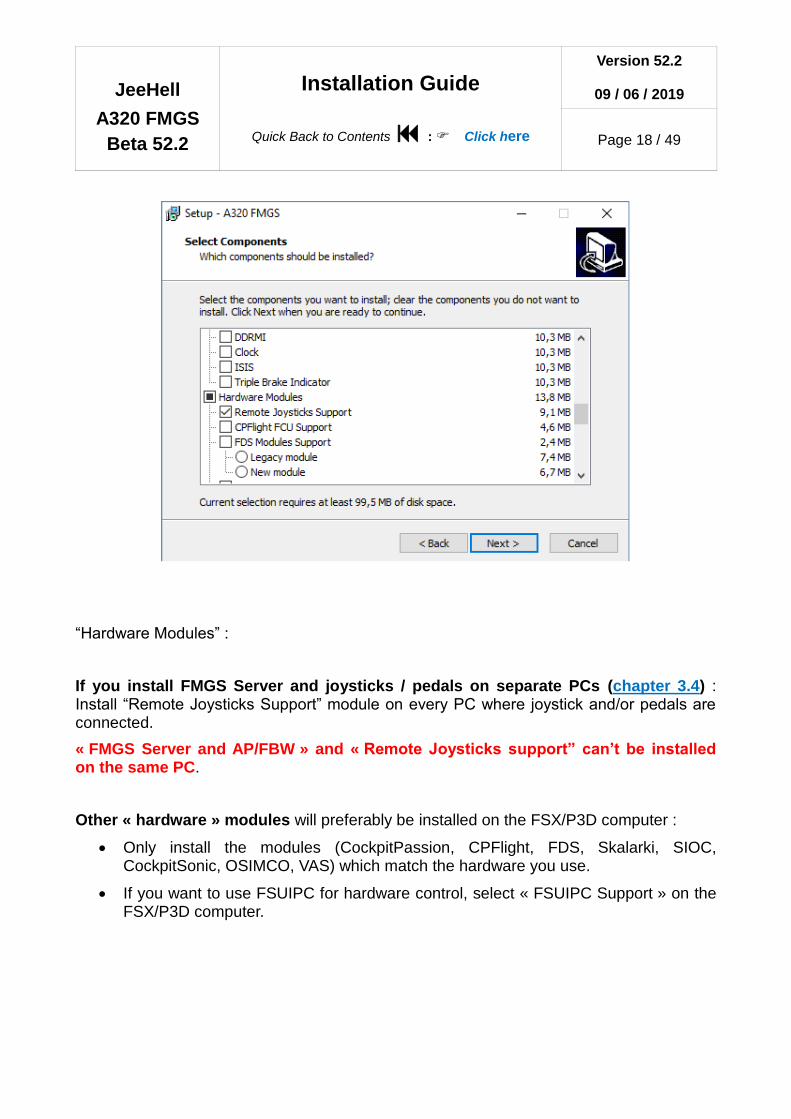
“Hardware Modules” :
If you install FMGS Server and joysticks / pedals on separate PCs (chapter 3.4) : Install “Remote Joysticks Support” module on every PC where joystick and/or pedals are connected.
« FMGS Server and AP/FBW » and « Remote Joysticks support” can’t be installed on the same PC.
Other « hardware » modules will preferably be installed on the FSX/P3D computer :
Only install the modules (CockpitPassion, CPFlight, FDS, Skalarki, SIOC, CockpitSonic, OSIMCO, VAS) which match the hardware you use.
If you want to use FSUIPC for hardware control, select « FSUIPC Support » on the FSX/P3D computer.

JeeHell
A320 FMGS
Beta 52.2
Installation Guide
Quick Back to Contents : Click here
Version 52.2
09 / 06 / 2019
Page 19 / 49
“Software panels interface” :
Software interfaces are grouped in the « Software panels interface » list : These are the thrust levers, flaps, spoilers, landing gear handle + A/BRK Panel, the 3 RMPs, the 3 ACPs, and ECAM Panel. Install these software modules according to your simulator configuration (however, only install what is necessary on each computer).
JeeHell
A320 FMGS
Beta 52.2
Installation Guide
Quick Back to Contents : Click here
Version 52.2
09 / 06 / 2019
Page 20 / 49
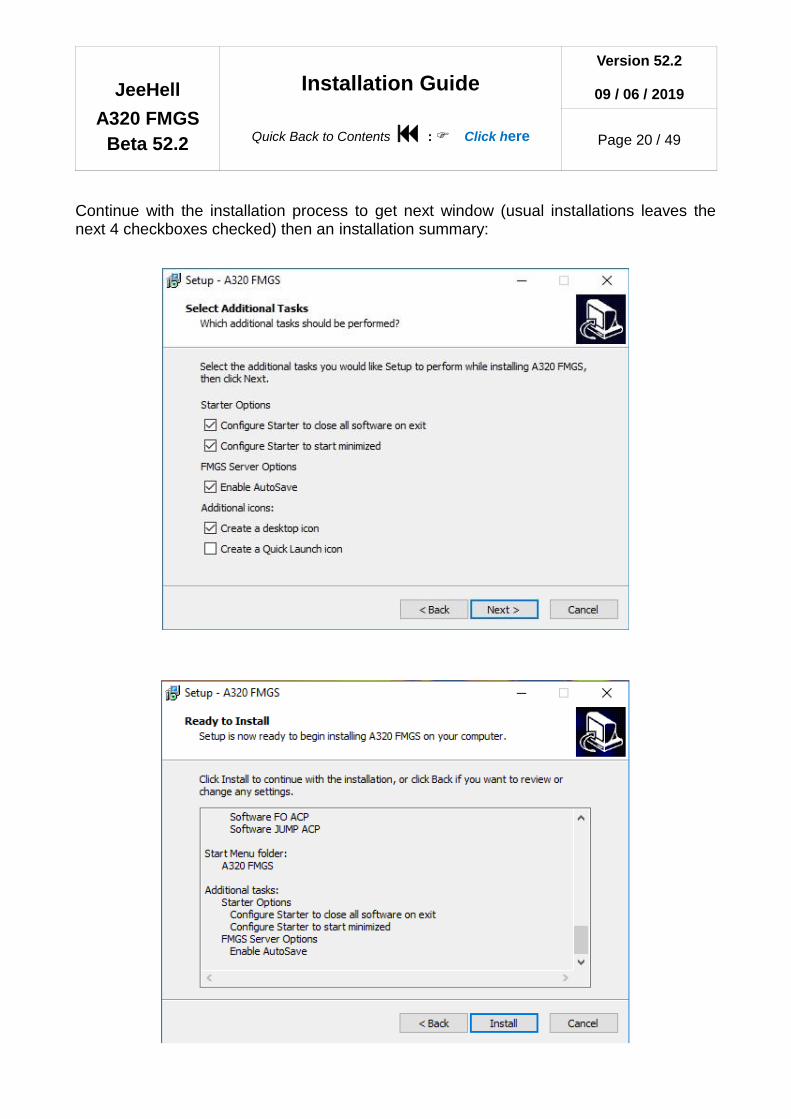
Continue with the installation process to get next window (usual installations leaves the next 4 checkboxes checked) then an installation summary:

JeeHell
A320 FMGS
Beta 52.2
Installation Guide
Quick Back to Contents : Click here
Version 52.2
09 / 06 / 2019
Page 21 / 49
Once the installer has finished copying the files, you will get another important window:
RRRRRRRRRRRRRRRRRRRRRRRRRRRRRRRRRRRRRRRRRRRRRRRRRRRRRRRRRRRRRRRRRRRRRR

JeeHell
A320 FMGS
Beta 52.2
Installation Guide
Quick Back to Contents : Click here
Version 52.2
09 / 06 / 2019
Page 22 / 49
This step is very important. If you do not enter correct data, the software will not work !
“This computer is running FMGS Server” : This box is automatically checked when FMGS_Server is installed on this PC (and FMGS Server IP address is grayed out).
This box is unchecked when FMGS Server is not installed on this PC ; so you must enter the IP address of the PC where FMGS Server runs.
“This computer is running FSX/P3D” : Same as just above.
“This computer is running EGPWS” : This box is automatically checked when EGPWS Logic is installed on this PC, and unchecked when not.
Server ports : Do not change the default ports, unless necessary in your network configuration. The button « Default values » will restore the default values for you.
“EGPWS” ( chapter 5.10 ) and « WX Radar » » ( chapitre 5.11 ) : The content of the folders C:\A320FMGS\WXR (on P3D computer) and C:\A320FMGS\EGPWS\EGPWS (on the PC where you install EGPWS module), will have to be used from the others PC where the ND modules run. So you will have to share these two folders (sharing rights to configure into Windows).
“WX Radar path” : Click on the indicated path. Windows will open an Explorer box, where you have to indicate the real (eventually networked) path to the shared WXR folder.
“EGPWS Output path” : When “This computer is running EGPWS” box is NOT checked (and so EGPWS module is not installed on this PC), you have to indicate (as just above) the real networked path to the shared EGPWS folder.
“EGPWS Data path” : When “This computer is running EGPWS” box IS checked (and so EGPWS module is installed on this PC), here is indicated the path to this folder. When not (unchecked box above), no need to indicate anything (this box remains grayed out).
Note : You will not be able to indicate any networked path above, as long as the sharing rights are not (or bad) configured into Windows. In this case, it would be better to let the installation go on till the end, before configuring the sharing rights into Windows. Afterwards, look after “Configure.exe” file and run it : you will get the same windows to rightly complete.
Now you only have to click on « Done » button to finish the installation.
Take care to leave « Setup Joysticks » box checked, particularly if you are a beginner with the software. It will make the installer launch the axis configuration tool when exiting the installation process, to calibrate your joystick axis.
RRRRRRRRRRRRRRRRRRRRRRRRRRRRRRRRRRRRRRRRRRRRRRRRRRRRRRRRRRRRR
RRRRRRRRRRRRRRRRRRRRRRRRRRRRRRRRRRRRRRRRRRRRRRRRR
RRRRRRRRRRRRRRRRRRRRRRRRRRRRRRRRRRR

JeeHell
A320 FMGS
Beta 52.2
Installation Guide
Quick Back to Contents : Click here
Version 52.2
09 / 06 / 2019
Page 23 / 49
If you uncheck it, the calibration tool is located in the FMGS Serve folder, and is called « FMGS_Config.exe ». You may launch it later, but please note that FMGS_Server and FMGS_Config can’t simultaneously work (you will get an error message).
4.2 - Axis Calibration – Buttons Setup
The axis calibration application runs at the end of the installation, as stated above.
It is recommended to deactivate joystick assignments both in FSX/P3D and in FSUIPC, to avoid conflicts.
If you chose to install your joysticks / pedals on separate computer(s) from FMGS Server PC chapter 3.4, you must run “RemoteJoyApp” (as an administrator) on the computer(s) where joysticks / pedals are connected, in order to allow FMGS Server to detect them through the network.
Important : “RemoteJoyApp” module may be blocked or deleted by security softwares (anti-virus / firewall or even Windows firewall ). It would be a wrong way to deactivate your security softwares ; the best way to deal with them is to configure them to allow the use of “RemoteJoyApp” module.
JeeHell
A320 FMGS
Beta 52.2
Installation Guide
Quick Back to Contents : Click here
Version 52.2
09 / 06 / 2019
Page 24 / 49
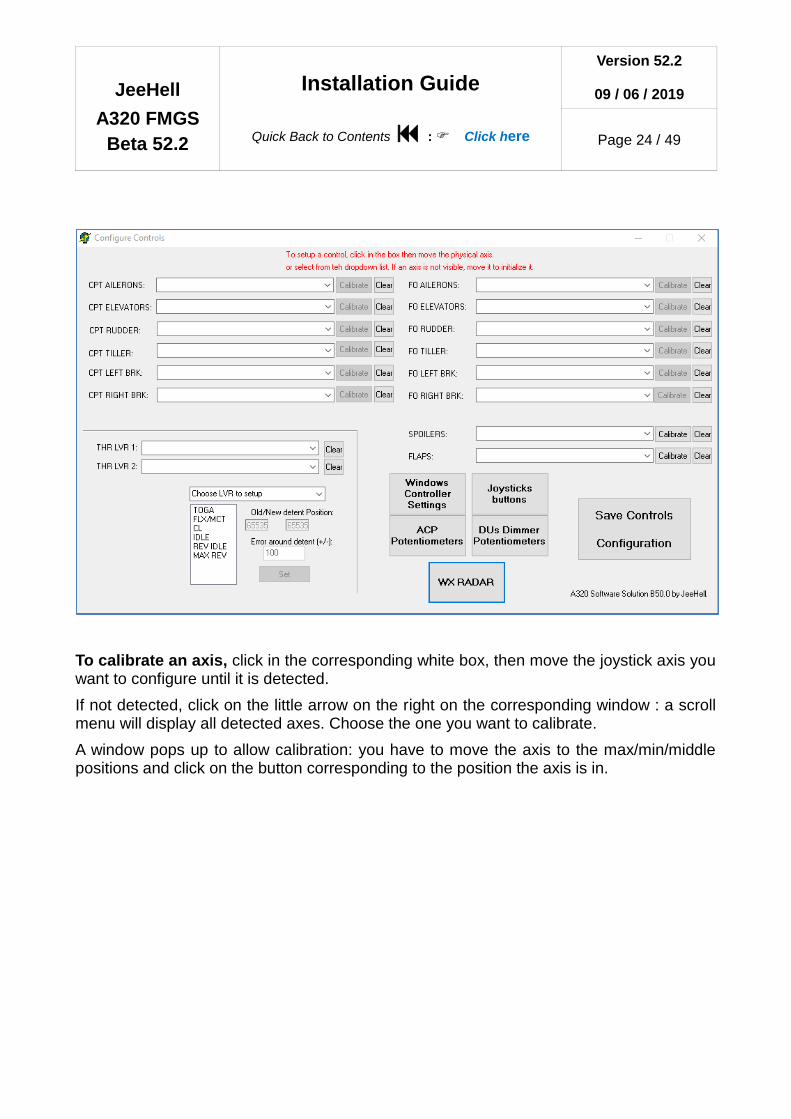
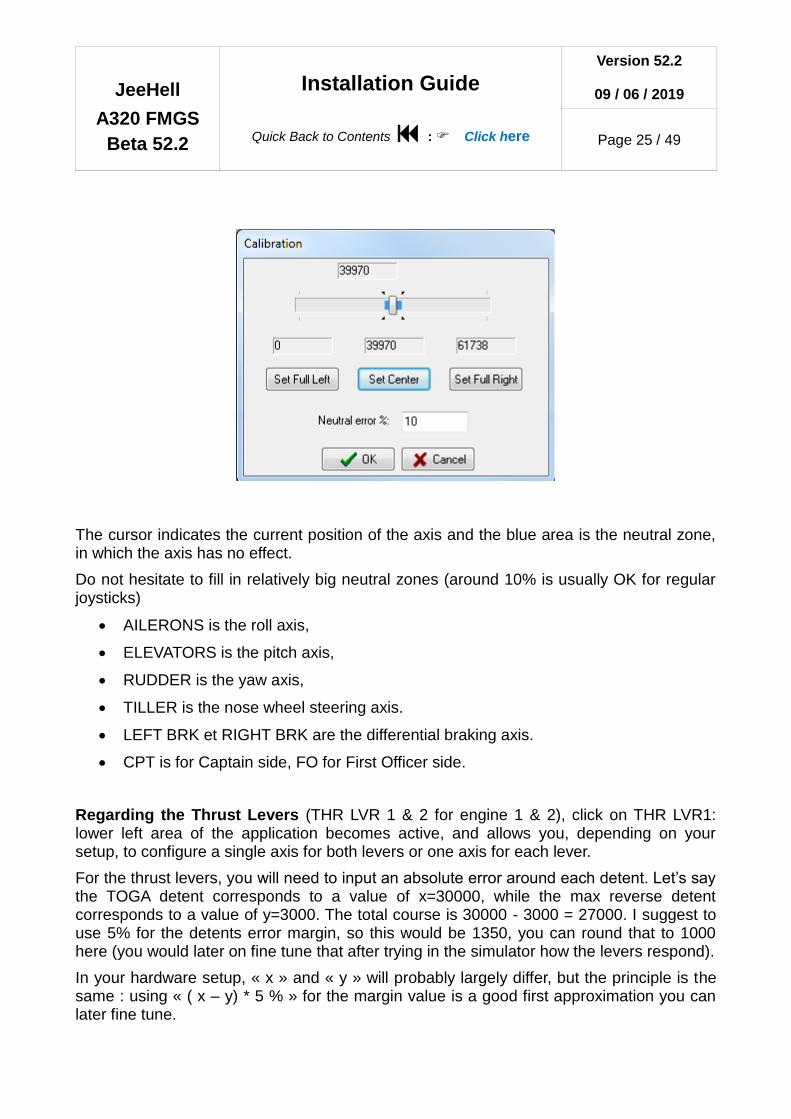
To calibrate an axis, click in the corresponding white box, then move the joystick axis you want to configure until it is detected.
If not detected, click on the little arrow on the right on the corresponding window : a scroll menu will display all detected axes. Choose the one you want to calibrate.
A window pops up to allow calibration: you have to move the axis to the max/min/middle positions and click on the button corresponding to the position the axis is in.
JeeHell
A320 FMGS
Beta 52.2
Installation Guide
Quick Back to Contents : Click here
Version 52.2
09 / 06 / 2019
Page 25 / 49
The cursor indicates the current position of the axis and the blue area is the neutral zone, in which the axis has no effect.
Do not hesitate to fill in relatively big neutral zones (around 10% is usually OK for regular joysticks)
AILERONS is the roll axis,
ELEVATORS is the pitch axis,
RUDDER is the yaw axis,
TILLER is the nose wheel steering axis.
LEFT BRK et RIGHT BRK are the differential braking axis.
CPT is for Captain side, FO for First Officer side.
Regarding the Thrust Levers (THR LVR 1 & 2 for engine 1 & 2), click on THR LVR1: lower left area of the application becomes active, and allows you, depending on your setup, to configure a single axis for both levers or one axis for each lever.
For the thrust levers, you will need to input an absolute error around each detent. Let’s say the TOGA detent corresponds to a value of x=30000, while the max reverse detent corresponds to a value of y=3000. The total course is 30000 - 3000 = 27000. I suggest to use 5% for the detents error margin, so this would be 1350, you can round that to 1000 here (you would later on fine tune that after trying in the simulator how the levers respond).
In your hardware setup, « x » and « y » will probably largely differ, but the principle is the same : using « ( x – y) * 5 % » for the margin value is a good first approximation you can later fine tune.
JeeHell
A320 FMGS
Beta 52.2
Installation Guide
Quick Back to Contents : Click here
Version 52.2
09 / 06 / 2019
Page 26 / 49
Tuning the course of the Levers:
Put your lever at the maximum thrust position, select TOGA in the list. Put an error of about 1000 (as per our example, again, here, an absolute range is needed, NOT a percentage) then click the “Set” button.
Move now your lever to what would be your FLX/MCT position (not too far from TOGA, but quite more than the error you put above). Select FMX/MCT in the list, put an error of 1000 as per our example, click “Set” (again, an absolute range is needed for THR LVRs, NOT a percentage) .
Repeat for each detent.
Note that if you leave an error of 0 or a too small value, you may not be able to select the proper detents, and it will have effects on the flight handling!
If you enter a too big error value, two detents may overlap and the software will get lost and misbehave as well.
Fine tune after trials to get the best values you need for error around each detents.
Clicking on « Save Controls Configuration » will save the settings you've applied already. It is a good idea to save regularly your work when configuring.
SPOILERS axis is configured on the same principles as ailerons or elevators axis. There is an added feature to make the ARM position part of the analog course (some hardware need that feature). In that case, the same neutral zone is applied bot hfor the ARM position and RET (FWD) position.
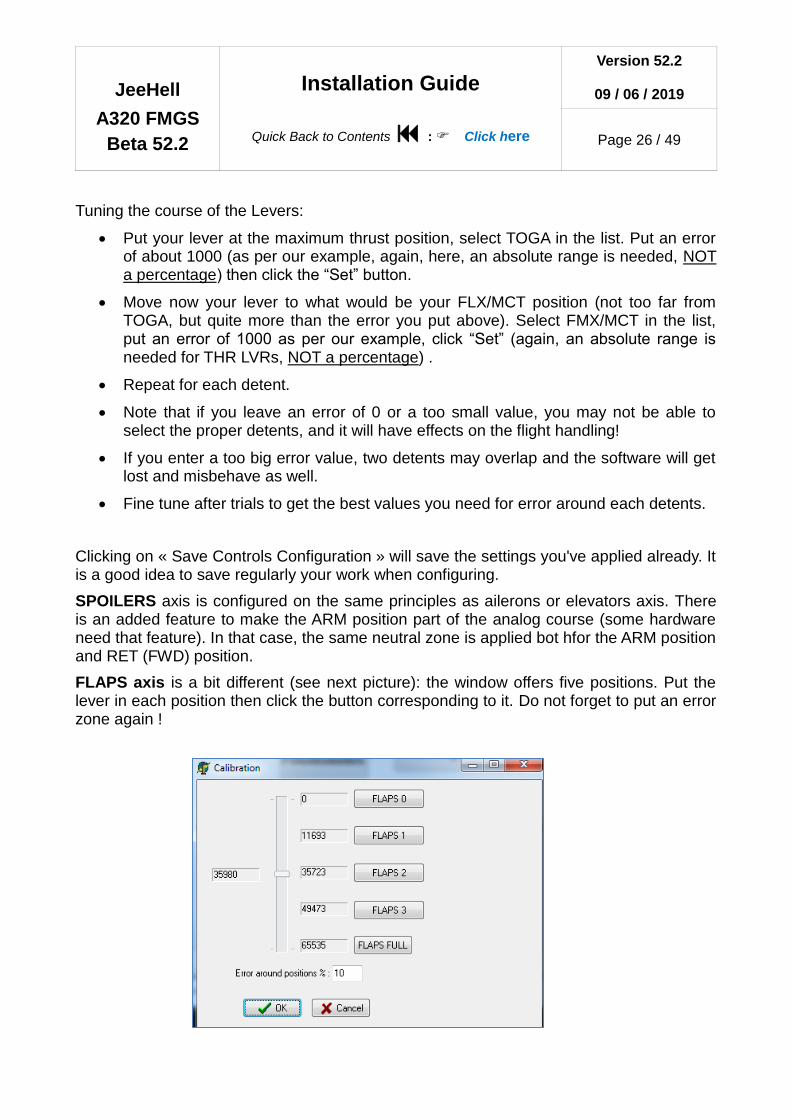
FLAPS axis is a bit different (see next picture): the window offers five positions. Put the lever in each position then click the button corresponding to it. Do not forget to put an error zone again !

JeeHell
A320 FMGS
Beta 52.2
Installation Guide
Quick Back to Contents : Click here
Version 52.2
09 / 06 / 2019
Page 27 / 49
You can also use axis configured in SIOC.
First declare them in « SIOC Creator » : see Advanced User Guide (separate document).
Then do exactly as you would with a regular joystick !
Joystick Buttons: you can also use joystick buttons to operate almost any switches/buttons of the cockpit.
Click on “Joystick Buttons” button, a new window appears (see next picture).
Push a joystick button, its joystick name and button number will appear.
You can now select an action for when you push the button, and another action when you release the button.
An action ID (i.e. which switch of the cockpit is used) can be selected by double clicking on gray boxes (marked by the arrows N°1 on the picture). A list with all actions will be displayed.
You can then select which event is associated (either Push, Release or Toggle events) (arrows N°2). Most events DO REQUIRE both events to work correctly.

JeeHell
A320 FMGS
Beta 52.2
Installation Guide
Quick Back to Contents : Click here
Version 52.2
09 / 06 / 2019
Page 28 / 49
In most cases, you should only use the same action ID and associate a Push/Release event to the joystick Push/Release actions (as on the picture).
Don't forget to save the entire configuration by clicking on « Save Controls Configuration » on main window.
Potentiometers settings (ACP, WX Radar, DU’s dimmers) : FMGS_Config allows you to setup these potentiometers (dimmers are used for PFDs, NDs, MCDUs, SD & EWD screens). New in B50 : WX RADAR (Gain and TILT) potentiometers settings.
4.3 - FMGS_Server and FSX / P3D on separate PCs
In all cases where FMGS Server and FSX / P3D are installed on separate PCs, you MUST install the external module called “Simconnect”.
This module has nothing to do with JeeHell A320 FMGS. It is a Microsoft component which is included in FSX or P3D. Maybe you already have installed it, or third-party addon did it during their installation.
For informational purpose :
1 – On your FSX / P3D computer (example given for P3D V4), run :
C:/Programmes/Lockheed Martin/Prepar3D V4/redist/Interface/FSX-SP2-XPACK/retail/lib/ SimConnect.msi
JeeHell
A320 FMGS
Beta 52.2
Installation Guide
Quick Back to Contents : Click here
Version 52.2
09 / 06 / 2019
Page 29 / 49
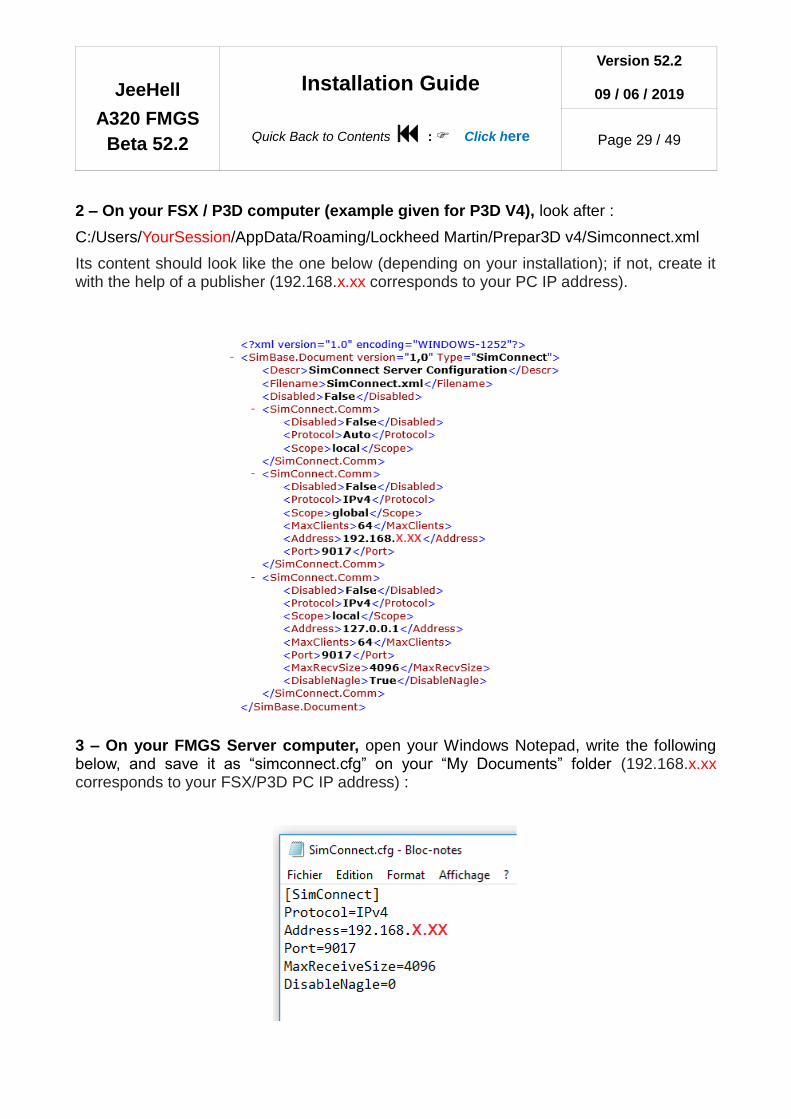
2 – On your FSX / P3D computer (example given for P3D V4), look after :
C:/Users/YourSession/AppData/Roaming/Lockheed Martin/Prepar3D v4/Simconnect.xml
Its content should look like the one below (depending on your installation); if not, create it with the help of a publisher (192.168.x.xx corresponds to your PC IP address).
3 – On your FMGS Server computer, open your Windows Notepad, write the following below, and save it as “simconnect.cfg” on your “My Documents” folder (192.168.x.xx corresponds to your FSX/P3D PC IP address) :

JeeHell
A320 FMGS
Beta 52.2
Installation Guide
Quick Back to Contents : Click here
Version 52.2
09 / 06 / 2019
Page 30 / 49
4.4 - NavData Installation
Before trying JeeHell A320 Software for the first time, you must now install the navigation data (Navdata) which you should have already bought ( chapter 2.4 ).
If you chose Aerosoft format ( NavDataPro ) :
Once Aerosoft application is installed on the comptuer running FMGS Server, you will ahve to select the « JeeHellWare » dataset format, without changing the default path!
If after running the FMGS Server for the first time you do not get a file called « navrecord.dat » in the following folders: C:\A320FMGS\Navdata\Navdata1 & C:\A320FMGS\Navdata\Navdata2, you will have to manually copy that file in them and run again the A320 software.
If you chose Navigraph format :
Each cycle comes in its own executable installer package.
As for Aerosoft navdata, after running the software for the first time you should have the « navrecord.dat » in the two folders C:\A320FMGS\Navdata\Navdata1 & C:\A320FMGS\Navdata\Navdata2. If not, you will have to copy it manually.
Caution : in both cases, the navdata is not usable by itself. You must let the FMGS Server compile them in another file format on the first run, and this process will need to take place on every cycle update, or FSX/P3D sceneries change. See chapter 5.4 for more details.
4.5 - Simpatcher manual installation
The software works with an added FSX/P3D module called Simpatcher. This module does many things in the background, including advanced icing simulation (direct effect on aerodynamics), ground friction tuning in real time, WXR link with ASN/AS16, fuel flow tuning.
On some systems, the automatic installation may fail (it seems it depends if you have more than one P3D installation on the same computer).
To install it manually, you need to locate your DLL.Xml file.
It is located usually in :
P3D : C:\Users\yourUser\AppData\Roaming\Lockheed Martin\Prepar3D vX
FSX : C:\Users\yourUser\AppData\Roaming\Microsoft\FSX
You then need to add to it the following section:
<Launch.Addon>
<Name>SimPatcher</Name>

JeeHell
A320 FMGS
Beta 52.2
Installation Guide
Quick Back to Contents : Click here
Version 52.2
09 / 06 / 2019
Page 31 / 49
<Disabled>False</Disabled>
<Path>C:\A320FMGS\Simpatch\SimPatcher.dll</Path>
</Launch.Addon>
To check proper installation of simpatcher, while the whole FMGS software is running, go to your FSX/P3D addon menu, and look for a simpatcher entry. If there is none, then it is not working/installed properly.
Congratulations ! JeeHellWare A320 FMGS installation is now over and we can check the software is running properly.
JeeHell
A320 FMGS
Beta 52.2
Installation Guide
Quick Back to Contents : Click here
Version 52.2
09 / 06 / 2019
Page 32 / 49
5. Starting the software
5.1 - Starter and StarterENGRUN
The « Starter » is a little application configured by the installer on each computer. When you launch (or close) this little application, it will run (or close) all the software needed (FMGS Server, AP/FBW, PFD, etc...) in « Cold and dark » state.
The « StarterENGRUN » does the same thing, but in an engines running situation. Only useful on the FMGS Server PC.
Some false alarms might ring while FSX/P3D is loading, if the initial scenario is saved with engines shut. It takes a few moments to settle down.
If you have hardware, make sure the hardware controls are in the correct position (such as engine master switches) to avoid issues.
You will need to have administrator rights to run the starter applications.
You may notice a 30 seconds delay before the full FMGS software is up and running. This is because it is loading various data in the background (navdata, performance, etc).
Important note about security softwares : Some of the software included in A320FMGS may be blocked or deleted by security software (Avast, Norton,…) and even by Windows Firewall. The best way to deal with it is to configure your security software to allow the use of my applications.
5.2 - Updates
The starter will automatically launch an update tool which checks online if a new update is available.
“Updater.exe” may trigger firewall alarms (see no above on security software).
Follow the instructions of the application to download the new version if available.
Note: if you installed the software on more than one computer, you need to run the update on each computer of your network. Otherwise, you may get errors while running the software.
5.3 - Minimized applications
Some applications are run in a minimized state after start up.
Those are necessary; do not close them as long as you are using JeeHell A320 FMGS.
When closing the starter application, all different windows will close as well.
JeeHell
A320 FMGS
Beta 52.2
Installation Guide
Quick Back to Contents : Click here
Version 52.2
09 / 06 / 2019
Page 33 / 49
5.4 - Navdata loading
At this stage, you should already have the « navrecord.dat » file from Aerosoft already installed (see chapter 4.4).
On first run of the FMGS Software :
The FMGS Server creates on its first launch a set of files, after about 5 to 10 minutes of computations. These 10 files with a « .bin » extension are located in the navdata folder (C:\A320FMGS\Navdata), and weigh about 350 MB.
The 10 files must then be manually copied to all the client computers running the NDs, in the same folder on the remote computer (C:\A320FMGS\Navdata).
On following runs:
You do not have anything particular to do. The « .bin » files are optimized to run the software much faster.
AIRAC Cycle updates (« navrecord.dat file » from Aerosoft) :
If the default Navdatapro/Navigraph installation path is correct (c:\users\username\appdata\roaming\jeehellware), the FMGS software will automatically detect the update and generate the 10 « .bin » files, just like on the first run. You will have to again manually copy the files to the client computers running the NDs.
If you used a different path for Navdatapro/navigraph, you'll have to manually copy the « navrecord.dat » file, delete the old « .bin » files, and proceed like a first run.
Modifications of scenery in FSX/P3D:
Any modification on the scenery installed in Flight Simulator (new add-on or removal of an add-on) requires the update of the « .bin » files.
Simply delete the 10 « .bin » files then proceed as for a first run.
5.5 - Check it works
At this stage, it is possible to check your installation and setup are correct.
As in the real aircraft in cold & dark cockpit, all your screens and buttons are not lit.
Check:
PFD, ND, EWD, SD = black screens.
OVHD = all « Korries » (switches with built in LEDs) off.
Server says « Connected » for all components (even for remote PCs).
No error messages linked to the software, navdata or else
No blocking message (such as antivirus or firewall alerts).

JeeHell
A320 FMGS
Beta 52.2
Installation Guide
Quick Back to Contents : Click here
Version 52.2
09 / 06 / 2019
Page 34 / 49
On the OVHD panel, click on BAT1 & BAT2 korries (indication « OFF » comes white). Check:
Korries = most OFF indications come white.
PFD, ND, EWD ; SD = displays go live.
Note : connection of the applications to the server can also be checked by doing a right click then “option”, on each application.
5.6 - Setup Screen displays (size, rotation, position)
Move the screens/instruments by « drag & drop »: click on the software, move around, then release mouse button.
Using the right click menu (picture below):
Make sure « Hide border » is not checked. You can now resize as any regular window. You may check it again to hide the border line.
Click Rotate (counter)clockwise to rotate the display by +/-90° (FCU, EFIS and Overhead cannot be rotated).
« Always on top » will make sure the instrument is always in the foreground.
« Lock position » will make sure you cannot accidentally move the window around.
Click on « Save Settings » every time you make a change (position, size, etc) to save for next time.
« Set AA » Allows you to set the level of Anti-Aliasing. 4X seems a good value.
JeeHell
A320 FMGS
Beta 52.2
Installation Guide
Quick Back to Contents : Click here
Version 52.2
09 / 06 / 2019
Page 35 / 49
When you save the settings, they are stored in a file called « XXX.ini », where XXX is the instrument name. Delete that file to restore “manufacture” settings.
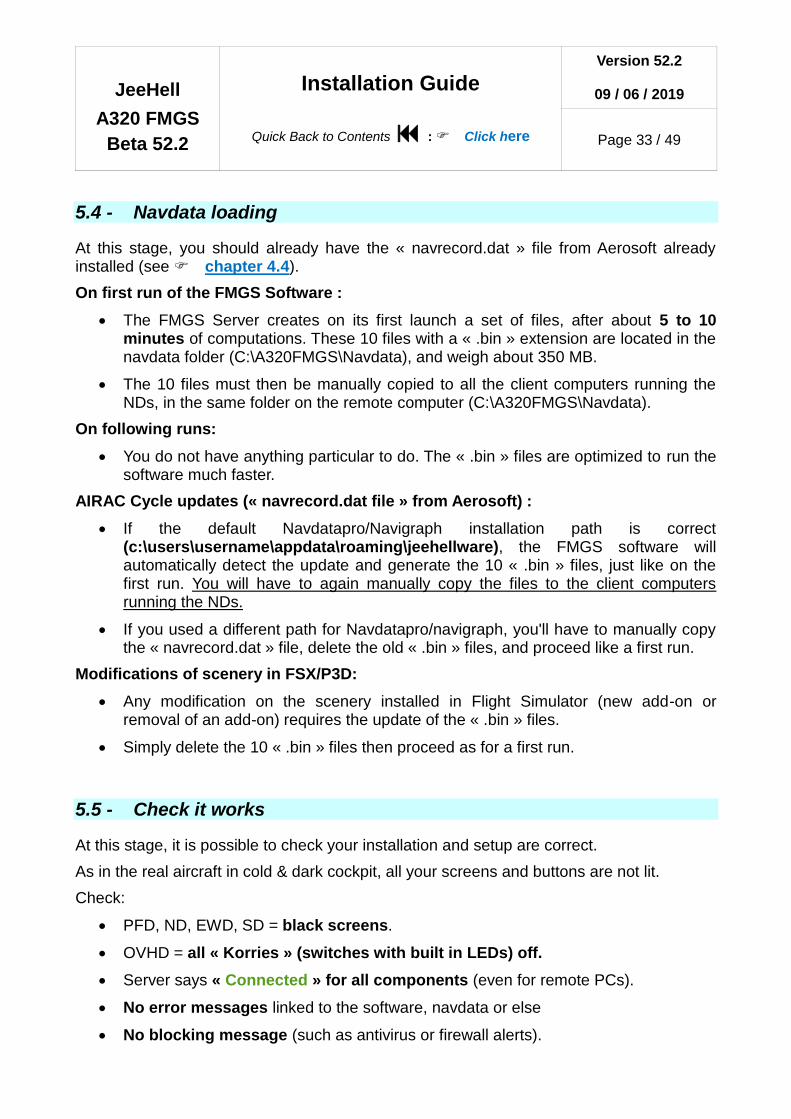
5.7 - Auto Pilot and Fly-By-Wire
The AP / FD and FBW systems are handled in a separate module ran along FMGS. This AP / FBW must be running !
Check in the drop-down menu “AP/FBW coefficients” :
« CFM » (normally selected by default) for A320-214,
« IAE » for A320-233.
Of course, you will also have to select the corresponding aircraft in FSX / P3D.
Reminder: JeeHell A320 FMGS installs the required flight model during installation (see chapter 2.5). Only advanced user should change the model and/or the AP/FBW coefficients.
This module must be running at all times!
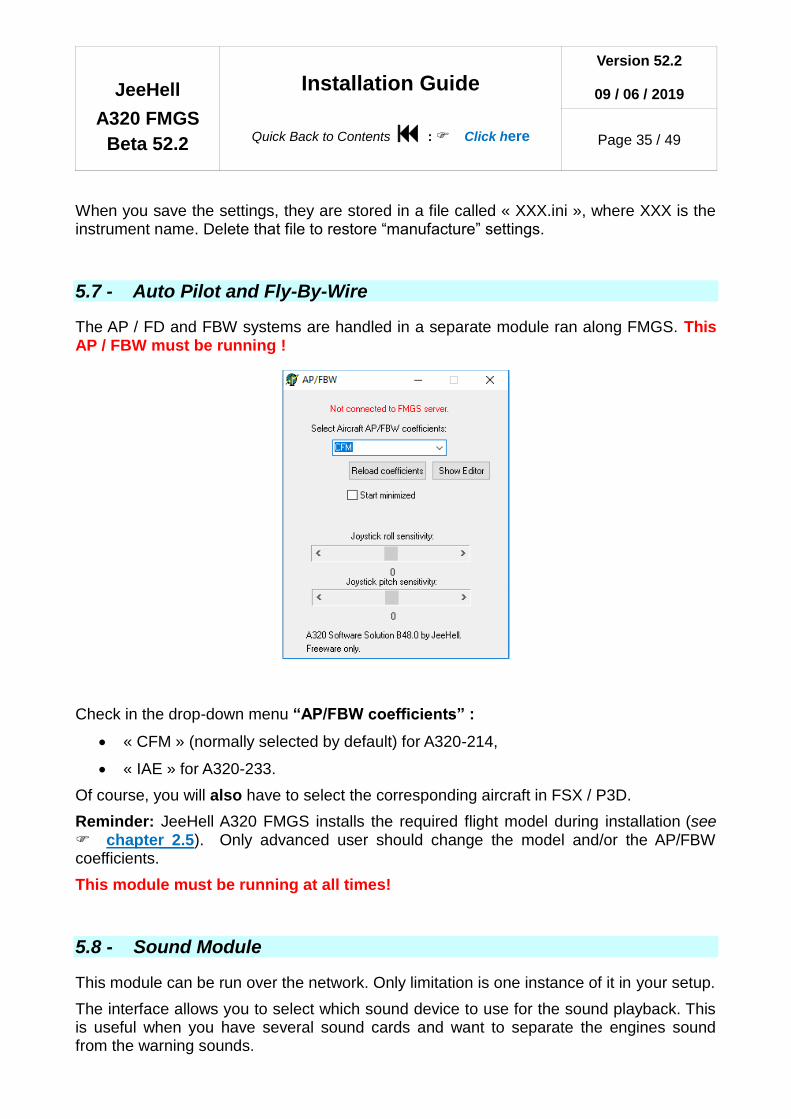
5.8 - Sound Module
This module can be run over the network. Only limitation is one instance of it in your setup.
The interface allows you to select which sound device to use for the sound playback. This is useful when you have several sound cards and want to separate the engines sound from the warning sounds.
JeeHell
A320 FMGS
Beta 52.2
Installation Guide
Quick Back to Contents : Click here
Version 52.2
09 / 06 / 2019
Page 36 / 49
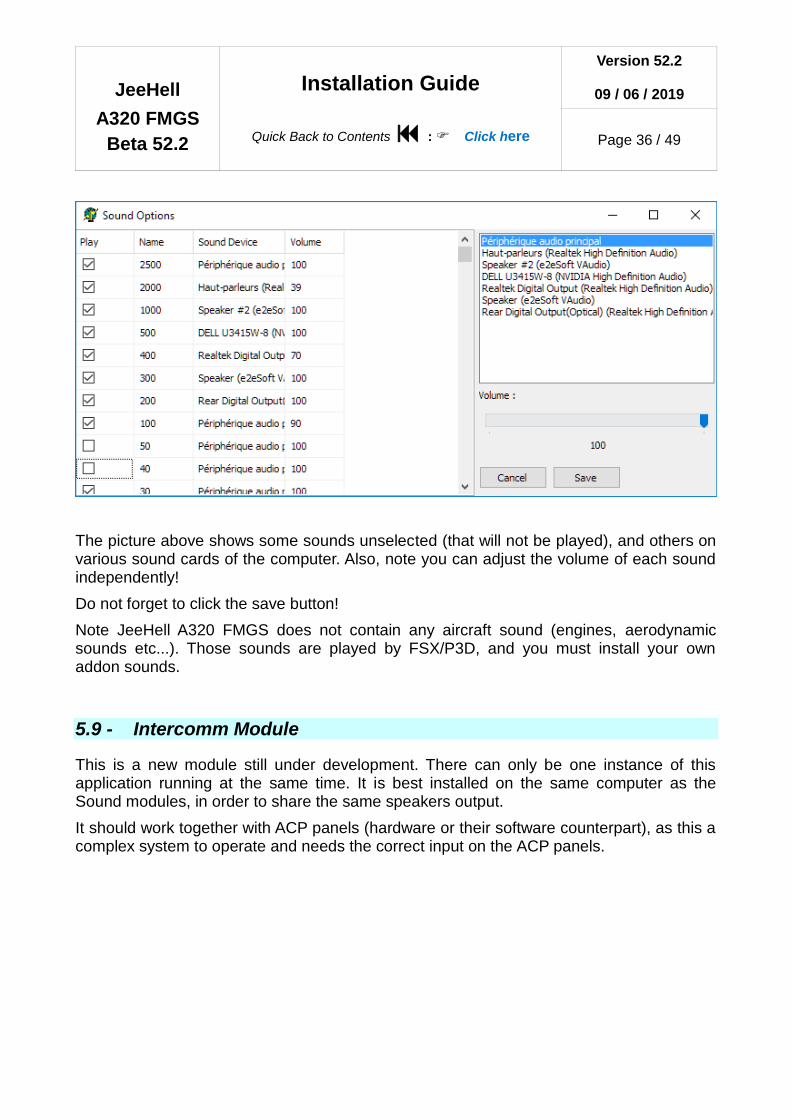
The picture above shows some sounds unselected (that will not be played), and others on various sound cards of the computer. Also, note you can adjust the volume of each sound independently!
Do not forget to click the save button!
Note JeeHell A320 FMGS does not contain any aircraft sound (engines, aerodynamic sounds etc...). Those sounds are played by FSX/P3D, and you must install your own addon sounds.
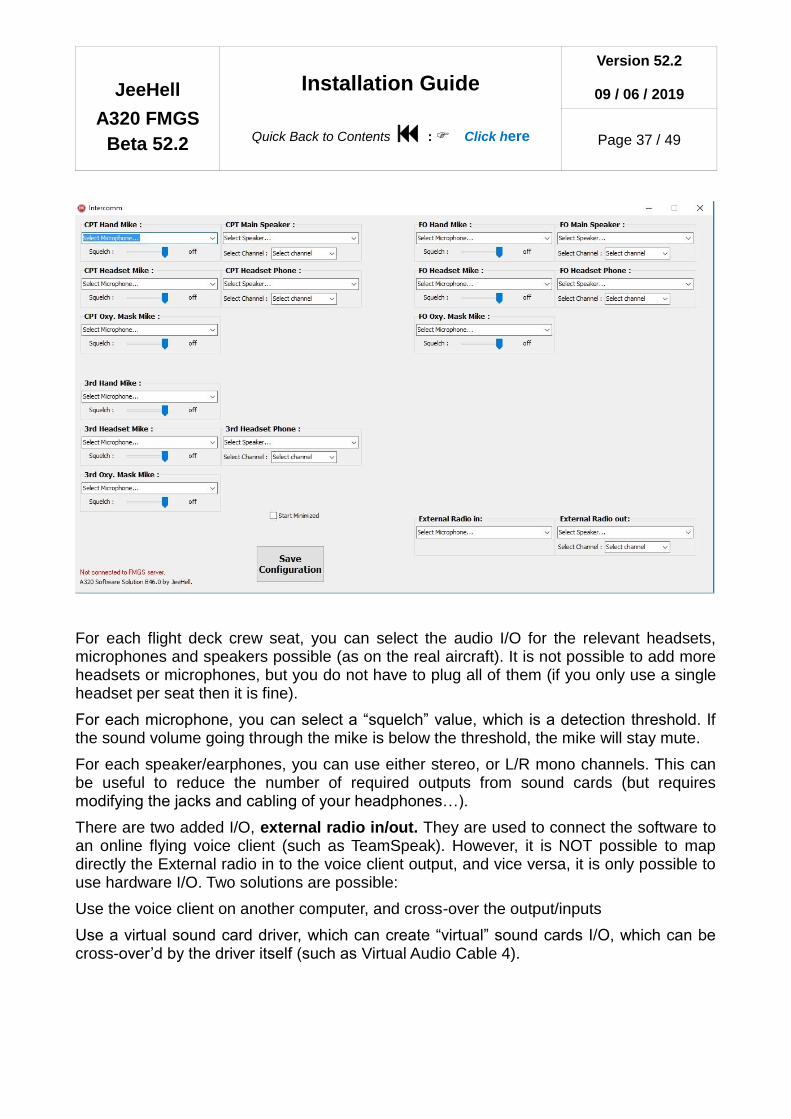
5.9 - Intercomm Module
This is a new module still under development. There can only be one instance of this application running at the same time. It is best installed on the same computer as the Sound modules, in order to share the same speakers output.
It should work together with ACP panels (hardware or their software counterpart), as this a complex system to operate and needs the correct input on the ACP panels.
JeeHell
A320 FMGS
Beta 52.2
Installation Guide
Quick Back to Contents : Click here
Version 52.2
09 / 06 / 2019
Page 37 / 49
For each flight deck crew seat, you can select the audio I/O for the relevant headsets, microphones and speakers possible (as on the real aircraft). It is not possible to add more headsets or microphones, but you do not have to plug all of them (if you only use a single headset per seat then it is fine).
For each microphone, you can select a “squelch” value, which is a detection threshold. If the sound volume going through the mike is below the threshold, the mike will stay mute.
For each speaker/earphones, you can use either stereo, or L/R mono channels. This can be useful to reduce the number of required outputs from sound cards (but requires modifying the jacks and cabling of your headphones…).
There are two added I/O, external radio in/out. They are used to connect the software to an online flying voice client (such as TeamSpeak). However, it is NOT possible to map directly the External radio in to the voice client output, and vice versa, it is only possible to use hardware I/O. Two solutions are possible:
Use the voice client on another computer, and cross-over the output/inputs
Use a virtual sound card driver, which can create “virtual” sound cards I/O, which can be cross-over’d by the driver itself (such as Virtual Audio Cable 4).

JeeHell
A320 FMGS
Beta 52.2
Installation Guide
Quick Back to Contents : Click here
Version 52.2
09 / 06 / 2019
Page 38 / 49
5.10 - EGPWS terrain database ◄
(This section used to be in the experts guide)
This is an optional part, you can leave this out for later.
The A320 FMGS software has an EGPWS system, which requires a terrain database to work. The US government provides a free database called GTOPO30, which can be used to make a compatible database for the A320 FMGS software.
The database cannot be included in the installer package, because of its size (1.44 Gb for the global data) and also because of redistribution rights (free database does not mean free to redistribute). This means you must download the data yourself here:
http://earthexplorer.usgs.gov/
You MUST register on that website to have access to the downloads. If you do not wish to give any personal data to the USGS, then you will not be able to use the EGPWS.
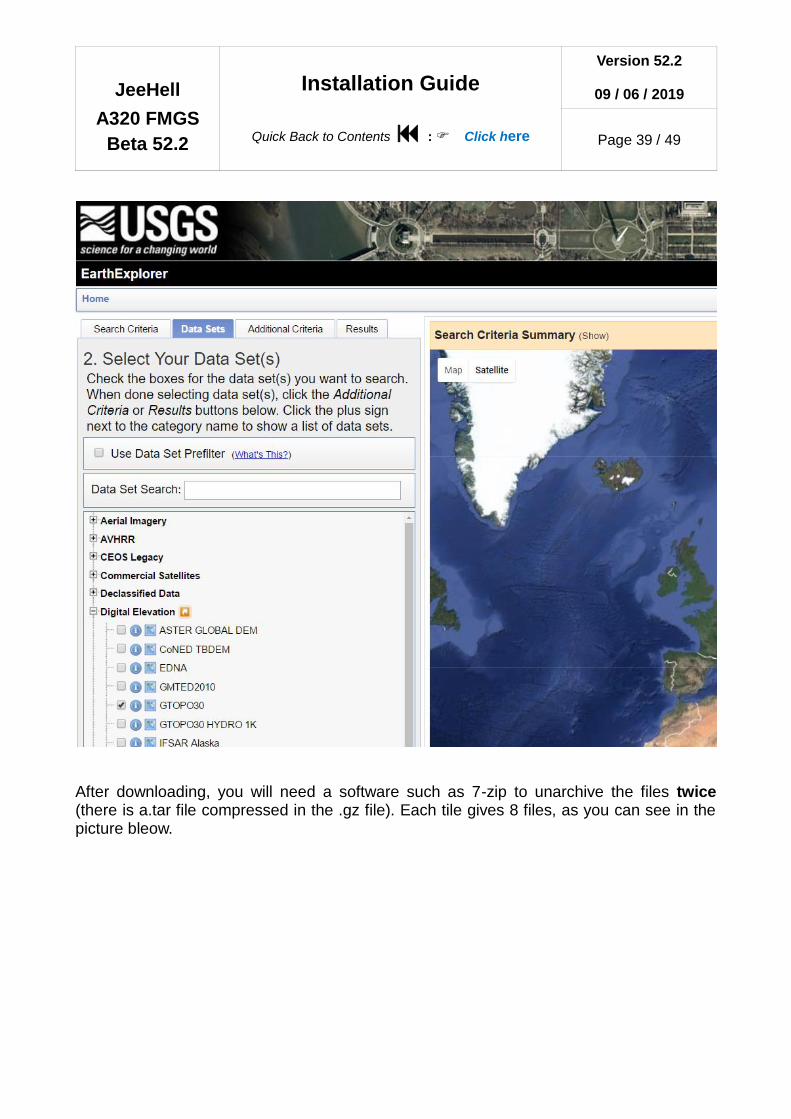
On that webpage, as you can see on the picture below, you must go in the “Data Sets” tab, hen expand the “Digital Elevation” tree. Then check the “GTOPO30” box and finally click on the “Results” tab.
You should get a total of 34 tiles. You do not need to download Antarctica tile which is not considered in the software anyway.
To download the tiles, you need to click on the download icon for each tile. This is where it is mandatory to have a working login into the USGS website.
JeeHell
A320 FMGS
Beta 52.2
Installation Guide
Quick Back to Contents : Click here
Version 52.2
09 / 06 / 2019
Page 39 / 49
After downloading, you will need a software such as 7-zip to unarchive the files twice (there is a.tar file compressed in the .gz file). Each tile gives 8 files, as you can see in the picture bleow.
JeeHell
A320 FMGS
Beta 52.2
Installation Guide
Quick Back to Contents : Click here
Version 52.2
09 / 06 / 2019
Page 40 / 49
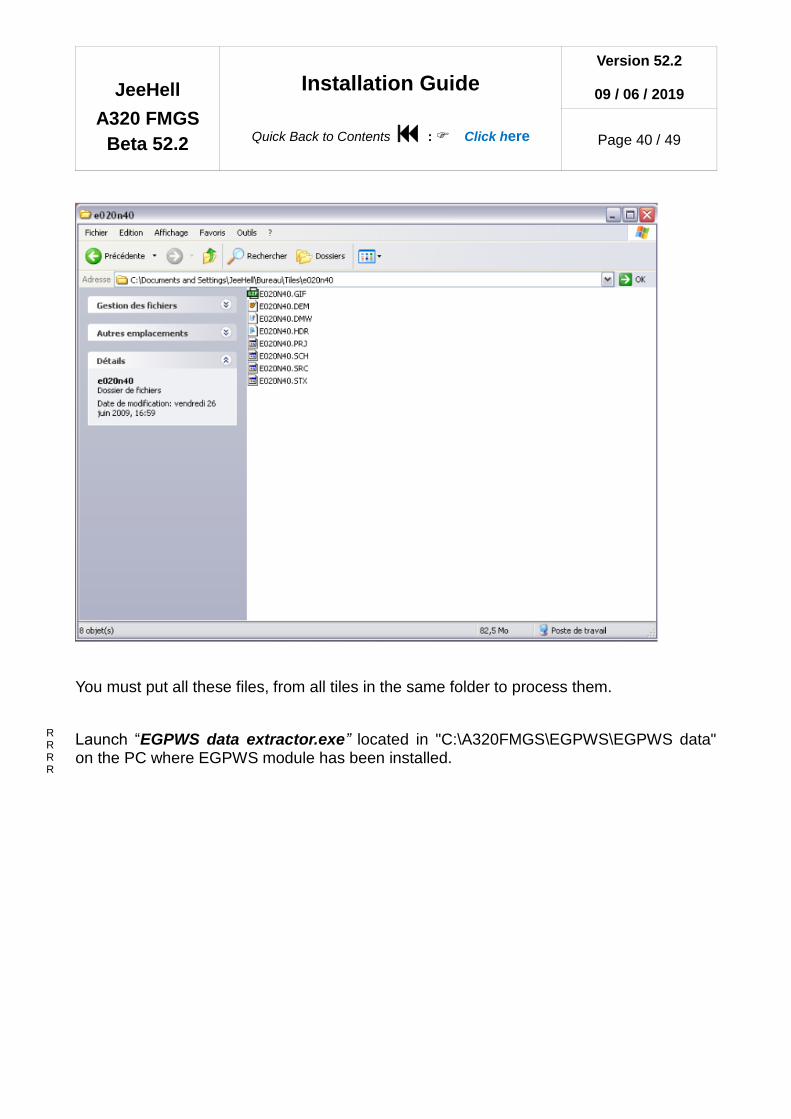
You must put all these files, from all tiles in the same folder to process them.
Launch “EGPWS data extractor.exe” located in "C:\A320FMGS\EGPWS\EGPWS data" on the PC where EGPWS module has been installed.
RRRRRRRRRRRRRRRRRRRRRRRRRRRRRRRRR
JeeHell
A320 FMGS
Beta 52.2
Installation Guide
Quick Back to Contents : Click here
Version 52.2
09 / 06 / 2019
Page 41 / 49
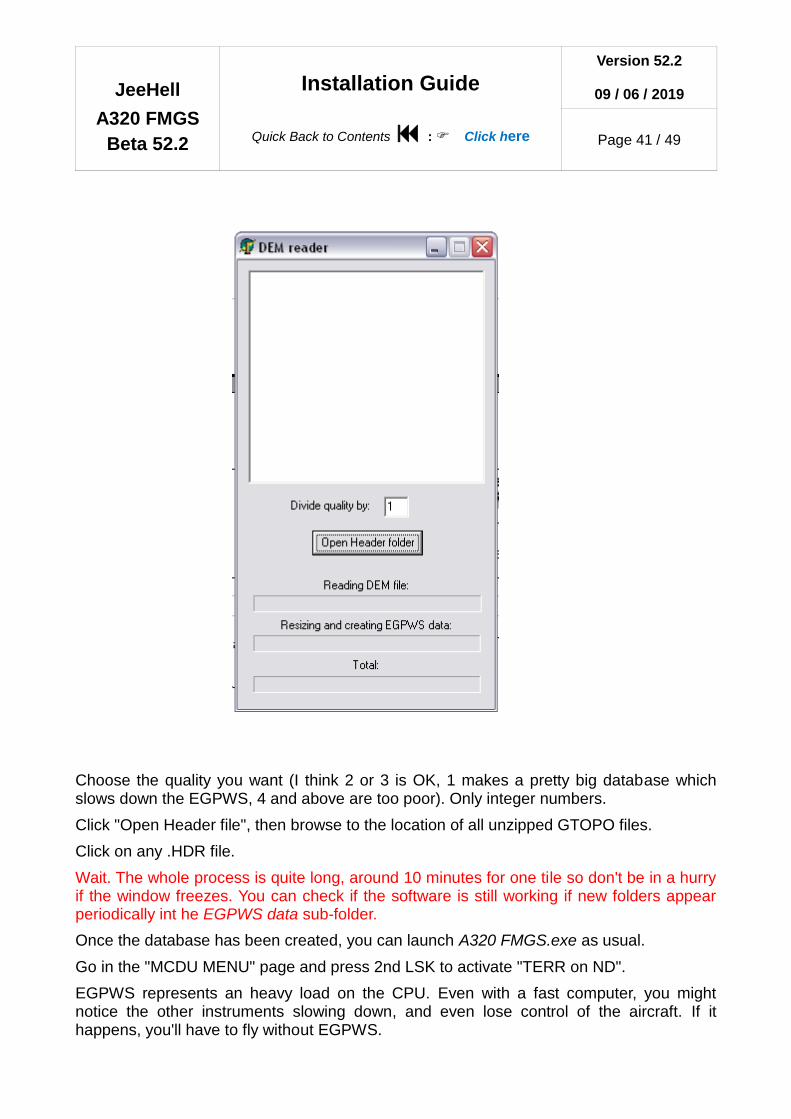
Choose the quality you want (I think 2 or 3 is OK, 1 makes a pretty big database which slows down the EGPWS, 4 and above are too poor). Only integer numbers.
Click "Open Header file", then browse to the location of all unzipped GTOPO files.
Click on any .HDR file.
Wait. The whole process is quite long, around 10 minutes for one tile so don't be in a hurry if the window freezes. You can check if the software is still working if new folders appear periodically int he EGPWS data sub-folder.
Once the database has been created, you can launch A320 FMGS.exe as usual.
Go in the "MCDU MENU" page and press 2nd LSK to activate "TERR on ND".
EGPWS represents an heavy load on the CPU. Even with a fast computer, you might notice the other instruments slowing down, and even lose control of the aircraft. If it happens, you'll have to fly without EGPWS.

JeeHell
A320 FMGS
Beta 52.2
Installation Guide
Quick Back to Contents : Click here
Version 52.2
09 / 06 / 2019
Page 42 / 49
5.11 - Weather Radar
This is an optional part, you can leave this out for later.
Since version B47.0, the software can display a weather radar image, provided by HiFi’s weather addon (ASNext or AS16 for FSX/P3D, or “ASP4” especially for P3DV4). Other weather addons providing a WXR are not compatible unfortunately, due to the lack of a correct interface.
Check https://hifisimtech.com for information on the WXR addon.
The WXR detects preiciapation and turbulences associated to precipitations. It will only display data when there is rain/snow/hail.
Setting up the WXR is a rather complex operation:
You need to have a working ASN / AS16 / ASP4.
On the FSX/P3D computer, you will be prompted to declare the WXR path (see chapter 4.1). I suggest leaving the default path.
You MUST then share this folder. Usually, you will need to right click on that fodler and select sharing options. This guide is not a Windows tutorial, you can find plenty of help on internet. Just make sure you do not need login/password to access the shared folder remotely.
It is possible to use network mapped drives. HOWEVER, due to the security features of windows, and particularly sandboxing features, a mapped drive created even with an admin session will not be accessible by my software running with admin rigths. The mapped drive must be created by a batch file … So only for VERY advanced users.
On all PCs running either PFD or ND applications, you must set in the WXR path the shared folder (it might look like, for example, “\\YOURP3DPC\WXR” ).
Some addons use FSUIPC to retrieve WXR image from AS16/ASN.This has the effect of disabling WXR access to other addons (AS16/ASN only gives one access to one addon at a time). You need to remove that feature in FSUIPC.ini file.
The WXR relies on the module called Simpatcher, provided with the FMGS software. If it is not correctly installed, you need to install it manually (see chapter 4.5). When Simaptcher is running correctly, and ASN16/ASN interface works, the WXR folder will be populated with files at regular intervals.
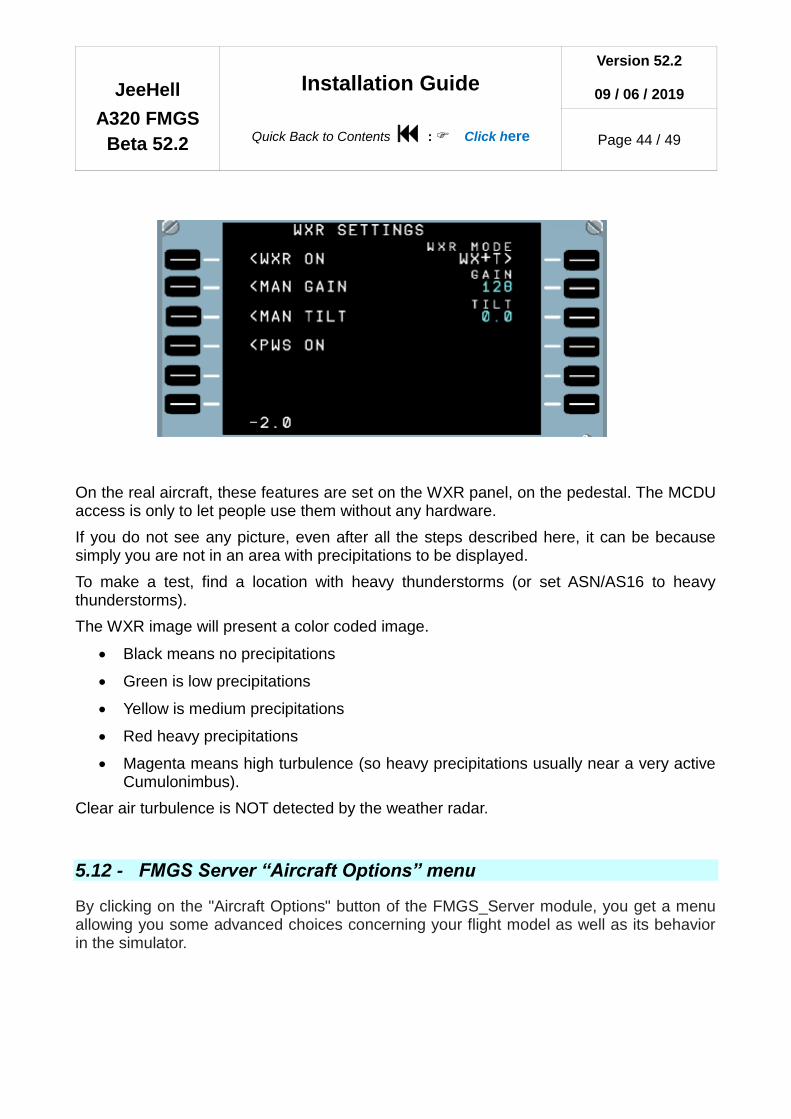
To operate the WXR, you can go in the “MCDU MENU” page of each MCDU. You will then get some controls on the WXR.
JeeHell
A320 FMGS
Beta 52.2
Installation Guide
Quick Back to Contents : Click here
Version 52.2
09 / 06 / 2019
Page 43 / 49
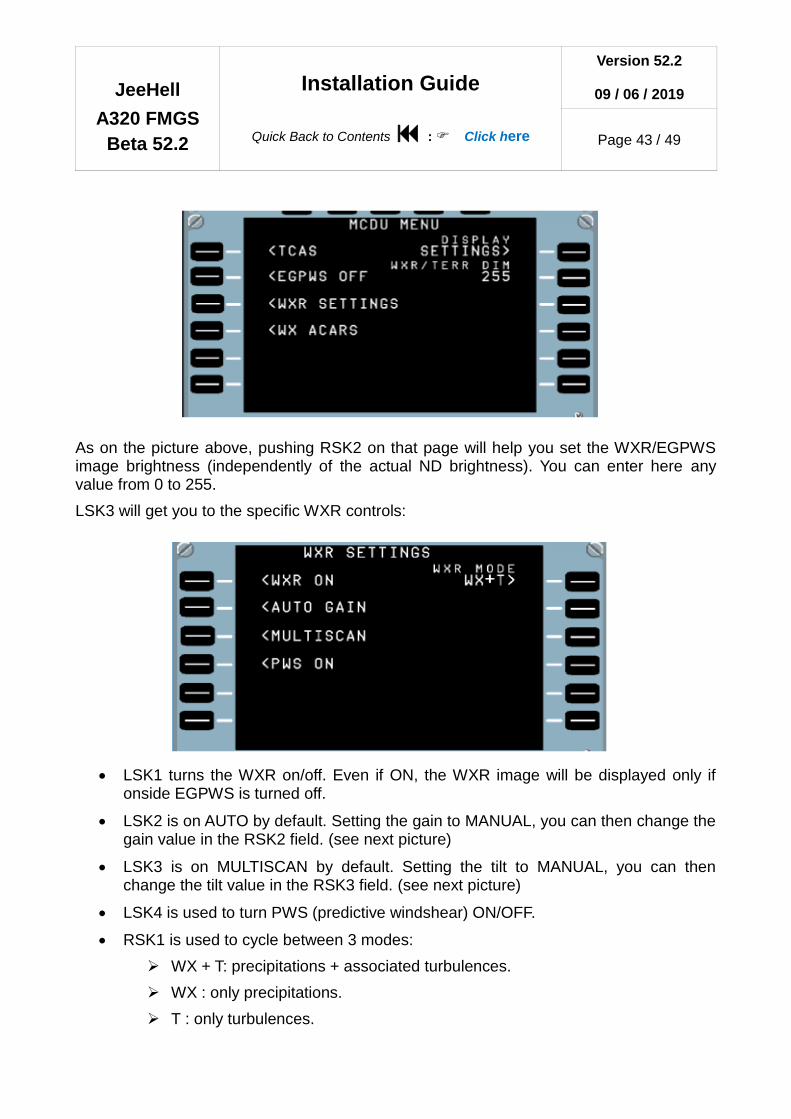
As on the picture above, pushing RSK2 on that page will help you set the WXR/EGPWS image brightness (independently of the actual ND brightness). You can enter here any value from 0 to 255.
LSK3 will get you to the specific WXR controls:
LSK1 turns the WXR on/off. Even if ON, the WXR image will be displayed only if onside EGPWS is turned off.
LSK2 is on AUTO by default. Setting the gain to MANUAL, you can then change the gain value in the RSK2 field. (see next picture)
LSK3 is on MULTISCAN by default. Setting the tilt to MANUAL, you can then change the tilt value in the RSK3 field. (see next picture)
LSK4 is used to turn PWS (predictive windshear) ON/OFF.
RSK1 is used to cycle between 3 modes:
WX + T: precipitations + associated turbulences.
WX : only precipitations.
T : only turbulences.
JeeHell
A320 FMGS
Beta 52.2
Installation Guide
Quick Back to Contents : Click here
Version 52.2
09 / 06 / 2019
Page 44 / 49
On the real aircraft, these features are set on the WXR panel, on the pedestal. The MCDU access is only to let people use them without any hardware.
If you do not see any picture, even after all the steps described here, it can be because simply you are not in an area with precipitations to be displayed.
To make a test, find a location with heavy thunderstorms (or set ASN/AS16 to heavy thunderstorms).
The WXR image will present a color coded image.
Black means no precipitations
Green is low precipitations
Yellow is medium precipitations
Red heavy precipitations
Magenta means high turbulence (so heavy precipitations usually near a very active Cumulonimbus).
Clear air turbulence is NOT detected by the weather radar.
5.12 - FMGS Server “Aircraft Options” menu
By clicking on the "Aircraft Options" button of the FMGS_Server module, you get a menu allowing you some advanced choices concerning your flight model as well as its behavior in the simulator.

JeeHell
A320 FMGS
Beta 52.2
Installation Guide
Quick Back to Contents : Click here
Version 52.2
09 / 06 / 2019
Page 45 / 49
EIS model : choose between the two types of screen interfaces.
“Rounded corners screens" (original CRT models) leaving the value "1".
“Square corners screen" (recent models) by replacing "1" with "2".
Altimeter Temperature Effect : Basically, FS and P3D do not simulate an important phenomenon : the effect of temperature on the altitude displayed on the altimeter. If it is warmer than the ISA atmosphere, the altimeter underestimates the altitude; if it is colder, he overestimates altitude.
The default "Altimeter Temperature Effect" option ("yes") takes this effect into account.
However, for those who fly online (IVAO, ...) the altitude of the aircraft will not be that expected by the controller or other aircrafts ... The "Altimeter Temperature effect" option allows you to disable this function by replacing “yes” by “no”.
Other options : We advise you to leave the default choices if you do not have sufficient knowledge of the A320 and its features.

JeeHell
A320 FMGS
Beta 52.2
Installation Guide
Quick Back to Contents : Click here
Version 52.2
09 / 06 / 2019
Page 46 / 49
5.13 - You're now ready to use JeeHell A320 FMGS
You should by now have installed and set up everything needed to perform your first flight.
Please read the User Guide (separately available) which you'll find helpful to conduct your first flights.
Read the Advanced User Guide (separately available) where the following points are detailed :
FSUIPC offsets
SIOC/Opencockpits integration as hardware interface.
Also read « Frequently Asked Questions (FAQ) » right after this chapter in case you run into issues.
5.14 - Uninstallation
You just have to run “Unist000.exe”, located in the folder C:/A320FMGS. Some files and folder will remain, in order to a further installation.
If you want to remove these elements to start from a complete installation, but have already configured your axes and screen positions, you can save the following files, copying them into another place :
Acontrols.cfg and JoySW.cfg (Joysticks and pedals buttons and axes),
• ".ini" or ".cfg" terminated files with the name of the modules (PFD.ini, ND.ini, OVHDvisual.ini, configMCDU.cfg, configFCU.cfg, configFOEFIS.cfg…
Do the same for the files from EGPWS data extraction.
Naturally, you will then put all them in their respective folders after your new installation.
Have nice flights !!!
JeeHell
A320 FMGS
Beta 52.2
Installation Guide
Quick Back to Contents : Click here
Version 52.2
09 / 06 / 2019
Page 47 / 49
6. Frequently Asked Questions (FAQ)
Q1. I want to see what the instruments look like, what do I have to do?
A. You need to install the FMGS on your FSX/P3D computer, then simply run the instruments separately. You NEED to launch the OVHD in order to switch on electrical power.
You can easily achieve a running state of the software by launching the suite using the « StarterENGRUN » application on the Server PC, check chapter 5.1.
Q2. I move my joysticks and throttle levers in all directions, but nothing moves inside FSX/P3D?
A. You first need to setup your Controls in the FMGS Config.exe software ! Check chapter 4.2 of this guide.
Q3. Can everything run on the network?
A. Now, yes. Refer to chapter 3.3 and following of this Manual. Q4. Is it mandatory to have analog axis for the sidesticks and thrust levers?
A. If you want to actually fly, this is mandatory for the sidesticks. B46+ provides now a graphical software panel for the thrust levers, but an actual hardware is still much more accurate.
Q5. All instruments and panels are black...
A. You need electrical power, see the first question... Also, after powering u the aircraft, a little delay of about 30s may be needed for the display to turn ON (simulating the real power up sequence)
Q6. I use FSUIPC to command the OVHD inputs, do I nevertheless need to launch the OVHD software?
A. The OVHD logic is part of a different application than the graphical interface. This means the graphical interface is not needed at all, but the logical one (on the FMGS Server) still is.
Q7. Most cfg files in the FMGS folders are unreadable?
A. The files that are not readable must not be modified by hand, they are created and modified by the software only.
Q8. The instruments are ON, but PFD and ND only show red flags such as HDG or ATT?
A. You need to align the IRS. To do so on the upper OVHD:
switch on the ADRs on the upper OVHD

JeeHell
A320 FMGS
Beta 52.2
Installation Guide
Quick Back to Contents : Click here
Version 52.2
09 / 06 / 2019
Page 48 / 49
Switch the IRs selectors on NAV (normal alignment, for a quick alignment, select them back OFF then back NAV again quickly)
When IRS alignment is complete, you need to initialize the IRS position through the MCDU INIT A page, after departure and destination fields are filled.
Read the User Guide for more information.
Q9. I cannot start the engines, help!!
A. To start an engine, it needs electricity and bleed air. The EXT WPR and GND HP features of the FSX/P3D add-on menu allow to easily turn them ON. Then on the OVHD panel:
Then on the upper OVHD, go to the Engine start panel (you can make it appear in the right click menu). Place the mode selector on IGN/START, then flick the engine master switches ON.
Read the User Guide for more information.
For an even easier startup sequence, start the software with the « StarterENGRUN » application on the Server PC, check chapter 5.1.
Q10. I want to use only the PFD, ND and ECAMs, is it possible?
A. No. This software is designed as whole, if you want to skip the systems logic, you'd miss a lot of the functions that are not by default in FSX or P3D. The point of this software is to produce a realistic complete A320 experience, without compromises.
Q11. I've just aligned the IRS1 and initialized the position on INITA page in the MCDU. The captain ND is showing the map but the FO one is still displaying red flags.
A. Under normal operations, CAPT ND receives data from IR1, whereas FO ND receives data from IR2. The IR3 provides data for both sides as a backup. It is good practice to align the three IRS at the same time, before engine start.
Read the User Guide for more information.
Q12. I've upgraded my preexisting installation to the latest beta release of the suite. When I launch an instrument (FCU, ND, etc) it shows the error “--- is not a valid Boolean value” or a similar error.
A. You probably forgot to update some of the instruments. All .exe files have to be replaced, even on client computers.
Q13. What Navigation Data do I have to use?
A. You must use Navdata from either Aerosoft or Navigraph
If you use Aerosoft, using their NavDataPro application, the format to choose for

JeeHell
A320 FMGS
Beta 52.2
Installation Guide
Quick Back to Contents : Click here
Version 52.2
09 / 06 / 2019
Page 49 / 49
download is called "JeeHellWare". Q14. I try to use F5-F8 keys for the flaps, but it does not work?
A. Almost all controls must be assigned from FMGS_Config.exe application. The A320 being very complex, FSX systems are somewhat too simple, and I had to bypass most of FS internal systems. This way, FSX is merely the aerodynamics model and visual system.
Q15. When airborne, I lose the NAV managed mode?
A. Usually this means you did not complete the MCDU properly before taking off. Make sure you have the INITA and B, PERF and FPLN pages filled. Also the ADIRS must be aligned.
Some have had issues because of their throttle not being calibrated correctly in FMGS config. When putting the levers in FLX or TOGA, it may not be detected in that position by the software, and so the Takeoff Mode does not engage, losing the managed modes.
Q16. I'm having any kind of troubles, can I contact you?
A. Of course, but first check your installation is complete, as stated in this Installation Guide! Check particularly:
Axis and buttons are configured
All necessary instruments are running (including minimized software).
Network is configured
Your anti-virus or firewall is not blocking any application
You studied thoroughly this Installation Guide
This document can not cover all possible hardware configurations.
Also, all configurations suggested here may not have been fully tested, and are not forming hardware/configuration specifications.
This document will evolve, as users share their experiences.