january 1, 2014 georgia soil and water conservation ... new... · georgia soil and water...
TRANSCRIPT

January 1, 2014
1
Georgia Soil and Water Conservation Commission The Manual for Erosion and Sediment Control in Georgia
New Products Procedure Introduction The Georgia Soil and Water Conservation Commission (GSWCC) was formed to protect, conserve and improve the soil and water resources of the State of Georgia. GSWCC's goal is to make Georgia a better place for its citizens through the wise use and protection of basic soil and water resources and to achieve practical water quality goals. GSWCC is responsible for maintaining the Manual for Erosion and Sediment Control in Georgia (Manual). The Manual contains standards and specifications that are followed and practiced through out the state of Georgia. The Manual was first published in 1975. Since then the Manual has under gone five revisions with the last revision happening in 2001. Chapter 6 of the Manual focuses on the standards and specifications for planning, design and installation of erosion and sediment control measures. In February 2009, GSWCC received a Federal 319 Grant to establish benchmark standards and procedures for accepting new practices and products into the Manual. The approved products list maintained by GSWCC is only for the Manual. Submittal Process To be considered for product approval, manufacturers will need to submit the following:
1. A completed GSWCC Product Approval Application 2. Product sample, product specifications, product literature, installation references, field performance
data, and any other state agency that has testing in progress, tests completed and/or product approval. 3. Certified lab results from a qualified laboratory capable of performing the required GSWCC tests. 4. Private label identification: Provide a letter from the private labeler identifying his source and name of
material along with a companion letter from the manufacturer. Material properties and identifying names shall be included in the letters of certification.
Products that meet GSWCC specified benchmarks are not guaranteed to be placed on the GSWCC Approved Products list. Products that are not environmentally compatible will not be allowed. All products must be approved by the GSWCC Board. Product information submitted by the manufacturers to GSWCC will not be considered confidential unless otherwise noted. Recertification Recertification of products, on a 3 year cycle, will be required for products to remain on the approved list. Manufacturers will be required submit a letter certifying that the product is still being manufactured with the same quality and composition as the test material originally submitted for evaluation. The submission of index tests may also be required. If modifications to an approved product have been made, manufacturers will have to have the current product retested and results submitted to GSWCC.

January 1, 2014
2
GSWCC Required Testing GSWCC has outlined specific tests for each practice currently in the Manual. The required tests are as followed:
1. Channel Stabilization Products seeking approval for channel stabilization applications must be tested according to ASTM D6460 Standard Test Method for Determination of Rolled Erosion Control Product (RECP) Performance in Protecting Earthen Channels from Stormwater-Induced Erosion. Products will be categorized as followed:
1. Category 1 (0-5 ft/sec) Vegetated Lining with Blankets 2. Category 2 (5- 10 ft/sec) Vegetated Lining with TRM or Rip Rap Lining 3. Category 3 (> 10 ft/sec) Concrete Lining
Reports should include ft/sec and equivalent sheer stress. 2. Check Dams
Products seeking approval for check dam applications must be tested using ASTM D7208 (Modified), as specified by GSWCC. The check dam must perform better than the unchecked channel 20% of control (i.e. 80% reduction in soil loss), and withstand a flow rate of 2.0 cfs. The product shall be tested at 0.5cfs, 1.0cfs and 2.0cfs, using sandy clay soil as shown on the USDA soil triangle. Please refer to GSWCC Approved Test Method for check dams, for complete testing procedures.
3. Inlet Sediment Traps
Products seeking approval for inlet sediment trap applications must be tested using ASTM D7351 – Modified (Proposed April 2013), as specified by GSWCC. Inlet sediment traps shall meet 90% soil retention efficiency with a minimum seepage efficiency of 65% for unpaved areas and shall meet 75% soil retention efficiency with a minimum seepage of 85% for paved areas.
4. Rolled and Hydraulic Erosion Control Products (Slope Stabilization) To be approved as a RECP or HECP the manufacturer must submit independent research data from rainfall simulated slope tests conducted through the National Transportation Product Evaluation Program (NTPEP) using ASTM D6459. With the only modifications allowed pertain to the installation methods required for HECPs and RECPs. Products shall have a maximum C-factor ASTM D6459 –for the following slope grade: Slope (H: V) C-Factor (max.) 3:1 or steeper 0.080

January 1, 2014
3
5. Sediment Barriers Sediment Barriers are to be tested according to the procedures by GSWCC. GSWCC is incorporating elements from the “Methods” and “Data Analyses” sections of the technical publication titled “Needed Information: Testing, Analyses, and Performance Values for Slope Interruption and Perimeter Control BMPs” authored by Kurt Kelsey, Tony Johnson, and Ryan Varva (IECA 2006) and portions of ASTM D6459 and ASTM WK 11340 (February 2012) to create its own test for sediment barrier (Sd1) products.
Please refer to GSWCC Approved Test Method for sediment barriers, for complete testing procedures. Each product will be required to perform index testing for quality control purposes. The index testing are as follows:
Two Dimensional Products (Geotextile – type), will include, but not limited to:
Mass /Area Thickness – ASTM D 5261 and ASTM D 5199 Tensile Strength – ASTM D 4632 Permittivity (flow) – ASTM D 4491 Apparent Opening Size – ASTM D 4751 Percent Open Area – Light Projection
Three Dimensional Products (Watttle – type), will include, but not limited to:
Mass/Volume Circumference/Perimeter Relevant Component Properties, such as but not limited to netting tensile strength
If a product does not meet one of these categories, please contact GSWCC’s Urban Program to discuss what index tests would be required. Products seeking approval must meet a P-factor of 0.030 for sensitive area applications and a P-factor of 0.045 for non sensitive area applications.
Sensitive areas can be defined as any area that needs additional protection, these areas include but not limited to state water, wetlands, or any area the design professional designates as sensitive.
6. Tackifiers For general use, the tackifier must meet the specifications in Manual. To be used in other BMP applications such as Slope Stabilization or Channel Stabilization please refer to that BMP testing specification.

January 1, 2014
4
References: ASTM D7208 “Standard Test Method for Determination of Temporary Ditch Check Performance in Protecting Earthen Channels from Stormwater Induced Erosion”, ASTM D6460 Standard Test Method for Determination of Rolled Erosion Control Product (RECP) Performance in Protecting Earthen Channels from Stormwater-Induced Erosion. ASTMD6459 “Standard Test Method for Determination of Rolled Erosion Control Product (RECP) Performance in Protecting Hillslopes and Rainfall Induced Erosion”, References (continued) ASTM D7208 “Standard Test Method for Determination of Temporary Ditch Check Performance in Protecting Earthen Channels from Stormwater Induced Erosion”, ASTM D7351 (Modified) Determination of Inlet Sediment Trap Effectiveness in Inlet Protection Applications WK11340 *Reprinted, with permission, from WK11340 “Standard Test Method for Determination of Sediment Retention Devices (SRDs) Performance in Reducing Soil Loss from Rainfall-Induced Erosion (December 2010), copyright ASTM International (ASTM), 100 Barr Harbor Drive, West Conshohocken, PA 19428. A copy of the complete standard may be obtained from ASTM, www.astm.org,
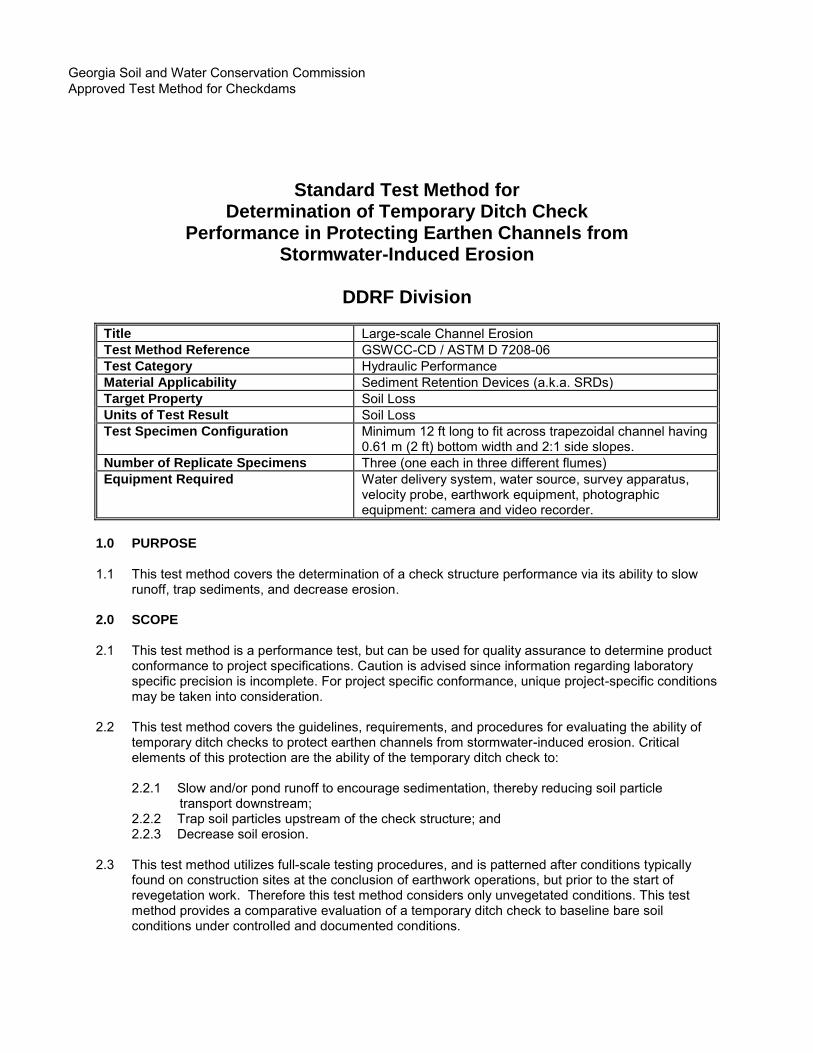
Standard Test Method for Determination of Temporary Ditch Check
Performance in Protecting Earthen Channels from Stormwater-Induced Erosion
DDRF Division
Title Large-scale Channel Erosion Test Method Reference GSWCC-CD / ASTM D 7208-06 Test Category Hydraulic Performance Material Applicability Sediment Retention Devices (a.k.a. SRDs) Target Property Soil Loss Units of Test Result Soil Loss Test Specimen Configuration Minimum 12 ft long to fit across trapezoidal channel having
0.61 m (2 ft) bottom width and 2:1 side slopes. Number of Replicate Specimens Three (one each in three different flumes) Equipment Required Water delivery system, water source, survey apparatus,
velocity probe, earthwork equipment, photographic equipment: camera and video recorder.
1.0 PURPOSE 1.1 This test method covers the determination of a check structure performance via its ability to slow
runoff, trap sediments, and decrease erosion. 2.0 SCOPE 2.1 This test method is a performance test, but can be used for quality assurance to determine product
conformance to project specifications. Caution is advised since information regarding laboratory specific precision is incomplete. For project specific conformance, unique project-specific conditions may be taken into consideration.
2.2 This test method covers the guidelines, requirements, and procedures for evaluating the ability of temporary ditch checks to protect earthen channels from stormwater-induced erosion. Critical elements of this protection are the ability of the temporary ditch check to:
2.2.1 Slow and/or pond runoff to encourage sedimentation, thereby reducing soil particle
transport downstream; 2.2.2 Trap soil particles upstream of the check structure; and 2.2.3 Decrease soil erosion.
2.3 This test method utilizes full-scale testing procedures, and is patterned after conditions typically
found on construction sites at the conclusion of earthwork operations, but prior to the start of revegetation work. Therefore this test method considers only unvegetated conditions. This test method provides a comparative evaluation of a temporary ditch check to baseline bare soil conditions under controlled and documented conditions.
Georgia Soil and Water Conservation Commission Approved Test Method for Checkdams

3.0 RESPONSIBILITIES 3.1 The Corporate Quality Officer in conjunction with the laboratory director is responsible for the
implementation and maintenance of the standard operating procedure. 3.2 The Laboratory Director/Assistant Laboratory Director is responsible for informing the technicians of
the maintenance and operation requirements for specific equipment and provides training to technicians.
3.3 The Technicians are responsible for performing apparatus/facility setup, conducting the test,
performing the required apparatus preventive maintenance and documenting the results. 4.0 SAFETY 4.1 Take care when performing preparation and testing operations in the channels. 5.0 APPARATUS / FACILITY 5.1 Testing is performed in trapezoidal cross section channels. Test channels have an approximate
bed slope of 5% and a test channel length of 60 ft. The trapezoidal channel has a 2 ft bottom width and 2:1 side slopes.
5.2 The test channel shall be constructed with a minimum 12-inch thick veneer of compacted soil of the type requested for testing. The default soil type is sandy clay as defined by the USDA soil triangle. Representative samples of the test soil shall be sent to a geotechnical laboratory at least once per year, or whenever the stockpile is changed, for determination of grain size distribution, Atterberg limits, organic matter content, standard Proctor density, and optimum moisture content.
5.3 The channel bed soil is compacted to create a geotechnically (structurally) stable subgrade. Place
soil in a minimum of two lifts and compact to 90 ± 3 % of standard Proctor density in accordance with Test Method D 698. In-situ density shall be verified via any generally accepted method, such as ASTM D2937 (drive cylinder method).
6.0 PROCEDURE 6.1 Test Channel Preparation:
6.1.1 Soil preparation methods for bare soil (control) testing should be identical to soil preparation methods for the protected scenario.
6.1.1.1 In the case previous testing was completed in the channel, obliterate any rills and
gullies and spread new soil of the same type across the plot and blend (rake or till) into the surface.
6.1.1.2 Determine the moisture content of the soil on each test plot. 6.1.1.3 Wet or dry each plot until the soil reaches the optimum moisture content ± 4%. 6.1.1.4 Rake the plot smooth with a steel hand rake. 6.1.1.5 Compact the soil surface using a trapezoid form “drag” and/or hand compaction.
6.1.2 Locate a 40 ft test reach sufficiently downstream of the channel inlet structure or transitions
of flow to ensure straight and parallel stream lines. Flow should enter test reach as uniform flow, or as close to uniform flow as possible.

6.1.3 Check Dam Installation - Install the check dam in accordance with the client’s directions.
Locate the check structure (and associated scour apron, if required) at a point in the test reach that will allow any upstream ponding to be contained in the test reach. (Data acquisition cross-sections should be 2.5 ft upstream and downstream of the center of the check dam.)
6.1.3.1 Record all pertinent information. 6.1.3.2 Extend the check dam ends up the channel side slopes to prohibit flow from
circumventing the check dam.
6.2 Pre-Test Documentation:
6.2.1 Maintain a digital test folder for each test, including the following information:
6.2.1.1 Calibrated flow properties. 6.2.1.2 Calibrated test soil properties, including soil classification; standard proctor
moisture-density relationship; “K” factor; gradation (including hydrometer test for the P200 fraction); and Atterberg limits.
6.2.1.3 Product manufacturer; product name; description; specifications; size; and a
picture of the material, if practical.
6.2.1.4 Test data, including all measurements made during testing and pictures and videos of the test.
. 6.2.2 When product testing, obtain a sufficient size sample of the product to be tested and submit
the sample for the index tests shown in the following table:
SRD – Silt Fence SRD - Wattle SRD - Other
Mass/Area Mass/Volume TBD Thickness Circumference / Perimeter TBD
Tensile Strength Permittivity
Apparent Opening Size Percent Open Area
6.3 Test Section Preparation:
6.3.1 Test Section - Immediately prior to testing, delineate cross sections for data acquisition. At a minimum, nine cross sections should be included through the test reach, with a maximum spacing between sections of 5 ft in the direction of flow. The test section shall be a minimum of 40 ft long.
6.3.2 Establish a sufficient number of uniformly spaced data acquisition locations within each
cross section to record water surface elevation and bed elevation both below and above the maximum water level. At a minimum, three data acquisition locations along the bed of the channel and up each side slope must be identified and monitored at each cross section. Record the elevation of each data acquisition location by survey apparatus or point gauge assembly. If using a point gauge assembly in a relative frame of reference, determine the longitudinal slope of the installation by survey apparatus. Elevation readings can be sensitive to the diameter of the probe (rod or point gauge assembly) in contact with the ground surface. Thus, the point gauge assembly or survey rod should include an extension

rod between 6.4 mm (0.25 in.) and 9.5 mm (0.375 in.) in diameter to make contact with the ground surface.
6.3.3 Use an upstream hydraulic control structure with a calibrated weir to introduce volumetric
flows to the channel. Three increasing flows – one per channel – will be used in the testing. The test flow rates shall be 0.5, 1.0, and 2.0 cfs.
6.4 Prepare facility for testing.
6.4.1 Provide access to each data acquisition cross section to permit measurement of bed and water surface elevations by means of survey apparatus or point gauge assembly without walking on channel surface. Record elevation of each data acquisition location to establish the baseline elevations.
6.5 Test Operation and Data Collection:
6.5.1 Record the following information and test data: 6.5.1.1 operator identification; 6.5.1.2 baseline channel elevations; 6.5.1.3 actual discharge recorded during testing, time flow began; 6.5.1.4 time flow stopped; 6.5.1.5 flow depths; and measured velocities; 6.5.1.6 final channel elevations.
6.5.2 Slowly increase flow to initial target discharge.
6.5.3 Allow flow to increase over approximately ten minutes to minimize shock to the system. 6.5.4 Once the flow has been increased to the target discharge, allow the flow to reach
equilibrium. 6.5.5 Record water surface elevation measurements at each data acquisition location at each
cross section using the point gauge assembly or survey apparatus used to record bed elevations.
6.5.6 Record velocity measurements at the centerline point of each test cross section using the
velocity probe. 6.5.7 Velocity measurements at approximately the mid-point of depth. 6.5.8 Record photographs and video footage of the testing. Convey flow for thirty minutes at the
target discharge or until the check dam becomes dislodged, whichever is shorter. 6.5.9 At the conclusion of the initial target discharge, inspect the test channel noting any changes
in SRD or bed soil condition. Record photographs and video footage of the installation. Record elevation of each data acquisition location at the same locations as recorded during initial data collection.
6.5.10 Carefully remove the SRD from the channel, with as little disturbance of the soil as possible.
Note general observations regarding the condition and scour patterns. Take photographs to record the condition of the test channel. Markers may be used to identify any scour patterns for the pictorial documentation. Photographs should show the final condition of the test plot with and without the SRD in place.
6.5.11 Setup and run identical channels for each of the higher flows.

6.5.12 A total of three tests (1 each at 0.5, 1.0, and 2.0 cfs) should be performed on each check
dam system to obtain a range of performance measurements. Each test should follow identical procedures as noted above.
6.6 Test Data:
6.6.1 Tabulate before and after elevations and flow (velocity/depth), as well as flow at weir measurements.
6.6.2 From the available data, compute soil loss and associated flow (shear/velocity)
characteristics and channel properties as discussed in 7.0.
7.0 Data Analysis
7.1 The objective of the analysis of test data is to determine the relationship between volumetric flow (including velocity) and soil loss and to determine the hydraulic conditions created by check dams.
7.2 Determine total discharge from weir, inline flow meter, or alternative procedure. 7.3 Develop profile plot for each test to include bed surface, water surface and energy grade line. 7.4 Bed elevation prior to testing should be plotted in conjunction with the water surface elevation
measured during testing.
7.5 Flow depth is computed as the vertical difference between water surface and bed surface elevation measurements.
7.7 Calculate the Clopper Soil Loss Index (CSLI) from the topographic data gathered before and
after test flows. Use the change in channel topography to define the performance of the SRD. Quantify areas of degradation (soil loss) as “cut” and quantify areas of aggradation (sediment deposition) as “fill.” Compute CSLI as follows:
CSLI = (CT/AT) x 100
Where: SAI = Soil Aggradation Index
CT = total cut, m3, and AT = wetted channel area, m2
7.9 Calculate the Soil Aggradation Index (SAI) from the topographic data gathered before and after
test flows. Use the change in channel topography to define the performance of the SRD. Quantify areas of degradation (soil loss) as “cut” and quantify areas of aggradation (sediment deposition) as “fill.” Compute SAI as follows:
SAI = (FT/AT) x 100
Where: SAI = Soil Aggradation Index
FT = total aggradation, m3, and AT = wetted channel area, m2
8.0 Report - An engineering report documenting the test facility, test preparation, test execution,
collected data, data analysis and results must be generated to include:
8.1 General information, including test facility location, date, and time,

8.2 Test channel preparation including geotechnical properties of test soil, 8.3 In-situ compaction validation, 8.4 Weir calibration data and analysis, if used, 8.5 Materials documentation including check dam material and installation details, 8.6 Test operation and data collected, and 8.7 Data analysis, 8.8 Table and/or plot of flow depth, flow velocity, and soil loss.
9.0 TRAINING
9.1 The Laboratory Director and Assistant Laboratory Director in conjunction with Division Management are responsible for providing initial and ongoing training. This SOP and all associated SOPs are included in the department training program of all department new hires that perform any part of this SOP's activities and as continued training for existing personnel.
10.0 REFERENCES
10.1 ISO 9001, Quality Management System – Requirements 10.2 ISO/IEC 17025, General Requirements for the Competence of Testing and Calibration
Laboratories 10.3 01CQSP, Corporate Quality System Plan 10.4 ASTM D 7208 10.5 ASTM D 698 10.6 ASTM D 2937
11.0 CHANGES TO PROCEDURE Each change shall be documented.

Standard Test Method for Determination of Sediment Retention Devices (SRDs) Performance in Reducing Sediment Loss from Rainfall-Induced Erosion during Perimeter Control Applications
DDRF Division
Title Large-scale Slope Sediment Retention Test Method Reference GSWCC-SB / WK11340 Test Category Hydraulic Performance Material Applicability Sediment Retention Devices (a.k.a. SRDs) Target Property Soil Loss / Seepage Units of Test Result Practice Factor (as used in the Universal Soil Loss Equation) Test Specimen Configuration 8 feet wide Number of Replicate Specimens Three (one each on three different slopes) Equipment Required Rainfall simulators, water source, runoff and sediment
collection system, other miscellaneous equipment including: rain gauges, sieve set (standard US sieves), drying cans, a drying oven or microwave oven, balances, meteorological equipment (wind speed, temperature, precipitation), sample bottles, and camera and video recorder.
1.0 PURPOSE
1.1 This test method covers the determination of a practice factor (a.k.a. “P-Factor”) for a sediment retention device.
2.0 SCOPE
2.1 This test method is a performance test, but can be used for quality assurance to determine product conformance to project specifications. Caution is advised since information regarding laboratory specific precision is incomplete. For project specific conformance, unique project-specific conditions may be taken into consideration.
2.2 This test method covers the guidelines, requirements and procedures for evaluating the
ability of Sediment Retention Devices (SRDs) to retain sediments resulting from rainfall-induced erosion.
2.3 This test method utilizes full-scale testing procedures, and is patterned after conditions
typically found on construction sites prior to revegetation work. Further, procedures for evaluation of baseline conditions are provided. Thus, test preparation, test execution, data collection, data analysis and reporting procedures herein are intended to be suitable for testing of bare soil and SRDs.
2.4 One control plot (bare soil) shall be tested either before or after the product testing. All
testing shall follow identical procedures. The control plot results are combined with previous control runs to characterize control plot performance and to obtain an associated “K-Factor” for use in P-Factor computations.
Georgia Soil and Water Conservation Commission Approved Test Method for Sediment Barriers

3.0 RESPONSIBILITIES
3.1 The Corporate Quality Officer in conjunction with the laboratory director is responsible for the implementation and maintenance of the standard operating procedure.
3.2 The Laboratory Director/Assistant Laboratory Director is responsible for informing the
technicians of the maintenance and operation requirements for specific equipment and provides training to technicians.
3.3 The Technicians are responsible for performing apparatus/facility setup, conducting the
test, performing the required equipment preventive maintenance and documenting the results.
4.0 SAFETY
4.1 Take care when performing preparation and testing operations on the slope. 5.0 APPARATUS / FACILITY
5.1 Testing is performed on three earthen embankment test plots having a surface slope of 3H:1V and a slope length of 40 ft, though the actual exposed surface upstream of the SRD is 27 ft. The test plot width is 8 ft.
5.2 The test plot shall be constructed with a minimum 12-inch thick veneer of compacted soil of
the type requested for testing. The default soil type is sandy clay as defined by the USDA soil triangle. Representative samples of the test soil shall be sent to a geotechnical laboratory at least once per year, or whenever the stockpile is changed, for determination of grain size distribution, Atterberg limits, organic matter content, standard Proctor density, and optimum moisture content.
5.3 The test plot soil is compacted to create a geotechnically (structurally) stable subgrade.
Place soil in a minimum of two lifts and compact to 90 ± 3 % of standard Proctor density in accordance with Test Method D 698. In-situ density shall be verified via any generally accepted method, such as ASTM D 2937 (drive cylinder method).
5.4 Test plots are separated sufficiently to prevent work activities and overspray from one plot
from impacting adjacent plots. The top and side edges of each plot are constructed with edging sufficient to prevent run-on of water from outside the plot.
5.5 The test plots are encircled by sprinkler risers around the perimeter of the test plot to
provide uniform distribution of the rainfall intensities to be used in testing. The sprinkler risers and locations shall be established based on the calibration procedures set forth in Section 7.0. The sprinkler risers are supplied and connected by a piping system capable of providing consistent water supply to maintain the calibrated performance.
6.0 PROCEDURE
6.1 Test Plot Preparation:
6.1.1 Repair depressions, voids, soft, or uncompacted areas. 6.1.2 Also, free the plot from obstructions or protrusions, such as roots, large stones,
or other foreign material.

6.1.3 If the plots have been used for previous test series, discard the soil carried off the plot and obliterate any rills and gullies. Spread new soil of the same type across the plot and blend (rake or till) into the surface.
6.1.4 Loosen the soil veneer to a depth of approximately 10 cm (4 in.) using a tiller or
other appropriate tool.
6.1.5 Determine the moisture content of the soil on each test plot. 6.1.6 Wet or dry each plot until the soil reaches the optimum moisture content ± 4%.
6.1.7 Rake the tilled plot smooth with a steel hand rake.
6.1.8 Lightly compact the soil surface using a turf roller.
6.2 Test Set-Up
6.2.1 Control (Bare Soil) Testing – Proceed to 6.2.4 6.2.2 Product Testing
6.2.2.1 Install the SRD at the base of the plot as directed by the client after the test plot has been prepared.
6.2.2.2 Permit no foot traffic on the plot, once the SRD has been installed.
6.2.2.3 Document the installation methodology for the SRD.
6.2.2.4 Install the SRD so that no runoff is allowed to run around the ends of the
SRD.
6.2.3 Take soil samples from each test plot to determine the pretest soil moisture content within 1 hour prior to the test. Generally, 3 samples are taken from each test plot at the horizontal quarter points.
6.2.4 Place rain gauges on each test plot to document actual rainfall amount.
Generally, 6 gauges are used on each test plot and positioned in pairs, each 2 ft from the plot edge, at the horizontal quarter points.
6.2.5 Take photographs of the plot prior to testing.
6.3 Pre-Test Documentation:
6.3.1 Maintain a digital test folder for each test, including the following information:
6.3.1.1 Calibrated rainfall properties. 6.3.1.2 Calibrated test soil properties, including soil classification; standard
proctor moisture-density relationship; “K” factor; gradation (including hydrometer test for the P200 fraction); and Atterberg limits.
6.3.1.3 Data from the on-site weather station at the time of the test, including ambient air temperature, wind speed, and precipitation.
6.3.1.4 Product manufacturer; product name; description; specifications; size; and a picture of the material, if practical.
6.3.1.5 Test data, including soil moisture condition, all measurements made during testing, and pictures and videos of the test.

6.3.2 When product testing, obtain a sufficient size sample of the product to be tested
and submit the sample for the index tests shown in the following table:
SRD – Silt Fence SRD – RECP SRD - Wattle
Mass/Area Mass/Area Mass/Volume Thickness Thickness Circumference / Perimeter
Tensile Strength Ground Cover Permittivity Tensile Strength
Apparent Opening Size Absorption (temporary) Percent Open Area Specific Gravity (permanent)
6.4 Test Operation and Data Collection:
6.4.1 Include the following test data:
6.4.1.1 operator identification; 6.4.1.2 operating pressure; 6.4.1.3 sprinkler heads activated; 6.4.1.4 time rainfall began; 6.4.1.5 time stopped; 6.4.1.6 time runoff stopped, and; 6.4.1.7 volume (timed) readings taken at 1 minute intervals; 6.4.1.8 sediment concentrations taken at 3 minute intervals.
6.4.2 Perform testing at sequential target intensities of 5.1, 10.2, 15.2 cm/hr (2, 4, 6
in/hr) for 20 min. 6.4.3 During each target intensity, collect all runoff. Take timed volume samples at 1
minute intervals and grab samples at 3 minute intervals to determine runoff rate and sediment concentration, respectively. Commence sampling when runoff starts and continue until runoff stops (or becomes minimal). Take timed volume samples from the plot apron in appropriately sized containers. Take grab samples from the plot apron in 250 mL laboratory sample bottles and analyze for suspended sediment.
6.4.4 When the test is stopped at the end of each intensity (20 minutes of catastrophic
failure) measure and record the depth of rainfall collected in each rain gauge.
6.4.5 Determine total sediment from the plot tested by allowing settlement to occur in the runoff collection tanks. Allow a minimum of 12 hours for settlement or use a flocculating agent. Decant and discard excess water, making sure that the sediment in the bottom of the tank is not disturbed. Collect the entire amount of the settled sediment.
6.4.6 Repeat 6.4.1 thru 6.4.5 for two additional slopes when testing a product. 6.4.7 Dry, weigh, and record the dry sediment weight. 6.4.8 Record general observations regarding the condition of the tested SRD at the
conclusion of the data collection. Take photographs of the test plot after testing has been completed.
6.4.9 Carefully remove the SRD from the plot with as little disturbance of the soil as
possible. Note general observations regarding the condition and erosion patterns (rills, etc.). Take photographs to record the condition of the soil.

6.5 Test Data:
6.5.1 Tabulate runoff data showing discharge as a function of time. 6.5.2 Tabulate sediment concentration as a function of time. 6.5.3 From the total sediment yield and available control data, compute the
cummulative practice factor (P-Factor), comparing soil loss from the protected condition to that of the bare soil condition.
6.6 Report
Report at a minimum the following information: 6.6.1 General information, including test facility location, date, time and operator(s), 6.6.2 Test plot preparation, 6.6.3 Calibration data and analysis, 6.6.4 Materials documentation including SRD material and installation description, 6.6.5 Test operation, data collected, and data analysis.
6.6.6 Cumulative results of associated control (bare soil) testing.
7.0 Calibration and Associated Calculations
7.1 Simulated Rainfall Calibration
7.1.1 Calibration of the rainfall simulation equipment includes establishing: Rainfall intensity; Uniformity of rainfall application across the plot; Drop size distribution for each intensity, and; Rainfall drop height.
7.1.2 To ensure uniform distribution, do not conduct calibration and testing when the
wind velocity is greater than 8 km/h (3 mph).
7.1.3 Conduct calibration annually or following equipment maintenance work. Conduct one intensity/uniformity check every 90 days, or after no more than four test series, whichever comes first.
7.1.4 Place sprinkler risers around the perimeter of the test plot to provide uniform
distribution. The precise location of the risers to provide uniform rainfall distribution will be determined by the calibration process and the nuances of any given simulator system.
7.1.5 To measure rainfall intensity and uniformity, calibration tests shall be fun for 15
minutes, recorded to the nearest second. The data shall be used to calculate the rainfall intensity uniformity using the Christiansen uniformity coefficient. Uniformity calibration shall be based on 14 rain gauges positioned equi-distant from each other across and down the slope. Thus, they are located 2 ft from the closest edge and 4 ft from each other. Perform calibrations at uniform pressure for each intensity. Adjust valve and pressure settings until an acceptably uniform rainfall distribution pattern is achieved.

7.1.6 To measure drop size distribution, completely fill three labeled pie pans with sifted flour, struck off with a ruler to produce a smooth, uncompacted surface.
7.1.6.1 Identify three locations along the vertical centerline of the test plot, and
at the horizontal quarter points. 7.1.6.2 Extend the covered, filled pie pans out into the rainfall at the identified
locations.
7.1.6.3 At the desired test intensity, remove the cover briefly so that drops impinge on the flour to form pellets.
7.1.6.4 Re-cover the pans after only a few seconds and before the drops start
to touch each other, and remove the pans from the rainfall.
7.1.6.5 Repeat this procedure at each desired intensity.
7.1.6.6 Air-dry the flour pellets for a minimum of 12 h. Screen each sample of these semi-dry pellets by emptying the entire contents of the pan onto a 70 mesh sieve to carefully remove as much loose flour as possible. Then transfer the remaining pellets to evaporating dishes and heat in an oven at approximately 43°C (110°F) for 2 h.
7.1.6.7 Record the total weight of the hard flour pellets.
7.1.6.8 Sieve the pellets through standard soil sieves by shaking for 2 min.
7.1.6.9 Cull foreign matter and any double pellets from each sieve and record
the total weight and pellet count for each size.
7.1.6.10 Raindrop sizes shall be shown to include no more than 10% greater than 6mm (0.24 in) and no more than 10% less than 1mm (0.04 in).
7.1.6.11 Repeat the raindrop size calibration procedure three times for each
desired intensity.
7.1.7 Determine raindrop fall height by measuring the average height of the raindrop trajectory using a surveyor’s rod. Hold the rod vertically in the spray of a single riser and measure the wetted height. Repeat the height measurement for each desired intensity.
7.2 Calibration Data:
7.2.1 Calculate the Christiansen uniformity coefficient (Cu) using the network of rain gauges described in 7.1.5, each of which represents an equal area of the test plot. Calculate the Cu as follows:
7.2.1.1 where:Cu = Christiansen uniformity coefficient,

7.2.2 The average rainfall intensity over the entire test plot is the average depth of
rainfall collected in the rain gauges divided by the elapsed time of the test. The formula to calculate intensity (in centimeters per hour) is:
7.2.3 Plot the raindrop size distribution for each rainfall intensity. The plot should
relate the percent of total volume to drop diameter.
8.0 TRAINING
8.1 The Laboratory Director and Assistant Laboratory Director in conjunction with Division Management are responsible for providing initial and ongoing training. This SOP and all associated SOPs are included in the department training program of all department new hires that perform any part of this SOP's activities and as continued training for existing personnel.
9.0 REFERENCES
9.1 ISO 9001, Quality Management System – Requirements 9.2 ISO/IEC 17025, General Requirements for the Competence of Testing and Calibration
Laboratories 9.3 01CQSP, Corporate Quality System Plan 9.4 ASTM WK11340 (February 2012) 9.5 ASTM D 698 9.6 ASTM D 2937
10.0 CHANGES TO PROCEDURE
Each change shall be documented.
Georgia Soil and Water Conservation Commission Approved Test Method for Sediment Barriers

INLET SEDIMENT TRAP TEST PROCEDURE
Designation: D7351 – Modified (Proposed April 2013)

Standard Test Method for Determination of Inlet Sediment Trap Effectiveness in Inlet Protection Applications
1. Scope
1.1 This test method establishes the guidelines, requirements and procedures for evaluating the ability of Inlet
Sediment Traps (Inlet BMPs) to retain sediment when exposed to sediment-laden water flowing to an storm water
inlet.
1.2 This test method is applicable to the use of an Inlet BMP as a vertical and/or horizontal permeable interceptor
designed to remove suspended soil from collecting storm water flow. The function of an Inlet BMP is to intercept
and restrict flowing water, allowing settlement of soil particles from sediment laden water. The purpose is to reduce
the transport of eroded soil from a disturbed site by water runoff.
1.3 The test method presented herein is intended to indicate representative performance and is not necessarily
adequate for all purposes in view of the wide variety of possible sediments and performance objectives.
1.4 The values stated in SI units are to be regarded as standard. The inch-pound values given in parentheses are
provided for information purposes only.
1.5 All observed and calculated values shall conform to the guidelines for significant digits and rounding
established in Practice D6026.
1.5.1 The procedures used to specify how data are collected/recorded and calculated in this standard are regarded
as the industry standard. In addition, they are representative of the significant digits that should generally be
retained. The procedures used do not consider material variation, purpose for obtaining the data, special purpose
studies, or any consideration for the user’s objectives; and it is common practice to increase or reduce significant
digits of reported data to commensurate with these considerations. It is beyond the scope of this standard to consider
significant digits used in analysis methods for engineering design.
1.6 This standard does not purport to address all of the safety concerns, if any, associated with its use. It is the
responsibility of the user of this standard to establish appropriate safety and health practices and determine the
applicability of regulatory limitations prior to use.
2. Referenced Documents
2.1 ASTM Standards:
D653 Terminology Relating to Soil, Rock, and Contained Fluids
D698 Test Methods for Laboratory Compaction Characteristics of Soil Using Standard Effort (12 400 ft-lbf/ft3
(600 kN-m/m3))
D3740 Practice for Minimum Requirements for Agencies Engaged in Testing and/or Inspection of Soil and
Rock as Used in Engineering Design and Construction
D5141 Test Method for Determining Filtering Efficiency and Flow Rate of the Filtration Component of a Inlet
Sediment Trap
D6026 Practice for Using Significant Digits in Geotechnical Data
3. Terminology
3.1 For definitions of terms used in this test method, see Terminology D653.
4. Summary of Test Method
4.1 Sediment-laden water is introduced upstream of a an installed Inlet Sediment Trap (Inlet BMP) and allowed
to seep into, through, over, and/or under. At a minimum, the amount (via water and soil weight) of sediment-laden
flow is measured both upstream and downstream of the Inlet BMP.
4.2 The measurement of sediment that passes through, over, and/or under the Inlet BMP compared to the amount
in the upstream flow is used to quantify the effectiveness of the Inlet BMP in retaining sediments.

5. Significance and Use
5.1 This test method quantifies the ability of a Inlet Sediment Trap (Inlet BMP) to retain eroded sediments caused
by sheet flowing water under full-scale conditions. This test method may also assist in identifying physical attributes
of Inlet BMPs that contribute to their erosion control performance.
5.2 The effectiveness of Inlet BMPs is installation dependent. Thus, replicating field installation techniques is an
important aspect of this test method. This test method is full-scale and therefore, appropriate as an indication of
product performance, for general comparison of product capabilities, and for assessment of product installation
techniques.
NOTE 1—Test Method D5141 is an alternate test method for evaluating Inlet Sediment Trap effectiveness,
if it is not necessary to simulate field installation conditions.
NOTE 2—The quality of the result produced by this standard is dependent on the competence of the
personnel performing it, and the suitability of the equipment and facilities used. Agencies that meet the
criteria of Practice D3740 are generally considered capable of competent and objective
testing/sampling/inspection/etc. Users of this standard are cautioned that compliance with Practice D3740
does not in itself assure reliable results. Reliable results depend on many factors: Practice D3740 provides a
means of evaluating some of those factors.
6. Apparatus
6.1 Equipment required. (See Fig. 1 and Fig. 2)
FIG. 1 D7351 Test Setup FIG. 2 Modification for Inlet Protection Testing
6.1.1 Combination mixing tank and scale—A tank with an internal paddle mixer device mounted on scales capable
of holding/weighing 4500 kg of sediment-laden water.
6.1.2 A clean water source and pumping equipment—A source of water and associated pumping equipment
sufficient to repeatedly fill the mixing tank in a timely manner.
6.1.3 A consistent soil stockpile—A stockpile of soil in sufficient quantity to both create sediment-laden water and
to create/replace subgrade in the installation zone. The general soil type to be used for testing shall be loam with
target grain sizes and plasticity index as shown in Table 1, unless otherwise specified.

TABLE 1 Target Grain Sizes and Plasticity Indices
Soil Characteristic Test Method Value
% Gravel
ASTM D 422
0
% Sand 47.9
% Silt 16.1
% Clay 36.0
Liquid Limit, % ASTM D 4318
53
Plasticity Index, % 21
Soil Classification USDA Sandy Clay
6.1.4 Buckets for moving the soil to the mixer— Buckets of sufficient capacity to transport a prescribed amount of
soil to the mixing tank.
6.1.5 A variable discharge apparatus from the mixer—A variable discharge apparatus from the mixer – A valve-
controlled discharge hose that allows for controlled, uniform discharge from the mixing tank.
6.1.6 Soil and water sampling equipment—Sampling jars (at least 12 per test) for taking ―grab‖ samples
periodically during the test.
6.1.7 Hand tools for cleaning and preparing the test area— Hand tools are needed to prepare/replace the soil in
the installation zone.
6.1.8 A scaled collection system adequate to handle the released runoff—A tank mounted on scales of sufficient
volume to collect all runoff passing the Inlet BMP.
6.2 Retention Area:
6.2.1 A pipe attached to the mixer discharge shall be provided to transport sediment-laden flows to the retention
zone surrounding the installation zone. The retention zone shall measure 2.44m x 2.44m.
6.2.2 An installation zone approximately 1.3m x 1.3m around a simulated manhole inlet to allow full-scale
installation of the Inlet BMP to be tested. Unless otherwise requested by the client, the simulated manhole inlet
shall measure 0.6m x 0.6m.
6.2.3 The installation zone should be centered within the retention zone.
6.2.4 If used, the prepared soil subgrade will be compromised each test, so it will have to be reconstructed after
each test.
6.2.5 The area downstream of the installation zone should facilitate efficient transmission of any seepage passing
the Inlet BMP to the collection tank.
6.3 The Collection Area:
6.3.1 The collection tank shall be at a lower grade than the installation area so that runoff/seepage passing the
Inlet BMP will efficiently flow via gravity into the tank.
7. Inlet BMP Installation
7.1 A representative sample of the Inlet BMP to be tested shall be used.
7.2 The Inlet BMP sample shall be installed in accordance with the manufacture’s recommendations or, lacking
recommendations, in accordance with generally accepted construction procedures, including proper orientation with
respect to the flow and appropriate trenching and/or staking.
7.2.1 Area Inlet Installation – For simulation of an area inlet installation, the Inlet BMP shall be deployed
completely around the inlet using actual field installation practices. The tested length is the average inside
and outside circumference of the installation.
7.2.2 Curb Inlet Installation - For simulation of a curb inlet installation, the Inlet BMP shall be deployed on one
side of the inlet from wall to wall of the retention zone. Care must be used to seal installation ends to
prevent seepage between the Inlet BMP and wall. The tested length is to be taken as 2.1m to account for
sealing at ends.

8. Procedure
8.1 Inlet BMP Installation:
8.1.1 If the Inlet BMP requires attachment/anchoring to the soil around the inlet, prepare the installation zone
using the same soil to be used as sediment, unless otherwise agreed with the client. The soil shall be placed to a
depth in excess of the depth of installation and compacted to 90 ± 3% of Standard Proctor density, at a soil moisture
within ±3 % of optimum moisture content per Test Method D698, unless otherwise requested by the client. The
installation zone should be wide enough to accommodate the Inlet BMP.
8.2 Mixing, Releasing, and Collecting Sediment-Laden Runoff:
8.2.1 Procure soil as described in 6.1.3 in adequate quantities for the testing process, determine its characteristics
for future replication needs, and cover to prevent contamination and rainfall degradation.
8.2.2 Create sediment-laden runoff by combining water and soil in the mixing tank and maintain agitation during
the test. Unless otherwise directed by the client, 4000 lb of water and 48 lb of sandy loam soil or 24 lb of sandy clay
soil shall be combined to create the sediment-laden runoff. This amount of water and sediment simulates seepage
from a hypothetical toe-of-slope Inlet BMP installation providing 80% sediment removal to the default runoff
described in ASTM D 7351. The calculation of this ―default‖ scenario is described in Note 3.
NOTE 3—An important variable in any testing procedure is the establishment of test ―conditions‖. For a sediment
control performance test this means selecting an appropriate design storm event and associated runoff along with an
expected amount of sediment to be transported by the runoff. For this testing, a standard 2-yr, 24-hr storm event (mid-
Atlantic region of US) was selected. This return frequency is commonly used for sizing sediment controls and, thus,
was deemed appropriate for the testing of other Inlet BMPs. Using this criterion, a 4 in rainfall was selected. It was
also assumed that approximately 25% of the storm would occur during the peak 30 minutes, and that 50% of the
rainfall would infiltrate into the ground. A theoretical contributory area of 100 ft slope length by 16 ft wide was
selected to limit runoff to sheet flow conditions. Runoff and associated sediment were calculated using the Modified
Universal Soil Loss Equation (MUSLE) which allows for calculating a storm-specific quantity of sediment. Following
is the MUSLE (In-Lb formula):
T = 95 (V x Qp)0.56 x K x LS x C x P
where:
T = sediment yield (ton);
V = runoff (acre-ft) = (Rainfall – Infiltration) x Area;
Qp = peak flow (ft3/s);
K, LS, C, P = from RUSLE charts.
The following calculations provided the runoff and sediment load used in the testing:
V = 0.25* x 0.5** x 0.33ft x 1600 ft2 = 66.6 ft
3 = 0.00153 acre-ft
Qp = V / t = 66.6 ft3/ 1800 sec = 0.037 ft
3/s
(* = 25% of storm during 30-min peak; ** = 50% infiltration)
K, sandy-clay = 0.22; LS (10% & 100 ft) = 1.46; C, P = 1.0
T = 95 (0.00153 x 0.037)0.56
(0.22) (1.46) (1.0) (1.0) = 0.128 Tons = 255 lb of soil
(assume most sediment is generated during the peak flow period)
Total Runoff Quantities (sandy loam):
30-Minute Runoff: 66.6 ft3 x 62.4 lb/ft
3 = 4156 (say 4000 lb) Sediment Load: 255 lb (say 240 lb)
Runoff Sediment Concentration = 240 / 4000 = 6%
Total Test Quantities (based on 80% filtration efficiency of hypothetical upstream Inlet BMP):
30-Minute Runoff: 4000 lb; Sediment Load: 240 lb x 20% = 48 lb
Inlet Testing Sediment Concentration = 48 / 4000 = 1.2%

8.2.3 Discharge volume evenly for 30 min. Measure the quantity of released runoff at no less than 5-min intervals
by noting the reduction in weight in the mixing tank. Adjust the valve on the outlet hose to increase/decrease flow to
stay as close as possible to the target (4240 lb / 30 min = 140 lb / min). Maintaining a relatively steady and accurate
flow rate is important, as the calculations will assume that this flow rate is constant. The retention area construction
and mixing tank discharge should combine to cause the flow to spread out to impact the full length of the Inlet BMP
8.2.4 As runoff passing the Inlet BMP enters the collection tank, record the weight of the collection tank, and
take grab samples of runoff entering the tank, at 5 min intervals.
8.2.5 Cutoff time is 90 min, unless otherwise directed by the client. An earlier cutoff time is acceptable when
there is low-volume ponding and minimal discharge.
8.3 Data Collection:
8.3.1 Grab Samples—Collect grab samples at 5 min intervals at the mouth of the discharge from the mixing tank
and from a suitable downstream (between the installed Inlet BMP and the collection tank) location. Collect all
samples in the same size container (250 ml bottles are recommended) and in the same manner. Pre-mark each
container and do not overfill or overrun the sample bottle. Concentrations may be small, thus poor sampling
techniques may significantly affect results. Multiple measurements cause a hectic pace, so pre-marking and
immediately recording insures consistency and accuracy.
8.3.2 Tank Measurements—Sediment-laden water in both the mixing and collection tanks is primarily measured
by weight.
8.3.3 Observations—Make and record visual observations relevant to the testing, such as height of the Inlet BMP,
the depth of ponding (maximum depth and depth at end of test), undermining, overtopping, catastrophic
product/system failure, etc. and the associated times. It is important to document the progression of undermining
flows and associated times. Photographic and video documentation is preferred.
8.3.4 Time Records—Record the time of each grab sample, each tank and ponding depth measurement, and the
time to reach zero ponding height, if reached within the time of the entire test.
8.3.5 Sediments—Collect and dry all sediments passing the Inlet BMP.
8.4 Lab Testing:
8.4.1 Turbidity—Grab samples shall be evaluated in a lab to determine turbidity.
8.4.2 Percent Solids—Grab samples shall be evaluated in a lab to determine percent dry solids content. Filtration
is the recommended technique.
9. Calculation
9.1 Record all collected data in a table, noting the time of each sampling.
9.2 The total soil retained by the Inlet BMP during the test is calculated by first multiplying the percent solids for
each grab sample by the time interval associated with that grab sample to obtain an interval average percent solids.
Then multiply the interval average percent solids by the ratio of the associated time interval to the total time to
obtain a weighted average percent solids. Sum all the weighted average percent solids to determine the total solids
fraction. Calculations should be tabulated as shown in Fig. 3.

Test Time, minutes Reservoir Weight, lb Coll. Tank Depth, mm
SRD Ponding Depth, mm
Sample Time, minutes Sample Number Turbidity Total Weight, g Dry Weight, g Bottle Weight, g
Upstream Upstream
0 4240 2.5 U2.5
5 7.5 U7.5
10 12.5 U12.5
15 17.5 U17.5
20 22.5 U22.5
25 27.5 U27.5
30 0
4000 240 4240
Downstream Downstream
0 2.5 D2.5
5 7.5 D7.5
10 12.5 D12.5
15 17.5 D17.5
20 22.5 D22.5
25 27.5 D27.5
30 32.5 D32.5
35 40 D40
45 52.5 D52.5
60 67.5 D67.5
75 82.5 D82.5
90
Total in Mixer (lbs):
ASTM D7351 Soil and Water Retention Effectiveness
Product:___________________________; Soil:______________________________________
Date:___________________________________
Water Added To Mixer (lbs): Soil Added To Mixer (lbs):
FIG. 3 Example of Data Collection Sheet
For each grab sample, calculate
Solids Fraction = (weight of sediment / weight of sediment/water mixture)
Weighted Average Solids Fraction = Solids Fraction x (time interval / total test time)
Then, for all the grab samples, calculate
Total Solids Fraction = (Weighted Average Solids Fraction)
For the entire test, Total Collected Flowdownstream is the total mass of water and sediment collected in the Receiving
Tank, plus the combined sediment/water mixture mass of the grab samples. Using that value,
Soil Retention, % = 100% * {1.0 – [(Total Collected Flowdownstream * Total Solids Fraction) / Weight of Soil Added
to Mixer]}
9.3 The total percent water retention is found by similarly comparing the applied clean water to the clean water in
the Receiving Tank. Calculations should be tabulated such as shown in Fig. 4.
Water Retention, % = 100% * {1.0 – [(Total Collected Flowdownstream / Weight of Water Added to Mixer)*(1.0 –
Total Solids Fraction)]}

Sample Number
Test Time,
minutesTurbidity
Total Weight,
g
Decanted Weight, g
Dry Weight,
g
Bottle Weight,
g
Dry Sediment Weight,
mg
Total Collected
Water Wt., g
Total Collected Volume of Water, l
Sediment Conc., mg/l
% Solids
Reservoir Weight, lb
Assoc. Discharge,
gal
Cumm Discharge,
gal
Coll. Tank
Depth, in
plot time
SRD Ponding Height,
in
Cumm Soil
Loss, lbs
Assoc. Solids Loss,
lbs
Soil Retention
Effectiveness, %
Water Retention
Effectiveness, %
Upstream 0 0 0
B0 0 8832 374.61 186.68 164.8 150.57 14230 209.81 0.21 67823 6.78% 4240 44 44 2.5 25.1 25.1B5 5 9999 354.62 175.98 162.98 150.22 12760 191.64 0.19 66583 6.66% 3450 72 117 7.5 65.4 40.3
B10 10 9999 353.57 206.61 162.78 150.00 12780 190.79 0.19 66985 6.70% 2950 75 192 12.5 107.4 42.1B15 15 9999 358.76 176.31 160.95 149.66 11290 197.81 0.20 57075 5.71% 2110 87 279 17.5 148.7 41.3B20 20 9999 358.04 174.13 161.61 151.35 10260 196.43 0.20 52232 5.22% 1420 79 358 22.5 183.4 34.6B25 25 9999 342.18 173.26 160.39 151.39 9000 181.79 0.18 49508 4.95% 715 81 439 27.5 216.9 33.5B30 30 4.95% 0 41 480 30.0 233.7 16.9
4000 240 AVGS: 60034 6.00% TOTALS: 480 233.7Downstream 0 0 0
A0 0 0.23% 0 0 0 0.0 2.5 0.0 0.0 0.0A5 5 3945 334.43 164.52 149.68 149.25 430 184.75 0.18 2327 0.23% 0 0 0 0.0 7.5 79.0 0.0 0.0
A10 10 6463 322.15 168.03 152.61 151.85 760 169.54 0.17 4483 0.45% 2 5 5 0.0 12.5 126.0 0.2 0.2A15 15 6229 323.56 182.21 151.23 150.52 710 172.33 0.17 4120 0.41% 80 12 17 14.0 17.5 169.0 0.6 0.4A20 20 1668 323.64 185.16 151.63 150.52 1110 172.01 0.17 6453 0.65% 198 17 34 22.0 22.5 206.0 1.5 0.9A25 25 7574 337.51 172.83 153.37 151.87 1500 184.14 0.18 8146 0.81% 370 24 58 31.0 27.5 234.0 3.1 1.6A30 30 6959 343.45 162.01 151.39 150.40 990 192.06 0.19 5155 0.52% 596 23 80 45.0 32.5 248.0 4.1 1.0A35 35 6332 336.19 168.78 151.42 150.57 850 184.77 0.18 4600 0.46% 752 23 103 52.0 40.0 230.0 5.0 0.9A45 45 5391 346.92 168.23 151.25 150.66 590 195.67 0.20 3015 0.30% 976 26 129 64.0 52.5 208.0 5.6 0.7A60 60 9999 304.13 168.52 152.00 151.59 410 152.13 0.15 2695 0.27% 1192 24 153 74.0 67.5 185.0 6.2 0.5A75 75 9999 305.92 163.14 151.46 151.11 350 154.46 0.15 2266 0.23% 1376 20 173 84.0 82.5 164.0 6.5 0.4A90 90 9607 336.22 170.11 148.19 147.73 460 188.03 0.19 2446 0.24% 1528 9 182 90.0 90.0 144.0 6.7 0.2
4155 0.40% 1528 182 6.7n/a (avg) (avg) (total) (total) (approx.)
Retention Effectiveness Calculations
Date:4/3/2013
Soil Added To Mixer (lbs):Water Added To Mixer (lbs):
Product:GAI-GT14; Soil:Loam
62.03%
Soil Collected (lbs):
97.19%
FIG. 4 Example of Data Table for Testing
10. Report
10.1 The report shall at a minimum include the following:
10.1.1 General information, including test facility location, date, time, air and water temperature, and dimensions
of test apparatus, along with any variations from the procedures detailed in 8. 10.1.2 Calibration data for tanks.
10.1.3 Test set-up activities, including 1) test conditions (i.e. weight of water and soil used); 2) soil type and
conditions,; 3) Inlet BMP product type and description, and: 4) Inlet BMP installation details.
10.1.4 Soil information shall be reported. The information shall include: soil type/texture (for example, topsoil,
sandy loam, silt loam, clay); gradation (including hydrometer test for the P200 fraction); organic matter content;
plasticity indices; and pH.
10.1.5 Raw data, including masses, percent solids, and associated times shall be reported.
10.1.6 All observations made in accordance with 8.3.3.
10.1.7 The calculated retention effectiveness for both soil and water for the Inlet BMP shall be reported.
11. Precision and Bias
11.1 Precision—Test data on precision is not presented due to the nature of the soil materials tested by this
method. It is either not feasible or too costly at this time to have ten or more laboratories participate in a round-robin
testing program.
11.2 Bias—There is no accepted reference value for this test method, therefore, bias cannot be determined.
11.3 Reproducibility—The reproducibility of the test method is being determined.
12. Keywords
12.1 sediment; sediment control; Inlet Sediment Trap; inlet protection