jackie robinson’s stars & stripes · construction: this pattern is planned with precise...
TRANSCRIPT

Animas Quilts Stars & StripesDesigner: Jackie Robinson Lap Size 63x63 www.animasquilts.com
Stars & StripesJackie Robinson’s

Stars & StripesLap - 6x6 - 63” x 63” - sample sizeTwin - 6x8 - 63” x 83”Queen - 8x10 - 83” x 103”King - 10x10 - 103” x 103”
YardageMulti Fireworks - US05-1 1 yd 1-1/4 yds 2 yds 2-1/2 yds
Bright Red - KP02-6US 5/8 yd 3/4 yd 1-3/8 yds 1-5/8 yds
Medium Blue - US02-4 5/8 yd 3/4 yd 1-3/8 yds 1-5/8 yds
Cream - KP02-1US 3/8 yd 3/8 yd 3/4 yd 7/8 yd
Red Poppies - US06-2 2-1/8 yds 2-5/8 yds` 4-1/8 yds 4-7/8 yds
White - US02-3 1-3/8 yds 1-3/4 yds 2-5/8 yds 3-1/4 yds
Navy - US08-6 3/8 yd 1/2 yd 3/4 yd 1 yd
Fusible Web 3/4 yd 1 yd 1-1/2 yds 2 yds
Backing 4-1/8 yds 5-1/4 yds 7-7/8 yds 9-5/8 yds
CuttingMulti Fireworks - US05-1Cut (4,5,8,10) 7-7/8” strips into: (18,24,40,50) 7-7/8” squares
Bright Red - KP02-6USCut (12,16,28,34) 1-1/2” strips
Medium Blue - US02-4Cut (12,16,28,34) 1-1/2” strips
Cream - KP02-1USCut (6,8,14,17) 1-1/2” strips
Red Poppies - US06-2Cut (7,8,10,11) 2-1/2” strips for BindingCut (34,44,72,88) 1-1/2” strips
White - US02-3Cut (5,6,9,11) 3-1/2” strips into: (49,63,99,121) 3-1/2” squaresCut (17,22,36,44) 1-1/2” strips
Navy - US08-6 Cut (49,63,99,121) stars after tracing on Fusible (Step 9)
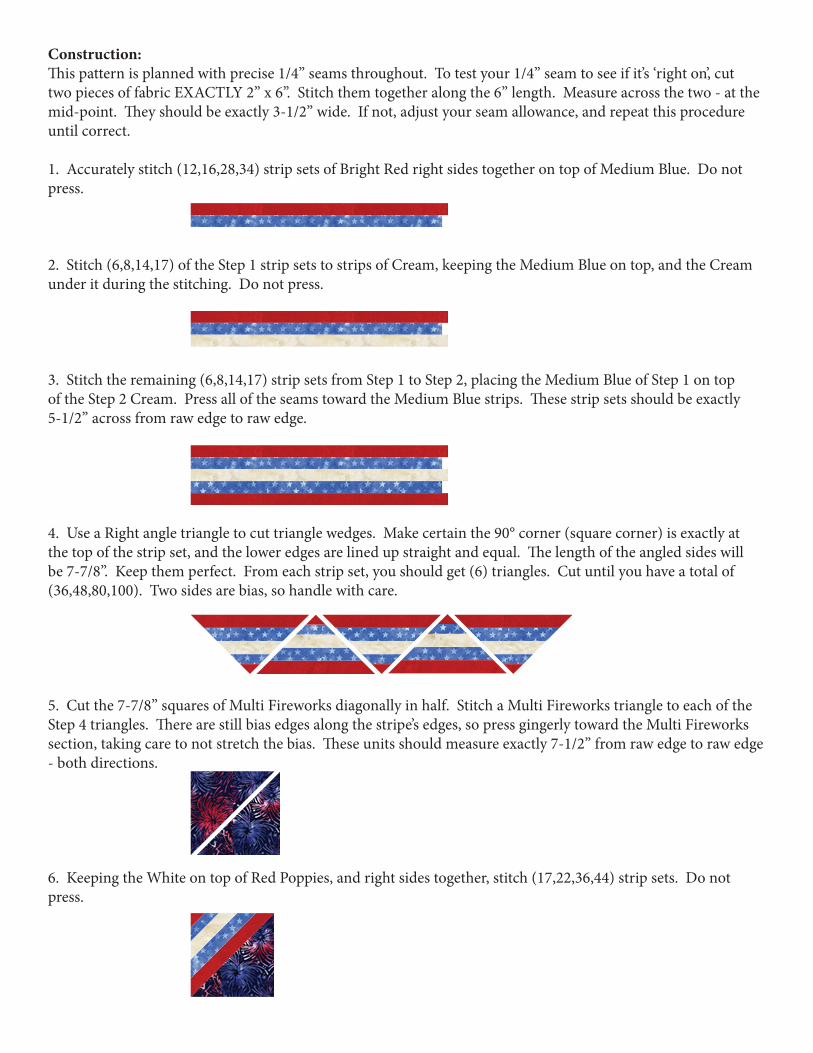
Construction:This pattern is planned with precise 1/4” seams throughout. To test your 1/4” seam to see if it’s ‘right on’, cut two pieces of fabric EXACTLY 2” x 6”. Stitch them together along the 6” length. Measure across the two - at the mid-point. They should be exactly 3-1/2” wide. If not, adjust your seam allowance, and repeat this procedure until correct.
1. Accurately stitch (12,16,28,34) strip sets of Bright Red right sides together on top of Medium Blue. Do not press.
2. Stitch (6,8,14,17) of the Step 1 strip sets to strips of Cream, keeping the Medium Blue on top, and the Cream under it during the stitching. Do not press.
3. Stitch the remaining (6,8,14,17) strip sets from Step 1 to Step 2, placing the Medium Blue of Step 1 on top of the Step 2 Cream. Press all of the seams toward the Medium Blue strips. These strip sets should be exactly 5-1/2” across from raw edge to raw edge.
4. Use a Right angle triangle to cut triangle wedges. Make certain the 90° corner (square corner) is exactly at the top of the strip set, and the lower edges are lined up straight and equal. The length of the angled sides will be 7-7/8”. Keep them perfect. From each strip set, you should get (6) triangles. Cut until you have a total of (36,48,80,100). Two sides are bias, so handle with care.
5. Cut the 7-7/8” squares of Multi Fireworks diagonally in half. Stitch a Multi Fireworks triangle to each of the Step 4 triangles. There are still bias edges along the stripe’s edges, so press gingerly toward the Multi Fireworks section, taking care to not stretch the bias. These units should measure exactly 7-1/2” from raw edge to raw edge - both directions.
6. Keeping the White on top of Red Poppies, and right sides together, stitch (17,22,36,44) strip sets. Do not press.

7. Sew the Step 6 strip sets to the remaining (17,22,36,44) Red Poppy strips, again keeping the White on top of the Red Poppies. Press Both seams toward the White. These strip sets should be exactly 3-1/2” wide from raw edge to raw edge.
8. From the Step 7 strip sets, cut (84,110,178,220) 7-1/2” segments.
9. Trace (49,63,99,121) stars close together on the paper side of Fusible Web. Fuse onto the back side of the Navy fabric. Cut out the (49,63,99,121) stars.
10. Fuse a Navy star to each of the 3-1/2” squares of White, centering it.

11. Lay out the blocks as shown in the diagrams.
Lap Size
Twin Size
Queen Size
King Size

12. Stitch a Step 8 strip set along the left side of each block. Press the seam toward the strip set.
13. Attach a Step 10 Star to a Step 8 strip set. Make (48,62,98,120). To one of these, add the remaining Star at the opposite end.
14. Stitch a Step 13 Star and Strip unit along the upper edge of all the Step 12 blocks, snugging and alternating the seams where the Star joins the previous part of the block. Do NOT press this seam until you lay the quilt back out. Half of them will press toward the block and half toward the Sashing, alternately.
15. Attach a Star and Strip set to the right side edge of all the blocks along the right of the quilt. Do not Press.
16. Join a Star and Strip set to the lower edge of all the blocks along the bottom of the quilt, using the piece with two stars on the block in the lower right corner. Do not press.
17. Join the blocks to create your quilt. Alternate the seams consistently where they meet.
18. Now you may press.
19. Prepare the backing, and layer for quilting. Quilt as desired. Ours have the corner stars stitched around their edges to secure, and the stripes of the sashing detailed. A nice star is centered in each 7” triangle.
20. Bind, following the instructions included with the Binding Miter Tool. There’s a video demo at www.animasquilts.com