it’s all about the presentation! holiday gift bags · holiday gift bags start ... • create...
TRANSCRIPT
©2009 BERNINA of America, Inc. Page 1 of 6
Created by Catherine Gross
Supplies Embroidery Designs • OESD Home for the Holidays Collection # 883
Fabric • Large Tote - Pinwale Corduroy - 3/4 yd. • Medium Tote - Cotton Twill - 1/2 yd. • Candy Bag - Sparkle Organza - 3/8 yd. • Wine Bottle Bag - Cotton Flannel (face) & two
Cotton Prints (lining and piping) - 1/4 yd. each. • Armo Weft Interfacing - 1/4 yd. • Trims & Ribbons Accents - 2 yds. per bag
Notions • Isacord Polyester & Yenmet Metallic Embroidery
Thread to compliment fabric • Sewing Thread • Organ Embroidery Needle size 80/10 Sharp • 505 Temporary Spray Adhesive • OESD Ultra Clean & Tear Stabilizer • OESD Aqua Film Topper • Uncovered ¼” Welt Cording for piping accent • Expandable Sewing Gauge • Appliqué Scissors
Machine & Accessories • BERNINA Sewing & Embroidery Machine • BERNINA Embroidery Software 6 • BERNINA Large Oval Embroidery Hoop • Edgestitch Foot #10 • Bulky Overlock Foot #12 • Cording Foot #22
Prepare the Fabric
Large Tote - Peace on Earth (13” w x 14” h)
• Cut one rectangle of Bag Fabric - 14” x 31” (Sample is cotton pinwale corduroy)
• Cut twp strips of Bag Fabric for handles - 2” x 22” • Cut two strips of Armo Weft Interfacing - 2” x 14” Medium Tote - Tree Ornaments (12” w x 10” h)
• Cut one rectangle of Bag Fabric-13” x 27½” (Sample is cotton twill.)
• Cut two strips of Armo Weft Interfacing - 2” x 14” Candy Bag- Christmas Tree (4¾” w x 9” h)
• Cut one rectangle - 6” x 24” (Sample is poly sparkle oraganza.)
Wine Bottle Bag - Snowflake (12” w x 16” h)
• Cut one rectangle of Bag Face Fabric - 13” x 17” (Sample is cotton flannel.)
• Cut one rectangle of Bag Lining Fabric - 13” x 17” (Sample is Bernartex Winterscapes cotton print.)
• Cut one bias strip for piping 1½” x 13.” • Uncovered ¼” Welt Cording - 14” length
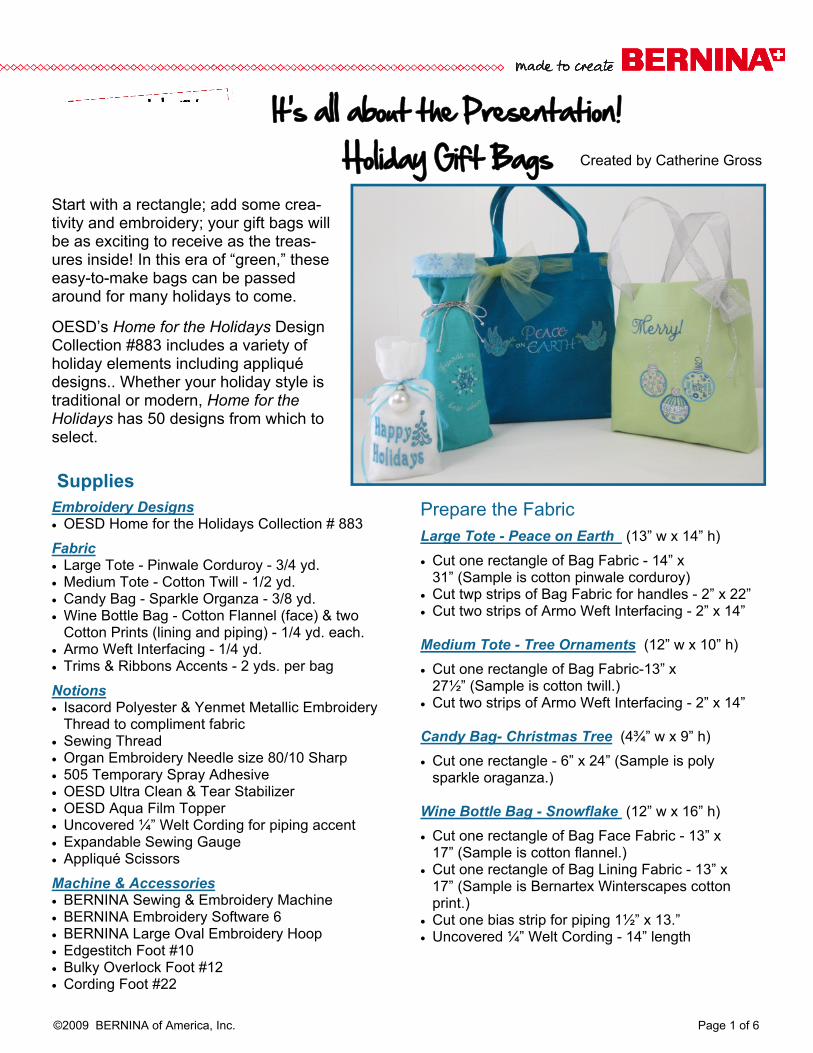
It’s all about the Presentation! Holiday Gift Bags Start with a rectangle; add some crea-
tivity and embroidery; your gift bags will be as exciting to receive as the treas-ures inside! In this era of “green,” these easy-to-make bags can be passed around for many holidays to come.
OESD’s Home for the Holidays Design Collection #883 includes a variety of holiday elements including appliqué designs.. Whether your holiday style is traditional or modern, Home for the Holidays has 50 designs from which to select.

©2009 BERNINA of America, Inc. Page 2 of 6
Embroidery
Combining Designs
The Large Tote features two designs, combined for embroidery:
• Open BERNINA Embroidery Software.
• Select File, Open, Design #CC88346 (Peace on Earth).
• Select File, Insert Design, Design #CC88339 (Dove). While the Dove is “selected” open Edit, Duplicate. The screen will flash.
• Choose Arrange, Mirror Horizontal.
• Click and Drag the mirrored “Dove” to the left side of “Peace on Earth.” Select the first “Dove” and Click and Drag it to the right side of “Peace on Earth”.
• Choose View, Show All. Edit, Select All.
• Next, click on the Align Centers (Horizontal) icon at the bottom of the screen.
• Choose Edit, Deselect All.
• Choose View, Grid to open the Options box. Click on Show Grid and change the spacing of the hori-zontal and vertical lines to .25.
• Select one of the “Doves” and using the keyboard arrows, adjust the placement until it is pleasing.
• Repeat this for the other “Dove.”
• Select File, Save As to save the new design.
• Select the design and use the Rotate 45 degrees icon to set the design in the hoop on the screen.
• Choose View, Show All.
• Use the sizing handles to adjust the size of the de-sign to fit the hoop.
• Send design to machine and embroider!
Adding Lettering to a Design
The Medium Tote, Candy Bag and Wine Bottle Bag each feature a design combined with lettering:
• Open BERNINA Embroidery Software.
• Select File, Open, Select Design: Medium Tote - #CC88309 (Ornaments). Candy Bag - #CC88338 (Tree) Wine Bottle Bag - #CC88306 (Snowflake)
• Choose Edit, Lettering. Type wording of choice. Select Alphabet Font and Baseline. Apply, Okay.
Medium Tote: “Merry!” Eliza Font - Free Baseline
Candy Bag: “Happy Holidays” Victoria Font -Free Baseline
Wine Bottle Tote: “Friends and wine are best when old” - Eliza Font - Curved Baseline
• Click in design workspace. Click and Drag the let-tering into a pleasing arrangement with the em-broidery design. Using the Sizing Handles, size the lettering proportional to the design.
©2009 BERNINA of America, Inc. Page 3 of 6
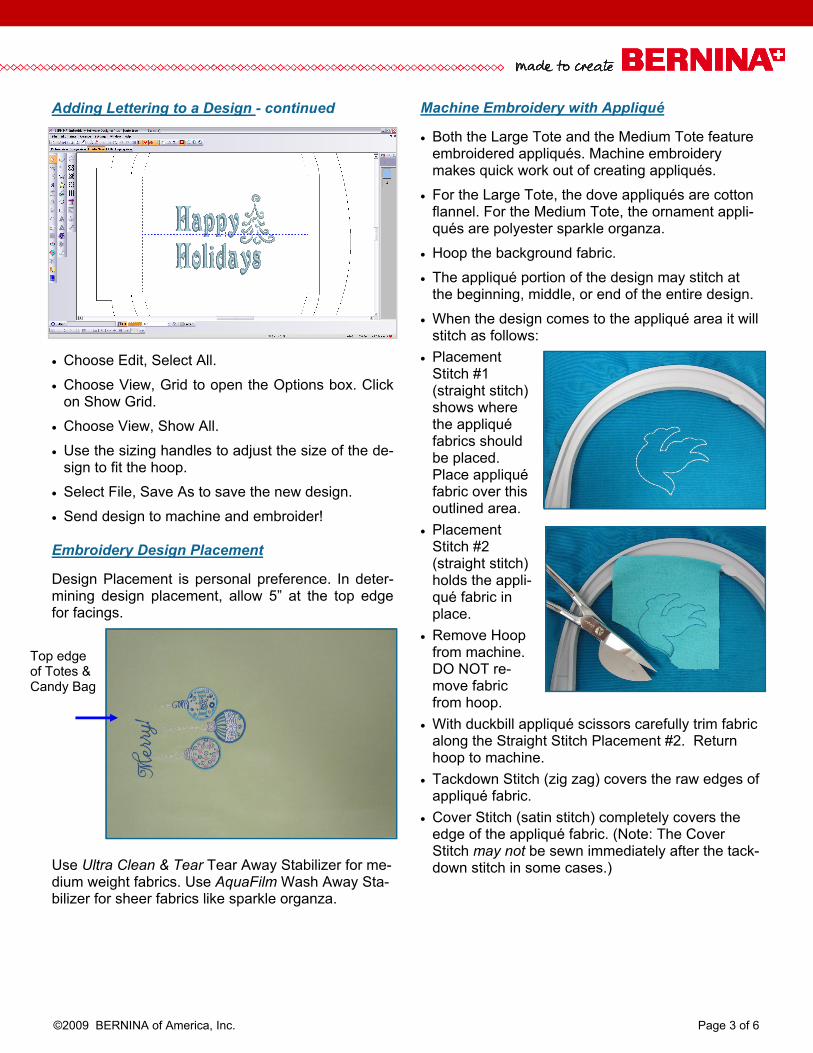
Adding Lettering to a Design - continued
• Choose Edit, Select All.
• Choose View, Grid to open the Options box. Click on Show Grid.
• Choose View, Show All.
• Use the sizing handles to adjust the size of the de-sign to fit the hoop.
• Select File, Save As to save the new design.
• Send design to machine and embroider! Embroidery Design Placement
Design Placement is personal preference. In deter-mining design placement, allow 5” at the top edge for facings.
Use Ultra Clean & Tear Tear Away Stabilizer for me-dium weight fabrics. Use AquaFilm Wash Away Sta-bilizer for sheer fabrics like sparkle organza.
Machine Embroidery with Appliqué
• Both the Large Tote and the Medium Tote feature embroidered appliqués. Machine embroidery makes quick work out of creating appliqués.
• For the Large Tote, the dove appliqués are cotton flannel. For the Medium Tote, the ornament appli-qués are polyester sparkle organza.
• Hoop the background fabric.
• The appliqué portion of the design may stitch at the beginning, middle, or end of the entire design.
• When the design comes to the appliqué area it will stitch as follows:
• Placement Stitch #1 (straight stitch) shows where the appliqué fabrics should be placed. Place appliqué fabric over this outlined area.
• Placement Stitch #2 (straight stitch) holds the appli-qué fabric in place.
• Remove Hoop from machine. DO NOT re-move fabric from hoop.
• With duckbill appliqué scissors carefully trim fabric along the Straight Stitch Placement #2. Return hoop to machine.
• Tackdown Stitch (zig zag) covers the raw edges of appliqué fabric.
• Cover Stitch (satin stitch) completely covers the edge of the appliqué fabric. (Note: The Cover Stitch may not be sewn immediately after the tack-down stitch in some cases.)
Top edge of Totes & Candy Bag

©2009 BERNINA of America, Inc. Page 4 of 6
The Large and Medium Totes are constructed in the same fashion.
• The short ends of the fabric rectangle form the facings for the top of the tote. On these short ends, press a 2¼” self facing to-ward the wrong side of the fabric. Fuse interfacing to the back of the facing. Clean finish the edges by pressing a ¼” seam toward the wrong side of the fabric.
• The long ends of the fabric rectangle form the side seams of the tote. Clean finish the edges by pressing a ¼” seam toward the wrong side of the fab-ric. Using Edgestitch Foot #10, edge stitch the pressed edge on the long ends.
• With right sides to-gether, fold the rectangle in half lengthwise. Line up side seams with the facing opened flat. Stitch the side seams together using a ½” seam allow-ance. Press the side seams open. Re-press the facing in place.
Bag Construction Large & Medium Totes
• To form a gusset in the
bottom of the bag, on each side of the bag, line up the side seam with the center bottom of the bag, forming a triangle. Determine the desired width of the bottom gus-set. (The Large Tote has a 3” gusset; the Medium Tote has a 2” gusset.) Mark the desired gusset width across the triangle, dividing the width evenly on either side of the side seam. Stitch along this line.
• For a tote with self-fabric handles (as in the Large Tote), use the fabric strips pre-cut for han-dles. On the long edges of handle fabric, press a ¼” seam toward the wrong side. Apply ¼” Steam-a-Seam to one long edge. Press these long edges in half width-wise, lining up the folded edges. Using the Edges-titch Foot#10, edge stitch both lengthwise edges of the handles.

©2009 BERNINA of America, Inc. Page 5 of 6
Bag Construction - Totes, continued
• Attach the handles to the tote hem facings, spac-ing about five inches apart. Stitch in place, stitch-ing only to the facings and not the tote body itself.
• Stitch the folded self fac-ing edge to tote body. Stitch both upper and lower edges of the facing in place using Edgestitch Foot #10.
• For decorative purposes, buttonholes are added to
the totes’ upper facing edges. Ribbons are woven through the buttonhole openings. On the Large Tote, colored tulle is woven through ten button-holes, finished with a bow accent. On the Medium Tote, four buttonholes serve as a way to add rib-bon handles.
• Make quick work of spac-ing your but-tonholes with an Expanding Sewing Gauge. The gauge meas-ures multiple equal dis-tances for fast accurate spacing of buttonholes. Mark and sew the buttonholes using the Memory Buttonhole fea-ture available on most BERINA models. Use But-tonhole Foot #3A.
• Cut the button-holes open with a button-hole cutter and wooden block.
• Finish the tote by weaving ribbon or tulle through the buttonholes.
• Enjoy!
• Create two fabric tubes, one each of face fabric and the lining fabric. With right sides to-gether, stitch each tube lengthwise using a ½” seam allowance. Press seams open.
• With right sides to-gether, stitch across the bottom edge of the face fabric using a ½” seam allowance. Press seams open.
• Create piping for the bag’s upper edge. Using Bulky Overlock Foot #12, cover the unfinished welt cord with the cotton print bias strip previously prepared. The groove in the bot-tom of Foot #12 allows the cording to ride smoothly in place, With the needle position three steps to the right of center, stitch in place creating piping with a ½” lip.
• Line up the raw edges of the piping with the upper edges of the lining tube. Baste in place with a ½” seam allowance.
• With right sides together, pin the upper edge of the lining to the upper edge of the face fabric. Stitch in place with a ½” seam allowance. Grade and clip seam allowance.
• Turn right side out. Lightly press the upper edge.
• Finish the bottom edge of the lining by turning the ½” seam edges to the wrong side of the lining. Stitch in place by machine or by hand.
• Use decorative cording as the bag closure.
Bag Construction -
Wine Bottle Bag

©2009 BERNINA of America, Inc. Page 6 of 6
• The short ends of the fabric rectangle form the fac-ings for the top of the bag. On these short ends, press a 2¼” hem facing toward the wrong side of the fabric. Clean finish the edges by pressing a ¼” seam toward the wrong side of the fabric.
• The long ends of the fabric rectangle form the side seams of the bag. Seams allowances on sheer fabrics like sparkle organza are best finished with French seams. With WRONG sides together, fold the rectangle in half lengthwise. Line up the side seams with the facing opened flat. Stitch together using a scant ¼” seam allowance.
• Turn the bag out-side in. With RIGHT sides together, stitch the side seams again, using a 3/8” seam allow-ance. The side seams are now en-cased. Press the seams to one side. Re-press the facings in place.
• Baste bottom edge of the facing to the bag.
• Create a quick drawstring cas-ing for narrow ribbon or cord-ing. The casing is stitched on the outside of the bag, along the bottom edge of the facing. Using Cording Foot #22 and the Uni-versal Stitch, (stitch width at 5.5), encase a narrow 1/8” rib-bon taking care not to catch the ribbon with the stitching.
• Leave a tail of ribbon at the beginning and the end for ty-ing.
• Enjoy!
Bag Construction -
Candy Bag
Great for
jewelry too!
Visit...
www.bernina.com
Find additional BERNINA projects , product information and promotions!