italiano - panasonic.com · e-1 read this first! warning: to reduce the risk of fire or electric...
TRANSCRIPT

EN
GL
ISH
DE
UT
SC
HF
RA
NÇ
AIS
ITA
LIA
NO
ES
PA
ÑO
L
日本語
Operating Instructions/Bedienungsanleitung Mode d’emploi/Istruzioni per l’uso
Instrucciones de funcionamiento 取扱説明書
Memory Card Drive/Laufwerk für SpeicherkartenLecteur de carte mémoire/Unità a schede di memoria
Unidad de transferencia de tarjeta de memoriaメモリーカードドライブ
Model No. AJ-PCD2G
FJ0210KT0 -PS DPrinted in Japan VQT2T35
Before operating this product, please read the instructions carefully and save this manual for future use.Bitte lesen Sie diese Bedienungsanleitung vor der Inbetriebnahme dieses Produkts aufmerksam durch, und bewahren Sie sie für späteres Nachschlagen auf.Avant d’utiliser l’appareil, lire attentivement ce mode d’emploi, et le conserver à des fins de référence ultérieure.Prima di far funzionare questo prodotto, leggere attentamente le istruzioni e conservare questo manuale per riferimenti futuri.Antes de utilizar este producto, lea cuidadosamente las instrucciones y guarde este manual por si tiene que utilizarlo en el futuro.このたびは、パナソニック製品をお買い上げいただき、まことにありがとうございます。● 取扱説明書をよくお読みのうえ、正しく安全にお使いください。● ご使用前に「安全上のご注意」(J-2 ~ J-3 ページ)を必ずお読みください。● 保証書は 「 お買い上げ日・販売店名 」 などの記入を確かめ、取扱説明書とともに大切
に保管してください。
保証書別添付
製造番号は、品質管理上重要なものです。製品本体と保証書の製造番号をお確かめください。

E-1
Read this first!
WARNING:● To reduce the risk of fire or electric shock, do not expose this equipment
to rain or moisture.● To reduce the risk of fire or electric shock, keep this equipment away
from all liquids. Use and store only in locations which are not exposed to the risk of dripping or splashing liquids, and do not place any liquid containers on top of the equipment.
CAUTION:In order to maintain adequate ventilation, do not install or place this unit in a bookcase, built-in cabinet or any other confined space. To prevent risk of electric shock or fire hazard due to overheating, ensure that curtains and any other materials do not obstruct the ventilation.
CAUTION:To reduce the risk of fire or electric shock and annoying interference, use the recommended accessories only.
CAUTION:Do not remove panel covers by unscrewing them.To reduce the risk of electric shock, do not remove the covers. No user serviceable parts inside.Refer servicing to qualified service personnel.
indicates safety information.
EEE Yönetmeliğine Uygundur.EEE Complies with Directive of Turkey.
The rating plate is on the underside of the unit.

E-2
EN
GL
ISH
FCC NOTICE (USA)Declaration of ConformityModel Number: AJ-PCD2GTrade Name: PanasonicResponsible Party: Panasonic Corporation of North America One Panasonic Way, Secaucus, NJ07094Support contact: 1-800-524-1448This device complies with Part 15 of the FCC Rules.Operation is subject to the following two conditions:(1)This device may not cause harmful interference, and (2) this device must accept any interference received, including interference that may cause undesired operation.To assure continued compliance, follow the attached installation instructions and do not make any unauthorized modifications.
Note:This equipment has been tested and found to comply with the limits for a class B digital device, pursuant to Part 15 of the FCC Rules. These limits are designed to provide reasonable protection against harmful interference in a residential installation. This equipment generates, uses, and can radiate radio frequency energy, and if not installed and used in accordance with the instructions, may cause harmful interference to radio communications. However, there is no guarantee that interference will not occur in a particular installation. If this equipment does cause harmful interference to radio or television reception, which can be determined by turning the equipment off and on, the user is encouraged to try to correct the interference by one of the following measures:• Reorient or relocate the receiving antenna.• Increase the separation between the equipment and receiver.• Connect the equipment into an outlet on a circuit different from that to which the
receiver is connected.• Consult the dealer or an experienced radio/TV technician for help.The user may find the booklet “Something About Interference” available from FCC local regional offices helpful.Warning:To assure continued FCC emission limit compliance, follow the attached installation instructions and the user must use only shielded interface cables when connecting to host computer or peripheral devices. Also, any unauthorized changes or modifications to this equipment could void the user’s authority to operate this device.
NOTIFICATION (Canada)This class B digital apparatus complies with Canadian ICES-003.
indicates safety information.
E-3
Software used by this productThis product contains software provided under the GNU General Public License (GPL) and the GNU Lesser General Public License (LGPL). The user has the right to obtain, change and redistribute the source code as he/she wishes.
For details on GPL and LGPL, refer to the files stored in the LDOC folder on the supplied CD-ROM. (Note that this information is provided in the original (English language) text.)To obtain the source code, visit the following web site.
http://pro-av.panasonic.net/
Please do not make enquiries regarding the source code you obtain.

E-4
EN
GL
ISH
Table of ContentsRead this first!............................................................................................ E-1Before Use .................................................................................................. E-5Overview ..................................................................................................... E-5Features ...................................................................................................... E-5Supplied Accessories (AJ-PCD2G) .......................................................... E-6Operating Environment Required for Installation .................................. E-6Parts and their Functions ......................................................................... E-7Connecting the P2 Drive to a Personal Computer.................................. E-8Removing the P2 Drive from a Personal Computer ............................... E-9Inserting a P2 Card .................................................................................. E-10Removing a P2 Card .................................................................................E-11Write-protecting a P2 Card ......................................................................E-11Installing a USB Driver for Windows ..................................................... E-12Installing a USB Driver for Macintosh ................................................... E-12Before Calling for Service ....................................................................... E-13Specifications .......................................................................................... E-14
Microsoft, Windows and Windows Vista are trademarks of Microsoft Corporation of the United States.Macnintosh, Mac OS and PowerBook are trademarks of Apple Inc. of the United States.Other names of companies and products are trademarks or registered trademarks of the respective companies.● In these instructions, Microsoft® Windows®, Windows® 2000, Windows® XP
Professional, Windows Vista® Business, Windows Vista® Ultimate, Windows® 7 Professional and Windows® 7 Ultimate are given as “Windows”, “Windows 2000”, “Windows XP Professional”, “Windows Vista Business”, “Windows Vista Ultimate”, “Windows 7 Professional” and “Windows 7 Ultimate” respectively.
● Similarly, in these instructions, Macintosh®, Mac® Pro, Mac OS® X and PowerBook® are given as “Macintosh”, “Mac Pro”, “Mac OS X” and “PowerBook” respectively.

E-5
Before Use• While the AJ-PCD2G is connected to a computer, install the required drivers
from the CD-ROM. Refer to the installation manual in the “Manuals” folder on the CD-ROM for
information on how to install the drivers for Windows. Refer to “Installing a USB driver for Macintosh” on page E-12 in this manual for
information on how to install drivers for Macintosh. • The AJ-PCD2G may become warm during use, but this is not a malfunction.
OverviewThe AJ-PCD2G (referred to as “P2 drive” below) is a single-slot drive for reading and writing P2 content on P2 cards (1 card at a time) when connected to a Windows PC or Macintosh via USB 2.0 (two USB cable connections that provide bus power). The P2 drive is capable of making high-speed transfers of clip data shot with a memory card camera-recorder for P2 cards to a personal computer (Windows/Apple Macintosh). This device supports not only the transferring and copying of clips recorded on P2 cards, but also direct editing.
Features• Single-slot P2 card drive with USB 2.0 interface• Light and compact construction makes it portable and ideal for field work with a
notebook PC• Supports both Windows and Macintosh operating systems• USB bus power eliminates need for AC adapter*1
*1: Two USB cables are required.

E-6
EN
GL
ISH
Supplied Accessories (AJ-PCD2G)USB cables (2) CD-ROM (1)
Operating Environment Required for InstallationThe host computer requires the following operating environment to operate the P2 drive.
USB 2.0 connectors: two or more
For one P2 drive, two USB 2.0 (Hi-Speed) connectors, i.e., SIGNAL (data transfer/power supply) and POWER (power supply), are needed. Up to two P2 drives can be connected to one personal computer.

E-7
Parts and their Functions
① ② ③ ④ ⑤
A Access indicator Lights green during P2 card access.
◆ NOTE: • Do not remove a P2 card during access. The file data could be corrupted or
the P2 card could be damaged. The indicator blinks rapidly when the USB 2.0 connector (POWER) is not
connected. Refer to “Before Calling for Service” (page E-13).
B P2 Card slot Insert a P2 card. The P2 drive is designed for P2 cards and does not work with other cards.
C EJECT button Press this button to remove a P2 card from the P2 drive.
D USB 2.0 connector (SIGNAL connector) Use the supplied USB cables to connect this connector to a USB 2.0 port on a
personal computer to transfer data and to power the P2 drive from the computer.
E USB 2.0 connector (POWER connector) Use the supplied USB cable to connect this connector to a USB 2.0 port on a
personal computer to power the P2 drive from the computer.
◆ NOTE:• Do not use the P2 drive in an upright position. Otherwise malfunction or damage
to the P2 drive may occur.

E-8
EN
GL
ISH
Connecting the P2 Drive to a Personal Computer
1 Connect the supplied USB cables to each USB 2.0 connector (SIGNAL, POWER) on the P2 drive.
2 Connect the other end of each USB cable to USB 2.0 ports on a personal computer. The access indicator blinks and then goes out and a drive letter for the P2 drive appears on the personal computer.
3 For the first time you use the P2 drive, proceed with the USB driver installation. Refer to “Installing a USB Driver for
Windows” (page E-12)
Refer to “Installing a USB Driver for Macintosh” (page E-12)
USB cables• Use the supplied 1.0 m USB cables. If you lose the supplied USB cables,
purchase two 1.0 m or shorter USB cables (USB 2.0 compliant). The P2 drive may not work with USB cables of different length.
• Do not transport the P2 drive with USB cables connected. The P2 drive could be damaged.
USB cable connection• Two USB cables are required to connect the P2 drive. • When only the USB (SIGNAL) connector on the P2 drive is connected to
a personal computer, the corresponding driver letter appears, but the content of an inserted P2 card will not appear. The access indicator will then blink rapidly for two seconds and go off for one second. This status repeats.
• When only the (POWER) USB connector on the P2 drive is connected to a personal computer, the corresponding drive letter does not appear.
■
■
Two USB cables are required to connect the P2 drive.Two USB cables are required to connect the P2 drive.
E-9
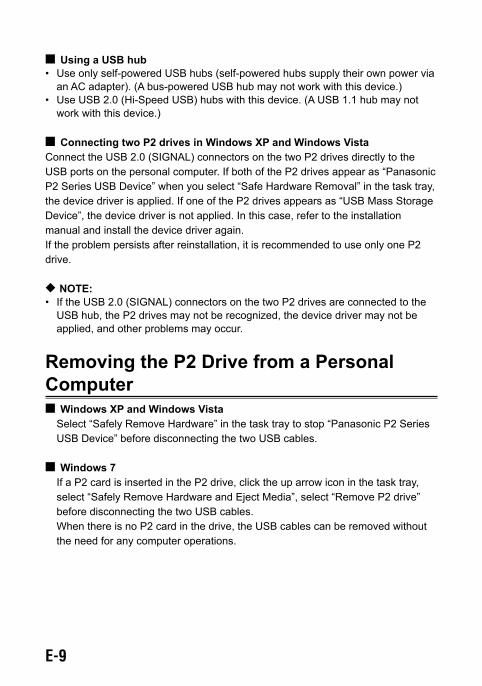
Using a USB hub• Use only self-powered USB hubs (self-powered hubs supply their own power via
an AC adapter). (A bus-powered USB hub may not work with this device.)• Use USB 2.0 (Hi-Speed USB) hubs with this device. (A USB 1.1 hub may not
work with this device.)
Connecting two P2 drives in Windows XP and Windows VistaConnect the USB 2.0 (SIGNAL) connectors on the two P2 drives directly to the USB ports on the personal computer. If both of the P2 drives appear as “Panasonic P2 Series USB Device” when you select “Safe Hardware Removal” in the task tray, the device driver is applied. If one of the P2 drives appears as “USB Mass Storage Device”, the device driver is not applied. In this case, refer to the installation manual and install the device driver again.If the problem persists after reinstallation, it is recommended to use only one P2 drive.
◆ NOTE:• If the USB 2.0 (SIGNAL) connectors on the two P2 drives are connected to the
USB hub, the P2 drives may not be recognized, the device driver may not be applied, and other problems may occur.
Removing the P2 Drive from a Personal Computer
Windows XP and Windows Vista Select “Safely Remove Hardware” in the task tray to stop “Panasonic P2 Series
USB Device” before disconnecting the two USB cables.
Windows 7 If a P2 card is inserted in the P2 drive, click the up arrow icon in the task tray,
select “Safely Remove Hardware and Eject Media”, select “Remove P2 drive” before disconnecting the two USB cables.
When there is no P2 card in the drive, the USB cables can be removed without the need for any computer operations.
■
■
■
■

E-10
EN
GL
ISH
Mac OS X 10.5 and 10.6 If a P2 card is inserted in the P2 drive, drag the P2 card icon to the Trash, check
that the P2 card icon has disappeared before disconnecting the two USB cables. When there is no P2 card in the P2 drive, the USB cables can be removed
without the need for any computer operations.
◆ NOTE:• After safely removing hardware in Windows, you can make the computer
recognize the P2 drive again by connecting both USB cables.
Inserting a P2 Card
1 Insert a P2 card in the P2 card slot. Press in the card until the EJECT button pops up. ◆ NOTE: • Be sure to insert the P2 card
horizontally. Forcing the card in at an angle may damage it.
• Do not remove a P2 card while it is being accessed or right after insertion. Otherwise, the card may be damaged.
• Do not transport the drive with a P2 card inserted. Otherwise, the P2 drive may be damaged.
2 Fold the EJECT button in the direction of the arrow.
◆NOTE: • Do not use the P2 drive with the EJECT
button fully extended. Otherwise, the EJECT button could be damaged.
■
EJECT buttonEJECT button

E-11
Removing a P2 Card
1 Flip up the EJECT button in the direction of the arrow.
2 Press the EJECT button. The P2 card will slide out far enough to allow you to remove it.
◆NOTE: • To remove a P2 card on a Macintosh, drag the P2 card icon to the Trash. Then
check that the icon has disappeared and the access indicator on the P2 drive has turned off before physically removing the P2 card.
• Do not remove a P2 card that is being accessed. Removing a P2 card during access may cause the P2 drive to malfunction. Should this happen, reconnect the two USB cables.
Write-protecting a P2 CardP2 cards come equipped with a write-protect switch. Slide this switch to the “PROTECT” side to prevent overwriting and deletion of data. Note that the write-protect switch will not work on a card that is inserted in the drive. In order for the drive to recognize the switch setting, remove the P2 card from the drive, set the switch and reinsert the card in the drive.
EJECT buttonEJECT button
PROTECT
P2 card
PROTECT
P2 card

E-12
EN
GL
ISH
Installing a USB Driver for WindowsRefer to the installation manual in the “Manuals” folder on the CD-ROM for information on how to install the Windows drivers.
Installing a USB Driver for MacintoshThis driver software enables a Macintosh to access content on a P2 card inserted in the P2 drive.
Perform the following steps to install the driver.
1 Insert the supplied CD-ROM.
2 Double-click the “Macintosh” folder on the CD-ROM.
3 For Mac OS X 10.5: Double click the “Leopard” folder on the CD-ROM. For Mac OS X 10.6: Double click the “Snow Leopard” folder on the CD-ROM.
4 Double click the “P2Drive” folder.
5 Double click the “P2DriveFamilyDriver Install.dmg” disk image module in the “P2Drive” folder.
6 Double click the “P2DriveFamilyDriver Install.pkg”.
7 The driver software installation process will now start. Follow the instructions given in the installation screen.
◆NOTE: • If the USB driver is not installed, a sufficient transfer rate may not be obtained.
For the latest information on software drivers, visit the following Web site. http://pro-av.panasonic.net/For the latest information on software drivers, visit the following Web site. http://pro-av.panasonic.net/

E-13
Before Calling for ServiceThe access indicator blinks rapidly and the P2 drive does not work.
Connect the USB 2.0 connector (POWER) and the USB 2.0 connector (SIGNAL) to USB ports on a personal computer using the two supplied USB cables. If the USB 2.0 connector (POWER) is not connected, the access indicator will blink rapidly for two seconds and go off for one second. This status repeats.
The personal computer does not recognize the P2 drive when it is connected with the two USB cables.
If they are connected to USB 1.1 ports on the personal computer, reconnect them to USB 2.0 ports.
If the USB cables are longer than 1.0 m, reconnect using the two supplied 1.0 m USB cables.
Do not use bus-powered USB hubs but self-powered USB hubs (self-powered hubs supply their own power via an AC adapter).
PCMCIA Type II cards other than P2 cards cannot be used.
The P2 drive is designed for P2 cards and does not support PCMCIA Type II cards other than P2 cards.
P2 cards cannot be accessed after resume from sleep or hibernation.
Some personal computers may not be able to access a P2 card in the P2 drive after resuming from sleep or hibernation. Should this happen, reconnect the two USB cables.
■
■
■
■
E-14
EN
GL
ISH
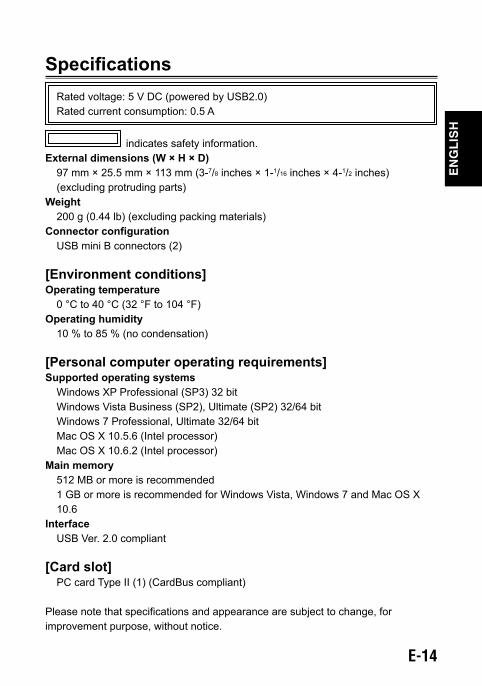
SpecificationsRated voltage: 5 V DC (powered by USB2.0)Rated current consumption: 0.5 A
indicates safety information.External dimensions (W × H × D) 97 mm × 25.5 mm × 113 mm (3-7/8 inches × 1-1/16 inches × 4-1/2 inches) (excluding protruding parts)Weight 200 g (0.44 lb) (excluding packing materials)Connector configuration USB mini B connectors (2)
[Environment conditions]Operating temperature 0 °C to 40 °C (32 °F to 104 °F)Operating humidity 10 % to 85 % (no condensation)
[Personal computer operating requirements]Supported operating systems Windows XP Professional (SP3) 32 bit Windows Vista Business (SP2), Ultimate (SP2) 32/64 bit Windows 7 Professional, Ultimate 32/64 bit Mac OS X 10.5.6 (Intel processor) Mac OS X 10.6.2 (Intel processor)Main memory 512 MB or more is recommended 1 GB or more is recommended for Windows Vista, Windows 7 and Mac OS X
10.6Interface USB Ver. 2.0 compliant
[Card slot] PC card Type II (1) (CardBus compliant)
Please note that specifications and appearance are subject to change, for improvement purpose, without notice.

E-15
Information on Disposal for Users of Waste Electrical & Electronic Equipment (private households)
This symbol on the products and/or accompanying documents means that used electrical and electronic products should not be mixed with general household waste.For proper treatment, recovery and recycling, please take these products to designated collection points, where they will be accepted on a free of charge basis.Alternatively, in some countries you may be able to return your products to your local retailer upon the purchase of an equivalent new product.Disposing of this product correctly will help to save valuable resources and prevent any potential negative effects on human health and the environment which could otherwise arise from inappropriate waste handling. Please contact your local authority for further details of your nearest designated collection point.Penalties may be applicable for incorrect disposal of this waste, in accordance with national legislation.
For business users in the European UnionIf you wish to discard electrical and electronic equipment, please contact your dealer or supplier for further information.
Information on Disposal in other Countries outside the European UnionThis symbol is only valid in the European Union.If you wish to discard this product, please contact your local authorities or dealer and ask for the correct method of disposal.

G-1
DE
UT
SC
H
Bitte lesen!
WARNUNG:● Zur Reduzierung der Gefahr von Brand und elektrischem Schlag dieses
Gerät weder Nässe noch Feuchtigkeit aussetzen.● Um Brand- oder elektrischem Schlag zu reduzieren, muss dieses Gerät
von allen Flüssigkeiten ferngehalten werden. Vermeiden Sie Gebrauch und Lagerung des Gerätes an Orten, an denen die Gefahr besteht, dass es mit Flüssigkeiten betropft oder bespritzt wird, und stellen Sie keine Flüssigkeitsbehälter auf das Gerät.
VORSICHT:Um eine ausreichende Belüftung zu gewährleisten, dieses Gerät nicht in einem Bücherregal, Einbauschrank oder an einem anderen engen Platz aufstellen.Um einen Brand oder elektrischen Schlag ausgelöst durch Überhitzing zu vermeiden sicherstellen, dass die Ventilationsöffnungen im Gehäuse nicht durch Vorhänge oder andere Materialien blockiert werden.
VORSICHT:Nur das empfohlene Zubehör verwenden, um die Gefahr von Feuer und elektrischem Schlag sowie Störungen auszuschalten.
WARNUNG:Öffnen Sie nicht das Gerät durch Abschrauben von Gehäuseteilen.Zur Reduzierung der Gefahr eines elektrischen Schlags darf das Gehäuse nicht geöffnet werden. Im Geräteinneren befinden sich keine Teile, die vom Benutzer gewartet werden können.Wartungs- und Reparaturarbeiten grundsätzlich autorisiertem Kundendienstpersonal überlassen.
ist die Sicherheitsinformation.
Das Typenschild befindet sich an der Unterseite des Gerates.
G-2
In diesem Produkt verwendete SoftwareDieses Produkt enthält Software, die unter der GNU General Public License (GPL) und der GNU Lesser General Public License (LGPL) zur Verfügung gestellt wurde. Der Benutzer ist berechtigt, den Quellcode zu erhalten, zu ändern und weiterzugeben.
Ausführliche Informationen zur GPL und LGPL finden Sie in den Dateien im Ordner LDOC auf der mitgelieferten CD-ROM. (Diese Informationen sind im Originaltext (auf Englisch) verfügbar.)Den Quellcode erhalten Sie auf der folgenden Website:
http://pro-av.panasonic.net/
Bitte versuchen Sie nicht, Auskunft über den Quellcode zu erhalten.

G-3
DE
UT
SC
H
InhaltsverzeichnisBitte lesen! .................................................................................................G-1Vor der Benutzung .....................................................................................G-4Übersicht ....................................................................................................G-4Merkmale ...................................................................................................G-4Mitgeliefertes Zubehör (AJ-PCD2G).........................................................G-5Für die Installation erforderliche Betriebsumgebung ........................... G-5Teile und ihre Funktionen .........................................................................G-6Anschließen des P2-Laufwerks an einen Personalcomputer................ G-7Abtrennen des P2-Laufwerks von einem Personalcomputer ................ G-8Einlegen einer P2-Karte ............................................................................G-9Herausnehmen einer P2-Karte ...............................................................G-10Schreibschutz einer P2-Karte .................................................................G-10Installieren eines USB-Treibers unter Windows ................................... G-11Installieren eines USB-Treibers für Macintosh ..................................... G-11Bevor Sie sich an den Kundendienst wenden ...................................... G-12Spezifikationen .......................................................................................G-13
Microsoft, Windows und Windows Vista sind Warenzeichen der Microsoft Corporation der USA.Macintosh, Mac OS und PowerBook sind Warenzeichen der Apple Inc. der USA.Andere Namen von Firmen und Produkten sind Warenzeichen oder eingetragene Handelsmarken der entsprechenden Unternehmen.● In dieser Bedienungsanleitung werden Microsoft® Windows®, Windows®
2000, Windows® XP Professional, Windows Vista® Business, Windows Vista® Ultimate, Windows® 7 Professional und Windows® 7 Ultimate jeweils als “Windows”, “Windows 2000”, “Windows XP Professional”, “Windows Vista Business”, “Windows Vista Ultimate”, “Windows 7 Professional” und “Windows 7 Ultimate” bezeichnet.
● Ebenso werden in dieser Bedienungsanleitung Macintosh®, Mac® Pro, Mac OS® X und PowerBook® jeweils als “Macintosh,” “Mac Pro”, “Mac OS X” und “PowerBook” bezeichnet.

G-4
Vor der Benutzung• Installieren Sie die erforderlichen Treiber von der CD-ROM, während das AJ-
PCD2G an einen Computer angeschlossen ist. Im Installationshandbuch im Ordner “Manuals” auf der CD-ROM finden Sie
Informationen zur Installation der Treiber für Windows. Im Abschnitt “Installieren eines USB-Treibers für Macintosh” auf Seite G-11 in
diesem Handbuch finden Sie Informationen zur Installation von Treibern für Macintosh.
• Das AJ-PCD2G kann im Einsatz warm werden, dies ist aber keine Fehlfunktion.
ÜbersichtDas AJ-PCD2G (im Folgenden als “P2-Laufwerk” bezeichnet) ist ein Laufwerk mit einem einzelnen Slot zum Lesen und Schreiben von P2-Inhalten auf P2-Karten (jeweils 1 Karte) bei Verbindung mit einem Windows PC oder Macintosh über USB 2.0 (zwei USB-Kabelverbindungen mit Stromversorgung für den Bus). Das P2-Laufwerk kann Clips, die mit einem Kamerarecorder für P2-Karten aufgenommen wurden, mit Hochgeschwindigkeit an einen Personalcomputer übertragen (Windows/Apple Macintosh). Dieses Gerät unterstützt nicht nur die Übertragung und das Kopieren von Clips, die auf P2-Karten aufgezeichnet wurden, sondern auch direkte Bearbeitung.
Merkmale • P2-Kartenlaufwerk mit einzelnem Slot und USB 2.0-Schnittstelle• Leicht und kompakt, tragbar und somit ideal für die Arbeit im Freien mit einem
Notebook-PC• Unterstützt Windows- und Macintosh-Betriebssysteme• USB-Bus-Stromversorgung macht einen Wechselstromadapter überflüssig*1
*1: Es sind zwei USB-Kabel erforderlich.

G-5
DE
UT
SC
H
Mitgeliefertes Zubehör (AJ-PCD2G)USB-Kabel (2) CD-ROM (1)
Für die Installation erforderliche Betriebsumgebung Für den Hostcomputer ist die folgende Betriebsumgebung zum Betreiben des P2-Laufwerks erforderlich.
USB 2.0-Anschlüsse: mindestens zwei
Für ein P2-Laufwerk werden zwei USB 2.0 (Hi-Speed)-Anschlüsse, d. h. SIGNAL (Datenübertragung/Stromversorgung) und POWER (Stromversorgung) benötigt. Bis zu zwei P2-Laufwerke können mit einem einzelnen Personalcomputer verbunden werden.
G-6
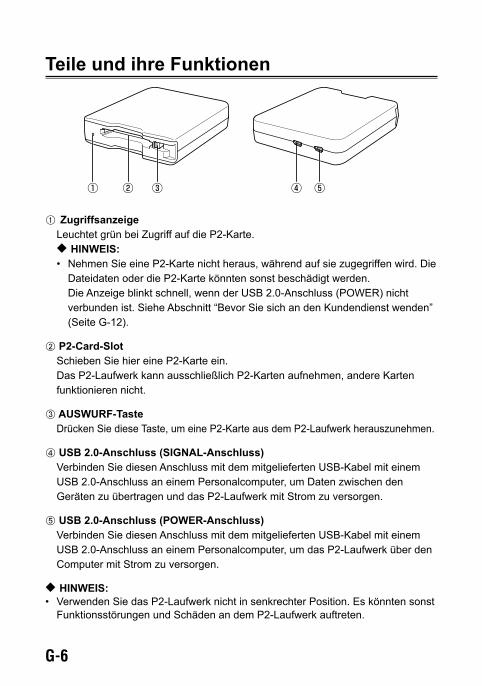
Teile und ihre Funktionen
① ② ③ ④ ⑤
A Zugriffsanzeige Leuchtet grün bei Zugriff auf die P2-Karte.
◆ HINWEIS: • Nehmen Sie eine P2-Karte nicht heraus, während auf sie zugegriffen wird. Die
Dateidaten oder die P2-Karte könnten sonst beschädigt werden. Die Anzeige blinkt schnell, wenn der USB 2.0-Anschluss (POWER) nicht
verbunden ist. Siehe Abschnitt “Bevor Sie sich an den Kundendienst wenden” (Seite G-12).
B P2-Card-Slot Schieben Sie hier eine P2-Karte ein. Das P2-Laufwerk kann ausschließlich P2-Karten aufnehmen, andere Karten
funktionieren nicht.
C AUSWURF-Taste Drücken Sie diese Taste, um eine P2-Karte aus dem P2-Laufwerk herauszunehmen.
D USB 2.0-Anschluss (SIGNAL-Anschluss) Verbinden Sie diesen Anschluss mit dem mitgelieferten USB-Kabel mit einem
USB 2.0-Anschluss an einem Personalcomputer, um Daten zwischen den Geräten zu übertragen und das P2-Laufwerk mit Strom zu versorgen.
E USB 2.0-Anschluss (POWER-Anschluss) Verbinden Sie diesen Anschluss mit dem mitgelieferten USB-Kabel mit einem
USB 2.0-Anschluss an einem Personalcomputer, um das P2-Laufwerk über den Computer mit Strom zu versorgen.
◆ HINWEIS: • Verwenden Sie das P2-Laufwerk nicht in senkrechter Position. Es könnten sonst
Funktionsstörungen und Schäden an dem P2-Laufwerk auftreten.
G-7
DE
UT
SC
H
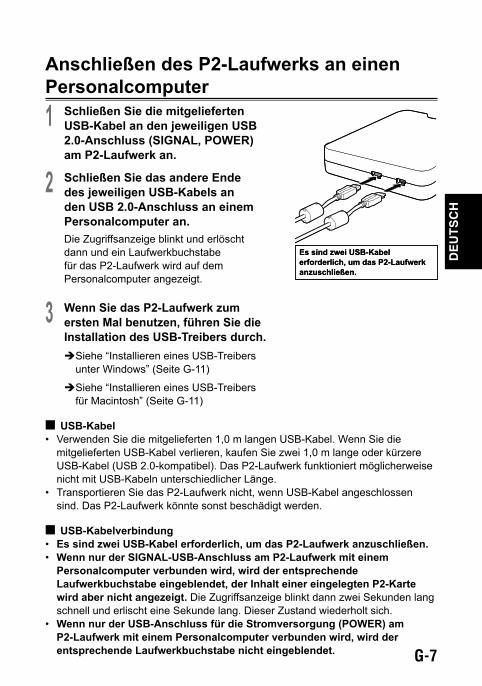
Anschließen des P2-Laufwerks an einen Personalcomputer
1 Schließen Sie die mitgelieferten USB-Kabel an den jeweiligen USB 2.0-Anschluss (SIGNAL, POWER) am P2-Laufwerk an.
2 Schließen Sie das andere Ende des jeweiligen USB-Kabels an den USB 2.0-Anschluss an einem Personalcomputer an. Die Zugriffsanzeige blinkt und erlöscht dann und ein Laufwerkbuchstabe für das P2-Laufwerk wird auf dem Personalcomputer angezeigt.
3 Wenn Sie das P2-Laufwerk zum ersten Mal benutzen, führen Sie die Installation des USB-Treibers durch. Siehe “Installieren eines USB-Treibers
unter Windows” (Seite G-11)
Siehe “Installieren eines USB-Treibers für Macintosh” (Seite G-11)
USB-Kabel• Verwenden Sie die mitgelieferten 1,0 m langen USB-Kabel. Wenn Sie die
mitgelieferten USB-Kabel verlieren, kaufen Sie zwei 1,0 m lange oder kürzere USB-Kabel (USB 2.0-kompatibel). Das P2-Laufwerk funktioniert möglicherweise nicht mit USB-Kabeln unterschiedlicher Länge.
• Transportieren Sie das P2-Laufwerk nicht, wenn USB-Kabel angeschlossen sind. Das P2-Laufwerk könnte sonst beschädigt werden.
USB-Kabelverbindung• Es sind zwei USB-Kabel erforderlich, um das P2-Laufwerk anzuschließen. • Wenn nur der SIGNAL-USB-Anschluss am P2-Laufwerk mit einem
Personalcomputer verbunden wird, wird der entsprechende Laufwerkbuchstabe eingeblendet, der Inhalt einer eingelegten P2-Karte wird aber nicht angezeigt. Die Zugriffsanzeige blinkt dann zwei Sekunden lang schnell und erlischt eine Sekunde lang. Dieser Zustand wiederholt sich.
• Wenn nur der USB-Anschluss für die Stromversorgung (POWER) am P2-Laufwerk mit einem Personalcomputer verbunden wird, wird der entsprechende Laufwerkbuchstabe nicht eingeblendet.
■
■
Es sind zwei USB-Kabel erforderlich, um das P2-Laufwerk anzuschließen.
Es sind zwei USB-Kabel erforderlich, um das P2-Laufwerk anzuschließen.
G-8
Verwendung eines USB-Hubs• Verwenden Sie nur USB-Hubs mit eigener Stromversorgung (über einen
Wechselstromadapter). (Ein aktiver Bus-USB-Hub funktioniert möglicherweise nicht bei diesem Gerät.)
• Verwenden Sie USB 2.0 (Hochgeschwindigkeits-USB)-Hubs mit diesem Gerät. (Ein USB 1.1-Hub funktioniert möglicherweise nicht bei diesem Gerät.)
Anschließen von zwei P2-Laufwerken unter Windows XP und Windows VistaVerbinden Sie die USB 2.0 (SIGNAL)-Anschlüsse beider P2-Laufwerke direkt mit den USB-Anschlüssen des Personalcomputers. Falls beide P2-Laufwerke als “Panasonic P2 Series USB Device” erscheinen, wenn Sie “Safe Hardware Removal” in der Taskleiste wählen, wird der Gerätetreiber angewendet. Falls jedoch eines der P2-Laufwerke als “USB Mass Storage Device” angezeigt wird, wird der Gerätetreiber nicht angewendet. Lesen Sie in diesem Fall bitte die Installationsanleitung und installieren Sie den Gerätetreiber erneut.Falls das Problem nach der Neuinstallation weiterhin besteht, empfehlen wir Ihnen, nur ein P2-Laufwerk zu verwenden.
◆ HINWEIS: • Wenn die USB 2.0 (SIGNAL)-Anschlüsse der beiden P2-Laufwerke an den USB-
Hub angeschlossen werden, könnten die P2-Laufwerke eventuell nicht erkannt oder der Gerätetreiber nicht angewendet werden, oder es könnten andere Probleme auftreten.
Abtrennen des P2-Laufwerks von einem Personalcomputer
Windows XP und Windows Vista Wählen Sie “Hardware entfernen oder auswerfen” in der Task-Leiste aus, um
das “Panasonic P2 Series USB Device” anzuhalten, bevor Sie die zwei USB-Kabel herausziehen.
Windows 7 Wenn sich eine P2-Karte im P2-Laufwerk befindet, klicken Sie auf den nach
oben zeigenden Pfeil in der Task-Leiste, wählen Sie “Sefely Remove Hardware and Eject Media” und dann “Remove P2 drive” aus, bevor Sie die zwei USB-Kabel herausziehen.
Wenn das Laufwerk keine P2-Karte enthält, können die USB-Kabel ohne irgendeine Aktion am Computer abgetrennt werden.
■
■
■
■

G-9
DE
UT
SC
H
Mac OS X 10.5 und 10.6 Wenn sich eine P2-Karte im P2-Laufwerk befindet, ziehen Sie das Symbol
für die P2-Karte in den Papierkorb und prüfen, ob das P2-Kartensymbol verschwunden ist, bevor Sie die zwei USB-Kabel herausziehen.
Wenn das P2-Laufwerk keine P2-Karte enthält, können die USB-Kabel ohne irgendeine Aktion am Computer abgetrennt werden.
◆ HINWEIS: • Nach dem sicheren Entfernen der Hardware in Windows kann der Computer das
P2-Laufwerk wieder erkennen, wenn beide USB-Kabel angeschlossen werden.
Einlegen einer P2-Karte
1 Schieben Sie eine P2-Karte in den P2-Card-Slot. Drücken Sie auf die Karte, bis die AUSWURF-Taste herauskommt. ◆ HINWEIS: • Achten Sie darauf, dass die P2-Karte
horizontal eingeschoben wird. Wenn Sie die Karte nicht horizontal einschieben, kann sie beschädigt werden.
• Nehmen Sie eine P2-Karte nicht heraus, während auf sie zugegriffen wird oder kurz nach dem Einschieben. Anderenfalls kann die Karte beschädigt werden.
• Transportieren Sie das Laufwerk nicht, wenn eine P2-Karte eingelegt ist. Anderenfalls kann das P2-Laufwerk beschädigt werden.
2 Legen Sie die AUSWURF-Taste in Pfeilrichtung um.
◆ HINWEIS:• Verwenden Sie das P2-Laufwerk nur,
wenn die AUSWURF-Taste umgelegt ist. Anderenfalls kann die AUSWURF-Taste beschädigt werden.
■
AUSWURF-TasteAUSWURF-Taste

G-10
Herausnehmen einer P2-Karte
1 Richten Sie die AUSWURF-Taste in Pfeilrichtung auf.
2 Drücken Sie die AUSWURF-Taste. Die P2-Karte wird soweit herausgeschoben, dass Sie sie ganz herausnehmen können.
◆ HINWEIS:• Um eine P2-Karte bei einem Macintosh herauszunehmen, ziehen Sie das
Symbol für die P2-Karte in den Papierkorb. Prüfen Sie dann, ob das Symbol verschwunden ist und ob die Zugriffsanzeige auf dem P2-Laufwerk erloschen ist, bevor Sie die P2-Karte aus dem Laufwerk nehmen.
• Nehmen Sie eine P2-Karte nicht heraus, während auf sie zugegriffen wird. Wenn Sie eine P2-Karte herausnehmen, während auf sie zugegriffen wird, kann dies zu einer Fehlfunktion des P2-Laufwerks führen. In diesem Fall müssen Sie die zwei USB-Kabel neu anschließen.
Schreibschutz einer P2-KarteP2-Karten haben einen Schreibschutzschalter. Stellen Sie diesen Schalter auf “PROTECT” ein, um Überschreiben und Löschen von Daten zu verhindern. Beachten Sie, dass der Schreibschutzschalter nicht an einer Karte betätigt werden kann, die in das Laufwerk eingelegt wurde. Damit das Laufwerk die Schaltereinstellung erkennt, nehmen Sie die P2-Karte aus dem Laufwerk, stellen Sie den Schalter in die gewünschte Position und schieben Sie die Karte wieder in das Laufwerk.
AUSWURF-TasteAUSWURF-Taste
PROTECT
P2-Karte
PROTECT
P2-Karte

G-11
DE
UT
SC
H
Installieren eines USB-Treibers unter WindowsIm Installationshandbuch im Ordner “Manuals” auf der CD-ROM finden Sie Informationen zur Installation der Treiber für Windows.
Installieren eines USB-Treibers für MacintoshDiese Treibersoftware ermöglicht einem Macintosh, auf Inhalte auf einer P2-Karte zuzugreifen, die in das P2-Laufwerk eingelegt wurde.
Führen Sie die folgenden Schritte zum Installieren des Treibers aus:
1 Legen Sie die mitgelieferte CD-ROM ein.
2 Doppelklicken Sie auf den Ordner “Macintosh” auf der CD-ROM.
3 Für Mac OS X 10.5: Doppelklicken Sie auf den Ordner “Leopard” auf der CD-ROM. Für Mac OS X 10.6: Doppelklicken Sie auf den Ordner “Snow Leopard” auf der CD-ROM.
4 Doppelklicken Sie auf den Ordner “P2Drive”.
5 Doppelklicken Sie auf “P2DriveFamilyDriver Install.dmg” im Ordner “P2Drive”.
6 Doppelklicken Sie auf “P2DriveFamilyDriver Install.pkg”.
7 Die Installation der Treibersoftware wird jetzt gestartet. Folgen Sie den Anweisungen auf dem Installationsbildschirm.
Aktuelle Informationen zu Softwaretreibern finden Sie auf der folgenden Website. http://pro-av.panasonic.net/
◆HINWEIS:• Falls der USB-Treiber nicht installiert wird, kann eventuell keine ausreichende
Übertragungsrate erzielt werden.
G-12
Bevor Sie sich an den Kundendienst wenden
Die Zugriffsanzeige blinkt schnell und das P2-Laufwerk funktioniert nicht.
Verbinden Sie den USB 2.0-Anschluss (POWER) und den USB 2.0-Anschluss (SIGNAL) mit den zwei mitgelieferten USB-Kabeln mit USB-Anschlüssen an einem Personalcomputer. Wenn der USB 2.0-Anschluss (POWER) nicht verbunden ist, blinkt die Zugriffsanzeige zwei Sekunden lang schnell und erlischt eine Sekunde lang. Dieser Zustand wiederholt sich.
Der Personalcomputer erkennt das P2-Laufwerk nicht, wenn dieses mit den zwei USB-Kabeln an den PC angeschlossen wird.
Wenn die Kabel an USB 1.1-Anschlüsse am Personalcomputer angeschlossen sind, schließen Sie sie an USB 2.0-Anschlüsse an.
Wenn die USB-Kabel länger als 1,0 m sind, verwenden Sie die zwei mitgelieferten 1,0 m langen USB-Kabel.
Verwenden Sie keine aktiven USB-Hubs, sondern USB-Hubs mit eigener Stromversorgung (über einen Wechselstromadapter).
Andere PCMCIA II-Karten als P2-Karten können nicht verwendet werden.
Das P2-Laufwerk wurde für P2-Karten konstruiert und unterstützt keine anderen PCMCIA II-Karten als P2-Karten.
Auf P2-Karten kann nach Verlassen des Energiesparmodus oder Ruhezustands nicht zugegriffen werden.
Manche Personalcomputer können nach Verlassen des Energiesparmodus oder Ruhezustands nicht auf eine P2-Karte im P2-Laufwerk zugreifen. In diesem Fall müssen Sie die zwei USB-Kabel neu anschließen.
■
■
■
■

G-13
DE
UT
SC
H
Spezifikationen Nennspannung: 5 V Gleichspannung (Spannungsversorgung mit USB2.0)Nennstromstärke: 0,5 A
gibt Sicherheitsinformationen an.Außenabmessungen (Breite x Höhe x Tiefe) 97 mm × 25,5 mm × 113 mm (mit Ausnahme vorstehender Teile)Gewicht 200 g (mit Ausnahme des Verpackungsmaterials)Anschlusskonfiguration USB-Mini-B-Buchsen (2)
[Umweltbedingungen]Betriebstemperatur 0 °C bis 40 °CLuftfeuchtigkeit 10 % bis 85 % (ohne Kondensierung)
[Systemanforderungen des PCs]Unterstützte Betriebssysteme Windows XP Professional (SP3) 32 Bit Windows Vista Business (SP2), Ultimate (SP2) 32/64 Bit Windows 7 Professional, Ultimate 32/64 Bit Mac OS X 10.5.6 (Intel-Prozessor) Mac OS X 10.6.2 (Intel-Prozessor)Hauptspeicher 512 MB oder mehr empfohlen 1 GB oder mehr wird empfohlen für Windows Vista, Windows 7 und Mac OS X
10.6Schnittstelle USB 2.0-kompatibel
[Card-Slot] PC-Karte Typ II (1) (CardBus-kompatibel)
Bitte beachten Sie, dass die Spezifikationen und das Aussehen zu Verbesserungszwecken Änderungen unterliegen, die nicht angekündigt werden.
G-14
Benutzerinformationen zur Entsorgung von elektrischen und elektronischen Geräten (private Haushalte)
Dieses Symbol auf Produkten und/oder begleitenden Dokumenten bedeutet, dass verbrauchte elektrische und elektronische Produkte nicht mit gewöhnlichem Haushaltsabfall vermischt werden sollen.Bringen Sie zur ordnungsgemäßen Behandlung, Rückgewinnung und Recycling diese Produkte zu den entsprechenden Sammelstellen, wo sie ohne Gebühren entgegengenommen werden. In einigen Ländern kann es auch möglich sein, diese Produkte beim Kauf eines entsprechenden neuen Produkts bei Ihrem örtlichen Einzelhändler abzugeben.Die ordnungsgemäße Entsorgung dieses Produkts dient dem Umweltschutz und verhindert mögliche schädliche Auswirkungen auf Mensch und Umgebung, die aus einer unsachgemäßen Handhabung von Abfall entstehen können. Genauere Informationen zur nächstgelegenen Sammelstelle erhalten Sie bei Ihrer Gemeindeverwaltung.In Übereinstimmung mit der Landesgesetzgebung können für die unsachgemäße Entsorgung dieser Art von Abfall Strafgebühren erhoben werden.
Für Geschäftskunden in der Europäischen UnionBitte treten Sie mit Ihrem Händler oder Lieferanten in Kontakt, wenn Sie elektrische und elektronische Geräte entsorgen möchten. Er hält weitere Informationen für sie bereit.
Informationen zur Entsorgung in anderen Ländern außerhalb der Europäischen UnionDieses Symbol ist nur in der Europäischen Union gültig.Bitte treten Sie mit Ihrer Gemeindeverwaltung oder Ihrem Händler in Kontakt, wenn Sie dieses Produkt entsorgen möchten, und fragen Sie nach einer Entsorgungsmöglichkeit.

F-1
FR
AN
ÇA
IS
Lire ces informations en premier !
AVERTISSEMENT:● Pour réduire les risques d’incendie ou de choc électrique, évitez
d’exposer cet appareil à la pluie ou à l’humidité.● Pour réduire tout risque de feu ou de choc électrique, éloigner l’appareil
des liquides. Utiliser et ranger uniquement dans un endroit ne risquant pas de recevoir des gouttes ou d’être aspergé de liquides, et ne pas mettre de récipient renfermant des liquides sur le dessus de l’appareil.
ATTENTION:Pour maintenir une bonne ventilation, ne pas installer ni placer l’appareil dans une étagère, un meuble encastré ni aucun endroit confiné. Pour éviter tout risque de choc électrique ou d’incendie dû à une surchauffe, vérifiez qu’aucun rideau ni aucun autre matériau ne fait obstacle à la ventilation.
ATTENTION:Pour éviter tout risque d’incendie, de chocs électriques ou d’interférences, n’utiliser que les accessoires recommandés.
AVERTISSEMENT:Ne pas dévisser le couvercle.Pour réduire tout risque d’électrocution, ne pas retirer le couvercle. Il ne se trouve à l’intérieur aucune pièce qui puisse être réparée par l’utilisateur.Confier toute réparation à un personnel qualifié.
Informations concernant la sécurité.
La plaque signaletique se trouve sur le fond de l’appareil.

F-2
Logiciel utilisé par ce produitCe produit contient un logiciel fourni conformément à la Licence publique générale GNU (General Public License - GPL) et à la Licence publique générale limitée GNU (Lesser General Public License - LGPL). L’utilisateur a le droit d’obtenir, de modifier et de redistribuer le code source comme il le souhaite.
Pour plus de détails sur les licences GPL et LGPL, reportez-vous aux fichiers enregistrés dans le dossier LDOC sur le CD-ROM fourni. (Notez que ces informations sont fournies en version originale (texte en anglais).)Pour obtenir le code source, visitez le site Web suivant.
http://pro-av.panasonic.net/
Veuillez ne pas demander de renseignements sur le code source que vous obtenez.

F-3
FR
AN
ÇA
IS
Table des matièresLire ces informations en premier ! ............................................................F-1Avant l’utilisation ........................................................................................F-4Présentation ................................................................................................F-4Fonctions.....................................................................................................F-4Accessoires fournis (AJ-PCD2G) ..............................................................F-5Configuration requise pour l’installation .................................................F-5Pièces et leurs fonctions ...........................................................................F-6Raccordement du lecteur P2 à un ordinateur personnel ........................F-7Retrait du lecteur P2 d’un ordinateur personnel .....................................F-8Insertion d’une carte P2 .............................................................................F-9Retrait d’une carte P2 ...............................................................................F-10Protection d’une carte P2 contre l’écriture ............................................F-10Installation d’un pilote USB pour Windows ...........................................F-11Installation d’un pilote USB pour Macintosh .........................................F-11Avant d’appeler le service technique .....................................................F-12Spécifications ...........................................................................................F-13
Micorsoft, Windows et Windows Vista sont des marques commerciales de Microsoft Corporation aux États-Unis.Macintosh, Mac OS et PowerBook sont des marques commerciales de Apple Inc. aux États-Unis.Les autres noms de sociétés et de produits sont des marques commerciales ou marques déposées des sociétés respectives.● Dans le cadre de ce manuel d’installation, Microsoft® Windows®, Windows®
2000, Windows® XP Professionnel, Windows Vista® Professionnel, Windows Vista® Édition Intégrale, Windows® 7 Professionnel et Windows® 7 Édition Intégrale sont appelés “Windows”, “Windows 2000”, “Windows XP Professionnel”, “Windows Vista Professionnel”, “Windows Vista Édition Intégrale”, “Windows 7 Professionnel” et “Windows 7 Édition Intégrale” respectivement.
● De même, dans ce manuel d’installation, Macintosh®, Mac® Pro, Mac OS® X et PowerBook® sont appelés “Macintosh”, “Mac Pro”, “Mac OS X” et “PowerBook” respectivement.
F-4
Avant l’utilisation• Une fois que l’AJ-PCD2G est raccordé à un ordinateur personnel, installez les
pilotes requis à partir du CD-ROM. Reportez-vous au manuel d’installation contenu dans le dossier “Manuals”
du CD-ROM pour plus d’informations sur la façon d’installer les pilotes pour Windows.
Reportez-vous à la rubrique “Installation d’un pilote USB pour Macintosh” à la page F-11 de ce manuel pour plus d’informations sur la façon d’installer les pilotes pour Macintosh.
• L’AJ-PCD2G pourrait chauffer pendant l’utilisation, mais cela n’est pas un dysfonctionnement.
PrésentationL’AJ-PCD2G (appelé ci-dessous “lecteur P2”) est un lecteur à un seul emplacement servant à lire et écrire du contenu P2 sur des cartes P2 (1 carte à la fois) lorsqu’il est raccordé à un ordinateur personnel Windows ou Macintosh par USB 2.0 (deux raccordements de câble USB fournissant une alimentation par bus). Le lecteur P2 est en mesure d’effectuer des transferts à haute vitesse de clips enregistrés sur la carte mémoire d’un caméscope pour cartes P2 à un ordinateur personnel (Windows/Apple Macintosh). Ce périphérique prend en charge non seulement le transfert et la copie de clips enregistrés sur des cartes P2, mais permet également l’édition directe.
Fonctions• Lecteur de carte P2 à un seul emplacement avec interface USB 2.0• Construction légère et compacte qui en fait un dispositif portable et idéal pour le
travail sur le terrain avec un ordinateur portable• Prend en charge les systèmes d’exploitation Windows et Macintosh• Alimentation par bus USB qui élimine le besoin d’un adaptateur CA*1
*1: Deux câbles USB sont requis.

F-5
FR
AN
ÇA
IS
Accessoires fournis (AJ-PCD2G)Câbles USB (2) CD-ROM (1)
Configuration requise pour l’installationL’ordinateur hôte doit avoir la configuration suivante pour que le lecteur P2 fonctionne.
Connecteurs USB 2.0 : deux ou plus
Pour un lecteur P2, deux connecteurs USB 2.0 (Hi-Speed), par exemple, SIGNAL (transfert de données/alimentation) et POWER (alimentation) sont nécessaires. Jusqu’à deux lecteurs P2 peuvent être raccordés à un ordinateur personnel.

F-6
Pièces et leurs fonctions
① ② ③ ④ ⑤
A Indicateur d’accès S’allume en vert pendant l’accès à la carte P2.
◆ REMARQUE : • Ne retirez pas une carte P2 quand elle est en cours d’accès. Les données des
fichiers pourraient être corrompues ou la carte P2 pourrait être endommagée. L’indicateur clignote rapidement quand le connecteur USB 2.0 (POWER) n’est
pas raccordé. Reportez-vous à “Avant d’appeler le service technique” (page F-12).
B Emplacement pour carte P2 Insérez une carte P2. Le lecteur P2 est conçu pour les cartes P2 et ne fonctionne pas avec les autres
cartes.
C Bouton EJECT Appuyez sur ce bouton pour retirer une carte P2 du lecteur P2.
D Connecteur USB 2.0 (Connecteur SIGNAL) Utilisez les câbles USB fournis pour raccorder ce connecteur à un port USB 2.0
sur un ordinateur personnel pour transférer des données et pour alimenter le lecteur P2 à partir de l’ordinateur.
E Connecteur USB 2.0 (Connecteur POWER) Utilisez le câble USB fourni pour raccorder ce connecteur à un port USB 2.0 sur
un ordinateur personnel pour alimenter le lecteur P2 à partir de l’ordinateur.
◆ REMARQUE :• N’utilisez pas le lecteur P2 en position verticale. Sinon, le lecteur P2 risque de
mal fonctionner ou d’être endommagé.

F-7
FR
AN
ÇA
IS
Raccordement du lecteur P2 à un ordinateur personnel
1 Raccordez les câbles USB fournis à chaque connecteur USB 2.0 (SIGNAL, POWER) du lecteur P2.
2 Raccordez l’autre extrémité de chaque câble USB aux ports USB 2.0 d’un ordinateur personnel. L’indicateur d’accès clignote puis s’éteint et une lettre de lecteur pour le lecteur P2 s’affiche sur l’ordinateur personnel.
3 La première fois que vous utilisez le lecteur P2, procédez à l’installation du pilote USB. Reportez-vous à la section “Installation
d’un pilote USB pour Windows” (page F-11)
Reportez-vous à la section “Installation d’un pilote USB pour Macintosh” (page F-11)
Câbles USB• Utilisez les câbles USB d’1,0 m fournis. Si vous perdez les câbles USB fournis,
achetez deux câbles USB d’1,0 m ou moins (compatibles USB 2.0). Il se peut que le lecteur P2 ne fonctionne pas avec des câbles USB de longueur différente.
• Ne transportez pas le lecteur P2 avec les câbles USB raccordés. Le lecteur P2 pourrait être endommagé.
Raccordement de câble USB• Deux câbles USB sont requis pour raccorder le lecteur P2. • Lorsque seul le connecteur USB (SIGNAL) du lecteur P2 est raccordé à un
ordinateur personnel, la lettre de lecteur correspondante s’affiche mais le contenu d’une carte P2 insérée ne s’affiche pas. L’indicateur d’accès clignote alors rapidement pendant deux secondes puis s’éteint pendant une seconde. Cet état se répète.
• Lorsque seul le connecteur USB (POWER) du lecteur P2 est raccordé à un ordinateur personnel, la lettre de lecteur correspondante ne s’affiche pas.
■
■
Deux câbles USB sont requis pour raccorder le lecteur P2.Deux câbles USB sont requis pour raccorder le lecteur P2.
F-8
Utilisation d’un concentrateur USB• N’utilisez que des concentrateurs USB à alimentation propre (les concentrateurs à
alimentation propre fournissent leur propre énergie via un adaptateur CA). (Il se peut qu’un concentrateur USB alimenté par bus ne fonctionne pas avec ce périphérique.)
• Utilisez des concentrateurs USB 2.0 (Hi-Speed USB) avec ce périphérique. (Il se peut qu’un concentrateur USB 1.1 ne fonctionne pas avec ce périphérique.)
Raccordement de deux lecteurs P2 sous Windows XP et Windows VistaRaccordez les connecteurs USB 2.0 (SIGNAL) aux deux lecteurs P2 directement sur les ports USB de l’ordinateur personnel. Si les deux lecteurs P2 apparaissent comme “Panasonic P2 Series USB Device” lorsque vous sélectionnez “Safe Hardware Removal” dans la barre des tâches, le pilote du périphérique est appliqué. Si l’un des lecteurs P2 apparaît comme “USB Mass Storage Device”, le pilote du périphérique n’est pas appliqué. Dans ce cas, reportez-vous au manuel d’installation et réinstallez le pilote du périphérique.Si le problème persiste après la réinstallation, il est recommandé de n’utiliser qu’un seul lecteur P2.
◆ REMARQUE :• Si les connecteurs USB 2.0 (SIGNAL) sur les deux lecteurs P2 sont raccordés
au concentrateur USB, il se peut que les lecteurs P2 ne soient pas reconnus, que le pilote du périphérique ne soit pas appliqué et que d’autres problèmes se produisent.
Retrait du lecteur P2 d’un ordinateur personnelWindows XP et Windows Vista
Sélectionnez “Retirer le matériel en toute sécurité” dans la barre des tâches pour arrêter “Panasonic P2 Series USB Device” avant de déconnecter les deux câbles USB.
Windows 7 Si une carte P2 est insérée dans le lecteur P2, cliquez sur l’icône de flèche vers
le haut dans la barre des tâches, sélectionnez “Safely Remove Hardware and Eject Media” puis “Remove P2 drive” avant de déconnecter les deux câbles USB.
Lorsqu’il n’y a aucune carte P2 dans le lecteur, les câbles USB peuvent être retirés sans aucune opération sur l’ordinateur.
■
■
■
■

F-9
FR
AN
ÇA
IS
Mac OS X 10.5 et 10.6 Si une carte P2 est insérée dans le lecteur P2, faites glisser l’icône de la carte
P2 dans la Corbeille et vérifiez que l’icône de la carte P2 a disparu avant de déconnecter les deux câbles USB.
Lorsqu’il n’y a aucune carte P2 dans le lecteur P2, les câbles USB peuvent être retirés sans aucune opération sur l’ordinateur.
◆ REMARQUE : • Après avoir retiré le périphérique en toute sécurité sous Windows, le lecteur P2
peut être de nouveau reconnu par l’ordinateur en raccordant les deux câbles USB.
Insertion d’une carte P2
1 Insérez une carte P2 dans l’emplacement pour carte P2. Appuyez sur la carte jusqu’à ce que le bouton EJECT ressorte. ◆ REMARQUE : • Assurez-vous d’insérer la carte P2
horizontalement. Le fait de forcer pour faire entrer la carte en biais pourrait l’endommager.
• Ne retirez pas une carte P2 lorsqu’elle est en cours d’accès ou juste après son insertion. Sinon la carte pourrait être endommagée.
• Ne transportez pas le lecteur lorsqu’une carte P2 est insérée. Sinon le lecteur P2 pourrait être endommagé.
2 Repliez le bouton EJECT dans le sens de la flèche.
◆ REMARQUE :• N’utilisez pas le lecteur P2 lorsque le
bouton EJECT est entièrement déployé. Sinon le bouton EJECT pourrait être
endommagé.
■
Bouton EJECTBouton EJECT

F-10
Retrait d’une carte P2
1 Déployez le bouton EJECT dans le sens de la flèche.
2 Appuyez sur le bouton EJECT. La carte P2 glisse suffisamment vers l’extérieur pour que vous puissiez la retirer.
◆ REMARQUE :• Pour retirer une carte P2 sur un Macintosh, faites glisser l’icône de carte P2
dans la Corbeille. Vérifiez ensuite que l’icône a disparu et que l’indicateur d’accès sur le lecteur P2 est éteint avant de retirer physiquement la carte P2.
• Ne retirez pas une carte P2 quand elle est en cours d’accès. Le fait de retirer une carte P2 quand elle est en cours d’accès risque de provoquer un dysfonctionnement du lecteur P2. Si cela se produit, raccordez de nouveau les deux câbles USB.
Protection d’une carte P2 contre l’écritureLes cartes P2 sont équipées d’un commutateur de protection contre l’écriture. Faites glisser ce commutateur vers le côté “PROTECT” pour empêcher un écrasement et une suppression des données. Notez que le commutateur de protection contre l’écriture ne fonctionne pas sur une carte insérée dans le lecteur. Afin que le lecteur reconnaisse le réglage du commutateur, retirez la carte P2 du lecteur, réglez le commutateur et réinsérez la carte dans le lecteur.
Bouton EJECTBouton EJECT
PROTECT
Carte P2
PROTECT
Carte P2

F-11
FR
AN
ÇA
IS
Installation d’un pilote USB pour WindowsReportez-vous au manuel d’installation contenu dans le dossier “Manuals” du CD-ROM pour plus d’informations sur la façon d’installer les pilotes Windows.
Installation d’un pilote USB pour MacintoshCe logiciel pilote permet à un Macintosh d’accéder au contenu sur une carte P2 insérée dans le lecteur P2.
Effectuez les étapes suivantes pour installer le pilote.
1 Insérez le CD-ROM fourni.
2 Double-cliquez sur le dossier “Macintosh” sur le CD-ROM.
3 Pour Mac OS X 10.5 : Double-cliquez sur le dossier “Leopard” sur le CD-ROM. Pour Mac OS X 10.6 : Double-cliquez sur le dossier “Snow Leopard” sur le CD-ROM.
4 Double-cliquez sur le dossier “P2Drive”.
5 Double-cliquez sur le module d’image du disque “P2DriveFamilyDriver Install.dmg” dans le dossier “P2Drive”.
6 Double-cliquez sur “P2DriveFamilyDriver Install.pkg”.
7 Le processus d’installation du logiciel pilote démarre alors. Suivez les instructions données sur l’écran d’installation.
◆ REMARQUE :• Si le pilote USB n’est pas installé, vous risquez de ne pas obtenir un taux de
transfert suffisant.
Pour obtenir les informations les plus récentes sur les pilotes logiciels, visitez le site Web suivant. http://pro-av.panasonic.net/
Pour obtenir les informations les plus récentes sur les pilotes logiciels, visitez le site Web suivant. http://pro-av.panasonic.net/

F-12
Avant d’appeler le service techniqueL’indicateur d’accès clignote rapidement et le lecteur P2 ne fonctionne pas.
Raccordez le connecteur USB 2.0 (POWER) et le connecteur USB 2.0 (SIGNAL) aux ports USB d’un ordinateur personnel en utilisant les deux câbles USB fournis. Si le connecteur USB 2.0 (POWER) n’est pas raccordé, l’indicateur d’accès clignote rapidement pendant deux secondes puis s’éteint pendant une seconde. Cet état se répète.
L’ordinateur personnel ne reconnaît pas le lecteur P2 lorsqu’il est raccordé avec les deux câbles USB.
S’ils sont raccordés à des ports USB 1.1 sur l’ordinateur personnel, raccordez-les de nouveau à des ports USB 2.0.
Si les câbles USB sont d’une longueur supérieure à 1,0 m, raccordez-les de nouveau en utilisant les deux câbles USB d’1,0 m fournis.
N’utilisez pas de concentrateurs USB alimentés par bus, mais des concentrateurs USB à alimentation propre (les concentrateurs à alimentation propre fournissent leur propre énergie via un adaptateur CA).
Les cartes PCMCIA Type II autres que les cartes P2 ne peuvent pas être utilisées.
Le lecteur P2 est conçu pour les cartes P2 et ne prend pas en charge les cartes PCMCIA Type II autres que les cartes P2.
Il n’est pas possible d’accéder aux cartes P2 lorsque l’ordinateur quitte le mode de veille ou de veille prolongée.
Il se peut que certains ordinateurs personnels ne puissent pas accéder à une carte P2 dans le lecteur P2 lorsqu’ils quittent le mode de veille ou de veille prolongée. Si cela se produit, raccordez de nouveau les deux câbles USB.
■
■
■
■

F-13
FR
AN
ÇA
IS
SpécificationsTension nominale : 5 V CC (alimentation par USB2.0)Consommation électrique nominale : 0,5 A
Informations concernant la sécurité.Dimensions externes (largeur × hauteur × profondeur) 97 mm × 25,5 mm × 113 mm (3-7/8 pouces × 1-1/16 pouces × 4-1/2 pouces) (sans compter les pièces saillantes)Poids 200 g (0,44 lb) (sans compter les matériaux d’emballage)Configuration des connecteurs Connecteurs USB mini B (2)
[Conditions d’environnement]Température de fonctionnement 0 °C à 40 °C (32 °F à 104 °F)Humidité de fonctionnement 10 % à 85 % (sans condensation)
[Configuration requise de l’ordinateur personnel]Systèmes d’exploitation pris en charge Windows XP Professionnel (SP3) 32 bit Windows Vista Professionnel (SP2), Édition Intégrale (SP2) 32/64 bit Windows 7 Professionnel, Édition Intégrale 32/64 bit Mac OS X 10.5.6 (Intel processor) Mac OS X 10.6.2 (Intel processor)Mémoire principale 512 Mo ou plus recommandé 1 Go ou plus recommandé pour Windows Vista, Windows 7 et Mac OS X 10.6Interface Compatible USB ver. 2.0
[Emplacement pour carte] Carte PC Type II (1) (compatible CardBus)
Veuillez noter que les spécifications et l’aspect du lecteur peuvent changer, pour améliorer l’appareil, sans préavis.
F-14
Informations relatives à l’évacuation des déchets, destinées aux utilisateurs d’appareils électriques et électroniques (appareils ménagers domestiques)
Lorsque ce symbole figure sur les produits et/ou les documents qui les accompagnent, cela signifie que les appareils électriques et électroniques ne doivent pas être jetés avec les ordures ménagères.Pour que ces produits subissent un traitement, une récupération et un recyclage appropriés, envoyez-les dans les points de pré-collecte désignés, où ils peuvent être déposés gratuitement. Dans certains pays, il est possible de renvoyer les produits au revendeur local en cas d’achat d’un produit équivalent.En éliminant correctement ce produit, vous contriburez à la conservation des ressources vitales et à la prévention des éventuels effets négatifs sur l’environnement et la santé humaine, pouvant être dus à la manipulation inappropriée des déchets. Veuillez contacter les autorités locales pour connaître le point de pré-collecte le plus proche.Des sanctions peuvent être appliquées en cas d’élimination incorrecte de ces déchets, conformément à la législation nationale.
Utilisateurs professionnels de l’Union européennePour en savoir plus sur l’élimination des appareils électriques et électroniques, contactez votre revendeur ou fournisseur.
Informations sur l’évacuation des déchets dans les pays ne faisant pas partie de l’Union européenneCe symbole n’est reconnu que dans l’Union européenne.Pour supprimer ce produit, contactez les autorités locales ou votre revendeur afin de connaître la procédure d’élimination à suivre.

I-1
ITA
LIA
NO
Leggere prima quanto segue!
AVVERTIMENTO:● Per ridurre il rischio d’incendio o di scosse elettriche, non esporre questo
prodotto alla pioggia o all’umidità.● Per ridurre il rischio d’incendio o di scosse elettriche, tenere questo
prodotto lontano da tutti i liquidi. Usarlo e conservarlo soltanto in luoghi che non siano esposti a gocciolamenti o spruzzi di liquidi, e non mettervi sopra recipienti di liquidi.
ATTENZIONE:Per assicurare una buona ventilazione, non installare o sistemare questo apparecchio in uno scaffale, mobile incorporato od altro spazio chiuso. Per evitare rischi di folgorazione o di incendio a causa di surriscaldamenti, accertarsi sempre che la ventilazione non sia ostacolata da tende o altri materiali.
ATTENZIONE:Per ridurre i pericoli d’incendio o di scosse elettriche e di fastidiose interferenze, usare soltanto gli accessori raccomandati.
ATTENZIONE:Non togliere il coperchio svitandolo. Per ridurre i pericoli di scosse elettriche, non togliere il coperchio. All’interno non ci sono parti riparabili dall’utente.Per le riparazioni, rivolgersi a personale tecnico qualificato.
sono le informazioni sulla sicurezza.
La piastrina di taratura si trova sulla parte inferiore dell’unita.
I-2
Software utilizzato dal prodottoQuesto prodotto contiene software rilasciato sotto licenze GNU/GPL (General Public License) e GNU/LGPL (Lesser General Public License). L’utente ha diritto di ottenere, modificare e ridistribuire il codice sorgente come desidera.
Per informazioni dettagliate sulle licenze GPL e LGPL, vedere i file disponibili nella cartella LDOC sul CD-ROM fornito (le informazioni sono fornite nel testo originale in lingua inglese).Per ottenere il codice sorgente, visitare il seguente sito Web:
http://pro-av.panasonic.net/
Non richiedere informazioni a proposito del codice sorgente ottenuto.

I-3
ITA
LIA
NO
SommarioLeggere prima quanto segue! ....................................................................I-1Prima di utilizzare il prodotto .....................................................................I-4Panoramica ..................................................................................................I-4Caratteristiche..............................................................................................I-4Accessori forniti (AJ-PCD2G) .....................................................................I-5Ambiente operativo richiesto per l’installazione ...................................... I-5Parti e relative funzioni ...............................................................................I-6Collegamento dell’unità P2 a un personal computer ............................... I-7Rimozione dell’unità P2 da un personal computer .................................. I-8Inserimento di una scheda P2 ....................................................................I-9Rimozione di una scheda P2 ....................................................................I-10Protezione dalla scrittura di una scheda P2 ........................................... I-10Installazione di un driver USB per Windows ........................................... I-11Installazione di un driver USB per Macintosh......................................... I-11Prima di richiedere assistenza .................................................................I-12Specifiche ...................................................................................................I-13
Microsoft, Windows e Windows Vista sono marchi di fabbrica di Microsoft Corporation degli Stati Uniti.Macintosh, Mac OS e PowerBook sono marchi di fabbrica di Apple Inc. degli Stati Uniti.Altri nomi di società e prodotti sono marchi di fabbrica o marchi registrati dei rispettivi proprietari.● Nelle presenti istruzioni, Microsoft® Windows®, Windows® 2000, Windows® XP
Professional, Windows Vista® Business, Windows Vista® Ultimate, Windows® 7 Professional e Windows® 7 Ultimate sono indicati rispettivamente come “Windows”, “Windows 2000”, “Windows XP Professional”, “Windows Vista Business”, “Windows Vista Ultimate”, “Windows 7 Professional” e “Windows 7 Ultimate”.
● In modo simile nelle presenti istruzioni, Macintosh®, Mac® Pro, Mac OS® X e PowerBook® sono indicate rispettivamente come “Macintosh,” “Mac Pro”, “Mac OS X” e “PowerBook”.
I-4
Prima di utilizzare il prodotto• Quando l’unità AJ-PCD2G è collegata a un computer, installare i driver richiesti
dal CD-ROM. Per informazioni sull’installazione dei driver per Windows, vedere il manuale di
installazione disponibile nella cartella “Manuals” sul CD-ROM. Per informazioni sull’installazione dei driver per Macintosh, vedere “Installazione
di un driver USB per Macintosh” a pagina I-11 del presente manuale. • L’unità AJ-PCD2G potrebbe scaldarsi durante l’uso, ma ciò non indica un
malfunzionamento.
PanoramicaL’unità AJ-PCD2G (di seguito “unità P2”) è un’unità a slot singolo per la lettura e la scrittura del contenuto P2 di schede P2 (1 scheda per volta) con collegamento a PC Windows o Macintosh tramite USB 2.0 (due collegamenti con cavo USB per l’alimentazione tramite bus). L’unità P2 è in grado di effettuare trasferimenti veloci su un personal computer (Windows/Apple Macintosh) dei dati dei clip registrati con un camcorder a schede di memoria per schede P2. Questo dispositivo non solo supporta il trasferimento e la copia di clip registrati su schede P2, ma ne consente anche la modifica diretta.
Caratteristiche• Unità a slot singolo per schede P2 con interfaccia USB 2.0• Formato leggero e compatto, portatile e ideale per il lavoro sul campo con un
notebook• Supporto di sistemi operativi sia Windows che Macintosh• Adattatore CA non necessario grazie all’alimentazione tramite bus USB*1
*1: Sono necessari due cavi USB.

I-5
ITA
LIA
NO
Accessori forniti (AJ-PCD2G)Cavi USB (2) CD-ROM (1)
Ambiente operativo richiesto per l’installazionePer il funzionamento dell’unità P2, nel computer host è richiesto l’ambiente operativo riportato di seguito.
Connettori USB 2.0: due o più
Per un’unità P2, sono necessari due connettori USB 2.0 (Hi-Speed USB), per esempio, SIGNAL (trasferimento dati/alimentazione) e POWER (alimentazione). A un personal computer possono essere connesse fino a due unità P2.

I-6
Parti e relative funzioni
① ② ③ ④ ⑤
A Indicatore di accesso È acceso in verde durante l’accesso alla scheda P2.
◆ NOTA: • Non rimuovere una scheda P2 durante l’accesso. Si potrebbero danneggiare i
dati dei file o la scheda P2. L’indicatore lampeggia rapidamente quando il connettore USB 2.0 (POWER)
non è collegato. Vedere “Prima di richiedere assistenza” a pagina I-12.
B Slot per schede P2 Inserire una scheda P2. L’unità P2 è progettata per schede P2 e non è utilizzabile con schede di altro
tipo.
C Pulsante EJECT Premere questo pulsante per rimuovere una scheda P2 dall’unità P2.
D Connettore USB 2.0 (Connettore SIGNAL) Utilizzare i cavi USB forniti per collegare questo connettore a una porta USB di
un personal computer per il trasferimento di dati e per l’alimentazione dell’unità P2 dal computer.
E Connettore USB 2.0 (Connettore POWER) Utilizzare il cavo USB fornito per collegare questo connettore a una porta USB
2.0 di un personal computer per l’alimentazione dell’unità P2 dal computer.
◆ NOTA:• Non utilizzare l’unità P2 in posizione eretta. In caso contrario potrebbero
verificarsi malfunzionamenti o danni all’unità P2.

I-7
ITA
LIA
NO
Collegamento dell’unità P2 a un personal computer
1 Collegare i cavi USB forniti a ciascun connettore USB 2.0 (SIGNAL, POWER) dell’unità P2.
2 Collegare l’altra estremità di ciascun cavo USB alle porte USB 2.0 di un personal computer. L’indicatore di accesso lampeggia e quindi si spegne e nel personal computer viene visualizzata una lettera di unità per l’unità P2.
3 La prima volta che si utilizza l’unità P2, procedere con l’installazione del driver USB. Fare riferimento a “Installazione di un
driver USB per Windows” (pagina I-11)
Fare riferimento a “Installazione di un driver USB per Macintosh” (pagina I-11)
Cavi USB• Utilizzare i cavi USB di 1,0 m forniti. In caso di smarrimento dei cavi USB forniti,
acquistare due cavi USB lunghi al massimo 1,0 m (conformi allo standard USB 2.0). Non si garantisce il funzionamento dell’unità P2 con cavi USB di diversa lunghezza.
• Non trasportare l’unità P2 con i cavi USB collegati. L’unità P2 si potrebbe danneggiare.
Collegamento dei cavi USB• Per il collegamento dell’unità P2 sono necessari due cavi USB. • Quando al personal computer è collegato soltanto il connettore USB
(SIGNAL) dell’unità P2, viene visualizzata la lettera di unità corrispondente, ma il contenuto della scheda P2 inserita non viene visualizzato. L’indicatore di accesso lampeggia rapidamente per due secondi e quindi si spegne per un secondo. Questo stato si ripete.
• Quando al personal computer è collegato soltanto il connettore USB (POWER) dell’unità P2, la lettera di unità corrispondente non viene visualizzata.
■
■
Per il collegamento dell’unità P2 sono necessari due cavi USB.Per il collegamento dell’unità P2 sono necessari due cavi USB.
I-8
Utilizzo di un hub USB• Utilizzare esclusivamente hub USB auto-alimentati (in grado di fornire
alimentazione tramite un adattatore CA). Non si garantisce il funzionamento corretto di un hub USB alimentato tramite bus con questo dispositivo.
• Utilizzare hub USB 2.0 (Hi-Speed USB) con questo dispositivo. (Non si garantisce il funzionamento corretto di un hub USB 1.1 con questo dispositivo.)
Collegamento di due unità P2 a Windows XP e Windows VistaCollegare i connettori USB 2.0 (SIGNAL) delle due unità P2 direttamente alle porte USB del computer. Se entrambe le unità P2 appaiono come “Panasonic P2 Series USB Device” quando si seleziona “Safe Hardware Removal” nella barra delle applicazioni, il driver del dispositivo viene applicato. Se una delle unità P2 appare come “USB Mass Storage Device”, il driver del dispositivo non viene applicato. In questo caso, fare riferimento al manuale di installazione e installare di nuovo il driver del dispositivo.Se in seguito alla reinstallazione il problema persiste, si consiglia di utilizzare solamente un’unità P2.
◆ NOTA:• Se i connettori USB (SIGNAL) delle due unità P2 sono collegati all’hub USB, le
unità P2 potrebbero non essere riconosciute, il driver del dispositivo potrebbe non essere applicato, e potrebbero verificarsi ulteriori problemi.
Rimozione dell’unità P2 da un personal computer
Windows XP e Windows Vista Prima di scollegare i due cavi USB, selezionare “Rimozione sicura dell’hardware”
nella barra delle applicazioni e disattivare “Panasonic P2 Series USB Device”.
Windows 7 Se nell’unità P2 è inserita una scheda P2, prima di scollegare i due cavi USB
fare clic sull’icona a forma di freccia verso l’alto nella barra delle applicazioni, selezionare “Sefely Remove Hardware and Eject Media” e quindi l’opzione “Remove P2 drive”.
Se nell’unità non è presente una scheda P2, è possibile rimuovere i cavi USB senza eseguire alcuna operazione sul computer.
■
■
■
■

I-9
ITA
LIA
NO
Mac OS X 10.5 e 10.6 Se nell’unità P2 è inserita una scheda P2, trascinare l’icona della scheda P2 sul
cestino. Prima di scollegare i due cavi USB, controllare che l’icona della scheda P2 sia scomparsa.
Se nell’unità P2 non è presente una scheda P2, è possibile rimuovere i cavi USB senza eseguire alcuna operazione sul computer.
◆ NOTA: • Dopo la rimozione sicura dell’hardware in Windows, perché il computer
riconosca nuovamente l’unità P2 è sufficiente collegare entrambi i cavi USB.
Inserimento di una scheda P2
1 Inserire una scheda P2 nell’apposito slot. Premere la scheda finché non fuoriesce il pulsante EJECT. ◆ NOTA: • Assicurarsi di inserire la scheda P2
orizzontalmente. Se spinta in posizione inclinata, la scheda si potrebbe danneggiare.
• Non rimuovere una scheda P2 mentre è in corso l’accesso alla scheda o subito dopo l’inserimento. In caso contrario, la scheda si potrebbe danneggiare.
• Non trasportare l’unità con una scheda P2 inserita. In caso contrario, l’unità P2 si potrebbe danneggiare.
2 Ripiegare il pulsante EJECT nella direzione della freccia.
◆ NOTA:• Non utilizzare l’unità P2 con il pulsante
EJECT in completa estensione. In caso contrario, il pulsante EJECT si
potrebbe danneggiare.
■
Pulsante EJECTPulsante EJECT

I-10
Rimozione di una scheda P2
1 Sollevare il pulsante EJECT nella direzione della freccia.
2 Premere il pulsante EJECT. La scheda P2 scorrerà verso l’esterno in modo da poter essere rimossa.
◆ NOTA:• Per rimuovere una scheda P2 in Macintosh, trascinare la relativa icona sul
cestino. Controllare quindi che l’icona sia scomparsa e che l’indicatore di accesso presente sull’unità P2 sia spento prima di rimuovere fisicamente la scheda P2.
• Non rimuovere una scheda P2 mentre è in corso l’accesso alla scheda. La rimozione di una scheda P2 durante l’accesso può causare il malfunzionamento dell’unità P2. In questo caso, ricollegare i due cavi USB.
Protezione dalla scrittura di una scheda P2Le schede P2 sono dotate di un interruttore di protezione dalla scrittura. Per impedire la sovrascrittura o l’eliminazione dei dati, spingere l’interruttore su “PROTECT”. L’interruttore di protezione della scrittura non funziona su una scheda inserita nell’unità. Affinché l’unità riconosca l’impostazione dell’interruttore, rimuovere la scheda P2 dall’unità, impostare l’interruttore e reinserire la scheda.
Pulsante EJECTPulsante EJECT
PROTECT
Scheda P2
PROTECT
Scheda P2

I-11
ITA
LIA
NO
Installazione di un driver USB per WindowsPer informazioni sull’installazione dei driver per Windows, vedere il manuale di installazione disponibile nella cartella “Manuals” sul CD-ROM.
Installazione di un driver USB per MacintoshIl software del driver consente a Macintosh di accedere al contenuto di una scheda P2 inserita nell’unità P2.
Per installare il driver, attenersi alla procedura descritta di seguito.
1 Inserire il CD-ROM fornito.
2 Fare doppio clic sulla cartella “Macintosh” sul CD-ROM.
3 Per Mac OS X 10.5: Fare doppio clic sulla cartella “Leopard” sul CD-ROM. Per Mac OS X 10.6: Fare doppio clic sulla cartella “Snow Leopard” sul CD-ROM.
4 Fare doppio clic sulla cartella “P2Drive”.
5 Fare doppio clic sul modulo di immagine del disco “P2DriveFamilyDriver Install.dmg” nella cartella “P2Drive”.
6 Fare doppio clic su “P2DriveFamilyDriver Install.pkg”.
7 Verrà così avviato il processo di installazione del software del driver. Seguire le istruzioni visualizzate nella schermata di installazione.
◆ NOTA:• Se il driver USB non è installato, è probabile che non si ottenga una velocità di
trasferimento sufficiente.
Per informazioni aggiornate sui driver software, visitare il seguente sito Web. http://pro-av.panasonic.net/Per informazioni aggiornate sui driver software, visitare il seguente sito Web. http://pro-av.panasonic.net/

I-12
Prima di richiedere assistenzaL’indicatore di accesso lampeggia rapidamente e l’unità P2 non funziona.
Collegare il connettore USB 2.0 (POWER) e il connettore USB 2.0 (SIGNAL) alle porte USB di un personal computer utilizzando i due cavi USB forniti. Se il connettore USB 2.0 (POWER) non è collegato, l’indicatore di accesso lampeggia rapidamente per due secondi e poi si spegne per un secondo. Questo stato si ripete.
Il personal computer non riconosce l’unità P2 quando è collegata con i due cavi USB.
Se sono collegati a porte USB 1.1 del personal computer, ricollegare i cavi a porte USB 2.0.
Se la lunghezza dei cavi USB è superiore a 1,0 m, effettuare di nuovo il collegamento utilizzando i due cavi USB di 1,0 m forniti.
Non utilizzare hub USB alimentati tramite bus, bensì hub USB auto-alimentati (in grado di fornire alimentazione tramite un adattatore CA).
Non è possibile utilizzare schede PCMCIA Tipo II diverse da schede P2.
L’unità P2 è progettata per schede P2 e non supporta schede PCMCIA Tipo II diverse.
Non è possibile accedere alle schede P2 dopo la riattivazione dallo stato di sospensione o ibernazione.
Alcuni personal computer potrebbero non essere in grado di accedere a una scheda P2 nell’unità P2 dopo la riattivazione dallo stato di sospensione o ibernazione. In questo caso, ricollegare i due cavi USB.
■
■
■
■

I-13
ITA
LIA
NO
SpecificheTensione nominale: 5 V CC (alimentazione via USB2.0)Consumo di corrente nominale 0,5 A
indica informazioni di sicurezza.Dimensioni esterne (larghezza × altezza × profondità) 97 mm × 25,5 mm × 113 mm (parti sporgenti escluse)Peso 200 g (materiali di imballaggio esclusi)Configurazione dei connettori Connettori USB mini-B (2)
[Condizioni ambientali]Temperatura di funzionamento Da 0 °C a 40 °CUmidità di funzionamento Da 10 % a 85 % (senza condensa)
[Requisiti operativi del personal computer]Sistemi operativi supportati Windows XP Professional (SP3) a 32 bit Windows Vista Business (SP2) o Ultimate (SP2) a 32/64 bit Windows 7 Professional o Ultimate a 32/64 bit Mac OS X 10.5.6 (processore Intel) Mac OS X 10.6.2 (processore Intel)Memoria principale 512 MB o più consigliati 1 GB o più consigliato per Windows Vista, Windows 7 e Mac OS X 10.6Interfaccia Conforme allo standard USB versione 2.0
[Slot per schede] PC card Tipo II (1) (conforme CardBus)
Le specifiche e l’aspetto qui riportati sono soggetti a variazioni per scopo migliorativo senza alcun preavviso.

I-14
Informazioni per gli utenti sullo smaltimento di apparecchiature elettriche ed elettroniche obsolete (per i nuclei familiari privati)
Questo simbolo sui prodotti e/o sulla documentazione di accompagnamento significa che i prodotti elettrici ed elettronici usati non devono essere mescolati con i rifiuti domestici generici.Per un corretto trattamento, recupero e riciclaggio, portare questi prodotti ai punti di raccolta designati, dove verranno accettati gratuitamente. In alternativa, in alcune nazioni potrebbe essere possibile restituire i prodotti al rivenditore locale, al momento dell’acquisto di un nuovo prodotto equivalente.Uno smaltimento corretto di questo prodotto contribuirà a far risparmiare preziose risorse ed evitare potenziali effetti negativi sulla salute umana e sull’ambiente, che potrebbero derivare, altrimenti, da uno smaltimento inappropriato. Per ulteriori dettagli, contattare la propria autorità locale o il punto di raccolta designato più vicino.In caso di smaltimento errato di questo materiale di scarto, potrebbero venire applicate delle penali, in base alle leggi nazionali.
Per gli utenti aziendali nell’Unione EuropeaQualora si desideri smaltire apparecchiature elettriche ed elettroniche, contattare il rivenditore o il fornitore per ulteriori informazioni.
Informazioni sullo smaltimento in nazioni al di fuori dell’Unione EuropeaQuesto simbolo è valido solo nell’Unione Europea.Qualora si desideri smaltire questo prodotto, contattare le autorità locali o il rivenditore e chiedere informazioni sul metodo corretto di smaltimento.

S-1
ES
PA
ÑO
L
Lea esto primero!
ADVERTENCIA:● Para reducir el riesgo de producir un incendio o recibir una sacudida
eléctrica, no exponga este equipo a la lluvia ni a la humedad.● Para reducir el riesgo de incendio o sacudida eléctrica, mantenga este
equipo alejado de todos los líquidos. Utilícelo y guárdelo solamente en lugares donde no corra el riesgo de que le caigan gotas o le salpiquen líquidos, y no coloque ningún recipiente de líquidos encima del equipo.
PRECAUCIÓN:Para mantener unas buenas condiciones de ventilación, no instale ni ponga este aparato en una librería, mueble empotrado u otro espacio reducido.Para evitar el riesgo de que se produzcan sacudidas eléctricas o peligros de incendio debidos al recalentamiento, asegúrese de que las cortinas y otros materiales no obstruyan la ventilación.
PRECAUCIÓN:Para reducir el riesgo de incendios, sacudidas eléctricas e interferencias molestas, utilice solamente los accesorios recomendados.
AVISO:No quite la cubierta desatornillándola.No quite la tapa para evitar el riesgo de sacudidas eléctricas. Las piezas del interior no requieren mantenimiento por parte del usuario.Solicite las reparaciones al personal de servicio calificado.
indica información de seguridad.
La placa indicadora esta en la parte inferior de la unidad.
S-2
Software utilizado por este productoEste producto contiene software cubierto por la Licencia Pública General de GNU (GPL) y la Licencia Pública General Reducida de GNU (LGPL). El usuario es libre de copiar, modificar y redistribuir el código fuente como desee.
Si desea obtener información más detallada acerca de las licencias GPL y LGPL, consulte los archivos de la carpeta LDOC del CD-ROM suministrado. (Tenga en cuenta que esta información únicamente se encuentra disponible en su texto original (en inglés)).Para obtener el código fuente, visite el siguiente sitio web:
http://pro-av.panasonic.net/
No realice consultas acerca del código fuente que obtenga.
S-3
ES
PA
ÑO
L
ÍndiceLea esto primero!....................................................................................... S-1Antes del uso ............................................................................................. S-4Descripción general .................................................................................. S-4Características ........................................................................................... S-4Accesorios suministrados (AJ-PCD2G) .................................................. S-5Entorno operativo necesario para la instalación.................................... S-5Partes y sus funciones.............................................................................. S-6Cómo conectar la unidad P2 a un PC ...................................................... S-7Cómo extraer la unidad P2 de un PC ....................................................... S-8Cómo introducir una tarjeta P2 ................................................................ S-9Cómo extraer una tarjeta P2 ................................................................... S-10Protección contra escritura de la tarjeta P2.......................................... S-10Instalación del controlador USB para Windows ....................................S-11Instalación del controlador USB para Macintosh ..................................S-11Antes de llamar al Servicio de asistencia ............................................. S-12Especificaciones...................................................................................... S-13
Microsoft, Windows y Windows Vista son marcas comerciales de Microsoft Corporation de Estados Unidos de América.Macintosh, Mac OS y PowerBook son marcas comerciales de Apple Inc. de Estados Unidos de América.Otros nombres de empresas y productos son marcas comerciales o marcas comerciales registradas de sus respectivas empresas.● Nelle presenti istruzioni, Microsoft® Windows®, Windows® 2000, Windows® XP
Professional, Windows Vista® Business, Windows Vista® Ultimate, Windows® 7 Professional e Windows® 7 Ultimate sono indicati rispettivamente come “Windows”, “Windows 2000”, “Windows XP Professional”, “Windows Vista Business”, “Windows Vista Ultimate”, “Windows 7 Professional” e “Windows 7 Ultimate”.
● In modo simile nelle presenti istruzioni, Macintosh®, Mac® Pro, Mac OS® X e PowerBook® sono indicate rispettivamente come “Macintosh,” “Mac Pro”, “Mac OS X” e “PowerBook”.

S-4
Antes del uso• Con la AJ-PCD2G conectada al PC, instale los controladores requeridos desde
el CD-ROM. Para obtener más detalles acerca de cómo instalar los controladores para
Windows, consulte el manual de instalación en la carpeta “Manuals” del CD-ROM.
Para obtener más detalles acerca de cómo instalar los controladores para Macintosh, consulte la sección “Instalación del controlador USB para Macintosh” en la página S-11 de este manual.
• La AJ-PCD2G podría calentarse durante el uso, pero esto no indica un fallo funcionamiento.
Descripción generalLa AJ-PCD2G (de aquí en adelante denominada “unidad P2”) es una unidad de una única ranura para leer y escribir contenidos P2 en tarjetas P2 (uso de una sola tarjeta simultáneamente) cuando se conecta a un PC con Windows o Macintosh por medio de una interfaz USB 2.0 (dos conexiones de cable USB que proporcionan alimentación para el bus). La unidad P2 es capaz de llevar a cabo transferencias de alta velocidad de datos de clips tomados con una cámara grabadora de tarjeta de memoria para tarjetas P2 a un PC (Windows/Apple Macintosh). Este dispositivo admite no sólo la transferencia y la copia de clips grabados en tarjetas P2, sino que además permite su edición.
Características• La unidad P2 cuenta con una ranura para tarjetas e interfaz USB 2.0• Su diseño ligero y compacto hace que sea fácil de transportar y que sea ideal
para utilizarla junto con un PC portátil• Admite tanto sistemas operativos Windows como Macintosh• La alimentación por medio del bus USB elimina la necesidad de disponer de un
adaptador de CA*1
*1: Se requieren dos cables USB.

S-5
ES
PA
ÑO
L
Accesorios suministrados (AJ-PCD2G)Cables USB (2) CD-ROM (1)
Entorno operativo necesario para la instalaciónEl ordenador anfitrión requiere el siguiente entorno operativo para poder utilizar la unidad P2.
Conectores USB 2.0: dos o más.
Para la unidad P2, son necesarios dos conectores USB 2.0 (de alta velocidad), por ejemplo, SIGNAL (transferencia de datos/suministro de alimentación) y POWER (suministro de alimentación). Es posible conectar hasta dos unidades P2 a un ordenador.

S-6
Partes y sus funciones
① ② ③ ④ ⑤
A Indicador de acceso Se ilumina en color verde durante el acceso a una tarjeta P2.
◆ NOTA: • No quite la tarjeta P2 mientras se esté accediendo a ella, de lo contrario, los
datos del archivo podrían corromperse o la tarjeta P2 podría resultar dañada. Cuando el conector USB 2.0 (POWER) no está conectado, el indicador
parpadea rápidamente. Consulte la sección “Antes de llamar al Servicio de asistencia” (página S-12).
B Ranura para tarjetas P2 Introduzca una tarjeta P2. La unidad P2 está diseñada para tarjetas P2 y no funciona con otros tipos de
tarjeta.
C Botón de expulsión (EJECT) Si desea extraer una tarjeta P2, pulse este botón.
D Conector USB 2.0 (Conector SIGNAL) Use los cables USB suministrados para conectar este conector a un puerto USB
2.0 de un ordenador para transferir datos y alimentar la unidad P2 desde el ordenador.
E Conector USB 2.0 (Conector POWER) Use el cable USB suministrado para conectar este conector al puerto USB 2.0
de un ordenador para alimentar la unidad P2 a través de éste.
◆ NOTA:• No utilice la unidad P2 en posición vertical. De lo contrario la unidad P2 podría
sufrir fallos o daños.

S-7
ES
PA
ÑO
L
Cómo conectar la unidad P2 a un PC
1 Conecte los cables USB suministrados a cada uno de los conectores USB 2.0 (SIGNAL, POWER) de la unidad P2.
2 Conecte el otro extremo de cada cable USB a los puertos USB 2.0 del ordenador. El indicador de acceso parpadeará, a continuación, se apagará y aparecerá la letra de la unidad en el ordenador.
3 La primera vez que utilice la unidad P2, efectúe la instalación del controlador USB. Consulte “Instalación del controlador
USB para Windows” (página S-11)
Consulte “Instalación del controlador USB para Macintosh” (página S-11)
Cables USB• Utilice los cables USB de 1,0 m suministrados. Si pierde los cables USB
suministrados, compre dos cables USB de 1,0 m o cables USB más cortos (compatibles con USB 2.0). Es posible que la unidad P2 no funcione con cables USB de otras longitudes.
• No transporte la unidad P2 con los cables USB conectados a ella. La unidad P2 podría resultar dañada.
Conexión del cable USB• Para conectar la unidad P2 se requieren dos cables USB. • Cuando solo esté conectado al ordenador el conector USB (SIGNAL)
de la unidad P2, aparecerá la letra de la unidad correspondiente, pero no se mostrará el contenido de la tarjeta P2 introducida. A continuación, el indicador de acceso parpadeará rápidamente durante dos segundos y se apagará durante un segundo. Este estado se repite.
• Cuando solo esté conectado al ordenador el conector USB (POWER) de la unidad P2, no aparecerá la letra de la unidad correspondiente.
■
■
Para conectar la unidad P2 se requieren dos cables USB.Para conectar la unidad P2 se requieren dos cables USB.

S-8
Utilización de un concentrador USB• Utilice únicamente concentradores USB con alimentación propia (los
concentradores USB con alimentación propia obtienen la energía por medio de un adaptador de CA). (Es posible que un concentrador USB alimentado por bus no funcione con este dispositivo).
• Utilice concentradores USB 2.0 (USB de alta velocidad) con este dispositivo. (Es posible que un concentrador USB 1.1 no funcione con este dispositivo).
Conexión de dos unidades P2 a Windows XP y Windows VistaConecte los conectores USB 2.0 (SIGNAL) de las unidades P2 directamente a los puertos USB del ordenador. Si al seleccionar “Safe Hardware Removal” en la barra de tareas ambas unidades aparecen como “Panasonic P2 Series USB Device” significa que el controlador de la unidad se ha instalado correctamente. Si una de las unidades P2 aparece como “USB Mass Storage Device”, significa que el controlador de la unidad no se ha instalado. En este caso, consulte el manual de instalación e instale el controlador de la unidad de nuevo.Si después de la reinstalación el problema persiste, se recomienda utilizar sólo una de las unidades P2.
◆ NOTA:• Si los USB (SIGNAL) de las dos unidades P2 están conectados a un
concentrador USB, las unidades P2 no serán reconocidas, el controlador de la unidad no se instalará y es posible que haya otro tipo de problemas.
Cómo extraer la unidad P2 de un PCWindows XP y Windows Vista
Seleccione “Quitar hardware de forma segura” en la barra de tareas para detener el dispositivo “Panasonic P2 Series USB Device” antes de desconectar los dos cables USB.
Windows 7 Si hay una tarjeta P2 introducida en la unidad P2, haga clic en el icono de la
flecha hacia arriba de la barra de tareas, seleccione “Sefely Remove Hardware and Eject Media” y seleccione “Remove P2 drive” antes de desconectar los dos cables USB.
Si la unidad no contiene ninguna tarjeta P2, se pueden desconectar los cables USB sin necesidad de realizar ninguna operación en el ordenador.
■
■
■
■
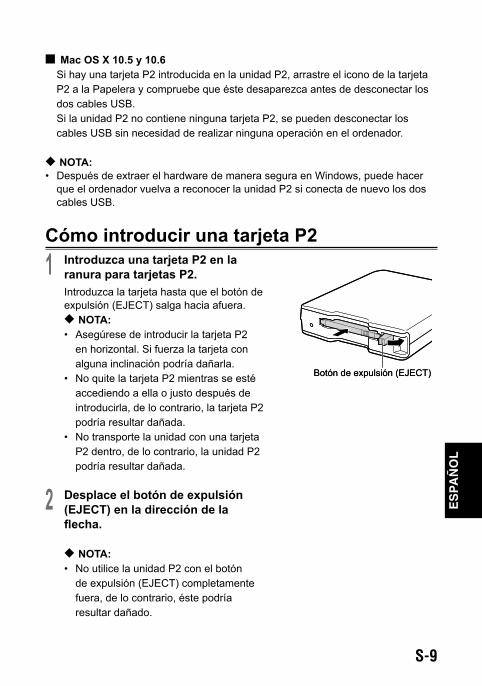
S-9
ES
PA
ÑO
L
Mac OS X 10.5 y 10.6 Si hay una tarjeta P2 introducida en la unidad P2, arrastre el icono de la tarjeta
P2 a la Papelera y compruebe que éste desaparezca antes de desconectar los dos cables USB.
Si la unidad P2 no contiene ninguna tarjeta P2, se pueden desconectar los cables USB sin necesidad de realizar ninguna operación en el ordenador.
◆ NOTA: • Después de extraer el hardware de manera segura en Windows, puede hacer
que el ordenador vuelva a reconocer la unidad P2 si conecta de nuevo los dos cables USB.
Cómo introducir una tarjeta P2
1 Introduzca una tarjeta P2 en la ranura para tarjetas P2. Introduzca la tarjeta hasta que el botón de expulsión (EJECT) salga hacia afuera. ◆ NOTA: • Asegúrese de introducir la tarjeta P2
en horizontal. Si fuerza la tarjeta con alguna inclinación podría dañarla.
• No quite la tarjeta P2 mientras se esté accediendo a ella o justo después de introducirla, de lo contrario, la tarjeta P2 podría resultar dañada.
• No transporte la unidad con una tarjeta P2 dentro, de lo contrario, la unidad P2 podría resultar dañada.
2 Desplace el botón de expulsión (EJECT) en la dirección de la flecha.
◆ NOTA: • No utilice la unidad P2 con el botón
de expulsión (EJECT) completamente fuera, de lo contrario, éste podría resultar dañado.
■
Botón de expulsión (EJECT)Botón de expulsión (EJECT)

S-10
Cómo extraer una tarjeta P2
1 Desplace hacia arriba el botón de expulsión (EJECT) en la dirección de la flecha.
2 Pulse el botón de expulsión (EJECT). La tarjeta P2 se deslizará lo suficiente como para que pueda extraerla.
◆ NOTA:• Para extraer una tarjeta P2 en un Macintosh, arrastre el icono de la tarjeta
hasta la Papelera. A continuación, compruebe que el icono ha desaparecido y que el indicador de acceso de la unidad P2 se ha apagado antes de extraer físicamente la tarjeta P2.
• No extraiga la tarjeta P2 mientras se esté accediendo a ella. De lo contrario, es posible provocar un mal funcionamiento de la unidad P2. Si esto sucede, vuelva a conectar los dos cables USB.
Protección contra escritura de la tarjeta P2Las tarjetas P2 poseen un dispositivo de protección contra escritura. Deslice el dispositivo hasta la posición “PROTECT” para evitar que se sobrescriban o se borren datos. Tenga en cuenta que el dispositivo de protección contra escritura no funcionará en las tarjetas introducidas en la unidad. Para que la unidad reconozca el ajuste del dispositivo, extraiga la tarjeta P2 de la unidad, seleccione el ajuste y vuelva a introducirla.
Botón de expulsión (EJECT)Botón de expulsión (EJECT)
PROTECT
Tarjeta P2
PROTECT
Tarjeta P2

S-11
ES
PA
ÑO
L
Instalación del controlador USB para WindowsPara obtener más detalles acerca de cómo instalar los controladores para Windows, consulte el manual de instalación en la carpeta “Manuals” del CD-ROM.
Instalación del controlador USB para MacintoshEl software de este controlador permite que se pueda acceder al contenido de las tarjetas P2 que se introduzcan en la unidad P2 desde los equipos Macintosh.
Siga los pasos siguientes para instalar el controlador:
1 Introduzca el CD-ROM suministrado.
2 Haga doble clic en la carpeta “Macintosh” del CD-ROM.
3 En Mac OS X 10.5: Haga doble clic en la carpeta “Leopard” del CD-ROM. En Mac OS X 10.6: Haga doble clic en la carpeta “Snow Leopard” del CD-ROM.
4 Haga doble clic en la carpeta “P2Drive”.
5 Haga doble clic en el módulo de la imagen de disco “P2DriveFamilyDriver Install.dmg” de la carpeta “P2Drive”.
6 Haga doble clic en “P2DriveFamilyDriver Install.pkg”.
7 A continuación se iniciará el proceso de instalación del software del controlador. Siga las instrucciones de la pantalla de instalación.
◆ NOTA:• Si el controlador USB no está instalado, es posible que no se alcance una tasa
de transferencia de datos suficiente.
Para obtener la información más reciente acerca de los controladores de software, visite el siguiente sitio web. http://pro-av.panasonic.net/
Para obtener la información más reciente acerca de los controladores de software, visite el siguiente sitio web. http://pro-av.panasonic.net/

S-12
Antes de llamar al Servicio de asistenciaEl indicador de acceso parpadea rápidamente y la unidad P2 no funciona.
Conecte el conector USB 2.0 (POWER) y el conector USB 2.0 (SIGNAL) a los puertos USB de un ordenador mediante los dos cables USB suministrados. Si el conector USB 2.0 (POWER) no está conectado, el indicador de acceso parpadeará rápidamente durante dos segundos y se apagará durante un segundo. Este estado se repite.
El ordenador no reconoce la unidad P2 cuando está conectada mediante los dos cables USB.
Si están conectados a puertos USB 1.1 del ordenador, vuelva a conectarlos a puertos USB 2.0.
Si los cables USB tienen más de 1,0 m de largo, vuelva a realizar la conexión mediante los dos cables USB de 1,0 m suministrados.
No utilice concentradores USB con alimentación por bus, sino concentradores USB con alimentación propia (éstos obtienen la energía por medio de un adaptador de CA).
No se pueden utilizar tarjetas PCMCIA Tipo II que no sean de tipo P2.
La unidad P2 está diseñada para tarjetas P2 y no funciona con otras tarjetas PCMCIA Tipo II que no sean de tipo P2.
No se puede acceder a la tarjeta P2 tras volver del estado de suspensión o hibernación.
Es posible que algunos ordenadores no puedan acceder a la tarjeta P2 de la unidad P2 después de reanudar el funcionamiento desde los estados de suspensión o hibernación. Si esto sucede, vuelva a conectar los dos cables USB.
■
■
■
■

S-13
ES
PA
ÑO
L
EspecificacionesVoltaje nominal: CC de 5 V (compatible con USB 2.0)Consumo de corriente nominal: 0,5 A
indica información de seguridad. Dimensiones externas (anchura × altura × profundidad) 97 mm × 25,5 mm × 113 mm (excluyendo las partes que sobresalen)Peso 200 g (excluyendo el embalaje)Configuración del conector Conectores USB mini B (2)
[Condiciones ambientales]Temperatura de funcionamiento Entre 0 °C y 40 °CHumedad de funcionamiento Entre 10 % y 85 % (sin condensación)
[Requisitos del PC]Sistemas operativos compatibles Windows XP Professional (SP3) 32 bit Windows Vista Business (SP2), Ultimate (SP2) 32/64 bit Windows 7 Professional, Ultimate 32/64 bit Mac OS X 10.5.6 (procesador Intel) Mac OS X 10.6.2 (procesador Intel)Memoria principal Se recomiendan 512 MB o más. Se recomienda disponer de 1 GB o más para Windows Vista, Windows 7 y Mac
OS X 10.6.Interfaz Compatible con la versión USB 2.0
[Ranura para tarjetas] Tarjeta PC Tipo II (1) (compatible con CardBus)
Tenga en cuenta que a fin de incluir mejoras, las especificaciones y el aspecto están sujetos a cambios sin previo aviso.

S-14
Información sobre la eliminación para los usuarios de equipos eléctricos y electrónicos usados (particulares)
La aparición de este símbolo en un producto y/o en la documentación adjunta indica que los productos eléctricos y electrónicos usados no deben mezclarse con la basura doméstica general.Para que estos productos se sometan a un proceso adecuado de tratamiento, recuperación y reciclaje, llévelos a los puntos de recogida designados, donde los admitirán sin coste alguno. En algunos países existe también la posibilidad de devolver los productos a su minorista local al comprar un producto nuevo equivalente.Si desecha el producto correctamente, estará contribuyendo a preservar valiosos recursos y a evitar cualquier posible efecto negativo en la salud de las personas y en el medio ambiente que pudiera producirse debido al tratamiento inadecuado de desechos. Póngase en contacto con su autoridad local para que le informen detalladamente sobre el punto de recogida designado más cercano.De acuerdo con la legislación nacional, podrían aplicarse multas por la eliminación incorrecta de estos desechos.
Para empresas de la Unión EuropeaSi desea desechar equipos eléctricos y electrónicos, póngase en contacto con su distribuidor o proveedor para que le informe detalladamente.
Información sobre la eliminación en otros países no pertenecientes a la Unión EuropeaEste símbolo sólo es válido en la Unión Europea.Si desea desechar este producto, póngase en contacto con las autoridades locales o con su distribuidor para que le informen sobre el método correcto de eliminación.

J-1
日本語
この装置は、クラスB情報技術装置です。この装置は、家庭環境で使用することを目的としていますが、この装置がラジオやテレビジョン受信機に近接して使用されると、受信障害を引き起こすことがあります。 取扱説明書に従って正しい取り扱いをして下さい。
VCCI-B
Microsoft、Windows、Windows Vista、は米国 Microsoft Corporationの登録商標です。Macintosh、Mac OS、PowerBook は米国 Apple Inc. の登録商標です。その他会社名、商品名は各社の商標または登録商標です。・ 本書では、Microsoft® Windows®、Windows® 2000、Windows® XP
Professional、Windows Vista® Business、Windows Vista® Ultimate、Windows® 7 Professional、Windows® 7 Ultimate を「Windows」、
「Windows 2000」「Windows XP Professional」、「Windows Vista Business」、「Windows Vista Ultimate」、「Windows 7 Professional」または「Windows 7 Ultimate」と表記します。
・ 本書では、Macintosh®、Mac® Pro、Mac OS® X、PowerBook® を「Macintosh」、「Mac Pro」、「Mac OS X」、または「PowerBook」と表記します。
目 次安全上のご注意 ..................................................................................................J-2ご使用の前に ......................................................................................................J-4概要 ......................................................................................................................J-4特長 ......................................................................................................................J-4付属品(AJ-PCD2G) ......................................................................................J-5インストールに必要な環境 ...............................................................................J-5各部の名称とはたらき .......................................................................................J-6本機をパーソナルコンピューターに接続する ................................................J-7本機をパーソナルコンピュータから取り外す ................................................J-8P2 カードを挿入する ........................................................................................J-9P2 カードを取り出す .....................................................................................J-10P2 カードへの書き込み保護 .........................................................................J-10Windows 用 USB ドライバーのインストール ..........................................J-11Macintosh 用 USB ドライバーのインストール .......................................J-11故障かな ? と思ったら ...................................................................................J-12アフターサービス ............................................................................................J-13定 格 ...............................................................................................................J-14

J-2
人への危害、財産の損害を防止するため、必ずお守りいただくことを説明しています。■ 誤った使い方をしたときに生じる危害や損害の程度を区分して、説明しています。
警告 「死亡や重傷を負うおそれがある内容」です。
注意 「傷害を負うことや、財産の損害が発生するおそれがある内容」です。
■ お守りいただく内容を次の図記号で説明しています。
してはいけない内容です。
実行しなければならない内容です。
警告 内部に金属物を入れたり、水などの液体をかけたりぬらしたりしない
(ショートや発熱により、故障の原因になります。) ⇒ 機器の上や近くに液体の入った花びんなどの容器や金属物を置か
ないでください。
■
注意 本機の放熱を妨げない
[押し入れや本箱など、狭いところに入れない、テーブルクロスを掛けたり、じゅうたんや布団の上に置かない]
(内部に熱がこもり、火災の原因になります。)
■
油煙や湯気、湿気やほこりの多い場所に置かない (火災の原因になります。)■
安全上のご注意 必ずお守りください
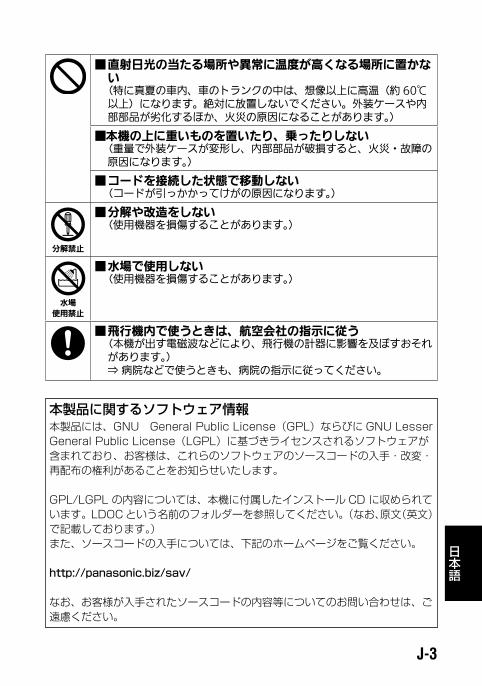
J-3
日本語
直射日光の当たる場所や異常に温度が高くなる場所に置かない
(特に真夏の車内、車のトランクの中は、想像以上に高温(約 60℃以上)になります。絶対に放置しないでください。外装ケースや内部部品が劣化するほか、火災の原因になることがあります。)
■
本機の上に重いものを置いたり、乗ったりしない (重量で外装ケースが変形し、内部部品が破損すると、火災・故障の
原因になります。)
■
コードを接続した状態で移動しない (コードが引っかかってけがの原因になります。)■
分解禁止
分解や改造をしない (使用機器を損傷することがあります。)■
水場使用禁止
水場で使用しない (使用機器を損傷することがあります。)■
飛行機内で使うときは、航空会社の指示に従う (本機が出す電磁波などにより、飛行機の計器に影響を及ぼすおそれ
があります。) ⇒ 病院などで使うときも、病院の指示に従ってください。
■
本製品に関するソフトウェア情報本製品には、GNU General Public License(GPL)ならびに GNU Lesser General Public License(LGPL)に基づきライセンスされるソフトウェアが含まれており、お客様は、これらのソフトウェアのソースコードの入手・改変・再配布の権利があることをお知らせいたします。
GPL/LGPL の内容については、本機に付属したインストール CD に収められています。LDOC という名前のフォルダーを参照してください。(なお、原文(英文)で記載しております。)また、ソースコードの入手については、下記のホームページをご覧ください。
http://panasonic.biz/sav/
なお、お客様が入手されたソースコードの内容等についてのお問い合わせは、ご遠慮ください。

J-4
ご使用の前に・ パーソナルコンピューターと AJ-PCD2G を接続した状態で、CD-ROM から
必要なドライバーをパーソナルコンピューターにインストールしてください。 Windows 用ドライバーのインストール手順は、CD-ROM の Manuals フォル
ダーにあるインストールマニュアルをご参照ください。 Macintosh 用 ド ラ イ バ ー の イ ン ス ト ー ル 手 順 は、 本 書 J-11 ペ ー ジ の「Macintosh 用 USB ドライバーのインストール」をご参照ください。
・ 本機(AJ-PCD2G)を使用中、本体が熱くなることがありますが異常ではありません。
概要AJ-PCD2G(以降“本機”と記載)は、Windows PC または Macintosh にUSB2.0 接続(2 本の USB ケーブルでのバスパワー駆動)で、P2 カード(1 枚)の P2 コンテンツを読み書きできる 1 スロットのドライブです。本機は、P2 カード用メモリーカードカメラレコ-ダ-で撮影したクリップデ-タをパーソナルコンピューター(Windows/Apple Macintosh)へ高速転送することを可能にします。P2 カードに記録されたクリップの転送やコピー、また、ダイレクト編集をサポートします。
特長・ USB2.0 インターフェース、1 スロットの P2 カードドライブ・ 軽量、小サイズ、携帯可能でノート PC とフィールドでの運用可能・ Windows/Macintosh の両 OS に対応・ AC アダプター不要の USB バスパワー駆動 *1
*1: USB ケーブルは、2 本接続する必要があります。

J-5
日本語
付属品(AJ-PCD2G)USB ケーブル× 2
CD-ROM× 1
インストールに必要な環境本機を動作させるには、以下のホストコンピューター環境が必要です。
USB2.0 端子(× 2 以上):
本機 1 台につき、SIGNAL 端子(データ転送 / 電源供給用)、POWER 端子(電源供給専用)の 2 つの USB2.0(Hi-Speed USB)端子が必要です。また、本機は 1 台のパーソナルコンピューターに、最大 2 台までの接続が可能です。

J-6
各部の名称とはたらき
① ② ③ ④ ⑤
① アクセスインジケーター P2 カードにアクセス中は、緑色に点滅します。 ◆ノート : ・ ファイルが壊れたり、P2 カード故障の原因となりますので、アクセス中は
P2 カードを抜かないでください。 USB2.0 端子(POWER)が接続されていない場合は、高速に点滅します。「故
障かな?と思ったら」(J-12 ページ)を参照してください。
② P2 カードスロット P2 カードを挿入します。 本機のカードスロットは P2 カード専用です。P2 カード以外では動作しません。
③ EJECT ボタン 本機から P2 カードを取り出すときに使用します。
④ USB2.0 端子(SIGNAL 端子) USB ケーブル(付属)で、パーソナルコンピューターの USB2.0 端子と接続
します。 データ転送 / 電源供給用の端子です。
⑤ USB2.0 端子(POWER 端子) USB ケーブル(付属)で、パーソナルコンピューターの USB2.0 端子と接続
します。 電源供給専用の端子です。
◆ノート :・ 本機を立ててご使用にならないでください。誤作動や故障の原因となるおそれ
があります。
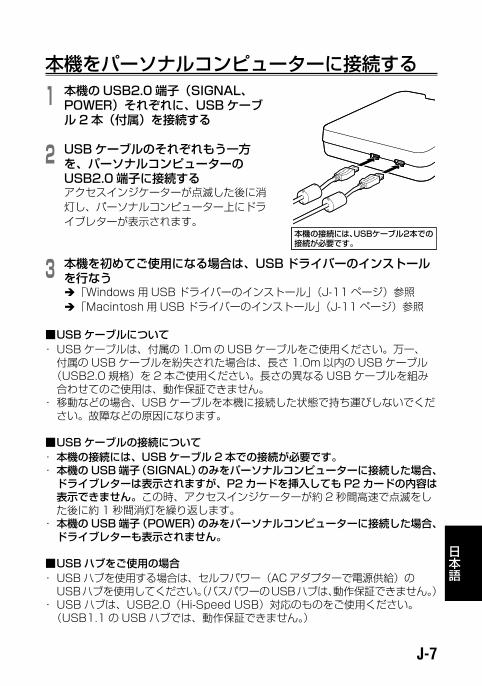
J-7
日本語
本機をパーソナルコンピューターに接続する
1 本機の USB2.0 端子(SIGNAL、POWER)それぞれに、USB ケーブル 2 本(付属)を接続する
2 USB ケーブルのそれぞれもう一方を、パーソナルコンピューターのUSB2.0 端子に接続するアクセスインジケーターが点滅した後に消灯し、パーソナルコンピューター上にドライブレターが表示されます。
3 本機を初めてご使用になる場合は、USB ドライバーのインストールを行なう 「Windows 用 USB ドライバーのインストール」(J-11 ページ)参照 「Macintosh 用 USB ドライバーのインストール」(J-11 ページ)参照
■ USB ケーブルについて・ USB ケーブルは、付属の 1.0m の USB ケーブルをご使用ください。万一、
付属の USB ケーブルを紛失された場合は、長さ 1.0m 以内の USB ケーブル(USB2.0 規格)を 2 本ご使用ください。長さの異なる USB ケーブルを組み合わせてのご使用は、動作保証できません。
・ 移動などの場合、USB ケーブルを本機に接続した状態で持ち運びしないでください。故障などの原因になります。
■ USB ケーブルの接続について・ 本機の接続には、USB ケーブル 2 本での接続が必要です。・ 本機の USB 端子(SIGNAL)のみをパーソナルコンピューターに接続した場合、
ドライブレターは表示されますが、P2 カードを挿入しても P2 カードの内容は表示できません。この時、アクセスインジケーターが約 2 秒間高速で点滅をした後に約 1 秒間消灯を繰り返します。
・ 本機の USB 端子(POWER)のみをパーソナルコンピューターに接続した場合、ドライブレターも表示されません。
■ USB ハブをご使用の場合・ USB ハブを使用する場合は、セルフパワー(AC アダプターで電源供給)の
USBハブを使用してください。(バスパワーのUSBハブは、動作保証できません。)・ USB ハブは、USB2.0(Hi-Speed USB)対応のものをご使用ください。
(USB1.1 の USB ハブでは、動作保証できません。)
本機の接続には、USBケーブル2本での接続が必要です。本機の接続には、USBケーブル2本での接続が必要です。
J-8
■ Windows XP、Vista で本機を 2 台接続する場合・ 本機 2 台両方の USB2.0 端子(SIGNAL)はパーソナルコンピューターの
USB ポートと直接接続してください。2 台接続した状態でタスクトレイの「ハードウェアの安全な取り外し」を選択したときの表示が、2 台とも「Panasonic P2 Series USB Device」の場合はドライバーが適用されています。1 台のみが「USB 大容量記憶装置デバイス」になっている場合はドライバーが適用されておりません。この場合、インストールマニュアルに従って、再度インストールをおこなってください。再度インストールを行なっても解決しない場合は、1台でご使用になることを推奨します。
◆ノート :・ 本機 2 台両方の USB2.0 端子(SIGNAL)を USB ハブに接続した場合、本機
が認識されない、ドライバーが適用されないなどの症状が発生する場合があります。
本機をパーソナルコンピュータから取り外す■ Windows XP、Windows Vista の場合 タスクトレイの「ハードウェアの安全な取り外し」を選択して「Panasonic
P2 Series USB Device」を停止してから、USB ケーブルを 2 本とも抜いてください。
■ Windows 7 の場合 本機にP2カードが挿入されている場合は、タスクトレイの上矢印をクリックし、「ハードウェアを安全に取り外してメディアを取り出す」を選択して「P2 driveの取り出し」を選択してから、USB ケーブルを 2 本とも抜いてください。
本機に P2 カードが挿入されていない場合は、そのまま USB ケーブルを 2 本とも抜いてください。
■ Mac OS X 10.5、Mac OS X 10.6 の場合 本機に P2 カードが挿入されている場合は、P2 カードのアイコンを「ゴミ箱」
にドラッグし、P2 カードのアイコンが消えたことを確認してから、USB ケーブルを 2 本とも抜いてください。
本機に P2 カードが挿入されていない場合は、そのまま USB ケーブルを 2 本とも抜いてください。
◆ノート :・ Windows で安全な取り外しを実行後、本機を再認識させる場合は USB ケーブ
ルを 2 本とも接続しなおしてください。
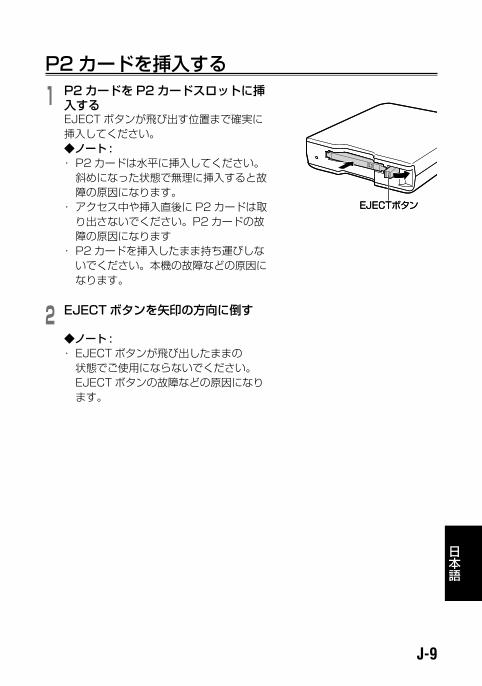
J-9
日本語
P2 カードを挿入する
1 P2 カードを P2 カードスロットに挿入するEJECT ボタンが飛び出す位置まで確実に挿入してください。◆ノート :・ P2 カードは水平に挿入してください。
斜めになった状態で無理に挿入すると故障の原因になります。
・ アクセス中や挿入直後に P2 カードは取り出さないでください。P2 カードの故障の原因になります
・ P2 カードを挿入したまま持ち運びしないでください。本機の故障などの原因になります。
2 EJECT ボタンを矢印の方向に倒す
◆ノート :・ EJECT ボタンが飛び出したままの
状態でご使用にならないでください。EJECT ボタンの故障などの原因になります。
EJECTボタンEJECTボタン

J-10
P2 カードを取り出す
1 EJECT ボタンを矢印の方向に起こす
2 EJECT ボタンを押すP2 カードが少し出てきますので、P2 カードを取り出すことができます。
◆ノート :・ Macintosh で P2 カードを取り出すときは、P2 カードのアイコンを「ゴミ箱」
にドラッグし、P2 カードのアイコンおよび本機のアクセスインジケーターが消えたことを確認してから、P2 カードを取り出してください。
・ P2 カードのアクセス中は、P2 カードを取り出さないでください。アクセス中に P2 カードを取り出すと、本機の動作が異常になる場合があります。その場合は、USB ケーブルを 2 本とも接続しなおしてください。
P2 カードへの書き込み保護P2 カードにはライトプロテクトスイッチがあります。このスイッチを「PROTECT」側にすると、書き込みや消去を防止することができます。なお、ライトプロテクトスイッチは、挿入状態のまま切り替えても機能しません。スイッチの切り替えを有効にするには、一度P2 カードを取り出し、スイッチを切り替えた後、再度挿入してください。
EJECTボタンEJECTボタン
PROTECT
P2カード
PROTECT
P2カード

J-11
日本語
Windows 用 USB ドライバーのインストールWindows 用ドライバーのインストール手順は、CD-ROM の Manuals フォルダーにあるインストールマニュアルをご参照ください。
Macintosh 用 USB ドライバーのインストール本ドライバーソフトは、P2 カードの内容を本機で参照するためのソフトウェアです。
下記の手順でインストールを行ってください。
1 付属の CD-ROM を挿入します。
2 CD-ROM 内の Macintosh フォルダーをダブルクリックします。
3 Mac OS X 10.5 の場合 CD-ROM 内の Leopard フォルダーをダブルクリックします。 Mac OS X 10.6 の場合 CD-ROM 内の Snow Leopard フォルダーをダブルクリックします。
4 P2Drive フォルダーをダブルクリックします。
5 P2Drive フォルダーの中にあるディスクイメージモジュール 「P2DriveFamilyDriver Install.dmg」をダブルクリックします。
6「P2DriveFamilyDriver Install.pkg」をダブルクリックします。
7 ドライバーソフトのインストールを開始しますので、インストール画面の指示に従ってインストールを行ってください。
◆ノート :・ USB ドライバーをインストールしていない場合は、十分な転送速度を得ること
ができません。
ドライバーに関する最新情報は、下記ウェブサイトをご覧ください。http://panasonic.biz/sav/

J-12
故障かな ? と思ったら■ アクセスインジケーターが高速で点滅し続けて、本機が使用できない
USB2.0 端子(POWER)と USB2.0 端子(SIGNAL)の両方を、付属のUSB ケーブルでそれぞれパーソナルコンピューターの USB 端子に接続してください。USB2.0 端子(POWER)が接続されていない場合は、アクセスインジケーターが約 2 秒間高速で点滅をした後に約 1 秒間消灯を繰り返します。
■ 本機をパーソナルコンピューターに USB ケーブル 2 本で接続したが、パーソナルコンピューターで認識されない
パーソナルコンピューターの USB1.1 端子に接続している場合は、USB2.0端子に接続してください。
1.0m を超える長さの USB ケーブルを使用している場合は、付属の 1.0m のUSB ケーブル 2 本で接続してください。
バスパワーの USB ハブを使用している場合は、セルフパワー(AC アダプターで電源供給)の USB ハブを使用してください。
■ P2 カード以外の PCMCIA Type Ⅱのカードが使用できない
本機は、P2 カード専用ドライブのため、P2 カード以外の PCMCIA Type Ⅱのカードには対応していません。
■ スリープ状態、休止状態から復帰後、P2 カードにアクセスできない
パーソナルコンピューターによっては、スリープ状態、休止状態から復帰後、本機の P2 カードにアクセスできなくなる場合かあります。その場合は、USBケーブルを 2 本とも接続しなおしてください。
J-13
日本語
■ 保証書(別添付) お買い上げ日・販売店名などの記入
を必ずお確かめのうえ、お買い上げの販売店からお受け取りください。
内容をよくお読みいただいたうえ、大切に保存してください。
万一、保証期間内に故障が生じた場合には、保証書記載内容に基づき、
「無料修理」させていただきます。
保証期間 : お買い上げから本体 1 年間
■ 補修用性能部品の保有期間 8 年 当社は、このメモリーカードドライ
ブの補修用性能部品を、製造打ち切り後 8 年保有しています。
※ 補修用性能部品とは、その製品の機能を維持するために必要な部品です。
■ 保守・点検 保守・点検は機器の機能を常に良好
な状態に維持し、お客様が安心してご使用していただくためのものです。
部品の劣化、ごみ、ホコリの付着などにより突発的な故障、トラブルを未然に防ぐとともに、安定した機能、性能の維持のために、定期的な保守・点検を推奨いたします。
保守・点検(有料)についての詳しい内容は、お買い上げの販売店にご相談ください。
アフターサービス故障・修理・お取り扱い
などのご相談は、まず、
お買い上げの販売店へ、お申し付けください。
お買い上げの販売店がご不明の場合は、当社(裏表紙)までご連絡ください。※ 内容により、お近くの窓口をご紹介させていただく場合がございますので、ご
了承ください。
修理を依頼されるときこの取扱説明書を再度ご確認のうえ、お買い上げの販売店までご連絡ください。
◆ 保証期間中の修理は...保証書の記載内容に従って、修理させていただきます。詳しくは、保証書をご覧ください。
◆ 保証期間経過後の修理は...修理により、機能、性能の回復が可能な場合は、ご希望により有料で修理させていただきます。
ご連絡いただきたい内容品名 メモリーカードドライブ品番 AJ-PCD2G
製造番号お買い上げ日故障の状況

J-14
定 格定格電圧 DC 5 V (USB2.0 バスパワーで給電)定格消費電流 0.5 A
は安全項目です。
外形寸法 ( 幅×高さ×奥行き ) 97 mm × 25.5 mm × 113 mm ( 突起部は含みません )質量 200 g(同梱品を除く)コネクター形状 USB mini B コネクター× 2
[環境条件]操作温度 0 ℃~ 40 ℃操作湿度 10 %~ 85 % ( 結露のないこと )
[パーソナルコンピューター動作条件]動作保証 OS Windows XP Professional(SP3) 32 bit Windows Vista Business(SP2)、Ultimate(SP2) 32/64 bit Windows 7 Professional、Ultimate 32/64 bit Mac OS X 10.5.6(Intel プロセッサー搭載機) Mac OS X 10.6.2(Intel プロセッサー搭載機)メインメモリー 512MB 以上推奨 Windows Vista、Windows 7、Mac OS X 10.6 の場合は 1GB 以上推奨インタ-フェ-ス USB Ver2.0 規格
[カードスロット] PC カード Type Ⅱ× 1(CardBus 準拠)
仕様および外観は、改良のため予告なく変更することがありますが、ご了承ください。
J-15
日本語
ヨーロッパ連合以外の国の廃棄処分に関する情報
このシンボルマークは EU 域内でのみ有効です。製品を廃棄する場合には、最寄りの市町村窓口、または販売店で、正しい廃棄方法をお問い合わせください。

Panasonic CorporationWeb Site: http://panasonic.net
Panasonic Broadcast & Television Systems Co.3 Panasonic Way, 2E-7 Secaucus, NJ 07094 Tel: 201-348-5300http://www.panasonic.com/broadcast e-mail: [email protected]
Panasonic Canada Inc.5770 Ambler Drive, Mississauga, Ontario L4W 2T3 Tel: 905-624-5010
Panasonic de México S.A. De C.V.Casa Matriz: Moras No.313 Col. Tlacoquemecatl Del Valle Del.Benito Juárez México, D.F., C.P.03200Tel: 55-5488-1000 Fax: 55-5575-6783
Panasonic Latin America, S.A.P.O.Box 0816-03164 Panama, Republic of Panama Tel: +507-229-2955 Fax: 507-229-5352
Panasonic do Brasil Ltda.Rua Cubatão, 320-6o andar-Paraíso CEP 04013-001- São Paulo -SP Tel: 11-3889-4000 Fax: 11-3889-4004
Professional & Broadcast IT Systems Business Unit EuropePanasonic AVC Systems Europe a Division of Panasonic Marketing Europe GmbH
Hagenauer Str. 43, 65203 Wiesbaden-Biebrich Deutschland Tel: +49-611-235-481
Panasonic Systems Asia Pacific (Broadcast Regional Operation Center)2 Jalan Kilang Barat, Panasonic Building, Singapore 159346 Tel: +65-6270-0110
パナソニック株式会社 AVCネットワークス社 システム事業グループ〒 571-8503 大阪府門真市松葉町 2 番15 号 (06) 6901ー1161
© Panasonic Corporation 2010G