it support helpsheets booklet ~ sims may 2011
DESCRIPTION
Helpsheets for SIMsTRANSCRIPT

IT Support helpsheets SIMs May 2011
IT SUPPORT HELPSHEETS
Index May 2011
Page Numbers
Helpsheet Title
1 ~ 6 Introduction to using Behaviour Management in SIMS
7 ~ 9 Creating a Report of Achievement and Behaviour issues using SIMS.
10 ~ 11 Individual Student Behaviour Report - creates an Excel document that lists the behaviour incidents and dates for one student
12 ~ 13 To Create a Bulk Achievement Record
14 ~ 15 Photos on Class Register
16 ~ 24 How to Configure the Home Page: to include Quick Search and Window Menu
25 ~ 32 How to Configure the Home Page V1
33 ~ 35 How to Change Your Password and Secure (lock) the Computer. Using XP and Windows 7 machines.
36 ~ 37 Viewing the SRS & CATs Results
38 ~ 42 Viewing the School Diary
43 ~ 44 Taking a Register that is not assigned to your Homepage (My Classes)
45 Taking a Register - " User Defined Group"
46 ~ 47 Saving, Printing and Deleting Messages from SIMS Homepage
48 Deleting Messages from your SIMS homepage
49 ~ 52 Creating and Sending a Message Using Sims

Introduction to using Behaviour Management in SIMS
Pag
e1
The recording of achievement and behaviour will now take place in SIMS replacing iBehave. It is separated into four areas – behaviour, achievements, detentions and report cards. The behaviour area is replacing the “bad” area in iBehave and is used to record when a student fails to meet the expectation as outlined in “Living and Learning Together policy”. The achievement area is replacing the “good” area in iBehave and is used to record academic achievements, sports results, positive behaviour etc. The detention area is used to create detentions and those students who will attend them. Report cards are created and attached to the students’ registration and can be filled in and monitored electronically. The “PASTORAL” area of iBehave is incorporated in some part in the Behaviour & Achievement areas of SIMS but will now be used on the SIMS messaging area and using All Staff emails. (Help sheets: - SIMS – Sending Messages and SIMS – Configuring Home Page –find in Shared Area – Read Only – ICT Help Guides) This help sheet will introduce how to use the basic “lookups” in the Behaviour Management area and as you become more familiar with the application using the Report cards and the Detention area but at the time of writing these can not be accessed comprehensively until the registers and timetable are setup. Getting started in Behaviour Management
This is the Behaviour Management icon in SIMS, and is one of the ways to access students’ details; there are several other links to this area via the registers etc. Look for the Links section on the right-hand side of the SIMS window.
A lookup is a drop-down menu of choices – these have been changed to create familiar descriptions in Behaviour Management as in iBehave, but there are “in-built” choices you can also use. Any suggestions for changes or new descriptions please email Jo Payne.
Introduction to using Behaviour Management in SIMS
Pag
e2
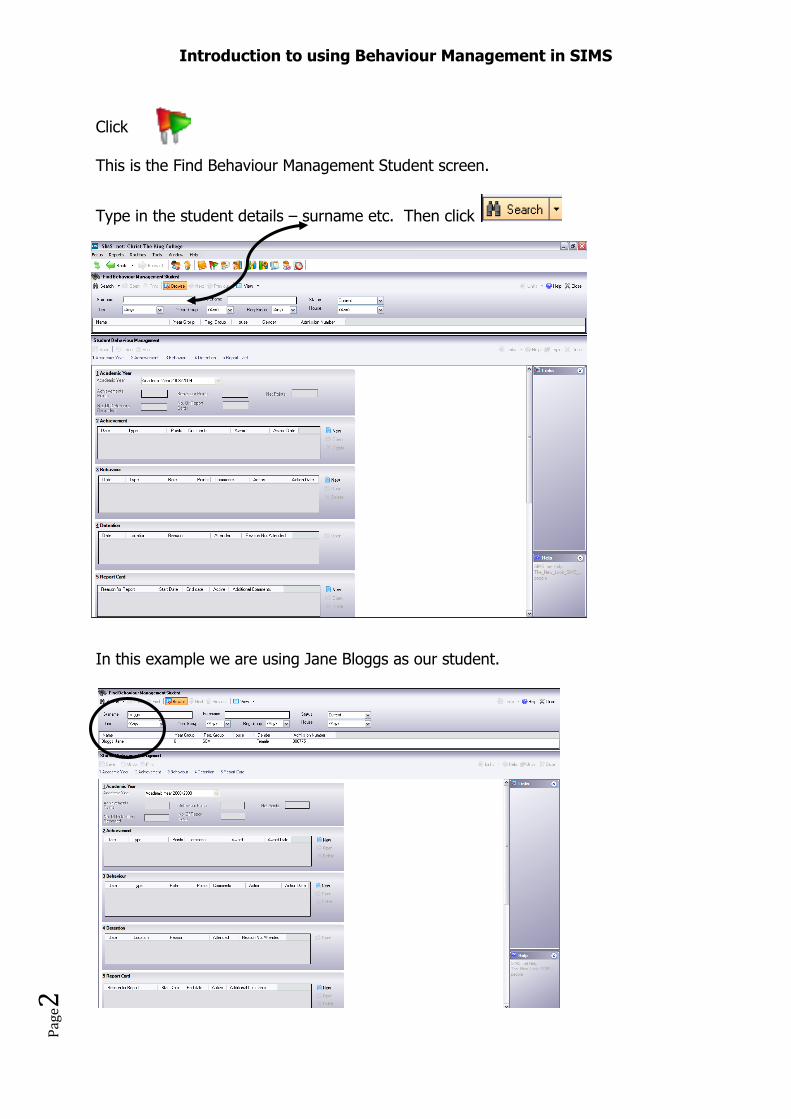
Click This is the Find Behaviour Management Student screen.
Type in the student details – surname etc. Then click
In this example we are using Jane Bloggs as our student.
Introduction to using Behaviour Management in SIMS
Pag
e3
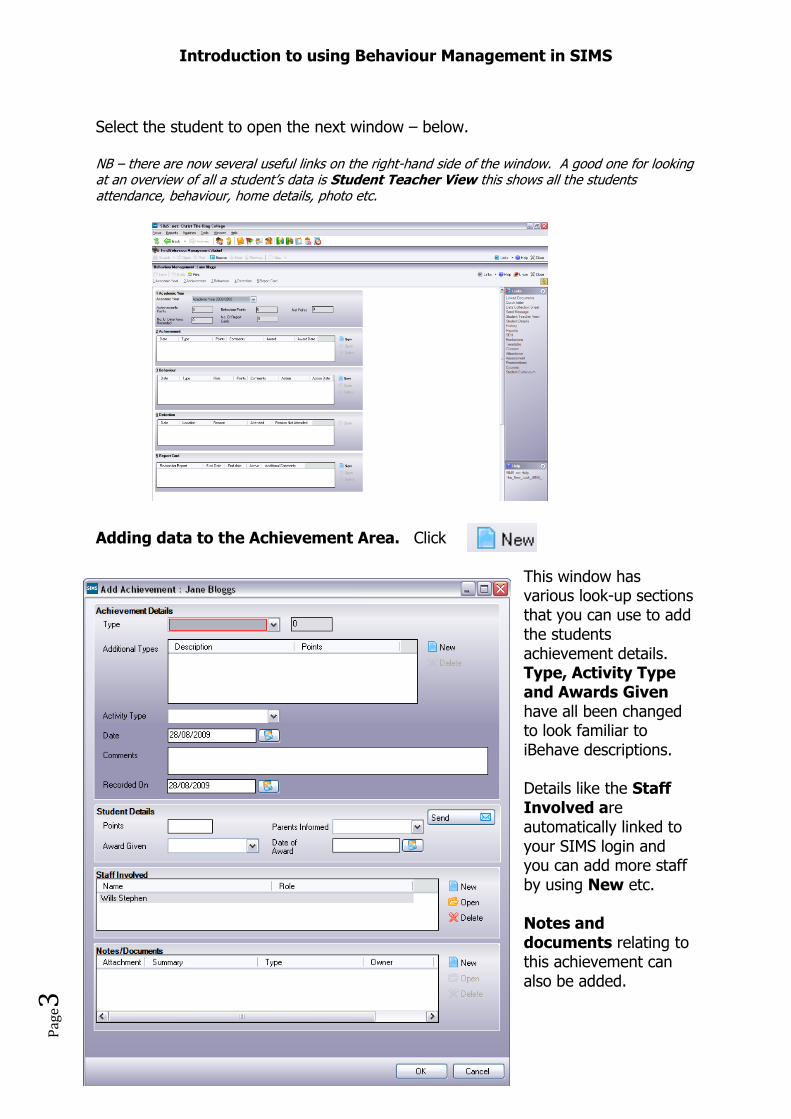
Select the student to open the next window – below. NB – there are now several useful links on the right-hand side of the window. A good one for looking at an overview of all a student’s data is Student Teacher View this shows all the students attendance, behaviour, home details, photo etc.
Adding data to the Achievement Area. Click
This window has various look-up sections that you can use to add the students achievement details. Type, Activity Type and Awards Given have all been changed to look familiar to iBehave descriptions. Details like the Staff Involved are automatically linked to your SIMS login and you can add more staff by using New etc. Notes and documents relating to this achievement can also be added.
Introduction to using Behaviour Management in SIMS
Pag
e4
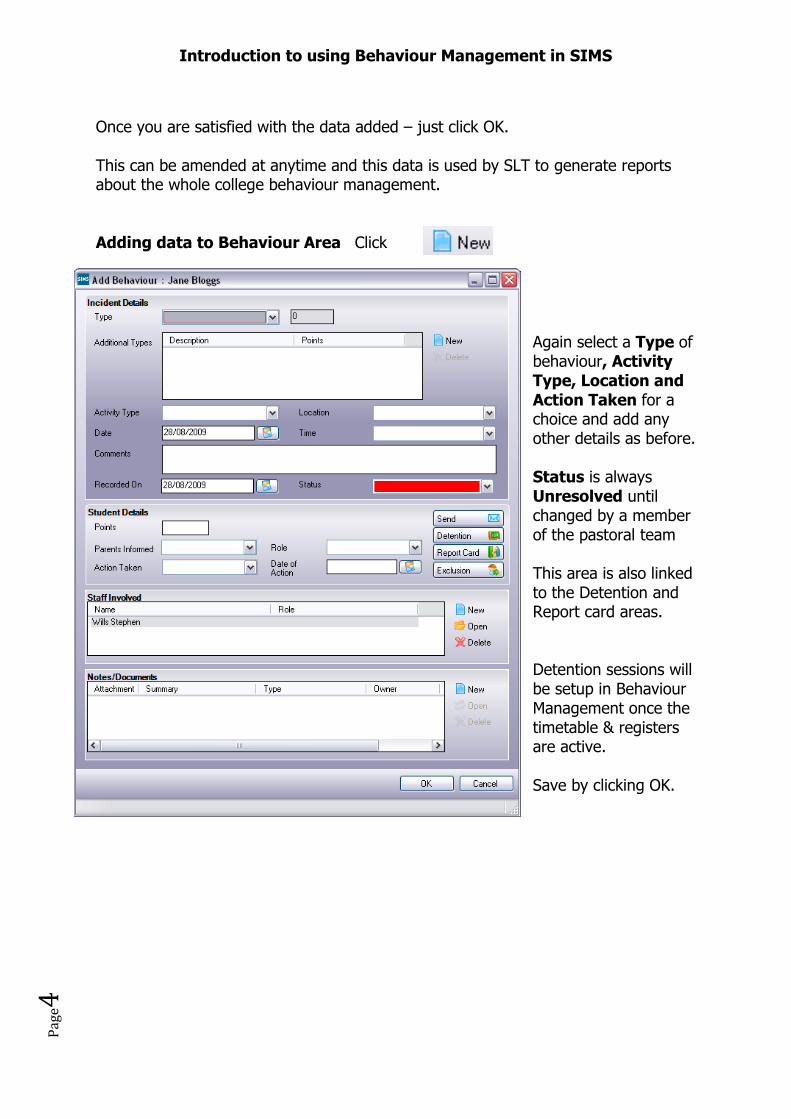
Once you are satisfied with the data added – just click OK. This can be amended at anytime and this data is used by SLT to generate reports about the whole college behaviour management. Adding data to Behaviour Area Click
Again select a Type of behaviour, Activity Type, Location and Action Taken for a choice and add any other details as before. Status is always Unresolved until changed by a member of the pastoral team This area is also linked to the Detention and Report card areas. Detention sessions will be setup in Behaviour Management once the timetable & registers are active. Save by clicking OK.
Introduction to using Behaviour Management in SIMS
Pag
e5
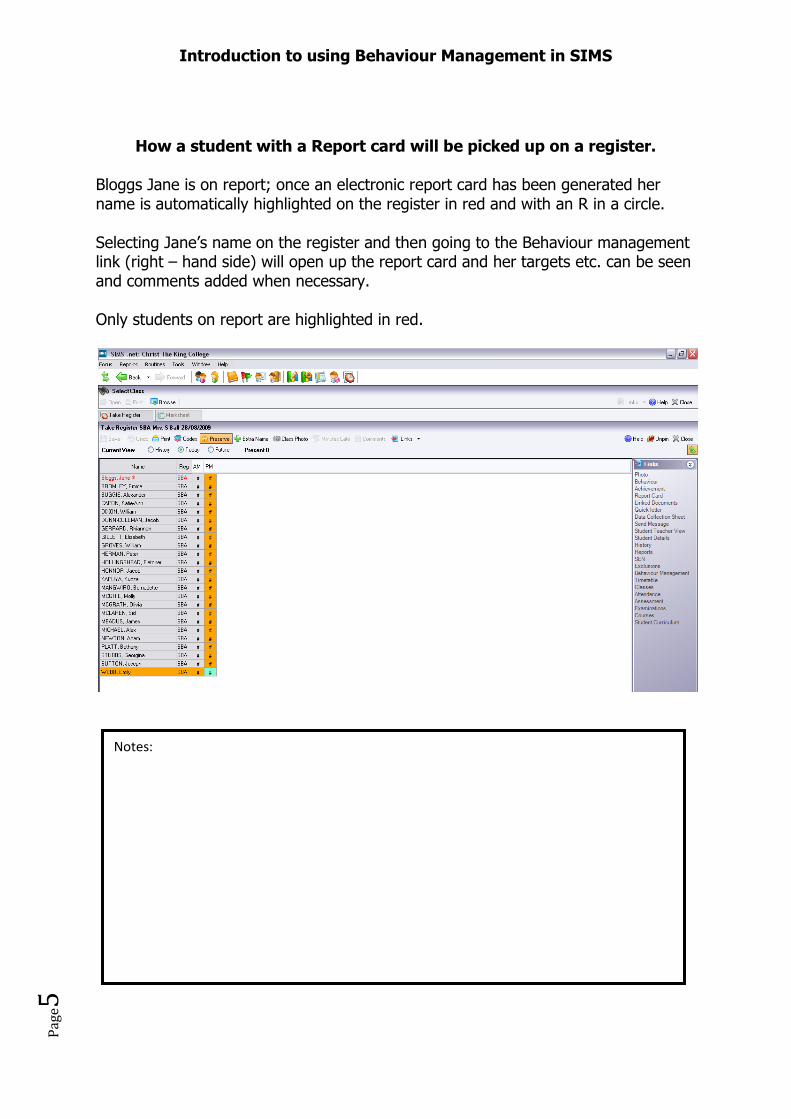
How a student with a Report card will be picked up on a register.
Bloggs Jane is on report; once an electronic report card has been generated her name is automatically highlighted on the register in red and with an R in a circle. Selecting Jane’s name on the register and then going to the Behaviour management link (right – hand side) will open up the report card and her targets etc. can be seen and comments added when necessary. Only students on report are highlighted in red.
Notes:

Introduction to using Behaviour Management in SIMS
Pag
e6
An example of a data sheet in the Student Teacher View.
An example of the descriptions in the lookup menus in Behaviour Management.
If you have any further questions please don’t hesitate to contact any of the IT Support team, you can do this by e-mailing ‘IT Support’ within Outlook.
Creating a Report of Achievement and Behaviour issues using SIMS. P
age1
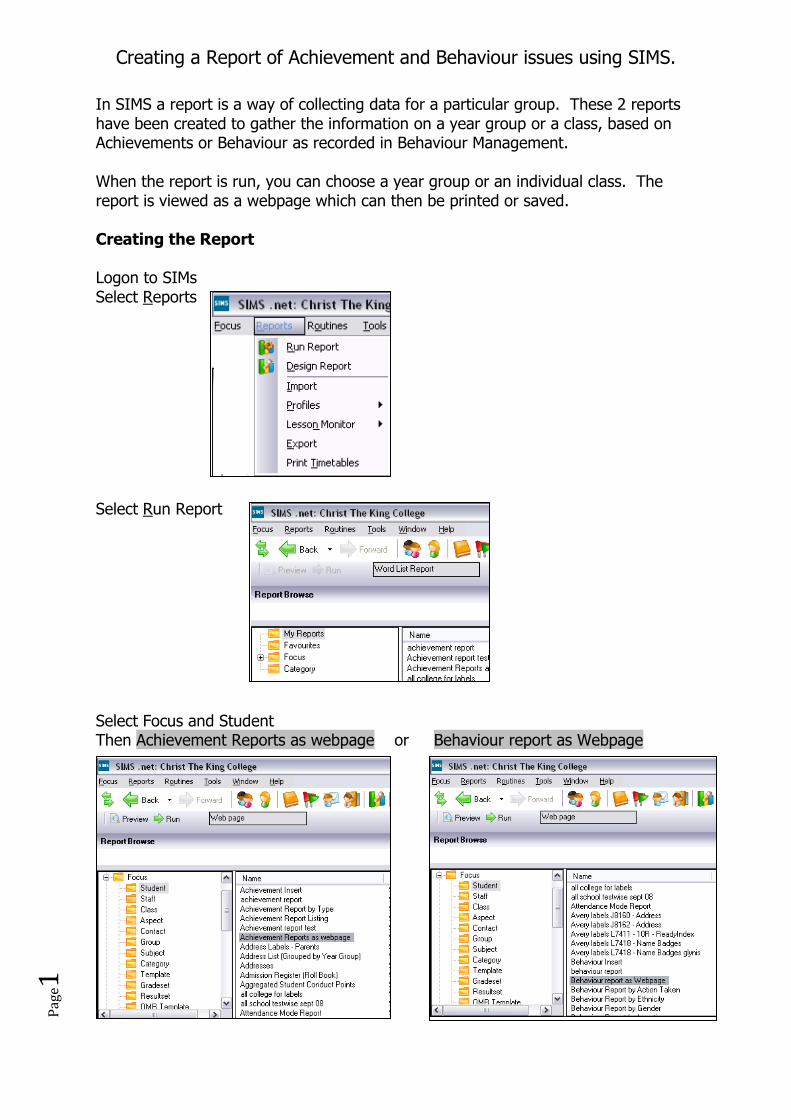
In SIMS a report is a way of collecting data for a particular group. These 2 reports have been created to gather the information on a year group or a class, based on Achievements or Behaviour as recorded in Behaviour Management. When the report is run, you can choose a year group or an individual class. The report is viewed as a webpage which can then be printed or saved. Creating the Report Logon to SIMs Select Reports Select Run Report Select Focus and Student Then Achievement Reports as webpage or Behaviour report as Webpage

Creating a Report of Achievement and Behaviour issues using SIMS. P
age2
Double click your report selection. This window allows you to filter the year group and Reg group you may want. You can tick more than on box in each section, but the more data asked for the longer the report will be to retrieve.
These values will gather data on 9ASU. Click OK
This is how the webpage will look. It can now be printed or saved.
Creating a Report of Achievement and Behaviour issues using SIMS. P
age3
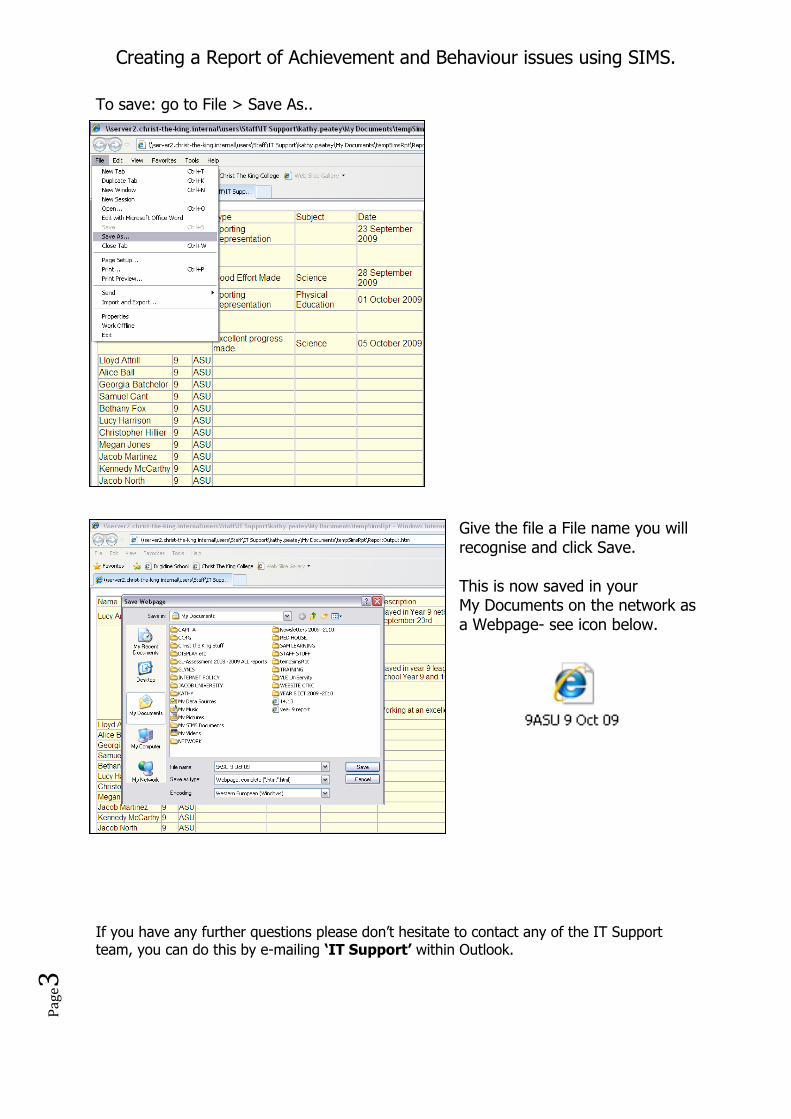
To save: go to File > Save As..
Give the file a File name you will recognise and click Save. This is now saved in your My Documents on the network as a Webpage- see icon below.
If you have any further questions please don’t hesitate to contact any of the IT Support team, you can do this by e-mailing ‘IT Support’ within Outlook.
SIMs- Individual Student Behaviour Report - creates an Excel document that lists the behaviour incidents and dates for one student.
If you have any further questions please don’t hesitate to contact any of the IT Support team, you can do this by e-mailing ‘IT Support’ within Outlook.
Pag
e1
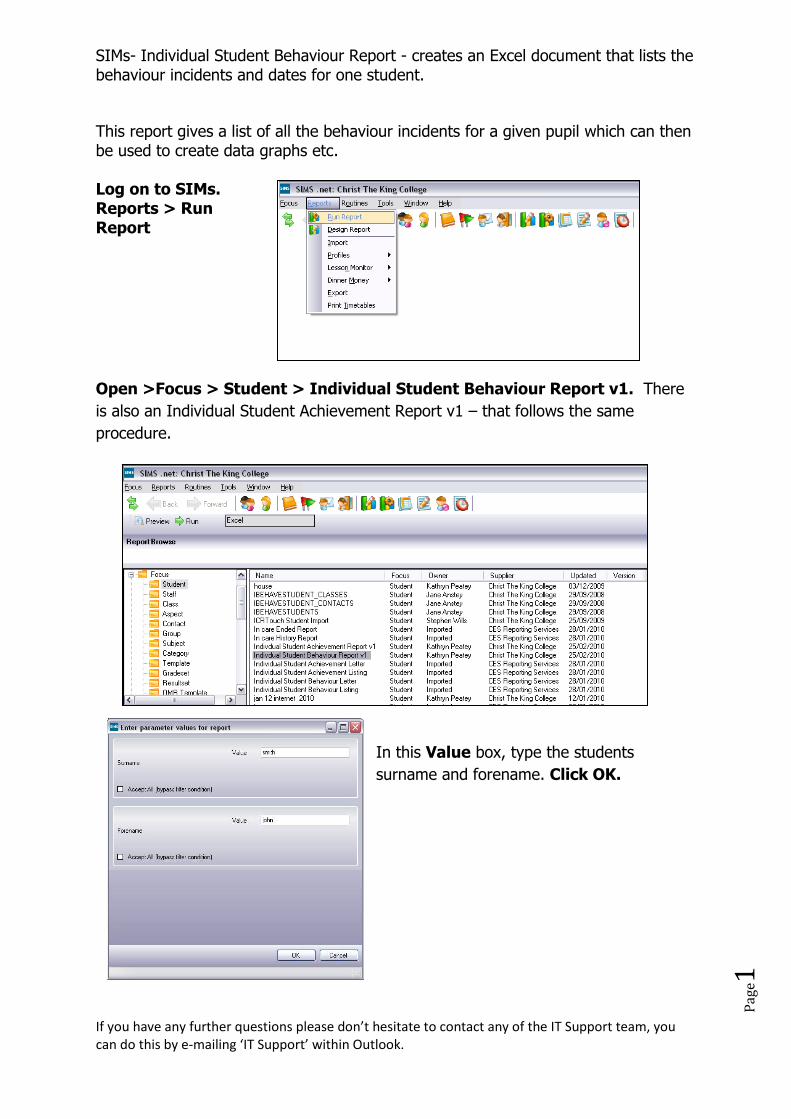
This report gives a list of all the behaviour incidents for a given pupil which can then be used to create data graphs etc. Log on to SIMs. Reports > Run Report
Open >Focus > Student > Individual Student Behaviour Report v1. There
is also an Individual Student Achievement Report v1 – that follows the same
procedure.
In this Value box, type the students
surname and forename. Click OK.

SIMs- Individual Student Behaviour Report - creates an Excel document that lists the behaviour incidents and dates for one student.
If you have any further questions please don’t hesitate to contact any of the IT Support team, you can do this by e-mailing ‘IT Support’ within Outlook.
Pag
e2
The report runs as a Excel spreadsheet –click the Options tab
Select the Enable this content
>OK
Close this window to see the Excel
window.
This data can now be sorted, turned into a graph etc.

To Create a Bulk Achievement Record
Pag
e1
There are two methods for recording achievements: 1. An achievement is added to an individual student record. 2. The achievement is recorded for a group/set/form of students e.g. a bulk
achievement
This helpsheet will show you how to add a bulk achievement record.
Log on to SIMS
Focus Behaviour management > Maintain Achievements New (Find Achievements panel)
1. Details Panel > add the Type of Achievement, Comments Activity type, dates etc
2. Staff Involved Panel > add any other staff if needed (your name will automatically be shown)
3. Students Involved Panel > New
Select Students panel > Year group / Reg Group etc.
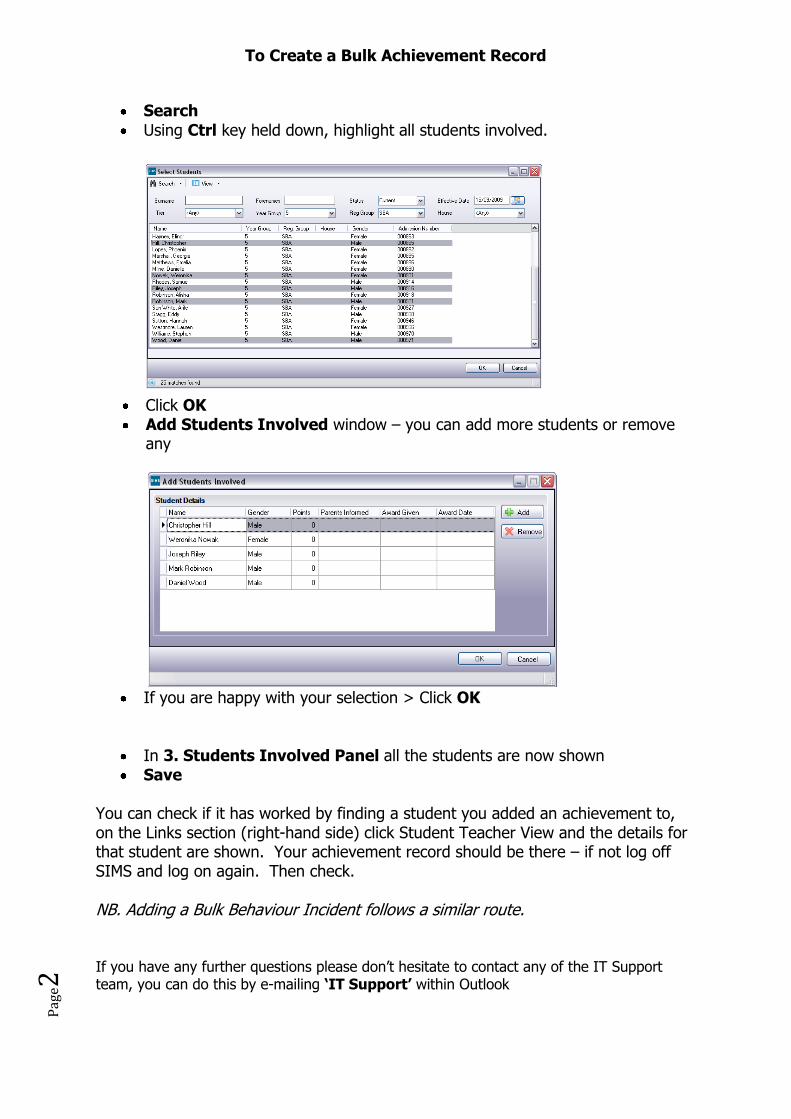
To Create a Bulk Achievement Record
Pag
e2
Search
Using Ctrl key held down, highlight all students involved.
Click OK Add Students Involved window – you can add more students or remove
any
If you are happy with your selection > Click OK
In 3. Students Involved Panel all the students are now shown Save
You can check if it has worked by finding a student you added an achievement to, on the Links section (right-hand side) click Student Teacher View and the details for that student are shown. Your achievement record should be there – if not log off SIMS and log on again. Then check. NB. Adding a Bulk Behaviour Incident follows a similar route. If you have any further questions please don’t hesitate to contact any of the IT Support team, you can do this by e-mailing ‘IT Support’ within Outlook

SIMS: Photos on Class Register
If you have any further questions please don’t hesitate to contact any of the IT Support team, you can do this by e-mailing ‘IT Support’ within Outlook
Pag
e1
When you record pupil attendance in the classroom using SIMS, individual and class photographs can be viewed on screen, which can help if there is a supply teacher. It can also make registration more interesting for pupils.
The class register screen can be opened via the Take Register Icon or by double-clicking on the AM or PM session on SIMS Home page. The screen will open on the right class for the teacher logged on. Individual photos can be seen by clicking the Photo button in the Links Panel. Tabbing down each pupil on the register will move through each photo in turn. Attendance functions can be set up so that the register can be taken simply by clicking the relevant name. This could be via an interactive whiteboard to allow greater pupil involvement.
Photographs for the whole class together can be seen by clicking the Class Photo button.

SIMS: Photos on Class Register
If you have any further questions please don’t hesitate to contact any of the IT Support team, you can do this by e-mailing ‘IT Support’ within Outlook
Pag
e2
Click Print and select a printer.
The photographs of the pupils are updated yearly.

1 [Update May 2011KPE]
How to Configure the Home Page: to include Quick Search and Window Menu.
A recent SIMs upgrade has added 2 new features to the SIMs Homepage: Quick Search and a dropdown Window Menu. The Quick Search bar is on the homepage: type in a name e.g. JONES
Select the student or contact you want and the Student Details window opens.
Navigating through SIMs has in the past been awkward now the Window feature is making this much easier. Window Menu: all pages that you have opened in SIMs appear as a dropdown menu when you click the Window tab.
This allows you to navigate through the pages you have open.
2 [Update May 2011KPE]
How to Configure the Home Page: to include Quick Search and Window Menu.
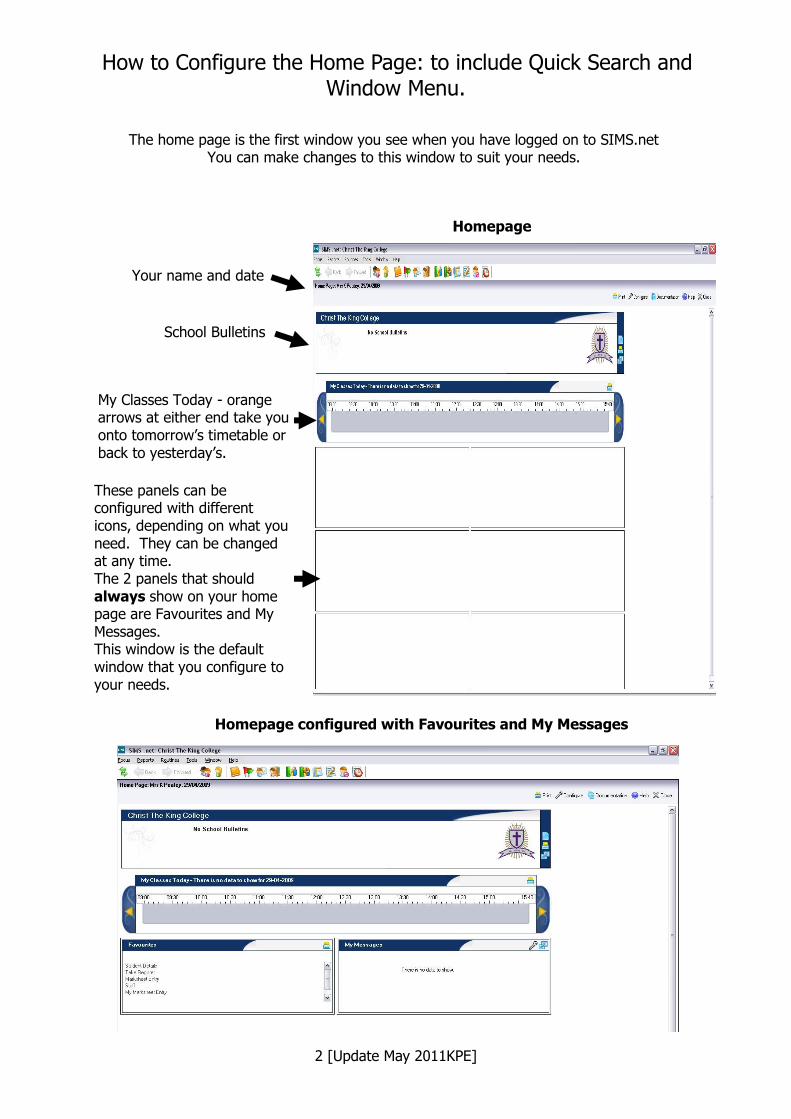
The home page is the first window you see when you have logged on to SIMS.net You can make changes to this window to suit your needs.
Your name and date
School Bulletins
My Classes Today - orange arrows at either end take you onto tomorrow’s timetable or back to yesterday’s.
These panels can be configured with different icons, depending on what you need. They can be changed at any time. The 2 panels that should always show on your home page are Favourites and My Messages. This window is the default window that you configure to your needs.
Homepage configured with Favourites and My Messages
Homepage
3 [Update May 2011KPE]
How to Configure the Home Page: to include Quick Search and Window Menu.
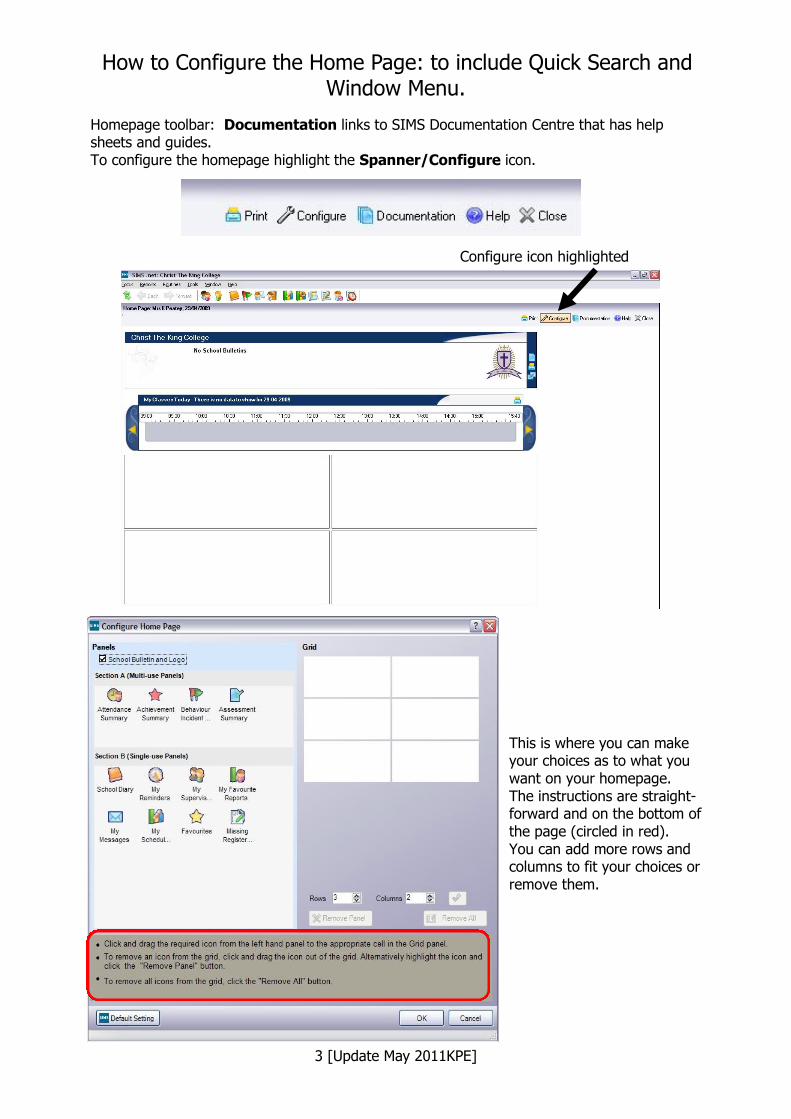
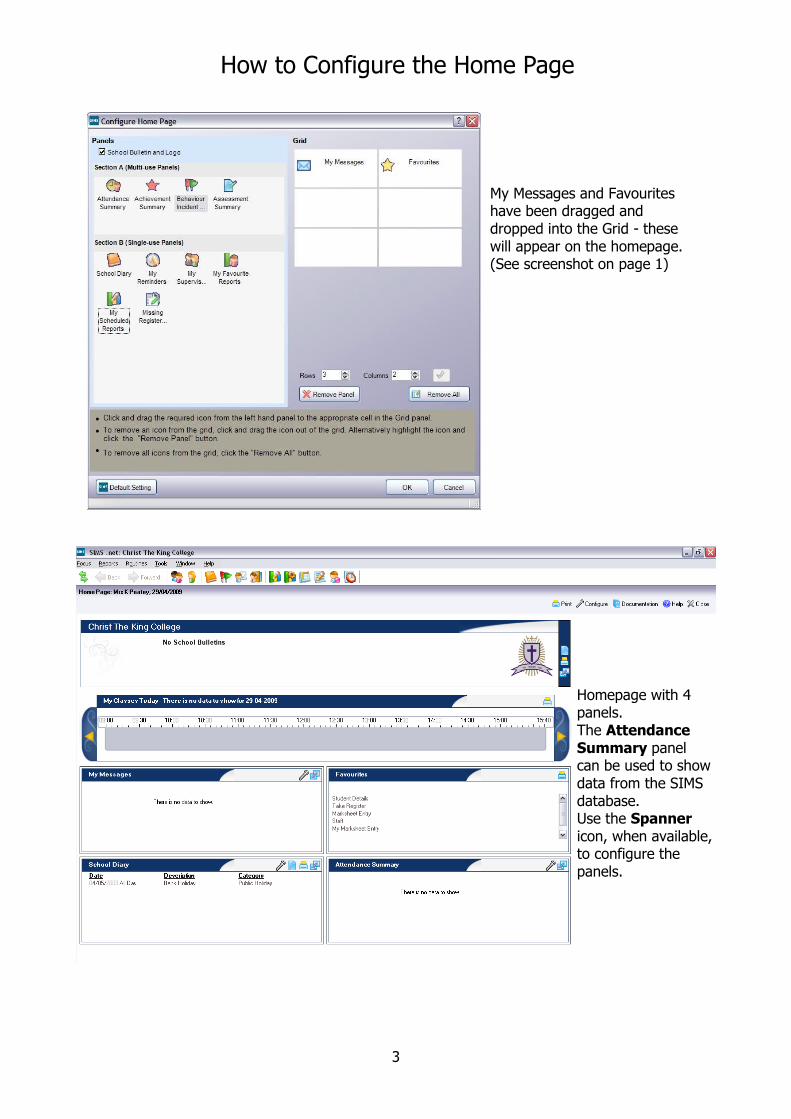
Homepage toolbar: Documentation links to SIMS Documentation Centre that has help sheets and guides. To configure the homepage highlight the Spanner/Configure icon.
Configure icon highlighted
This is where you can make your choices as to what you want on your homepage. The instructions are straight-forward and on the bottom of the page (circled in red). You can add more rows and columns to fit your choices or remove them.

4 [Update May 2011KPE]
How to Configure the Home Page: to include Quick Search and Window Menu.
My Messages and Favourites have been dragged and dropped into the Grid - these will appear on the homepage. (See screenshot on page 1)
Homepage with 4 panels. The Attendance Summary panel can be used to show data from the SIMS database. Use the Spanner icon, when available, to configure the panels.

5 [Update May 2011KPE]
How to Configure the Home Page: to include Quick Search and Window Menu.
The Attendance Summary is showing the Whole School data. More data can be seen form this panel by clicking on the icons in the top - right of the panel. The attendance Summary is a Multi-use panel: which means you can have more than one on your home page. You drag and drop the number you want.
The Configure Home Page window with 2 Attendance Summary panels. Click OK

6 [Update May 2011KPE]
How to Configure the Home Page: to include Quick Search and Window Menu.
Homepage showing the 2 Attendance Summary panels. One is going to show the Whole School Attendance and the second will show an individual classes’ Attendance for comparison.
Click on the Spanner toggle to configure details of the panel.
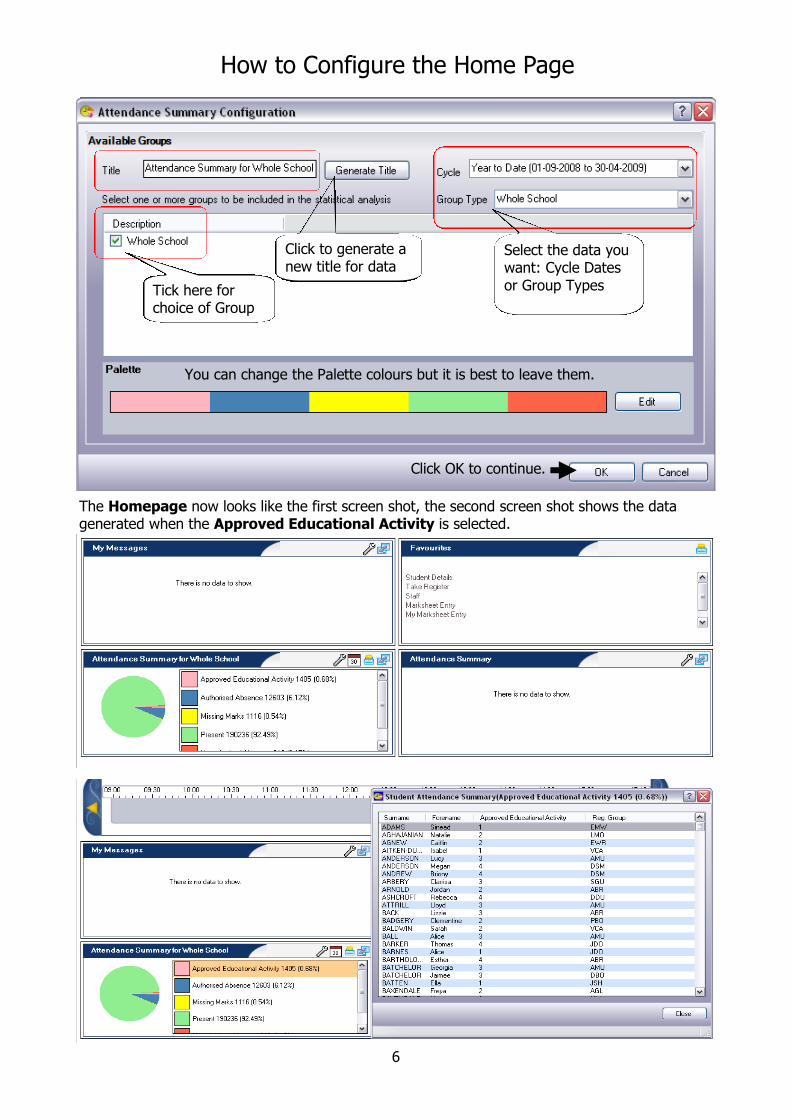
In this panel you can gen-erate data as a Pie Chart for Whole School Attend-ance between the dates shown in the Cycle choice box. You can also change the Title of the Data, the Group Type and then TICK in the selection in the Description Window.

7 [Update May 2011KPE]
How to Configure the Home Page: to include Quick Search and Window Menu.
Click to generate a new title for data
Select the data you want: Cycle Dates or Group Types Tick here for
choice of Group
You can change the Palette colours but it is best to leave them.
Click OK to continue.
The Homepage now looks like the first screen shot, the second screen shot shows the data generated when the Approved Educational Activity is selected.

8 [Update May 2011KPE]
How to Configure the Home Page: to include Quick Search and Window Menu.
These icons give you differ-ent options, Spanner to configure the data, A toggle to view the data as a table - (screen shot) Print Icon and an icon to expand the panel to a full size screen.
Here the Title has been changed to Attendance Summary for SBA, the Cycle is the same as the whole school, and the Group Type is Reg Groups and SBA has been selected. Click OK.
The Homepage now shows a comparison between Attendance Data for the Whole School and 5SBA. The extra data can be viewed with the icons and toggles.

9 [Update May 2011KPE]
How to Configure the Home Page: to include Quick Search and Window Menu.
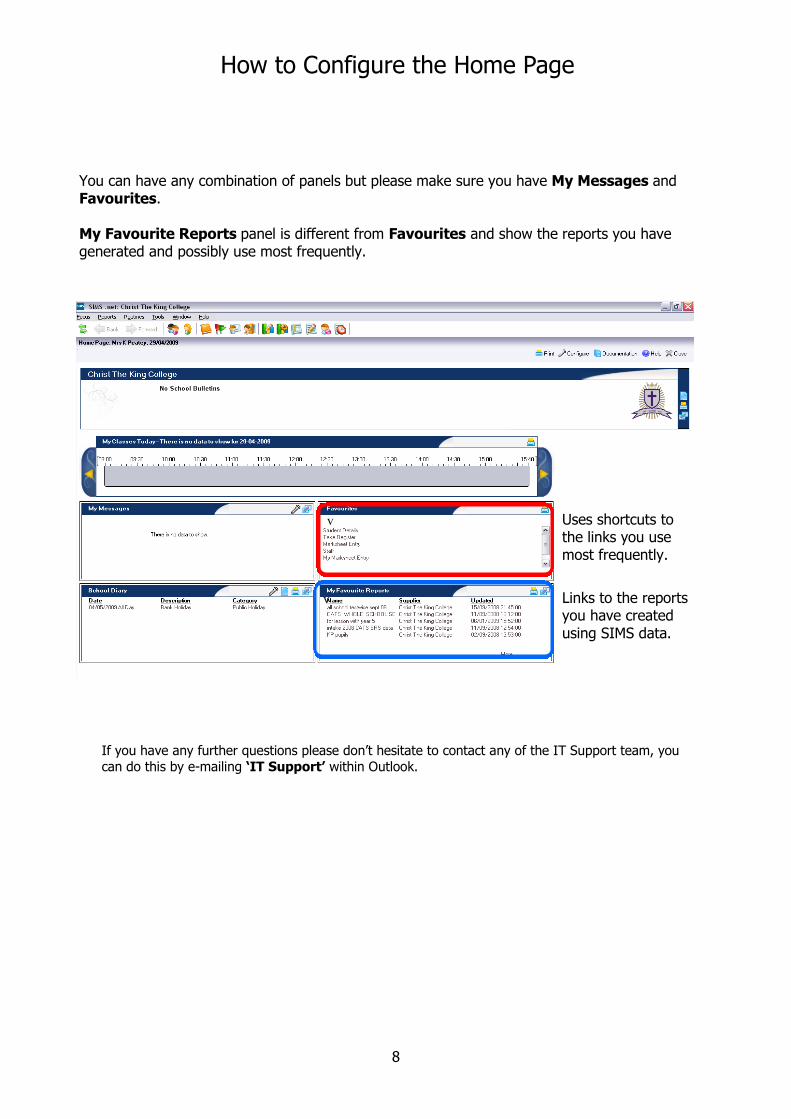
You can have any combination of panels but please make sure you have My Messages and Favourites. My Favourite Reports panel is different from Favourites and show the reports you have generated and possibly use most frequently.
v
Uses shortcuts to the links you use most frequently.
v
Links to the reports you have created using SIMS data.
If you have any further questions please don’t hesitate to contact any of the IT Support team, you
can do this by e-mailing ‘IT Support’ within Outlook.

1
How to Configure the Home Page
The home page is the first window you see when you have logged on to SIMS.net You can make changes to this window to suit your needs.
Your name and date
School Bulletins
My Classes Today - orange arrows at either end take you onto tomorrow’s timetable or back to yesterday’s.
These panels can be configured with different icons, depending on what you need. They can be changed at any time. The 2 panels that should always show on your home page are Favourites and My Messages. This window is the default window that you configure to your needs.
Homepage configured with Favourites and My Messages
Homepage
2
How to Configure the Home Page
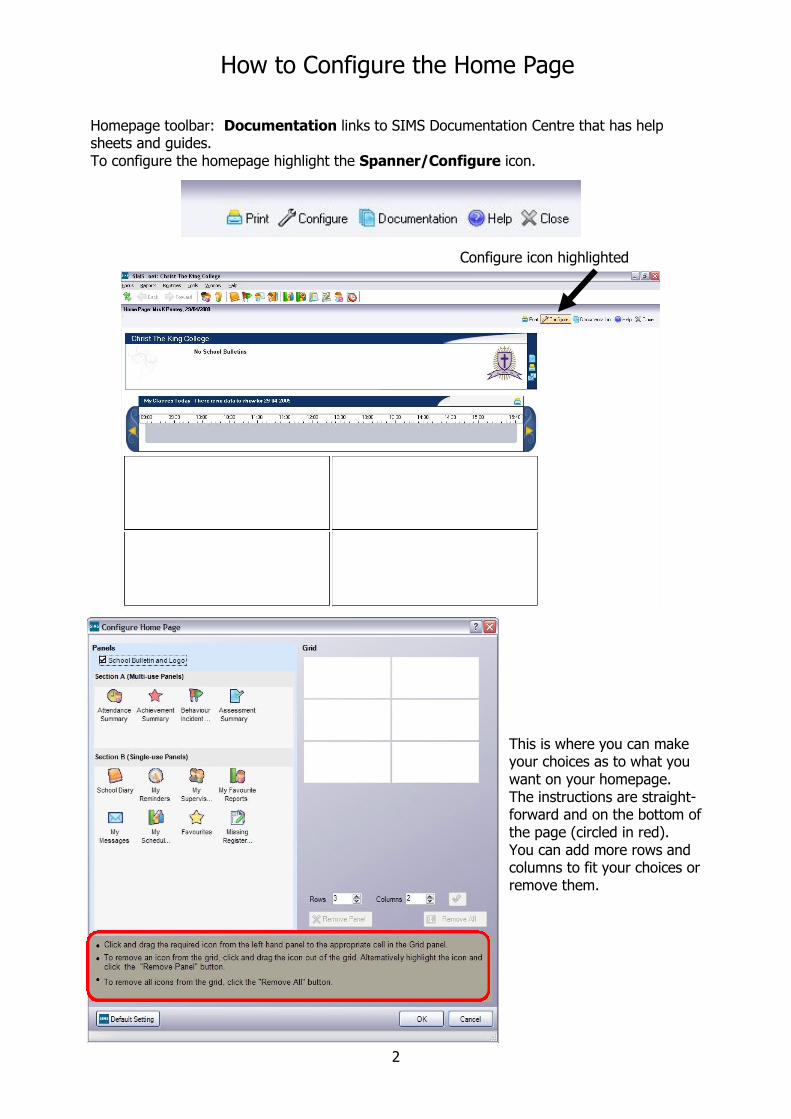
Homepage toolbar: Documentation links to SIMS Documentation Centre that has help sheets and guides. To configure the homepage highlight the Spanner/Configure icon.
Configure icon highlighted
This is where you can make your choices as to what you want on your homepage. The instructions are straight-forward and on the bottom of the page (circled in red). You can add more rows and columns to fit your choices or remove them.
3
How to Configure the Home Page
My Messages and Favourites have been dragged and dropped into the Grid - these will appear on the homepage. (See screenshot on page 1)
Homepage with 4 panels. The Attendance Summary panel can be used to show data from the SIMS database. Use the Spanner icon, when available, to configure the panels.

4
How to Configure the Home Page
The Attendance Summary is showing the Whole School data. More data can be seen form this panel by clicking on the icons in the top - right of the panel. The attendance Summary is a Multi-use panel: which means you can have more than one on your home page. You drag and drop the number you want.
The Configure Home Page window with 2 Attendance Summary panels. Click OK

5
How to Configure the Home Page
Homepage showing the 2 Attendance Summary panels. One is going to show the Whole School Attendance and the second will show an individual classes’ Attendance for comparison.
Click on the Spanner toggle to configure details of the panel.
In this panel you can gen-erate data as a Pie Chart for Whole School Atten-dance between the dates shown in the Cycle choice box. You can also change the Title of the Data, the Group Type and then TICK in the selection in the Description Window.
6
How to Configure the Home Page
Click to generate a new title for data
Select the data you want: Cycle Dates or Group Types Tick here for
choice of Group
You can change the Palette colours but it is best to leave them.
Click OK to continue.
The Homepage now looks like the first screen shot, the second screen shot shows the data generated when the Approved Educational Activity is selected.

7
How to Configure the Home Page
These icons give you differ-ent options, Spanner to configure the data, A toggle to view the data as a table - (screen shot) Print Icon and an icon to expand the panel to a full size screen.
Here the Title has been changed to Attendance Summary for SBA, the Cycle is the same as the whole school, and the Group Type is Reg Groups and SBA has been selected. Click OK.
The Homepage now shows a comparison between Attendance Data for the Whole School and 5SBA. The extra data can be viewed with the icons and toggles.
8
How to Configure the Home Page
You can have any combination of panels but please make sure you have My Messages and Favourites. My Favourite Reports panel is different from Favourites and show the reports you have generated and possibly use most frequently.
v
Uses shortcuts to the links you use most frequently.
v
Links to the reports you have created using SIMS data.
If you have any further questions please don’t hesitate to contact any of the IT Support team, you
can do this by e-mailing ‘IT Support’ within Outlook.

How to Change Your Password and Secure (lock) the Computer. Using XP and Windows 7 machines.
If you have any further questions please don’t hesitate to contact any of the IT Support team, you can do this by e-mailing ‘IT Support’ within Outlook. [May 2011KPE]
Pag
e1
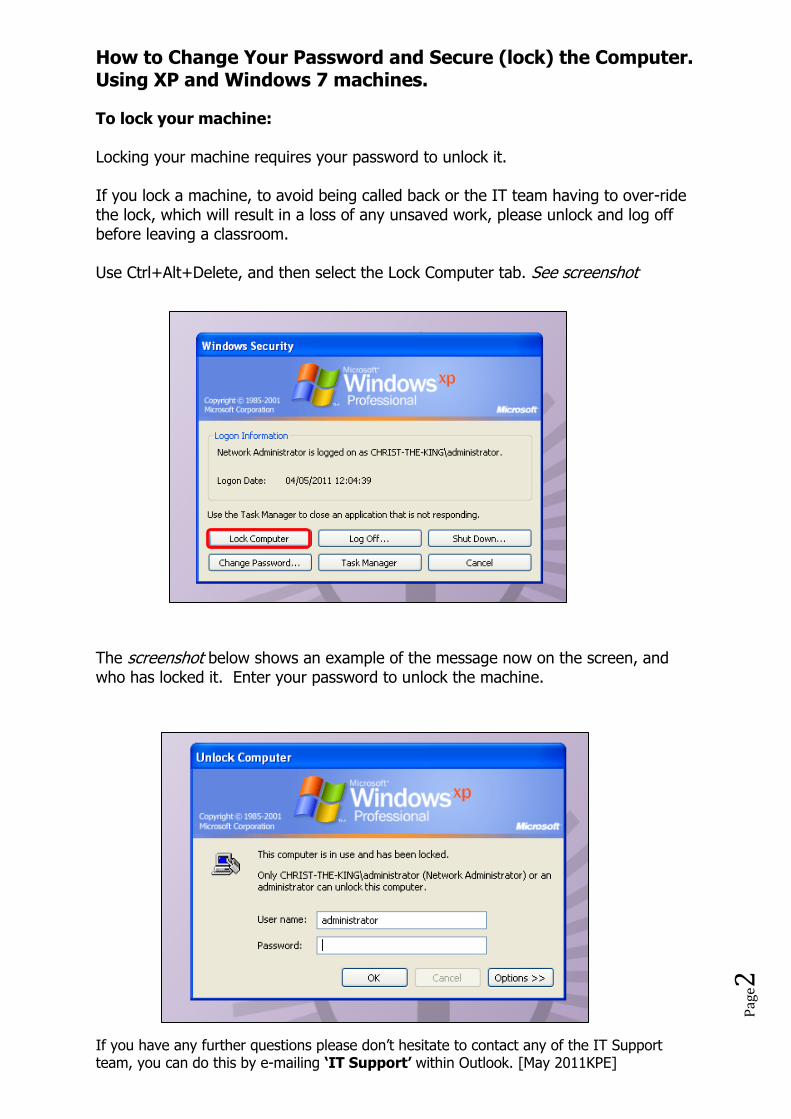
When logged on to a Windows XP machine, using the Ctrl, Alt and Delete keys together will access the Windows Security options. Screenshot below To change your password: Select Change Password… The new window requires you to enter your old password and your new password twice. Then OK. See screenshot For a more secure password, it should have at least 8 characters, one capital letter and one number, e.g. New9ort2
How to Change Your Password and Secure (lock) the Computer. Using XP and Windows 7 machines.
If you have any further questions please don’t hesitate to contact any of the IT Support team, you can do this by e-mailing ‘IT Support’ within Outlook. [May 2011KPE]
Pag
e2
To lock your machine: Locking your machine requires your password to unlock it. If you lock a machine, to avoid being called back or the IT team having to over-ride the lock, which will result in a loss of any unsaved work, please unlock and log off before leaving a classroom. Use Ctrl+Alt+Delete, and then select the Lock Computer tab. See screenshot The screenshot below shows an example of the message now on the screen, and who has locked it. Enter your password to unlock the machine.

How to Change Your Password and Secure (lock) the Computer. Using XP and Windows 7 machines.
If you have any further questions please don’t hesitate to contact any of the IT Support team, you can do this by e-mailing ‘IT Support’ within Outlook. [May 2011KPE]
Pag
e3
Using Windows 7 When logged on to a Windows 7 machine, using the Ctrl, Alt and Delete keys together will access the Windows Security options. Screenshot below Select the option to lock the computer or to change your password, as with an XP machine. Please remember not to leave a machine locked when you leave the classroom.
SIMs - Viewing the SRS & CATs Results
If you have any further questions please don’t hesitate to contact any of the IT Support team, you can do this by e-mailing ‘IT Support’ within Outlook.
Pag
e1
All the CATs and SRS scores have been put into marksheets on SIMS. They have been updated into Intake profiles; As of June 2010: – Intake 2005 = Year 9
Intake 2006 = Year 8 Intake 2007 = Year 7 Intake 2008 = Year 6 Intake 2009 = Year 5
This will change with the academic year.
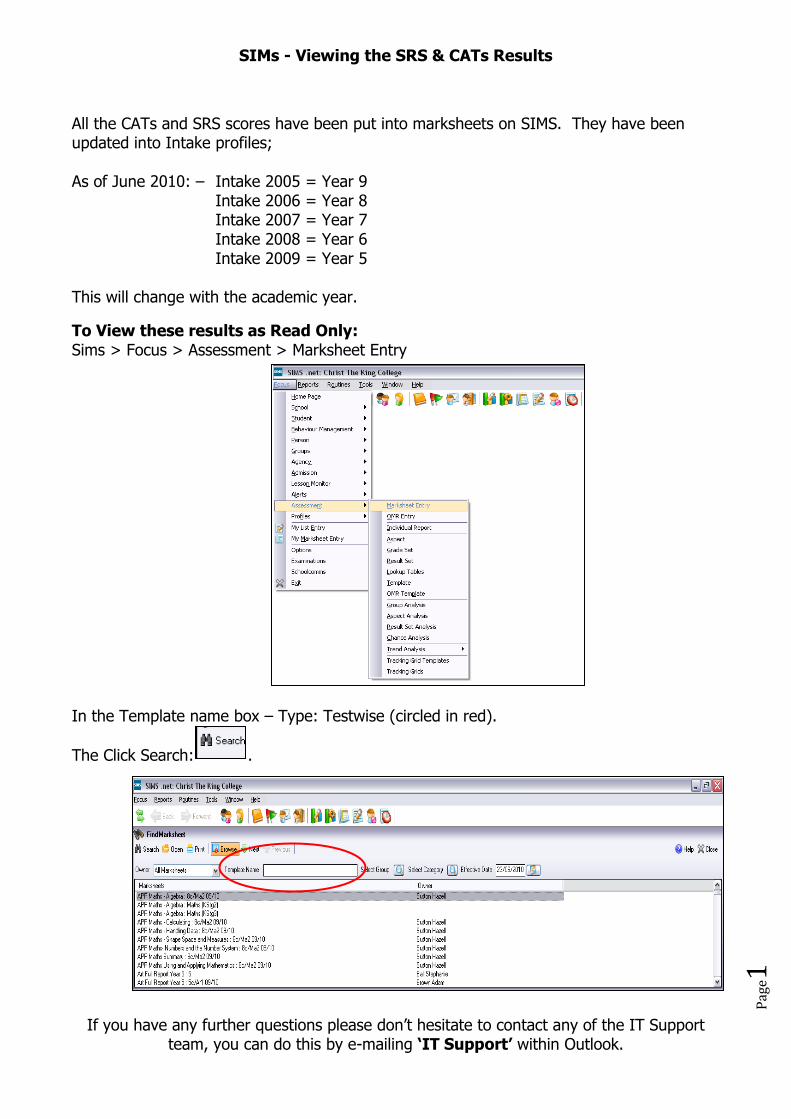
To View these results as Read Only: Sims > Focus > Assessment > Marksheet Entry In the Template name box – Type: Testwise (circled in red).
The Click Search: .
SIMs - Viewing the SRS & CATs Results
If you have any further questions please don’t hesitate to contact any of the IT Support team, you can do this by e-mailing ‘IT Support’ within Outlook.
Pag
e2
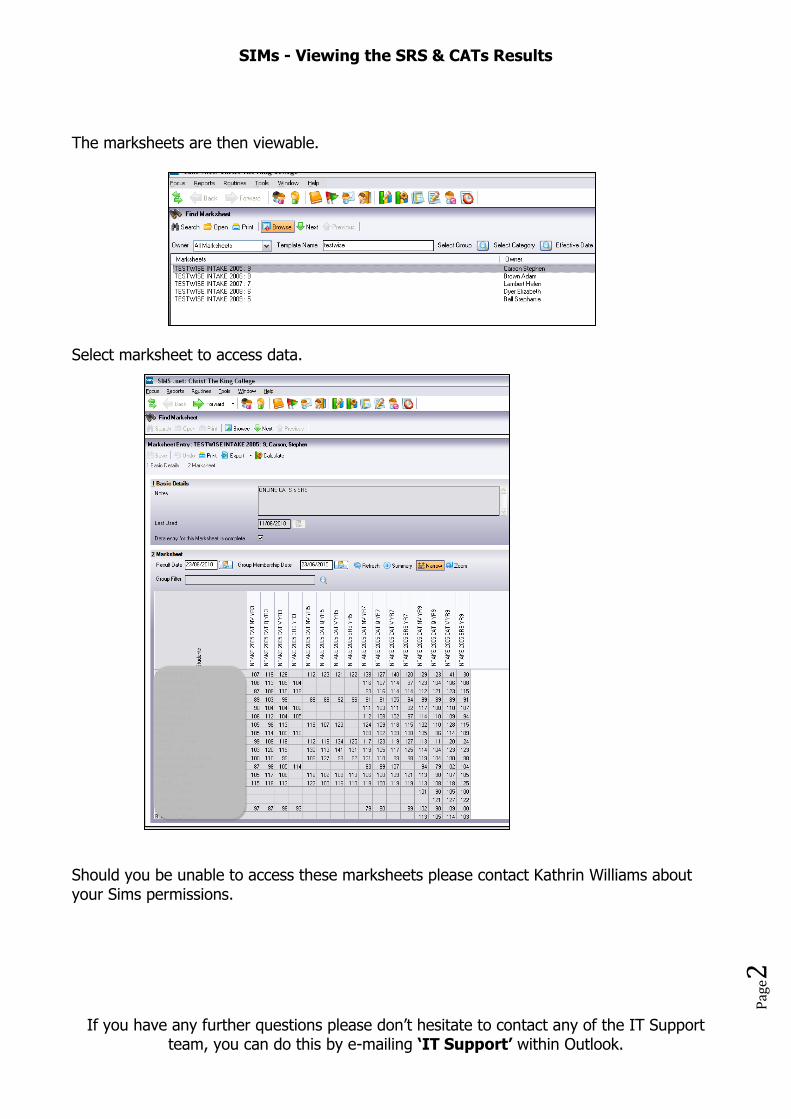
The marksheets are then viewable. Select marksheet to access data. Should you be unable to access these marksheets please contact Kathrin Williams about your Sims permissions.

Viewing the School Diary
If you have any further questions please don’t hesitate to contact any of the IT Support team, you can do this by e-mailing ‘IT Support’ within Outlook.
Pag
e1
Using the Home Page The Home Page is displayed automatically each time you log into SIMS. It can also be accessed at any time by selecting Focus > Home Page.
The Home Page provides an overview of the key content in your SIMS system, such as events from the School Diary, reminders, messages, etc. together with group summary information on attendance, behaviour incidents, achievements and assessments. A default set of panels is initially displayed, but the Home Page can be customised by each user, enabling additional panels to be added or unwanted panels to be removed. The display order of the panels can be changed and the text on each panel can be also be amended to reflect your requirements. W:\Read-only\ICT Help Guides\1) SIMs > How to Configure the Home Page.pdf NOTE: Changes to the layout and content of the Home Page panels are specific to each user, and will not affect the layout set by other users. Viewing the School Diary
The School Diary is used to record and display any school events that occur during the course of the year. These might include school trips, training days, staff meetings and parent’s evenings, for example. The Admin team will add the major college events but private events can be added on individual diaries. (All diary events for public view will still go to SLT for prior agreement)

Viewing the School Diary
If you have any further questions please don’t hesitate to contact any of the IT Support team, you can do this by e-mailing ‘IT Support’ within Outlook.
Pag
e2
If there are more events than can be displayed in the School Diary panel, a hyperlink entitled More… is displayed at the bottom of the panel. Click this link to maximise the panel to a full page listing all available events. A private event can be added to the diary which is not viewed by other users.
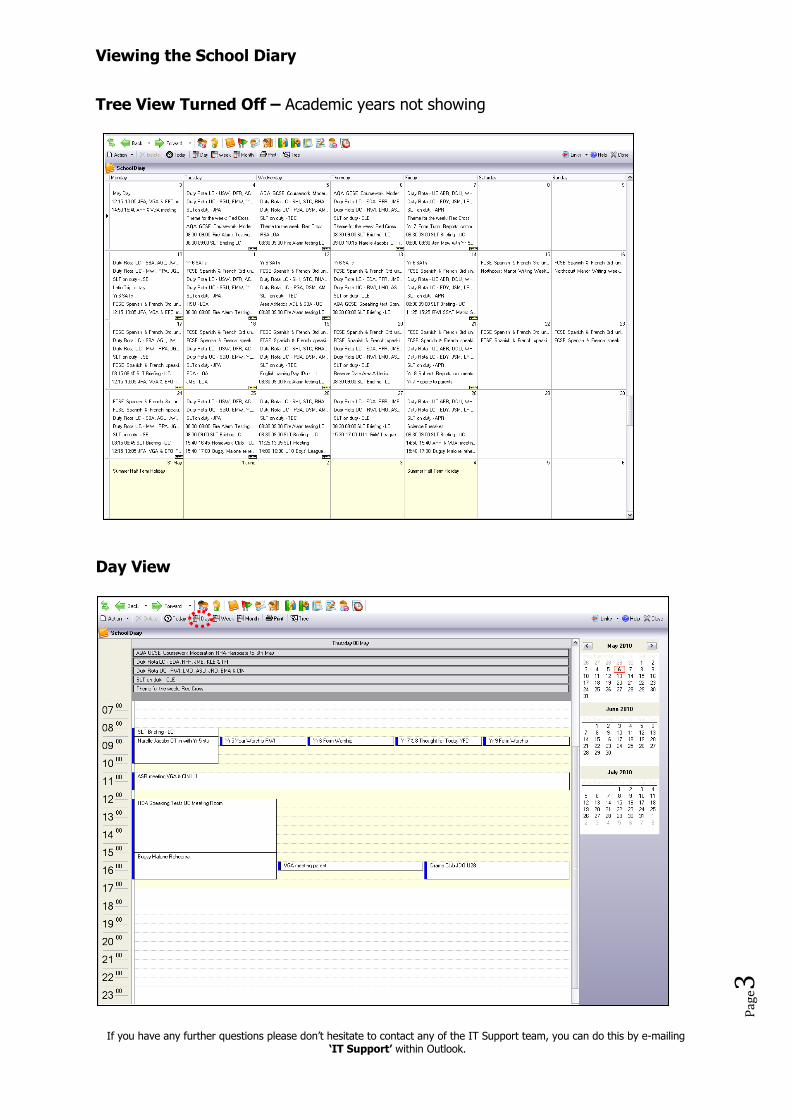
A full diary which will include events from current, previous, and future academic years can be viewed using the icon on the homepage toolbar and from there the diary view can be changed to day, week, month etc which then looks very much like the Outlook diary. Tree View of Diary
Viewing the School Diary
If you have any further questions please don’t hesitate to contact any of the IT Support team, you can do this by e-mailing ‘IT Support’ within Outlook.
Pag
e3
Tree View Turned Off – Academic years not showing
Day View
Viewing the School Diary
If you have any further questions please don’t hesitate to contact any of the IT Support team, you can do this by e-mailing ‘IT Support’ within Outlook.
Pag
e4
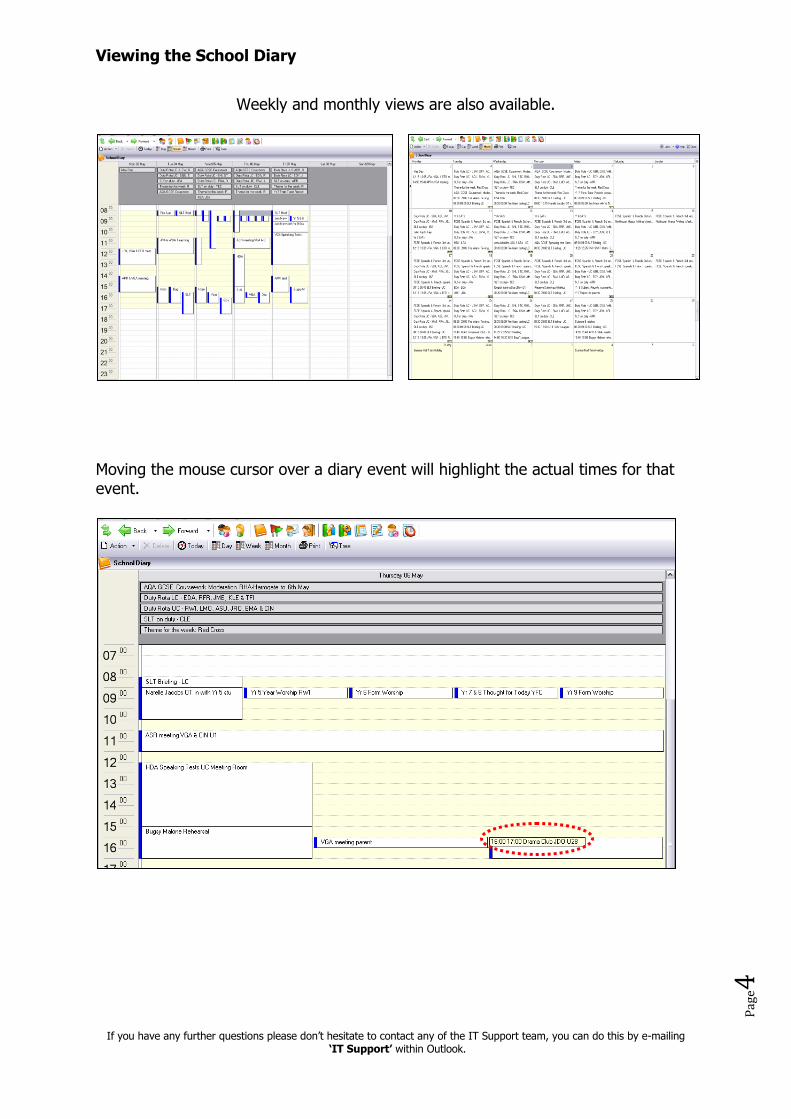
Weekly and monthly views are also available.
Moving the mouse cursor over a diary event will highlight the actual times for that event.
Viewing the School Diary
If you have any further questions please don’t hesitate to contact any of the IT Support team, you can do this by e-mailing ‘IT Support’ within Outlook.
Pag
e5
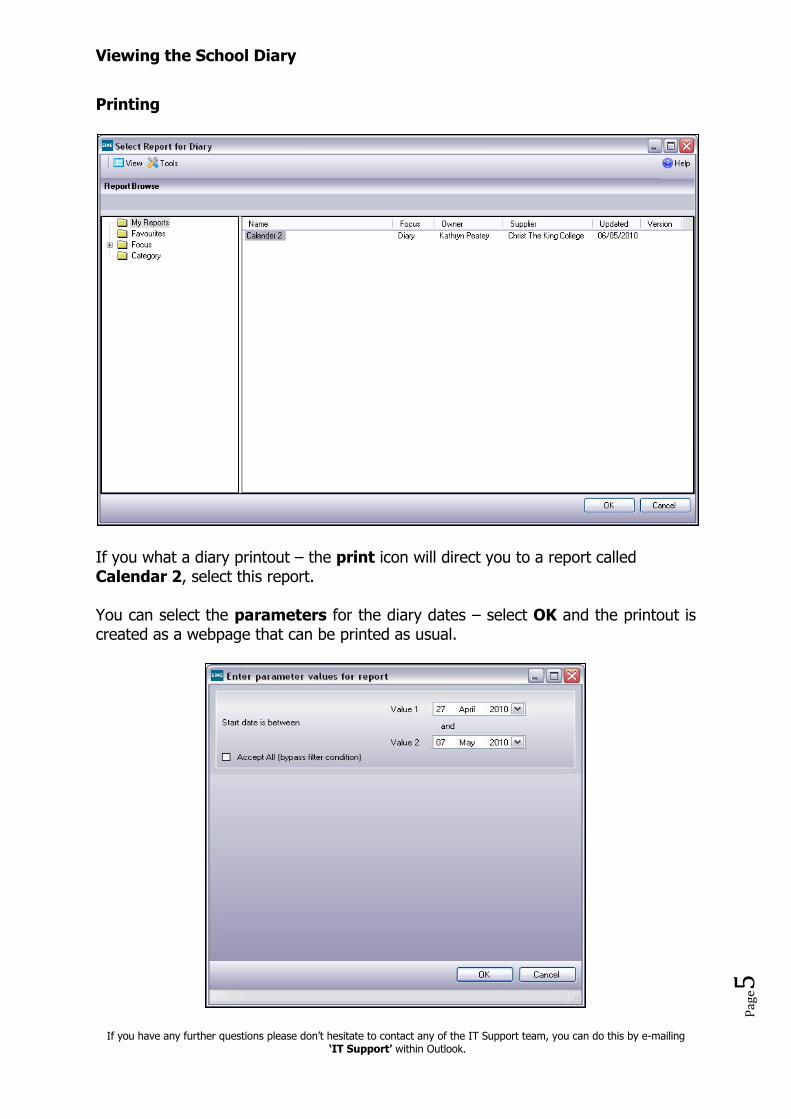
Printing
If you what a diary printout – the print icon will direct you to a report called Calendar 2, select this report. You can select the parameters for the diary dates – select OK and the printout is created as a webpage that can be printed as usual.

(15) Taking a Register that is not assigned to your Homepage (My Classes)
If you have any further questions please don’t hesitate to contact any of the IT Support team, you can do this by e-mailing ‘IT Support’ within Outlook.
Pag
e1
To take a register of a class that has not been assigned to your My Classes Today bar, you first, need to know the name of the teacher that would normally be taking them, then log on to Sims.
Using the Take Register icon on the top menu bar. Open the following window: Select Class
Click on the browse icon in the Surname box, type in the teachers name (or first 3 letters) and click Search – see next page.

(15) Taking a Register that is not assigned to your Homepage (My Classes)
If you have any further questions please don’t hesitate to contact any of the IT Support team, you can do this by e-mailing ‘IT Support’ within Outlook.
Pag
e2
This screen appears, select the session you wish to register and click OK.
The register for that session will upload.

TAKING A REGISTER - “USER DEFINED GROUP”
1
Log on to Sims Focus Lesson Monitor
Edit marks – see screenshot
In the Group Type box select User Defined Groups View - select Sessions Then click Search See screenshot
Then select Registration group e.g. RED 1 Take register.

(14) Saving, Printing and Deleting Messages from SIMS Hompage
If you have any further questions please don’t hesitate to contact any of the IT Support team, you can do this by e-mailing ‘IT Support’ within Outlook.
Pag
e1
SIMS homepage showing My Messages box. This box can quickly become full of messages that you might want to save a copy of, delete or print. Once it is full it blocks other messages being seen.
Using these tools you can Configure the refresh rate – how often you want your messages to be updated Print the details of the message Expand the window to see all the details of the message – double clicking on the message will also open it.
What a print message looks like with just the message details, not the text. To print this you would go to File >Print etc.
Printing and saving a message can be done at the same time.

(14) Saving, Printing and Deleting Messages from SIMS Hompage
If you have any further questions please don’t hesitate to contact any of the IT Support team, you can do this by e-mailing ‘IT Support’ within Outlook.
Pag
e2
Open the message Read Message window Click >Print. This window will open, using File > Print etc to make a hard copy of the entire message.
Or to save a copy File >Save As.. it can be saved as a webpage which you can give a new filename to and save on the network in your My Documents. NB: it will not save as a favourite in Explorer – as the next message you try to save this way over-writes the previous URL- even if you change its name!

Deleting Messages from your SIMS homepage
If you have any further questions please don’t hesitate to contact any of the IT Support team, you can do this by e-mailing ‘IT Support’ within Outlook. 08 October 2009 KPE
Pag
e1
To delete messages from the messages panel on your homepage
The panel is opened to reveal all messages.
The expanded panel can be “cleaned” out of all unwanted messages and the restored to the homepage.
Click to expand
the panel
Select and delete
the message
Click to restore
the panel

CREATING AND SENDING A MESSAGE USING SIMS
1
Uses:- It creates a message on the homepage of SIMs that is seen by that person when logged into SIMS The message is based around a pupil, NOT person to person. A message alert is also sent if the message is High propriety. The SIMs homepage is refreshed every 30 seconds. The message can be replied to, so that the sender knows it has been read. To send a message and receive a message you need to be logged into Sims!
Homepage
Student details
Use the icon Or Focus >Student>Student details

CREATING AND SENDING A MESSAGE USING SIMS
2
This is the students detail window. You will need to find the student, enter the surname and
click Search or if you know more details add them too, before clicking Search.
If more than one student is found – select the one you want. We are going to look at Alfie’s details

CREATING AND SENDING A MESSAGE USING SIMS
3
The first thing to do is find Alfie’s timetable so we know which staff to send the message to.
Using the LINKS section on the right-hand side – look at his Timetable, take note of the teachers he has for the morning lessons on any given day. Close this window and on the LINKS section click Send Message

CREATING AND SENDING A MESSAGE USING SIMS
4
This is the message window – it already has Alfie’s details in it so you need to Add staff names in the Recipient box – it will take more than one name. You can search for the staff in a search box.
Click Add then OK and the name appears in the Recipient box.
Type you message in the message box and send. Close student details window.
The message will appear in the My Messages on the Homepage of the teacher it was sent to – it updates every 30 seconds. If the message is marked High priority then a message alert appears and a warning sound might be heard – it depends on the receiving computers volume settings. The receiver can send a reply if needed. If you have any further questions please don’t hesitate to contact any of the IT Support team, you can do this by e-mailing ‘IT Support’ within Outlook.