irp (interactive resiliency portal) help guide - ibm · irp (interactive resiliency portal) help...
TRANSCRIPT
Date of last update: 18 Jun 2019
IRP (Interactive Resiliency Portal) Help GuideRelease 5.0
IBM Business Resiliency Services
The material in this document will be helpful in making effective use of IBM BusinessResiliency Services' Interactive Resiliency Portal (IRP).
1. Table of Contents
2. Access to IRP 2.1 Prerequisite for IRP access 2.2 How to obtain an IBM id 2.3 Initial client access to IRP 2.4 Link to IRP 3. Hints and tips4. Dashboard5. User management 5.1 View a user 5.2 Add a user 5.3 Modify a user 5.4 Delete a user 5.5 Define a "default" Client Coordinator 6. Contracts 6.1 Configuration 6.2 Services 6.3 Dates 6.4 Scheduled exercises 6.5 Summary 6.6 Charge list report 6.7 Usage report 6.8 Usage simulator 7. Document management in IRP (a general discussion)8. Scheduled exercises & docs 8.1 Overview of exercise document management 8.2 Team assignments (used to route notifications) 8.3 Worksheet management 8.4 Manage "Setup document" 8.5 Document versioning 8.6 Copy a document
9. Non-exercise documents 9.1 Uploading a non-exercise document 9.2 Downloading a non-exercise document; Comment log; Versioning 9.3 Versioning for a non-exercise document 9.4 Linking a non-exercise document to a work order 9.5 Document tagging 10. Exercise requests 10.1 Create a new exercise request 10.2 View existing requests or drafts 10.3 Saving and editing a request draft 11. Worksheet templates12. Personnel13. Notifications14. My profile 14.1 Assign a backup 15. Usage of IRP to Manage Declaration Authorization 15.1 Creating / updating declaration authorization 15.2 Individual users can create/update their own "User confirmation code" 15.3 The Admin can create a "Company declaration pass code" 16. Related links in navigation 16.1 IRP Help 16.2 IBM Business Resiliency Services 16.3 Service Request Tool / Orchestra 16.4 Declaration number 17. FAQs18. Glossary
2. Access to IRP2.1 Prerequisite for IRP access
A user must have an IBM id and be a client of IBM Business Resiliency Services.
2.2 How to obtain an IBM id
If a user has an IBM id, this step is not needed. If not, then follow these steps. It's preferable to assign your primary work email address tobe your IBM id. Step 1: Go to and click on the "human icon" and select "Sign in".www.ibm.com
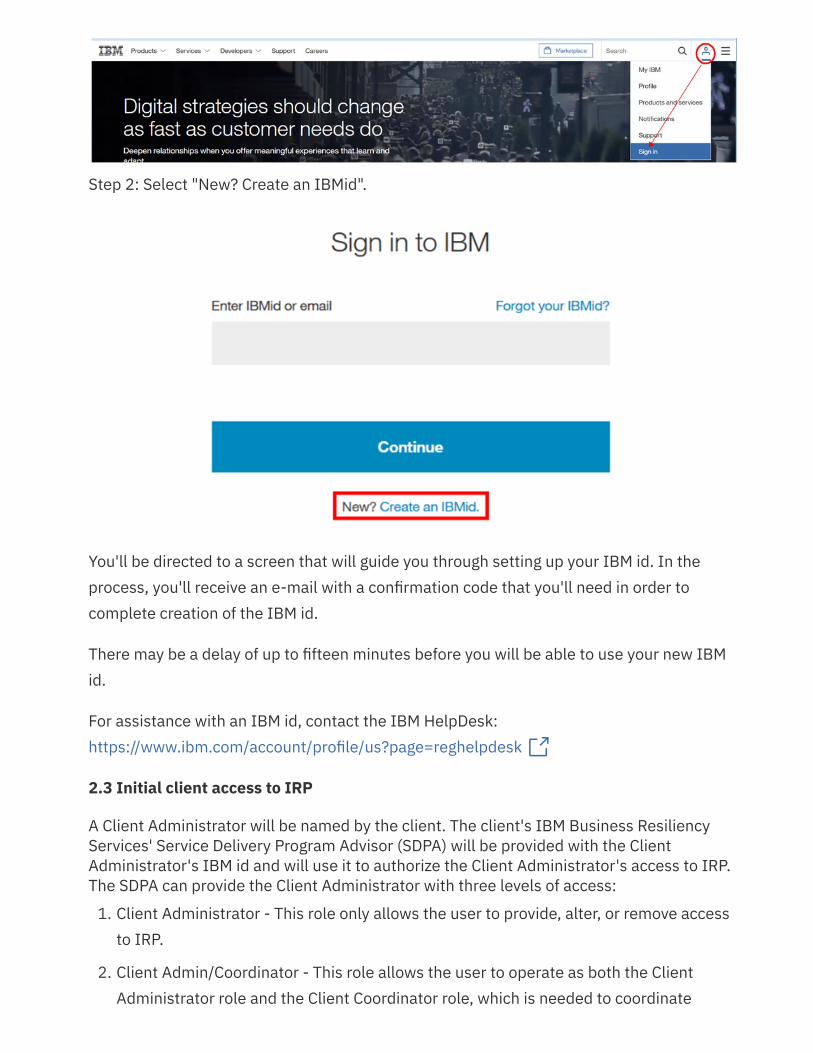
Step 2: Select "New? Create an IBMid".
You'll be directed to a screen that will guide you through setting up your IBM id. In theprocess, you'll receive an e-mail with a confirmation code that you'll need in order tocomplete creation of the IBM id.
There may be a delay of up to fifteen minutes before you will be able to use your new IBMid.
For assistance with an IBM id, contact the IBM HelpDesk:
2.3 Initial client access to IRP
A Client Administrator will be named by the client. The client's IBM Business ResiliencyServices' Service Delivery Program Advisor (SDPA) will be provided with the ClientAdministrator's IBM id and will use it to authorize the Client Administrator's access to IRP.The SDPA can provide the Client Administrator with three levels of access:
Client Administrator - This role only allows the user to provide, alter, or remove accessto IRP.
Client Admin/Coordinator - This role allows the user to operate as both the ClientAdministrator role and the Client Coordinator role, which is needed to coordinate
https://www.ibm.com/account/profile/us?page=reghelpdesk
1.
2.

worksheets and setup documents with IBM Business Resiliency Services.
Client Admin/Coordinator/Tech - This role allows the user to operate as:
the Client Administrator role
the Client Coordinator role, which is needed to coordinate worksheets and setupdocuments with IBM Business Resiliency Services and
the Client Admin/Coordinator/Tech role, which is useful when a user needs to playa technical role along with performing function of Client Administrator and ClientCoordinator
IMPORTANT: The Client Administrator role is very important, so there should always be abackup, which is the first assignment the Client Administrator should make. If the ClientAdministrator was not initially assigned as Client Admin/Coordinator or ClientAdmin/Coordinator/Tech, the Client Administrator should next assign a Client Coordinator,as that role is required to work with IBM Business Resiliency Services.
2.4 Link to IRP
Once the Client Administrator access is set up by the SDPA, IRP can be accessed using theIBM id via this url:
IMPORTANT: Copy this url into your browser and execute to get to the IRP signon screen.Do NOT bookmark it yet. Only bookmark the url obtained AFTER signing on. Bookmarkingbefore signing on will present an error message when you subsequently try to log on.
3. Hints and tips
IRP is a single sign-on application. The session is closed when the browser is closed;not just a tab in the browser, but the entire browser. The other way to log out mayrequire two steps. First, in the upper right of the screen, click on the person icon andthen click on the "log out".
3.
••
•
https://www.ibm.com/services/us-en/it-services/business-continuity/resiliency-portal
1.

Then you'll be presented with this screen which may require a second "sign out".
Navigation
The browser back arrow has been disabled. When you are nested in function, nearthe top of the screen you'll see a rectangle with a left arrow that will take you backa level. It looks like this:
From wherever you are in IRP, the navigational area on the left side of the screenoffers movement to any of the main functions
From the Dashboard, you can use the portlets to access subsets of a function
As you nest into a function, you'll see "bread crumbs" at the top of the screen. Itshows the screens you went through to get where you are. Click on any one ofthem and it will take you back to that point. It looks like this:
Searching and Sorting
See the "Contracts" section for information as to how this works. Searching andSorting works the same in all parts of IRP.
4. DashboardThe Dashboard is composed of a navigational area on the left, which is always available forfast path access to IRP functions, and portlets that can be used to directly access subsetsof information related to each function. All IRP users have access to six portlets("Contracts", "Scheduled exercises & docs", "Non-exercise documents", "Templates","Personnel", and "Reference center").
The "User management" portlet is only available to a user with Client Administrator,Client Admin/Coordinator, or Client Admin/Coordinator/Tech roles.
The "Exercise request" portlet is only available to a user with Client Coordinator,Client Admin/Coordinator, or Client Admin/Coordinator/Tech roles.
2.
a.
b.
c.
d.
3.
a.
•
•

5. User management(control of client access to IRP)
Only users with the Client Administrator, Client Admin/Coordinator, or ClientAdmin/Coordinator/Tech roles may add, modify, or delete access to IRP for otherclients. Clients are provided with different roles dependent upon the type of accessneeded. The roles are:
Client Administrator - This role only allows the user to add, modify, or remove accessto IRP.
Client Admin/Coordinator - This role allows the user to play both the ClientAdministrator role and the Client Coordinator role, which is needed to manage/approveworksheets and setup documents with IBM Business Resiliency Services.
Client Admin/Coordinator/Tech – This role allows the user to play the ClientAdministrator role, the Client Coordinator role, and the Client Tech role.
1.
2.
3.

Client Coordinator - This role allows the user to manage/approve worksheets andsetup documents with IBM Business Resiliency Services.
Client Tech - This role can receive notifications about setup documents.
Client Display - This role has "read only" access to IRP.
Client Non IRP User - The role can have contact information stored for reference, butdoes not have access to IRP.
"User management" is accessed from the Dashboard or the navigational area byauthorized personnel as noted above. Here is an example:
5.1 View a user
This can be done by any user from the "Personnel" portlet. It is also available as part of"User management" but for authorized users only. Here is how it would be done from "Usermanagement":
4.
5.
6.
7.
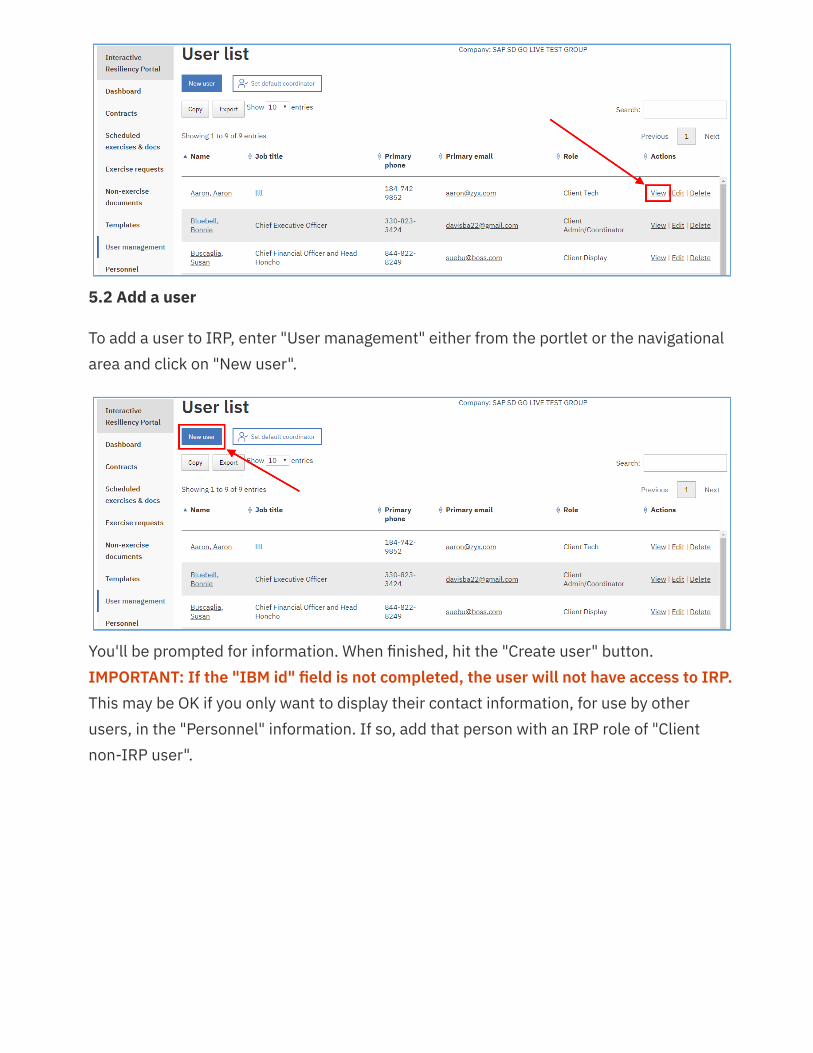
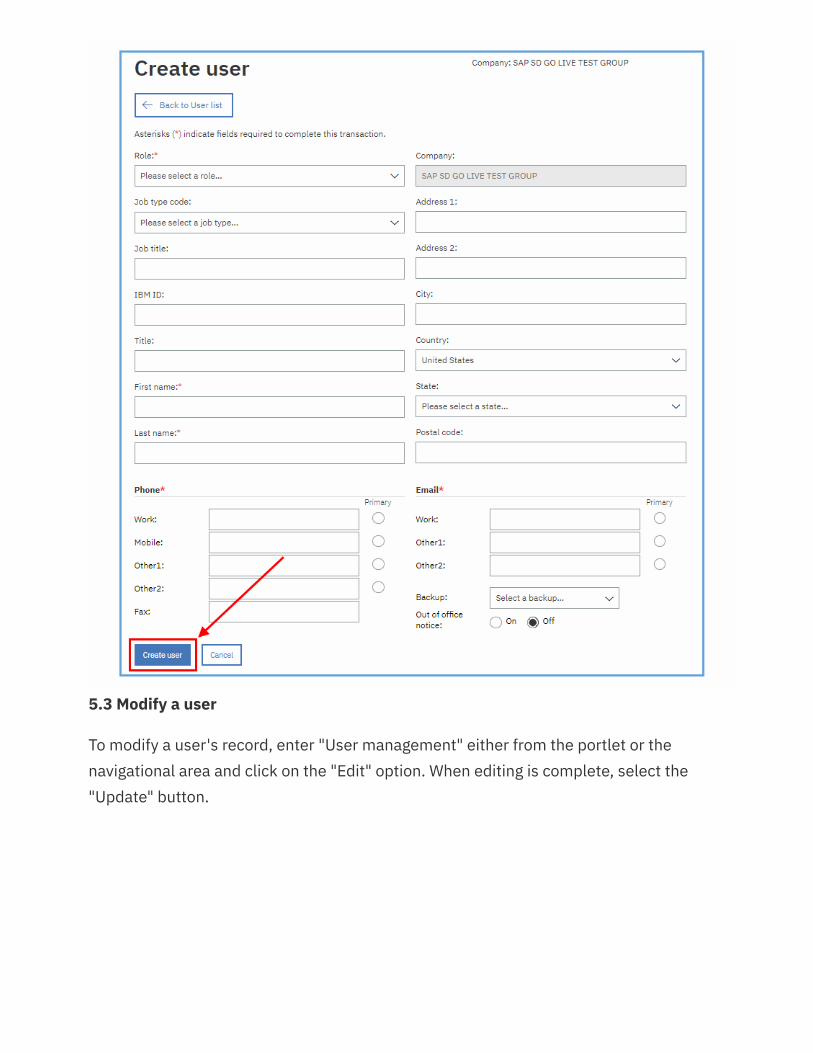
5.2 Add a user
To add a user to IRP, enter "User management" either from the portlet or the navigationalarea and click on "New user".
You'll be prompted for information. When finished, hit the "Create user" button. IMPORTANT: If the "IBM id" field is not completed, the user will not have access to IRP.This may be OK if you only want to display their contact information, for use by otherusers, in the "Personnel" information. If so, add that person with an IRP role of "Clientnon-IRP user".
5.3 Modify a user
To modify a user's record, enter "User management" either from the portlet or thenavigational area and click on the "Edit" option. When editing is complete, select the"Update" button.
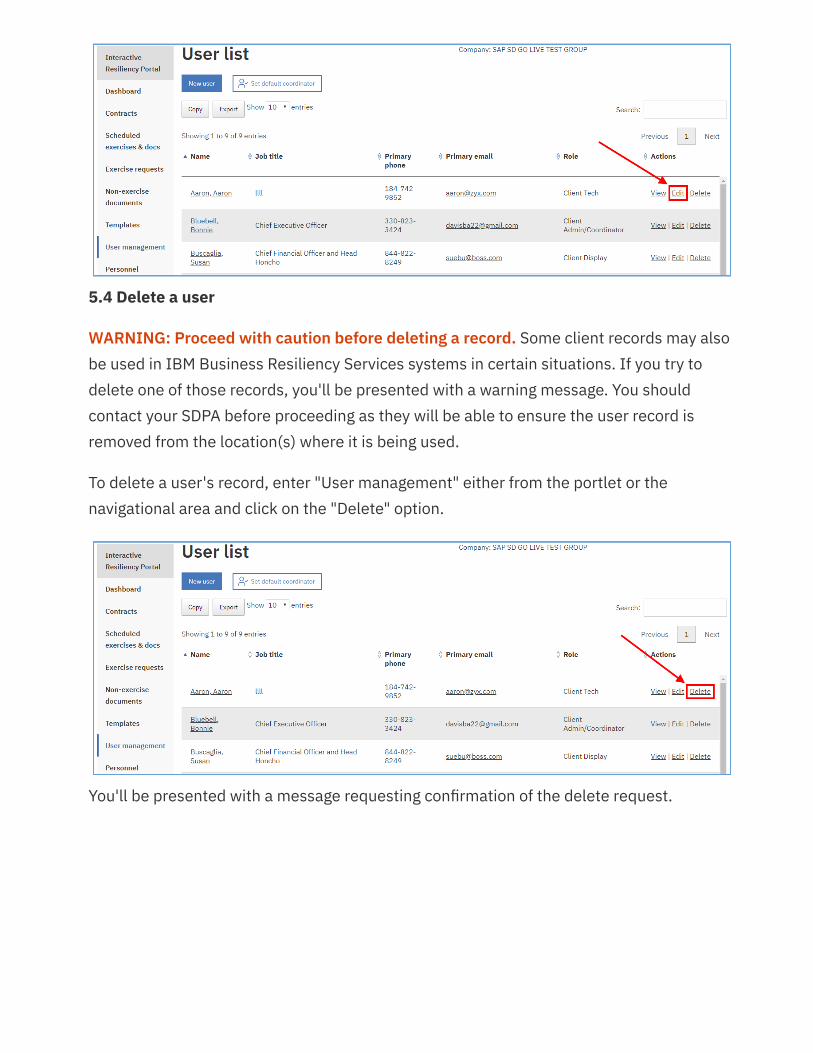
5.4 Delete a user
WARNING: Proceed with caution before deleting a record. Some client records may alsobe used in IBM Business Resiliency Services systems in certain situations. If you try todelete one of those records, you'll be presented with a warning message. You shouldcontact your SDPA before proceeding as they will be able to ensure the user record isremoved from the location(s) where it is being used.
To delete a user's record, enter "User management" either from the portlet or thenavigational area and click on the "Delete" option.
You'll be presented with a message requesting confirmation of the delete request.
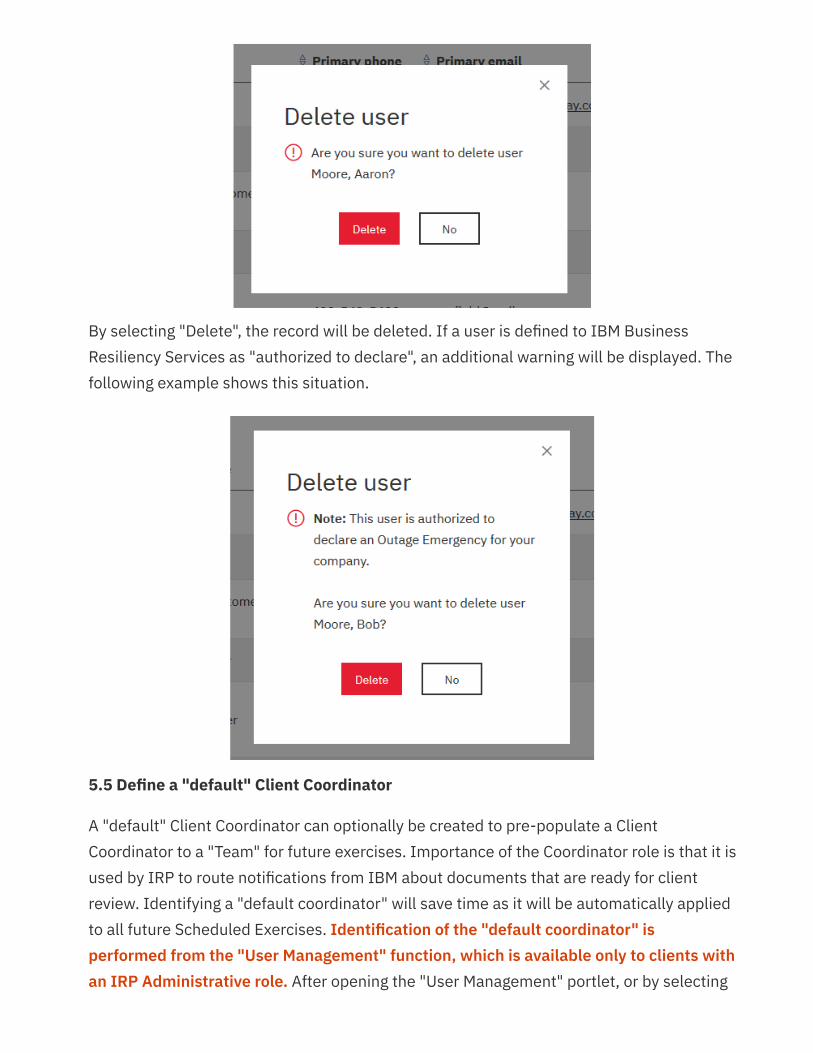
By selecting "Delete", the record will be deleted. If a user is defined to IBM BusinessResiliency Services as "authorized to declare", an additional warning will be displayed. Thefollowing example shows this situation.
5.5 Define a "default" Client Coordinator
A "default" Client Coordinator can optionally be created to pre-populate a ClientCoordinator to a "Team" for future exercises. Importance of the Coordinator role is that it isused by IRP to route notifications from IBM about documents that are ready for clientreview. Identifying a "default coordinator" will save time as it will be automatically appliedto all future Scheduled Exercises. Identification of the "default coordinator" isperformed from the "User Management" function, which is available only to clients withan IRP Administrative role. After opening the "User Management" portlet, or by selecting

"User Management" from the navigational area, you'll see a "Set Default Coordinator"button. Click on that button, select a coordinator, and click on OK.
Clicking on "Set default coordinator" results in this window where the default ClientCoordinator can be selected. Choose whether the Client Coordinator will be automaticallyassigned to the "Team" for all future exercises, or only future exercises with no coordinatorassignment. This process removes an extra step for the client and, provides IRP a directcontact for notifications of setup documents needing review.

6. ContractsA user can view much of their contract information from IRP. From the Dashboard, it isavailable either through the portlet or the navigational area.
In this example, I've clicked within the portlet where it shows number of contracts as"Total (4)" and get this result:
Along with currently active contract revisions, contracts with a revision that goes intoeffect in the future would also display. This example doesn't have any "future" revisions in
it as is shown in the "status" column. Five items are highlighted here:
Copy - List is copied to the user’s clipboard for subsequent pasting elsewhere.
Export - List can be downloaded by the user.
Show 10 entries - Using the dropdown allows raising number of contracts on the firstscreen to be raised to either 25, 50, or 100. This can be used to allow all contracts tobe on the first screen. This setting is retained between sessions.
Search - Use any part of a string and the contract list will be reduced to just those rowsthat match the string. For example, in the above screen, a search on “orch” wouldreturn just one row (where Description is “Orchestration – Managed Services). Thesearch works across multiple screens used to provide the entire list.
Sorting (Column Headers) - Sorting of a column is performed by clicking on columnheader or the up/down arrows to their right. As with searching, sorting is performedacross all screens used to provide the list.
Contract - provides a hot link to be opened to show contract details. See below formore on this.
If any effective or end dates are shown as '*', please refer to your contractualdocumentation - For some contracts, the date information is not currently available inthe system. For those, the user should refer to the original contract provided by IBMBusiness Resiliency Services sales.
When selecting a contract from the list, there are five tabs of information (Configuration,Services, Dates, Scheduled exercises, and Summary) that will be described in the followingsubsections.
6.1 Configuration
By clicking on the contract number, more contract information becomes visible. Thisexample shows the result of selecting contract CFTZ90D. Search, sort, and "show entries"function the same here as was explained above for the contract list. The default result isthe contracted configuration (in this example of contract CFTZ90D, which was selected).Note also the "Nickname" which will be explained in more detail following the image.
1.
2.
3.
4.
5.
6.
7.
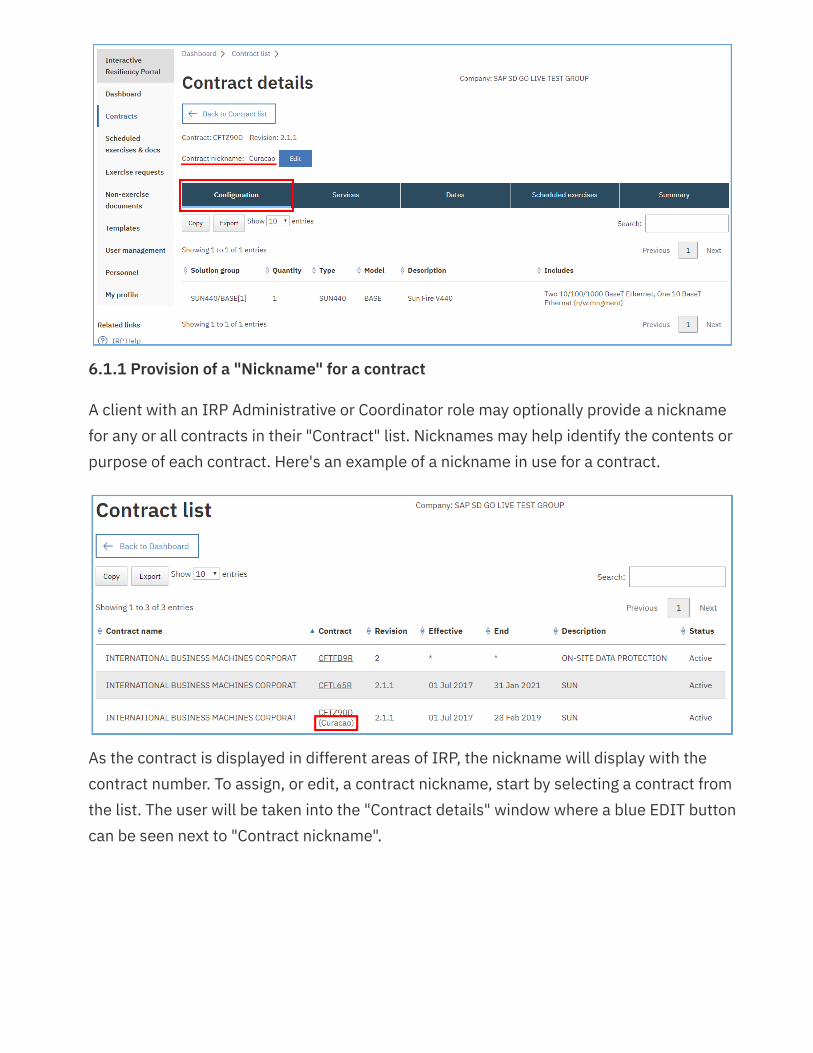
6.1.1 Provision of a "Nickname" for a contract
A client with an IRP Administrative or Coordinator role may optionally provide a nicknamefor any or all contracts in their "Contract" list. Nicknames may help identify the contents orpurpose of each contract. Here's an example of a nickname in use for a contract.
As the contract is displayed in different areas of IRP, the nickname will display with thecontract number. To assign, or edit, a contract nickname, start by selecting a contract fromthe list. The user will be taken into the "Contract details" window where a blue EDIT buttoncan be seen next to "Contract nickname".
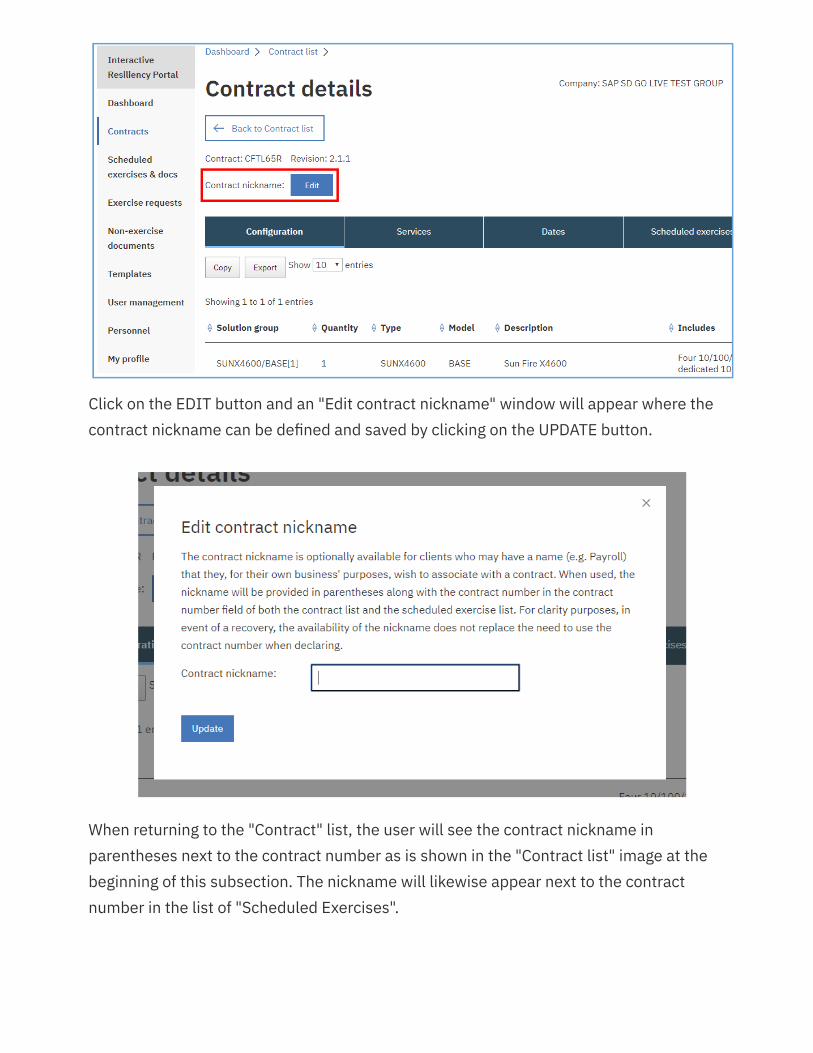
Click on the EDIT button and an "Edit contract nickname" window will appear where thecontract nickname can be defined and saved by clicking on the UPDATE button.
When returning to the "Contract" list, the user will see the contract nickname inparentheses next to the contract number as is shown in the "Contract list" image at thebeginning of this subsection. The nickname will likewise appear next to the contractnumber in the list of "Scheduled Exercises".
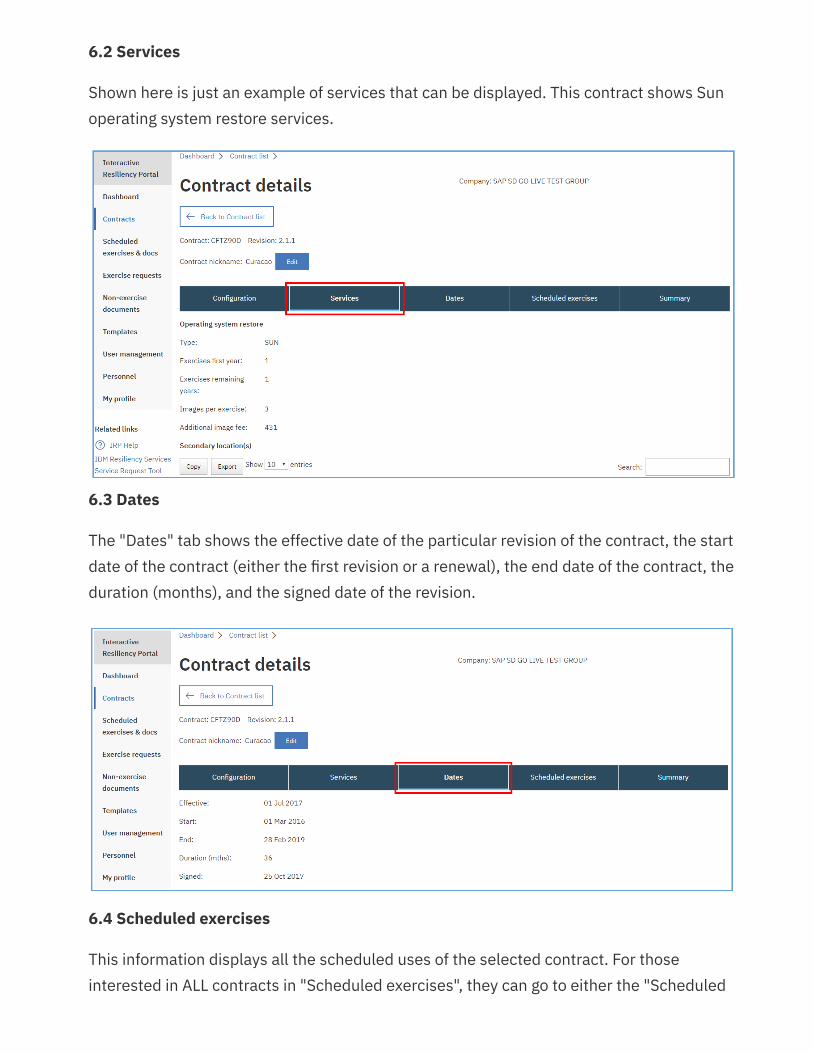
6.2 Services
Shown here is just an example of services that can be displayed. This contract shows Sunoperating system restore services.
6.3 Dates
The "Dates" tab shows the effective date of the particular revision of the contract, the startdate of the contract (either the first revision or a renewal), the end date of the contract, theduration (months), and the signed date of the revision.
6.4 Scheduled exercises
This information displays all the scheduled uses of the selected contract. For thoseinterested in ALL contracts in "Scheduled exercises", they can go to either the "Scheduled
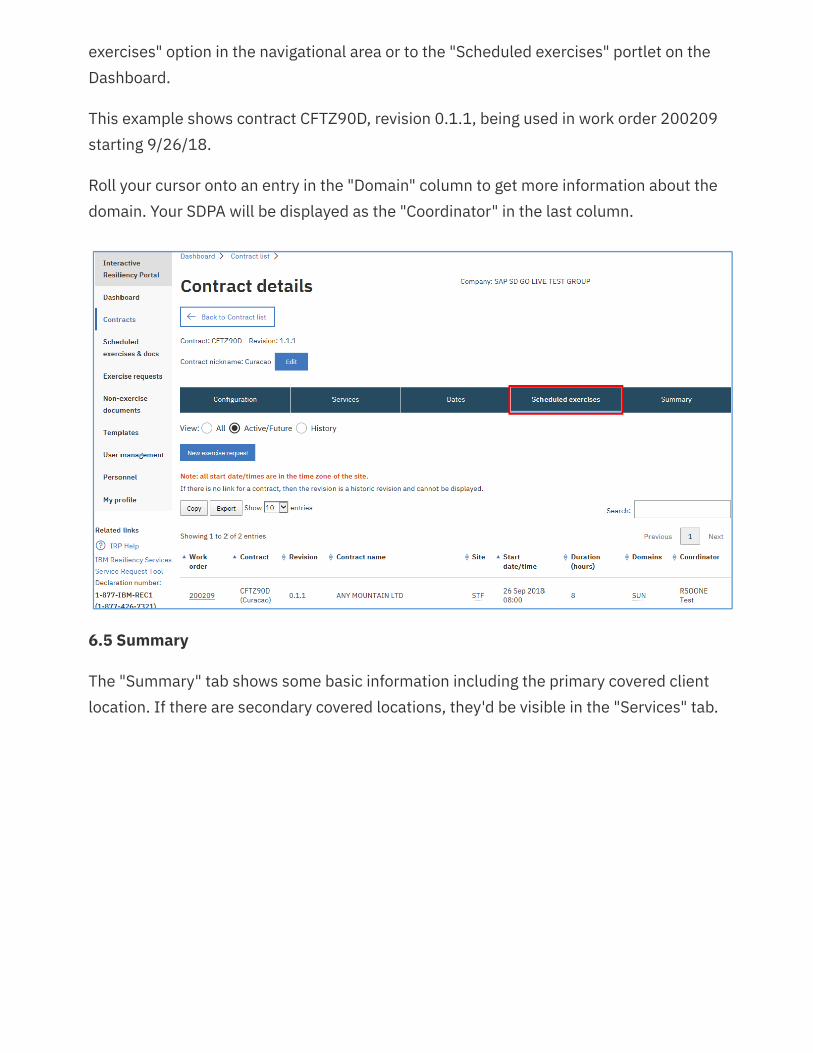
exercises" option in the navigational area or to the "Scheduled exercises" portlet on theDashboard.
This example shows contract CFTZ90D, revision 0.1.1, being used in work order 200209starting 9/26/18.
Roll your cursor onto an entry in the "Domain" column to get more information about thedomain. Your SDPA will be displayed as the "Coordinator" in the last column.
6.5 Summary
The "Summary" tab shows some basic information including the primary covered clientlocation. If there are secondary covered locations, they'd be visible in the "Services" tab.

6.6 Charge list report
Users can view current and past charges associated with contracts by selecting one ormore contract line items from the contract list. Then from the table selection menu, usethe "Charge list" function to view these details.
Below is the Charge list view. Seven items are highlighted here:

Contract toggle - If more then one contract was selected for a charge list report, thesebuttons can be used to toggle (hide/show) row items for specific contracts.
Status - Status of charges shown. Most charges will have event NEW or COMPLETE.NEW charges have been entered in the system but have not yet been reviewed by theSDPA and released to a client. It is important to note that charges may still be underreview and any expected adjustments may not yet have been applied in status NEW.COMPLETE charges have been reviewed and released to the client.
Released date - Released date shows the date the charge was validated by the SDPAand released to the client. NEW charges will show "Not released yet" in this field.
Charge Type – Type of charge associated with event. This field can show chargesassociated with exercise hours or additional services, for example, mediamanagement.
Actual and Assessed – Actual charges shows charges generated for the event withoutany modification. Assessed charges represents the adjusted charges that will beincurred by the client. This can be important in the case of waived or reduced charges.When a client has tested using hours within their Recovery Exercise Allowance, thecharges will show as $0.00.
Event Date – This is the date the charges were incurred. This is usually the exercisedate for the contract.
Action – Action provides additional information using the detail function and the abilityto download the charge statement.
1.
2.
3.
4.
5.
6.
7.

6.7 Usage report
Users can view exercise event and hours usage by selecting a contract in the contract listand using the "Usage report" function from the table selection menu. Note: only onecontract can be selected at a time for this function.
Below is the Usage report view. Four items are highlighted here:
Activity type - Most entries will have Activity type CONTRACT or EXERCISE.CONTRACT shows the hours and events included in the contract in a contract year. Thisentry can be thought of as the "deposit" of the hours in the client's account. EXERCISEis the hours and events used for a specific exercise. This is the "debit."
Exercise hours and events - An exercise uses both hours and an event. These fieldsshow the respective values. "Avail" shows the number of exercises or hours included ineach contract year. Actual allows for the adjustment of the Avail hours, for example,
1.
2.
carryover or borrowed hours would result in a change to the Actual value. Used andRemain show the respective totals for the selected contract and contract year.
Activity Charge – Similar to the charge list, the Actual value shows generated chargeswithout modification. Assessed shows the charge after an adjustment, if applicable.
Action – Action provides additional information using the detail function and the abilityto download the charge statement.
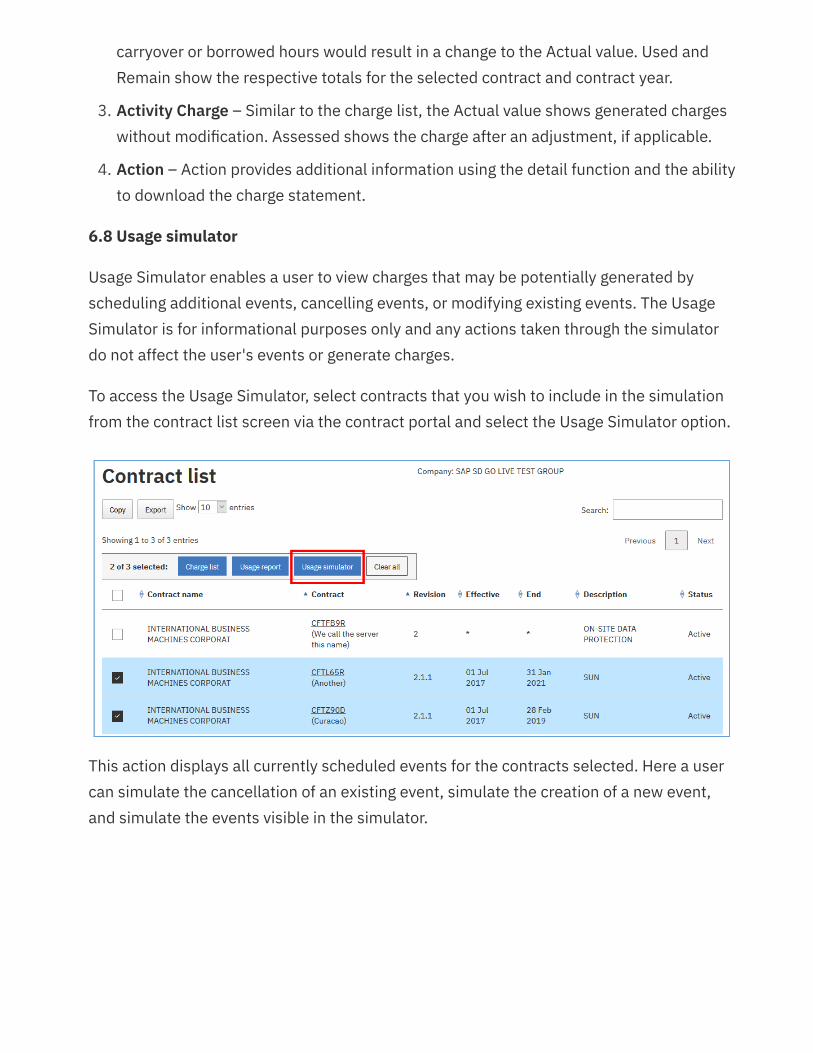
6.8 Usage simulator
Usage Simulator enables a user to view charges that may be potentially generated byscheduling additional events, cancelling events, or modifying existing events. The UsageSimulator is for informational purposes only and any actions taken through the simulatordo not affect the user's events or generate charges.
To access the Usage Simulator, select contracts that you wish to include in the simulationfrom the contract list screen via the contract portal and select the Usage Simulator option.
This action displays all currently scheduled events for the contracts selected. Here a usercan simulate the cancellation of an existing event, simulate the creation of a new event,and simulate the events visible in the simulator.
3.
4.

If a user chooses to create a new work order, the following screen is visible. The user canselect the desired start, duration, and included contracts. This will add the new work orderto the simulation.
A user can also choose to simulate the cancellation of existing events by selecting theCANCEL action. Below is a view that includes a contract cancelled for work order 200274using the simulator and the newly created event from the previous step. When the user isready to execute the simulation, they can do so using the SIMULATE button on this screen.

Below are the results from a different simulation. In this example, two events have beensimulated (NEW_WO1 and NEW_WO2) and added to the existing event on the schedule.This contract contains 72 hours of testing annually. The example focuses on the exercisehours fields. Many of the values are also available for the exercise events field and use thesame logic.
AVAIL - Hours available for scheduling in the contract allowance at the time of theevent.
EVENT - Hours or duration of the contract event.
1.
2.
USED - Hours exceeding the contract allowance for the contract period. In most cases,these hours generated charges.
REMAIN - Hours remaining in the contract allowance following the scheduled event.
CHARGE - The cost for any events or hours exceeding the contract allowance.
Additional notes on simulations:
A simulation can be modified using the action column in the Usage Simulator. This allowsusers to make changes to the simulation criteria through editing, deleting, or changing thestatus of a simulated event. This can be done when the simulation is being assembled orcan be used after it has been run by using the "Back to Usage simulator" button.
Usage Simulator does not return results for events simulated beyond the current contractperiod. If an event is created beyond the end date of an active contract, the user will seean red exclamation point that provides the text “will expire” when hovered over.
7. Document management in IRP (a general discussion)There are two types of documents managed in IRP:
Exercise documents
Company documents
To effectively use IRP, it's important to understand the difference.
Exercise documents are stored with a particular scheduled exercise as shown in thefollowing "Scheduled exercises & docs" section, where the management of thesedocuments is shown in detail. Exercise document types are:
"Exercise worksheets" and "Access & Media Mgmt Form" (both of which are created bythe client as input to exercise planning)
"Setup documents" (which are created by IBM and used to execute the exercise)
Exercise documents are found by going to "Scheduled exercises & docs" to viewdocuments attached to a particular work order. Refer to the "Scheduled exercises & docs"section for details.
Non-exercise documents, while possibly used in support of an exercise, are notassociated with a single exercise as are "exercise documents". Non-exercise documents
3.
4.
5.
••
•
•
are intended to be useful at any point in time, particularly in the event of a recovery. To beeffective in their use, non-exercise documents need to be managed in synch with changesmade in the client’s production environment. Refer to the "Non-exercise documents"section for details.
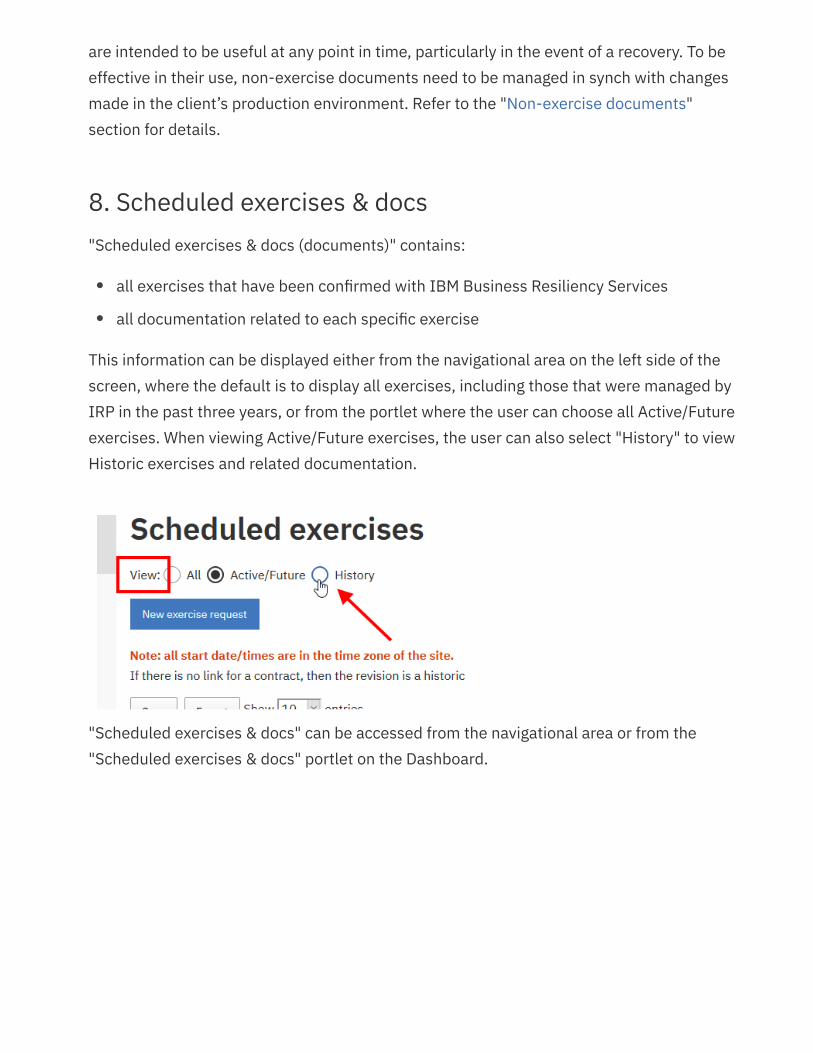
8. Scheduled exercises & docs"Scheduled exercises & docs (documents)" contains:
all exercises that have been confirmed with IBM Business Resiliency Services
all documentation related to each specific exercise
This information can be displayed either from the navigational area on the left side of thescreen, where the default is to display all exercises, including those that were managed byIRP in the past three years, or from the portlet where the user can choose all Active/Futureexercises. When viewing Active/Future exercises, the user can also select "History" to viewHistoric exercises and related documentation.
"Scheduled exercises & docs" can be accessed from the navigational area or from the"Scheduled exercises & docs" portlet on the Dashboard.
••

Clicking on "Active/Future" in the portlet would take the user to the following screen whichprovides a list of contracts scheduled in work orders. A work order is a unique number thatlinks one or more contracts in a particular exercise. The list is sorted by date with the nextexercise at the top. In this case, it is work order 200250, which is scheduled to use twocontracts in an exercise starting on 9/26/18.
Clicking on any either of the two occurrences of work order 200250 will take the userto "Work order details" which is where exercise document management is performed.
Clicking on any of the contract numbers will take the user to contract details, whichwas explained in a previous section on "Contracts". IMPORTANT: The revision number (the column to the right of the contract column)uniquely identifies the configuration currently used to allocate resources. It may not bethe same as the revision number for the contract as shown in the Contract view. Moreinformation about the scheduled exercises is available in the Exercise Confirmationletter provided by your SDPA.
•
•

Note in this image the blue button entitled "New exercise request". This is an alternatepath to a function available directly from the Dashboard. It is explained in detail in a latersection entitled "Exercise requests".
8.1 Overview of exercise document management
Aside from displaying scheduled exercises, the most important function performed from"Scheduled exercises & docs (documents)" is uploading of:
Exercise worksheets - created by the client for review and use by IBM BusinessResiliency Services to prepare "setup documents"
Access & Media Management form - created by the client for use by IBM to preparelogistics for the exercise
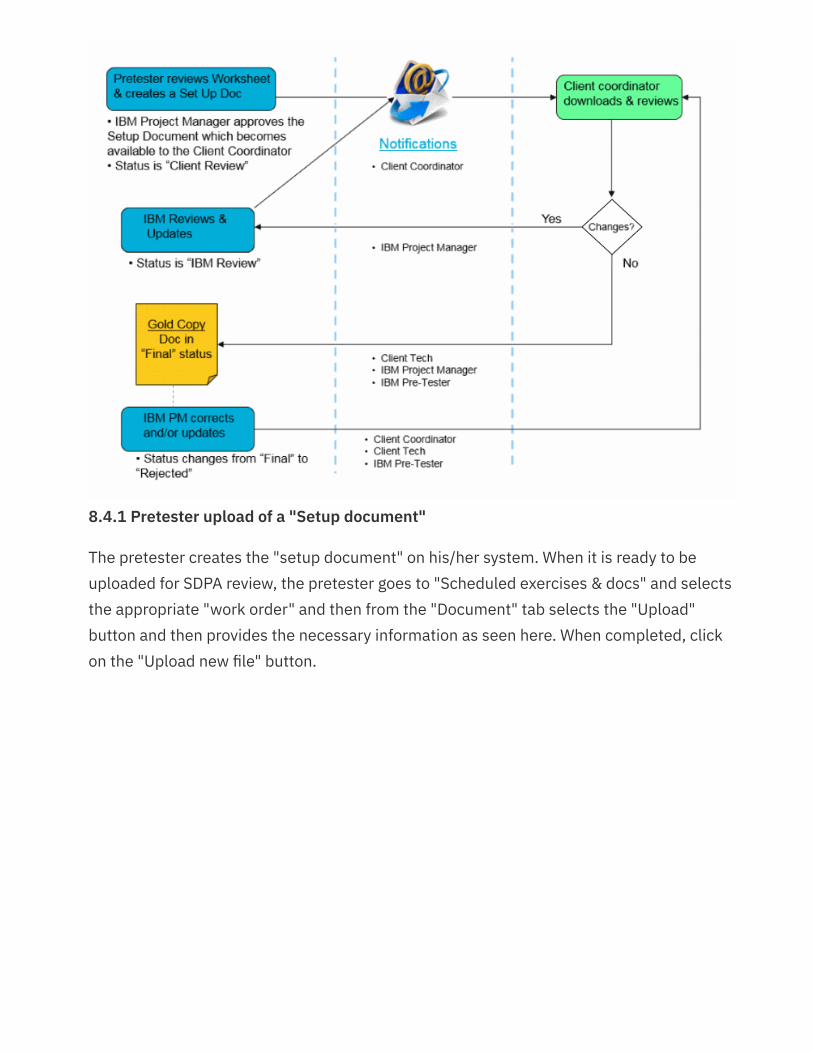
Setup documents - created by the IBM Business Resiliency Services pretester forreview by the client to be used in execution of the exercise. A "setup document" is infinal status only when approved by the client.
Management of these exercise documents is handled via workflow controlled by IRPthrough system controlled notifications and review. Here is a high level diagram of how itworks.
•
•
•

8.2 Team assignments (used to route notifications)
IMPORTANT: Prior to beginning work on pretest review, IRP's "Manage team" functionmust be used to identify participants in the pretest process. IRP will route notifications ofdocument workflow based on team members assigned via "Manage team".
Clicking on the work order number in the "Scheduled exercises" list, will take the user to"Work order details". It is from there that a user can assign pretest team participants. Startby clicking on the "Team" tab and clicking on the "Manage team" button.

Notice the SDPA (Project Manager) is on the team by default. Here is an example of theclient adding the "Client Coordinator" role for this particular exercise. This does not makethis person the "Client Coordinator" for all future exercises. If that is desired, refer to thefollowing section that describes how to set up a "default" Client Coordinator. Also note thatif no "Client Coordinators" are selectable, it means that the Client Administrator needs toadd someone with that role via the "User management" function.

This is the result after clicking on the "Update" button.
To add a "Client Tech", click on the "Manage team" button and look for "Client Tech"options. If no "Client Techs" are selectable, it means that the Client Administrator needs toadd someone with that role via the "User management" function. Assuming there are"Client Techs" in the list, click on the "+" in front of the name, which will open up skills thatthe "Client Tech" would be playing in exercise planning. Select the skills that person willplay and then scroll down and click on the Update button.
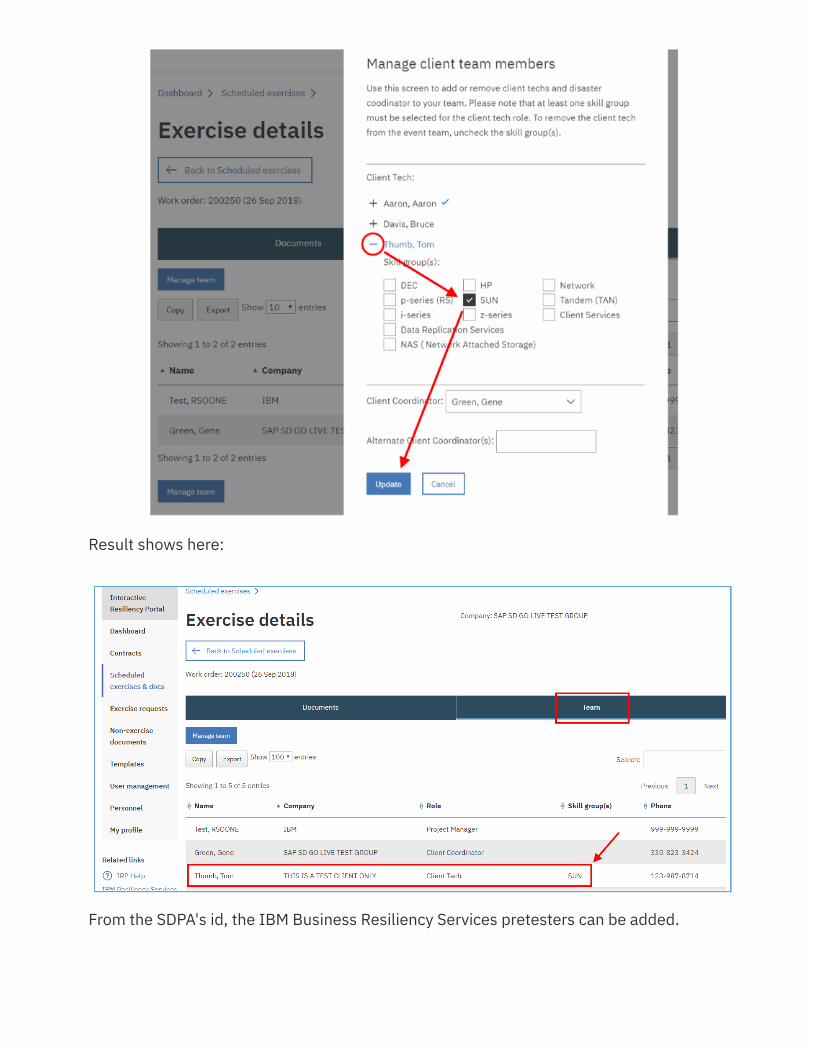
Result shows here:
From the SDPA's id, the IBM Business Resiliency Services pretesters can be added.

8.2.1 Assignment to "Team" of "alternate" Client Coordinator(s)
As an IRP "Coordinator", when you are defining your "Team" for an exercise, you can defineone or more "Alternate Coordinators" from the list of people on your team who have eithera "Client Coordinator", "Client Admin/Coordinator", or "Client Admin/Coordinator/Tech"role in IRP. This will allow notifications related to exercise document review to flow to theperson defined as "Coordinator" on the "Team" as a TO: recipient while those defined tothe "Team" as "Alternate Coordinator" will receive the notification as a CC: recipient.Alternate Coordinators are defined for a single exercise and are assigned as seen in thisscreen shot:
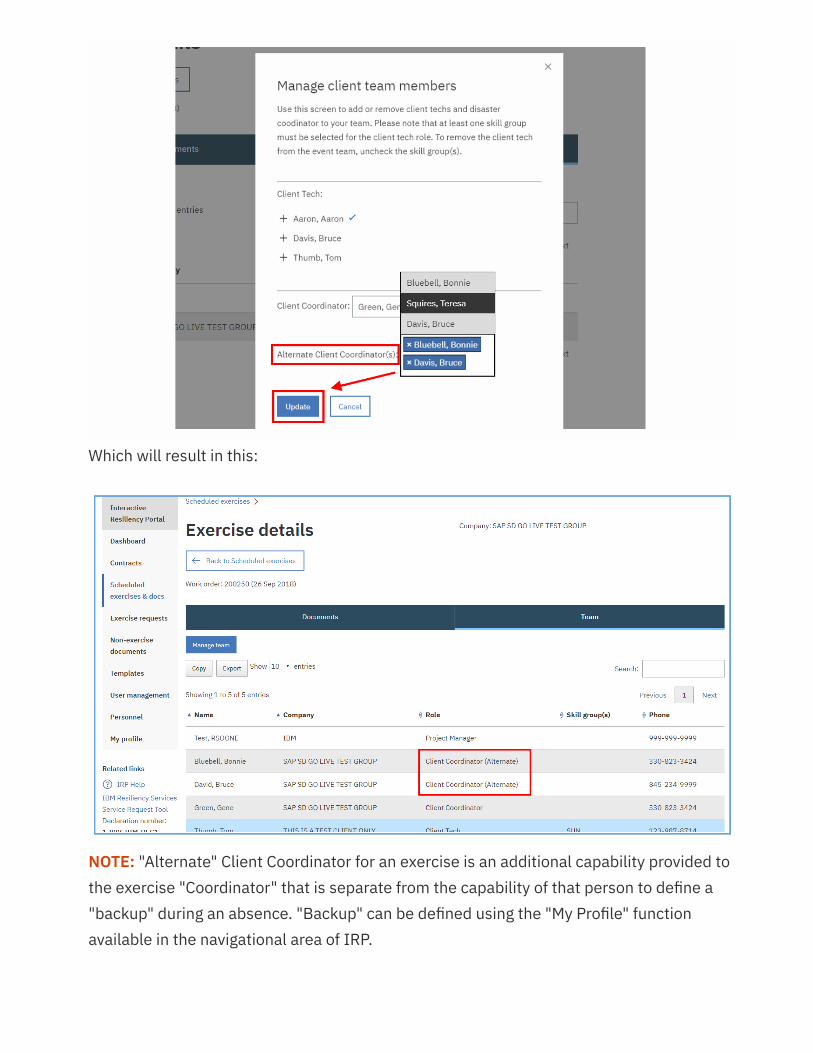
Which will result in this:
NOTE: "Alternate" Client Coordinator for an exercise is an additional capability provided tothe exercise "Coordinator" that is separate from the capability of that person to define a"backup" during an absence. "Backup" can be defined using the "My Profile" functionavailable in the navigational area of IRP.
8.2.2 Assignment to "Team" of a "default" Client Coordinator
A "default" Client Coordinator can optionally be created to pre-populate a ClientCoordinator to a "Team" for future exercises. This is defined in more detail in the "Usermanagement" section.
8.3 Worksheet management
Worksheet templates are available from the "Templates" portlet (covered in a latersection). Clients complete those worksheets on their workstation where they are ready toupload to IRP.
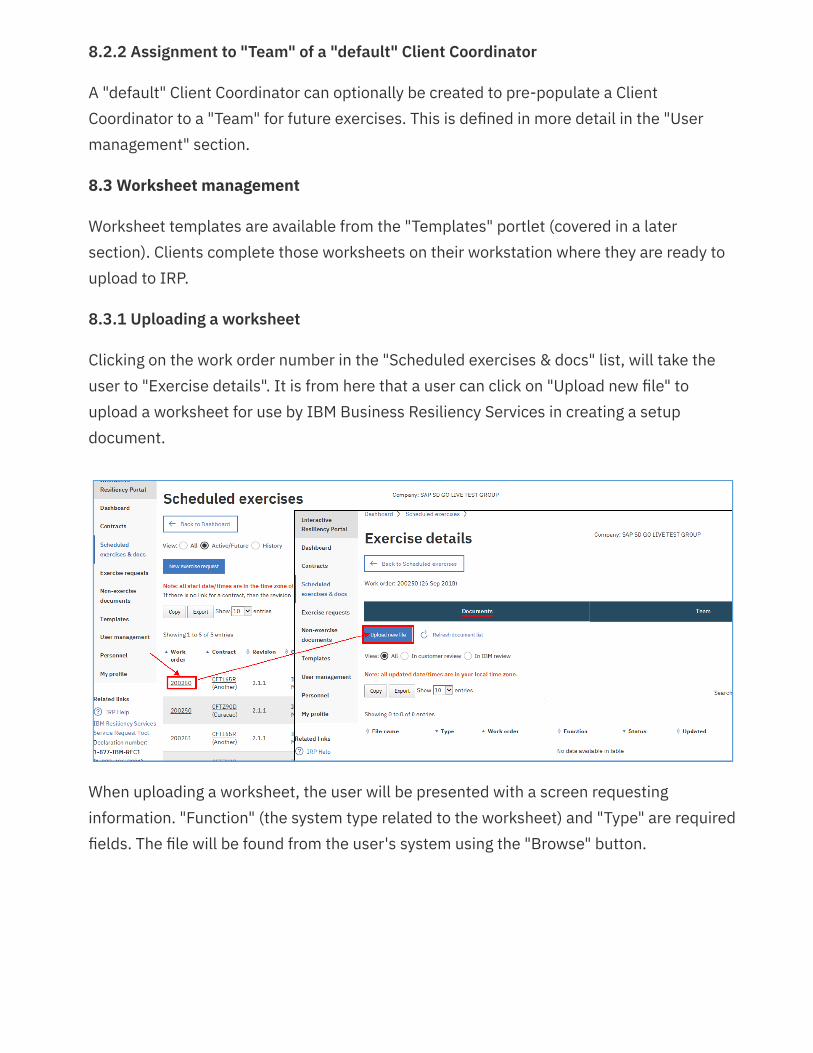
8.3.1 Uploading a worksheet
Clicking on the work order number in the "Scheduled exercises & docs" list, will take theuser to "Exercise details". It is from here that a user can click on "Upload new file" toupload a worksheet for use by IBM Business Resiliency Services in creating a setupdocument.
When uploading a worksheet, the user will be presented with a screen requestinginformation. "Function" (the system type related to the worksheet) and "Type" are requiredfields. The file will be found from the user's system using the "Browse" button.
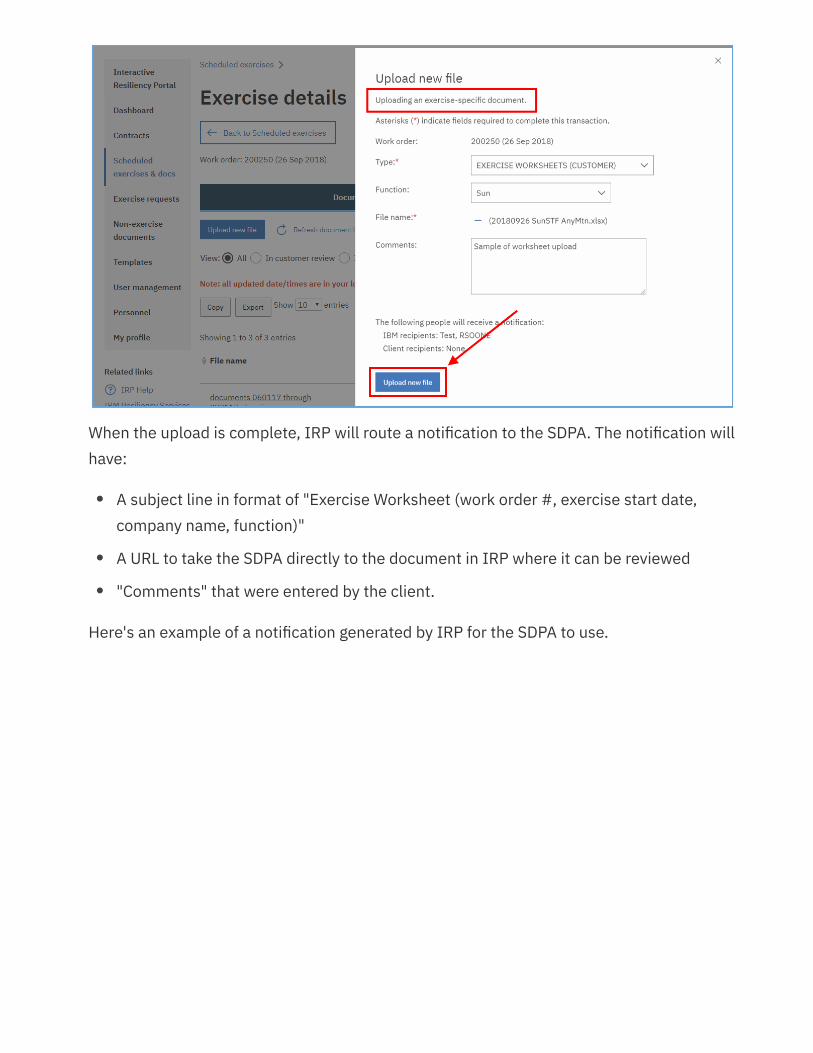
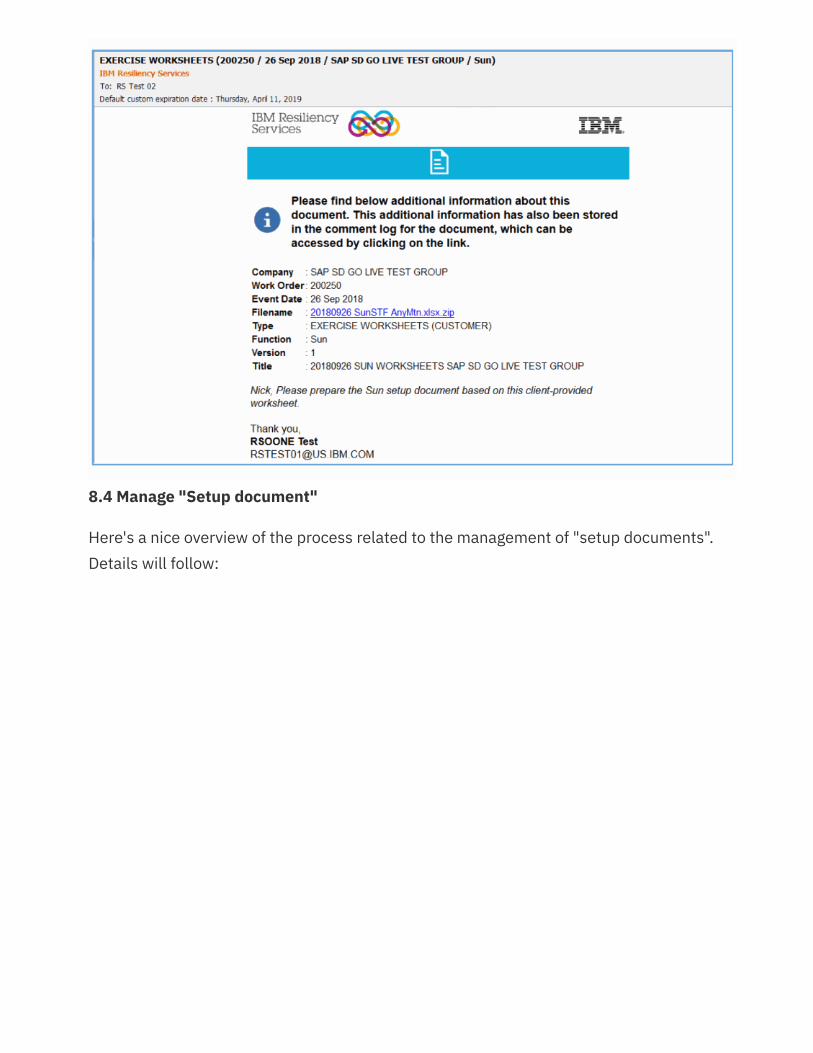
When the upload is complete, IRP will route a notification to the SDPA. The notification willhave:
A subject line in format of "Exercise Worksheet (work order #, exercise start date,company name, function)"
A URL to take the SDPA directly to the document in IRP where it can be reviewed
"Comments" that were entered by the client.
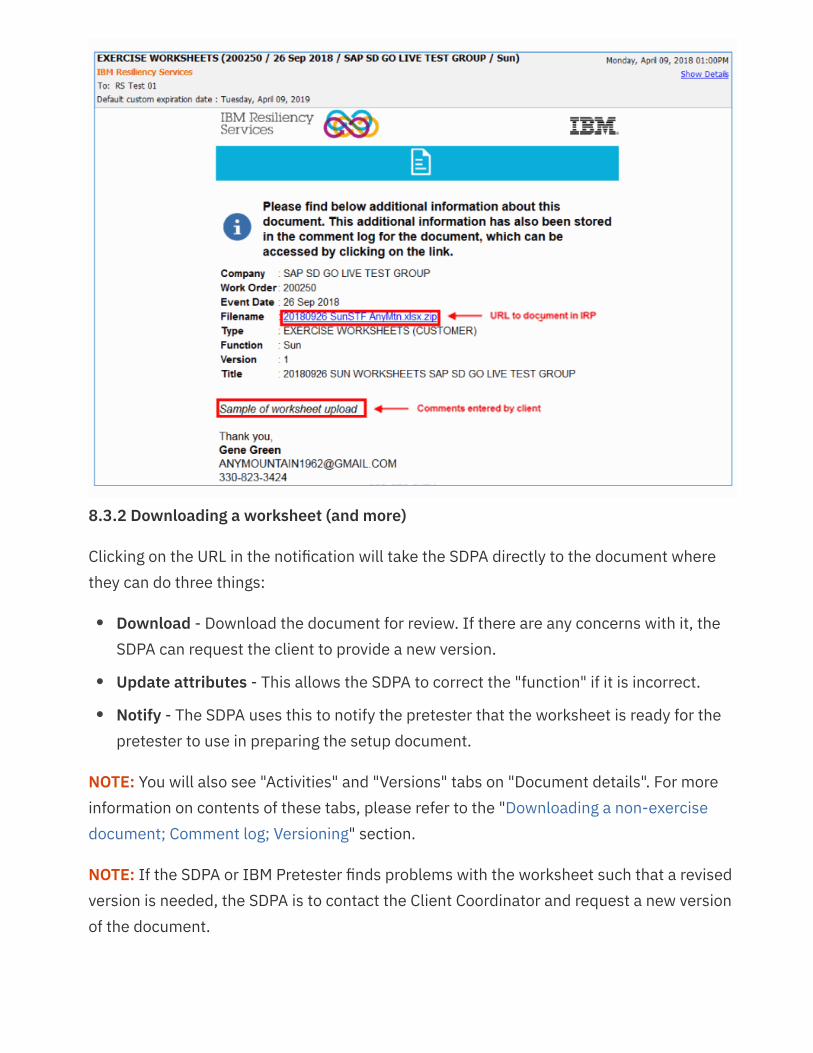
Here's an example of a notification generated by IRP for the SDPA to use.
•
••
8.3.2 Downloading a worksheet (and more)
Clicking on the URL in the notification will take the SDPA directly to the document wherethey can do three things:
Download - Download the document for review. If there are any concerns with it, theSDPA can request the client to provide a new version.
Update attributes - This allows the SDPA to correct the "function" if it is incorrect.
Notify - The SDPA uses this to notify the pretester that the worksheet is ready for thepretester to use in preparing the setup document.
NOTE: You will also see "Activities" and "Versions" tabs on "Document details". For moreinformation on contents of these tabs, please refer to the "Downloading a non-exercisedocument; Comment log; Versioning" section.
NOTE: If the SDPA or IBM Pretester finds problems with the worksheet such that a revisedversion is needed, the SDPA is to contact the Client Coordinator and request a new versionof the document.
•
••
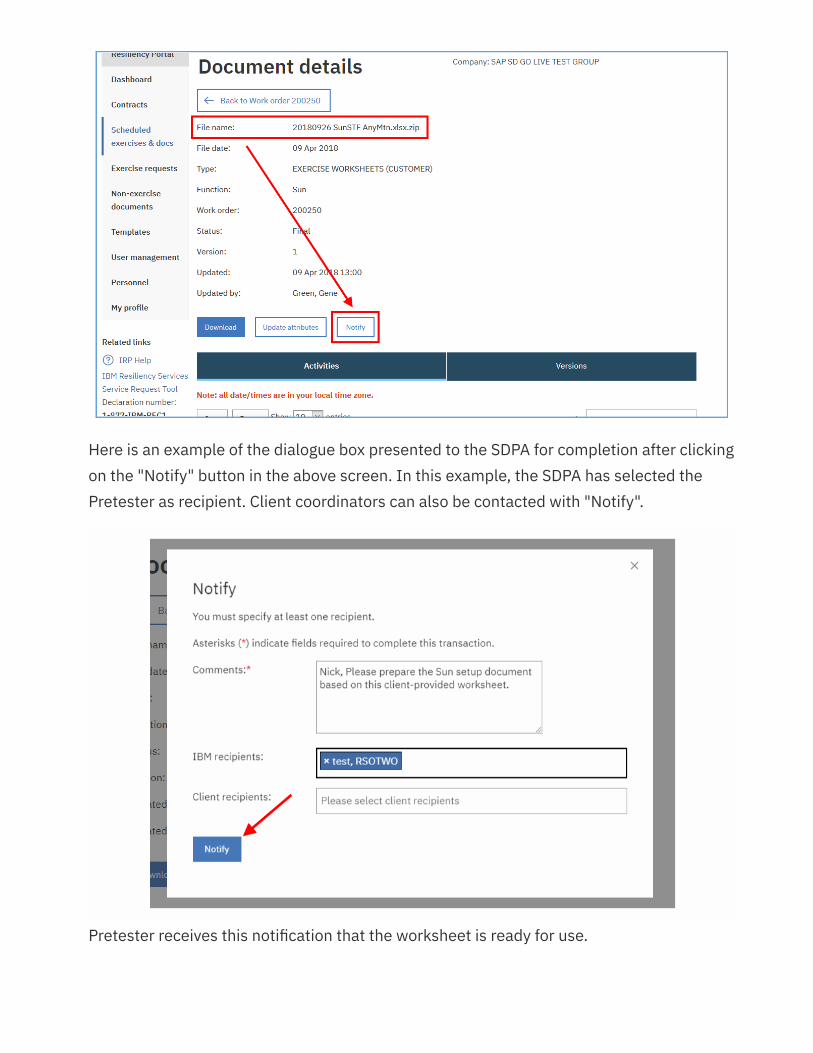
Here is an example of the dialogue box presented to the SDPA for completion after clickingon the "Notify" button in the above screen. In this example, the SDPA has selected thePretester as recipient. Client coordinators can also be contacted with "Notify".
Pretester receives this notification that the worksheet is ready for use.
8.4 Manage "Setup document"
Here's a nice overview of the process related to the management of "setup documents".Details will follow:
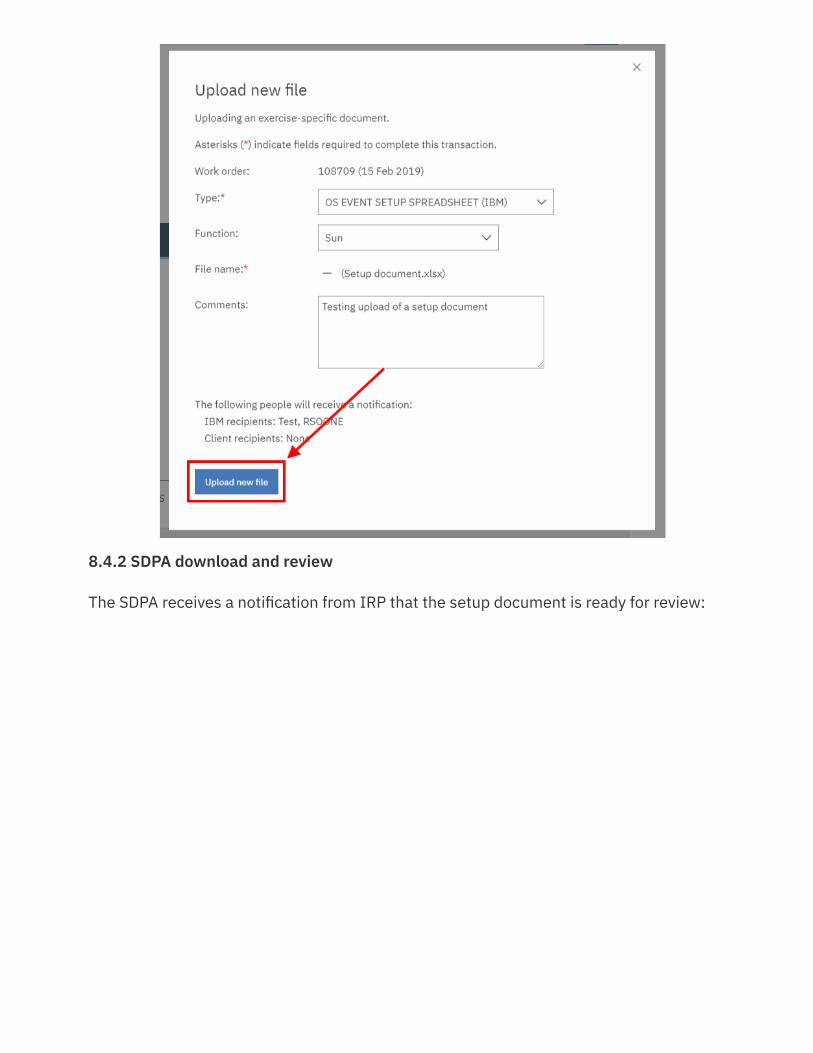
8.4.1 Pretester upload of a "Setup document"
The pretester creates the "setup document" on his/her system. When it is ready to beuploaded for SDPA review, the pretester goes to "Scheduled exercises & docs" and selectsthe appropriate "work order" and then from the "Document" tab selects the "Upload"button and then provides the necessary information as seen here. When completed, clickon the "Upload new file" button.
8.4.2 SDPA download and review
The SDPA receives a notification from IRP that the setup document is ready for review:
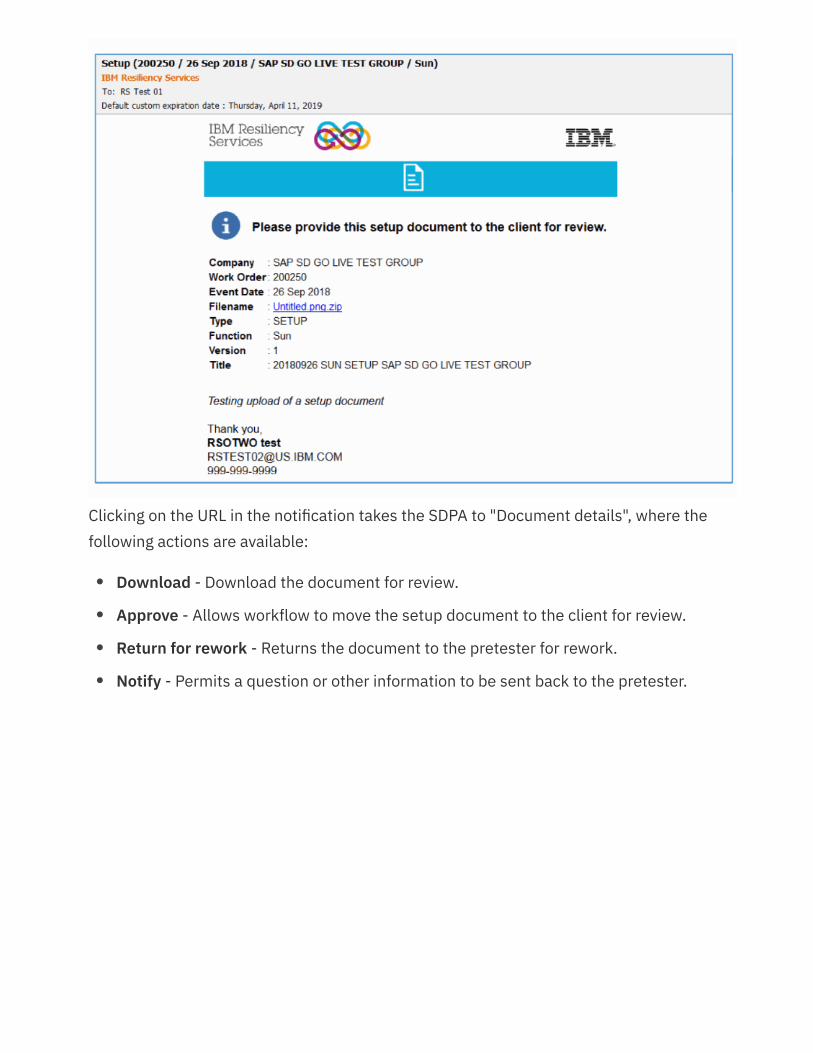
Clicking on the URL in the notification takes the SDPA to "Document details", where thefollowing actions are available:
Download - Download the document for review.
Approve - Allows workflow to move the setup document to the client for review.
Return for rework - Returns the document to the pretester for rework.
Notify - Permits a question or other information to be sent back to the pretester.
••••

When "approving" (in this case) or "returning for rework", comments are required before anotification can be sent. "Return for rework" comments should be sufficient so that theIBM pretester knows what changes need to be made.
8.4.3 Client download and review
The client will receive a notification (same structure as shown in previous notifications)that can be used to go directly to the document for review.
The client can also can go to Documents from "Scheduled exercises & docs" to finddocuments in "Customer Review" status. Here's an image of how this would look.
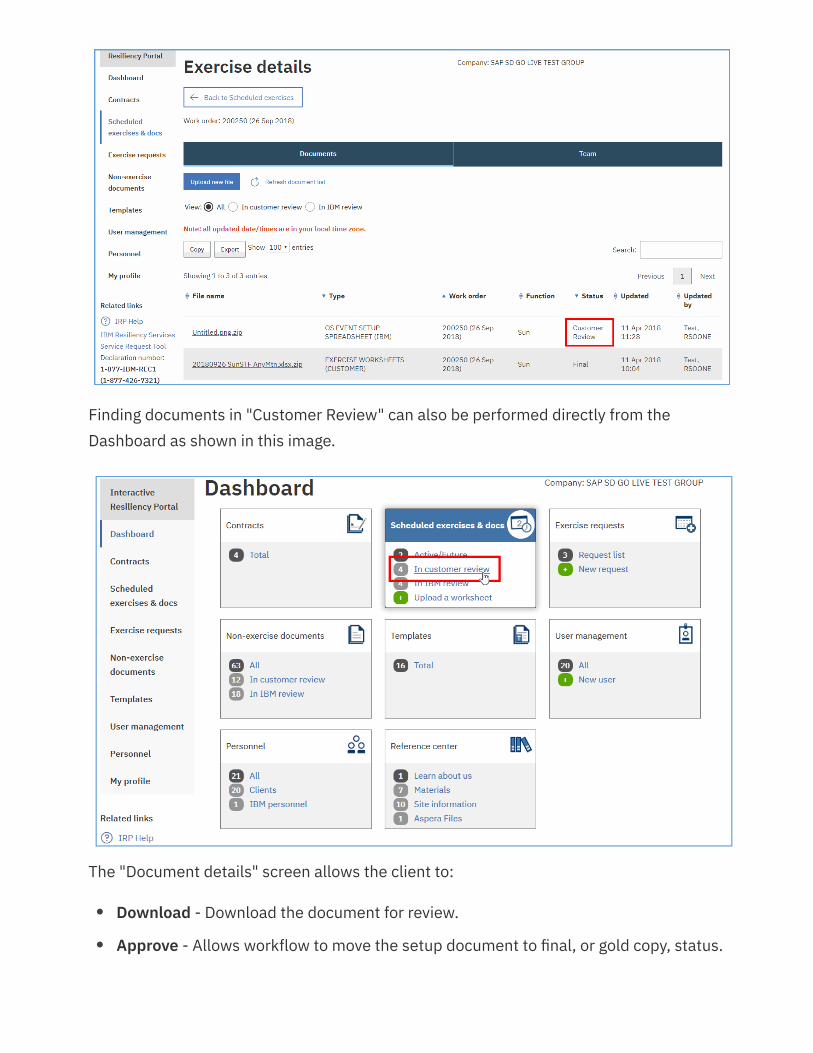
Finding documents in "Customer Review" can also be performed directly from theDashboard as shown in this image.
The "Document details" screen allows the client to:
Download - Download the document for review.
Approve - Allows workflow to move the setup document to final, or gold copy, status.
••
Return for rework - Returns the document to the SDPA for rework. Client is to use"Comments" section of the "reject" window to specify what needs to be done to gainapproval.
Notify - Allows client to pose a question or pass along comments.
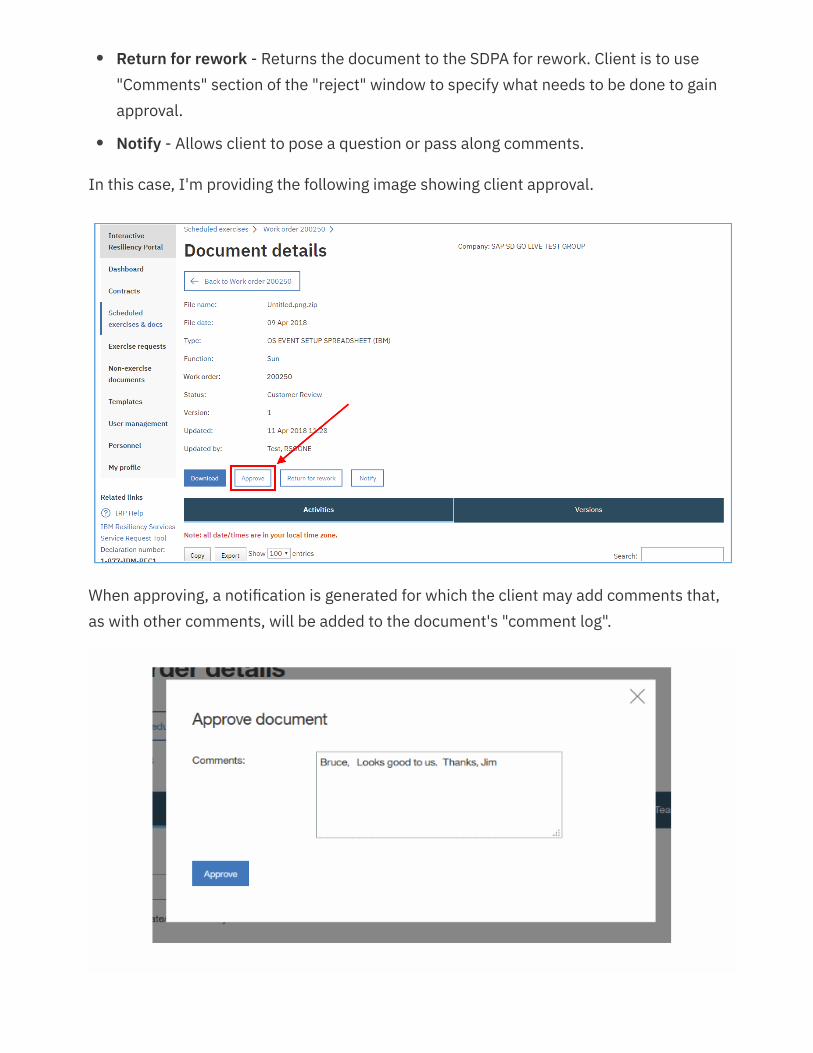
In this case, I'm providing the following image showing client approval.
When approving, a notification is generated for which the client may add comments that,as with other comments, will be added to the document's "comment log".
•
•
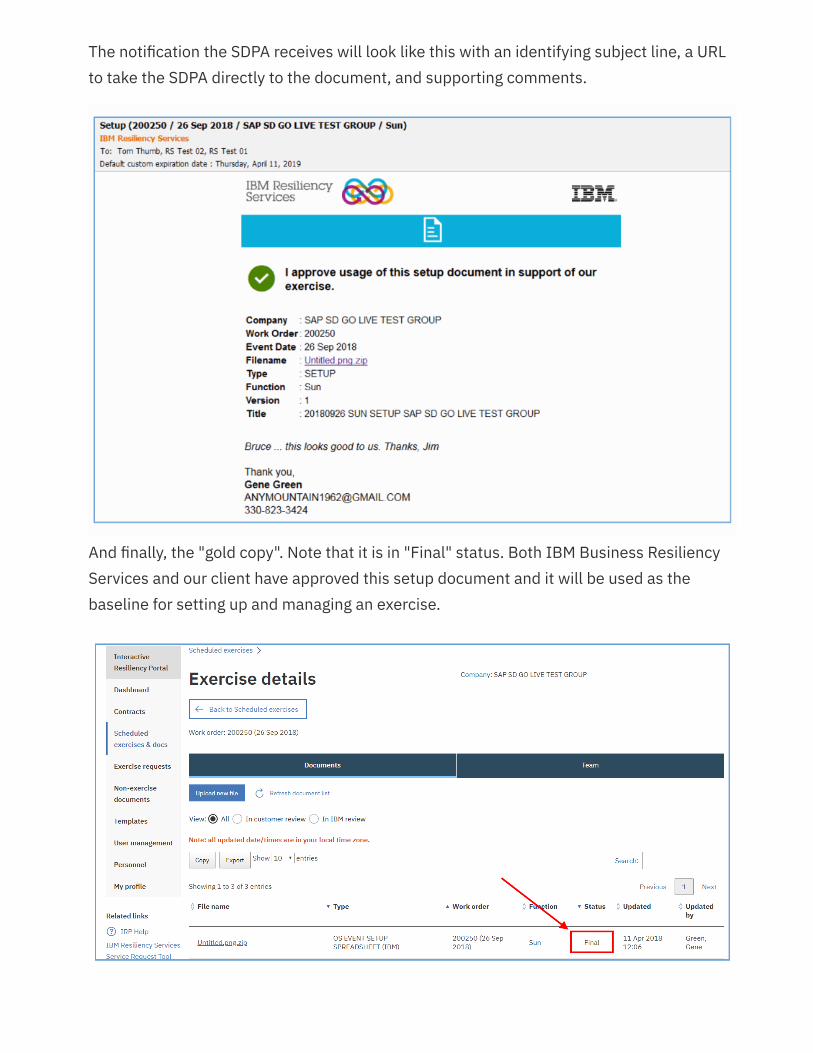
The notification the SDPA receives will look like this with an identifying subject line, a URLto take the SDPA directly to the document, and supporting comments.
And finally, the "gold copy". Note that it is in "Final" status. Both IBM Business ResiliencyServices and our client have approved this setup document and it will be used as thebaseline for setting up and managing an exercise.
8.5 Document versioning
Another important concept to know in effectively managing documents in IRP isversioning. All documents are intended to have a single footprint in IRP document lists.When new versions of a document are uploaded, previous versions of the document dropdown a level, but still remain available if needed. Versioning is supported for both exercisedocuments and non-exercise documents.
Exercise documents are either worksheets created by the Client Coordinator or setupdocuments created by the IBM Business Resiliency Services' pretester. New versions ofthese documents can be created while retaining access to prior versions. From onefootprint in the document list found within "Scheduled exercises", a new version of aworksheet can be created by the Client Coordinator and a new version of a setupdocument can be created by the IBM pretester.
NOTE: An IBM pretester may create a new version of a setup document if it is in either"IBM Review" or "Customer Review" status, by selecting "Return for rework" and providingproper supporting comments.
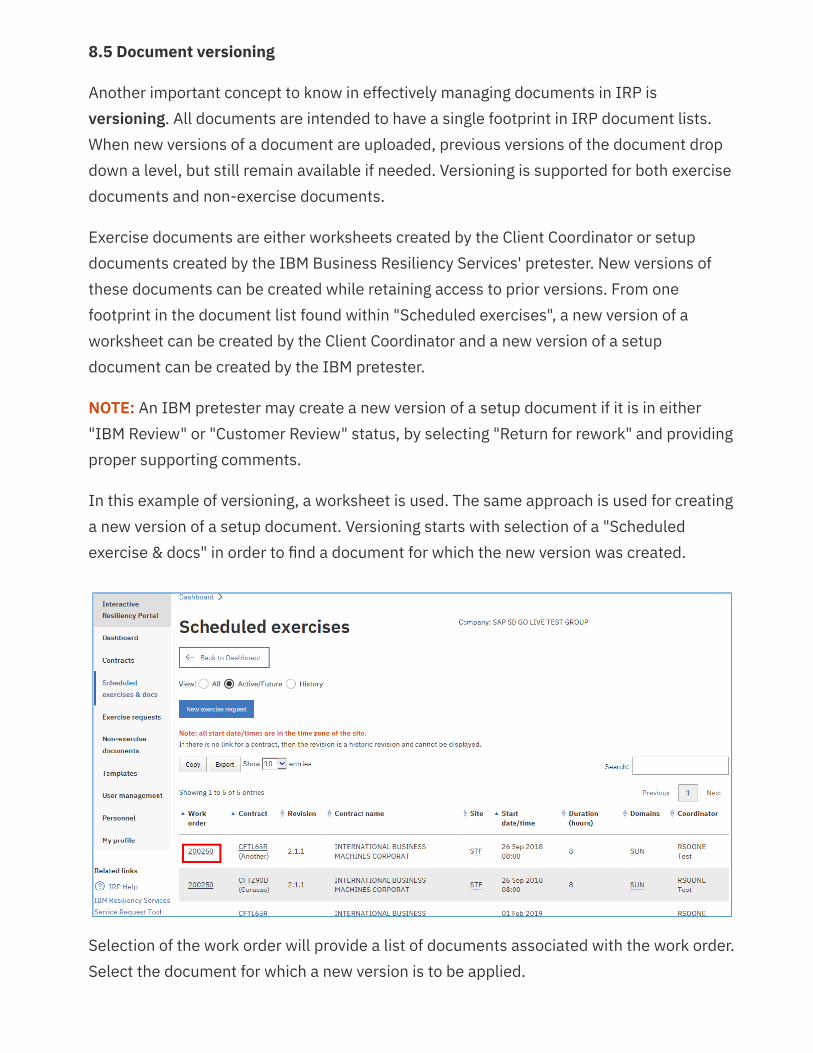
In this example of versioning, a worksheet is used. The same approach is used for creatinga new version of a setup document. Versioning starts with selection of a "Scheduledexercise & docs" in order to find a document for which the new version was created.
Selection of the work order will provide a list of documents associated with the work order.Select the document for which a new version is to be applied.
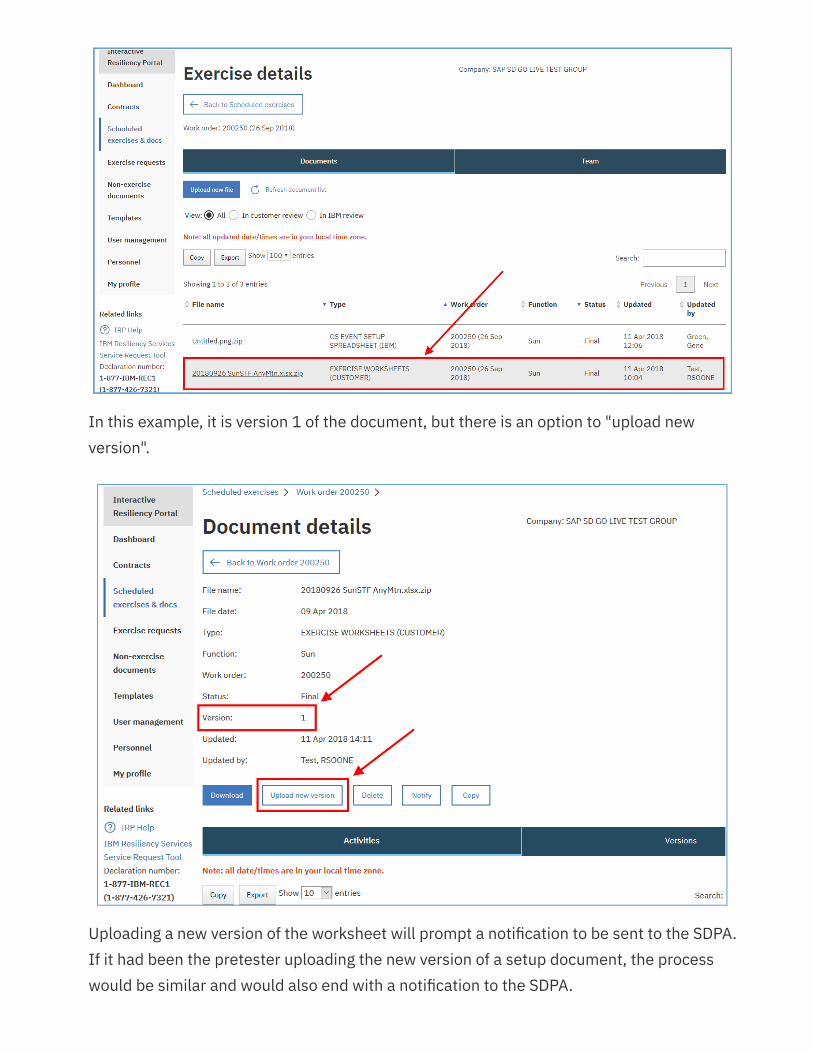
In this example, it is version 1 of the document, but there is an option to "upload newversion".
Uploading a new version of the worksheet will prompt a notification to be sent to the SDPA.If it had been the pretester uploading the new version of a setup document, the processwould be similar and would also end with a notification to the SDPA.
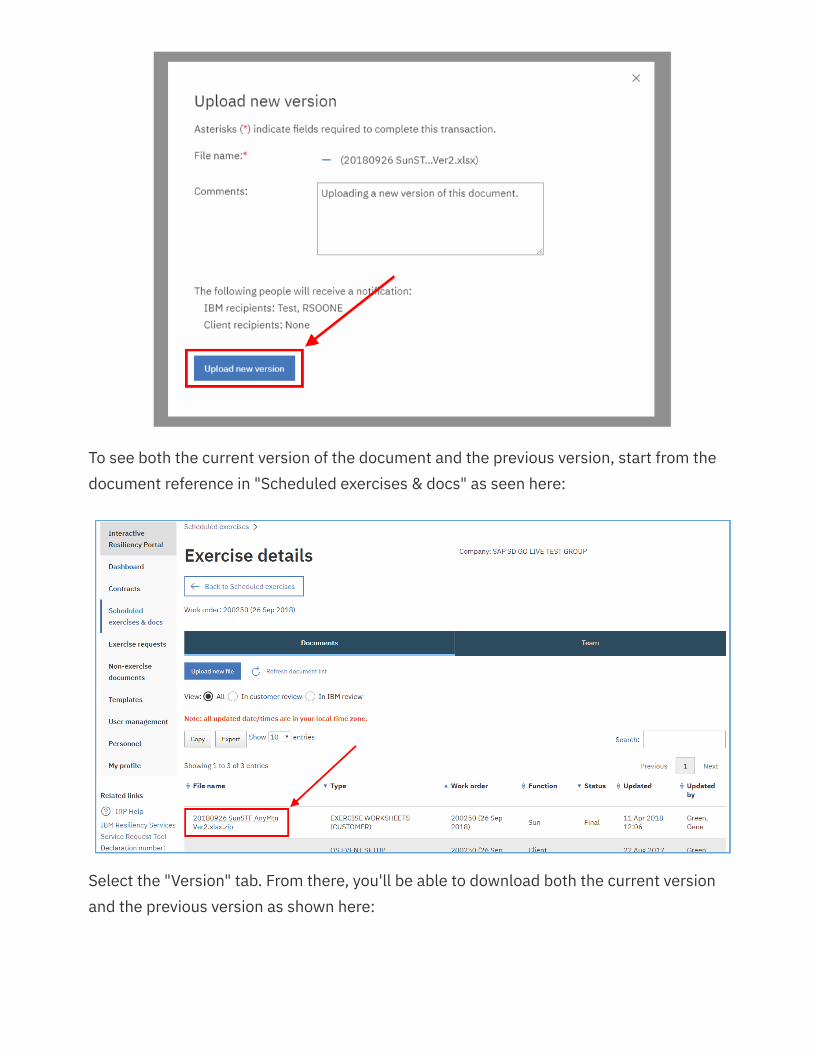
To see both the current version of the document and the previous version, start from thedocument reference in "Scheduled exercises & docs" as seen here:
Select the "Version" tab. From there, you'll be able to download both the current versionand the previous version as shown here:
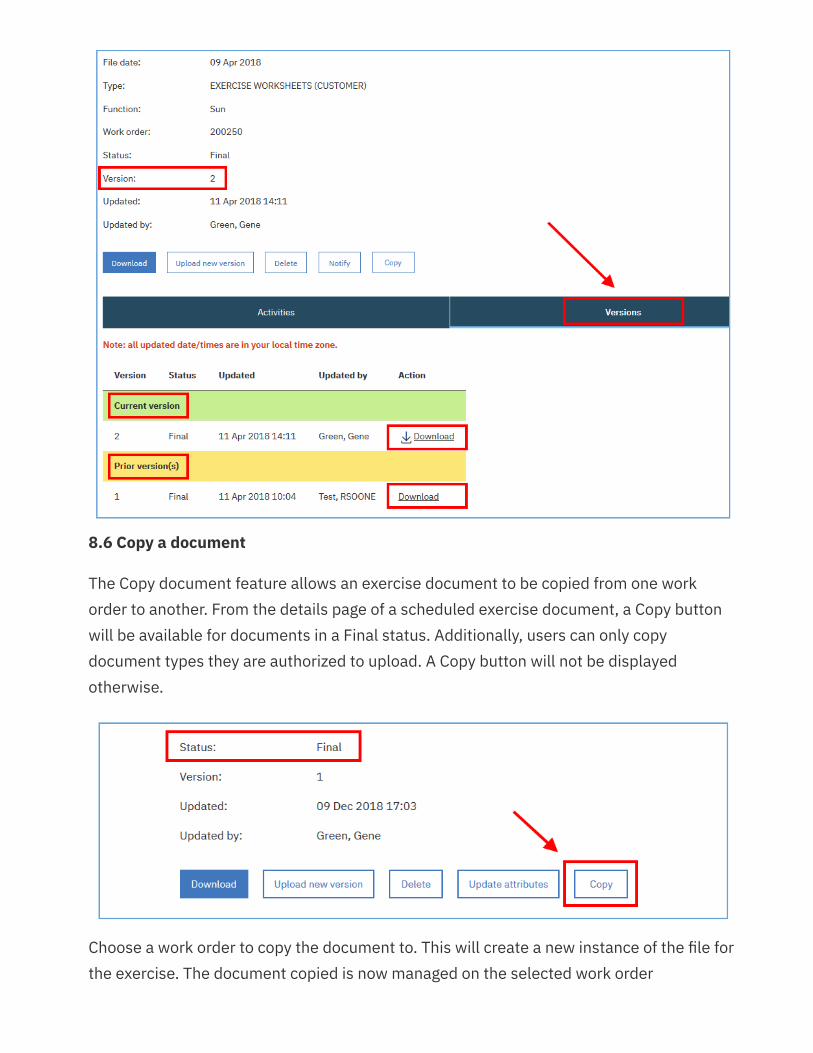
8.6 Copy a document
The Copy document feature allows an exercise document to be copied from one workorder to another. From the details page of a scheduled exercise document, a Copy buttonwill be available for documents in a Final status. Additionally, users can only copydocument types they are authorized to upload. A Copy button will not be displayedotherwise.
Choose a work order to copy the document to. This will create a new instance of the file forthe exercise. The document copied is now managed on the selected work order
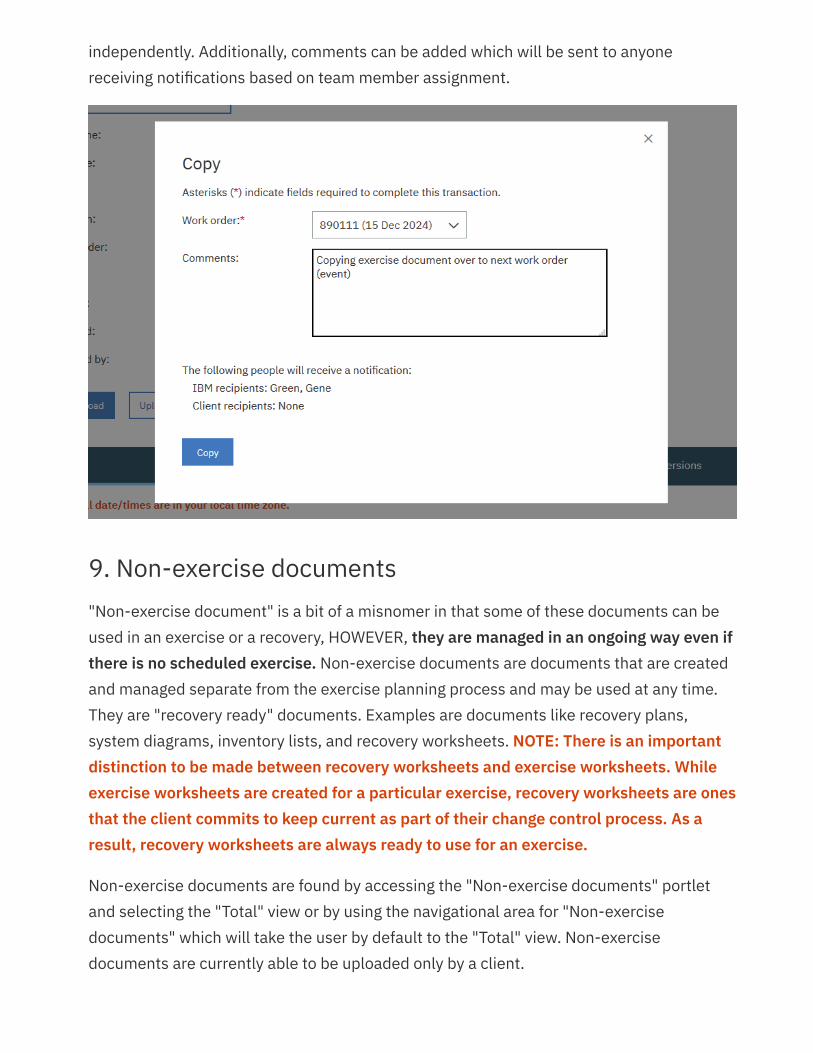
independently. Additionally, comments can be added which will be sent to anyonereceiving notifications based on team member assignment.
9. Non-exercise documents"Non-exercise document" is a bit of a misnomer in that some of these documents can beused in an exercise or a recovery, HOWEVER, they are managed in an ongoing way even ifthere is no scheduled exercise. Non-exercise documents are documents that are createdand managed separate from the exercise planning process and may be used at any time.They are "recovery ready" documents. Examples are documents like recovery plans,system diagrams, inventory lists, and recovery worksheets. NOTE: There is an importantdistinction to be made between recovery worksheets and exercise worksheets. Whileexercise worksheets are created for a particular exercise, recovery worksheets are onesthat the client commits to keep current as part of their change control process. As aresult, recovery worksheets are always ready to use for an exercise.
Non-exercise documents are found by accessing the "Non-exercise documents" portletand selecting the "Total" view or by using the navigational area for "Non-exercisedocuments" which will take the user by default to the "Total" view. Non-exercisedocuments are currently able to be uploaded only by a client.
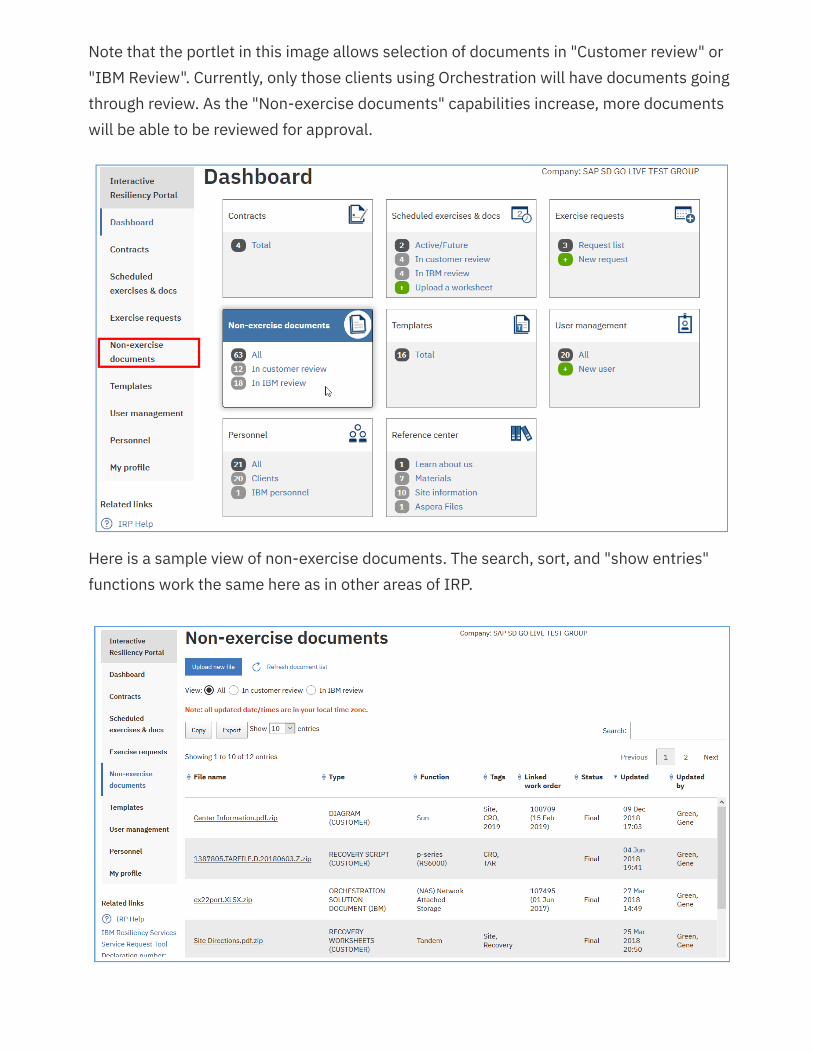
Note that the portlet in this image allows selection of documents in "Customer review" or"IBM Review". Currently, only those clients using Orchestration will have documents goingthrough review. As the "Non-exercise documents" capabilities increase, more documentswill be able to be reviewed for approval.
Here is a sample view of non-exercise documents. The search, sort, and "show entries"functions work the same here as in other areas of IRP.
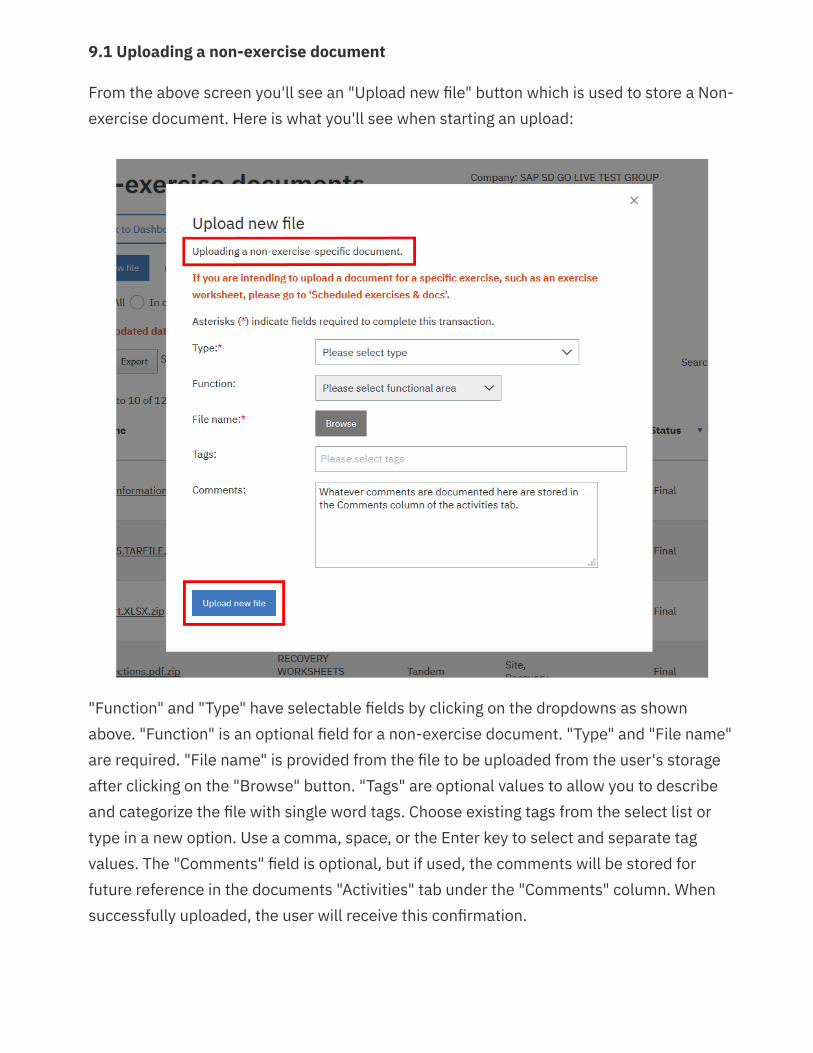
9.1 Uploading a non-exercise document
From the above screen you'll see an "Upload new file" button which is used to store a Non-exercise document. Here is what you'll see when starting an upload:
"Function" and "Type" have selectable fields by clicking on the dropdowns as shownabove. "Function" is an optional field for a non-exercise document. "Type" and "File name"are required. "File name" is provided from the file to be uploaded from the user's storageafter clicking on the "Browse" button. "Tags" are optional values to allow you to describeand categorize the file with single word tags. Choose existing tags from the select list ortype in a new option. Use a comma, space, or the Enter key to select and separate tagvalues. The "Comments" field is optional, but if used, the comments will be stored forfuture reference in the documents "Activities" tab under the "Comments" column. Whensuccessfully uploaded, the user will receive this confirmation.

Here's a sample image showing the "Comments" under the document's "Activities" tab.This is found after selecting the document from the list of non-exercise documents.
9.2 Downloading a non-exercise document; Comment log; Versioning
From document list, select the document of interest.

Then click on the file name of the document to be downloaded. You’ll be presented withthis screen:
From here, you can do six things:
Download - Download the document for review.
Upload new version - Upload a new version of the document. The previous version isalso saved.
1.
2.
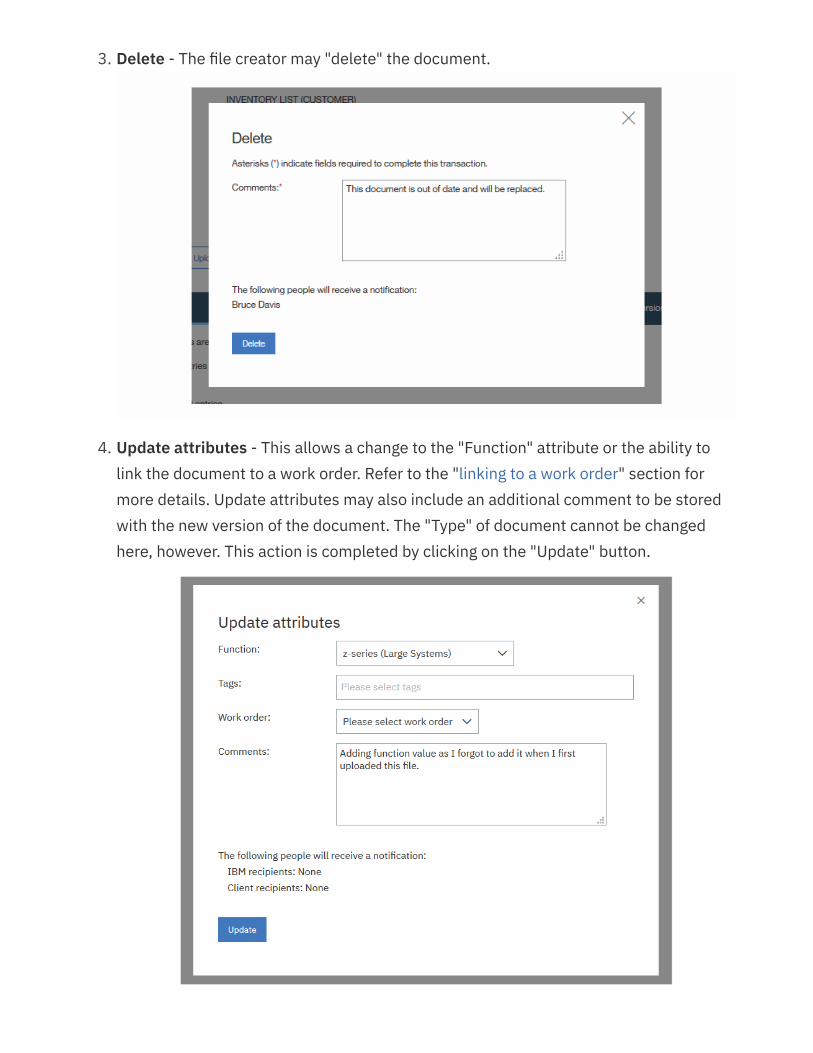
Delete - The file creator may "delete" the document.
Update attributes - This allows a change to the "Function" attribute or the ability tolink the document to a work order. Refer to the "linking to a work order" section formore details. Update attributes may also include an additional comment to be storedwith the new version of the document. The "Type" of document cannot be changedhere, however. This action is completed by clicking on the "Update" button.
3.
4.
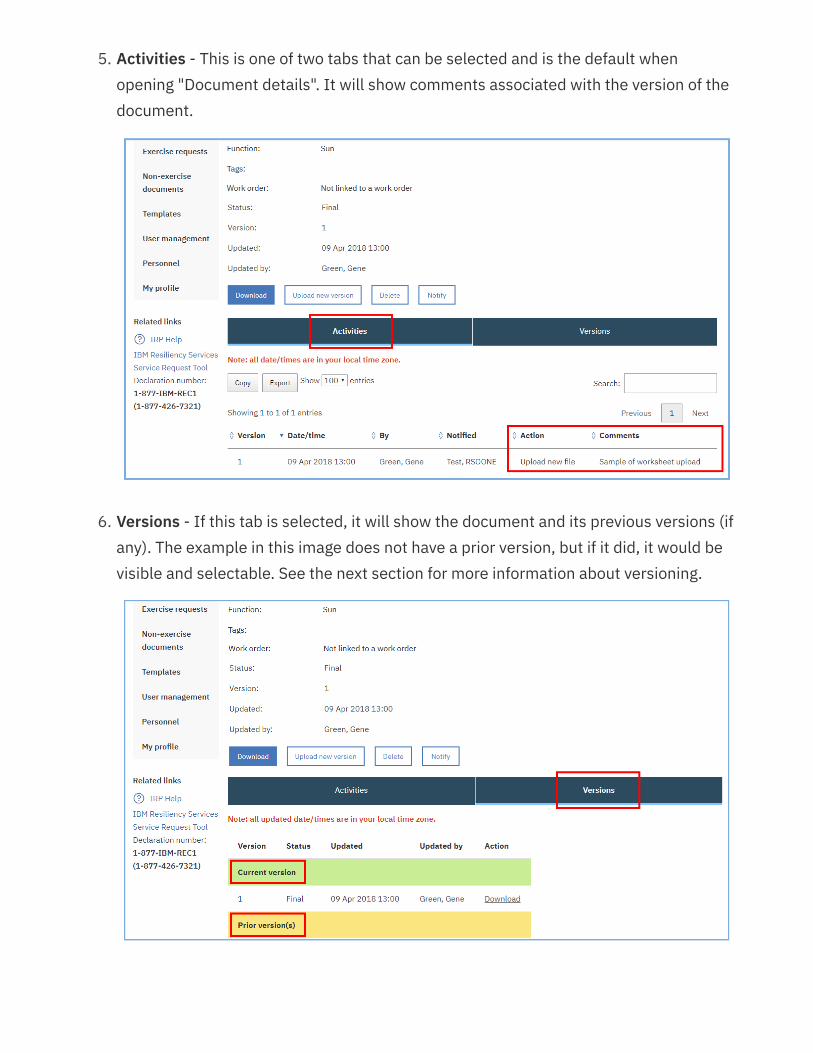
Activities - This is one of two tabs that can be selected and is the default whenopening "Document details". It will show comments associated with the version of thedocument.
Versions - If this tab is selected, it will show the document and its previous versions (ifany). The example in this image does not have a prior version, but if it did, it would bevisible and selectable. See the next section for more information about versioning.
5.
6.
9.3 Versioning for a non-exercise document
Versioning is handled the same as it is for an exercise document (see previous section for"Versioning for an exercise document").
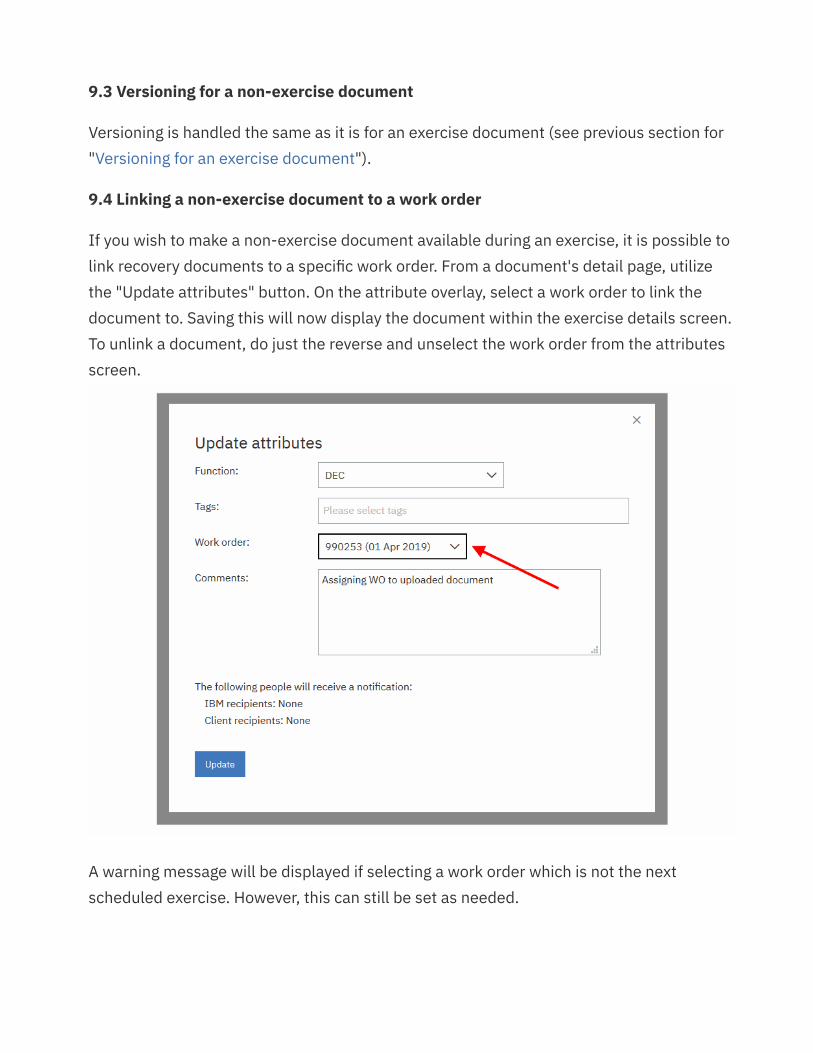
9.4 Linking a non-exercise document to a work order
If you wish to make a non-exercise document available during an exercise, it is possible tolink recovery documents to a specific work order. From a document's detail page, utilizethe "Update attributes" button. On the attribute overlay, select a work order to link thedocument to. Saving this will now display the document within the exercise details screen.To unlink a document, do just the reverse and unselect the work order from the attributesscreen.
A warning message will be displayed if selecting a work order which is not the nextscheduled exercise. However, this can still be set as needed.

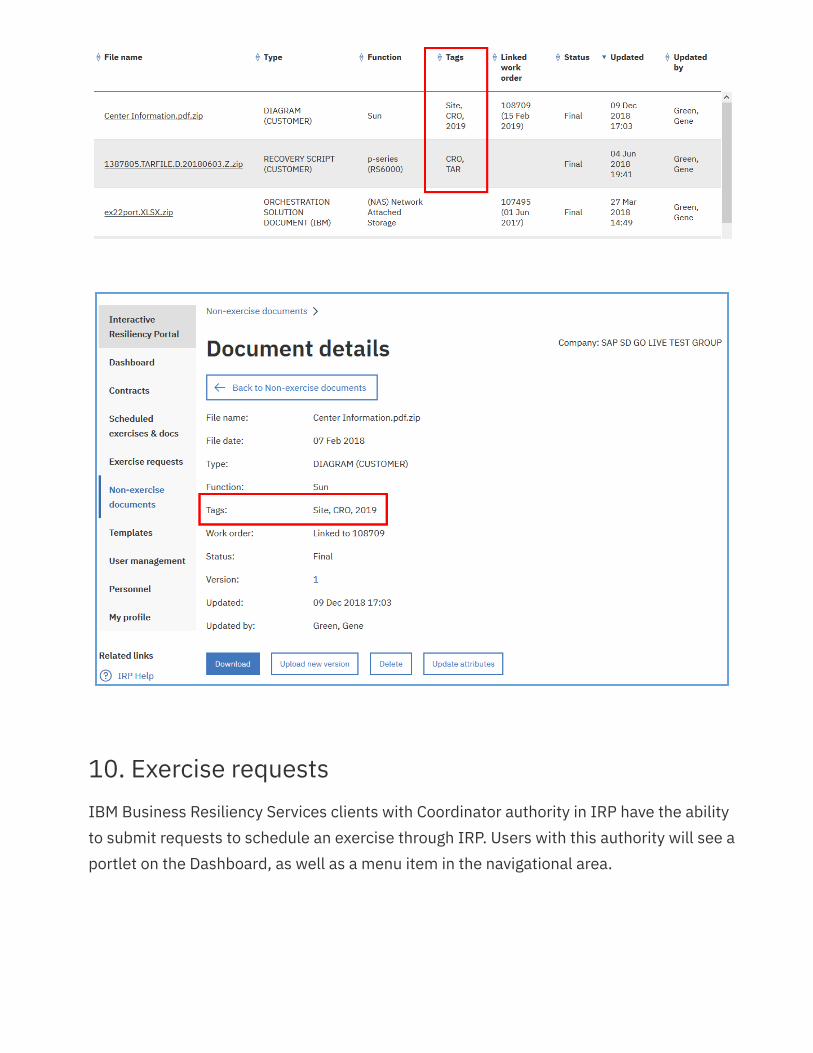
9.5 Document tagging
Adding tags to an uploaded file can be done for non-exercise documents. Tags allow you toadd a more personalized categorization to any documents uploaded.
The following image depicts the use of tags for an uploaded document. The user hasselected and entered three tags to help identify this document file.
Tags applied to a document will be seen in the file listing page, as well as on the documentdetails page as seen in the following two screen images.
10. Exercise requestsIBM Business Resiliency Services clients with Coordinator authority in IRP have the abilityto submit requests to schedule an exercise through IRP. Users with this authority will see aportlet on the Dashboard, as well as a menu item in the navigational area.

Selecting either the left navigation menu item or the Request list link on the dashboard,will display the Exercise request list page. From here you have the opportunity to submit anew exercise request, review an existing request, or manage a saved draft.
From the "Exercise request list" page, you can perform a number of functions relating toexercise requests:
View request list - This provides a list of your IRP-submitted requests. Click on theUpdated date value to view the details of a specific request.
Create new request - This will permit you to submit a new exercise request.
1.
2.

Edit and delete drafts - Any draft exercise requests can be viewed, edited, or deletedfrom the list screen.
10.1 Create a new exercise request
Clicking on the "New exercise request" button will take you to a request form. Fill in allrequired information and select the "Submit request" button to submit. Information in thefollowing request is just an example.
You can select multiple contracts in your "New request" by selecting each with CTL+Clickor by adding one at a time by selecting a contract, then repositioning the cursor in the"Contract(s)" box and selecting another.
3.
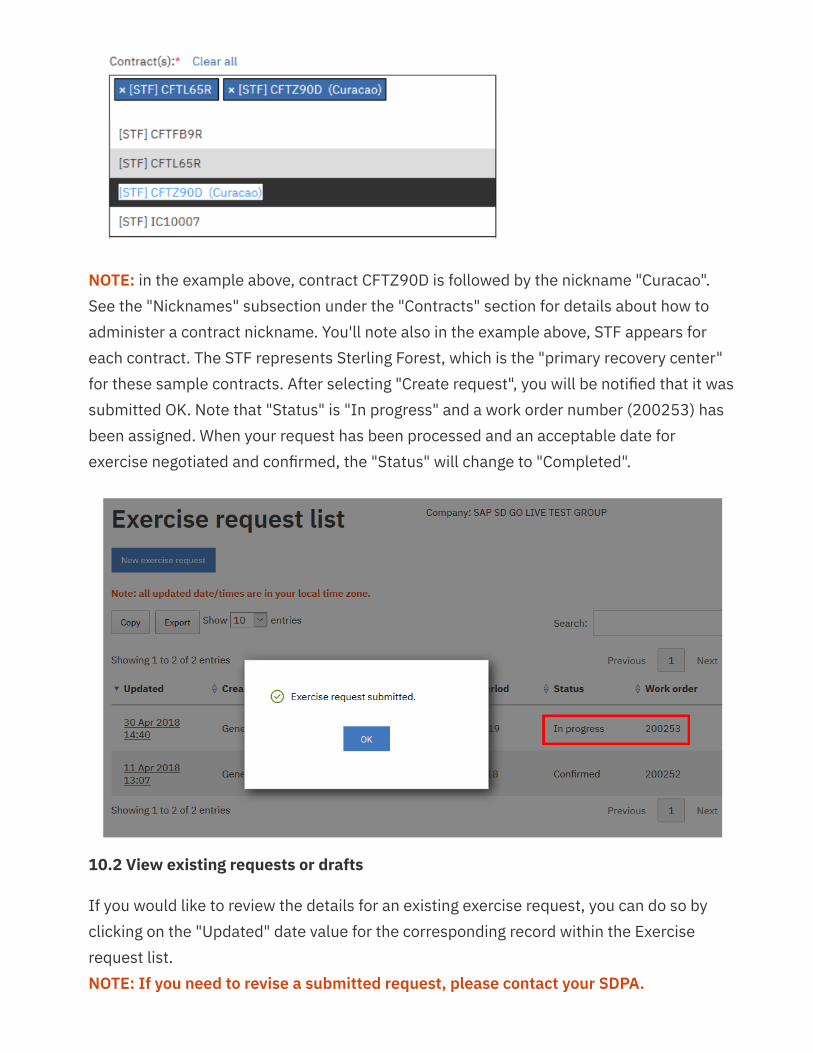
NOTE: in the example above, contract CFTZ90D is followed by the nickname "Curacao".See the "Nicknames" subsection under the "Contracts" section for details about how toadminister a contract nickname. You'll note also in the example above, STF appears foreach contract. The STF represents Sterling Forest, which is the "primary recovery center"for these sample contracts. After selecting "Create request", you will be notified that it wassubmitted OK. Note that "Status" is "In progress" and a work order number (200253) hasbeen assigned. When your request has been processed and an acceptable date forexercise negotiated and confirmed, the "Status" will change to "Completed".
10.2 View existing requests or drafts
If you would like to review the details for an existing exercise request, you can do so byclicking on the "Updated" date value for the corresponding record within the Exerciserequest list. NOTE: If you need to revise a submitted request, please contact your SDPA.
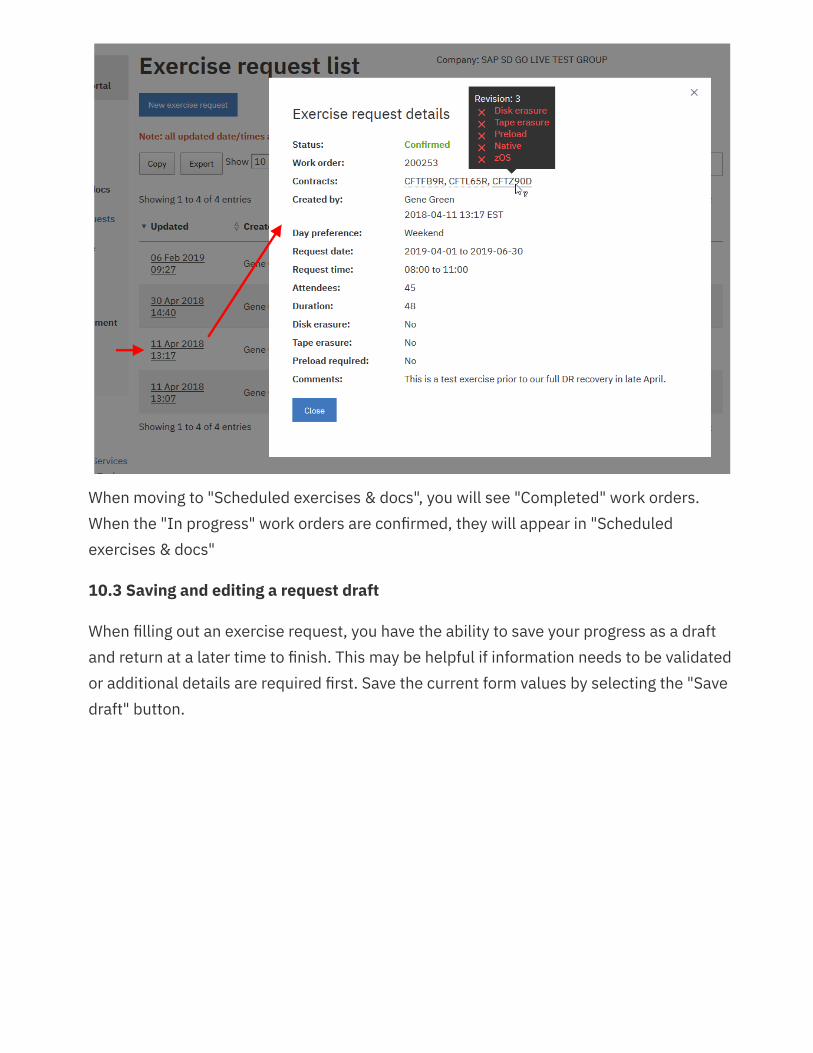
When moving to "Scheduled exercises & docs", you will see "Completed" work orders.When the "In progress" work orders are confirmed, they will appear in "Scheduledexercises & docs"
10.3 Saving and editing a request draft
When filling out an exercise request, you have the ability to save your progress as a draftand return at a later time to finish. This may be helpful if information needs to be validatedor additional details are required first. Save the current form values by selecting the "Savedraft" button.
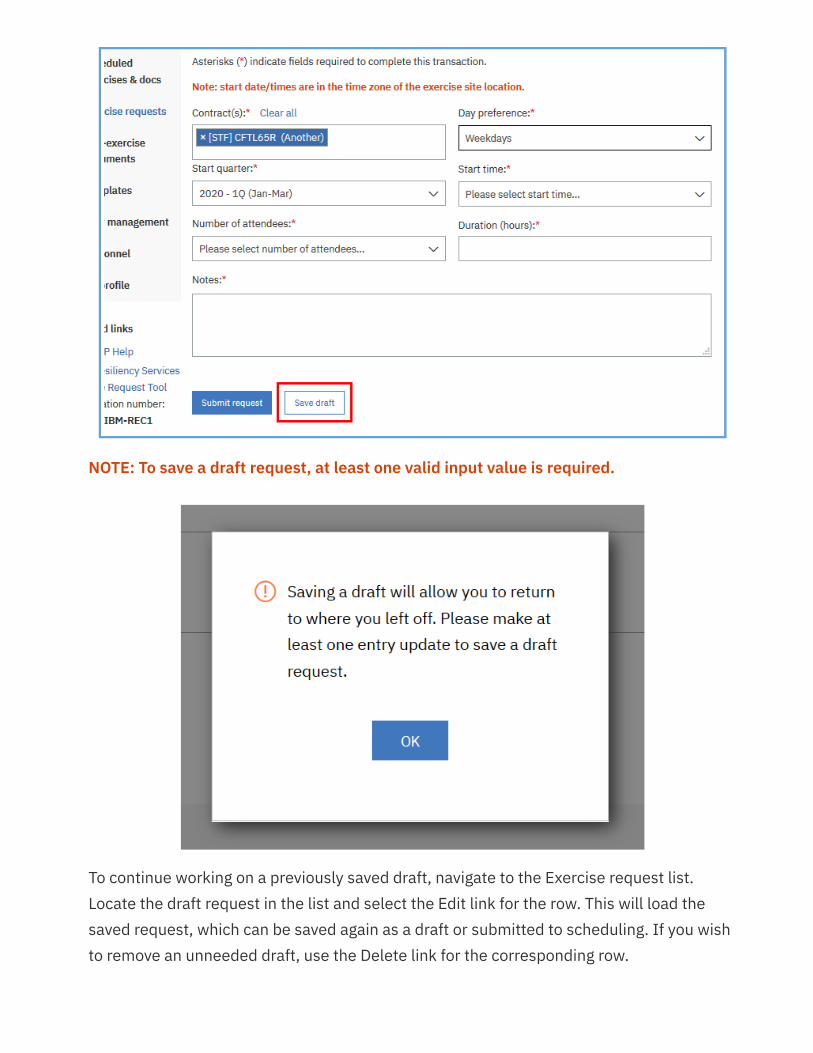
NOTE: To save a draft request, at least one valid input value is required.
To continue working on a previously saved draft, navigate to the Exercise request list.Locate the draft request in the list and select the Edit link for the row. This will load thesaved request, which can be saved again as a draft or submitted to scheduling. If you wishto remove an unneeded draft, use the Delete link for the corresponding row.
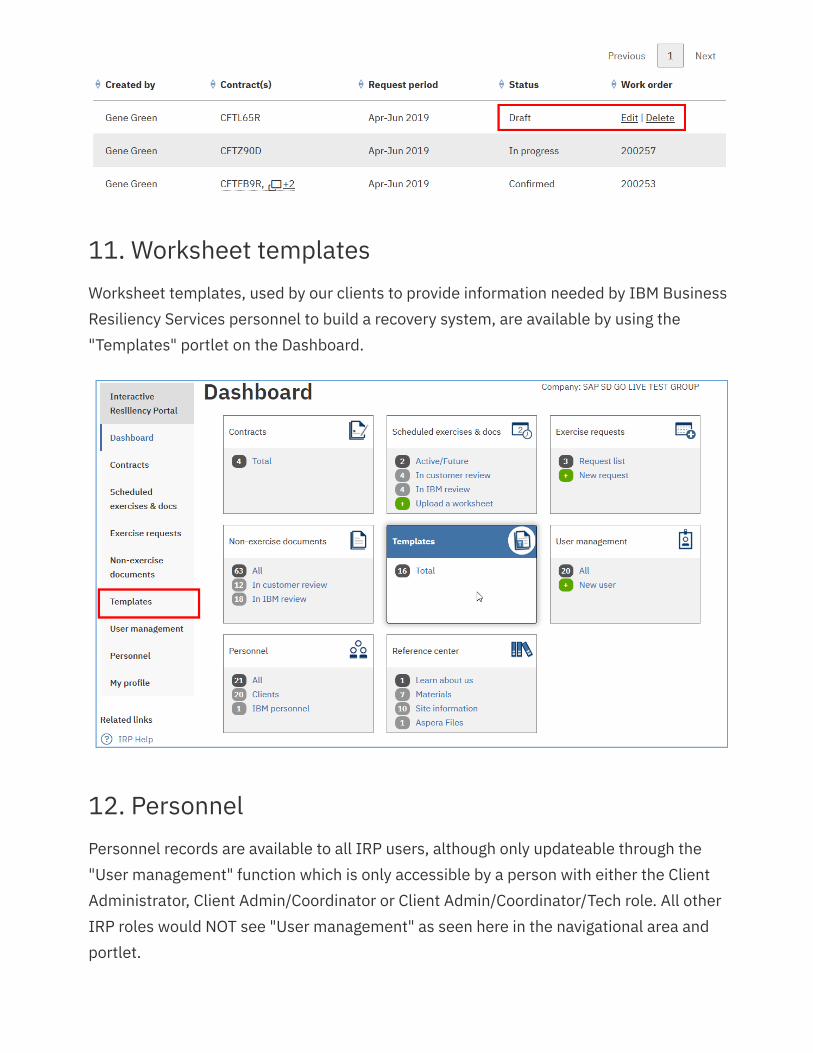
11. Worksheet templatesWorksheet templates, used by our clients to provide information needed by IBM BusinessResiliency Services personnel to build a recovery system, are available by using the"Templates" portlet on the Dashboard.
12. PersonnelPersonnel records are available to all IRP users, although only updateable through the"User management" function which is only accessible by a person with either the ClientAdministrator, Client Admin/Coordinator or Client Admin/Coordinator/Tech role. All otherIRP roles would NOT see "User management" as seen here in the navigational area andportlet.
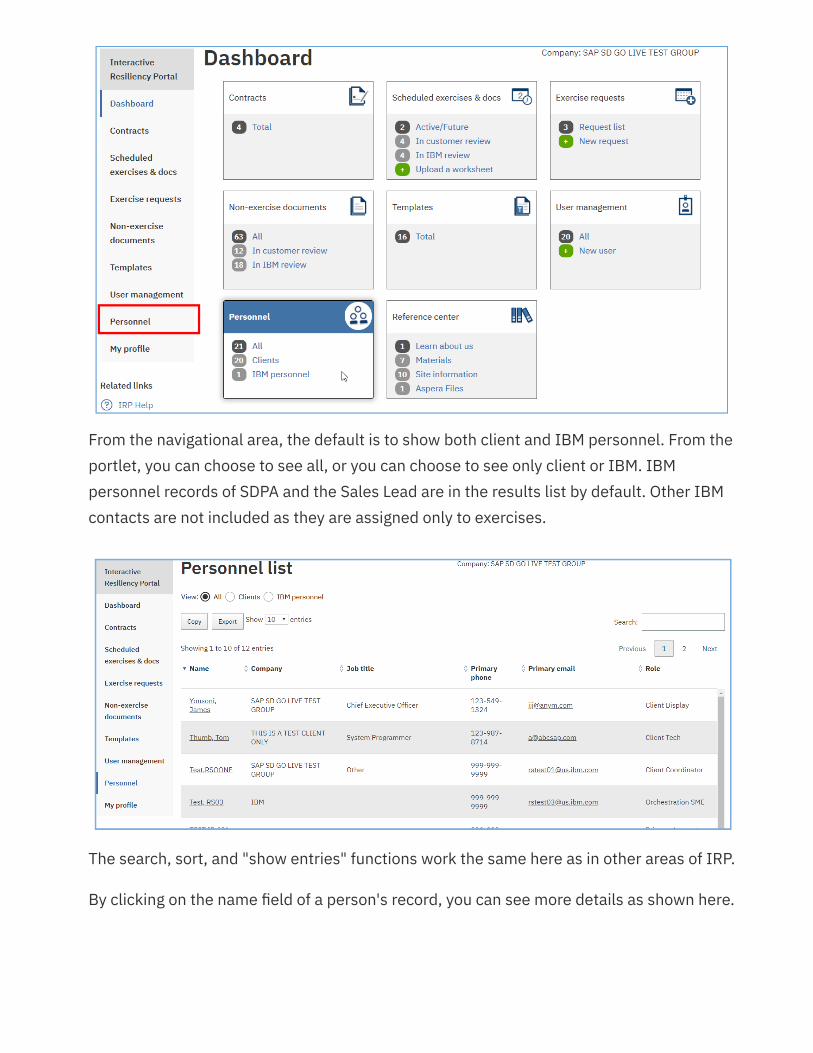
From the navigational area, the default is to show both client and IBM personnel. From theportlet, you can choose to see all, or you can choose to see only client or IBM. IBMpersonnel records of SDPA and the Sales Lead are in the results list by default. Other IBMcontacts are not included as they are assigned only to exercises.
The search, sort, and "show entries" functions work the same here as in other areas of IRP.
By clicking on the name field of a person's record, you can see more details as shown here.
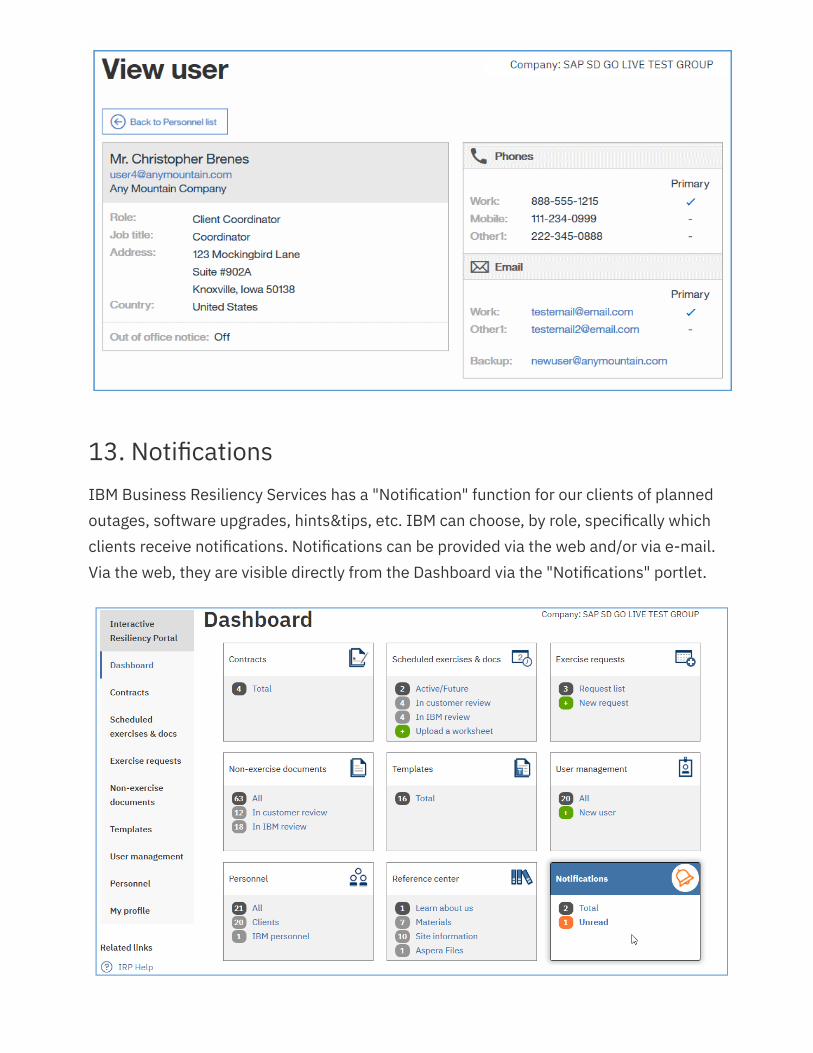
13. NotificationsIBM Business Resiliency Services has a "Notification" function for our clients of plannedoutages, software upgrades, hints&tips, etc. IBM can choose, by role, specifically whichclients receive notifications. Notifications can be provided via the web and/or via e-mail.Via the web, they are visible directly from the Dashboard via the "Notifications" portlet.
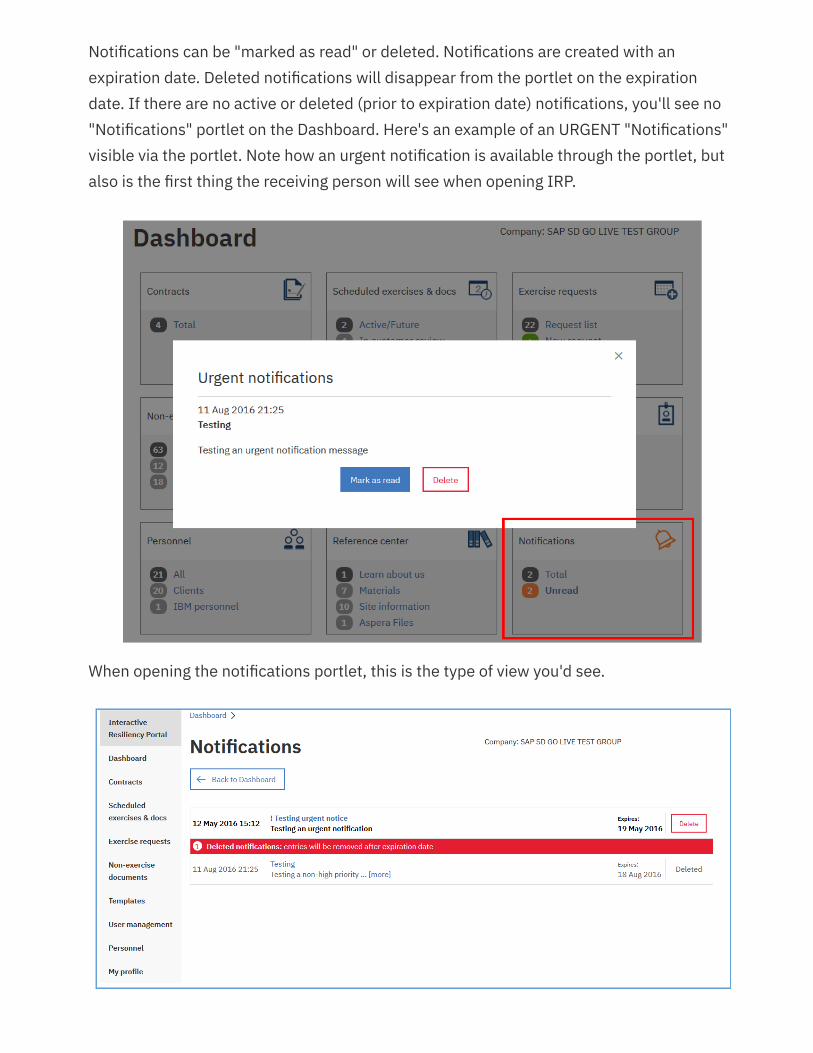
Notifications can be "marked as read" or deleted. Notifications are created with anexpiration date. Deleted notifications will disappear from the portlet on the expirationdate. If there are no active or deleted (prior to expiration date) notifications, you'll see no"Notifications" portlet on the Dashboard. Here's an example of an URGENT "Notifications"visible via the portlet. Note how an urgent notification is available through the portlet, butalso is the first thing the receiving person will see when opening IRP.
When opening the notifications portlet, this is the type of view you'd see.

The user can open details of the notification by clicking on the subject or on [more].
14. My profile"My profile" is located in the navigational area on the left side of the screen. With it, userscan update their personnel record.NOTE: Only a Client Administrator, Client Admin/Coordinator or ClientAdmin/Coordinator/Tech can update the role field.
14.1 Assign a backup
With IRP routing documents to you for review, it's necessary if you are out of the office thatyou have the capability to have the system route notifications to a backup that you define.It can be done through "My profile" as seen here in a portion of that information.
15. Usage of IRP to Manage Declaration AuthorizationAs declaring an Outage Emergency (also called "Disaster") is a financial commitment onthe part of an IBM client, IBM Business Resiliency Services (BRS) permits clients tooptionally pre-define information to be used by IBM to authenticate a customer calling todeclare an Outage Emergency. Clients with authority can optionally define who isauthorized to declare an Outage Emergency. For each person authorized to declare, thefollowing information is also optional, but should be set to further secure theauthorization:
Company Declaration Pass Code - this is a company-wide declare code that would bethe same for all authorized personnel
User Confirmation Code - this is a code the individual user could define
15.1 Creating / updating declaration authorization
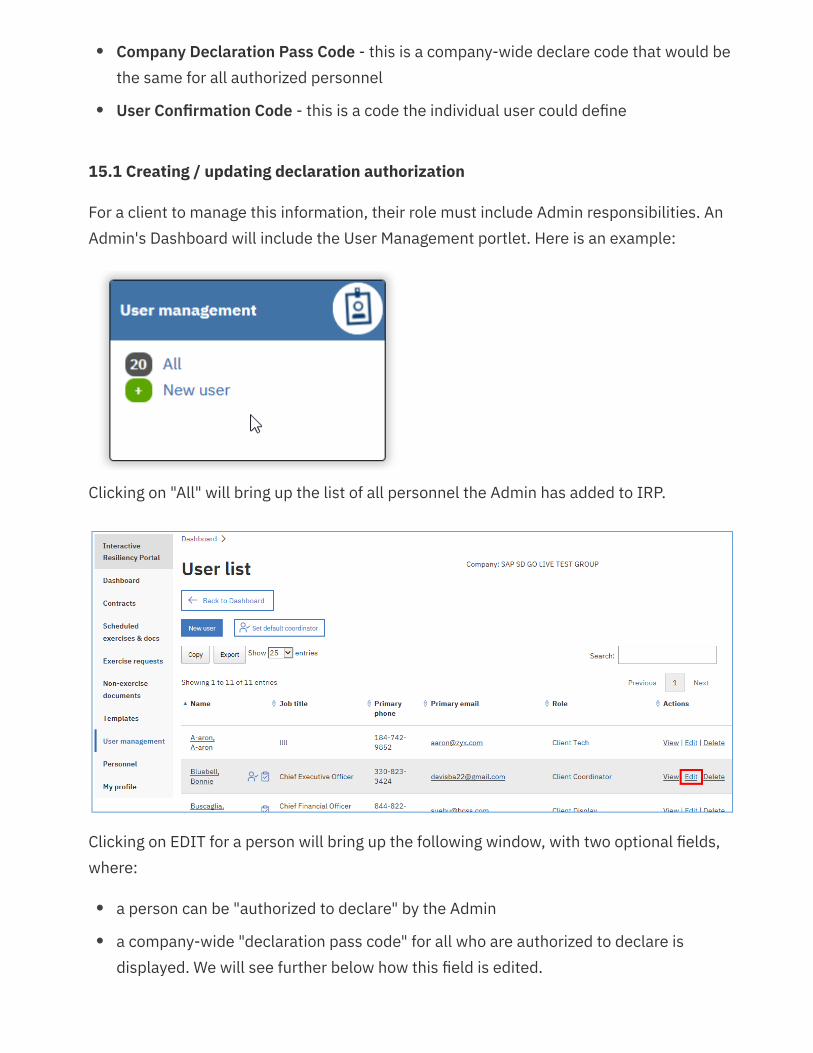
For a client to manage this information, their role must include Admin responsibilities. AnAdmin's Dashboard will include the User Management portlet. Here is an example:
Clicking on "All" will bring up the list of all personnel the Admin has added to IRP.
Clicking on EDIT for a person will bring up the following window, with two optional fields,where:
a person can be "authorized to declare" by the Admin
a company-wide "declaration pass code" for all who are authorized to declare isdisplayed. We will see further below how this field is edited.
•
•
••
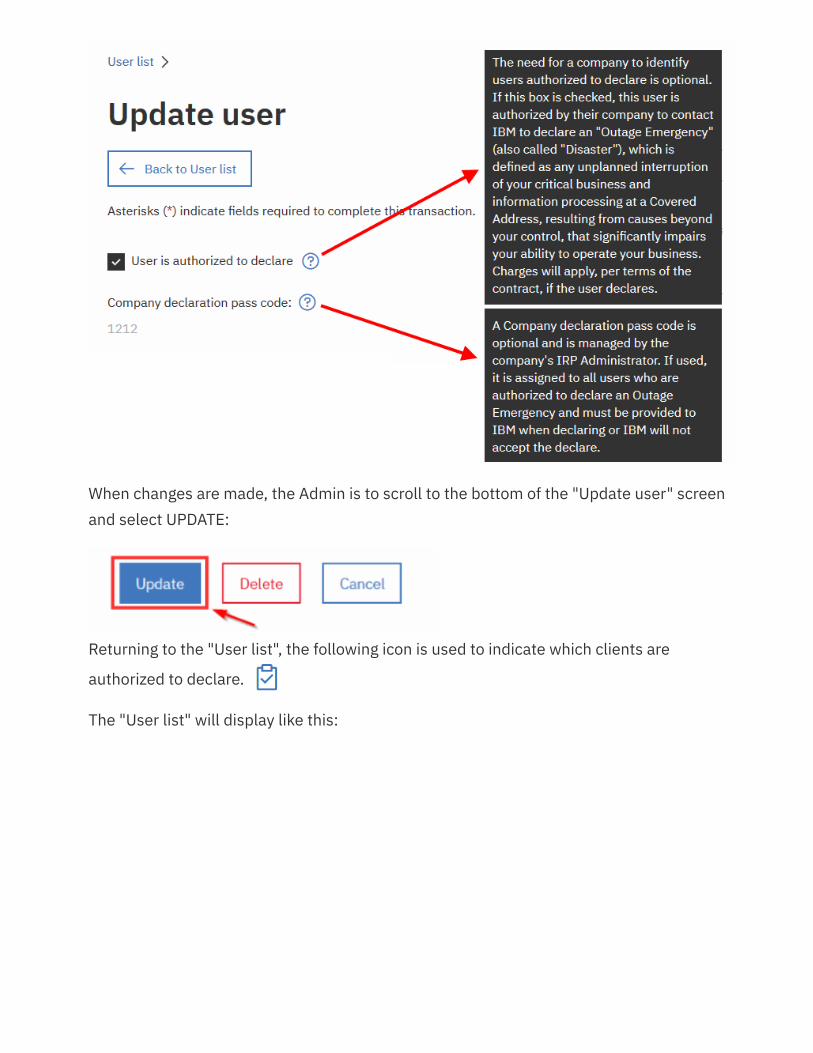
When changes are made, the Admin is to scroll to the bottom of the "Update user" screenand select UPDATE:
Returning to the "User list", the following icon is used to indicate which clients are
authorized to declare.
The "User list" will display like this:
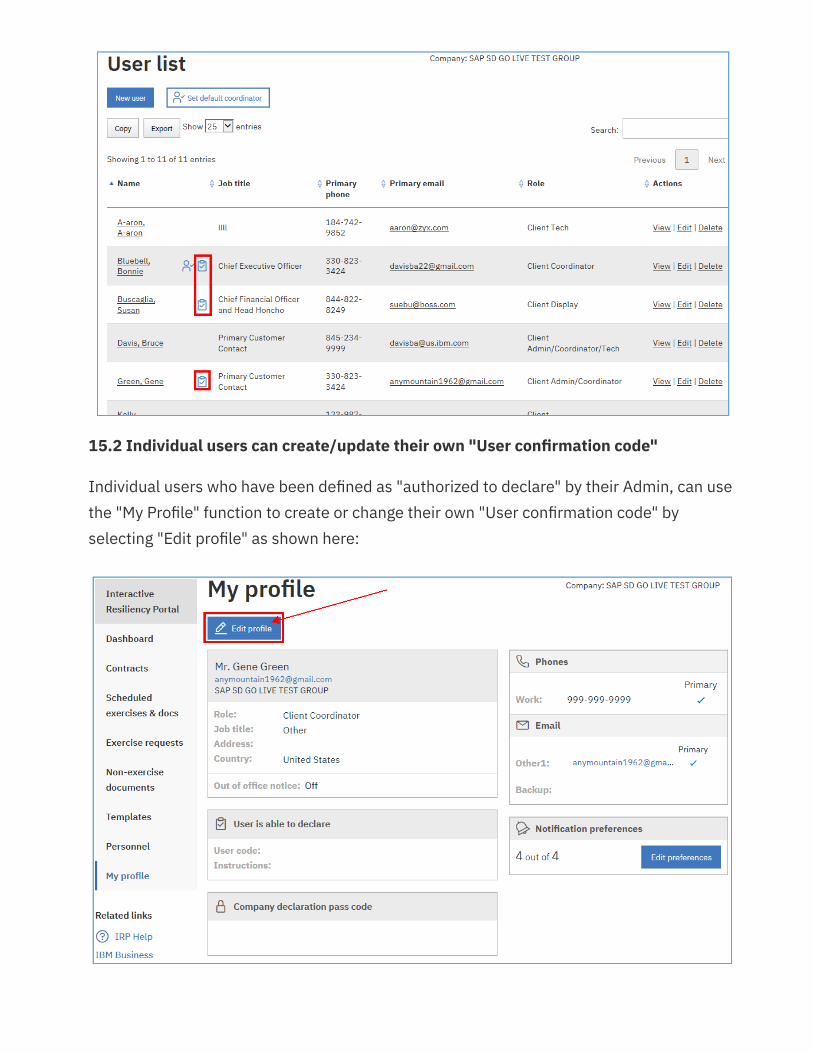
15.2 Individual users can create/update their own "User confirmation code"
Individual users who have been defined as "authorized to declare" by their Admin, can usethe "My Profile" function to create or change their own "User confirmation code" byselecting "Edit profile" as shown here:

Here is a sample of "Edit profile" where users define their own "User confirmation code",this adds an additional level of security to verify the individual.
NOTE: "Declare Instructions" are also optional and may be used by the client to providefurther authentication information that IBM will administer at time of declare. However,updating of this field is not currently supported in IRP. The client must provide theseinstructions to their SDPA for review to ensure IBM's ability to properly handle, in the eventof a declare. When approved, they will be visible here. Individuals will only be able to viewand edit their own declare details.
This is saved by scrolling to the bottom of the "Edit profile" screen and selecting "Update":
Result is shown here after "Update"
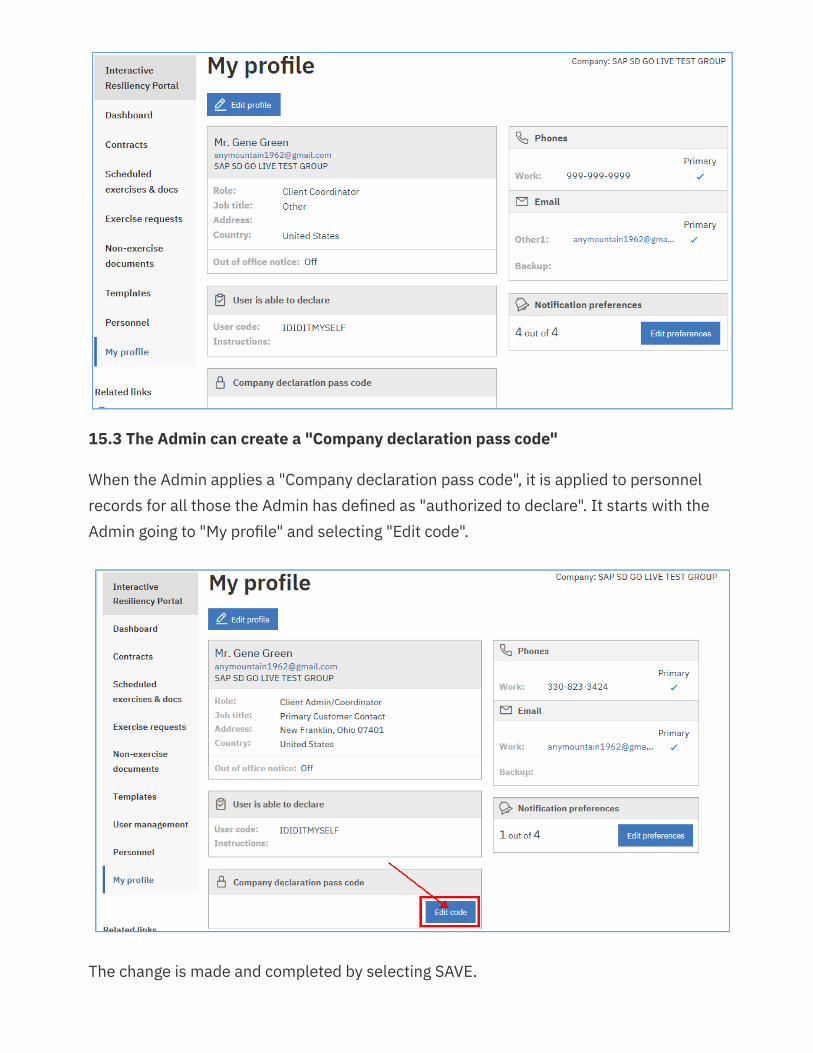
15.3 The Admin can create a "Company declaration pass code"
When the Admin applies a "Company declaration pass code", it is applied to personnelrecords for all those the Admin has defined as "authorized to declare". It starts with theAdmin going to "My profile" and selecting "Edit code".
The change is made and completed by selecting SAVE.
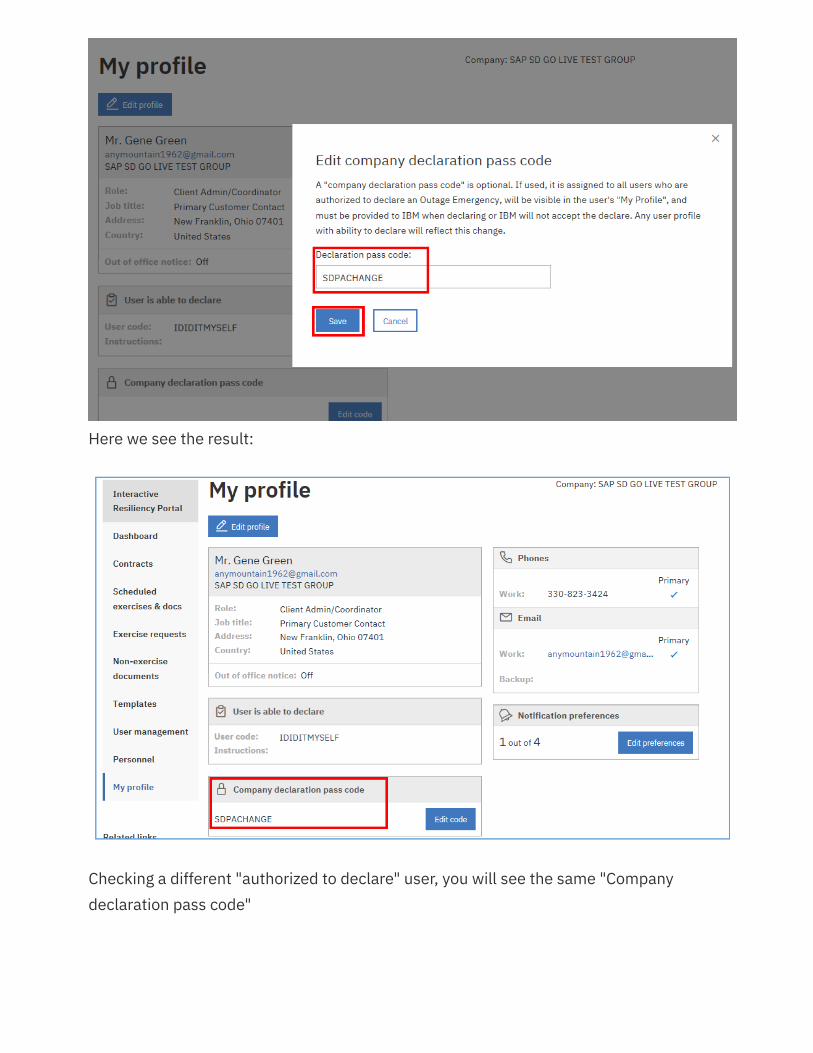
Here we see the result:
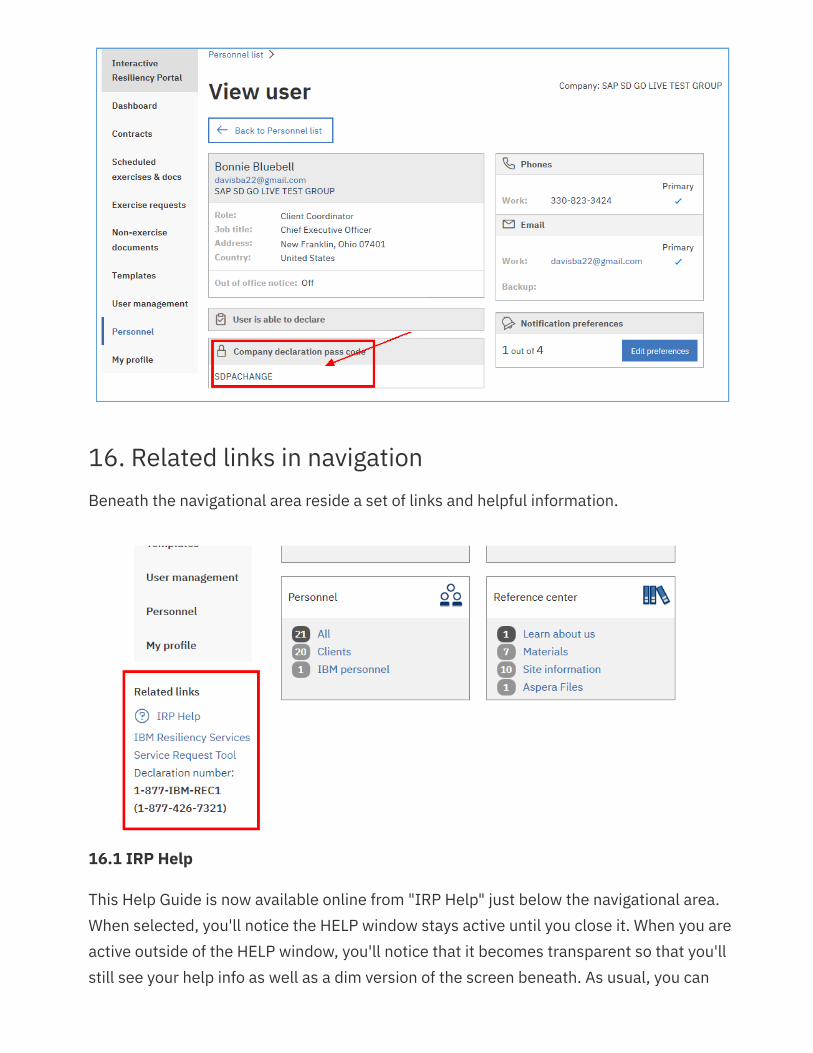
Checking a different "authorized to declare" user, you will see the same "Companydeclaration pass code"
16. Related links in navigationBeneath the navigational area reside a set of links and helpful information.
16.1 IRP Help
This Help Guide is now available online from "IRP Help" just below the navigational area.When selected, you'll notice the HELP window stays active until you close it. When you areactive outside of the HELP window, you'll notice that it becomes transparent so that you'llstill see your help info as well as a dim version of the screen beneath. As usual, you can

scroll through the table of contents to access information of interest. However, I'd pointyou to the SEARCH option in the upper right. You can place one or more search argumentsin that field and it'll quickly return sections of Help that have those values. There is an ALLoption next to it that will only return results that have "all" of the search arguments inthem.
16.2 IBM Business Resiliency Services
This link provides direct access to IBM Business Resiliency Services' internet site.
16.3 Service Request Tool / Orchestra
For clients with contracts for Data Center Floor Space or for Data Replications Services,this link can be used to go directly to the Service Request Tool, which is also known asOrchestra.
16.4 Declaration number
While not a link, this number is included in the navigational area for ease of access forthose clients needing to declare an Outage Emergency.
17. FAQsIs there a charge for using IRP?No
Is there a recovery plan for IRP?IRP data are housed in SAP which has a full disaster recovery plan and has an annualrecovery exercise and Business Continuity Program test.
Who has access to my company's information?Only personnel from your company that you have authorized to use IRP and only IBMBusiness Resiliency Services personnel who need the information to support yourcompany
Can I store SPI (Sensitive Personal Information) on IRP?IRP is not designed to support SPI.
Are there any size restrictions on documents that my company will store on IRP?50 MB is the max size for a document. There is currently no limit on the number ofdocuments you can store.
How does IRP handle security?A document detailing IRP security was provided to your company upon initial usage ofIRP. Contact your SDPA if a copy of that information is desired.
18. GlossaryConfiguration - the equipment, software, workspace, and telecommunications services, sodesignated in a Supplement. What IBM provides may not be identical to the Configuration.However, it will be compatible with, and will offer capacity and functionality equivalent toor greater than that of the Configuration. (source: Z125- 8306-07)
Hotsite - Shared Configuration available for usage by IBM Business Resiliency Services'clients based on contractual agreement.
Outage Emergency (also called "Disaster") - any unplanned interruption of your criticalbusiness and information processing at a Covered Address, resulting from causes beyondyour control, that significantly impairs your ability to operate your business. (source: Z125-8306-07)
Pretester - IBM Business Resiliency Services will provide a pretester for each skill groupthat will be involved in an exercise. Their role is to use worksheet information to createsetup documents that will be used to prepare the exercise environment. For example, ifthere is an exercise with scope of Sun and Intel, there will be a Sun pretester, an Intelpretester, and a network pretester. There will always be a network pretester. Pretesters areassigned using the IRP "Manage team" function, by the SDPA prior to a pretestteleconference.
SDPA - Service Delivery Program Advisor; also known as the client's IBM BusinessResiliency Services Project Manager. The SDPA is provided to the client as a single point ofcontact into IBM Business Resiliency Services.
Setup document - A setup document (also known as a "deliverable") is created by an IBMBusiness Resiliency Services pretester, for each platform and for the network, based oninformation provided by the client via completed worksheets. Setup documents welldefine how the system will be set up for the client's use during the exercise. Thesedocuments require client approval.
Skill group - A sub-team of the overall technical team involved in an exercise. (e.g., theSun "skill group" is the set of personnel involved in Sun support). A person may be involved
in more than one "skill group".
Supplement - A transaction document that describes the hotsite hardware that IBMBusiness Resiliency Services provides.
URL - Uniform Resource Locator. An address used to reference a web page. (e.g.,www.ibm.com )
Work order - A unique number in IBM Business Resiliency Services' scheduling systemthat links one or more client contracts that are needed for testing recoverability. Keyattributes of a "Work order" are, by contract, the start date/time, end date/time, andconfiguration resources allocated for usage during that period.
Worksheets - Template based documents, used for each platform and network, providedby IBM Business Resiliency Services for the client to complete in preparation for anexercise. With this information, IBM Business Resiliency Services provides the client withsetup documents.