ires pd reference guides - yale university · ires pd reference guides 5/1/2014 9:08:56 ... select...
TRANSCRIPT

IRES PD Reference Guides
5/1/2014 9:08:56 AM
Content Guide How do I Navigate IRES?
Logging In and Navigation PD Record Navigation Searching for a Proposal
How do I Create a PD Record?
Initiating a Proposal (S2S) Initiating a Proposal (Non-S2S) Creating a Child Record Proposal Entering a Letter of Intent Proposal Creating a Non-Competing Continuation Proposal Submission Mechanism Screen Template Matrix Understanding Parent/Master and Child Records
How do I Create and Edit the Budget?
Entering Budget Costs Entering a Modular Budget Exporting Budgets Budget Versioning Entering Cost Sharing Costs Entering a SubAward Entering a SubProject Adding an Academic (9/9) Appointment Type Updating Fringe Benefit Rates
How do I Upload Documents?
Uploading Internal Documents Uploading Documents to an NIH Proposal Naming Conventions
How do I Submit and Certify a Record?
Finalizing and Submitting an S2S Proposal Finalizing and Submitting a Non-S2S Proposal Certifying a Proposal Submitting a Changed/Corrected Proposal
How do I Add Personnel who are Not on the Budget or Change PI?
Adding Personnel Understanding Personnel Types Changing the PI
How do I Change the Owning Department Org?
Changing Proposal Departments How do I know what Template to use on the Set-Up Questions Tab?
Submission Mechanism Screen Template Matrix
For additional assistance, please contact [email protected].
IRES Logging In and Navigation
4/25/2014 5:03:23 PM Page 1 of 4
This quick guide highlights the process for logging into IRES and navigating the tabs on the menu bar.
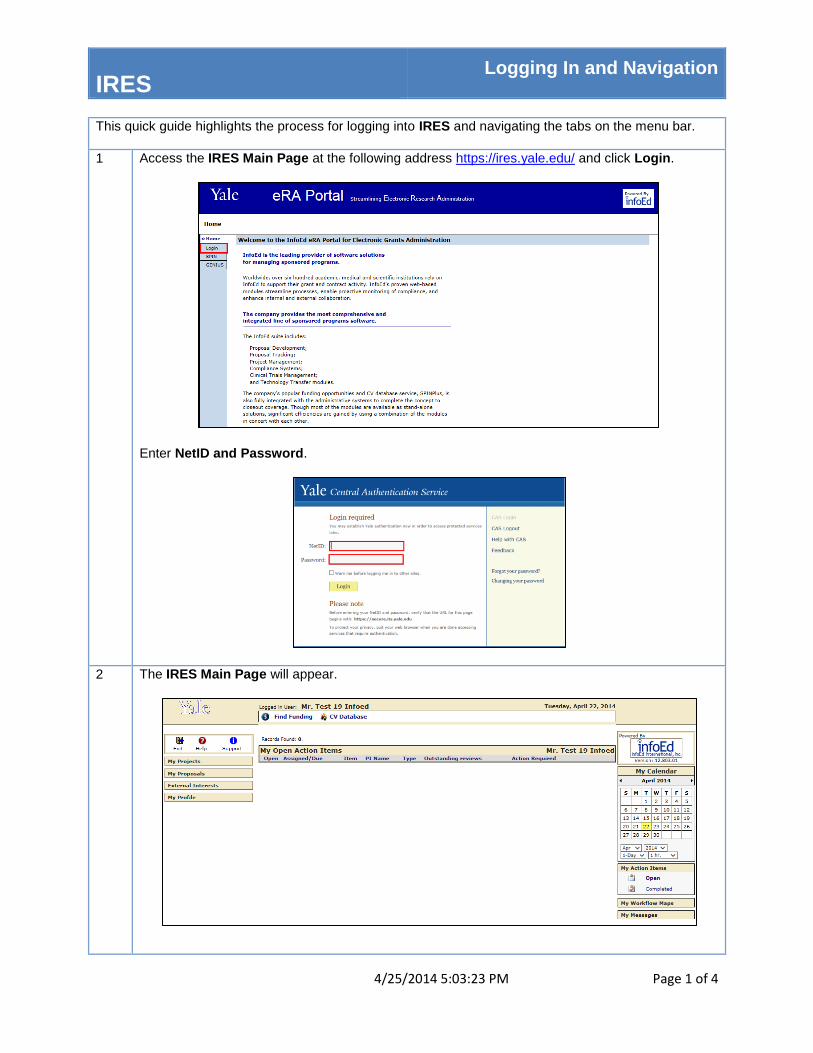
1 Access the IRES Main Page at the following address https://ires.yale.edu/ and click Login.
Enter NetID and Password.
2 The IRES Main Page will appear.
IRES Logging In and Navigation
4/25/2014 5:03:23 PM Page 2 of 4
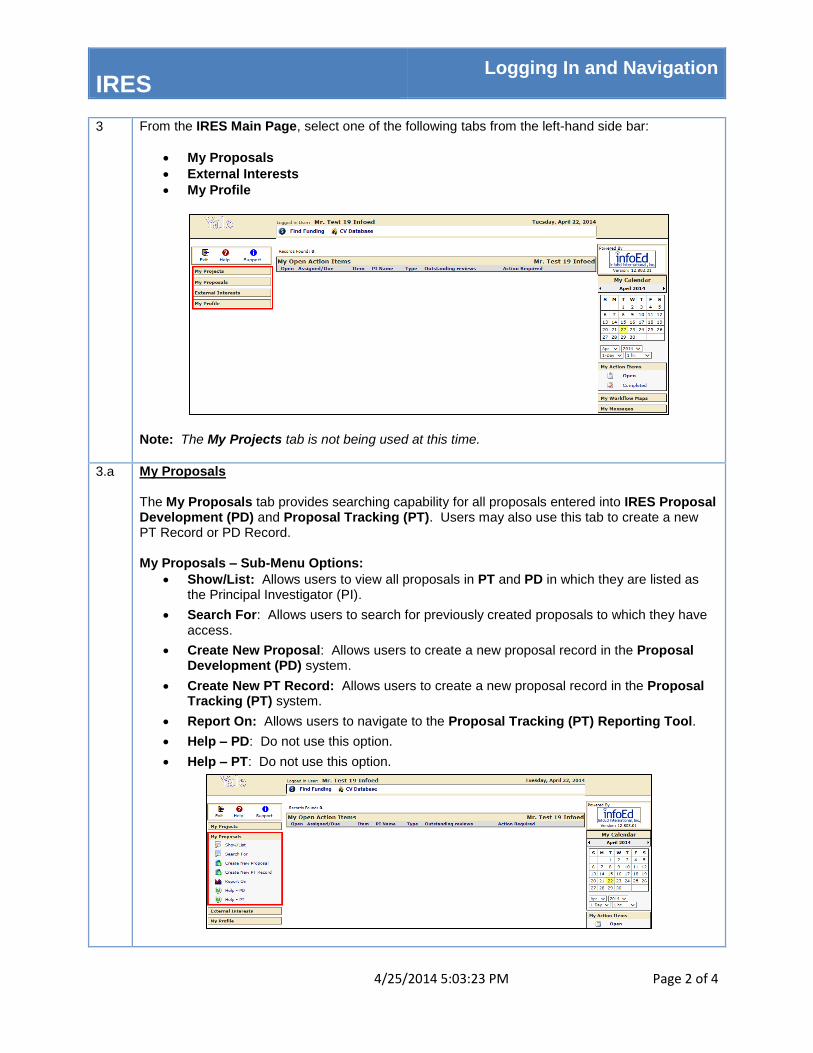
3 From the IRES Main Page, select one of the following tabs from the left-hand side bar:
My Proposals
External Interests
My Profile
Note: The My Projects tab is not being used at this time.
3.a My Proposals The My Proposals tab provides searching capability for all proposals entered into IRES Proposal Development (PD) and Proposal Tracking (PT). Users may also use this tab to create a new PT Record or PD Record. My Proposals – Sub-Menu Options:
Show/List: Allows users to view all proposals in PT and PD in which they are listed as the Principal Investigator (PI).
Search For: Allows users to search for previously created proposals to which they have access.
Create New Proposal: Allows users to create a new proposal record in the Proposal Development (PD) system.
Create New PT Record: Allows users to create a new proposal record in the Proposal Tracking (PT) system.
Report On: Allows users to navigate to the Proposal Tracking (PT) Reporting Tool.
Help – PD: Do not use this option.
Help – PT: Do not use this option.
IRES Logging In and Navigation
4/25/2014 5:03:23 PM Page 3 of 4
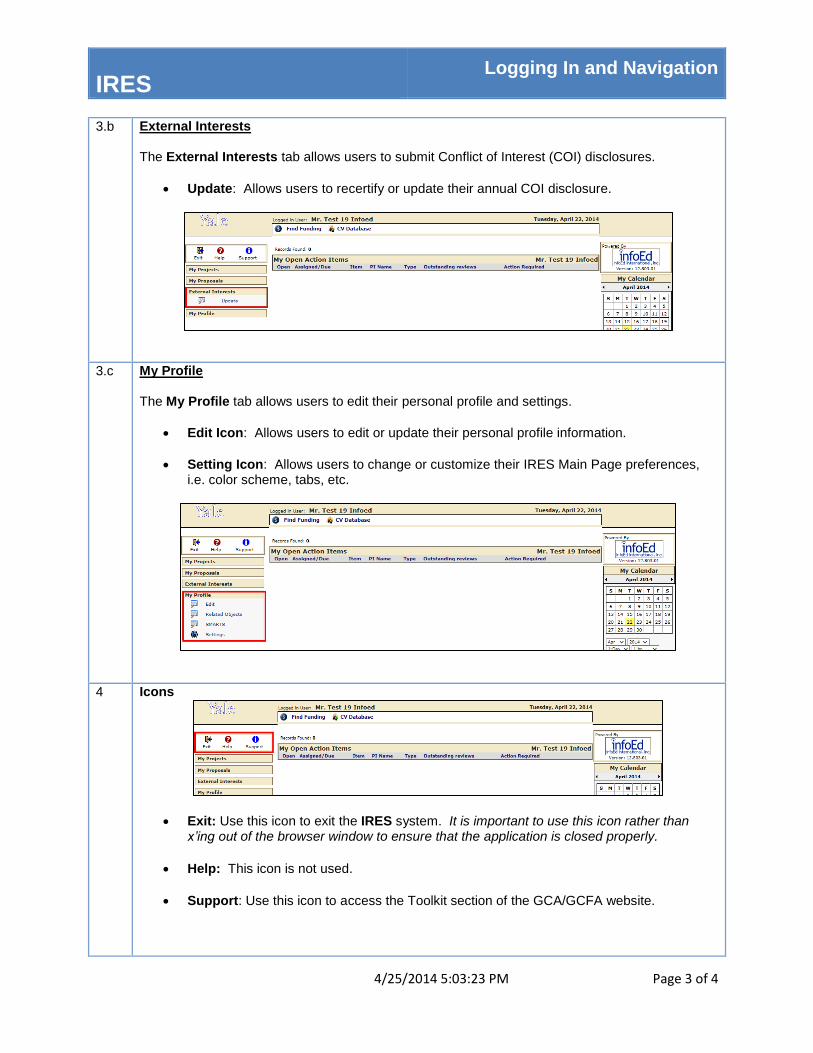
3.b External Interests The External Interests tab allows users to submit Conflict of Interest (COI) disclosures.
Update: Allows users to recertify or update their annual COI disclosure.
3.c My Profile The My Profile tab allows users to edit their personal profile and settings.
Edit Icon: Allows users to edit or update their personal profile information.
Setting Icon: Allows users to change or customize their IRES Main Page preferences, i.e. color scheme, tabs, etc.
4 Icons
Exit: Use this icon to exit the IRES system. It is important to use this icon rather than x’ing out of the browser window to ensure that the application is closed properly.
Help: This icon is not used.
Support: Use this icon to access the Toolkit section of the GCA/GCFA website.
IRES Logging In and Navigation
4/25/2014 5:03:23 PM Page 4 of 4
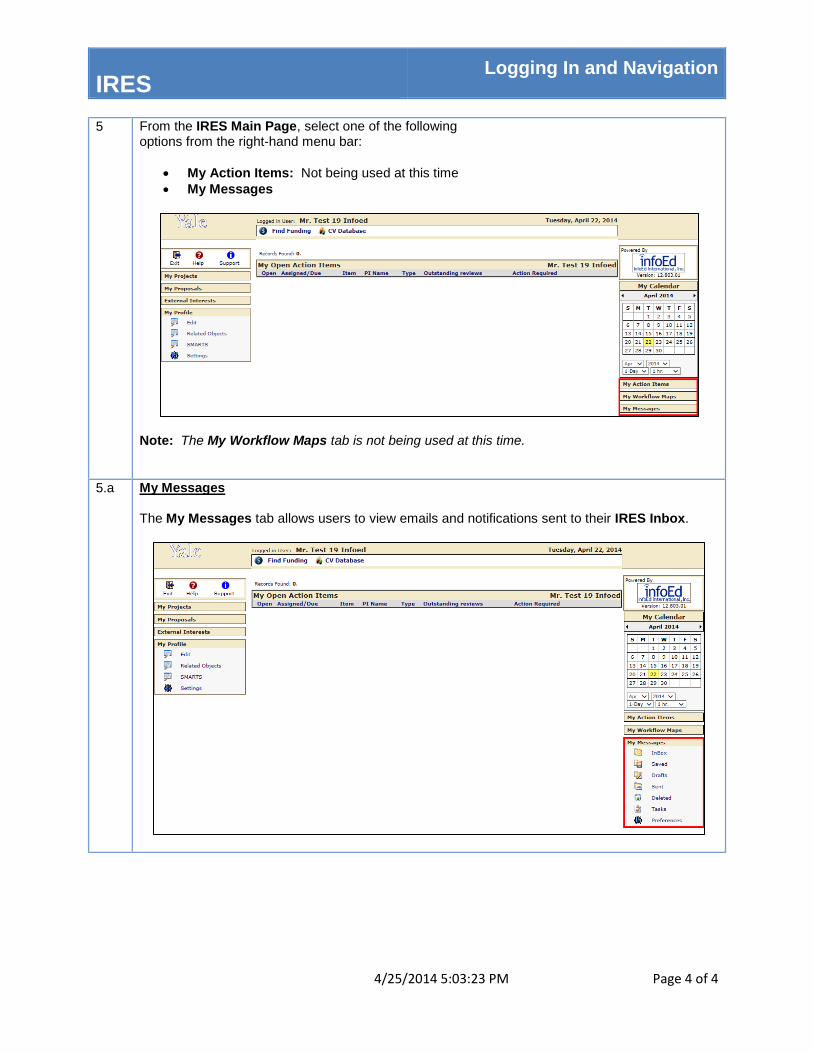
5 From the IRES Main Page, select one of the following options from the right-hand menu bar:
My Action Items: Not being used at this time
My Messages
Note: The My Workflow Maps tab is not being used at this time.
5.a My Messages The My Messages tab allows users to view emails and notifications sent to their IRES Inbox.
IRES PD and PT Record Navigation
4/25/2014 5:04:17 PM Page 1 of 4
This quick guide highlights the process for navigating IRES Proposal Development (PD) and Proposal Tracking (PT) records, the standard tabs, and folders located in each.
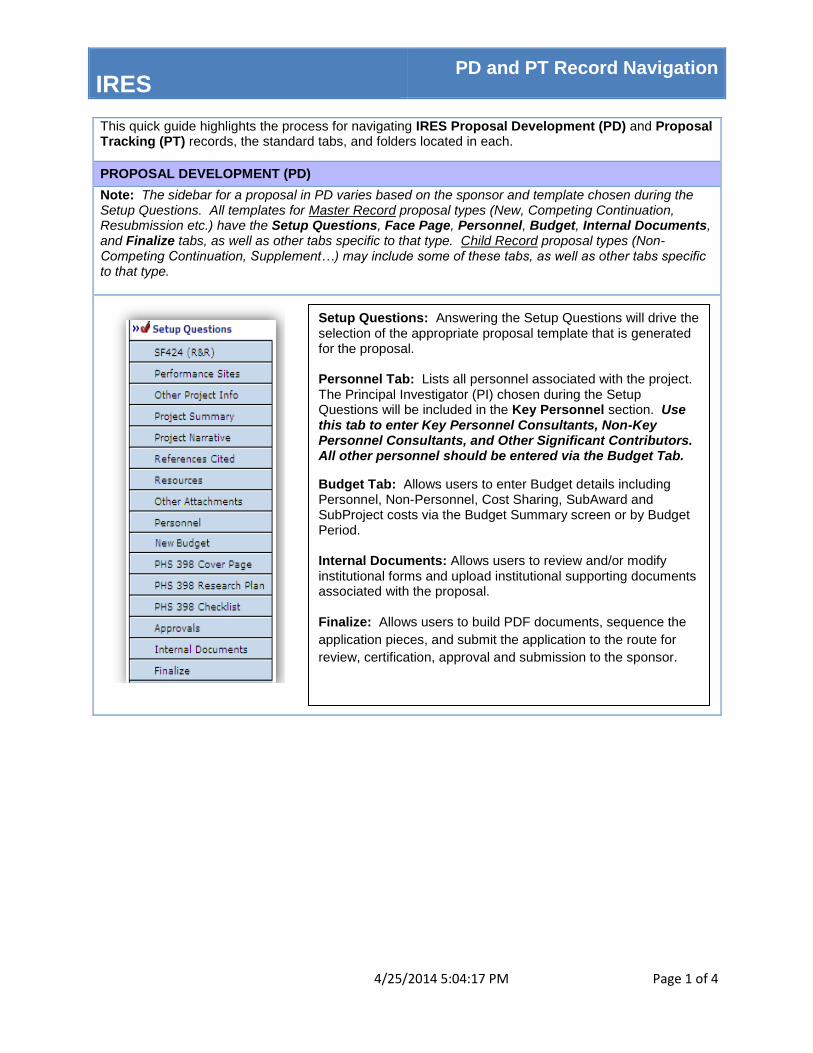
PROPOSAL DEVELOPMENT (PD)
Note: The sidebar for a proposal in PD varies based on the sponsor and template chosen during the Setup Questions. All templates for Master Record proposal types (New, Competing Continuation, Resubmission etc.) have the Setup Questions, Face Page, Personnel, Budget, Internal Documents, and Finalize tabs, as well as other tabs specific to that type. Child Record proposal types (Non-Competing Continuation, Supplement…) may include some of these tabs, as well as other tabs specific to that type.
Setup Questions: Answering the Setup Questions will drive the selection of the appropriate proposal template that is generated for the proposal. Personnel Tab: Lists all personnel associated with the project. The Principal Investigator (PI) chosen during the Setup Questions will be included in the Key Personnel section. Use this tab to enter Key Personnel Consultants, Non-Key Personnel Consultants, and Other Significant Contributors. All other personnel should be entered via the Budget Tab.
Budget Tab: Allows users to enter Budget details including Personnel, Non-Personnel, Cost Sharing, SubAward and SubProject costs via the Budget Summary screen or by Budget Period. Internal Documents: Allows users to review and/or modify institutional forms and upload institutional supporting documents associated with the proposal. Finalize: Allows users to build PDF documents, sequence the
application pieces, and submit the application to the route for
review, certification, approval and submission to the sponsor.
IRES PD and PT Record Navigation
4/25/2014 5:04:17 PM Page 2 of 4
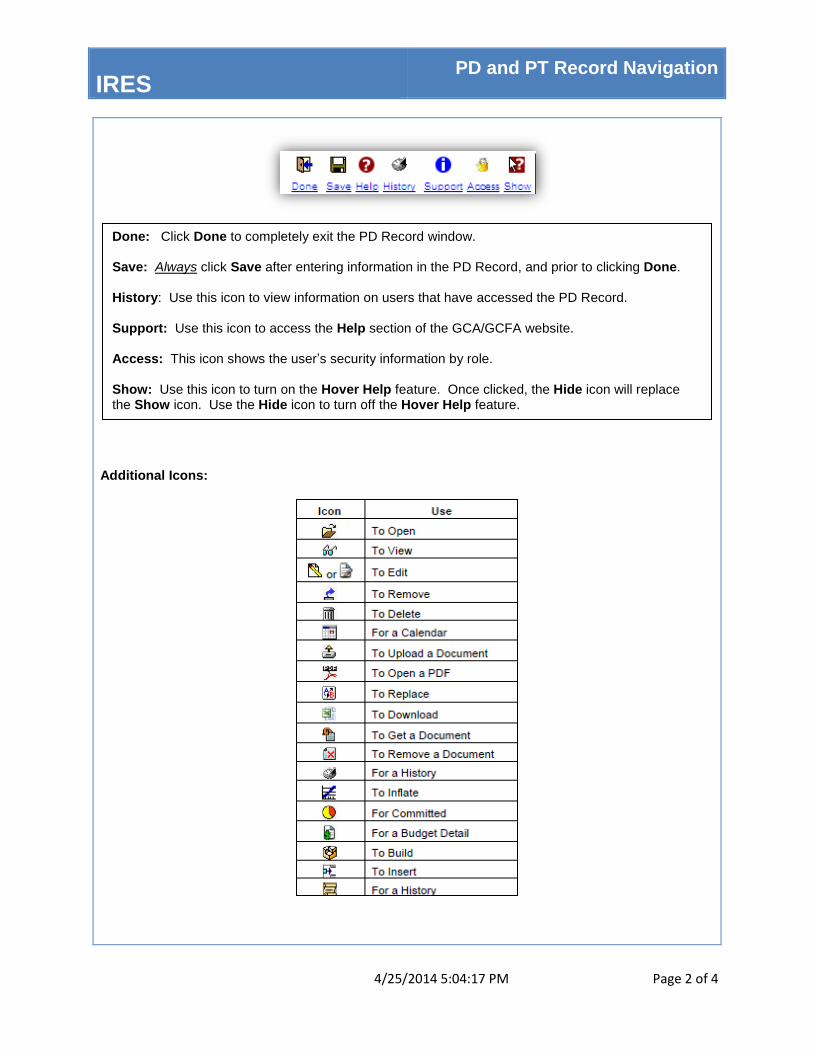
Additional Icons:
Done: Click Done to completely exit the PD Record window. Save: Always click Save after entering information in the PD Record, and prior to clicking Done. History: Use this icon to view information on users that have accessed the PD Record. Support: Use this icon to access the Help section of the GCA/GCFA website. Access: This icon shows the user’s security information by role. Show: Use this icon to turn on the Hover Help feature. Once clicked, the Hide icon will replace the Show icon. Use the Hide icon to turn off the Hover Help feature.
IRES PD and PT Record Navigation
4/25/2014 5:04:17 PM Page 3 of 4
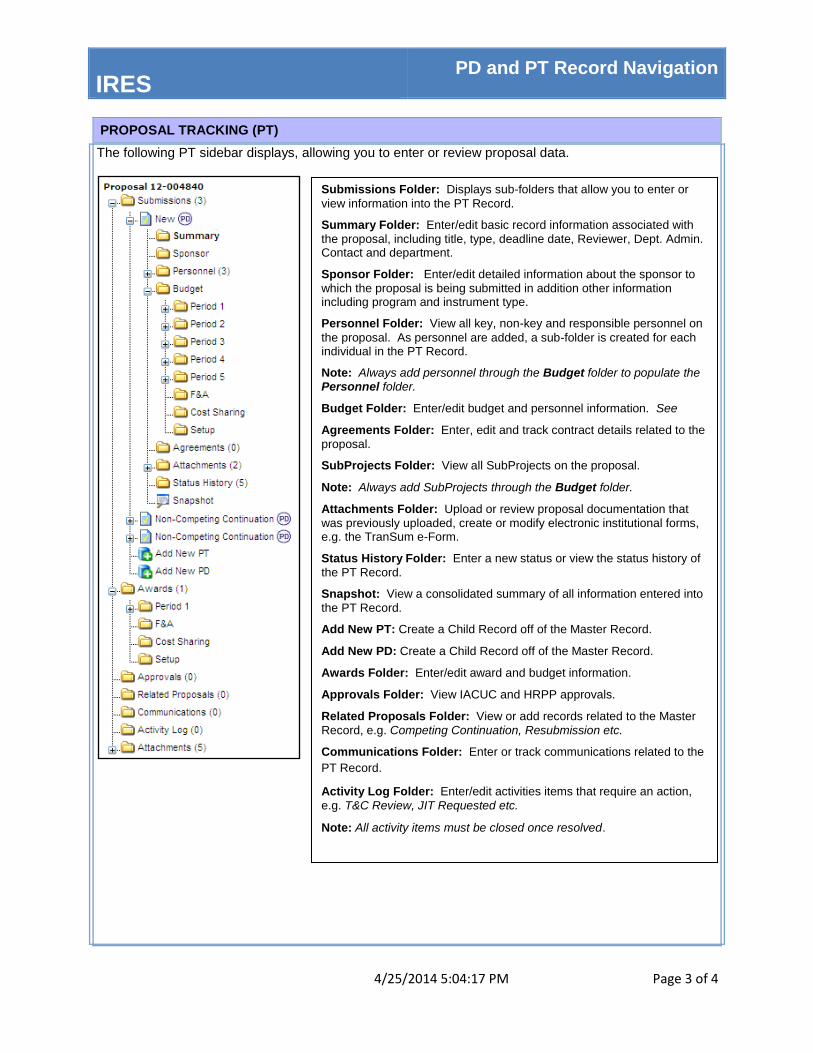
PROPOSAL TRACKING (PT)
The following PT sidebar displays, allowing you to enter or review proposal data.
Submissions Folder: Displays sub-folders that allow you to enter or
view information into the PT Record.
Summary Folder: Enter/edit basic record information associated with
the proposal, including title, type, deadline date, Reviewer, Dept. Admin. Contact and department.
Sponsor Folder: Enter/edit detailed information about the sponsor to
which the proposal is being submitted in addition other information including program and instrument type.
Personnel Folder: View all key, non-key and responsible personnel on
the proposal. As personnel are added, a sub-folder is created for each individual in the PT Record.
Note: Always add personnel through the Budget folder to populate the Personnel folder.
Budget Folder: Enter/edit budget and personnel information. See
Agreements Folder: Enter, edit and track contract details related to the
proposal.
SubProjects Folder: View all SubProjects on the proposal.
Note: Always add SubProjects through the Budget folder.
Attachments Folder: Upload or review proposal documentation that
was previously uploaded, create or modify electronic institutional forms, e.g. the TranSum e-Form.
Status History Folder: Enter a new status or view the status history of
the PT Record.
Snapshot: View a consolidated summary of all information entered into
the PT Record.
Add New PT: Create a Child Record off of the Master Record.
Add New PD: Create a Child Record off of the Master Record.
Awards Folder: Enter/edit award and budget information.
Approvals Folder: View IACUC and HRPP approvals.
Related Proposals Folder: View or add records related to the Master
Record, e.g. Competing Continuation, Resubmission etc.
Communications Folder: Enter or track communications related to the
PT Record.
Activity Log Folder: Enter/edit activities items that require an action,
e.g. T&C Review, JIT Requested etc.
Note: All activity items must be closed once resolved.
IRES PD and PT Record Navigation
4/25/2014 5:04:17 PM Page 4 of 4
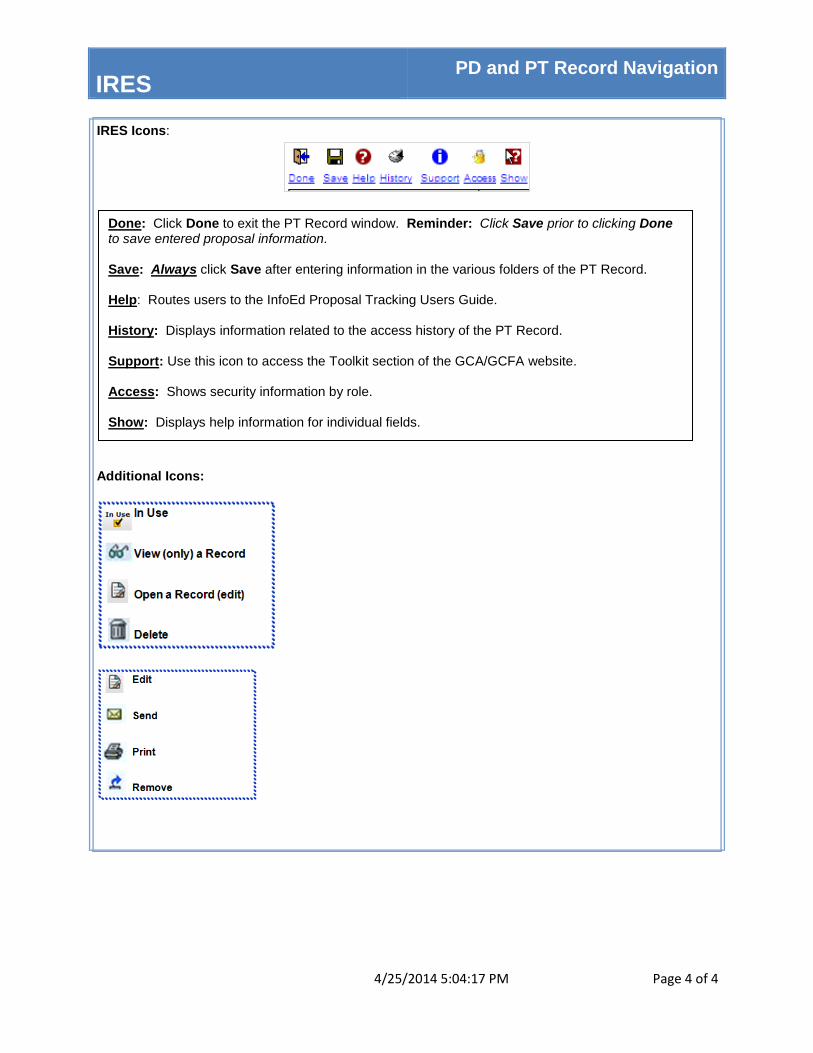
IRES Icons:
Additional Icons:
Done: Click Done to exit the PT Record window. Reminder: Click Save prior to clicking Done to save entered proposal information. Save: Always click Save after entering information in the various folders of the PT Record. Help: Routes users to the InfoEd Proposal Tracking Users Guide. History: Displays information related to the access history of the PT Record. Support: Use this icon to access the Toolkit section of the GCA/GCFA website. Access: Shows security information by role. Show: Displays help information for individual fields.
IRES Searching for a Proposal
4/25/2014 5:05 PM Page 1 of 3
This quick guide highlights the process for searching for a proposal in IRES.
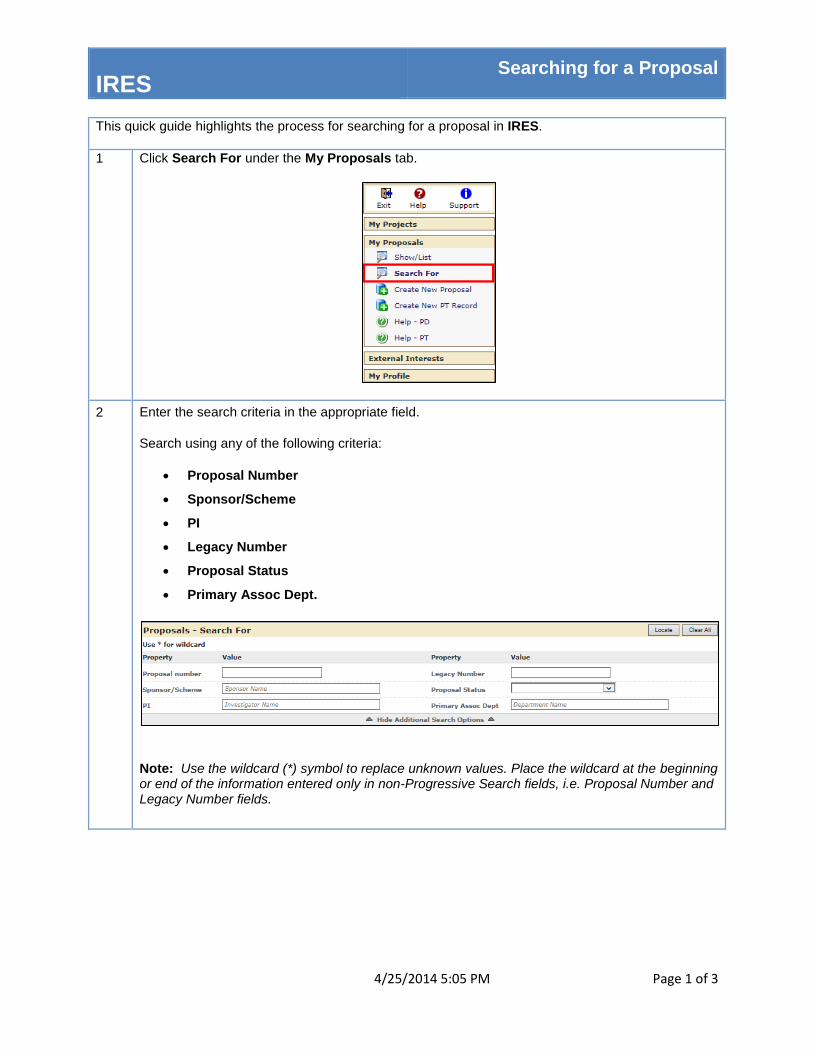
1 Click Search For under the My Proposals tab.
2 Enter the search criteria in the appropriate field.
Search using any of the following criteria:
Proposal Number
Sponsor/Scheme
PI
Legacy Number
Proposal Status
Primary Assoc Dept.
Note: Use the wildcard (*) symbol to replace unknown values. Place the wildcard at the beginning or end of the information entered only in non-Progressive Search fields, i.e. Proposal Number and Legacy Number fields.
IRES Searching for a Proposal
4/25/2014 5:05 PM Page 2 of 3
2.a If necessary, click Show Additional Search Options tab to enter additional details.
The Additional Search Fields screen will display. Use this screen to narrow your search.
Click Hide Additional Search Options to hide the Additional Search Fields section.
3 To search and locate proposals beginning with the number 14 (i.e., created in the year 2014), enter 14* in the proposal number field and click Locate to execute your search.
IRES Searching for a Proposal
4/25/2014 5:05 PM Page 3 of 3
4 All results matching your search criteria will display.
5 Scroll your mouse over the folder ( ) icon. The record menu bar will display.
Select one of the following icons within the appropriate column:
Select the Edit ( ) icon to open the record in edit mode.
Select the View ( ) icon to view the record in View Only mode.
Select the Forward ( ) icon to forward the record to another IRES user.
The Delete ( ) icon is disabled, and is not available for use.
IRES Initiating a Proposal
(S2S:System to System)
4/25/2014 5:06 PM Page 1 of 11
This quick guide highlights the process for initiating a proposal for an S2S proposal for submission to Grants.gov in IRES Proposal Development (PD).
1 Log into IRES and click the My Proposals tab.
2 Click Create New Proposal.

IRES Initiating a Proposal
(S2S:System to System)
4/25/2014 5:06 PM Page 2 of 11
3 The Create New Proposal window will display. Complete the New Proposal Questionnaire. Step #0: Click the Change PI button.
The Personnel window will display.
1. Enter the Principal Investigator’s (PI) name in the Progressive Search field.
2. Locate and click the name of the person in the search results list.
3. Click Select.
The PI’s name will display in Step #0. Step #1: Confirm that the system defaults to Create a New Proposal, and click Continue to Next Step.
IRES Initiating a Proposal
(S2S:System to System)
4/25/2014 5:06 PM Page 3 of 11
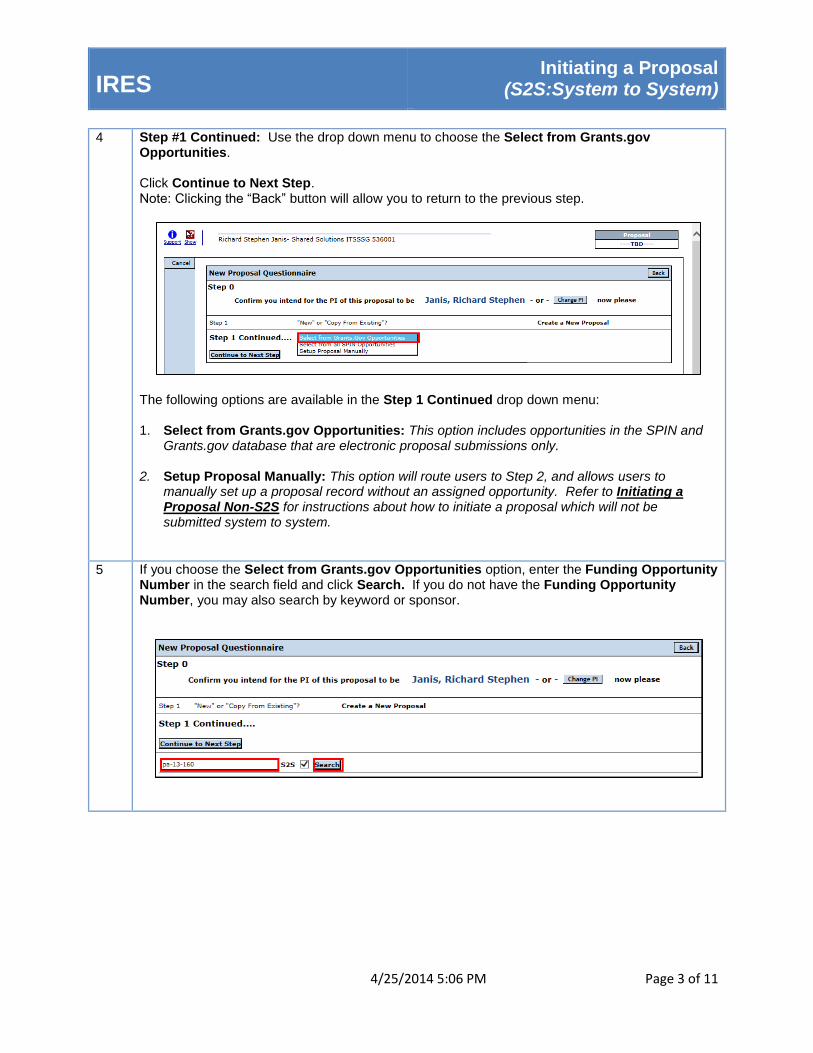
4 Step #1 Continued: Use the drop down menu to choose the Select from Grants.gov Opportunities. Click Continue to Next Step. Note: Clicking the “Back” button will allow you to return to the previous step.
The following options are available in the Step 1 Continued drop down menu: 1. Select from Grants.gov Opportunities: This option includes opportunities in the SPIN and
Grants.gov database that are electronic proposal submissions only.
2. Setup Proposal Manually: This option will route users to Step 2, and allows users to manually set up a proposal record without an assigned opportunity. Refer to Initiating a Proposal Non-S2S for instructions about how to initiate a proposal which will not be submitted system to system.
5 If you choose the Select from Grants.gov Opportunities option, enter the Funding Opportunity Number in the search field and click Search. If you do not have the Funding Opportunity Number, you may also search by keyword or sponsor.

IRES Initiating a Proposal
(S2S:System to System)
4/25/2014 5:06 PM Page 4 of 11
6 Upon selecting the funding opportunity, you will be routed back to the New Proposal
Questionnaire screen. Verify that the Opportunity Number, CFDA, Sponsor, and Title
populated correctly from Grants.gov. Click Select.
7 Step #2: Use the drop down menu next to Please Select a Proposal Type to select the type of proposal that you want to create. The default Proposal Type will be New. Click Continue to Next Step.
IRES Initiating a Proposal
(S2S:System to System)
4/25/2014 5:06 PM Page 5 of 11
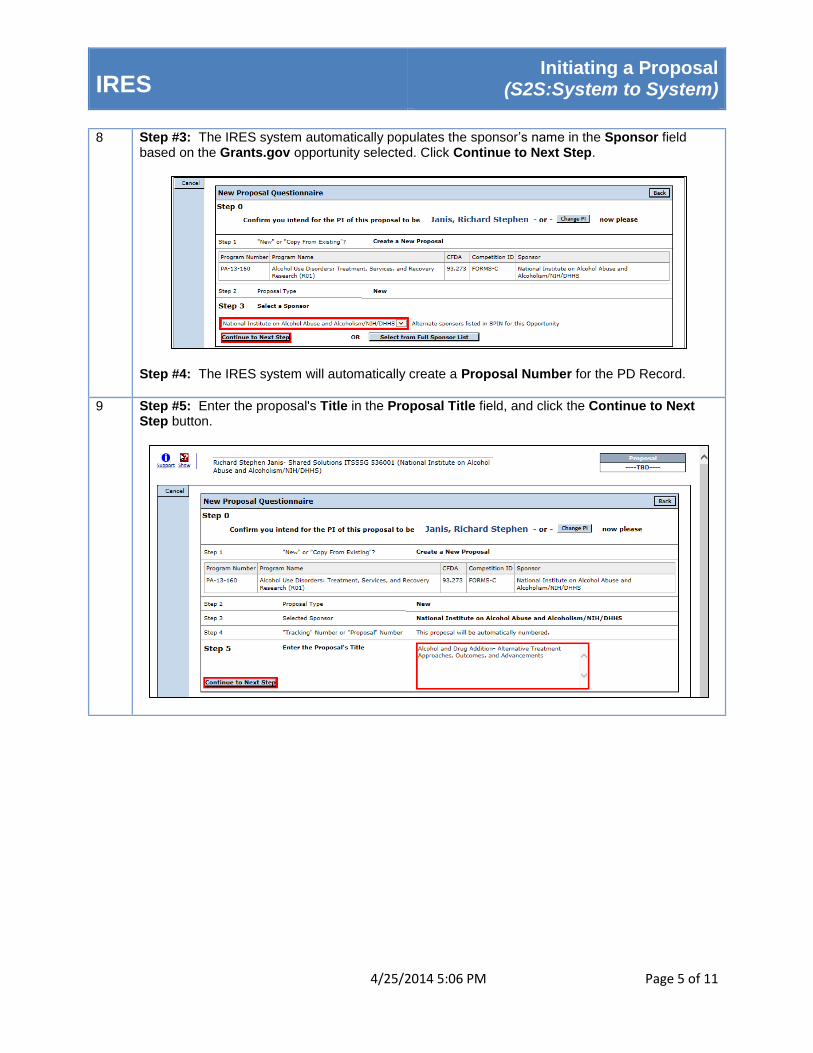
8 Step #3: The IRES system automatically populates the sponsor’s name in the Sponsor field based on the Grants.gov opportunity selected. Click Continue to Next Step.
Step #4: The IRES system will automatically create a Proposal Number for the PD Record.
9 Step #5: Enter the proposal's Title in the Proposal Title field, and click the Continue to Next Step button.
IRES Initiating a Proposal
(S2S:System to System)
4/25/2014 5:06 PM Page 6 of 11
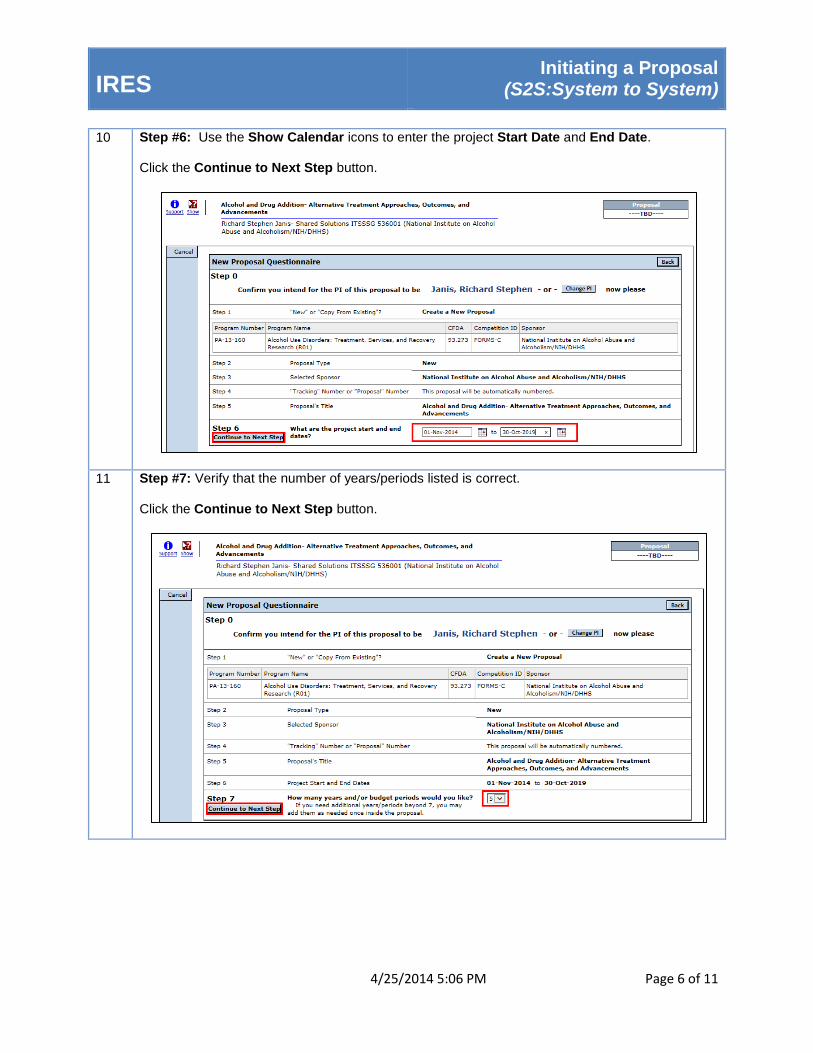
10 Step #6: Use the Show Calendar icons to enter the project Start Date and End Date. Click the Continue to Next Step button.
11 Step #7: Verify that the number of years/periods listed is correct. Click the Continue to Next Step button.
IRES Initiating a Proposal
(S2S:System to System)
4/25/2014 5:06 PM Page 7 of 11
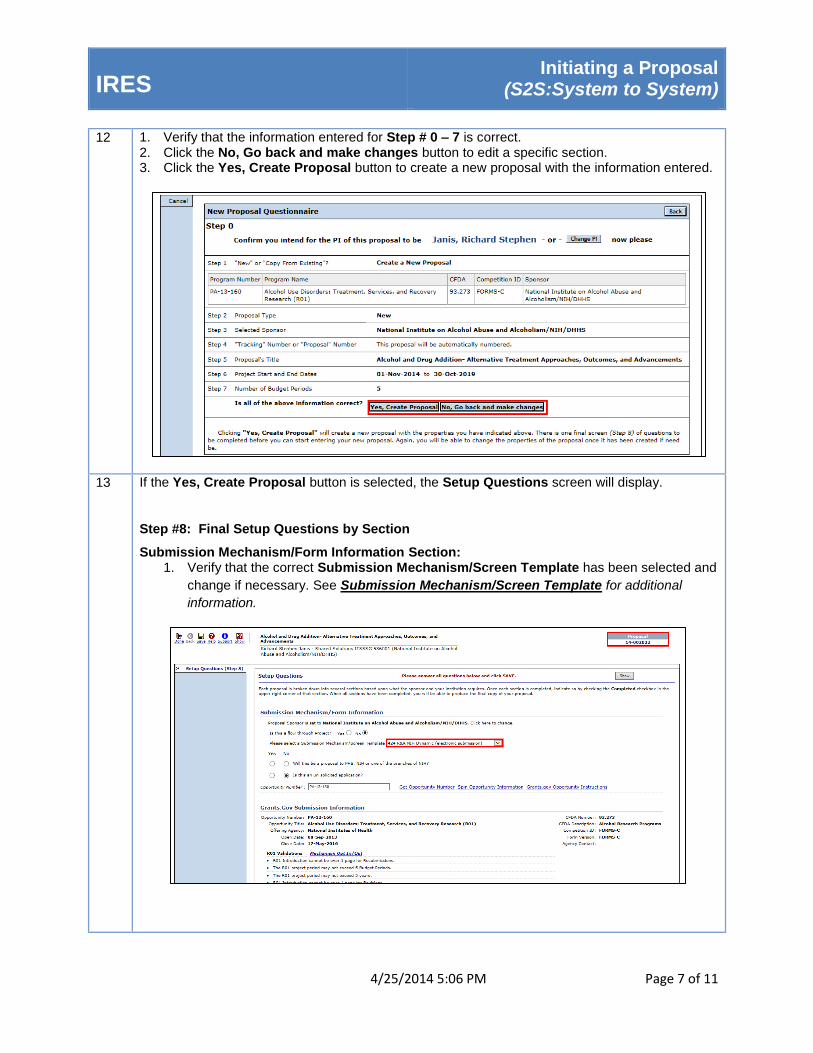
12 1. Verify that the information entered for Step # 0 – 7 is correct. 2. Click the No, Go back and make changes button to edit a specific section. 3. Click the Yes, Create Proposal button to create a new proposal with the information entered.
13 If the Yes, Create Proposal button is selected, the Setup Questions screen will display.
Step #8: Final Setup Questions by Section
Submission Mechanism/Form Information Section: 1. Verify that the correct Submission Mechanism/Screen Template has been selected and
change if necessary. See Submission Mechanism/Screen Template for additional
information.
IRES Initiating a Proposal
(S2S:System to System)
4/25/2014 5:06 PM Page 8 of 11
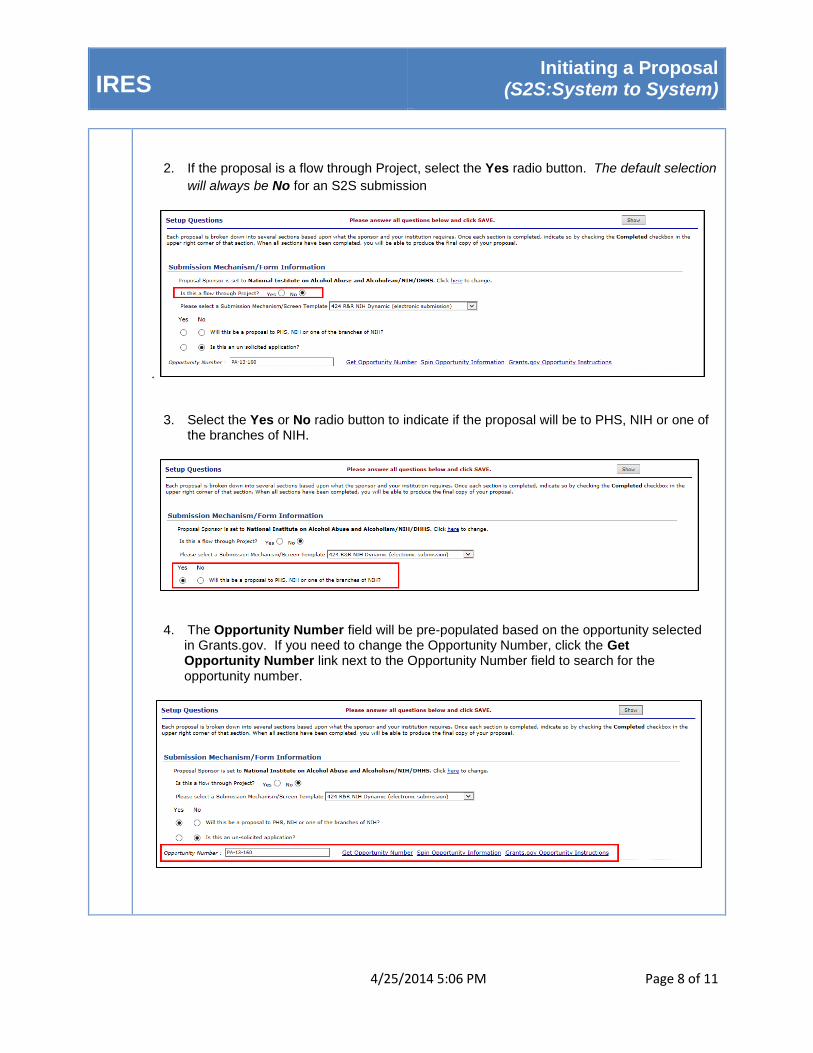
2. If the proposal is a flow through Project, select the Yes radio button. The default selection
will always be No for an S2S submission
.
3. Select the Yes or No radio button to indicate if the proposal will be to PHS, NIH or one of
the branches of NIH.
4. The Opportunity Number field will be pre-populated based on the opportunity selected
in Grants.gov. If you need to change the Opportunity Number, click the Get Opportunity Number link next to the Opportunity Number field to search for the opportunity number.
IRES Initiating a Proposal
(S2S:System to System)
4/25/2014 5:06 PM Page 9 of 11
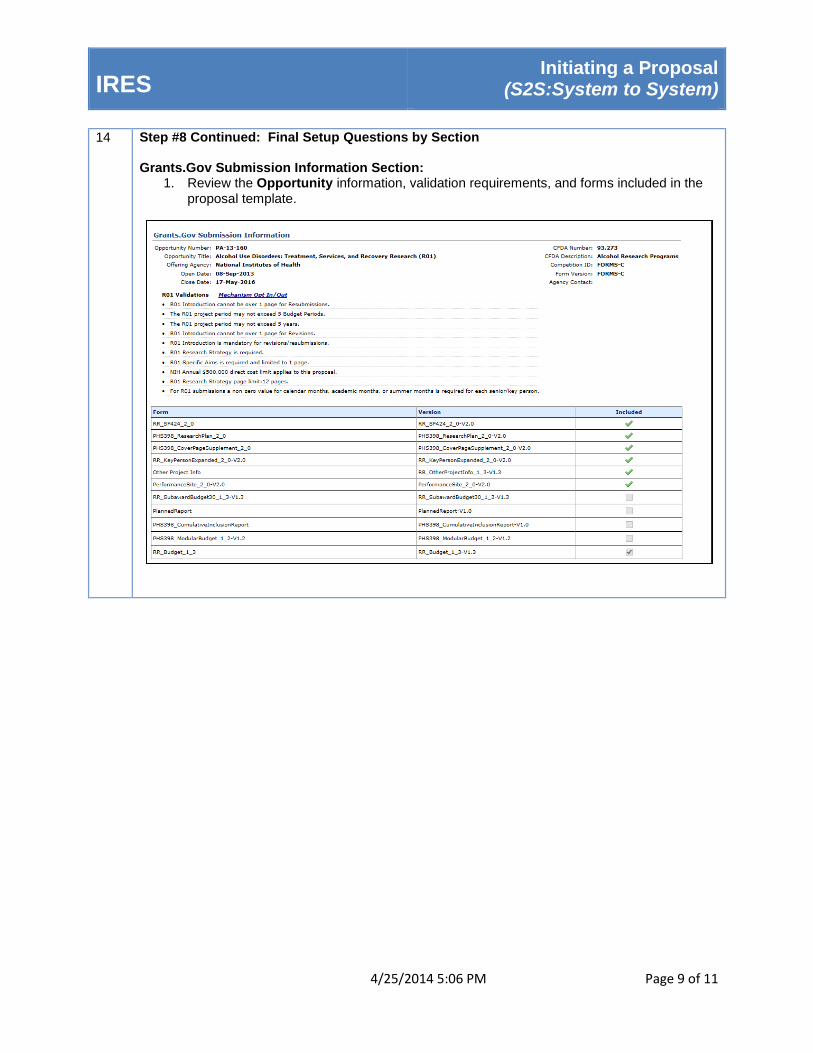
14 Step #8 Continued: Final Setup Questions by Section Grants.Gov Submission Information Section:
1. Review the Opportunity information, validation requirements, and forms included in the
proposal template.
IRES Initiating a Proposal
(S2S:System to System)
4/25/2014 5:06 PM Page 10 of 11
14
15
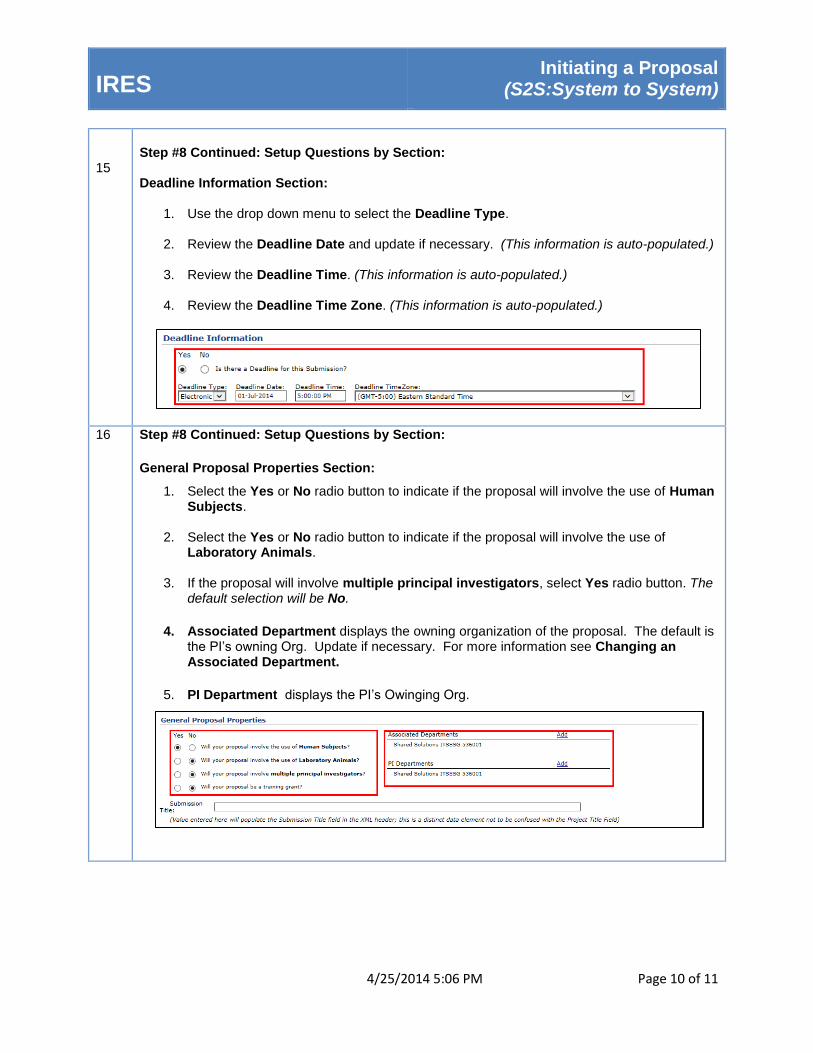
Step #8 Continued: Setup Questions by Section: Deadline Information Section:
1. Use the drop down menu to select the Deadline Type.
2. Review the Deadline Date and update if necessary. (This information is auto-populated.)
3. Review the Deadline Time. (This information is auto-populated.)
4. Review the Deadline Time Zone. (This information is auto-populated.)
16 Step #8 Continued: Setup Questions by Section:
General Proposal Properties Section:
1. Select the Yes or No radio button to indicate if the proposal will involve the use of Human Subjects.
2. Select the Yes or No radio button to indicate if the proposal will involve the use of Laboratory Animals.
3. If the proposal will involve multiple principal investigators, select Yes radio button. The default selection will be No.
4. Associated Department displays the owning organization of the proposal. The default is the PI’s owning Org. Update if necessary. For more information see Changing an Associated Department.
5. PI Department displays the PI’s Owinging Org.
IRES Initiating a Proposal
(S2S:System to System)
4/25/2014 5:06 PM Page 11 of 11
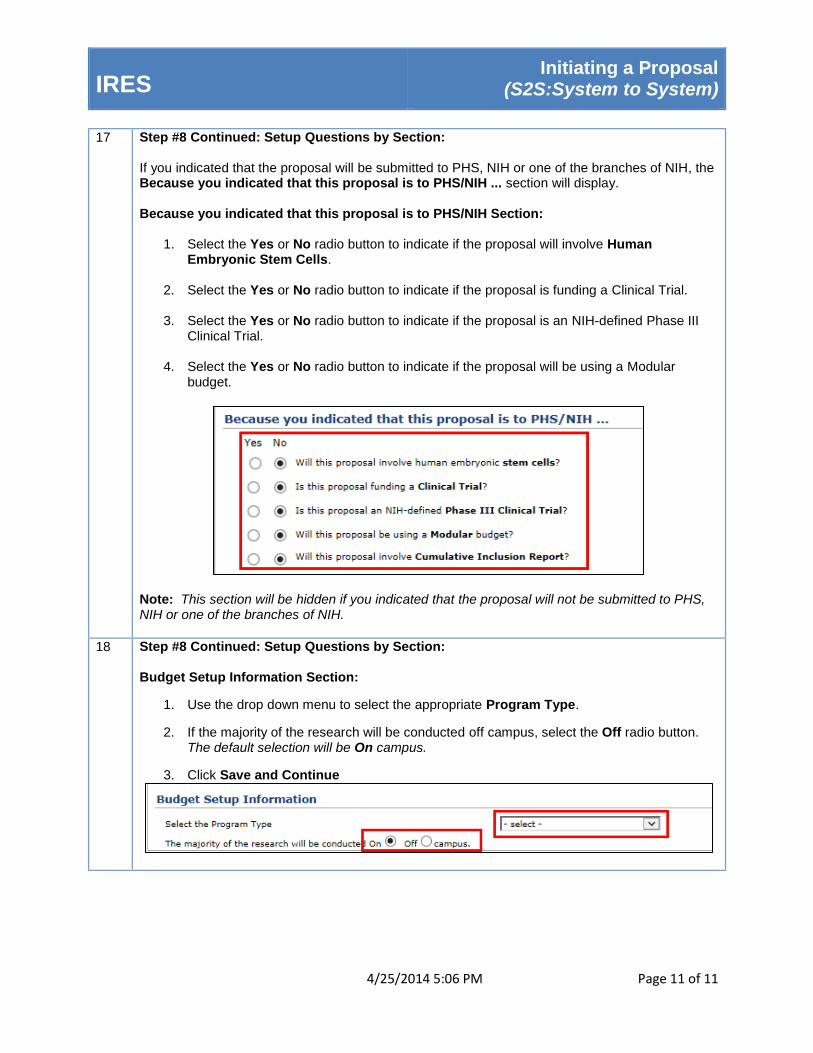
17 Step #8 Continued: Setup Questions by Section: If you indicated that the proposal will be submitted to PHS, NIH or one of the branches of NIH, the Because you indicated that this proposal is to PHS/NIH ... section will display. Because you indicated that this proposal is to PHS/NIH Section:
1. Select the Yes or No radio button to indicate if the proposal will involve Human Embryonic Stem Cells.
2. Select the Yes or No radio button to indicate if the proposal is funding a Clinical Trial.
3. Select the Yes or No radio button to indicate if the proposal is an NIH-defined Phase III Clinical Trial.
4. Select the Yes or No radio button to indicate if the proposal will be using a Modular budget.
Note: This section will be hidden if you indicated that the proposal will not be submitted to PHS, NIH or one of the branches of NIH.
18 Step #8 Continued: Setup Questions by Section: Budget Setup Information Section:
1. Use the drop down menu to select the appropriate Program Type.
2. If the majority of the research will be conducted off campus, select the Off radio button. The default selection will be On campus.
3. Click Save and Continue
IRES Initiating a Proposal
(Non-S2S)
4/25/2014 5:06 PM Page 1 of 8
This quick guide highlights the process for creating a Non-S2S proposal in IRES Proposal Development (PD).
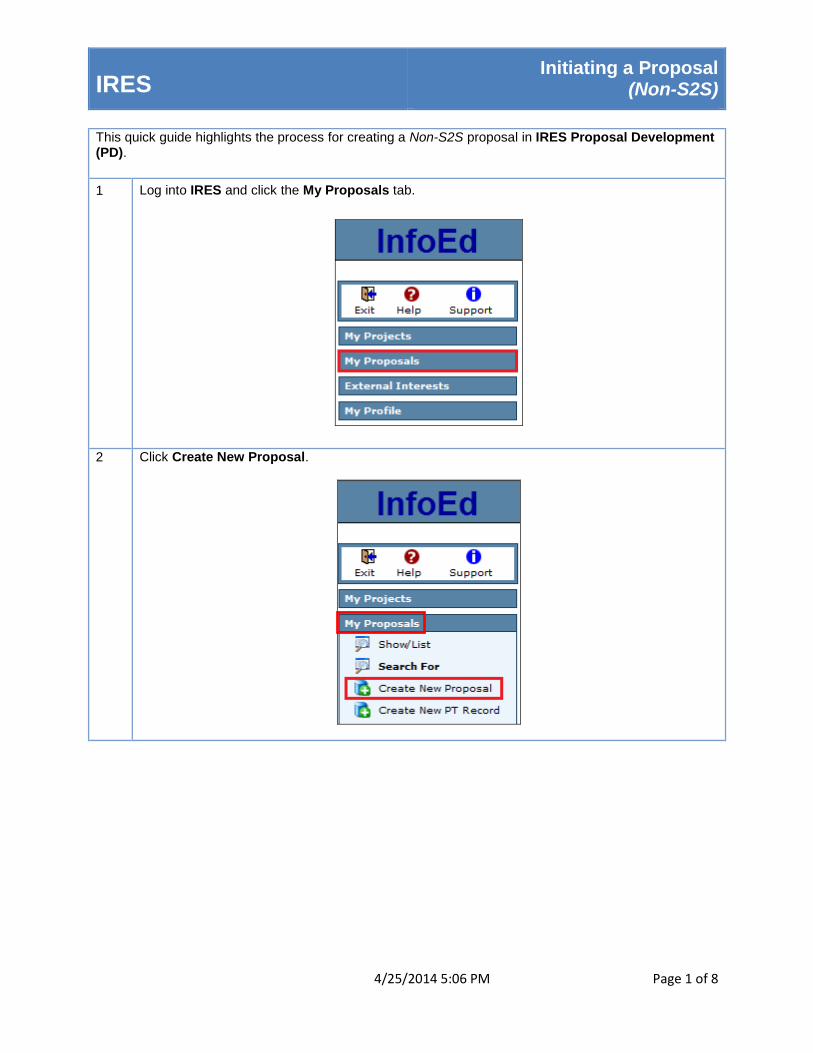
1 Log into IRES and click the My Proposals tab.
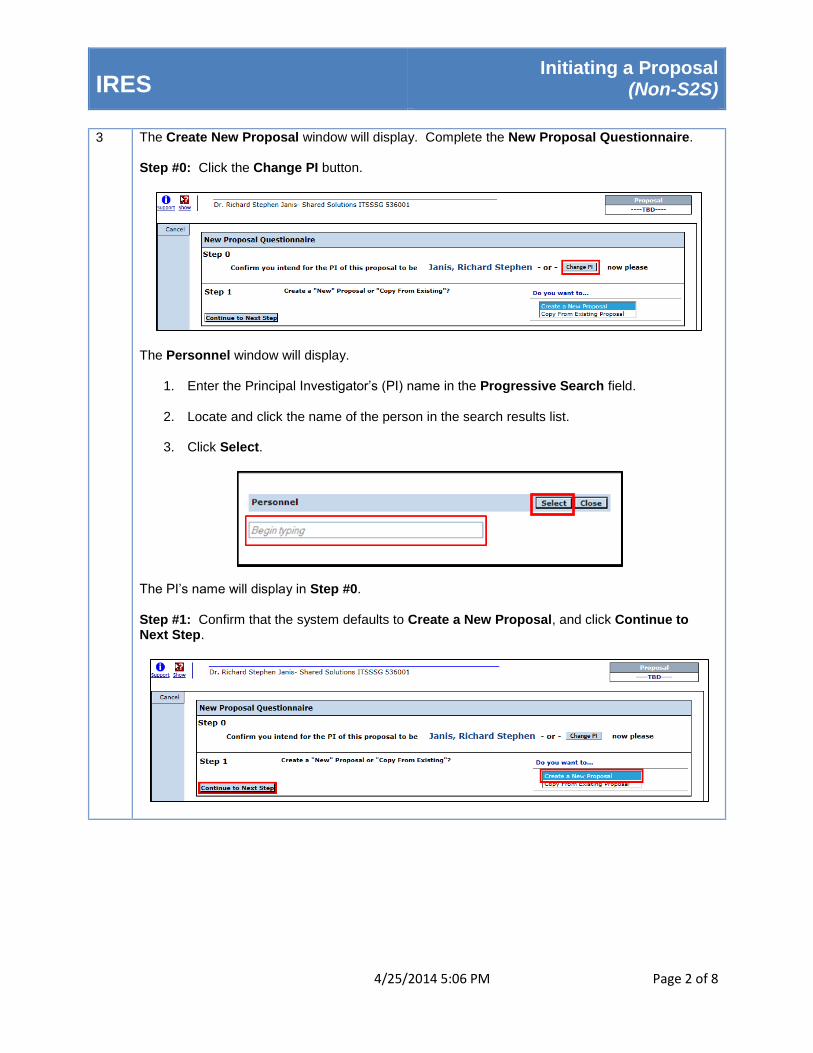
2 Click Create New Proposal.
IRES Initiating a Proposal
(Non-S2S)
4/25/2014 5:06 PM Page 2 of 8
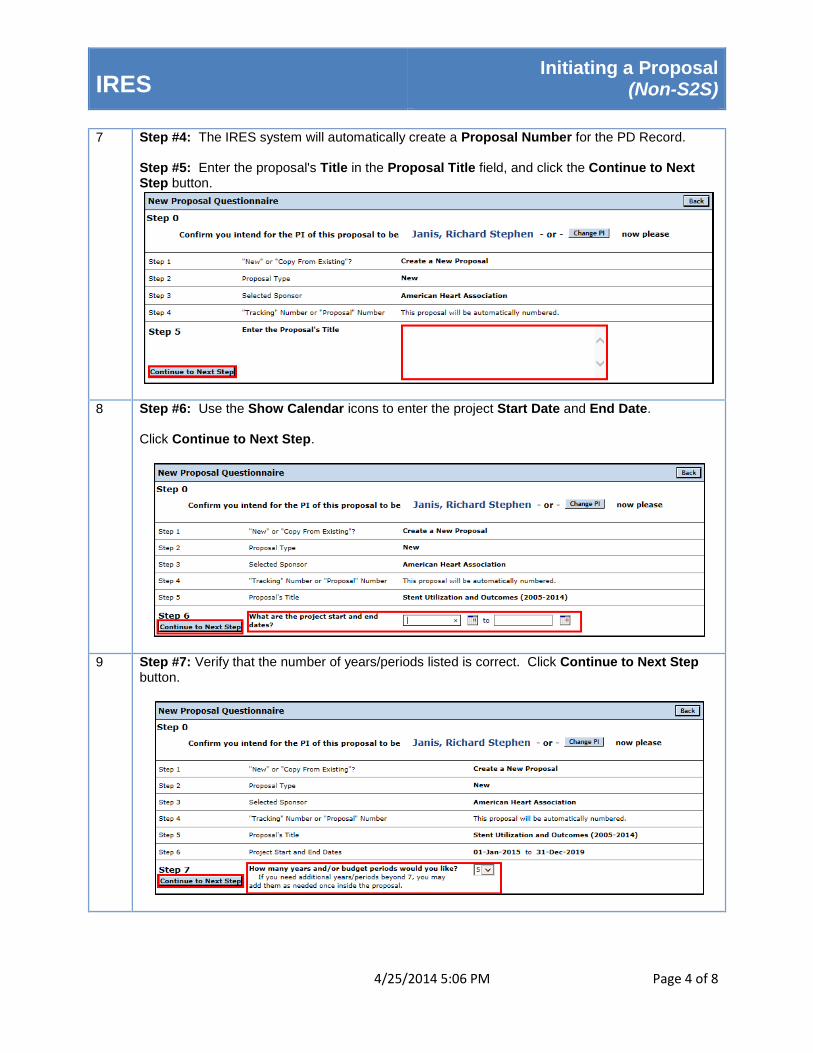
3 The Create New Proposal window will display. Complete the New Proposal Questionnaire. Step #0: Click the Change PI button.
The Personnel window will display.
1. Enter the Principal Investigator’s (PI) name in the Progressive Search field.
2. Locate and click the name of the person in the search results list.
3. Click Select.
The PI’s name will display in Step #0. Step #1: Confirm that the system defaults to Create a New Proposal, and click Continue to Next Step.

IRES Initiating a Proposal
(Non-S2S)
4/25/2014 5:06 PM Page 3 of 8
4 Step #1 Continued: Use the drop down menu to choose the Setup Proposal Manually option. Click Continue to Next Step. Note: Clicking the “Back” button will allow you to return to the previous step.
5 Step #2: Use the drop down menu next to Please Select a Proposal Type to select the type of proposal that you want to create. The default Proposal Type will be New. Click Continue to Next Step.
6 Step #3: Enter the Sponsor’s name in the Progressive Search field. Locate and click the appropriate sponsor’s name in the search results list. Click Continue to Next Step.
IRES Initiating a Proposal
(Non-S2S)
4/25/2014 5:06 PM Page 4 of 8
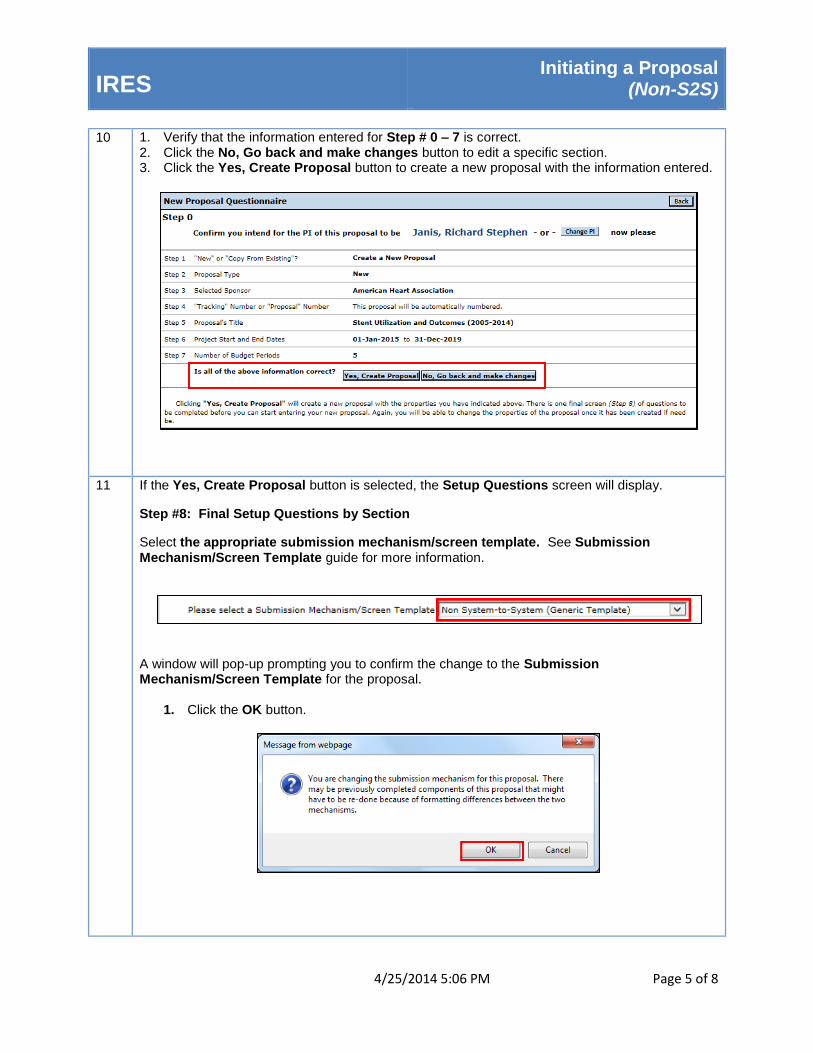
7 Step #4: The IRES system will automatically create a Proposal Number for the PD Record. Step #5: Enter the proposal's Title in the Proposal Title field, and click the Continue to Next Step button.
8 Step #6: Use the Show Calendar icons to enter the project Start Date and End Date. Click Continue to Next Step.
9 Step #7: Verify that the number of years/periods listed is correct. Click Continue to Next Step button.
IRES Initiating a Proposal
(Non-S2S)
4/25/2014 5:06 PM Page 5 of 8
10 1. Verify that the information entered for Step # 0 – 7 is correct. 2. Click the No, Go back and make changes button to edit a specific section. 3. Click the Yes, Create Proposal button to create a new proposal with the information entered.
11 If the Yes, Create Proposal button is selected, the Setup Questions screen will display.
Step #8: Final Setup Questions by Section
Select the appropriate submission mechanism/screen template. See Submission Mechanism/Screen Template guide for more information.
A window will pop-up prompting you to confirm the change to the Submission Mechanism/Screen Template for the proposal.
1. Click the OK button.
IRES Initiating a Proposal
(Non-S2S)
4/25/2014 5:06 PM Page 6 of 8
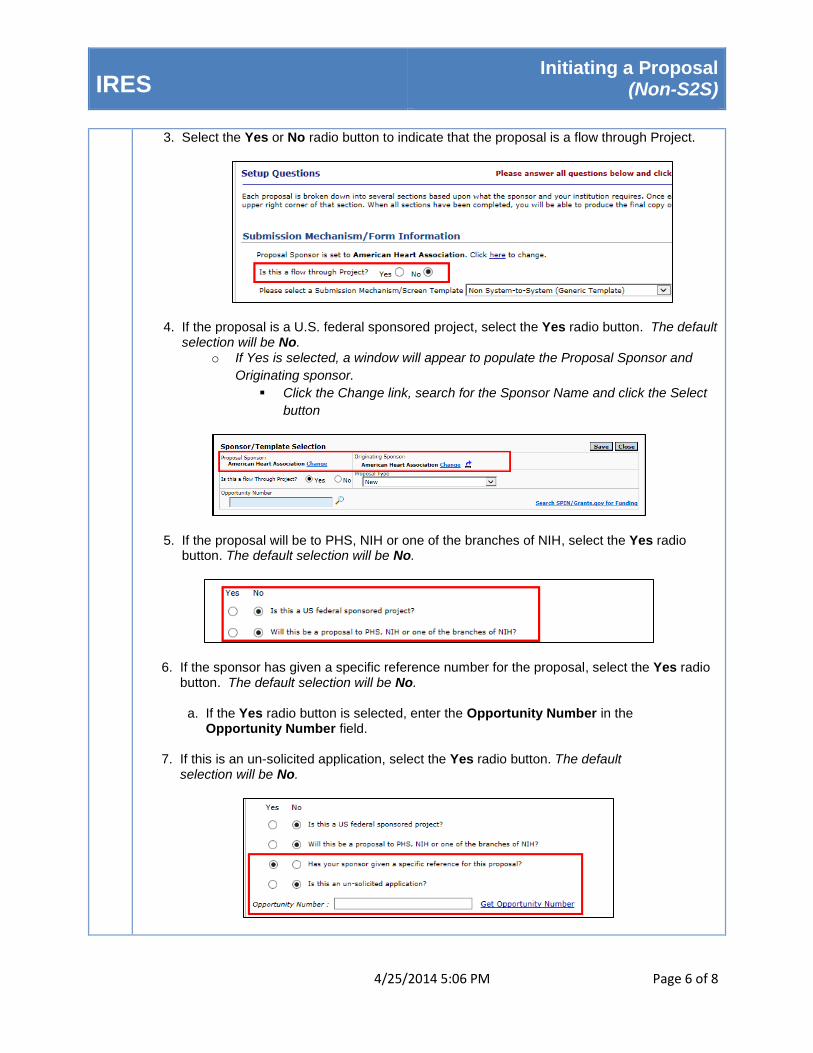
3. Select the Yes or No radio button to indicate that the proposal is a flow through Project.
4. If the proposal is a U.S. federal sponsored project, select the Yes radio button. The default selection will be No.
o If Yes is selected, a window will appear to populate the Proposal Sponsor and
Originating sponsor.
Click the Change link, search for the Sponsor Name and click the Select
button
5. If the proposal will be to PHS, NIH or one of the branches of NIH, select the Yes radio button. The default selection will be No.
6. If the sponsor has given a specific reference number for the proposal, select the Yes radio button. The default selection will be No.
a. If the Yes radio button is selected, enter the Opportunity Number in the Opportunity Number field.
7. If this is an un-solicited application, select the Yes radio button. The default selection will be No.
IRES Initiating a Proposal
(Non-S2S)
4/25/2014 5:06 PM Page 7 of 8
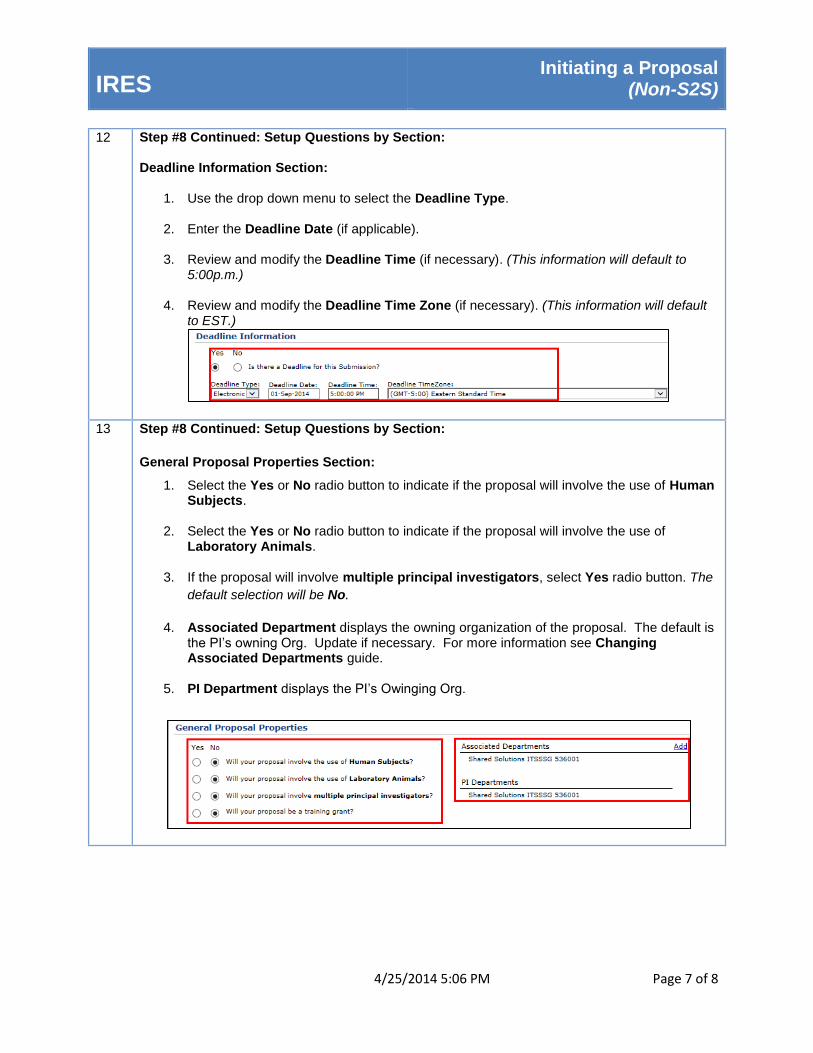
12 Step #8 Continued: Setup Questions by Section: Deadline Information Section:
1. Use the drop down menu to select the Deadline Type.
2. Enter the Deadline Date (if applicable).
3. Review and modify the Deadline Time (if necessary). (This information will default to 5:00p.m.)
4. Review and modify the Deadline Time Zone (if necessary). (This information will default to EST.)
13 Step #8 Continued: Setup Questions by Section:
General Proposal Properties Section:
1. Select the Yes or No radio button to indicate if the proposal will involve the use of Human Subjects.
2. Select the Yes or No radio button to indicate if the proposal will involve the use of Laboratory Animals.
3. If the proposal will involve multiple principal investigators, select Yes radio button. The
default selection will be No.
4. Associated Department displays the owning organization of the proposal. The default is the PI’s owning Org. Update if necessary. For more information see Changing Associated Departments guide.
5. PI Department displays the PI’s Owinging Org.
IRES Initiating a Proposal
(Non-S2S)
4/25/2014 5:06 PM Page 8 of 8
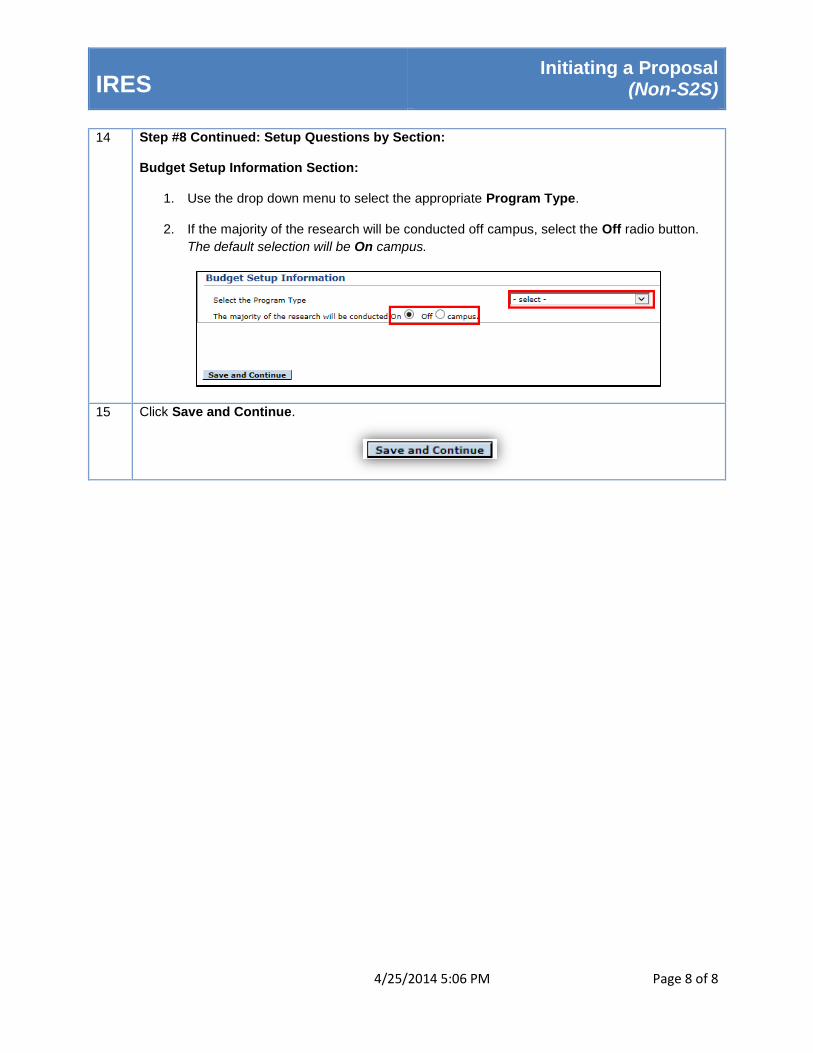
14 Step #8 Continued: Setup Questions by Section: Budget Setup Information Section:
1. Use the drop down menu to select the appropriate Program Type.
2. If the majority of the research will be conducted off campus, select the Off radio button.
The default selection will be On campus.
15 Click Save and Continue.
IRES Creating a Child Record Proposal
4/25/2014 5:07 PM Page 1 of 6
This quick guide highlights the process for creating a Child Record proposal in IRES Proposal Development (PD). Note: The types of PD Child Record proposals that may be created include:
Non-Competing Continuation
Supplement
Extension
Just In Time (JIT) for revised budgets
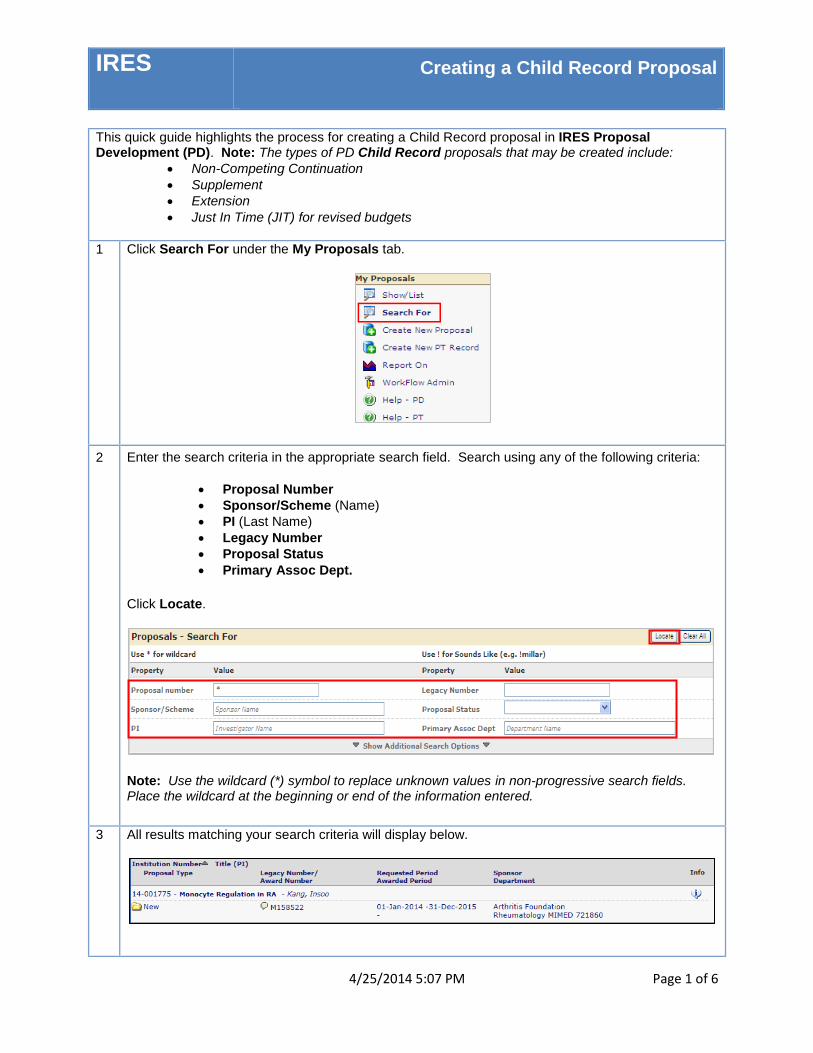
1 Click Search For under the My Proposals tab.
2 Enter the search criteria in the appropriate search field. Search using any of the following criteria:
Proposal Number
Sponsor/Scheme (Name)
PI (Last Name)
Legacy Number
Proposal Status
Primary Assoc Dept.
Click Locate.
Note: Use the wildcard (*) symbol to replace unknown values in non-progressive search fields. Place the wildcard at the beginning or end of the information entered.
3 All results matching your search criteria will display below.

IRES Creating a Child Record Proposal
4/25/2014 5:07 PM Page 2 of 6
4 Scroll your mouse over the folder ( ) icon and the record menu bar will display. Click the Edit PT Proposal icon to open the PT Record.
5 Click the Add New PD icon located in the proposal tree.
6 The Additional Submission Questionnaire screen will display.
Click the Change PI button.
IRES Creating a Child Record Proposal
4/25/2014 5:07 PM Page 3 of 6
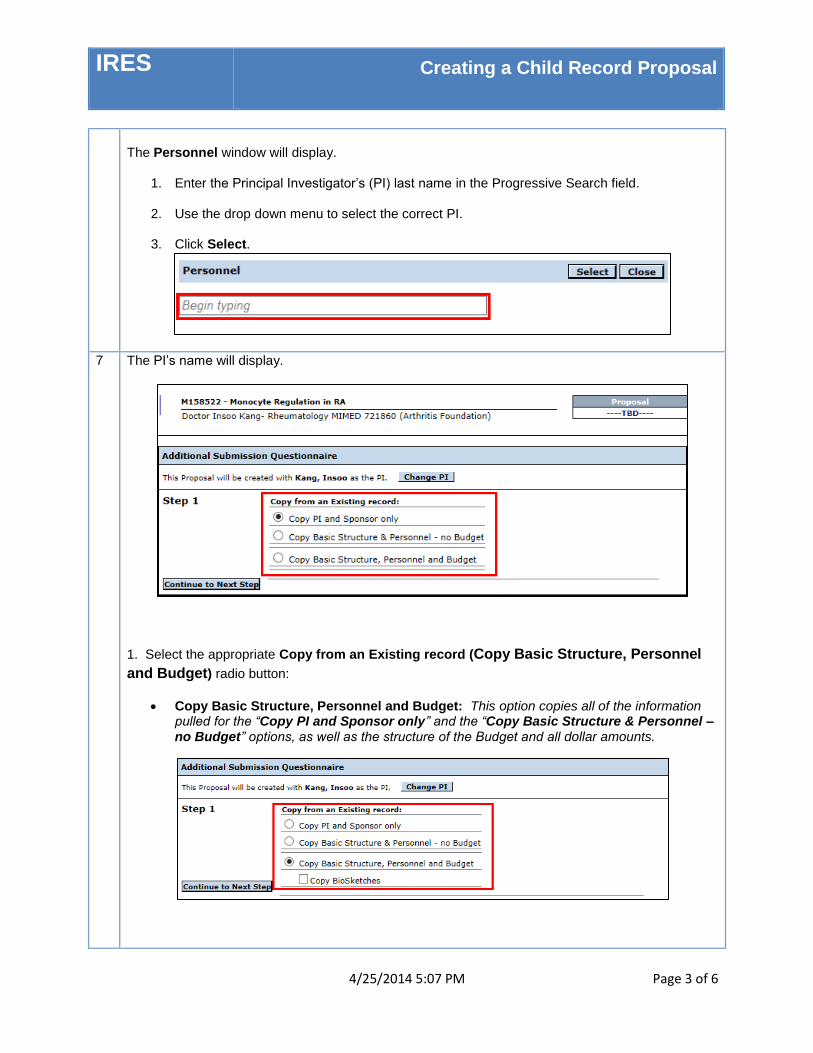
The Personnel window will display.
1. Enter the Principal Investigator’s (PI) last name in the Progressive Search field.
2. Use the drop down menu to select the correct PI.
3. Click Select.
7 The PI’s name will display.
1. Select the appropriate Copy from an Existing record (Copy Basic Structure, Personnel
and Budget) radio button:
Copy Basic Structure, Personnel and Budget: This option copies all of the information pulled for the “Copy PI and Sponsor only” and the “Copy Basic Structure & Personnel – no Budget” options, as well as the structure of the Budget and all dollar amounts.
IRES Creating a Child Record Proposal
4/25/2014 5:07 PM Page 4 of 6
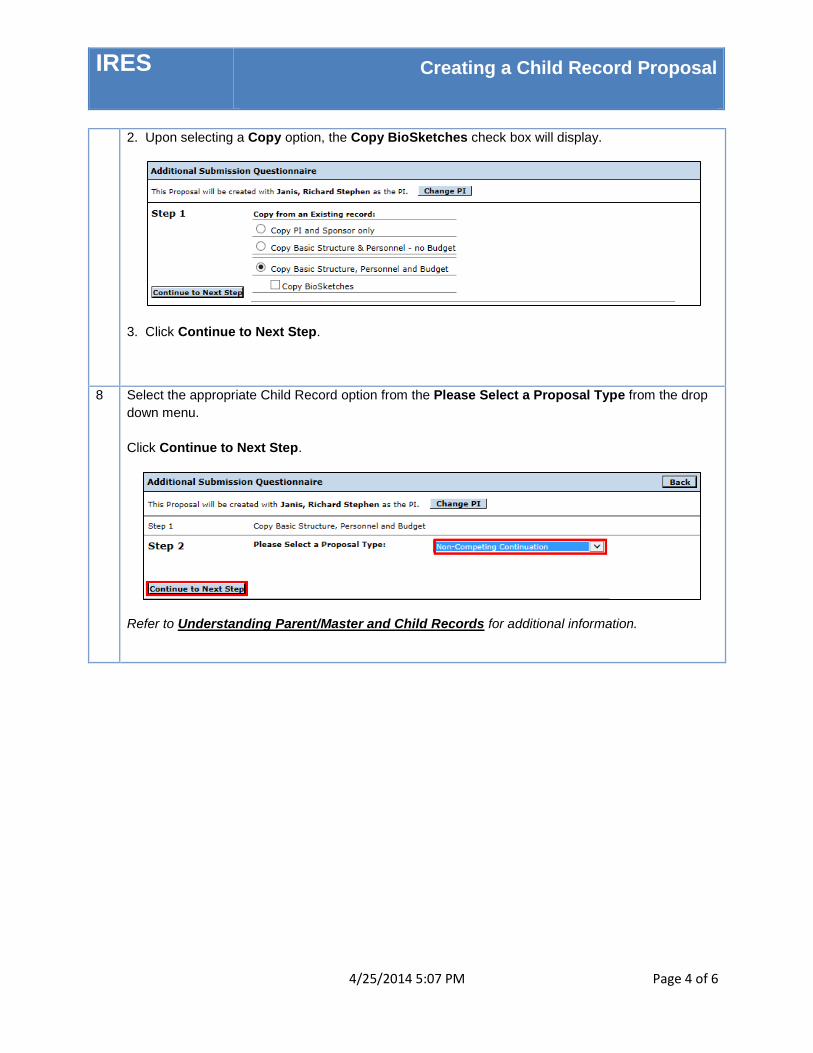
2. Upon selecting a Copy option, the Copy BioSketches check box will display.
3. Click Continue to Next Step.
8 Select the appropriate Child Record option from the Please Select a Proposal Type from the drop
down menu.
Click Continue to Next Step.
Refer to Understanding Parent/Master and Child Records for additional information.
IRES Creating a Child Record Proposal
4/25/2014 5:07 PM Page 5 of 6
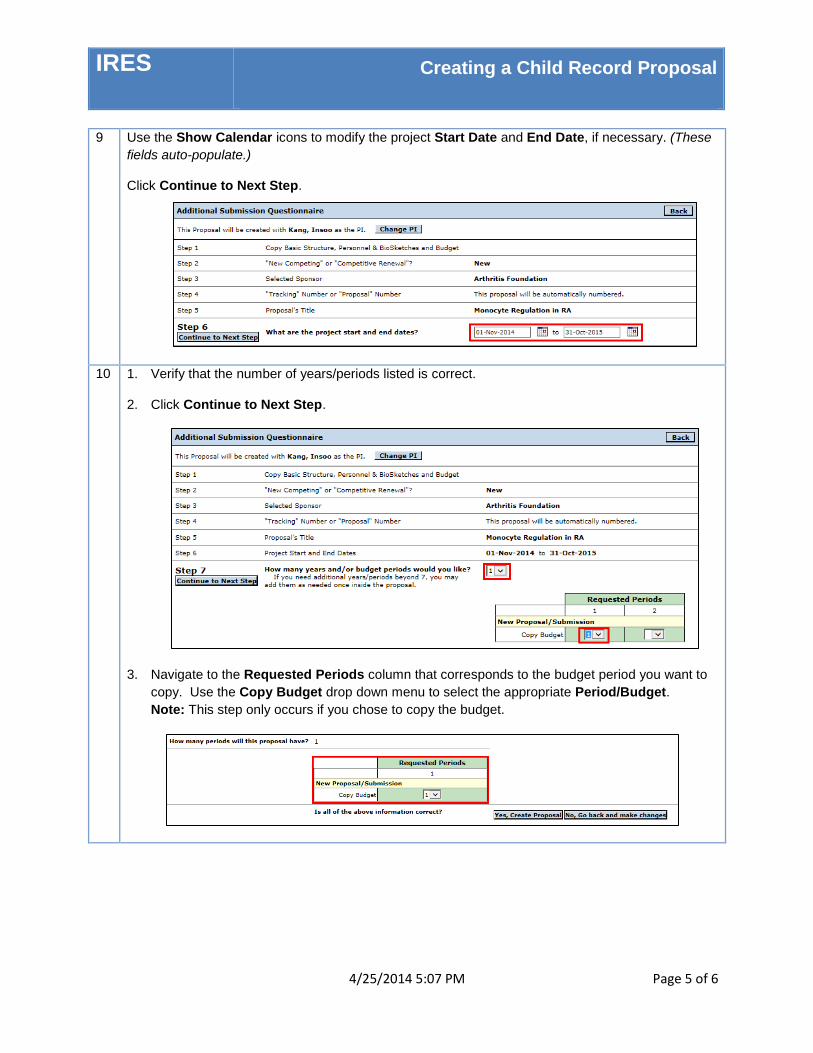
9 Use the Show Calendar icons to modify the project Start Date and End Date, if necessary. (These
fields auto-populate.)
Click Continue to Next Step.
10 1. Verify that the number of years/periods listed is correct.
2. Click Continue to Next Step.
3. Navigate to the Requested Periods column that corresponds to the budget period you want to
copy. Use the Copy Budget drop down menu to select the appropriate Period/Budget.
Note: This step only occurs if you chose to copy the budget.
IRES Creating a Child Record Proposal
4/25/2014 5:07 PM Page 6 of 6
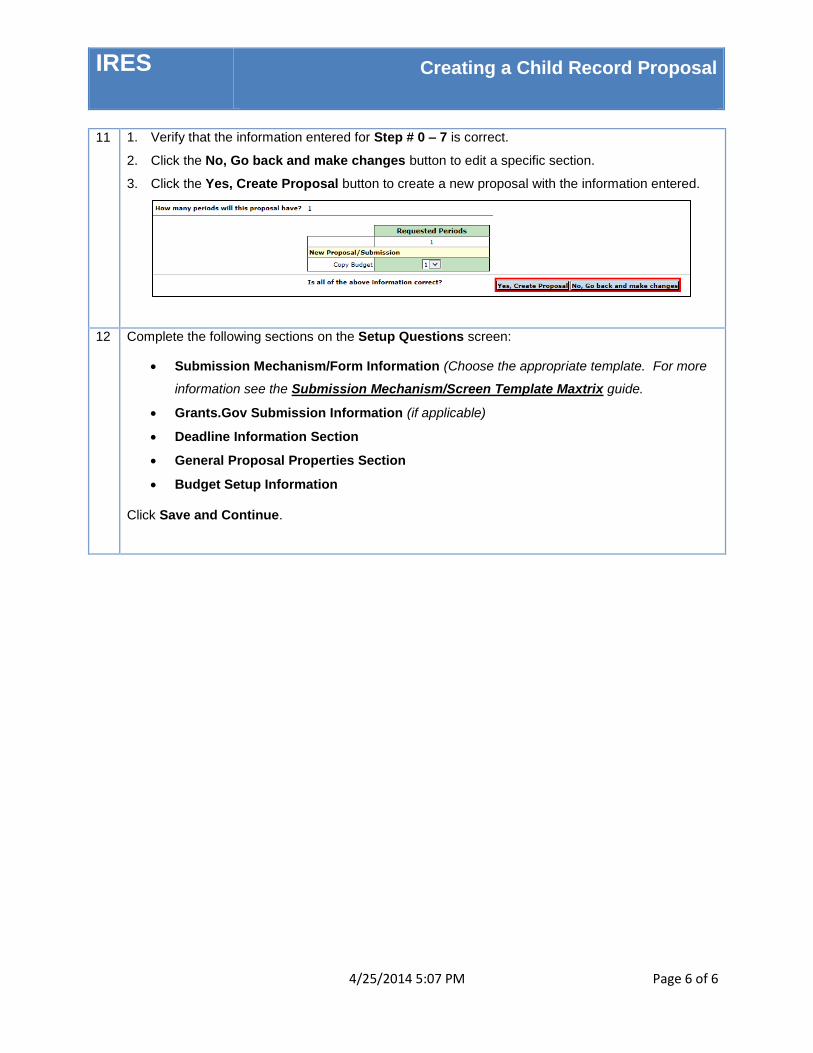
11 1. Verify that the information entered for Step # 0 – 7 is correct.
2. Click the No, Go back and make changes button to edit a specific section.
3. Click the Yes, Create Proposal button to create a new proposal with the information entered.
12 Complete the following sections on the Setup Questions screen:
Submission Mechanism/Form Information (Choose the appropriate template. For more
information see the Submission Mechanism/Screen Template Maxtrix guide.
Grants.Gov Submission Information (if applicable)
Deadline Information Section
General Proposal Properties Section
Budget Setup Information Click Save and Continue.
IRES Entering a Letter of Intent /Pre-Application Proposal
4/25/2014 5:08 PM Page 1 of 6
This quick guide highlights the process for entering a Binding Letter of Intent/Pre-Application proposal in IRES Proposal Development (PD).
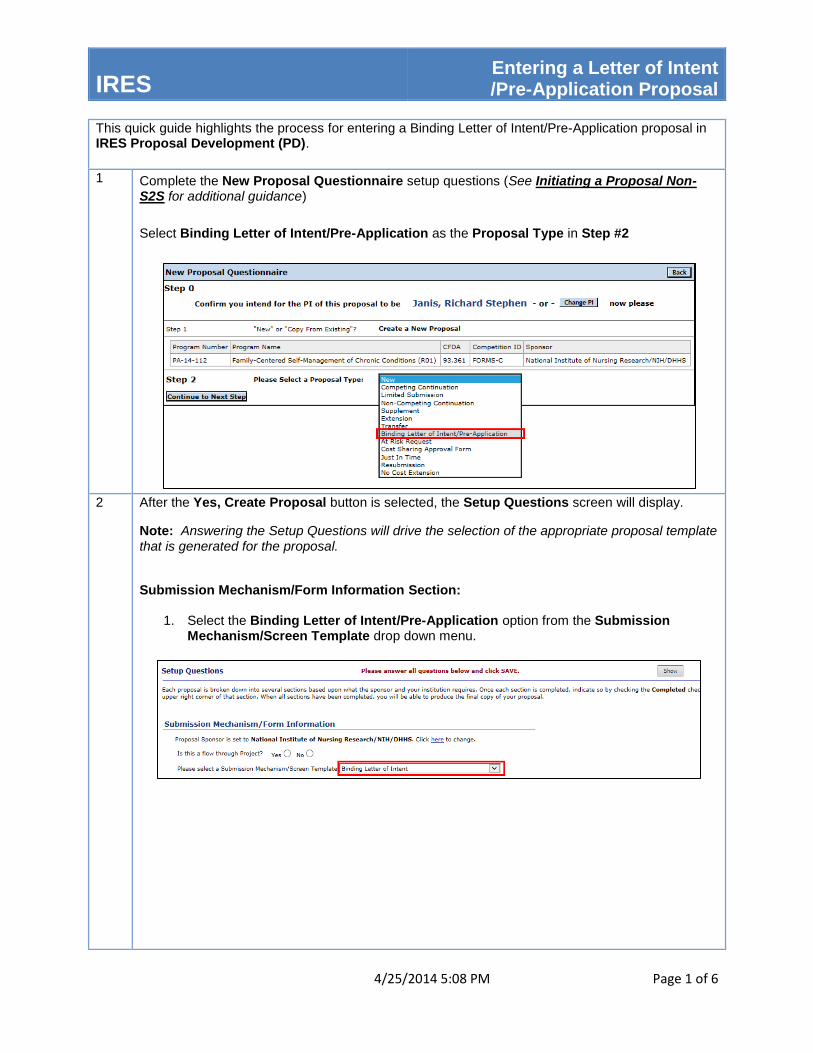
1 Complete the New Proposal Questionnaire setup questions (See Initiating a Proposal Non-
S2S for additional guidance)
Select Binding Letter of Intent/Pre-Application as the Proposal Type in Step #2
2 After the Yes, Create Proposal button is selected, the Setup Questions screen will display.
Note: Answering the Setup Questions will drive the selection of the appropriate proposal template that is generated for the proposal.
Submission Mechanism/Form Information Section:
1. Select the Binding Letter of Intent/Pre-Application option from the Submission
Mechanism/Screen Template drop down menu.
IRES Entering a Letter of Intent /Pre-Application Proposal
4/25/2014 5:08 PM Page 2 of 6
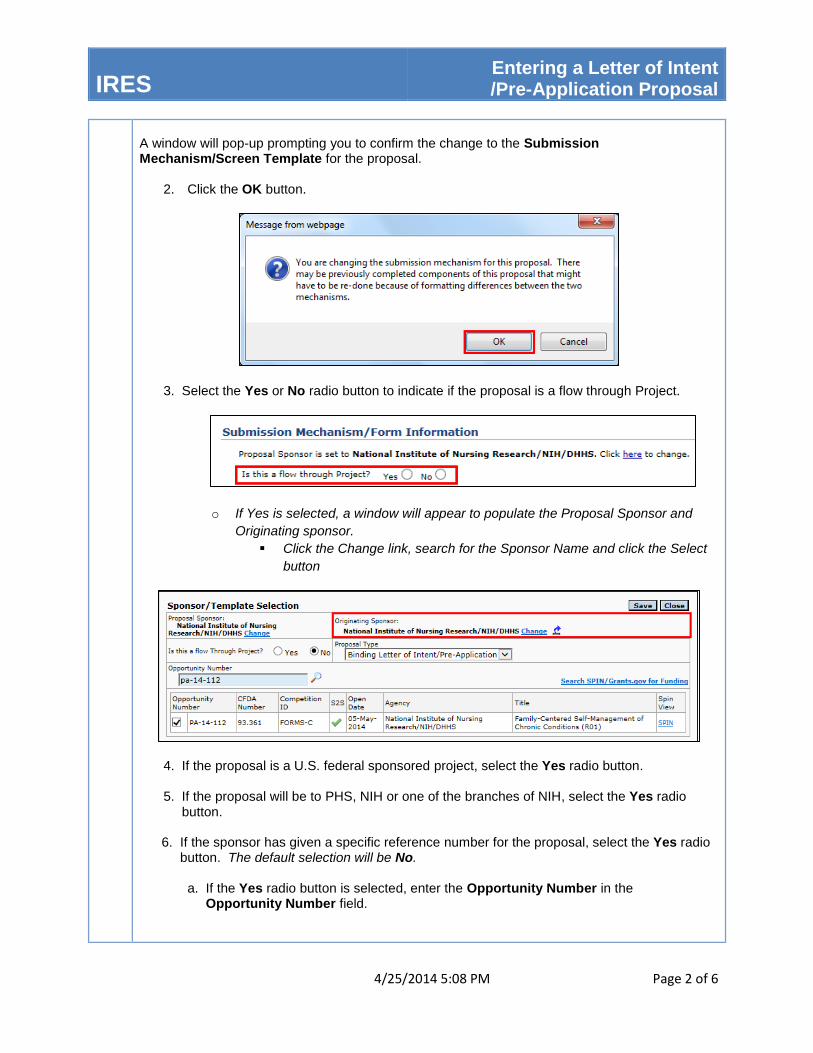
A window will pop-up prompting you to confirm the change to the Submission Mechanism/Screen Template for the proposal.
2. Click the OK button.
3. Select the Yes or No radio button to indicate if the proposal is a flow through Project.
o If Yes is selected, a window will appear to populate the Proposal Sponsor and
Originating sponsor.
Click the Change link, search for the Sponsor Name and click the Select
button
4. If the proposal is a U.S. federal sponsored project, select the Yes radio button. 5. If the proposal will be to PHS, NIH or one of the branches of NIH, select the Yes radio button.
6. If the sponsor has given a specific reference number for the proposal, select the Yes radio button. The default selection will be No.
a. If the Yes radio button is selected, enter the Opportunity Number in the Opportunity Number field.

IRES Entering a Letter of Intent /Pre-Application Proposal
4/25/2014 5:08 PM Page 3 of 6
Deadline Information Section:
1. Use the drop down menu to select the Deadline Type.
2. Enter the Deadline Date (if applicable).
3. Review and modify the Deadline Time (if necessary). (This information will default to 5:00p.m.)
4. Review and modify the Deadline Time Zone (if necessary). (This information will default to EST.)
3 General Proposal Properties Section:
1. Select the Yes or No radio button to indicate if the proposal will involve the use of Human Subjects.
2. Select the Yes or No radio button to indicate if the proposal will involve the use of Laboratory Animals.
3. If the proposal will involve multiple principal investigators, select Yes radio button. The default selection will be No.
4. If the proposal will be a training grant, select Yes radio button. The default selection will be No.
5. Leave the Submission Title field blank.
IRES Entering a Letter of Intent /Pre-Application Proposal
4/25/2014 5:08 PM Page 4 of 6
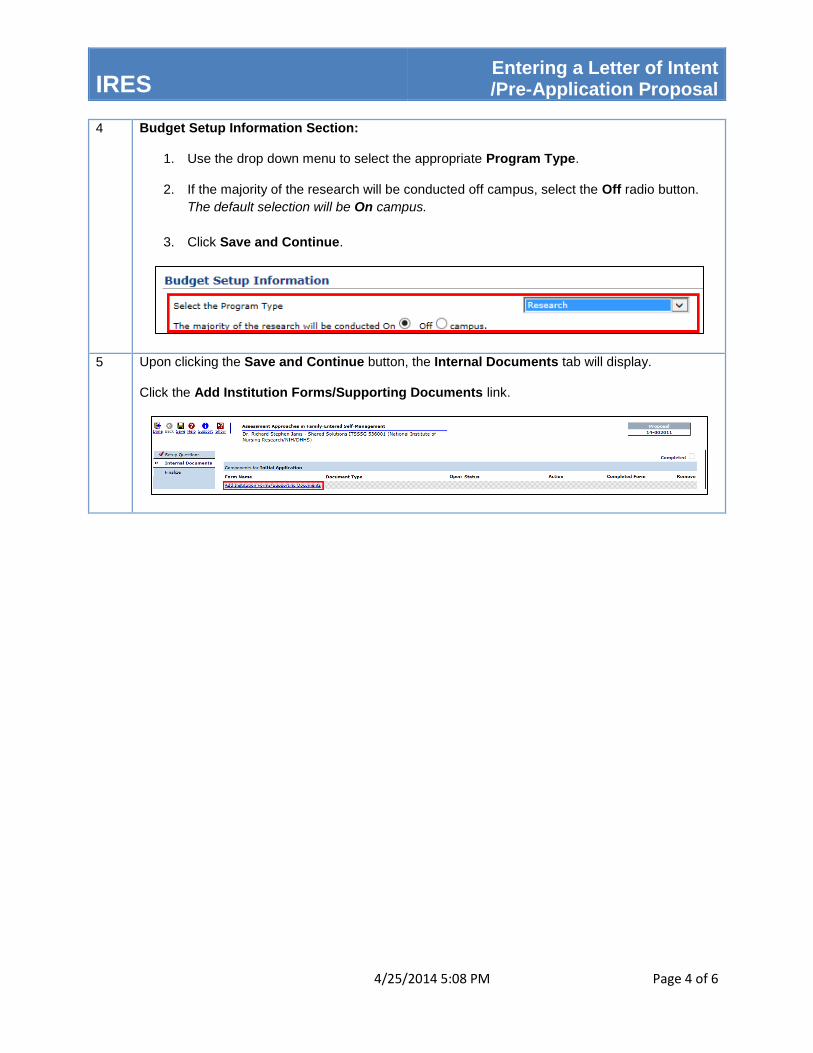
4 Budget Setup Information Section:
1. Use the drop down menu to select the appropriate Program Type.
2. If the majority of the research will be conducted off campus, select the Off radio button.
The default selection will be On campus.
3. Click Save and Continue.
5 Upon clicking the Save and Continue button, the Internal Documents tab will display. Click the Add Institution Forms/Supporting Documents link.
IRES Entering a Letter of Intent /Pre-Application Proposal
4/25/2014 5:08 PM Page 5 of 6
6 The Add Institution Forms/Supporting Documents screen will appear.
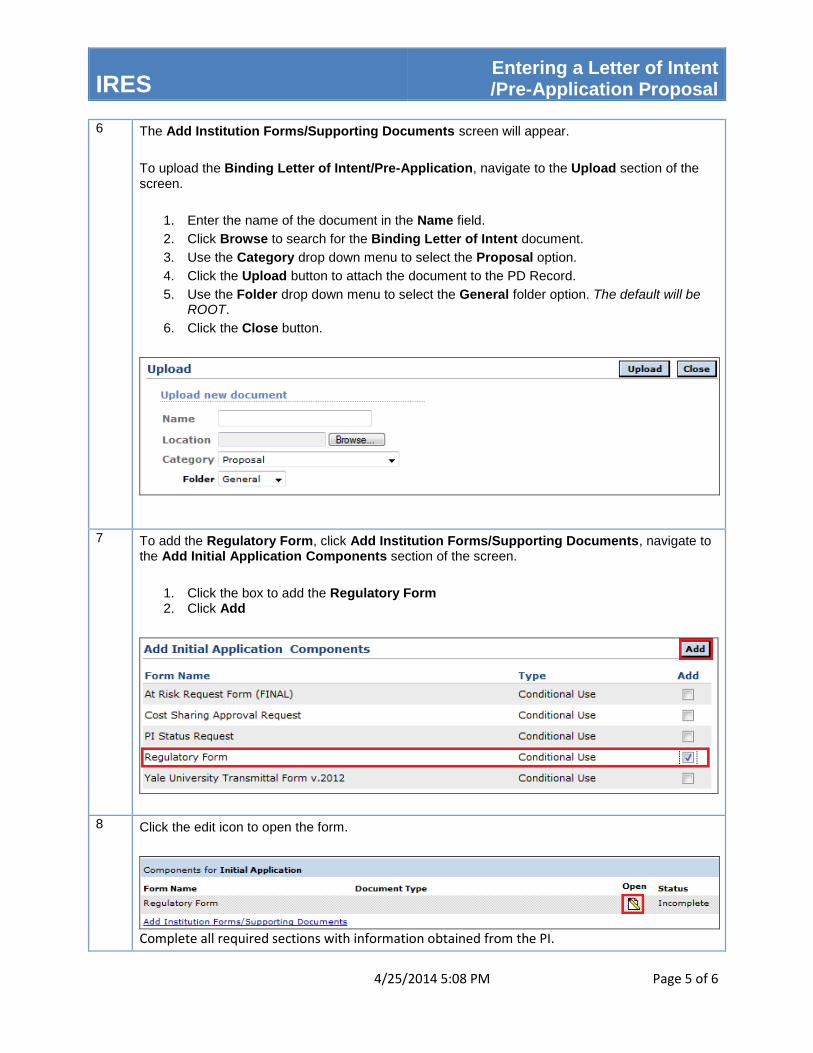
To upload the Binding Letter of Intent/Pre-Application, navigate to the Upload section of the screen.
1. Enter the name of the document in the Name field.
2. Click Browse to search for the Binding Letter of Intent document.
3. Use the Category drop down menu to select the Proposal option.
4. Click the Upload button to attach the document to the PD Record.
5. Use the Folder drop down menu to select the General folder option. The default will be ROOT.
6. Click the Close button.
7 To add the Regulatory Form, click Add Institution Forms/Supporting Documents, navigate to the Add Initial Application Components section of the screen.
1. Click the box to add the Regulatory Form 2. Click Add
8 Click the edit icon to open the form.
Complete all required sections with information obtained from the PI.
IRES Entering a Letter of Intent /Pre-Application Proposal
4/25/2014 5:08 PM Page 6 of 6
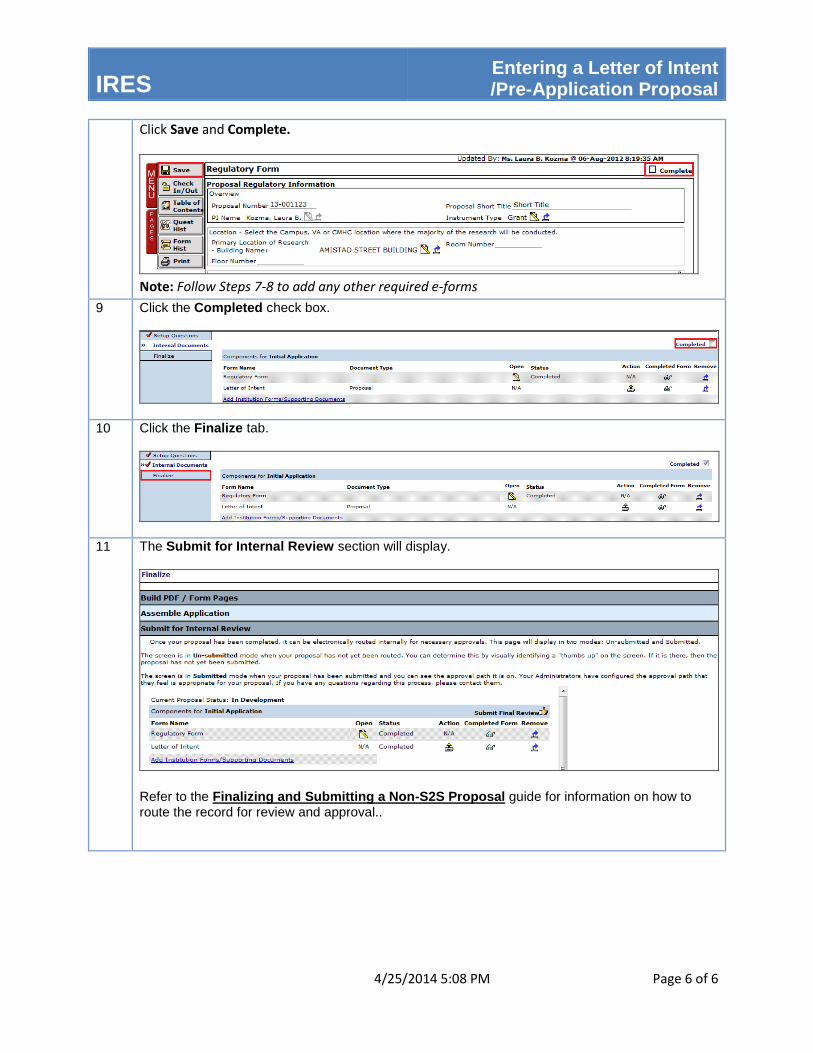
Click Save and Complete.
Note: Follow Steps 7-8 to add any other required e-forms
9 Click the Completed check box.
10 Click the Finalize tab.
11 The Submit for Internal Review section will display.
Refer to the Finalizing and Submitting a Non-S2S Proposal guide for information on how to route the record for review and approval..
IRES Creating a Non-Competing Continuation Proposal
4/25/2014 5:08 PM Page 1 of 12
This quick guide highlights the process for creating a Non-Competing Continuation (NCC) Child Record proposal in IRES Proposal Development (PD).
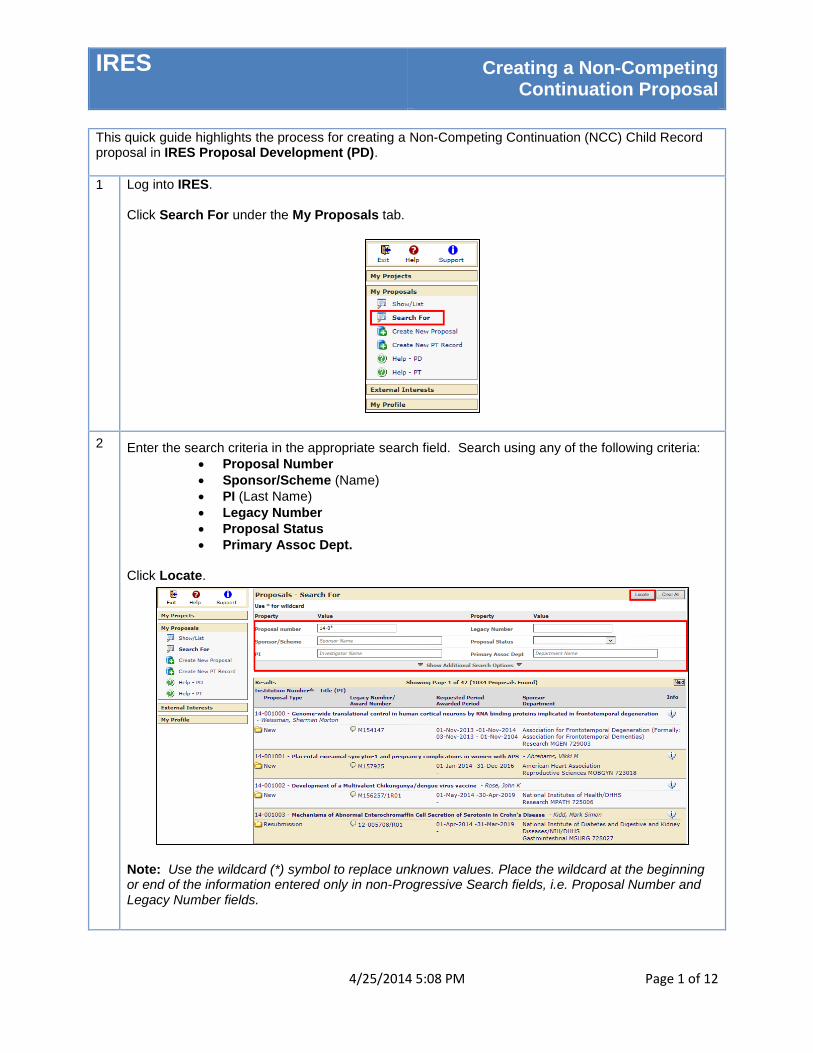
1 Log into IRES. Click Search For under the My Proposals tab.
2 Enter the search criteria in the appropriate search field. Search using any of the following criteria:
Proposal Number
Sponsor/Scheme (Name)
PI (Last Name)
Legacy Number
Proposal Status
Primary Assoc Dept.
Click Locate.
Note: Use the wildcard (*) symbol to replace unknown values. Place the wildcard at the beginning or end of the information entered only in non-Progressive Search fields, i.e. Proposal Number and Legacy Number fields.
IRES Creating a Non-Competing Continuation Proposal
4/25/2014 5:08 PM Page 2 of 12
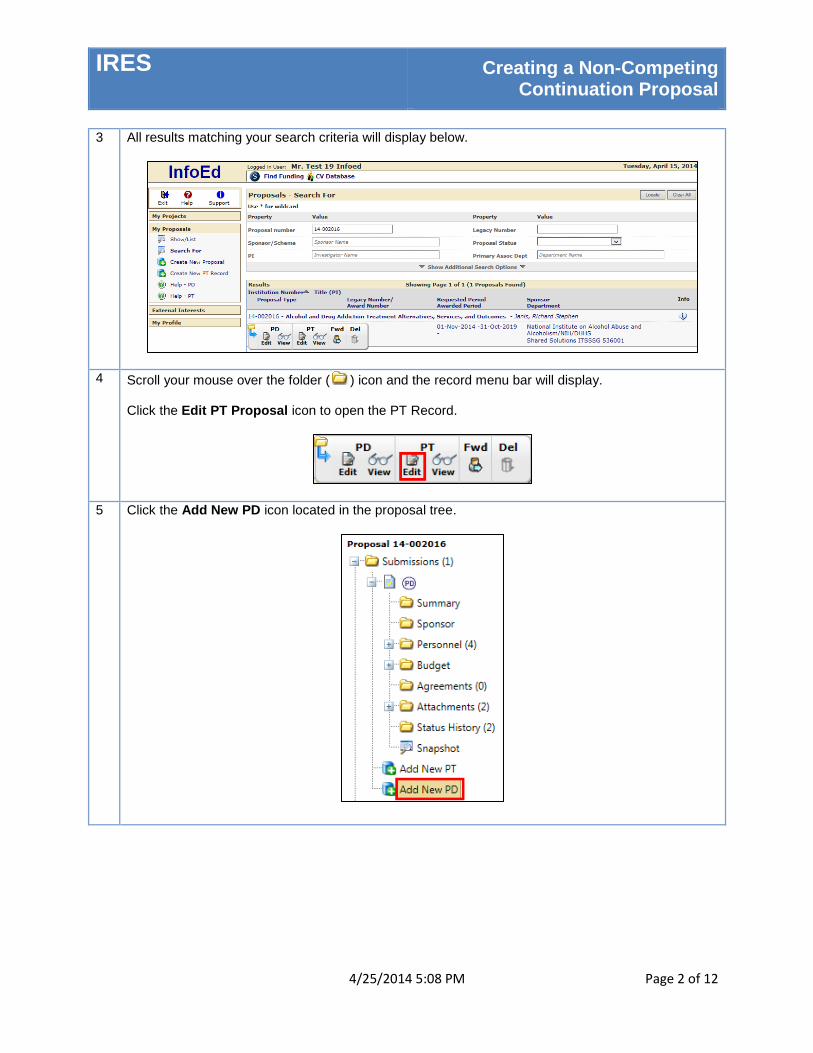
3 All results matching your search criteria will display below.
4 Scroll your mouse over the folder ( ) icon and the record menu bar will display. Click the Edit PT Proposal icon to open the PT Record.
5 Click the Add New PD icon located in the proposal tree.
IRES Creating a Non-Competing Continuation Proposal
4/25/2014 5:08 PM Page 3 of 12
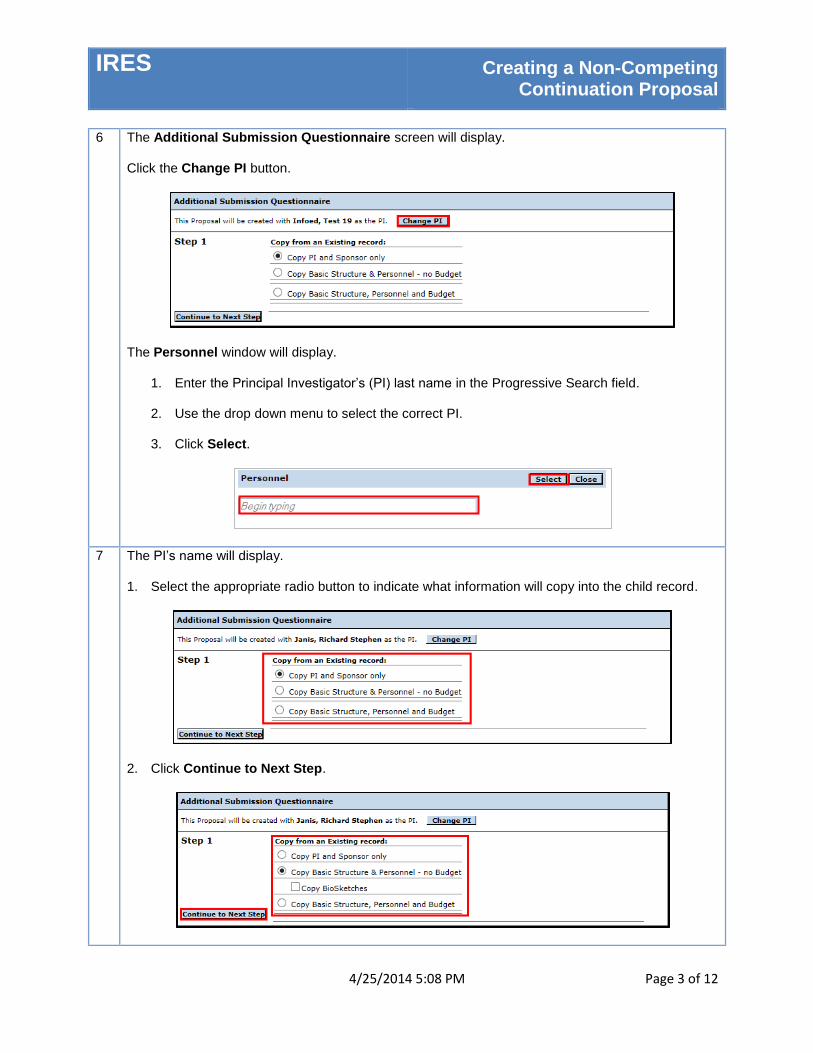
6 The Additional Submission Questionnaire screen will display.
Click the Change PI button.
The Personnel window will display.
1. Enter the Principal Investigator’s (PI) last name in the Progressive Search field.
2. Use the drop down menu to select the correct PI.
3. Click Select.
7 The PI’s name will display.
1. Select the appropriate radio button to indicate what information will copy into the child record.
2. Click Continue to Next Step.
IRES Creating a Non-Competing Continuation Proposal
4/25/2014 5:08 PM Page 4 of 12
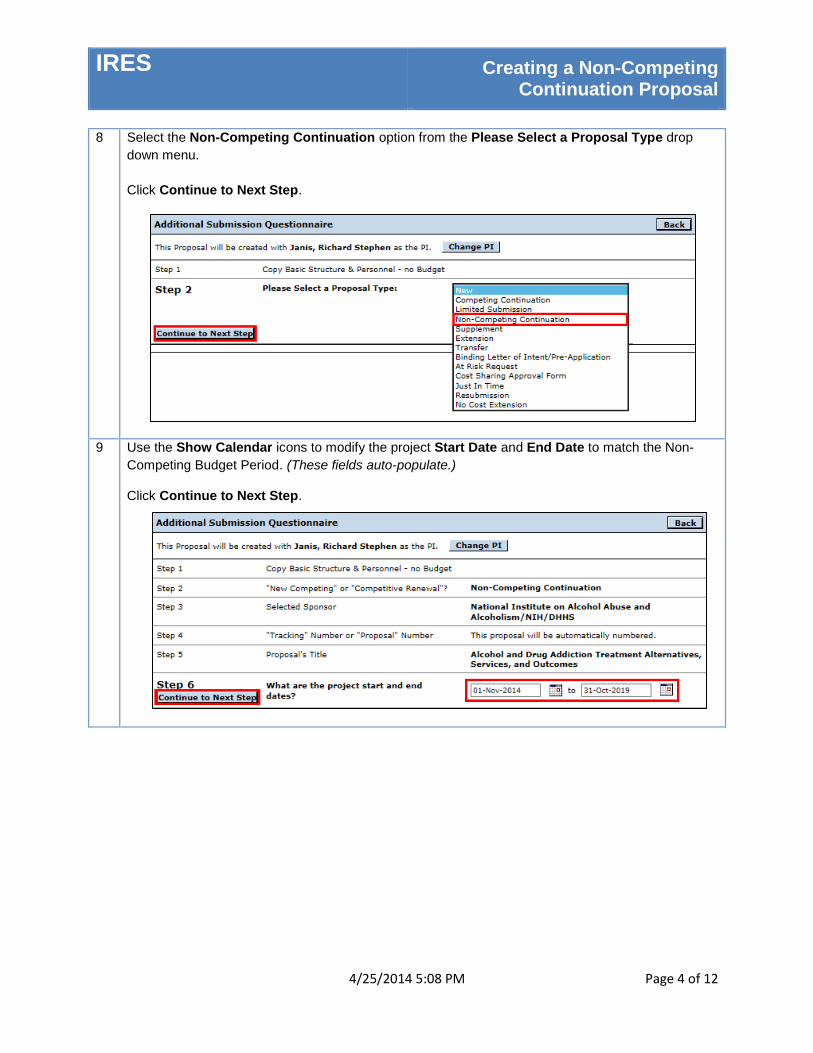
8 Select the Non-Competing Continuation option from the Please Select a Proposal Type drop
down menu.
Click Continue to Next Step.
9 Use the Show Calendar icons to modify the project Start Date and End Date to match the Non-
Competing Budget Period. (These fields auto-populate.)
Click Continue to Next Step.
IRES Creating a Non-Competing Continuation Proposal
4/25/2014 5:08 PM Page 5 of 12
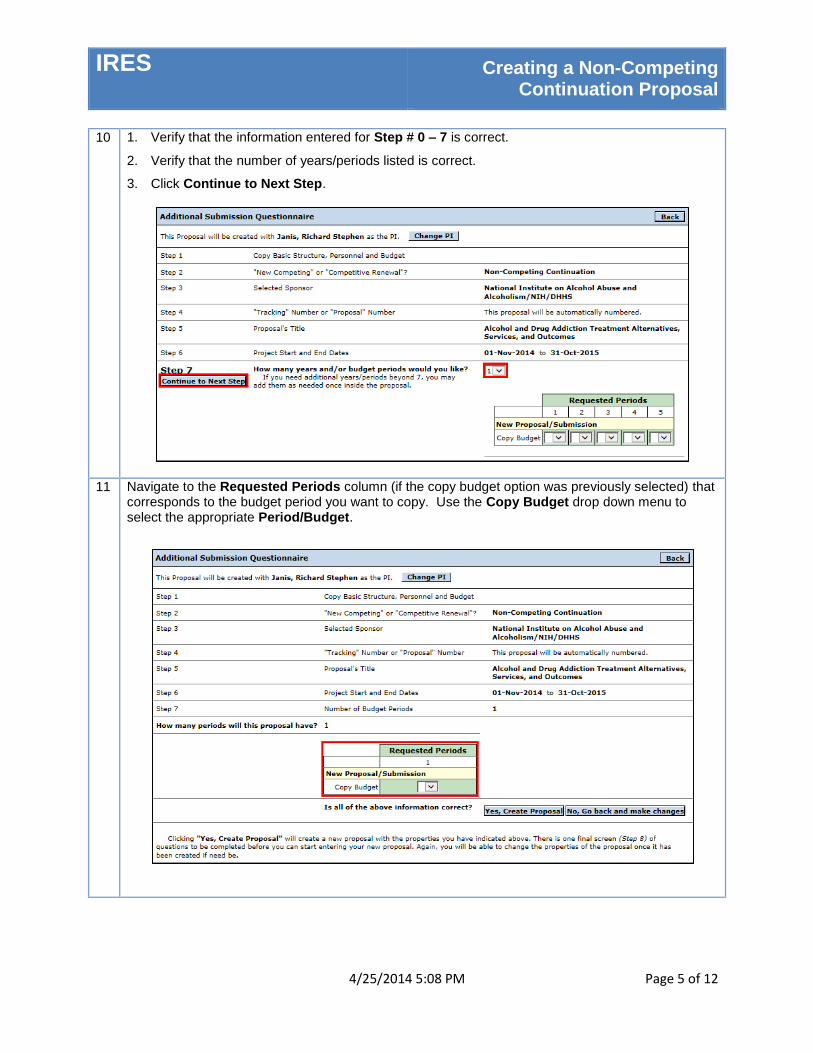
10 1. Verify that the information entered for Step # 0 – 7 is correct.
2. Verify that the number of years/periods listed is correct.
3. Click Continue to Next Step.
11 Navigate to the Requested Periods column (if the copy budget option was previously selected) that corresponds to the budget period you want to copy. Use the Copy Budget drop down menu to select the appropriate Period/Budget.
IRES Creating a Non-Competing Continuation Proposal
4/25/2014 5:08 PM Page 6 of 12
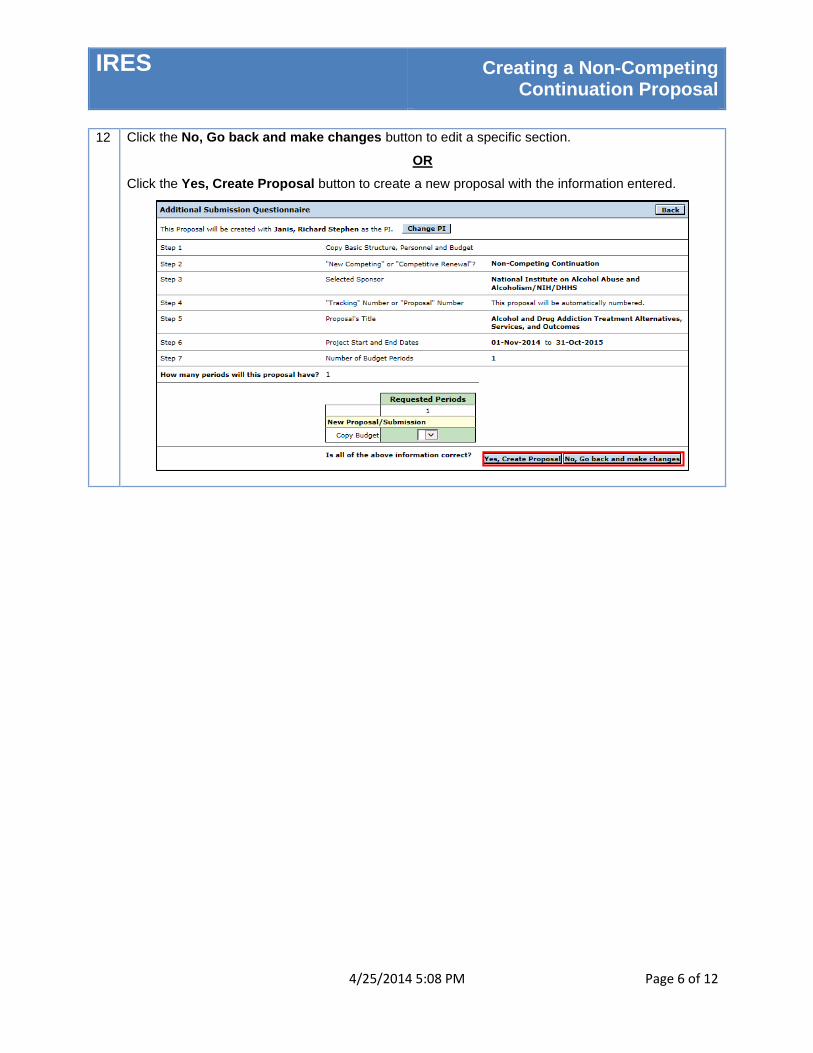
12 Click the No, Go back and make changes button to edit a specific section.
OR
Click the Yes, Create Proposal button to create a new proposal with the information entered.
IRES Creating a Non-Competing Continuation Proposal
4/25/2014 5:08 PM Page 7 of 12
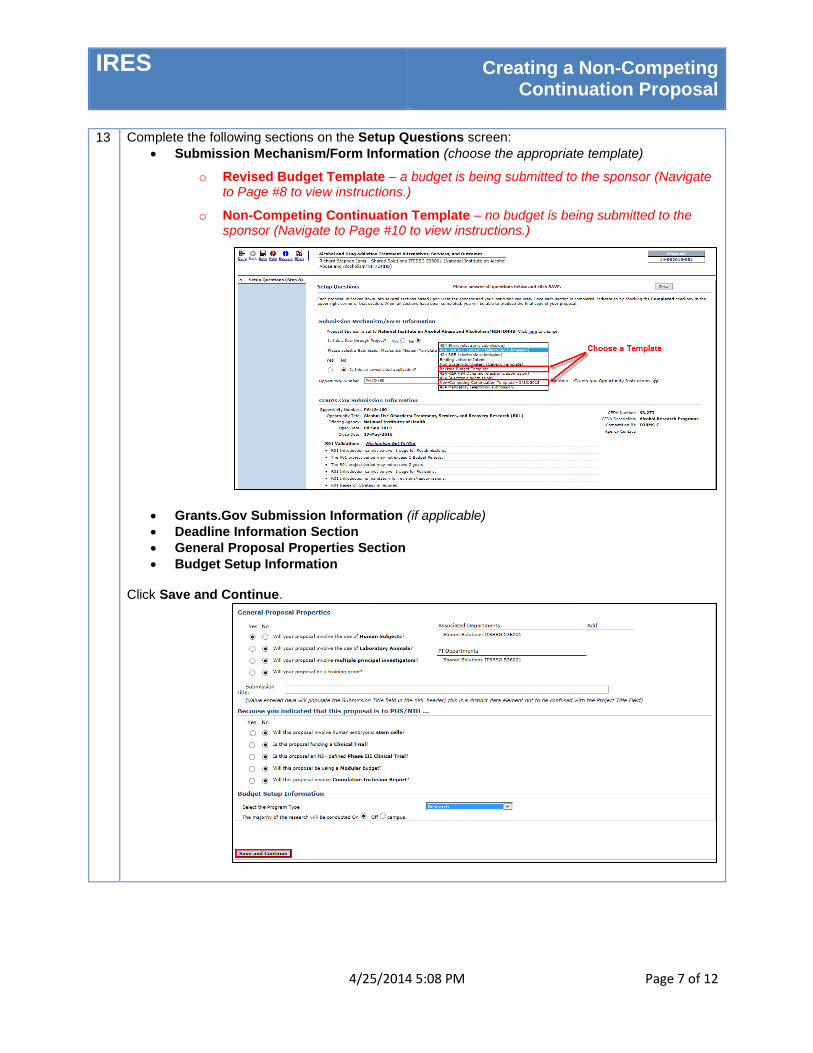
13 Complete the following sections on the Setup Questions screen:
Submission Mechanism/Form Information (choose the appropriate template)
o Revised Budget Template – a budget is being submitted to the sponsor (Navigate to Page #8 to view instructions.)
o Non-Competing Continuation Template – no budget is being submitted to the sponsor (Navigate to Page #10 to view instructions.)
Grants.Gov Submission Information (if applicable)
Deadline Information Section
General Proposal Properties Section
Budget Setup Information
Click Save and Continue.
IRES Creating a Non-Competing Continuation Proposal
4/25/2014 5:08 PM Page 8 of 12
Revised Budget Template
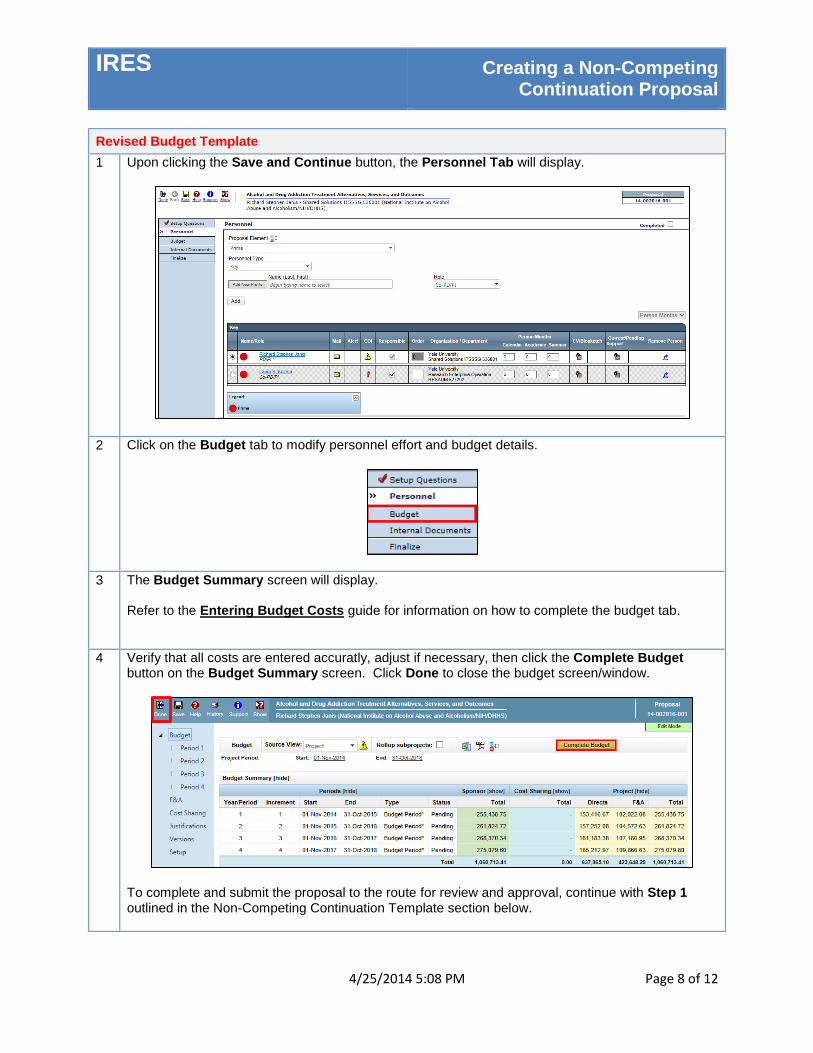
1 Upon clicking the Save and Continue button, the Personnel Tab will display.
2 Click on the Budget tab to modify personnel effort and budget details.
3 The Budget Summary screen will display. Refer to the Entering Budget Costs guide for information on how to complete the budget tab.
4 Verify that all costs are entered accuratly, adjust if necessary, then click the Complete Budget button on the Budget Summary screen. Click Done to close the budget screen/window.
To complete and submit the proposal to the route for review and approval, continue with Step 1 outlined in the Non-Competing Continuation Template section below.
IRES Creating a Non-Competing Continuation Proposal
4/25/2014 5:08 PM Page 9 of 12
Non-Competing Continuation (NCC) Template
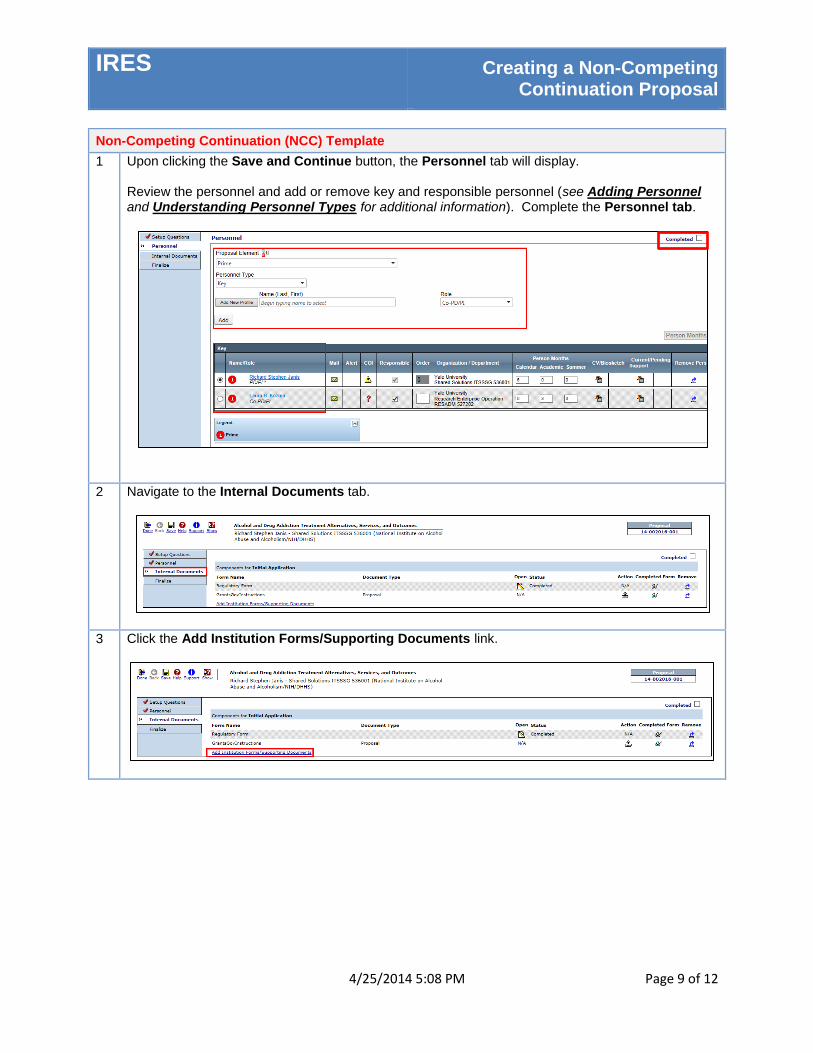
1 Upon clicking the Save and Continue button, the Personnel tab will display. Review the personnel and add or remove key and responsible personnel (see Adding Personnel and Understanding Personnel Types for additional information). Complete the Personnel tab.
2 Navigate to the Internal Documents tab.
3 Click the Add Institution Forms/Supporting Documents link.
IRES Creating a Non-Competing Continuation Proposal
4/25/2014 5:08 PM Page 10 of 12
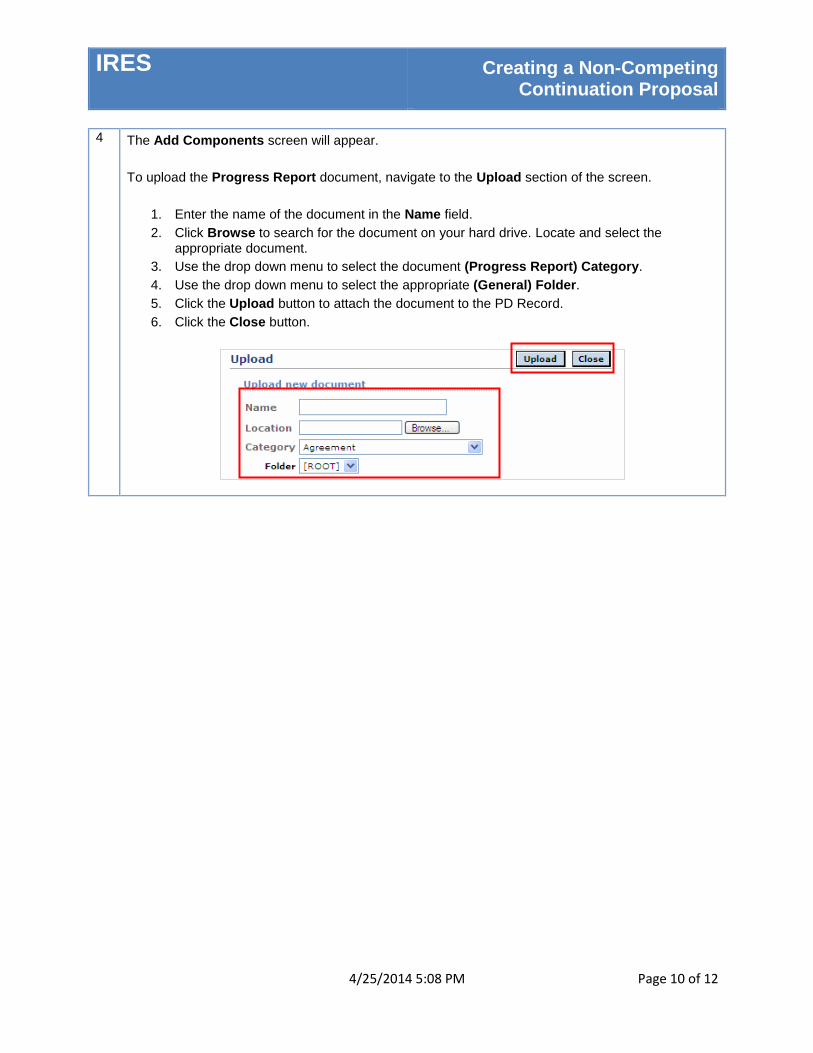
4 The Add Components screen will appear.
To upload the Progress Report document, navigate to the Upload section of the screen.
1. Enter the name of the document in the Name field.
2. Click Browse to search for the document on your hard drive. Locate and select the appropriate document.
3. Use the drop down menu to select the document (Progress Report) Category.
4. Use the drop down menu to select the appropriate (General) Folder.
5. Click the Upload button to attach the document to the PD Record.
6. Click the Close button.
IRES Creating a Non-Competing Continuation Proposal
4/25/2014 5:08 PM Page 11 of 12
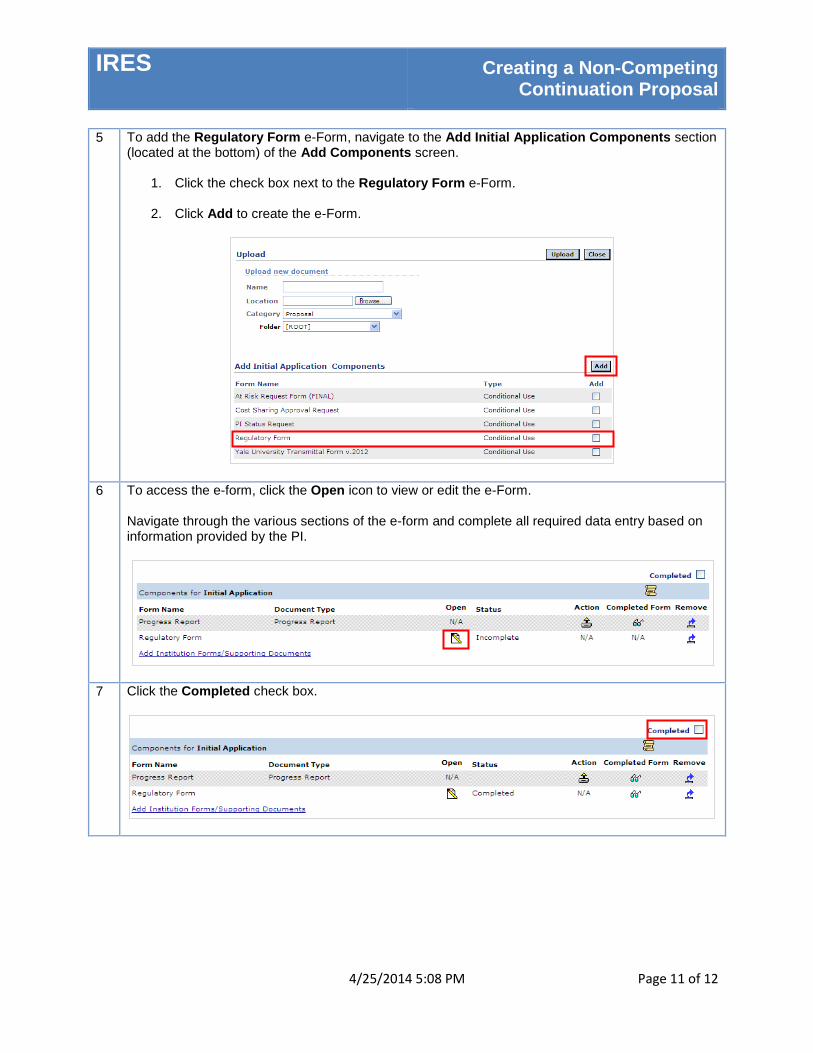
5 To add the Regulatory Form e-Form, navigate to the Add Initial Application Components section (located at the bottom) of the Add Components screen.
1. Click the check box next to the Regulatory Form e-Form.
2. Click Add to create the e-Form.
6 To access the e-form, click the Open icon to view or edit the e-Form. Navigate through the various sections of the e-form and complete all required data entry based on information provided by the PI.
7 Click the Completed check box.

IRES Creating a Non-Competing Continuation Proposal
4/25/2014 5:08 PM Page 12 of 12
8 Click the Finalize tab.
9 The Submit for Internal Review section will display. Click the Submit Final Review icon.
Refer to Finalizing and Submitting a Non-S2S Proposal for more information.
IRES Submission Mechanism/Screen
Template Matrix
4/25/2014 5:09:22 PM Page 1 of 2
This guide provides a matrix of what Submission Mechanism/Screen Template should be selected.
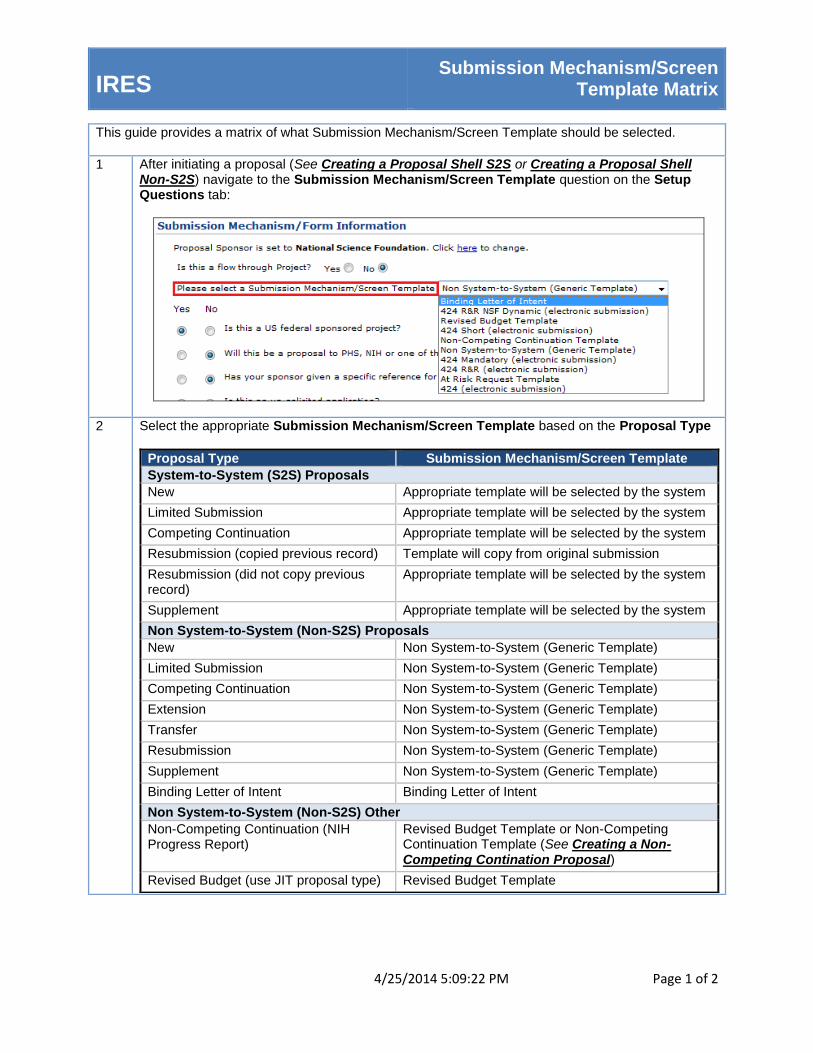
1 After initiating a proposal (See Creating a Proposal Shell S2S or Creating a Proposal Shell Non-S2S) navigate to the Submission Mechanism/Screen Template question on the Setup Questions tab:
2 Select the appropriate Submission Mechanism/Screen Template based on the Proposal Type
Proposal Type Submission Mechanism/Screen Template
System-to-System (S2S) Proposals
New Appropriate template will be selected by the system
Limited Submission Appropriate template will be selected by the system
Competing Continuation Appropriate template will be selected by the system
Resubmission (copied previous record) Template will copy from original submission
Resubmission (did not copy previous record)
Appropriate template will be selected by the system
Supplement Appropriate template will be selected by the system
Non System-to-System (Non-S2S) Proposals
New Non System-to-System (Generic Template)
Limited Submission Non System-to-System (Generic Template)
Competing Continuation Non System-to-System (Generic Template)
Extension Non System-to-System (Generic Template)
Transfer Non System-to-System (Generic Template)
Resubmission Non System-to-System (Generic Template)
Supplement Non System-to-System (Generic Template)
Binding Letter of Intent Binding Letter of Intent
Non System-to-System (Non-S2S) Other
Non-Competing Continuation (NIH Progress Report)
Revised Budget Template or Non-Competing Continuation Template (See Creating a Non-Competing Contination Proposal)
Revised Budget (use JIT proposal type) Revised Budget Template
IRES Submission Mechanism/Screen
Template Matrix
4/25/2014 5:09:22 PM Page 2 of 2
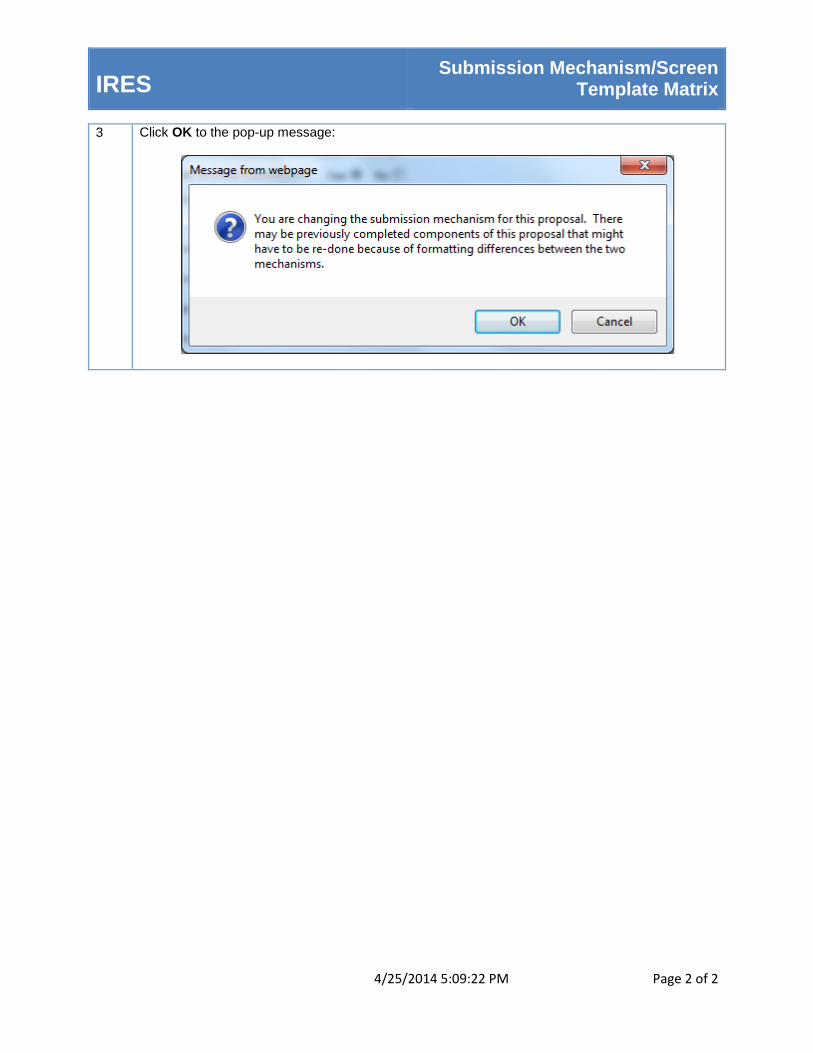
3 Click OK to the pop-up message:
IRES Understanding Parent/Master and
Child Records
4/25/2014 5:10:08 PM Page 1 of 1
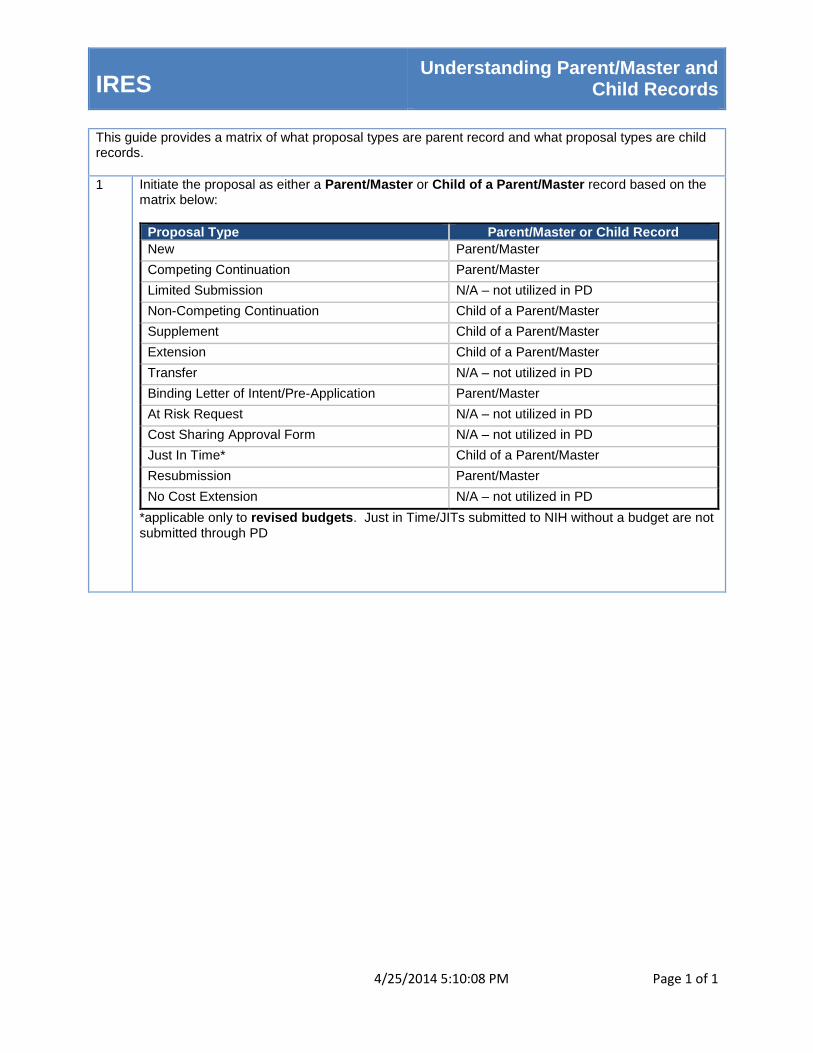
This guide provides a matrix of what proposal types are parent record and what proposal types are child records.
1 Initiate the proposal as either a Parent/Master or Child of a Parent/Master record based on the matrix below:
Proposal Type Parent/Master or Child Record
New Parent/Master
Competing Continuation Parent/Master
Limited Submission N/A – not utilized in PD
Non-Competing Continuation Child of a Parent/Master
Supplement Child of a Parent/Master
Extension Child of a Parent/Master
Transfer N/A – not utilized in PD
Binding Letter of Intent/Pre-Application Parent/Master
At Risk Request N/A – not utilized in PD
Cost Sharing Approval Form N/A – not utilized in PD
Just In Time* Child of a Parent/Master
Resubmission Parent/Master
No Cost Extension N/A – not utilized in PD
*applicable only to revised budgets. Just in Time/JITs submitted to NIH without a budget are not submitted through PD
IRES
Entering Budgets Costs
4/25/2014 5:11 PM Page 1 of 11
This quick guide highlights the process for entering budget elements in IRES Proposal Development (PD).
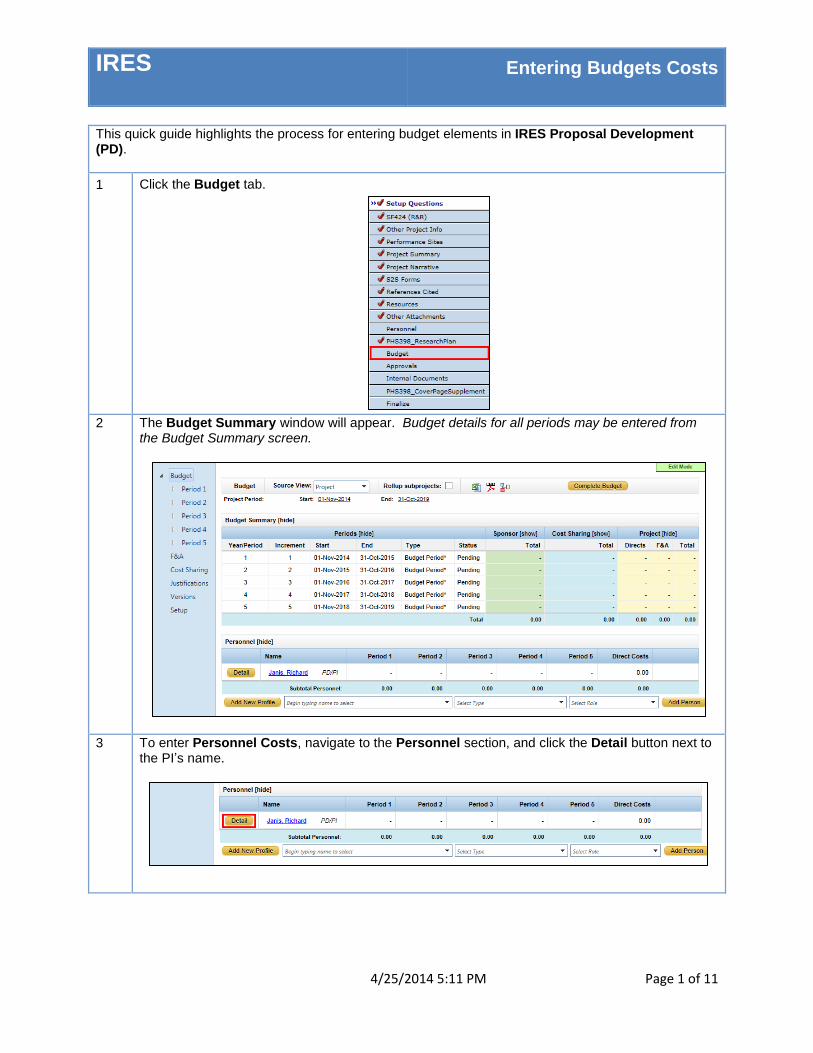
1 Click the Budget tab.
2 The Budget Summary window will appear. Budget details for all periods may be entered from the Budget Summary screen.
3 To enter Personnel Costs, navigate to the Personnel section, and click the Detail button next to the PI’s name.

IRES
Entering Budgets Costs
4/25/2014 5:11 PM Page 2 of 11
4 The Personnel Detail screen will appear.
1. Click the Appointments tab.
2. Enter base salary.
3. Validate that the appropriate Fringe Benefit Rate has been applied. To modify the Fringe Benefits, click on the Fringe Benefits column header icon, and select the appropriate option from the drop down menu.
4. Enter the % Inflation amount and click save.
IRES
Entering Budgets Costs
4/25/2014 5:11 PM Page 3 of 11
5
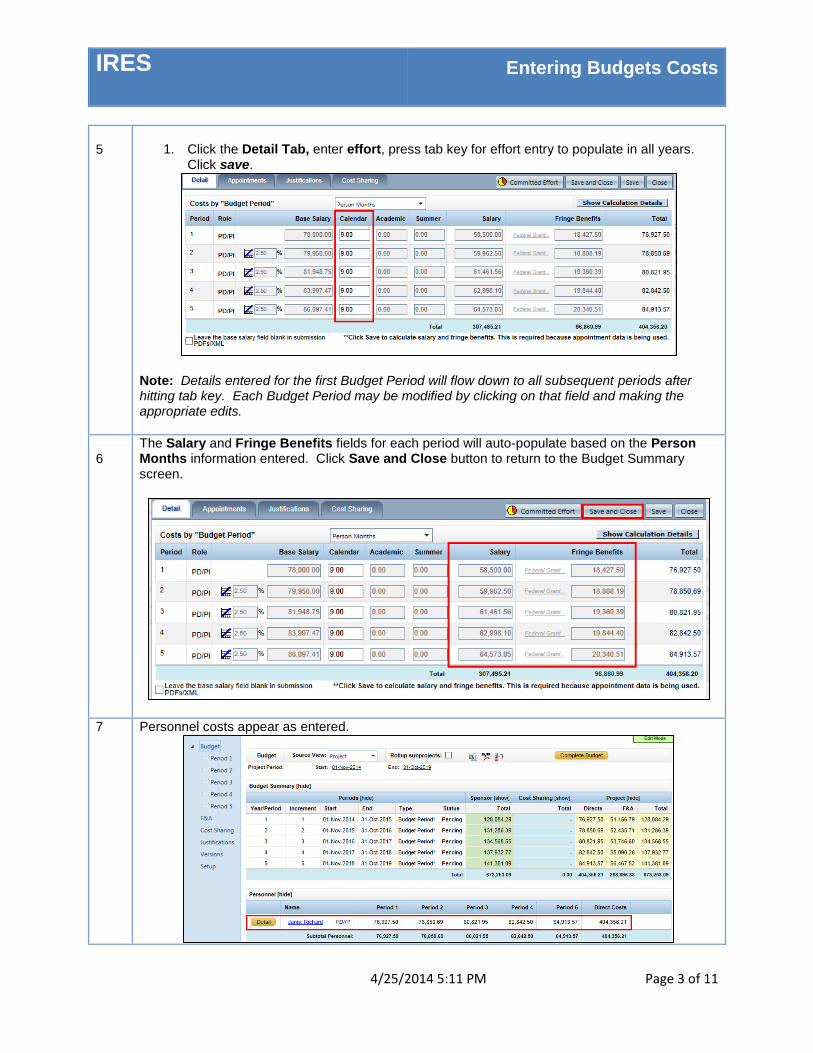
1. Click the Detail Tab, enter effort, press tab key for effort entry to populate in all years.
Click save.
Note: Details entered for the first Budget Period will flow down to all subsequent periods after hitting tab key. Each Budget Period may be modified by clicking on that field and making the appropriate edits.
6
The Salary and Fringe Benefits fields for each period will auto-populate based on the Person Months information entered. Click Save and Close button to return to the Budget Summary screen.
7 Personnel costs appear as entered.
IRES
Entering Budgets Costs
4/25/2014 5:11 PM Page 4 of 11
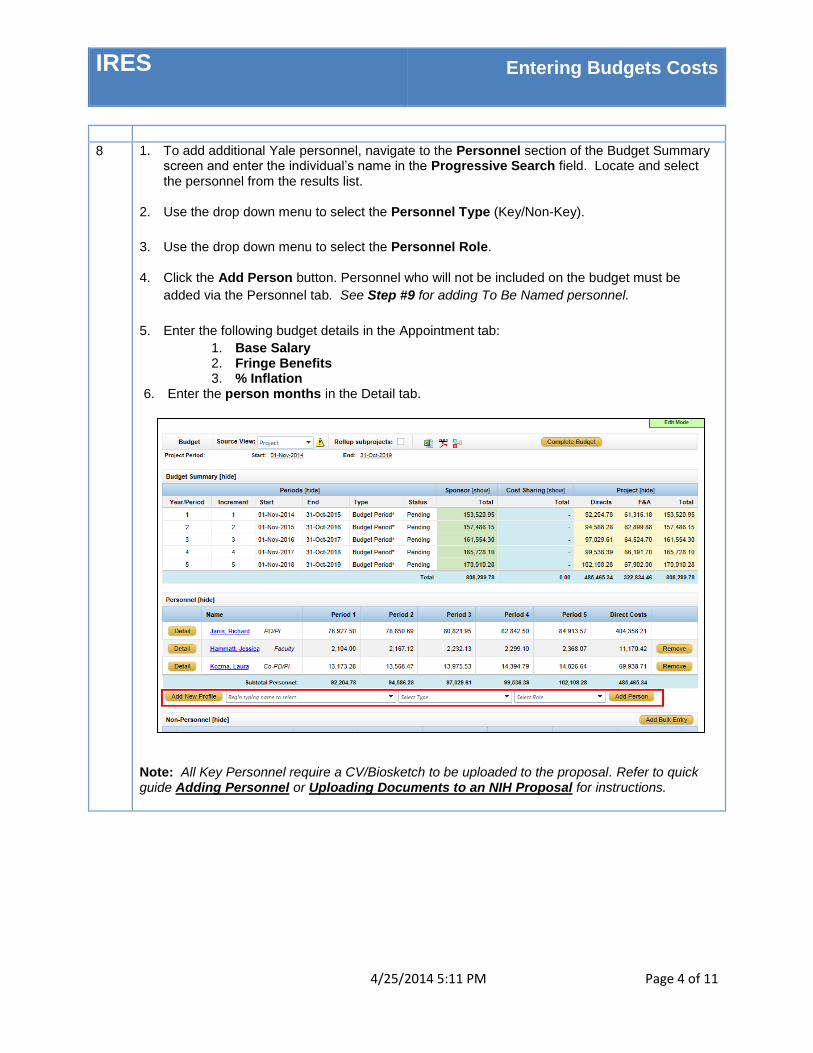
8 1. To add additional Yale personnel, navigate to the Personnel section of the Budget Summary screen and enter the individual’s name in the Progressive Search field. Locate and select the personnel from the results list.
2. Use the drop down menu to select the Personnel Type (Key/Non-Key).
3. Use the drop down menu to select the Personnel Role. 4. Click the Add Person button. Personnel who will not be included on the budget must be
added via the Personnel tab. See Step #9 for adding To Be Named personnel.
5. Enter the following budget details in the Appointment tab:
1. Base Salary 2. Fringe Benefits 3. % Inflation
6. Enter the person months in the Detail tab.
Note: All Key Personnel require a CV/Biosketch to be uploaded to the proposal. Refer to quick guide Adding Personnel or Uploading Documents to an NIH Proposal for instructions.
IRES
Entering Budgets Costs
4/25/2014 5:11 PM Page 5 of 11
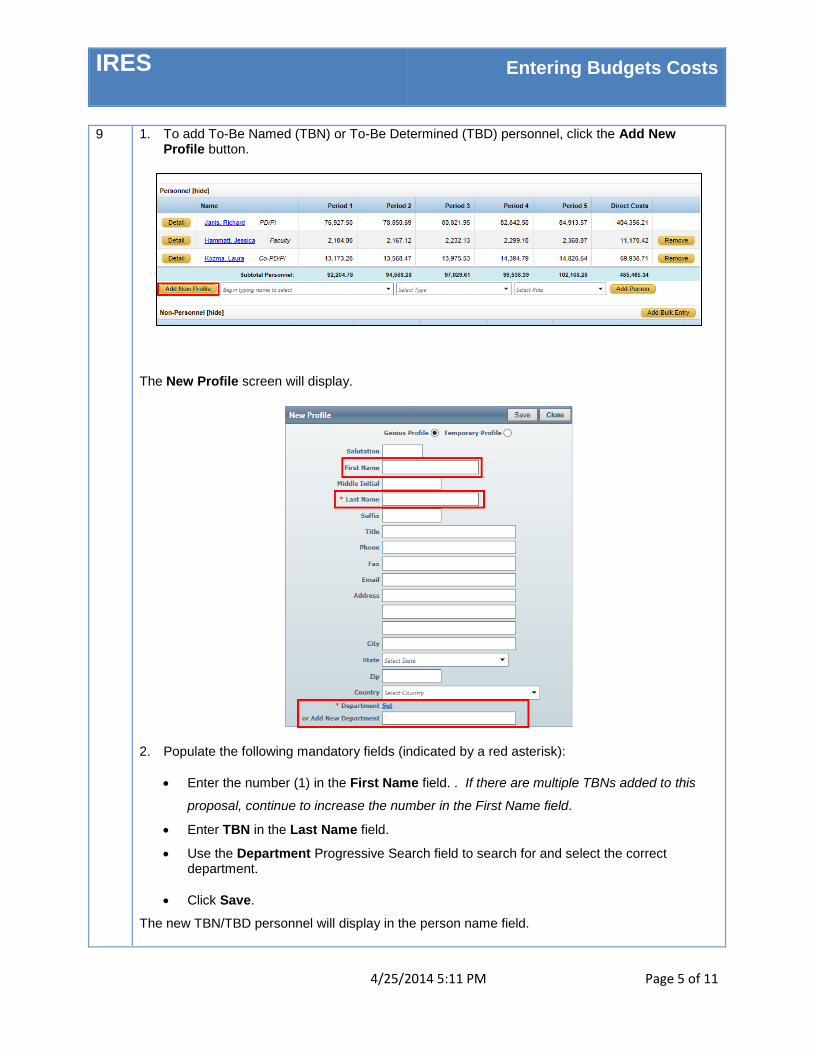
9 1. To add To-Be Named (TBN) or To-Be Determined (TBD) personnel, click the Add New Profile button.
The New Profile screen will display.
2. Populate the following mandatory fields (indicated by a red asterisk):
Enter the number (1) in the First Name field. . If there are multiple TBNs added to this
proposal, continue to increase the number in the First Name field.
Enter TBN in the Last Name field.
Use the Department Progressive Search field to search for and select the correct department.
Click Save.
The new TBN/TBD personnel will display in the person name field.
IRES
Entering Budgets Costs
4/25/2014 5:11 PM Page 6 of 11
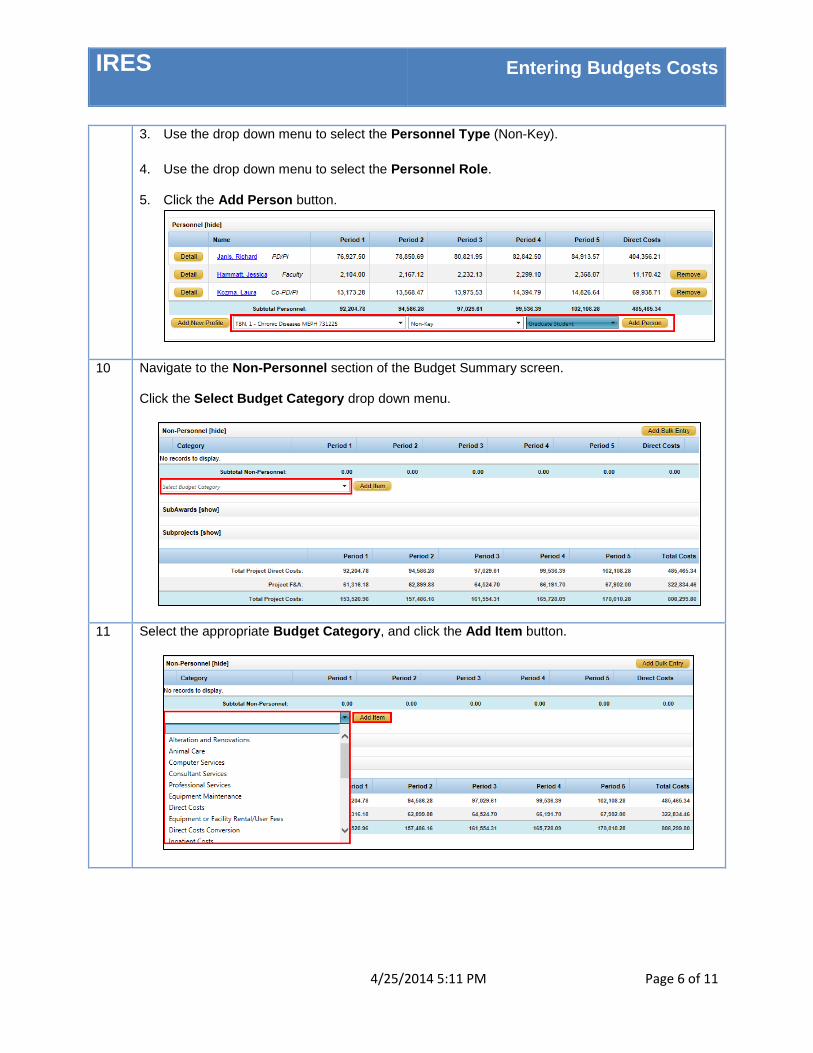
3. Use the drop down menu to select the Personnel Type (Non-Key).
4. Use the drop down menu to select the Personnel Role. 5. Click the Add Person button.
10 Navigate to the Non-Personnel section of the Budget Summary screen. Click the Select Budget Category drop down menu.
11 Select the appropriate Budget Category, and click the Add Item button.
IRES
Entering Budgets Costs
4/25/2014 5:11 PM Page 7 of 11
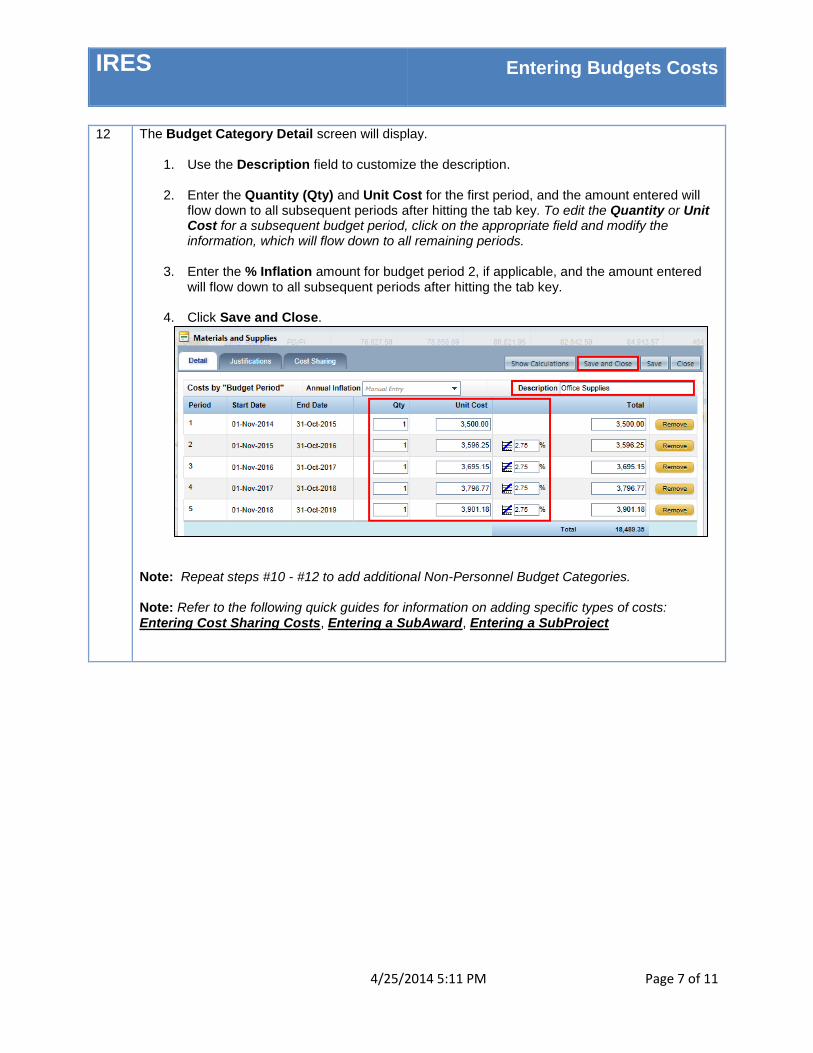
12 The Budget Category Detail screen will display.
1. Use the Description field to customize the description.
2. Enter the Quantity (Qty) and Unit Cost for the first period, and the amount entered will flow down to all subsequent periods after hitting the tab key. To edit the Quantity or Unit Cost for a subsequent budget period, click on the appropriate field and modify the information, which will flow down to all remaining periods.
3. Enter the % Inflation amount for budget period 2, if applicable, and the amount entered will flow down to all subsequent periods after hitting the tab key.
4. Click Save and Close.
Note: Repeat steps #10 - #12 to add additional Non-Personnel Budget Categories. Note: Refer to the following quick guides for information on adding specific types of costs: Entering Cost Sharing Costs, Entering a SubAward, Entering a SubProject
IRES
Entering Budgets Costs
4/25/2014 5:11 PM Page 8 of 11
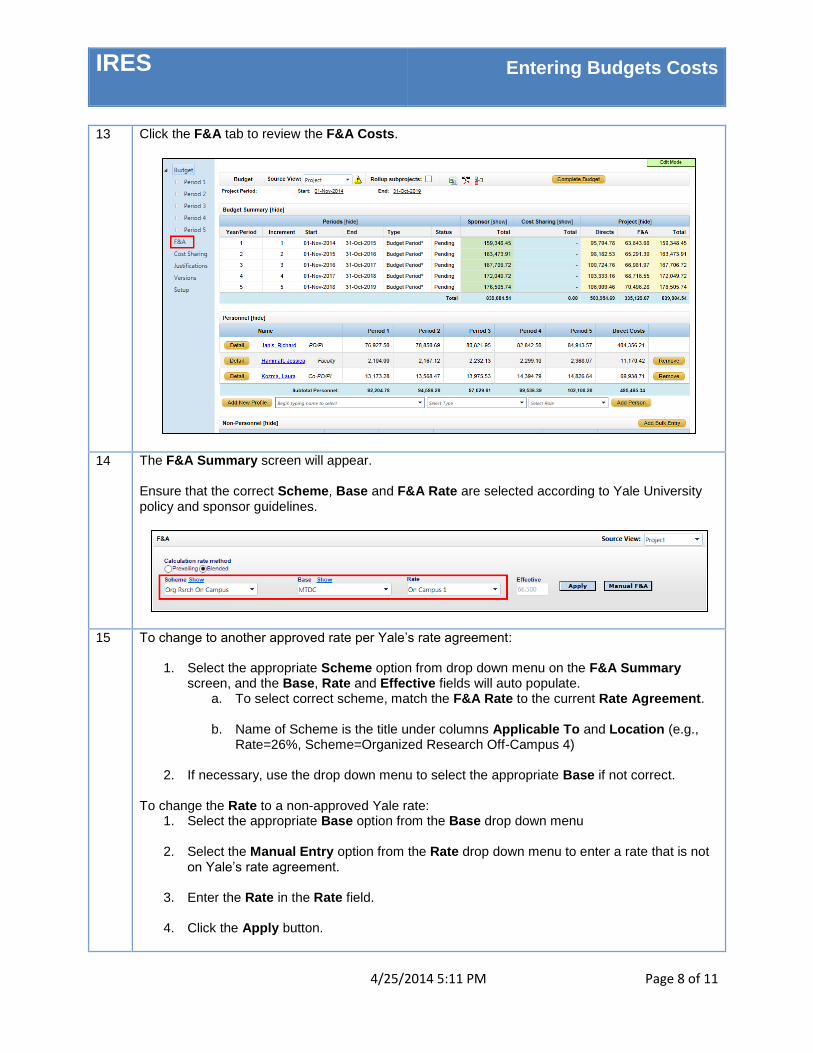
13 Click the F&A tab to review the F&A Costs.
14 The F&A Summary screen will appear. Ensure that the correct Scheme, Base and F&A Rate are selected according to Yale University policy and sponsor guidelines.
15 To change to another approved rate per Yale’s rate agreement:
1. Select the appropriate Scheme option from drop down menu on the F&A Summary screen, and the Base, Rate and Effective fields will auto populate.
a. To select correct scheme, match the F&A Rate to the current Rate Agreement.
b. Name of Scheme is the title under columns Applicable To and Location (e.g., Rate=26%, Scheme=Organized Research Off-Campus 4)
2. If necessary, use the drop down menu to select the appropriate Base if not correct.
To change the Rate to a non-approved Yale rate:
1. Select the appropriate Base option from the Base drop down menu
2. Select the Manual Entry option from the Rate drop down menu to enter a rate that is not on Yale’s rate agreement.
3. Enter the Rate in the Rate field.
4. Click the Apply button.
IRES
Entering Budgets Costs
4/25/2014 5:11 PM Page 9 of 11
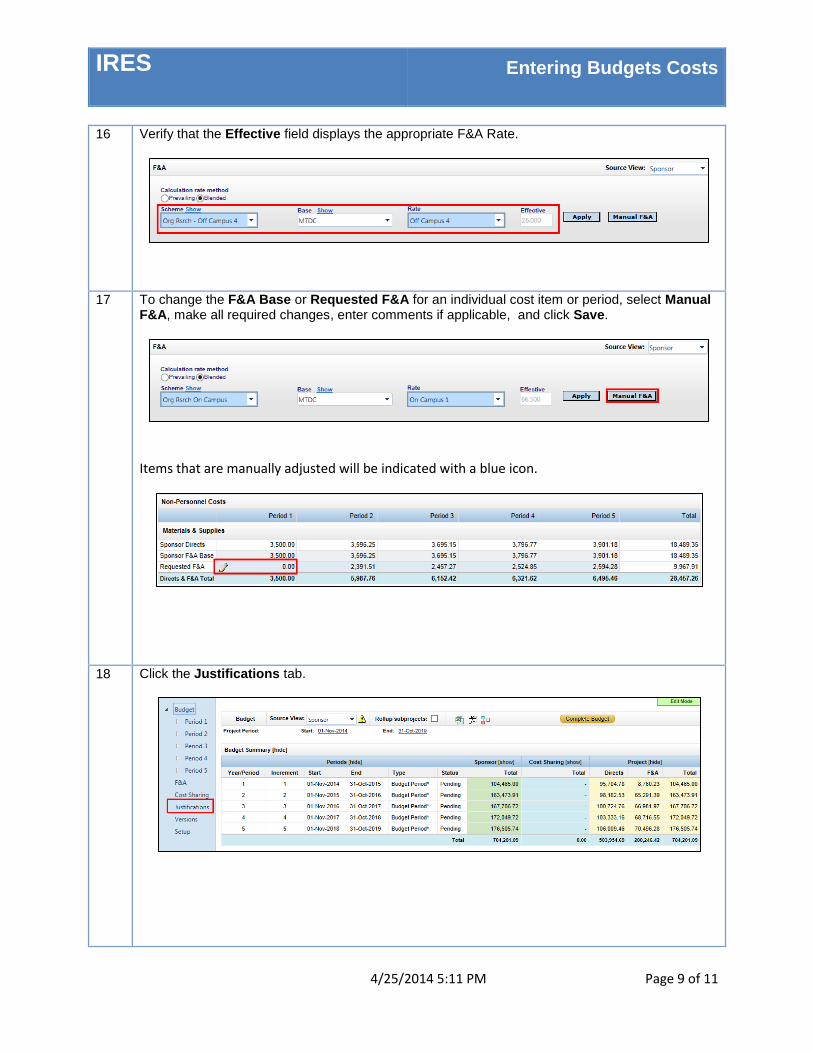
16 Verify that the Effective field displays the appropriate F&A Rate.
17 To change the F&A Base or Requested F&A for an individual cost item or period, select Manual F&A, make all required changes, enter comments if applicable, and click Save.
Items that are manually adjusted will be indicated with a blue icon.
18 Click the Justifications tab.

IRES
Entering Budgets Costs
4/25/2014 5:11 PM Page 10 of 11
19 The Justifications screen will appear. The default selection is the Upload Form radio button. Click the Browse button to upload the budget justification document. Note: The budget justification should only be updated when preparing an S2S proposal.
20 The Choose File window will display. Locate and select the MS Word or PDF document. Click the Open button.
21 Click the Upload icon.
IRES
Entering Budgets Costs
4/25/2014 5:11 PM Page 11 of 11
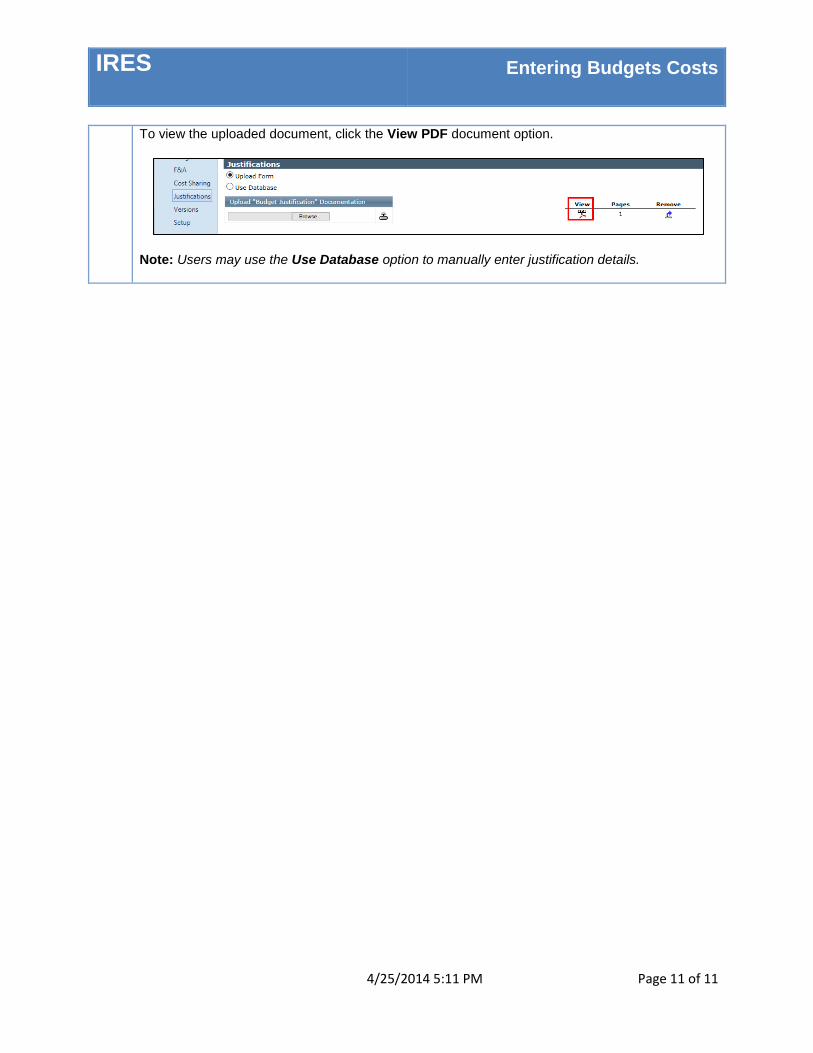
To view the uploaded document, click the View PDF document option.
Note: Users may use the Use Database option to manually enter justification details.
IRES
Entering a Modular Budget
4/25/2014 5:11 PM Page 1 of 4
This quick guide highlights the process for entering a modular budget in IRES Proposal Development (PD).
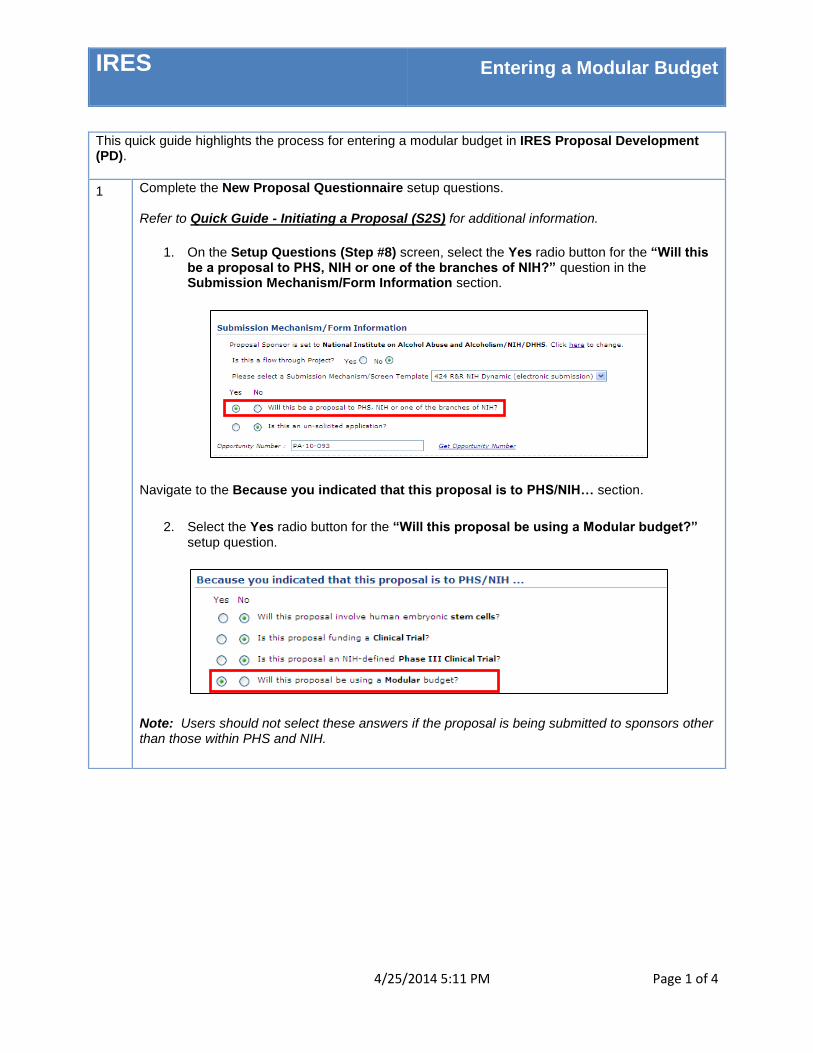
1 Complete the New Proposal Questionnaire setup questions. Refer to Quick Guide - Initiating a Proposal (S2S) for additional information.
1. On the Setup Questions (Step #8) screen, select the Yes radio button for the “Will this
be a proposal to PHS, NIH or one of the branches of NIH?” question in the Submission Mechanism/Form Information section.
Navigate to the Because you indicated that this proposal is to PHS/NIH… section.
2. Select the Yes radio button for the “Will this proposal be using a Modular budget?” setup question.
Note: Users should not select these answers if the proposal is being submitted to sponsors other than those within PHS and NIH.
IRES
Entering a Modular Budget
4/25/2014 5:11 PM Page 2 of 4
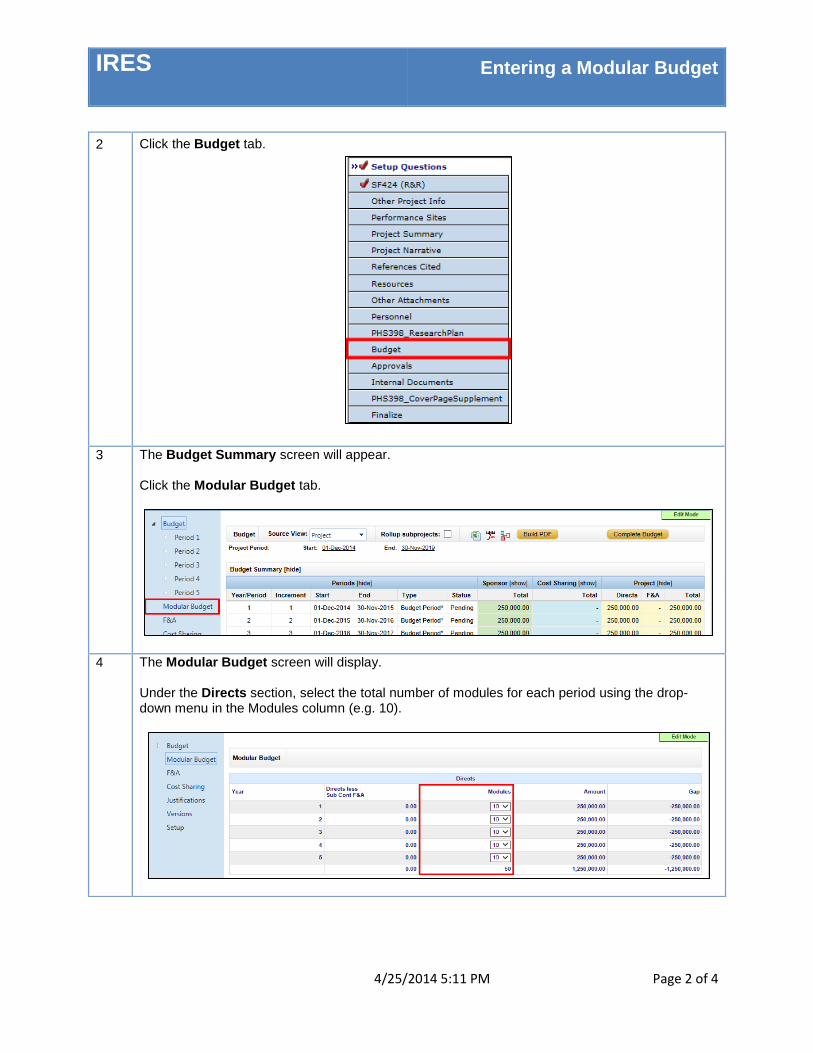
2 Click the Budget tab.
3 The Budget Summary screen will appear. Click the Modular Budget tab.
4 The Modular Budget screen will display. Under the Directs section, select the total number of modules for each period using the drop-down menu in the Modules column (e.g. 10).

IRES
Entering a Modular Budget
4/25/2014 5:11 PM Page 3 of 4
5 Under the F&A Basis section, select the total number of modules for each period using the drop-down menu in the Modules column. Align the F&A period modules with the Directs period modules (e.g. 10).
6 Click Save.
7 Click the Budget tab.
8 Enter Personnel, Non-Personnel and SubAward (if applicable) budget details and costs. Refer to Entering Budget Costs, Entering Cost Sharing Costs, Entering a SubAward, Entering a SubProject for additional information.
IRES
Entering a Modular Budget
4/25/2014 5:11 PM Page 4 of 4
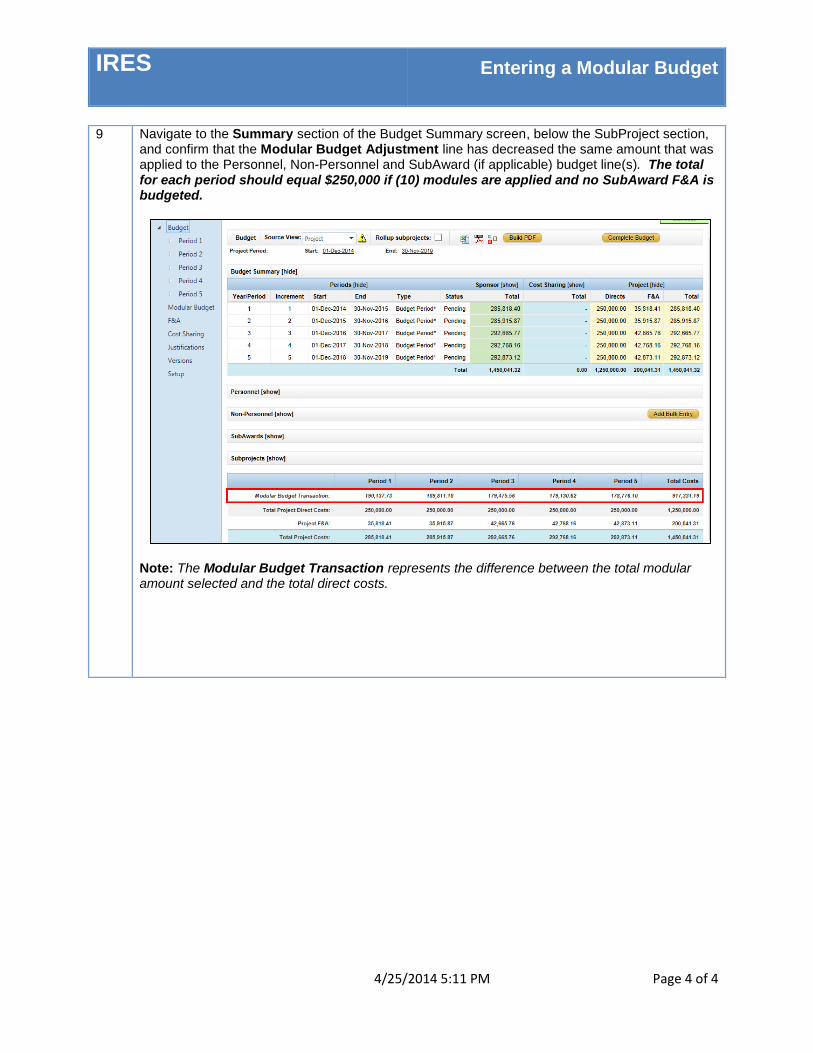
9 Navigate to the Summary section of the Budget Summary screen, below the SubProject section, and confirm that the Modular Budget Adjustment line has decreased the same amount that was applied to the Personnel, Non-Personnel and SubAward (if applicable) budget line(s). The total for each period should equal $250,000 if (10) modules are applied and no SubAward F&A is budgeted.
Note: The Modular Budget Transaction represents the difference between the total modular amount selected and the total direct costs.
IRES Exporting Budgets
4/25/2014 Page 1 of 3
This quick guide highlights the process for exporting budgets in IRES Proposal Development (PD).
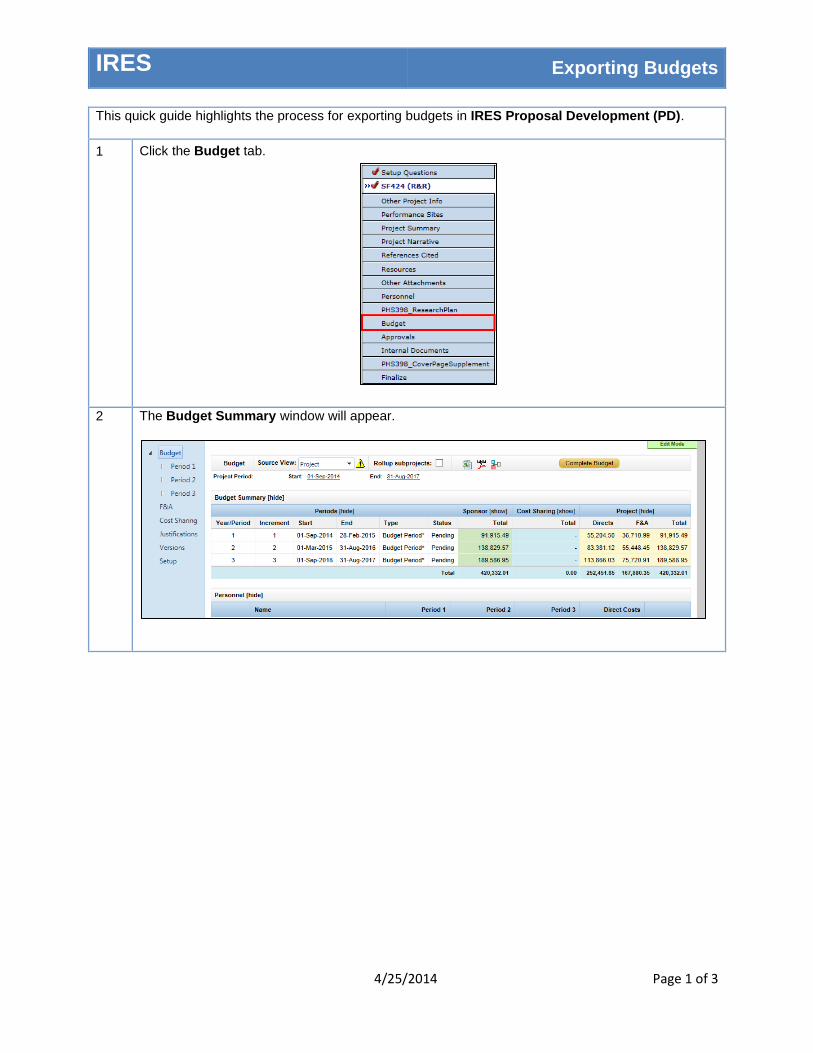
1 Click the Budget tab.
2 The Budget Summary window will appear.

IRES Exporting Budgets
4/25/2014 Page 2 of 3
3 Select the Source View that you wish to export
4 Click either the Excel (exports the budget into Microsoft Excel) or pdf (exports the budget as a PDF document) icon.
5 The File Download window will appear.
Click the Open button.

IRES Exporting Budgets
4/25/2014 Page 3 of 3
6 If exported as an excel, use the tabs at the bottom of the document to view Summary, Labor breakdown, F&A, Cost Sharing, and Effort budget details.
Either Save or Close the Excel document. Note: If exported as a PDF document, the Summary, Labor breakdown, F&A, Cost Sharing, and Effort budget details will appear on separate pages.
IRES Budget Versioning
4/25/2014 5:12 PM Page 1 of 3
This quick guide highlights the process for using the budget versioning function in IRES Proposal Development (PD).
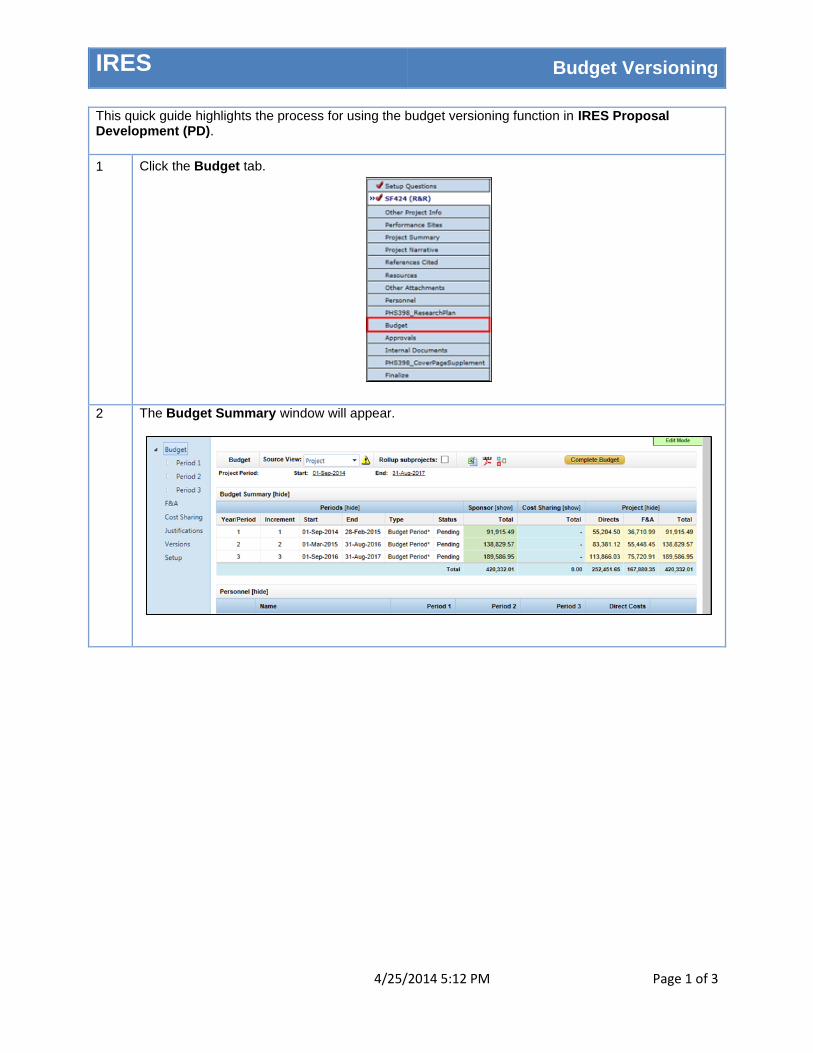
1 Click the Budget tab.
2 The Budget Summary window will appear.
IRES Budget Versioning
4/25/2014 5:12 PM Page 2 of 3
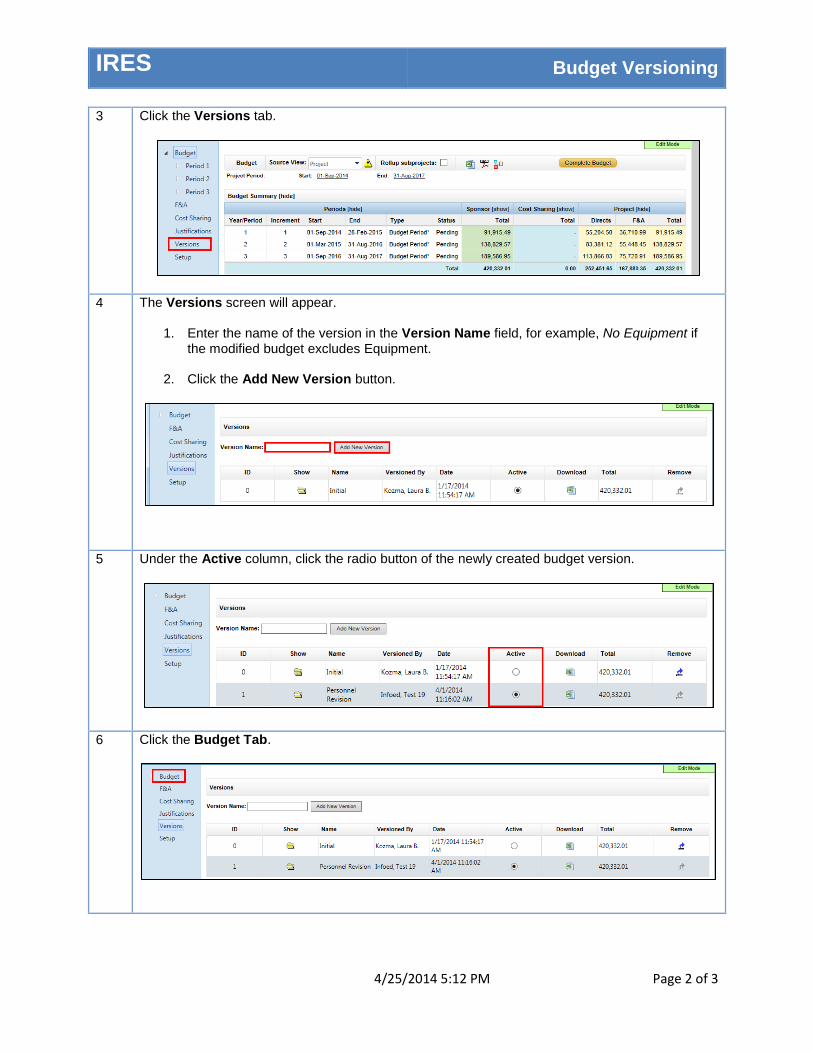
3 Click the Versions tab.
4 The Versions screen will appear.
1. Enter the name of the version in the Version Name field, for example, No Equipment if the modified budget excludes Equipment.
2. Click the Add New Version button.
5 Under the Active column, click the radio button of the newly created budget version.
6 Click the Budget Tab.
IRES Budget Versioning
4/25/2014 5:12 PM Page 3 of 3
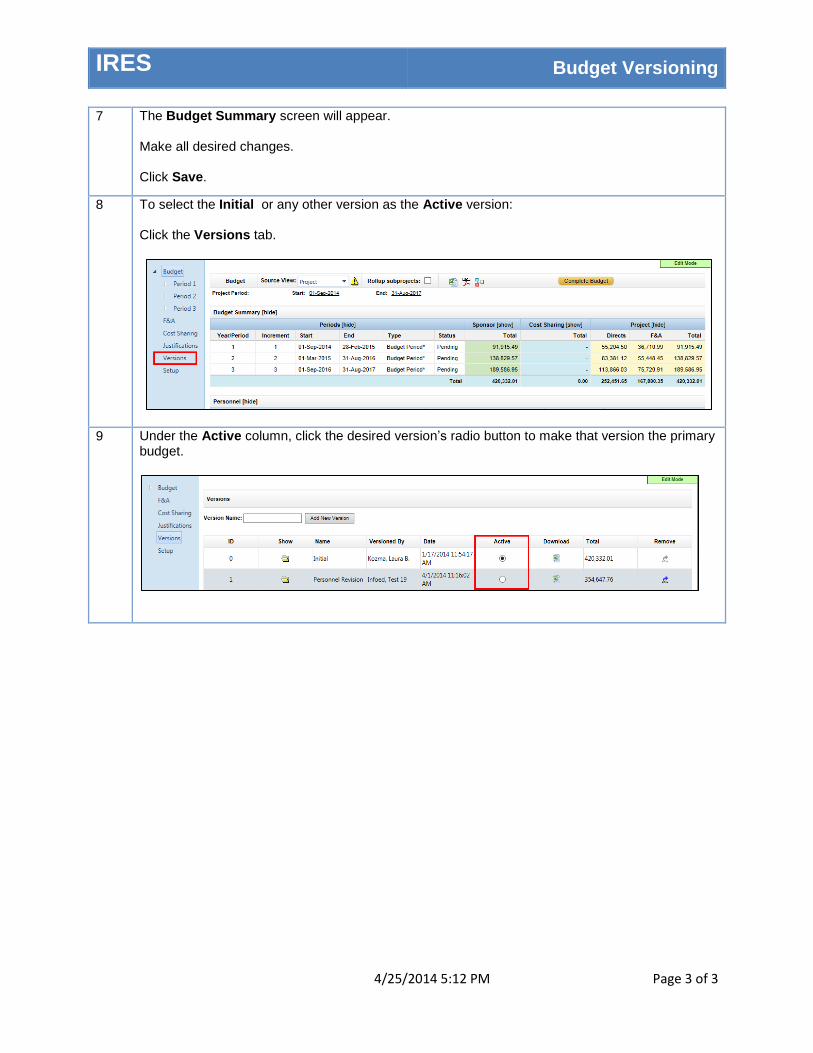
7 The Budget Summary screen will appear. Make all desired changes. Click Save.
8 To select the Initial or any other version as the Active version: Click the Versions tab.
9 Under the Active column, click the desired version’s radio button to make that version the primary budget.
IRES Entering Cost Sharing Costs
4/25/2014 5:13 PM Page 1 of 6
This quick guide highlights the process for entering Cost Sharing costs in IRES Proposal Development (PD).
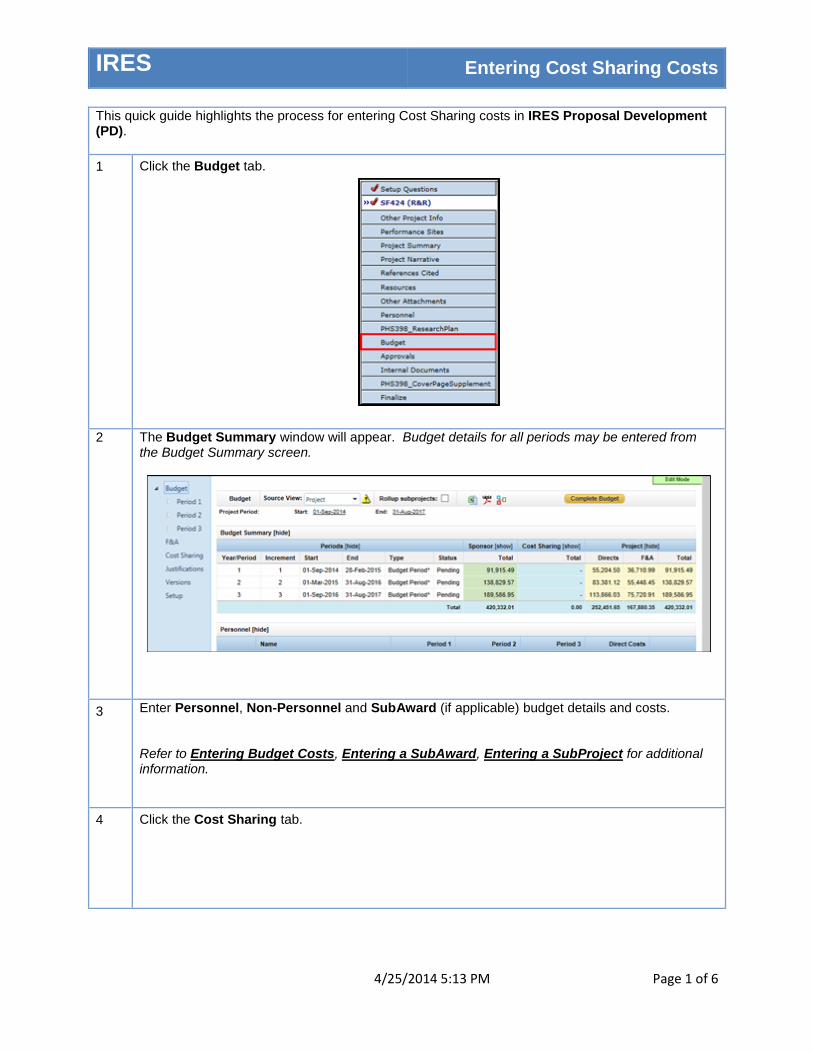
1 Click the Budget tab.
2 The Budget Summary window will appear. Budget details for all periods may be entered from the Budget Summary screen.
3 Enter Personnel, Non-Personnel and SubAward (if applicable) budget details and costs. Refer to Entering Budget Costs, Entering a SubAward, Entering a SubProject for additional information.
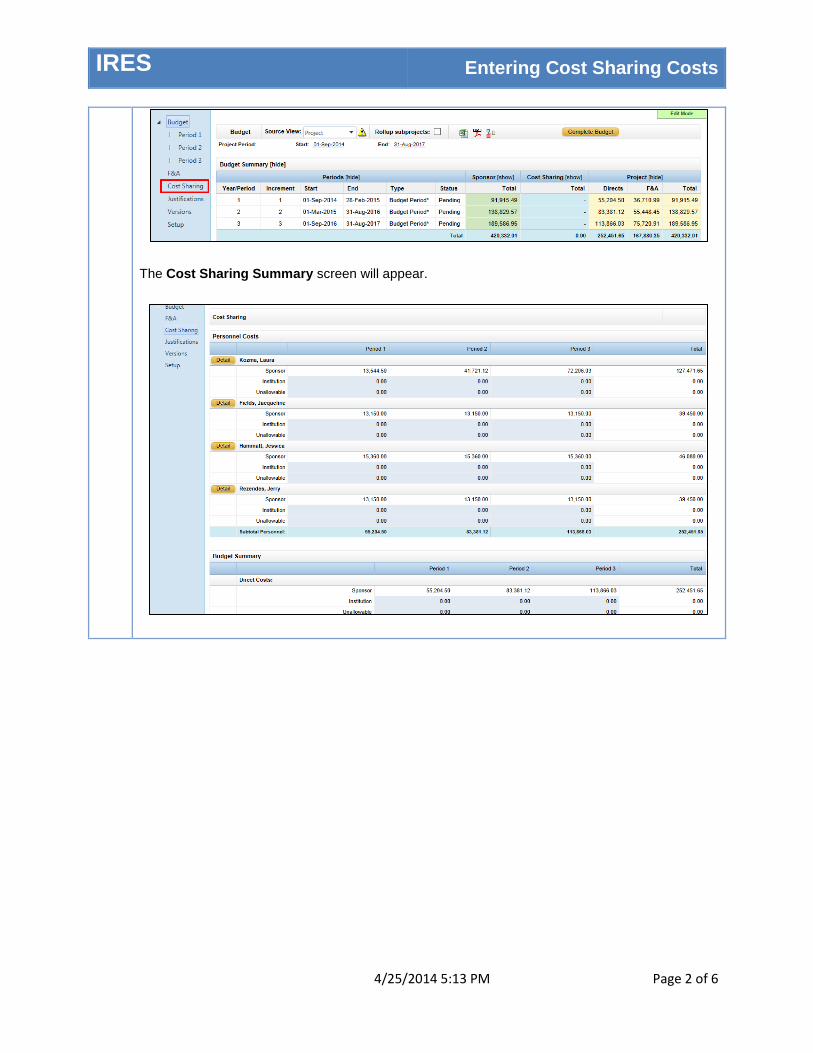
4 Click the Cost Sharing tab.
IRES Entering Cost Sharing Costs
4/25/2014 5:13 PM Page 2 of 6
The Cost Sharing Summary screen will appear.
IRES Entering Cost Sharing Costs
4/25/2014 5:13 PM Page 3 of 6
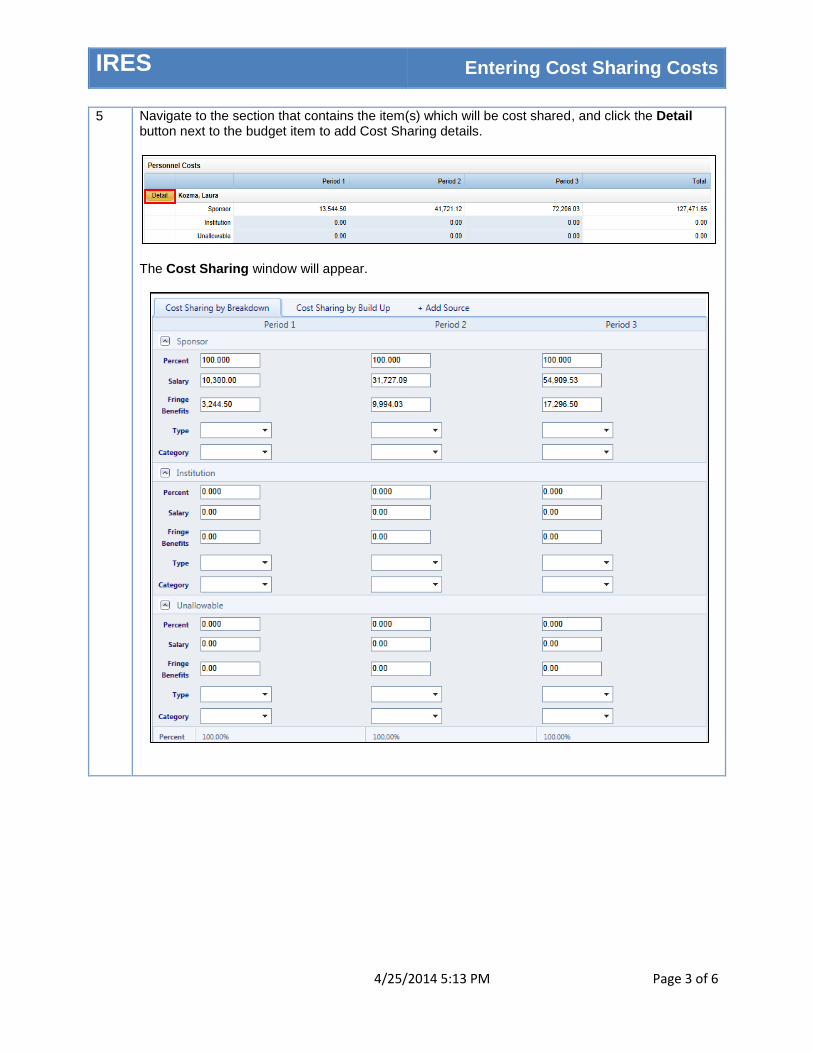
5 Navigate to the section that contains the item(s) which will be cost shared, and click the Detail button next to the budget item to add Cost Sharing details.
The Cost Sharing window will appear.
IRES Entering Cost Sharing Costs
4/25/2014 5:13 PM Page 4 of 6
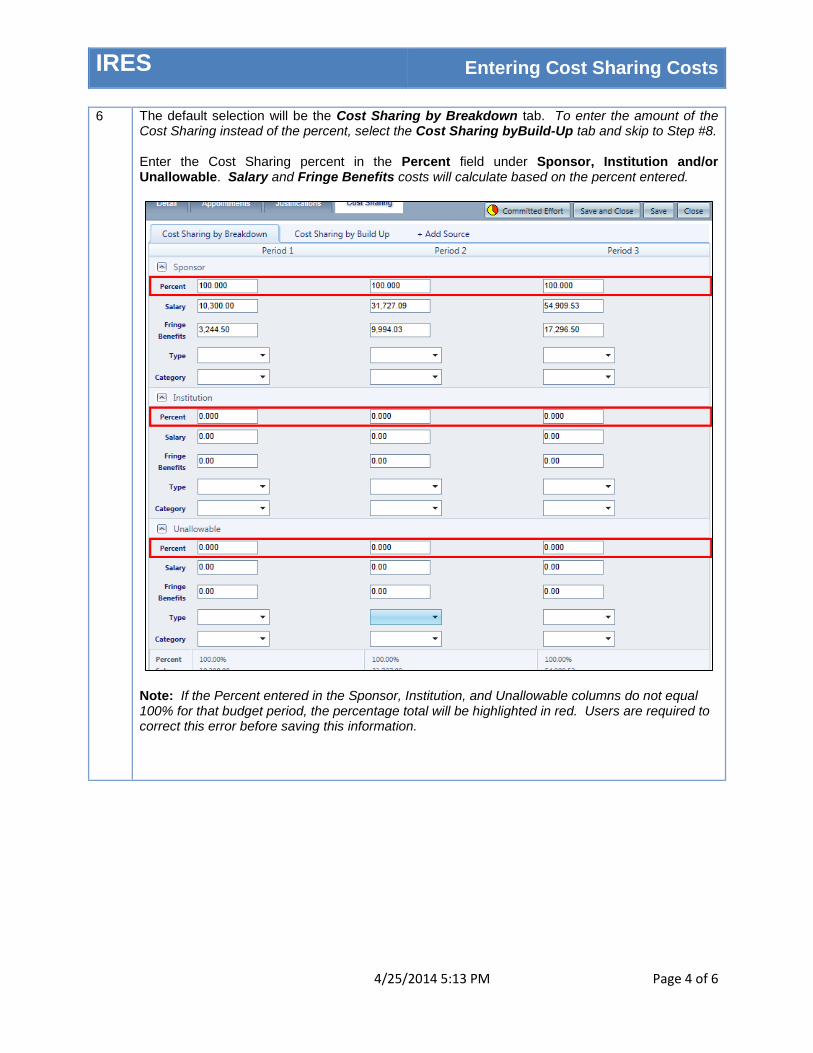
6 The default selection will be the Cost Sharing by Breakdown tab. To enter the amount of the Cost Sharing instead of the percent, select the Cost Sharing byBuild-Up tab and skip to Step #8.
Enter the Cost Sharing percent in the Percent field under Sponsor, Institution and/or Unallowable. Salary and Fringe Benefits costs will calculate based on the percent entered.
Note: If the Percent entered in the Sponsor, Institution, and Unallowable columns do not equal 100% for that budget period, the percentage total will be highlighted in red. Users are required to correct this error before saving this information.

IRES Entering Cost Sharing Costs
4/25/2014 5:13 PM Page 5 of 6
7 Select the Type (Type of Approved Cost Sharing) and Category (Cost Sharing) from the drop down menu for period 1, and the Type and Category selected will flow to subsequent periods. Click Save and Close.
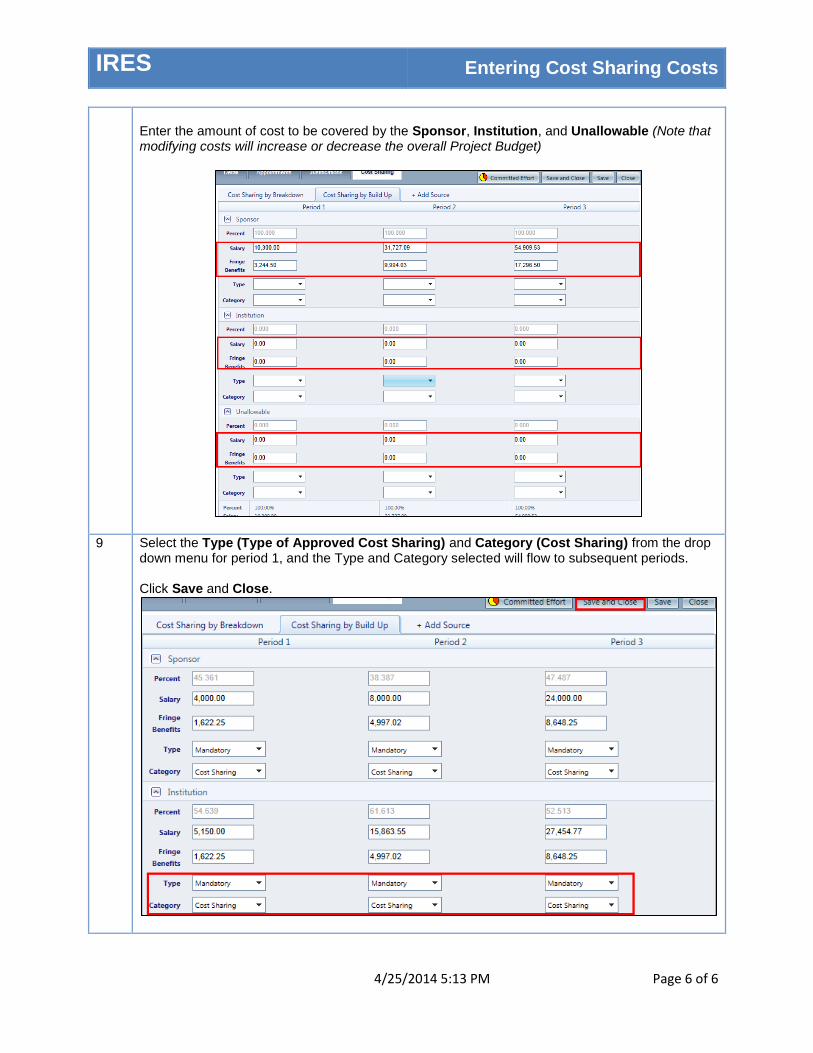
8 To enter cost sharing by cost, select the Cost Sharing by Build Up tab.
IRES Entering Cost Sharing Costs
4/25/2014 5:13 PM Page 6 of 6
Enter the amount of cost to be covered by the Sponsor, Institution, and Unallowable (Note that modifying costs will increase or decrease the overall Project Budget)
9 Select the Type (Type of Approved Cost Sharing) and Category (Cost Sharing) from the drop down menu for period 1, and the Type and Category selected will flow to subsequent periods. Click Save and Close.
IRES Entering a SubAward
4/25/2014 5:14 PM Page 1 of 7
This quick guide highlights the process for entering a SubAward in IRES Proposal Development (PD).
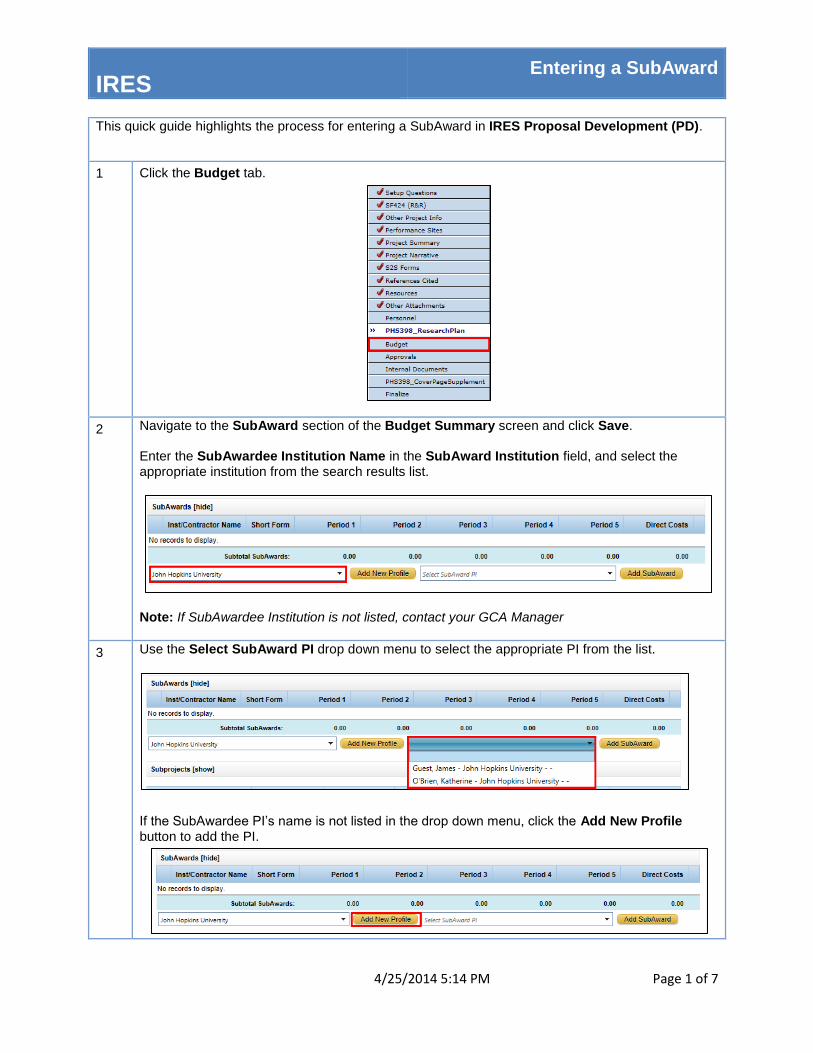
1 Click the Budget tab.
2 Navigate to the SubAward section of the Budget Summary screen and click Save. Enter the SubAwardee Institution Name in the SubAward Institution field, and select the appropriate institution from the search results list.
Note: If SubAwardee Institution is not listed, contact your GCA Manager
3 Use the Select SubAward PI drop down menu to select the appropriate PI from the list.
If the SubAwardee PI’s name is not listed in the drop down menu, click the Add New Profile button to add the PI.
IRES Entering a SubAward
4/25/2014 5:14 PM Page 2 of 7
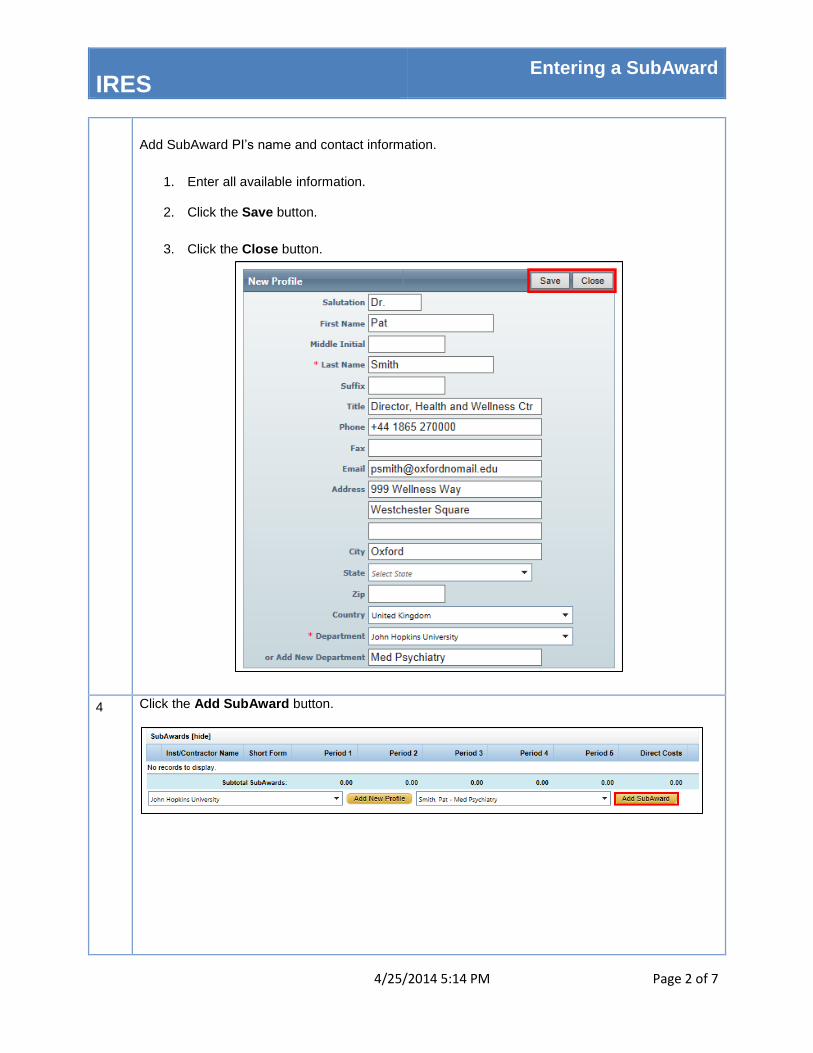
Add SubAward PI’s name and contact information.
1. Enter all available information.
2. Click the Save button.
3. Click the Close button.
4 Click the Add SubAward button.
IRES Entering a SubAward
4/25/2014 5:14 PM Page 3 of 7
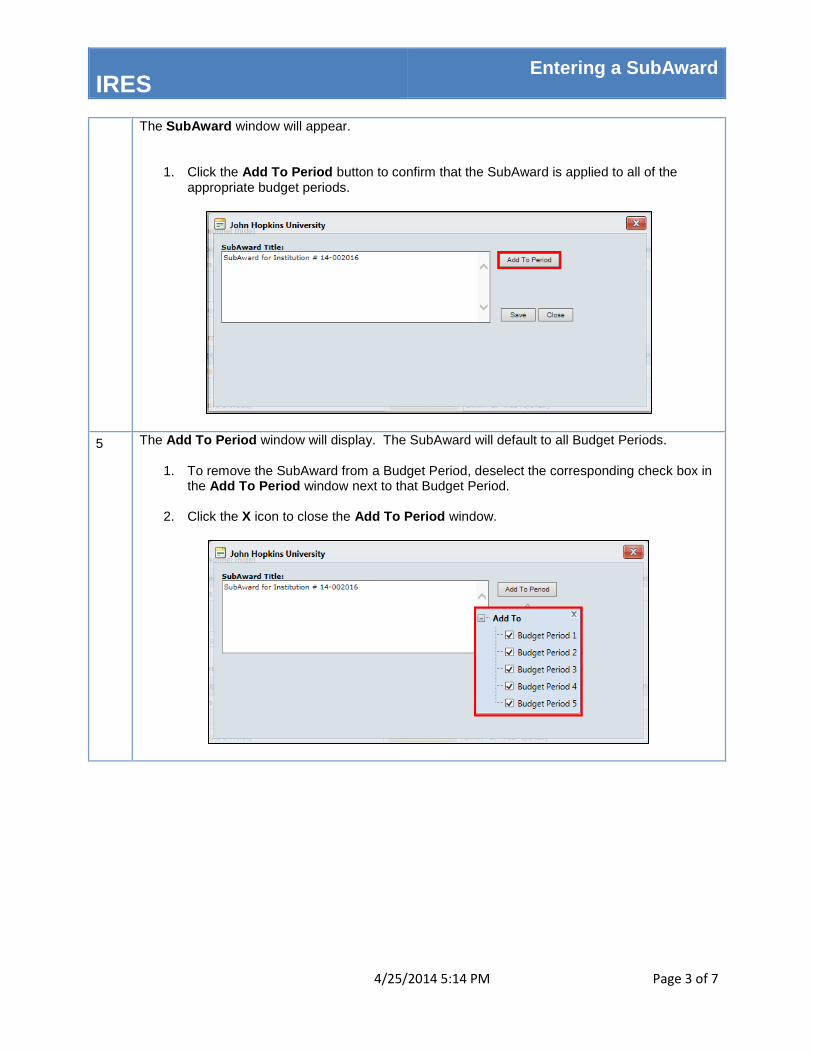
The SubAward window will appear.
1. Click the Add To Period button to confirm that the SubAward is applied to all of the appropriate budget periods.
5 The Add To Period window will display. The SubAward will default to all Budget Periods.
1. To remove the SubAward from a Budget Period, deselect the corresponding check box in the Add To Period window next to that Budget Period.
2. Click the X icon to close the Add To Period window.
IRES Entering a SubAward
4/25/2014 5:14 PM Page 4 of 7
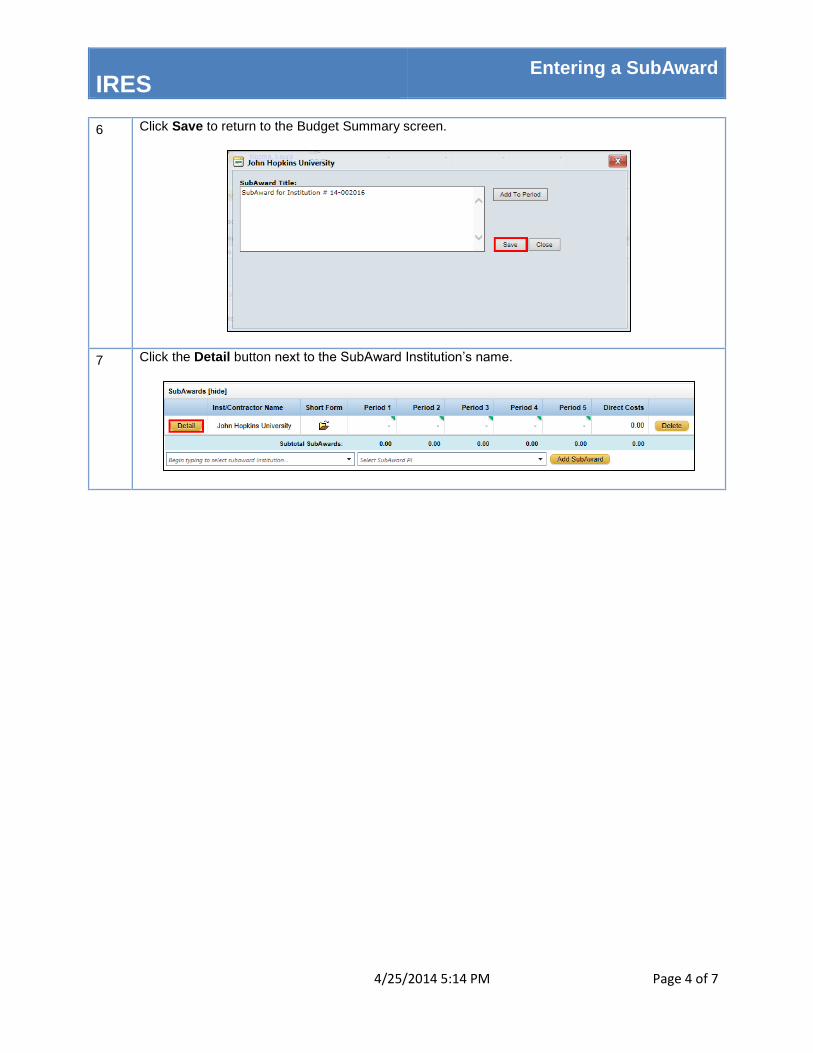
6 Click Save to return to the Budget Summary screen.
7 Click the Detail button next to the SubAward Institution’s name.
IRES Entering a SubAward
4/25/2014 5:14 PM Page 5 of 7
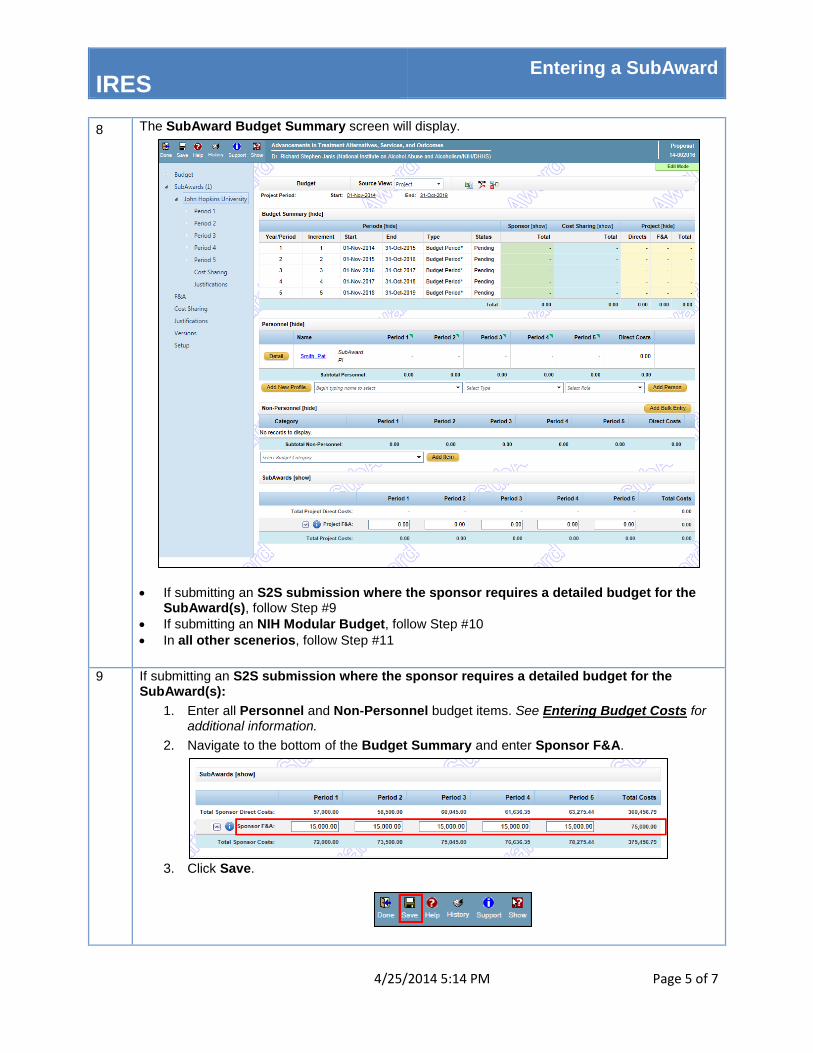
8 The SubAward Budget Summary screen will display.
If submitting an S2S submission where the sponsor requires a detailed budget for the SubAward(s), follow Step #9
If submitting an NIH Modular Budget, follow Step #10
In all other scenerios, follow Step #11
9 If submitting an S2S submission where the sponsor requires a detailed budget for the SubAward(s):
1. Enter all Personnel and Non-Personnel budget items. See Entering Budget Costs for additional information.
2. Navigate to the bottom of the Budget Summary and enter Sponsor F&A.
3. Click Save.
IRES Entering a SubAward
4/25/2014 5:14 PM Page 6 of 7
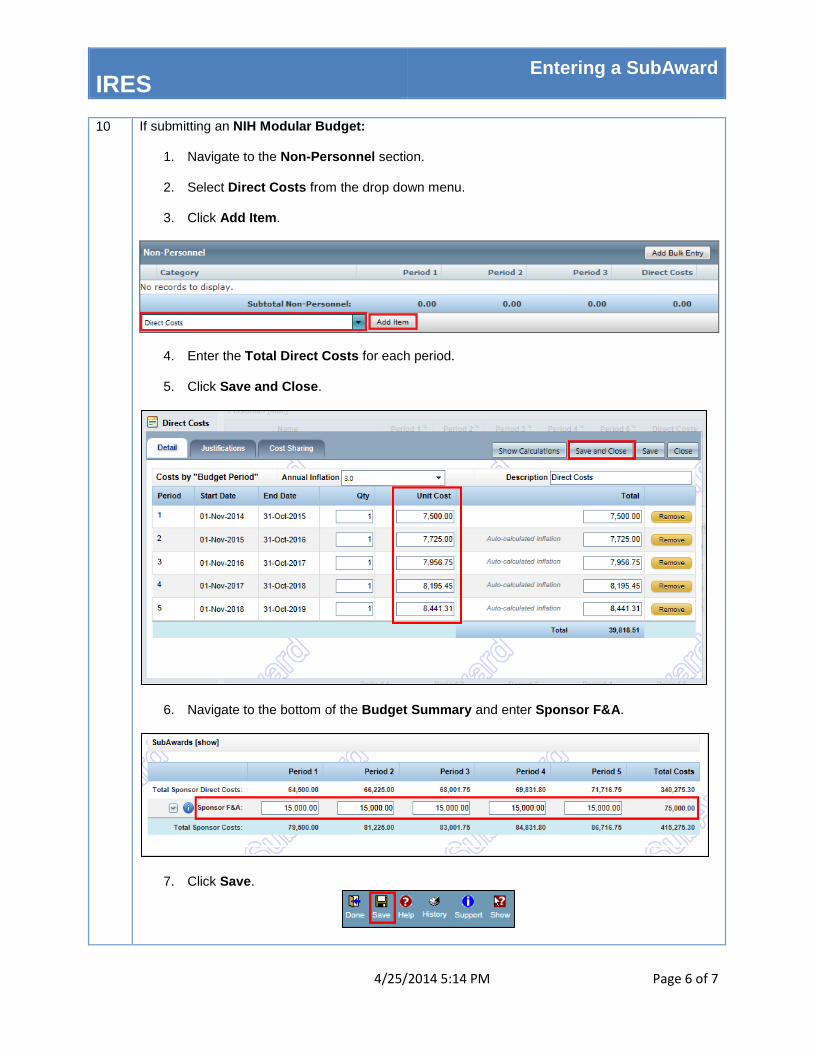
10 If submitting an NIH Modular Budget:
1. Navigate to the Non-Personnel section. 2. Select Direct Costs from the drop down menu.
3. Click Add Item.
4. Enter the Total Direct Costs for each period.
5. Click Save and Close.
6. Navigate to the bottom of the Budget Summary and enter Sponsor F&A.
7. Click Save.
IRES Entering a SubAward
4/25/2014 5:14 PM Page 7 of 7
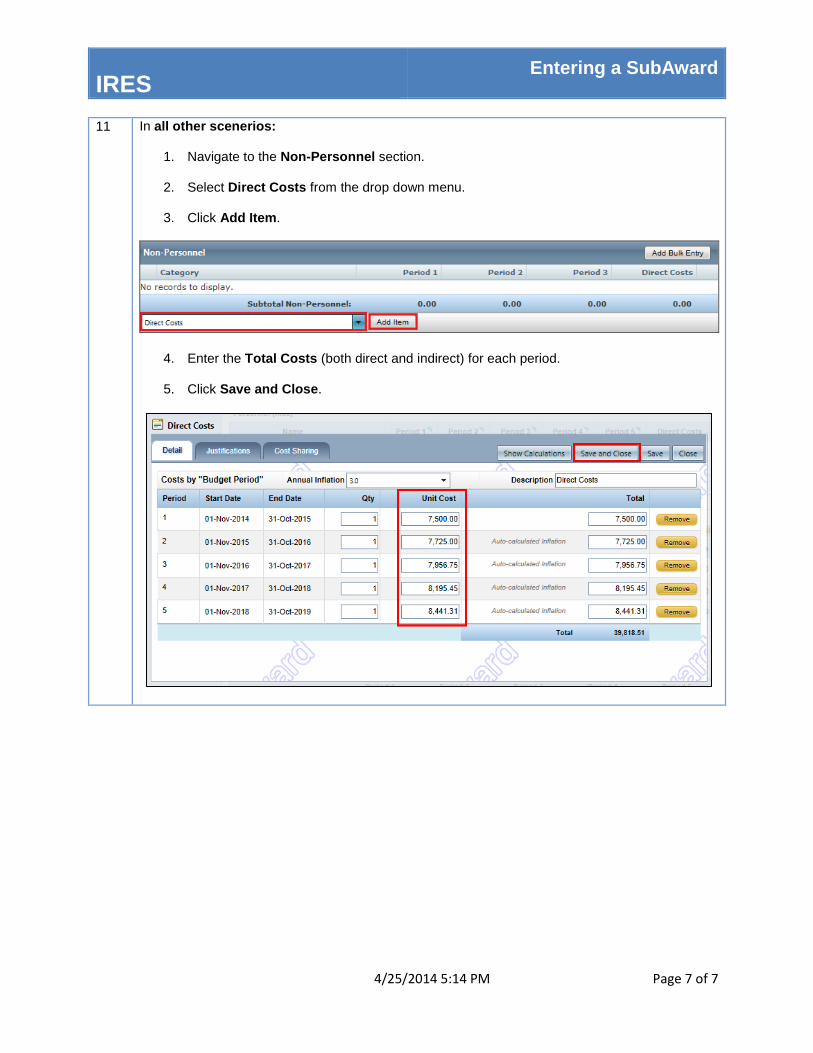
11 In all other scenerios:
1. Navigate to the Non-Personnel section. 2. Select Direct Costs from the drop down menu.
3. Click Add Item.
4. Enter the Total Costs (both direct and indirect) for each period.
5. Click Save and Close.
IRES Entering a SubProject
4/25/2014 5:15 PM Page 1 of 4
This quick guide highlights the process for entering a SubProject in IRES Proposal Development (PD). Note: When utilizing subprojects, ALL costs must be entered into a subproject budget.
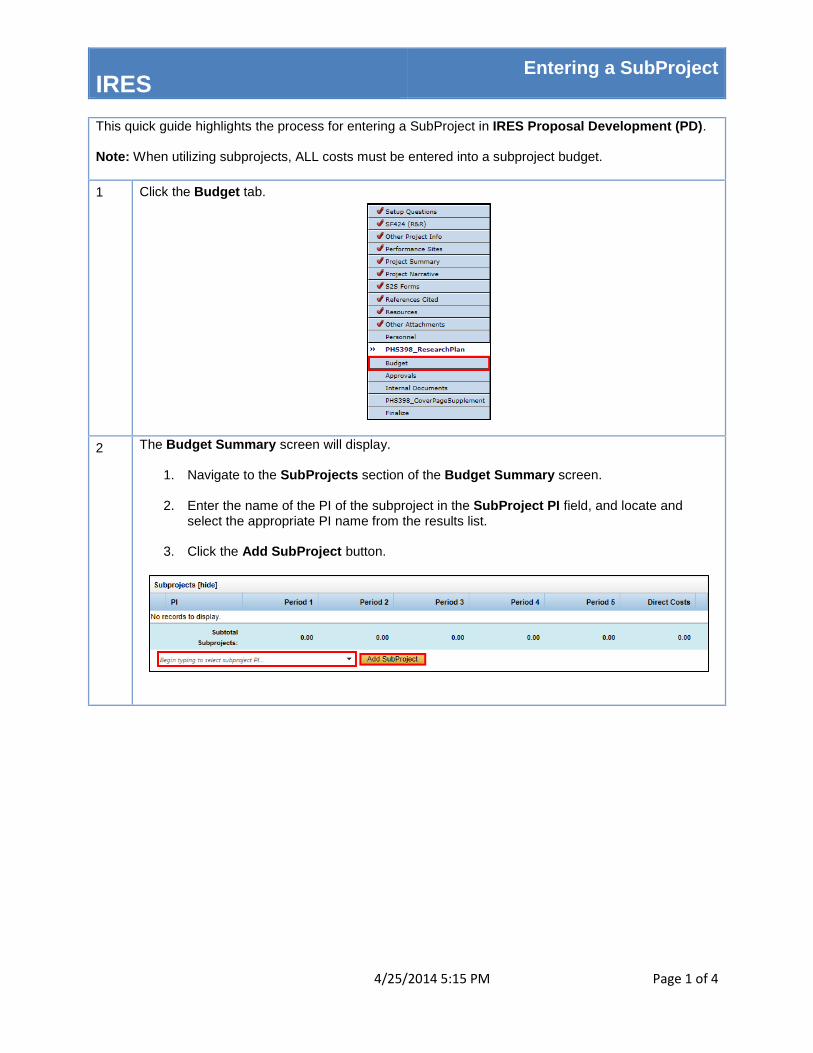
1 Click the Budget tab.
2 The Budget Summary screen will display.
1. Navigate to the SubProjects section of the Budget Summary screen.
2. Enter the name of the PI of the subproject in the SubProject PI field, and locate and select the appropriate PI name from the results list.
3. Click the Add SubProject button.
IRES Entering a SubProject
4/25/2014 5:15 PM Page 2 of 4
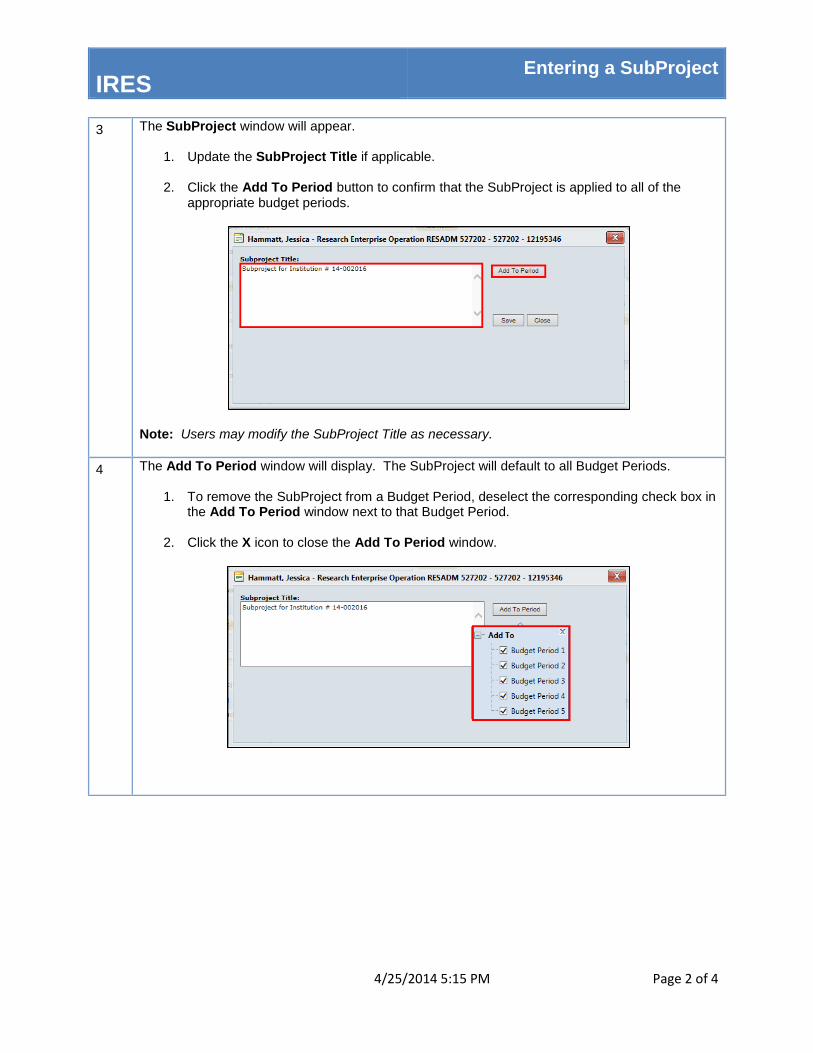
3 The SubProject window will appear.
1. Update the SubProject Title if applicable.
2. Click the Add To Period button to confirm that the SubProject is applied to all of the appropriate budget periods.
Note: Users may modify the SubProject Title as necessary.
4 The Add To Period window will display. The SubProject will default to all Budget Periods.
1. To remove the SubProject from a Budget Period, deselect the corresponding check box in the Add To Period window next to that Budget Period.
2. Click the X icon to close the Add To Period window.
IRES Entering a SubProject
4/25/2014 5:15 PM Page 3 of 4
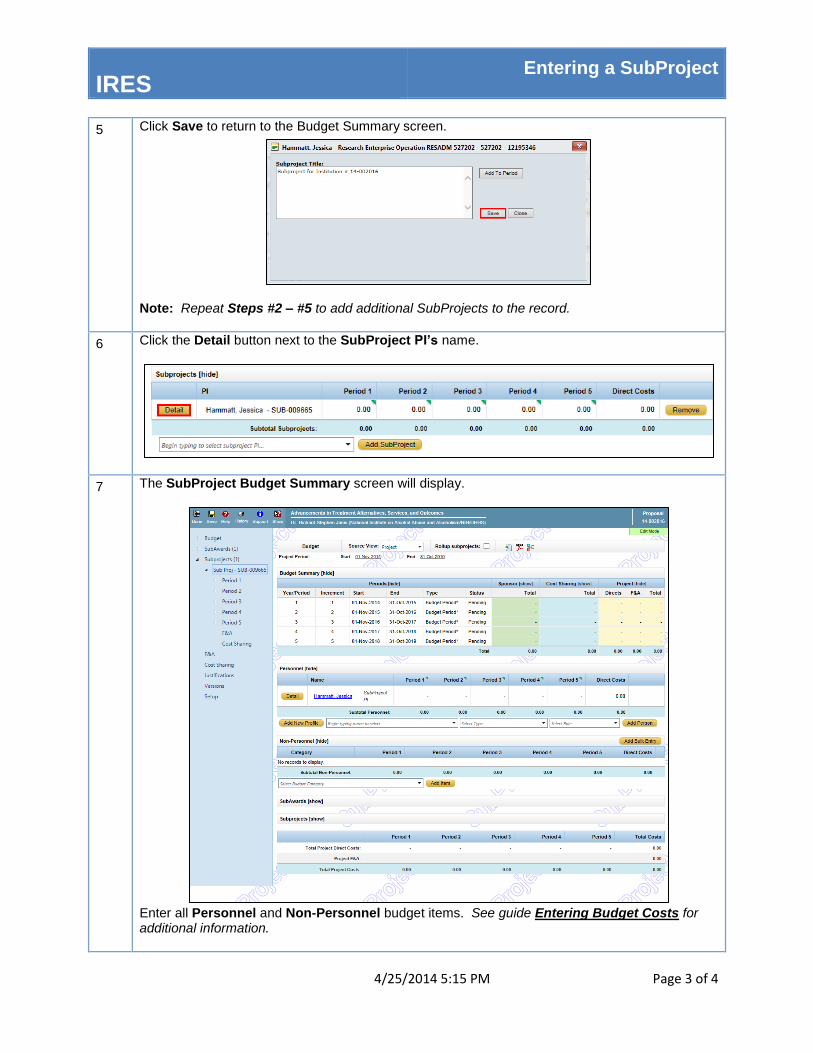
5 Click Save to return to the Budget Summary screen.
Note: Repeat Steps #2 – #5 to add additional SubProjects to the record.
6 Click the Detail button next to the SubProject PI’s name.
7 The SubProject Budget Summary screen will display.
Enter all Personnel and Non-Personnel budget items. See guide Entering Budget Costs for additional information.
IRES Entering a SubProject
4/25/2014 5:15 PM Page 4 of 4
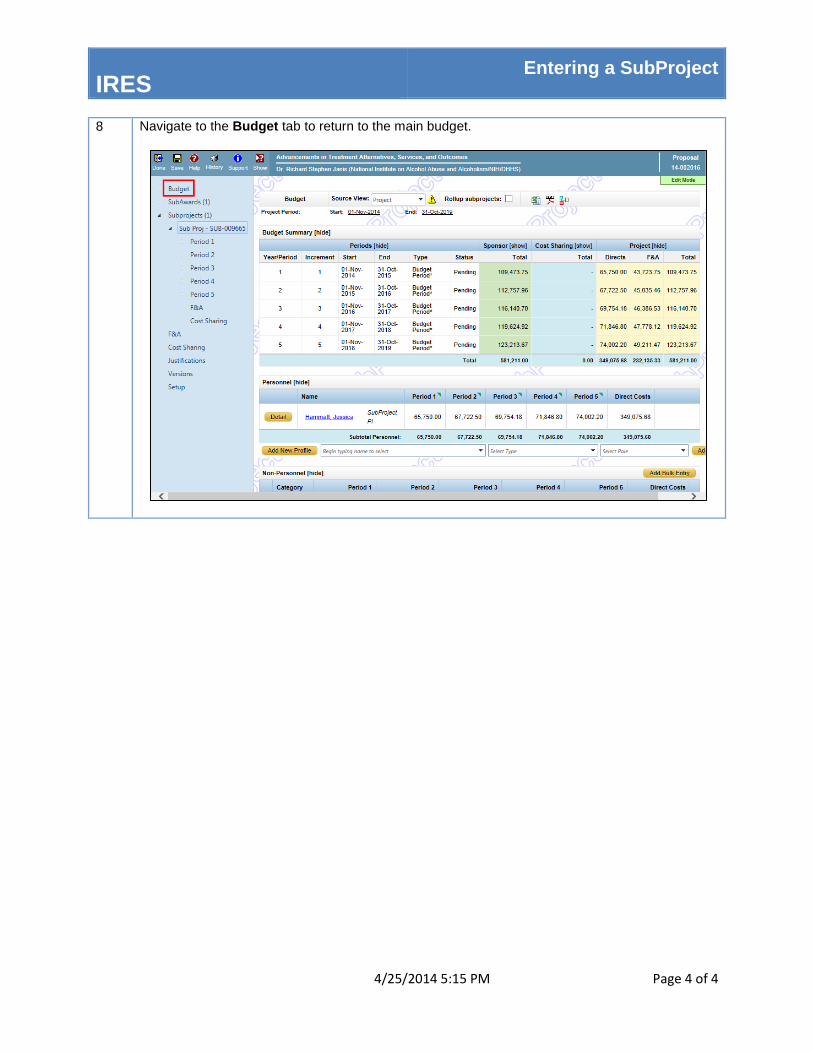
8 Navigate to the Budget tab to return to the main budget.
IRES Adding an Academic (9/9) Appointment Type
4/25/2014 5:16 PM Page 1 of 3
This quick guide highlights the process for adding an Academic Appointment Type in IRES Proposal Development (PD).
1 Click the Budget tab.
2 Navigate to the Personnel section of the Budget Summary screen, and click the Drill icon next to the appropriate individual’s name.
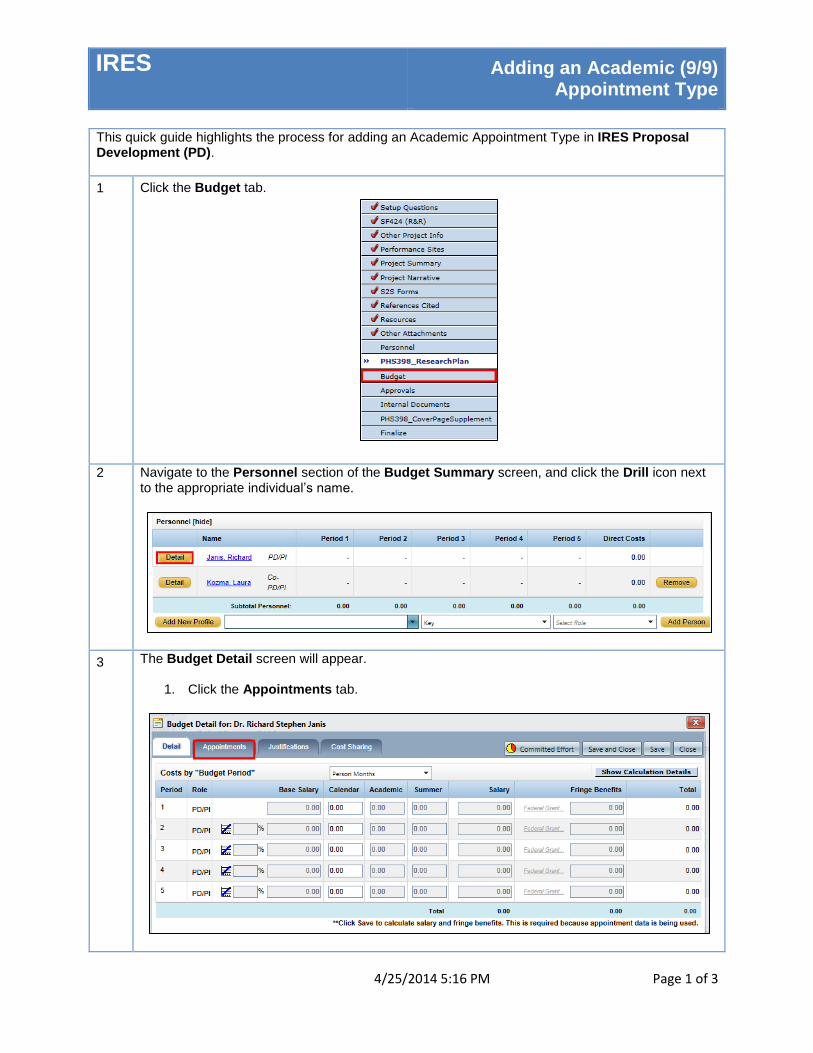
3 The Budget Detail screen will appear.
1. Click the Appointments tab.
IRES Adding an Academic (9/9) Appointment Type
4/25/2014 5:16 PM Page 2 of 3
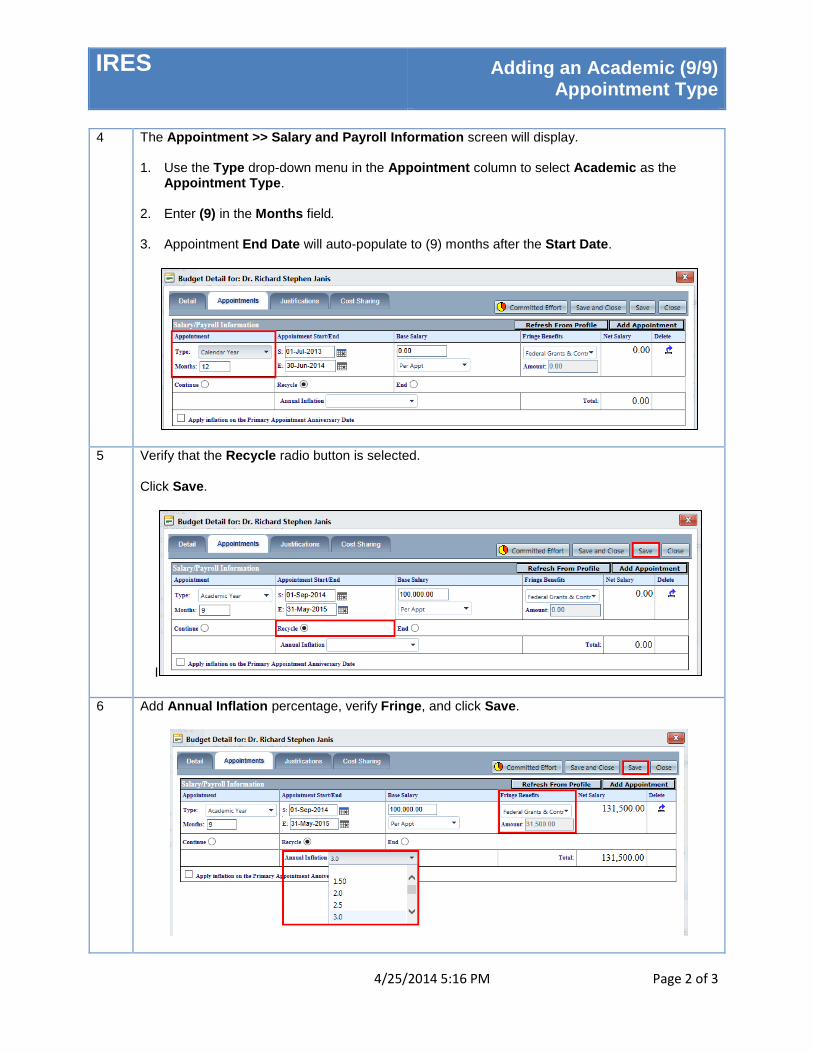
4 The Appointment >> Salary and Payroll Information screen will display. 1. Use the Type drop-down menu in the Appointment column to select Academic as the
Appointment Type.
2. Enter (9) in the Months field.
3. Appointment End Date will auto-populate to (9) months after the Start Date.
5 Verify that the Recycle radio button is selected.
Click Save.
I
6 Add Annual Inflation percentage, verify Fringe, and click Save.
IRES Adding an Academic (9/9) Appointment Type
4/25/2014 5:16 PM Page 3 of 3
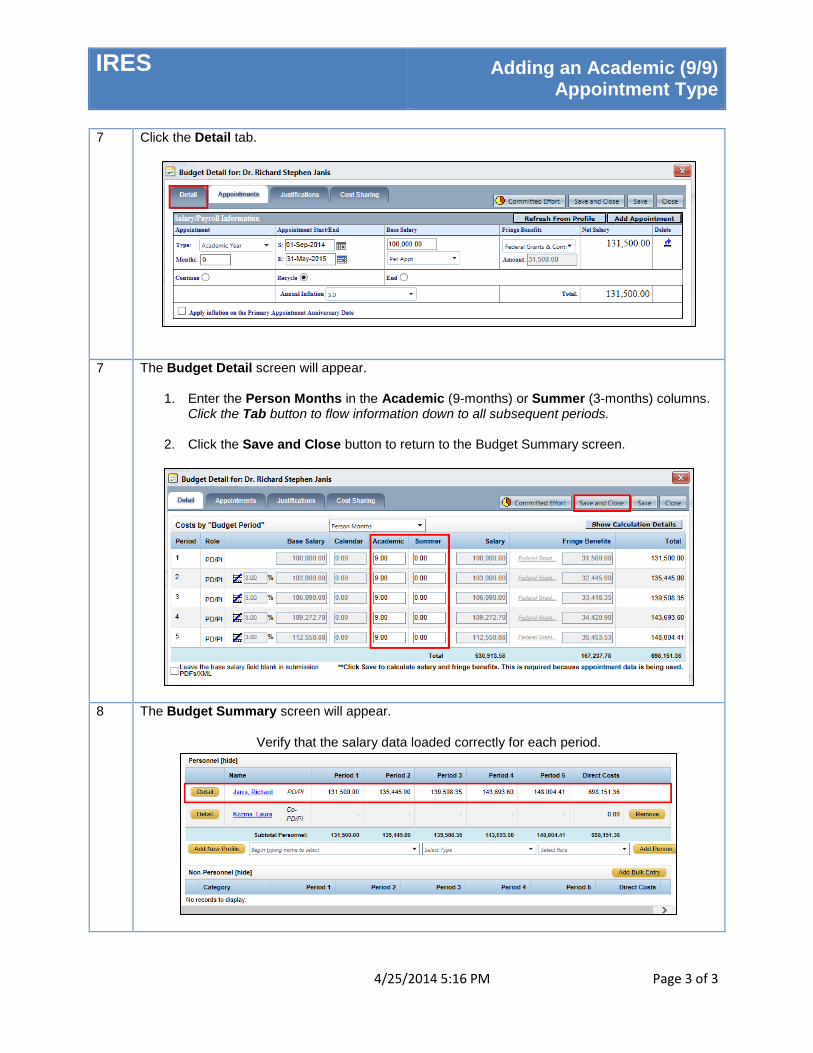
7 Click the Detail tab.
7 The Budget Detail screen will appear.
1. Enter the Person Months in the Academic (9-months) or Summer (3-months) columns. Click the Tab button to flow information down to all subsequent periods.
2. Click the Save and Close button to return to the Budget Summary screen.
8 The Budget Summary screen will appear.
Verify that the salary data loaded correctly for each period.
IRES Updating Fringe Benefits
4/25/2014 5:17 PM Page 1 of 2
This documents highlights the process for updating a budget to reflect new fringe benefit rates in Proposal Development (PD).
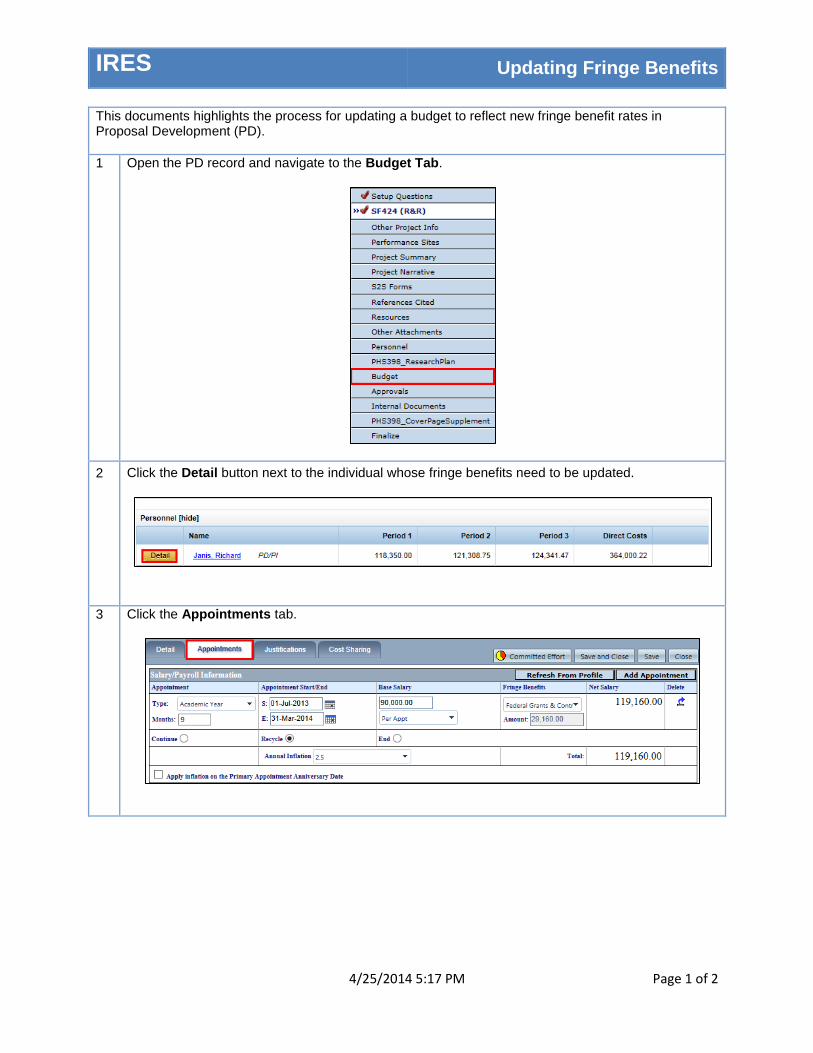
1 Open the PD record and navigate to the Budget Tab.
2 Click the Detail button next to the individual whose fringe benefits need to be updated.
3 Click the Appointments tab.
IRES Updating Fringe Benefits
4/25/2014 5:17 PM Page 2 of 2
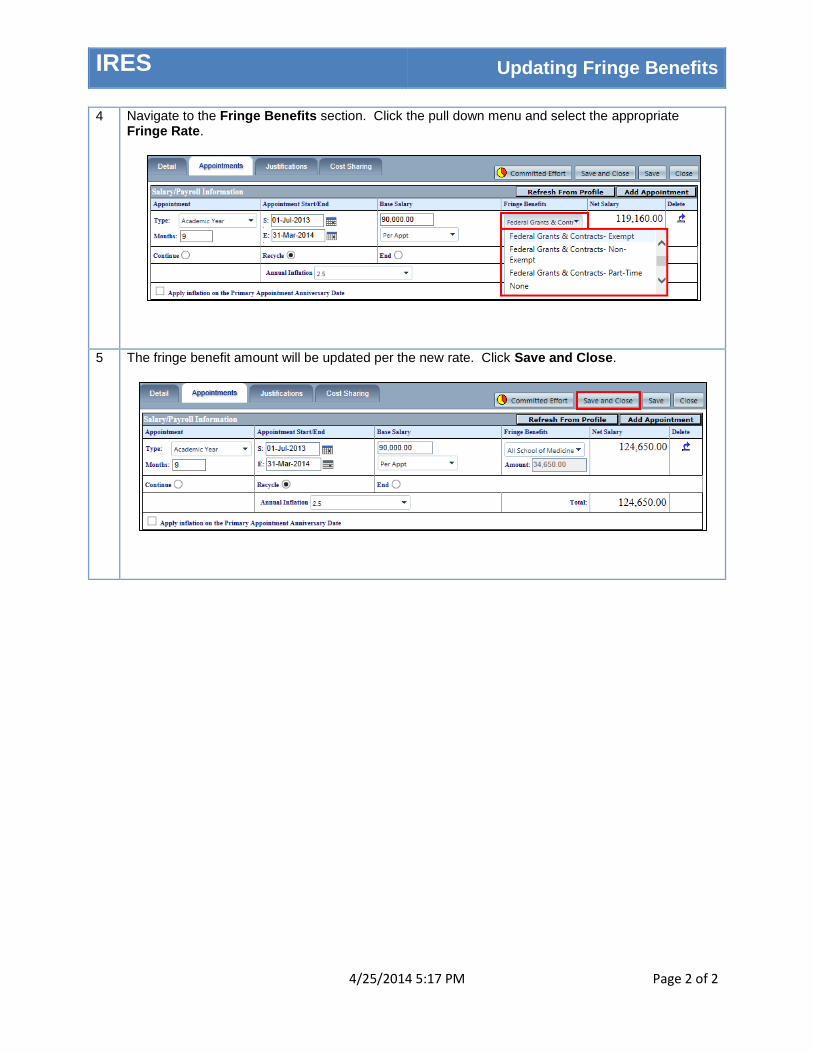
4 Navigate to the Fringe Benefits section. Click the pull down menu and select the appropriate Fringe Rate.
5 The fringe benefit amount will be updated per the new rate. Click Save and Close.
IRES Uploading Internal Documents
4/25/2014 5:17 PM Page 1 of 3
This quick guide highlights the process for uploading internal documents in IRES Proposal Development (PD). The following sections are included in this quick guide:
1. Uploading Internal Documents 2. Adding Institutional e-Forms
Uploading Internal Documents
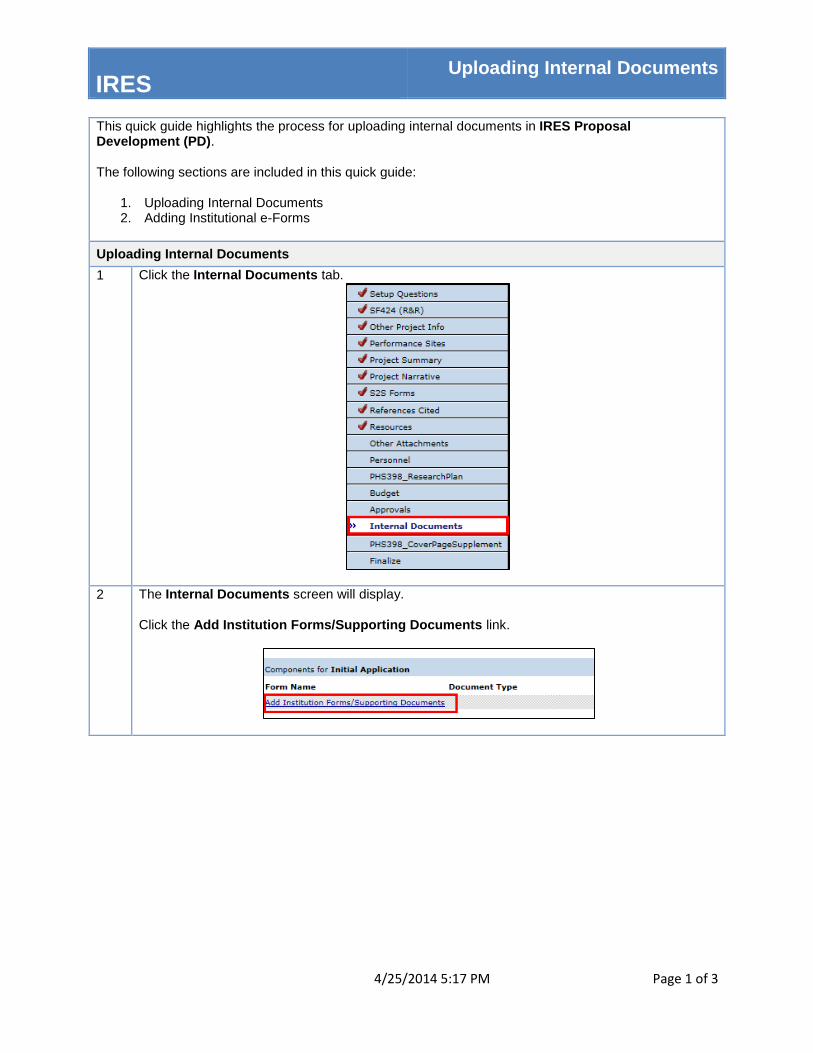
1 Click the Internal Documents tab.
2 The Internal Documents screen will display. Click the Add Institution Forms/Supporting Documents link.
IRES Uploading Internal Documents
4/25/2014 5:17 PM Page 2 of 3
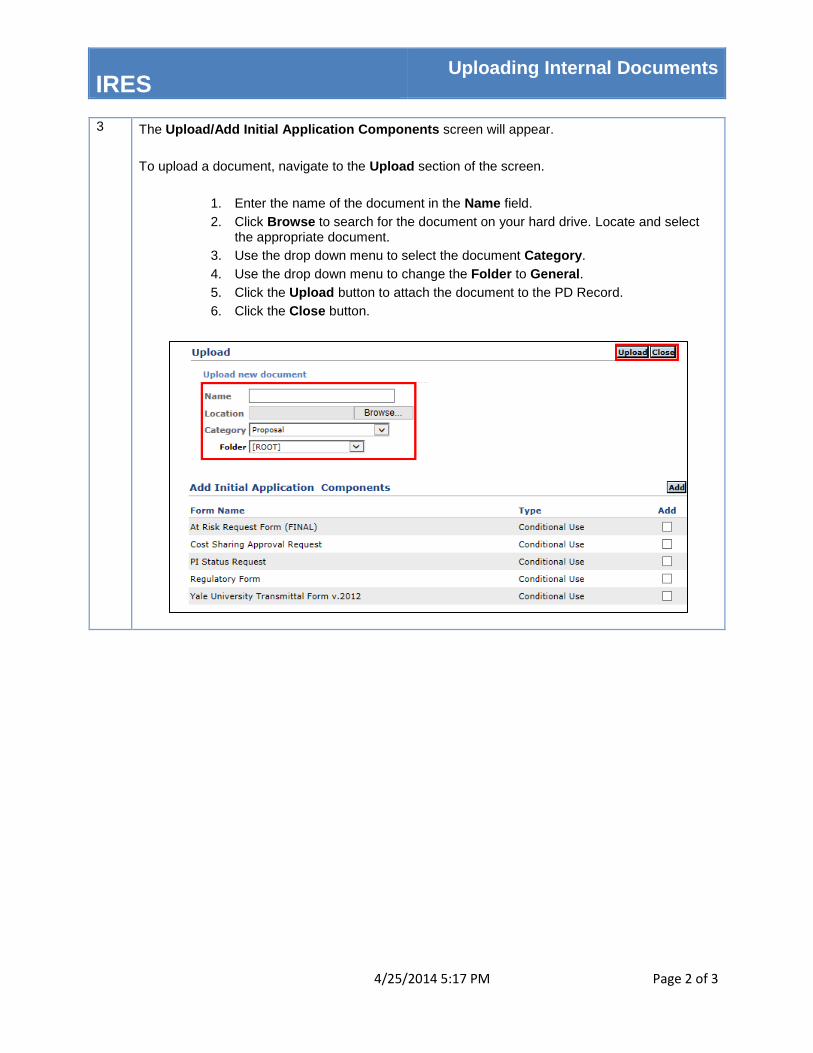
3 The Upload/Add Initial Application Components screen will appear.
To upload a document, navigate to the Upload section of the screen.
1. Enter the name of the document in the Name field.
2. Click Browse to search for the document on your hard drive. Locate and select the appropriate document.
3. Use the drop down menu to select the document Category.
4. Use the drop down menu to change the Folder to General.
5. Click the Upload button to attach the document to the PD Record.
6. Click the Close button.
IRES Uploading Internal Documents
4/25/2014 5:17 PM Page 3 of 3
Adding Institutional e-Forms
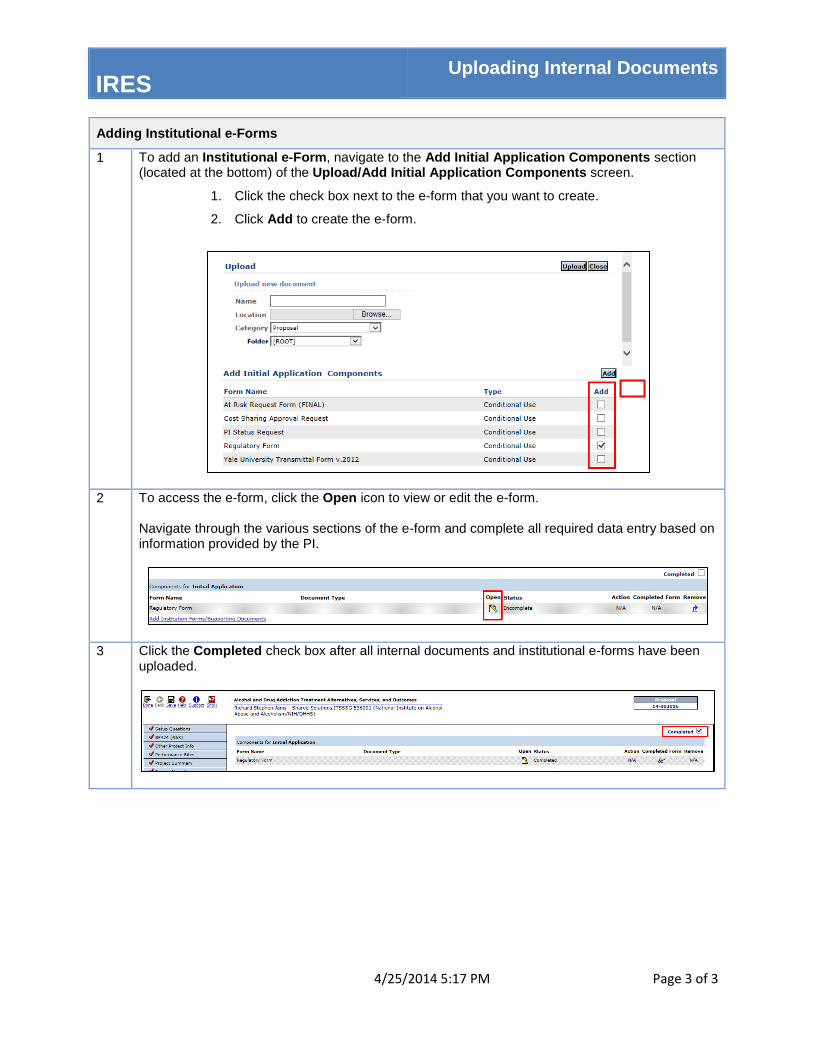
1 To add an Institutional e-Form, navigate to the Add Initial Application Components section (located at the bottom) of the Upload/Add Initial Application Components screen.
1. Click the check box next to the e-form that you want to create.
2. Click Add to create the e-form.
2 To access the e-form, click the Open icon to view or edit the e-form. Navigate through the various sections of the e-form and complete all required data entry based on information provided by the PI.
3 Click the Completed check box after all internal documents and institutional e-forms have been uploaded.
IRES Uploading Documents to an NIH Proposal
4/25/2014 5:18 PM Page 1 of 6
This quick guide highlights the process for uploading documents in an NIH proposal. The following sections are included in this quick guide:
1. Page Size 2. Uploading Project Summary Tab Document(s) 3. Uploading Project Narrative Tab Document(s) 4. Uploading Other Attachments Tab Document(s) 5. Uploading Personnel Tab Document(s) 6. Uploading PHS 398 Research Plan Document(s) 7. Uploading PHS 398 Cover Letter
1. Page Size
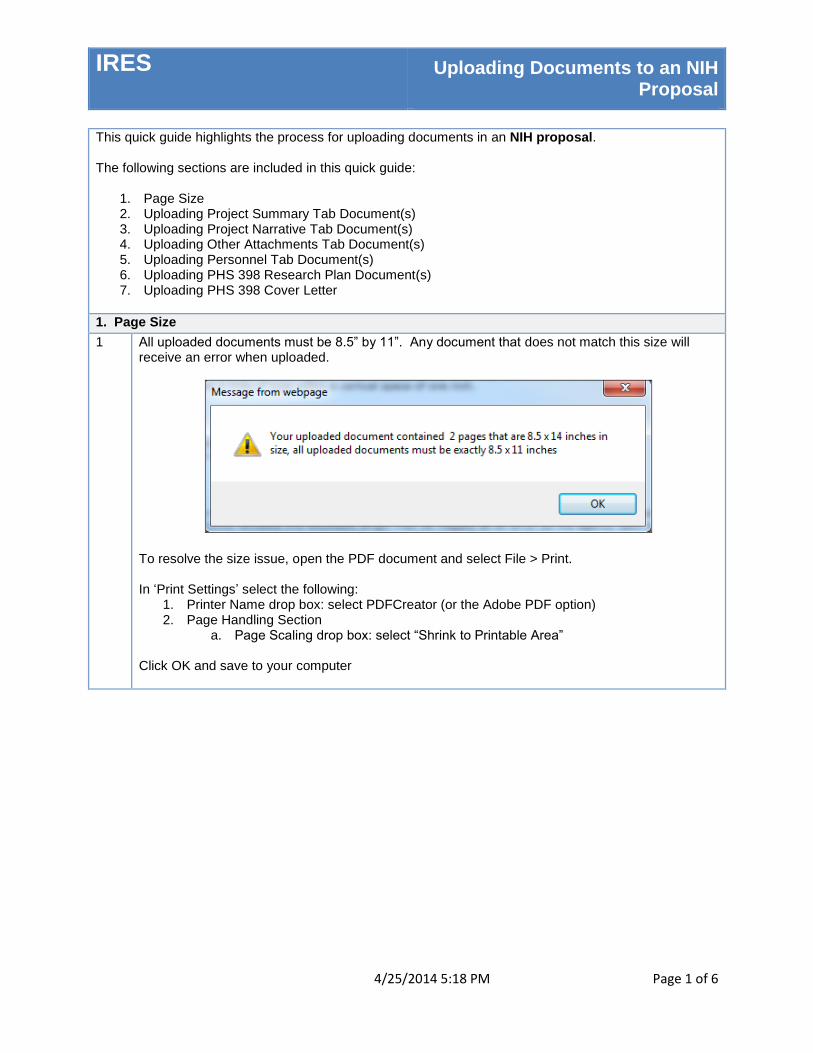
1 All uploaded documents must be 8.5” by 11”. Any document that does not match this size will receive an error when uploaded.
To resolve the size issue, open the PDF document and select File > Print. In ‘Print Settings’ select the following:
1. Printer Name drop box: select PDFCreator (or the Adobe PDF option) 2. Page Handling Section
a. Page Scaling drop box: select “Shrink to Printable Area” Click OK and save to your computer
IRES Uploading Documents to an NIH Proposal
4/25/2014 5:18 PM Page 2 of 6
Upload the newly saved document per the following sections.
2. Uploading Project Summary Tab Document(s)
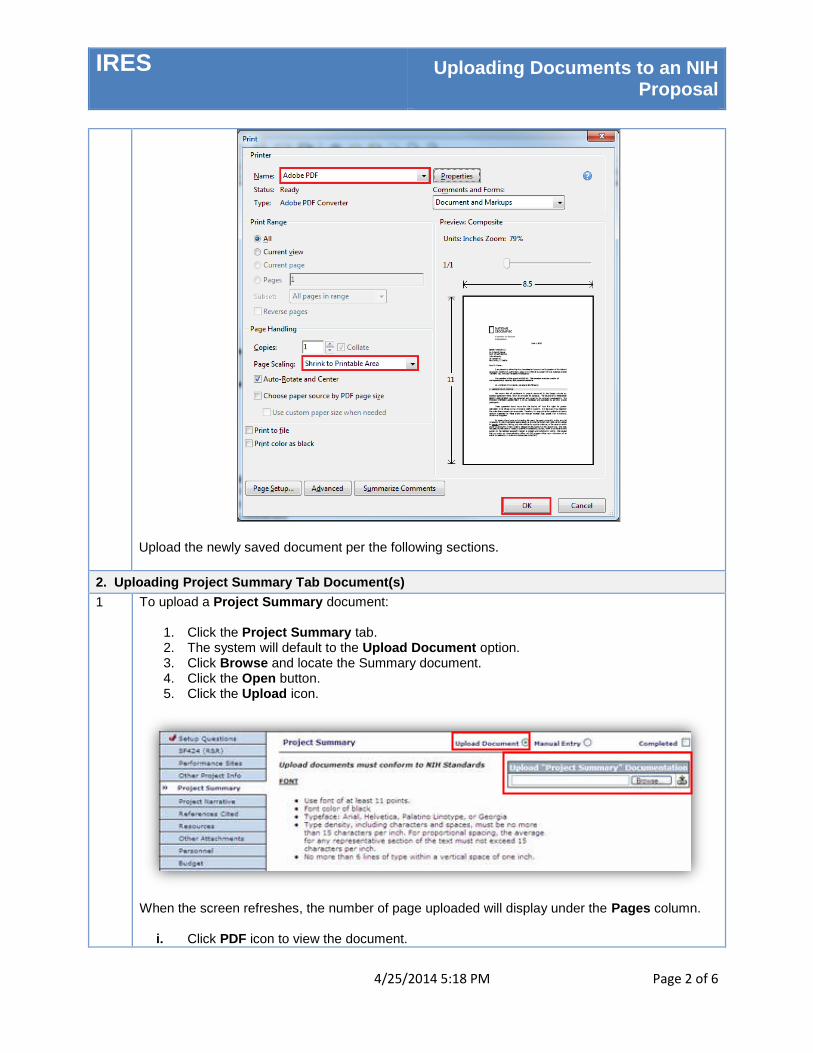
1 To upload a Project Summary document:
1. Click the Project Summary tab. 2. The system will default to the Upload Document option. 3. Click Browse and locate the Summary document. 4. Click the Open button. 5. Click the Upload icon.
When the screen refreshes, the number of page uploaded will display under the Pages column.
i. Click PDF icon to view the document.
IRES Uploading Documents to an NIH Proposal
4/25/2014 5:18 PM Page 3 of 6
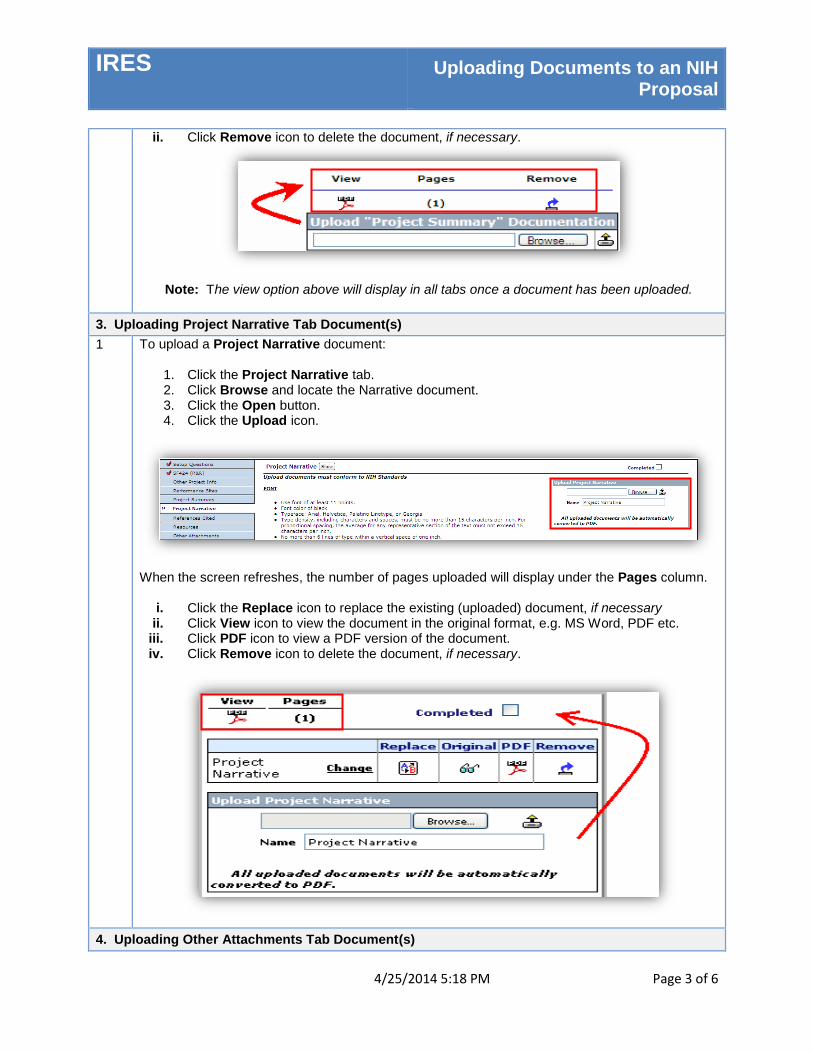
ii. Click Remove icon to delete the document, if necessary.
Note: The view option above will display in all tabs once a document has been uploaded.
3. Uploading Project Narrative Tab Document(s)
1 To upload a Project Narrative document:
1. Click the Project Narrative tab. 2. Click Browse and locate the Narrative document. 3. Click the Open button. 4. Click the Upload icon.
When the screen refreshes, the number of pages uploaded will display under the Pages column.
i. Click the Replace icon to replace the existing (uploaded) document, if necessary ii. Click View icon to view the document in the original format, e.g. MS Word, PDF etc.
iii. Click PDF icon to view a PDF version of the document. iv. Click Remove icon to delete the document, if necessary.
4. Uploading Other Attachments Tab Document(s)
IRES Uploading Documents to an NIH Proposal
4/25/2014 5:18 PM Page 4 of 6
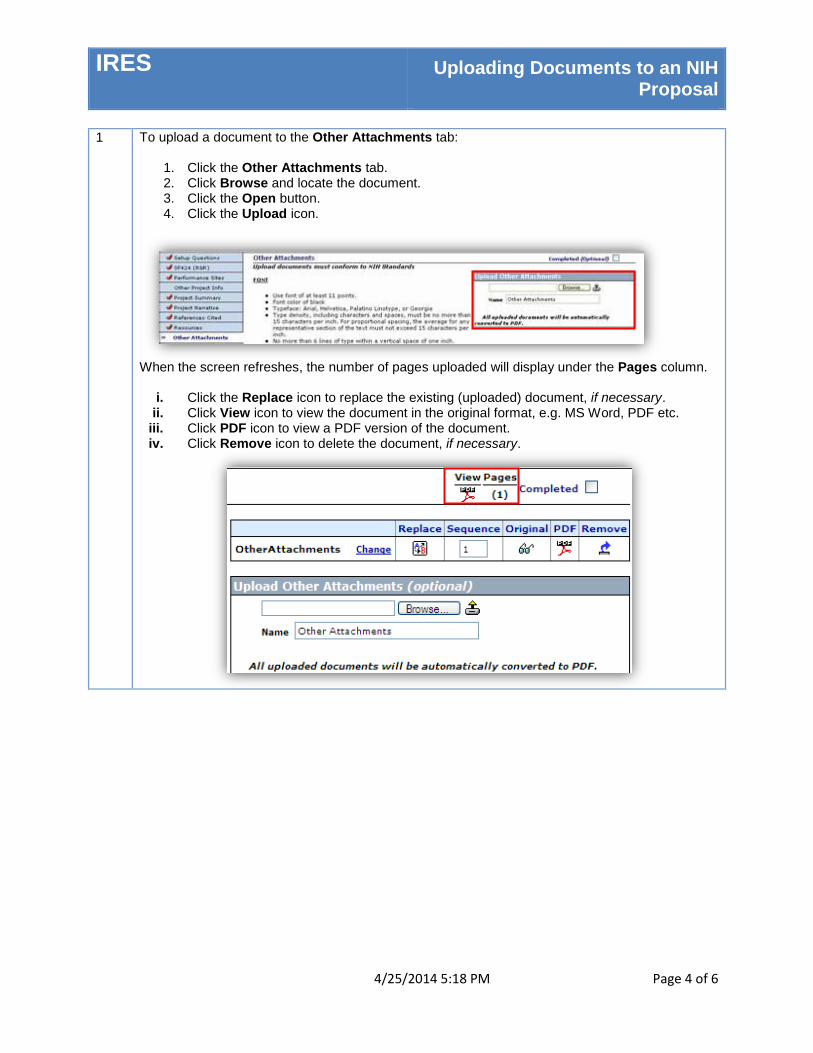
1 To upload a document to the Other Attachments tab:
1. Click the Other Attachments tab. 2. Click Browse and locate the document. 3. Click the Open button. 4. Click the Upload icon.
When the screen refreshes, the number of pages uploaded will display under the Pages column.
i. Click the Replace icon to replace the existing (uploaded) document, if necessary. ii. Click View icon to view the document in the original format, e.g. MS Word, PDF etc.
iii. Click PDF icon to view a PDF version of the document. iv. Click Remove icon to delete the document, if necessary.
IRES Uploading Documents to an NIH Proposal
4/25/2014 5:18 PM Page 5 of 6
5. Uploading Personnel Tab Document(s)
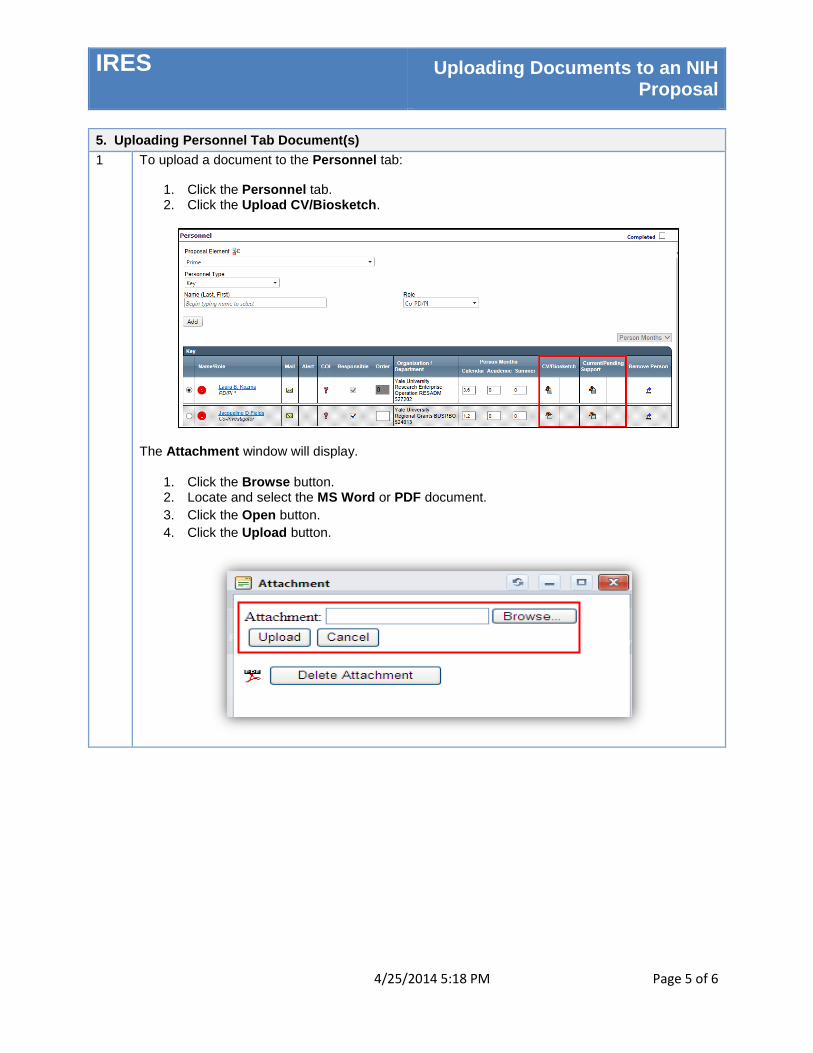
1 To upload a document to the Personnel tab:
1. Click the Personnel tab. 2. Click the Upload CV/Biosketch.
The Attachment window will display.
1. Click the Browse button. 2. Locate and select the MS Word or PDF document.
3. Click the Open button.
4. Click the Upload button.
IRES Uploading Documents to an NIH Proposal
4/25/2014 5:18 PM Page 6 of 6
6. Uploading PHS 398 Research Plan Document(s)
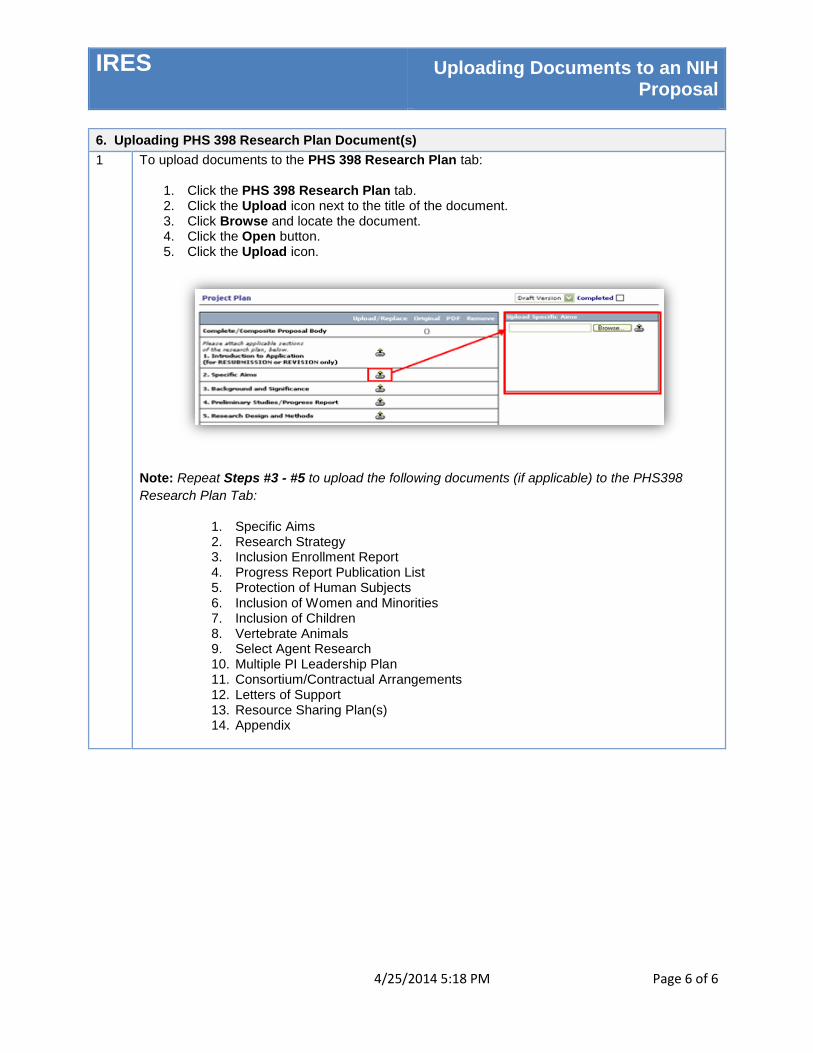
1 To upload documents to the PHS 398 Research Plan tab:
1. Click the PHS 398 Research Plan tab. 2. Click the Upload icon next to the title of the document. 3. Click Browse and locate the document. 4. Click the Open button. 5. Click the Upload icon.
Note: Repeat Steps #3 - #5 to upload the following documents (if applicable) to the PHS398
Research Plan Tab:
1. Specific Aims 2. Research Strategy 3. Inclusion Enrollment Report 4. Progress Report Publication List 5. Protection of Human Subjects 6. Inclusion of Women and Minorities 7. Inclusion of Children 8. Vertebrate Animals 9. Select Agent Research 10. Multiple PI Leadership Plan 11. Consortium/Contractual Arrangements 12. Letters of Support 13. Resource Sharing Plan(s) 14. Appendix
IRES Naming Conventions
4/25/2014 5:20 PM Page 1 of 1
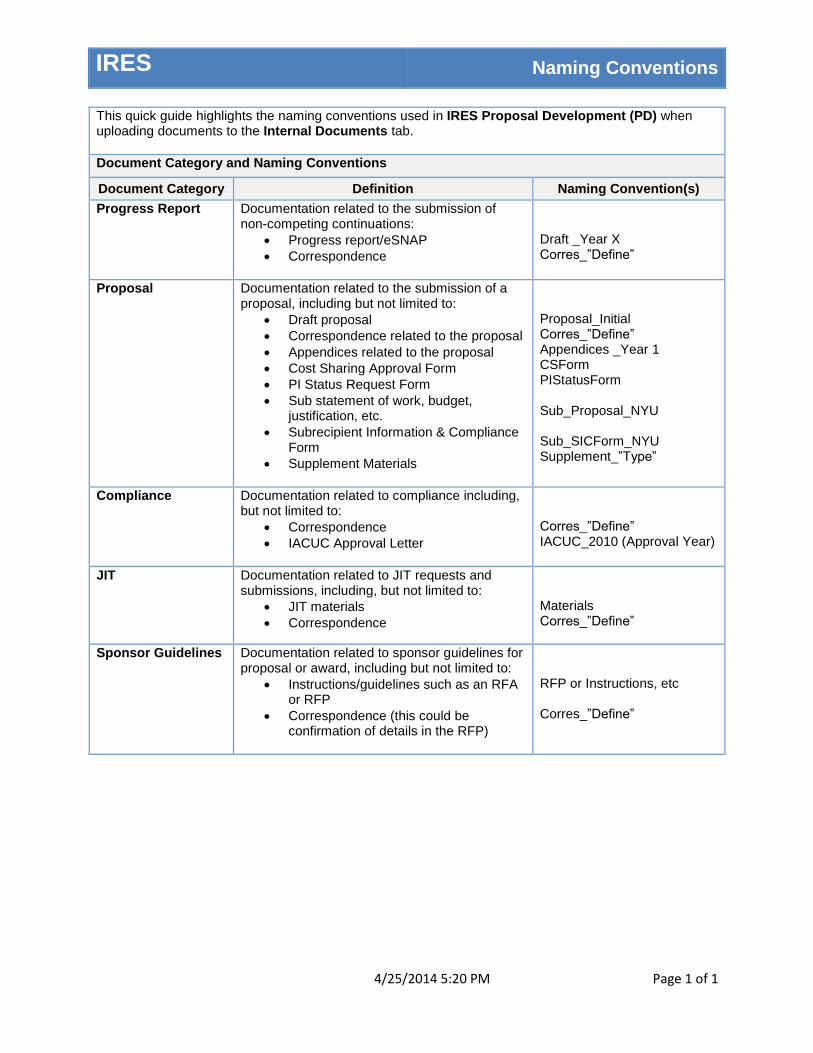
This quick guide highlights the naming conventions used in IRES Proposal Development (PD) when uploading documents to the Internal Documents tab.
Document Category and Naming Conventions
Document Category Definition Naming Convention(s)
Progress Report Documentation related to the submission of non-competing continuations:
Progress report/eSNAP
Correspondence
Draft _Year X Corres_”Define”
Proposal Documentation related to the submission of a proposal, including but not limited to:
Draft proposal
Correspondence related to the proposal
Appendices related to the proposal
Cost Sharing Approval Form
PI Status Request Form
Sub statement of work, budget, justification, etc.
Subrecipient Information & Compliance Form
Supplement Materials
Proposal_Initial Corres_”Define” Appendices _Year 1 CSForm PIStatusForm Sub_Proposal_NYU Sub_SICForm_NYU Supplement_”Type”
Compliance Documentation related to compliance including, but not limited to:
Correspondence
IACUC Approval Letter
Corres_”Define” IACUC_2010 (Approval Year)
JIT Documentation related to JIT requests and submissions, including, but not limited to:
JIT materials
Correspondence
Materials Corres_”Define”
Sponsor Guidelines Documentation related to sponsor guidelines for proposal or award, including but not limited to:
Instructions/guidelines such as an RFA or RFP
Correspondence (this could be confirmation of details in the RFP)
RFP or Instructions, etc Corres_”Define”
IRES Finalizing and Submitting a
S2S Proposal
4/25/2014 5:20 PM Page 1 of 7
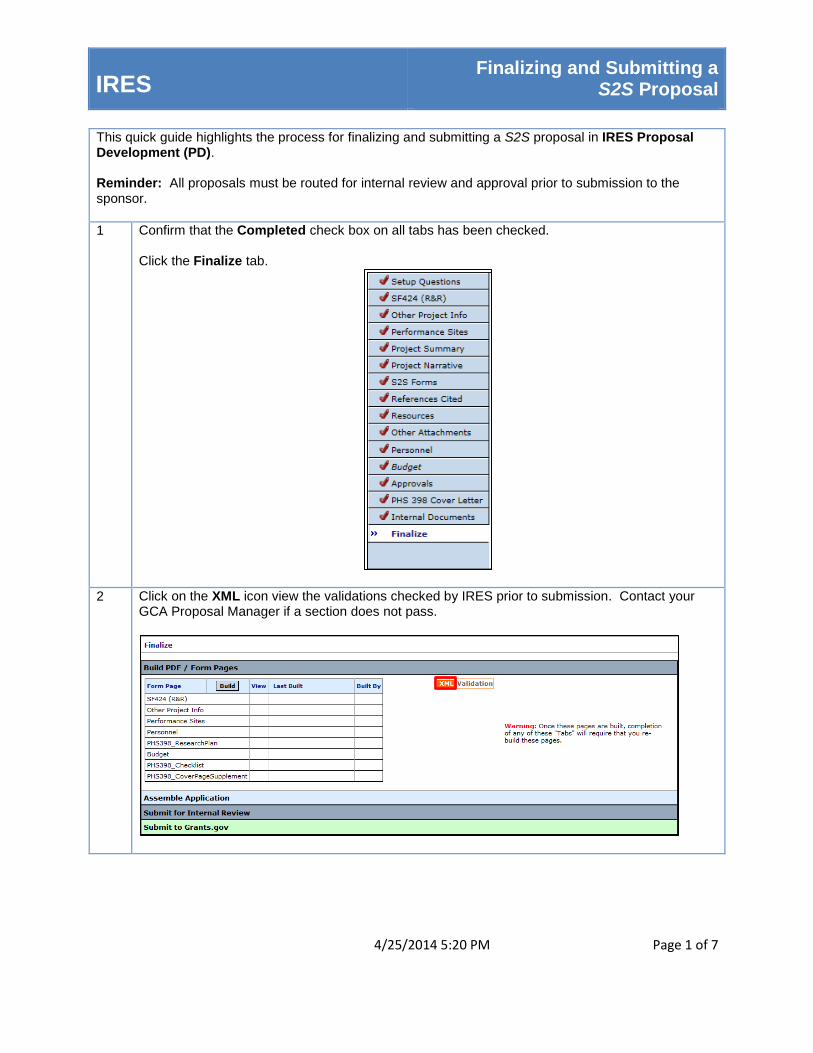
This quick guide highlights the process for finalizing and submitting a S2S proposal in IRES Proposal Development (PD). Reminder: All proposals must be routed for internal review and approval prior to submission to the sponsor.
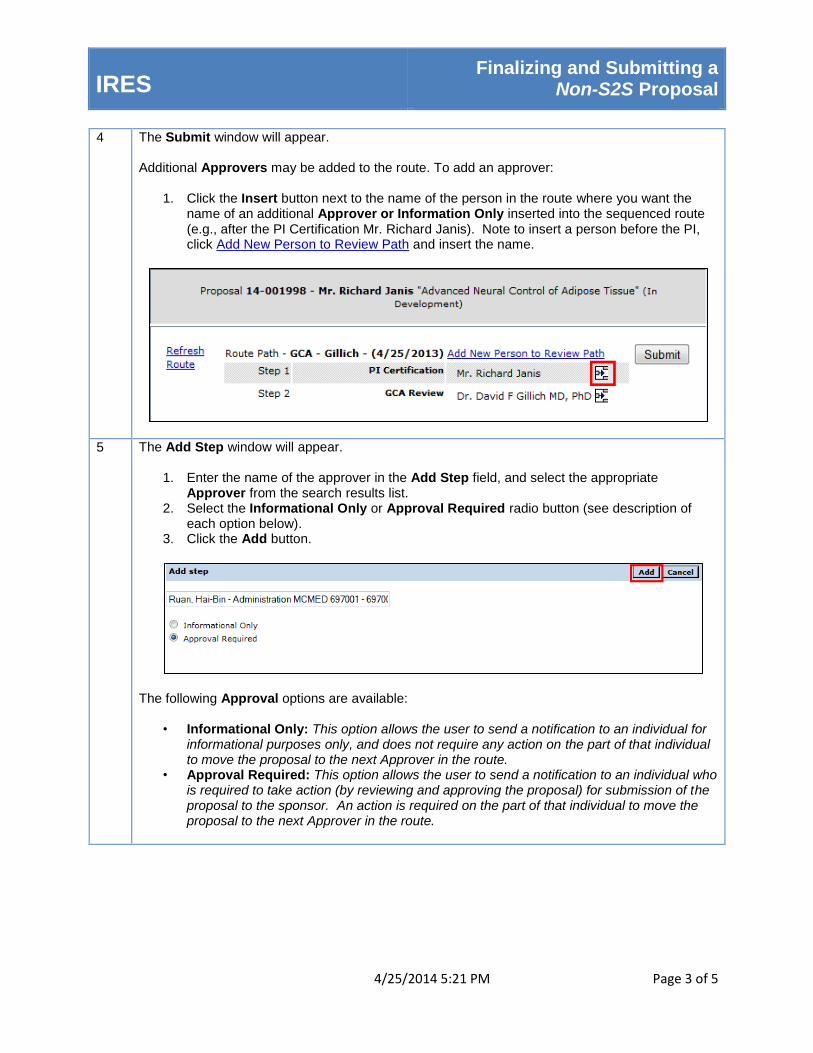
1 Confirm that the Completed check box on all tabs has been checked. Click the Finalize tab.
2 Click on the XML icon view the validations checked by IRES prior to submission. Contact your GCA Proposal Manager if a section does not pass.
IRES Finalizing and Submitting a
S2S Proposal
4/25/2014 5:20 PM Page 2 of 7
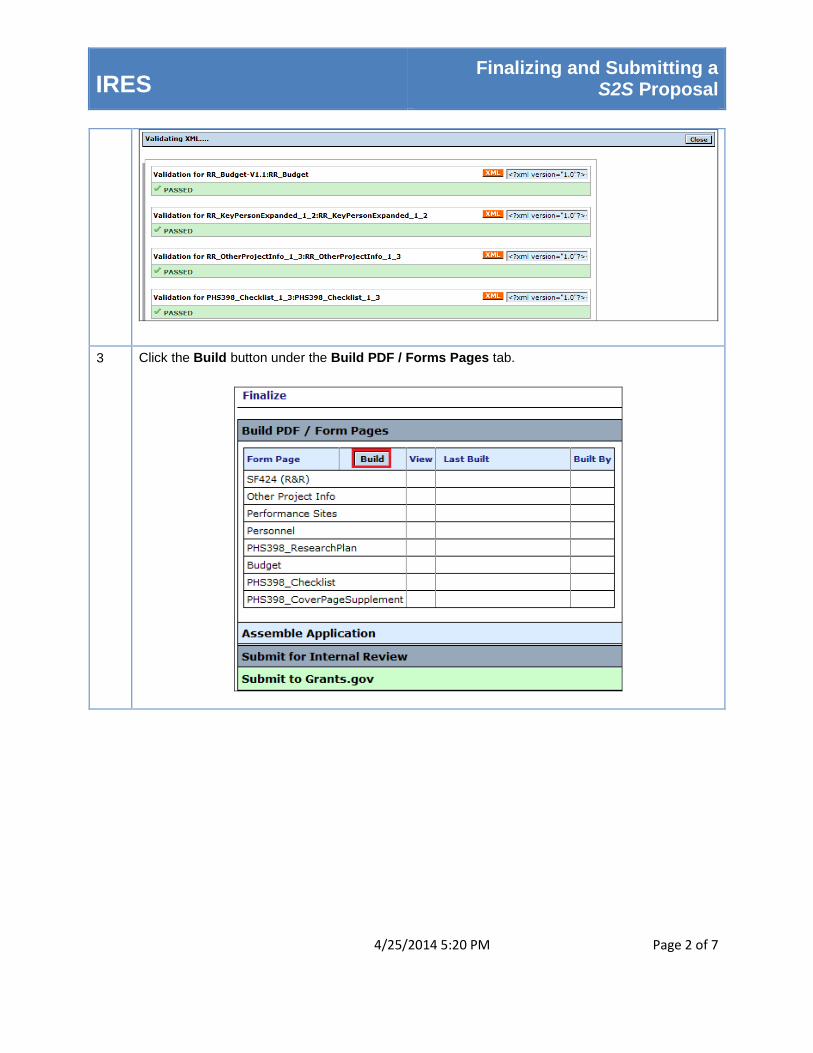
3 Click the Build button under the Build PDF / Forms Pages tab.
IRES Finalizing and Submitting a
S2S Proposal
4/25/2014 5:20 PM Page 3 of 7
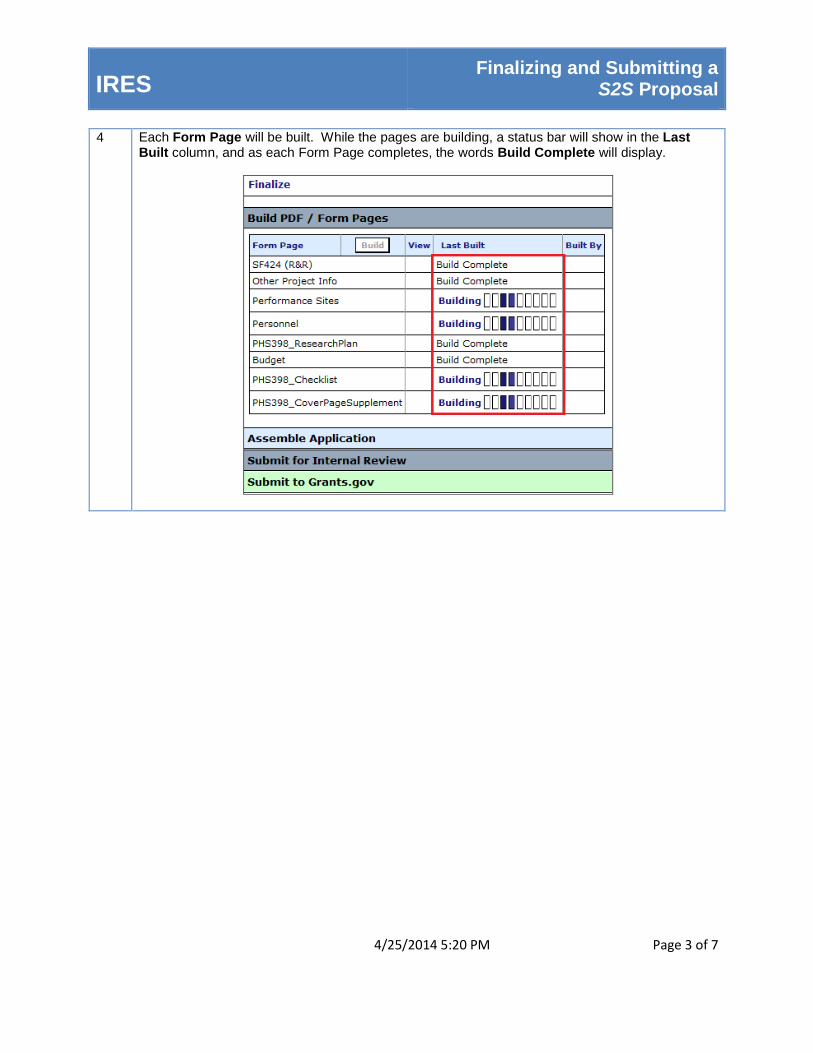
4 Each Form Page will be built. While the pages are building, a status bar will show in the Last Built column, and as each Form Page completes, the words Build Complete will display.
IRES Finalizing and Submitting a
S2S Proposal
4/25/2014 5:20 PM Page 4 of 7
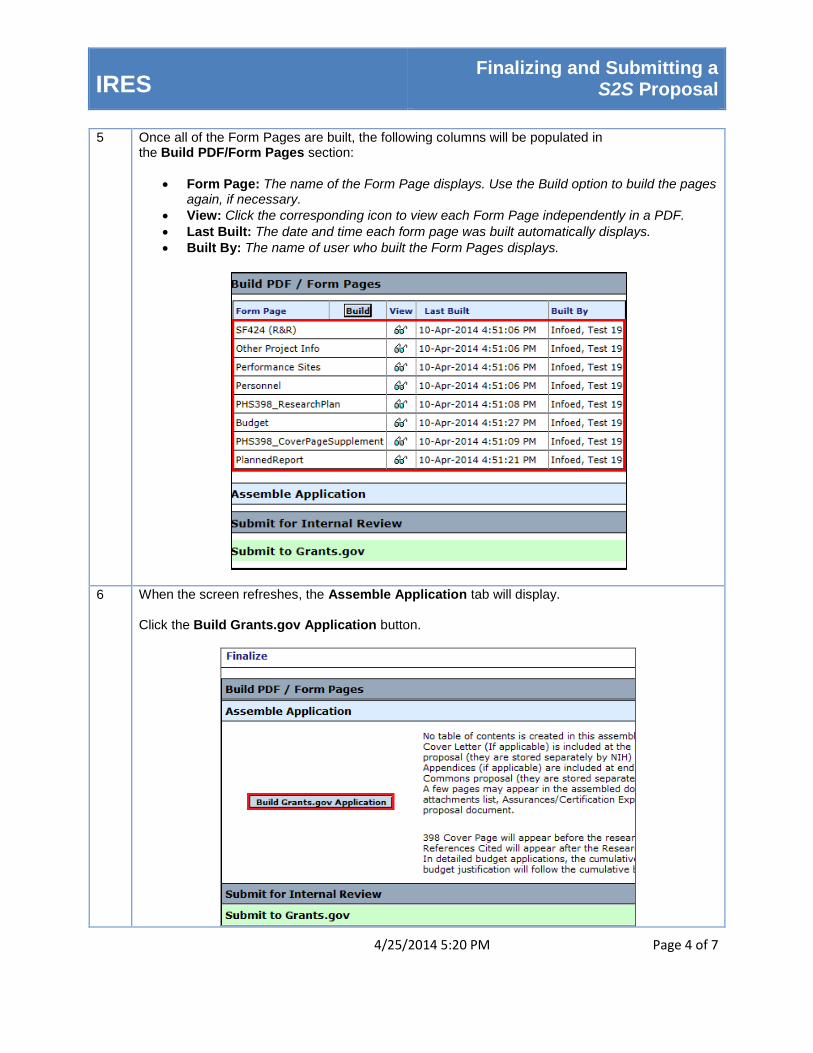
5 Once all of the Form Pages are built, the following columns will be populated in the Build PDF/Form Pages section:
Form Page: The name of the Form Page displays. Use the Build option to build the pages again, if necessary.
View: Click the corresponding icon to view each Form Page independently in a PDF.
Last Built: The date and time each form page was built automatically displays.
Built By: The name of user who built the Form Pages displays.
6 When the screen refreshes, the Assemble Application tab will display. Click the Build Grants.gov Application button.
IRES Finalizing and Submitting a
S2S Proposal
4/25/2014 5:20 PM Page 5 of 7
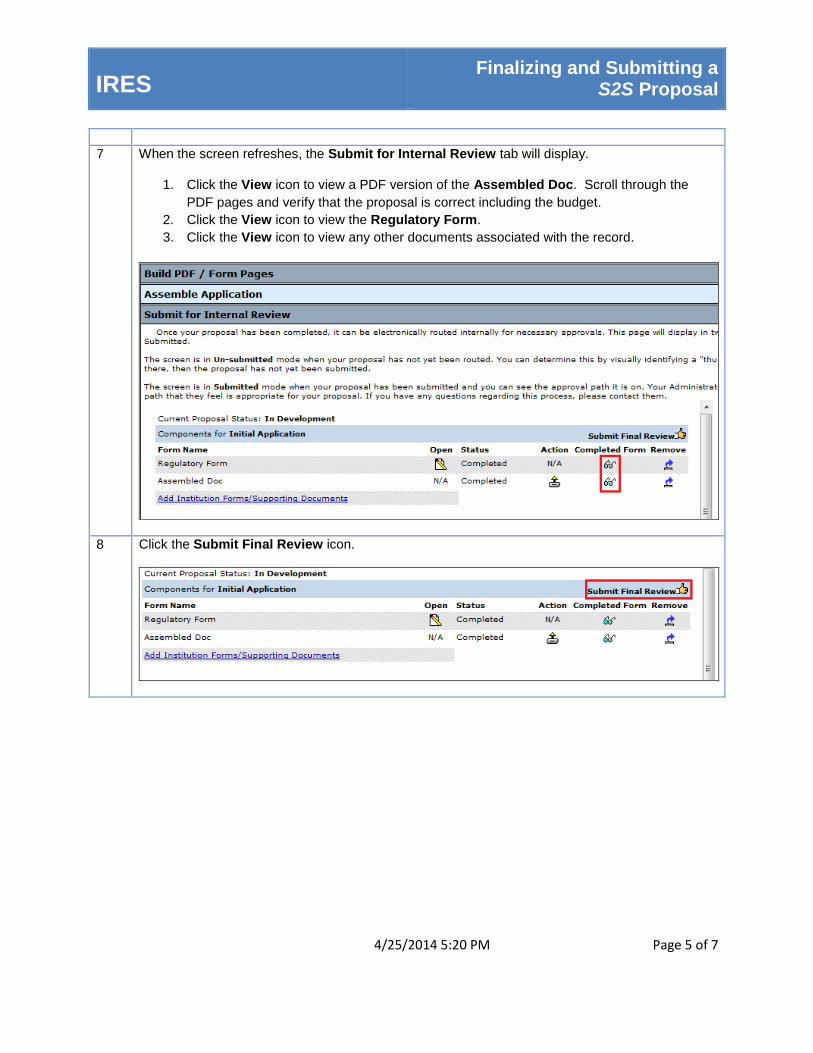
7 When the screen refreshes, the Submit for Internal Review tab will display.
1. Click the View icon to view a PDF version of the Assembled Doc. Scroll through the
PDF pages and verify that the proposal is correct including the budget.
2. Click the View icon to view the Regulatory Form.
3. Click the View icon to view any other documents associated with the record.
8 Click the Submit Final Review icon.
IRES Finalizing and Submitting a
S2S Proposal
4/25/2014 5:20 PM Page 6 of 7
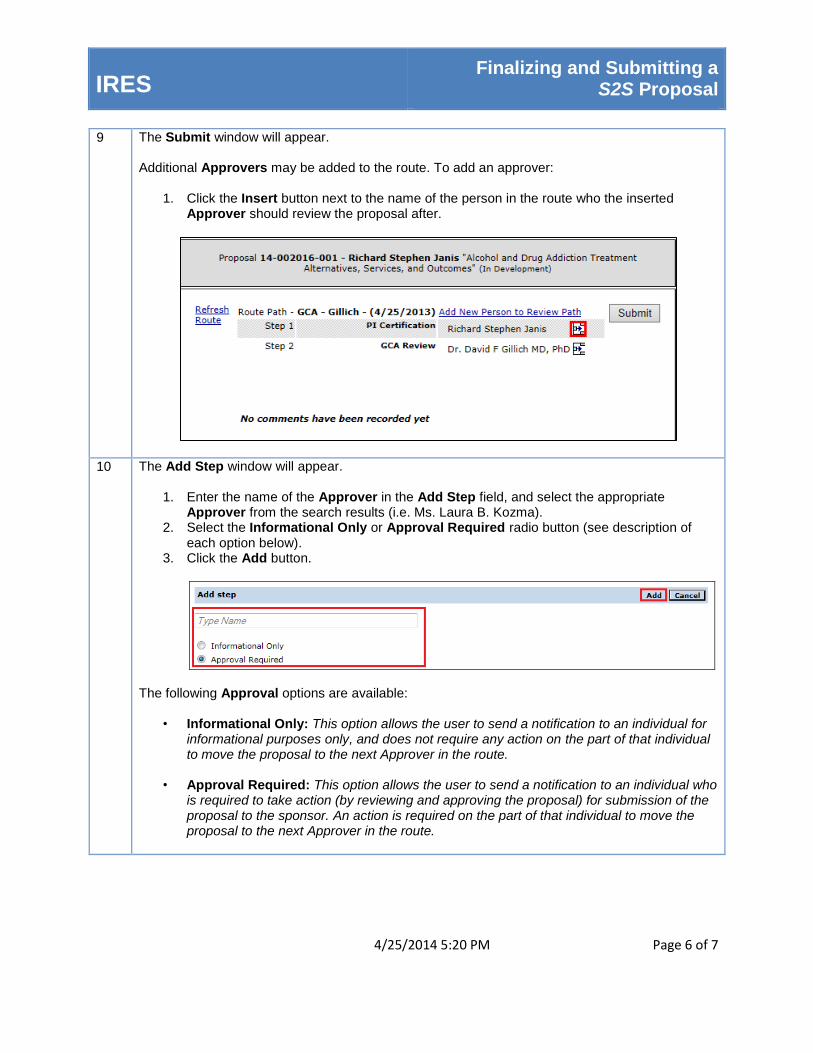
9 The Submit window will appear. Additional Approvers may be added to the route. To add an approver:
1. Click the Insert button next to the name of the person in the route who the inserted Approver should review the proposal after.
10 The Add Step window will appear.
1. Enter the name of the Approver in the Add Step field, and select the appropriate Approver from the search results (i.e. Ms. Laura B. Kozma).
2. Select the Informational Only or Approval Required radio button (see description of each option below).
3. Click the Add button.
The following Approval options are available:
• Informational Only: This option allows the user to send a notification to an individual for informational purposes only, and does not require any action on the part of that individual to move the proposal to the next Approver in the route.
• Approval Required: This option allows the user to send a notification to an individual who is required to take action (by reviewing and approving the proposal) for submission of the proposal to the sponsor. An action is required on the part of that individual to move the proposal to the next Approver in the route.
IRES Finalizing and Submitting a
S2S Proposal
4/25/2014 5:20 PM Page 7 of 7
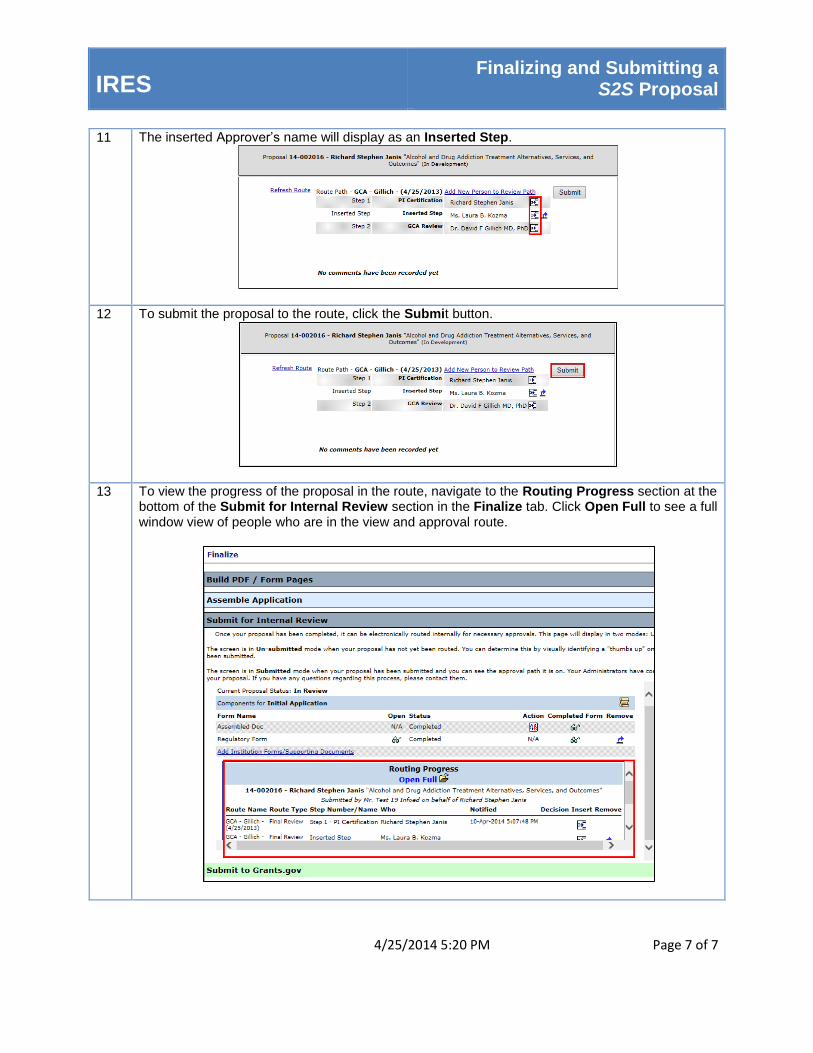
11 The inserted Approver’s name will display as an Inserted Step.
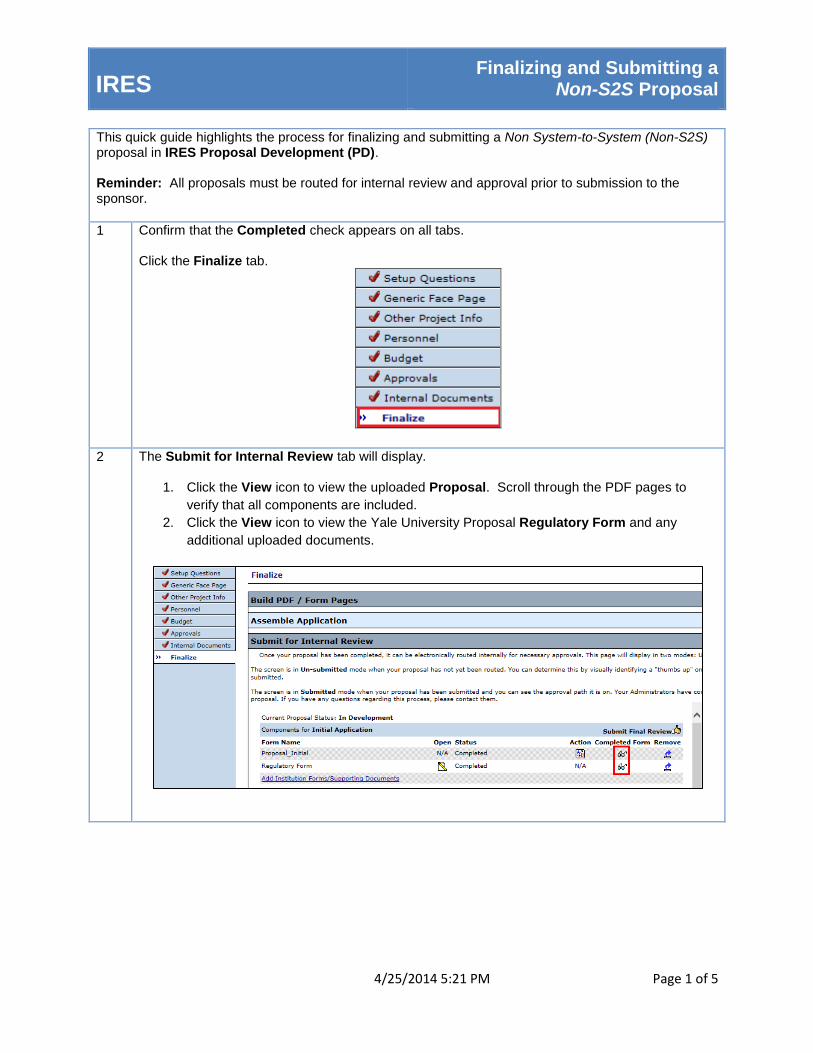
12 To submit the proposal to the route, click the Submit button.
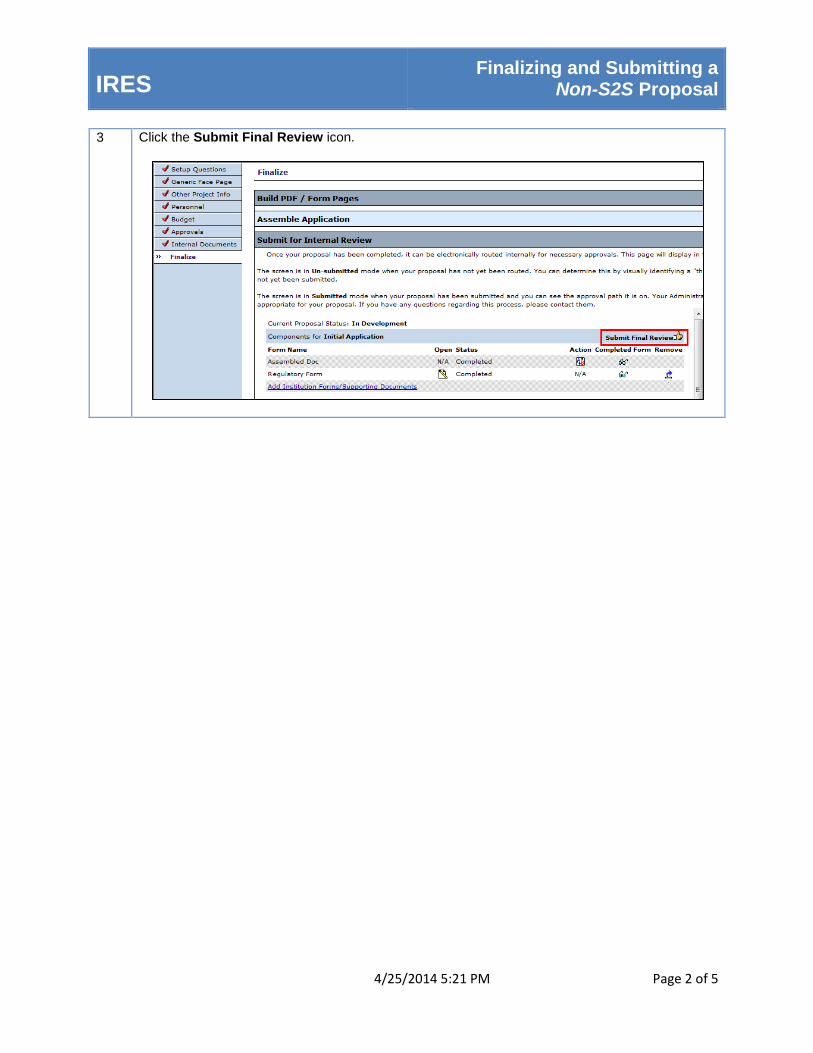
13 To view the progress of the proposal in the route, navigate to the Routing Progress section at the bottom of the Submit for Internal Review section in the Finalize tab. Click Open Full to see a full window view of people who are in the view and approval route.
IRES Finalizing and Submitting a
Non-S2S Proposal
4/25/2014 5:21 PM Page 1 of 5
This quick guide highlights the process for finalizing and submitting a Non System-to-System (Non-S2S) proposal in IRES Proposal Development (PD). Reminder: All proposals must be routed for internal review and approval prior to submission to the sponsor.
1 Confirm that the Completed check appears on all tabs. Click the Finalize tab.
2 The Submit for Internal Review tab will display.
1. Click the View icon to view the uploaded Proposal. Scroll through the PDF pages to
verify that all components are included.
2. Click the View icon to view the Yale University Proposal Regulatory Form and any
additional uploaded documents.
IRES Finalizing and Submitting a
Non-S2S Proposal
4/25/2014 5:21 PM Page 2 of 5
3 Click the Submit Final Review icon.
IRES Finalizing and Submitting a
Non-S2S Proposal
4/25/2014 5:21 PM Page 3 of 5
4 The Submit window will appear. Additional Approvers may be added to the route. To add an approver:
1. Click the Insert button next to the name of the person in the route where you want the name of an additional Approver or Information Only inserted into the sequenced route (e.g., after the PI Certification Mr. Richard Janis). Note to insert a person before the PI, click Add New Person to Review Path and insert the name.
5 The Add Step window will appear.
1. Enter the name of the approver in the Add Step field, and select the appropriate Approver from the search results list.
2. Select the Informational Only or Approval Required radio button (see description of each option below).
3. Click the Add button.
The following Approval options are available:
• Informational Only: This option allows the user to send a notification to an individual for informational purposes only, and does not require any action on the part of that individual to move the proposal to the next Approver in the route.
• Approval Required: This option allows the user to send a notification to an individual who is required to take action (by reviewing and approving the proposal) for submission of the proposal to the sponsor. An action is required on the part of that individual to move the proposal to the next Approver in the route.
IRES Finalizing and Submitting a
Non-S2S Proposal
4/25/2014 5:21 PM Page 4 of 5
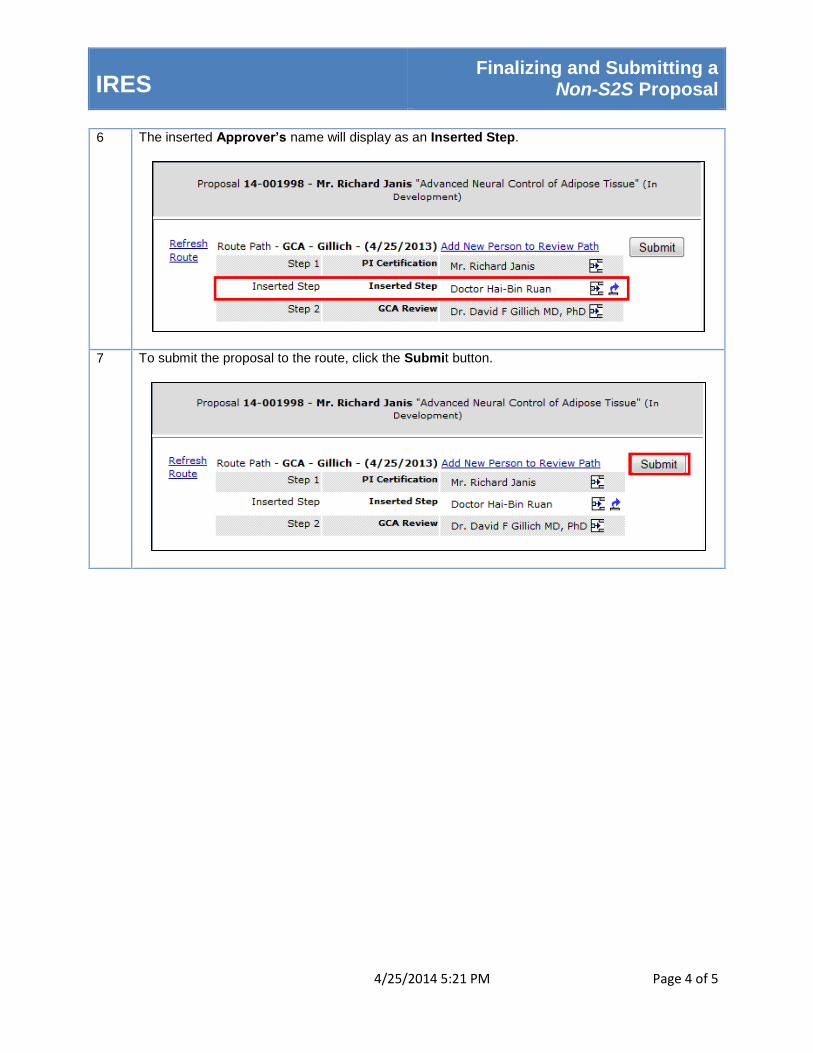
6 The inserted Approver’s name will display as an Inserted Step.
7 To submit the proposal to the route, click the Submit button.
IRES Finalizing and Submitting a
Non-S2S Proposal
4/25/2014 5:21 PM Page 5 of 5
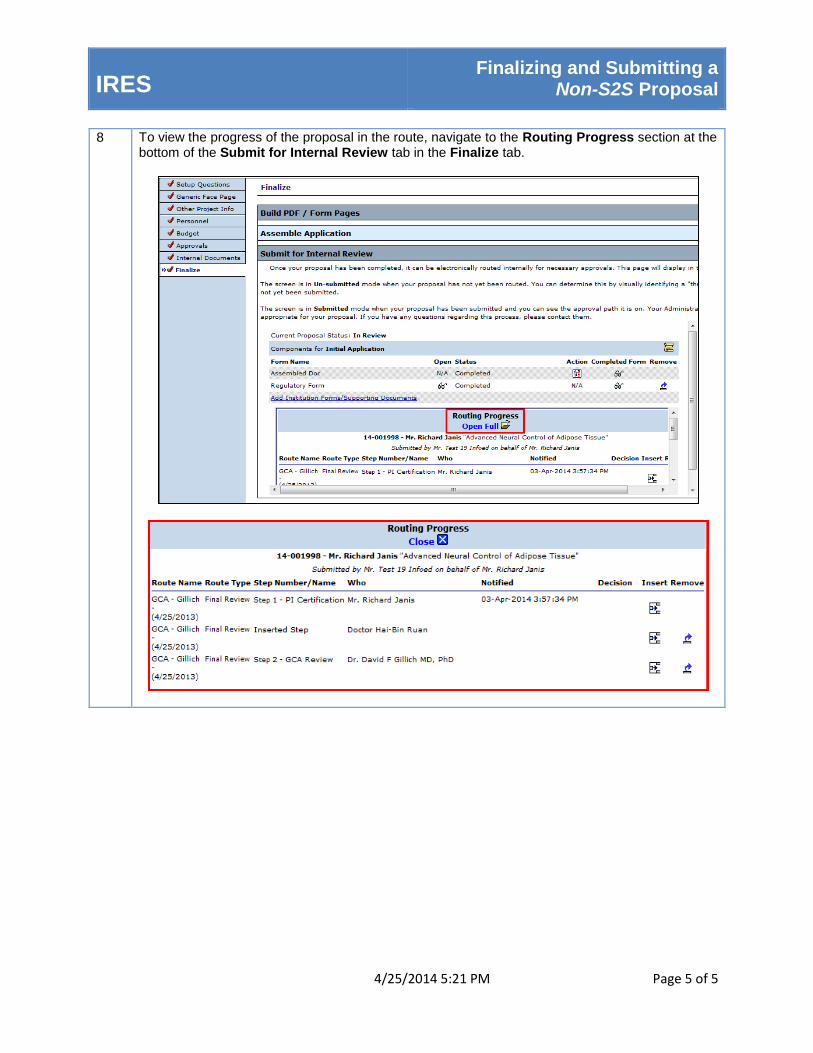
8 To view the progress of the proposal in the route, navigate to the Routing Progress section at the bottom of the Submit for Internal Review tab in the Finalize tab.
IRES Certifying a Proposal
4/25/2014 5:21 PM Page 1 of 6
This quick guide highlights the process for certifying a proposal in IRES Proposal Development (PD).
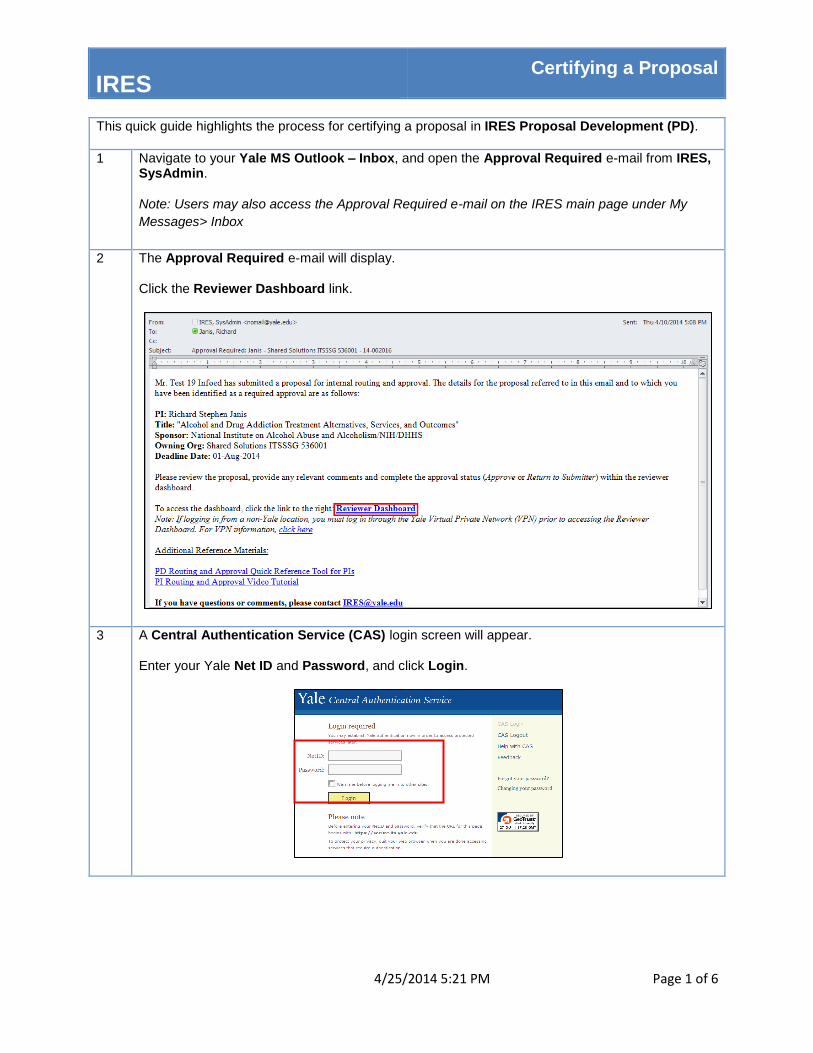
1 Navigate to your Yale MS Outlook – Inbox, and open the Approval Required e-mail from IRES, SysAdmin. Note: Users may also access the Approval Required e-mail on the IRES main page under My
Messages> Inbox
2 The Approval Required e-mail will display. Click the Reviewer Dashboard link.
3 A Central Authentication Service (CAS) login screen will appear. Enter your Yale Net ID and Password, and click Login.
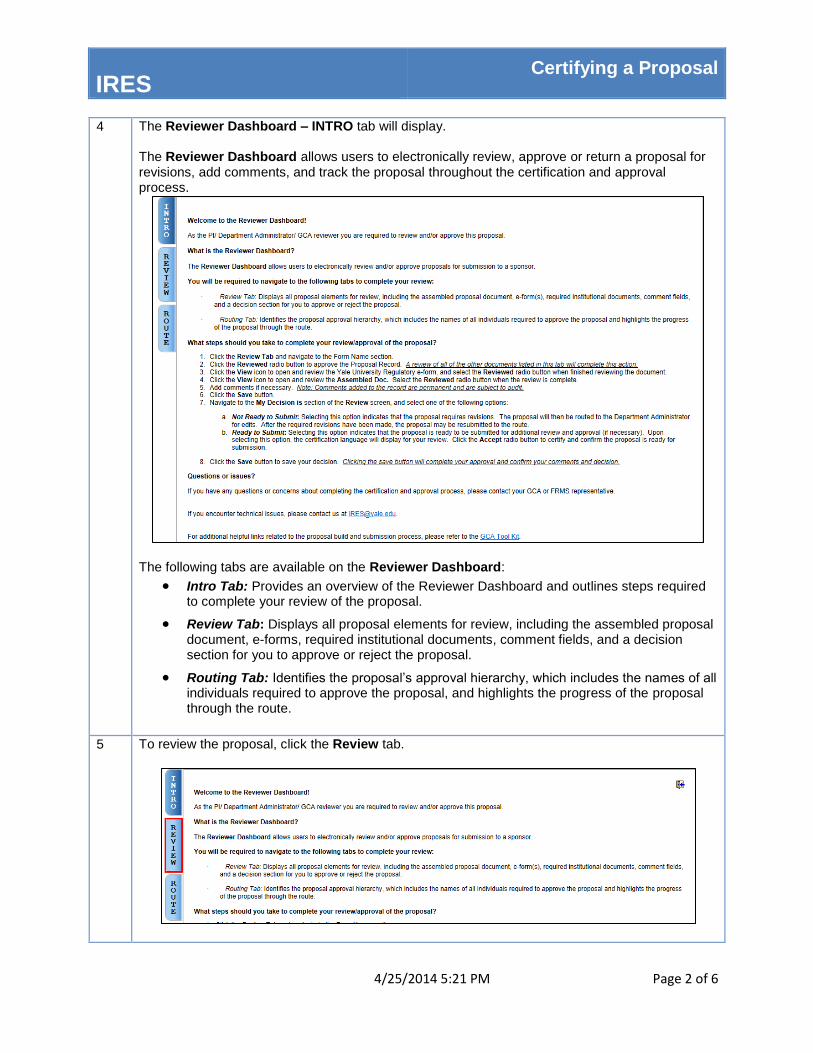
IRES Certifying a Proposal
4/25/2014 5:21 PM Page 2 of 6
4 The Reviewer Dashboard – INTRO tab will display. The Reviewer Dashboard allows users to electronically review, approve or return a proposal for revisions, add comments, and track the proposal throughout the certification and approval process.
The following tabs are available on the Reviewer Dashboard:
Intro Tab: Provides an overview of the Reviewer Dashboard and outlines steps required to complete your review of the proposal.
Review Tab: Displays all proposal elements for review, including the assembled proposal document, e-forms, required institutional documents, comment fields, and a decision section for you to approve or reject the proposal.
Routing Tab: Identifies the proposal’s approval hierarchy, which includes the names of all individuals required to approve the proposal, and highlights the progress of the proposal through the route.
5 To review the proposal, click the Review tab.
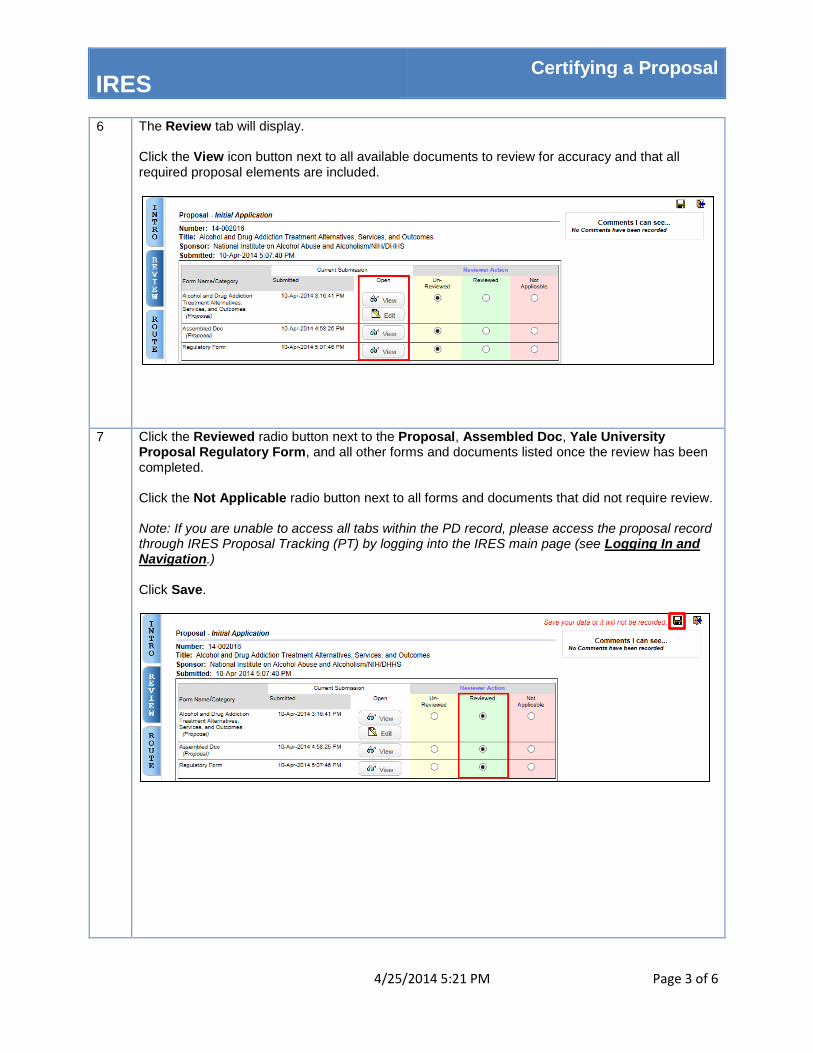
IRES Certifying a Proposal
4/25/2014 5:21 PM Page 3 of 6
6 The Review tab will display. Click the View icon button next to all available documents to review for accuracy and that all required proposal elements are included.
7 Click the Reviewed radio button next to the Proposal, Assembled Doc, Yale University Proposal Regulatory Form, and all other forms and documents listed once the review has been completed. Click the Not Applicable radio button next to all forms and documents that did not require review. Note: If you are unable to access all tabs within the PD record, please access the proposal record through IRES Proposal Tracking (PT) by logging into the IRES main page (see Logging In and Navigation.) Click Save.
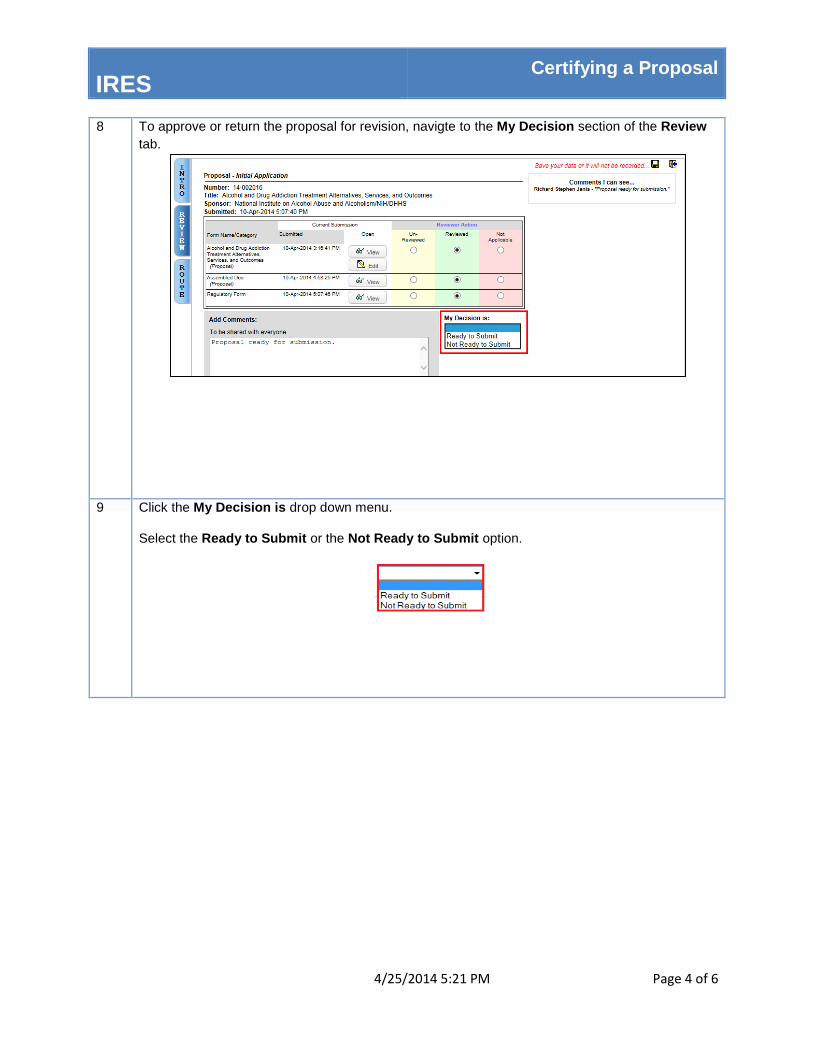
IRES Certifying a Proposal
4/25/2014 5:21 PM Page 4 of 6
8 To approve or return the proposal for revision, navigte to the My Decision section of the Review
tab.
9 Click the My Decision is drop down menu.
Select the Ready to Submit or the Not Ready to Submit option.
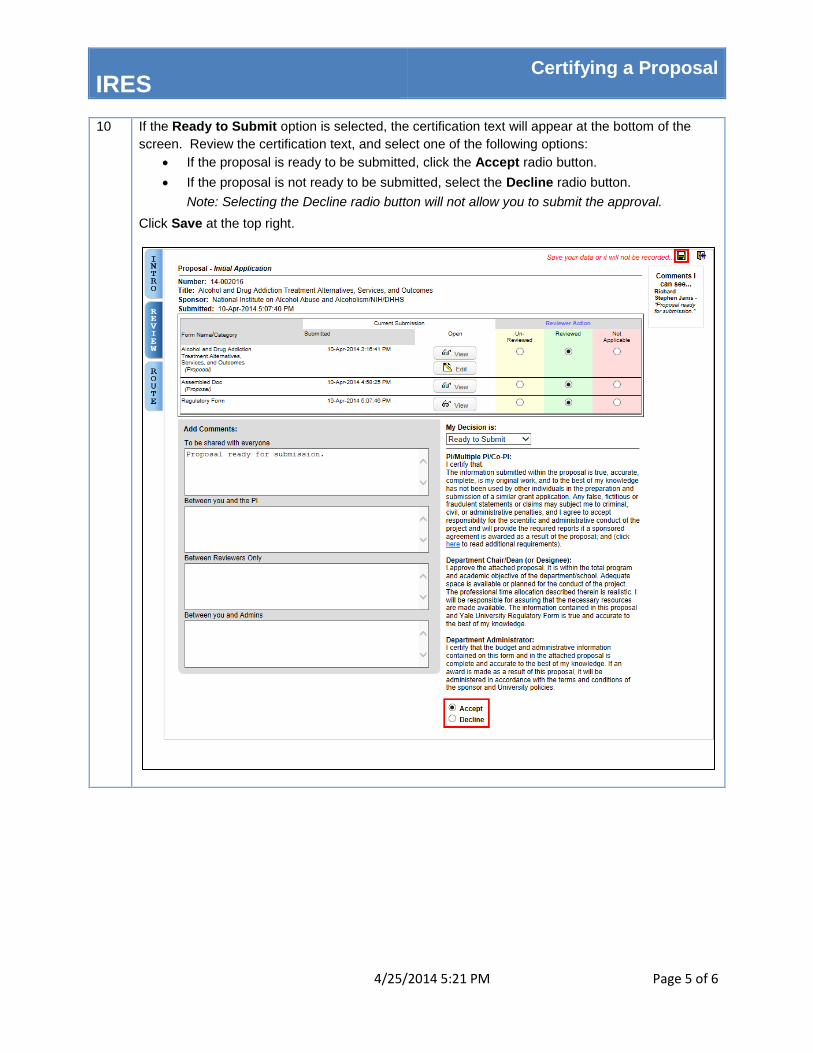
IRES Certifying a Proposal
4/25/2014 5:21 PM Page 5 of 6
10 If the Ready to Submit option is selected, the certification text will appear at the bottom of the
screen. Review the certification text, and select one of the following options:
If the proposal is ready to be submitted, click the Accept radio button.
If the proposal is not ready to be submitted, select the Decline radio button.
Note: Selecting the Decline radio button will not allow you to submit the approval.
Click Save at the top right.
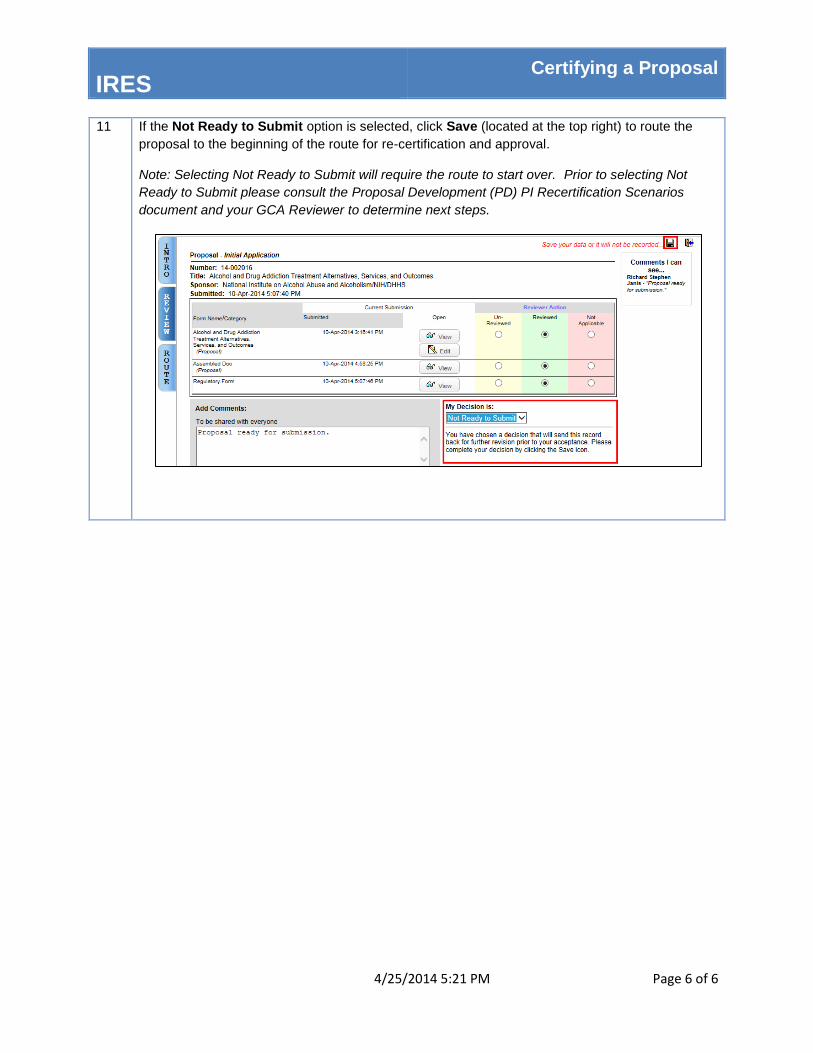
IRES Certifying a Proposal
4/25/2014 5:21 PM Page 6 of 6
11 If the Not Ready to Submit option is selected, click Save (located at the top right) to route the
proposal to the beginning of the route for re-certification and approval.
Note: Selecting Not Ready to Submit will require the route to start over. Prior to selecting Not
Ready to Submit please consult the Proposal Development (PD) PI Recertification Scenarios
document and your GCA Reviewer to determine next steps.
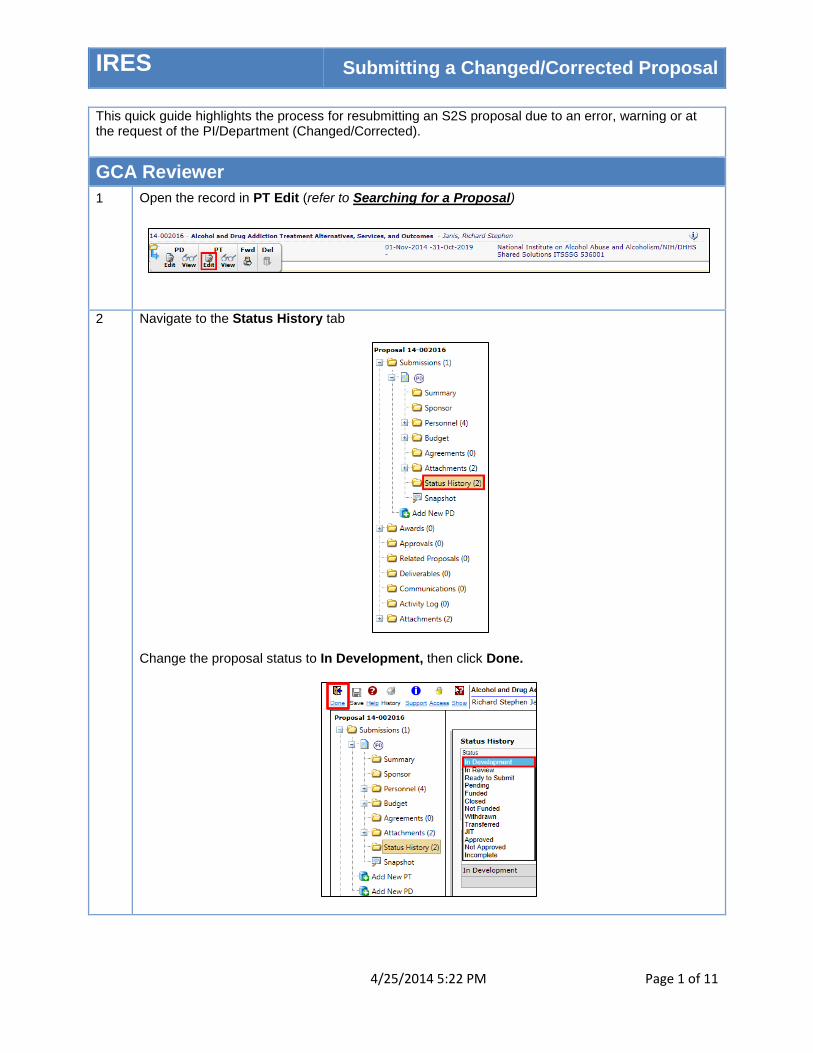
IRES Submitting a Changed/Corrected Proposal
4/25/2014 5:22 PM Page 1 of 11
This quick guide highlights the process for resubmitting an S2S proposal due to an error, warning or at the request of the PI/Department (Changed/Corrected).
GCA Reviewer
1 Open the record in PT Edit (refer to Searching for a Proposal)
2 Navigate to the Status History tab
Change the proposal status to In Development, then click Done.
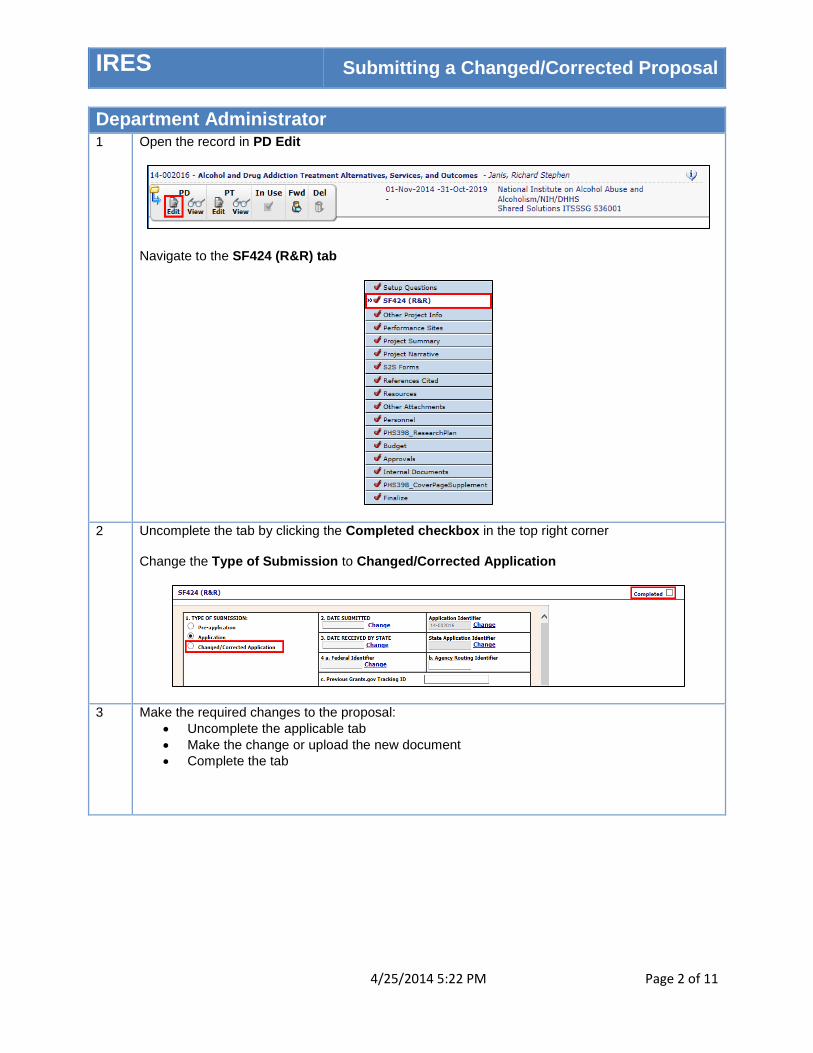
IRES Submitting a Changed/Corrected Proposal
4/25/2014 5:22 PM Page 2 of 11
Department Administrator
1 Open the record in PD Edit
Navigate to the SF424 (R&R) tab
2 Uncomplete the tab by clicking the Completed checkbox in the top right corner Change the Type of Submission to Changed/Corrected Application
3 Make the required changes to the proposal:
Uncomplete the applicable tab
Make the change or upload the new document
Complete the tab

IRES Submitting a Changed/Corrected Proposal
4/25/2014 5:22 PM Page 3 of 11
4 Once all required changes have been made, confirm that the Completed check box on all tabs has been checked. Click the Finalize tab.
5 Click the XML Validation button under the Finalize tab to view the validations checked by IRES prior to submission.
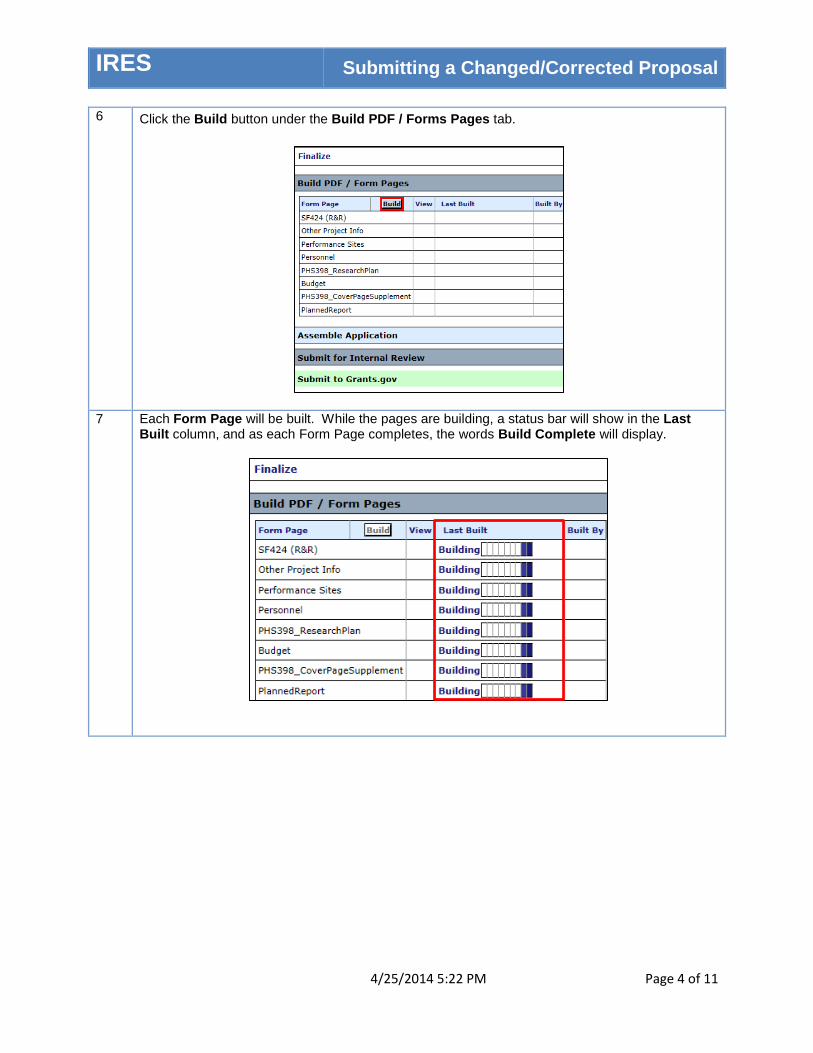
IRES Submitting a Changed/Corrected Proposal
4/25/2014 5:22 PM Page 4 of 11
6 Click the Build button under the Build PDF / Forms Pages tab.
7 Each Form Page will be built. While the pages are building, a status bar will show in the Last Built column, and as each Form Page completes, the words Build Complete will display.
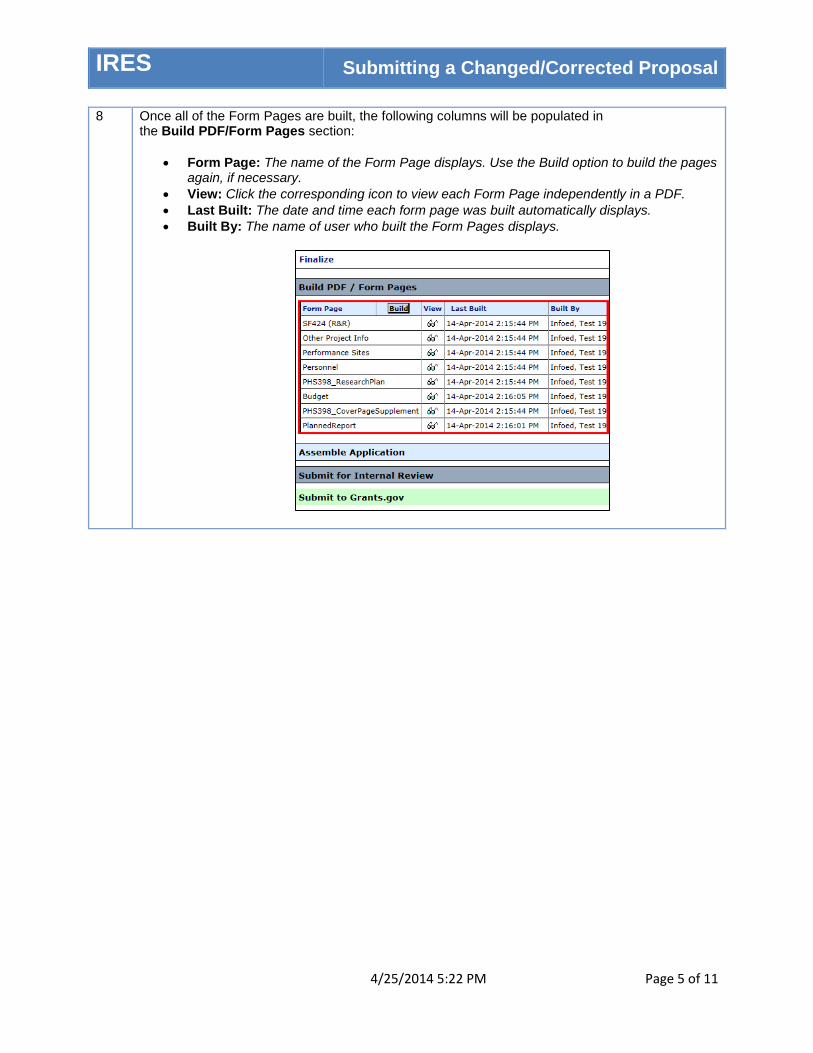
IRES Submitting a Changed/Corrected Proposal
4/25/2014 5:22 PM Page 5 of 11
8 Once all of the Form Pages are built, the following columns will be populated in the Build PDF/Form Pages section:
Form Page: The name of the Form Page displays. Use the Build option to build the pages again, if necessary.
View: Click the corresponding icon to view each Form Page independently in a PDF.
Last Built: The date and time each form page was built automatically displays.
Built By: The name of user who built the Form Pages displays.
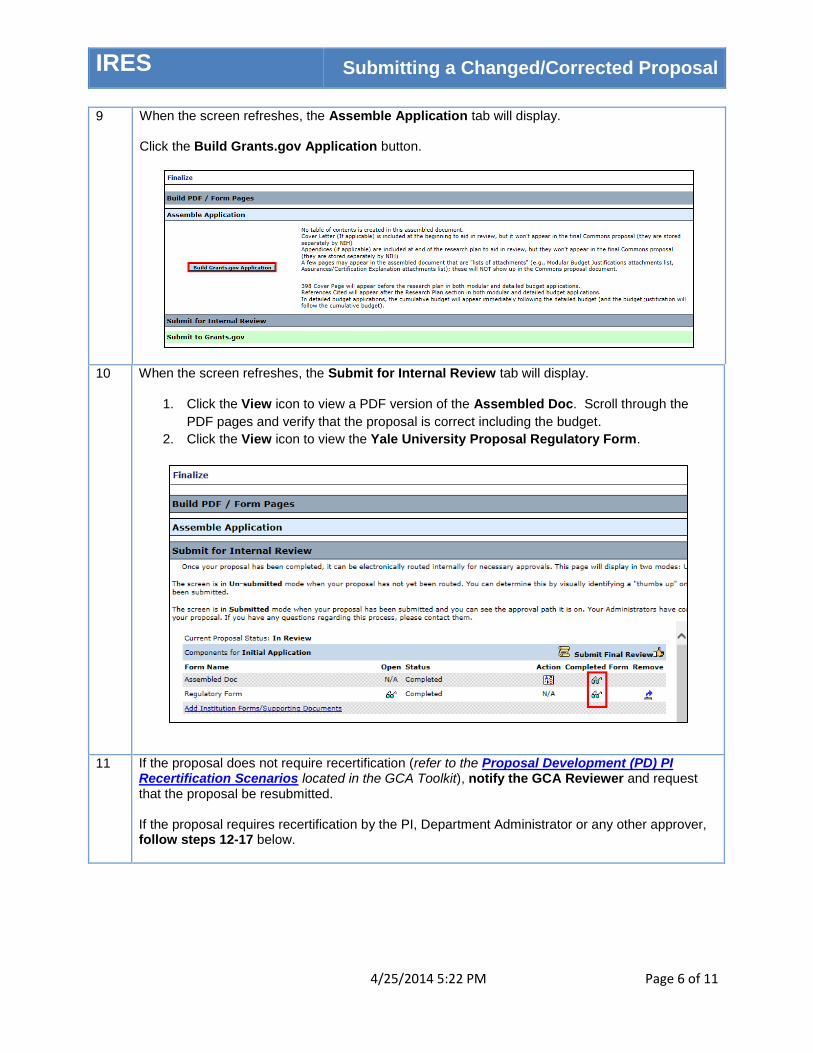
IRES Submitting a Changed/Corrected Proposal
4/25/2014 5:22 PM Page 6 of 11
9 When the screen refreshes, the Assemble Application tab will display. Click the Build Grants.gov Application button.
10 When the screen refreshes, the Submit for Internal Review tab will display.
1. Click the View icon to view a PDF version of the Assembled Doc. Scroll through the
PDF pages and verify that the proposal is correct including the budget.
2. Click the View icon to view the Yale University Proposal Regulatory Form.
11 If the proposal does not require recertification (refer to the Proposal Development (PD) PI Recertification Scenarios located in the GCA Toolkit), notify the GCA Reviewer and request that the proposal be resubmitted. If the proposal requires recertification by the PI, Department Administrator or any other approver, follow steps 12-17 below.
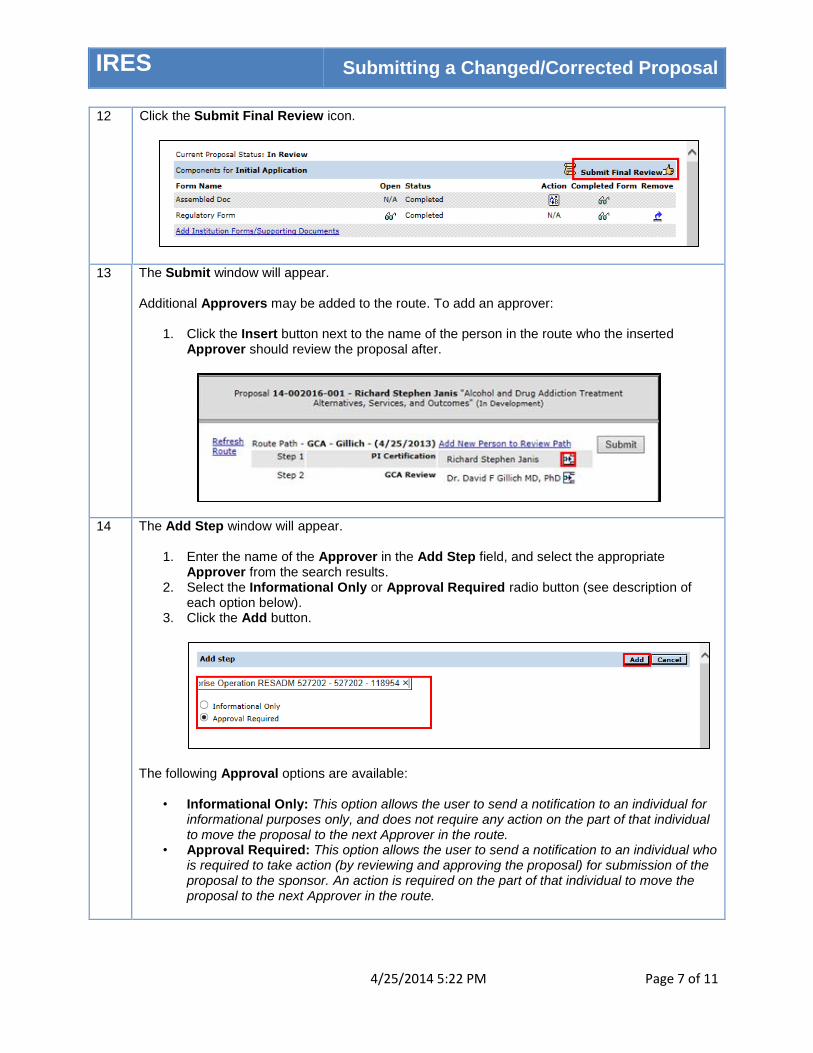
IRES Submitting a Changed/Corrected Proposal
4/25/2014 5:22 PM Page 7 of 11
12 Click the Submit Final Review icon.
13 The Submit window will appear. Additional Approvers may be added to the route. To add an approver:
1. Click the Insert button next to the name of the person in the route who the inserted Approver should review the proposal after.
14 The Add Step window will appear.
1. Enter the name of the Approver in the Add Step field, and select the appropriate Approver from the search results.
2. Select the Informational Only or Approval Required radio button (see description of each option below).
3. Click the Add button.
The following Approval options are available:
• Informational Only: This option allows the user to send a notification to an individual for informational purposes only, and does not require any action on the part of that individual to move the proposal to the next Approver in the route.
• Approval Required: This option allows the user to send a notification to an individual who is required to take action (by reviewing and approving the proposal) for submission of the proposal to the sponsor. An action is required on the part of that individual to move the proposal to the next Approver in the route.
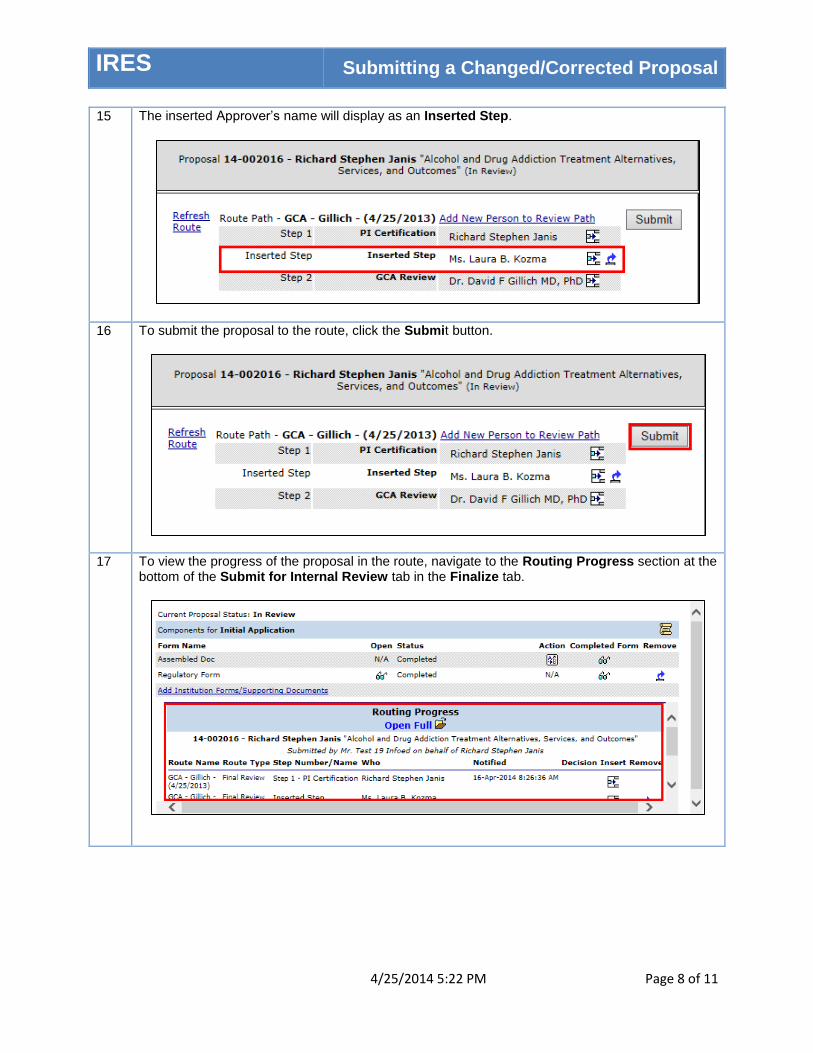
IRES Submitting a Changed/Corrected Proposal
4/25/2014 5:22 PM Page 8 of 11
15 The inserted Approver’s name will display as an Inserted Step.
16 To submit the proposal to the route, click the Submit button.
17 To view the progress of the proposal in the route, navigate to the Routing Progress section at the bottom of the Submit for Internal Review tab in the Finalize tab.
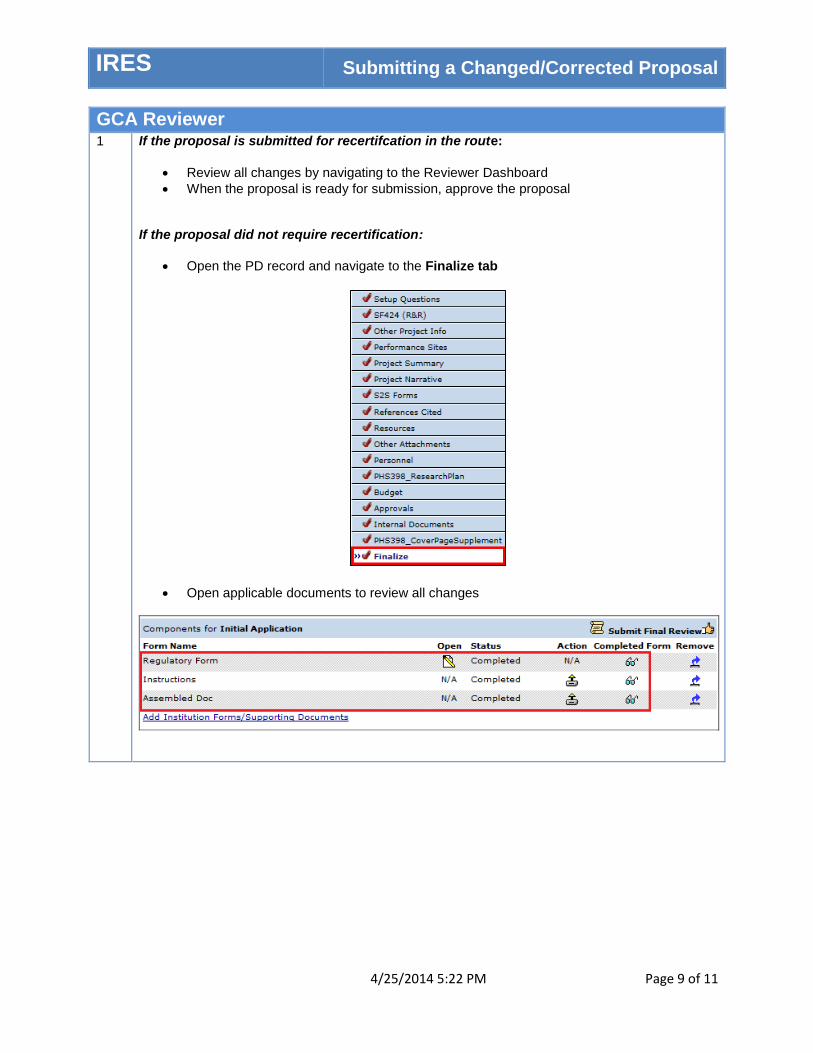
IRES Submitting a Changed/Corrected Proposal
4/25/2014 5:22 PM Page 9 of 11
GCA Reviewer
1 If the proposal is submitted for recertifcation in the route:
Review all changes by navigating to the Reviewer Dashboard
When the proposal is ready for submission, approve the proposal If the proposal did not require recertification:
Open the PD record and navigate to the Finalize tab
Open applicable documents to review all changes
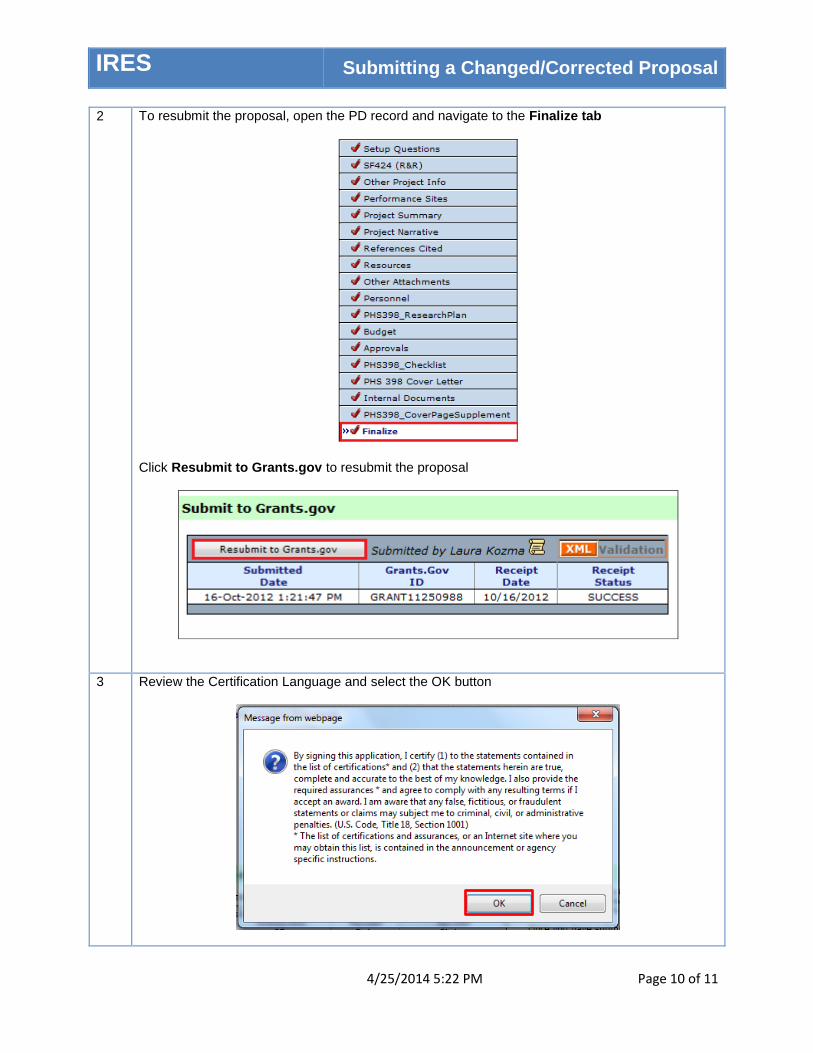
IRES Submitting a Changed/Corrected Proposal
4/25/2014 5:22 PM Page 10 of 11
2 To resubmit the proposal, open the PD record and navigate to the Finalize tab
Click Resubmit to Grants.gov to resubmit the proposal
3 Review the Certification Language and select the OK button

IRES Submitting a Changed/Corrected Proposal
4/25/2014 5:22 PM Page 11 of 11
4 Screen refreshes to show an additional submission row under the Submit to Grants.gov section
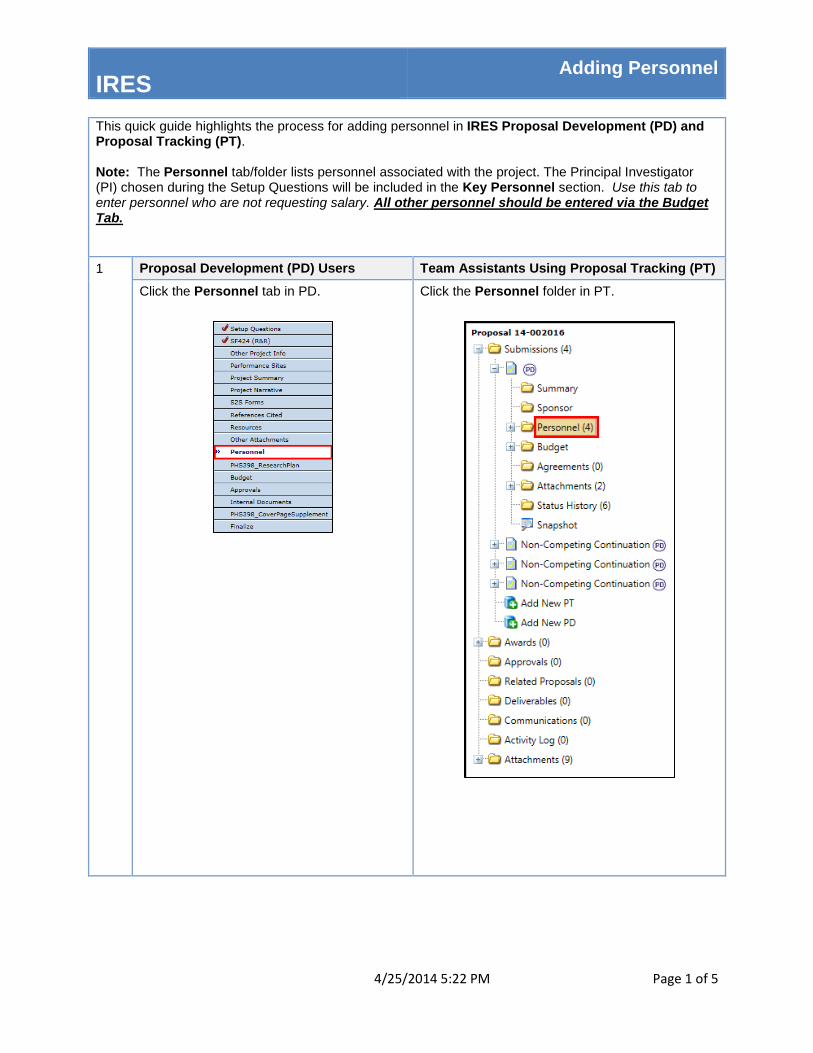
IRES Adding Personnel
4/25/2014 5:22 PM Page 1 of 5
This quick guide highlights the process for adding personnel in IRES Proposal Development (PD) and Proposal Tracking (PT). Note: The Personnel tab/folder lists personnel associated with the project. The Principal Investigator (PI) chosen during the Setup Questions will be included in the Key Personnel section. Use this tab to enter personnel who are not requesting salary. All other personnel should be entered via the Budget Tab.
1
Proposal Development (PD) Users Team Assistants Using Proposal Tracking (PT)
Click the Personnel tab in PD.
Click the Personnel folder in PT.
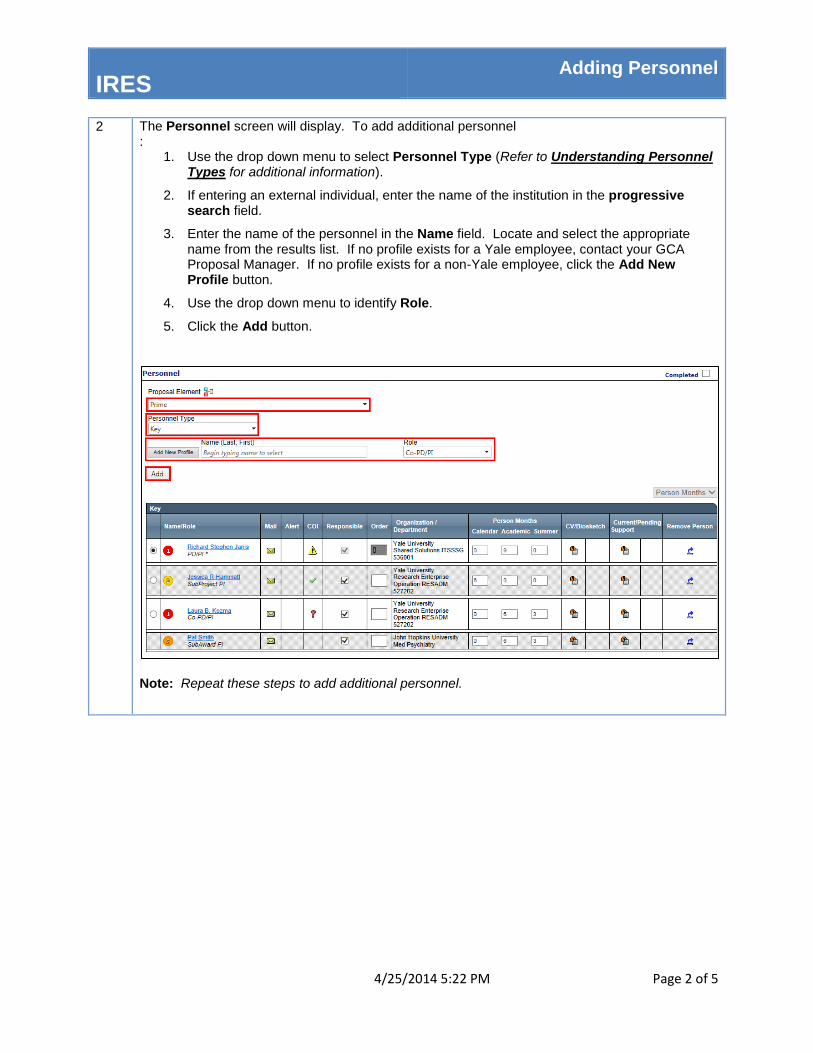
IRES Adding Personnel
4/25/2014 5:22 PM Page 2 of 5
2 The Personnel screen will display. To add additional personnel :
1. Use the drop down menu to select Personnel Type (Refer to Understanding Personnel Types for additional information).
2. If entering an external individual, enter the name of the institution in the progressive search field.
3. Enter the name of the personnel in the Name field. Locate and select the appropriate name from the results list. If no profile exists for a Yale employee, contact your GCA Proposal Manager. If no profile exists for a non-Yale employee, click the Add New Profile button.
4. Use the drop down menu to identify Role.
5. Click the Add button.
Note: Repeat these steps to add additional personnel.
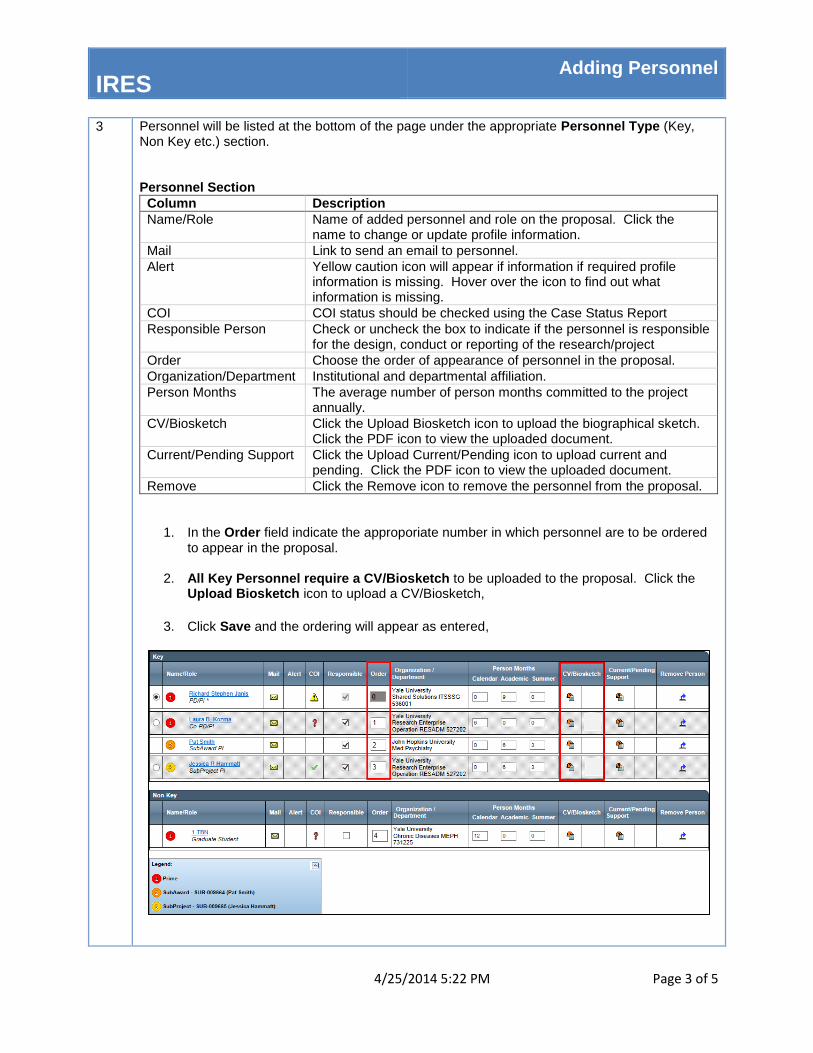
IRES Adding Personnel
4/25/2014 5:22 PM Page 3 of 5
3 Personnel will be listed at the bottom of the page under the appropriate Personnel Type (Key, Non Key etc.) section. Personnel Section
Column Description
Name/Role Name of added personnel and role on the proposal. Click the name to change or update profile information.
Mail Link to send an email to personnel.
Alert Yellow caution icon will appear if information if required profile information is missing. Hover over the icon to find out what information is missing.
COI COI status should be checked using the Case Status Report
Responsible Person Check or uncheck the box to indicate if the personnel is responsible for the design, conduct or reporting of the research/project
Order Choose the order of appearance of personnel in the proposal.
Organization/Department Institutional and departmental affiliation.
Person Months The average number of person months committed to the project annually.
CV/Biosketch Click the Upload Biosketch icon to upload the biographical sketch. Click the PDF icon to view the uploaded document.
Current/Pending Support Click the Upload Current/Pending icon to upload current and pending. Click the PDF icon to view the uploaded document.
Remove Click the Remove icon to remove the personnel from the proposal.
1. In the Order field indicate the approporiate number in which personnel are to be ordered to appear in the proposal.
2. All Key Personnel require a CV/Biosketch to be uploaded to the proposal. Click the Upload Biosketch icon to upload a CV/Biosketch,
3. Click Save and the ordering will appear as entered,
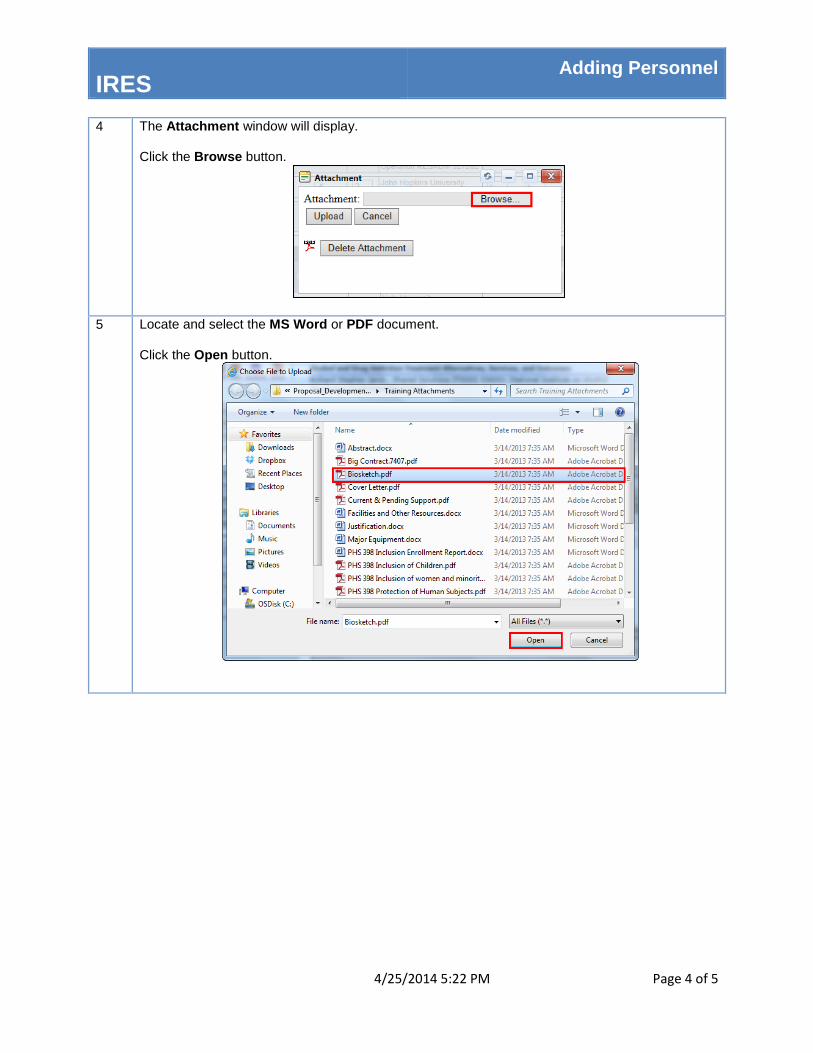
IRES Adding Personnel
4/25/2014 5:22 PM Page 4 of 5
4 The Attachment window will display. Click the Browse button.
5 Locate and select the MS Word or PDF document. Click the Open button.
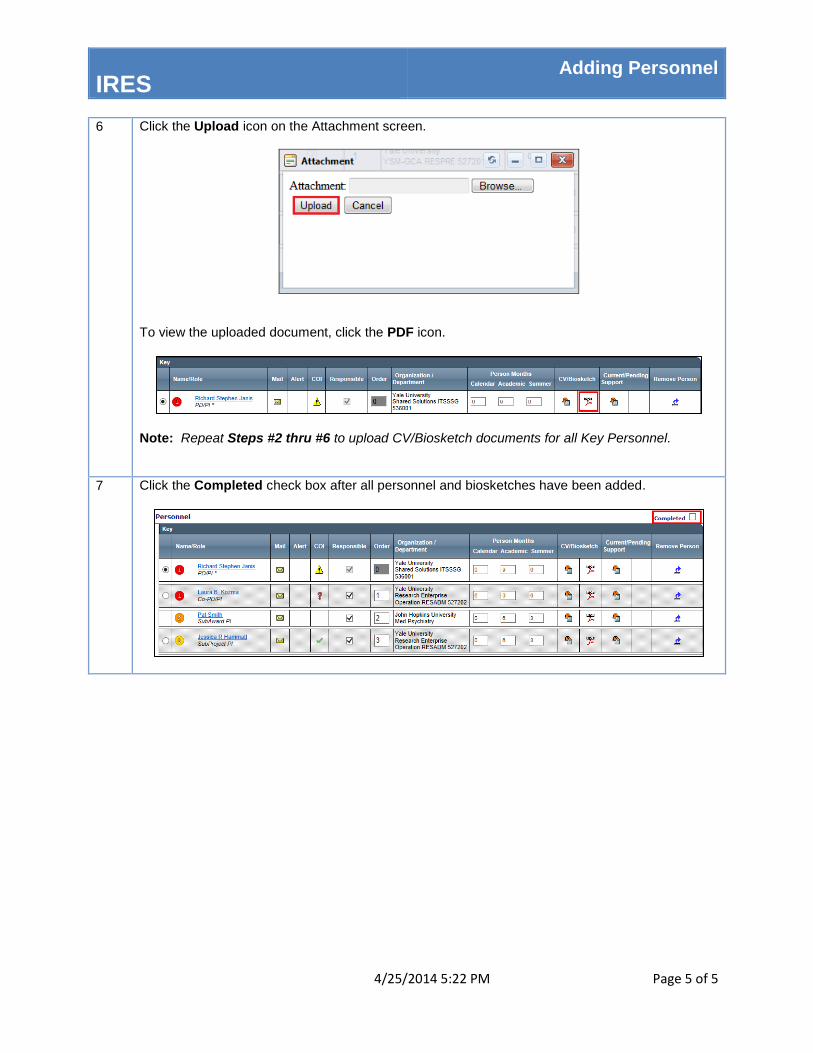
IRES Adding Personnel
4/25/2014 5:22 PM Page 5 of 5
6 Click the Upload icon on the Attachment screen.
To view the uploaded document, click the PDF icon.
Note: Repeat Steps #2 thru #6 to upload CV/Biosketch documents for all Key Personnel.
7 Click the Completed check box after all personnel and biosketches have been added.
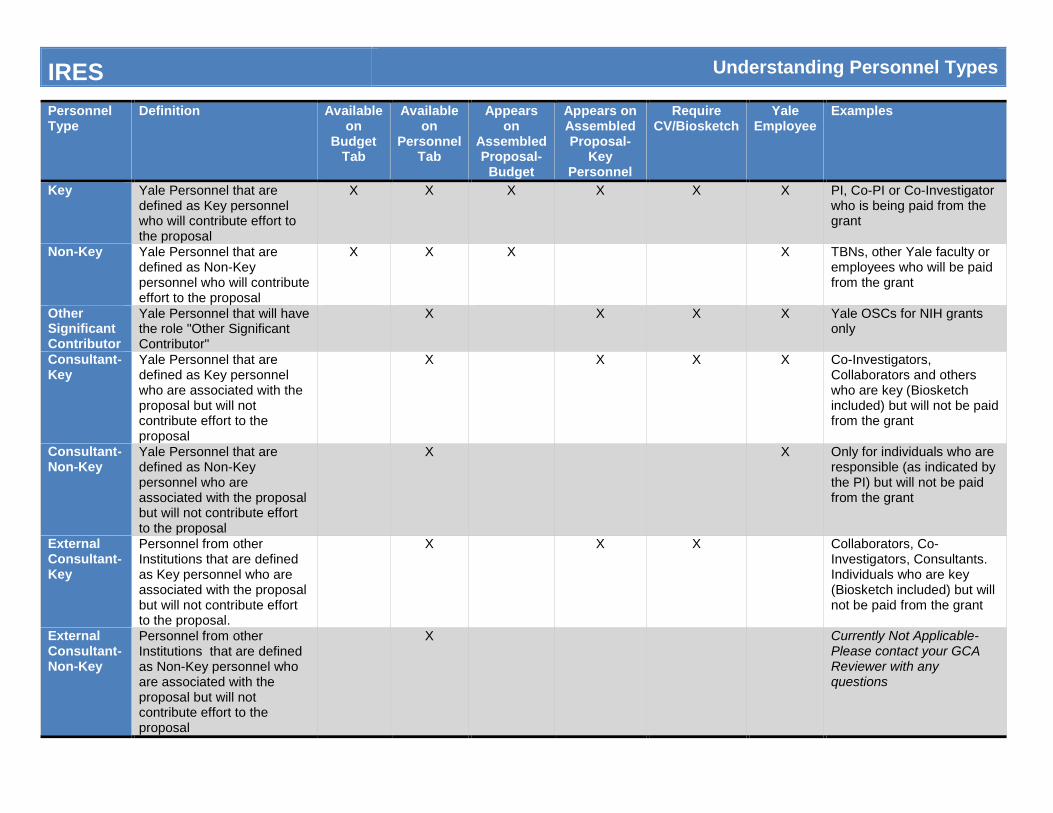
IRES Understanding Personnel Types
Personnel Type
Definition Available on
Budget Tab
Available on
Personnel Tab
Appears on
Assembled Proposal-
Budget
Appears on Assembled Proposal-
Key Personnel
Require CV/Biosketch
Yale Employee
Examples
Key Yale Personnel that are defined as Key personnel who will contribute effort to the proposal
X X X X X X PI, Co-PI or Co-Investigator who is being paid from the grant
Non-Key Yale Personnel that are defined as Non-Key personnel who will contribute effort to the proposal
X X X X TBNs, other Yale faculty or employees who will be paid from the grant
Other Significant Contributor
Yale Personnel that will have the role "Other Significant Contributor"
X X X X Yale OSCs for NIH grants only
Consultant- Key
Yale Personnel that are defined as Key personnel who are associated with the proposal but will not contribute effort to the proposal
X X X X Co-Investigators, Collaborators and others who are key (Biosketch included) but will not be paid from the grant
Consultant- Non-Key
Yale Personnel that are defined as Non-Key personnel who are associated with the proposal but will not contribute effort to the proposal
X X Only for individuals who are responsible (as indicated by the PI) but will not be paid from the grant
External Consultant- Key
Personnel from other Institutions that are defined as Key personnel who are associated with the proposal but will not contribute effort to the proposal.
X X X Collaborators, Co-Investigators, Consultants. Individuals who are key (Biosketch included) but will not be paid from the grant
External Consultant- Non-Key
Personnel from other Institutions that are defined as Non-Key personnel who are associated with the proposal but will not contribute effort to the proposal
X Currently Not Applicable- Please contact your GCA Reviewer with any questions
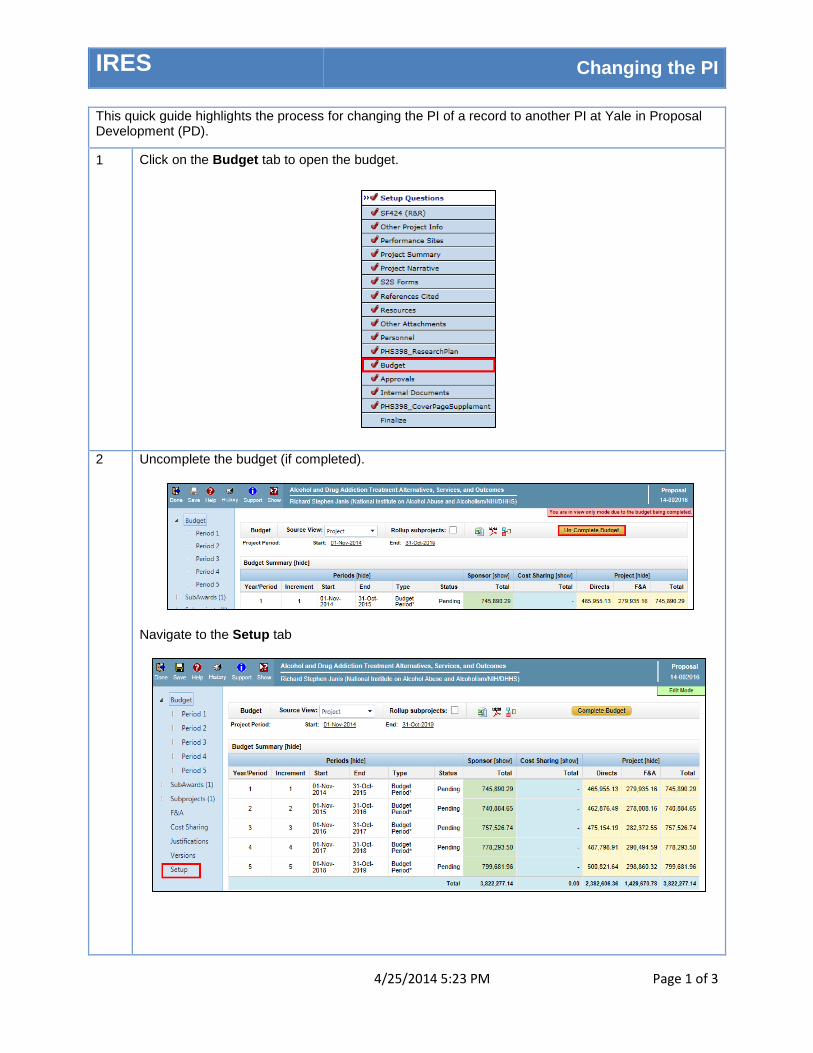
IRES Changing the PI
4/25/2014 5:23 PM Page 1 of 3
This quick guide highlights the process for changing the PI of a record to another PI at Yale in Proposal Development (PD).
1 Click on the Budget tab to open the budget.
2 Uncomplete the budget (if completed).
Navigate to the Setup tab
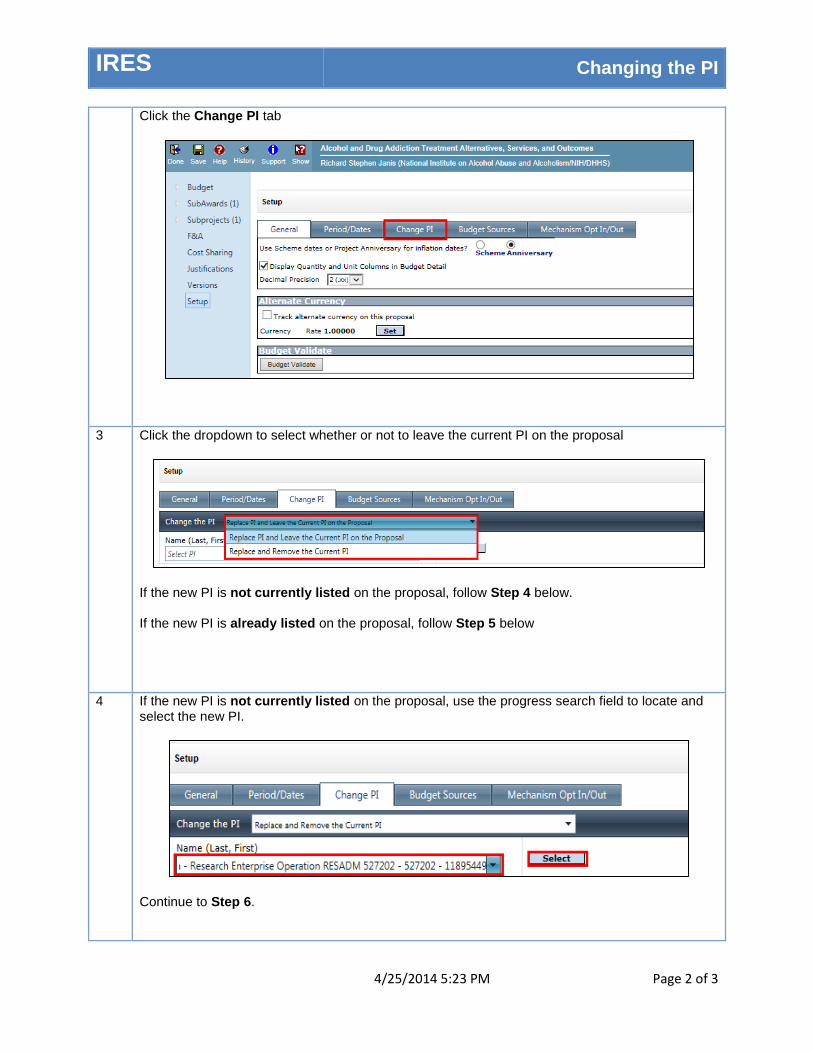
IRES Changing the PI
4/25/2014 5:23 PM Page 2 of 3
Click the Change PI tab
3 Click the dropdown to select whether or not to leave the current PI on the proposal
If the new PI is not currently listed on the proposal, follow Step 4 below. If the new PI is already listed on the proposal, follow Step 5 below
4 If the new PI is not currently listed on the proposal, use the progress search field to locate and select the new PI.
Continue to Step 6.
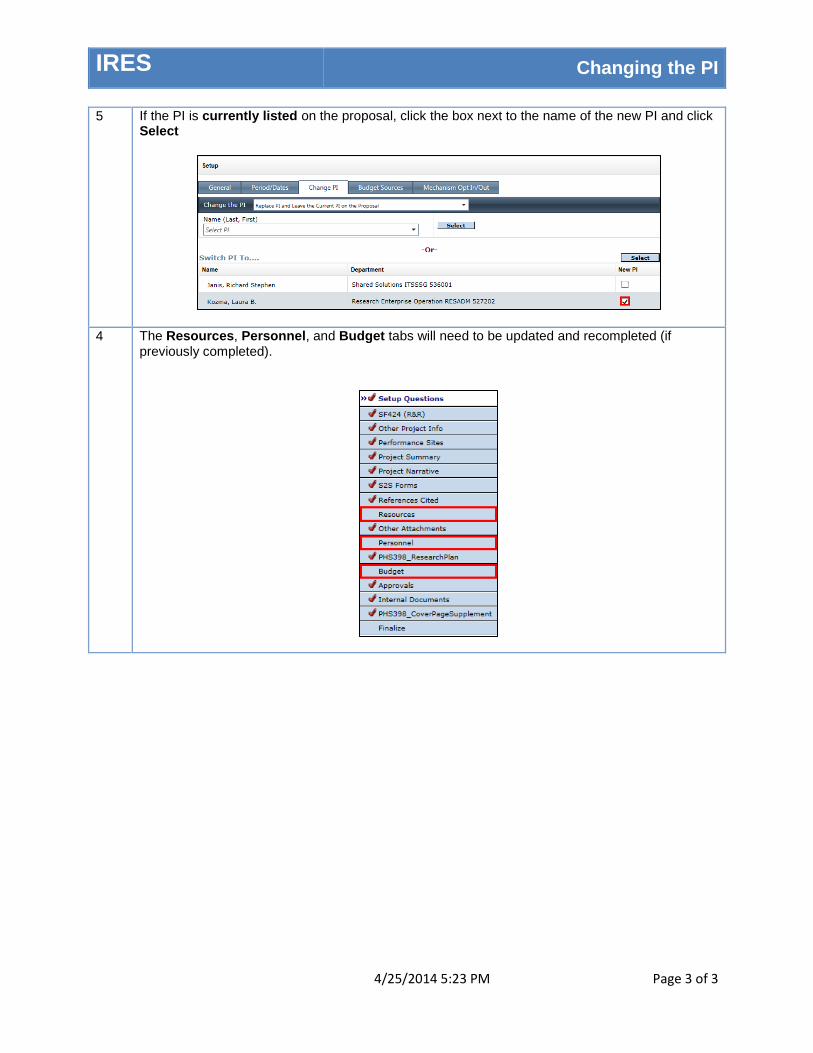
IRES Changing the PI
4/25/2014 5:23 PM Page 3 of 3
5 If the PI is currently listed on the proposal, click the box next to the name of the new PI and click Select
4 The Resources, Personnel, and Budget tabs will need to be updated and recompleted (if previously completed).
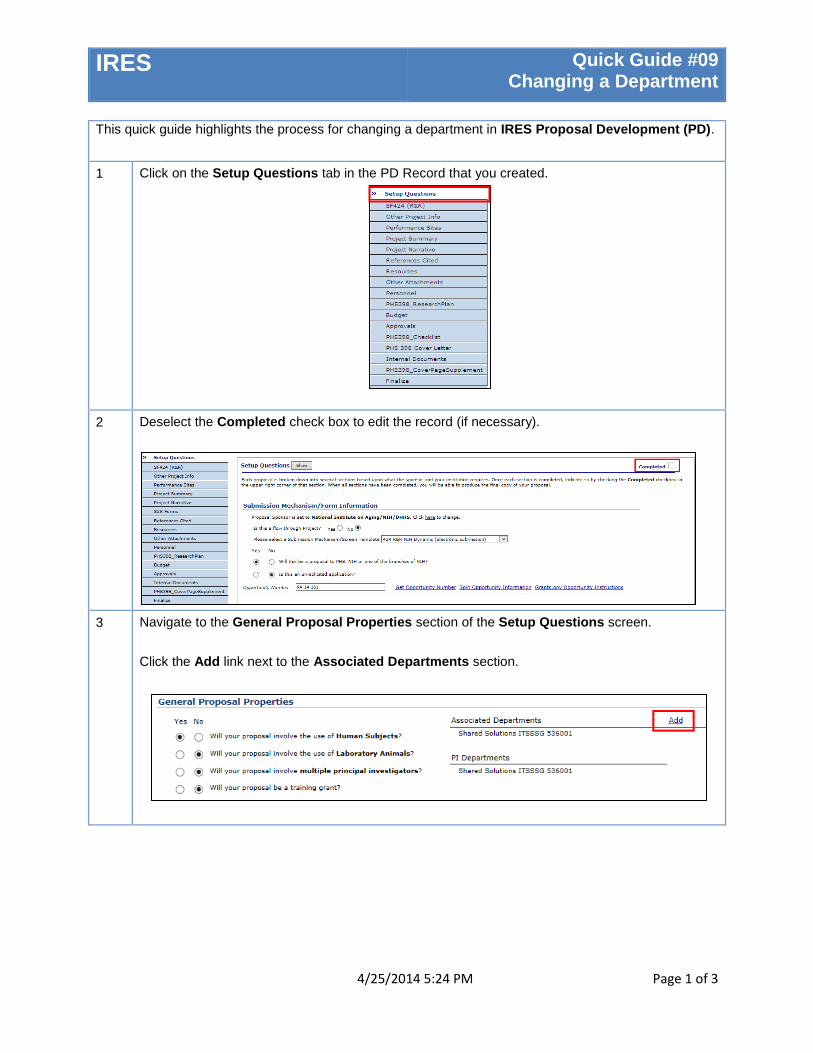
IRES Quick Guide #09 Changing a Department
4/25/2014 5:24 PM Page 1 of 3
This quick guide highlights the process for changing a department in IRES Proposal Development (PD).
1 Click on the Setup Questions tab in the PD Record that you created.
2 Deselect the Completed check box to edit the record (if necessary).
3 Navigate to the General Proposal Properties section of the Setup Questions screen.
Click the Add link next to the Associated Departments section.
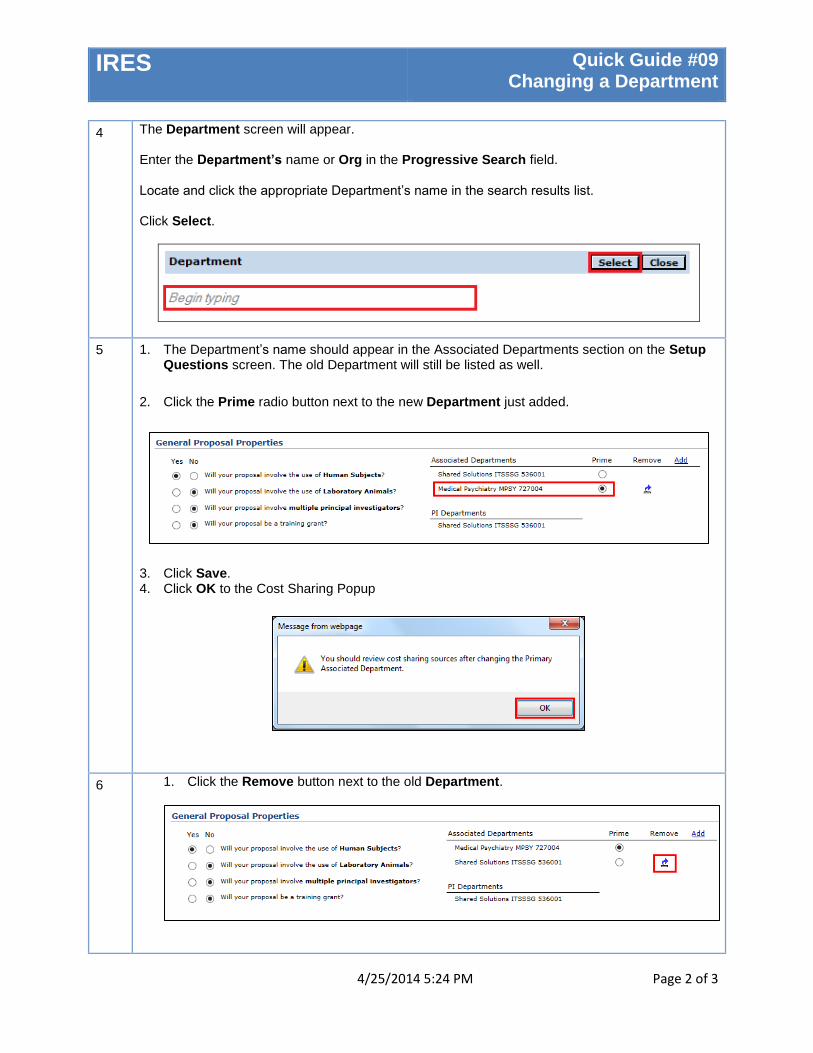
IRES Quick Guide #09 Changing a Department
4/25/2014 5:24 PM Page 2 of 3
4 The Department screen will appear. Enter the Department’s name or Org in the Progressive Search field. Locate and click the appropriate Department’s name in the search results list. Click Select.
5 1. The Department’s name should appear in the Associated Departments section on the Setup Questions screen. The old Department will still be listed as well.
2. Click the Prime radio button next to the new Department just added.
3. Click Save. 4. Click OK to the Cost Sharing Popup
6 1. Click the Remove button next to the old Department.
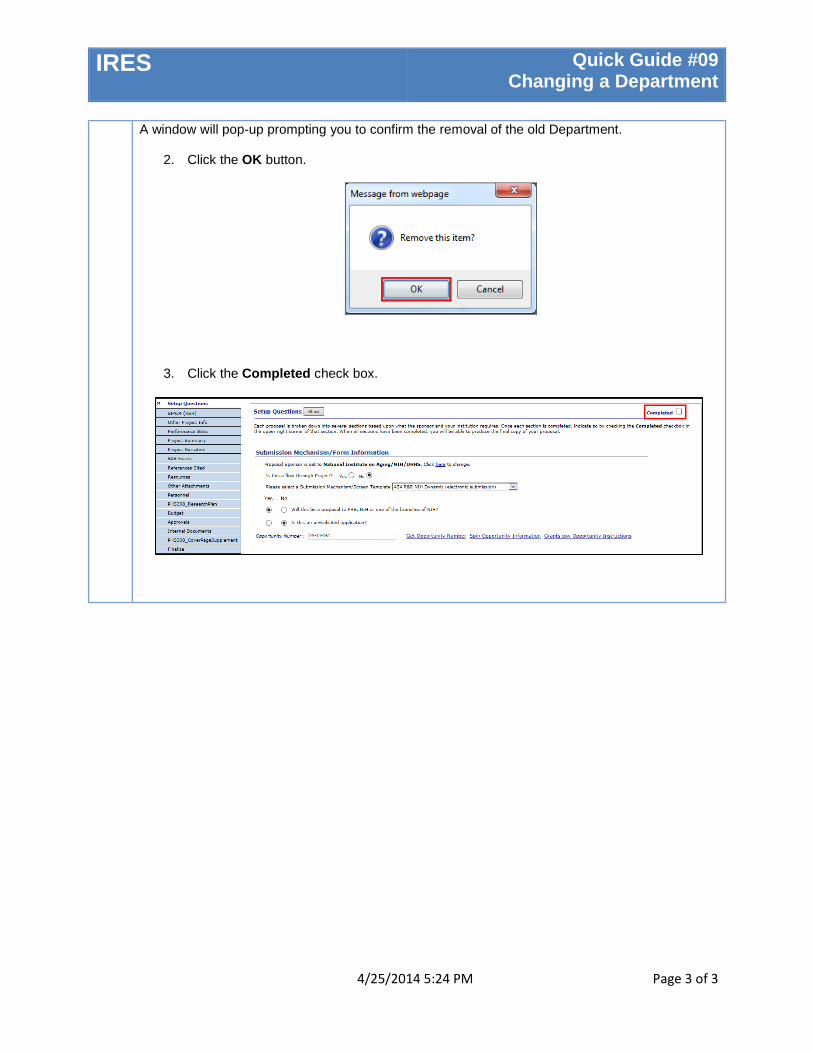
IRES Quick Guide #09 Changing a Department
4/25/2014 5:24 PM Page 3 of 3
A window will pop-up prompting you to confirm the removal of the old Department.
2. Click the OK button.
3. Click the Completed check box.