iprocurement requisitioner training - wordpress.com and all references to oracle products are...
TRANSCRIPT

iProcurement Requisitioner Training Student Guide
P2P - Edition 1.0
AUG 2005

Copyright © 2005 Agere Systems Inc. All rights reserved.
Copyright © Oracle Corporation, 2003. All rights reserved.
This documentation contains proprietary information of Oracle Corporation. It is provided under a license agreement containing restrictions on use and disclosure and is also protected by copyright law. Reverse engineering of the software is prohibited. If this documentation is delivered to a U.S. Government Agency of the Department of Defense, then it is delivered with Restricted Rights and the following legend is applicable:
Restricted Rights Legend
Use, duplication or disclosure by the Government is subject to restrictions for commercial computer software and shall be deemed to be Restricted Rights software under Federal law, as set forth in subparagraph (c)(1)(ii) of DFARS 252.227-7013, Rights in Technical Data and Computer Software (October 1988).
This material or any portion of it may not be copied in any form or by any means without the express prior written permission of the Education Products group of Oracle Corporation. Any other copying is a violation of copyright law and may result in civil and/or criminal penalties.
If this documentation is delivered to a U.S. Government Agency not within the Department of Defense, then it is delivered with “Restricted Rights,” as defined in FAR 52.227-14, Rights in Data-General, including Alternate III (June 1987).
The information in this document is subject to change without notice. If you find any problems in the documentation, please report them in writing to Worldwide Education Services, Oracle Corporation, 500 Oracle Parkway, Box SB-6, Redwood Shores, CA 94065. Oracle Corporation does not warrant that this document is error-free.
Oracle and all references to Oracle Products are trademarks or registered trademarks of Oracle Corporation.
All other products or company names are used for identification purposes only, and may be trademarks of their respective owners.
Published by
Tina Scott
Technical Contributors and Reviewers
Heather Hetrick
This book was published using: oracletutor

Copyright © Oracle, 2004. All rights reserved.
iProcurement Requisitioner Training Table of Contents i
Table of Contents
iProcurement Requisitioner............................................................................................................................1-1 iProcurement Requisitioner ...........................................................................................................................1-2 Setting iProcurement Preferences..................................................................................................................1-3
Setting iProcurement Preferences..............................................................................................................1-4 Creating an iProcurement Requisition...........................................................................................................1-7
Create an iProcurement Requisition ..........................................................................................................1-8 Search a Supplier Website Using Punchout...............................................................................................1-11 Shop Using an iProcurement Store............................................................................................................1-18 Searching for Items in iProcurement .........................................................................................................1-21 Create a Non-Catalog Requisition Line in iProcurement ..........................................................................1-27 Checkout and Complete an iProcurement Requisition ..............................................................................1-31
Create an iProcurement Requisition to Request an RFQ...............................................................................1-47 Create an iProcurement Requisition to Request an RFQ...........................................................................1-48 Update the Prices on a Requisition in iProcurement..................................................................................1-49
Receiving in iProcurement ............................................................................................................................1-59 Receive an Item in iProcurement...............................................................................................................1-60 Return or Correct Receipts in iProcurement ..............................................................................................1-70
Additional iProcurement Information............................................................................................................1-79 View Status or Control an iProcurement Requisition................................................................................1-80
iProcurement Requisition Approval Flows ...................................................................................................2-1 iProcurement Requisition Approval Flows....................................................................................................2-2
iProcurement Approver ..................................................................................................................................3-1 iProcurement Approver .................................................................................................................................3-2 Approve an iProcurement Requisition...........................................................................................................3-3
Approve an iProcurement Requisition.......................................................................................................3-4 Approve a Requisition ...............................................................................................................................3-5
Vacation Handling.........................................................................................................................................3-23 Vacation Handling.....................................................................................................................................3-24


Copyright © Oracle, 2004. All rights reserved.
iProcurement Requisitioner Training Table of Contents iii
Preface
Profile
Before You Begin This Course
Before you begin this course, you should have the following qualifications:
• Working experience with Purchasing
Prerequisites
• Oracle Navigation
How This Course Is Organized
iProcurement Requisitioner Training is an instructor-led course featuring lecture and hands-on exercises. Online demonstrations and written practice sessions reinforce the concepts and skills introduced.
Copyright © Oracle, 2004. All rights reserved.
iProcurement Requisitioner Training Table of Contents iv
Typographic Conventions in Oracle Application Navigation Paths
This course uses simplified navigation paths, such as the following example, to direct you through Oracle Applications.
(N) Invoice > Entry > Invoice Batches Summary (M) Query > Find (B) Approve
This simplified path translates to the following:
1. (N) From the Navigator window, select Invoice then Entry then Invoice Batches Summary.
2. (M) From the menu, select Query then Find.
3. (B) Click the Approve button.
Notations:
(N) = Navigator
(M) = Menu
(T) = Tab
(B) = Button
(I) = Icon
(H) = Hyperlink
(ST) = Sub Tab
Typographical Conventions in Oracle Application Help System Paths
This course uses a “navigation path” convention to represent actions you perform to find pertinent information in the Oracle Applications Help System.
The following help navigation path, for example—
(Help) General Ledger > Journals > Enter Journals
—represents the following sequence of actions:
1. In the navigation frame of the help system window, expand the General Ledger entry.
2. Under the General Ledger entry, expand Journals.
3. Under Journals, select Enter Journals.

Copyright © Oracle, 2004. All rights reserved.
iProcurement Requisitioner Training Table of Contents v
4. Review the Enter Journals topic that appears in the document frame of the help system window.
Help Desk
For Oracle and Software support:
Call the Global Service Desk 1-610-712-8800 or 1-877-2RESOLV (1-877-273-7658)

Copyright © Oracle, 2004. All rights reserved.
iProcurement Requisitioner Training Table of Contents vi

Copyright © Oracle, 2004. All rights reserved.
iProcurement Requisitioner Chapter 1 - Page 1
iProcurement Requisitioner Chapter 1

Copyright © Oracle, 2004. All rights reserved.
iProcurement Requisitioner Chapter 1 - Page 2
iProcurement Requisitioner
Section Objectives
At the end of this section, you should be able to:
• Setting iProcurement Preferences
• Create an iProcurement Requisition
• Create an iProcurement Requisition to Request an RFQ
• Receiving in iProcurement
• Additional iProcurement Information

Copyright © Oracle, 2004. All rights reserved.
iProcurement Requisitioner Chapter 1 - Page 3
Setting iProcurement Preferences

Copyright © Oracle, 2004. All rights reserved.
iProcurement Requisitioner Chapter 1 - Page 4
Setting iProcurement Preferences iProcurement
N > Preferences > (ST) iProcurement Preferences
IProcurement Preferences
In iProcurement, fields that are required by the system are marked with an asterisk (*).
1. Select a default Favorite Store.
It is recommended that you select Main Store because this will include all of the local catalog content.
Copyright © Oracle, 2004. All rights reserved.
iProcurement Requisitioner Chapter 1 - Page 5
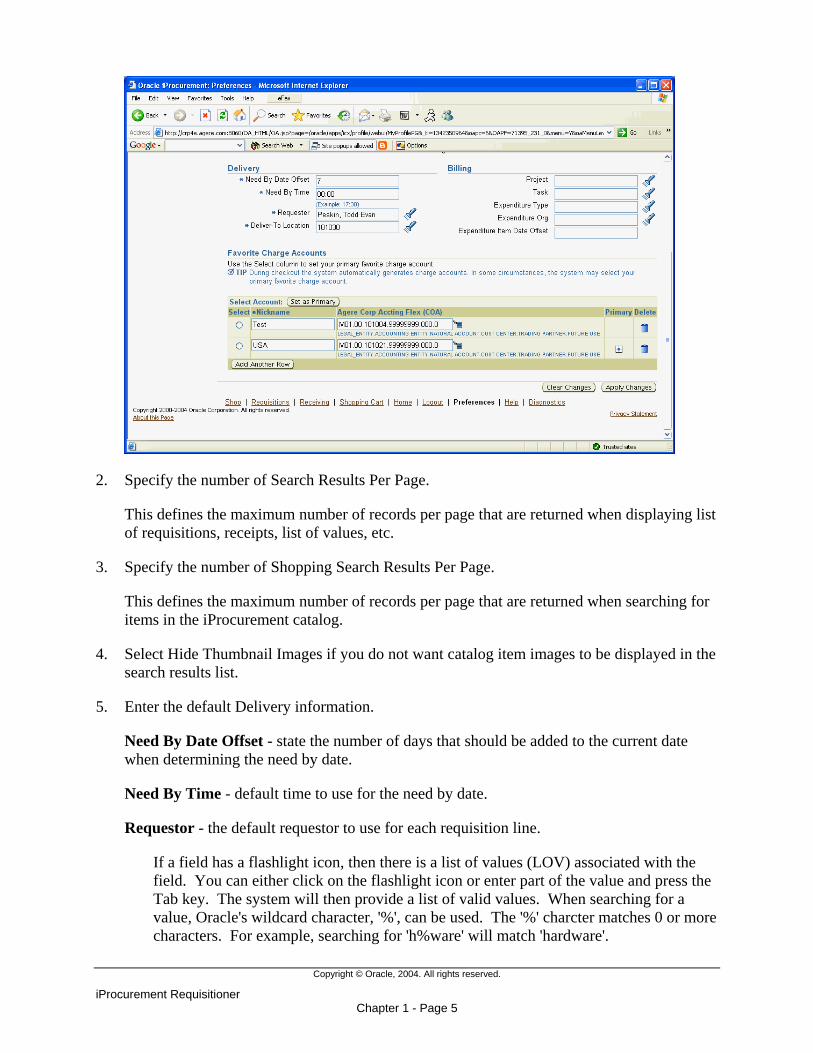
2. Specify the number of Search Results Per Page.
This defines the maximum number of records per page that are returned when displaying list of requisitions, receipts, list of values, etc.
3. Specify the number of Shopping Search Results Per Page.
This defines the maximum number of records per page that are returned when searching for items in the iProcurement catalog.
4. Select Hide Thumbnail Images if you do not want catalog item images to be displayed in the search results list.
5. Enter the default Delivery information.
Need By Date Offset - state the number of days that should be added to the current date when determining the need by date.
Need By Time - default time to use for the need by date.
Requestor - the default requestor to use for each requisition line.
If a field has a flashlight icon, then there is a list of values (LOV) associated with the field. You can either click on the flashlight icon or enter part of the value and press the Tab key. The system will then provide a list of valid values. When searching for a value, Oracle's wildcard character, '%', can be used. The '%' charcter matches 0 or more characters. For example, searching for 'h%ware' will match 'hardware'.

Copyright © Oracle, 2004. All rights reserved.
iProcurement Requisitioner Chapter 1 - Page 6
Deliver-To Location - the default deliver-to location to use for each requisition line. This will default based on the selected Requestor.
6. Enter the default Billing information.
7. Define Favorite Charge Accounts if desired.
• Click (B) Add Another Row for each charge account.
• Enter a nickname for each account.
• Specify the appropriate charge account.
• Select one favorite charge account and click (B) Set as Primary.
This is a required step. The default charge account for the employee will still default on each requisition line even if a primary favorite charge account is defined.
8. Click (B) Apply Changes.
End of activity.

Copyright © Oracle, 2004. All rights reserved.
iProcurement Requisitioner Chapter 1 - Page 7
Creating an iProcurement Requisition

Copyright © Oracle, 2004. All rights reserved.
iProcurement Requisitioner Chapter 1 - Page 8
Create an iProcurement Requisition
Create an iProcurement Requisition
Start
RequisitionPreparer
Navigate toiProcurement HomePage. (1)
> Stores
Supplier isknown & is displayed
in list of Stores?
An appropriatestore can be
determined for itemor service (i.e. youneed software, so
you can useComputer Related
store)?
Item or serviceis definitely a one-
time purchase suchas a prototype?
RequisitionPreparer
Use punchout tosearch supplier'swebsite for requesteditem. (2)
> Stores
Item was not found?
Creating morerequisition lines?
A
A
B
C
D
B
E
GB
F A
Y
N
N
Y
Y
N N
Y
Y
N

Copyright © Oracle, 2004. All rights reserved.
iProcurement Requisitioner Chapter 1 - Page 9
Create an iProcurement Requisition
Create an iProcurement Requisition
RequisitionPreparer
Use another method tocreate requisition line.(3)
You would liketo search anothersupplier website?
You would liketo use a store?
RequisitionPreparer
Navigate to appropriatestore. (4)
> Shop: Stores
Item was not found?
Creating morerequisition lines?
RequisitionPreparer
Search for item orservice in localiProcurement catalog.(5)
> Stores
Item was not found?
Creating morerequisition lines?
F
A
G
E
B
G
E
D A CA
N
Y
N
Y
N
Y
N
Y
N
Y
Y
N

Copyright © Oracle, 2004. All rights reserved.
iProcurement Requisitioner Chapter 1 - Page 10
Create an iProcurement Requisition
Create an iProcurement Requisition
RequisitionPreparer
Create a non-catalogrequisition line. (6)
> Non-catalog RequestStore
RequisitionPreparer
Checkout & completerequisition. (7)
> Shopping Cart
End
B
E

Copyright © Oracle, 2004. All rights reserved.
iProcurement Requisitioner Chapter 1 - Page 11
Search a Supplier Website Using Punchout iProcurement
N > iProcurement > (ST) Shop > (ST) Stores
Stores
1. Click on the image or link for the appropriate supplier in order to begin a supplier punchout.

Copyright © Oracle, 2004. All rights reserved.
iProcurement Requisitioner Chapter 1 - Page 12
You will be re-routed to the supplier's website where you can search for items. Please note that each supplier's website is different and this demonstration will show how to order from one specific supplier, Newark InOne. Ordering from other suppliers will be different, but a similar process can be followed.

Copyright © Oracle, 2004. All rights reserved.
iProcurement Requisitioner Chapter 1 - Page 13
2. Search for the desired item or service desired.
3. Add the appropriate item or items to the supplier's shopping cart.
In this case, click the appropriate shopping cart icon in the Buy column.

Copyright © Oracle, 2004. All rights reserved.
iProcurement Requisitioner Chapter 1 - Page 14
4. Continue to search for additional items if desired.
5. Update the quantity if desired.
Many supplier websites require you to click on a button to update the shopping cart with the new quantity.

Copyright © Oracle, 2004. All rights reserved.
iProcurement Requisitioner Chapter 1 - Page 15
6. Click the appropriate button to update the quantity or shopping cart.
In this case, click (B) Update Quantity.
7. Checkout from the supplier site.

Copyright © Oracle, 2004. All rights reserved.
iProcurement Requisitioner Chapter 1 - Page 16
In this case, click (B) Process Order.
A summary screen is usually displayed as a confirmation.
8. Click the appropriate button to return to iProcurement.
In this case, click (B) Send Order.

Copyright © Oracle, 2004. All rights reserved.
iProcurement Requisitioner Chapter 1 - Page 17
The selected items will now be in your iProcurement shopping cart.
End of activity.

Copyright © Oracle, 2004. All rights reserved.
iProcurement Requisitioner Chapter 1 - Page 18
Shop Using an iProcurement Store iProcurement
N > iProcurement > (ST) Shop > (ST) Stores
Shop: Stores
1. Click on the image or link for the appropriate store.

Copyright © Oracle, 2004. All rights reserved.
iProcurement Requisitioner Chapter 1 - Page 19
You will be taken to a screen showing you all of the catalogs contained in the store.
If an appropriate supplier can be found in the store, goto task #2. Otherwise, goto End of Activity.

Copyright © Oracle, 2004. All rights reserved.
iProcurement Requisitioner Chapter 1 - Page 20
2. Click on the link for one of the available catalogs.
This will take you either to a supplier Punchout site or an informational webpage.
For a punch-out catalog, you will be re-routed to the supplier's website where you can search for items.
Additional information: Search a Supplier Website Using Punchout [../FND/@NAP2P201]
End of activity.

Copyright © Oracle, 2004. All rights reserved.
iProcurement Requisitioner Chapter 1 - Page 21
Searching for Items in iProcurement iProcurement
N > iProcurement > (ST) Shop > (ST) Stores
Stores
1. Specify the appropriate search criteria in the search field.
Oracle's wildcard character, '%', can be used in a search. The '%' charcter matches 0 or more characters. For example, searching for 'h%ware' will match 'hardware'.
When searching the iProcurement catalog, searches are word based and must match the entire word. For example, 'wir' will not match 'wired', but 'wir%' will match 'wired' or 'wires'.

Copyright © Oracle, 2004. All rights reserved.
iProcurement Requisitioner Chapter 1 - Page 22
2. Click (B) Go.
Copyright © Oracle, 2004. All rights reserved.
iProcurement Requisitioner Chapter 1 - Page 23
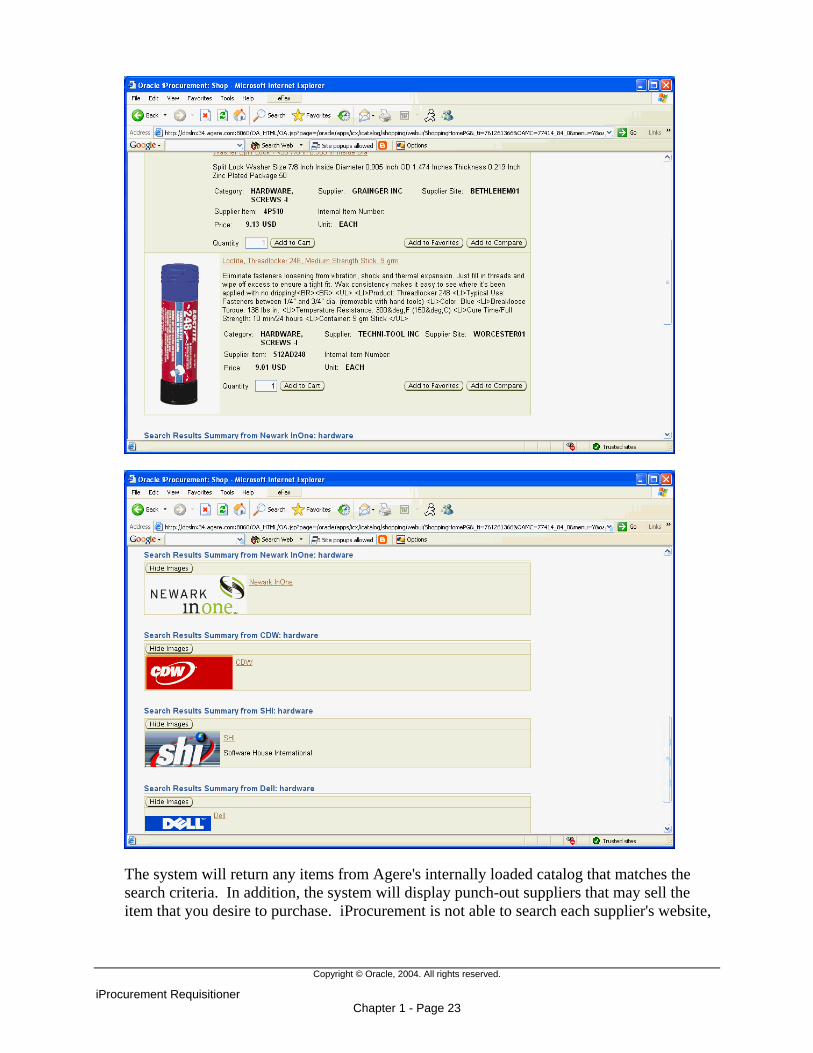
The system will return any items from Agere's internally loaded catalog that matches the search criteria. In addition, the system will display punch-out suppliers that may sell the item that you desire to purchase. iProcurement is not able to search each supplier's website,

Copyright © Oracle, 2004. All rights reserved.
iProcurement Requisitioner Chapter 1 - Page 24
but iProcurement will return suggested punch-out suppliers based on the categories of items that they sell.
If the desired item is displayed, goto task #3.
If a possible supplier is displayed, goto task #5. Otherwise, goto End of Activity.
3. Specify the appropriate quantity and click (B) Add to Cart.
If additional items are desired, goto task #1. Otherwise, goto task #4.
4. Click (B) View Cart and Checkout.

Copyright © Oracle, 2004. All rights reserved.
iProcurement Requisitioner Chapter 1 - Page 25
End of activity.
5. Click on the link for one of the available catalogs.
This will take you either to a supplier Punchout site or an informational webpage.

Copyright © Oracle, 2004. All rights reserved.
iProcurement Requisitioner Chapter 1 - Page 26
For a punchout catalog, you will be re-routed to the supplier's website where you can search for items.
Additional information: Search a Supplier Website Using Punchout [../FND/@NAP2P201]
End of activity.

Copyright © Oracle, 2004. All rights reserved.
iProcurement Requisitioner Chapter 1 - Page 27
Create a Non-Catalog Requisition Line in iProcurement iProcurement
N > iProcurement > (ST) Shop > (ST) Non-Catalog Request
Non-catalog Request Store
1. Click (ST) Non-Catalog Request.

Copyright © Oracle, 2004. All rights reserved.
iProcurement Requisitioner Chapter 1 - Page 28
2. Select an appropriate Request Type or New if none of the request types are appropriate.
The request type selected will determine the fields that are available on this screen.
3. Specify the Item Type.
Goods billed by quantity - this is used anytime that you are ordering a product that can be specified in terms of a quantity and a price.
Goods or services billed by amount - this is used when a flat currency amount needs to be specified. This item type IS NOT recommended if you are requesting an RFQ.
Services billed by quantity - this is used when ordering a service that can be expressed in terms of a quantity and price such as 100 hours at 50 dollars per hour.
The item type selected will determine the fields that are available on this screen.
4. Enter an appropriate item description.
This needs to be descriptive enough that the buyer and supplier will understand what you would like to order.
5. Select an appropriate category.
6. Enter the quantity or amount.
7. Specify a unit of measure.

Copyright © Oracle, 2004. All rights reserved.
iProcurement Requisitioner Chapter 1 - Page 29
8. Enter the Price or Rate per Unit.
If this is a request for an RFQ, then the price should be specified as 0.
9. Select the appropriate Currency.
10. Enter the contract and supplier information if you know the appropriate values.
11. Enter a Supplier Item Number if known.
12. Click (B) Add to Cart.
If additional items are desired, goto task #13. Otherwise, goto task #14.
13. Click (B) Clear All.
Goto task #2
14. Click (B) View Cart and Checkout.

Copyright © Oracle, 2004. All rights reserved.
iProcurement Requisitioner Chapter 1 - Page 30
End of activity.

Copyright © Oracle, 2004. All rights reserved.
iProcurement Requisitioner Chapter 1 - Page 31
Checkout and Complete an iProcurement Requisition iProcurement
N > iProcurement > (ST) Shop
Shopping Cart
1. Update the Quantity if desired.
2. Click (B) Checkout.

Copyright © Oracle, 2004. All rights reserved.
iProcurement Requisitioner Chapter 1 - Page 32
3. Enter an appropriate description for the requisition.
The description will automatically default from the first requisition line, but you may want to change it to something more useful.
4. Update the Need-By Date appropriately.
This date will automatically populate based on your iProcurement preferences.
5. Update the Requester or Deliver-to Location fields if necessary.
These fields will default automatically based on the user that is creating the requisition.
If this order is being placed on behalf of another employee, then update these fields appropriately.
6. Specify the Suggested Buyer if it was not already populated by the system.
This is a mandatory field and the information must be specified for each requisition line.
If the word Multiple is displayed for this field, then click on the Multiple link and verify that a Suggested Buyer has been specified for each requisition line.
Do not change any Suggested Buyers that are automatically populated by the system.
7. Enter the appropriate Project Billing information if this requisition will be billed to a project.

Copyright © Oracle, 2004. All rights reserved.
iProcurement Requisitioner Chapter 1 - Page 33
The Taxable information will automatically default by the system and should not be modified.
The Charge Account will automatically default on all requisition lines based on your default charge account on your employee record, unless you have already set an alternative primary account through Preferences.
Additional information: Setting iProcurement Preferences [../FND/@NAP2P200]
If any of these details differ for any of the requisition lines, goto task #8. Otherwise, goto task #40.
8. Click (B) Edit Lines.
9. Update any of the fields in the Delivery section as desired.
10. Verify that the Suggested Buyer has been populated for each requisition lines.
Catalog and punchout lines will normally pre-populate with the correct Suggested Buyer.
Non-catalog lines need to be populated with the correct buyer.
11. Click (ST) Billing to update Project Billing related information.

Copyright © Oracle, 2004. All rights reserved.
iProcurement Requisitioner Chapter 1 - Page 34
12. Click (ST) Accounts to update the charge account information.
If the charge account needs to be modified, goto task #13. Otherwise, goto task #23.
13. Click on the Charge Account link for the appropriate line.

Copyright © Oracle, 2004. All rights reserved.
iProcurement Requisitioner Chapter 1 - Page 35
If using a nickname, goto task #14. Otherwise, goto task #15.
14. Select an appropriate Nickname.
Goto task #20
15. Click the flashlight icon to search for a charge account.

Copyright © Oracle, 2004. All rights reserved.
iProcurement Requisitioner Chapter 1 - Page 36
16. Enter the appropriate values for each account segment or use the flashlight to search for a value.
17. Click (B) Search to find all of the charge accounts that meet the search criteria.
18. Select an appropriate account.
19. Click (B) Select.
Copyright © Oracle, 2004. All rights reserved.
iProcurement Requisitioner Chapter 1 - Page 37
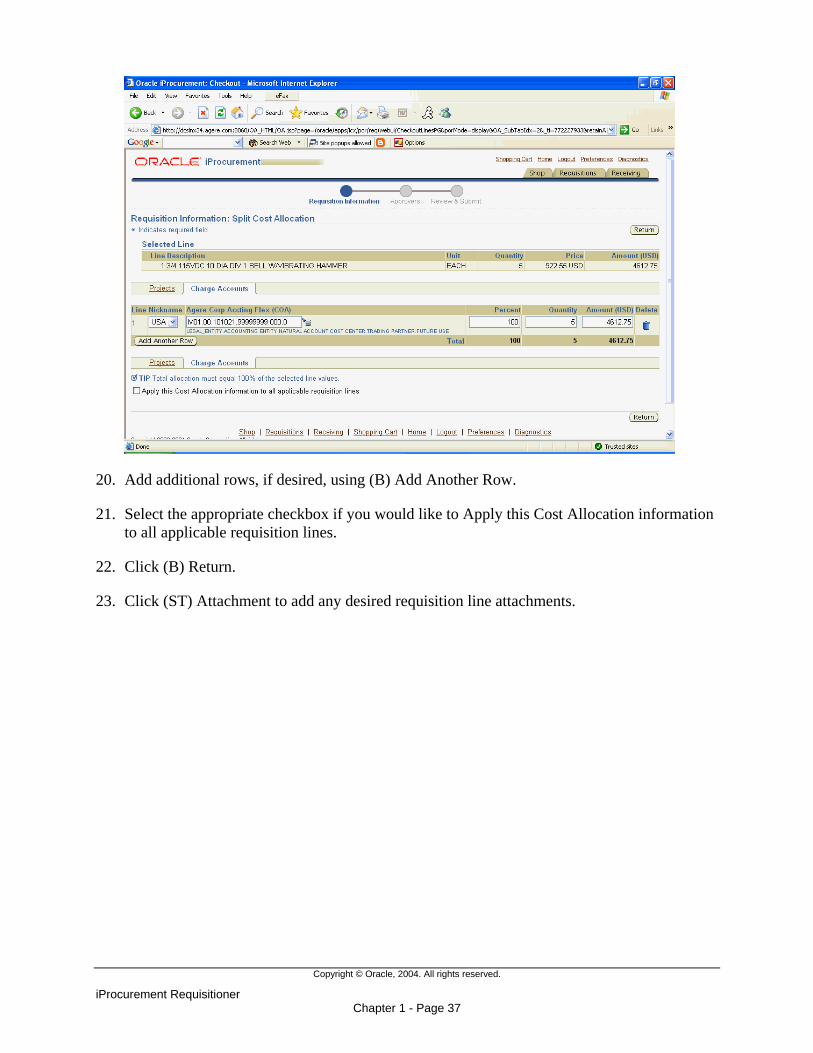
20. Add additional rows, if desired, using (B) Add Another Row.
21. Select the appropriate checkbox if you would like to Apply this Cost Allocation information to all applicable requisition lines.
22. Click (B) Return.
23. Click (ST) Attachment to add any desired requisition line attachments.

Copyright © Oracle, 2004. All rights reserved.
iProcurement Requisitioner Chapter 1 - Page 38
24. Click (I) + to add additional attachments if desired.
If adding an attachment, goto task #25. Otherwise, goto task #38.
25. Enter a description for the attachment.

Copyright © Oracle, 2004. All rights reserved.
iProcurement Requisitioner Chapter 1 - Page 39
26. Specify the Category.
• Select "To Supplier" if the supplier should be able to view the attachment.
If adding a file attachment, goto task #27.
If adding a URL (web link) attachment, goto task #31.
If entering a text attachment, goto task #34.
27. Click on the File radio button.
File attachments will not print on the purchase order. The supplier will, however, see a note stating that a file attachment exists for the purchase order line.
The supplier will be able to download the file using iSupplier, but they can only view the file if they have the appropriate program (i.e. Microsoft Excel for a spreadsheet).
28. Click (B) Browse.
29. Select the appropriate file.

Copyright © Oracle, 2004. All rights reserved.
iProcurement Requisitioner Chapter 1 - Page 40
30. Click (B) Apply.
Goto task #38
31. Click on the URL radio button.
32. Enter the URL for the web page.

Copyright © Oracle, 2004. All rights reserved.
iProcurement Requisitioner Chapter 1 - Page 41
33. Click (B) Apply.
Goto task #38
34. Click on the Text radio button.
35. Enter the Text for the attachment.
If you need to enter a large amount of text, it may be better to enter the text in a file and use a file attachment.
36. Specify a Name for the attachment if desired.

Copyright © Oracle, 2004. All rights reserved.
iProcurement Requisitioner Chapter 1 - Page 42
37. Click (B) Apply.
38. Click (B) Add Attachments to add attachments that apply to the entire requisition.
39. Click (B) Return.

Copyright © Oracle, 2004. All rights reserved.
iProcurement Requisitioner Chapter 1 - Page 43
40. Click (B) Next
41. Add additional approvers if desired.
If adding an additional approver, goto task #42. Otherwise, goto task #46.
42. Click the flashlight icon to search for an approver.

Copyright © Oracle, 2004. All rights reserved.
iProcurement Requisitioner Chapter 1 - Page 44
43. Search for an Approver name using partial value (i.e. HET%)
44. Select the appropriate approver.
45. Click (B) Select.

Copyright © Oracle, 2004. All rights reserved.
iProcurement Requisitioner Chapter 1 - Page 45
46. Specify a Justification for your approvers or a Note to Buyer if desired.
47. Click (B) Next.

Copyright © Oracle, 2004. All rights reserved.
iProcurement Requisitioner Chapter 1 - Page 46
48. Review the details of the requisition and click (B) Submit when satisfied with the information.
End of activity.

Copyright © Oracle, 2004. All rights reserved.
iProcurement Requisitioner Chapter 1 - Page 47
Create an iProcurement Requisition to Request an RFQ

Copyright © Oracle, 2004. All rights reserved.
iProcurement Requisitioner Chapter 1 - Page 48
Create an iProcurement Requisition to Request an RFQ
Create an iProcurement Requisition to Request an RFQ
Start
RequisitionPreparer
Navigate toiProcurement HomePage. (1)
> Stores
RequisitionPreparer
Create a non-catalogrequisition line. (2)
> Non-catalog RequestStore
RequisitionPreparer
Checkout & completerequisition. (3)
> Shopping Cart
BuyerPlace requisition ontoa Sourcing RFQ orAuction usingAutocreate form. (4)
BuyerNotify requisitionpreparer through e-mail when RFQ orAuction is complete "es/bids have beenreceived. (5)
RequisitionPreparer
Review RFQ orAuction info if required.(6)
RequisitionPreparer
Change requisition sothat it will containcorrect prices. (7)
> Stores
RequisitionPreparer
Notify buyer oncerequisition has beenre-approved (by allrequired approvers).(8)
BuyerAward & completeRFQ or Auction. (9)
End

Copyright © Oracle, 2004. All rights reserved.
iProcurement Requisitioner Chapter 1 - Page 49
Update the Prices on a Requisition in iProcurement iProcurement
N > iProcurement > (ST) Shop
Stores
1. View the My Requisitions section of the home page.
If the requisition is not listed, goto task #2. Otherwise, goto task #6.
2. Click (B) Full List.

Copyright © Oracle, 2004. All rights reserved.
iProcurement Requisitioner Chapter 1 - Page 50
If the requisition is still not listed, goto task #3. Otherwise, goto task #6.
3. Click (B) Search.
4. Specify the appropriate search criteria.

Copyright © Oracle, 2004. All rights reserved.
iProcurement Requisitioner Chapter 1 - Page 51
You can enter an alternate requestor or preparer (Requisition Created By) if desired.
The creation date window can be entered.
A search can be performed using an exact Requistion N umber or Order Number (PO Number).
The Requisition Status can be specified.
A search can be performed using all or part of the requisition description. The '%' wildcard can be used.
The search can be performed on the Supplier as well.
5. Click (B) Go.
6. Click on the appropriate Requisition link.

Copyright © Oracle, 2004. All rights reserved.
iProcurement Requisitioner Chapter 1 - Page 52
7. Click (B) Change.
8. Click (B) Yes.

Copyright © Oracle, 2004. All rights reserved.
iProcurement Requisitioner Chapter 1 - Page 53
9. Click (B) Checkout.
10. Click (B) Edit Lines.

Copyright © Oracle, 2004. All rights reserved.
iProcurement Requisitioner Chapter 1 - Page 54
11. Select one line and click (B) Update.
Each line must be updated individually. The price cannot be updated if you select multiple lines at one time.
Copyright © Oracle, 2004. All rights reserved.
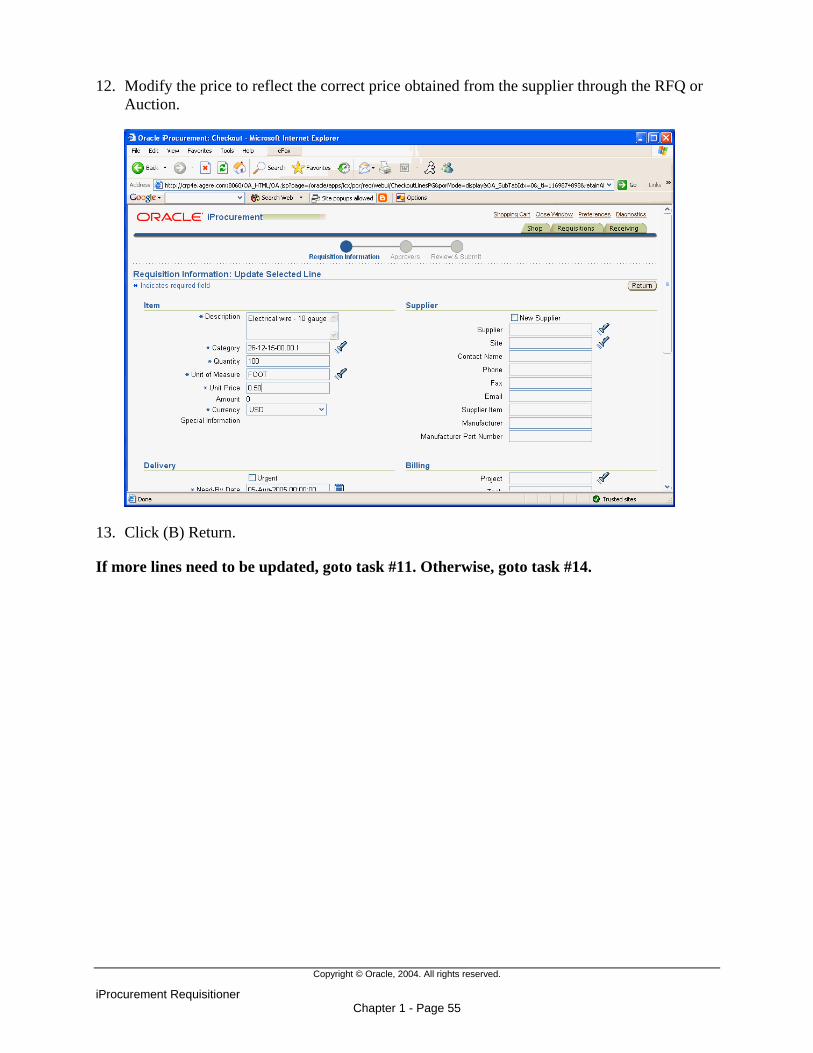
iProcurement Requisitioner Chapter 1 - Page 55
12. Modify the price to reflect the correct price obtained from the supplier through the RFQ or Auction.
13. Click (B) Return.
If more lines need to be updated, goto task #11. Otherwise, goto task #14.

Copyright © Oracle, 2004. All rights reserved.
iProcurement Requisitioner Chapter 1 - Page 56
14. Click (B) Return.
15. Click (B) Next.

Copyright © Oracle, 2004. All rights reserved.
iProcurement Requisitioner Chapter 1 - Page 57
16. Add additional approvers if required.
17. Click (B) Next.
18. Review the requisition.

Copyright © Oracle, 2004. All rights reserved.
iProcurement Requisitioner Chapter 1 - Page 58
19. Click (B) Submit.
End of activity.

Copyright © Oracle, 2004. All rights reserved.
iProcurement Requisitioner Chapter 1 - Page 59
Receiving in iProcurement

Copyright © Oracle, 2004. All rights reserved.
iProcurement Requisitioner Chapter 1 - Page 60
Receive an Item in iProcurement iProcurement
N > iProcurement > (ST) Receiving
Receiving
1. Determine type of action.
Express Receive - no entry of receipt details; full receipt of ordered quantity.
If the requisition is missing in the Requisitions to Receive list, goto task #2.
If using Express Receive, goto task #7.
If performing a detailed receipt, goto task #10.
2. Click (B) Full List.

Copyright © Oracle, 2004. All rights reserved.
iProcurement Requisitioner Chapter 1 - Page 61
3. Enter the appropriate search criteria.
You can search for requisitions created by other users by specifying the appropriate Preparer or Requester.
• Perform a search by using the Requisition Number or Order Number (PO Number).
4. Click (B) Go.

Copyright © Oracle, 2004. All rights reserved.
iProcurement Requisitioner Chapter 1 - Page 62
Express Receive - no entry of receipt details; full receipt of ordered quantity.
If using Express Receive, goto task #5. Otherwise, goto task #10.
5. Select the appropriate requisition by clicking on the Select radio button.

Copyright © Oracle, 2004. All rights reserved.
iProcurement Requisitioner Chapter 1 - Page 63
6. Click (B) Express Receive.
Goto task #9
7. Click (I) Express Receive.

Copyright © Oracle, 2004. All rights reserved.
iProcurement Requisitioner Chapter 1 - Page 64
8. Review the receipt information.
9. Click (B) Submit.
End of activity.
10. Click on the requisition link for the appropriate requisition.
11. Click (B) Receive.

Copyright © Oracle, 2004. All rights reserved.
iProcurement Requisitioner Chapter 1 - Page 65
12. Select the lines that you would like to receive.
You can click on the Select All link to quickly select all of the requisition lines.

Copyright © Oracle, 2004. All rights reserved.
iProcurement Requisitioner Chapter 1 - Page 66
13. Update the Receipt Quantity and Unit of Measure if desired.
14. Click (B) Next.
15. Enter the correct Receipt Date and time.

Copyright © Oracle, 2004. All rights reserved.
iProcurement Requisitioner Chapter 1 - Page 67
16. Enter a Waybill number or Packing Slip if appropriate.
17. Record Receipt Comments if desired.
If the specified information applies to all of the received lines, goto task #22. Otherwise, goto task #18.
18. Click on the radio button for the "No, some receipt information differs by item" option.
19. Click (B) Next.
20. Enter a Waybill number or Packing Slip at the line level if appropriate.
21. Enter Item Comments for each line if desired.
22. Click (B) Next.
If a warning page is displayed, goto task #23. Otherwise, goto task #26.

Copyright © Oracle, 2004. All rights reserved.
iProcurement Requisitioner Chapter 1 - Page 68
A warning page may be displayed if the item is received earlier or later than expected. This is only a warning, it is still possible to continue with the receipt.
23. Verify that the receipt date is correct.
If the receipt date is correct, goto task #25. Otherwise, goto task #24.
24. Correct the receipt date.
25. Click (B) Next.

Copyright © Oracle, 2004. All rights reserved.
iProcurement Requisitioner Chapter 1 - Page 69
26. Review the receipt information.
27. Click (B) Submit.
End of activity.

Copyright © Oracle, 2004. All rights reserved.
iProcurement Requisitioner Chapter 1 - Page 70
Return or Correct Receipts in iProcurement iProcurement
N > iProcurement > (ST) Receiving
Receiving
1. Determine action to perform.
If correcting a receipt, goto task #2. Otherwise to return an item, goto task #9.
2. Click on the Correct Receipts link.
You can use the link at the top of the screen or in the Receiving Process section on the right hand side of the screen.

Copyright © Oracle, 2004. All rights reserved.
iProcurement Requisitioner Chapter 1 - Page 71
3. Enter the appropriate search criteria.
You can search for receipts created by other users by specifying the appopriate Receipt Created By.
Perform search by using the receipt date, Receipt number, Requisition Number, Order Number (Purchase Order number), or Supplier.
4. Click (B) Go.

Copyright © Oracle, 2004. All rights reserved.
iProcurement Requisitioner Chapter 1 - Page 72
5. Enter the correct quantity.
6. Click (B) Continue.

Copyright © Oracle, 2004. All rights reserved.
iProcurement Requisitioner Chapter 1 - Page 73
7. Review the changes.
8. Click (B) Submit.
End of activity.
9. Click on the Return Items link.
You can use the link at the top of the screen or in the Receiving Process section on the right hand side of the screen.
If there are physical goods to be returned to a Supplier, please ensure that you follow all location specific procedures (e.g. contact Buyer for RMA #, take material to receiving dock, etc.) related to material returns.

Copyright © Oracle, 2004. All rights reserved.
iProcurement Requisitioner Chapter 1 - Page 74
10. Enter the appropriate search criteria.
You can search for receipts created by other users by specifying the appopriate Receipt Created By.
Perform search by using the receipt date, Receipt number, Requisition Number, Order Number (Purchase Order number), or Supplier.
11. Click (B) Go.

Copyright © Oracle, 2004. All rights reserved.
iProcurement Requisitioner Chapter 1 - Page 75
12. Enter the quantity to return.
13. Click (B) Next.

Copyright © Oracle, 2004. All rights reserved.
iProcurement Requisitioner Chapter 1 - Page 76
14. Specify the details for the return.
15. Select a Reason by clicking on (I) Flashlight.
16. Enter a Return Material Authorization (RMA) number if appropriate.
17. Enter comments if desired.
18. Click (B) Next.

Copyright © Oracle, 2004. All rights reserved.
iProcurement Requisitioner Chapter 1 - Page 77
19. Review the return information.
20. Click (B) Submit.

Copyright © Oracle, 2004. All rights reserved.
iProcurement Requisitioner Chapter 1 - Page 78
21. Notify the appropriate personnel of the return and take the item to the proper location so that it can be shipped back to the supplier.
End of activity.

Copyright © Oracle, 2004. All rights reserved.
iProcurement Requisitioner Chapter 1 - Page 79
Additional iProcurement Information

Copyright © Oracle, 2004. All rights reserved.
iProcurement Requisitioner Chapter 1 - Page 80
View Status or Control an iProcurement Requisition iProcurement
N > iProcurement > (ST) Shop
Stores
1. View the My Requisitions section of the home page.
If the requisition is listed, goto task #6. Otherwise, goto task #2.
2. Click (B) Full List.

Copyright © Oracle, 2004. All rights reserved.
iProcurement Requisitioner Chapter 1 - Page 81
If the requisition is missing from listed, goto task #3. Otherwise, goto task #6.
3. Click (B) Search.
4. Specify the appropriate search criteria.

Copyright © Oracle, 2004. All rights reserved.
iProcurement Requisitioner Chapter 1 - Page 82
You can enter an alternate requestor or preparer (Requisition Created By) if desired.
The creation date window can be entered.
A search can be performed using an exact Requisition Number or Order Number (PO Number).
The Requisition Status can be specified.
A search can be performed using all or part of the requisition description. The '%' wildcard can be used.
The search can be performed on the Supplier as well.
5. Click (B) Go.
6. Click on the appropriate Requisition link.
Requisition detail - PO, Receipt, Invoice, Payament
If viewing the requisition details, goto task #7.
If copying the requisition to your shopping cart, goto task #16.
If canceling one or more requisition lines, goto task #18.
If changing requisition, goto task #25.

Copyright © Oracle, 2004. All rights reserved.
iProcurement Requisitioner Chapter 1 - Page 83
7. Click on the Order number link to view the purchase order associated with the requisition line.

Copyright © Oracle, 2004. All rights reserved.
iProcurement Requisitioner Chapter 1 - Page 84
8. Click on the Show link to view the details of the Purchase Order line.
9. Click (B) Ok.

Copyright © Oracle, 2004. All rights reserved.
iProcurement Requisitioner Chapter 1 - Page 85
10. Click on (I) Details to view the details of a specific line.

Copyright © Oracle, 2004. All rights reserved.
iProcurement Requisitioner Chapter 1 - Page 86
11. Click the Show Additional Information link to view more details for the line including the charge account information.

Copyright © Oracle, 2004. All rights reserved.
iProcurement Requisitioner Chapter 1 - Page 87
12. Click the Show link in the Invoice Details column to view additional invoice information including invoice holds.
Any underlined link can be clicked to provide additional details.

Copyright © Oracle, 2004. All rights reserved.
iProcurement Requisitioner Chapter 1 - Page 88
This includes the Order Number and Receipt number.
13. Click (B) Ok.
14. Click on the status link for information on the approval history of the requisition.

Copyright © Oracle, 2004. All rights reserved.
iProcurement Requisitioner Chapter 1 - Page 89
15. Click (B) Ok.
If copying the requisition to your shopping cart, goto task #16.
If canceling one or more requisition lines, goto task #18.
If changing the requisition, goto task #25.
If none of the above, goto End of Activity.
16. Click (B) Copy To Cart.

Copyright © Oracle, 2004. All rights reserved.
iProcurement Requisitioner Chapter 1 - Page 90
The requisition lines will be copied to the current shopping cart.
DO NOT use this method to reorder catalog or punchout items because the latest prices may not be reflected on the new purchase order.
17. Complete the requisition.
Additional information Checkout and Complete an iProcurement Requisition [../FND/@NAP2P205].
End of activity.

Copyright © Oracle, 2004. All rights reserved.
iProcurement Requisitioner Chapter 1 - Page 91
18. Click (B) Cancel Requisition.
If canceling the entire requisition, goto task #19. Otherwise, goto task #22.
19. Click (B) Cancel Entire Requisition.

Copyright © Oracle, 2004. All rights reserved.
iProcurement Requisitioner Chapter 1 - Page 92
20. Review the screen to verify that this is the correct requisition to be cancelled.
21. Click (B) Submit.
End of activity.
22. Select the appropriate line or lines.

Copyright © Oracle, 2004. All rights reserved.
iProcurement Requisitioner Chapter 1 - Page 93
23. Click (B) Continue.
24. Click (B) Submit.
End of activity.

Copyright © Oracle, 2004. All rights reserved.
iProcurement Requisitioner Chapter 1 - Page 94
25. Click (B) Change.
26. Click (B) Yes.
Copyright © Oracle, 2004. All rights reserved.
iProcurement Requisitioner Chapter 1 - Page 95
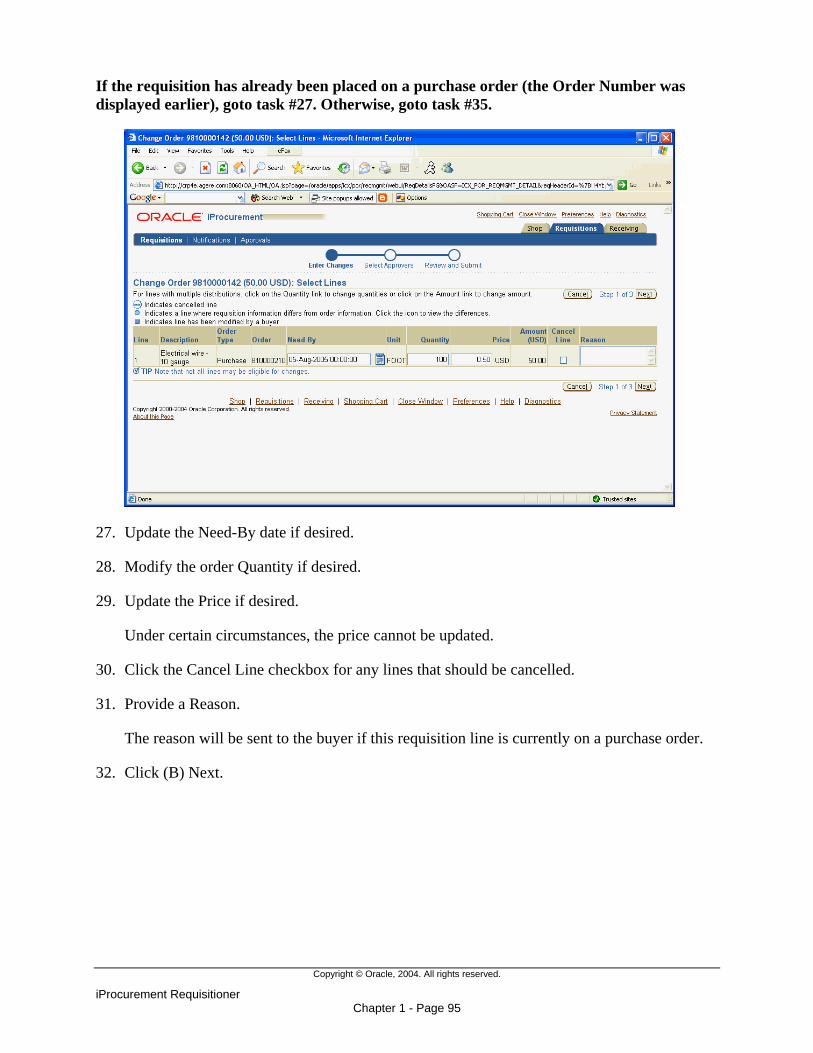
If the requisition has already been placed on a purchase order (the Order Number was displayed earlier), goto task #27. Otherwise, goto task #35.
27. Update the Need-By date if desired.
28. Modify the order Quantity if desired.
29. Update the Price if desired.
Under certain circumstances, the price cannot be updated.
30. Click the Cancel Line checkbox for any lines that should be cancelled.
31. Provide a Reason.
The reason will be sent to the buyer if this requisition line is currently on a purchase order.
32. Click (B) Next.

Copyright © Oracle, 2004. All rights reserved.
iProcurement Requisitioner Chapter 1 - Page 96
33. Review the changes.
34. Click (B) Submit.
End of activity.

Copyright © Oracle, 2004. All rights reserved.
iProcurement Requisitioner Chapter 1 - Page 97
35. Complete the requisition and make changes as necessary.
Additional information Checkout and Complete an iProcurement Requisition [../FND/@NAP2P205]
End of activity.

Copyright © Oracle, 2004. All rights reserved.
iProcurement Requisitioner Chapter 1 - Page 98

Copyright © Oracle, 2004. All rights reserved.
iProcurement Requisition Approval Flows Chapter 2 - Page 1
iProcurement Requisition Approval Flows Chapter 2

Copyright © Oracle, 2004. All rights reserved.
iProcurement Requisition Approval Flows Chapter 2 - Page 2
iProcurement Requisition Approval Flows
Section Objectives
At the end of this section, you should be able to:
• Understand iProcurement Requisition Approval Flows

Copyright © Oracle, 2004. All rights reserved.
iProcurement Requisition Approval Flows Chapter 2 - Page 3
iProcurement Requisition Approval Flows

Copyright © Oracle, 2004. All rights reserved.
iProcurement Requisition Approval Flows Chapter 2 - Page 4

Copyright © Oracle, 2004. All rights reserved.
iProcurement Requisition Approval Flows Chapter 2 - Page 5

Copyright © Oracle, 2004. All rights reserved.
iProcurement Requisition Approval Flows Chapter 2 - Page 6

Copyright © Oracle, 2004. All rights reserved.
iProcurement Requisition Approval Flows Chapter 2 - Page 7

Copyright © Oracle, 2004. All rights reserved.
iProcurement Requisition Approval Flows Chapter 2 - Page 8

Copyright © Oracle, 2004. All rights reserved.
iProcurement Approver Chapter 3 - Page 1
iProcurement Approver Chapter 3

Copyright © Oracle, 2004. All rights reserved.
iProcurement Approver Chapter 3 - Page 2
iProcurement Approver
Section Objectives
At the end of this section, you should be able to:
• Approve an iProcurement Requisition
• Vacation Handling

Copyright © Oracle, 2004. All rights reserved.
iProcurement Approver Chapter 3 - Page 3
Approve an iProcurement Requisition

Copyright © Oracle, 2004. All rights reserved.
iProcurement Approver Chapter 3 - Page 4
Approve an iProcurement Requisition
Approve an iProcurement Requisition
Start
RequisitionApprover
Approve, Reject,Forward, or Approve &Forward Requisition,as required. (1)
> Requisitions
Requisition isfor IT related goods
and/or servicesexceeding $1000
USD?
IT ApproverApprove or RejectRequisition. (2)
> Requisitions
Requisition isfor chemicals?
EH&S ApproverApprove or RejectRequisition. (3)
> Requisitions
Finance ApproverApprove, Reject,Forward, or Approve &Forward Requisition,as required. (4)
> Requisitions
End
A
A
Y
N
Y
N

Copyright © Oracle, 2004. All rights reserved.
iProcurement Approver Chapter 3 - Page 5
Approve a Requisition iProcurement
N > iProcurement > (ST) Requisitions > (ST) Approvals
Requisitions
1. Determine if approving by iProcurement.
If approving by iProcurement, goto task #22. Otherwise, goto task #2.
2. Open the workflow notification that you received by e-mail.

Copyright © Oracle, 2004. All rights reserved.
iProcurement Approver Chapter 3 - Page 6
If reviewing the full details of the requisition, goto task #3.
If approving, goto task #5.
If approving and forwarding, goto task #8.
If forwarding, goto task #12.
If rejecting, goto task #16.
If requesting additional information, goto task #19.
3. Click the View Requisition Details link.

Copyright © Oracle, 2004. All rights reserved.
iProcurement Approver Chapter 3 - Page 7
4. Log into the system if necessary by specifying your username and password and clicking (B) Login.
Goto task #24

Copyright © Oracle, 2004. All rights reserved.
iProcurement Approver Chapter 3 - Page 8
5. Click the Approve link.
Outlook will open a new e-mail.
Note that the Action has automatically populated as 'Approve'.
DO NOT modify this e-mail in any way except to place values in between any of the single quotes (') for the appropriate fields.
6. Enter a note if desired.

Copyright © Oracle, 2004. All rights reserved.
iProcurement Approver Chapter 3 - Page 9
7. Click (B) Send.
End of activity.
8. Click the Approve and Forward link.

Copyright © Oracle, 2004. All rights reserved.
iProcurement Approver Chapter 3 - Page 10
Outlook will open a new e-mail.
Note that the Action has automatically populated as 'Approve and Forward'.
DO NOT modify this e-mail in any way except to place values in between any of the single quotes (') for the appropriate fields.
9. Enter the appropriate userid for the person to whom the notification should be forwarded.
10. Enter a note if desired.
11. Click (B) Send.
End of activity.
12. Click the Forward link.
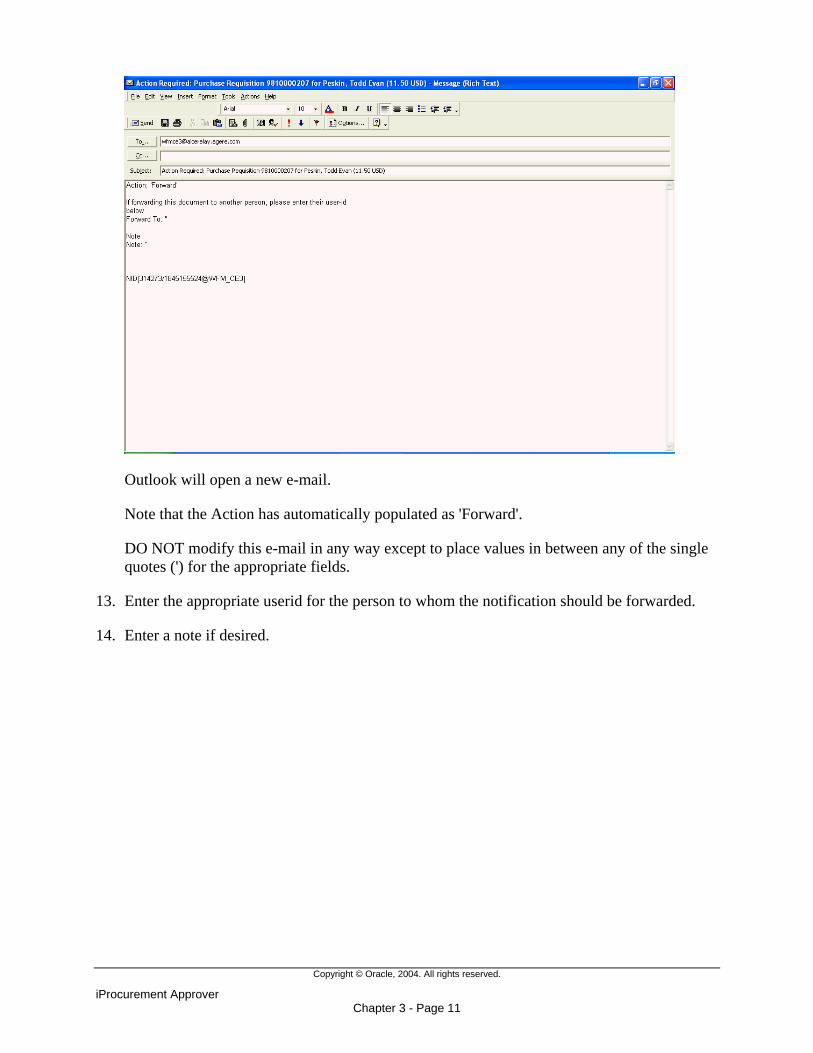
Copyright © Oracle, 2004. All rights reserved.
iProcurement Approver Chapter 3 - Page 11
Outlook will open a new e-mail.
Note that the Action has automatically populated as 'Forward'.
DO NOT modify this e-mail in any way except to place values in between any of the single quotes (') for the appropriate fields.
13. Enter the appropriate userid for the person to whom the notification should be forwarded.
14. Enter a note if desired.

Copyright © Oracle, 2004. All rights reserved.
iProcurement Approver Chapter 3 - Page 12
15. Click (B) Send.
End of activity.
16. Click the Reject link.

Copyright © Oracle, 2004. All rights reserved.
iProcurement Approver Chapter 3 - Page 13
Outlook will open a new e-mail.
Note that the Action has automatically populated as 'Reject'.
DO NOT modify this e-mail in any way except to place values in between any of the single quotes (') for the appropriate fields.
17. Enter a note if desired.
18. Click (B) Send.
End of activity.
19. Click the Request Information link.

Copyright © Oracle, 2004. All rights reserved.
iProcurement Approver Chapter 3 - Page 14
Outlook will open a new e-mail.
DO NOT modify this e-mail in any way except to place values in between any of the single quotes (') for the appropriate fields.
20. Enter an appropriate question.

Copyright © Oracle, 2004. All rights reserved.
iProcurement Approver Chapter 3 - Page 15
21. Click (B) Send.
End of activity.
22. Select Requisitions to Approve (if not already displayed) and click (B) Go.

Copyright © Oracle, 2004. All rights reserved.
iProcurement Approver Chapter 3 - Page 16
23. Click on the Requisition link for the appropriate requisition.
24. Review the requisition.
25. Click the Details icon for the full requisition line details if desired.

Copyright © Oracle, 2004. All rights reserved.
iProcurement Approver Chapter 3 - Page 17
26. Click the Show Additional Information link for the full line information.
27. Click (B) OK.
If additional lines need to be reviewed, goto task #25.

Copyright © Oracle, 2004. All rights reserved.
iProcurement Approver Chapter 3 - Page 18
If approving the requisition without specifying a note, goto task #28.
If rejecting the requisition, goto task #29.
IF entering a note; goto task #30.
28. Click (B) Approve.
End of activity.
29. Click (B) Respond.
Do NOT click (B) Reject because you will not be able to enter a note to the requestor. If you click (B) Respond, then you will be given the opportunity to enter an appropriate note when rejecting.
Goto task #31
30. Click (B) Respond.

Copyright © Oracle, 2004. All rights reserved.
iProcurement Approver Chapter 3 - Page 19
31. Enter an appropriate note if desired.
If approving, goto task #32.
If approving and forwarding to an additional user, goto task #33.

Copyright © Oracle, 2004. All rights reserved.
iProcurement Approver Chapter 3 - Page 20
If forwarding without providing your dollar level approval, goto task #35.
If rejecting, goto task #37.
If reassigning the approval notification to another user, goto task #38.
If requesting more information, goto task #43.
32. Click (B) Approve.
End of activity.
33. Specify the appropriate Forward To employee.
You may use the flashlight to search for an employee.
34. Click (B) Approve and Forward.
End of activity.
35. Specify the appropriate Forward To employee.
You may use the flashlight to search for an employee.
36. Click (B) Forward.
End of activity.
37. Click (B) Reject.
End of activity.
38. Click (B) Reassign.

Copyright © Oracle, 2004. All rights reserved.
iProcurement Approver Chapter 3 - Page 21
39. Specify the appropriate Asignee employee.
You may use the flashlight to search for an employee.
40. Select the appropriate type of reassignment. − Delegate your response allows you to delegate your approval authority to the new
approver. − Transfer notification ownership allows you to simply transfer the approval
notification to another employee. The system will use the new approver's dollar approval authority when he responds to the notification.
41. Enter comments to the new approver if desired.
42. Click (B) Submit.
End of activity.
43. Click (B) Request Information

Copyright © Oracle, 2004. All rights reserved.
iProcurement Approver Chapter 3 - Page 22
44. Select the user that you would like to contact for more information.
You can either select a workflow participant from the drop-down list or you can manually select any employee in the system by selecting the Any User radio button and specifying the employee.
45. Enter the Information Requested.
This text will be sent to the specified employee.
End of activity.

Copyright © Oracle, 2004. All rights reserved.
iProcurement Approver Chapter 3 - Page 23
Vacation Handling

Copyright © Oracle, 2004. All rights reserved.
iProcurement Approver Chapter 3 - Page 24
Vacation Handling iProcurement
N > iProcurement > (ST) Requisitions > (ST) Notifications
Requisitions: Notifications
1. Click on the Vacation Rules link.

Copyright © Oracle, 2004. All rights reserved.
iProcurement Approver Chapter 3 - Page 25
If creating a vacation handling rule, goto task #2.
If updating a rule, goto task #13.
If deleting a rule, goto task #14.
2. Click (B) Create Rule.

Copyright © Oracle, 2004. All rights reserved.
iProcurement Approver Chapter 3 - Page 26
3. Select the appropriate Item Type.
For requisition approval notifications, select an Item Type of "Requisition".
The Item Type list will contain all of the types of notifications that you have previously received in the system. You will not be able to create a vacation-handling rule for any type of notification that you have not already received at some point. If this is the case, then you can select "--All--" to forward all of your Oracle notifications to another user.
4. Click (B) Next.

Copyright © Oracle, 2004. All rights reserved.
iProcurement Approver Chapter 3 - Page 27
5. Select the appropriate Notification.
For requisition approvals, select a value of "&DOCUMENT_TYPE_DISP &DOCUMENT_NUMBER for &PREPARER_DISPLAY_NAME (&TOTAL_AMOUNT_DSP)".
The values displayed in the Notification list represent the subjects of the notifications that you receive.
6. Click (B) Next.

Copyright © Oracle, 2004. All rights reserved.
iProcurement Approver Chapter 3 - Page 28
7. Enter an appropriate Start Date and End Date.
The system will automatically begin forwarding your notifications on the start date and time entered and it will stop forwarding your notifications on the end date and time specified.
8. Enter a message for the approver if desired.
9. Click the Reassign radio button.
10. Enter an appropriate user to whom you would like your notifications forwarded.
11. Select to either Delegate your response or Transfer the notification ownership.
Delegating your response provides the new approver of this requisition with the same dollar authority as yourself.
Transfer notification ownership simply forwards the notification to the new approver. The new approver's dollar approval authority will still be their normal dollar approval authority (not yours).

Copyright © Oracle, 2004. All rights reserved.
iProcurement Approver Chapter 3 - Page 29
12. Click (B) Apply.
End of activity.
13. Click the (I) Update pencil for the appropriate rule.

Copyright © Oracle, 2004. All rights reserved.
iProcurement Approver Chapter 3 - Page 30
Goto task #7
14. Click the (D) Delete trash can for the appropriate rule.

Copyright © Oracle, 2004. All rights reserved.
iProcurement Approver Chapter 3 - Page 31
15. Click (B) Apply.
End of activity.

Copyright © Oracle, 2004. All rights reserved.
iProcurement Approver Chapter 3 - Page 32