iphone 101
TRANSCRIPT

8/3/2019 iPhone 101
http://slidepdf.com/reader/full/iphone-101 1/60
Your First iOS AppGeneral
2011-10-12

8/3/2019 iPhone 101
http://slidepdf.com/reader/full/iphone-101 2/60
Apple Inc.
© 2011 Apple Inc.
All rights reserved.
No partof this publication maybe reproduced,
stored in a retrieval system, or transmitted, in
any form or by any means, mechanical,
electronic, photocopying, recording, or
otherwise, without prior written permission of
Apple Inc., with the following exceptions: Any
person is hereby authorized to store
documentation on a single computer for
personal use only and to print copies of
documentation for personal use provided that
the documentation contains Apple’scopyright
notice.
The Apple logo is a trademark of Apple Inc.
No licenses, express or implied, are grantedwith respectto anyof thetechnology described
in this document. Apple retains all intellectual
property rights associated withthe technology
described in this document. This document is
intended to assist application developers to
develop applications only for Apple-labeled
computers.
Apple Inc.
1 Infinite Loop
Cupertino, CA 95014
408-996-1010
App Store is a service mark of Apple Inc.
Apple, the Apple logo, Cocoa, Cocoa Touch,Instruments, iPhone, iTunes, Mac, Mac OS,
Objective-C,andXcodeare trademarksof Apple
Inc., registered in the United States and other
countries.
iPad is a trademark of Apple Inc.
IOS is a trademark or registered trademark of
Ciscoin theU.S.and othercountriesand isused
under license.
Even though Apple has reviewed this document,APPLEMAKESNO WARRANTYOR REPRESENTATION,EITHER EXPRESS OR IMPLIED, WITH RESPECT TOTHIS DOCUMENT, ITS QUALITY, ACCURACY,MERCHANTABILITY, OR FITNESSFOR A PARTICULARPURPOSE. AS A RESULT, THIS DOCUMENT ISPROVIDED “AS IS,” ANDYOU,THE READER, AREASSUMING THEENTIRE RISK AS TO ITSQUALITY
AND ACCURACY.IN NO EVENT WILL APPLE BE LIABLEFOR DIRECT,INDIRECT, SPECIAL, INCIDENTAL, ORCONSEQUENTIAL DAMAGESRESULTING FROM ANYDEFECT OR INACCURACY IN THISDOCUMENT,evenif advised of the possibility of such damages.
THEWARRANTY ANDREMEDIES SETFORTH ABOVEARE EXCLUSIVEAND INLIEUOF ALLOTHERS,ORALOR WRITTEN, EXPRESS OR IMPLIED.No Appledealer, agent,or employee is authorized to make
anymodification, extension, or addition to thiswarranty.
Somestates do notallow theexclusion orlimitationof implied warranties or liability forincidental orconsequential damages,so the abovelimitation orexclusion maynot applyto you.Thiswarranty givesyouspecificlegal rights, and youmay also haveother rightswhich vary from state to state.
8/3/2019 iPhone 101
http://slidepdf.com/reader/full/iphone-101 3/60
Contents
Introduction About Creating Your First iOS App 5
At a Glance 6
Becoming Familiar with the Tools and the Design Patterns 6
Learning About the Roles of View Controllers and Views 6
Writing Code to Perform a Custom Task 6
Solving Problems and Choosing Your Next Steps 7
See Also 7
Chapter 1 Getting Started 9
Create and Test a New Project 9
Find Out How an Application Starts Up 15
Recap 20
Chapter 2 Understanding Fundamental Design Patterns 21
Cocoa Touch Provides the Frameworks You Need for iOS App Development 21
Delegation Helps You Add Functionality Without Subclassing 21
Model-View-Controller Makes Code Easier to Write and Reuse 22
The Target-Action Pattern Enables Responses to User Interactions 22
Other Design Patterns 23
Chapter 3 Inspecting the View Controller and Its View 25
Use the Inspector to Examine the View Controller 25
Change the View’s Background Color 28
Recap 31
Chapter 4 Configuring the View 33
Add the User Interface Elements 33
Create an Action for the Button 37
Create Outlets for the Text Field and the Label 40
Make the Text Field’s Delegate Connection 44
Test the Application 46
Recap 46
Chapter 5 Implementing the View Controller 47
Add a Property for the User’s Name 47
Implement the changeGreeting: Method 49
32011-10-12 | © 2011 Apple Inc. All Rights Reserved.
8/3/2019 iPhone 101
http://slidepdf.com/reader/full/iphone-101 4/60
Configure the View Controller as the Text Field’s Delegate 50
Test the Application 51
Recap 51
Chapter 6 Troubleshooting 53
Code and Compiler Warnings 53
Check the Storyboard File 53
Delegate Method Names 53
Chapter 7 Next Steps 55
Improve the User Interface 55
Install the Application on a Device 55
Add More Functionality 55
Add Unit Tests 56
Appendix A Code Listings 57
The Interface file: HelloWorldViewController.h 57
The Implementation File: HelloWorldViewController.m 57
Document Revision History 59
42011-10-12 | © 2011 Apple Inc. All Rights Reserved.
CONTENTS
8/3/2019 iPhone 101
http://slidepdf.com/reader/full/iphone-101 5/60
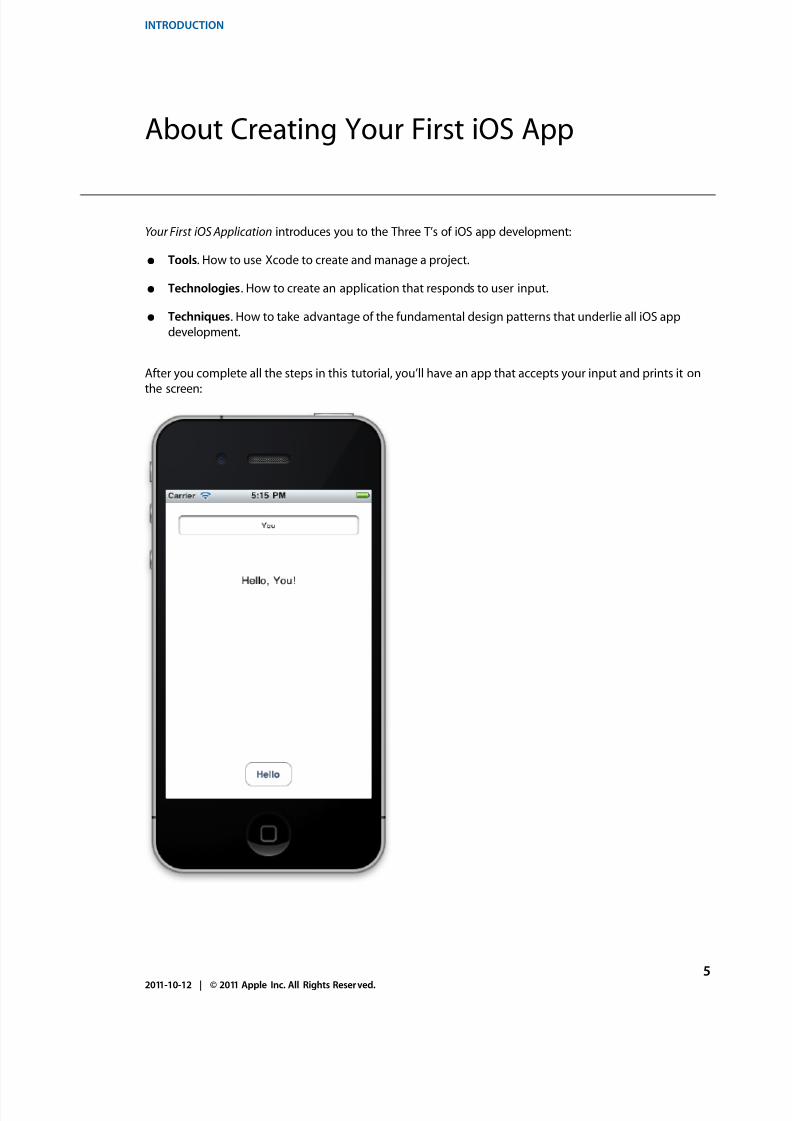
Your First iOS Application introduces you to the Three T’s of iOS app development:
● Tools. How to use Xcode to create and manage a project.
● Technologies. How to create an application that responds to user input.
● Techniques. How to take advantage of the fundamental design patterns that underlie all iOS app
development.
After you complete all the steps in this tutorial, you’ll have an app that accepts your input and prints it on
the screen:
52011-10-12 | © 2011 Apple Inc. All Rights Reserved.
INTRODUCTION
About Creating Your First iOS App
8/3/2019 iPhone 101
http://slidepdf.com/reader/full/iphone-101 6/60
To benefit from this tutorial, youmustalreadyhave some familiarity withthe basics of computer programming
in general and with the Objective-C language in particular. If you haven’t used Objective-C before, read
Learning Objective-C: A Primer before you begin this tutorial.
Note: You can use this tutorial to get started with iOS app development even if you intend to develop solely
for iPad. Although this tutorial shows the iPhone user interface, the tools and techniques you use are exactlythe same as those you use to develop iPad applications.
At a Glance
Following this tutorial helps you get started on the path to developing great iOS apps. Although the app
youcreatein this tutorial is verysimple, it willhelp yougetcomfortable with theiOSdevelopment environment
and introduce you to the powerful design patterns that characterize the best iOS apps.
Becoming Familiar with the Tools and the Design Patterns
iOS apps are developed in Xcode, Apple’s integrated development environment. Xcode includes several
developer tools and is tightly integrated with the programming frameworks you use to code your app.
As you begin coding your app, you need to learn how successful iOS apps are structured and how some key
design patterns can help you write better code.
Relevant chapters: “Getting Started” (page 9), “Understanding Fundamental Design Patterns” (page 21)
Learning About the Roles of View Controllers and Views
In an iOS app, a view is simply an onscreen area that users can see or interact with. A view object can be any
size, and it can contain other view objects, such as buttons or images. A view controller is an object that
controls one or more views. In this tutorial, you learn about the roles of different objects in your app, and
how to create connections between the view controller and the objects that you add to its view.
Relevant chapters: “Understanding Fundamental Design Patterns” (page 21), “Inspecting the ViewController
and Its View” (page 25), “Configuring the View” (page 33)
Writing Code to Perform a Custom Task
Xcode and the programming frameworks work together to provide a lot of functionality for you, but there
will always be custom tasks that an app must perform. In this tutorial, you learn how to implement a custom
task by writing a method that gets called when a button is tapped.
6 At a Glance2011-10-12 | © 2011 Apple Inc. All Rights Reserved.
INTRODUCTION
About Creating Your First iOS App

8/3/2019 iPhone 101
http://slidepdf.com/reader/full/iphone-101 7/60
Relevant chapter: “Implementing the View Controller” (page 47)
Solving Problems and Choosing Your Next Steps
As you complete the tasks in this tutorial, you might encounter problems that you don’t know how to solve.
Your First iOS Application outlines a few common errors that you can look for and it includes code listings
you can use to compare with the code in your project.
After you finish this tutorial, you should think about ways in which you can improve your app and increase
your knowledge. There are many directions in which you can go, and Xcode and the iOS programming
frameworks can help you implement just about anything you can design.
Relevant chapters: “Troubleshooting” (page 53), “Code Listings” (page 57), “Next Steps” (page 55)
See Also
Developing an iOS app is a multistep process that ranges from determining what the app should do to
submitting it to the App Store. Your First iOS Application can’t help you decide what your apps should do,
and it doesn’t describe how to submit them to the App Store, but there are many resources that can help
you accomplish these and other tasks. Some of these resources are listed here:
● To learn about the recommended approaches to designing the user interface and user experience of an
iOS app, see iOS Human Interface Guidelines.
● For comprehensive guidance on creating a full-featured iOS app, see iOS App Programming Guide.
● To learn about all the tasks you need to perform as you prepare to submit your app to the App Store,
see App Development Overview .
See Also 72011-10-12 | © 2011 Apple Inc. All Rights Reserved.
INTRODUCTION
About Creating Your First iOS App

8/3/2019 iPhone 101
http://slidepdf.com/reader/full/iphone-101 8/60
8 See Also2011-10-12 | © 2011 Apple Inc. All Rights Reserved.
INTRODUCTION
About Creating Your First iOS App
8/3/2019 iPhone 101
http://slidepdf.com/reader/full/iphone-101 9/60
To create the iOS application in this tutorial, you need Xcode 4.2. Xcode is Apple’s integrated development
environment (or IDE) for both iOS and Mac OS X development. When you install Xcode on your Mac, you
also get the iOS SDK, which includes the programming interfaces of the iOS platform.
If you don’t have Xcodeinstalled on your Mac, visit the iOSDev Center anddownload theXcode 4.2developer
toolset (which includes the iOS 5 SDK). Double-click the package and follow the installer instructions.
Create and Test a New Project
To get started developing your application, you create a new Xcode project.
To create a new project . . .
1. Open Xcode (by default it’s in /Developer/Applications).
If you’ve never created or openeda project in Xcodebefore, you shouldseea Welcometo Xcodewindow
similar to this:
Create and Test a New Project 92011-10-12 | © 2011 Apple Inc. All Rights Reserved.
CHAPTER 1
Getting Started
8/3/2019 iPhone 101
http://slidepdf.com/reader/full/iphone-101 10/60
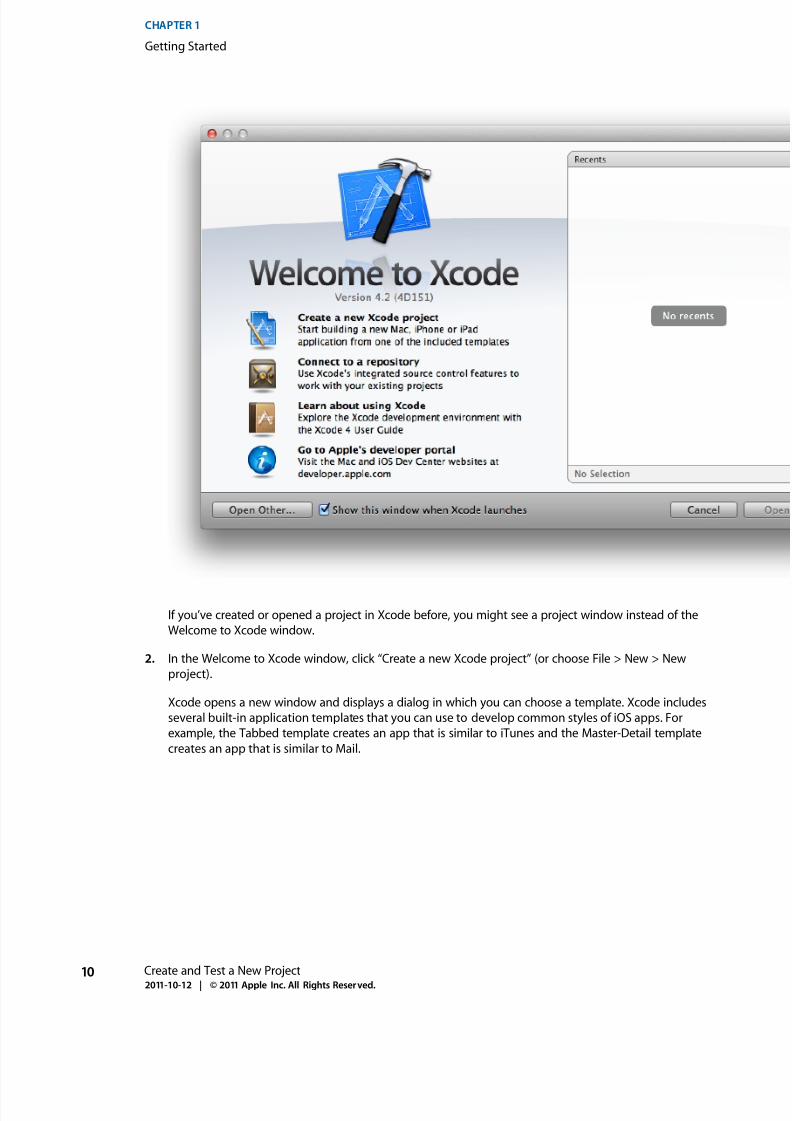
If you’ve created or opened a project in Xcode before, you might see a project window instead of the
Welcome to Xcode window.
2. In the Welcome to Xcode window, click “Create a new Xcode project” (or choose File > New > New
project).
Xcode opens a new window and displays a dialog in which you can choose a template. Xcode includes
several built-in application templates that you can use to develop common styles of iOS apps. For
example, the Tabbed template creates an app that is similar to iTunes and the Master-Detail template
creates an app that is similar to Mail.
10 Create and Test a New Project2011-10-12 | © 2011 Apple Inc. All Rights Reserved.
CHAPTER 1
Getting Started
8/3/2019 iPhone 101
http://slidepdf.com/reader/full/iphone-101 11/60
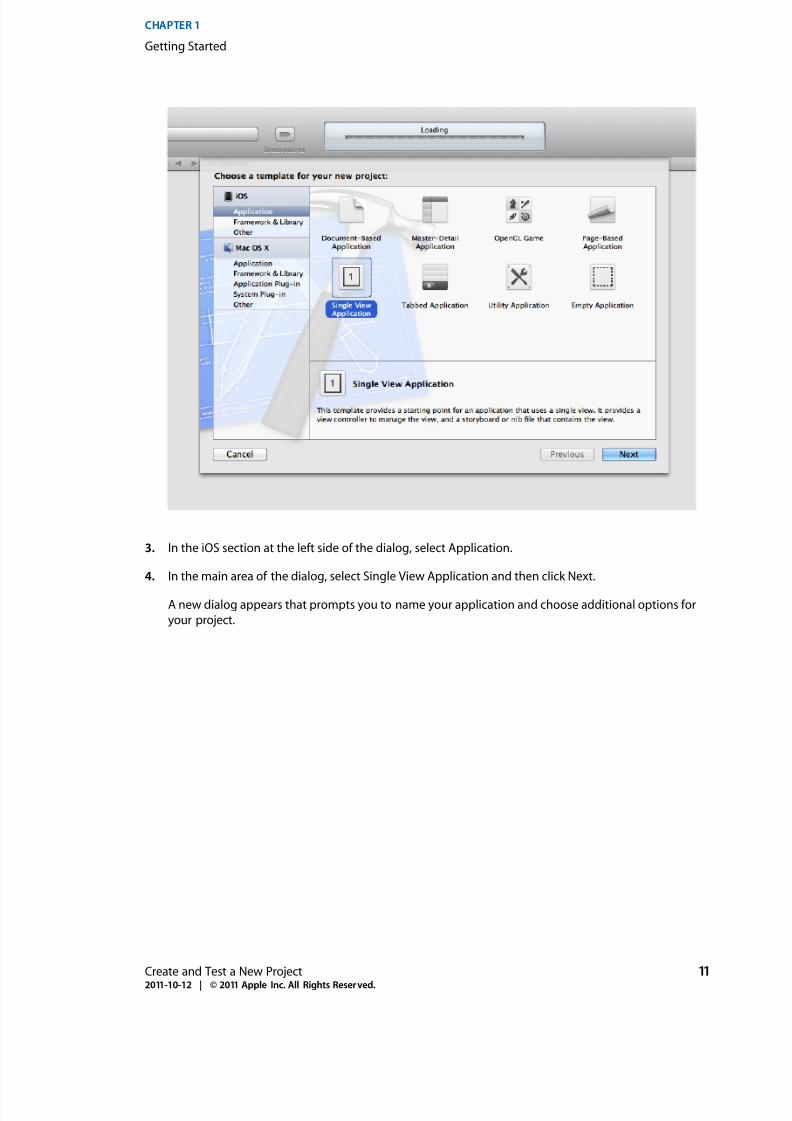
3. In the iOS section at the left side of the dialog, select Application.
4. In the main area of the dialog, select Single View Application and then click Next.
A new dialog appears that prompts you to name your application and choose additional options for
your project.
Create and Test a New Project 112011-10-12 | © 2011 Apple Inc. All Rights Reserved.
CHAPTER 1
Getting Started

8/3/2019 iPhone 101
http://slidepdf.com/reader/full/iphone-101 12/60
5. Fill in the Product Name, Company Identifier, and Class Prefix fields.
You can use the following values:
● Product Name: HelloWorld
● Company Identifier: Your company identifier, if you have one. If you don’t have a company identifier,
you can use edu.self.
● Class Prefix: HelloWorld
Note: Xcode uses the product name you entered to name your project and the application. Xcode uses
the classprefix name you entered to name the classes it creates for you. For example, Xcode automatically
creates an application delegate class and names it HelloWorldAppDelegate. If you enter a different
valuefor the class prefix, then theapplication delegate class is named YourClassPrefixNameAppDelegate.
To keep things simple, this tutorial assumes that you named your product HelloWorld and that you
used HelloWorld for the class prefix value.
6. In the Device Family pop-up menu, make sure that iPhone is selected.
7. Make sure that the Use Storyboard and Use Automatic Reference Counting options are selected and
that the Include Unit Tests option is unselected (these are the default values).
12 Create and Test a New Project2011-10-12 | © 2011 Apple Inc. All Rights Reserved.
CHAPTER 1
Getting Started
8/3/2019 iPhone 101
http://slidepdf.com/reader/full/iphone-101 13/60
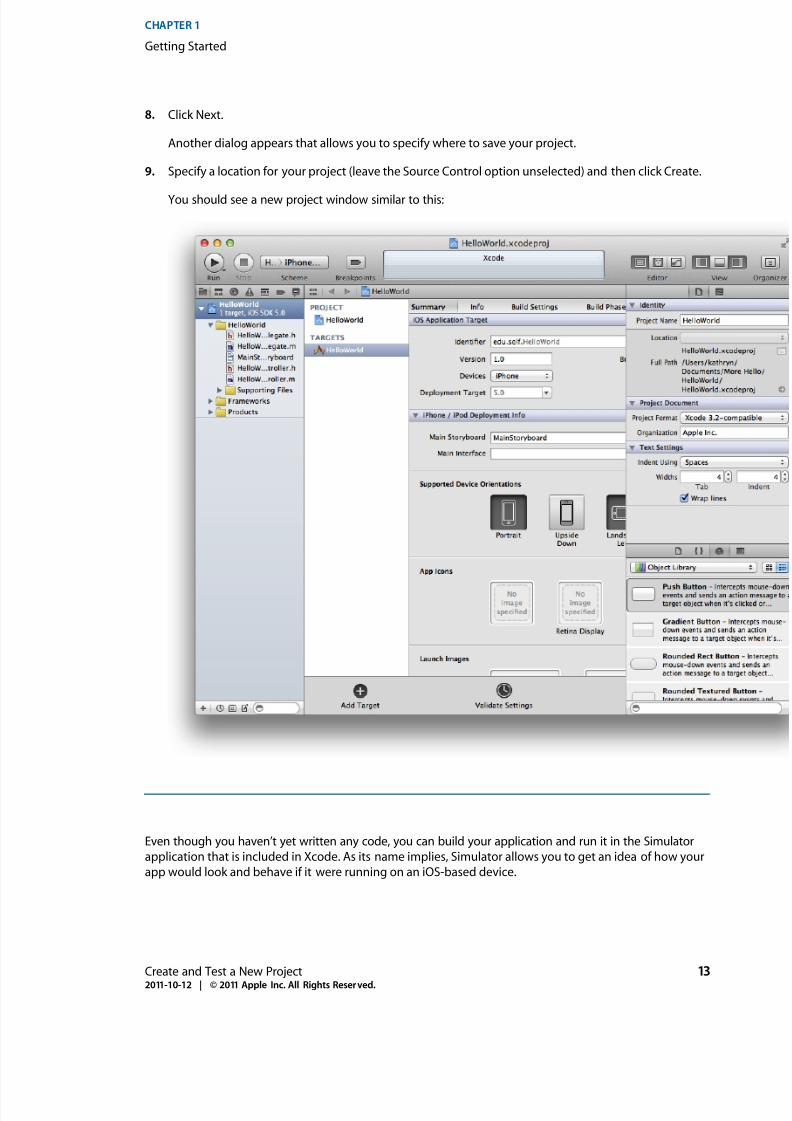
8. Click Next.
Another dialog appears that allows you to specify where to save your project.
9. Specify a location for your project (leave the Source Control option unselected) and then click Create.
You should see a new project window similar to this:
Even though you haven’t yet written any code, you can build your application and run it in the Simulator
application that is included in Xcode. As its name implies, Simulator allows you to get an idea of how your
app would look and behave if it were running on an iOS-based device.
Create and Test a New Project 132011-10-12 | © 2011 Apple Inc. All Rights Reserved.
CHAPTER 1
Getting Started

8/3/2019 iPhone 101
http://slidepdf.com/reader/full/iphone-101 14/60
To run your application in Simulator . . .
1. Make sure that the Scheme pop-up menu in the Xcode toolbar has HelloWorld > iPhone 5.0 Simulator
chosen.
If the pop-up menu does not display that choice, open it and choose iPhone 5.0 Simulator from the
menu.
2. Click the Run button in the toolbar (or choose Product > Run).
Xcode displays various messages that update you on the build process.
After Xcode finishes building your project, Simulator should start automatically. Because you specified an
iPhone product (as opposed to an iPad product), Simulator displays a window that looks like an iPhone. On
the simulated iPhone screen, Simulator opens your application, which should look like this:
14 Create and Test a New Project2011-10-12 | © 2011 Apple Inc. All Rights Reserved.
CHAPTER 1
Getting Started
8/3/2019 iPhone 101
http://slidepdf.com/reader/full/iphone-101 15/60
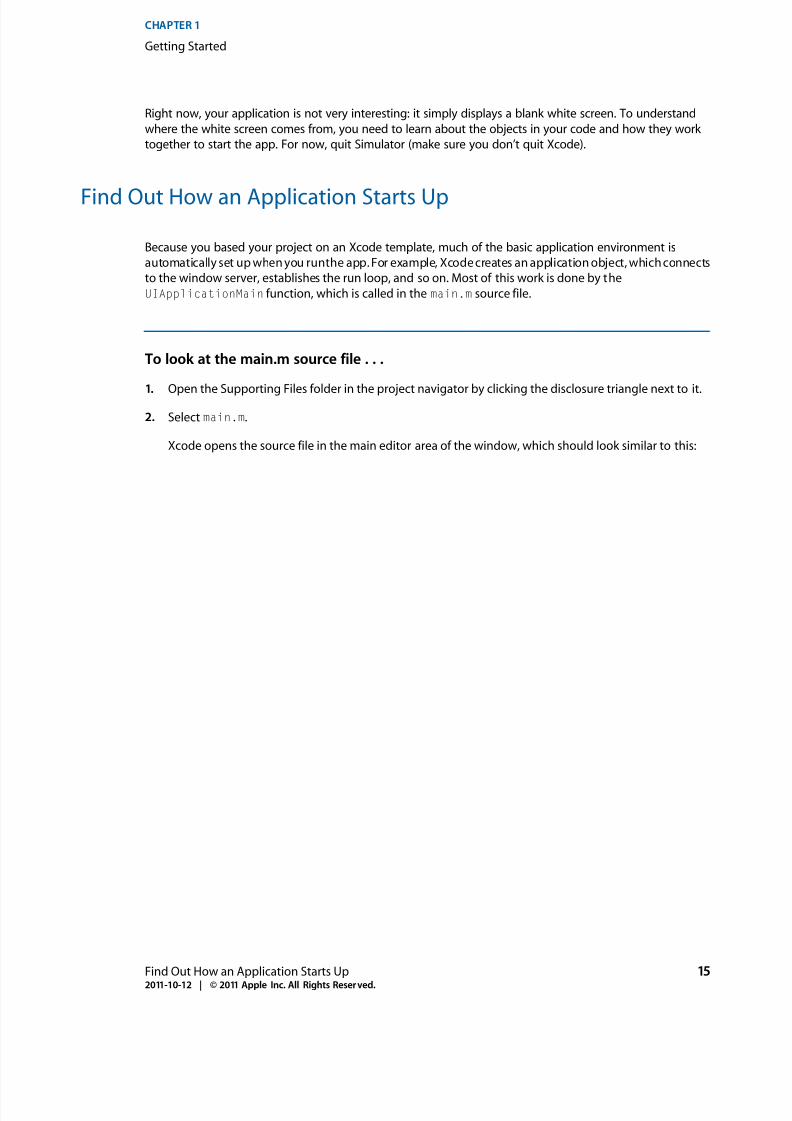
Right now, your application is not very interesting: it simply displays a blank white screen. To understand
where the white screen comes from, you need to learn about the objects in your code and how they work
together to start the app. For now, quit Simulator (make sure you don’t quit Xcode).
Find Out How an Application Starts Up
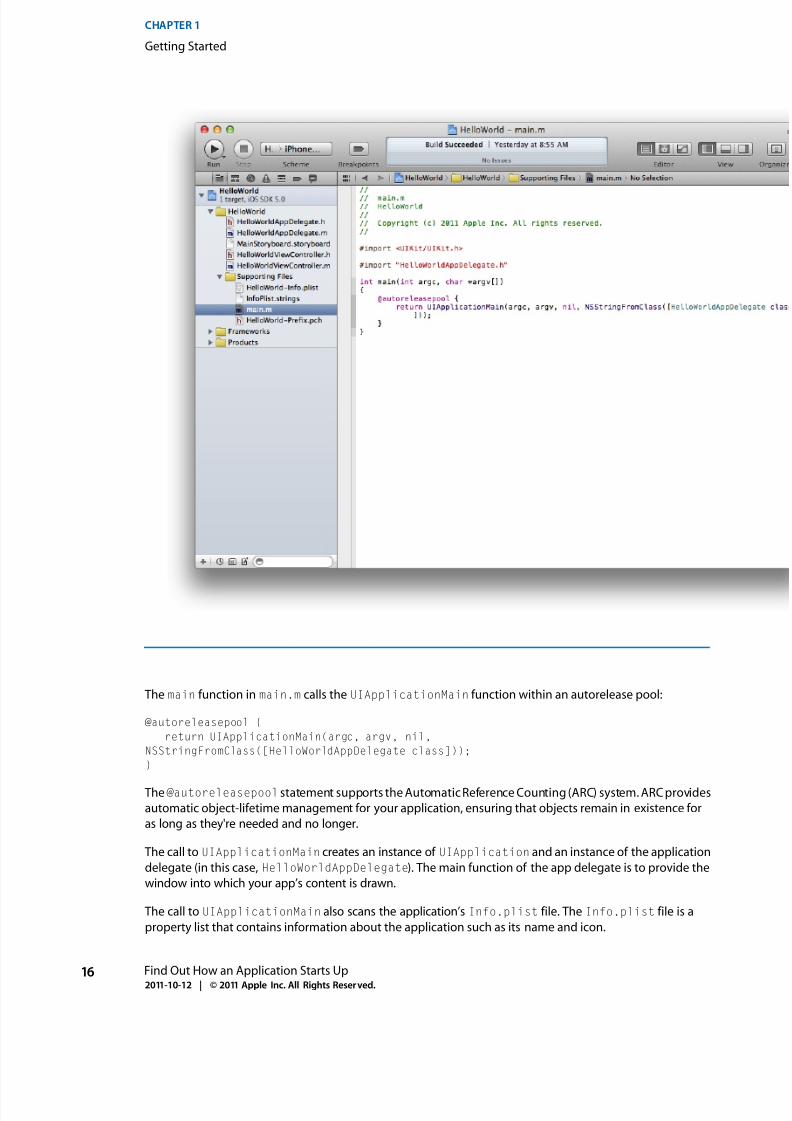
Because you based your project on an Xcode template, much of the basic application environment is
automatically set up when you runthe app.For example, Xcodecreates an application object, whichconnects
to the window server, establishes the run loop, and so on. Most of this work is done by the
UIApplicationMain function, which is called in the main.m source file.
To look at the main.m source file . . .
1. Open the Supporting Files folder in the project navigator by clicking the disclosure triangle next to it.
2. Select main.m.
Xcode opens the source file in the main editor area of the window, which should look similar to this:
Find Out How an Application Starts Up 152011-10-12 | © 2011 Apple Inc. All Rights Reserved.
CHAPTER 1
Getting Started
8/3/2019 iPhone 101
http://slidepdf.com/reader/full/iphone-101 16/60
The main function in main.m calls the UIApplicationMain function within an autorelease pool:
@autoreleasepool {
return UIApplicationMain(argc, argv, nil,
NSStringFromClass([HelloWorldAppDelegate class]));
}
The@autoreleasepool statement supports the AutomaticReference Counting (ARC) system. ARCprovides
automatic object-lifetime management for your application, ensuring that objects remain in existence for
as long as they're needed and no longer.
The call to UIApplicationMain creates an instance of UIApplication and an instance of the application
delegate (in this case, HelloWorldAppDelegate). The main function of the app delegate is to provide the
window into which your app’s content is drawn.
The call to UIApplicationMain also scans the application’s Info.plist file. The Info.plist file is a
property list that contains information about the application such as its name and icon.
16 Find Out How an Application Starts Up2011-10-12 | © 2011 Apple Inc. All Rights Reserved.
CHAPTER 1
Getting Started

8/3/2019 iPhone 101
http://slidepdf.com/reader/full/iphone-101 17/60
To look at the property list file . . .
● In the Supporting Files folder in the project navigator, select HelloWorld-Info.plist.
Xcode opens the Info.plist file in the main editor area of the window, which should look similar tothis:
Because you chose to use a storyboard in this project, the Info.plist file also contains the name of thestoryboard file that the application object should load. A storyboard file contains an archive of the objects,
transitions, and connections that define an application’s user interface.
To minimize distractions, close the Supporting Files folder in the project navigator by again clicking the
disclosure triangle next to it.
In this application, thestoryboard file is namedMainStoryboard.storyboard (note that theInfo.plist
file shows only the first part of this name). When the app starts, the MainStoryboard.storyboard file is
loaded and the initial view controller is instantiated from it.
Find Out How an Application Starts Up 172011-10-12 | © 2011 Apple Inc. All Rights Reserved.
CHAPTER 1
Getting Started
8/3/2019 iPhone 101
http://slidepdf.com/reader/full/iphone-101 18/60
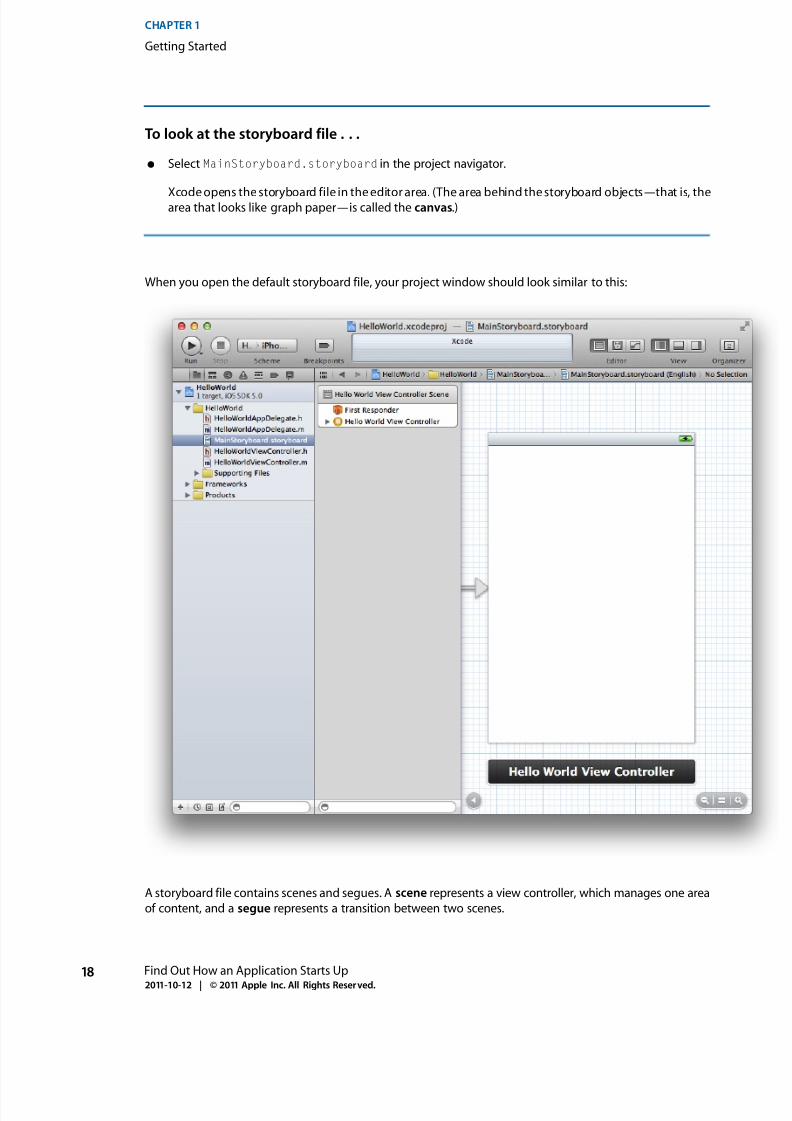
To look at the storyboard file . . .
● Select MainStoryboard.storyboard in the project navigator.
Xcode opens the storyboard file in the editor area. (The area behind the storyboard objects—that is, thearea that looks like graph paper—is called the canvas.)
When you open the default storyboard file, your project window should look similar to this:
A storyboard file contains scenes and segues. A scene represents a view controller, which manages one area
of content, and a segue represents a transition between two scenes.
18 Find Out How an Application Starts Up2011-10-12 | © 2011 Apple Inc. All Rights Reserved.
CHAPTER 1
Getting Started

8/3/2019 iPhone 101
http://slidepdf.com/reader/full/iphone-101 19/60
Because the Single View template provides only one area of content which occupies the entire screen, the
MainStoryboard file in your app contains only one scene and no segues. (The arrow that points to the left
side of the scene on the canvas is the initial scene indicator, which identifies the initial scene in an app.)
The scene that you see on the canvas is named Hello World View Controller Scene because it is managed by
theHelloWorldViewControllerobject in your application.TheHello World ViewController scene consists
of a few items that are displayed in the Xcode outline view (which is the pane that appears between the
canvas and the project navigator):
● A first responder placeholder object (represented by an orange cube).
The first responder is a dynamic placeholder that represents the responder object that first receives
events such as keyboard events, motion events, and action messages (you’ll learn more about action
messages in “The Target-Action Pattern Enables Responses to User Interactions” (page 22)). You won’t
be doing anything with the first responder in this tutorial, but you can learn more about it in Event
Handling Guide for iOS.
● The HelloWorldViewController object (represented by a pale rectangle inside a yellow sphere).
When a scene in a storyboardfile is loaded, it creates an instance of the view controller class that managesit.
● A view (which is listed below the view controller—you might have to open the disclosure triangle next
to HelloWorldViewController to reveal it).
The white background of this view is what you saw when you ran the application in Simulator.
Note: The area below the scene on the canvas is called the scene dock . Right now, it displays the view
controller’s name (that is, Hello World View Controller). At other times, the scene dock can contain the icons
that represent the first responder and the view controller object.
During setup, the application object performs the following tasks:
● Loads the main storyboard file.
● Gets the window object from the app delegate (or creates a new instance of UIWindow and associates
it with the app delegate).
● Instantiates the storyboard’s initial view controller and assigns it as the window object’s root view
controller.
When the application object has completed these tasks, it sends its delegate an
application:didFinishLaunchingWithOptions:message. This message gives the delegate an
opportunity to perform other tasks, such as additional configuration, before the application is displayed.
In this tutorial, the application delegate is provided by the Single View template and it’s called
HelloWorldAppDelegate. You will not be changing the default app delegate class in this project, but you
will be using delegation in a later step. You can learn more about delegation in “Delegation Helps You Add
Functionality Without Subclassing” (page 21).
Find Out How an Application Starts Up 192011-10-12 | © 2011 Apple Inc. All Rights Reserved.
CHAPTER 1
Getting Started

8/3/2019 iPhone 101
http://slidepdf.com/reader/full/iphone-101 20/60
Recap
In this chapter you used Xcode to create a new project based on the Single View template. Then, you built
and ran the default application that the template defines. You also looked at some of the basic pieces of the
project, such as the main.m source file, the Info.plist file, and the storyboard file, and learned how anapplication starts up. In the next chapter, you’ll learn about the design patterns that pervade iOS application
development and how they apply to your app.
20 Recap2011-10-12 | © 2011 Apple Inc. All Rights Reserved.
CHAPTER 1
Getting Started
8/3/2019 iPhone 101
http://slidepdf.com/reader/full/iphone-101 21/60
Before you start customizing your app, take a moment to learn about the programming environment you’re
working in and the design patterns that characterize great iOS applications. You can complete the tutorial
without reading this chapter, but if you allow some time to read and think about the concepts it describes,
you’ll have a much better understanding of iOS app development.
Cocoa Touch Provides the Frameworks You Need for iOS AppDevelopment
Cocoa Touch is the application environment for all iOS apps (Cocoa provides the application environment
for Mac OS X apps). As you develop apps for iOS, including the app in this tutorial, you’ll rely on the
object-oriented frameworksthatCocoa Touch provides. In particular, you’ll use the application programming
interfaces (APIs) of the UIKit framework, which provides all the classes that an app needs to construct and
manage its user interface.
There are several resources that can help you gain a deeper understanding of Cocoa Touch (and Cocoa). A
good place to start is Cocoa Fundamentals Guide.
Delegation Helps You Add Functionality Without Subclassing
Delegation is a design pattern in which one object sends messages to another object that hasbeen specified
as its delegate, to ask for input or to notify the delegate that an event is occurring. The delegate object
responds to these messages in a custom way. Delegation is a common design pattern in Cocoa Touch apps
because it allows you to provide custom behavior without having to subclass and override the methods of
a complex framework object, such as UIApplication.
Delegate methods aretypically grouped together into a protocol.A protocol is basically just a list of methods.
If a class conforms to (or adopts) a protocol, it guarantees that it implements the required methods of a
protocol. (Protocols can also include optional methods.) A delegate protocol specifies all the messages an
object might send to its delegate. For example, the UIApplicationDelegate protocol specifies all the
messages that the UIApplication object might send to its delegate, such as
application:didFinishLaunchingWithOptions. To learn more about protocols and the role they playin Objective-C, see “Protocols”.
The application in this tutorial uses delegation in two ways:
● Every iOS app must have an application delegate object; in this app, it’s an instance of the
HelloWorldAppDelegate class that’s provided by the Single View template.
Cocoa Touch Provides the Frameworks You Need for iOS App Development 212011-10-12 | © 2011 Apple Inc. All Rights Reserved.
CHAPTER 2
Understanding Fundamental Design Patterns

8/3/2019 iPhone 101
http://slidepdf.com/reader/full/iphone-101 22/60
In addition to performing custom configuration tasks, the app delegate can handle application-level
events because it participates in the responder chain. In this tutorial, you do not have to performcustom
configuration tasks or explicitly handle app-level events, so you do not need to make any changes to
the HelloWorldAppDelegate source files.
● The text field that you’ll be adding later needs to tell its delegate when the user is finished typing.
To help accomplish this, youensure that theview controller object (that is,HelloWorldViewController)
conforms to the UITextFieldDelegate protocol.
Model-View-Controller Makes Code Easier to Write and Reuse
The Model-View-Controller (MVC) design pattern defines three roles for objects in an application.
Model objects represent data, such as space ship objects in a game, to-do items in a calendar app, or shapes
in a drawing app.
In this application, the model object is very simple—it’s just a string that holds the name the user enters.
Because this string is used in only one method, it’s not strictly necessary to identify it as a model object, but
treating it as such helps you become comfortable with the MVC design pattern.
View objects know how to display data (represented by model objects) and can allow the user to edit the
data.
In this application, you need a main view to contain three other views: A text field to get input from the user,
a label to display the text the user entered, and a button the user taps to see their input in the label.
Controller objects mediate between models and views.
In this application, the view controller object takes the data from the input text field (a view), stores it in a
string (the model), and updates the label (another view). The update is initiated as a result of an action
message sent by the button.
The Target-Action Pattern Enables Responses to User Interactions
The target-actionmechanismallows a control object, such as a button, to send to another object a meaningful
message in response to a user-initiated event, such as a tap. For example, consider an app that stores the
user’s contacts: When the user taps an Add Contact button, the button sends an “add contact” message (the
action) to a custom application object (the target ) that knows how to add the contact to the contact list.
In this application, when the button is tapped, it sends an action message to the controller (the target) that
tells it to update its model and view based on the user’s input.
22 Model-View-Controller Makes Code Easier to Write and Reuse2011-10-12 | © 2011 Apple Inc. All Rights Reserved.
CHAPTER 2
Understanding Fundamental Design Patterns

8/3/2019 iPhone 101
http://slidepdf.com/reader/full/iphone-101 23/60
Other Design Patterns
Cocoa Touch makes pervasive use of a number of other design patterns in addition to delegation, MVC, and
target-action. Later, when you’ve finished this tutorial, you should learn about these patterns so that you
can employ them as you develop more complicated apps. You can get a great overview of Cocoa designpatterns in “Cocoa Design Patterns”.
Understanding Cocoa design patterns makes it easier for you to use the various technologies Cocoa Touch
provides, and to transfer the skills you learn in one area to another. Following the patterns also means that
your code is betterable to takeadvantageof enhancements to theapplication frameworks in futurereleases.
Other Design Patterns 232011-10-12 | © 2011 Apple Inc. All Rights Reserved.
CHAPTER 2
Understanding Fundamental Design Patterns

8/3/2019 iPhone 101
http://slidepdf.com/reader/full/iphone-101 24/60
24 Other Design Patterns2011-10-12 | © 2011 Apple Inc. All Rights Reserved.
CHAPTER 2
Understanding Fundamental Design Patterns
8/3/2019 iPhone 101
http://slidepdf.com/reader/full/iphone-101 25/60
As you learned earlier, a view controller is responsible for managing one scene, which represents one area
of content. The content that you see in this area is defined in the view controller’s view. In this chapter, you
take a closer look at your view controller and learn how to adjust the background color of the view.
Use the Inspector to Examine the View Controller
When an app starts up, the main storyboard file is loaded and the initial view controller is instantiated. The
initial view controller manages the first scene that users see when they open the app. Because the Single
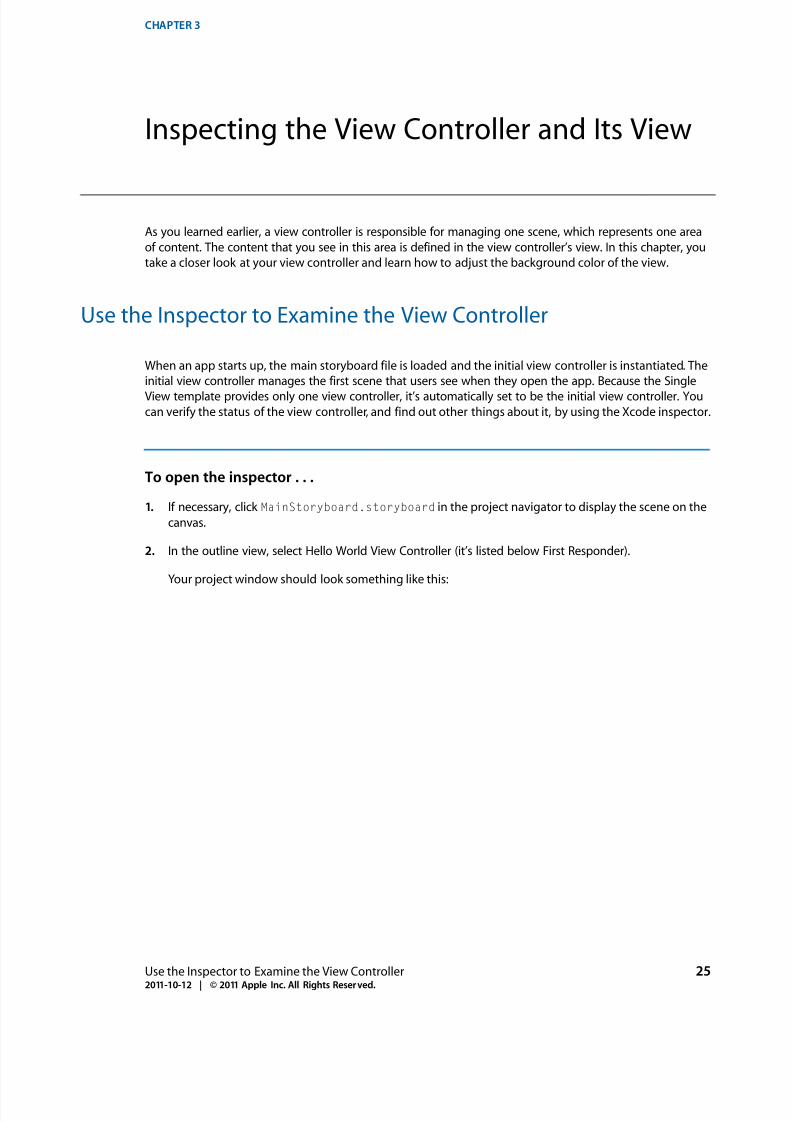
View template provides only one view controller, it’s automatically set to be the initial view controller. Youcan verify the status of the view controller, and find out other things about it, by using the Xcode inspector.
To open the inspector . . .
1. If necessary, click MainStoryboard.storyboard in the project navigator to display the scene on the
canvas.
2. In the outline view, select Hello World View Controller (it’s listed below First Responder).
Your project window should look something like this:
Use the Inspector to Examine the View Controller 252011-10-12 | © 2011 Apple Inc. All Rights Reserved.
CHAPTER 3
Inspecting the View Controller and Its View
8/3/2019 iPhone 101
http://slidepdf.com/reader/full/iphone-101 26/60
Note that the scene and the scene dock are both outlined in blue, and the view controller object is
selected in the scene dock.
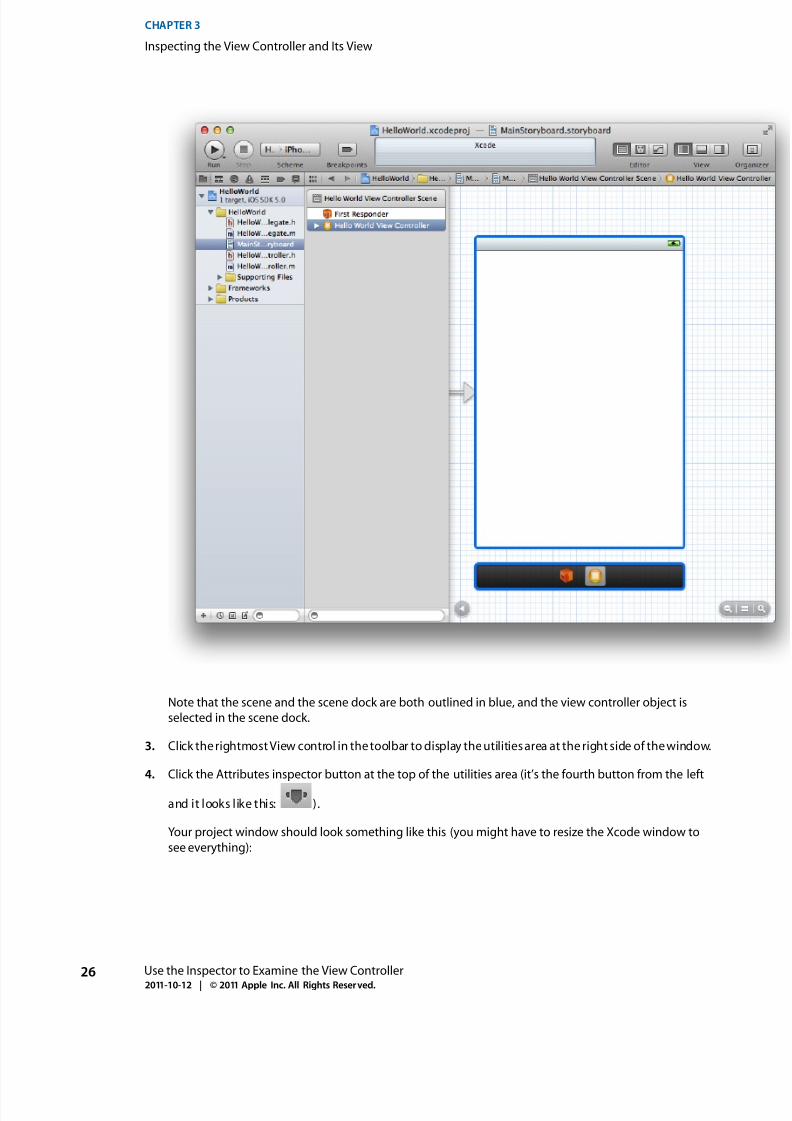
3. Click therightmostView control in thetoolbar to display theutilitiesarea at the right side of thewindow.
4. Click the Attributes inspector button at the top of the utilities area (it’s the fourth button from the left
and it looks like this: ).
Your project window should look something like this (you might have to resize the Xcode window to
see everything):
26 Use the Inspector to Examine the View Controller2011-10-12 | © 2011 Apple Inc. All Rights Reserved.
CHAPTER 3
Inspecting the View Controller and Its View
8/3/2019 iPhone 101
http://slidepdf.com/reader/full/iphone-101 27/60
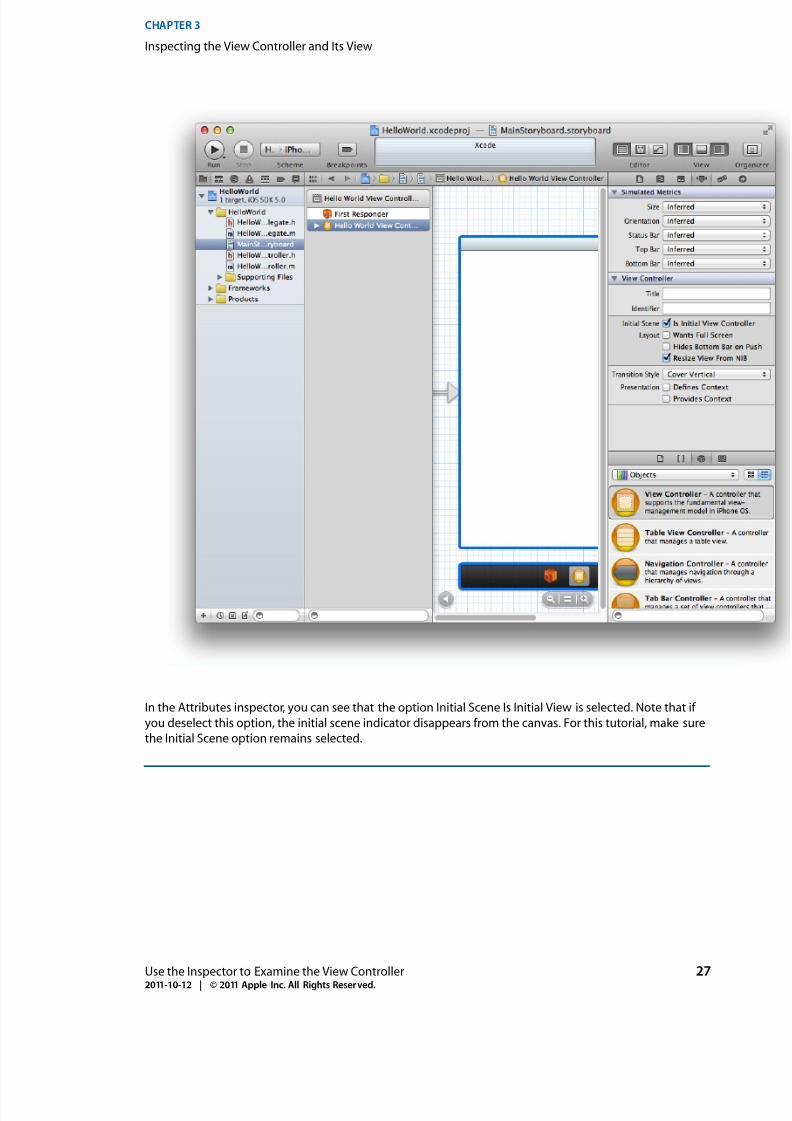
In the Attributes inspector, you can see that the option Initial Scene Is Initial View is selected. Note that if
you deselect this option, the initial scene indicator disappears from the canvas. For this tutorial, make sure
the Initial Scene option remains selected.
Use the Inspector to Examine the View Controller 272011-10-12 | © 2011 Apple Inc. All Rights Reserved.
CHAPTER 3
Inspecting the View Controller and Its View
8/3/2019 iPhone 101
http://slidepdf.com/reader/full/iphone-101 28/60
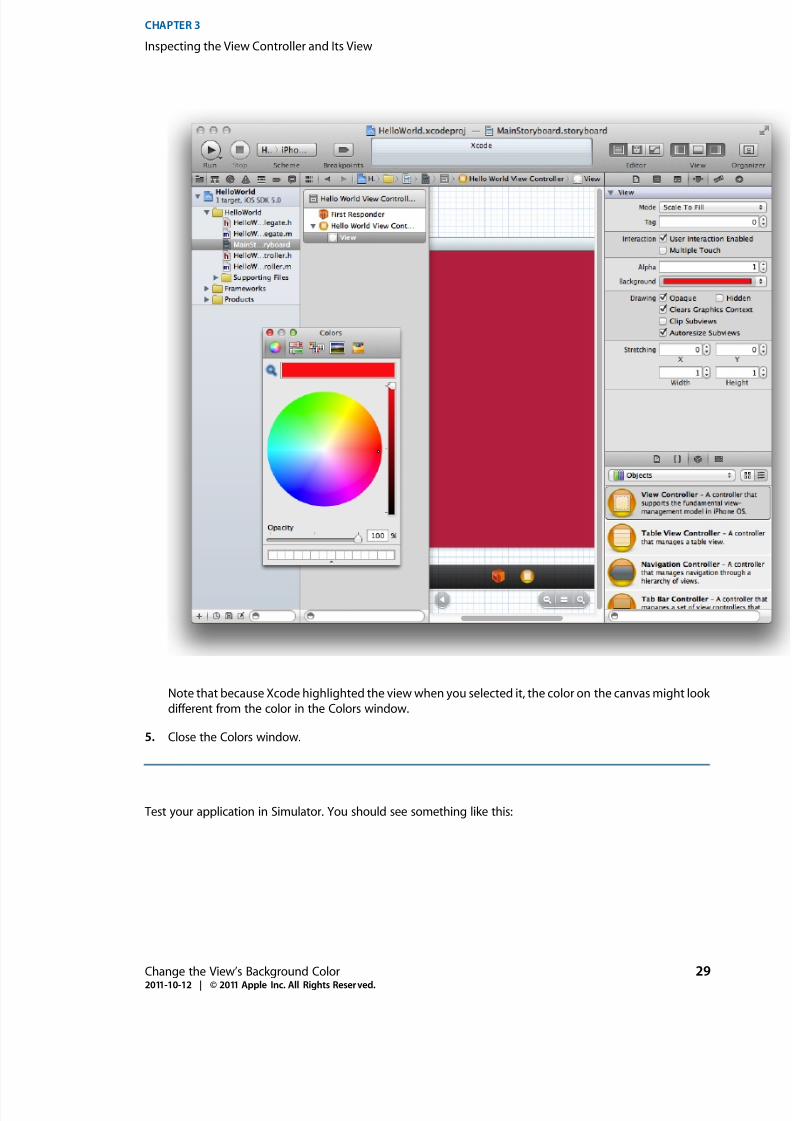
Change the View’s Background Color
In “Find Out How an Application Starts” (page 15), you learned that a view provides the white background
that you saw when you ran the app in Simulator. To make sure that your application is working correctly,
you can set the background color of the view to something other than white and verify that the new coloris displayed by again running the app in Simulator. Before you change the background of the view, make
sure that the main storyboard file is still open on the canvas.
To set the background color of the view controller’s view . . .
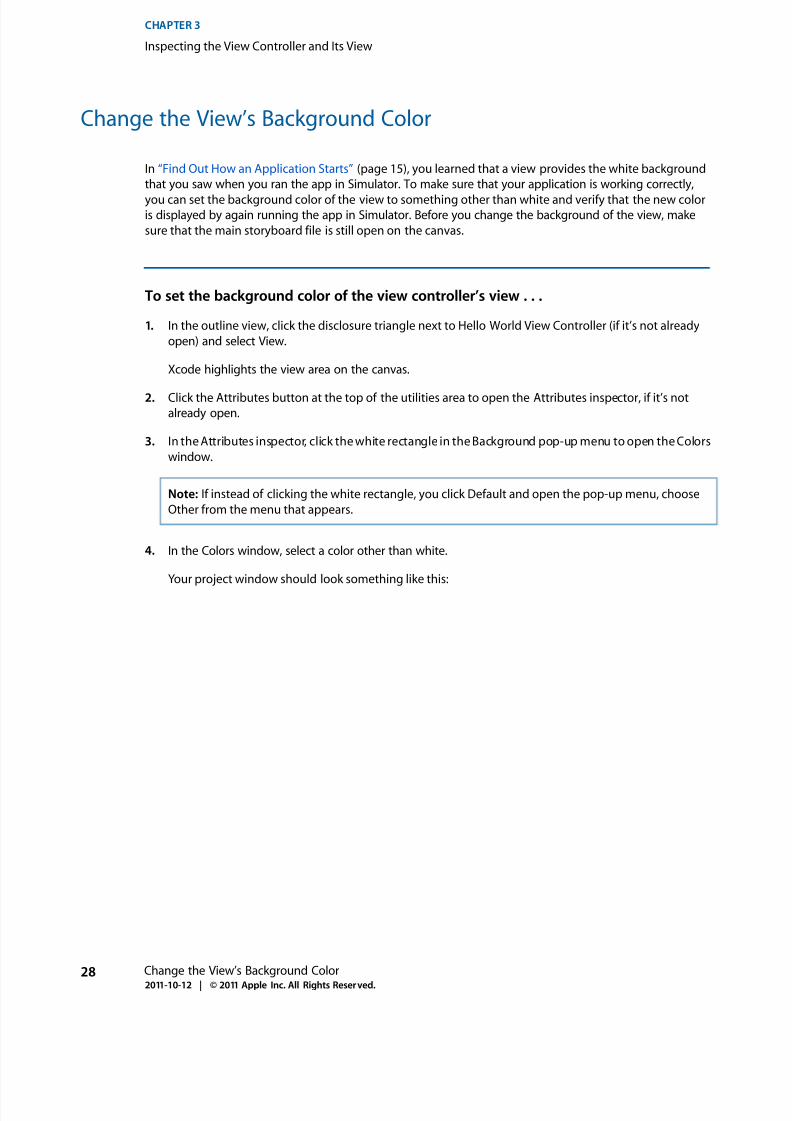
1. In the outline view, click the disclosure triangle next to Hello World View Controller (if it’s not already
open) and select View.
Xcode highlights the view area on the canvas.
2. Click the Attributes button at the top of the utilities area to open the Attributes inspector, if it’s notalready open.
3. In the Attributes inspector, click the white rectangle in the Background pop-up menu to open the Colors
window.
Note: If instead of clicking the white rectangle, you click Default and open the pop-up menu, choose
Other from the menu that appears.
4. In the Colors window, select a color other than white.
Your project window should look something like this:
28 Change the View’s Background Color2011-10-12 | © 2011 Apple Inc. All Rights Reserved.
CHAPTER 3
Inspecting the View Controller and Its View
8/3/2019 iPhone 101
http://slidepdf.com/reader/full/iphone-101 29/60
Note that because Xcode highlighted the view when you selected it, the color on the canvas might look
different from the color in the Colors window.
5. Close the Colors window.
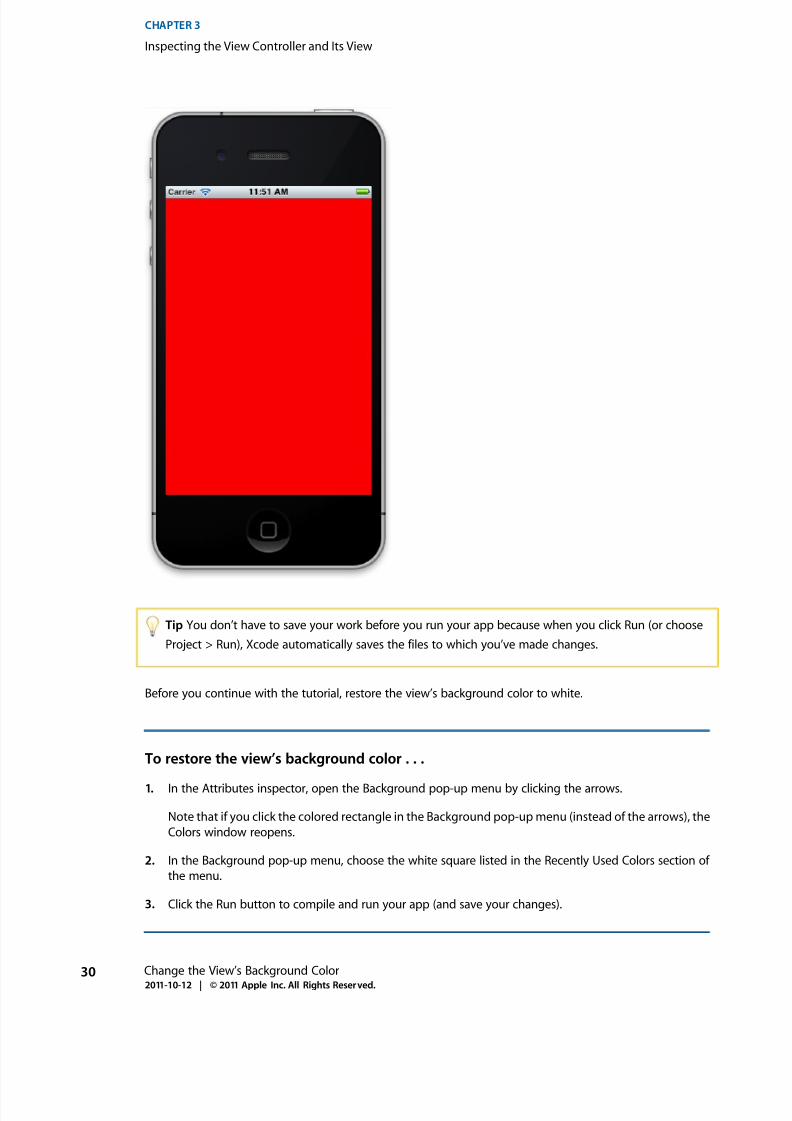
Test your application in Simulator. You should see something like this:
Change the View’s Background Color 292011-10-12 | © 2011 Apple Inc. All Rights Reserved.
CHAPTER 3
Inspecting the View Controller and Its View
8/3/2019 iPhone 101
http://slidepdf.com/reader/full/iphone-101 30/60
Tip You don’t have to save your work before you run your app because when you click Run (or choose
Project > Run), Xcode automatically saves the files to which you’ve made changes.
Before you continue with the tutorial, restore the view’s background color to white.
To restore the view’s background color . . .
1. In the Attributes inspector, open the Background pop-up menu by clicking the arrows.
Note that if you click the colored rectangle in the Background pop-up menu (instead of the arrows), the
Colors window reopens.
2. In the Background pop-up menu, choose the white square listed in the Recently Used Colors section of
the menu.
3. Click the Run button to compile and run your app (and save your changes).
30 Change the View’s Background Color2011-10-12 | © 2011 Apple Inc. All Rights Reserved.
CHAPTER 3
Inspecting the View Controller and Its View

8/3/2019 iPhone 101
http://slidepdf.com/reader/full/iphone-101 31/60
After you’ve verified that your app again displays a white background, quit Simulator.
When you run your app, Xcode might open the Debug area at the bottom of the project window. You won’t
use this pane in this tutorial, so you can close it to make more room in your window.
To close the Debug area . . .
● Click the Debug View button in the toolbar.
The Debug View button is the middle View button and it looks like this: .
Recap
In this chapter, you inspected the scene and changed (and restored) the background color of the view.
In the next chapter, you add controls to the view.
Recap 312011-10-12 | © 2011 Apple Inc. All Rights Reserved.
CHAPTER 3
Inspecting the View Controller and Its View

8/3/2019 iPhone 101
http://slidepdf.com/reader/full/iphone-101 32/60
32 Recap2011-10-12 | © 2011 Apple Inc. All Rights Reserved.
CHAPTER 3
Inspecting the View Controller and Its View

8/3/2019 iPhone 101
http://slidepdf.com/reader/full/iphone-101 33/60
Xcode provides a library of objects that you can add to a storyboard file. Some of these are user interface
elements that belong in a view, such as buttons and text fields; others are higher level objects, such as view
controllers and gesture recognizers.
Your Hello World View Controller scene already contains a view—now you need to add a button, a label,
and a text field. Then, you make connections between these elements and the view controller class so that
the elements provide the behavior you want.
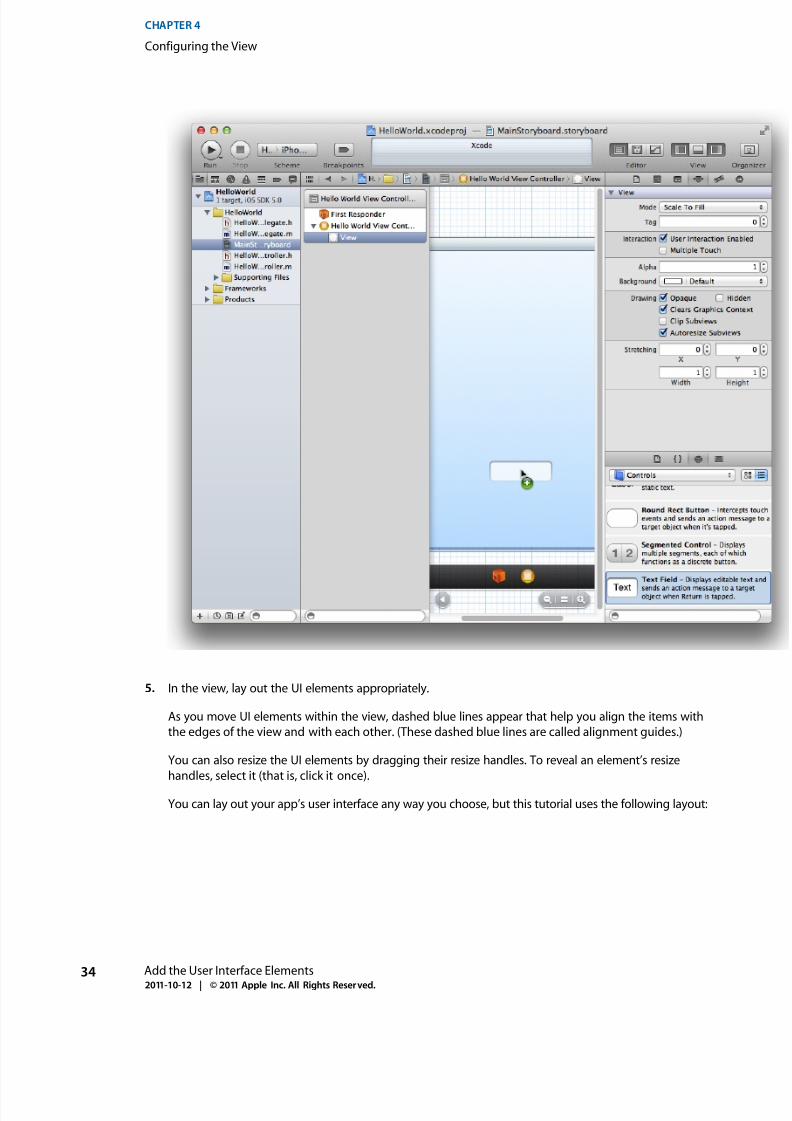
Add the User Interface Elements
You add user interface (UI) elements by dragging them from the object library to a view on the canvas. After
the UI elements are in a view, you can move and resize them as appropriate.
To add the UI elements to the view and lay them out appropriately . . .
1. If necessary, select MainStoryboard.storyboard in the project navigator to display the scene on the
canvas.
2. If necessary, open the object library.
The object library appears at the bottom of the utilities area. If you don’t see it, you can click the object
library button, which looks like this: .
3. In the object library, choose Controls from the Objects pop-up menu.
Xcode displays a list of controls below the pop-up menu. The list displays each control’s name and
appearance, and a short description of its function.
4. One at a time, drag a text field, a round rect button, and a label from the list to the view.
Add the User Interface Elements 332011-10-12 | © 2011 Apple Inc. All Rights Reserved.
CHAPTER 4
Configuring the View
8/3/2019 iPhone 101
http://slidepdf.com/reader/full/iphone-101 34/60
5. In the view, lay out the UI elements appropriately.
As you move UI elements within the view, dashed blue lines appear that help you align the items with
the edges of the view and with each other. (These dashed blue lines are called alignment guides.)
You can also resize the UI elements by dragging their resize handles. To reveal an element’s resize
handles, select it (that is, click it once).
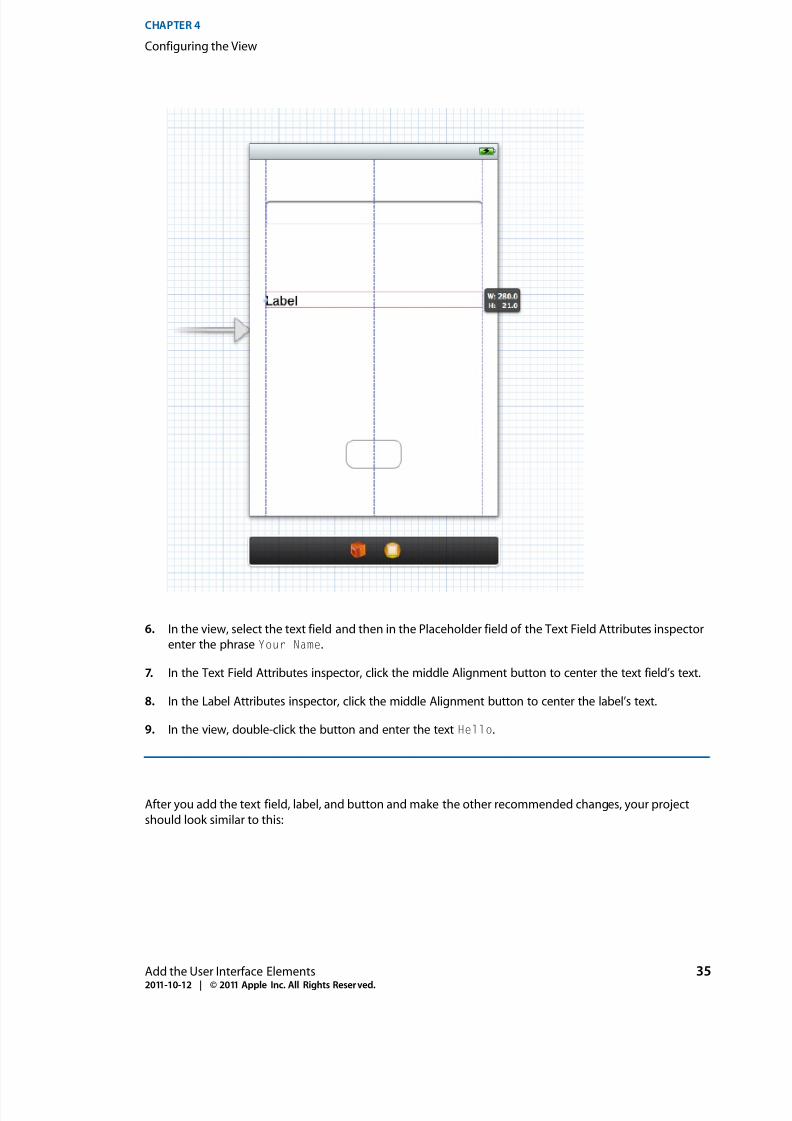
You can lay out your app’s user interface any way you choose, but this tutorial uses the following layout:
34 Add the User Interface Elements2011-10-12 | © 2011 Apple Inc. All Rights Reserved.
CHAPTER 4
Configuring the View
8/3/2019 iPhone 101
http://slidepdf.com/reader/full/iphone-101 35/60
6. In the view, select the text field and then in the Placeholder field of the Text Field Attributes inspector
enter the phrase Your Name.
7. In the Text Field Attributes inspector, click the middle Alignment button to center the text field’s text.
8. In the Label Attributes inspector, click the middle Alignment button to center the label’s text.
9. In the view, double-click the button and enter the text Hello.
After you add the text field, label, and button and make the other recommended changes, your project
should look similar to this:
Add the User Interface Elements 352011-10-12 | © 2011 Apple Inc. All Rights Reserved.
CHAPTER 4
Configuring the View
8/3/2019 iPhone 101
http://slidepdf.com/reader/full/iphone-101 36/60
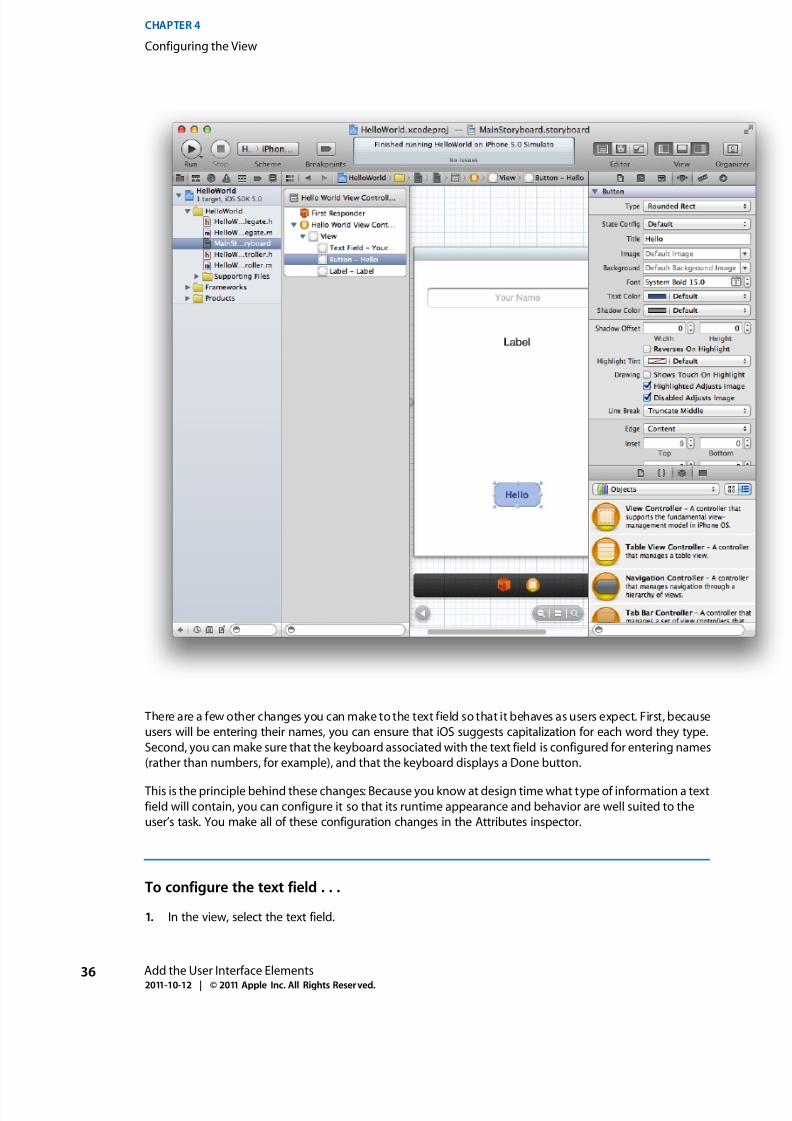
There are a few other changes you can make to the text field so that it behaves as users expect. First, because
users will be entering their names, you can ensure that iOS suggests capitalization for each word they type.
Second, you can make sure that the keyboard associated with the text field is configured for entering names
(rather than numbers, for example), and that the keyboard displays a Done button.
This is the principle behind these changes: Because you know at design time what type of information a text
field will contain, you can configure it so that its runtime appearance and behavior are well suited to the
user’s task. You make all of these configuration changes in the Attributes inspector.
To configure the text field . . .
1. In the view, select the text field.
36 Add the User Interface Elements2011-10-12 | © 2011 Apple Inc. All Rights Reserved.
CHAPTER 4
Configuring the View

8/3/2019 iPhone 101
http://slidepdf.com/reader/full/iphone-101 37/60
2. In the Text Field Attributes inspector, make the following choices:
● In the Capitalization pop-up menu, choose Words.
● Ensure that the Keyboard pop-up menu is set to Default.
● In the Return Key pop-up menu, choose Done.
Run your app in Simulator to make sure that the UI elements you added look the way you expect them to.
If you click the button, it should highlight, and if you click inside the text field, the keyboard should appear.
At the moment, though, the button doesn’t do anything, the label remains empty, and there’s no way to
dismiss the keyboard after it appears. To addthis functionality, you need to make theappropriate connections
between the UI elements and the view controller. These connections are described next.
Note: When you run an app in Simulator, you have to click controls that users tap when they run your appon a device.
Create an Action for the Button
As you learned in “The Target-Action Pattern Enables Responses to User Interactions” (page 22), when the
user activates a UI element, the element can send an action message to an object that knows how to perform
the corresponding action method (such as “add this contact to the user’s list of contacts”). In this tutorial,
when the user taps the button, you want it to send a “change the greeting” message to the view controller.
Then, youwant the viewcontroller to respond by executing the corresponding“changethe greeting” method,
which changes the text that’s displayed in the label.
Using Xcode, you can add an action to a UI element and set up its corresponding action method by dragging
from the element on the canvas to the appropriate source file (typically, a view controller’s source file). When
you drag from a UI element on the canvas to a source file, you create a connection that is archived in the
storyboard file. Later, when theapploads thestoryboard file, theconnectionbetween theobjects is restored.
To add an action for the button . . .
1. If necessary, select MainStoryboard.storyboard in the project navigator to display the scene on the
canvas.
2. In the toolbar, click the Utilities button to hide the utilities area and click the assistant editor button to
display the Assistant editor pane.
The assistant editor button is the middle Editor button, which looks like this: .
3. Make sure that theAssistant displays the view controller’s header file (HelloWorldViewController.h ).
Create an Action for the Button 372011-10-12 | © 2011 Apple Inc. All Rights Reserved.
CHAPTER 4
Configuring the View

8/3/2019 iPhone 101
http://slidepdf.com/reader/full/iphone-101 38/60
4. Control-drag from the button in the view to the method declaration area in the header file.
As you Control-drag, you should see something like this:
When you release the Control-drag, Xcode displays a popover in which you can configure the action
connection you just made:
38 Create an Action for the Button2011-10-12 | © 2011 Apple Inc. All Rights Reserved.
CHAPTER 4
Configuring the View
8/3/2019 iPhone 101
http://slidepdf.com/reader/full/iphone-101 39/60
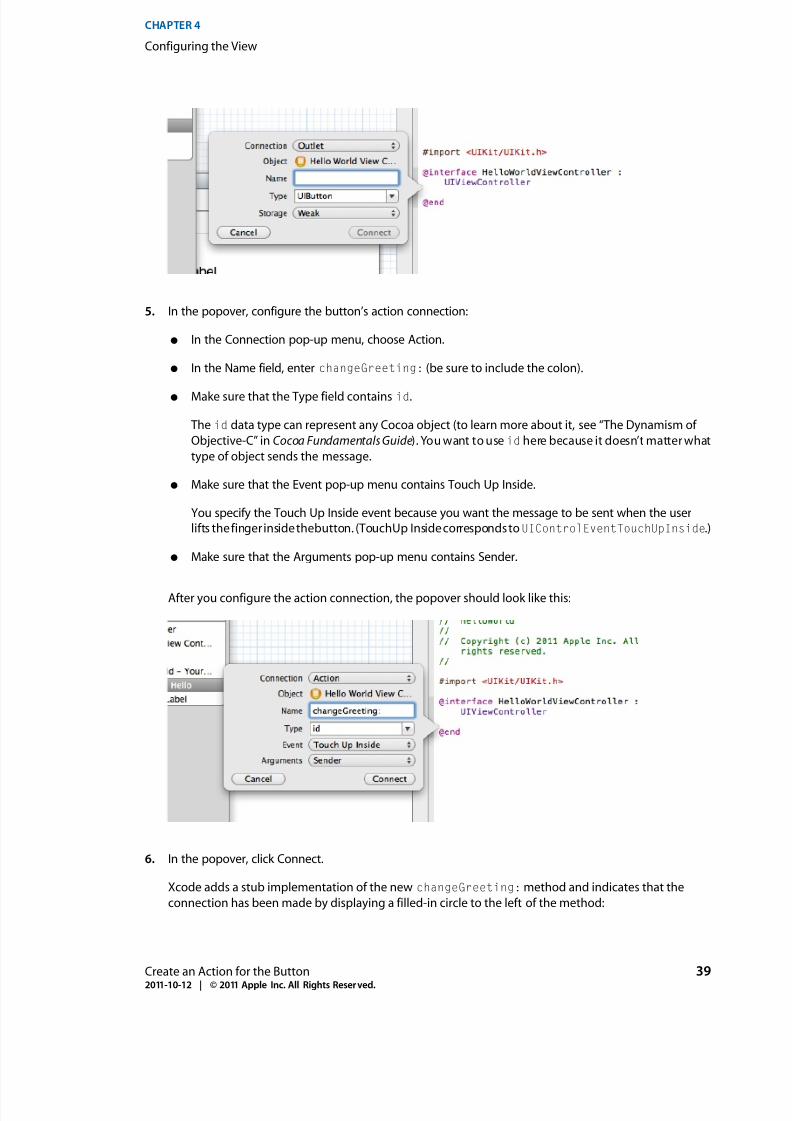
5. In the popover, configure the button’s action connection:
● In the Connection pop-up menu, choose Action.
● In the Name field, enter changeGreeting: (be sure to include the colon).
● Make sure that the Type field contains id.
The id data type can represent any Cocoa object (to learn more about it, see “The Dynamism of
Objective-C” in Cocoa Fundamentals Guide). You want to use id here because it doesn’t matter what
type of object sends the message.
● Make sure that the Event pop-up menu contains Touch Up Inside.
You specify the Touch Up Inside event because you want the message to be sent when the user
lifts thefingerinsidethebutton. (TouchUp InsidecorrespondstoUIControlEventTouchUpInside.)
● Make sure that the Arguments pop-up menu contains Sender.
After you configure the action connection, the popover should look like this:
6. In the popover, click Connect.
Xcode adds a stub implementation of the new changeGreeting:method and indicates that the
connection has been made by displaying a filled-in circle to the left of the method:
Create an Action for the Button 392011-10-12 | © 2011 Apple Inc. All Rights Reserved.
CHAPTER 4
Configuring the View
8/3/2019 iPhone 101
http://slidepdf.com/reader/full/iphone-101 40/60
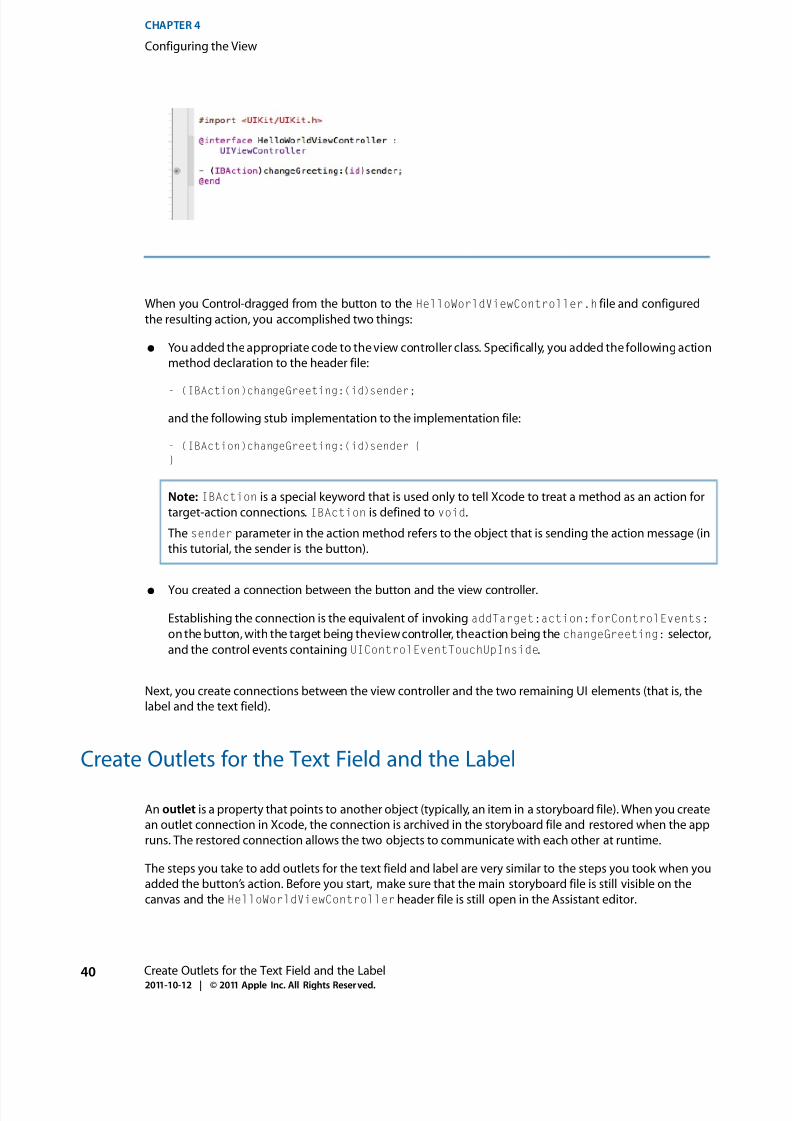
When you Control-dragged from the button to the HelloWorldViewController.h file and configured
the resulting action, you accomplished two things:
● You added the appropriate code to the view controller class. Specifically, you added the following action
method declaration to the header file:
- (IBAction)changeGreeting:(id)sender;
and the following stub implementation to the implementation file:
- (IBAction)changeGreeting:(id)sender {
}
Note: IBAction is a special keyword that is used only to tell Xcode to treat a method as an action for
target-action connections. IBAction is defined to void.
The sender parameter in the action method refers to the object that is sending the action message (in
this tutorial, the sender is the button).
● You created a connection between the button and the view controller.
Establishing the connection is the equivalent of invoking addTarget:action:forControlEvents:
on the button, with the target being theview controller, theaction being the changeGreeting: selector,
and the control events containing UIControlEventTouchUpInside.
Next, you create connections between the view controller and the two remaining UI elements (that is, the
label and the text field).
Create Outlets for the Text Field and the Label
An outlet is a property that points to another object (typically, an item in a storyboard file). When you create
an outlet connection in Xcode, the connection is archived in the storyboard file and restored when the app
runs. The restored connection allows the two objects to communicate with each other at runtime.
The steps you take to add outlets for the text field and label are very similar to the steps you took when you
added the button’s action. Before you start, make sure that the main storyboard file is still visible on the
canvas and the HelloWorldViewControllerheader file is still open in the Assistant editor.
40 Create Outlets for the Text Field and the Label2011-10-12 | © 2011 Apple Inc. All Rights Reserved.
CHAPTER 4
Configuring the View

8/3/2019 iPhone 101
http://slidepdf.com/reader/full/iphone-101 41/60
To add an outlet for the text field . . .
1. Control-drag from the text field in the view to the method declaration area in the header file.
As you Control-drag, you should see something like this:
2. In the popover that appears when you release the Control-drag, configure the text field’s connection:
● Make sure that the Connection pop-up menu contains Outlet.
● In the Name field, enter textField.
You can call the outlet whatever you want, but your code is more understandable when an outlet
name bears some relationship to the item it represents.
Create Outlets for the Text Field and the Label 412011-10-12 | © 2011 Apple Inc. All Rights Reserved.
CHAPTER 4
Configuring the View
8/3/2019 iPhone 101
http://slidepdf.com/reader/full/iphone-101 42/60
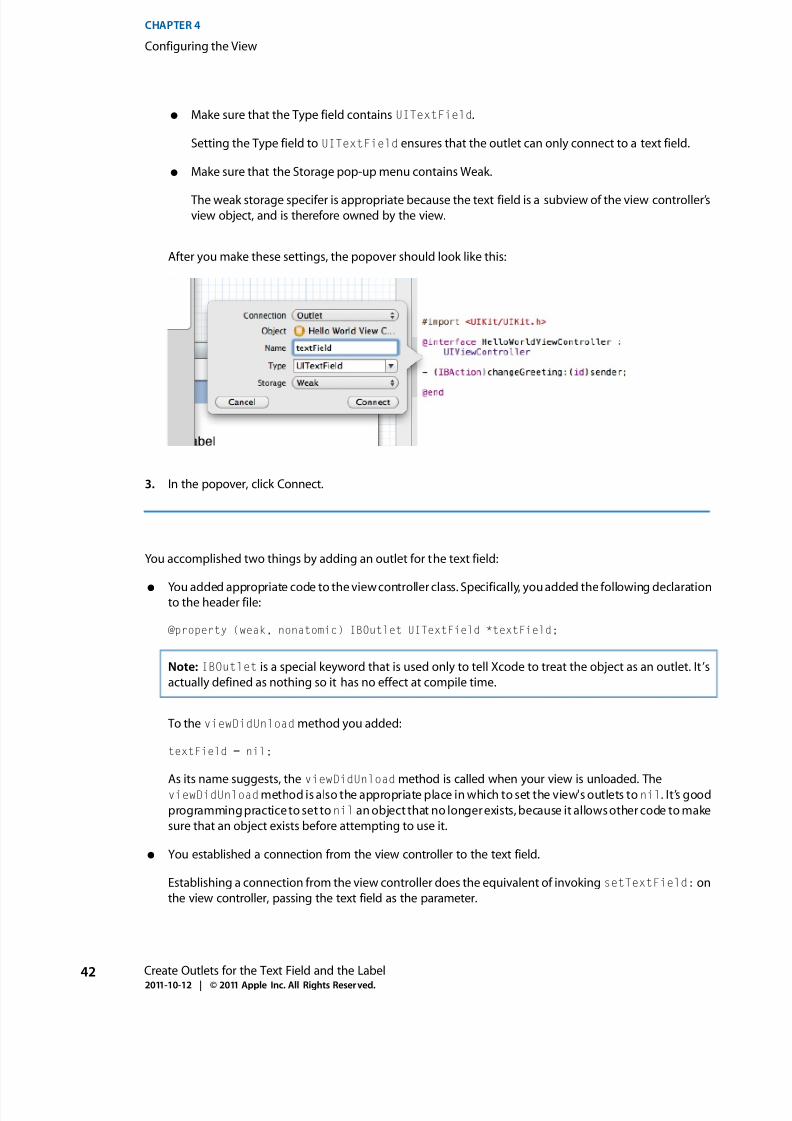
● Make sure that the Type field contains UITextField.
Setting the Type field to UITextField ensures that the outlet can only connect to a text field.
● Make sure that the Storage pop-up menu contains Weak.
The weak storage specifer is appropriate because the text field is a subview of the view controller’sview object, and is therefore owned by the view.
After you make these settings, the popover should look like this:
3. In the popover, click Connect.
You accomplished two things by adding an outlet for the text field:
● You added appropriate code to the viewcontroller class. Specifically, youadded the following declarationto the header file:
@property (weak, nonatomic) IBOutlet UITextField *textField;
Note: IBOutlet is a special keyword that is used only to tell Xcode to treat the object as an outlet. It ’s
actually defined as nothing so it has no effect at compile time.
To the viewDidUnload method you added:
textField = nil;
As its name suggests, theviewDidUnload
method is called when your view is unloaded. TheviewDidUnloadmethod is also the appropriate place in which to set the view's outlets tonil. It’s good
programmingpracticeto set tonil an object that no longerexists, because it allowsother code to make
sure that an object exists before attempting to use it.
● You established a connection from the view controller to the text field.
Establishing a connection from the view controller does the equivalent of invoking setTextField: on
the view controller, passing the text field as the parameter.
42 Create Outlets for the Text Field and the Label2011-10-12 | © 2011 Apple Inc. All Rights Reserved.
CHAPTER 4
Configuring the View
8/3/2019 iPhone 101
http://slidepdf.com/reader/full/iphone-101 43/60
Now add an outlet for the label and configure the connection. The steps you follow for this task are the same
as theonesyou followed toaddthe outlet for the text field, but with appropriate changes to theconfiguration.
To add an outlet for the label . . .
1. Control-drag from the label in the view to the method declaration area in the
HelloWorldViewControllerheader file in the Assistant editor.
2. In the popover that appears when you release the Control-drag, configure the label’s connection:
● Make sure that the Connection pop-up menu contains Outlet.
● In the Name field, enter label.
● Make sure that the Type field contains UILabel.
● Make sure that the Storage pop-up menu contains Weak.
3. In the popover, click Connect.
At this point in the tutorial, you’ve created a total of three connections to your view controller:
● An action connection for the button
● An outlet connection for the text field
● An outlet connection for the label
You can verify these connections in the Connections inspector.
To open the Connections inspector for the view controller . . .
1. Click the Standard editor button to switch to the standard editor view.
The Standard editor button is to the left of the Assistant editor button, and it looks like this:
2. Click the Utilities view button to open the utilities area.
3. Select Hello World View Controller in the outline view.
4. Show the Connections inspector in the utilities area.
The Connections inspector button is the rightmost inspector button, and it looks like this:
Create Outlets for the Text Field and the Label 432011-10-12 | © 2011 Apple Inc. All Rights Reserved.
CHAPTER 4
Configuring the View

8/3/2019 iPhone 101
http://slidepdf.com/reader/full/iphone-101 44/60
In the Connections inspector, Xcode displays the connections for the selected object (in this case, the view
controller). In your project window, you should see something like this:
Noticethat there’s a connection between theview controlleranditsview, in addition to the three connections
you created. Xcode provides this default connection between the view controller and its view; you do not
have to access it in any way.
Make the Text Field’s Delegate Connection
You have one more connection to make in your app: You need to connect the text field to an object that
you specify as its delegate. In this tutorial, you use the view controller for the text field’s delegate.
44 Make the Text Field’s Delegate Connection2011-10-12 | © 2011 Apple Inc. All Rights Reserved.
CHAPTER 4
Configuring the View
8/3/2019 iPhone 101
http://slidepdf.com/reader/full/iphone-101 45/60
You need to specify a delegate object for the text field because the text field sends a message to its delegate
when the user taps the Return button in the keyboard. In a later step, you’ll use the method associated with
this message to dismiss the keyboard (see “Configure the View Controller as the Text Field’s Delegate” (page
50)).
Make sure that the storyboard file is open on the canvas. If it ’s not, select MainStoryboard.storyboard
in the project navigator.
To set the text field’s delegate . . .
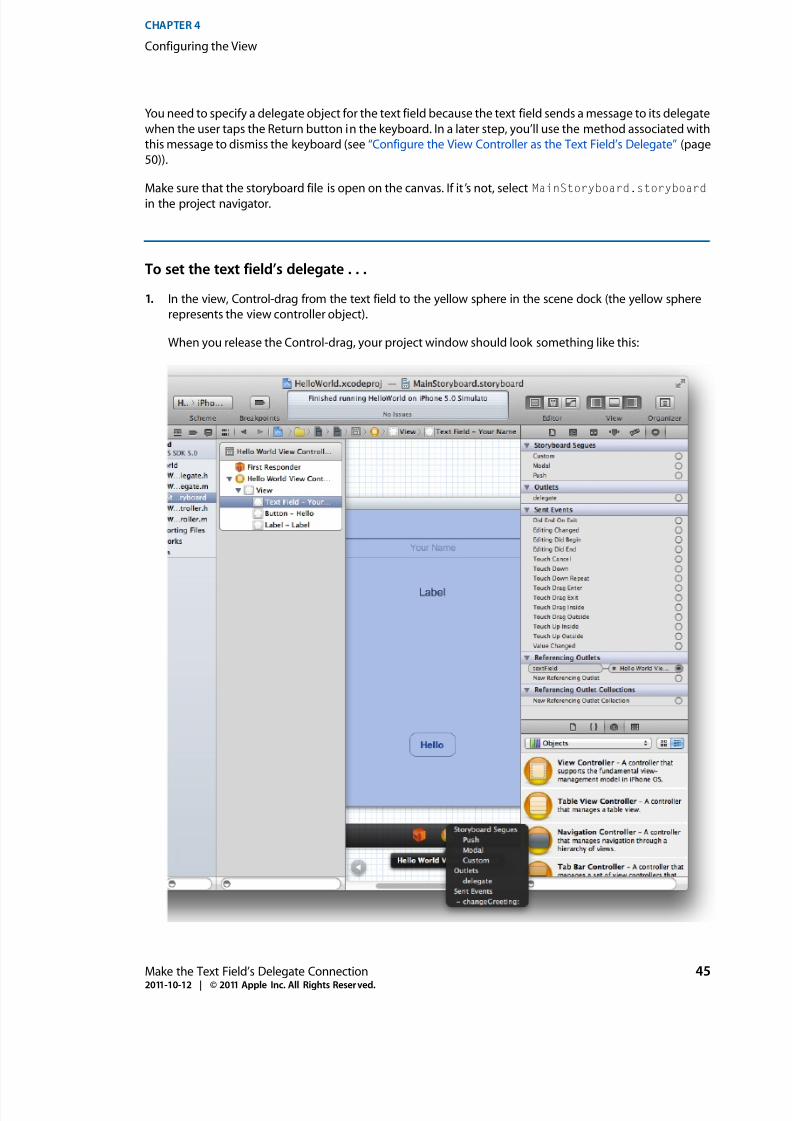
1. In the view, Control-drag from the text field to the yellow sphere in the scene dock (the yellow sphere
represents the view controller object).
When you release the Control-drag, your project window should look something like this:
Make the Text Field’s Delegate Connection 452011-10-12 | © 2011 Apple Inc. All Rights Reserved.
CHAPTER 4
Configuring the View

8/3/2019 iPhone 101
http://slidepdf.com/reader/full/iphone-101 46/60
2. Select delegate in the Outlets section of the translucent panel that appears.
Test the Application
Click Run to test your app.
You should find that the button highlights when you click it. You should also find that if you click in the text
field, the keyboard appears and you can enter text. However, there’s still no way to dismiss the keyboard. To
do that, you have to implement the relevant delegate method. You’ll do that in the next chapter.
Recap
When you configured the view with the appropriate connections you also updated the implementation file
to support the outlets and the action.
At this point in thetutorial, yourHelloWorldViewController.mfile should look similar to this (unchanged
stub implementations are not shown):
#import "HelloWorldViewController.h"
@implementation HelloWorldViewController
@synthesize textField;
@synthesize label;
...
- (void)viewDidUnload
{[self setTextField:nil];
[self setLabel:nil];
[super viewDidUnload];
// Release any retained subviews of the main view.
// e.g. self.myOutlet = nil;
}
...
- (IBAction)changeGreeting:(id)sender {
}
@end
Note that you don’t have to use the Xcode feature that automatically adds code when you establish a
connection by Control-dragging from the canvas to a source file. Instead, you can add the property and
method declarations to the header file yourself, and then make the connections as you did with the text
field’s delegate. Typically, though, you make fewer mistakes (and have less typing to do) when you let Xcode
do as much of the work as it can.
46 Test the Application2011-10-12 | © 2011 Apple Inc. All Rights Reserved.
CHAPTER 4
Configuring the View

8/3/2019 iPhone 101
http://slidepdf.com/reader/full/iphone-101 47/60
There are several parts to implementing the view controller: You need to add a property for the user’s name,
implement the changeGreeting:method, and ensure that the keyboard is dismissed when the user taps
Done.
Add a Property for the User’s Name
You need to declare a variable for the string that holds the user’s name, and you need to add a property
declaration for it so that your code always has a reference to it. You add both declarations to the view
controller’s header file (that is, HelloWorldViewController.h).
At this point in the tutorial, you don’t need to make any further changes to thestoryboard file. To give yourself
more room in which to add the code described in the following steps, hide the utilities area by clicking the
Utilities View button again.
To add the variable and property declarations for the user’s name . . .
1. In the project navigator, select HelloWorldViewController.h.
2. Within the @interface braces, add a variable declaration for the string that will hold the user’s name.
Note that you might have to enterthe braces after the@interface statement. After youadd the variable
declaration, @interface block should look like this:
@interface HelloWorldViewController : UIViewController {
NSString *userName;
}
3. After the closing @interface brace and before the @end statement, add an @property statement for
the string variable you just declared.
The property declaration looks like this:
@property (nonatomic, copy) NSString *userName;
The userNameproperty needs a setter method calledsetUserName:. You’llprovide this method in thenext
step.
Add a Property for the User’s Name 472011-10-12 | © 2011 Apple Inc. All Rights Reserved.
CHAPTER 5
Implementing the View Controller
8/3/2019 iPhone 101
http://slidepdf.com/reader/full/iphone-101 48/60
To complete the implementation of the userName property, you also need to tell the compiler to synthesize
the accessor methods. You provide code to do this in the view controller’s implementation file (that is,
HelloWorldViewController.m).
To synthesize the accessor methods for the user name property . . .
1. In the project navigator, select HelloWorldViewController.m.
2. After the @implementation HelloWorldViewController line, add the following line of code:
@synthesize userName=_userName;
When you usethe@synthesize directive, youtell thecompiler to synthesizeaccessor methodsfor a property
according to the specification that you gave in the interface file. In this tutorial, your declaration of the
userNameproperty is@property (nonatomic, copy) NSString *userName;, so thecompiler generates
two accessor methods:
- (NSString *)userName
- (void)setUserName:(NSString *)newUserName
By adding the underscore to userName in your @synthesize code line, you tell the compiler to use
_userName as the name of the instance variable for the userName property. Because you didn’t declare an
instance variable called _userName in your class, this code line also asks the compiler to synthesize that as
well.
By convention, you prefix the instance variable name with an underscore to remind you that you shouldn’t
access an instance variable directly. Instead, you should use the accessor methods you synthesized. (Anexception to this is that you can get and set an instance variable directly in an init method.)
From an academicperspective, avoidingthe direct access of instance variables helps preserveencapsulation,
but there are also a couple of practical benefits:
● Some Cocoa technologies (notably key-value coding) depend on the use of accessor methods, and on
the appropriate naming of the accessor methods. If you don’t use accessor methods, your application
may be less able to take advantage of standard Cocoa features.
● Some property values are created on-demand. If you try to use the instance variable directly, you may
get nil or an uninitialized value. (A view controller’s view is a good example of a property value that’s
created on-demand.)
To help you remember this convention, modify the @synthesize code lines that Xcode added for the text
field and label so that they look like this:
@synthesize textField=_textField;
@synthesize label=_label;
(If you’re interested, you can read more about encapsulation in “Storing and Accessing Properties” in Cocoa
Fundamentals Guide.)
48 Add a Property for the User’s Name2011-10-12 | © 2011 Apple Inc. All Rights Reserved.
CHAPTER 5
Implementing the View Controller
8/3/2019 iPhone 101
http://slidepdf.com/reader/full/iphone-101 49/60
Implement the changeGreeting: Method
In “To add an action for the button” (page 37), you configured the button so that when the user taps it, it
sends a changeGreeting:message to the view controller. In response, you want the view controller to
display in the label the text that the user entered in thetext field. Specifically, the changeGreeting:methodshould:
1. Retrieve the string from the text field and set the view controller’s userName property to this string.
2. Create a new string that is based on the userName property and display it in the label.
To implement the changeGreeting: method . . .
1. If necessary, select HelloWorldViewController.m in the project navigator.
2. Complete the stub implementation of the changeGreeting: method by adding the following code:
- (IBAction)changeGreeting:(id)sender {
self.userName = self.textField.text;
NSString *nameString = self.userName;
if ([nameString length] == 0) {
nameString = @"World";
}
NSString *greeting = [[NSString alloc] initWithFormat:@"Hello, %@!",
nameString];
self.label.text = greeting;
}
There are several interesting things to note in the changeGreeting: method:
● self.userName = self.textField.text; retrieves the text from the text field and sets the view
controller’s userName property to the result.
In this tutorial, you don’t actually use the string that holds the user’s name anywhere else, but it’s
important to remember its role: It’s the very simple model object that the view controller is managing.
In general, the controller should maintain information about application data in its own model
objects—application data shouldn’t be stored in user interface elements.
● NSString *nameString = self.userName; creates a new variable (of type NSString) and sets it
to the view controller’s userName property.
● @"World" is a string constant represented by an instance of NSString. If the user runs your app but
does not enter any text (that is, [nameString length] == 0), nameString will contain the string
“World”.
Implement the changeGreeting: Method 492011-10-12 | © 2011 Apple Inc. All Rights Reserved.
CHAPTER 5
Implementing the View Controller

8/3/2019 iPhone 101
http://slidepdf.com/reader/full/iphone-101 50/60
● The initWithFormat: method creates a new string that follows the format specified by the format
string (much like the C printf function with which you might be familiar).
In the format string, %@ acts as a placeholder for a string object. All other characters within the double
quotation marks of this format string will be displayed onscreen exactly as they appear. (To learn more
about strings, see “Strings”.)
Configure the View Controller as the Text Field’s Delegate
If you build and run the application, you should find that when you click the button, the label shows “Hello,
World!” If you select the text field and start typing, though, you should find that you still have no way to
indicate that you’ve finished entering text and dismiss the keyboard.
In an iOS application, the keyboard is shown automatically when an element that allows text entry becomes
the first responder; it is dismissedautomatically when theelement loses first responder status. (You can learn
more about the first responder by reading “The Event-Handling System” in iOS App Programming Guide.)Although there’s noway todirectlymessagethe keyboard,you can make it appear or disappear as a side-effect
of toggling the first responder status of a text-entry element.
The UITextFieldDelegate protocol includes the textFieldShouldReturn:method that the text field
calls when the user taps the Return button (regardless of the actual title of this button). Because you set the
view controller as the text field’s delegate, you can implement this method to force the text field to lose first
responder statusbysending it theresignFirstRespondermessage—which has the side-effect of dismissing
the keyboard.
To configure HelloWorldViewController as the text field’s delegate . . .1. If necessary, select HelloWorldViewController.m in the project navigator.
2. Implement the textFieldShouldReturn:method.
The method should tell the text field to resign first responder status. The implementation might look
like this:
- (BOOL)textFieldShouldReturn:(UITextField *)theTextField {
if (theTextField == self.textField) {
[theTextField resignFirstResponder];
}
return YES;
}
In this application, it’s not really necessary to include the theTextField == self.textField test
because there’s only onetext field.This is a good pattern to use, though, because there may be occasions
when your object is the delegate of more than one object of the same type and you might need to
differentiate between them.
3. Select HelloWorldViewController.h in the project navigator.
50 Configure the View Controller as the Text Field’s Delegate2011-10-12 | © 2011 Apple Inc. All Rights Reserved.
CHAPTER 5
Implementing the View Controller
8/3/2019 iPhone 101
http://slidepdf.com/reader/full/iphone-101 51/60
4. In the @interface line, just before the opening brace, add <UITextFieldDelegate> after
UIViewController.
Your interface declaration should look like this:
@interface HelloWorldViewController : UIViewController <UITextFieldDelegate> {
...
This declaration specifies that your HelloWorldViewController class adopts the
UITextFieldDelegate protocol.
Test the Application
Build and run the application. This time, everything should behave as you expect. In Simulator, click Done
to dismiss the keyboard after you have entered your name, and then click the Hello button to display “Hello,Your Name!” in the label.
If the app doesn’t behave as you expect, you need to troubleshoot (for some areas to investigate, see
“Troubleshooting” (page 53)).
Recap
Now that you’ve finished the implementation of the view controller, you’ve completed your first iOS
application. Congratulations!
Take a moment to think about how the view controller fits into the overall application architecture. You will
use view controllers in all iOS applications you write.
Test the Application 512011-10-12 | © 2011 Apple Inc. All Rights Reserved.
CHAPTER 5
Implementing the View Controller

8/3/2019 iPhone 101
http://slidepdf.com/reader/full/iphone-101 52/60
52 Recap2011-10-12 | © 2011 Apple Inc. All Rights Reserved.
CHAPTER 5
Implementing the View Controller

8/3/2019 iPhone 101
http://slidepdf.com/reader/full/iphone-101 53/60
If you have trouble getting your application to work correctly, try the problem-solving approaches described
in this chapter.
Code and Compiler Warnings
If things aren’t working as they should, first compare your code with the complete listings in “Code
Listings” (page 57).
Your code should compile without any warnings. If you do receive warnings, it’s recommended that youtreat them as very likely to be errors. The reason for this is that Objective-C is a very flexible language, so
that sometimes the most you get from the compiler is a warning.
Check the Storyboard File
As a developer, if things don’t work correctly, your natural instinct is probably to check your source code for
bugs. But when you use Cocoa, another dimension is added. Much of your application’s configuration may
be “encoded” in the storyboard file. Forexample, if youhaven’t madethe correct connections, your application
won’t behave as you expect.
● If the text doesn’t update when you click the button, it might be that you didn’t connect the button’s
action to the view controller, or that you didn’t connect the view controller’s outlets to the text field or
label.
● If the keyboard does not disappear when you click Done, you might not have connected the text field’s
delegateor connected the view controller’s textFieldoutlet to the text field (see “Makethe Text Field’s
Delegate Connection” (page 44)). If you have connected the delegate, there might be a more subtle
problem (see “Delegate Method Names” (page 53)).
Delegate Method Names
A common mistake with delegates is to misspell the delegate method name. Even if you’ve set the delegate
objectcorrectly, if thedelegatedoesn’t usethe right name in itsmethodimplementation, thecorrect method
won’t be invoked. It’s usually best to copy and paste delegate method declarations, such as
textFieldShouldReturn:, from the documentation.
Code and Compiler Warnings 532011-10-12 | © 2011 Apple Inc. All Rights Reserved.
CHAPTER 6
Troubleshooting

8/3/2019 iPhone 101
http://slidepdf.com/reader/full/iphone-101 54/60
54 Delegate Method Names2011-10-12 | © 2011 Apple Inc. All Rights Reserved.
CHAPTER 6
Troubleshooting
8/3/2019 iPhone 101
http://slidepdf.com/reader/full/iphone-101 55/60
In thistutorial, youcreated a verysimple iOS application. Cocoa Touchoffers a richdevelopment environment,
though, and this tutorial only scratches the surface. This chapter suggests some directions you might take
next as you continue to learn about iOS app development.
Improve the User Interface
iOS users have high expectations for the look and feel of the apps they run on their iOS-based devices. As
you work on improving the UI of your app, consider adding images and color to the UI elements, or a
background image to the view. One way to find out about different ways to configure a UI element is to dragit from theobject library into a view on the canvas and then look at itsconfigurable attributes in the Attributes
inspector.
Many iPhone applicationssupport multiple orientations; applications for iPad should support all orientations.
Another way to improve the UI of your app is to make sure that your view controller can handle changes in
orientation. To support different orientations, first learn about the
shouldAutorotateToInterfaceOrientation:method. Then, in your storyboard file, adjust the UI to
ensure that all the UI elements are properly positioned when the view is rotated.
Be sure to read iOS Human Interface Guidelines to learn about the recommended ways to design the user
interface and user experience of your app.
Install the Application on a Device
If you have a suitable device connected to your computer via its 30-pin USB cable, and you have a valid
certificate from the iOS Developer Program, set the active SDK for your project to iPhone Device (instead of
iOS Simulator) and build and run the project. Assuming your code compiles successfully, Xcode then
automatically uploads the app to your device. To learn more about this part of the development process,
see App Development Overview .
Add More Functionality
You can also try expanding the app’s functionality. Here are some of the many directions in which you can
go:
● Write a custom view. Rather than using a view as a canvas on which to drop prebuilt user interface
controls, you might try writing a custom view that draws its own content or responds to touch events.
For inspiration, look at sample code projects such as MoveMe and Metronome.
Improve the User Interface 552011-10-12 | © 2011 Apple Inc. All Rights Reserved.
CHAPTER 7
Next Steps
8/3/2019 iPhone 101
http://slidepdf.com/reader/full/iphone-101 56/60
● Use a table view. Although you used Xcode to lay out the user interface for this application, many
applicationsusetable views to layoutthe interface. This makes it easy to createan interface that extends
beyond the bounds of the screen—allowing the user to scroll to reveal additional elements. You should
first investigate how to create a simple list using a table view. There are several sample code projects,
such as TableViewSuite , that you can use as a foundation for a custom app.
● Use a navigation controller. Navigation controllers and tab bar controllers provide different ways to
organize an iOS app. Navigation controllers often work in conjunction with table views, but both
navigation controllers and tab bar controllers work together with view controllers. Take a look at some
of the sample code projects—such as SimpleDrillDown—that use navigation controllers and expand on
them to create your own applications.
● Localizeyourapp. You canoften increasethe size of your potential marketby localizing your application.
Internationalization is the process of making your application localizable. To learn more about
internationalization, read Internationalization Programming Topics.
● Optimize your code. High performance is critical to a good user experience on iOS. You should learn to
use the various performance tools provided with Xcode—in particular Instruments—to tune your
application so that it minimizes its resource requirements.
The most important thing is to try out new ideas and to experiment. There are many code samples you can
look at for inspiration, and the documentation will help you to understand concepts and programming
interfaces.
Add Unit Tests
When you created the project for this tutorial, you didn’t select the option to add support for unit tests. As
you develop real apps, it’s important to incorporate testing. In some respects, you can think of testing as the
counterpart of thedesign principle of encapsulation:Testing ensures that if the implementation of a methodchanges, the method still works as advertised.
When you add testing to your app, you can either create a new version of the project that sets up unit testing
from the start, or you can use the current project and choose File > New > New Target, select the Other
category, and then select the template Cocoa Unit Testing Bundle. Examine your project to see what Xcode
adds when you incorporate unit testing. To learn about unit testing, see “Unit Testing Applications”.
56 Add Unit Tests2011-10-12 | © 2011 Apple Inc. All Rights Reserved.
CHAPTER 7
Next Steps
8/3/2019 iPhone 101
http://slidepdf.com/reader/full/iphone-101 57/60
This appendix provides listings fortheinterface andimplementationfiles of theHelloWorldViewController
class. The listings don’t show comments and other method implementations from the file templates.
The Interface file: HelloWorldViewController.h
#import <UIKit/UIKit.h>
@interface HelloWorldViewController : UIViewController <UITextFieldDelegate> {
NSString *userName;}
@property (weak, nonatomic) IBOutlet UITextField *textField;
@property (weak, nonatomic) IBOutlet UILabel *label;
@property (nonatomic, copy) NSString *userName;
- (IBAction)changeGreeting:(id)sender;
@end
The Implementation File: HelloWorldViewController.m
#import "HelloWorldViewController.h"
@implementation HelloWorldViewController
@synthesize textField=_textField;
@synthesize label=_label;
@synthesize userName=_userName;
- (BOOL)textFieldShouldReturn:(UITextField *)theTextField {
if (theTextField == self.textField) {
[theTextField resignFirstResponder];
}
return YES;
}
- (IBAction)changeGreeting:(id)sender {
self.userName = self.textField.text;
NSString *nameString = self.userName;
if ([nameString length] == 0) {
nameString = @"World";
The Interface file: HelloWorldViewController.h 572011-10-12 | © 2011 Apple Inc. All Rights Reserved.
APPENDIX A
Code Listings
8/3/2019 iPhone 101
http://slidepdf.com/reader/full/iphone-101 58/60
}
NSString *greeting = [[NSString alloc] initWithFormat:@"Hello, %@!",
nameString];
self.label.text = greeting;
}
@end
58 The Implementation File: HelloWorldViewController.m2011-10-12 | © 2011 Apple Inc. All Rights Reserved.
APPENDIX A
Code Listings
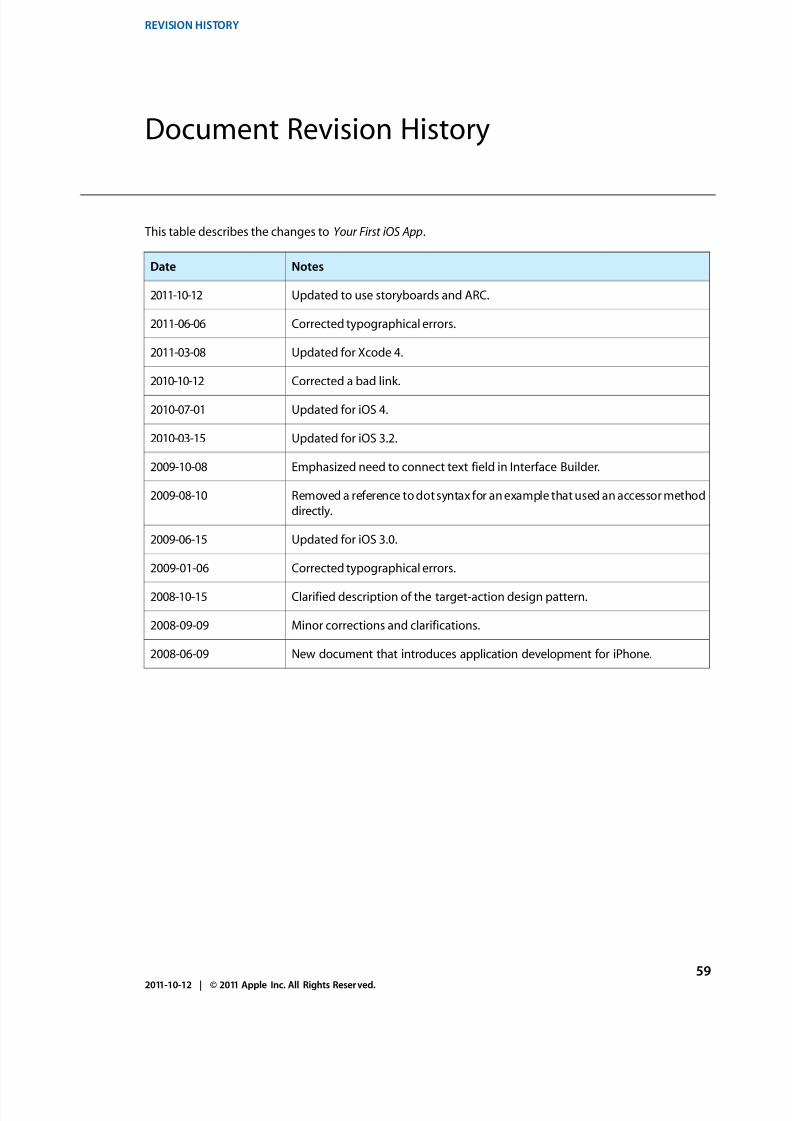
8/3/2019 iPhone 101
http://slidepdf.com/reader/full/iphone-101 59/60
This table describes the changes to Your First iOS App.
NotesDate
Updated to use storyboards and ARC.2011-10-12
Corrected typographical errors.2011-06-06
Updated for Xcode 4.2011-03-08
Corrected a bad link.2010-10-12
Updated for iOS 4.2010-07-01
Updated for iOS 3.2.2010-03-15
Emphasized need to connect text field in Interface Builder.2009-10-08
Removed a reference todotsyntax for an example that used an accessor method
directly.
2009-08-10
Updated for iOS 3.0.2009-06-15
Corrected typographical errors.2009-01-06
Clarified description of the target-action design pattern.2008-10-15
Minor corrections and clarifications.2008-09-09
New document that introduces application development for iPhone.2008-06-09
592011-10-12 | © 2011 Apple Inc. All Rights Reserved.
REVISION HISTORY
Document Revision History

8/3/2019 iPhone 101
http://slidepdf.com/reader/full/iphone-101 60/60
REVISION HISTORY
Document Revision History