ip communications user training clinton community college
TRANSCRIPT

IP Communications User Training
Clinton Community College

Table of Contents
Section 1 – Getting to Know Your Phone
– Phone Anatomy……………………………….…3
– Using the Softkeys…………………………........4
Section 2 – Basic Calls
– Placing a Call…………………………………..…5
– Dialing a Number………...……………………....6
– Answering an Incoming Call……………….........7
– Ending a Call………………………………….......8
– Transferring a Call………………………………..9
– Putting a Call on Hold…………………………...10
– Answering a Second Call………………….........11
– Parking and Retrieving a Call…………………..12
– Forwarding All Calls……………………………..13
Section 3 – Voicemail– Becoming a Voicemail Subscriber……………..14
– Voicemail Management….……………………...15
– Accessing Voicemail from an Outside Line…...16
Section 4 – Conference Calls
– Making a Conference Call (Basic)…………......17
– Making a Conference Call (Meet-Me)………....18
Section 5 – Extension Mobility
– Using the Extension Mobility Feature…………..19
Section 6 – Frequently Asked Questions
– Frequently Asked Questions…………………….20
Section 7 – Ongoing Support
– Where to Get Additional Support……………….21
Section 9 – Cisco Presence Application
– Cisco Unified Personal Communicator………...22
– Logging In…………………………………………23
– Layout ………....................................................24
– Changing Status……….....................................25
– Adding New Contacts........................................26
– Communicating.…………………………………..27
– Searching for Users….……...............................28
2

Phone Anatomy
3

Using the Softkeys
• Press the button beneath any softkey to select that function.
• Softkeys change depending on the feature in use.
• Select the more softkey to see more softkeys.
Softkeys: Point to feature options displayed along the bottom of the LCD screen.
Softkeys: first screen
Softkeys: when more button is pressed
4

Placing a Call
There are many ways to place a phone call.
• Lift the handset
• Dial the phone number
Other ways include the following:
1. Dial the phone number
2. Do one of the following:
• Lift the handset
• Press the line button for the line you wish to call on
• Press the Speaker button
• Press the Headset button
Handset
Line Buttons
Speaker
Headset
5

Dialing the Number
Inside Calls:
Dial the 4-digit extension number
Outside Calls:
Dial “9” + the number
Example – 9+1 (XXX) XXX-XXXX
Example – 9+ XXX-XXXX
Dial or transfer to someone's voicemail:
Dial “ * ” + the extension number
6

Answering an Incoming Call
• Lift the handset
• Or, answer with the speakerphone; either:
– Press the Speaker button
– Press the Answer softkey
– Press the line button for the incoming call
• Or, answer with a headset; either:
– Press the Headset button(If not lighted)
– If lighted, either:• Press the Answer softkey
• Press the line button for the incoming call
Speaker
Headset
Mute
Line Buttons
SoftkeysHandset
7

Ending a Call
• Depending on how the call was placed (or accepted), do one of the following:
– Hang up the handset
– Press the Speaker button
– Press the Headset button
– Press the EndCall softkey
HandsetHeadset
SpeakerSoftkeys
8

Transferring an Incoming Call
• General Process:Transfer – Dial Number – Transfer
– 1st Transfer places a caller on hold
– 2nd Transfer connects the two parties
• Option 1 – Warm
– Transfer – Dial – Speak with receiving party – Transfer
• Option 2 – Cold
– Transfer – Dial – Transfer
• If the party refuses
– press the Resume softkey to re-join the original call
– To transfer to voice mail: Transfer – * – Extension – Transfer
Softkeys
9

Putting a Call on Hold
• Press the Hold softkey
• To return to the call, press the Resume softkey
• If you have multiple calls on hold:
– Use the Scroll key to select the call to resume
– Press the Resume softkey
ScrollSoftkeys
10

Answering a Second Call
• While on the first call:– If necessary, press the Scroll key to highlight the
second call
– Then, press the Answer softkey. This places the first call on hold.
• To resume either call:– Use the Scroll key to select the call
– Then, press the Resume softkey.
• To end either call:– Use the Scroll key to select the call
– Then, press the EndCall softkey.
• After ending either call, press the Resume softkey to resume the other call.
• I-Divert Softkey– When receiving a call, press the IDivert
softkey to send the call directly to voicemail ScrollSoftkeys
11

Parking and Retrieving a Call
• During a call, press the more softkey, then the Park softkey
• The parking extension is automatically assigned
• Hang up
• From any IP phone, dial the Call Park extension
• Note 1 – The Call Park extension is displayed on the screen (for approximately 15 seconds)
• Note 2 – You have 90 seconds to answer the call, then it starts ringing at the original phone
• Note 3 – All Park Extensions will be 8830 – 8839.
Park an active call on one phone and retrieve the call on another phone.
Softkeys
12

Forwarding All Calls
• To forward all incoming calls to another extension:
– Press the CFwdAll softkey
– Dial the number to which you want to forward all your incoming calls
• A flashing right arrow appears in the top right corner of your phone’s display and the forward destination appears near the bottom of the display
• You are able to forward to:– Voicemail (Press CFwdAll then
Messages)
– Another Extension (which could be a person or a group)
– Outside Line (Ex. cell phone)
• To turn off forwarding, press the CFwdAll softkey Softkeys
13

Becoming a Voicemail Subscriber
1. Press the Messages button
2. Enter your Password (12345 by default)
3. Listen carefully to the prompts and respond as prompted:
– Record your name
– Record a personal greeting that outside callers will hear when you do not answer your phone
– Change your PIN to something other than 12345 that is at least 4 digits long
4. The system will tell you when you have finished enrollment
14

Voicemail Management
Checking Voicemail
1. Press the Messages button
2. Enter your PIN and press #
3. Follow the voice instructions
Voicemail Rules
- Each mailbox can hold approximately 30 short messages
- Deleted messages will be purged after 24 hours
- Saved messages will be deleted after 30 days
15
During a Message1. Restart2. Save3. Delete7. Rewind9. Fast Forward
After a Message1. Replay2. Save3. Delete5. Forward6. Save As New7. Rewind

Accessing Voicemail from an Outside Line
2. When Voicemail answers, press *3. Enter your ID (your extension number) and #
4. Enter your PIN and press #
5. Follow the voice instructions
1. Dial your personal work phone numberOr Dial (563) 244-7195
When listening to the automated message:
*#
Accesses your voicemail box
Skips past the automated message so you can leave a message
16

Making Conference Calls (Basic)
1. Place or answer a call
2. Press the more softkey, then, press the Confrn softkey. This selects a new line and places the first call on hold
3. Dial another telephone number
4. When the next call is answered, press the Confrn softkey to add this person to the conference call. You should now be able to speak to both called parties
5. If you wish, you can add up to 4 more calls; for each, press Confrn, dial the next number, then press Confrn
• Maximum participants is 6 (5 other lines and yourself)
• To review the list of participants on the call, press the ConfnLst softkey
Softkeys
Ad-Hoc Conferences follow the same process as transfers.
17

Making Conference Calls (Meet-Me)
1. To Create a Meet-Me Conference1. Lift your receiver
2. Press the more softkey, then, press the MeetMe softkey
3. Dial a Meet-Me number
2. To Attend a Meet-Me Conference1. From any phone on your network
– dial the Meet-Me number
2. From any phone outside of the network
– call an internal phone and have them transfer you to the MeetMe extension
• Max of 10 members
• No ConfList softkey functionality
• MeetMe Extensions are:8850 – 8869
Softkeys
18
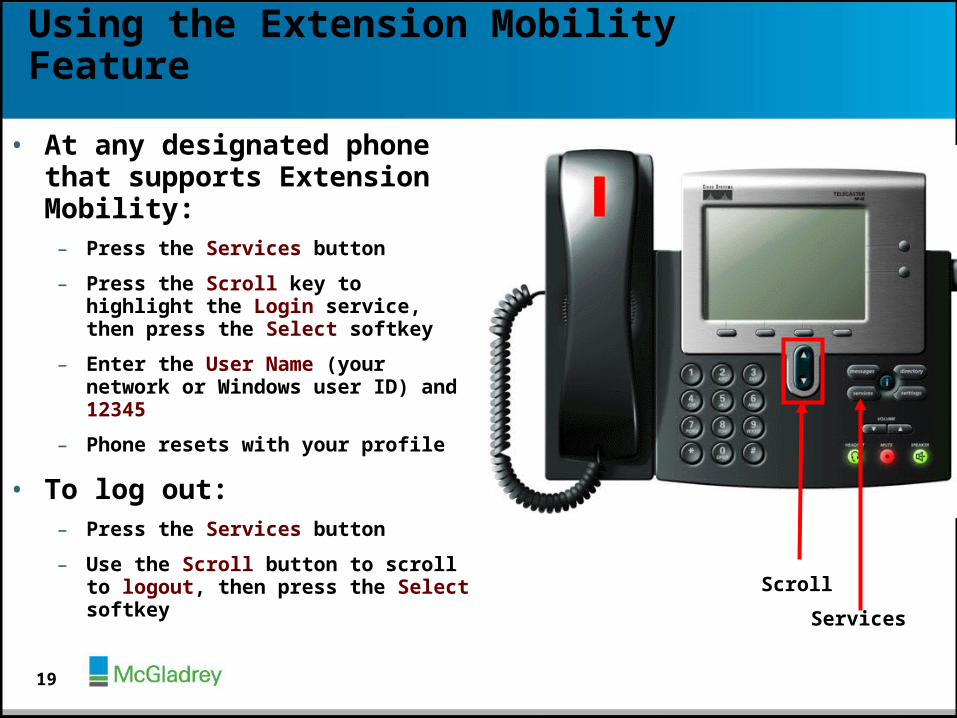
Using the Extension Mobility Feature
• At any designated phone that supports Extension Mobility:
– Press the Services button
– Press the Scroll key to highlight the Login service, then press the Select softkey
– Enter the User Name (your network or Windows user ID) and 12345
– Phone resets with your profile
• To log out:– Press the Services button
– Use the Scroll button to scroll to logout, then press the Select softkey
Services
Scroll
19

Frequently Asked Questions
Q. I am picking up the handset and pressing the “Answer” softkey, why am I not able to hear anything?A. You only need to pick up the handset OR press the “Answer” softkey. The “Answer” softkey generally turns to “Hold” when you pick up the receiver.
Q. Does #912121 still work?A. No. The Cisco phones will use “CFwdAll” as a softkey that allows you to forward all calls to voicemail. IDivert will ignore that one particular call.
Q. How do I forward calls to my cell phone?A. Press the “CFwdAll” softkey followed by your cell phone number. Regular rules apply so you will need to dial 9 + your cell phone number.
Q. Can I clear the call history from my Dialed, Received, and Missed Calls menus?A. Yes, through the call history menu you will see an option to “Clear” – keep in mind that this will clear all entries.“More” > “Delete” – Delete one single entry.
20

Where to Get Support
• Local Questions
– Deb Richter
– Extension: 7030
• EICCD Support
– Name: IT Helpdesk
– Extension: 3456
• In an emergency (non-phone), dial: 911 or 9911
21

Cisco Unified Personal Communicator
• Commonly known as “Personal Communicator” or “Presence”
• Software tool installed on your PC
• Offers a single application for Internal Communications:
– Viewing Other Users Availability Before You Call
– Display Your Own Availability for Others to See
– Dialing
– Instant Messaging
– Emailing
22

Presence – Logging In
• User ID – Same as the Windows password you use to log into your computer
• Password – Same as the password you use to log into your computer
• Click on Change Server to open up the address box and enter 10.10.0.30
– You will only have to enter this the first time
• It is generally recommended to check the box for Automatically Sign In
2310.10.0.30

Presence – Layout
My Availability
Groups
Other Users’ Availability
History
Search Pane
24
Availability Status Include:
• Available (Green)
• On the Phone (Yellow)
• Busy (Yellow)
• Away (Yellow)
• Do Not Disturb (Red)
• Not Available (Grey)

Presence – Changing Status
25
• Click on the arrow next to your current availability
• Choose an option from the drop down menu
• To create a custom message
• Choose “Edit Status Menu…”
• Choose the type of status (Available, Busy, or Do Not Disturb)
• Type in the custom message
• Choose Add

Presence – Adding New Contacts
• To Add a Contact– From the main screen click Contact
– Choose Add Contact
– From the Add Contact pop-up menu type in the name of the person you want to add
– Click Search
– Choose the person from the Search Results
– Choose which group to add the contact to
– Click Add
26

Presence – Communicating
• Highlighting a contact will give you communications options
– Click on the phone to call
– Click on the IM bubble to start an instant message chat
– Click on the letter to start an email
• Double-click on a contact to start an instant message chat
– Type in a message and press Enter to send
• Hold down control and click on contacts to select multiple people
– Right click on one of the users to start a Conference Call or Group Chat
27

Presence – Search
• Even if you have not added a person as a contact, you can still see them in Presence
• Click in the Search Pane and type in a name and you can
– See the user’s availability
– Right-Clicking on the user to:
• Chat
• Call
• Add to Contact List
28