inventory manager - restaurant manager posdealer.rmpos.com/downloads/invman3/inventory manager...
TRANSCRIPT
Inventory Manager Version 3
Last Revision: May 25, 2004
Copyright 1989-2004 Action Systems, Incorporated All Rights Reserved
First Edition January, 1991
RESTAURANT MANAGER is a registered trademark of Action Systems, Inc.
1734 Elton Road, # 219, Silver Spring, MD 20903 Email: [email protected]
WWW: http://www.actionsystems.com

Table of Contents
INTRODUCTION............................................................................................................. 5
Why do Inventory Control? ......................................................................................................... 5 The Right Person for the Job ....................................................................................................... 5 Inventory Control Objectives....................................................................................................... 5 Understanding Inventory Control ................................................................................................ 7 The Full Inventory Control Cycle................................................................................................ 7 Inventory Control Concepts......................................................................................................... 9
Depletion Modes .................................................................................................................................... 9 Order Units ............................................................................................................................................. 9
GETTING STARTED...................................................................................................... 9 Installation ................................................................................................................................. 10 Upgrades .................................................................................................................................... 10 Running INVENTORY MANAGER ........................................................................................ 10 Password Protection................................................................................................................... 10
SETUP PROCEDURES ................................................................................................. 13 What Information to Gather....................................................................................................... 13 Inventory Organization .............................................................................................................. 13 Inventory Locations ................................................................................................................... 14
Associating Locations to Stations......................................................................................................... 14 Associating Items to Locations............................................................................................................. 15 Associating Items to Stations ............................................................................................................... 15
General....................................................................................................................................... 16 Vendors...................................................................................................................................... 18 Inventory Categories.................................................................................................................. 21 Measurement Units .................................................................................................................... 21
Unit Types ............................................................................................................................................ 21 Unit Ratios............................................................................................................................................ 22
Taxes.......................................................................................................................................... 22 Inventory Items.......................................................................................................................... 24
Template Inventory Database............................................................................................................... 24 Sub-Recipe Items....................................................................................................................... 29 Batch Items ................................................................................................................................ 29
To Define a Batch Item ........................................................................................................................ 29 To Produce a Batch Item ...................................................................................................................... 30
Menu Explosion/Recipes ........................................................................................................... 31 OPERATING PROCEDURES...................................................................................... 35
Initializing Inventory Item Quantities........................................................................................ 35 Shopping Lists and Purchase Orders ......................................................................................... 35
Shopping Lists by Vendor .................................................................................................................... 35 Shopping Lists by Group...................................................................................................................... 37 Purchase Orders.................................................................................................................................... 39
Registering Inventory Purchases (Invoices) .............................................................................. 41 Creating Invoices from Purchase Orders .............................................................................................. 43 Importing Purchases from a File........................................................................................................... 43
Depleting Inventory Manually (Manual Debits)........................................................................ 44 Editing Transactions .................................................................................................................. 44
Printing Transactions ................................................................................................................. 45 Posting Inventory Transactions ................................................................................................. 45 Menu Cost Recalculation........................................................................................................... 46 Physical Inventories................................................................................................................... 47
Printing the Physical Inventory Entry Form......................................................................................... 47 Entering the Physical Inventory............................................................................................................ 47 Posting Physical Inventories................................................................................................................. 49
INVENTORY REPORTS .............................................................................................. 51 Lists............................................................................................................................................ 51 Food Cost Report ....................................................................................................................... 51
Generating the Food Cost Report ......................................................................................................... 51 Understanding the Food Cost Report ................................................................................................... 55 The Bottom Line: Food Cost as a Percentage of Sales......................................................................... 55 Managing Deviations............................................................................................................................ 55
Cost Trend Report...................................................................................................................... 56 Consumption Report .................................................................................................................. 56 Item Movement report ............................................................................................................... 58
Glossary ........................................................................................................................... 59 Appendix 1: Upgrade Procedures ................................................................................ 60
What you will need .................................................................................................................... 60 Installation procedures............................................................................................................... 60 Configuration............................................................................................................................. 60
4
INTRODUCTION The INVENTORY MANAGER module is an optional feature of RESTAURANT MANAGER. This manual concerns itself solely with the inventory control aspects of RESTAURANT MANAGER, and it is assumed you are already familiar with RESTAURANT MANAGER’s backoffice and POS functionality.
Why do Inventory Control? Make no mistake: Inventory control is hard to implement in a restaurant business. Unlike a retail store, where the items sold are essentially the same as the items bought from the manufacturers, a restaurant inventory is combined (in the form of recipes) to make the finished product, increasing the complexity of managing inventory. But, if done properly, the benefits of implementing inventory control are well worthwhile. In going from no, or little, inventory control to a well managed inventory control system it is possible to shave off from 2 to 5% of your food cost. The cost of food and beverages in the restaurant business is the largest controllable expense. Typically it ranges between 15% and 50% of revenues. So, for $2,000,000 a year in revenues with a 35% food cost, this translates to $700,000. So, if we shave off 2.5% in our example, this would translate to $50,000 savings per year!
The Right Person for the Job However, it is important to thoroughly understand all the steps involved in managing a perpetual inventory, and to realize that the key to success is to assign the resources necessary and to have the right person in charge of implementing and managing the inventory control process. This person must be detail oriented to a flaw, and able to work with the rest of the restaurant staff. Failure to assign such a person will invariably result in bogus numbers being generated by the program (Garbage in, garbage out!), and a great deal of frustration! As a rule of thumb, you will need to dedicate someone to inventory control an average of 1 hour a day per million dollars in revenue. If you pay this person $20/hour, say, this translates to $7,300 per million revenues… well worth the money when you consider the potential savings. In addition to this recurring cost, you need to factor in the time it takes to setup the inventory control system. Use the following formula to estimate the time it will take to enter the information necessary for the inventory control to commence: Setup Time (hours) = (# of Inventory Items * 5 + # of Menu Items * 10 + # of Vendors * 5)/60 Example: 500 inventory items, 300 menu items, and 40 vendors gives: Setup time = (500 * 5 + 300 * 10 + 40 * 5)/60 = 95 hours. At cost of $20/hour this equates to $1900.
Inventory Control Objectives In general, one implements inventory control to: Minimize the food and beverage cost to the business by controlling:
- Waste - Theft - Vendor price increases
Increase productivity by making the ordering process more efficient.
Increase revenues and profit by:
- Pricing menu items correctly according to food cost - Avoiding “out of stock” situations
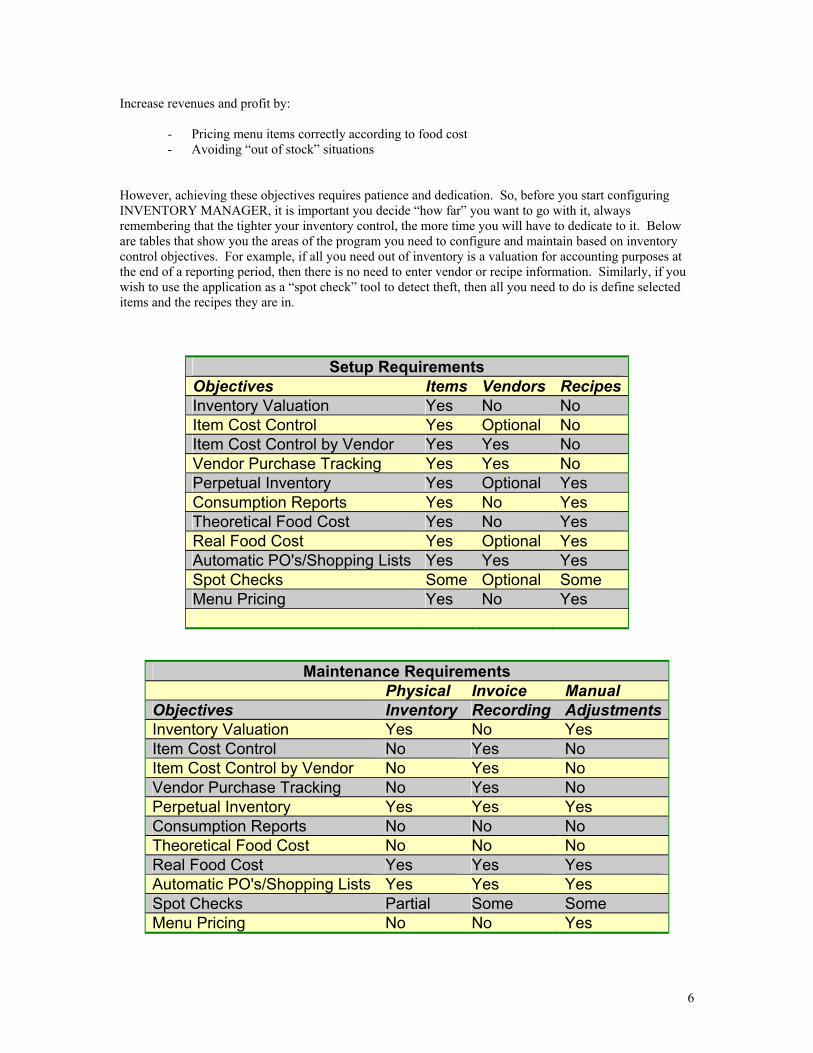
However, achieving these objectives requires patience and dedication. So, before you start configuring INVENTORY MANAGER, it is important you decide “how far” you want to go with it, always remembering that the tighter your inventory control, the more time you will have to dedicate to it. Below are tables that show you the areas of the program you need to configure and maintain based on inventory control objectives. For example, if all you need out of inventory is a valuation for accounting purposes at the end of a reporting period, then there is no need to enter vendor or recipe information. Similarly, if you wish to use the application as a “spot check” tool to detect theft, then all you need to do is define selected items and the recipes they are in.
Setup Requirements Objectives Items Vendors Recipes Inventory Valuation Yes No No Item Cost Control Yes Optional No Item Cost Control by Vendor Yes Yes No Vendor Purchase Tracking Yes Yes No Perpetual Inventory Yes Optional Yes Consumption Reports Yes No Yes Theoretical Food Cost Yes No Yes Real Food Cost Yes Optional Yes Automatic PO's/Shopping Lists Yes Yes Yes Spot Checks Some Optional Some Menu Pricing Yes No Yes
Maintenance Requirements Physical Invoice Manual Objectives Inventory Recording AdjustmentsInventory Valuation Yes No Yes Item Cost Control No Yes No Item Cost Control by Vendor No Yes No Vendor Purchase Tracking No Yes No Perpetual Inventory Yes Yes Yes Consumption Reports No No No Theoretical Food Cost No No No Real Food Cost Yes Yes Yes Automatic PO's/Shopping Lists Yes Yes Yes Spot Checks Partial Some Some Menu Pricing No No Yes
6
Understanding Inventory Control One of the main ratios used to monitor the business is the food cost as a percentage of sales. Ideally we would like to compare the theoretical cost of inventory used to the actual cost. In an ideal world, the difference of these two numbers should be 0, the theoretical cost being equal to the actual cost. In the real world it is more likely that the actual cost will be greater than the theoretical cost due to waste, theft, measurement inaccuracies and other factors. The real, or actual, food cost is relatively easy to compute. First, at the beginning of a control period (Monday), before the business opens, count all the food items in stock and assign them a total dollar value based on the last price paid for the items. We will call this amount Sb (for Stock Begin.) Do the same at the end of the control period (Sunday) after the close of business, which will give us Se (Stock-End). Now add up all the invoices received during the control period. We will call this Sr (Stock Received.) We can now say that the real (actual) cost of sales is Se - Sb + Sr. Or in plain words, the cost of sales is equal to the ending value of our Stock minus the beginning value plus the cost of the purchases in between the beginning and end stock counts. To compute the food cost as a percentage of sales simply divide the cost number just calculated by the gross sales for the control period and multiply by 100. That was easy. Now comes the hard part; how do we compute the theoretical cost of inventory sold? If we were just selling Coca Cola cans the exercise would be relatively simple, assuming that our POS system keeps track of the number of Coca Cola cans sold (and not only the dollars received). In this simple case the theoretical cost is the number of cans sold times the price paid to the vendor for each can. But now consider computing the theoretical cost of a sale item (the Hamburger Special) consisting of a hamburger, french fries, and salad. To calculate the theoretical cost accurately, we need to quantify all the ingredients used to prepare the dish. In this case, the amount of ground beef, potatoes, lettuce, tomatoes, onions, oil, salt, etc., and use the current actual cost (paid to the vendor) of the ingredients. We also need a way to automatically update the theoretical cost of the item every time the cost of purchased ingredients changes. To do this manually would be a lot of work! Also, at the POS, every time a Hamburger Special is sold, the defined quantities for the ingredients must be decremented from the inventory. INVENTORY MANAGER provides all the tools necessary to accomplish all the above in a streamlined and efficient manner.
The Full Inventory Control Cycle Once the inventory program has been configured with Vendors and Inventory Items, and the Menu Items have been linked to the Inventory Items via Menu Explosion (Ingredients), you will be ready to start the Inventory Control Cycle. Step 1: Register purchases and post to Inventory. This process will update (increase) the
inventory with the quantities of items purchased. Check for pricing anomalies, calling vendors when necessary to make price corrections.
Step 2: Register waste and other inventory debits. Close POS session. (On closing a session, the inventory is decremented according to the ingredients defined for each menu item.)
Step 3: Generate purchase orders and send to vendors. This should always be done after closing the session and registering the invoices to avoid over/under ordering.
Step 4: Perform and Register Physical Inventory at end of control period. This is the process where the Inventory is adjusted to reflect the actual quantities found for each inventory item. When the Physical Inventory is posted, the actual loss quantities and dollar amounts are computed. For effective Inventory control, you should perform a physical inventory at least once every two weeks.
7
Step 5: Issue Food Cost report to analyze difference between theoretical and actual inventory levels. This report also provides the 2 key ratios, % unit loss and % amount loss for the period selected. Take corrective action for those items whose ratios deviate from the norm.
Step 6: Issue the Item Cost Trend report to identify out-of-line price increases.
8
Inventory Control Concepts Depletion Modes Inventory control consists of a set of functions that allow tight monitoring of the raw ingredients used in the restaurant. It is designed to be highly flexible, by allowing various automatic depletion modes. Depletion modes refers to the way the inventory levels are debited. A debit occurs when an inventory item is used. Ideally debits should occur automatically, the moment the item is taken out of inventory. One would have electronically rigged dispensers for every inventory item. Next to ideal, one would have an inventory room, with someone tracking and entering inventory transactions (manual approach). This is impractical in a restaurant environment, especially for fresh food (although liquor control is more amenable to this type of control.) A more sensible approach is to quantify the amount of inventory that goes into each end product (the menu item) and to use this information to automatically debit inventory at the time an order is put through (We will term this 'depletion from ingredients '.) Again, this technique is practical for the higher value quantifiable goods, but not for general purpose goods such as salt, sugar etc. For these inventory items, it is more appropriate to debit inventory either manually, by client debit or by time debit. Manual debiting requires that the user know the used amount of the inventory item to be debited since the last update. This is suitable in situations were the inventory is kept in a stock room, and all debits are recorded. Manual debits are also used to record known waste and theft. In the Client debit approach, the rate of depletion is tied to the number of clients served. So in this case an entry of 0.01 lbs implies that on average 0.01 lbs of salt per client is consumed. When a session is closed the system automatically adjusts the inventory. Timed (session) debit is accomplished by entering the rate of depletion for an item based on time. Thus, for salt, say, the time debit parameter might be 25 lbs, meaning that every session 25 lbs are consumed. This is by far the least desirable way to control an inventory item, but can be useful for consumables that are depleted independently from the activity in the restaurant. The time and client debit systems are obviously not very accurate, but they do offer an additional aid to inventory control. INVENTORY MANAGER gives you full flexibility on the debiting method for each stock item. That is, manual, ingredients-based, time-based or client-based debiting schemes. The method is selected when creating the inventory data base, but may be modified at any time. Order Units Unfortunately not every vendor uses the same units to sell the products. One vendor might sell and invoice lettuce by the box, each box containing 10 heads of lettuce, and another one might do it by the bag, each bag containing 5 heads of lettuce. INVENTORY MANAGER deals with this problem by using a default “universal” order unit for each item that can be overridden by a vendor unit if so specified. So, in the example above, the “universal” order unit could be set to be a box, and the override unit for the item sold by Vendor X would be set to bag with a “conversion” factor of 2 to indicate that 2 bags make up a box. It is important to realize a good part of your cost savings is going to come from managing your vendors, and that the order units flexibility described above is required if you wish to “play the market” by using more than one vendor for the items you purchase.
GETTING STARTED
Installation The INVENTORY MANAGER application and other files are installed during the Restaurant Manager installation in Restaurant Manager’s working directory (usually c:\rmwin). To allow the POS stations to decrement inventory, you must have “INVENTORY MANAGER Services” (rminvservices.exe) running at all times, preferably on the fileserver. We recommend you add this application to the server’s startup folder.
Upgrades To update an older version, follow the instructions in the corresponding appendix.
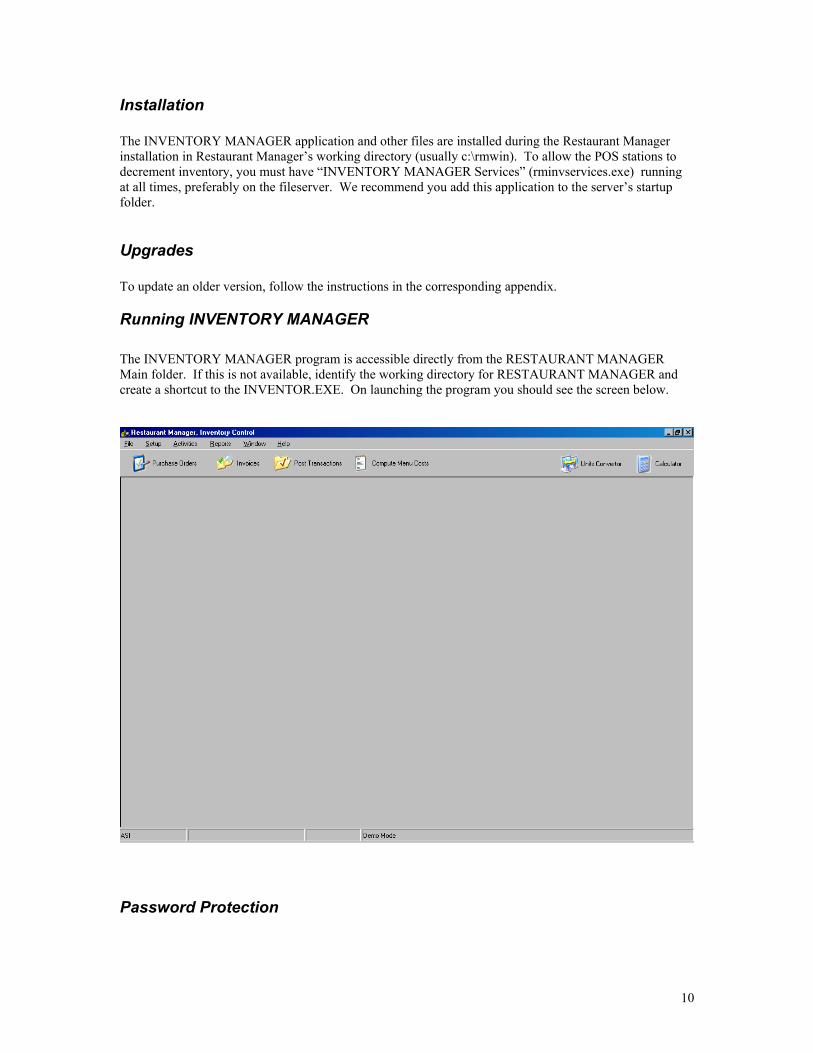
Running INVENTORY MANAGER The INVENTORY MANAGER program is accessible directly from the RESTAURANT MANAGER Main folder. If this is not available, identify the working directory for RESTAURANT MANAGER and create a shortcut to the INVENTOR.EXE. On launching the program you should see the screen below.
Password Protection
10
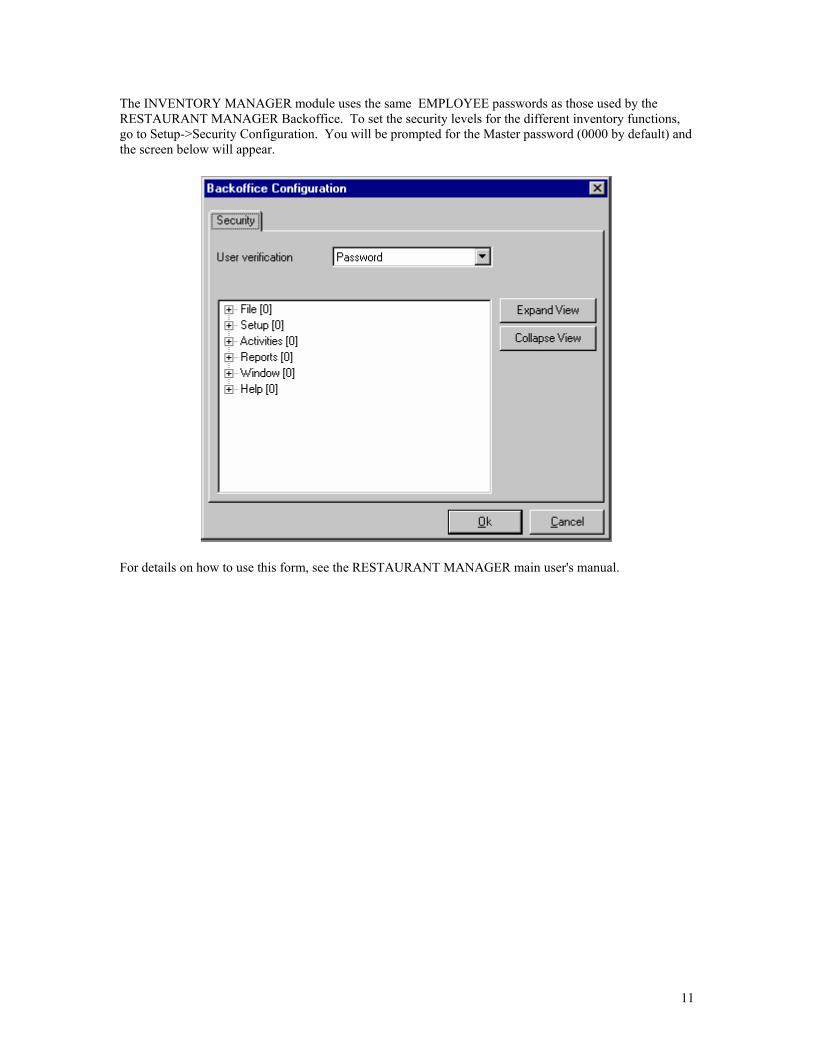
The INVENTORY MANAGER module uses the same EMPLOYEE passwords as those used by the RESTAURANT MANAGER Backoffice. To set the security levels for the different inventory functions, go to Setup->Security Configuration. You will be prompted for the Master password (0000 by default) and the screen below will appear.
For details on how to use this form, see the RESTAURANT MANAGER main user's manual.
11


SETUP PROCEDURES
What Information to Gather Before you begin entering any data into the system, we recommend you make a list of the PHYSICAL INVENTORY, writing down the following information: - The description of the item - The existing quantity - The recipe units (lbs, quarts, etc) - The default order units (case, box, etc…. use vendor invoices to determine order units) - If it is a base or batched item (see glossary) Note: a batched item is one that is composed of base items. Base items are those you purchase from your vendors. And, for each item you will need to DETERMINE: - The order to recipe and order to sub-recipe units factors eg. ozs/lbs = 16 And then DECIDE, for each item the: - The depletion mode manual from menu item ingredients based on clients based on session - The minimum allowable stock - The maximum desirable stock NOTE: The system will generate your shopping lists and/or purchase orders by flagging all the items that are below the minimum level specified and printing the quantity to acquire as the difference between the full stock quantity and the existing quantity. And then ORGANIZE, if you wish to have vendor control: - A list of your vendors, with their address, telephone number, etc.. With this information in hand you are ready to enter it into the system. But first, a word on the organization of the Inventory.
Inventory Organization IN ORDER FOR RESTAURANT MANAGER TO WORK EFFICIENTLY YOU MUST ORGANIZE YOUR INVENTORY CAREFULLY BEFORE YOU BEGIN TO ENTER DATA INTO THE COMPUTER. By default, Restaurant Manager stores inventory items in groups of thirty, and you can define as many groups as you like. Though an inventory group can include more than thirty items, you should aim to
create inventory groups of as close to thirty items as possible. If you find that there are too many items for an inventory group, find a logical way to divide the group into two. For example, if you started organizing all your meats under one title, say MEATS, and you found that there were more than 30, you could sub-divide the group into additional groups -- for example, BEEF, SEAFOOD, and POULTRY.
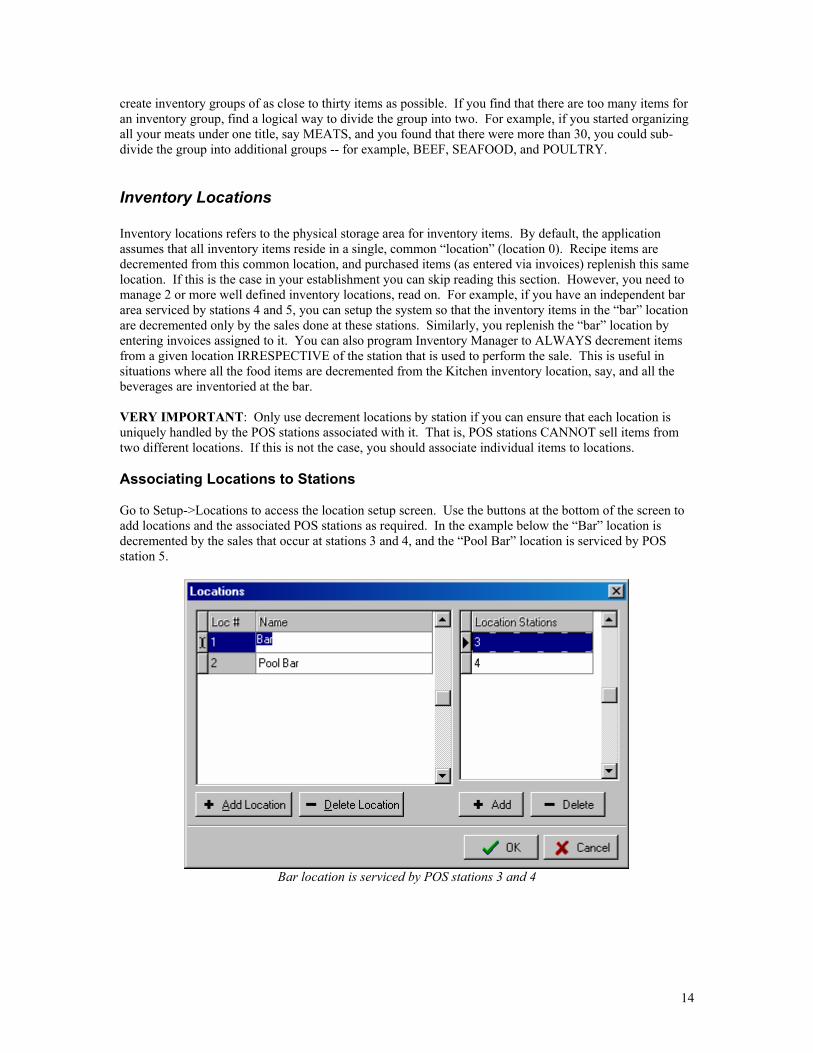
Inventory Locations Inventory locations refers to the physical storage area for inventory items. By default, the application assumes that all inventory items reside in a single, common “location” (location 0). Recipe items are decremented from this common location, and purchased items (as entered via invoices) replenish this same location. If this is the case in your establishment you can skip reading this section. However, you need to manage 2 or more well defined inventory locations, read on. For example, if you have an independent bar area serviced by stations 4 and 5, you can setup the system so that the inventory items in the “bar” location are decremented only by the sales done at these stations. Similarly, you replenish the “bar” location by entering invoices assigned to it. You can also program Inventory Manager to ALWAYS decrement items from a given location IRRESPECTIVE of the station that is used to perform the sale. This is useful in situations where all the food items are decremented from the Kitchen inventory location, say, and all the beverages are inventoried at the bar. VERY IMPORTANT: Only use decrement locations by station if you can ensure that each location is uniquely handled by the POS stations associated with it. That is, POS stations CANNOT sell items from two different locations. If this is not the case, you should associate individual items to locations. Associating Locations to Stations Go to Setup->Locations to access the location setup screen. Use the buttons at the bottom of the screen to add locations and the associated POS stations as required. In the example below the “Bar” location is decremented by the sales that occur at stations 3 and 4, and the “Pool Bar” location is serviced by POS station 5.
Bar location is serviced by POS stations 3 and 4
14
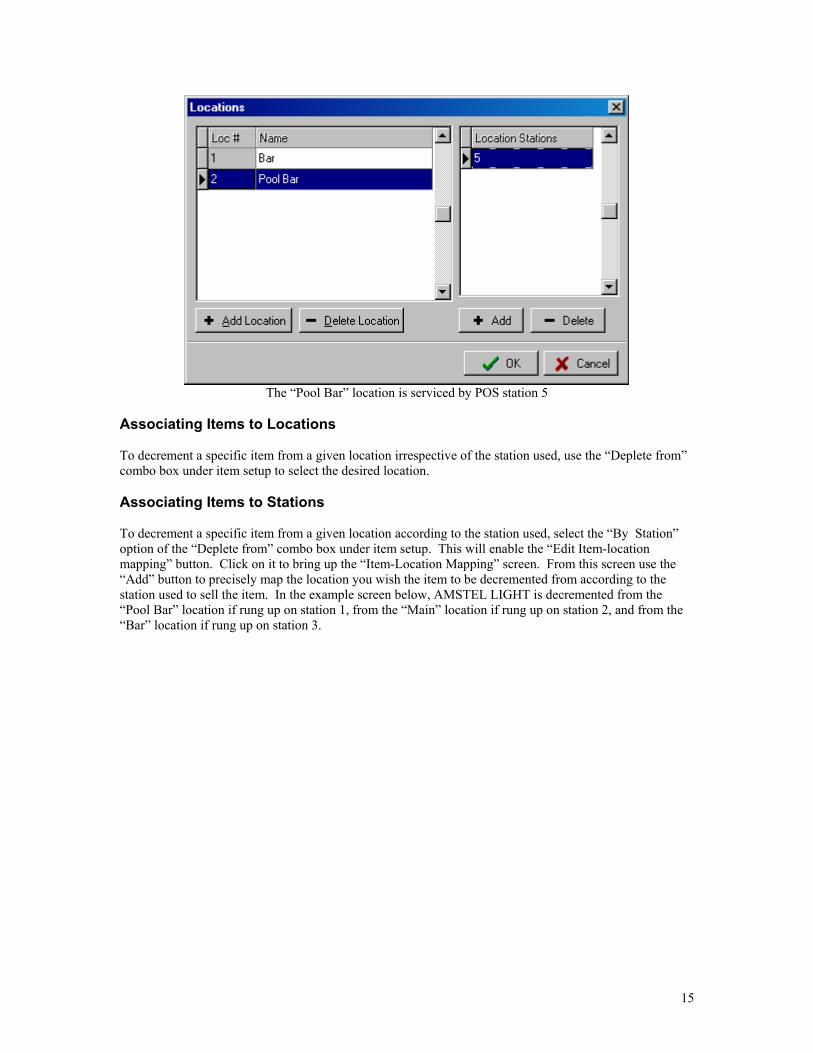
The “Pool Bar” location is serviced by POS station 5
Associating Items to Locations To decrement a specific item from a given location irrespective of the station used, use the “Deplete from” combo box under item setup to select the desired location. Associating Items to Stations To decrement a specific item from a given location according to the station used, select the “By Station” option of the “Deplete from” combo box under item setup. This will enable the “Edit Item-location mapping” button. Click on it to bring up the “Item-Location Mapping” screen. From this screen use the “Add” button to precisely map the location you wish the item to be decremented from according to the station used to sell the item. In the example screen below, AMSTEL LIGHT is decremented from the “Pool Bar” location if rung up on station 1, from the “Main” location if rung up on station 2, and from the “Bar” location if rung up on station 3.
15
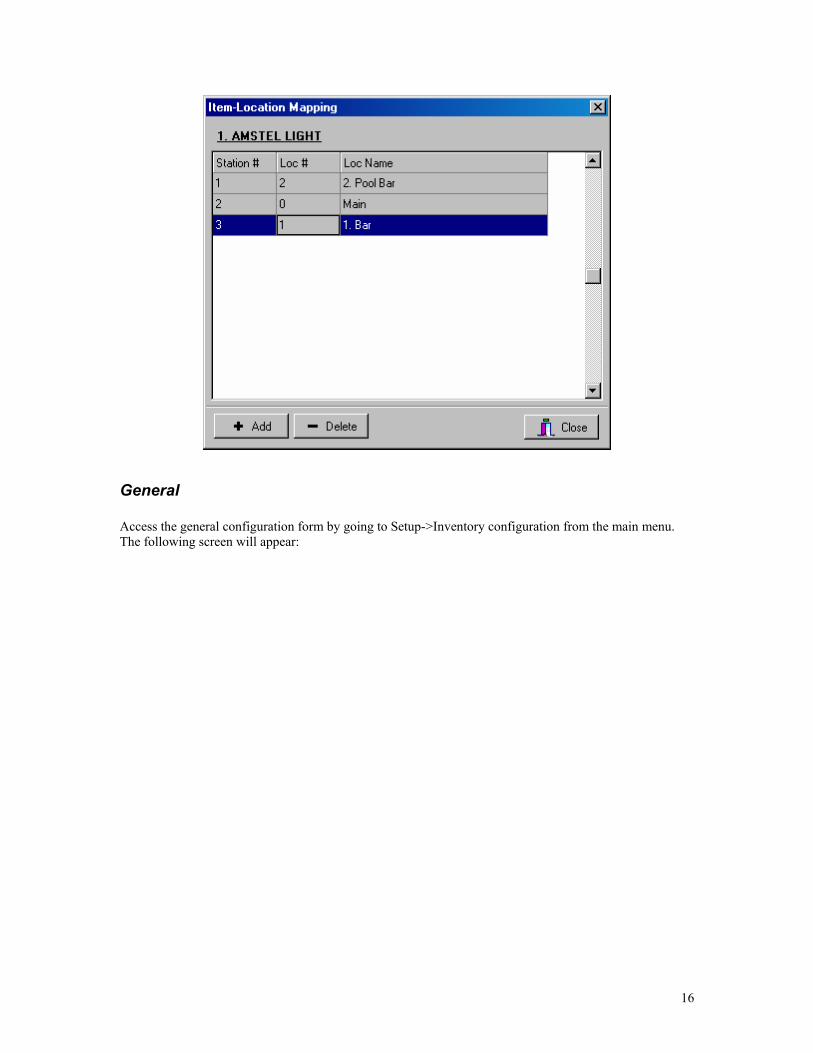
General Access the general configuration form by going to Setup->Inventory configuration from the main menu. The following screen will appear:
16
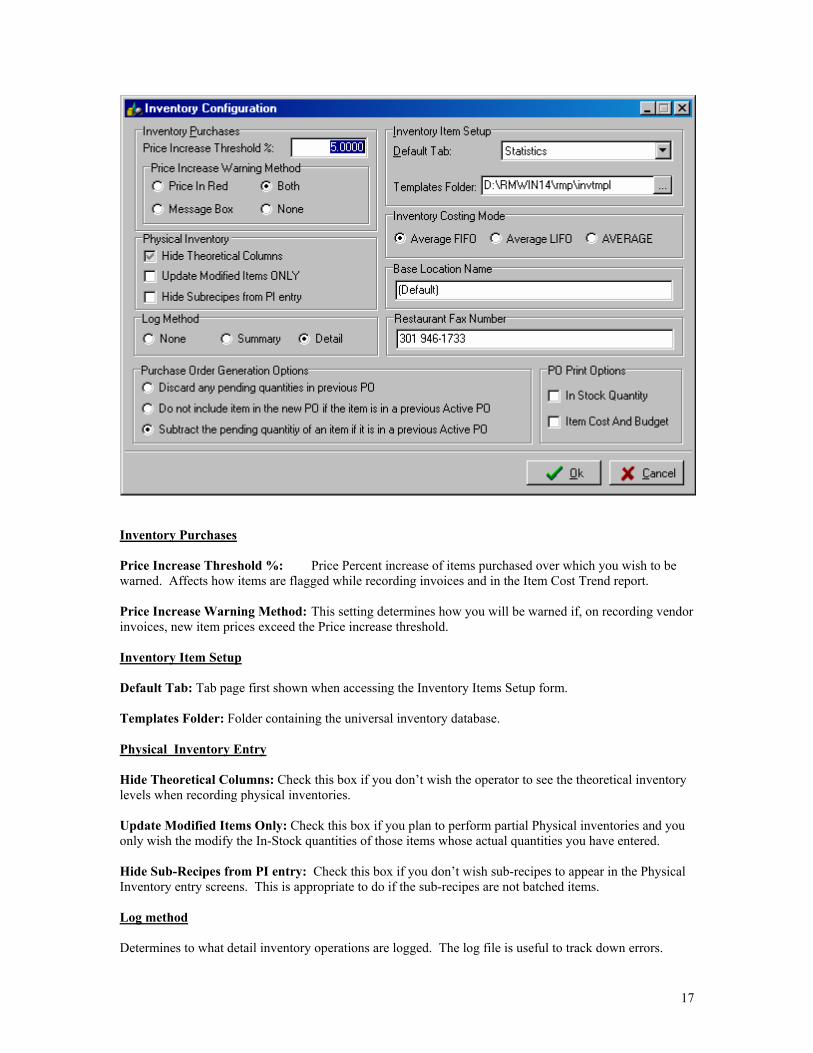
Inventory Purchases Price Increase Threshold %: Price Percent increase of items purchased over which you wish to be warned. Affects how items are flagged while recording invoices and in the Item Cost Trend report. Price Increase Warning Method: This setting determines how you will be warned if, on recording vendor invoices, new item prices exceed the Price increase threshold. Inventory Item Setup Default Tab: Tab page first shown when accessing the Inventory Items Setup form. Templates Folder: Folder containing the universal inventory database. Physical Inventory Entry Hide Theoretical Columns: Check this box if you don’t wish the operator to see the theoretical inventory levels when recording physical inventories. Update Modified Items Only: Check this box if you plan to perform partial Physical inventories and you only wish the modify the In-Stock quantities of those items whose actual quantities you have entered. Hide Sub-Recipes from PI entry: Check this box if you don’t wish sub-recipes to appear in the Physical Inventory entry screens. This is appropriate to do if the sub-recipes are not batched items. Log method Determines to what detail inventory operations are logged. The log file is useful to track down errors.
17
Inventory Costing Mode Method used to compute inventory costs in the Food Cost Report. Average First In, First Out (FIFO) uses the oldest item (and its associated cost) in inventory first when making calculations. Average Last In, First Out, uses the cost of the last item. The average in both cases refers to the value used once the initial quantity at the first/last cost is depleted. This value is computed as the average of the purchases made over the period of interest. Base location name Description of the primary inventory location when inventory is located in multiple areas. Restaurant Fax # Used on purchase orders. Purchase Order generation options (default) Discard any pending quantities in previous PO: If a PO already exists for the vendor, the quantities in that PO are zeroed out and incorporated to the new PO. Do not include item in the new PO if the item is in a previous active PO: This mode maintains the validity of the previously issued PO, but you run the risk of running out of an item that is near minimums. Subtract the pending quantity of an item if it is in a previous active PO: This is the preferred mode of operation, since it maintains the validity of the previously issued PO, and it compensates for items that might run low if not reordered. PO Print options In Stock Quantity: check this box if you wish this information to appear on purchase orders. Item Cost and Budget: check this box if you wish the vendor to see the amounts you expect to pay for the items you order.
Vendors Entering vendor information will give you the capability to handle shopping lists, purchase orders and invoices by vendor, and, more importantly, track the quantities and prices paid to each vendor for goods provided. This all ties into one of the most powerful cost savings tool in INVENTORY MANAGER, the Cost Trend report, that tracks and flags price increases that are outside the expected range. Access the Vendors form by selecting Vendors under the Setup menu option. The screen shown below will appear, the box on the right holding the names of the vendors, the box on the left the vendor details.
18
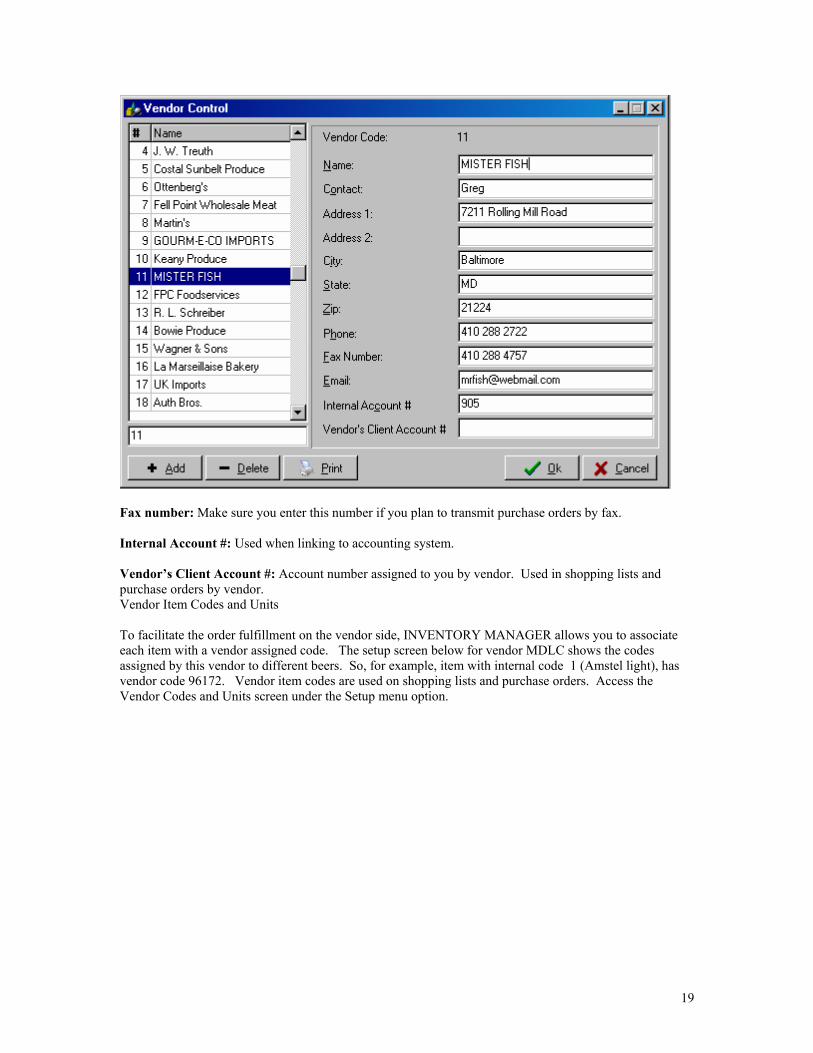
Fax number: Make sure you enter this number if you plan to transmit purchase orders by fax. Internal Account #: Used when linking to accounting system. Vendor’s Client Account #: Account number assigned to you by vendor. Used in shopping lists and purchase orders by vendor. Vendor Item Codes and Units To facilitate the order fulfillment on the vendor side, INVENTORY MANAGER allows you to associate each item with a vendor assigned code. The setup screen below for vendor MDLC shows the codes assigned by this vendor to different beers. So, for example, item with internal code 1 (Amstel light), has vendor code 96172. Vendor item codes are used on shopping lists and purchase orders. Access the Vendor Codes and Units screen under the Setup menu option.
19
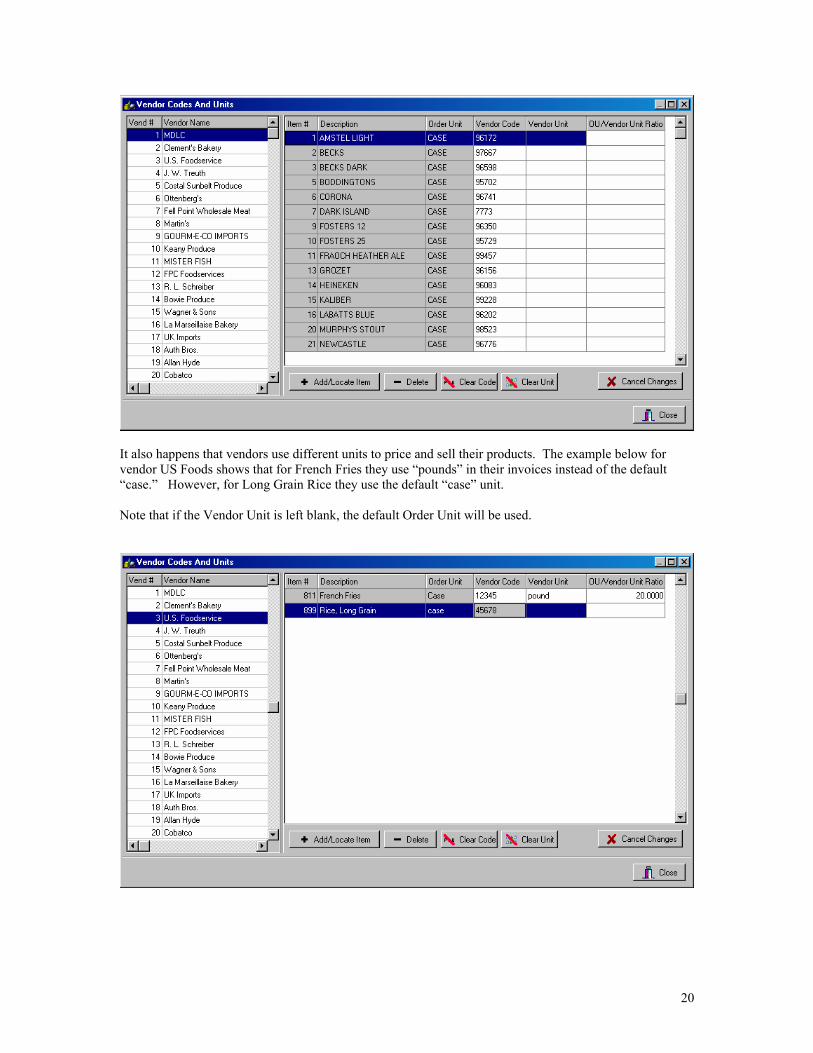
It also happens that vendors use different units to price and sell their products. The example below for vendor US Foods shows that for French Fries they use “pounds” in their invoices instead of the default “case.” However, for Long Grain Rice they use the default “case” unit. Note that if the Vendor Unit is left blank, the default Order Unit will be used.
20
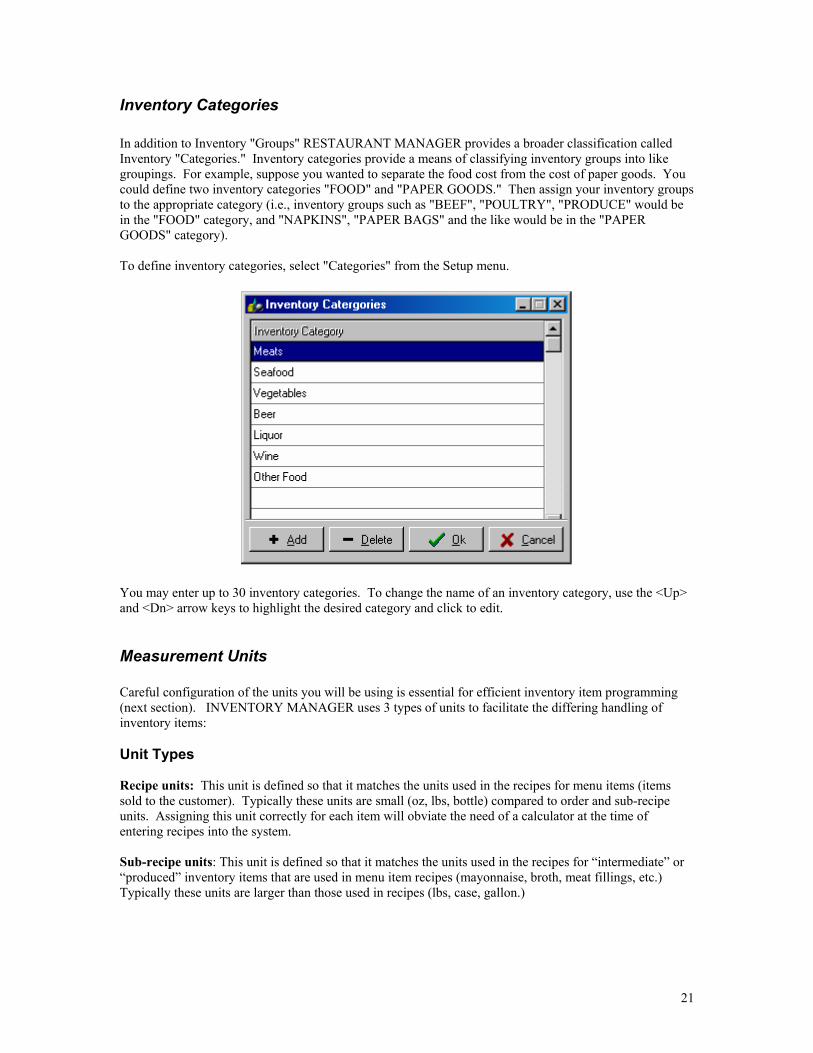
Inventory Categories In addition to Inventory "Groups" RESTAURANT MANAGER provides a broader classification called Inventory "Categories." Inventory categories provide a means of classifying inventory groups into like groupings. For example, suppose you wanted to separate the food cost from the cost of paper goods. You could define two inventory categories "FOOD" and "PAPER GOODS." Then assign your inventory groups to the appropriate category (i.e., inventory groups such as "BEEF", "POULTRY", "PRODUCE" would be in the "FOOD" category, and "NAPKINS", "PAPER BAGS" and the like would be in the "PAPER GOODS" category). To define inventory categories, select "Categories" from the Setup menu.
You may enter up to 30 inventory categories. To change the name of an inventory category, use the <Up> and <Dn> arrow keys to highlight the desired category and click to edit.
Measurement Units Careful configuration of the units you will be using is essential for efficient inventory item programming (next section). INVENTORY MANAGER uses 3 types of units to facilitate the differing handling of inventory items: Unit Types Recipe units: This unit is defined so that it matches the units used in the recipes for menu items (items sold to the customer). Typically these units are small (oz, lbs, bottle) compared to order and sub-recipe units. Assigning this unit correctly for each item will obviate the need of a calculator at the time of entering recipes into the system. Sub-recipe units: This unit is defined so that it matches the units used in the recipes for “intermediate” or “produced” inventory items that are used in menu item recipes (mayonnaise, broth, meat fillings, etc.) Typically these units are larger than those used in recipes (lbs, case, gallon.)
21
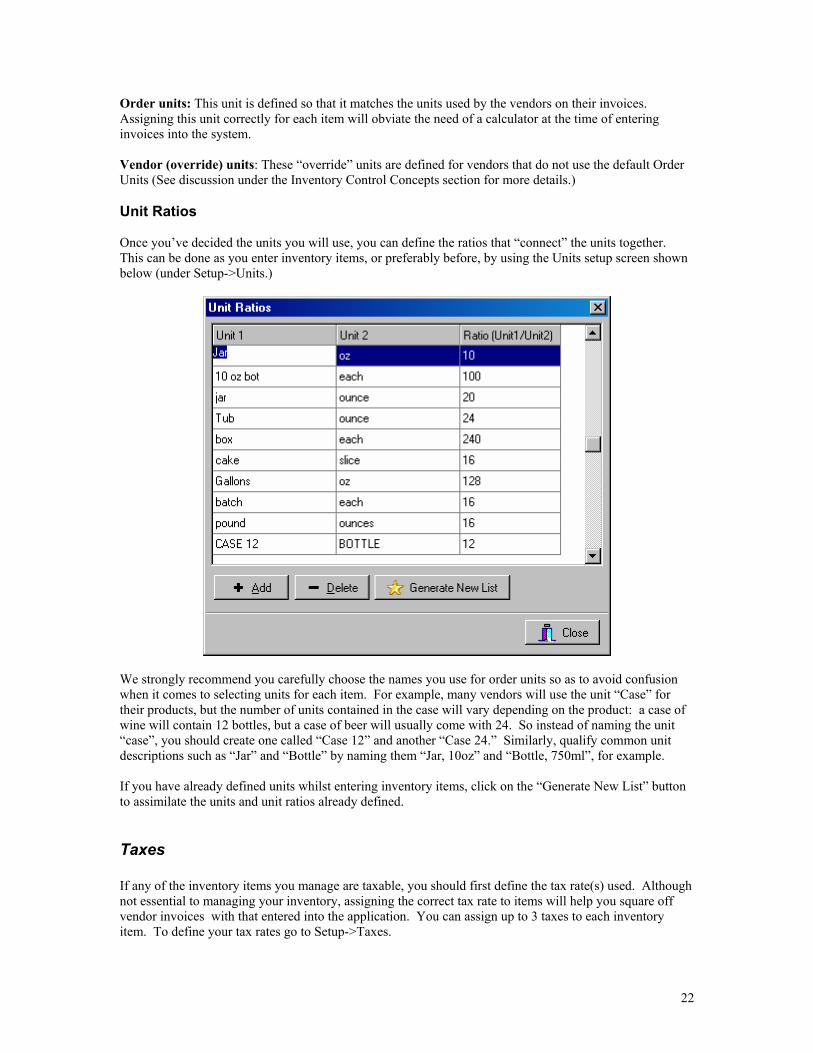
Order units: This unit is defined so that it matches the units used by the vendors on their invoices. Assigning this unit correctly for each item will obviate the need of a calculator at the time of entering invoices into the system. Vendor (override) units: These “override” units are defined for vendors that do not use the default Order Units (See discussion under the Inventory Control Concepts section for more details.) Unit Ratios Once you’ve decided the units you will use, you can define the ratios that “connect” the units together. This can be done as you enter inventory items, or preferably before, by using the Units setup screen shown below (under Setup->Units.)
We strongly recommend you carefully choose the names you use for order units so as to avoid confusion when it comes to selecting units for each item. For example, many vendors will use the unit “Case” for their products, but the number of units contained in the case will vary depending on the product: a case of wine will contain 12 bottles, but a case of beer will usually come with 24. So instead of naming the unit “case”, you should create one called “Case 12” and another “Case 24.” Similarly, qualify common unit descriptions such as “Jar” and “Bottle” by naming them “Jar, 10oz” and “Bottle, 750ml”, for example. If you have already defined units whilst entering inventory items, click on the “Generate New List” button to assimilate the units and unit ratios already defined.
Taxes If any of the inventory items you manage are taxable, you should first define the tax rate(s) used. Although not essential to managing your inventory, assigning the correct tax rate to items will help you square off vendor invoices with that entered into the application. You can assign up to 3 taxes to each inventory item. To define your tax rates go to Setup->Taxes.
22
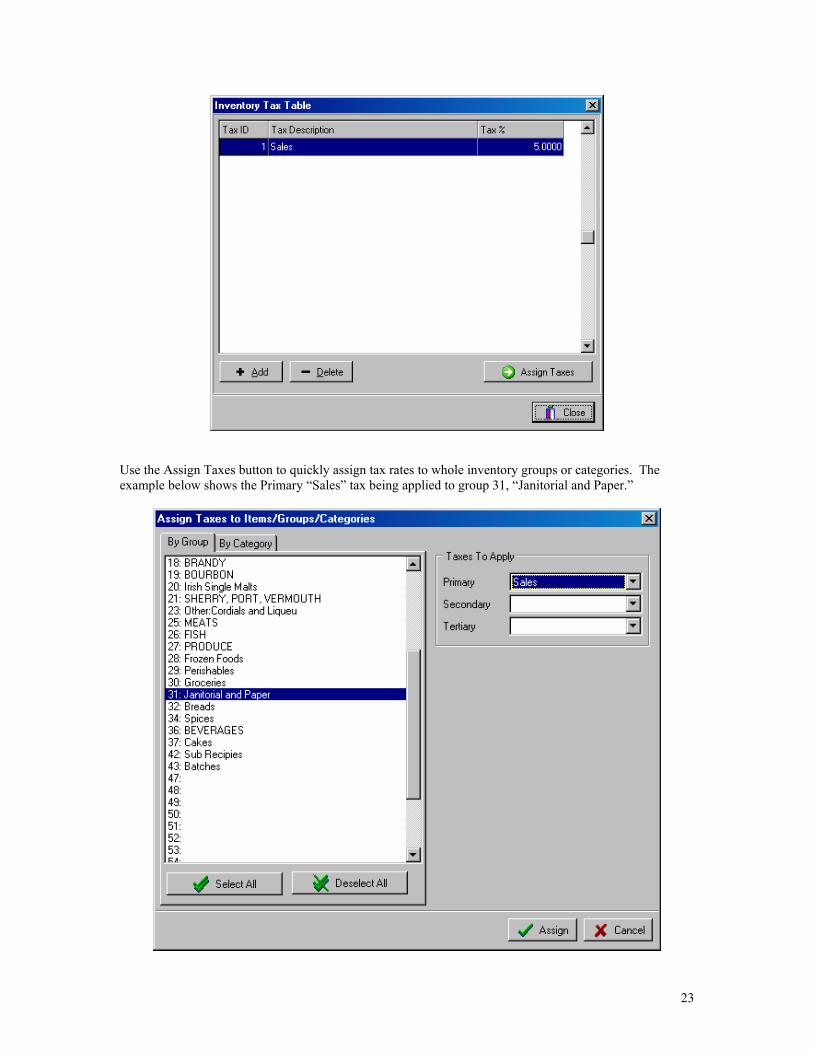
Use the Assign Taxes button to quickly assign tax rates to whole inventory groups or categories. The example below shows the Primary “Sales” tax being applied to group 31, “Janitorial and Paper.”
23
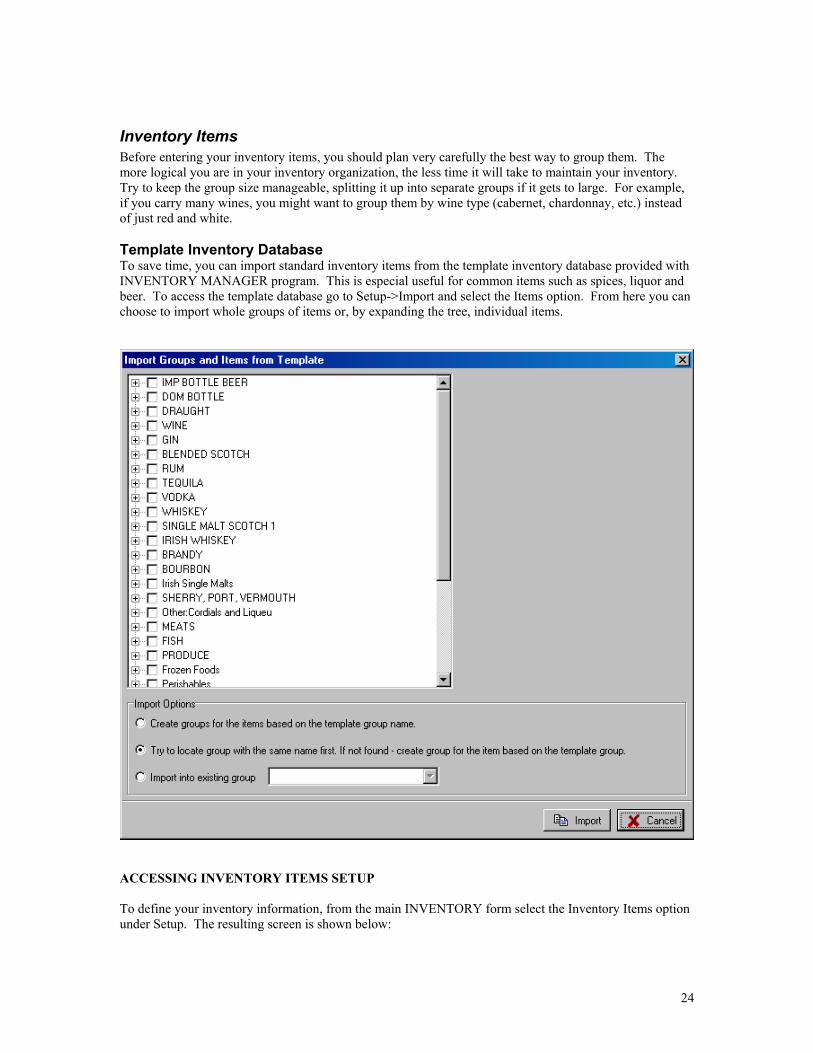
Inventory Items Before entering your inventory items, you should plan very carefully the best way to group them. The more logical you are in your inventory organization, the less time it will take to maintain your inventory. Try to keep the group size manageable, splitting it up into separate groups if it gets to large. For example, if you carry many wines, you might want to group them by wine type (cabernet, chardonnay, etc.) instead of just red and white. Template Inventory Database To save time, you can import standard inventory items from the template inventory database provided with INVENTORY MANAGER program. This is especial useful for common items such as spices, liquor and beer. To access the template database go to Setup->Import and select the Items option. From here you can choose to import whole groups of items or, by expanding the tree, individual items.
ACCESSING INVENTORY ITEMS SETUP To define your inventory information, from the main INVENTORY form select the Inventory Items option under Setup. The resulting screen is shown below:
24
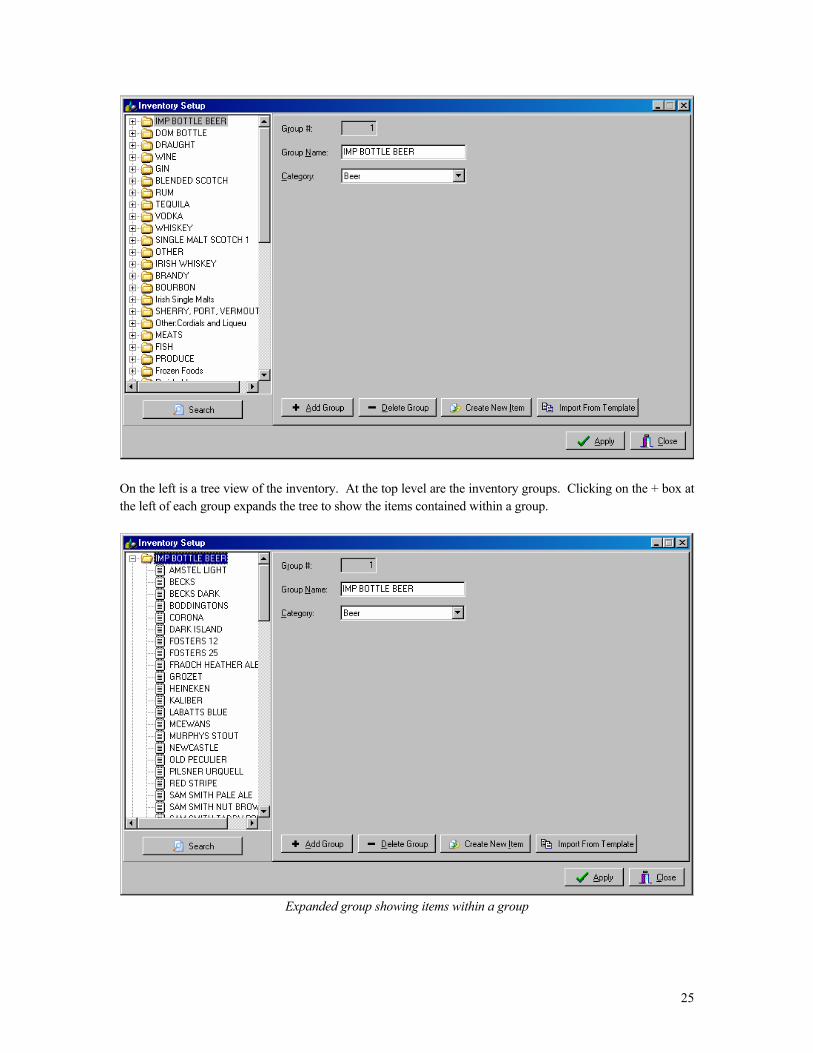
On the left is a tree view of the inventory. At the top level are the inventory groups. Clicking on the + box at the left of each group expands the tree to show the items contained within a group.
Expanded group showing items within a group
25
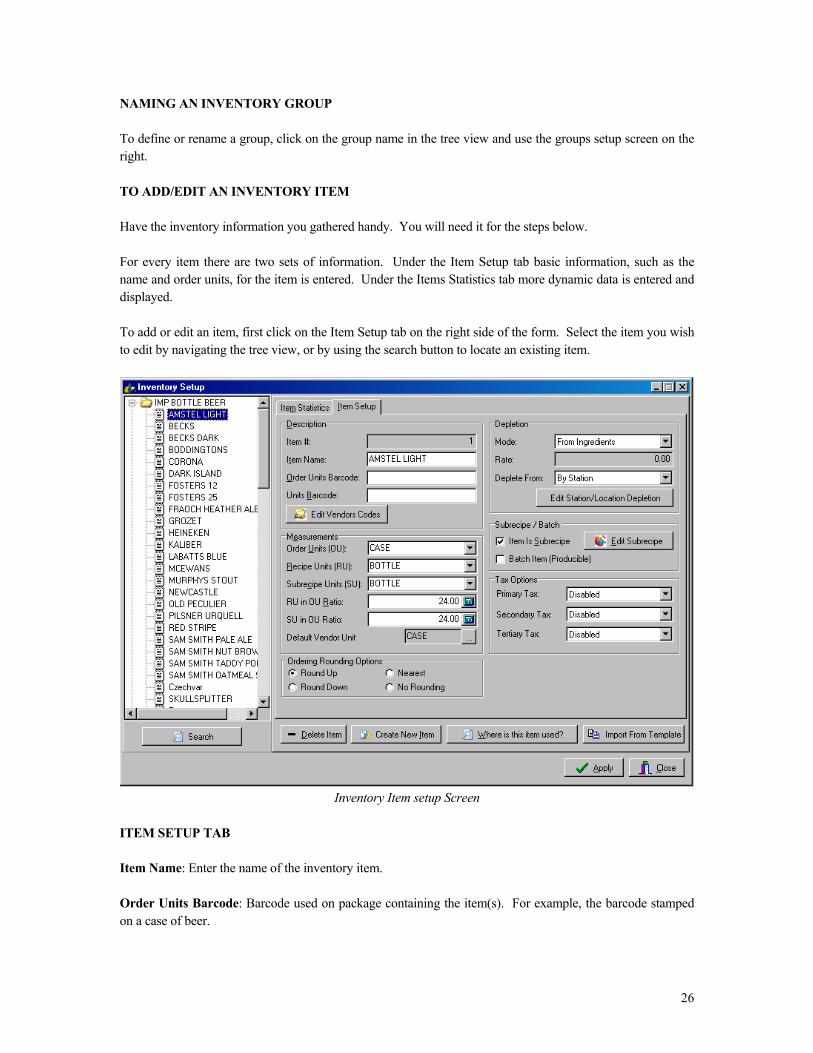
NAMING AN INVENTORY GROUP To define or rename a group, click on the group name in the tree view and use the groups setup screen on the right. TO ADD/EDIT AN INVENTORY ITEM Have the inventory information you gathered handy. You will need it for the steps below. For every item there are two sets of information. Under the Item Setup tab basic information, such as the name and order units, for the item is entered. Under the Items Statistics tab more dynamic data is entered and displayed. To add or edit an item, first click on the Item Setup tab on the right side of the form. Select the item you wish to edit by navigating the tree view, or by using the search button to locate an existing item.
Inventory Item setup Screen
ITEM SETUP TAB Item Name: Enter the name of the inventory item. Order Units Barcode: Barcode used on package containing the item(s). For example, the barcode stamped on a case of beer.
26
Units Barcode: Barcode for the individual items contained in a package. For example, the barcode stamped on each bottle contained in a case of beer. Edit Vendor Codes: Click on this button to assign codes used by vendors to identify the item. The Vendor codes are used on purchase orders and shopping lists. Order Units (OU): Enter the units you wish to use when placing orders with vendors. For example, you might want to order Sirloin Steak by the pound, so you would enter "lbs" in this field. Recipe Units (RU): Enter the most convenient unit of measure for this item when used in recipes. For example, for Sirloin Steak, you may want to measure your portions in ounces, so you would enter "ozs" in this field. Subrecipe Units (SU): Enter the most convenient unit of measure for this item when/if used in sub-recipes. For example, for vegetable oil, you may want to measure your portions in gallons when used in “batch” subrecipes. RU in OU Ratio: Enter here the number of recipe units in each order unit. For example, the ratio between pound ORDER UNITS and ounce RECIPE UNITS, is 16 (i.e., there are 16 ounces in each pound). Important: See the Units section above for instructions on how to pre-define units and ratios. Doing so will save you time and minimize duplication. SU in OU Ratio: Enter here the number of sub-recipe units in each order unit. Depletion Mode: The options for this field are: Manual: Items are depleted by creating an invoice with negative quantities. From Ingredients: Items are depleted according to quantities in recipes and sub-recipes. Per Person: Items are depleted by multiplying the number of customers served times the per
person amount entered in the Rate field. Per Session: Items are depleted by the amount specified in the Rate field. Depletion Rate: This entry is only significant if the depletion for the item is based on “per person” or “per session”. Enter the rate at which the depletion will occur. For example, if you entered a per person based depletion for salt, and you figure that on average .05 lbs of salt is used per person, then you would enter .05 as the DEPLETION RATE. Deplete From: Use this option to link the depletion of an item to a specific location or to the locations associated to POS stations. See the Inventory Locations section for more information on this topic. Item is Subrecipe: Check this box if the item is composed of other inventory items. If checked you can click on the “Edit Subrecipe” button to add/edit the items in the sub-recipe. Batch Item: Check this box if you plan to batch produce and stock the item. Ordering Rounding Options: Select the way you wish to round the quantities when generating shopping lists and purchase orders. In general you should not select the no rounding option since this will allow ordering decimal quantities (0.56 cases of beer).
27
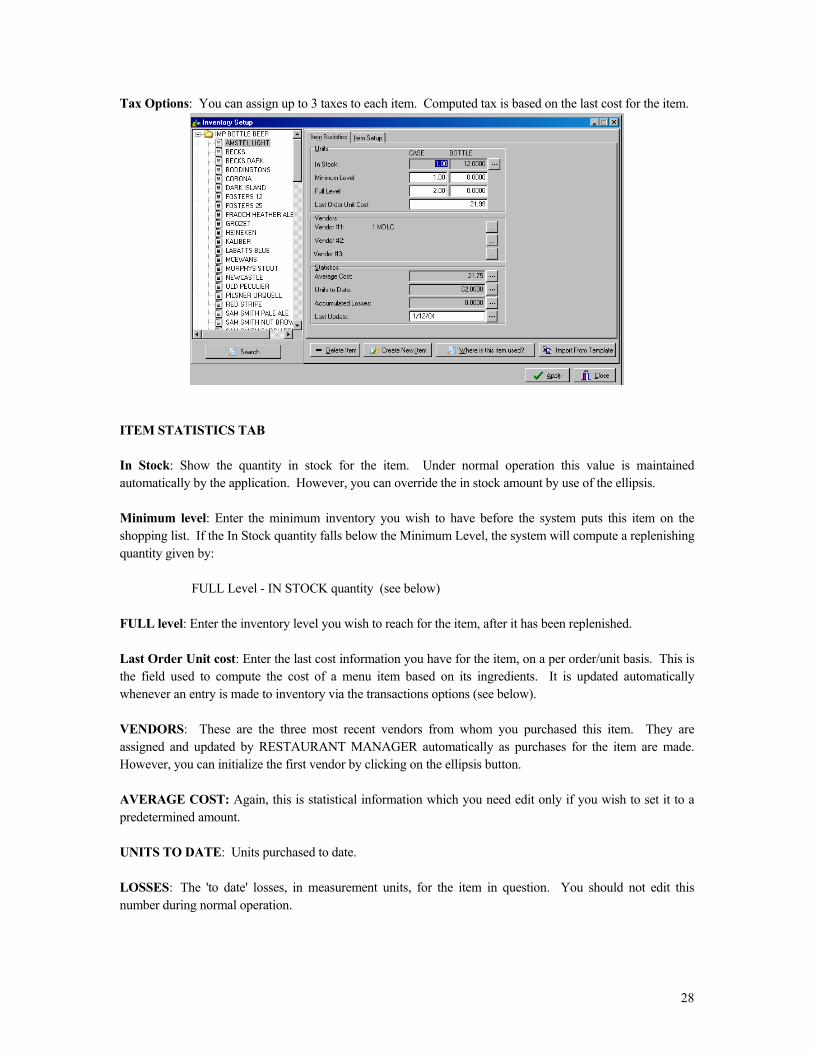
Tax Options: You can assign up to 3 taxes to each item. Computed tax is based on the last cost for the item.
ITEM STATISTICS TAB In Stock: Show the quantity in stock for the item. Under normal operation this value is maintained automatically by the application. However, you can override the in stock amount by use of the ellipsis. Minimum level: Enter the minimum inventory you wish to have before the system puts this item on the shopping list. If the In Stock quantity falls below the Minimum Level, the system will compute a replenishing quantity given by: FULL Level - IN STOCK quantity (see below) FULL level: Enter the inventory level you wish to reach for the item, after it has been replenished. Last Order Unit cost: Enter the last cost information you have for the item, on a per order/unit basis. This is the field used to compute the cost of a menu item based on its ingredients. It is updated automatically whenever an entry is made to inventory via the transactions options (see below). VENDORS: These are the three most recent vendors from whom you purchased this item. They are assigned and updated by RESTAURANT MANAGER automatically as purchases for the item are made. However, you can initialize the first vendor by clicking on the ellipsis button. AVERAGE COST: Again, this is statistical information which you need edit only if you wish to set it to a predetermined amount. UNITS TO DATE: Units purchased to date. LOSSES: The 'to date' losses, in measurement units, for the item in question. You should not edit this number during normal operation.
28
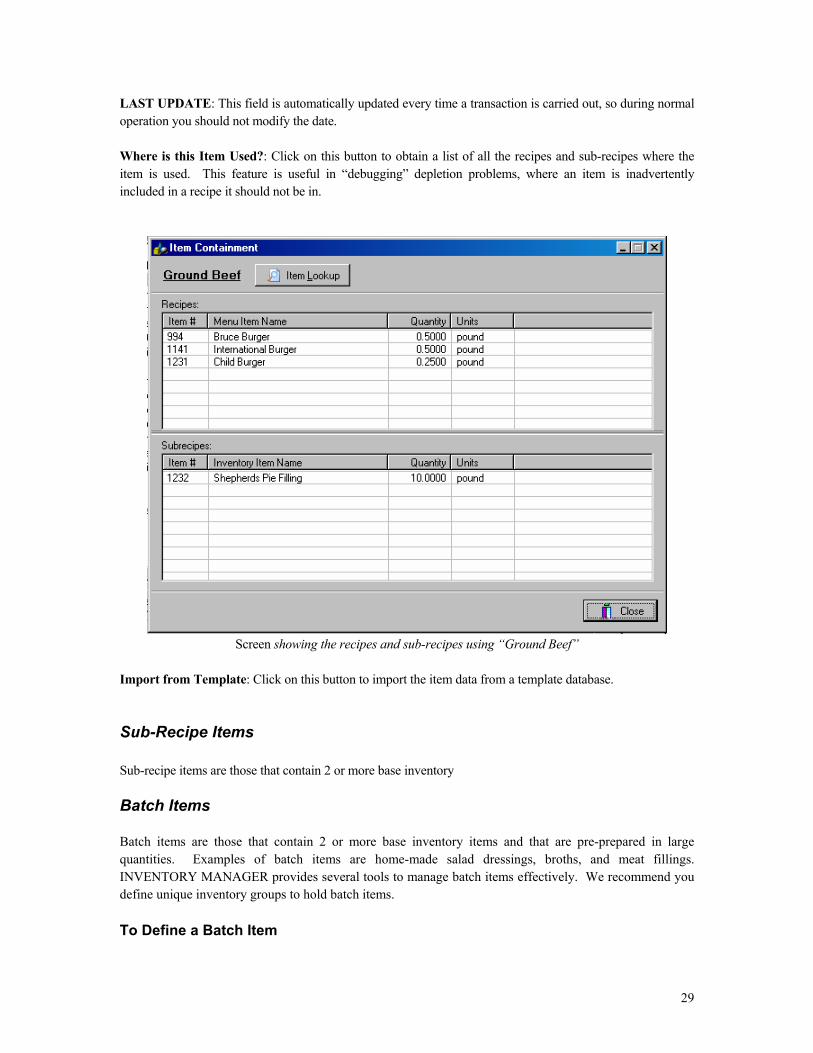
LAST UPDATE: This field is automatically updated every time a transaction is carried out, so during normal operation you should not modify the date. Where is this Item Used?: Click on this button to obtain a list of all the recipes and sub-recipes where the item is used. This feature is useful in “debugging” depletion problems, where an item is inadvertently included in a recipe it should not be in.
Screen showing the recipes and sub-recipes using “Ground Beef”
Import from Template: Click on this button to import the item data from a template database.
Sub-Recipe Items Sub-recipe items are those that contain 2 or more base inventory
Batch Items Batch items are those that contain 2 or more base inventory items and that are pre-prepared in large quantities. Examples of batch items are home-made salad dressings, broths, and meat fillings. INVENTORY MANAGER provides several tools to manage batch items effectively. We recommend you define unique inventory groups to hold batch items. To Define a Batch Item
29
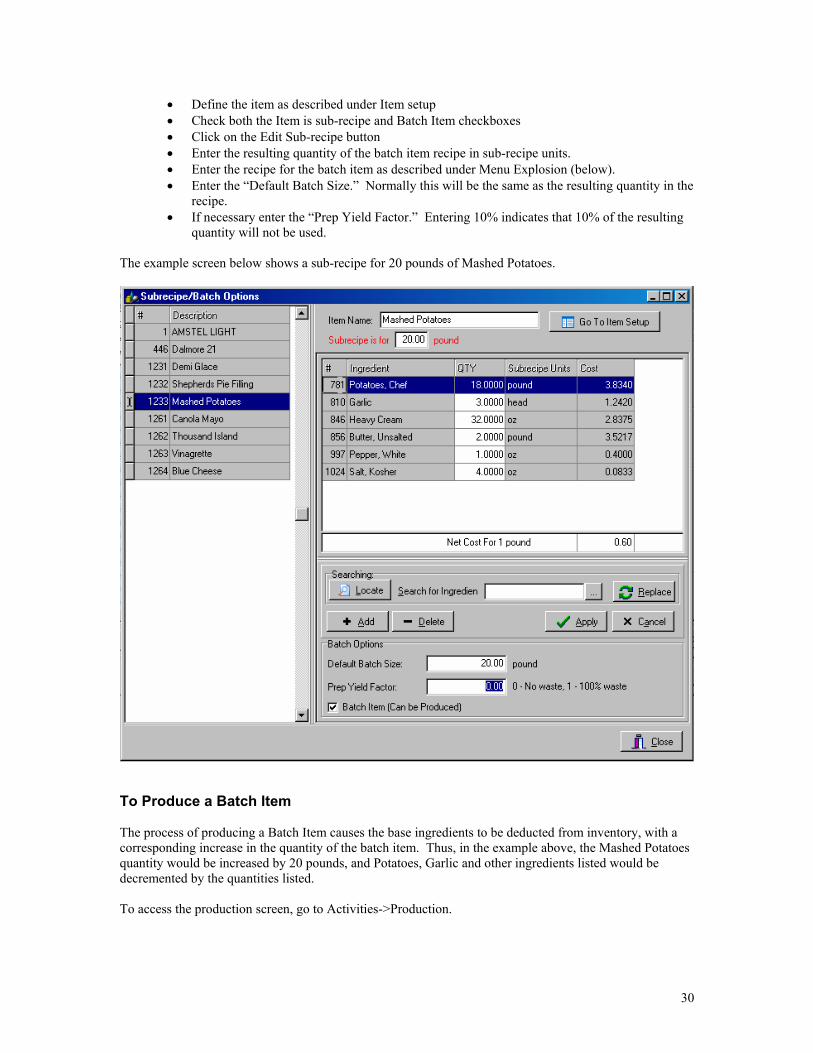
• Define the item as described under Item setup • Check both the Item is sub-recipe and Batch Item checkboxes • Click on the Edit Sub-recipe button • Enter the resulting quantity of the batch item recipe in sub-recipe units. • Enter the recipe for the batch item as described under Menu Explosion (below). • Enter the “Default Batch Size.” Normally this will be the same as the resulting quantity in the
recipe. • If necessary enter the “Prep Yield Factor.” Entering 10% indicates that 10% of the resulting
quantity will not be used. The example screen below shows a sub-recipe for 20 pounds of Mashed Potatoes.
To Produce a Batch Item The process of producing a Batch Item causes the base ingredients to be deducted from inventory, with a corresponding increase in the quantity of the batch item. Thus, in the example above, the Mashed Potatoes quantity would be increased by 20 pounds, and Potatoes, Garlic and other ingredients listed would be decremented by the quantities listed. To access the production screen, go to Activities->Production.
30
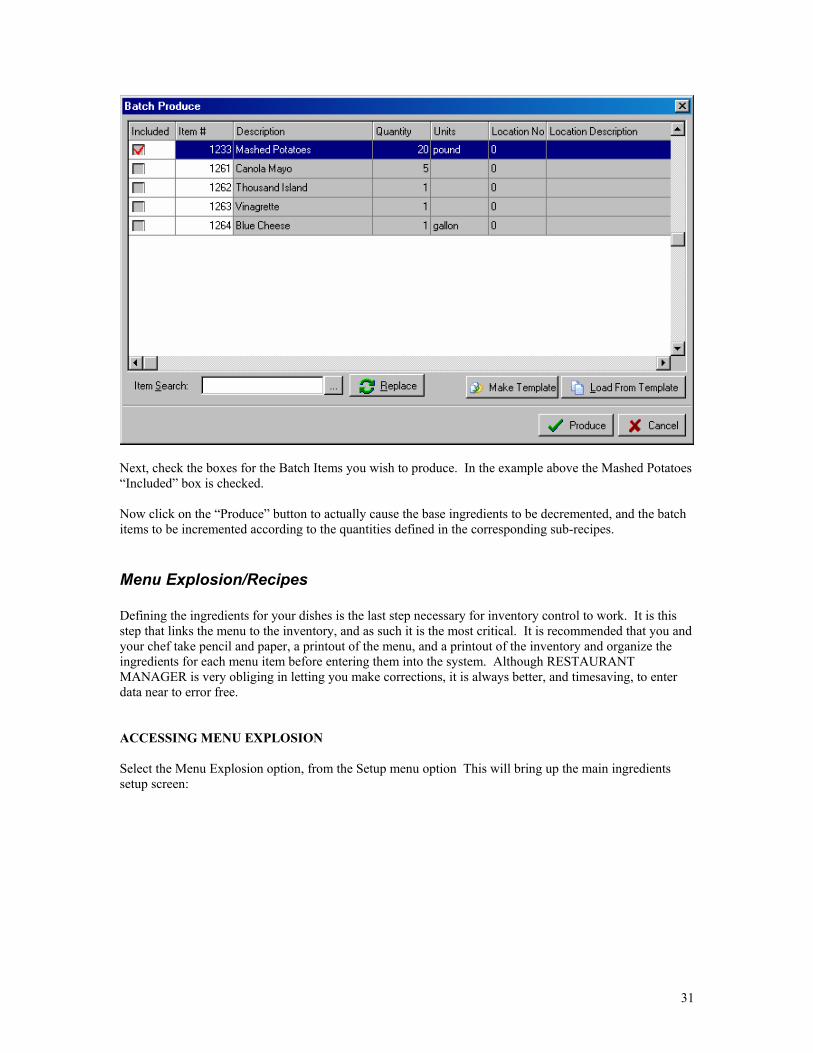
Next, check the boxes for the Batch Items you wish to produce. In the example above the Mashed Potatoes “Included” box is checked. Now click on the “Produce” button to actually cause the base ingredients to be decremented, and the batch items to be incremented according to the quantities defined in the corresponding sub-recipes.
Menu Explosion/Recipes Defining the ingredients for your dishes is the last step necessary for inventory control to work. It is this step that links the menu to the inventory, and as such it is the most critical. It is recommended that you and your chef take pencil and paper, a printout of the menu, and a printout of the inventory and organize the ingredients for each menu item before entering them into the system. Although RESTAURANT MANAGER is very obliging in letting you make corrections, it is always better, and timesaving, to enter data near to error free. ACCESSING MENU EXPLOSION Select the Menu Explosion option, from the Setup menu option This will bring up the main ingredients setup screen:
31
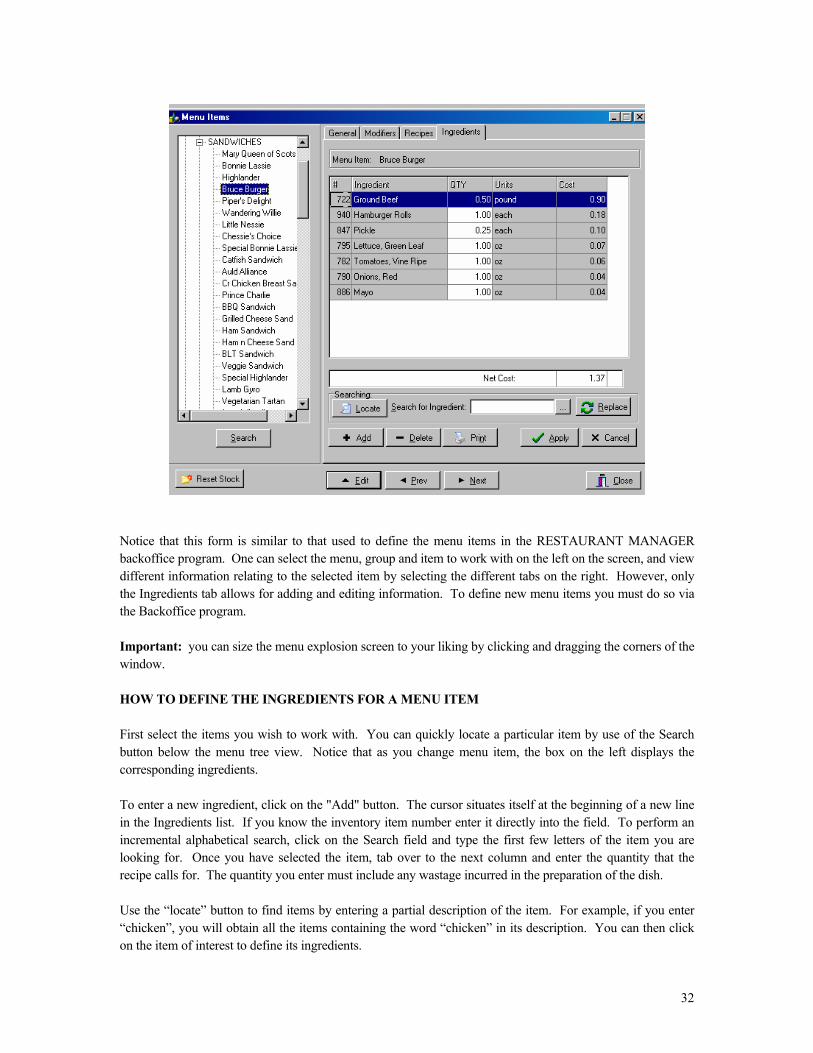
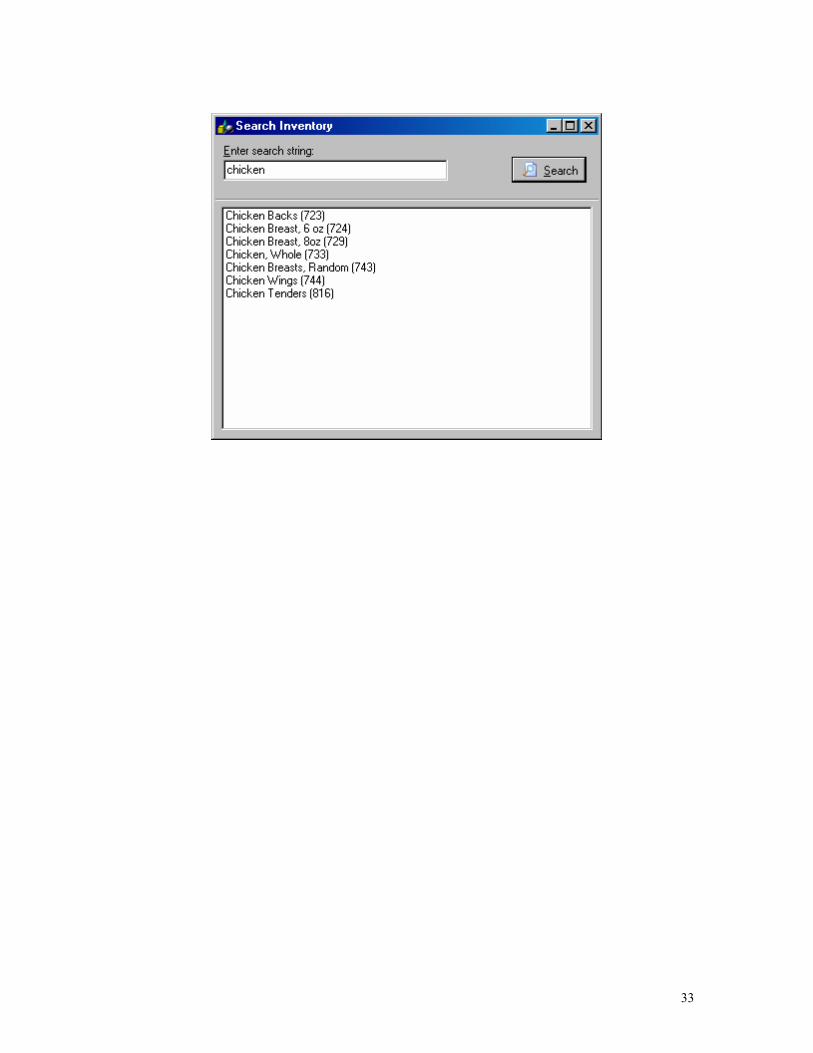
Notice that this form is similar to that used to define the menu items in the RESTAURANT MANAGER backoffice program. One can select the menu, group and item to work with on the left on the screen, and view different information relating to the selected item by selecting the different tabs on the right. However, only the Ingredients tab allows for adding and editing information. To define new menu items you must do so via the Backoffice program. Important: you can size the menu explosion screen to your liking by clicking and dragging the corners of the window. HOW TO DEFINE THE INGREDIENTS FOR A MENU ITEM First select the items you wish to work with. You can quickly locate a particular item by use of the Search button below the menu tree view. Notice that as you change menu item, the box on the left displays the corresponding ingredients. To enter a new ingredient, click on the "Add" button. The cursor situates itself at the beginning of a new line in the Ingredients list. If you know the inventory item number enter it directly into the field. To perform an incremental alphabetical search, click on the Search field and type the first few letters of the item you are looking for. Once you have selected the item, tab over to the next column and enter the quantity that the recipe calls for. The quantity you enter must include any wastage incurred in the preparation of the dish. Use the “locate” button to find items by entering a partial description of the item. For example, if you enter “chicken”, you will obtain all the items containing the word “chicken” in its description. You can then click on the item of interest to define its ingredients.
32
33

OPERATING PROCEDURES
Initializing Inventory Item Quantities In most instances you will be implementing Inventory Control with the business already operating. To initialize the inventory item quantities you will have to record the physical inventory and enter it into the program. This must be done at the before opening for business, or after the close of business. It is very important that you initialize ALL of the items you wish to track at once. See the Physical Inventory section for instructions on performing a physical inventory.
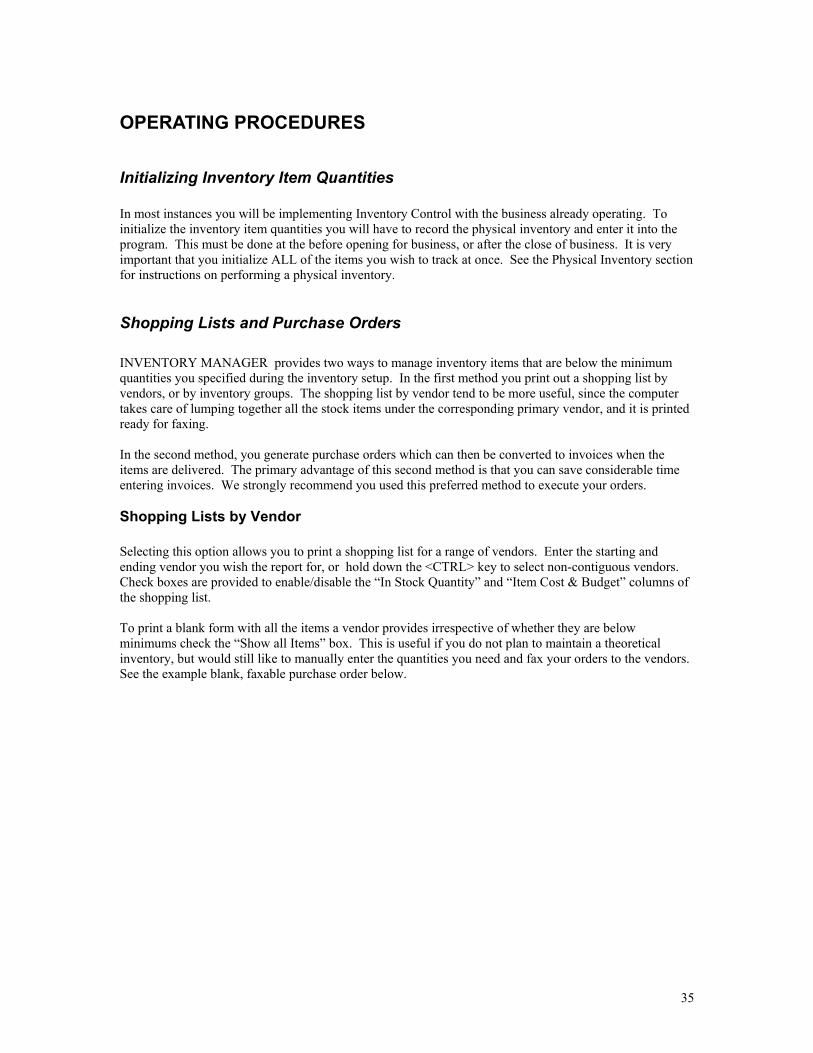
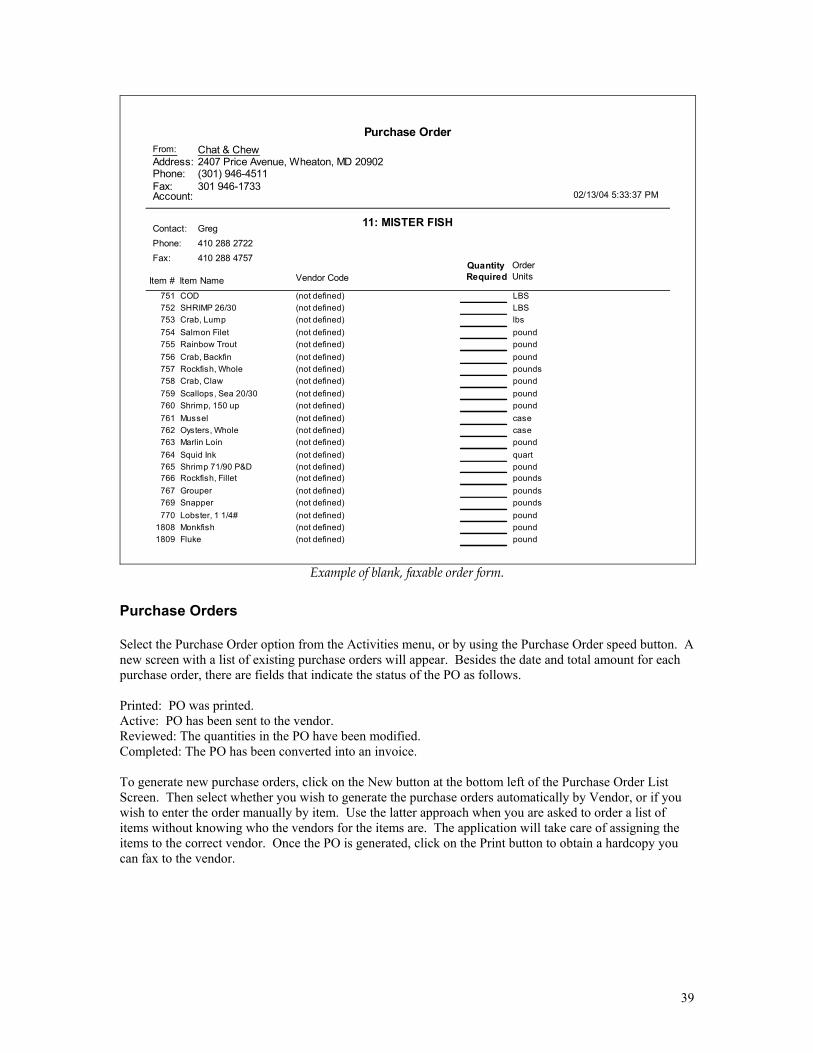
Shopping Lists and Purchase Orders INVENTORY MANAGER provides two ways to manage inventory items that are below the minimum quantities you specified during the inventory setup. In the first method you print out a shopping list by vendors, or by inventory groups. The shopping list by vendor tend to be more useful, since the computer takes care of lumping together all the stock items under the corresponding primary vendor, and it is printed ready for faxing. In the second method, you generate purchase orders which can then be converted to invoices when the items are delivered. The primary advantage of this second method is that you can save considerable time entering invoices. We strongly recommend you used this preferred method to execute your orders. Shopping Lists by Vendor Selecting this option allows you to print a shopping list for a range of vendors. Enter the starting and ending vendor you wish the report for, or hold down the <CTRL> key to select non-contiguous vendors. Check boxes are provided to enable/disable the “In Stock Quantity” and “Item Cost & Budget” columns of the shopping list. To print a blank form with all the items a vendor provides irrespective of whether they are below minimums check the “Show all Items” box. This is useful if you do not plan to maintain a theoretical inventory, but would still like to manually enter the quantities you need and fax your orders to the vendors. See the example blank, faxable purchase order below.
35
Shopping List
Filter SettingsNo active filtering.
Report Period: 01/27/04
Chat & Chew01/27/04Date:Time: 4:22 PM
Page: 1
Grand Totals
MDLCU.S. FoodserviceCostal Sunbelt ProduceOttenberg'sFell Point Wholesale MeatMISTER FISHFPC FoodservicesBowie ProduceLa Marseillaise BakeryAuth Bros.
Vendor Total
2,791.7291.30
1,688.478.92
94.87116.35
18,183.4444.7020.6764.46
___________23,104.90
36
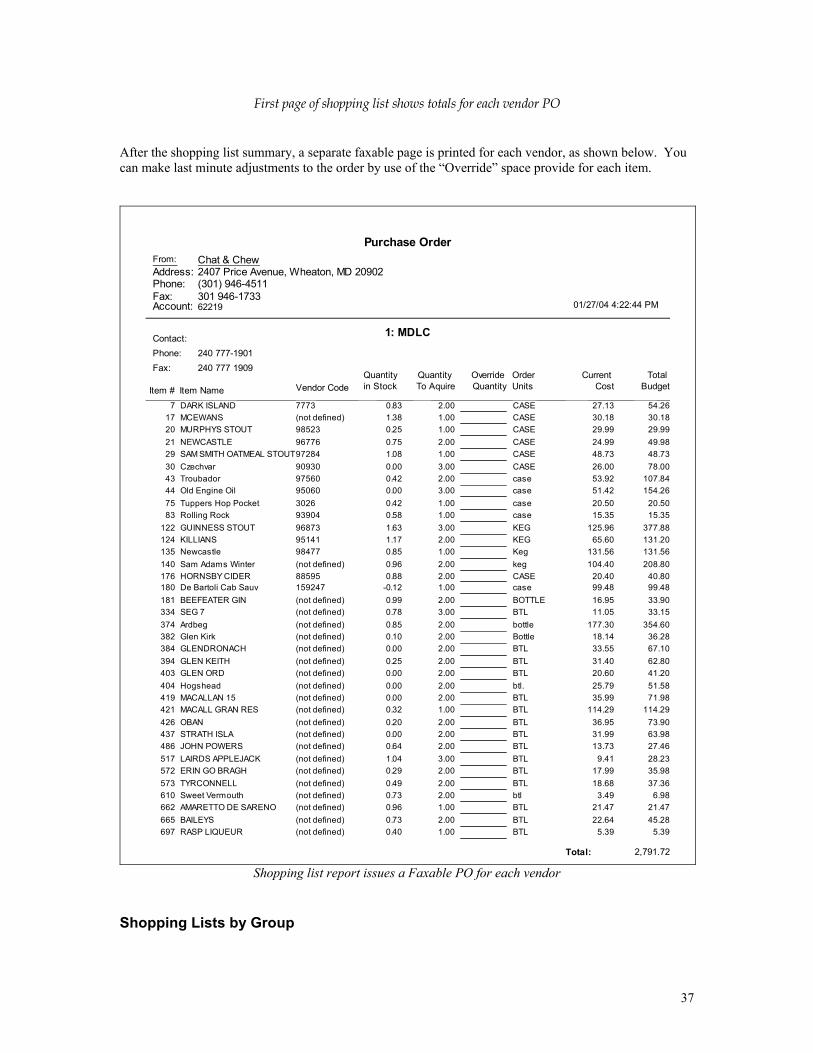
First page of shopping list shows totals for each vendor PO After the shopping list summary, a separate faxable page is printed for each vendor, as shown below. You can make last minute adjustments to the order by use of the “Override” space provide for each item.
Purchase OrderChat & Chew2407 Price Avenue, Wheaton, MD 20902Address:
Phone: (301) 946-4511
01/27/04 4:22:44 PM
From:
Fax: 301 946-1733Account: 62219
1: MDLCContact: Phone: 240 777-1901
Item # Item Name Vendor CodeQuantity in Stock
Quantity To Aquire
Override Quantity
Order Units
Current Cost
Total Budget
Fax: 240 777 1909
7 DARK ISLAND 7773 0.83 2.00 CASE 27.13 54.2617 MCEWANS (not defined) 1.38 1.00 CASE 30.18 30.1820 MURPHYS STOUT 98523 0.25 1.00 CASE 29.99 29.9921 NEWCASTLE 96776 0.75 2.00 CASE 24.99 49.9829 SAM SMITH OATMEAL STOUT97284 1.08 1.00 CASE 48.73 48.7330 Czechvar 90930 0.00 3.00 CASE 26.00 78.0043 Troubador 97560 0.42 2.00 case 53.92 107.8444 Old Engine Oil 95060 0.00 3.00 case 51.42 154.2675 Tuppers Hop Pocket 3026 0.42 1.00 case 20.50 20.5083 Rolling Rock 93904 0.58 1.00 case 15.35 15.35
122 GUINNESS STOUT 96873 1.63 3.00 KEG 125.96 377.88124 KILLIANS 95141 1.17 2.00 KEG 65.60 131.20135 Newcastle 98477 0.85 1.00 Keg 131.56 131.56140 Sam Adams Winter (not defined) 0.96 2.00 keg 104.40 208.80176 HORNSBY CIDER 88595 0.88 2.00 CASE 20.40 40.80180 De Bartoli Cab Sauv 159247 -0.12 1.00 case 99.48 99.48181 BEEFEATER GIN (not defined) 0.99 2.00 BOTTLE 16.95 33.90334 SEG 7 (not defined) 0.78 3.00 BTL 11.05 33.15374 Ardbeg (not defined) 0.85 2.00 bottle 177.30 354.60382 Glen Kirk (not defined) 0.10 2.00 Bottle 18.14 36.28384 GLENDRONACH (not defined) 0.00 2.00 BTL 33.55 67.10394 GLEN KEITH (not defined) 0.25 2.00 BTL 31.40 62.80403 GLEN ORD (not defined) 0.00 2.00 BTL 20.60 41.20404 Hogshead (not defined) 0.00 2.00 btl. 25.79 51.58419 MACALLAN 15 (not defined) 0.00 2.00 BTL 35.99 71.98421 MACALL GRAN RES (not defined) 0.32 1.00 BTL 114.29 114.29426 OBAN (not defined) 0.20 2.00 BTL 36.95 73.90437 STRATH ISLA (not defined) 0.00 2.00 BTL 31.99 63.98486 JOHN POWERS (not defined) 0.64 2.00 BTL 13.73 27.46517 LAIRDS APPLEJACK (not defined) 1.04 3.00 BTL 9.41 28.23572 ERIN GO BRAGH (not defined) 0.29 2.00 BTL 17.99 35.98573 TYRCONNELL (not defined) 0.49 2.00 BTL 18.68 37.36610 Sweet Vermouth (not defined) 0.73 2.00 btl 3.49 6.98662 AMARETTO DE SARENO (not defined) 0.96 1.00 BTL 21.47 21.47665 BAILEYS (not defined) 0.73 2.00 BTL 22.64 45.28697 RASP LIQUEUR (not defined) 0.40 1.00 BTL 5.39 5.39
Total: 2,791.72
Shopping list report issues a Faxable PO for each vendor Shopping Lists by Group
37
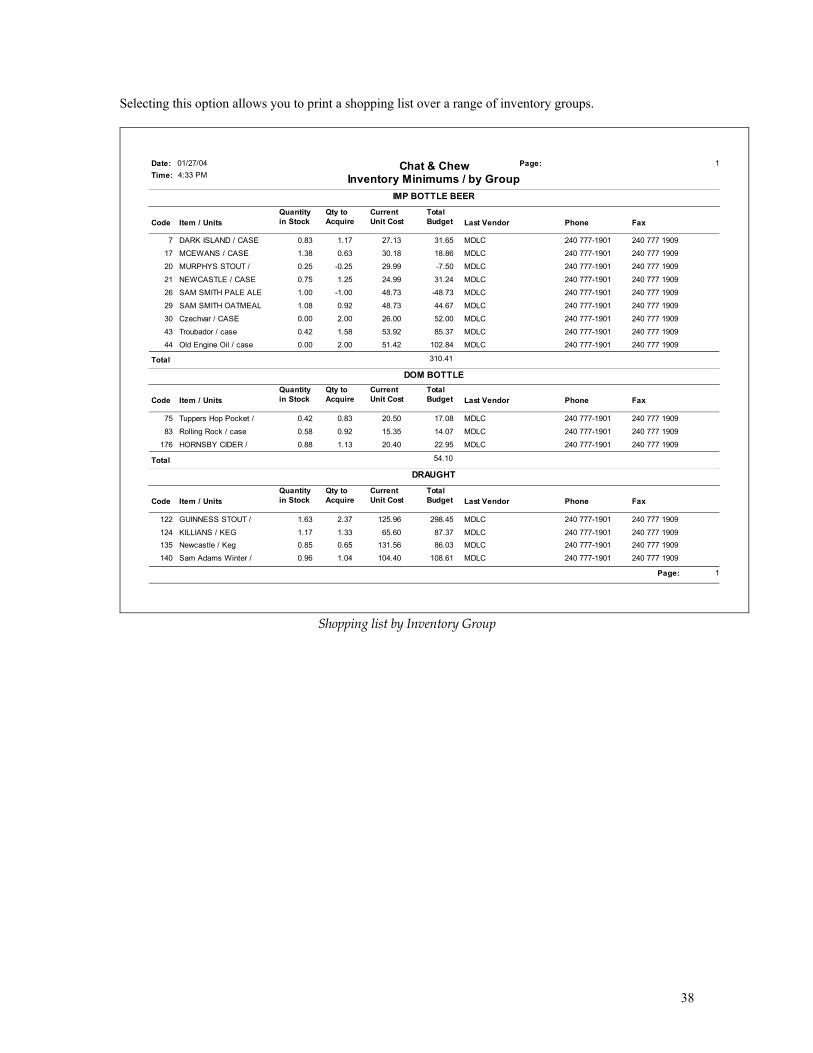
Selecting this option allows you to print a shopping list over a range of inventory groups.
Inventory Minimums / by Group01/27/04Date:
Time: 4:33 PMPage: 1Chat & Chew
IMP BOTTLE BEER
Code Item / UnitsQuantity in Stock
Qty to Acquire
Current Unit Cost
Total Budget Last Vendor Phone Fax
7 DARK ISLAND / CASE 0.83 1.17 27.13 31.65 MDLC 240 777-1901 240 777 1909
17 MCEWANS / CASE 1.38 0.63 30.18 18.86 MDLC 240 777-1901 240 777 1909
20 MURPHYS STOUT / 0.25 -0.25 29.99 -7.50 MDLC 240 777-1901 240 777 1909
21 NEWCASTLE / CASE 0.75 1.25 24.99 31.24 MDLC 240 777-1901 240 777 1909
26 SAM SMITH PALE ALE 1.00 -1.00 48.73 -48.73 MDLC 240 777-1901 240 777 1909
29 SAM SMITH OATMEAL 1.08 0.92 48.73 44.67 MDLC 240 777-1901 240 777 1909
30 Czechvar / CASE 0.00 2.00 26.00 52.00 MDLC 240 777-1901 240 777 1909
43 Troubador / case 0.42 1.58 53.92 85.37 MDLC 240 777-1901 240 777 1909
44 Old Engine Oil / case 0.00 2.00 51.42 102.84 MDLC 240 777-1901 240 777 1909
Total 310.41
DOM BOTTLE
Code Item / UnitsQuantity in Stock
Qty to Acquire
Current Unit Cost
Total Budget Last Vendor Phone Fax
75 Tuppers Hop Pocket / 0.42 0.83 20.50 17.08 MDLC 240 777-1901 240 777 1909
83 Rolling Rock / case 0.58 0.92 15.35 14.07 MDLC 240 777-1901 240 777 1909
176 HORNSBY CIDER / 0.88 1.13 20.40 22.95 MDLC 240 777-1901 240 777 1909
Total 54.10
DRAUGHT
Code Item / UnitsQuantity in Stock
Qty to Acquire
Current Unit Cost
Total Budget Last Vendor Phone Fax
122 GUINNESS STOUT / 1.63 2.37 125.96 298.45 MDLC 240 777-1901 240 777 1909
124 KILLIANS / KEG 1.17 1.33 65.60 87.37 MDLC 240 777-1901 240 777 1909135 Newcastle / Keg 0.85 0.65 131.56 86.03 MDLC 240 777-1901 240 777 1909
140 Sam Adams Winter / 0.96 1.04 104.40 108.61 MDLC 240 777-1901 240 777 1909
Page: 1
Shopping list by Inventory Group
38
Purchase OrderChat & Chew2407 Price Avenue, Wheaton, MD 20902Address:
Phone: (301) 946-4511
02/13/04 5:33:37 PM
From:
Fax: 301 946-1733Account:
11: MISTER FISHContact: Phone:
Greg410 288 2722
Item # Item Name Vendor CodeQuantity Required
Order Units
Fax: 410 288 4757
751 COD (not defined) LBS752 SHRIMP 26/30 (not defined) LBS753 Crab, Lump (not defined) lbs754 Salmon Filet (not defined) pound755 Rainbow Trout (not defined) pound756 Crab, Backfin (not defined) pound757 Rockfish, Whole (not defined) pounds758 Crab, Claw (not defined) pound759 Scallops, Sea 20/30 (not defined) pound760 Shrimp, 150 up (not defined) pound761 Mussel (not defined) case762 Oysters, Whole (not defined) case763 Marlin Loin (not defined) pound764 Squid Ink (not defined) quart765 Shrimp 71/90 P&D (not defined) pound766 Rockfish, Fillet (not defined) pounds767 Grouper (not defined) pounds769 Snapper (not defined) pounds770 Lobster, 1 1/4# (not defined) pound
1808 Monkfish (not defined) pound1809 Fluke (not defined) pound
Example of blank, faxable order form.
Purchase Orders Select the Purchase Order option from the Activities menu, or by using the Purchase Order speed button. A new screen with a list of existing purchase orders will appear. Besides the date and total amount for each purchase order, there are fields that indicate the status of the PO as follows. Printed: PO was printed. Active: PO has been sent to the vendor. Reviewed: The quantities in the PO have been modified. Completed: The PO has been converted into an invoice. To generate new purchase orders, click on the New button at the bottom left of the Purchase Order List Screen. Then select whether you wish to generate the purchase orders automatically by Vendor, or if you wish to enter the order manually by item. Use the latter approach when you are asked to order a list of items without knowing who the vendors for the items are. The application will take care of assigning the items to the correct vendor. Once the PO is generated, click on the Print button to obtain a hardcopy you can fax to the vendor.
39

Purchase Order list
Using the “By Item” option allows you to enter items from multiple vendors. On the vendor selection screen you can check the “Include all vendor items” box to obtain a blank PO with all the vendor items irrespective of whether they are below minimums. This is useful to handle special situations where you know you will be needing more product than that indicated by the system.
40

Purchase orders vendor selection screen.
Registering Inventory Purchases (Invoices) This option is used to enter information on the incoming stock. Inventory purchases are vendor oriented, in that you enter information into the system directly from the vendors invoice. Once the stock purchases are typed into the system, all you do is post the information to inventory, automatically adjusting all the inventory stock levels. You may also use this option to find out what items each vendor provides. More on that below. REGISTERING INVOICES To add invoices, from main Inventory Control screen, select Activities->Invoices/Manual Debits->Invoices, or simply click on the Invoices speed button. The following screen will appear:
41

Enter the vendor code. If you do not remember the vendor code, click on the Lookup speed button for a list of all the vendors. The next prompt is for a reference. This can be any information relevant to the transaction, such as an invoice number. Once you have entered the reference, the cursor moves to the Date field. This will, by default, have the current date. It is very important that you enter the correct date (and time, if you are performing daily physical inventories) for the invoice, since it is used to compute your actual food cost between physical inventories. An incorrect date and/or time might cause the invoice to be incorrectly accounted for in the food cost reports. Now we are ready to enter the invoice items. The items sold by the vendor will appear in the left part of the screen. If it is the first transaction for the vendor, the screen will be blank, ready for you to enter the items. To do so, simply start writing the name of the item, or enter the item code directly.
42

Once the code is entered, the description and units of the item selected will be shown. You may now enter the quantity of the item received (in order units), and the price per unit paid. The system will compute the total price for the item and move on to the next line. A running total of the invoice is shown at the bottom right of the screen. If you’ve enabled the Price Increase Threshold feature, you will be flagged of any price increase that exceeds the Price Increase Threshold. The tax for taxable items is also computed. This helps to square off the registered invoice with the vendors invoice. You can also assign a % tax to any item during the entry process. This feature is provided in case the taxable status of an item was not programmed correctly during the item setup process. When you are finished, check the “Hide unused items” checkbox so that you can review the entries, and if correct, click on the SAVE button. A clean list of the items on the invoice will be displayed for you to cross check, and a confirming prompt will appear at the bottom of the screen. Finally, you are presented with an option to print the registered invoice. IF YOU MAKE A MISTAKE RESTAURANT MANAGER lets you undo any errors very simply. From the Inventory Invoices/Manual Debits menu, select the View-Edit-Print option, and follow the editing instructions described below, in HOW TO EDIT TRANSACTIONS. Creating Invoices from Purchase Orders Click on the “From Purchase Order” button if you wish to create the invoice from a previously issued purchase order. The invoice is populated with the items on the PO, and all you have to do is make any necessary corrections to the quantities and prices. Importing Purchases from a File In addition to manual entry, RESTAURANT MANAGER provides the ability to import vendor purchases from a disk file. In order to use this feature, your vendor must supply an ASCII text file which is compatible with RESTAURANT MANAGER. Contact Action Systems, Inc. or your local authorized reseller for details on the import file specifications.
43
To import purchase data, click on the "Import" button from the Inventory Purchases form. RESTAURANT MANAGER will ask for the name of the input file. If the file has been copied to the RESTAURANT MANAGER directory, then you only need to enter the file name by itself. If the file is in another sub-directory, or on a floppy disk, you must enter the full DOS path name for the file. RESTAURANT MANAGER will then bring up the purchases screen and ask for the header information which consists of the vendor number, the date and a reference description for the transaction. After filling in the header information, RESTAURANT MANAGER will read the import file and display the entries on screen. The entries can be modified as necessary before saving the transaction.
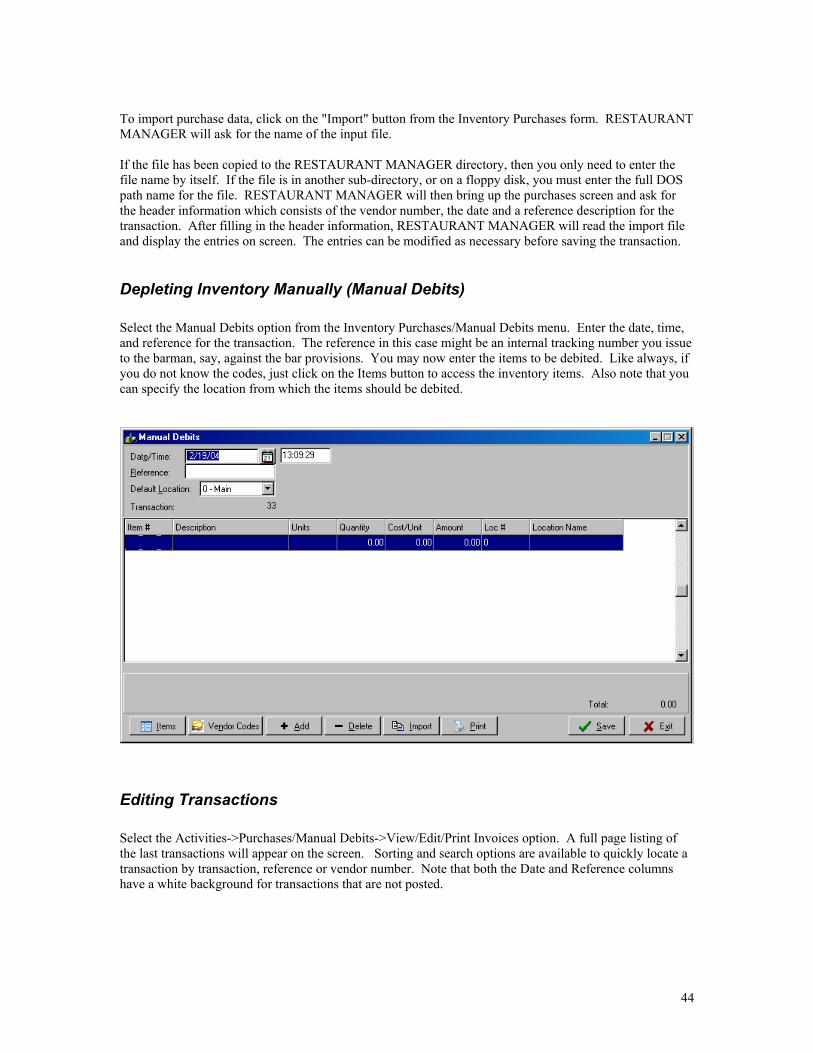
Depleting Inventory Manually (Manual Debits) Select the Manual Debits option from the Inventory Purchases/Manual Debits menu. Enter the date, time, and reference for the transaction. The reference in this case might be an internal tracking number you issue to the barman, say, against the bar provisions. You may now enter the items to be debited. Like always, if you do not know the codes, just click on the Items button to access the inventory items. Also note that you can specify the location from which the items should be debited.
Editing Transactions Select the Activities->Purchases/Manual Debits->View/Edit/Print Invoices option. A full page listing of the last transactions will appear on the screen. Sorting and search options are available to quickly locate a transaction by transaction, reference or vendor number. Note that both the Date and Reference columns have a white background for transactions that are not posted.
44
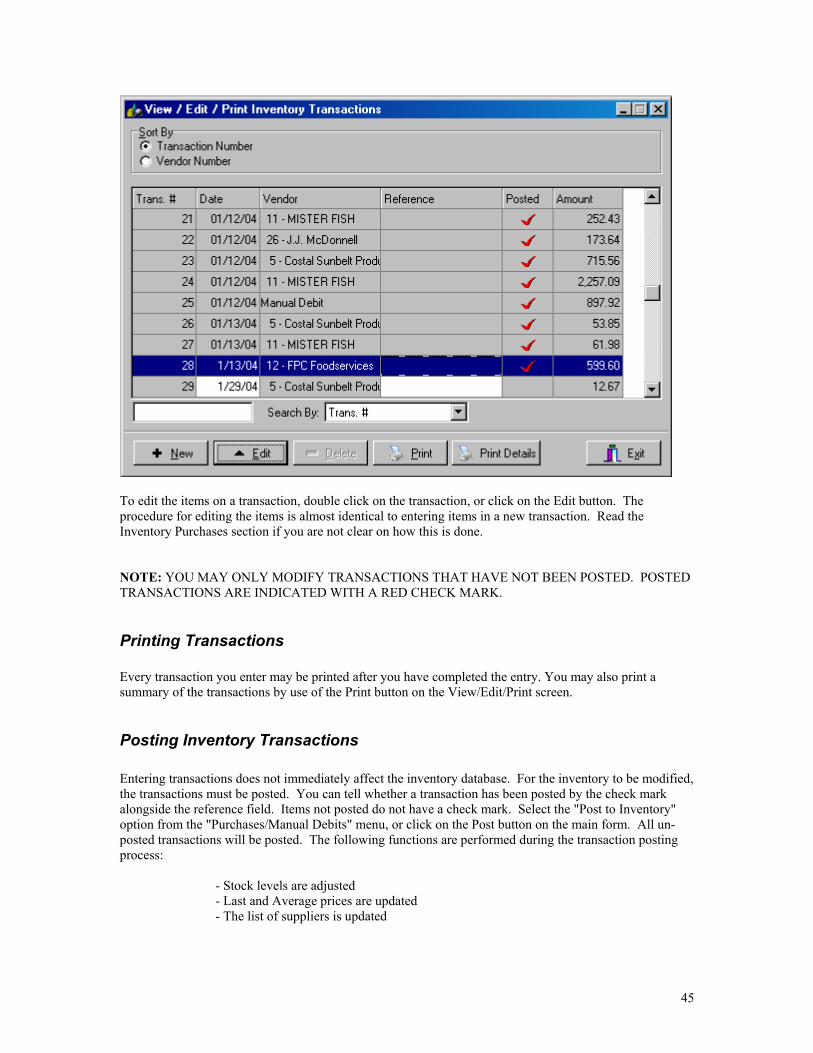
To edit the items on a transaction, double click on the transaction, or click on the Edit button. The procedure for editing the items is almost identical to entering items in a new transaction. Read the Inventory Purchases section if you are not clear on how this is done. NOTE: YOU MAY ONLY MODIFY TRANSACTIONS THAT HAVE NOT BEEN POSTED. POSTED TRANSACTIONS ARE INDICATED WITH A RED CHECK MARK.
Printing Transactions Every transaction you enter may be printed after you have completed the entry. You may also print a summary of the transactions by use of the Print button on the View/Edit/Print screen.
Posting Inventory Transactions Entering transactions does not immediately affect the inventory database. For the inventory to be modified, the transactions must be posted. You can tell whether a transaction has been posted by the check mark alongside the reference field. Items not posted do not have a check mark. Select the "Post to Inventory" option from the "Purchases/Manual Debits" menu, or click on the Post button on the main form. All un-posted transactions will be posted. The following functions are performed during the transaction posting process: - Stock levels are adjusted - Last and Average prices are updated - The list of suppliers is updated
45

Menu Cost Recalculation When you define the ingredients for a menu item, the system will calculate the total cost of the item using the current costs of the inventory items that compose it. The "Menu Cost Recalculation" option is provided so that you may update the item costs in the Menu using the most current Inventory items costs. As you update the inventory (using the Inventory Purchases function) the cost of the inventory items will probably change, and the item costs stored in the Menu file will become out of date. We recommend you always recalculate the menu item costs after recording any invoices and before you issue any reports.
46

Physical Inventories This option is used periodically to adjust the computer inventory levels to actual levels. It is the most critical data entry function you will be performing. It is by comparing the actual inventory levels with the theoretical levels that one gets the most useful information. Physical inventories should be performed on a regular basis (every one or two weeks) during inactive periods of the business, usually early or late in the day. The session must be closed, and all invoices for received product must be entered and posted. If this procedure is not followed, your food cost and other reports will not be accurate. Printing the Physical Inventory Entry Form Before counting your inventory, print out the Physical Inventory Entry Form available from the Reports->Lists Menu. This form is conveniently laid out to allow easy entry of the quantities both in order and recipe units. If using locations, print the “Physical Inventory by Location” report.
Physical Inventory List / by Group01/29/04Date:
Time: 1:51 PMPage: 1Chat & Chew
Group 1: IMP BOTTLE BEER
Item # Description QTY Order Units QTY Measurement Units
1 CASE BOTTLEAMSTEL LIGHT
2 CASE BOTTLEBECKS
3 CASE BOTTLEBECKS DARK
5 CASE BOTTLEBODDINGTONS
6 CASE BOTTLECORONA
7 CASE BOTTLEDARK ISLAND
9 CASE BOTTLEFOSTERS 12
10 CASE CANFOSTERS 25
11 CASE BOTTLEFRAOCH HEATHER ALE
13 CASE BOTTLEGROZET
14 CASE BOTTLEHEINEKEN
15 CASE BOTTLEKALIBER
16 CASE BOTTLELABATTS BLUE
17 CASE BOTTLEMCEWANS
20 CASE CANMURPHYS STOUT
21 CASE BOTTLENEWCASTLE Entering the Physical Inventory Select the "Physical Inventory" Option under "Activities" from the main Inventory Control screen. The Physical Inventory Main screen shown below appears.
47
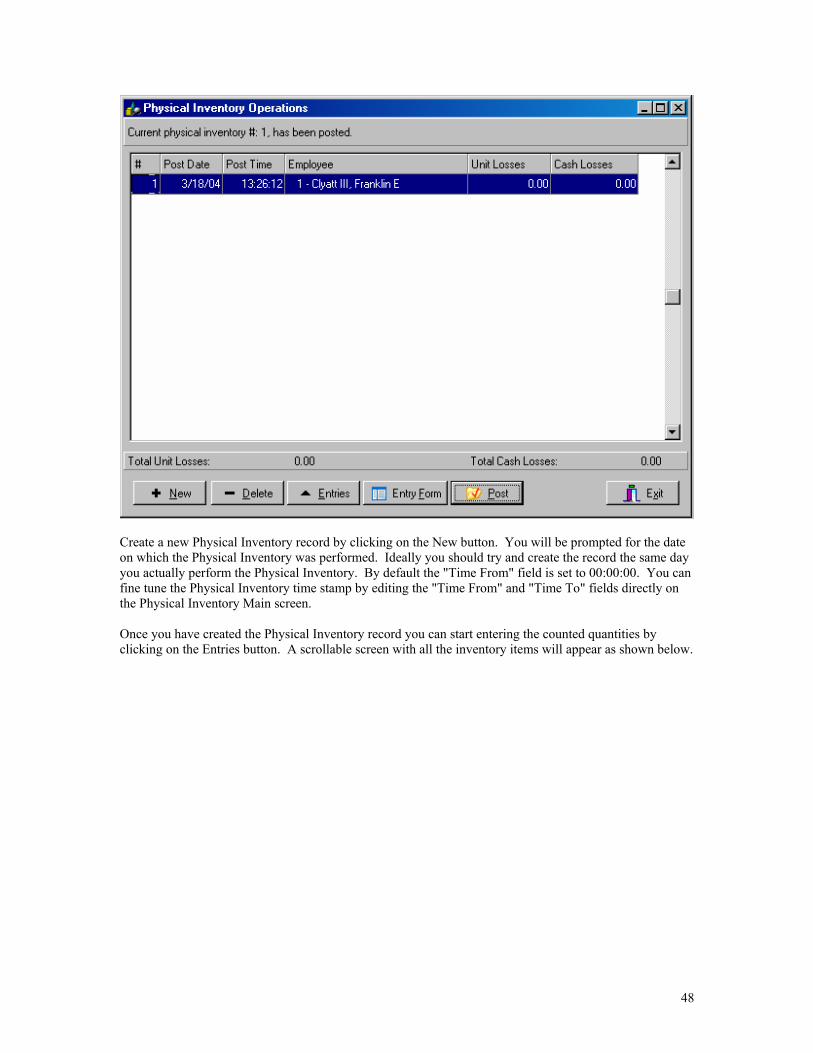
Create a new Physical Inventory record by clicking on the New button. You will be prompted for the date on which the Physical Inventory was performed. Ideally you should try and create the record the same day you actually perform the Physical Inventory. By default the "Time From" field is set to 00:00:00. You can fine tune the Physical Inventory time stamp by editing the "Time From" and "Time To" fields directly on the Physical Inventory Main screen. Once you have created the Physical Inventory record you can start entering the counted quantities by clicking on the Entries button. A scrollable screen with all the inventory items will appear as shown below.
48
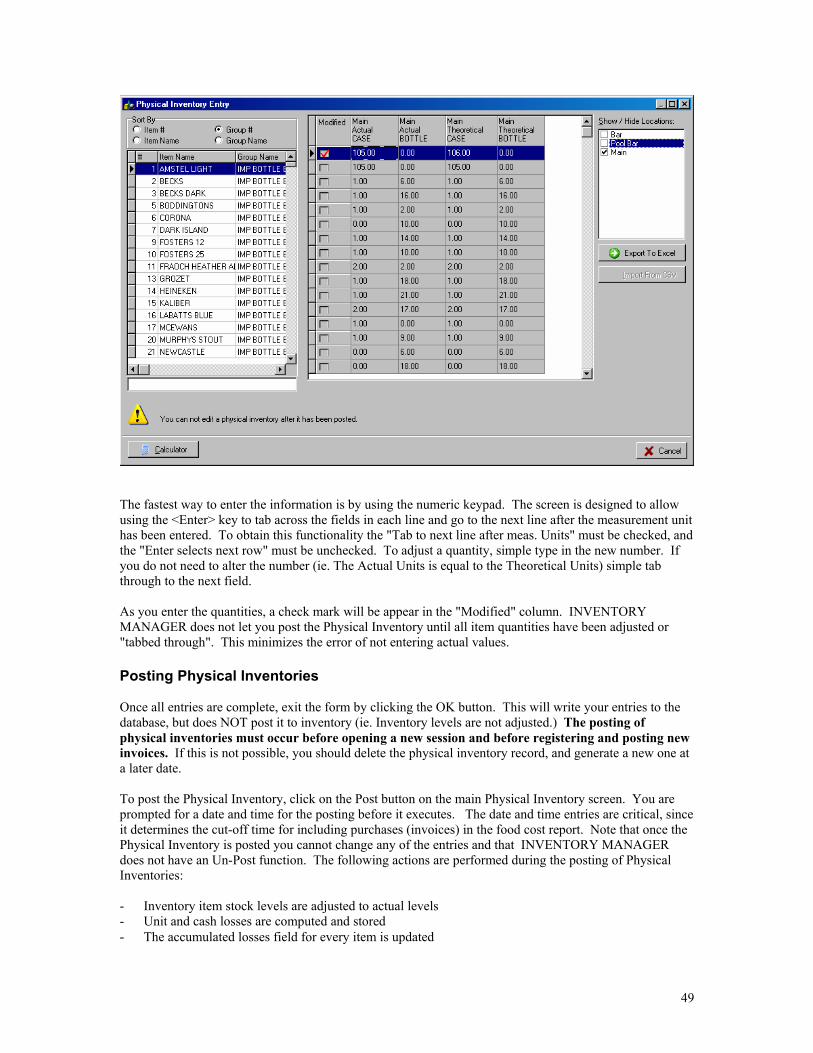
The fastest way to enter the information is by using the numeric keypad. The screen is designed to allow using the <Enter> key to tab across the fields in each line and go to the next line after the measurement unit has been entered. To obtain this functionality the "Tab to next line after meas. Units" must be checked, and the "Enter selects next row" must be unchecked. To adjust a quantity, simple type in the new number. If you do not need to alter the number (ie. The Actual Units is equal to the Theoretical Units) simple tab through to the next field. As you enter the quantities, a check mark will be appear in the "Modified" column. INVENTORY MANAGER does not let you post the Physical Inventory until all item quantities have been adjusted or "tabbed through". This minimizes the error of not entering actual values. Posting Physical Inventories Once all entries are complete, exit the form by clicking the OK button. This will write your entries to the database, but does NOT post it to inventory (ie. Inventory levels are not adjusted.) The posting of physical inventories must occur before opening a new session and before registering and posting new invoices. If this is not possible, you should delete the physical inventory record, and generate a new one at a later date. To post the Physical Inventory, click on the Post button on the main Physical Inventory screen. You are prompted for a date and time for the posting before it executes. The date and time entries are critical, since it determines the cut-off time for including purchases (invoices) in the food cost report. Note that once the Physical Inventory is posted you cannot change any of the entries and that INVENTORY MANAGER does not have an Un-Post function. The following actions are performed during the posting of Physical Inventories: - Inventory item stock levels are adjusted to actual levels - Unit and cash losses are computed and stored - The accumulated losses field for every item is updated
49
Once you’ve posted the Physical inventory you are ready to issue the Food Cost report, which shows, amongst other things, the difference between theoretical and actual inventory usage. See below for more information on the Food Cost Report.
50
INVENTORY REPORTS Following are descriptions of all the reports available from INVENTORY MANAGER.
Lists Go to Reports->Lists to obtain hard copies of all the core inventory data including: Inventory Items Ingredients (Recipes) Sub-Recipes Vendors Under this menu you can also print reports showing what recipes items are in (Item Containment) and Physical Inventory data collection sheets (Physical Inventory and Physical Inventory by Location).
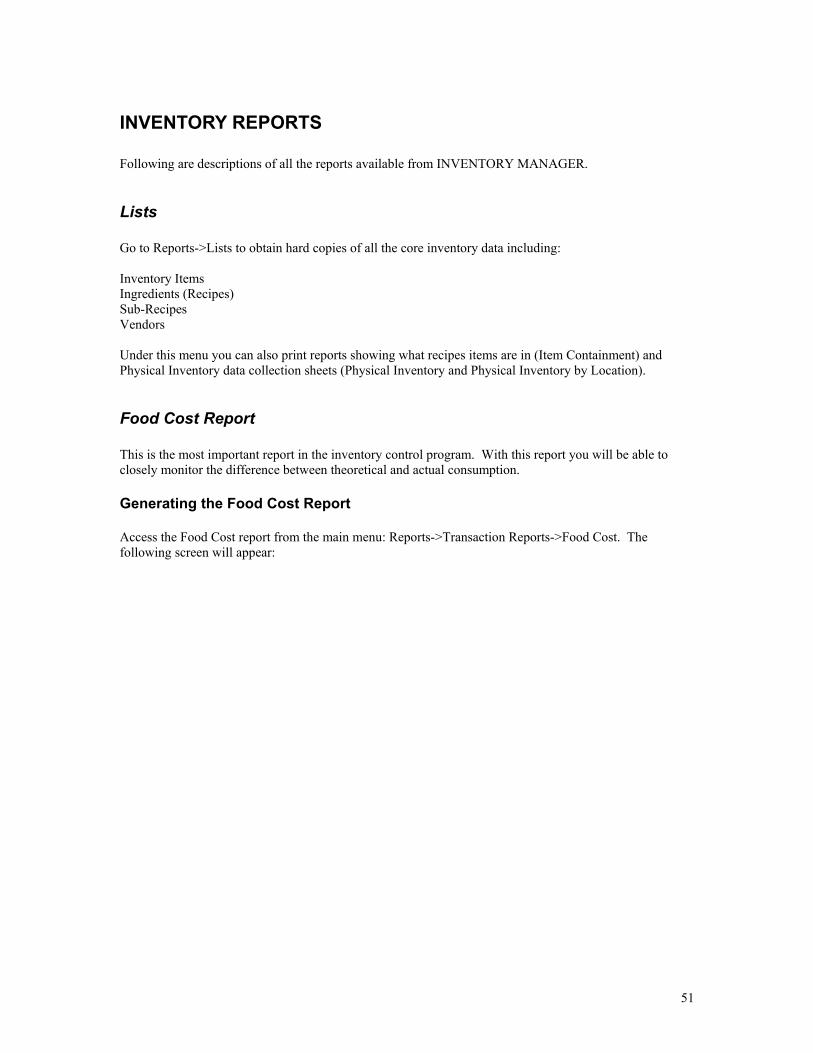
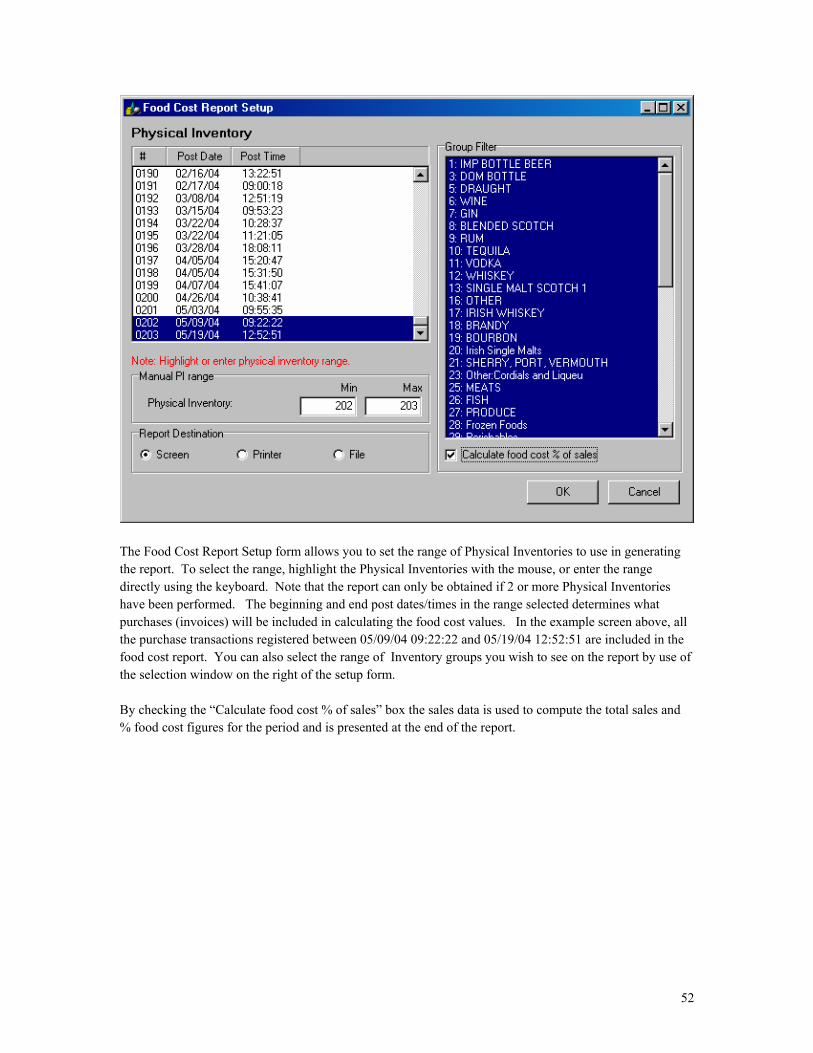
Food Cost Report This is the most important report in the inventory control program. With this report you will be able to closely monitor the difference between theoretical and actual consumption. Generating the Food Cost Report Access the Food Cost report from the main menu: Reports->Transaction Reports->Food Cost. The following screen will appear:
51
The Food Cost Report Setup form allows you to set the range of Physical Inventories to use in generating the report. To select the range, highlight the Physical Inventories with the mouse, or enter the range directly using the keyboard. Note that the report can only be obtained if 2 or more Physical Inventories have been performed. The beginning and end post dates/times in the range selected determines what purchases (invoices) will be included in calculating the food cost values. In the example screen above, all the purchase transactions registered between 05/09/04 09:22:22 and 05/19/04 12:52:51 are included in the food cost report. You can also select the range of Inventory groups you wish to see on the report by use of the selection window on the right of the setup form. By checking the “Calculate food cost % of sales” box the sales data is used to compute the total sales and % food cost figures for the period and is presented at the end of the report.
52
Inventory Food Cost Report
Filter SettingsGroups: 5Average First In First Out
Report Period: 05/09/04 9:22:22 AM - 05/19/04 12:52:51 PM
Chat & Chew05/20/04Date:Time: 12:55 PM
Page: 1
Item Description QtyUnits /Unit
Actual
5. DRAUGHT
Avg
Cost Used
Theor
QtyCost QtyQty
Avg
Cost
Theor
Used
Actual
CostTheoret
CostActual Loss
UnitsLoss
AmountCost TotalStart Purch Purch
TotalPurch Qty QtyEnd End
Loss% Unit %
Loss
122 GUINNESS 2.30 289.71125.96 1.68KEG 251.922.00 125.96 1.75 2.62 2.55 329.65 321.20 -0.07 -8.45 -2.56 -2.56
124 KILLIANS 1.00 65.6065.60 1.86KEG 131.202.00 65.60 2.00 1.14 1.00 74.57 65.60 -0.14 -8.97 -12.03 -12.03
125 MILLER LITE 2.00 108.2654.13 1.43KEG 55.751.00 55.75 1.10 1.57 1.90 84.87 102.85 0.33 17.98 21.18 21.18
129 TETLEYS 1.70 194.09114.17 1.50KEG 114.171.00 114.17 1.60 1.20 1.10 136.47 125.59 -0.10 -10.88 -7.97 -7.97
130 SIERRA NEV 1.00 98.4298.42 1.05KEG 99.181.00 99.18 1.00 0.95 1.00 93.13 98.42 0.05 5.29 5.69 5.69
133 Pil Urquell keg 1.00 105.94105.94 0.84KEG 112.551.00 112.55 0.84 1.17 1.17 124.51 124.51 0.00 0.00 0.00 0.00
134 Yuengling 0.00 0.0097.68 0.00Keg 0.000.00 0.00 0.00 0.00 0.00 0.00 0.00 0.00 0.00 0.00 0.00
135 Newcastle 2.00 263.12131.56 1.05Keg 0.000.00 0.00 1.00 0.95 1.00 124.72 131.56 0.05 6.84 5.49 5.49
136 Smithwicks 2.10 235.05111.93 2.77keg 223.862.00 111.93 2.00 1.33 2.10 148.44 235.05 0.77 86.61 58.35 58.35
139 Hardcore Cider 1.20 127.37106.14 0.74Keg 0.000.00 0.00 0.95 0.46 0.25 48.87 26.54 -0.21 -22.33 -45.70 -45.70
140 Blue Moon 1.00 93.2993.29 1.53keg 94.181.00 94.18 1.70 0.47 0.30 43.91 27.99 -0.17 -15.92 -36.27 -36.27
141 Bass Ale 2.10 244.04116.21 2.74KEG 236.002.00 118.00 3.00 1.36 1.10 158.17 127.83 -0.26 -30.34 -19.18 -19.18
Group Total: 17.40104.88 1,824.89 13.00 101.45 1,318.81 17.21 16.94 13.19 13.47 1367.31 0.311387.14 19.89 2.05 1.45
53
Food Cost Report Totals and Food Cost percentages
17.40104.88Grand Total: 1,824.89 13.00 101.45 1,318.81 17.21 16.94 13.19 13.47 1367.31 1387.14 0.31 19.89 2.05 123451.45
Food cost percentage of sales (Theoretical, Actual): 35.71% 36.23%
Food cost percentage of sales INCLUDING discount (Theoretical, Actual): 33.94% 34.43%
3829.20Total Sales of Recipe Items:
Total Sales of Recipe Items INCLUDING Discounts: 4028.40
Total Sales of ALL Items: 20758.8Food cost percentage of sales (Theoretical, Actual): 6.59% 6.68%
Total Sales of ALL Items INCLUDING Discounts: 21194.9
Food cost percentage of sales INCLUDING discount (Theoretical, Actual): 6.45% 6.54%
54
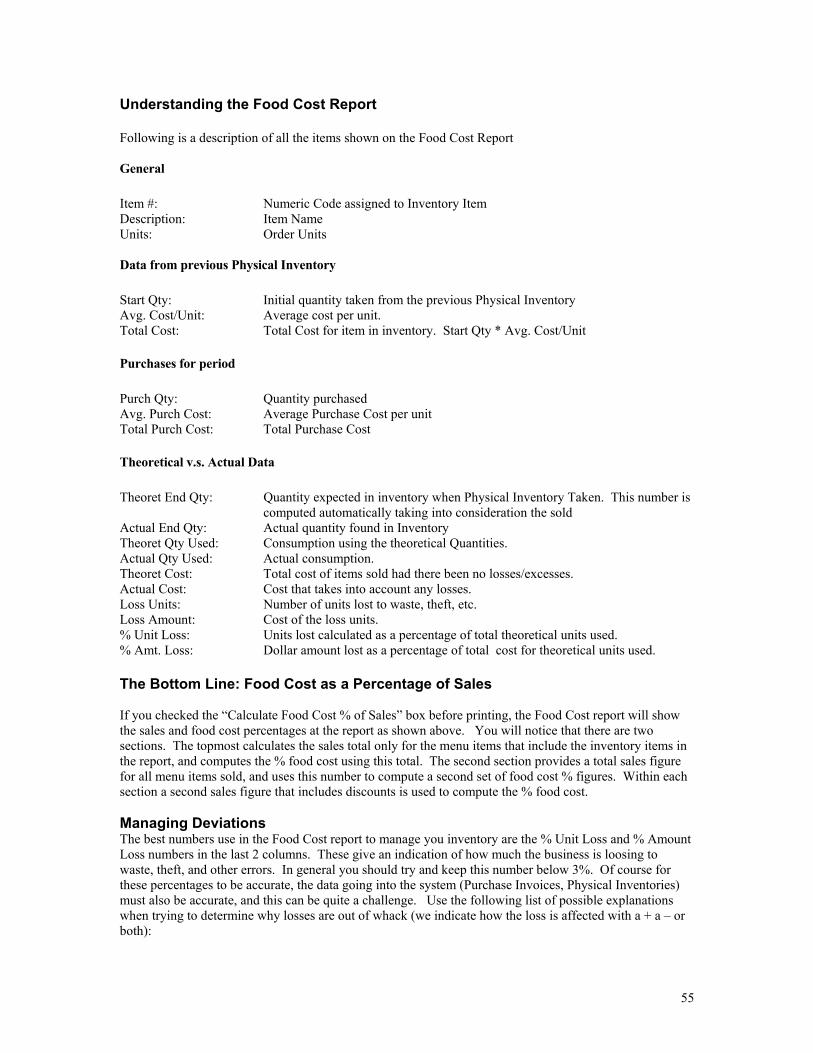
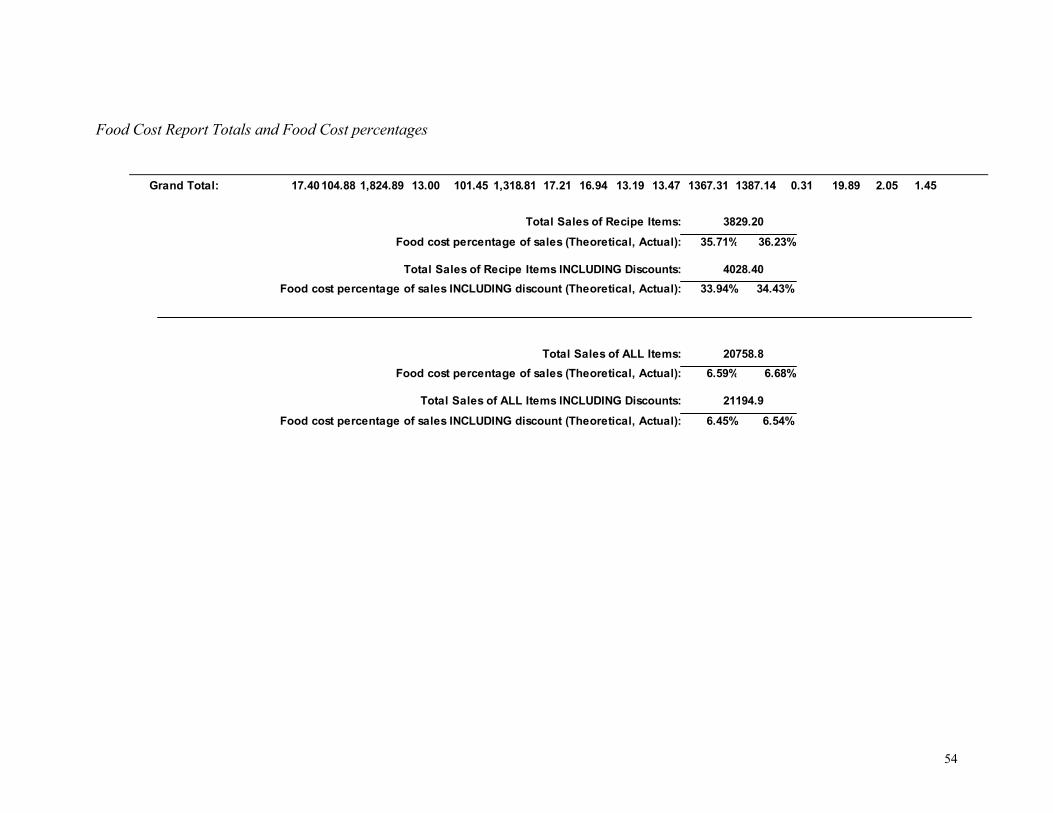
Understanding the Food Cost Report Following is a description of all the items shown on the Food Cost Report General Item #: Numeric Code assigned to Inventory Item Description: Item Name Units: Order Units Data from previous Physical Inventory Start Qty: Initial quantity taken from the previous Physical Inventory Avg. Cost/Unit: Average cost per unit. Total Cost: Total Cost for item in inventory. Start Qty * Avg. Cost/Unit Purchases for period Purch Qty: Quantity purchased Avg. Purch Cost: Average Purchase Cost per unit Total Purch Cost: Total Purchase Cost Theoretical v.s. Actual Data Theoret End Qty: Quantity expected in inventory when Physical Inventory Taken. This number is
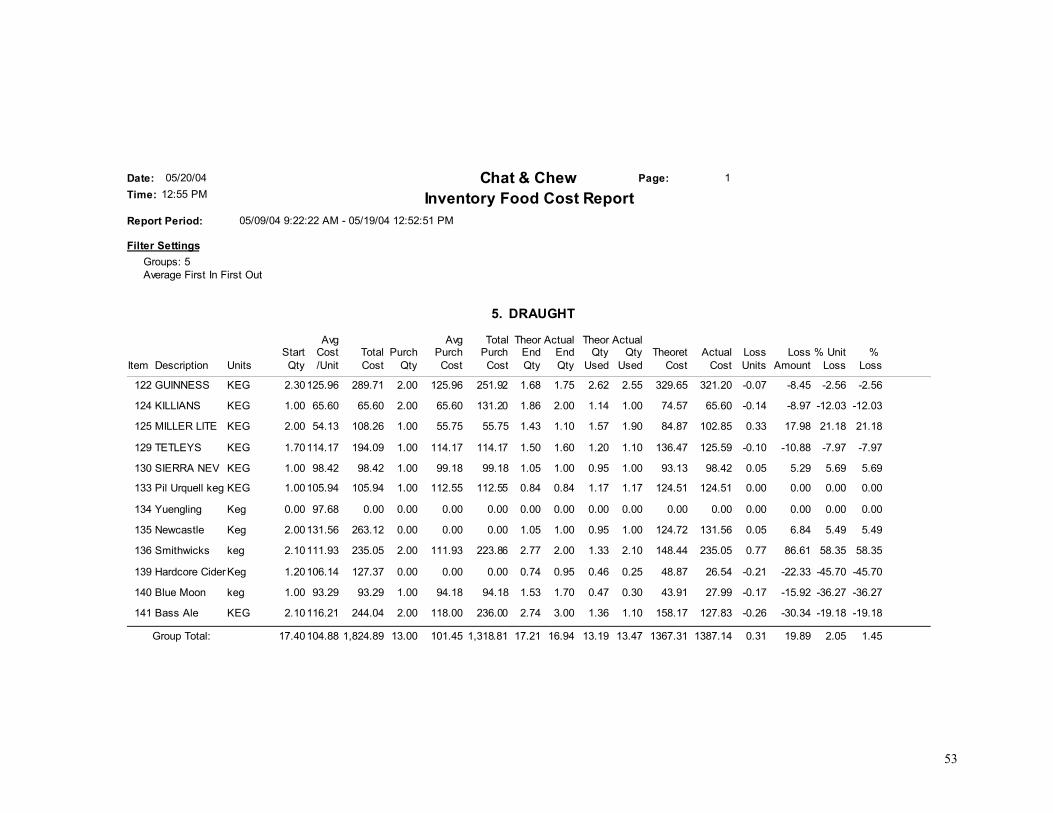
computed automatically taking into consideration the sold Actual End Qty: Actual quantity found in Inventory Theoret Qty Used: Consumption using the theoretical Quantities. Actual Qty Used: Actual consumption. Theoret Cost: Total cost of items sold had there been no losses/excesses. Actual Cost: Cost that takes into account any losses. Loss Units: Number of units lost to waste, theft, etc. Loss Amount: Cost of the loss units. % Unit Loss: Units lost calculated as a percentage of total theoretical units used. % Amt. Loss: Dollar amount lost as a percentage of total cost for theoretical units used. The Bottom Line: Food Cost as a Percentage of Sales If you checked the “Calculate Food Cost % of Sales” box before printing, the Food Cost report will show the sales and food cost percentages at the report as shown above. You will notice that there are two sections. The topmost calculates the sales total only for the menu items that include the inventory items in the report, and computes the % food cost using this total. The second section provides a total sales figure for all menu items sold, and uses this number to compute a second set of food cost % figures. Within each section a second sales figure that includes discounts is used to compute the % food cost. Managing Deviations The best numbers use in the Food Cost report to manage you inventory are the % Unit Loss and % Amount Loss numbers in the last 2 columns. These give an indication of how much the business is loosing to waste, theft, and other errors. In general you should try and keep this number below 3%. Of course for these percentages to be accurate, the data going into the system (Purchase Invoices, Physical Inventories) must also be accurate, and this can be quite a challenge. Use the following list of possible explanations when trying to determine why losses are out of whack (we indicate how the loss is affected with a + a – or both):
55
- Incorrect Physical Inventory quantities (+/-) - Unrecorded Invoices (+) - Session not closed at the time of Physical Inventory posting (-) - Incorrect unit ratios (+/-) - Missing recipes, sub-recipes (-) - Waste (+) - Theft (+)
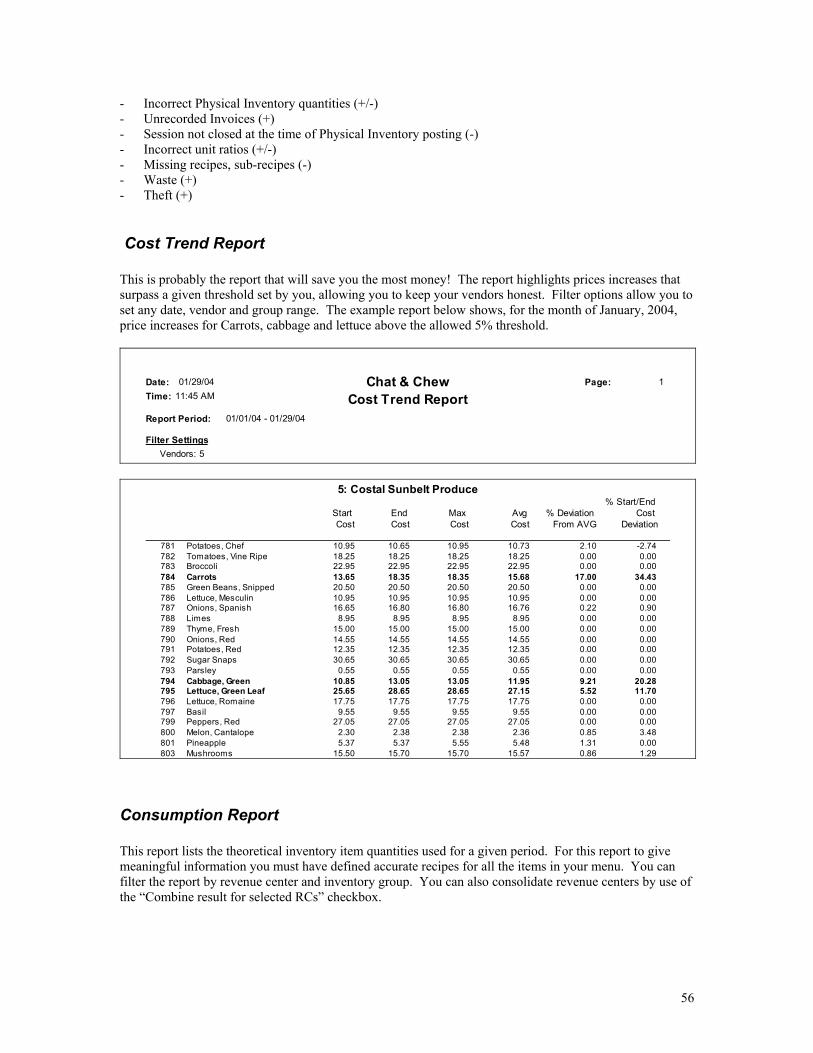
Cost Trend Report This is probably the report that will save you the most money! The report highlights prices increases that surpass a given threshold set by you, allowing you to keep your vendors honest. Filter options allow you to set any date, vendor and group range. The example report below shows, for the month of January, 2004, price increases for Carrots, cabbage and lettuce above the allowed 5% threshold.
Cost Trend Report
Filter SettingsVendors: 5
Report Period: 01/01/04 - 01/29/04
Chat & Chew01/29/04Date:Time: 11:45 AM
Page: 1
5: Costal Sunbelt Produce
Start Cost
End Cost
Max Cost
Avg Cost
% Deviation From AVG
% Start/End Cost
Deviation
10.95 10.65 10.95 10.73Potatoes, Chef781 2.10 -2.7418.25 18.25 18.25 18.25Tomatoes, Vine Ripe782 0.00 0.0022.95 22.95 22.95 22.95Broccoli783 0.00 0.0013.65 18.35 18.35 15.68Carrots784 17.00 34.4320.50 20.50 20.50 20.50Green Beans, Snipped785 0.00 0.0010.95 10.95 10.95 10.95Lettuce, Mesculin786 0.00 0.0016.65 16.80 16.80 16.76Onions, Spanish787 0.22 0.90
8.95 8.95 8.95 8.95Limes788 0.00 0.0015.00 15.00 15.00 15.00Thyme, Fresh789 0.00 0.0014.55 14.55 14.55 14.55Onions, Red790 0.00 0.0012.35 12.35 12.35 12.35Potatoes, Red791 0.00 0.0030.65 30.65 30.65 30.65Sugar Snaps792 0.00 0.00
0.55 0.55 0.55 0.55Parsley793 0.00 0.0010.85 13.05 13.05 11.95Cabbage, Green794 9.21 20.2825.65 28.65 28.65 27.15Lettuce, Green Leaf795 5.52 11.7017.75 17.75 17.75 17.75Lettuce, Romaine796 0.00 0.00
9.55 9.55 9.55 9.55Basil797 0.00 0.0027.05 27.05 27.05 27.05Peppers, Red799 0.00 0.00
2.30 2.38 2.38 2.36Melon, Cantalope800 0.85 3.485.37 5.37 5.55 5.48Pineapple801 1.31 0.00
15.50 15.70 15.70 15.57Mushrooms803 0.86 1.29
Consumption Report This report lists the theoretical inventory item quantities used for a given period. For this report to give meaningful information you must have defined accurate recipes for all the items in your menu. You can filter the report by revenue center and inventory group. You can also consolidate revenue centers by use of the “Combine result for selected RCs” checkbox.
56
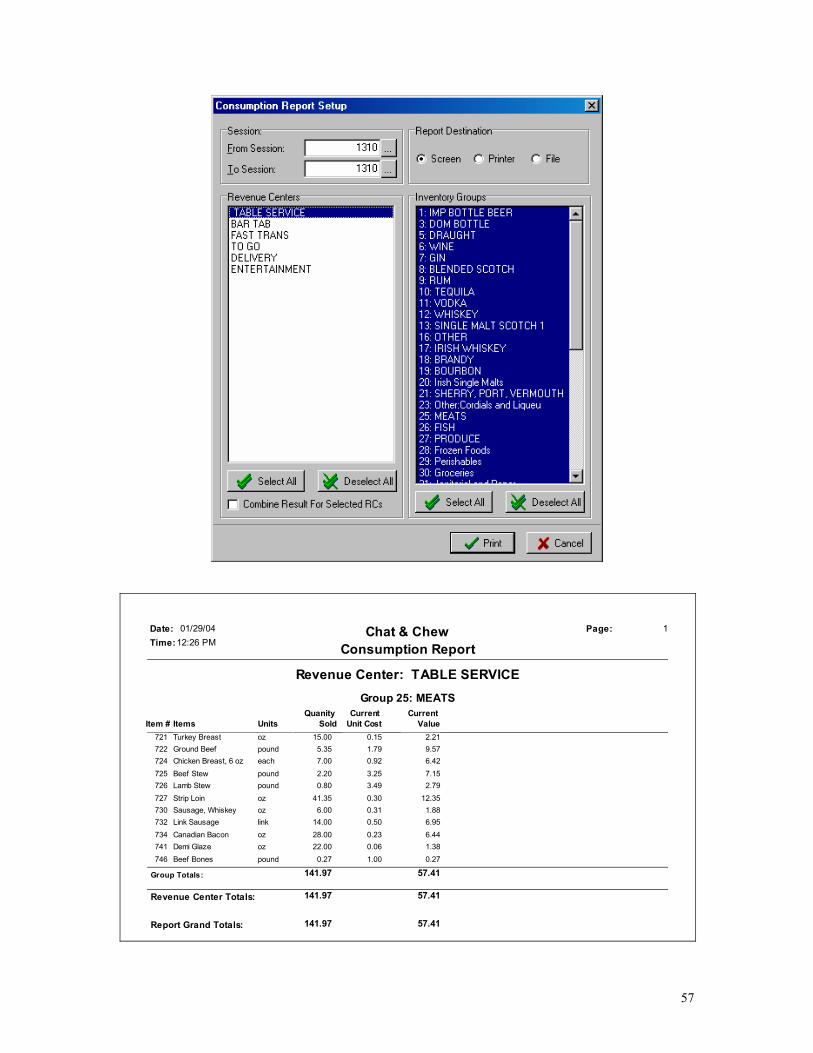
Consumption Report01/29/04Date:
Time: 12:26 PMPage: 1Chat & Chew
Revenue Center: TABLE SERVICEGroup 25: MEATS
Item # Items UnitsQuanity
SoldCurrent
ValueCurrent
Unit Cost721 Turkey Breast oz 15.00 0.15 2.21722 Ground Beef pound 5.35 1.79 9.57724 Chicken Breast, 6 oz each 7.00 0.92 6.42725 Beef Stew pound 2.20 3.25 7.15726 Lamb Stew pound 0.80 3.49 2.79727 Strip Loin oz 41.35 0.30 12.35730 Sausage, Whiskey oz 6.00 0.31 1.88732 Link Sausage link 14.00 0.50 6.95734 Canadian Bacon oz 28.00 0.23 6.44741 Demi Glaze oz 22.00 0.06 1.38746 Beef Bones pound 0.27 1.00 0.27
Group Totals: 57.41141.97
Revenue Center Totals: 57.41141.97
Report Grand Totals: 141.97 57.41
57
Item Movement report This report summarizes the purchases, sales, manual transfers, production and transfers affecting each inventory item.
58
Glossary Base Inventory Item (or Base Item): Refers to core items that are purchased from vendors. Used in recipes and sub-recipes. Recipe: Ingredients (inventory base and sub-recipe items) contained in a menu item. Not to be confused with a sub-recipe (see below) Sub-recipe (item): Inventory item that contains base items and optionally other sub-recipes. Not to be confused with the recipe for a menu item. Batch Item: Batch items are sub-recipes that contain 2 or more inventory items (including other sub-recipes) and that are pre-prepared in large quantities. Examples of batch items are home-made salad dressings, broths, and meat fillings.
59
60
Appendix 1: Upgrade Procedures If you did not install INVENTORY MANAGER, Version 3 at the time you installed Restaurant Manager, please follow the upgrade procedures below.
What you will need - Inventory upgrade files (invman3.zip) - Upgrade code - Access to the Restaurant Manager Server
Installation procedures - Shut down all POS stations - Exit all applications on the Fileserver and Manager workstation. - Unzip new inventory files into working directory (default is c:\rmwin on the fileserver.), OR… - Run the Restaurant Manager Installation and select the INVENTORY MANAGER Upgrade option. - Run UPGRADE.EXE and set New Inventory Vers to “3”. - Select the Proceed with upgrade option. - Enter the ASI provided upgrade code. For demo version use: 67443160
Configuration - Update the inventory tables by Running INVENTORY MANAGER. - Add RMINVSERVICES.EXE to the Windows Startup folder, or RMSTARTSETUP.EXE to add
RMINVSERVICES.EXE to the list of programs started when the system server boots up. IMPORTANT: RMINVSERVICES.EXE must be running for inventory decrements based on POS sales to occur.