inventory management tasks - cisco.com · 7-3 user guide for cisco license manager ol-18476-01...
TRANSCRIPT

C H A P T E R
7-1User Guide for Cisco License Manager
OL-18476-01
7Inventory Management Tasks
This chapter provides information about managing your inventory with Cisco License Manager and contains the following sections:
• Manage Devices, page 7-1
• Manage PAKs, page 7-20
Manage DevicesThis section provides the following information about managing devices:
• Add Cisco Devices to Your Inventory, page 7-1
• Delete a Device, page 7-12
• Manage Devices Using Device Groups, page 7-12
• Find a Device, page 7-15
• View Device Properties, page 7-16
• Update Device Information, page 7-18
• Assign an Access Control List to Device Groups and Devices, page 7-19
• Check Device Connectivity, page 7-19
Add Cisco Devices to Your InventoryThere are several ways to add devices to the Cisco License Manager database:
• Auto Discovery of Devices, page 7-2
• Discover Devices Using the Discover Device Assistant, page 7-6
• Add a Device Using the GUI, page 7-9
Note To create a device, you can enter either the device UDI or the device IP address in Cisco License Manager. If you use only an IP address, Cisco License Manager detects the device UDI. To obtain a license, the device UDI must be available, but for using all the licensing features, the availability of the device IP address is also mandatory.

7-2User Guide for Cisco License Manager
OL-18476-01
Chapter 7 Inventory Management Tasks Manage Devices
Auto Discovery of Devices
Cisco License Manager can be set to automatically discover devices in your environment at predefined intervals. To set Cisco License Manager to discover devices automatically, complete the following steps:
Step 1 Select Manage > Auto Discovery.
The Auto Discovery dialog box appears. The Network Information page shows the networks from which devices will be discovered, the discovery methods, and the device group to put the discovered devices in. If you are an administrator, you can add more networks or edit networks listed here. Other users can view the contents of this dialog box but not edit them.
Step 2 Click Add.
The Network Discovery dialog box appears.

7-3User Guide for Cisco License Manager
OL-18476-01
Chapter 7 Inventory Management Tasks Manage Devices
Step 3 Enter the following information:
Step 4 Choose your discovery methods from the drop-down menu. Your choices are HTTP, HTTPS, SSH, and Telnet. Cisco License Manager tries the choices in the order in which you select them until the operation is successful.
Note HTTP and HTTPS are the quickest discovery methods. Telnet is the slowest discovery method and is not secure. The most secure discovery method is SSH.
Step 5 Choose a device group for the new devices from the Add To Group drop-down menu.
Note This drop-down menu includes a list of existing device groups to which to add your devices. Newly discovered devices appear in the Default device group unless you create a new device group before you discover devices. To create a new device group, see “Add a Device Group” section on page 7-12.
Step 6 Click the Device Login tab.
Field Description
Network The IP address of the network on which you want to discover devices; for example, 172.0.0.0.
Note If the information turns red, that portion of the network address is not valid.
Subnet Mask Defines which portion of the address is used to identify the network and which denotes the hosts.

7-4User Guide for Cisco License Manager
OL-18476-01
Chapter 7 Inventory Management Tasks Manage Devices
The Device Login page appears.
Step 7 To provide login information for the devices in the network:
• Click Add Device Login. The Add Device Login dialog box appears.
• Enter the device login name and device login password and confirm the password.
• Click Save.
Note The total number of entries for device login names is ten.
Note To edit or view an entry, double-click the entry. To delete any device login information, select the entry and click Delete.
Step 8 To provide enable password information for the devices in the network:
• Click Add Enable Password. The Enable Password dialog box appears.
• Enter the enable password.
• Click OK.

7-5User Guide for Cisco License Manager
OL-18476-01
Chapter 7 Inventory Management Tasks Manage Devices
Note The Enabled Passwords table on the Device Login dialog box appears only if you select SSH or Telnet as the discovery method.
The total number of entries for enabling passwords is ten.
Step 9 After you have entered the device login and enable password information, click OK.
The Auto Discovery dialog box reappears.
Step 10 Click the Schedule Information tab.
The Schedule Information page appears.
Step 11 To schedule the auto discovery operation:
• Enter the start date in the mm/dd/yyyy format.
• Enter the start time in the hh:mm am/pm format.
• Enter the frequency of the auto discovery operation.
• Select the policies that you want to run during auto discovery.
Step 12 Click OK.
While the auto discovery job is running, the job progress can be viewed in the View Job Status window. When the auto discovery operation completes, the job status of the executed policies appears in the View Job Status window. There is one job for each executed policy.

7-6User Guide for Cisco License Manager
OL-18476-01
Chapter 7 Inventory Management Tasks Manage Devices
Discover Devices Using the Discover Device Assistant
You can discover devices in a specific network using the Discover Device Assistant. You can also create a new device group and collect license information on those devices during the same discovery process. You can use discovery to synchronize device license information instead of using device polling.
While a discovery operation is in progress, no other discovery operations can be started.
When you add a device using the IP address, the UDI and Device ID parameters are automatically added into the database.
Each time you perform a discovery, the device authentication information, network address, and subnet mask are stored. When you schedule discovery, Cisco License Manager uses this stored information to check if new devices are added and generates a report for each new discovery. You can also specify policies to be run after each discovery.
Caution A discovery will overwrite any out-of-date or manually entered data, except for the device display name.
Tip Before you get started, make sure that you have the network IP address, network subnet mask, and device login names and passwords available.
To discover a device using the Discover Device Assistant, complete the following steps:
Step 1 In the Quick Links pane, click Discover Devices.
The Welcome screen of the Discover Devices Assistant appears. The assistant guides you through the necessary steps to discover the Cisco devices in your network.
Step 2 Click Next.

7-7User Guide for Cisco License Manager
OL-18476-01
Chapter 7 Inventory Management Tasks Manage Devices
The Network Info screen appears.
Step 3 Enter the following information:
Step 4 Choose your discovery methods from the drop-down menus. Your choices are HTTP, HTTPS, SSH, and Telnet. Cisco License Manager tries the choices in the order in which you select them until the operation is successful.
Note HTTP and HTTPS are the quickest discovery methods. Telnet is the slowest discovery method and is not secure. The most secure discovery method is ssh.
Step 5 Choose a device group for the new devices from the Add To Group drop-down menu.
Note This drop-down menu includes a list of existing device groups to which to add your devices. Newly discovered devices appear in the Default device group unless you create a new device group before you discover devices. To create a new device group, see “Add a Device Group” section on page 7-12.
Field Description
Network The IP address of the network on which you want to discover devices; for example, 172.0.0.0.
Note If the information turns red, that portion of the network address is not valid.
Subnet Mask Defines which portion of the address is used to identify the network and which denotes the hosts.

7-8User Guide for Cisco License Manager
OL-18476-01
Chapter 7 Inventory Management Tasks Manage Devices
Step 6 Click Next.
The Device Login screen appears.
Step 7 To provide login information for the devices in the network:
• Click Add Device Login. The Add Device Login dialog box appears.
• Enter the device login name and device login password and confirm the password.
• Click Save.
Note The total number of entries for device login names is ten.
Note To edit or view an entry, double-click the entry. To delete any device login information, select the entry and click Delete.
Step 8 To provide enable password information for the devices in the network:
• Click Add Enable Password. The Enable Password dialog box appears.
• Enter the enable password.

7-9User Guide for Cisco License Manager
OL-18476-01
Chapter 7 Inventory Management Tasks Manage Devices
• Click OK.
Note The Enabled Passwords table on the Device Login screen appears only if you select SSH or Telnet as the discovery method.
The total number of entries for enabling passwords is ten.
Step 9 After you have entered the device login and enable password information, click Next.
The Summary screen appears.
Step 10 Verify that the information is correct and click Next. If it is not correct, click Back and correct the information.
The Find Devices screen appears and Cisco License Manager begins searching for Cisco devices in your network.
Step 11 Once the process is complete and a list of discovered devices appears, click Finish. The device status appears in the View Alert dialog box.
Add a Device Using the GUI
You must add your Cisco devices to the Cisco License Manager inventory before you can request a PAK license file. To add a new device, complete the following steps:
Tip When you add a device using the IP address, the UDI and Device ID parameters are automatically added into the database. If you add the device using only the UDI, the Device ID is automatically added into the inventory.
Step 1 Select Manage > Manage Devices or click Devices in the Quick Links pane.
The Manage Devices explorer appears in the Content Area.
Step 2 Select an existing device group folder to which you want to add a new device.
Make sure to select a folder that makes sense to you so that you can easily locate and retrieve device and license information at a later date.
Step 3 With the device group folder selected, right-click and select New Device. The New Device dialog box appears.

7-10User Guide for Cisco License Manager
OL-18476-01
Chapter 7 Inventory Management Tasks Manage Devices
Step 4 Enter the following in the New Devices window:
Tip The UDI can be discovered during device discovery, so it may not have to be entered manually. If you enter the UDI manually, ensure that you use the required format. Ensure that you poll your device so that this information can be added into the device’s inventory.
Note To create a device, you can enter either the device UDI or the device IP address in Cisco License Manager. If you use only an IP address, Cisco License Manager detects the device UDI. To obtain a license, the device UDI must be available, but for using all the licensing features, the availability of the device IP address is also mandatory.
Field Description
Device Name Descriptive device name, which you can assign.
Note If no device name is assigned, the hostname or device UDI will be used.
IP Address IP address of the device.
UDI Unique device identifier. Cisco-wide identifier that contains product ID, serial number, and version (optional).
Note Cisco License Manager uses a different UDI format from the UDI found on the device. The format of UDI in the Cisco License Manager inventory is (PID):(VID):(SN). If you create a device using the UDI, it must be entered in this format.
Transport Method An ordered list of transport methods. The device will try methods 1, 2, 3, and 4 in order.
The approved transport methods are HTTP, HTTPS, SSH, and Telnet.
Poll License Information Synchronizes the information in the device inventory with the device (optional).

7-11User Guide for Cisco License Manager
OL-18476-01
Chapter 7 Inventory Management Tasks Manage Devices
Step 5 You can click OK now if you wish to add the device without entering login information for that device.
If the operation is successful, the device appears in the device group folder you selected. If it is unsuccessful, an error message appears.
Step 6 If you wish to edit the login information for the newly added device, click the Edit Login Information button and the Edit Login Information dialogue box will appear.
Step 7 Enter the following in the Edit Login Information window:
• Click the Add Device Login Information button to add the login information to the device configuration.
or
• Select a login or series of log-ins from the list and click Delete to disable and remove them from the device configuration.
or
• Click the Add Enable Passwords button to save the enable passwords to the device configuration.
or
• Select a series of passwords from the list and click Delete to disable and remove them from the device configuration.
Step 8 Click Cancel to disregard the changes indicated and return to the New Device dialogue box. Click OK to save the changes to the device configuration.
Field Description
Login Names List of names of the users logging into the device (optional unless the device requires authentication).
Login Passwords Passwords required for the listed users to access to the device (optional unless device requires authentication).
Re-Enter Device Passwords
Confirmation of password (optional unless device requires authentication).
Enable Passwords Passwords required for access to the device when using SSH or Telnet.
Re-Enter Enable Passwords
Confirmation of password.

7-12User Guide for Cisco License Manager
OL-18476-01
Chapter 7 Inventory Management Tasks Manage Devices
Delete a DeviceTo delete a device, complete the following steps:
Caution This action completely removes the device from the inventory and from all associated device groups.
Step 1 Select Manage > Manage Devices or click Devices in the Quick Links pane.
The Manage Devices explorer appears in the Content Area.
Step 2 Select the device you want to delete.
Step 3 Right-click on the selected device and click Delete.
A Delete Device dialog box appears.
Step 4 If you want to delete the device, click Yes. If you do not, click No.
Manage Devices Using Device GroupsUse device groups to organize devices according to a scheme that is meaningful to you. For example, you can organize devices by feature, region, or work site. A device can be present in more than one device group. If you do not want to create device groups, you must use the default device group, Default. Device groups can contain any number of devices.
Device group tasks are as follows:
• Add a Device Group, page 7-12
• Rename a Device Group, page 7-13
• Delete a Device Group, page 7-13
• Refresh the Device Group, page 7-14
• Add a Device to an Existing Device Group, page 7-14
• Remove a Device from a Device Group, page 7-14
• Move a Device to a Different Device Group, page 7-15
Add a Device Group
To add a new device group, complete the following steps:
Step 1 Select Manage > Manage Devices or click Devices in the Quick Links pane.
The Manage Devices explorer appears in the Content Area.
Step 2 Click the New Group button or select Manage > New Device Group.
The New Group dialog box appears.
Step 3 Enter the name of your new device group in the dialog box and click OK.

7-13User Guide for Cisco License Manager
OL-18476-01
Chapter 7 Inventory Management Tasks Manage Devices
Your new device group name appears in the Manage Devices explorer.
Note For details about naming device groups, see “Allowable Characters for Names and Descriptions” section on page 9-8.
Rename a Device Group
To rename a device group, complete the following steps:
Step 1 Select Manage > Manage Devices or click Devices in the Quick Links pane.
The Manage Devices explorer appears in the Content Area.
Step 2 Right-click the device group and select Rename Group.
The Rename Group dialog box appears.
Step 3 Enter the device group’s new name.
Step 4 Click OK.
Your new device group name appears in the Manage Devices explorer.
Note For details about naming device groups, see “Allowable Characters for Names and Descriptions” section on page 9-8.
Delete a Device Group
To delete a device group, complete the following steps:
Step 1 Select Manage > Manage Devices or click Devices in the Quick Links pane.
The Manage Devices explorer appears in the Content Area.
Step 2 Right-click the device group and select Delete.
The Delete Group dialog box appears.
Step 3 If you want to delete the device group, click Yes. If you do not, click No.
Note If the device group you are deleting contains a device that does not belong to any other device group, the device will be moved to the default device group.
7-14User Guide for Cisco License Manager
OL-18476-01
Chapter 7 Inventory Management Tasks Manage Devices
Refresh the Device Group
You can refresh the contents of an existing device group by selecting the device group. Right-click to select Refresh.
The folder redisplays with updated contents.
Add a Device to an Existing Device Group
Adding a device to an existing device group creates a copy of the device that will be placed in the device group you choose. This operation allows you to store devices in more than one device group. For example, you could create a feature-based device group and a group based on a specific work site.
To add a device to an existing device group, complete the following steps:
Step 1 Select Manage > Manage Devices or click Devices in the Quick Links pane.
The Manage Devices explorer appears in the Content Area.
Step 2 Right-click the device and select Add to Group.
The Select Group dialog box appears.
Step 3 From the drop-down list, select the device group to which you would like to add the device.
Step 4 Click OK.
Remove a Device from a Device Group
Devices are removed only from the selected device group and not from other device groups they may be in.
To remove a device from a device group, complete the following steps:
Step 1 Select Manage > Manage Devices or click Devices in the Quick Links pane.
The Manage Devices explorer appears in the Content Area.
Step 2 Right-click the device and select Remove from Group.
The Remove from Group dialog box appears.
Step 3 If you want to remove the device from the device group, click Yes. If you do not, click No.
Note To be removed from a device group, a device must be part of another device group.

7-15User Guide for Cisco License Manager
OL-18476-01
Chapter 7 Inventory Management Tasks Manage Devices
Move a Device to a Different Device Group
You can move a device from one device group into another device group. Moving a device from one device group to another removes the device from the original device group unless youuse the copy function.
To move a device to another device group, complete the following steps:
Step 1 Select Manage > Manage Devices or click Devices in the Quick Links pane.
The Manage Devices explorer appears in the Content Area.
Step 2 Right-click the device and select Move to Group.
The Move to Group dialog box appears.
Step 3 From the drop-down list, select the device group to which you would like to move this device.
Step 4 Click OK.
To move multiple devices to another device group, complete the following steps:
Step 1 Select Manage > Manage Devices or click Devices in the Quick Links pane.
The Manage Devices explorer appears in the Content Area.
Step 2 Select one or more devices in one group and drag them together into another group.
Note If you keep the Control key pressed while dragging devices, the selected devices are copied into the group to which you drag them rather than being removed from the original group.
Find a DeviceUse the Find feature to locate a PAK or device. To find a PAK or device, complete the following steps:
Step 1 Click Edit > Find.
The Find a PAK/Device dialog box appears.

7-16User Guide for Cisco License Manager
OL-18476-01
Chapter 7 Inventory Management Tasks Manage Devices
Step 2 To find a PAK, check the Find PAK check box. Type in the PAK name or ID.
Step 3 To find a device, check the Find Device check box. Type in the information you want to search for and choose device name, IP address, hostname, or UDI.
Step 4 If you want to match the case exactly, select Match Case.
Step 5 If you want to wrap the search text, select Wrap Search.
Note The search starts from the selected PAK and proceeds downward in the Manage PAK screen. If it reaches the last PAK in the tree and Wrap Search is enabled, the search continues from the top of the PAK tree.
Step 6 Click Find.
View Device PropertiesEach device has properties associated with it.
To view device propertie, complete the following steps:
Step 1 Select Manage > Manage Devices or click Devices in the Quick Links pane.
The Manage Devices explorer appears in the Content Area.
Step 2 Right-click the device and select Properties.
The Device Properties dialog box appears.

7-17User Guide for Cisco License Manager
OL-18476-01
Chapter 7 Inventory Management Tasks Manage Devices
Step 3 To view the device’s license information, select the License tab. The information on this tab is read-only.
Note For further information about the fields in the Device Properties dialog box, see the Device Properties, page 2-10.
To view connection information, select the Connection Information tab.
The Connection Information dialog box appears.
Step 4 To change connection information about the device and the capabilities that you want to provide for it, enter the new information, and click Apply.
7-18User Guide for Cisco License Manager
OL-18476-01
Chapter 7 Inventory Management Tasks Manage Devices
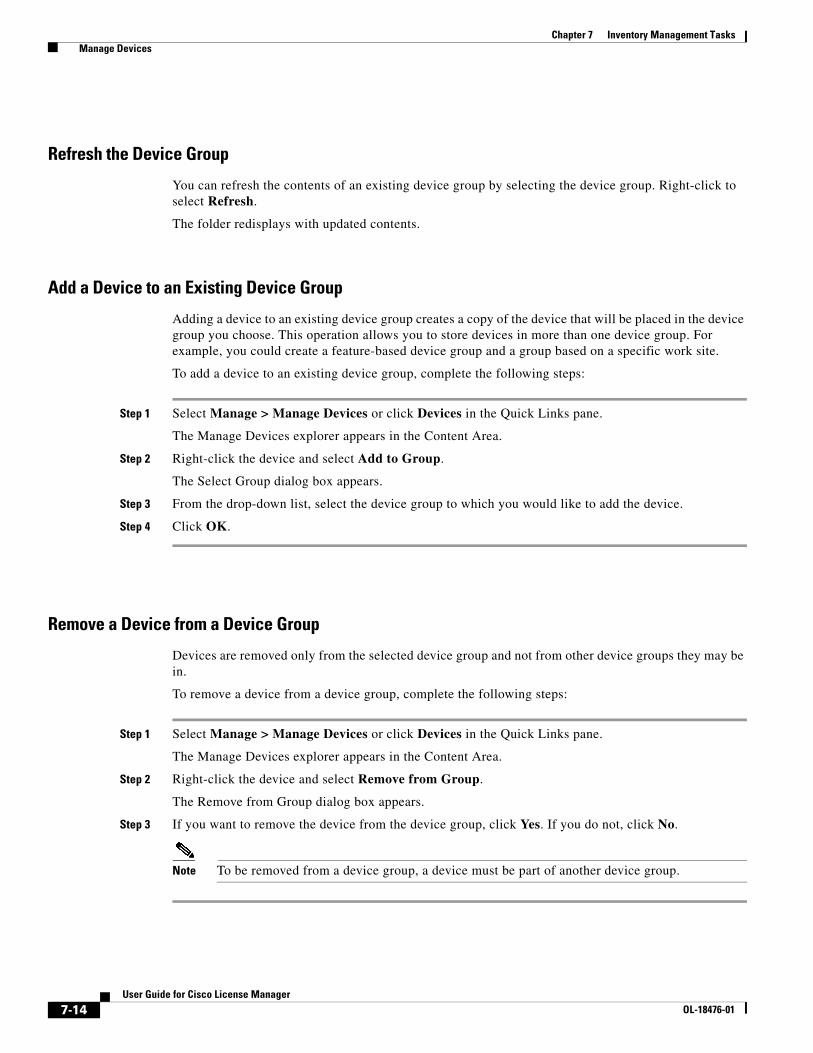
Step 5 To view information about the connection method, select the Connection Method tab.
The Connection Method page appears. The information on this page is read-only.
Step 6 To close the Device Properties dialog box, click OK.
Update Device InformationUse Poll Licenses to collect up-to-date information (such as license expiry) on existing Cisco devices and to synchronize the information in the device inventory.
Cisco License Manager synchronizes licenses using two methods:
• GUI—Use Poll Licenses to update the license information.
• API—Use the PollDevicesLicenseInfo call to provide the list of devices.
To learn more about license polling, see “How Cisco License Manager Communicates with Devices” section on page 1-6.
To update device information, complete the following steps:
Step 1 Select Manage > Manage Devices or click Devices in the Quick Links pane.
The Manage Devices explorer appears in the Content Area.
Step 2 Right-click the device and select Poll Licenses.
The Poll Licenses dialog box appears.
Step 3 Click Yes.
A status window appears. If you get any error messages, verify that your device UDI and IP address are entered correctly.
7-19User Guide for Cisco License Manager
OL-18476-01
Chapter 7 Inventory Management Tasks Manage Devices
Step 4 Once the process is complete, a confirmation window appears. Click OK to close the window.
Status messages for device polling appear in the View Job Status dialog box. For information about viewing job status, see “View Job Status” section on page 6-6.
Assign an Access Control List to Device Groups and DevicesThe Edit Access Control List dialog box appears when you select a device or device group, right-click, and choose Assign Access Control List.
Use this dialog box to assign user access to devices or device groups. Only administrators can change the access list.
This dialog box displays a list of Cisco License Manager usernames, each with a check box in front of it. If the box is checked, the user has access to the devices and device groups. If it is unchecked, the user does not have access.
If no username is checked and Allow None is checked, only administrators are allowed access to the devices and device groups. If Allow None is not checked, all users are allowed access to the devices and device groups.
Check Device ConnectivityUse the Check Device Connection feature to check for connectivity between Cisco License Manger and a device using the current configuration method (HTTP, SSH, or Telnet).
To check device connectivity, complete the following steps:
Step 1 To check device connection, either
• Click Troubleshoot > Check Device Connection or Check Device Connection in the Quick Links pane. The Select Device dialog box appears. Select the device you want to check and click OK.
or
• Right-click the device and select Check System Connections. The Check System Connections dialog box appears. Click Yes.
The Check System Connections window appears.

7-20User Guide for Cisco License Manager
OL-18476-01
Chapter 7 Inventory Management Tasks Manage PAKs
Note From Manage Devices, you may select one or more devices to bring up Check System Connections. The graphic indicates the connections from Cisco License Manager Server to each selected device. A green link represents a successful check of the connection by the Cisco License Manager Server. A red link shows that the indication connection could not be verified by the Cisco License Manager Server.
Step 2 Once the connection has been checked, a popup window appears stating the results of the task. Click Close.
Manage PAKsThis section provides the following information about managing PAKs:
• Add a PAK, page 7-20
• Delete a PAK, page 7-21
• Manage PAKS Using Folders, page 7-22
• Find a PAK, page 7-25
• View PAK Properties, page 7-26
• Download PAK Information, page 7-27
• Assign an Access Control List to PAKs, page 7-27
Add a PAKTo deploy a license to a device, you must provide a valid PAK so that a license can be obtained from Cisco.com for the device. To add a new PAK, complete the following steps:
Tip Before you do this, be sure to enter your Cisco.com password in your user profile.
Step 1 Select Manage > Manage Authorization Keys (PAK) or click Authorization Keys (PAKs) in the Quick Links pane.
7-21User Guide for Cisco License Manager
OL-18476-01
Chapter 7 Inventory Management Tasks Manage PAKs
The Manage PAKs explorer appears in the Content Area.
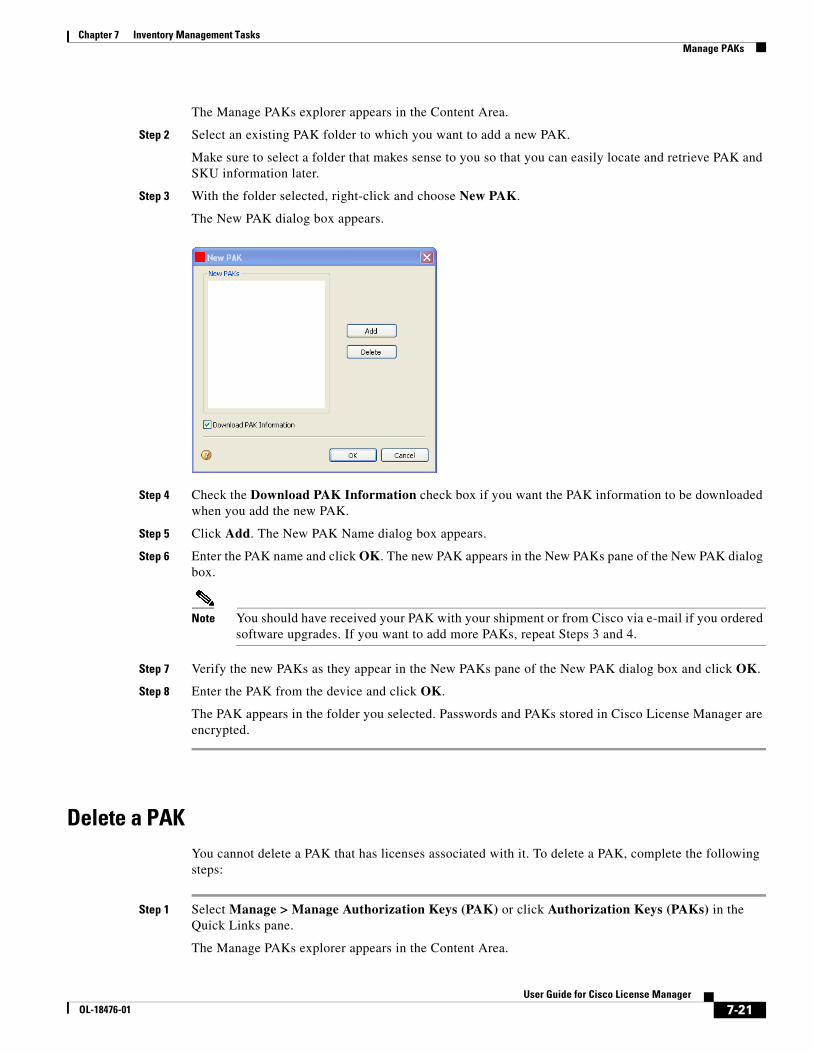
Step 2 Select an existing PAK folder to which you want to add a new PAK.
Make sure to select a folder that makes sense to you so that you can easily locate and retrieve PAK and SKU information later.
Step 3 With the folder selected, right-click and choose New PAK.
The New PAK dialog box appears.
Step 4 Check the Download PAK Information check box if you want the PAK information to be downloaded when you add the new PAK.
Step 5 Click Add. The New PAK Name dialog box appears.
Step 6 Enter the PAK name and click OK. The new PAK appears in the New PAKs pane of the New PAK dialog box.
Note You should have received your PAK with your shipment or from Cisco via e-mail if you ordered software upgrades. If you want to add more PAKs, repeat Steps 3 and 4.
Step 7 Verify the new PAKs as they appear in the New PAKs pane of the New PAK dialog box and click OK.
Step 8 Enter the PAK from the device and click OK.
The PAK appears in the folder you selected. Passwords and PAKs stored in Cisco License Manager are encrypted.
Delete a PAKYou cannot delete a PAK that has licenses associated with it. To delete a PAK, complete the following steps:
Step 1 Select Manage > Manage Authorization Keys (PAK) or click Authorization Keys (PAKs) in the Quick Links pane.
The Manage PAKs explorer appears in the Content Area.

7-22User Guide for Cisco License Manager
OL-18476-01
Chapter 7 Inventory Management Tasks Manage PAKs
Step 2 Select an existing PAK that you want to delete.
Step 3 Right-click and select Delete.
The Delete PAK dialog box appears.
Step 4 Click Yes to confirm the deletion of this PAK.
The PAK is removed from the folder.
Manage PAKS Using FoldersUse folders to organize PAKs by any method that is convenient and logical to you. Folder management tasks are as follows:
• Add a PAK Folder, page 7-22
• Rename a PAK Folder, page 7-23
• Delete a PAK Folder, page 7-23
• Refresh the PAK Folder, page 7-23
• Add a PAK to an Existing Folder, page 7-24
• Remove a PAK from a Folder, page 7-24
• Move a PAK to a Different Folder, page 7-24
Add a PAK Folder
To add a new PAK folder, complete the following steps:
Timesaver You can skip this procedure if you want to use the Default PAK folder.
Step 1 Select Manage > Manage Authorization Keys (PAK) or click Authorization Keys (PAKs) in the Quick Links pane.
The Manage PAKs explorer appears in the Content Area.
Step 2 Click the New Folder button.
The New Folder dialog box appears.
Step 3 Enter the name of your new PAK folder in the dialog box and click OK.
Your new PAK folder name appears in the Manage PAKs explorer.
Note For details about naming PAK folders, see “Allowable Characters for Names and Descriptions” section on page 9-8.
7-23User Guide for Cisco License Manager
OL-18476-01
Chapter 7 Inventory Management Tasks Manage PAKs
Rename a PAK Folder
To rename a PAK folder, complete the following steps:
Step 1 Select Manage > Manage Authorization Keys (PAK) or click Authorization Keys (PAKs) in the Quick Links pane.
The Manage PAKs explorer appears in the Content Area.
Step 2 Right-click the PAK folder and select Rename Folder.
The Rename Folder dialog box appears.
Step 3 Enter the folder’s new name.
Step 4 Click OK.
Your new PAK folder name appears in the Manage PAKs explorer.
Note For details about naming device groups, see see “Allowable Characters for Names and Descriptions” section on page 9-8.
Delete a PAK Folder
To delete a PAK folder, complete the following steps:
Step 1 Select Manage > Manage Authorization Keys (PAK) or click Authorization Keys (PAKs) in the Quick Links pane.
The Manage PAKs explorer appears in the Content Area.
Step 2 Right-click the PAK folder and select Delete.
The Delete Folder dialog box appears.
Step 3 If you want to delete the PAK folder, click Yes. If you do not, click No.
Note If the folder you are deleting contains a PAK that does not belong to another folder, the PAK will be moved to the default folder.
Refresh the PAK Folder
You can refresh the contents of an existing PAK folder by selecting the folder. Right-click to select Refresh.
The folder redisplays with updated contents.

7-24User Guide for Cisco License Manager
OL-18476-01
Chapter 7 Inventory Management Tasks Manage PAKs
Add a PAK to an Existing Folder
Adding a PAK to an existing folder creates a copy of the PAK that will be placed in the folder you choose. This operation allows you to store PAKs in more than one folder. For example, you could create a feature-based PAK folder and a folder based on a specific work site.
To add a PAK to an existing PAK folder, complete the following steps:
Step 1 Select Manage > Manage Authorization Keys (PAK) or click Authorization Keys (PAKs) in the Quick Links pane.
The Manage PAKs explorer appears in the Content Area.
Step 2 Right-click the PAK and select Add to Folder.
The Select Folder dialog box appears.
Step 3 From the drop-down list, select the PAK folder to which you would like to add the PAK.
Step 4 Click OK.
Remove a PAK from a Folder
PAKs are removed only from the selected folder and not from other folders they may be in.
To remove a PAK from a PAK folder, complete the following steps:
Step 1 Select Manage > Manage Authorization Keys (PAK) or click Authorization Keys (PAKs) in the Quick Links pane.
The Manage PAKs explorer appears in the Content Area.
Step 2 Right-click the PAK and select Remove from Folder.
The Remove from Folder dialog box appears.
Step 3 If you want to remove the PAK from the PAK folder, click Yes. If you do not, click No.
Note If the PAK you are removing is not located in another folder, it will be moved to the default folder.
Move a PAK to a Different Folder
You can move a PAK from one folder into another folder. Moving a PAK from one folder to another removes the PAK from the original folder.
To move a PAK to another PAK folder, complete the following steps:

7-25User Guide for Cisco License Manager
OL-18476-01
Chapter 7 Inventory Management Tasks Manage PAKs
Step 1 Select Manage > Manage Authorization Keys (PAK) or click Authorization Keys (PAKs) in the Quick Links pane.
The Manage PAKs explorer appears in the Content Area.
Step 2 Right-click the PAK and select Move to Folder.
The Move to Folder dialog box appears.
Step 3 From the drop-down list, select the PAK folder to which you would like to move this PAK.
Step 4 Click OK.
To move multiple PAKs to a different folder, complete the following steps:
Step 1 Select Manage > Manage Authorization Keys (PAK) or click Authorization Keys (PAKs) in the Quick Links pane.
The Manage PAKs explorer appears in the Content Area.
Step 2 Select one or more PAKs in one folder and drag them together into another folder.
Note If you keep the Control key pressed while dragging PAKs, the selected PAKs are copied into the group to which you drag them.
Find a PAKUse the Find feature to locate a PAK or device. To find a PAK or device, complete the following steps:
Step 1 Click Edit > Find.
The Find a PAK/Device dialog box appears.
Step 2 To find a PAK, check the Find PAK check box. Type in the PAK name or ID.
Step 3 To find a device, check the Find Device check box. Type in the information you want to search for and choose device name, IP address, hostname, or UDI.
Step 4 If you want to match the case exactly, select Match Case.

7-26User Guide for Cisco License Manager
OL-18476-01
Chapter 7 Inventory Management Tasks Manage PAKs
Step 5 If you want to wrap the search text, select Wrap Search.
Note The search starts from the selected PAK and proceeds downward in the Manage PAK screen. If it reaches the last PAK in the tree and Wrap Search is enabled, the search continues from the top of the PAK tree.
Step 6 Click Find.
View PAK PropertiesEach PAK has properties associated with it.
To view PAK properties, complete the following procedures:
Step 1 Select Manage > Manage Authorization Keys (PAK) or click Authorization Keys (PAKs) in the Quick Links pane.
The Manage PAKs explorer appears in the Content Area.
Step 2 Right-click the PAK and select Properties.
The PAK/SKU Properties dialog box appears.
The only properties field that is not read-only is the PAK Display Name.
Note For further information about the fields in the PAK Properties dialog box, see the “View PAK Properties” section on page 7-26.

7-27User Guide for Cisco License Manager
OL-18476-01
Chapter 7 Inventory Management Tasks Manage PAKs
Step 3 To change the PAK Display Name, enter the new information and click Apply.
Step 4 To close the PAK/SKU Properties dialog box, click OK or Cancel.
Download PAK InformationSome Cisco products require you to enter a PAK to receive a license key. You can use Cisco License Manager to enter your PAK, register your product, and obtain the license key instead of going directly to Cisco.com. Then you can manage your licenses from your desktop and deploy them at your convenience.
Tip Before you do this, be sure to enter your Cisco.com password in your user profile.
To download the PAK information, enter your PAK string in the Add PAK window. Cisco License Manager accesses Cisco.com and receives the PAK information, which contains a list of SKUs. You can then continue the steps to obtain a license.
To download PAK information, complete the following steps:
Step 1 Click an existing PAK folder and right-click New PAK.
Note If you need to download PAK information for an existing PAK, select the PAK, right-click, and click Download PAK Info.
Step 2 Click Add, enter the PAK, and click OK.
Step 3 Be sure the Download PAK button is selected. It should already have a check box selected. Click OK.
The download begins, and a Request Status window displays status.
Tip If you receive an error message, ensure that your user profile has your current e-mail address and Cisco.com password. Then reselect the PAK and click Download PAK Info.
Step 4 Click OK to close the status window.
Step 5 To view the status of the request, select the View Jobs link in the Quick Links pane.
Step 6 To close the status message, click the X in the upper right portion of the tab.
Assign an Access Control List to PAKsThe Edit Access Control List window appears when you select a PAK, right-click, and choose Assign Access Control List.

7-28User Guide for Cisco License Manager
OL-18476-01
Chapter 7 Inventory Management Tasks Manage PAKs
Use this dialog box to assign user access to PAKs. Only an administrator or a PAK owner can change the access list.
This dialog box displays a list of Cisco License Manager usernames, each with a check box in front of it. If the box is checked, the user has access to the PAKs. If it is unchecked, the user does not have access.