introduction5 what’s new6 overview of new features in
TRANSCRIPT

1
AMD RenderMonkey IDE Version 1.71
Introduction ..................................................................................... 5 What’s New...................................................................................... 6
Overview of New Features in RenderMonkey 1.71 ................................. 7 OpenGL ES 2.0 Preview Window............................................................................7
DirectX Disassembly Window.................................................................................7
DirectX Preview Window........................................................................................7
Shader Editor...........................................................................................................7
Render State Editor..................................................................................................7
Texture Parameter Editor .........................................................................................7
Stream Map Editor ..................................................................................................7
RenderMonkey SDK ...............................................................................................8
Overview of New Features in RenderMonkey 1.62 ................................. 8 Shader Editor...........................................................................................................8
DirectX / OpenGL Preview Window .......................................................................8
DirectX Preview Window........................................................................................8
FX Exporter.............................................................................................................8
Overview of New Features in RenderMonkey 1.6 ................................... 8 Shader Editor...........................................................................................................8
Workspace Editor ....................................................................................................9
Texture Viewer........................................................................................................9
Fur Generator ..........................................................................................................9
Fur Fin Generator ....................................................................................................9
Artist Editor...........................................................................................................10
DirectX / OpenGL Preview Window .....................................................................10
DirectX Preview Window......................................................................................10
Interface overview......................................................................... 11 Application Interface .............................................................................. 12

2
Application Menu ................................................................................... 12 The File menu........................................................................................................12
The Edit menu .......................................................................................................13
The View menu .....................................................................................................14
The Window menu ................................................................................................14
The Help menu ......................................................................................................15
Application Toolbar ................................................................................ 16 Application Preferences ......................................................................... 19 The General Preferences Page................................................................................19
Cycle time for pre-defined ‘time’ variable......................................................20 Auto Refresh....................................................................................................20 Default Directories ..........................................................................................20
Default Model Orientation...............................................................................21 Default Texture Origin.....................................................................................21 Reset Camera on Effect Change...................................................................21
The DirectX 9.0 Viewer Preference Page...............................................................21
HLSL Includes .................................................................................................22 Back Buffer Format .........................................................................................22 Multisample Type ............................................................................................23 Depth / Stencil Buffer Settings.......................................................................23 Default Device .................................................................................................23
Enable rendering on demand (HAL) .............................................................23 Default Clear Color .........................................................................................24 Default Camera Settings ................................................................................24 Rendering Error Font ......................................................................................24 Rendering Refresh Rate.................................................................................25 Full Screen Monitor.........................................................................................25
The OpenGL ES Viewer Preference Page ..............................................................26
Full Screen Monitor.........................................................................................26 The OpenGL Viewer Preference Page ...................................................................27
Full Screen Monitor.........................................................................................27 The Shader Editor Preference Page ........................................................................28
Tabs..................................................................................................................28 Font ..................................................................................................................29
The External File Editor Preference Page...............................................................29
The Workspace Editor Preference Page .................................................................30
Workspace Tree ..............................................................................................31 Workspace Menu ............................................................................................31
Workspace Editor.......................................................................... 33 Standard Node Operations .................................................................... 35 Editing a node........................................................................................................36
Importing / Exporting a node .................................................................................36
Generating a node..................................................................................................36
Saving a node ........................................................................................................36
General Nodes....................................................................................... 36
Effect Workspace Node ....................................................................................37

3
Effect Group Node / ....................................................................................37
Effect Node / / ........................................................................................39
Pass Node .........................................................................................................40
Camera Nodes and Camera References .......................................................42
Model Nodes and Model References ...........................................................43
Stream Mapping Nodes and Stream Mapping References ............................47
Texture Object Nodes / and Texture References .......................................48
Render State Block Nodes .................................................................................51
Render Target Nodes / ...................................................................................52
Vertex Shader Nodes / / / ....................................................................53
Pixel Shader Nodes / / / .......................................................................55
Node Notes ......................................................................................................56
Variable Nodes / / / / / / / / / .............................................. 57 Texture Nodes / / / ...................................................................... 60
Preview Modules ........................................................................... 65 Common Renderer Features ................................................................. 65 Viewer Input and Camera Control .........................................................................65
View Selection ......................................................................................................66
Rendering Error Reporting.....................................................................................67
Setting Clear Color ................................................................................................70
Controlling Active Camera Settings.......................................................................70
Displaying Axes Triad, Bounding Box and Fitting Model to Screen ......................71
Common Keyboard Shortcuts ................................................................................72
DirectX Preview Module......................................................................... 75 OpenGL Preview Module....................................................................... 76
Shader Editor................................................................................. 77 Shader Editor................................................................................. 78
Editing Assembly Shaders ..................................................................... 79 Editing DirectX HLSL Shaders............................................................... 81 HLSL Disassembly Window..................................................................................83
Editing OpenGL Shaders ....................................................................... 84 Assembly or Compilation Errors and Warnings ..................................... 84
Output Module............................................................................... 86 Variable Editors............................................................................. 87
Color Editor ........................................................................................ 87
Scalar Editor ....................................................................................... 89
Vector Editor ....................................................................................... 89
Matrix Editor ...................................................................................... 90
Dynamic Variable Editor / / / / / / / ......................................... 91
Note Editor ........................................................................................ 93
Other Editors ................................................................................. 95 Texture Viewer / / / ...................................................................... 95

4
Renderable Texture Editor ................................................................ 97
Stream Mapping Editor ..................................................................... 98
Render State Editor ........................................................................... 99
Render Target Editor / .................................................................. 100
Texture State Editor / .................................................................... 101
Camera Editor ................................................................................. 103
Artist Editor ................................................................................. 105 Editing Colors....................................................................................... 107 Editing Numbers .................................................................................. 108 Editing Textures ................................................................................... 111 Editing Notes........................................................................................ 113
Loader / Saver Plug-Ins .............................................................. 115 Texture Loader Plug-In ........................................................................ 115 Texture Saver Plug-In .......................................................................... 115 Model Loader Plug-In........................................................................... 115 Geometry Saver Plug-In ...................................................................... 115
Generator Plug-Ins...................................................................... 117 Fur Generator Plug-In .......................................................................... 117 General Page .......................................................................................................117
Effect Properties Page..........................................................................................118
Shells and Fins Page ............................................................................................119
Fur Properties Page..............................................................................................120
Texture Generator Plug-In ................................................................... 121 Geometry Generator Plug-In................................................................ 122 Edge Quad Generator Plug-In ............................................................. 125 Fur Fin Generator Plug-In .................................................................... 125
Importer / Exporter Plug-Ins ....................................................... 127 Package Importer / Exporter Plug-In ................................................... 127 FX Exporter Plug-In ............................................................................. 127
Appendix...................................................................................... 128 Predefined Variables............................................................................ 128 Time....................................................................................................................128
Viewport .............................................................................................................130
Random Values ..................................................................................................131
Pass .....................................................................................................................131
Mouse Parameters ..............................................................................................131
Model Parameters................................................................................................133
View Parameters..................................................................................................133
View Matrices .....................................................................................................134
Customizing Predefined Variable Names.............................................................135
Default Workspace............................................................................... 137 RenderMonkey File Format ................................................................. 139
RenderMonkey Support and Feedback ..................................... 140

5
Introduction
Many of the current challenges facing 3D graphics application developers are centered on
creating and using programmable graphics shaders. These programmable graphics
shaders are at the heart of all modern graphics chips. Since the introduction of the
Radeon 9000, shaders are now supported on the entry level PC and will soon trickle
down to all other devices.
The developers with the ability to create and use these programmable shaders will be able
to take advantage of all that the hardware offers and create applications that redefine the
art of real-time graphics.
In order to help developers unlock the creative potential of these chips, AMD has
developed RenderMonkeyTM
.
The motivation for developing the RenderMonkey Integrated Development Environment
(IDE) is to provide:
• A powerful programmer’s development environment for creating shaders.
• A standard delivery mechanism to facilitate the sharing of shaders amongst
developers.
• A flexible, extensible framework that supports the integration of custom
components and provides the basis for future tools development.
• An environment where not just programmers but artists and game designers can
work to create mind-blowing special effects.
• A tool that can easily be customized and integrated into a developer’s regular
workflow.
This release of the RenderMonkey IDE provides support for all shader models provided
with DirectX 9.0c (including HLSL), shading using OpenGL GLSL shading language,
and OpenGL ES shading language.
This release of RenderMonkey also includes an SDK for developing custom components
for the application. Please refer to the separate document describing the RenderMonkey
SDK in complete detail.

6
What’s New
This is the official release of RenderMonkey version 1.71 for DirectX 9.0c, OpenGL 2.0,
and OpenGL ES 2.0.
This release also includes the RenderMonkey SDK 1.71 which allows creation of custom
component plug-ins into the RenderMonkey environment. A list of available plug-in
interfaces for SDK developers can be found in "SDK Documentation.doc" which can be
found in the SDK/Docs directory. Users can also read the "Custom Components
Development Using RenderMonkey SDK" presentation to see a more detailed
presentation on the RenderMonkey SDK.
Notes about using OpenGL and OpenGL ES for shader programming:
In OpenGL, if you plan to use tangent and binormal vertex information in
RenderMonkey, they must be declared as follows:
attribute vec3 rm_Tangent; attribute vec3 rm_Binormal;
in order to be correctly filled with the appropriate data by RenderMonkey
In OpenGL ES, RenderMonkey allows the user to set vertex attribute names. By default,
names are chosen such as "rm_Vertex", "rm_TexCoord0", etc. To change the vertex
attribute names, modify the name in the Stream Map Editor.
Winding of polygons in OpenGL / OpenGL ES and DirectX is different. RenderMonkey
loads model data by default in the DirectX style, using LHS coordinate system. However,
each user has an option to modify the style of geometry object creation in
RenderMonkey. In order to do so, the user can right-click on any geometry object and
select their preference - "LHS orientation" for DirectX-style, left-hand coordinate system,
or "RHS orientation" for OpenGL-style, right-hand coordinate system. If the user wishes
to preserve this preference as the default for all of their workspaces, they can select the
orientation style from the application preferences accessible from the Edit menu.
Similarly, the user has a choice for loading textures into RenderMonkey texture variables.
By default (and without specific user application preference), textures are loaded in
DirectX-style orientation, with the top-left corner corresponding to the (0, 0) coordinate
(i.e. origin). However, by right-clicking on a given texture node, the user can select
OpenGL-style orientation for the texture (the origin would be located in the bottom right
corner of the texture). The user also has an option to select this as the default loading
style by selecting appropriate origin orientation from the application preferences.

7
Overview of New Features in RenderMonkey 1.71
OpenGL ES 2.0 Preview Window
1. Newly added preview window, with full support for the OpenGL ES 2.0 API.
DirectX Disassembly Window
1. For DX9 HLSL shaders, the Disassembly window now shows GPU HW
disassembly with shader stats. The supported GPU disassemblies are Radeon
9700, Radeon x800, Radeon x850, Radeon x1800, and Radeon x1900.
DirectX Preview Window
1. Now built using the February 2007 DirectX 9.0 SDK Update.
Shader Editor
1. Syntax highlighting for the OpenGL ES Shading Language (ES SL 1.0)
Render State Editor
1. Modified to support OpenGL ES 2.0 render states
Texture Parameter Editor
1. Modified to support OpenGL ES 2.0 texture parameters
Stream Map Editor
1. Modified to support user editable vertex attribute names for OpenGL ES 2.0.
Examples
1. A full suite of shader examples for OpenGL ES 2.0 have been added.

8
RenderMonkey SDK
1. All PlugIn SDK samples have been converted to Visual Studio 2005.
Overview of New Features in RenderMonkey 1.62
Shader Editor
1. HLSL compilation flags for controlling matrix packing, flow control, and
optimization compilation behavior.
DirectX / OpenGL Preview Window
1. Full screen rendering option through the F2 key.
DirectX Preview Window
2. RenderMonkey has fixed how it handles a matrix in HLSL, changing the packing
order to make it more compatible with other applications. Existing workspaces
will retain their original packing orders, while allowing the user to update the
packing order if necessary. This is done through the “Properties” button in the
HLSL Shader Editor. These changes also enable the user to directly use
RenderMonkey disassembled HLSL shaders, without needing to transpose the
matrix multiplications.
3. Now built using the August 2006 DirectX 9.0 SDK Update.
FX Exporter
1. There have been improvements made to the FX Exporter, making exported
workspaces more compatible with other applications.
Overview of New Features in RenderMonkey 1.6
Shader Editor

9
1. Now contains “IntelliSense”, making struct or vector component selection much
quicker and easier.
2. Improved syntax highlighting for all shader models.
3. An improved constant editor (for DX9 assembler shaders).
Workspace Editor
1. Small texture thumbnails for both color and alpha channels displayed right in tree
view. Texture thumbnails in the tree view context menus also now contain both
the color and alpha channels (when appropriate).
2. Thumbnails for all color variables are displayed, showing both the color and alpha
components.
3. Error conditions in nodes are now better visualized by node text being displayed
red, as well as the appropriate icon error overlay.
4. The workspace tree view now supports multiple node drag and drop operations.
Node selection is done while pressing the control or shift buttons, or the user can
also select a group of nodes in the workspace tree by defining a rectangular
region.
Texture Viewer
1. This release contains a new texture viewer plug-in. This plug-in allows the user
to view the contents of a texture (2D, 3D, and cubemap), and change the
associated properties. The user is able to view all available mip-map levels, and
is also able to zoom into the displayed texture contents.
Fur Generator
1. This release contains a new fur generator plug-in. This plug-in allows the user to
create fur textures (for shell and fin rendering) based on a set of parameters, and
will also create an example workspace that shows how to use the various features
encoded into the generated textures.
Fur Fin Generator
1. To accompany the fur generator, this release contains a new fur fin geometry
generator plug-in. This plug-in will take a model, and generate a new model that
contains degenerate fin geometry based on the original model. Users can use this
model directly with the fur generator, or in their own applications.

10
Artist Editor
1. This release contains the first revision of a new artist editor. This interface
supports the editing of all artist-editable variables within RenderMonkey,
including dynamic variables, matrices, and textures.
DirectX / OpenGL Preview Window
1. Added additional runtime error checking and reporting for shader constant types,
sampler types, supported texture formats, etc.
DirectX Preview Window
1. Added support to allow texture sampling through the vertex shader (SM 3.0).
2. Improved support for shader models 2.a, 2.b, and 3.0.
3. Now outputs compilation warnings for successful compiles.

11
Interface overview
The RenderMonkey application interface has been designed to be intuitive for any
developer that has used an IDE tool such as Microsoft® Visual Studio®.
The main interface consists of:
• a Workspace View which shows the Effect Workspace being edited
• an Output Window for compilation results and text messages from the application
• a Preview Window used to display effects being edited
• Other editor modules such as editors for shaders, or GUI editors for shader
parameters
Shader parameters can be tagged as “Artist Editable” and then edited in a coherent way
using either the artist editor module, or through the Workspace View Artist Tab.

12
Application Interface
Application Menu
The application menu contains standard File, Edit, View, Window, and Help menu
options.
The File menu
New ( Ctrl-N) command creates a new Effect Workspace. By default, the new
workspace starts out empty, with just the workspace node itself. If the user selected New
while working on an unsaved workspace, the application will prompt the user to save
currently opened workspace first.
Open ( Ctrl-O) opens an existing Effect Workspace file.
Recent Files menu provides the user a list of 5 recently used RenderMonkey workspace
files.
Save ( Ctrl-S) command saves the currently opened workspace.
Save As (Ctrl-Shift-S) will prompt the user to change the current file name and\or
location.
RenderMonkey IDE allows developers to create custom plug-ins supporting their own
file format. To accomplish that, they can create importer and exporter plug-ins to convert
the data from custom file formats to RenderMonkey run-time database format. The
Import command allows the user to load a custom data file using one of the plug-ins, if

13
any are found, and convert the data to RenderMonkey database format. Example of an
importer plug-in is the Package Importer. For more information about creating exporter /
importer plug-ins or any other plug-in types, please see the RenderMonkey SDK
documentation.
Similarly, the user can select Export command to convert from the RenderMonkey data
format to a different file format. This version includes the ability to export from
RenderMonkey native data format to Microsoft DirectX 9.0 .fx file format. There are
certain restrictions on the syntax of data presented in the RenderMonkey workspace in
order to output valid FX files.
Exit will close the application, prompting the user to save any currently opened Effect
Workspace.
The Edit menu
The Edit menu contains the following commands: Undo, Redo, Cut, Copy, Paste, Delete,
Commit Changes, and Preferences options.
The Undo command ( Ctrl-Z) allows the user to undo the last undoable operation, and
return RenderMonkey to its previous state. The application allows the users to undo all
operations on the nodes done in the workspace view, for example, deleting, pasting,
renaming of any nodes in the workspace. The shader editor also supports standard set of
text operations undo functionality.
The Redo menu option ( Ctrl-Y) will redo an undone operation.
Undo / Redo operations will cover node renaming, cut, copy, and paste operations,
changing the Active Effect, and adding or deleting nodes.
The Cut ( ), Copy ( ), Paste ( ) and Delete ( ) operations will work on individually
selected nodes, as well as with text in the text editors. Please note that these operations
will not work on the Effect Workspace node itself since at any time you may not have
more than one opened effect workspace. Note that you can cut / copy / paste nodes across

14
multiple files in a single instance of the application. To do that, select a node that you
wish to copy in a currently opened workspace, and then open the workspace that you
would like to paste this node into, select appropriate location and paste the node. This
functionality allows users to combine data between multiple workspaces. Note that if you
have multiple instances of RenderMonkey opened at the same time, you can paste nodes
between them seamlessly.
Commit Changes (F7) will compile and commit the currently active shader in the shader
editor.
The Preferences… ( ) menu option will open up the application Preferences Dialog (see
the section on Application Preferences below for more details).
The View menu
The View menu allows the user to open or close main RenderMonkey modules windows,
such the workspace view window, the output window, the preview window and the artist
editor window.
The Window menu
The Window menu contains standard window options such as Close, Close All, Cascade
( ), Tile Horizontally ( ), and Tile Vertically ( ) options. A list of opened windows

15
will also be maintained at the bottom of the menu, allowing the user to quickly bring an
opened window into focus by selecting the window from a list.
The Help menu
The PlugIn Wizard command assists users in developing custom RenderMonkey plug-
ins. The wizard allows the user to choose the type of plug-in to build and to specify the
name of the plug-in. The wizard will generate a Microsoft Visual Studio 2005 project and
code for new RenderMonkey plug-in based on the type of plug-in selected. The name of
the generated class will be based on the PlugIn Name specified in the dialog box. The
generated project and code will be located in the ‘RenderMonkey 1.71\SDK\Projects\’
directory and will contain all the necessary RenderMonkey API calls and basic
functionality for the plug-in. Please see the RenderMonkey SDK Documentation for
more details regarding usage of this wizard.
The Help menu gives access to the About dialog ( ). The about dialog contains version
information, as well as contact information for application support or feedback.
Example:

16
Application Toolbar
The application has a toolbar for commonly used functions.
Open Workspace (File Open)
Opens a File Open dialog to open a RenderMonkey workspace
Save Workspace (File Save)
Saves currently opened workspace
Toggle Workspace Window (View Workspace) ( )
Opens or closes the workspace view window. Note that the button state will reflect
whether the window is closed (the button is up) or opened (the button is down).

17
Toggle Output Window (View Output) ( )
Opens or closes the RenderMonkey output window. Note that the button state will reflect
whether the window is closed (the button is up) or opened (the button is down).
Toggle Preview Window (View Preview) ( / / )
Opens or closes the preview window for the currently active effect. Note that the button
state will reflect whether the window is closed (the button is up) or opened (the button is
down).
Toggle Artist Editor Window (View Artist Editor) ( )
Opens or closes the artist editor window. Note that the button state will reflect whether
the window is closed (the button is up) or opened (the button is down).
Comple Single Shader (F5)
Compiles the shader that is in the shader editor; if the shader editor is not open, or is open
but not active, then no shader will be compiled. Note that at the moment, the preview
window for the selected shader must be opened in order to compile.
Compile All Shaders in Active Effect (F6)
Compiles all shaders for all passes in the active effect. Note that at the moment, the
preview window for the active effect must be opened in order to compile shaders.
Compile All Shaders in the Workspace (F7)
Compile all shaders in all effects in the currently opened workspace. Note that at the
moment, only the shaders which graphics API will match the currently active effect will
be compiled (i.e. if the active effect is DX, only the DirectX effect will be compiled
during the execution of this command, and vice versa). Also note that a renderer (preview
window) must be opened in order to compile any shaders.
Rotate Camera (please refer to the Preview Module section for details)
Pan Camera (please refer to the Preview Module section for details)
Zoom Camera (please refer to the Preview Module section for details)

18
Camera Home (please refer to the Preview Module section for details)
Overloaded Camera Mode (please refer to the Preview Module section for details)
Mouse Input Mode (please refer to the Preview Module section for details)

19
Application Preferences
The preferences dialog can be invoked through the application menu option
“Preferences…” under the “Edit” menu. This dialog allows the modification of
application and plug-in settings, and affects all subsequent RenderMonkey sessions.
The General Preferences Page

20
Cycle time for pre-defined ‘time’ variable
This option allows the user to modify the cycle period for all predefined time variables
(such as time_0_1 for example. Please refer to the section on Predefined Variables for
more details). The default value is set to 120 seconds; however the user may enter any
positive integer number to control the cycling of the time.
Auto Refresh
RenderMonkey has the ability to continuously scan the disk for modified textures and
models used for rendering the currently active effect in the workspace. If the file has been
modified, the application will reload the resources from that file and update the rendering
of the current effect. This functionality can be very useful for artists as they can be
modifying the resources in another application (for example, editing the textures in
Adobe Photoshop), while maintaining the most up-to-date rendering of the effect they are
working on.
The application will check if a file has been modified every n seconds, where n is equal
to the application preference for that particular resource. To enable automatic update of
texture resources, select the Textures checkbox in the application preferences dialog. To
set the refresh period for texture files disk scan, either keep the default value of 5 seconds
refresh period or enter another positive integer number value. Similarly, to enable
automatic refresh of models rendering resources, select the Models checkbox in the
preference dialog and define a custom refresh rate if desired or keep the default value.
Note that only the resources used in rendering of the selected active effect will be
scanned for file modifications and updated.
Default Directories
The next two application preferences allow the user to specify default directories used by
RenderMonkey as automatic starting point for locating texture and model resource files.
Every time when a new model or texture is created, RenderMonkey will search starting in
the specified default directory. If the user loads a workspace file, in the event that
RenderMonkey fails to find the sources in the saved directory links, it will attempt to
locate the resources by looking in the default directories for the resource type. If that will
be the case, RenderMonkey will notify the user about a different location for their
resource files via a dialog box, if it successfully matched the missing items filenames
with files in the default directories.
To specify the default directory for texture resources, the user to type or select a folder in
the Textures field. Similarly, the user can specify the models default loading directory by
providing a default Models directory value.

21
Default Model Orientation
This option allows the user to select the model orientation (LHS or RHS) that a newly
created model will be set to use. This can be used to match the coordinate system used
by the users content creation tools, as well as the target rendering API.
Default Texture Origin
This option allows the user to select the texture origin (Top Left or Bottom Left) that a
newly created texture will be set to use. This can be used to match the texture origin used
by the users content creation tools, as well as the target rendering API.
Reset Camera on Effect Change
When the user switches active effects being rendered in the preview window, the
application preference value for Reset Camera on Effect Change controls whether the
preview window camera settings will be reset upon switching the active effect to the
default values (thus bringing it into the origin) if the check box for that preference is
selected. Or if the check box is not selected, the trackball orientation will not be modified
upon switching to a new active effect.
The DirectX 9.0 Viewer Preference Page
The “DirectX 9.0 Viewer” property page allows the user to modify application settings
applied to the DX preview window.

22
HLSL Includes
This field allows the user to specify the directories in which any HLSL include files are
to be found. Multiple entries are separated by a semi-colon (;), allowing for several
directories if include files to exist. Note that this setting is currently per application
preference, not per individual workspace. When compiling any shader that uses #include
directive in HLSL, RenderMonkey will scan the directories stored in the HLSL include
directories preference to locate the HLSL include file.
Back Buffer Format
The user can select the default format for the rendering back buffer. The combo box will
contain all surface formats that may be used as a back buffer. Please note that the user’s

23
hardware may not support all listed types, in which case RenderMonkey will revert to the
default supported buffer setting (which will be reflected in the combo box selection).
Multisample Type
This option allows the user to select the type of full scene multisampling the preview
window will perform by default. To have no default multisampling performed, select the
“D3DMULTISAMPLE_NONE” option.
Depth / Stencil Buffer Settings
Format
This option allows the user to select the type of depth / stencil buffer the preview will
create (if any). Please note that the user’s hardware may not support all listed types, in
which case RenderMonkey will select the default supported depth/stencil buffer format
and display the selection in the appropriate combo box.
Depth Clear
This option allows the user to optionally have the depth buffer cleared before the
rendering of each frame. If the option is selected, the user may select the value that the
buffer will be cleared to.
Stencil Clear
This option allows the user to optionally have the stencil buffer cleared before the
rendering of each frame. If the option is selected, the user may select the value that the
buffer will be cleared to.
Default Device
The user can select the default device that will be created by the preview window. The
user can select to create either a hardware (HAL) or software (REF) rendering device.
Enable rendering on demand (HAL)
If the user would like to render on demand, even when a hardware (HAL) rendering
device has been created, the user may select the “Enable rendering on demand (HAL)”
option. This option is enabled by default when rendering through a software (REF)
device.

24
Default Clear Color
This option allows the user to select the default color used to clear the back buffer before
rendering of each frame. Selecting the button will activate a color editor dialog:
Default Camera Settings
The preview window maintains a default camera, which is used when there is no user
camera currently selected as the active camera. Selecting this button will activate a
camera editor, allowing the user to modify the settings for the preview owned camera:
Rendering Error Font

25
The user can select the font used to display errors in the preview window. Selecting this
button till activate a font selection dialog, where the user can modify the font style, size,
color, etc:
Rendering Refresh Rate
The user can control the frequency with which the Preview window will refresh its
contents while rendering the active effect. If the user selects “VSync” option, the preview
window will wait until vertical retrace is completed to refresh itself – note that selecting
that option limits the frame rate for the preview window to the monitor’s vertical refresh
rate. If the user selects “Fastest”, the preview window will refresh itself immediately thus
resulting in significantly higher frame rate – but tearing artifacts may be visible in certain
effects.
Full Screen Monitor
The user can control which monitor the full screen preview window will be created on.
The default value is Monitor 0, which is normally the primary monitor.

26
The OpenGL ES Viewer Preference Page
The “OpenGL ES Viewer” property page allows the user to modify application settings
applied to the OpenGL ES preview window.
Full Screen Monitor
The user can control which monitor the full screen preview window will be created on.
The default value is Monitor 0, which is normally the primary monitor.

27
The OpenGL Viewer Preference Page
The “OpenGL Viewer” property page allows the user to modify application settings
applied to the OpenGL preview window.
Full Screen Monitor
The user can control which monitor the full screen preview window will be created on.
The default value is Monitor 0, which is normally the primary monitor.

28
The Shader Editor Preference Page
The “Shader Editor” property page allows the user to modify application settings applied
to the shader editor window.
Tabs
The user can specify the “Tab Size” and ”Indent Size” by editing the values in the
respective fields, similarly to Visual Studio-style tab settings. If the user prefers to have
spaces instead of tabs entered when the tab key is pressed in the editor, the user can select
the “Insert Spaces” or “Keep Tabs” option.

29
Font
The user can select the font used in the shader editor by selecting the “Select…” button.
This button will activate a font selection dialog:
The property page will display pertinent information of the selected font, such as the
type, size, etc.
The External File Editor Preference Page
The “External File Editor” property page allows the user select an external application
that can be used to modify model / texture files. This external application can then be
launched by selecting “External File Editor” option from the “Edit With…” menu option
in the workspace editor for the selected node.

30
Selecting the “Browse” button will launch a file dialog, where the user can then choose
the appropriate executable file. Leaving the fields blank will result in the launching of
the default editor associated with the file extension by Windows.
The Workspace Editor Preference Page
The “Workspace Editor” property page allows the user to enable / disable some viewing
options within the workspace tree view, and associated context menus.

31
Workspace Tree
Enabling the “Auto-Expand Effect Nodes when set to Active Effect” will result in the
active effect node being automatically expanded when selected to be the active effect.
The “Show Extended Tree View” results in small texture icons being displayed within the
tree view, and also some additional coloring to bring attention to node errors. On slower
computers, the user may wish to disable this option to allow faster redrawing.
Workspace Menu

32
The “Show texture thumbnails” option allows the user to enable / disable textures from
being displayed in the tree view context menus. On slower computers, the user may wish
to disable this option to allow faster redrawing.
The “Show file paths” option allows the user to toggle between having the full path, or
the filename only being displayed in the file lists generated within the context menu.

33
Workspace Editor
The workspace editor is a dock-able window usually positioned on the left of the main
interface containing a tabbed tree control which provides a high level view of the effect
database.
This editor can be used to access all elements, or nodes, in the workspace. The individual
effects can be grouped by their common attributes in the workspace as seen fit by the user
(either by rendered effects style, or by the fallback paths, or by rendering API).
Example:

34
There are two tabs in the workspace editor: The Effect tab ( ) and the Art tab ( ). The
Effect tab ( ) is used to view and modify the entire workspace – with all variable and
pass nodes visible. The Art tab ( ) is used to view only the artist-editable variables that
are present in the workspace. The Art tab will only allow the user to edit artist-editable
nodes, without the ability to add, delete, rename, etc. This functionality allows the
programmers to develop the full effect and then allow the artists to modify the effect’s
rendering output without worrying about accidentally modifying the effect’s contents.
The workspace editor displays all node elements in a tree hierarchy. Each branch in the
tree can be collapsed or expanded by either double clicking on the branch with the
mouse, or by selecting the node and using the right or left arrow keys.
Node selection can be accomplished through either pressing the left mouse button while
the mouse cursor is hovering over the node, or by using the arrow keys to traverse the
tree structure. Multiple nodes can be selected in a number of ways. When selecting
nodes using the left mouse button, hold down the control key to select or unselect
multiple nodes. Holding down the shift key will result in a block of nodes being selected.
An additional method is to press the left mouse button, and drag to create a rectangular
region that encompasses the nodes that are desired to be selected.
Example:
All nodes have an associated context menu, where most node operations are available.
The context menu is activated by selecting the node and either pressing the right mouse
button, or by pressing ctrl-m. When multiple nodes have been selected, the context menu
is simplified.

35
Example:
Standard Node Operations
Most nodes support the following standard node operations:
1. will add a child note to the parent node.
2. will allow the user to rename the selected node. Keyboard shortcut F2.
3. will place the selected node(s) onto the windows clipboard, and remove
it from the workspace tree. Keyboard shortcut Ctrl-X.
4. will place a copy of the selected node(s) onto the windows clipboard.
Keyboard shortcut Ctrl-C.
5. will paste node(s) from the windows clipboard into the workspace
tree. Keyboard shortcut Ctrl-V.
6. will delete the selected node(s) from the workspace tree. Keyboard
shortcut Delete.
Most nodes have drag & drop capabilities. This can be used to move a node from one
workspace tree branch into another, or it can also be used to simply reorder a group of
nodes to achieve a more coherent layout. Nodes will still be grouped together based on
the node type, but nodes of the same type can be arbitrarily reordered. To drag & drop a
node, select the node and keep the left-mouse button pressed down as you move the node
to the desired location. An image of the selected node will follow the mouse cursor, until
the left-mouse button is released over the desired location. If the drop target of the drag
& drop operation is invalid, the mouse cursor will switch to an invalid cursor, with
additional information states in the application status bar.
Nodes can be rearranged locally, within the same workspace tree branch, using the
keyboard shortcuts Ctrl-Up and Ctrl-Down. These will move a node up or down, within
the same tree branch, one element at a time.
Note that all of these operations are undo / redo-able. Use keyboard shortcut Ctrl-Z for
undo ( ), or Ctrl-Y for redo ( ), or the main application menu to perform these
operations.

36
Editing a node
Nodes that have a supporting editor plug-in will display the option in the nodes
context menu. If a node has multiple editors associated with it, then the option
will also appear, allowing the user to select the desired plug-in from a list of available
plug-ins. If the user prefers one plug-in over another, please note that the option
will automatically use the last selected editor from the list.
Double clicking on the node in the workspace tree will have the same results as selecting
from the context menu, as will hitting the Enter key with the desired node selected.
Importing / Exporting a node
If an Importer plug-in exists for a selected node type, the option will enable the
user to select, and activate, the importer from a list of available importers. The purpose
of an importer is to allow the user to take data form an external source, and propagate the
information into the workspace. Operating much like the importer, the option
will allow the user to export node-specific data to an external data source.
Generating a node
If a Generator plug-in exists for a selected node type, the option will enable
the user to select, and activate, the generator from a list of available generators. A
generator will allow the user to programmatically generate data for use within a set of
RenderMonkey nodes.
Saving a node
If a Saver plug-in exists for a selected node type, the option will enable the
user to select, and activate, the saver from a list of available savers. A saver will allow
the user to save data contained within a node externally.
General Nodes

37
Effect Workspace Node
The Effect Workspace node ( ) is the root node of all RenderMonkey workspaces. All
information contained in the workspace is displayed within child nodes from this root
node. This node cannot be deleted, copied, or cut from the workspace.
The effect workspace node can contain the following elements:
1. / Effect Groups
2. / / Default Effects
3. / / / / etc. Variables
4. / / / Textures
5. Stream Mappings
6. Models
7. Notes
All of these elements can be added through the effect workspace context menu.
Example:
Effect Group Node /
Each effect group ( / ) is used to encapsulate a series of related effects. For
example, you may want to group all effects that use a noise function to render
perturbation effects, such as clouds, fire or plasma, in one single effect group. Another
good use for this node is to group various implementations of a single effect for fallback
rendering in your engine.

38
To add an effect group to a workspace, select the option, then choose
whether to add an empty effect group, or an initialized effect group. An initialized effect
group will contain the effect group, with an initialized effect of the selected API.
Example:
The effect group node can contain the following elements:
1. / / Effects
2. / / / / etc. Variables
3. / / / Textures
4. Stream Mappings
5. Models
6. Notes
All of these elements can be added through the effect group context menu.
Example:

39
Effect Node / /
Each effect ( / / ) is used to draw a single, coherent visual effect in the viewer.
You may have a single pass effect, or may want to use several draw calls to generate the
look that you want.
To add an effect (as a child of an effect group), select the option, then
choose the API of the desired effect ( DirectX, OpenGL, or OpenGL ES). To
add a default effect (only as a child of the effect workspace), select the
option, then choose the API of the desired effect. Note that the user
can then select from a list of effects of the specified API, but there can only be one
default effect for each API. If the workspace already contains a default effect for an API,
the API will appear disabled in the context menu.
Example:
The effect node can contain the following elements:
1. Cameras
2. Passes
3. / / / / etc. Variables
4. / / / Textures
5. Stream Mappings
6. Models
7. Notes
All of these elements can be added through the effect context menu.
Example:

40
The active effect is the effect that the preview window will display. To flag an effect as
the Active Effect, select the option. A check ( ) will appear beside the
currently active effect. Whenever the user sets an effect as active, the renderer for that
API will open automatically (if closed) and display this effect in its window. Currently
only one effect can be displayed in the preview window in RenderMonkey.
To print all of the shaders belonging to the effect, select the option from
the effect node context menu. This will activate the standard print dialog to commence
printing.
Pass Node
An individual effect may have one or more rendering passes ( ), or draw calls. The
passes are drawn in the order in which they are arranged within their parent effect.
Passes can be rearranged by drag & drop, or Ctrl-Up / Ctrl-Down on the selected pass.
Note that each draw call can refer to a separate model, thus enabling drawing of different
geometry for each draw call.
The pass node can contain the following elements:
1. / / / / etc. Variables
2. / / Textures
3. Render State Block
4. Vertex Shader

41
5. Pixel Shader
6. / Texture Object
7. Camera Reference
8. Stream Mapping Reference
9. Model Reference
10. Render Targets
11. Notes
All of these elements can be added through the pass context menu.
Example:
To enable / disable a particular pass, select the option in the context
menu. A disabled pass will appear with a slash through it ( ). For example:
At a minimum, every pass must contain a model reference ( ) and a stream mapping
reference ( ). The passes cannot inherit geometry object settings (model and stream
map) from previous passes. It is possible to inherit vertex shaders ( ) and pixel shaders
( ) from the preceding passes (including the default effect for the API). The inheritance
for shaders and rendering states happens as follows: the renderer scans current pass for
shaders or a render state block. If the renderer does not find a vertex or a pixel shader, or
a render state block, it will look in the preceding passes up the effect tree. If none of the
passes in the active effect contain the item, the renderer will scan the default effect with

42
the matching API (same as the active effect) to attempt to locate the item. Passes that do
not contain, or are unable to inherit the required nodes (vertex or pixel shaders), will be
marked as invalid ( ), and will not contribute to the rendering of the effect.
To print all of the shaders belonging to the pass, select the option from the
pass node context menu. This will activate the standard print dialog to commence
printing.
Camera Nodes and Camera References
Camera nodes ( ) and Camera Reference nodes ( ) are used to specify view
orientations for each rendering pass ( ). This allows users to specify rendering from
different view points, including rendering from the light viewpoint for shadow map
rendering.
Camera nodes are placed under an effect ( / / ) and the camera node marked as
“Active” will be manipulated by the preview window trackball. Non-active cameras will
only be modifiable through the editor for that camera node. A camera reference is added
to a pass ( ) to indicate that the referenced camera settings should be used when
rendering that pass.
To add a camera node ( ) to an effect ( / / ), right click the effect node and
select from the context menu. The “Active” camera node is marked with a
small check . For example: . To make a specific camera node “Active”, right
click the camera node, and select from the context menu.
To enable a camera node to affect a specific rendering pass, a camera reference ( )
must be added to that pass. To add a camera reference to a pass ( ), right click the pass
node and select from the context menu. If camera nodes exist
under the parent effect already, they will be listed as one of the options in the context
menu, and selecting them will result in a new camera reference that references the
selected camera node.
Example:

43
The camera reference can change what camera it is referencing at any time. Selecting the
option will provide the user with a list of available camera nodes to
reference. The currently referenced node will be displayed in bold.
Example:
An alternate way for a camera reference node to reference a camera node is to select the
option. This option causes the camera reference to always reference the
active camera, even when the active camera changes. If this option is selected, and there
is no active camera, then the camera reference is considered invalid.
An alternate method to change the camera reference is to drag a camera node and drop it
either onto an existing camera reference, or onto the parent pass. If no camera reference
exists in the pass, dropping a camera node onto the pass will create the appropriate
reference.
An invalid camera reference will appear with a slash through it ( ). For example: .
Broken references should be fixed as soon as possible, as they may cause unintended
effects in the workspace.
The camera and camera reference nodes can contain child note nodes ( ), available
through their context menus.
To edit the camera node, select the or context menu option, double click
on the node, or press Enter when the node is selected. Please refer to the Camera Editor
section in this manual for more information about this editor.
Model Nodes and Model References

44
Model nodes ( ) contain the geometry data, that can be used when rendering a pass
( ). A model reference ( ) is added to a pass ( ) to indicate which geometry is to be
rendered in the pass.
To add a model node to an ancestor of the pass, select the option. When
available, a shortlist of model files may appear in the menu option.
RenderMonkey will parse the default models directory (see Preferences section on how
to specify this directory) for all supported models, and use the list for this menu. This
allows very easy selection of geometry objects:
Selecting one of these options will result in the creation of a model node which
references the selected model file. The user is always free to select an alternate file after
the node has been created. To change the referenced model file, select either ,
, double click on the node, or press Enter when the node is selected. This will
bring up a file dialog, allowing the user to select an alternate file. An alternate method to
change the file is to use the option from the model node context menu.
Example:

45
The menu option allows the user to quickly change the referenced model
file by selecting one of the shown files in the generated list. The list is determined
through the available files found in the default model directory, as set in the Application
Preferences (Main Menu: Edit->Preferences->General).
The menu option allows the user to change the expected orientation of the
model. This is to help when a model was saved in one coordinate system, but it is being
used in another coordinate system. RenderMonkey will modify the loaded model data
before rendering it. Select the desired orientation from the popup orientation menu. The
current orientation will be displayed with a check mark.
Example:

46
To select a model for rendering in a specific pass, a model reference ( ) must be added
to that pass. To add a model reference to a pass ( ), right click the pass node and select
from the context menu. If existing model nodes are within the
same scope, they will be listed as one of the options in the context menu, and selecting
them will result in a new model reference that references the selected model node.
Example:
The model reference can change what model it is referencing at any time. Selecting the
option will provide the user with a list of available model nodes to
reference. The currently referenced node will be displayed in bold.
Example:

47
An alternate method to change the model reference is to drag a model node and drop it
either onto an existing model reference, or onto the parent pass. If no model reference
exists in the pass, dropping a model node onto the pass will create the appropriate
reference.
An invalid model reference will appear with a slash through it ( ). For example: .
Broken references should be fixed as soon as possible, as they may cause unintended
effects in the workspace.
The model and model reference nodes can contain child note nodes ( ), available
through their context menus.
Stream Mapping Nodes and Stream Mapping References
Stream mapping nodes ( ) describe what information from the model data will get
passed through to the rendering engine. A stream mapping reference ( ) is added to a
pass ( ) to indicate the data set used within the pass.
To add a stream mapping node to an ancestor of the pass, select the
option.
To select a stream mapping for rendering in a specific pass, a stream mapping reference
( ) must be added to that pass. To add a stream mapping reference to a pass ( ), right
click the pass node and select from the context menu. If
existing stream mapping nodes are within the same scope, they will be listed as one of the
options in the context menu, and selecting them will result in a new stream mapping
reference that will reference the selected stream mapping node.
Example:
The stream mapping reference can change what stream mapping it is referencing at any
time. Selecting the option will provide the user with a list of available
stream mapping nodes to reference. The currently referenced node will be displayed in
bold.
Example:

48
An alternate method to change the stream mapping reference is to drag a stream mapping
node and drop it either onto an existing stream mapping reference, or onto the parent
pass. If no stream mapping reference exists in the pass, dropping a stream mapping node
onto the pass will create the appropriate reference.
An invalid stream mapping reference will appear with a slash through it ( ). For
example: . Broken references should be fixed as soon as possible, as they may cause
unintended effects in the workspace.
The stream mapping and stream mapping reference nodes can contain child note nodes
( ), available through their context menus.
To edit the stream mapping node, select either , , double click on the node,
or press Enter when the node is selected. Please refer to the Stream Mapping Editor
section in this manual for more information about this editor.
Texture Object Nodes / and Texture References
Texture object node(s) ( ) can be added to any pass, allowing the user to set any texture
or sampler states for each stage that the API will allow. Texture objects also provide
links to texture nodes through adding a texture reference node ( ) as a child.
To add a texture object node, select the option from the pass ( )
context menu. The texture stage is determined by the ordering within the workspace tree,
with the first texture object defined as having a stage index of 0. Texture objects can be
reordered through mouse drag & drop operations, or by selecting the appropriate texture
object node and pressing ctrl-up or ctrl-down.
Vertex texture object node(s) ( ) can be added to any pass (if supported), allowing the
user to set any texture or sampler states for each stage that the API will allow. Vertex
texture objects also provide links to texture nodes through adding a texture reference
node ( ) as a child.

49
To add a vertex texture object node, select the option from the
pass ( ) context menu. The texture stage is determined by the ordering within the
workspace tree, with the first vertex texture object defined as having a vertex texture
stage index of 0. Vertex texture objects can be reordered through mouse drag & drop
operations, or by selecting the appropriate texture object node and pressing ctrl-up or ctrl-
down.
Texture stage state values are inherited from the first higher-level texture object at the
same stage in the active effect. If there are no set texture stage states at the same stage
created within the active effect, the application will look through the passes in the default
effect (of matching API) to see if any of them define the texture stage state. If there are
no other texture objects setting the texture stage state prior to the one created, it will not
inherit any values. By default the incoming values for the texture stage states are set to
API default values for those states (please refer to the API documentation for actual
default state values).
Changing the texture stage state values in the created texture object node will override
inherited values. Note that for upward traversal the application only looks in the pass
within the current effect and the default effect. Texture stage states in other effects don’t
propagate their values.
To bind a texture ( / / / ) with a texture object ( / ), a texture reference ( )
must be added to that texture object. To add a texture reference to a texture object, right
click the texture object node and select from the context menu. If
existing texture nodes are within the same scope, they will be listed as one of the options
in the context menu, and selecting them will result in a new texture reference that will
reference the selected texture node.
Example:

50
The texture object node context menu will show a small texture thumbnail if a valid
texture reference is attached.
Example:
The texture reference can change what texture it is referencing at any time. Selecting the
option will provide the user with a list of available texture nodes to
reference, including small thumbnails when available. The currently referenced node
will be displayed in bold.
Example:
An alternate method to change the texture reference is to drag a texture node and drop it
either onto an existing texture reference, or onto the parent texture object. If no texture

51
reference exists in the texture object, dropping a texture node onto the texture object will
create the appropriate reference.
An invalid texture reference will appear with a slash through it ( ). For example: .
Broken references should be fixed as soon as possible, as they may cause unintended
effects in the workspace.
The texture object and texture reference nodes can contain child note nodes ( ),
available through their context menus.
To edit the texture object node, select either , , double click on the node, or
press Enter when the node is selected. Please refer to the Texture State Editor section in
this manual for more information about this editor.
Render State Block Nodes
A render state block node ( ) can be added to any pass, allowing the user to set any
render state the API will allow. To add a render state block node, select the
option from the pass ( ) node context menu.
If no render state block is defined within a pass, the application will traverse the
workspace tree upwards from the current pass to find a render state block node and will
inherit the render states from the first render state block found. When you create a render
state block node in a pass, it inherits the values from the first higher-level render state
block found in the active effect. If there are no render state blocks created within the
active effect, the application will look through the passes in the default effect (of
matching API) to see if any of them define a render state block. If there are no other
render state block found prior to the one created, it will not inherit any values. By default
the incoming values for the rendering states within a render state block are set to API
default values for those states (please refer to the API documentation for actual default
state values).
Changing the render state values in the created render state block node will override
inherited values. Note that for upward traversal the application only looks in the pass
within the current effect and the default effect. The render state block in other effects
don’t propagate their values.
The render state block can contain child note nodes ( ), available through the context
menu.
To edit the render state block node, select either , , double click on the
node, or press Enter when the node is selected. Please refer to the Render State Editor
section in this manual for more information about this editor.

52
Render Target Nodes /
Render target nodes can re-direct pass rendering into a specified renderable texture,
instead of the back buffer. Render target node(s) ( ) can be added to any pass, allowing
the user to render into a renderable texture ( ), instead of the back buffer. To add a
render target node, select the option from the pass ( ) context menu.
If existing renderable texture nodes are within the same scope, they will be listed as one
of the options in the context menu, and selecting them will result in a new render target
that will reference the selected renderable texture node.
Example:
The render target can change what renderable texture it is referencing at any time.
Selecting the option will provide the user with a list of available
renderable texture nodes to reference. The currently referenced node will be displayed in
bold.
Example:

53
An alternate method to change the render target reference is to drag a renderable texture
node and drop it onto an existing render target node.
An invalid render target will appear with a slash through it ( ). For example: .
Broken references should be fixed as soon as possible, as they may cause unintended
effects in the workspace.
To temporarily disable a render target, drawing the pass to the screen, select the
option from the render target context menu. The render target icon will
change from to to reflect the state change. Note that if multiple render targets are
present in a given pass, only one of them may have the render to screen option enabled at
the same time. Also note that if this option is selected for any render targets, subsequent
passes rendering results may not be correct, if the renderable texture selected for this
render target is used.
The render target node can contain child note nodes ( ), available through the context
menu.
To edit the render target node, select either , , double click on the node, or
press Enter when the node is selected. Please refer to the Render Target Editor section in
this manual for more information about this editor.
Vertex Shader Nodes / / /

54
Vertex shader nodes ( ) contain the actual code for a vertex shader, or vertex program,
and can be added to any pass. To add a vertex shader node, select the
or option from the pass ( ) node context
menu.
Vertex shaders may be of varying types, depending on the API of the parent effect ( /
/ ). If different types exist for the API, the options will be shown in a popup menu
when adding the shader.
Example (DirectX):
Example (OpenGL):
Example (OpenGL ES):
The resulting type will be denoted by an overlay over the created node. The node types
with overlays are described below:
1. A DirectX ASM vertex shader
2. A DirectX HLSL vertex shader
3. An OpenGL GLSL vertex shader (vertex program)
4. An OpenGL ES GLSL vertex shader (vertex program)
To print the shader, select the option through the shader node context
menu. This will activate the standard print dialog to commence printing.
Example:

55
The vertex shader can contain child note nodes ( ), available through the context menu.
To edit the vertex shader node, select either , , double click on the node, or
press Enter when the node is selected. Please refer to the Shader Editor section in this
manual for more information about this editor.
Pixel Shader Nodes / / /
Pixel shader nodes ( ) contain the actual code for a pixel shader, or fragment program,
and can be added to any pass. To add a pixel shader node, select the
or option from the pass ( ) node context menu.
Pixel shaders may be of varying types, depending on the API of the parent effect ( / ).
If different types exist for the API, the options will be shown in a popup menu when
adding the shader.
Example (DirectX):
Example (OpenGL):
Example (OpenGL ES):
The resulting type will be denoted by an overlay over the created node. The node types
with overlays are described below:
1. A DirectX ASM pixel shader
2. A DirectX HLSL pixel shader
3. An OpenGL GLSL pixel shader (fragment program)
4. An OpenGL ES GLSL pixel shader (fragment program)
To print the shader, select the option through the shader node context
menu. This will activate the standard print dialog to commence printing.

56
Example:
The pixel shader can contain child note nodes ( ), available through the context menu.
To edit the pixel shader node, select either , , double click on the node, or
press Enter when the node is selected. Please refer to the Shader Editor section in this
manual for more information about this editor.
Node Notes
A node note ( ) can be used to hold user text, and can be added as a child to most node
types. Normally, these are used to describe the algorithm used within an effect, track
revisions, or to detail the purpose of a specific node used within an effect.
To add a node note to a node, select the option from the parent node context
menu.
The node note context menu contains the standard variable node operations.
Example:

57
The option will toggle whether or not the variable is modifiable by artists, ie:
visible in the workspace tree art tab ( ) , or visible in the artist editor ( ). If a
variable is considered artist editable, a small flag ( ) will appear along with the variable
in the workspace tree view. Eg: . There will also be a check ( ) beside the
menu option if it is currently artist editable.
To edit the node note, select either , , double click on the node, or press
Enter when the node is selected. Please refer to the Note Editor section in this manual for
more information about this editor.
Variable Nodes / / / / / / / / /
RenderMonkey supports the following variable types:
1. ( , , , ) 1-4 component Boolean
2. ( , , , ) 1-4 component Integer
3. ( , , , ) 1-4 component Float
4. ( , , ) 2x2, 3x3, and 4x4, Float matrix
5. NxM Boolean, Integer, or Float matrix
6. Color Variable
To add a new variable, select the menu option in the workspace tree view
context menu.
In the adjoining popup menu, select the variable type.
Based on the variable type, select the desired variable dimension.

58
When applicable, there is a list of predefined variables ( ) that the user can select from
that will create a variable of a predetermined name and semantic. The listed predefined
variable will contain an icon depicting the type ( , , , etc.), the name that the variable
will be created with, and the semantic that will initially be associated with the variable.
An example, taken from the “Add Variable->Float->Predefined” variable list:
Selecting will create a float variable, named
“viewport_width”, that will be associated with the “ViewportWidth” predefined
semantic. The user can associate, un-associate, or re-associate a variable with a
predefined semantic at any time, through the variable context menu. Selecting
will bring up a list much like the list available through the “Add
Variable->Float->Predefined” options when adding a new variable. However, this list’s
options will be restricted to the selected variable’s type, and it will also contain an option
to clear the associated semantic . The currently selected semantic will
appear in bold print in the list. A variable will have an overlay ( ) if it is currently being
used as a predefined variable.
Example:

59
Variable context menus:
The option will toggle whether or not the variable is modifiable by artists, ie:
visible in the workspace tree art tab ( ) , or visible in the artist editor ( ). If a
variable is considered artist editable, a small flag ( ) will appear along with the variable
in the workspace tree view. Eg: . There will also be a check ( ) beside the
menu option if it is currently artist editable.
The variable nodes can contain child note nodes ( ), available through their context
menus.
To toggle 1 component boolean variables’ values, use the menu option.
The icon in the tree view will change to reflect the current value ( if false, if true).
To Edit all other variable types, either select , , double click on the node, or
press Enter when the node is selected. Please refer to the Variable Editors section in this
manual for more information about these editors.

60
Texture Nodes / / /
RenderMonkey supports the following texture types:
1. 2D Texture
2. Cubemap Texture
3. Volume Texture
4. Renderable Texture
To add a new texture, select the menu option in the workspace tree view
context menu.
In the adjoining popup menu, select the variable type.
Note that a renderable texture ( ) cannot be added to a rendering pass ( ), so that
option will not appear in the menu for passes.
When available, a shortlist of texture files may appear in one or more of the add texture
menu options.
Selecting one of these options will result in the creation of a texture node which
references the selected texture file. The user is always free to select an alternate file after

61
the node has been created. To change the referenced texture file, either select ,
, double click on the node, or press Enter when the node is selected. This will
bring up a file dialog, allowing the user to select an alternate file. An alternate method to
change the file is to use the option from the texture node itself.
Example:
Texture context menus:

62
The option will toggle whether or not the variable is modifiable by artists, i.e.:
visible in the workspace tree art tab ( ) , or visible in the artist editor ( ). If a
variable is considered artist editable, a small flag ( ) will appear along with the variable
in the workspace tree view. For example: . There will also be a check ( ) beside the
menu option if it is currently artist editable. The option is not
available for renderable textures ( ).
The menu option allows the user to quickly change the referenced texture
file by selecting one of the shown files in the generated list. The list is determined
through the available files found in the default texture directory, as set in the Application
Preferences (Main Menu: Edit->Preferences->General). This option is not available for
renderable textures ( ).
The menu option allows the user to change the expected origin of the texture.
This is to help when a texture was saved based on one origin, but it is being used
expecting a different origin. RenderMonkey will modify the loaded texture data before
using. Select the desired origin from the popup origin menu. The current origin will be
displayed with a check mark.
Example:

63
When available, the option will display a thumbnail of the referenced texture.
This feature is available for all texture types. The option will provide the
user with a large thumbnail, as well as additional information such as image size,
filename, and format.
Example:

64
If the texture contains an alpha channel, the option will provide the same
information, but will show the texture alpha channel instead of the color channels.
Selecting any of these options will launch the external file editor associated with texture
files, as set in the Application Preferences (Main Menu: Edit->Preferences->External File
Editor).
The texture nodes can contain child note nodes ( ), available through their context
menus.

65
Preview Modules
RenderMonkey provides renderers for all supported API including DirectX 9.0, OpenGL
2.0, and OpenGL ES 2.0. It will automatically select appropriate renderer for the active
effect using its rendering API and create a window rendering this effect.
Common Renderer Features
Viewer Input and Camera Control
RenderMonkey provides an interface for controlling the camera settings for displaying
the active effect. That is done by using the Camera nodes and the Camera Editor.
Camera nodes and camera reference nodes are used to specify view orientations for
each rendering pass. Camera nodes are placed under an effect, and the camera node
marked as “Active” will be manipulated by the Preview window trackball. A Camera
Reference is added to a Pass to indicate that the referenced camera settings should be
used when rendering that pass. See Editing Camera Settings section to get more details
about setting up and editing the camera nodes.
By default, any effect rendered in RenderMonkey uses an implicit, default camera
defined in the preview window. That camera is not visible to the user but it is active from
the start. If an effect does not have a camera node defined by the user, the effect is
rendered using the settings for the default camera. If the user added one or more camera
nodes to the effect and camera references to passes, they can select one of the camera
nodes to be the active camera for rendering of the effect. One can think of
RenderMonkey’s camera nodes in the following fashion: the camera node controls the
settings of the rendering camera for rendering of each draw call. The user can set up the
entire effect by using a single camera (either an implicit default one or a specifically
defined camera node). On the other hand, the user may wish to render separate draw calls
with different camera settings (perhaps a different camera position is desired, as to render
from light’s point of view). In that case, the user can define separate camera nodes for the
purpose.
Only one camera can be active at one time, however, and that is the camera which gets
modified as the user applies the trackball interface in the preview window to modify the
camera. As the user rotates or pans the camera around in the preview window, the active
camera’s values get updated to reflect the new settings. The buttons on the main
application toolbar can be used to control the mode for the trackball:

66
Rotate Camera: Selecting this mode locks the active camera in the
rotation mode for the active camera. The user will be
able to modify the orientation of the camera by using
the left mouse button in the preview window. This is
default starting mode for trackball.
Pan Camera: Selecting this trackball mode locks the active camera in
panning mode. Using the left mouse, the user will be
able to pan the camera in the preview window.
Zoom Camera: Selecting this mode locks the active camera in the zoom
mode – by using the left mouse button the user can
bring the camera closer or further from the viewer.
Camera Home: Pressing on this toolbar button will move the active
camera to the origin.
Overloaded Camera Mode: Selecting this mode, the user can use the overload mode
for the trackball: left mouse button will rotate the
camera, Ctrl-left mouse button will pan the camera, and
middle mouse button or the mouse wheel will zoom the
camera in and out.
Mouse Input Mode: Selecting this mode, all mouse input by the user will be
sent to the mouse shader parameters. Neither the
preview window context menu, nor the camera will be
modified by the user when in this mode. This mode is
useful when effects are modifiable though the
predefined variables that are associated with mouse
movement and selection. Any effect that uses mouse
input for its rendering will need to utilize this mode.
View Selection
The user can also select one of the predefined view settings from the Preview window’s
menu, activated by right-clicking in the preview window (when not in Mouse Input
Mode).
DirectX Example:

67
OpenGL / OpenGL ES Example:
The user can select from one of the following views defined for the preview window:
Original, Front, Back, Left, Right, Top and Bottom views.
Rendering Error Reporting
The preview window provides automatic error reporting about invalid or missing
resources that are used for rendering currently active effect for the developer of the
effect. If you render an effect which has a constant that isn’t linked correctly to a
RenderMonkey variable node or if the effect attempts to render using an invalid stream
map, the renderer module will display an error in the output window as well as in the
preview window itself. The image below shows errors for the shadows effect if all of the
model-related resources were deleted:
Example:

68
As you can see, the preview window reports that certain passes will not be rendered
correctly because they are missing a geometry object reference.
In the case of an effect that uses render targets and passes rendering into renderable
textures, if the user creates a pass that uses a renderable texture before it was properly
initialized by another pass that would render into that texture, the renderable texture starts
out initialized to bright green, to provide instant visual feedback to the user about that
setup. For example, the image on the left below is the correct rendering of a glow on a
golden coin. The effect is created by rendering the image of a coin into a renderable
texture and then applying a glow on that texture and compositing the two images. If we
delete the pass that renders the golden coin into a renderable texture, you will see that the
glow pass uses a green texture and the overall result in this particular case is clearly
incorrect:
Correct rendering example:

69
Incorrect renderable texture initialization example:

70
Setting Clear Color
The Clear Color menu option allows the user to make temporary changed to the clear
color applied to the color buffer before rendering takes place. When this option is
selected, a color editor window is activated to let the user make the appropriate
adjustments. Note that the clear color modified by this editor only affects the current
rendering in the preview window. As soon as the preview window is closed, the setting
will not be saved. Every time the user opens the preview window, its clear color gets
initialized to the value specified in the DirectX preferences for clear color.
Example:
Controlling Active Camera Settings
The Camera Settings menu option allows the user to adjust the camera settings for the
preview-owned default camera. When this option is selected, a camera editor window is
activated to let the user make the appropriate adjustments. Note that the camera settings
modified by this editor only affects the current rendering in the preview window. As
soon as the preview window is closed, the setting will not be saved. Every time the user
opens the preview window, its camera settings get initialized to the value specified in the
DirectX preferences for the default camera settings.

71
Example:
Displaying Axes Triad, Bounding Box and Fitting Model to Screen
The Show Triad menu option will toggle the displaying of the view coordinate axis.
The Show Bounding Box option will toggle the displaying of the object bounding box.
Please note that the bounding box is representative of the model coordinates after the
standard projection matrix has been applied to the stored vertices. If the vertex shader
modifies the vertex positions in any way, this will invalidate the bounding box displayed
for this model. Only initial model bounding box (as imported or generated by
RenderMonkey) will be displayed. Further modification of the model vertices by a vertex
shader will not be reflected.
Example of Show Bounding Box and Show Triad options:

72
The Fit Model to Screen menu option will modify the active camera to fit best to the
bounding box of the models in the passes that use this active camera. Note that if any of
the passes in the effect do not use the active camera, Fit Model to Screen mode will not
include these passes for computing the fitting bounding box. Another precaution about
this setting and geometry bounding boxes: if any passes use vertex shaders that modify
vertex positions, the original bounding box will not correspond to actual output vertex
positions and thus will not be correct.
Common Keyboard Shortcuts
Pressing ‘h’ in the preview window displays all keyboard shortcuts available for the
window. Currently supported options:
• Press ‘s’ to toggle display the rendering statistics of the active effect
• Press ‘u’ will force an update of all rendering resources used to render currently
active effect, such as reloading textures, recreating the buffers, etc.
• Press ‘p’ to display the output of each draw call in a separate mini-viewport.
Each individual viewport contains the output of each pass and all the passes prior
to the pass. If a pass outputs to a render target, the viewport for that pass will
contain the contents of the renderable texture generated by the pass. In the
example below, you see the output of a soft shadows effect where the shadow is

73
generated in multiple passes blurring the shadow from the light in successive
blurs and then composited onto scene.
DirectX Example:
OpenGL Example:

74
OpenGL ES Example:

75
• Press ‘a’ will toggle display of the coordinate axes triad
• Press ‘m’ to reload all models used for rendering of the active effect
• Press ‘t’ to reload all textures used for rendering of the active effect
• Press ‘b’ will toggle display of the geometry bounding box
• Press ‘h’ will display the available shortcuts in the output window
• Press space to update rendering output while rendering effect in REF rasterizer
(DirectX) or software rasterizer (OpenGL/OpenGL ES). By default, rendering in
software rasterizer is only updated on demand, since it can be quite slow on many
users’ machines. To refresh rendering for a particular frame, press “space” bar.
RenderMonkey will notify the user when the rendering is completed.
• Press F2 to toggle between windowed and full screen mode.
DirectX Preview Module
The DirectX Preview module is used to interactively preview effects in the opened
workspace. To view a particular effect, you must select it to be the currently active effect
in the workspace; to do so, right-click on the effect node and select “Set as Active Effect”
from the context menu for that effect.

76
The user can also use the DirectX preview window’s menu to select the type of device
used for rendering current effect. By default, RenderMonkey will try to create HAL
rendering device if hardware settings permit. However, if user’s hardware fails to support
hardware acceleration of shaders, or if they simply wish to view their effect using the
DirectX reference rasterizer, they can select that setting by selecting REF option from the
preview window. Once the user selected the reference rasterizer, the contents of the
preview window will be updated only on demand, as rendering shader-based effects
using software rasterizer can be quite slow. To update the rendering, the user can press
the space bar in the preview window. When rotating or panning or zooming in the
preview window, the user will see the bounding box of rendered objects and the
coordinate axes triad in the preview window when they are modifying the camera.
DirectX preview window context menu options:
DirectX preview window specific keyboard shortcuts:
• Press “i” to take a snapshot image of currently rendered effect. A bitmap image
will be saved in the directly for currently opened workspace when “i” is pressed
OpenGL Preview Module
The OpenGL Preview module is used to interactively preview OpenGL based effects in
the opened workspace. To view a particular effect, you must select it to be the currently
active effect in the workspace; to do so, right-click on the effect node and select “Set as
Active Effect” from the context menu for that effect.

77

78
Shader Editor
The shader editor is an MDI window editor that is used to edit the properties of pixel /
vertex shader nodes ( / ).
To edit a particular shader, the user can either double-click on the shader node or select
“Edit” from the shader context menu. This will open the shader source editor, which is a
tabbed window used to edit shaders within an Effect. Each tab denotes a vertex (or pixel)
shader per Pass in the Effect. There is one shader source editor for all shaders within an
Effect.
Depending on the language used for the shader, the High Level Shading Language editor
or the assembly shader editor will be automatically selected to edit that shader. The
features of each particular interface will be described in the sections below.
To compile the shader being edited, the user should click one of the
(“Compile Shader”) buttons on the main toolbar or use the accelerator (F7 by default).
Pressing that button not only compiles the current shader, but it also internally saves the
changes of the code of from the shader editor into the shader node. If the user modified
the shader text and then tries to close the editor without committing (compiling) the
changes, the user will be prompted to commit changes for that particular shader to save
the updated shader code.

79
Editing Assembly Shaders
The assembly shader editor window consists of two panes – the top pane is used to bind
RenderMonkey variable nodes to shader constant registers and the bottom pane is used to
directly edit the shader text.
The constant store editor is a list view with three columns. Each row represents values for
one particular register. The first column, “Constant”, denotes the index of that register.
The second column, “Name”, shows the node that is linked to that register, or “…” if
there isn’t a variable linked to that register. The third column shows the initial value of
variable node linked to the register.
Binding a RenderMonkey variable node to a constant store register means that the
software will actually bind the internal values of the nodes directly to the register values.
Within RenderMonkey IDE, vector and colors nodes are represented by 4 different floats,
scalars are mapped to 4 floats having the same value, and matrices are represented by 16
floats.
To bind a RenderMonkey node to a register, the user should click on the field in the
“Name” column for the constant and select a variable node from the popup menu that

80
will appear. The popup menu will contain all variables that are within scope of the shader
being edited. Once a node is selected, the user will see its name appear in the “Name”
column for the selected register and the current values of the node will be displayed in the
“Initial Value” column.
To clear a constant store register, the user should select menu option from the
popup menu for the register. The name of the variable previously linked to that node will
be replaced by “…” and the “Initial Value” column will be cleared.
Please note that if the user binds a matrix to a particular constant, then the three constants
below that constant will be overwritten with the rows of that matrix.
The source editor has support for customizable syntax coloring for pixel and vertex
shader assembly code. There is also full clipboard support for standard editing operations.
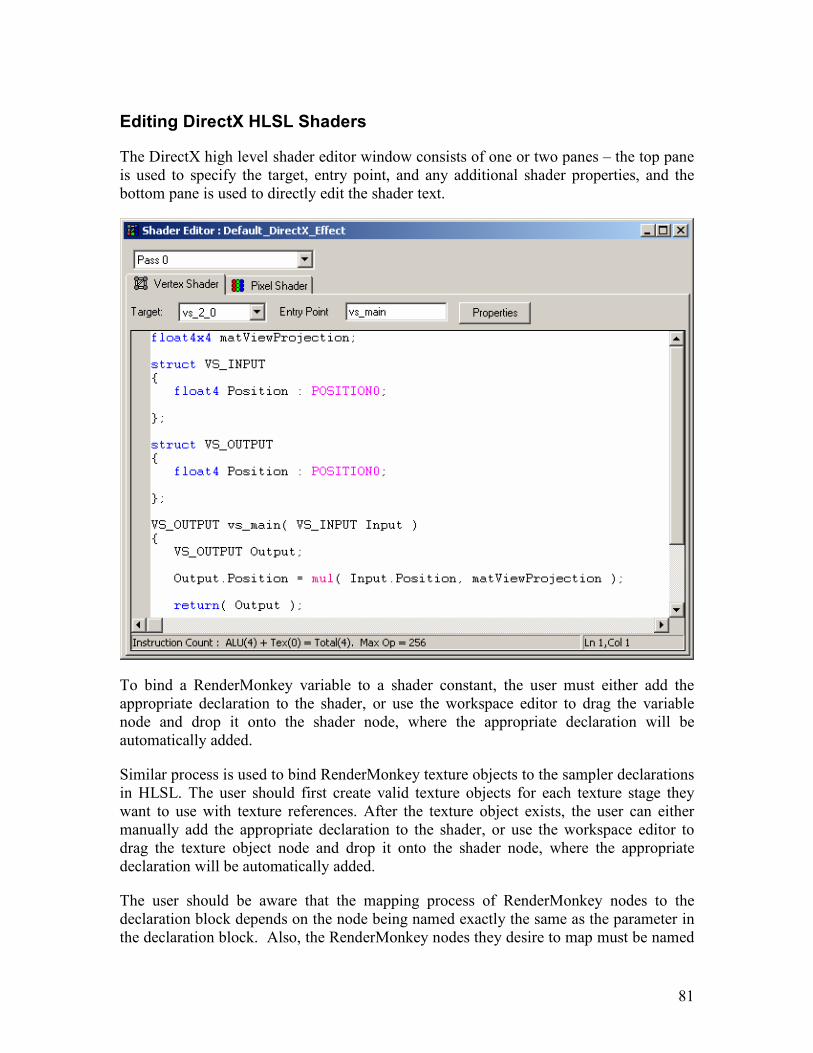
81
Editing DirectX HLSL Shaders
The DirectX high level shader editor window consists of one or two panes – the top pane
is used to specify the target, entry point, and any additional shader properties, and the
bottom pane is used to directly edit the shader text.
To bind a RenderMonkey variable to a shader constant, the user must either add the
appropriate declaration to the shader, or use the workspace editor to drag the variable
node and drop it onto the shader node, where the appropriate declaration will be
automatically added.
Similar process is used to bind RenderMonkey texture objects to the sampler declarations
in HLSL. The user should first create valid texture objects for each texture stage they
want to use with texture references. After the texture object exists, the user can either
manually add the appropriate declaration to the shader, or use the workspace editor to
drag the texture object node and drop it onto the shader node, where the appropriate
declaration will be automatically added.
The user should be aware that the mapping process of RenderMonkey nodes to the
declaration block depends on the node being named exactly the same as the parameter in
the declaration block. Also, the RenderMonkey nodes they desire to map must be named

82
within the constraints of the high level shading language, otherwise improper naming will
result in compilation errors. Please refer to the language manual to learn of valid naming
conventions. If a variable of texture object node is renames in the workspace, the user
must manually make the appropriate changes in the affected shaders to update the
declaration with the new name.
By default, an HLSL shader entry point is set to main. The user can change it by typing a
different name in the entry point edit field: .
Every HLSL shader must provide a compilation target. To do that, the user should select
from a list of available targets from the Target combo box: . The
target sets are separate for pixel and vertex shader – please refer to High Level Shading
Language documentation for explanation of each target value.
The user can change some of the compilation flags that will get applied to the shader. By
selecting the button, a shader properties dialog will be displayed.
Example:
From this dialog, the user can specify the matrix packing, flow control, and optimization
flags that will get applied to the shader upon compilation.
The bottom pane of the editor is used to edit the actual text of the shader. The shader text
must contain at least one function with the same name as the specified entry point for the
shader to compile. The shader text editor has High Level Shading Language customizable
syntax coloring.

83
HLSL Disassembly Window
Upon successful compilation of an HLSL Shader, the disassembly code from the
compiled shader is available to view. Selecting “Show Disassembly Code…” from the
shader editor’s context menu will bring up the Disassembly Window to view.
Example:
The disassembler window shows code information such as the number of ALU
instructions (ALU Op #), the number of texture instructions used by the shader (Tex Op
#), the total number of instructions generated by this shader (Total Op #) and the
maximum number of instructions allowed for a particular compile target (Max Op #).
This information is very useful when targeting specific hardware with HLSL shaders as
well getting the best performance out of your shaders.

84
Editing OpenGL Shaders
The OpenGL high level shader editor window consists of a single pane used to edit the
shader text.
To bind a RenderMonkey variable to a shader constant, the user must either add the
appropriate declaration to the shader, or use the workspace editor to drag the variable
node and drop it onto the shader node, where the appropriate declaration will be
automatically added.
Similar process is used to bind RenderMonkey texture objects to the sampler
declarations. The user should first create valid texture objects for each texture stage they
want to use with texture references. After the texture object exists, the user can either
manually add the appropriate declaration to the shader, or use the workspace editor to
drag the texture object node and drop it onto the shader node, where the appropriate
declaration will be automatically added.
The user should be aware that the mapping process of RenderMonkey nodes to the
declaration block depends on the node being named exactly the same as the parameter in
the declaration block. Also, the RenderMonkey nodes they desire to map must be named
within the constraints of the high level shading language, otherwise improper naming will
result in compilation errors. Please refer to the language manual to learn of valid naming
conventions. If a variable of texture object node is renames in the workspace, the user
must manually make the appropriate changes in the affected shaders to update the
declaration with the new name.
Assembly or Compilation Errors and Warnings
The source editor supports line highlighting for assembly or compilation errors and
warnings. If a particular shader has an error or warning, it will be reported in the output

85
module window. The user then can double-click the error in the output window and the
line containing the error or warning will be highlighted in the shader source editor for
that shader:

86
Output Module
The output module is a docked window typically located on the bottom of the main
application interface. That window is used to output the results of shader compilation and
other application text messages. The output window is linked with the shader editor for
compilation error and warning highlighting.

87
Variable Editors
Color Editor
The color editor is a dock-able editor that is used to edit color variable nodes ( ). The
user can edit color variables using either the RGB or HSV color models, selectable
through the combo box on the lower left hand side of the editor. These editing
preferences will be preserved through subsequent edits of the same color variable.
RGB Example:
When editing using the RGB color model, the user can edit values in an integer format
[0..255], or in a floating point format [0..1]. This is selectable through the “Floating
Point” check box on the lower right hand side of the editor. When using the floating
point format, values outside of the [0..1] range can be entered.
HSV Example:

88
Value changes can be accomplished in the following ways:
1. Directly typing the values in the appropriate edit boxes for each
component (R, G, B, A or H, S, V, A).
2. Interactively selecting color from the color wheel.
3. Modifying the color sliders for each component.
4. Modifying the intensity of the color being edited by using the vertical
intensity slider.
The value of the color is shown in the color swatch at the top left corner of the color
picker. All changes made in the editor are immediately reflected in the associated color
variable node.
The color editor can operate in two modes. By selecting the small color key botton at the
top left of the editor, the color editor will toggle between a large and a small view.
Example:
When using the small view, tool tips are available to display the value at each scroll
control.

89
The user can select to keep the changes to the color variable or to dismiss them by
selecting either the “OK” or “Cancel” buttons.
Scalar Editor
The scalar editor is a dock-able editor that is used to edit scalar floating point variable
nodes ( ).
Example:
The scalar can be edited by either directly typing the value in the main edit box, or by
interactively using a popup slider which will be in the same range as the clamping bounds
(regardless whether the user chooses to clamp the vector or not). By selecting the “Clamp
from” check box, and choosing the appropriate minimum and maximum ranges, the user
can ensure the variable values stay within a known range during modification.
The user can preview the changes to the rendered effect by modifying the value of the
scalar interactively in the preview window.
At any point, the user can select “Cancel” to undo the changes to the variable. If “OK” is
pressed, the new value for the scalar variable is propagated to the database.
Vector Editor
The vector editor is a dock-able editor that is used to edit 4-component floating point
vector variable nodes ( ).
Example:

90
Each vector component can be edited by either directly typing the value in the component
edit box or by interactively using a popup slider for each component. The sliders’ ranges
will be the same as the clamping bounds for the vector (regardless whether the user
chooses to clamp the vector or not). By selecting the “Clamp from” check box, and
choosing the appropriate minimum and maximum ranges, the user can ensure the variable
values stay within a known range during modification. The user may also select to keep
the vector normalized by selecting “Keep vector normalized” check box.
The user can preview the changes to the rendered effect by modifying the value of the
vector interactively in the preview window.
At any point, the user can select “Cancel” to undo the changes to the variable. If “OK” is
pressed, the new value for the vector variable is propagated to the database.
Matrix Editor
The matrix editor is a dock-able editor that is used to edit 4x4 floating point matrix
variable nodes ( ).
Example:

91
Each matrix component can be edited by either directly typing the value in the
component edit box or by interactively using a popup slider for each component. The
slider range is preset to be between [-100.0; 100.0], however, typing a value outside of
that range expands the range to that value. The user can also set the matrix to an identity
matrix by clicking the appropriately named button. Similarly to the other variables, the
user can select to keep the changes to the variable values or to dismiss it by selecting
either “OK” or “Cancel” variables.
Dynamic Variable Editor / / / / / / /
The dynamic variable editor is a dock-able editor that is used to edit the following types
of variables:
7. ( , , ) 2-4 component Boolean
8. ( , , , ) 1-4 component Integer
9. ( , ) 2-3 component Float
10. ( , ) 2x2 and 3x3 Float matrix
11. NxM Boolean, Integer, or Float matrix
Examples of 2-4 component vector editors of varying types:

92
Examples of a 2x2 matrix editor of float type:

93
Dynamically sized variables have row and column edit fields. These can be adjusted to
tailor the dimensions of the variable to suite the requirements. A note of caution though,
as once the variable has been added to a shader, changing the dimension without also
modifying the shader declaration, may have unintended consequences.
Example of an NxM dynamic matrix of float type:
Each component can be edited by either directly typing the value in the component edit
box or by interactively using a popup slider for each component. The sliders’ ranges will
be the same as the clamping bounds, regardless whether the user chooses to clamp the
vector or not. By selecting the “Clamp” check box, and choosing the appropriate
“Minimum” and “Maximum” ranges, the user can ensure the variable values stay within a
known range during modification.
The user can preview the changes to the rendered effect by modifying the values
interactively in the preview window.
At any point, the user can select “Cancel” to undo the changes to the variable. If “OK” is
pressed, the new value for the variable is propagated to the database.
Note Editor
The note editor is a dock-able editor that is used to edit node notes ( ).
Example:

94
The user may type in information into notes to describe particular algorithms, explain
variable value restrictions, leave information for other users, etc.
At any point, the user can select “Cancel” to undo the changes to the note. If “OK” is
pressed, the new note is propagated to the database.

95
Other Editors
Texture Viewer / / /
The texture viewer is a docking dialog editor that is used to view and edit the properties
of standard texture nodes ( / / / ).
Example:
The top of the editor shows the filename, and a “Browse” button that will launch the
texture loader to select an alternate texture file. Renderable textures will have a
“Refresh” button in place of a “Browse” button. The “Refresh” button will allow the user
to refresh the contents of the renderable texture, providing the associated preview
window has modified the contents.
The texture viewer contains two collapsible groups of controls, plus the texture image
itself.
The “Show Texture Properties” group displays information about the texture, such as the
format, dimensions, mip map levels, and the origin options. Like the origin options
available through the tree view texture node context menu, the user can select between a

96
“Top Left” and a “Bottom Left” texture origin. This will inform the preview window on
how to load the associated texture data into the API specific structure.
Example:
Collapse the “Show Texture Properties” group by selecting the check box ( ) next to the
group label.
Example:
The “Show View Options” allow the user to change the properties of the shown texture
image below. The user can modify the thumbnail size, shown mip map level, volume
depth, and alpha texture properties. Note that some of these options may not apply to the
associated texture, and will not be displayed.
Example:
The user can change the “Thumbnail Size” option to “Thumbnail”, which will fill the
available area, or set a percentage of the texture size (25%, 50%, 100%, 200%, 400%, or
800%). The user can also select the “Mip Level” to step through the texture mip map
chain. The “Volume Depth” option allows the user to step through slices of a 3D volume
texture, and the selected mip map level. The “Show Alpha” option allows the user to
view the texture alpha channel instead of the color channel.
Collapse the “Show View Options” group by selecting the check box ( ) next to the
group label.
Example:

97
The displayed texture will resize to fill the remaining available space, while honoring the
selected thumbnail size.
Renderable Texture Editor
The renderable texture editor is a dialog editor that is used to edit the properties of a
renderable texture node ( ).
Example:
In that editor you can change the dimensions of the renderable texture: to change either
width or height of the texture, type the integer dimension that you wish into the
appropriate edit box and press “Enter” to propagate the changes and create new
renderable texture. You may also bind the texture to use the dimensions of current
viewport by checking “Use viewport dimensions” button. When this option is selected,
you can modify the “Viewport Ratio” width and height settings. These settings will
enable the user to create a renderable texture whose size is proportional to the size of the
rendering viewport.
Example:

98
Selecting “Auto-Generate Mip Map” will enable the mip-map chain to be auto generated
during the rendering process.
To change the format of the renderable texture, the user can select from a list of
predefined formats by selecting them from the Format combo box control.
Stream Mapping Editor
The stream mapping editor is a dialog editor that is used to edit the properties of a stream
mapping node ( ).
Example:

99
To add new stream channels to the stream, the user can click the button in the stream
mapping editor. Then the user can select the desired usage for that stream, and select the
usage index and type. The “Attribute Name” field displays the default name that can be
used in the shader editor to refer to that stream. In an OpenGL ES effect, the changed
name should be used to reference the stream; however, in a DirectX or OpenGL effect,
the new name has no affect in the shader editor.
To delete a stream channel, the user can click on the right of the channel.
Stream channels can be reordered by pressing the (up) and (down) buttons.
The user can select to keep the changes to the stream map, or to dismiss them by
selecting either or . Changes made to the stream map are propagated to the
database upon the selection of .
Render State Editor
The render state editor is an MDI window editor that is used to edit the properties of a
render state block node ( ).
Example:
This editor will display all render state blocks within the containing effect, and will
update accordingly as new render state blocks are added, renamed, or removed from the
containing effect. Each render state block is displayed under a tab that represents the

100
containing pass. Selecting the appropriate pass tab will result in the displaying of the
contained render state block.
The editor has three columns. The “State” column gives the name of each available state.
The “Value” column specifies the current value of the state, if any. The “Incoming”
column specifies any incoming value that will have been set in a previous pass, or the
default effect. The user can modify the sort order of the listed values by clicking on the
appropriate column with the mouse.
Clicking in the value field will initiate the editing of the selected state. If the state is a
numerical state, the user will be able to modify the numeric value in place. If the state
has an associated context menu, the context menu will provide the valid options for the
state.
Example:
Changing the render state values in the created render state block node will override
inherited (incoming) values. Note that for upward traversal, the application only looks in
the pass within the current effect and the default effect. The render state block in other
effects don’t propagate their values.
Changes made to the render state block of an active effect will take effect immediately.
Render Target Editor /
The render target editor is a dialog editor that is used to edit the properties of a render
target node ( / ).
Example:

101
From this editor, the user can select whether to clear the renderable texture by checking
or un-checking “Enable color clear” button. If the user chose to clear the texture, they can
select the color they wish to clear it to by clicking on the “Clear Color” button and
selecting the color from the dialog that will appear. The user can also select whether to
enable depth clearing by checking of un-checking “Enable depth clear” button. If depth
clearing is enabled, the user can select the value used.
Texture State Editor /
The texture state editor is an MDI window editor that is used to edit the properties of a
texture object node ( / ).
Example:

102
This editor will display all texture object states within the containing effect, grouped
according to the parent pass, and will update accordingly as texture objects are added,
renamed, or removed from the containing effect. Groups of texture objects are displayed
under a tab that represents the containing pass. Selecting the appropriate pass tab will
result in the displaying of the texture objects contained in the selected pass.
The top of the editor displays all of the texture objects contained under the selected pass.
The texture objects are represented by thumbnails determined by the attached texture
reference (when available). Each thumbnail will display a small icon in the lower left
region to indicate the attached texture type (when available).
Examples:
Texture references pointing to invalid texture, invalid texture references, or texture
objects without texture references will be shown with an invalid texture icon.
Example:

103
Select the appropriate texture icon to display the texture / sampler states associated with
each texture object.
The state editor has three columns. The “State” column gives the name of each available
state. The “Value” column specifies the current value of the state, if any. The
“Incoming” column specifies any incoming value that will have been set in a previous
pass, or the default effect. The user can modify the sort order of the listed values by
clicking on the appropriate column with the mouse.
Clicking in the value field will initiate the editing of the selected state. If the state is a
numerical state, the user will be able to modify the numeric value in place. If the state
has an associated context menu, the context menu will provide the valid options for the
state.
Examples:
Changing the state values in the created render state block node will override inherited
(incoming) values. Note that for upward traversal, the application only looks in the pass
within the current effect and the default effect. The texture objects in other effects don’t
propagate their values.
Changes made to the texture object of an active effect will take effect immediately.
Camera Editor

104
The camera editor is a dialog editor that is used to edit the properties of a camera node
( ).
Example:
The camera editor allows the user to manipulate the “Camera Position”, the “Look At
Position”, the “Up Vector”, the “Field Of View (FOV)”, and the “Near / Far Clip Planes”
values. If the camera editor for the active camera is opened and the user is manipulating
the trackball in the preview window, the values will be updated after the trackball has
changes its values.
The user can select to keep the changes to the camera or to dismiss them by selecting
either the “OK” or “Cancel” buttons. All changes made in the editor are immediately
reflected in the associated camera node.

105
Artist Editor
One of the problems that shader developers face in production is how to present the
shaders to the 3D artists to allow the artists to experiment with the shader parameters to
achieve desired Effects. RenderMonkey’s solution for this problem is the Artist Editor
module combined with the Art tab in the workspace view.
A shader developer can select certain variables in the shader Effect Workspace to be
flagged as “artist-editable” variables. To do that, the user selects “Artist Variable” from
the right-click menu for the desired variable node and a small yellow flag icon ( ) will be
overlaid over the icon for that variable. Then the shader developer can give the Effect
Workspace with their shaders to the artists. The artist can select the Art tab ( ) from the
workspace view to only view artist variables present in the workspace. For added
convenience the artist can edit artist variables of supported types in the artist editor
module.
To open the artist editor, the user can either click the button on the application
toolbar, or select “Artist Editor” from View menu in the main application menu.
The artist editor displays the artist editable variables that are currently being used by the
active effect. If the variable is not used by the artist editor, then it will not be displayed,
even if it is flagged as artist editable. When changing the active effect, the variables

106
shown will change accordingly. The variables will be displayed first by type, then sorted
to match the order displayed in the workspace tree. When an artist editable variable node
is selected in the workspace tree, the associated variable control in the artist editor will
automatically scroll into view and become selected as well. Conversely, if a variable
control is selected within the artist editor, the matching variable node will be selected in
the workspace tree.
Individual items can be expanded / collapsed by clicking on the selected items icon, or by
double clicking on the item name text or thumbnails.
Expanded Example:
Collapsed Example:

107
Editing Colors
Color variables can be edited in the artist editor in much the same manor as the stand-
alone color editor. The user can edit color variables using either the RGB or HSV color
models, selectable through the combo box on the lower left hand side of the editor.
RGB Example:
When editing using the RGB color model, the user can edit values in an integer format
[0..255], or in a floating point format [0..1]. This is selectable through the “Floating
Point” check box on the lower right hand side of the editor. When using the floating
point format, values outside of the [0..1] range can be entered.
HSV Example:

108
Value changes can be accomplished in the following ways:
1. Directly typing the values in the appropriate edit boxes for each
component (R, G, B, A or H, S, V, A).
2. Interactively selecting color from the color wheel.
3. Modifying the color sliders for each component.
4. Modifying the intensity of the color being edited by using the vertical
intensity slider.
The value of the color is shown in the color swatch at the top left corner of the color
picker. All changes made in the editor are immediately reflected in the associated color
variable node.
The color editor can operate in two modes. By selecting the small color key botton at the
top left of the editor, the color editor will toggle between a large and a small view.
Example:
When using the small view, tool tips are available to display the value at each scroll
control.
Editing Numbers
Numeric (boolean, integer, and float) variables of all dimensions can be edited in the
artist editor through the numeric edit control.
Float Example:

109
Integer Example:
Boolean Example:
Matrix Example:

110
Dynamic Variable Example:
The numeric editor control displays the variable values, as well as additional options
(when applicable) such as clamping, vector normalization, matrix identity initialization,
and dimension settings for dynamic variables. These additional options can be shown or
hidden by selecting the / button, located beside the “Options” label.
Expanded Example:

111
Collapsed Example:
Editing Textures
Texture variables can be edited in the artist editor in much the same manor as the stand-
alone texture viewer.
Example:
The top of the editor shows the filename, and a “Browse” button that will launch the
texture loader to select an alternate texture file.
The texture viewer contains two collapsible groups of controls, plus the texture image
itself.
The “Show Texture Properties” group displays information about the texture, such as the
format, dimensions, mip map levels, and the origin options. Like the origin options
available through the tree view texture node context menu, the user can select between a

112
“Top Left” and a “Bottom Left” texture origin. This will inform the preview window on
how to load the associated texture data into the API specific structure.
Example:
Collapse the “Show Texture Properties” group by selecting the check box ( ) next to the
group label.
Example:
The “Show View Options” allow the user to change the properties of the shown texture
image below. The user can modify the thumbnail size, shown mip map level, volume
depth, and alpha texture properties. Note that some of these options may not apply to the
associated texture, and will not be displayed.
Example:
The user can change the “Thumbnail Size” option to “Thumbnail”, which will fill the
available area, or set a percentage of the texture size (25%, 50%, 100%, 200%, 400%, or
800%). The user can also select the “Mip Level” to step through the texture mip map
chain. The “Volume Depth” option allows the user to step through slices of a 3D volume
texture, and the selected mip map level. The “Show Alpha” option allows the user to
view the texture alpha channel instead of the color channel.
Collapse the “Show View Options” group by selecting the check box ( ) next to the
group label.
Example:

113
Editing Notes
If an artist editable node has an artist editable child node note ( ), then that too will be
available for viewing and editing from within the artist editor, when the parent item is
expanded.
Example:
Like the parent variable in the artist editor, the node note can be expanded / collapsed by
clicking on the node note icon ( ), or by double clicking on the note label text.
Collapsed Example:

114

115
Loader / Saver Plug-Ins
Texture Loader Plug-In
The texture loader plug-in can be used to load a texture file into a RenderMonkey texture
variable. This plug-in can be used with non-renderable texture types ( / / ), and
consists of a standard file load dialog when invoked.
To use the texture loader, right click the texture node ( / / ) in the workspace tree,
select the option from the context menu, and then select from the
option list. If the texture loader was the last plug-in launched from the workspace tree
view for that particular texture node, then simply double clicking on the node will invoke
the loader.
Texture Saver Plug-In
The texture saver plug-in can be used to save any texture data to a file. This plug-in can
be used with all texture types ( / / / ), but is most useful for saving the contents of
a renderable texture of a generated texture to file.
To use the texture saver, right click the texture node ( / / / ) in the workspace tree,
select the option from the context menu, then select from the option
list. The following save dialog allows the user to select the desired file format the texture
will be saved in.
Model Loader Plug-In
The model loader plug-in can be used to load a model file into a RenderMonkey model
node ( ). This plug-in consists of a standard file load dialog when invoked.
To use the model loader, right click the model node ( ) in the workspace tree, select the
option from the context menu, then select from the option list. If the
model loader was the last plug-in launched from the workspace tree view for that
particular model node, then simply double clicking on the node will invoke the loader.
Geometry Saver Plug-In

116
The geometry saver plug-in can be used to save model data to a file. This plug-in can be
used only with model nodes ( ), and is most useful for saving the contents of generated
models to file.
To use the geometry saver, right click the model node ( ) in the workspace tree, select
the option from the context menu, then select from the option list.
The following save dialog allows the user to select the desired file format the model will
be saved in.

117
Generator Plug-Ins
Fur Generator Plug-In
The fur generator plug-in allows the user to create both the textures and the
RenderMonkey example effect for the shell and fin fur rendering method. The plug-in
can produce rendering code for both DirectX ( ) and OpenGL ( ) effects.
To use the fur generator, right click the effect node ( / ) in the workspace tree, select
the option from the context menu, and then select from the option
list. The fur generator dialog will now be visible.
General Page
The general page is where the user will begin the texture and / or effect generation
process.
The “Texture Output Directory” is where any generated textures will get saved, replacing
any old textures with the same filename. The “Fur Texture Filename Prefix” defines a
prefix that will get append to all generated texture filenames. This allows for different
sets of textures to reside within the same directory.

118
“Generate Fur Textures” will begin the shell / fin texture generation process. “Setup
Render Passes” will begin the RenderMonkey effect generation process that will use the
generated textures. Note that the generated shader code contains code for all available
options, so the user may wish to simplify the code to reduce the shader instruction count
once the desired options have been decided upon.
Depending on the configuration selected, the texture / effect generation process may take
some time. The “Fur Generation Messages:” window will display the progress of the
generation, as well as any errors encountered.
The default settings for the generated textures and RenderMonkey effect will result in the
following effect:
Effect Properties Page
The effect properties page is where the user will set the configuration for a generated
shell and fin rendering RenderMonkey effect.

119
All of the settings under the “Interactive Fur Properties” group can be modified after the
effect has been generated, and those changes will also be reflected in the associated
RenderMonkey variables in the workspace tree view.
Shells and Fins Page
The shells and fins page is where the user will define the number of hairs that will get
generated, as well as the size of the shell and fin textures that will get created.

120
Fur Properties Page
The fur properties page is where the user sets the properties and randomness of each hair
that will get generated in the shell and fin textures.

121
Texture Generator Plug-In
The texture generator plug-in allows the user to procedurally generate textures based on a
DirectX HLSL pixel shader. The plug-in works with 2D texture variables ( ), cubemap
variables ( ), and 3D texture variables ( ).
To procedurally generate a texture, right click the texture variable ( / / ) in the
workspace tree, select the option from the context menu, and then select the
option. This will activate one of three editors, which are outlined
below.
Example of the 2D Texture Generator Editor:
Example of the Cubemap Texture Generator Editor:
Example of the 3D Texture Generator Editor:

122
In each editor, the user can select the desired texture output format from the
combo box. The user provides the for the generation function, which is “Main”
in the above examples. The size of the generated texture is specified differently,
depending upon the texture type. For 2D textures, the user provides both the and
the . For cubemap textures. The user provides a single . For 3D textures,
the user provides the , , and .
Once the initial setup has been completed, and the appropriate generation function has
been added in the editor, the user can select the button to compile the
shader code. Any errors found in the code will be reported in the RenderMonkey output
window ( ). Once the shader has been successfully compiled, the texture can then be
generated by pressing the button.
Geometry Generator Plug-In
The geometry generator plug-in allows the user to procedurally create a model from a list
of available types. The plug-in works only with model nodes ( ).
To procedurally generate a model, right click the model node ( ) in the workspace tree,
select the option from the context menu, and then select from
the option list. This will activate the geometry generator plug-in dialog, where the user
can select the type of model to generate through the option. Selecting one of the
available shapes will change the settings to those appropriate for that particular shape.
The available shapes are Box, Sphere, Cylinder, and Cone.
Box Example:

123
Sphere Example:
Cylinder Example:

124
Cone Example:
Once the model has been generated, the user if free to re-generate the model with
modified settings, or to load a new model from a file. A procedurally generated model
will be automatically re-generated when required, for example, when the workspace is
loaded.

125
Edge Quad Generator Plug-In
The edge-quad generator plug-in allows the user to create a degenerate edge-quad model
based on an existing model. The plug-in works only with model nodes ( ), and creates
an additional model that can be used for shadow volume, or other algorithms.
To create the edge-quad model, right click the original model node ( ) in the workspace
tree, select the option from the context menu, and then select
from the option list. This will activate edge-quad generator plug-in, where the user will
be asked for a location to save the generated model. Please note that the model must be
saved if the workspace is to save and load correctly, otherwise the generated model data
will be lost. Once the model has been generated, a new model node ( ) will be added to
the workspace, in the same scope as the original model. This node will be named the
same as the original node, with the “_EdgeQuad” appended to it.
Example:
Once created, the user is free to use the generated model node ( ) like any other model
node in the workspace.
The generated model is saved as an “.x” file, where additional per vertex information can
be stored. The vertex normals in the generated model represent the normals of the faces
that contributed to the generated edge quad. The first set of texture coordinates are added
to help differentiate between the vertices for each quad, where each vertex will have a
texture coordinate of (0,0), (1,0), (0,1), or (1,1). The second set of texture coordinates are
copied from the originating model.
Fur Fin Generator Plug-In
The fur fin generator plug-in allows the user to create a degenerate fur fin model based on
an existing model. The plug-in works only with model nodes ( ), and creates an
additional model that can be used for fur fin, or other algorithms.
To create the fur fin model, right click the original model node ( ) in the workspace
tree, select the option from the context menu, and then select
from the option list. This will activate fur fin generator plug-in, where the user will be
asked for a location to save the generated model. Please note that the model must be
saved if the workspace is to save and load correctly, otherwise the generated model data
will be lost. Once the model has been generated, a new model node ( ) will be added to
the workspace, in the same scope as the original model. This node will be named the
same as the original node, with the “_FurFin” appended to it.

126
Example:
Once created, the user is free to use the generated model node ( ) like any other model
node in the workspace.
The generated model is saved as an “.x” file, where additional per vertex information can
be stored. Each vertex in the model contains the vertex normal from the originating
model. The first set of texture coordinates are added to help differentiate between the
vertices for each quad, where each vertex will have a texture coordinate of (0,0), (1,0),
(0,1), or (1,1). The second set of texture coordinates are copied from the originating
model.

127
Importer / Exporter Plug-Ins
Package Importer / Exporter Plug-In
The package importer / exporter provides an easy method to share RenderMonkey
workspaces with other users. It will package all resources used within a workspace into a
single zip file, allowing the distributed package to be imported with all of the required
resources.
To export a workspace, right click the workspace node ( ) in the workspace tree, select
the option from the context menu, then select from the option list.
The following save dialog allows the user to select where the .zip file will be saved.
To import a workspace, select the option from the workspace node ( ) context
menu, then select from the option list. The following load dialog allows
the user to select which .zip file will be imported. Once the appropriate package .zip file
has been selected, the user will then be asked to specify a folder where the packaged files
can be expanded into. Once an appropriate directory has been selected, the package will
be expanded, and the workspace will be imported into RenderMonkey.
FX Exporter Plug-In
The FX exporter plug-in allows the user to export a RenderMonkey workspace into a .fx
file format. To export a workspace, right click the workspace node ( ) in the workspace
tree, select the option from the context menu, then select from the
option list. The following save dialog allows the user to select the path where the .fx file
will be saved.
Because there is no concept of variable scope in an .fx file, great care must be taken when
creating a RenderMonkey workspace which is meant for .fx export. RenderMonkey
variables can be created within different scopes, and each pass in an effect could
potentially use a variable of the same name, but within a different scope. To account for
this differentiation in specification, the .fx exporter will mangle the names of shaders,
passes, and variables in an effort to reduce scope collisions. Although great care has
been made to create valid .fx files through name mangling upon export, the user should
be aware of this limitation and write RenderMonkey workspaces with this scope
limitation in mind.

128
Appendix
Predefined Variables
RenderMonkey provides a set of predefined variables for added shader development
convenience. Such variables will display an appropriate tool tip (Predefined Variable) if
the mouse hovers over them. Predefined variables are shader constants whose values get
filled in at run-time by the viewer module directly at every frame. You cannot modify the
values directly through the same user interface that you can use to edit other variables of
similar types. A properly flagged predefined variable will be denoted in the workspace
tree view with a symbol over the nodes icon. For example:
RenderMonkey provides this set of predefined variables for your convenience:
Time
"Time0_X"
Provides a floating point time value (in seconds) which repeats itself based on the
“Cycle time” set in the RenderMonkey Preferences dialog. By default this “Cycle
time” is set to 120 seconds. This means that the value of this variable cycles from
0 to 120 in 120 seconds and then goes back to 0 again.
"CosTime0_X"
This variable will provide the cosine of Time0_X.
"SinTime0_X"
This variable will provide the sine of Time0_X.
"TanTime0_X"
This variable will provide the tangent of Time0_X.
"Time0_X_Packed"
This variable will pack the above xxxTime0_X variables into a 4 component
floating point vector.
Example: float4(Time0_X,CosTime0_X,SinTime0_X,TanTime0_X).
"Time0_1"

129
This variable provides a scaled floating point time value [0..1] which repeats itself
based on the “Cycle time” set in the RenderMonkey Preferences dialog. By
default this “Cycle time” is set to 120 seconds. This means that the value of this
variable cycles from 0 to 1 in 120 seconds and then goes back to 0 again.
"CosTime0_1"
This variable will provide the cosine of Time0_1.
"SinTime0_1"
This variable will provide the sine of Time0_1.
"TanTime0_1"
This variable will provide the tangent of Time0_1.
"Time0_1_Packed"
This variable will pack the above xxxTime0_1 variables into a 4 component
floating point vector.
Example: float4(Time0_1,CosTime0_1,SinTime0_1,TanTime0_1).
"Time0_2PI"
This variable provides a scaled floating point time value [0..2PI] which repeats
itself based on the “Cycle time” set in the RenderMonkey Preferences dialog. By
default this “Cycle time” is set to 120 seconds. This means that the value of this
variable cycles from 0 to 2PI in 120 seconds and then goes back to 0 again.
"CosTime0_2PI"
This variable will provide the cosine of Time0_2PI.
"SinTime0_2PI"
This variable will provide the sine of Time0_2PI.
"TanTime0_2PI"
This variable will provide the tangent of Time0_2PI .
"Time0_2PI_Packed"

130
This variable will pack the above xxxTime0_2PI variables into a 4 component
floating point vector.
Example: float4(Time0_2PI,CosTime0_2PI,SinTime0_2PI,TanTime0_2PI).
"TimeCyclePeriod"
This variable provides the “Cycle time” floating point value, as set in the
RenderMonkey Preferences dialog. By default this “Cycle time” is set to 120
seconds.
"FPS"
This variable provides the calculated frames per second, returned as a floating
point value.
"TimeElapsed"
This variable provides the elapsed time (in seconds) from the last frame to the
current frame, returned as a floating point value.
Viewport
"ViewportWidth"
This variable provides the preview window width (in pixels), returned as a
floating point value.
"ViewportHeight"
This variable provides the preview window height (in pixels), returned as a
floating point value.
"ViewportDimensions"
This variable provides the preview window width and height (in pixels), returned
as a float2 value.
"ViewportWidthInverse"
This variable will return 1.0 / ViewportWidth.
"ViewportHeightInverse"
This variable will return 1.0 / ViewportHeight.

131
"InverseViewportDimensions"
This variable provides the inverse of the “ViewportDimensions”, returned as a
float2 value.
Random Values
"RandomFraction1PerPass"
"RandomFraction2PerPass"
"RandomFraction3PerPass"
"RandomFraction4PerPass"
Each of these variables provide a random floating point value in the range of
[0..1]. These values are updated each pass.
"RandomFraction1PerEffect"
"RandomFraction2PerEffect"
"RandomFraction3PerEffect"
"RandomFraction4PerEffect"
Each of these variables provide a random floating point value in the range of
[0..1]. These values are updated each effect.
Pass
"PassIndex"
This variable will provide the pass index, returned as a floating point value.
Mouse Parameters
"LeftMouseButton"
This variable will return a floating point value of 1.0 if the left mouse button is
currently pressed, or 0.0 if it is not currently pressed.

132
"MiddleMouseButton"
This variable will return a floating point value of 1.0 if the middle mouse button is
currently pressed, or 0.0 if it is not currently pressed.
"RightMouseButton"
This variable will return a floating point value of 1.0 if the right mouse button is
currently pressed, or 0.0 if it is not currently pressed.
"MouseButtonsPacked"
This variable will pack the above xxxMouseButton variables into a 4 component
floating point vector.
Example: float4(LeftMouseButton,MiddleMouseButton,RightMouseButton ,0.0).
"MouseCoordinateX"
This variable will return the horizontal mouse position (in pixels), relative to the
client area of the preview window, returned as a floating point value.
"MouseCoordinateY"
This variable will return the vertical mouse position (in pixels), relative to the
client area of the preview window, returned as a floating point value.
"MouseCoordinateXNDC"
This variable will return "MouseCoordinateX" / "ViewportWidth".
"MouseCoordinateYNDC"
This variable will return "MouseCoordinateY" / "ViewportHeight".
"MouseCoordsPacked"
This variable will pack the above MouseCoordinatexxx variables into a 4
component floating point vector.
Example: float4(MouseCoordinateX,MouseCoordinateY,XNDC,YNDC).
"MouseCoordinateXY"
This variable will return the "MouseCoordinateX" and "MouseCoordinateY"
coordinates into a 2 component floating point vector.
Example: float2(MouseCoordinateX,MouseCoordinateY).

133
"MouseCoordinateXYNDC"
This variable will return the "MouseCoordinateXNDC" and
"MouseCoordinateYNDC" coordinates into a 2 component floating point vector.
Example: float2(MouseCoordinateXNDC,MouseCoordinateYNDC).
Model Parameters
"ModelMoundingBoxTopLeftCorner"
This variable provides the top left coordinate of the model as a 3 component
floating point vector (world space).
"ModelMoundingBoxBottomRightCorner"
This variable provides the bottom right coordinate of the model as a 3 component
floating point vector (world space).
"ModelMoundingBoxCenter"
This variable provides the bounding box center of the model as a 3 component
floating point vector (world space).
"ModelCentroid"
This variable provides the centroid of the model as a 3 component floating point
vector (world space).
"ModelBoundingSphereCenter"
This variable provides the bounding sphere center of the model as a 3 component
floating point vector (world space).
"ModelBoundingSphereRadius"
This variable provides the bounding sphere radius of the model as a single
component floating point value (world space).
View Parameters
"ViewDirection"

134
This variable provides the view direction vector (world space).
"ViewPosition"
This variable provides the view position (world space).
"ViewSideVector"
This variable provides the view size vector (world space).
"ViewUpVector"
This variable provides the view up vector (world space).
"FOV"
This variable provides the field of view as a floating point value.
"NearClipPlane”
This variable provides the near clip distance as a floating point value.
"FarClipPlane”
This variable provides the far clip distance as a floating point value.
View Matrices
"View"
"ViewTranspose"
"ViewInverse"
"ViewInverseTranspose"
These 4x4 matrix variables provide the view matrix, its transpose, its inverse, and
the inverse transpose.
"Projection"
"ProjectionTranspose"
"ProjectionInverse"
"ProjectionInverseTranspose"
These 4x4 matrix variables provide the projection matrix, its transpose, its
inverse, and the inverse transpose.

135
"ViewProjection"
"ViewProjectionTranspose"
"ViewProjectionInverse"
"ViewProjectionInverseTranspose"
These 4x4 matrix variables provide the view * projection matrix, its transpose, its
inverse, and the inverse transpose.
"World"
"WorldTranspose"
"WorldInverse"
"WorldInverseTranspose"
These 4x4 matrix variables provide the world matrix, its transpose, its inverse,
and the inverse transpose. Note that since this version of RenderMonkey does not
support implementation of a scene graph, we have decided to keep the world
matrix as identity, but provide this predefined variable for your development
convenience. The user may apply this variable in their shader and when imported
into their engine, they may provide appropriate value of the world view projection
matrix through the engine’s calculations.
"WorldView"
"WorldViewTranspose"
"WorldViewInverse"
"WorldViewInverseTranspose"
These 4x4 matrix variables provide the world * view matrix, its transpose, its
inverse, and the inverse transpose.
"WorldViewProjection"
"WorldViewProjectionTranspose"
"WorldViewProjectionInverse"
"WorldViewProjectionInverseTranspose"
These 4x4 matrix variables provide the World * View * Projection matrix, its
transpose, its inverse, and the inverse transpose.
Customizing Predefined Variable Names
All predefined variable names are customizable through editing the
“.\UserData\RmPredefinedVariabled.txt” file. The data file is organized into four
columns. The first column contains the name that the variable will be created with by
default. This column is editable by the user. No other column data should be modified.

136
The second column specifies the variable type; the third column specifies the rendering
update frequency, and the fourth column species the predefined variable semantic. When
items in the first column have been modified, RenderMonkey should be restarted for the
changes to take effect.

137
Default Workspace
The default workspace (“.\data\DefaultWorkspace.rfx”) is a specially formatted
RenderMonkey workspace that can provide auto-initialization for nodes added through
the workspace tree.
A note ( ) is added to the default workspace that will act as a key, whose contents point
to the specific node that will provide the initialization to the newly added node in the
workspace tree.
API specific keys are stored in the appropriate or Effect Group nodes,
while non-API specific nodes are stored directly under the node. The
name of the key must match the XML DTD names (“.\data\RmDTDHeader.rfx”) used for
the node type, with the exception of shader nodes, which also have "_Vertex" or "_Pixel"
appended for type clarification.
The contents of the key must follow the following naming structure:
"...Grandparent_Node_Name.Parent_Node_Name.Node_Name".
The naming structure contains all ancestral names back to the root Effect Workspace
node, with a "." seperating all node names.
Example:
If the user wishes to specify the above selected effect ( ) to be created by
default upon the addition of a new DirectX effect in the workspace, then the appropriate
key must be added into the D3D folder ( ) of the workspace node ( ).
The key, or node note ( ), is named “RmDirectXEffect”, as this is the name specified in

138
the XML DTD for DirectX effect nodes. The value of the note is the name chain of the
selected DirectX effect node (“Effect Workspace.Default Effects.Effect_D3D”).
RenderMonkey also provides the ability to add a preset list of effects ( / / ) for
easy addition into a workspace. These effects must be placed in the appropriate
or effect groups to be properly recognized.
Please view the contents of our provided keys and effects for working node auto-
initialization examples.

139
RenderMonkey File Format
Each set of visual effects in RenderMonkey is encapsulated in a single XML workspace,
the “.rfx” file. All of the information necessary for recreation of each effect, excluding
the actual textures and model data, is stored in this single file. It is user-readable and any
game developer can create a converter from the RenderMonkey’s file format into their
game engine script format. We chose XML to store effect workspaces for several
reasons. Most importantly, XML is an industry standard with parsers readily available
(RenderMonkey uses the Microsoft XML parser; there are other alternatives freely
available). It allows easy data representation and it is user-extensible. Best of all, any user
can just open an XML RenderMonkey file and read the file directly in Internet Explorer –
it’s just another ASCII file format.

140
RenderMonkey Support and Feedback
As with all the tools and samples provided by AMD, we welcome feedback from the
developers who spend every day “in the trenches” solving real problems.
AMD is committed to providing you with the tools you need to make your job easier. In
order to do this, we need you to tell us what works and what doesn’t. What additions or
enhancements would you like to see? What additional problem area exists that we’re not
currently helping with?
Please help us to help you by providing as much feedback as possible to